If you’ve ever felt the overwhelming crunch of support tickets and dealt with project management chaos, you’re not alone. As someone who’s been in the trenches of IT support, I get the struggle.
That’s why I’m excited to share my experience on ServiceDesk Plus Jira integration, which made my IT life a lot simpler. Imagine a world where you can manage incidents and track projects without shifting between applications and still get the desired data at your fingertips.
Quick note: Jira now refers to issues as work items. Throughout this guide, we’ll use “work items” when discussing Jira-related data.
In this guide, we’ll cover why you need a ServiceDesk Plus Jira integration, explore practical use cases, compare integration options, and help you choose the right approach for your organization.
Key Takeaways
- ServiceDesk Plus Jira integration connects IT service management and software development workflows, enabling automatic ticket escalation, real-time status updates, and bidirectional data synchronization between support and dev teams.
- The native integration provides one-way synchronization from ServiceDesk Plus to Jira, suitable for basic escalation scenarios, while third-party tools like Exalate enable full bidirectional sync with granular control.
- Common use cases include support-to-dev ticket escalation, change request management, parent-child work item linking, and tiered support handoffs between helpdesk teams using different platforms.
- Organizations using Exalate report faster incident resolution, reduced manual data entry, and improved visibility across teams without exposing internal system access or admin credentials.

Why Integrate ServiceDesk Plus and Jira?
ServiceDesk Plus is a comprehensive IT service management (ITSM) solution designed to automate and streamline support and help desk operations. Developed by ManageEngine, it offers features like incident management, change management, problem management, and more.
Jira, created by Atlassian, is a powerful project management and work tracking tool widely used in software development and other industries. Known for its flexibility, Jira enables teams to track, plan, and manage their work efficiently through customizable workflows, agile boards, and much more.
Working with integration experts over a couple of years, I have noticed the following benefits of a ServiceDesk Plus Jira integration:
- Unified visibility across teams. Integrated systems give your organization a complete picture of projects and service operations. Support agents see development progress. Developers understand customer impact. This transparency leads to better decision-making and improved overall visibility without requiring access to both systems.
- Real-time cross-team communication. Integration facilitates automatic updates between your support and development teams. When a developer changes a work item status, support agents see it immediately. When support adds context to a ticket, developers receive the information without email chains or chat messages.
- Faster incident resolution. Information flows swiftly and accurately between service requests and development tasks. No more waiting for manual handoffs or status update requests. Customer incidents move through their lifecycle automatically, leading to quicker resolution and a more responsive support system.
- Enhanced customer satisfaction. When incidents move quickly through their lifecycle, customers get faster responses. Support agents can provide accurate status updates because they see real-time progress. Development teams have full context without asking clarifying questions. The result is a streamlined help desk management experience.
Yet, we tech enthusiasts understand the hurdles associated with building an integration from the ground up. Constructing a ServiceDesk Plus-Jira integration isn’t always practical or budget-friendly. Thankfully, many vendors acknowledge this challenge and provide robust support for integrating their systems.

Calculate time and money savings from automated bidirectional sync.
Features to Consider When Choosing an Integration Tool
Selecting the right integration solution requires evaluating several factors. Here’s what matters most for ServiceDesk Plus and Jira integration:
Synchronization Direction and Flexibility
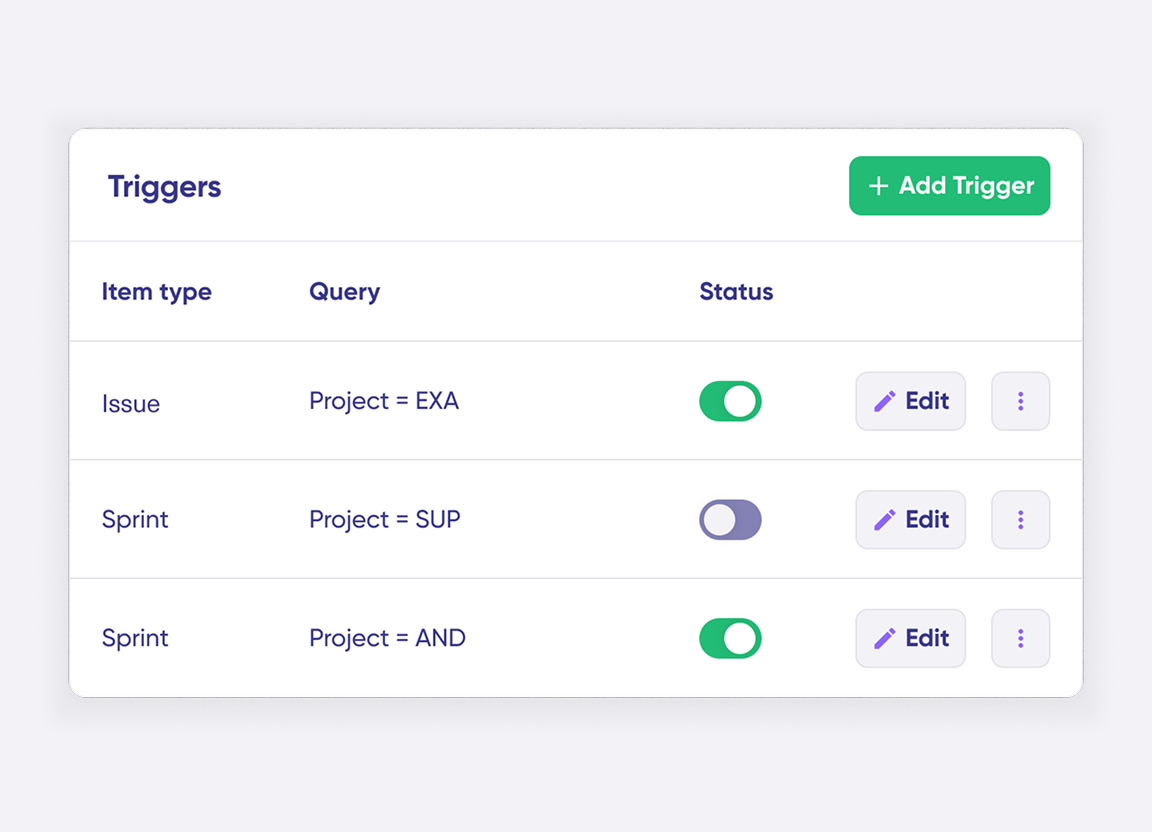
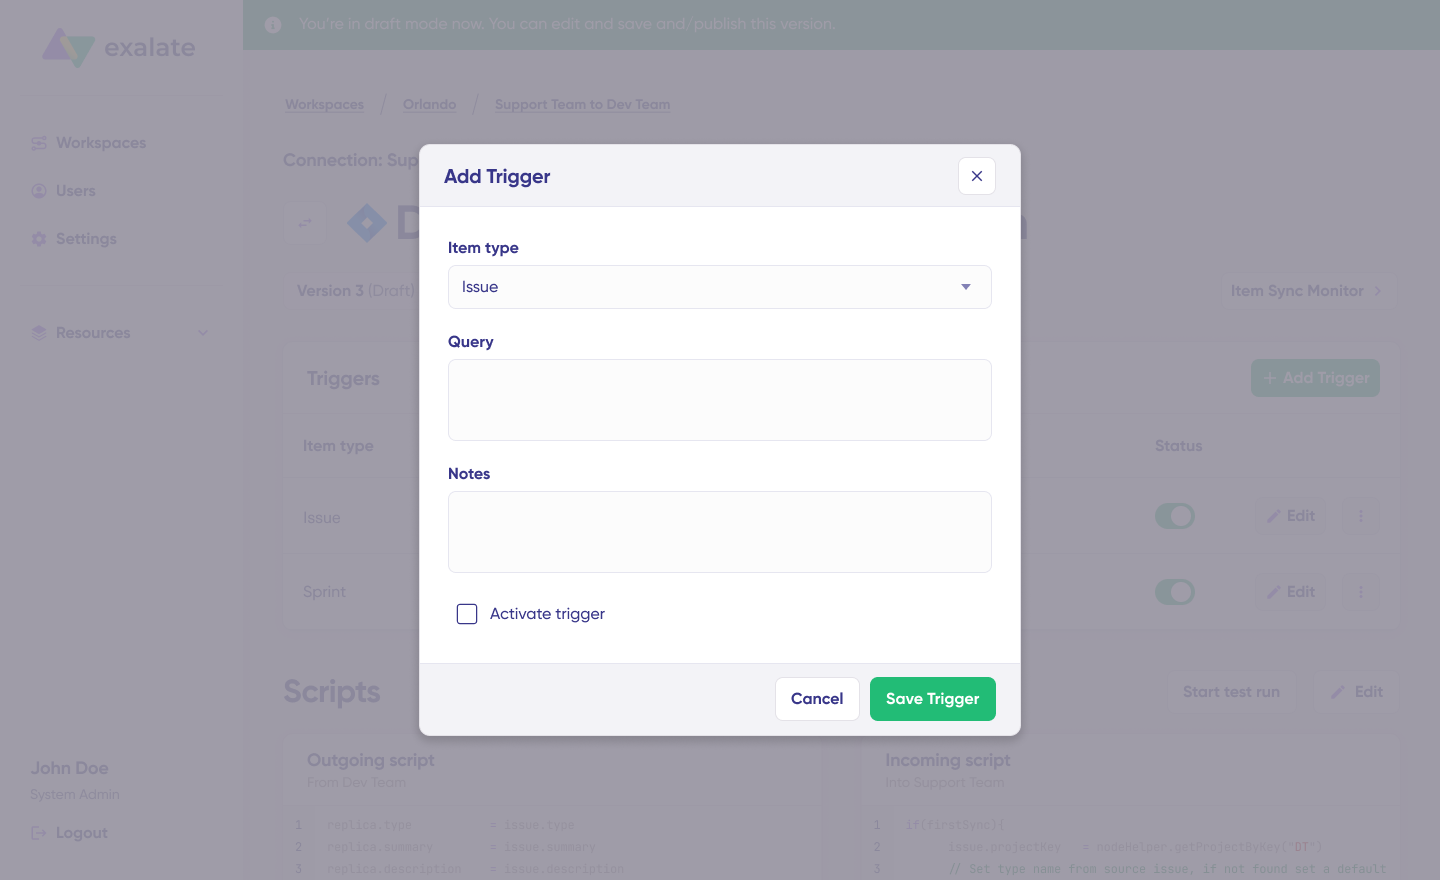
Some integrations only support one-way data flow. If you need support agents to see development updates and developers to receive ticket context, you need bidirectional synchronization. Consider whether the tool can handle different sync directions for different field types; perhaps comments sync both ways, while status updates only flow from Jira to ServiceDesk Plus.
Real-Time vs. Scheduled Sync
Real-time synchronization ensures both platforms reflect current data. Scheduled syncs work for less time-sensitive workflows but can create confusion when teams reference outdated information. Look for tools that offer real-time sync with automatic retry mechanisms for failed updates.
Scripting and Customization Capabilities
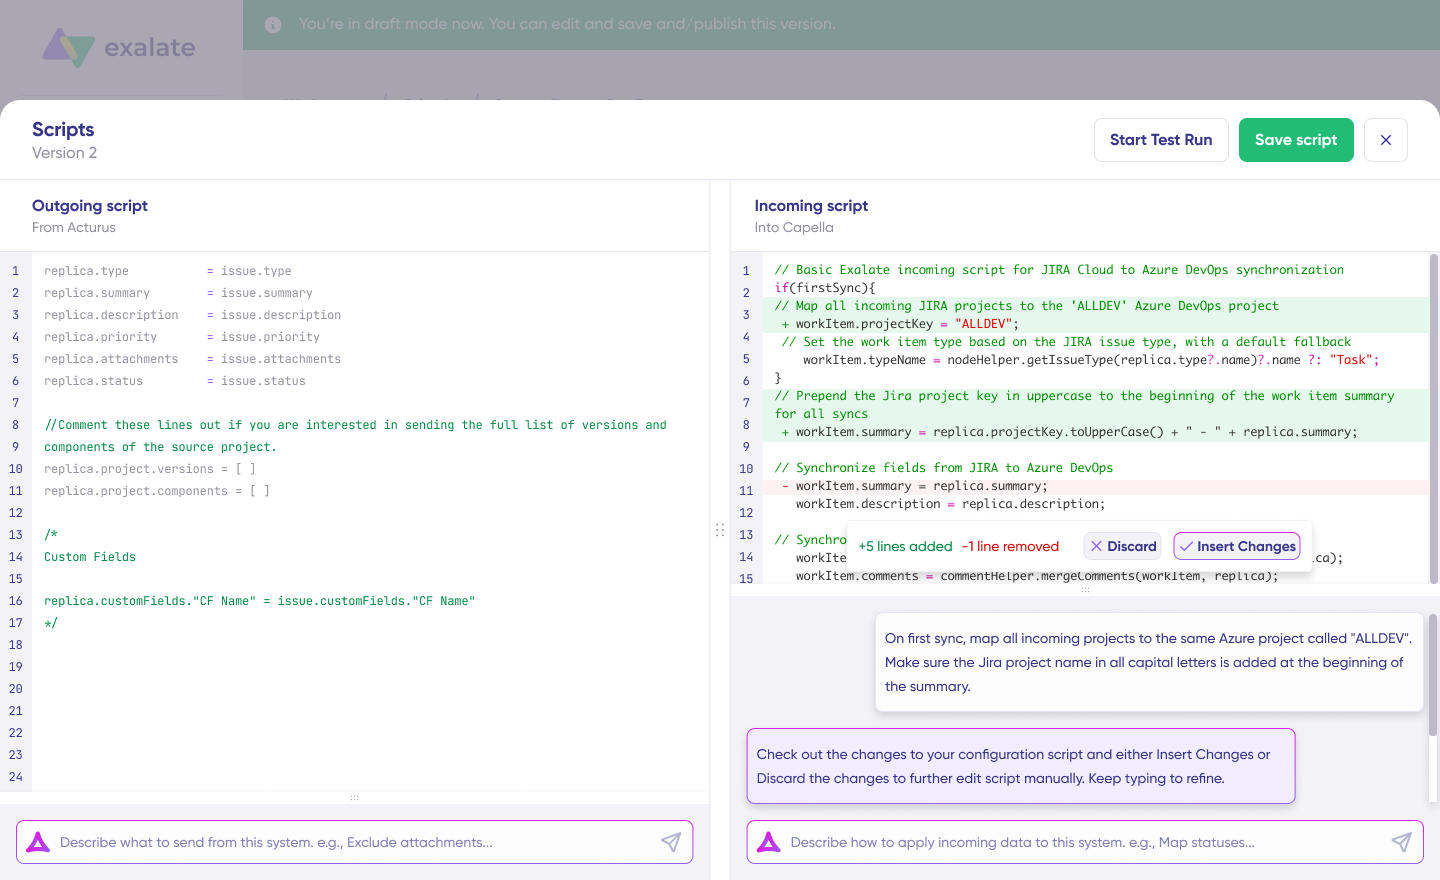
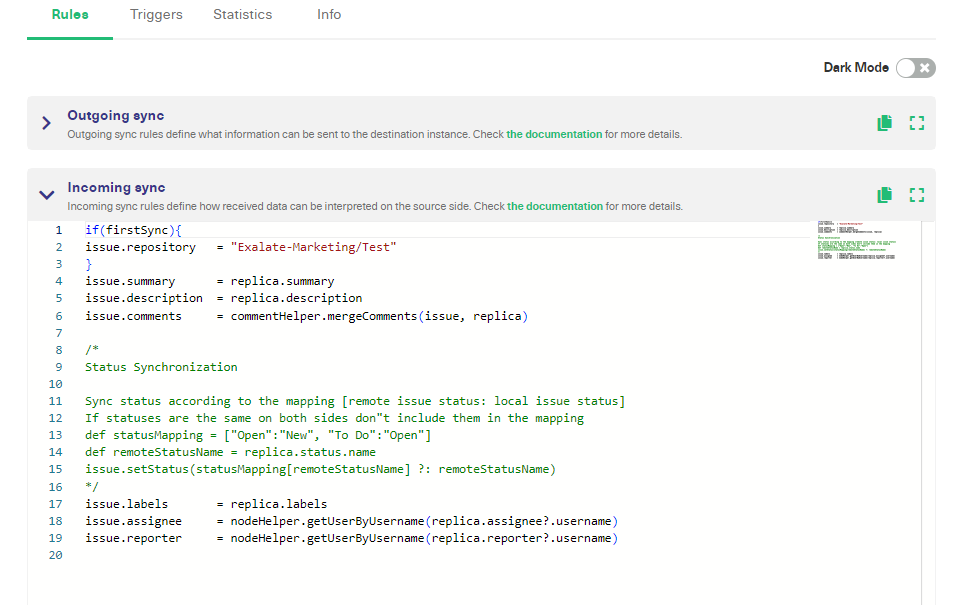
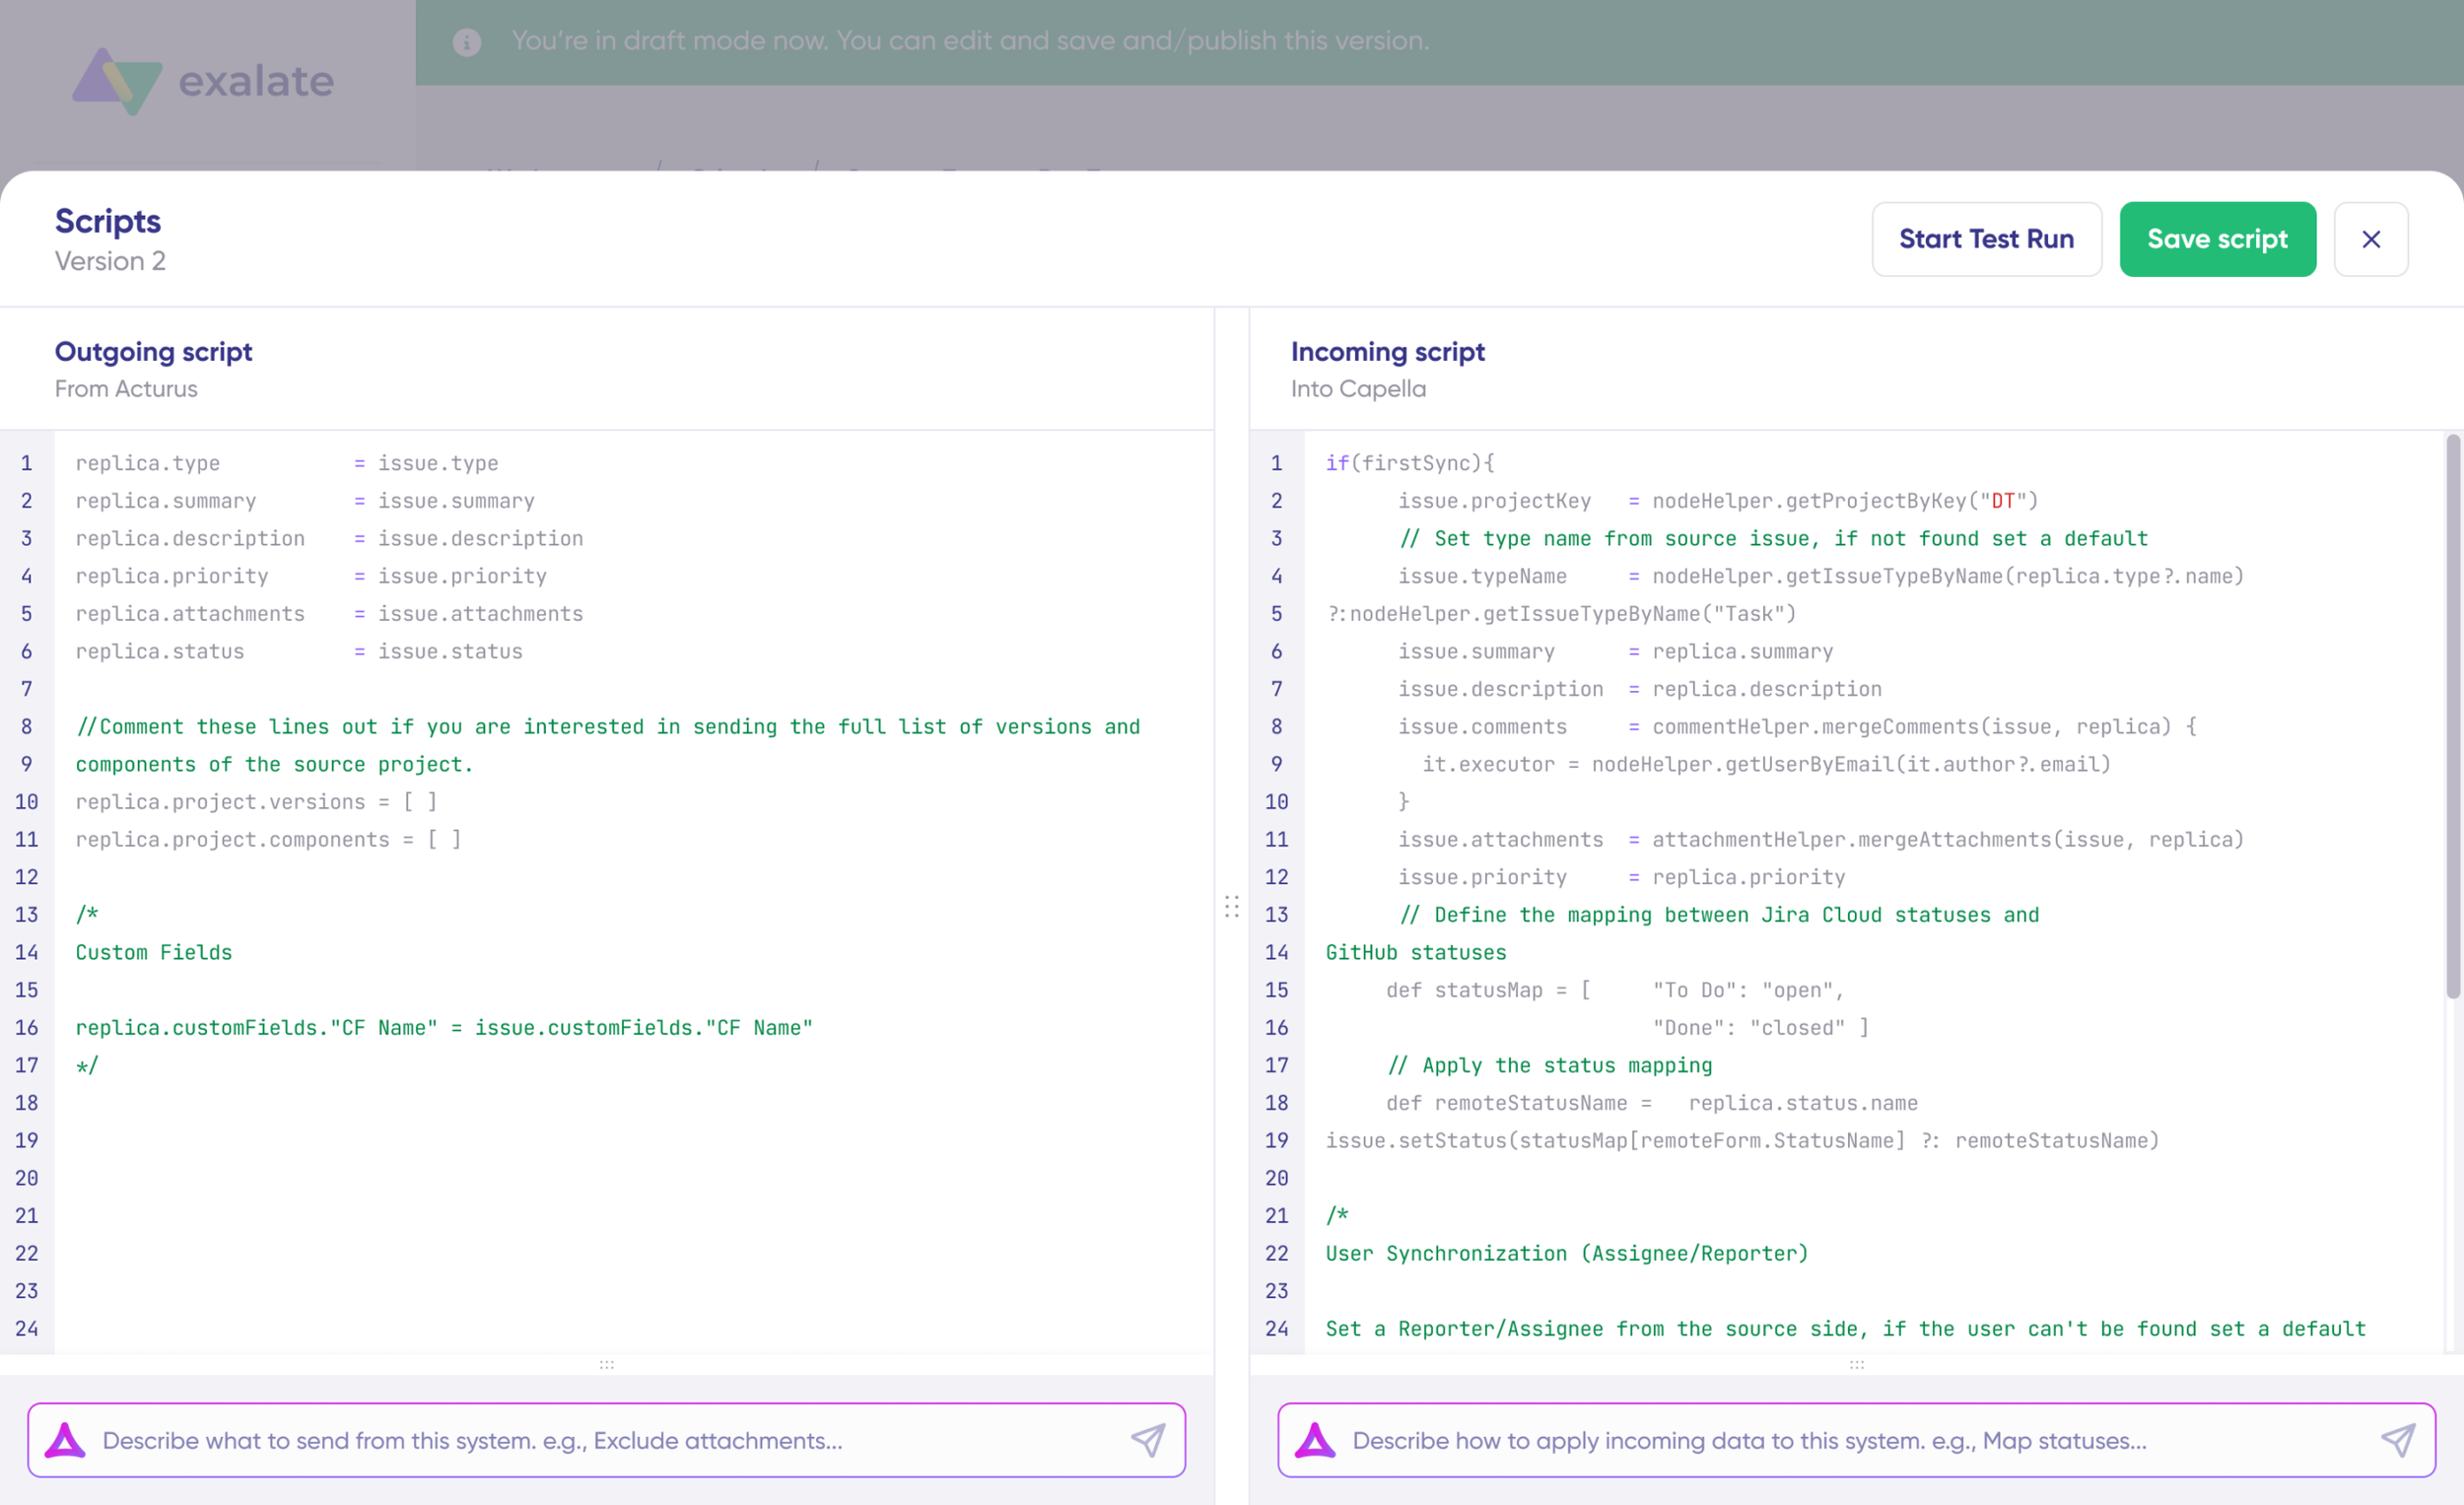
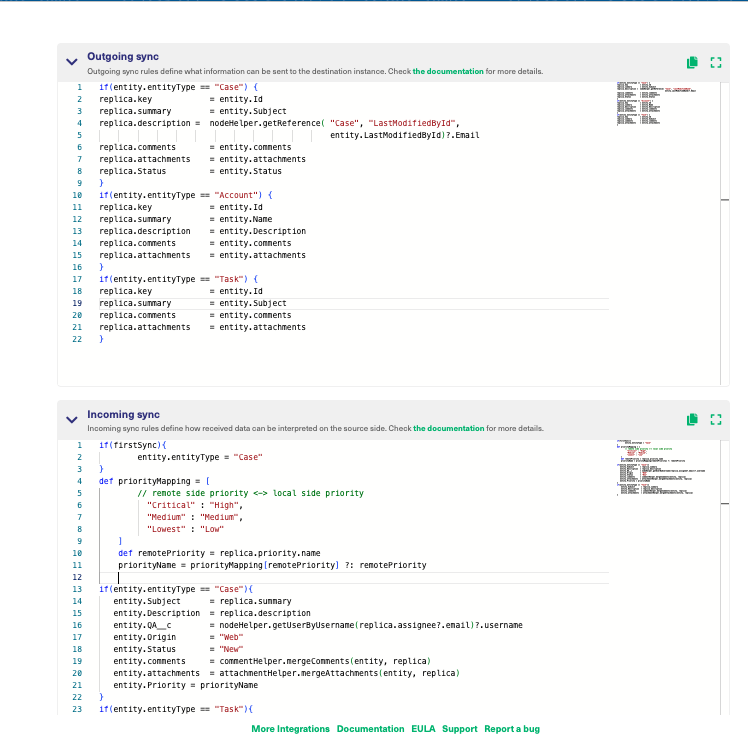
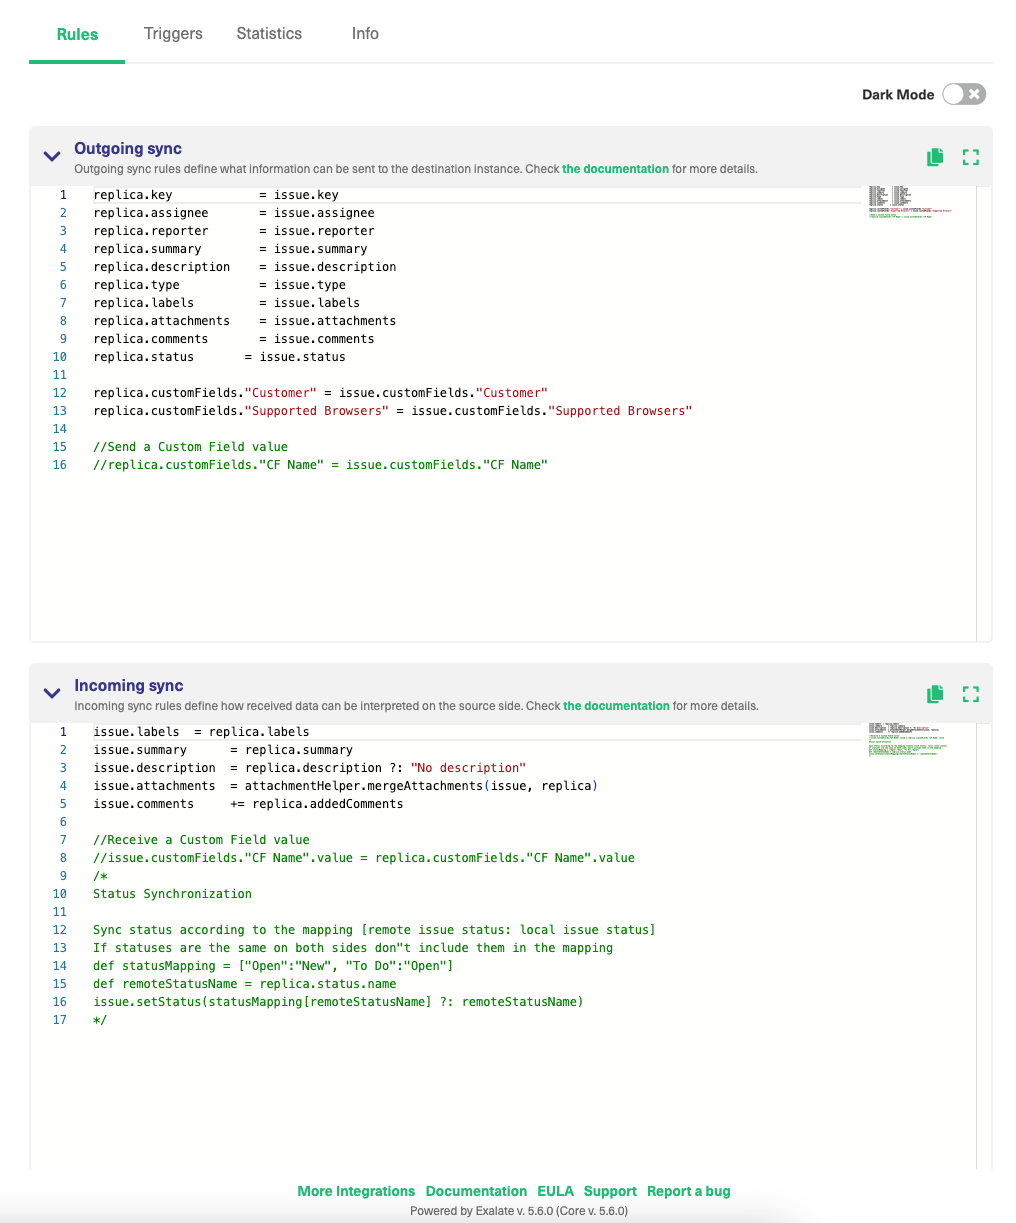
Generic integrations rarely match complex workflows. The ability to write custom logic—filtering comments, transforming field values, and conditionally routing tickets—determines how well the integration fits your specific processes. Groovy-based scripting engines and AI-assisted configuration (like Exalate’s Aida) provide flexibility without requiring extensive coding expertise.
Security and Compliance
Data protection matters when syncing customer support tickets and development work items, especially in regulated industries.
Look for these security features:
- ISO 27001 certification validates that the vendor follows internationally recognized information security practices
- Role-based access control (RBAC) ensures that only authorized users can configure integrations
- Encryption of data, both in transit and at rest, protects information at every stage
- No shared admin credentials between organizations, so each side authenticates independently
- Full script and operational control over your sync side means you decide what data leaves your system
Exalate maintains ISO 27001 certification and comprehensive security practices documented in the Exalate Trust Center.
Scalability for Growth
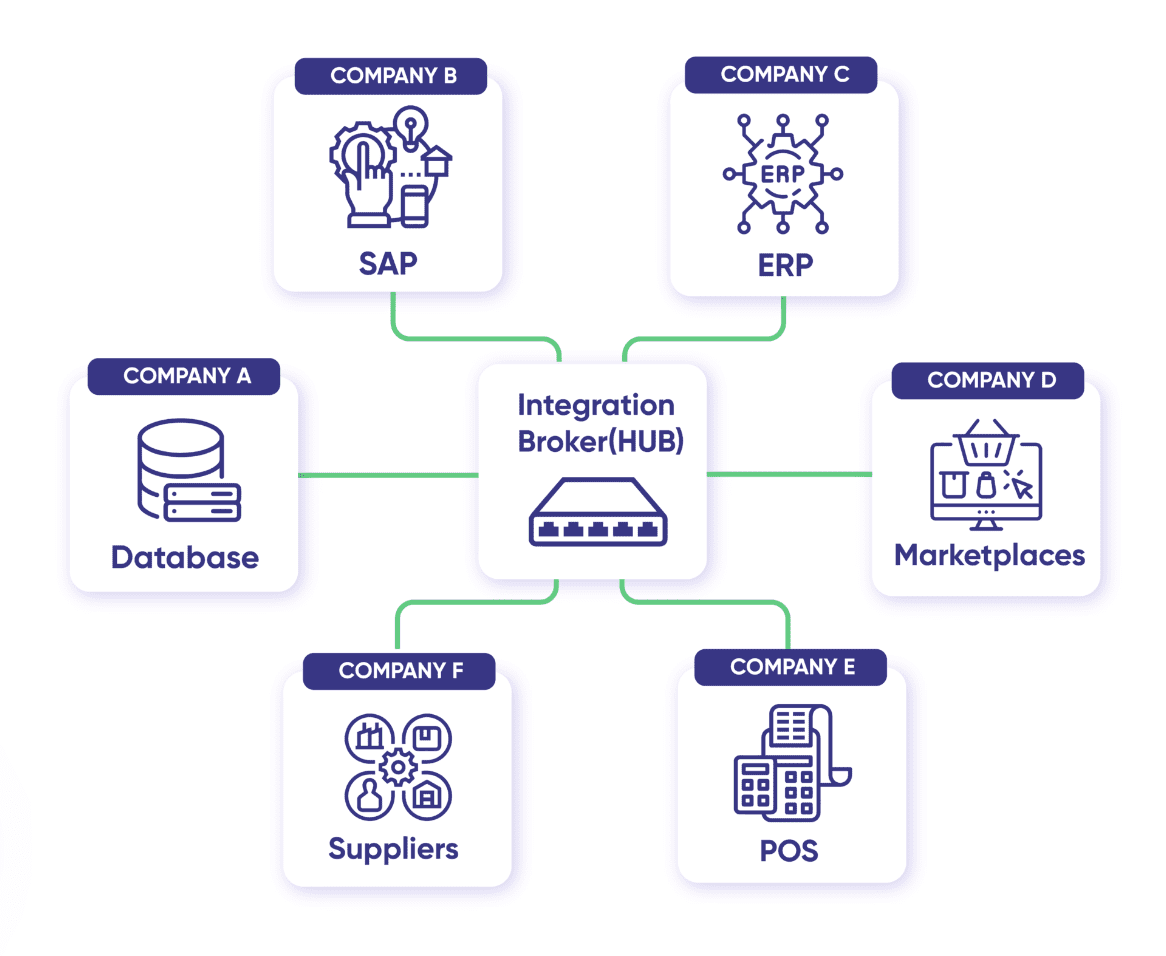
Your integration needs will evolve. MSPs connecting to multiple customer environments need tools that scale without linear cost increases. Organizations adding new platforms (ServiceNow, Zendesk, Azure DevOps) need solutions with broad connector support. Consider whether the tool handles hub-and-spoke architectures or mesh networks connecting many platforms.
Vendor Support and Implementation Services
Complex integrations benefit from expert guidance. Evaluate whether the vendor offers implementation support, training resources, and responsive technical assistance. Some organizations prefer integration-as-a-service offerings where experts handle configuration and ongoing maintenance.
Overview of ServiceDesk Plus Jira Integration Options
Native Integration
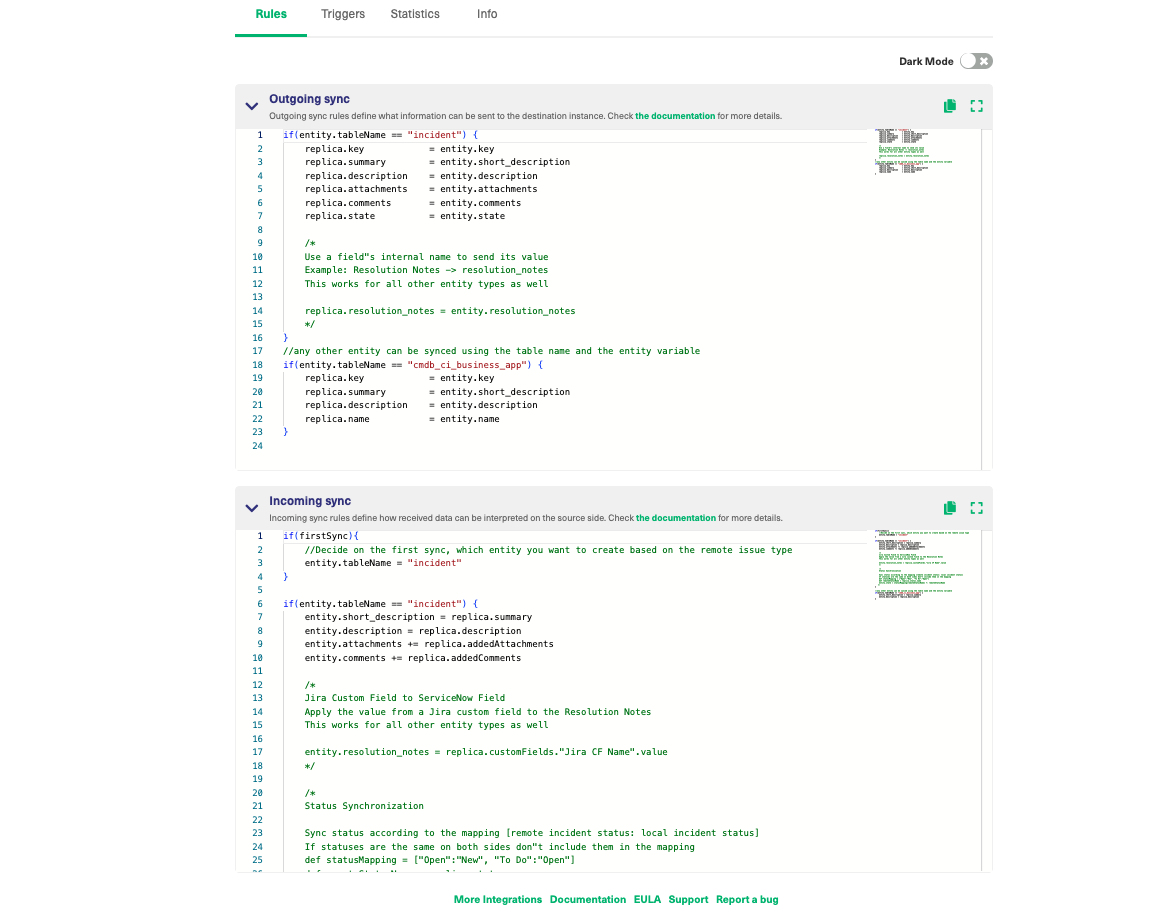
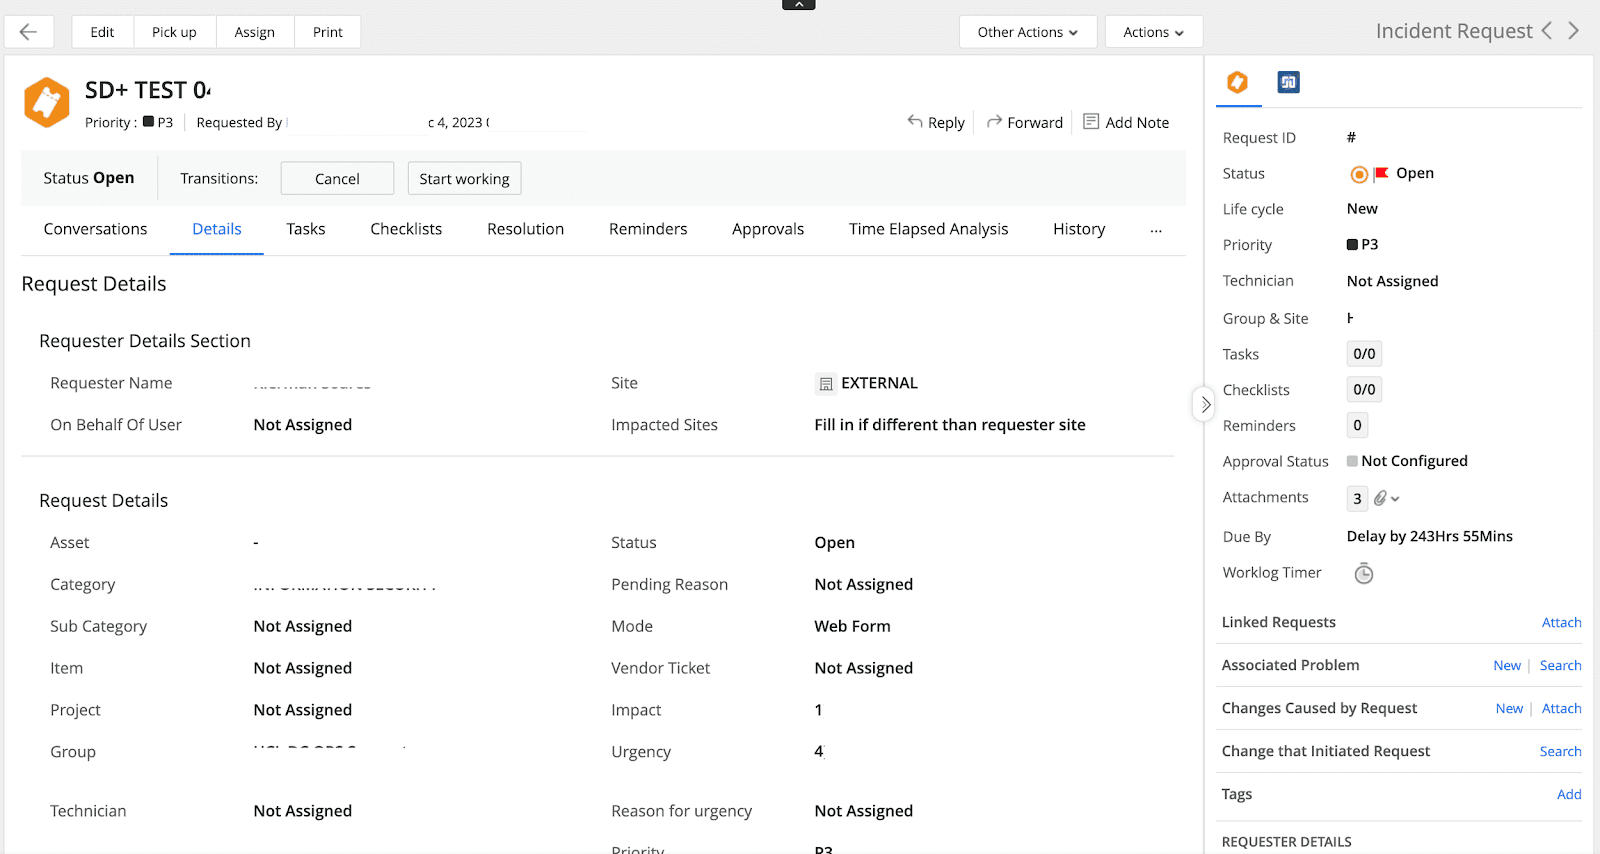
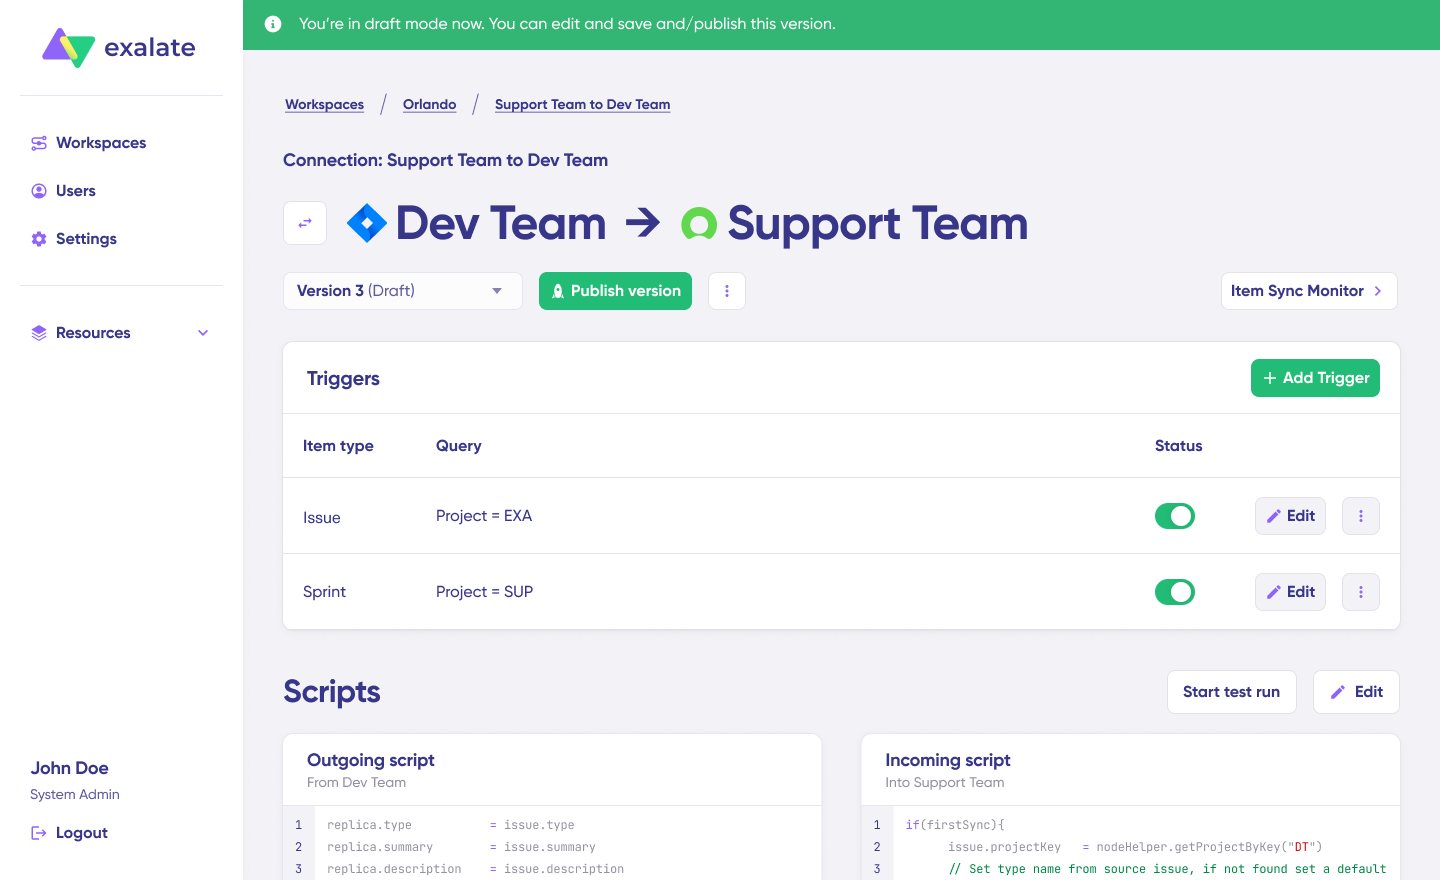
The out-of-the-box functionality allows for one-way synchronization between ServiceDesk Plus and Jira. Incidents created in ServiceDesk Plus can automatically trigger Jira work items with a specific work item type for the development team.
This approach works well when companies want external customer-facing teams to escalate work items to internal development teams. You can also associate Jira work items with ServiceDesk Plus incidents or service requests, then track these linked requests and Jira updates in either application.
What’s the limitation?
The native functionality allows for one-way communication only. To establish ongoing bidirectional sync, you need additional configuration or third-party tools. If support agents need to see real-time development updates or developers need access to evolving ticket context, the native option falls short.
Third-Party Apps for ServiceDesk Plus Jira Integration
Let me share insights from working with an EU-based MSP (we’ll call them Orella Solutions Inc.). They offer security monitoring and reporting services aimed at automating ticket transfers from Jira Cloud to their customers’ ITSM platforms, including ServiceDesk Plus.
They needed to integrate their Jira Cloud instance with multiple customer applications. Their diverse clientele used different ITSM platforms—ServiceNow, TopDesk, Jira Service Management—but we’ll focus on the ServiceDesk Plus connection here.
They evaluated several integration solutions before selecting Exalate.
Exalate offers uni or bidirectional continuous, real-time integration between multiple platforms, including Jira, Salesforce, Zendesk, ServiceNow, ServiceDesk Plus, Freshdesk, Freshservice, Azure DevOps, Azure DevOps Server, Asana, and more.
They wanted a faster setup and preferred an offloading configuration to an integration service provider for a better service experience. Over time, I’ve seen customers asking for integration tools that offer scalability and customization to a granular level without having to manage them themselves.
Here’s why they chose Exalate:
- Natural scalability for multi-customer environments. A point-to-point connection with a single partner easily scales to multiple point-to-point networks. Exalate for MSPs connects a single central instance with multiple internal or external customers, each using different applications.
- Integration-as-a-service option. Users can customize plans and services based on specific requirements. The result is an integration implemented end-to-end without internal engineering overhead.
- Enterprise-grade security. ISO 27001 certification, role-based access control, encryption of data both in transit and at rest, and JWT-based authentication ensure integration security matches enterprise requirements—especially important for cross-company integrations.
- Flexibility through scripting. Full script and operational control over your sync side. Groovy-based scripting enables complex transformations, conditional routing, and custom field mapping that generic tools can’t handle.
ServiceDesk Plus Jira Integration Use Cases
Use Case 1: Support-to-Development Ticket Escalation
Challenge: Your support portal is external and customer-facing, while Jira manages internal development. When support identifies a software bug, they need to escalate it to developers without copying data manually or losing track of the original ticket.
Solution: Configure automatic work item creation in Jira when ServiceDesk Plus tickets meet specific criteria (status change, category assignment, or manual trigger). Map relevant fields—summary, description, priority, attachments—so developers have full context.
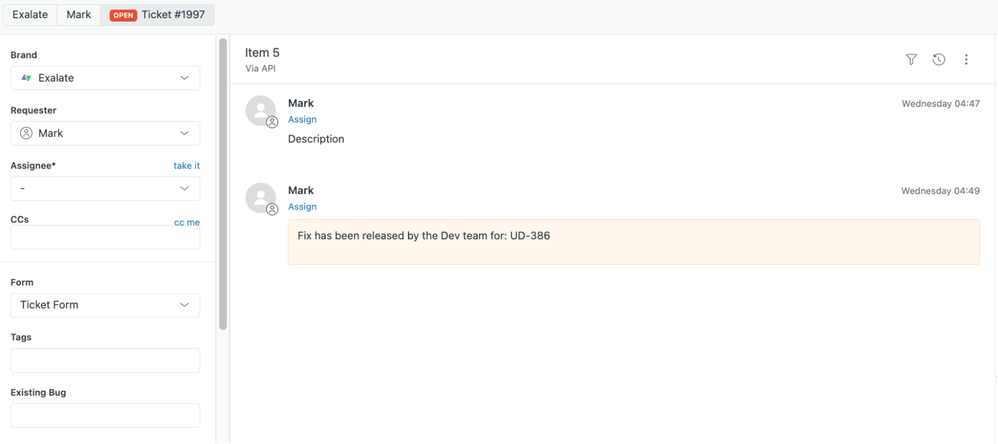
Real-World Application: A SaaS company’s support team receives bug reports through ServiceDesk Plus. When agents confirm a bug and change the status to “Escalated,” a Jira work item appears automatically in the development backlog. Developers see customer-reported details, reproduction steps, and attached screenshots. When they fix the bug and update the Jira status, the ServiceDesk Plus ticket reflects the change so agents can notify the customer.
Use Case 2: Bidirectional Status Synchronization
Challenge: Support agents constantly ask developers, “What’s the status of ticket #1234?” and developers ask, “Can you get more context from the customer?” Both teams waste time on manual status checks and information requests.
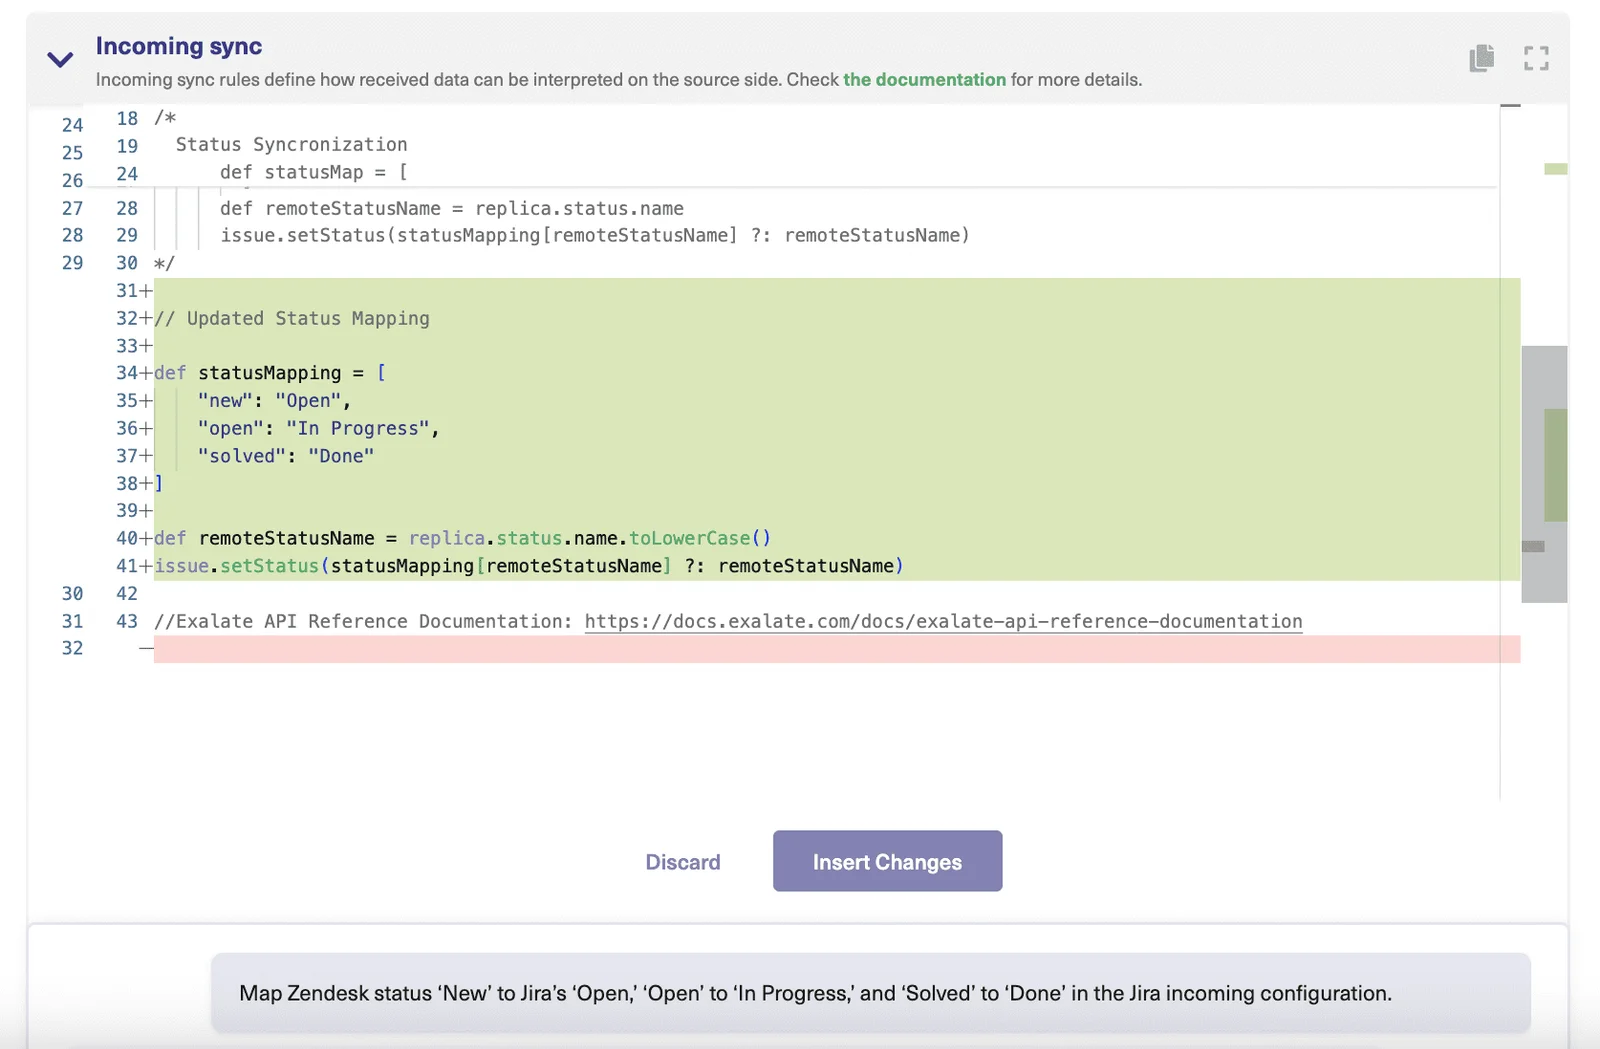
Solution: Configure bidirectional sync that maps status values between platforms. When Jira status changes from “In Progress” to “Code Review,” the corresponding ServiceDesk Plus status updates automatically. When support adds comments with customer clarifications, developers see them in Jira.
Real-World Application: An enterprise IT team uses ServiceDesk Plus for internal support and Jira for application development. Status mapping ensures that Jira’s “Open → In Progress → Code Review → Testing → Done” aligns with ServiceDesk Plus’s workflow. Comments sync both ways, so developers can ask questions that support agents relay to end users, with responses flowing back automatically.
Use Case 3: Multi-Tier Support Handoffs
Challenge: Your Level 1 helpdesk team uses ServiceDesk Plus to manage customer requests. When tickets require escalation to Level 2 (using Jira Service Management), the handoff loses context and creates duplicate data entry.
Solution: Configure automatic ticket conversion when Level 1 escalates. The original ticket’s full history—comments, attachments, customer information—transfers to the Level 2 system. Real-time sync ensures that customer updates (like email replies to ServiceDesk Plus) appear in JSM, and technical team responses sync back.
Real-World Application: A managed services provider operates a tiered support model. Simple requests stay in ServiceDesk Plus with Level 1 agents. Complex technical issues escalate to a specialized team using Jira Service Management. Integration ensures seamless handoffs. No re-typing ticket details, no lost context, no conflicting status updates.
Use Case 4: MSP Multi-Customer Integration Hub
Challenge: As an MSP, you manage multiple customers who each use different ITSM platforms. Your internal team uses Jira, but you need to sync with Customer A’s ServiceDesk Plus, Customer B’s ServiceNow, and Customer C’s Zendesk without building separate integrations for each.
Solution: Deploy a hub-and-spoke architecture where your Jira instance acts as the central hub. Each customer connection operates independently, with sync rules tailored to their specific requirements, field mappings, and data sensitivity constraints.
Real-World Application: A security monitoring MSP receives alerts from its monitoring platform into Jira. When an alert requires customer attention, it automatically syncs to the appropriate customer’s ITSM platform. Customer A sees the alert in ServiceDesk Plus with their custom field mappings. Customer B sees it in ServiceNow with different priority mappings. Each customer’s internal comments stay private; only designated updates sync back to the MSP’s Jira.
Use Case 5: Parent-Child Work Item Linking
Challenge: Complex incidents in ServiceDesk Plus spawn multiple related Jira work items: a bug fix, a documentation update, a configuration change. You need to track these as related items while maintaining proper hierarchy.
Solution: Configure sync rules that preserve parent-child relationships. When creating linked work items in Jira, maintain references back to the original ServiceDesk Plus incident. Track all related work items together so nothing falls through the cracks.
Real-World Application: A software company’s support team creates an incident for a customer-reported outage. Investigation reveals three underlying issues: a database query bug, a missing error handler, and outdated documentation. Three Jira work items are created with parent-child links to the original incident. As developers resolve each item, status updates flow back to the ServiceDesk Plus incident, giving support a complete view of remediation progress.
Use Case 6: Site-Based Routing to Specific Projects
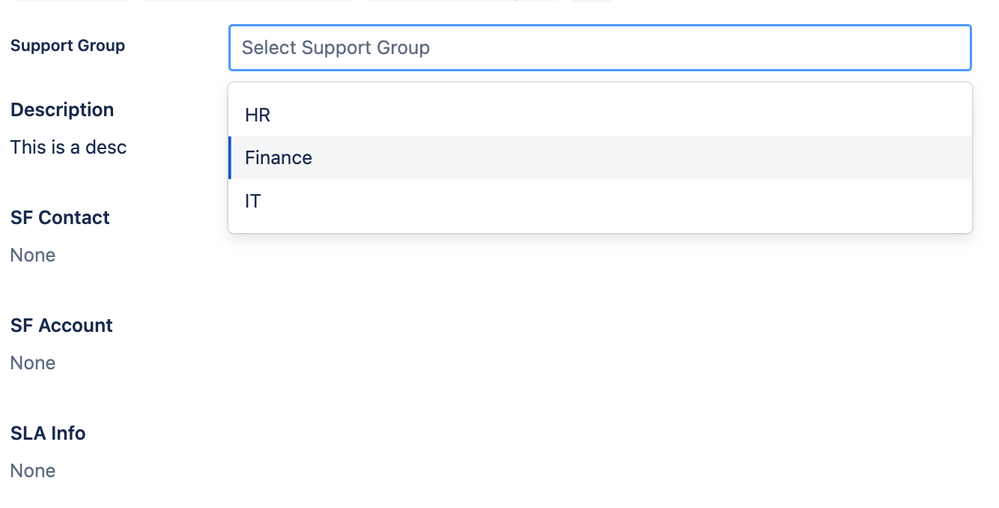
Challenge: Your organization has multiple Jira projects for different product lines or regional teams. ServiceDesk Plus tickets need to route to the appropriate Jira project based on the customer’s site, product category, or other attributes.
Solution: Configure conditional routing in your sync rules. When the ServiceDesk Plus “Site” field contains “North America,” work items route to the JIRA-NA project. European sites route to JIRA-EU. Product-specific routing sends hardware issues to one project and software issues to another.
Real-World Application: A global IT services company supports customers across three regions. Each region has dedicated development teams working in separate Jira projects. When ServiceDesk Plus tickets are escalated, the integration examines the site field and routes automatically. Regional teams see only relevant work items. Status updates sync back to the original ticket regardless of which project handles the work.
ServiceDesk Plus Jira Integration: An Advanced Use Case

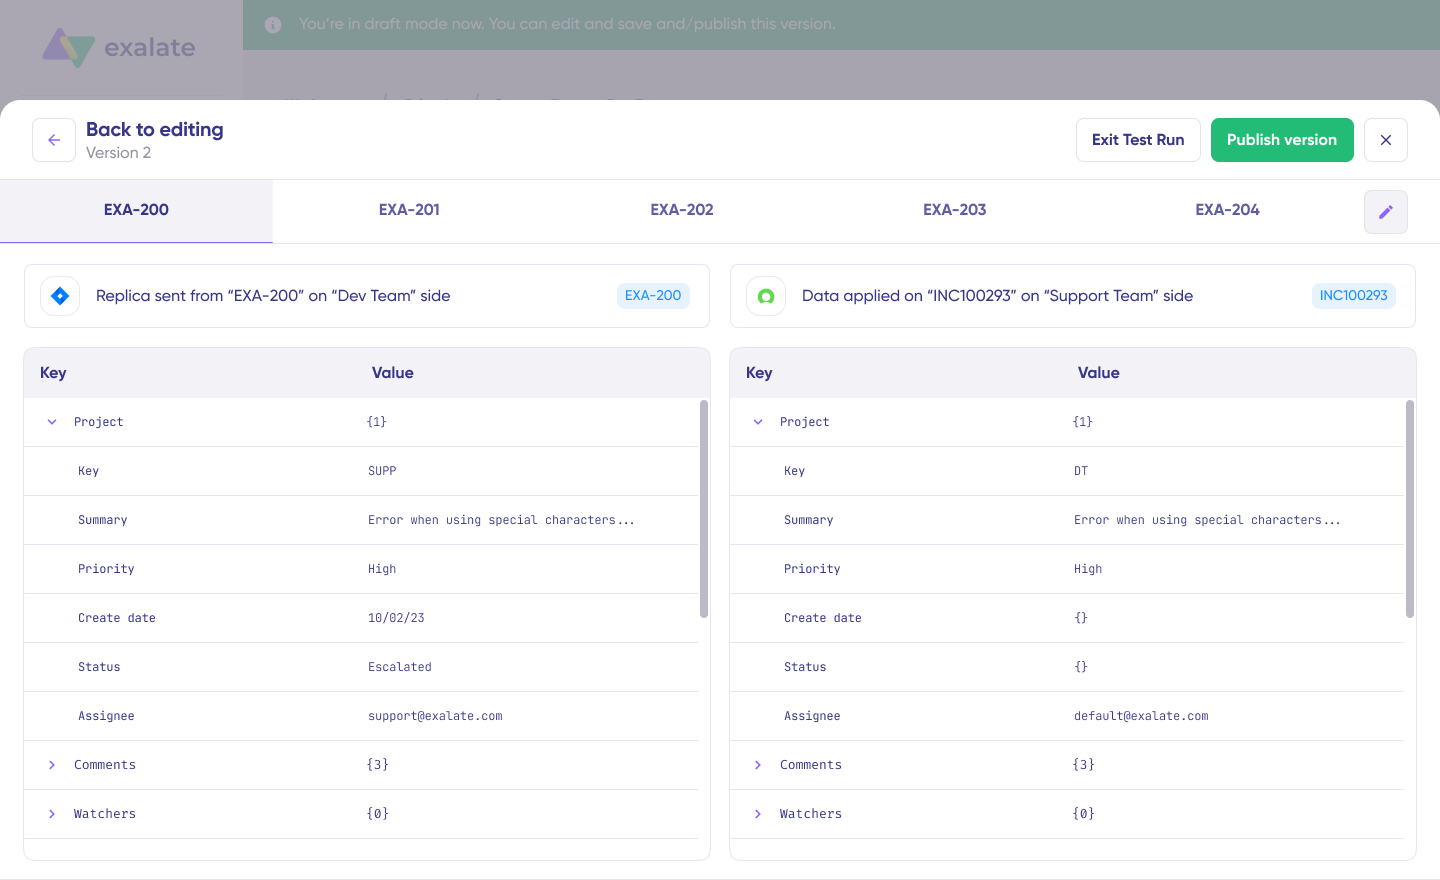
Here’s a real-time, bidirectional integration scenario demonstrating seamless work item synchronization between ServiceDesk Plus and Jira:
The setup:
- A work item is created in the Jira Cloud instance
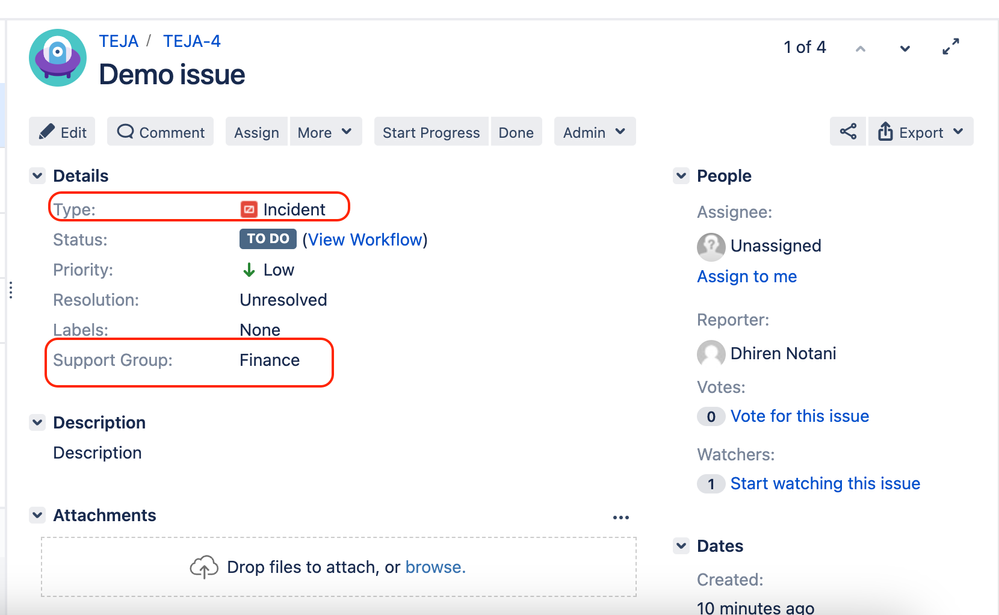
- A trigger ensures that Jira work items with a custom field (Mood = angry) sync to ServiceDesk Plus as Requests
- The ServiceDesk Plus Request number and URL are automatically added as custom fields in Jira for better visibility
The sync in action:
- When a ServiceDesk Plus agent assigns the ticket to a Technician or updates fields like Reporter, Group, or Site, these changes sync back to Jira
- Additional fields like Category and Subcategory from ServiceDesk Plus are mirrored in Jira
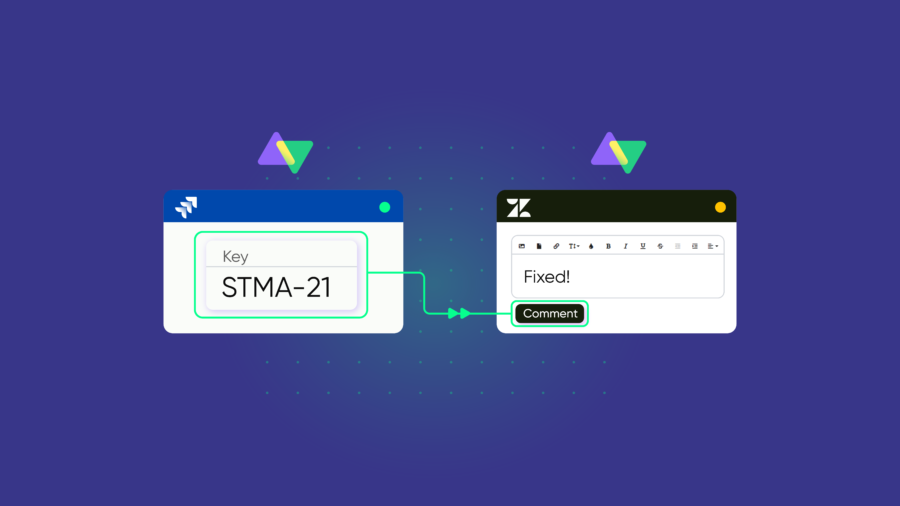
- Only public comments are shared between platforms, keeping the necessary context intact while filtering internal discussions
- Status updates sync in both directions for real-time tracking
- Attachments are transferred to maintain the full context
By keeping both systems in sync, no ticket slips through the cracks, and teams stay updated in real time within their preferred platform.

Exalate is a competitive advantage for us as an MSSP since it enables us to have a close and smooth collaboration with our customers and find workarounds for bottlenecks. That is something both sides appreciate a lot because we are not merely another partner to our customers, but are in fact an extension of their team. And that is NVISO’s strategic vision as a managed security services provider.
— ALEXANDER SINNO, NVISO
ServiceDesk Plus Jira Integration Scenarios Implemented Using Exalate
I’ve seen many different implementations for connecting Jira and ServiceDesk Plus. Here are some that stand out:
Scenario 1: Selective Field Sync with Status-Based Triggers
Requirements:
- External support portal syncs with internal Jira project
- Only specific fields from ServiceDesk Plus sync to Jira
- Work item creation triggers on status changes
- Status changes on ServiceDesk Plus create Jira work items
- Status changes sync bidirectionally
- Ticket owner from ServiceDesk Plus syncs to Jira Assignee and vice versa
- Comments, due dates, and work item types (Task in ServiceDesk Plus relates to Operations or Development in Jira)
- Parent work item links from Jira maintain parent-child relationships
- Site-specific routing sends tickets to the appropriate Jira projects
Scenario 2: Tiered Support with Real-Time Sync
Requirements:
- Level 1 helpdesk uses ServiceDesk Plus for customer requests
- Level 2 technical team uses Jira Service Management
- Tickets automatically convert to JSM tickets upon escalation
- Real-time synchronization between both systems
- Customer updates (email replies to ServiceDesk Plus) reflect in JSM
- Technical team updates sync back to ServiceDesk Plus
- Full context preservation during handoffs
Calculating Integration ROI
Before implementing an integration, understand the potential return on investment. Consider these factors:
- Time savings from eliminating manual data entry. Calculate hours spent copying ticket information between platforms. Multiply by the hourly labor cost.
- Faster incident resolution. Measure the current mean time to resolution (MTTR) for escalated tickets. Integration typically reduces MTTR by eliminating handoff delays.
- Reduced errors from manual processes. Quantify rework caused by typos, missed updates, or conflicting information between systems.
- Improved customer satisfaction. Track customer satisfaction scores before and after integration. Faster resolution and accurate updates improve NPS and retention.
Calculate time and money savings from automated bidirectional sync.
Conclusion
Integrating Jira and ServiceDesk Plus significantly enhances your organization’s efficiency, transparency, and customer satisfaction. The native integration provides a foundation for simple escalation scenarios, but for dynamic, customizable, bidirectional synchronization, third-party apps like Exalate offer advantages that scale with your needs.
In the ever-evolving landscape of IT service management, a robust integration solution is not just a convenience—it’s a strategic necessity. Consider talking to our experts if you want to discuss the impact on your MSP operations.
Frequently Asked Questions
What is ServiceDesk Plus Jira integration?
ServiceDesk Plus Jira integration connects ManageEngine’s ITSM platform with Atlassian’s work management tool. It enables automatic data synchronization between support tickets in ServiceDesk Plus and work items in Jira, allowing support and development teams to collaborate without switching platforms or manually copying information.
Can I set up bidirectional sync between ServiceDesk Plus and Jira?
Yes, but not with native functionality alone. The built-in ServiceDesk Plus integration supports one-way sync from ServiceDesk Plus to Jira. For full bidirectional synchronization—where updates in either platform reflect in the other—you need a third-party tool like Exalate that supports real-time, two-way data flow.
What fields can I sync between ServiceDesk Plus and Jira?
Common synchronized fields include summary, description, status, priority, assignee, comments, attachments, custom fields, due dates, and work item types. With tools like Exalate, you can map any field between platforms, including custom fields unique to your workflows. Groovy scripting enables complex transformations like converting ServiceDesk Plus categories to Jira labels or mapping status values between different workflow structures.
How does the integration handle status mapping?
Status mapping translates workflow states between platforms. For example, ServiceDesk Plus might use “Open, In Progress, Resolved, Closed” while Jira uses “To Do, In Progress, Code Review, Testing, Done.” You configure mappings so that changing the status in one platform triggers the corresponding status in the other. Advanced tools allow conditional mapping based on work item type or project.
Is the integration secure for sensitive data?
Security depends on the integration tool. Exalate maintains ISO 27001 certification, implements role-based access control, and encrypts data both in transit and at rest. Each organization controls its own sync configuration independently; no shared admin credentials, no exposed internal systems. Visit the Exalate Trust Center for detailed security documentation and compliance certifications.
Can I filter which tickets or work items sync?
Yes, Exalate uses platform-native query languages—JQL for Jira and ServiceDesk Plus query syntax—to define precisely which items sync. You might sync only escalated incidents, only high-priority bugs, or only tickets assigned to specific groups.
Does the integration support attachments and comments?
Yes. Attachments (screenshots, documents, logs) and comments typically sync between platforms. With Exalate, you can configure comment filtering; for example, syncing only public comments while keeping internal notes private. You can also filter comments by author or content to control what information crosses the integration boundary.
Can Exalate connect ServiceDesk Plus with platforms other than Jira?
Yes. Exalate supports integration between ServiceDesk Plus and many platforms, including Jira, ServiceNow, Zendesk, Freshservice, Freshdesk, Azure DevOps, Azure DevOps Server, Salesforce, Asana, GitHub, and custom systems via REST API connectors. This enables hub-and-spoke architectures where ServiceDesk Plus connects to multiple partner platforms or MSP customers using different ITSM tools.
Recommended Reads:
- Jira ServiceNow Integration: How to Connect Jira and ServiceNow in 6 Steps
- Jira Zendesk Integration: Connect Jira and Zendesk Bidirectionally
- MSP Integration: Why It Matters for Your Business
- ITSM Integration: Simplify Your IT Services Like Never Before
- Exploring Ways To Implement Managed Services Integration


 Open
Open