The popularity of Salesforce is evident in the increasing user base, enhanced customer experience, better sales cycles, and customizability.
When such a powerful CRM platform needs to be integrated with other tools like GitHub, Jira, ServiceNow, Azure DevOps, Zendesk, or Freshservice, you need a solution that can make their APIs interact and transform data in the correct format.
That’s why you need Salesforce integrations. They allow users the comfort of staying in the tool they already use and still getting the information they are looking for.
This blog will highlight the importance of Salesforce integrations, walk through common use cases, explore native and third-party options, and help you choose the right integration solution for your business needs.
Key Takeaways
- Salesforce integrations connect your CRM with external applications to automate data exchange and streamline business processes across sales, support, and development teams.
- Common integration patterns include data migration, one-to-many syncs, many-to-one consolidation, and real-time bidirectional synchronization between Salesforce and tools like Jira, ServiceNow, Azure DevOps, Zendesk, and GitHub.
- Native Salesforce options (REST API, SOAP API, Apex callouts) work for basic scenarios but face limitations around flexibility, technical resource requirements, and governor limits.
- Third-party integration tools like Exalate, Zapier, MuleSoft, and Workato offer pre-built connectors, advanced customization, and support for complex enterprise workflows.

What Are Salesforce Integrations?
Salesforce integrations are tools that allow users to connect multiple applications and share information using automated triggers and mappings.
Information needs to flow between all these different platforms. However, if done manually, it can be time-consuming and prone to errors.
Here are some common integration scenarios:
- Data synchronization: Data can be converted to a common format and synced or exchanged between applications in real-time or on a schedule.
- Business process automation: Business logic can be automated end-to-end, streamlining collaboration across different teams. This is also known as B2B integration.
- Unified visibility: Salesforce integrations provide a unified user interface so teams using different applications can access or manage information through a single pane of glass.
These integrations can be either synchronous or asynchronous, depending on the use case. You can also classify integrations based on the timing of information exchange:
- Scheduled frequency: Monthly, daily, hourly. For example, when an Opportunity is marked ‘Won’, triggers activate the system to transfer details to Jira for escalation to the license management team.
- Real-time integration: Most use cases depend on real-time data exchange since time is critical for sales teams making quick decisions.
- Near real-time integration: When there is a confirmation about a purchase order that needs to be passed between two systems, near real-time integration can be a safe approach.
Benefits of Salesforce Integrations
Here’s what Salesforce integrations bring to your organization:
- Eliminates context switching: Have information handy in the platform you’re already familiar with instead of toggling between applications.
- Increases team productivity: Automate business processes and remove manual data entry, reducing friction and human error.
- Improves decision-making: Exchange accurate information through integrations, providing teams with better insights for faster decisions.
- Enables cross-team collaboration: Diverse tools start interacting through API integration, allowing efficient communication across sales, support, and development teams.
- Aligns business and technical teams: Integrations benefit a range of audiences, helping everyone get aligned on common business goals.
- Provides visibility: Transparency between teams and visibility of critical information come naturally through Salesforce integration solutions.
How to Set up a Salesforce to Salesforce Integration With Exalate
This tutorial demonstrates how to set up a Salesforce-to-Salesforce integration using Exalate.
Get Started with Exalate
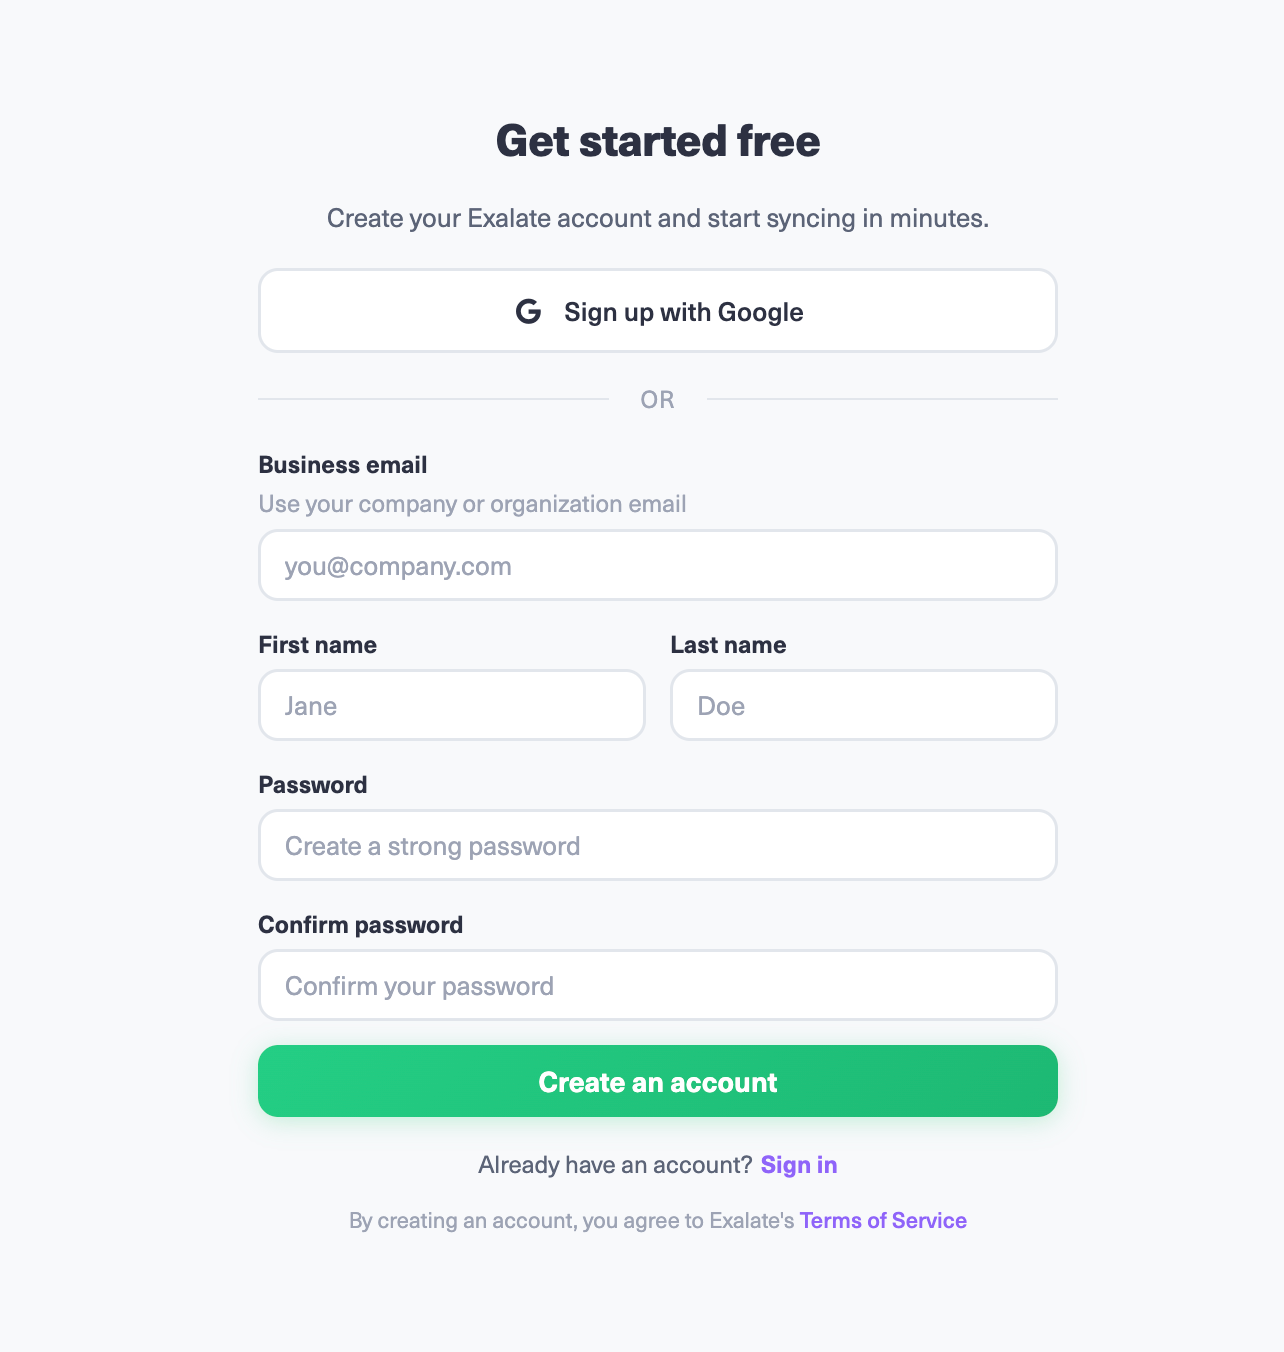
Navigate to the Exalate integrations page and create your account. If you’re a returning user, simply log in. You can register manually with business email verification or use Google sign-in for faster access.
Initiate Your Salesforce-to-Salesforce Connection
Navigate to the “Connections” tab to view all your connections. From here, you can edit connections and access detailed connection information.
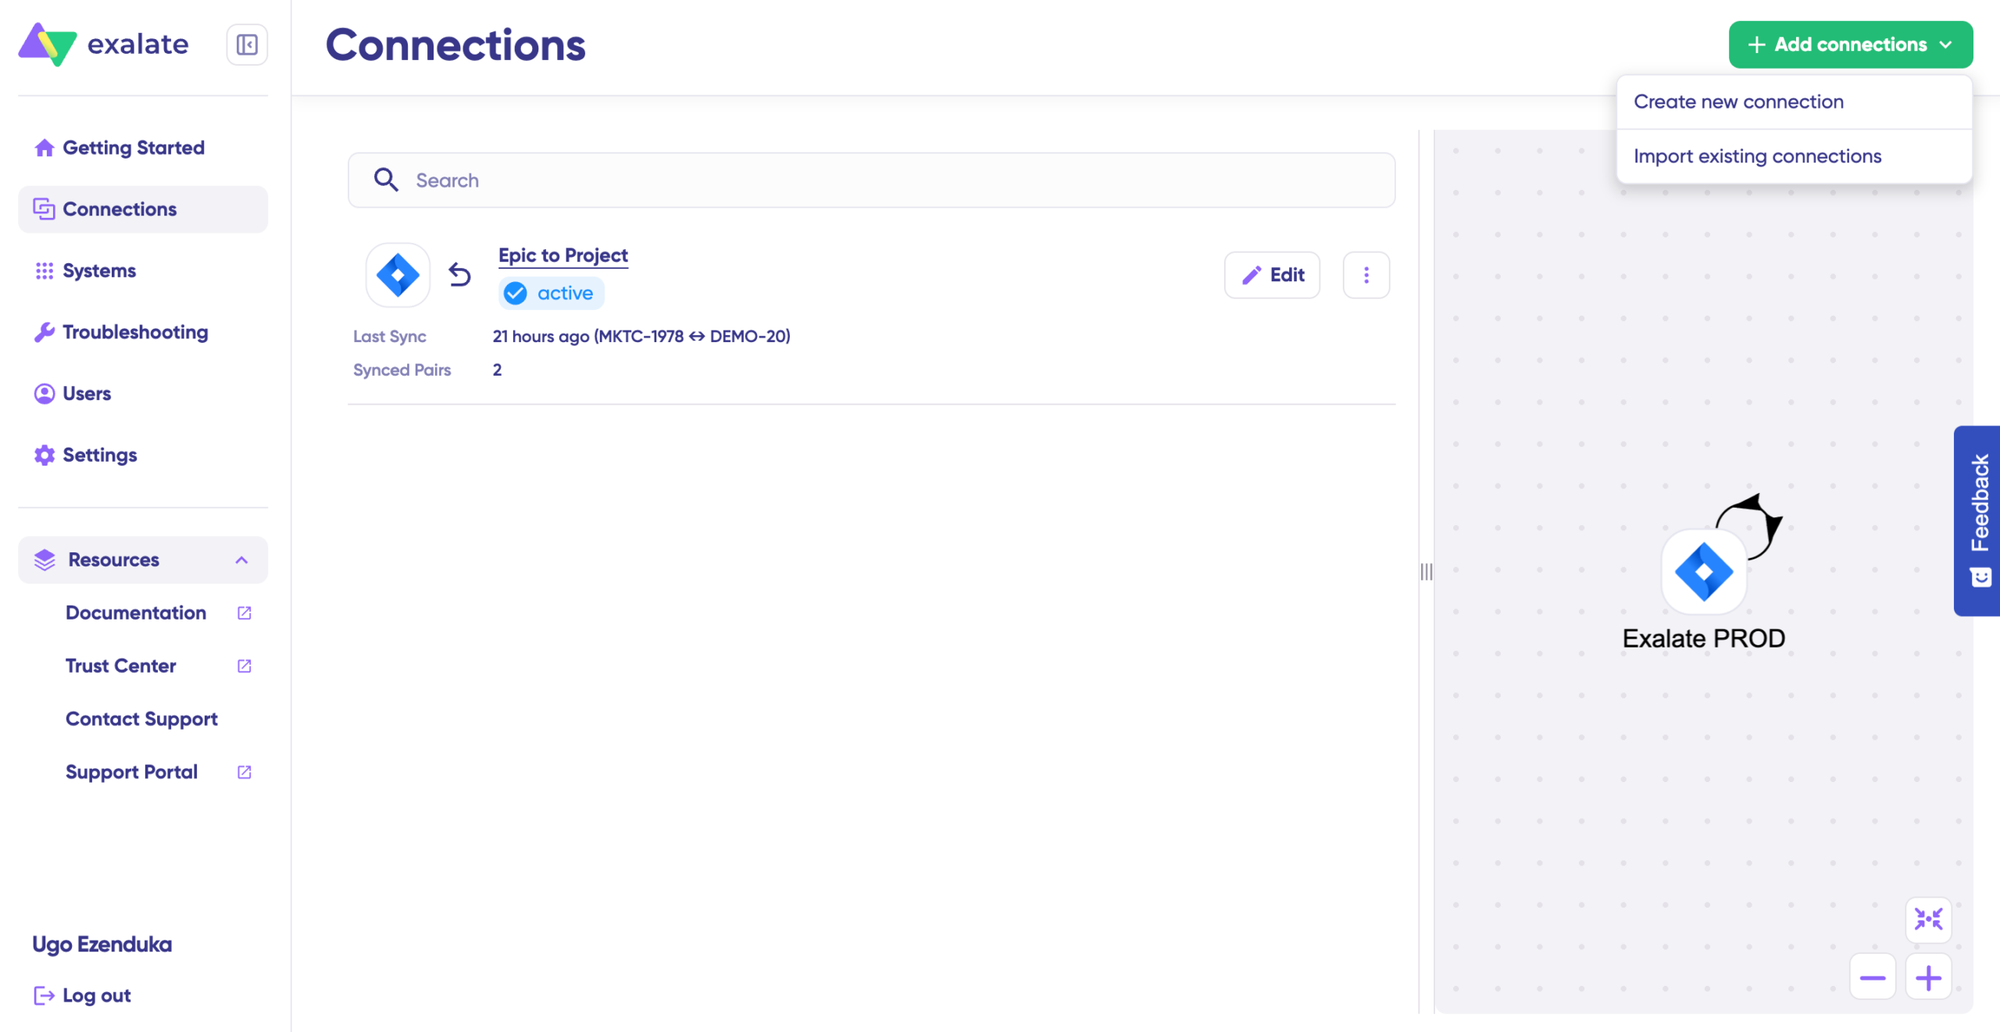
Click “+ Add connections” → “Create new connection“. Enter the name for your first Salesforce instance as System A. Then provide the URL of your first Salesforce org.
Note: Creating a connection requires an active Exalate account with authentication credentials for both Salesforce instances you want to connect.
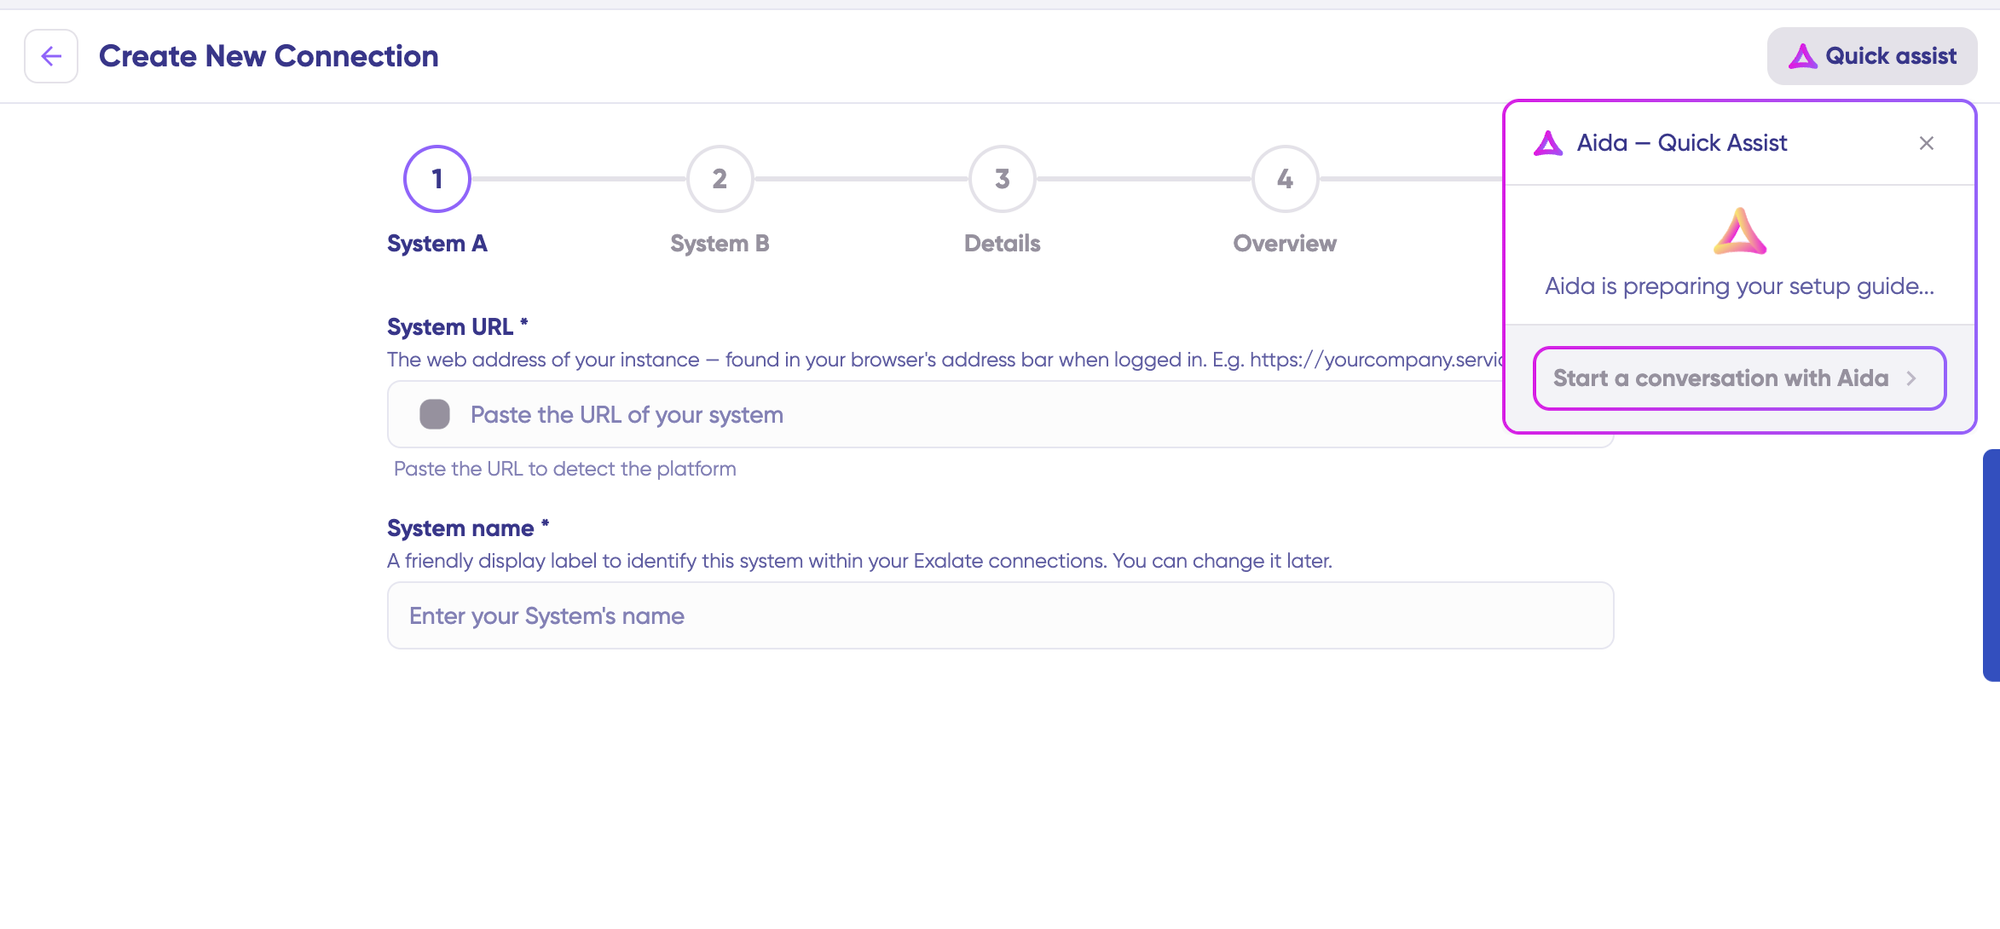
You can also speed up the process by using Aida – Quick Assist at the top right of the dashboard.
Enter the URL so that Exalate performs a validation check.
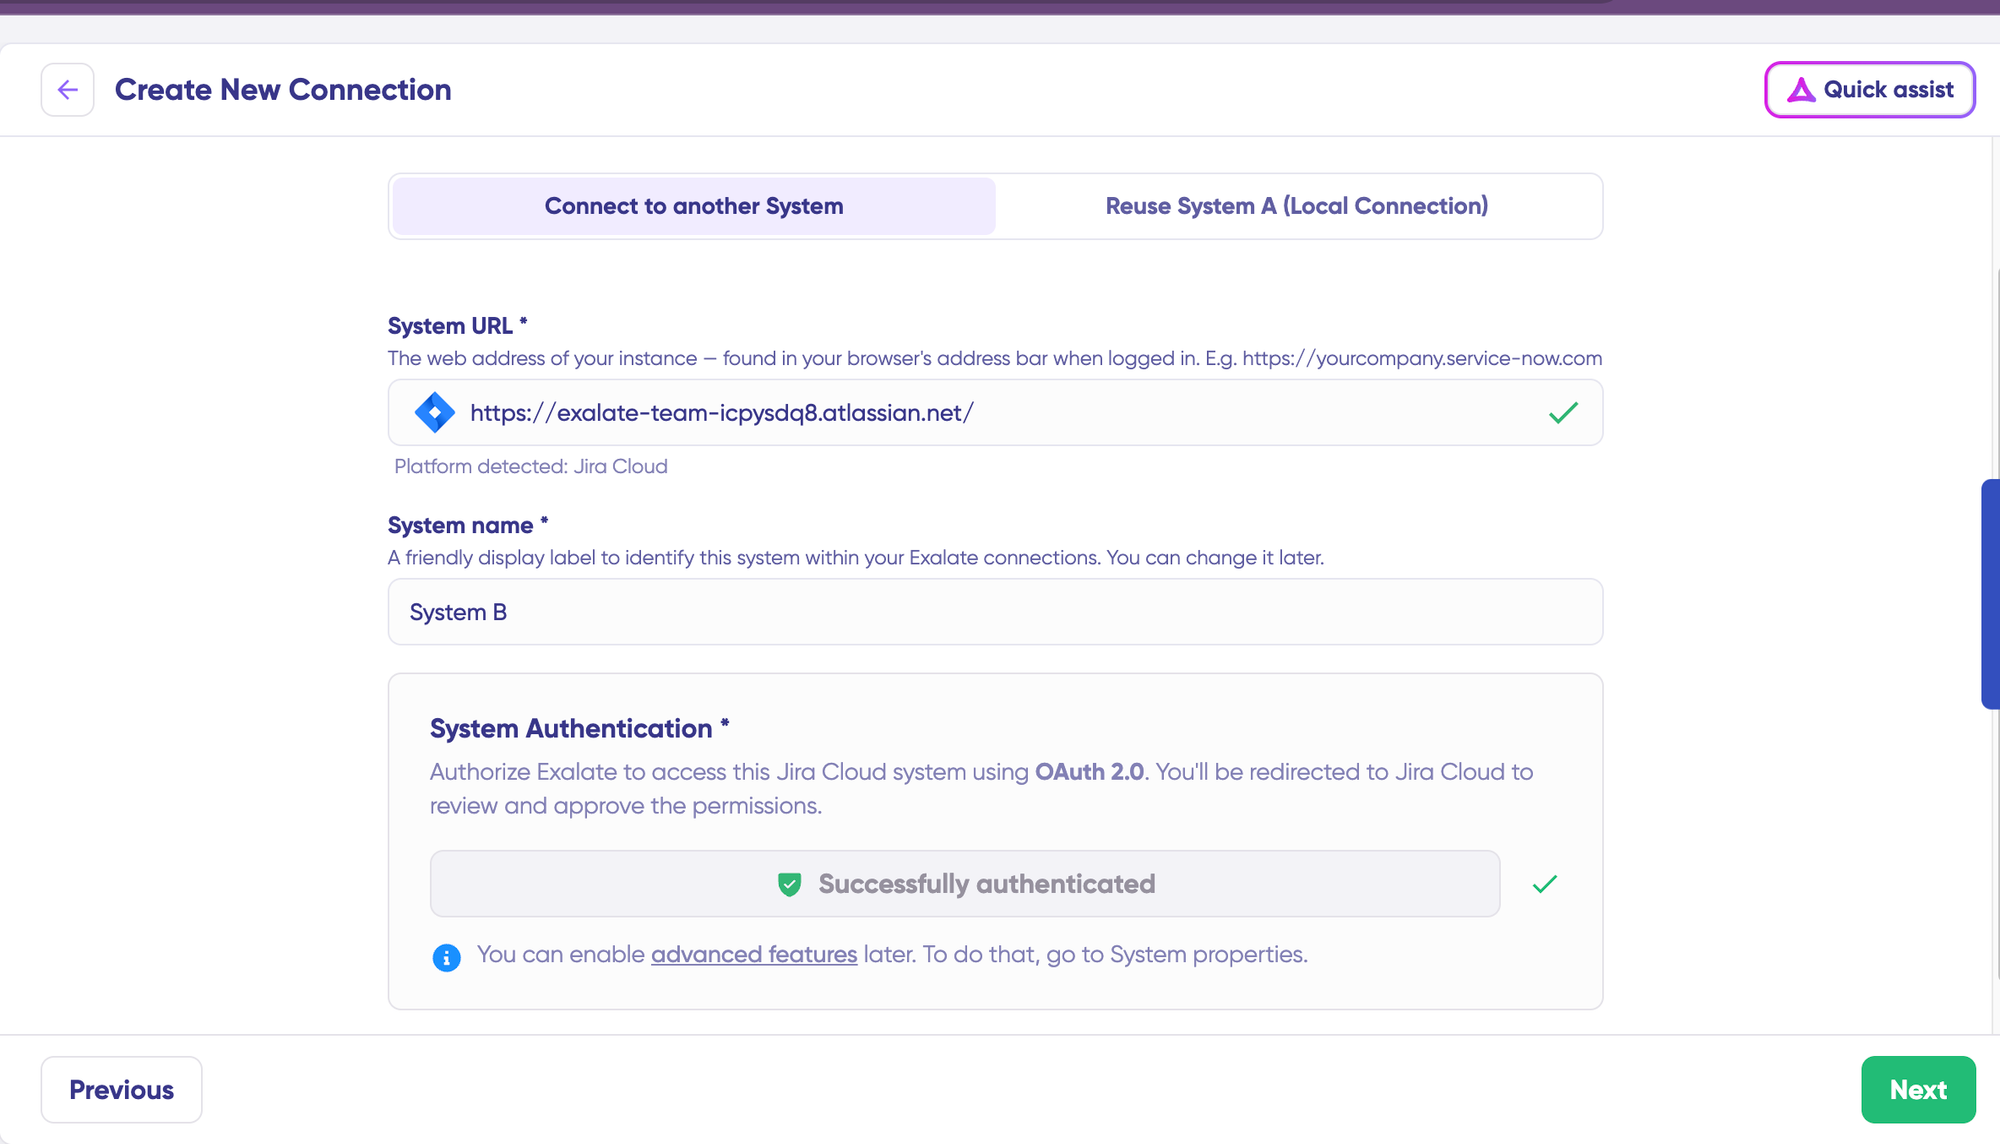
For a new Salesforce instance, you’ll need to enter your authentication credentials using your Client ID and Client Secret.
Complete the same setup process for your second Salesforce instance (System B). The authentication rules remain identical since both systems are the same.
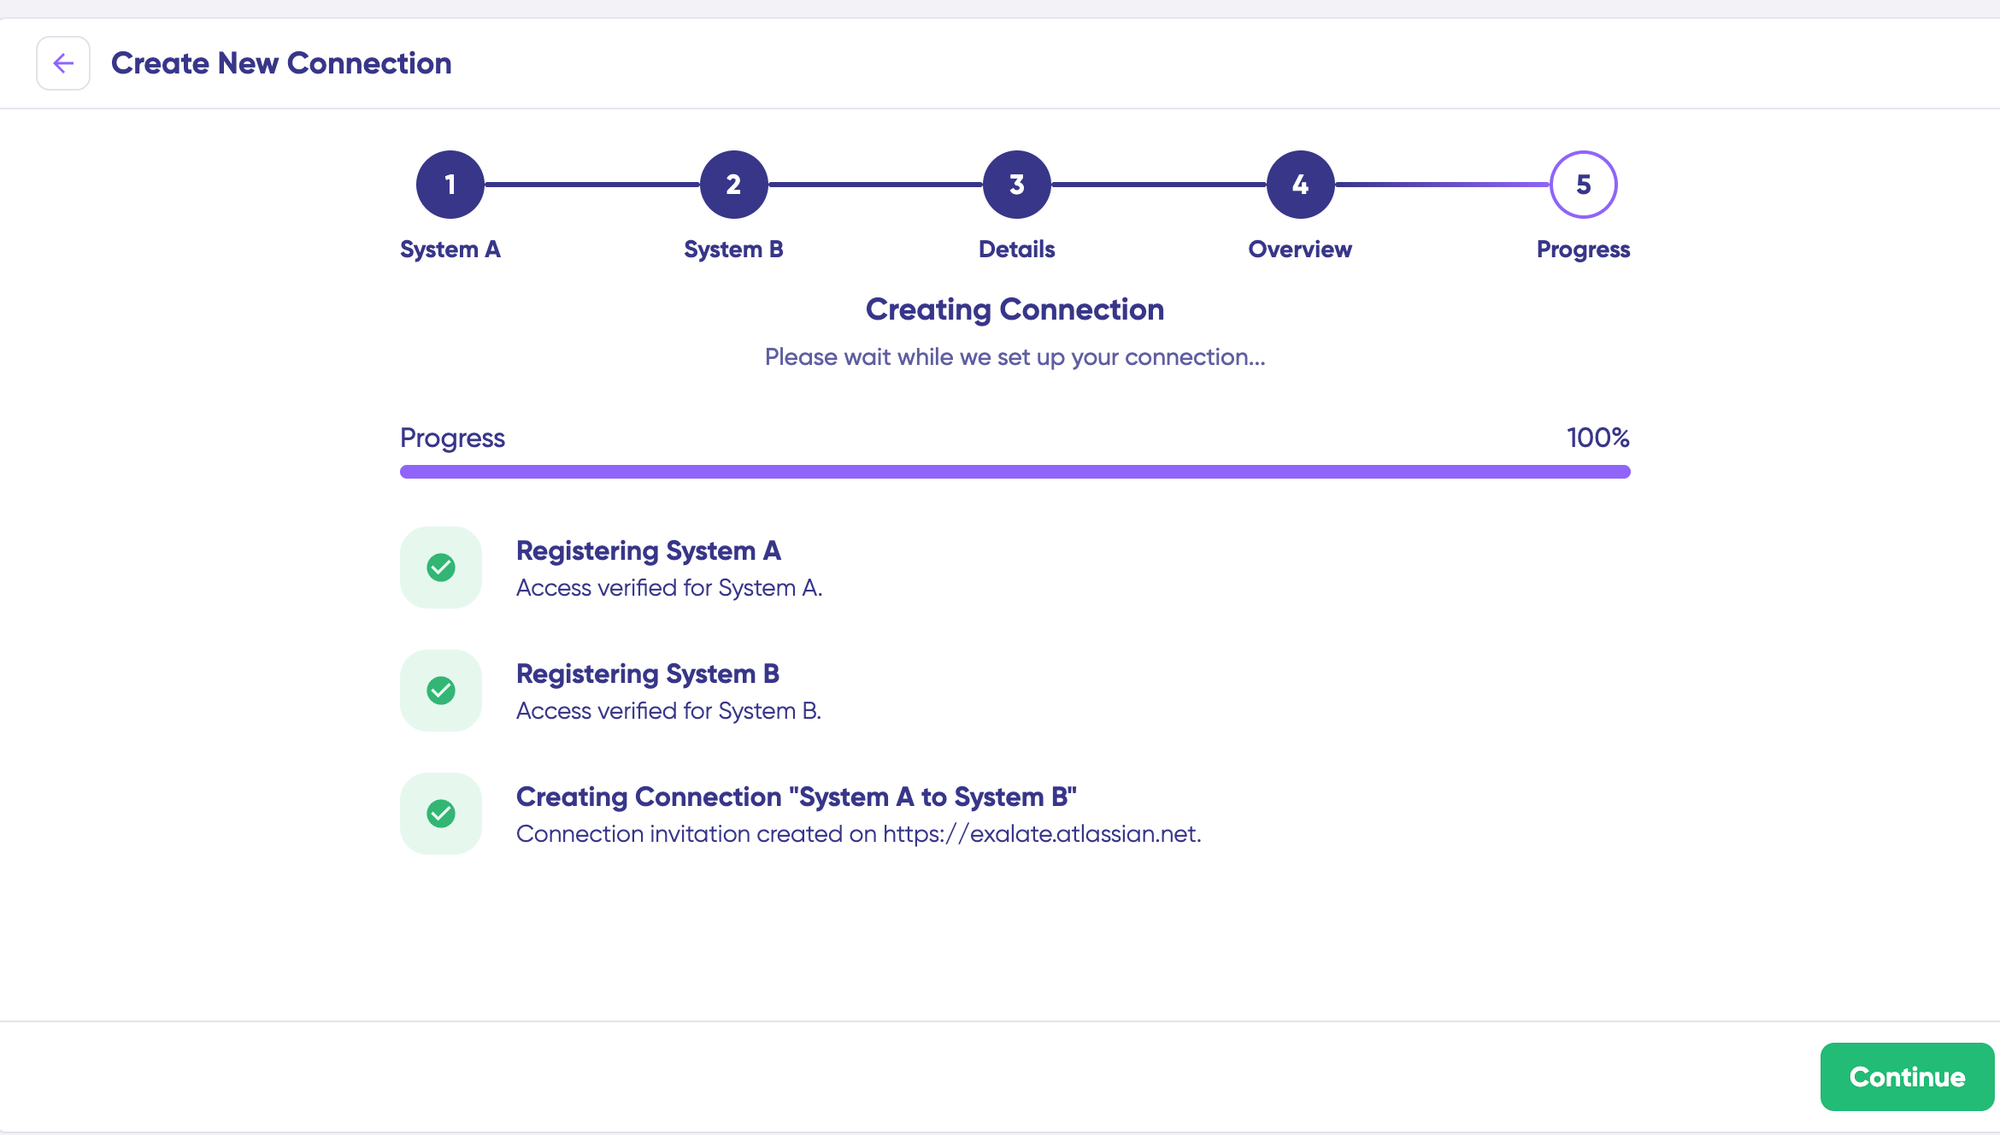
Assign a name and description for your connection, then click “Next“. Review the configuration details for accuracy and click “Create connection“.
When the process completes, select “Continue to configuration” and choose the Salesforce objects you want to synchronize (such as Accounts, Opportunities, Cases, or Leads).
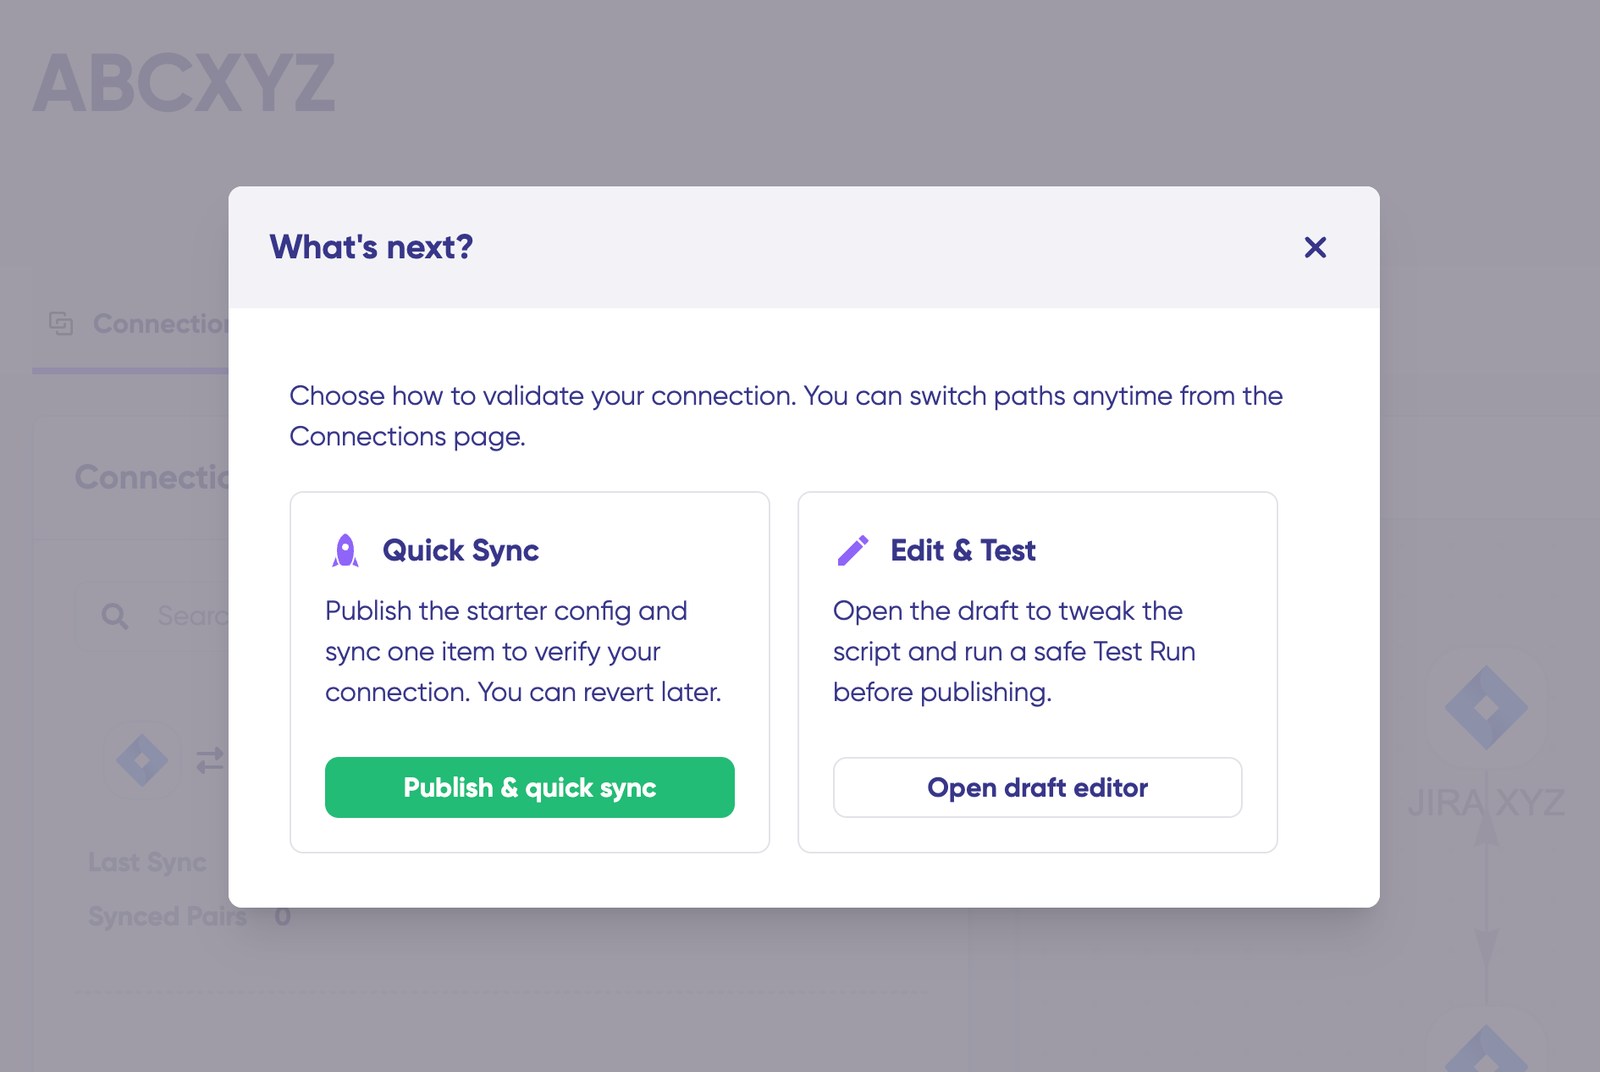
You’ll now see two configuration options: “Quick sync” and “Edit & Test“. Let’s explore both approaches.

- Quick Sync: Test Your Connection Immediately
This option allows you to synchronize one record between your Salesforce instances to verify that the connection works correctly. This is an optional but recommended step.
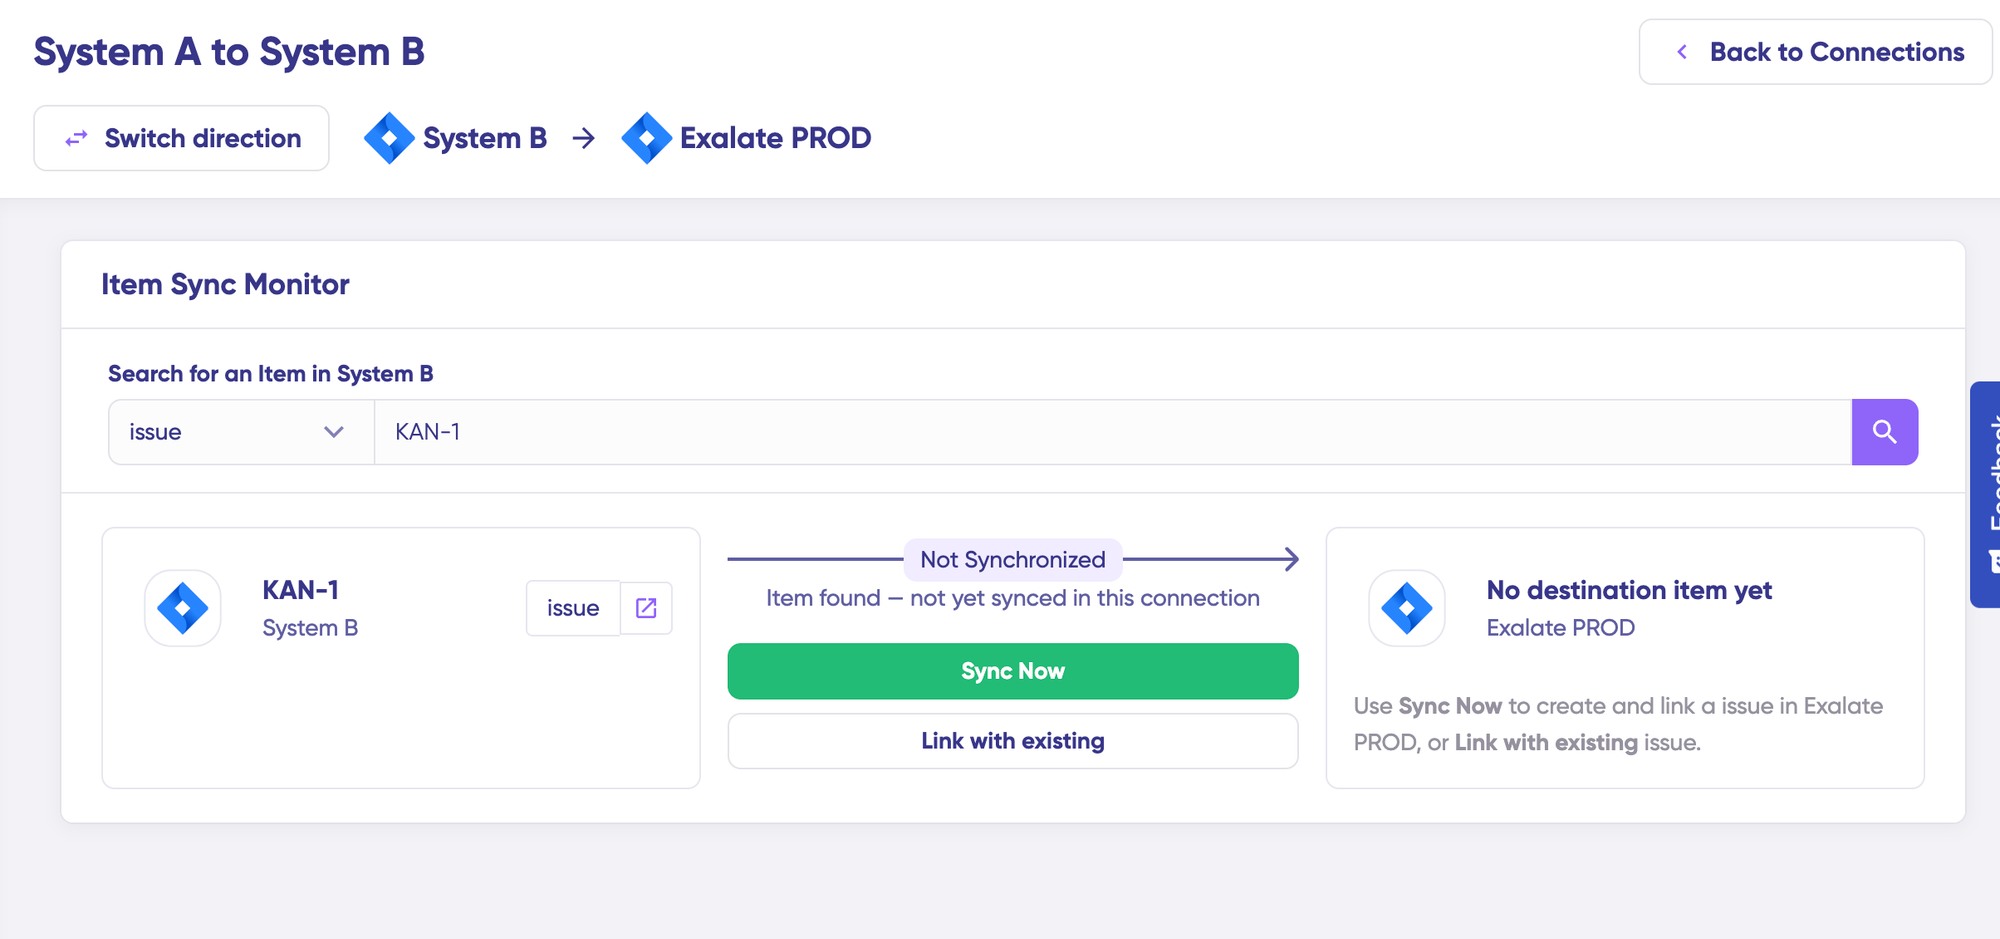
Under the “Item sync monitor,” enter the Salesforce record ID from either instance—such as an Account ID, Opportunity ID, or Case Number.
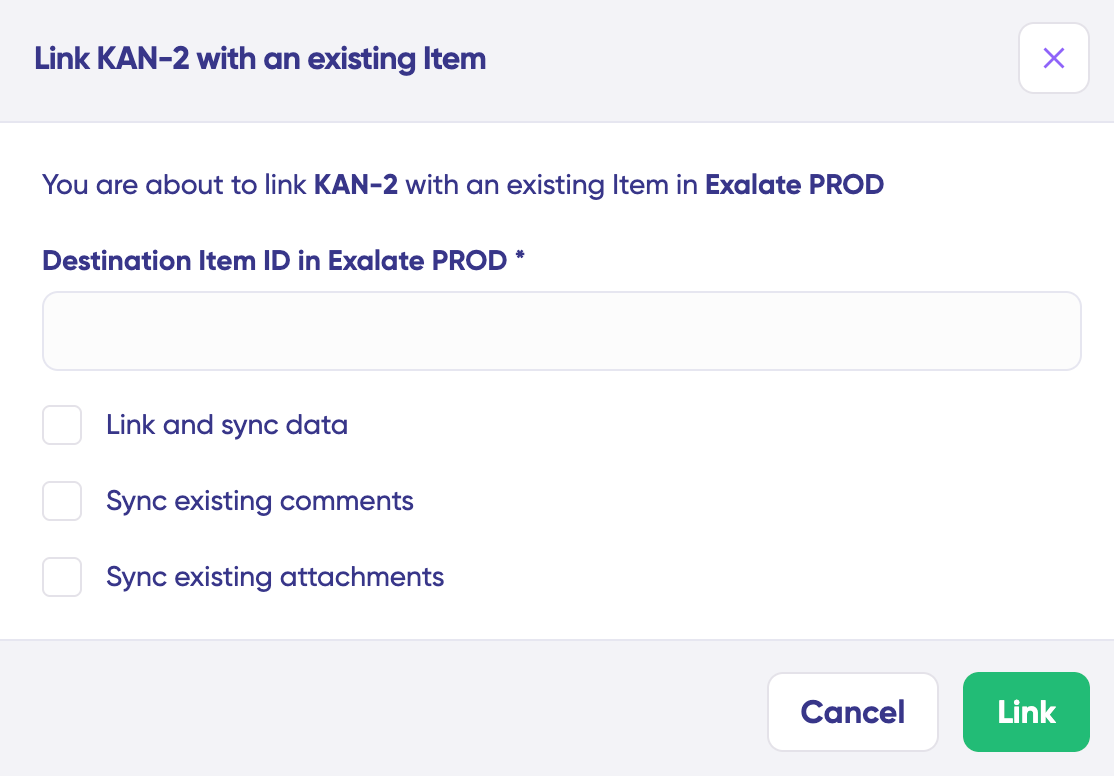
To synchronize the first record, click “Sync Now“. To link two existing records from both instances, select “Link with existing“. You’ll receive real-time status updates during synchronization.
Once complete, view both synchronized records by opening them in separate windows. You can also compare how the synchronized records appear and preview how changes will be applied across both instances.
- Edit & Test: Configure Custom Sync Rules
To customize your synchronization behavior, click “+ New version” or select “Open latest draft“. This prevents accidental modifications to your active configuration. All changes in draft mode are saved automatically.
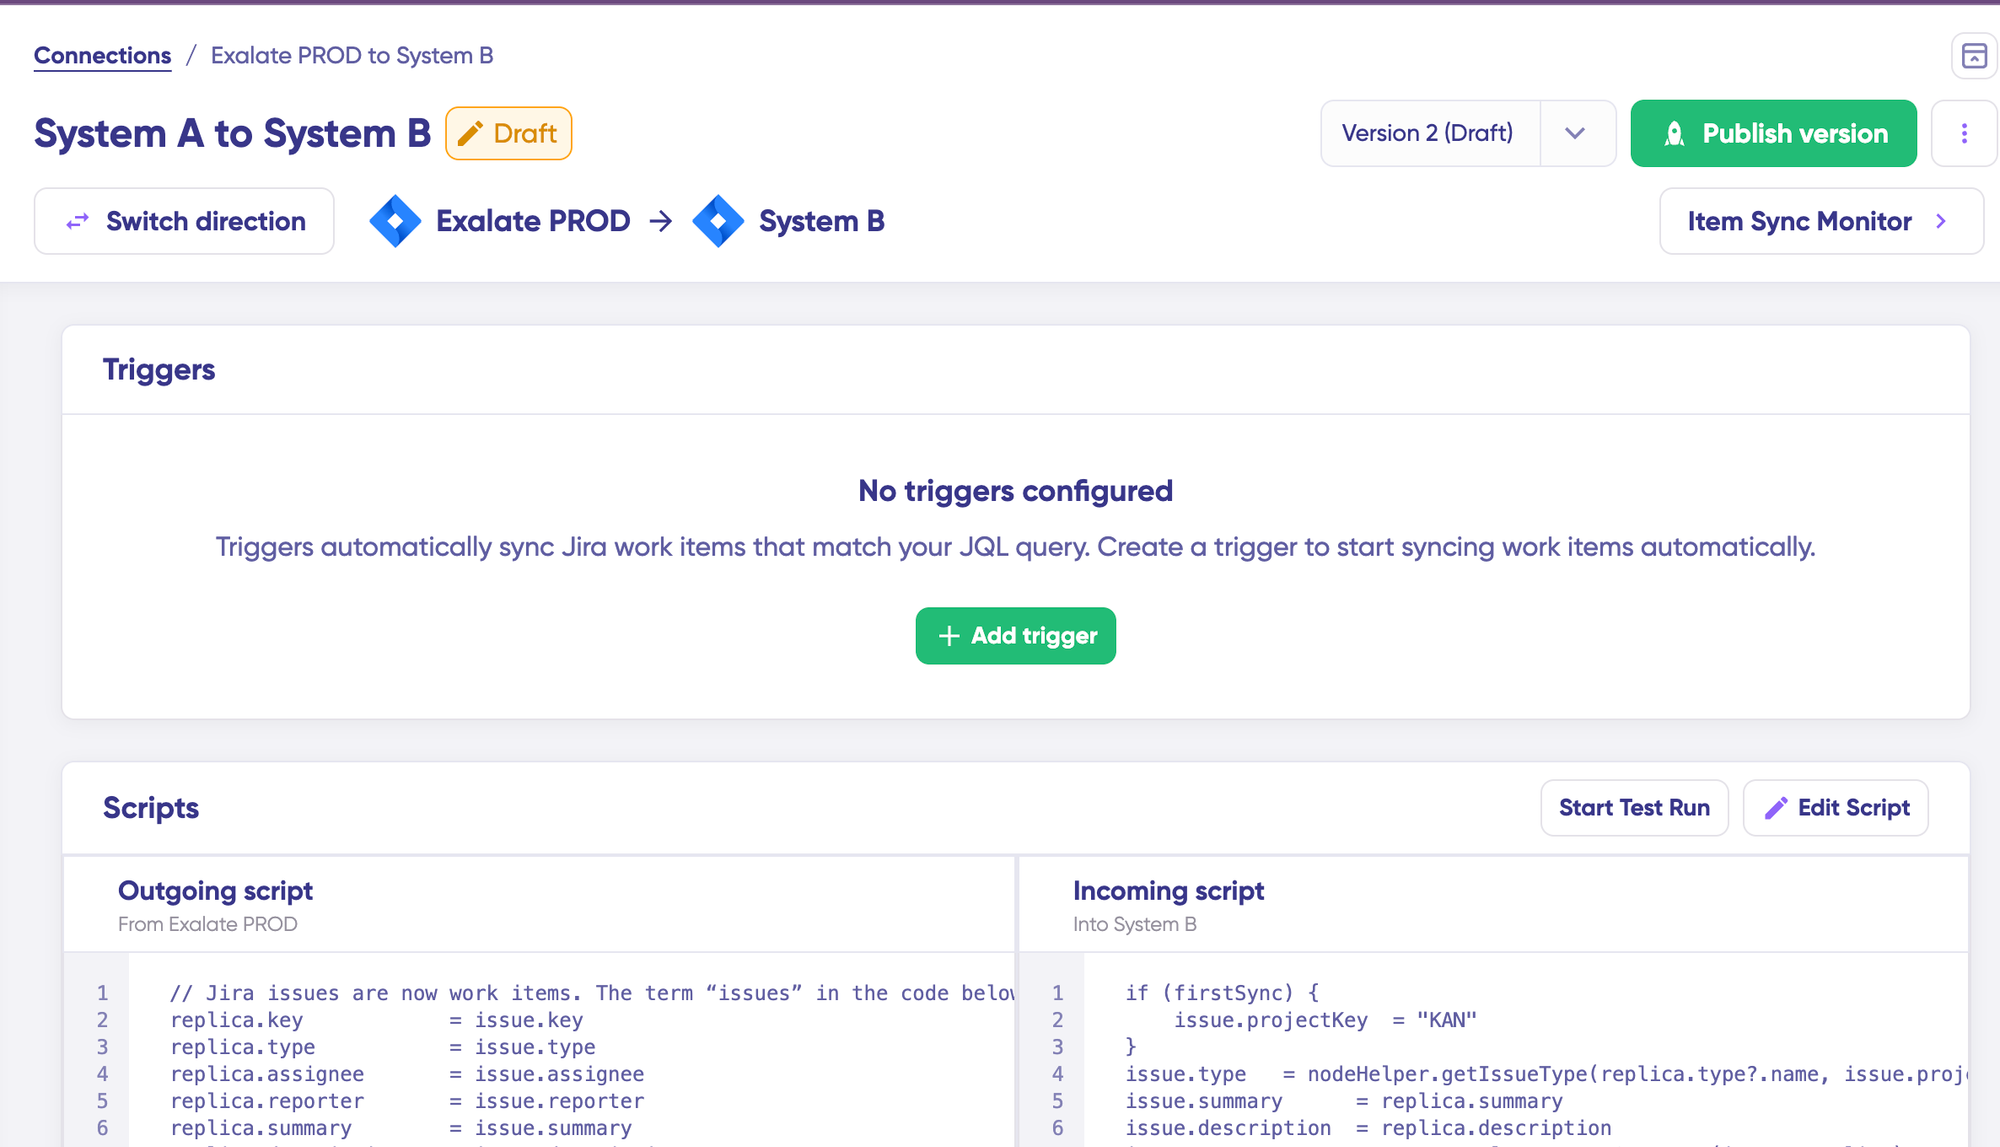
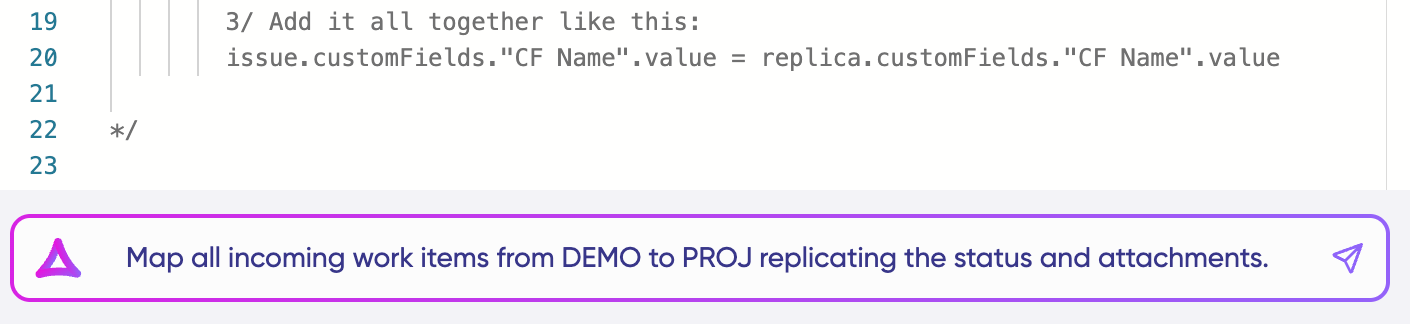
Click the “Edit Script” button to access the configuration editor and modify sync rules. Sync rules use Groovy-based scripting. These scripts enable custom data logic, field mapping, and conditional workflows, allowing you to handle complex business requirements and unique integration scenarios.
Change the synchronization direction by clicking the Switch direction button next to the connection name.
Scripts are organized into incoming and outgoing sections. If the sync direction flows from Salesforce A to Salesforce B, the outgoing script defines which values are sent from Org A to Org B, while the incoming script determines how those values are mapped in Org B. These scripts reverse when you change direction.
To synchronize new fields, add them to the sync script directly (if you’re comfortable with scripting). To prevent specific data from syncing, remove that script line from the outgoing script.
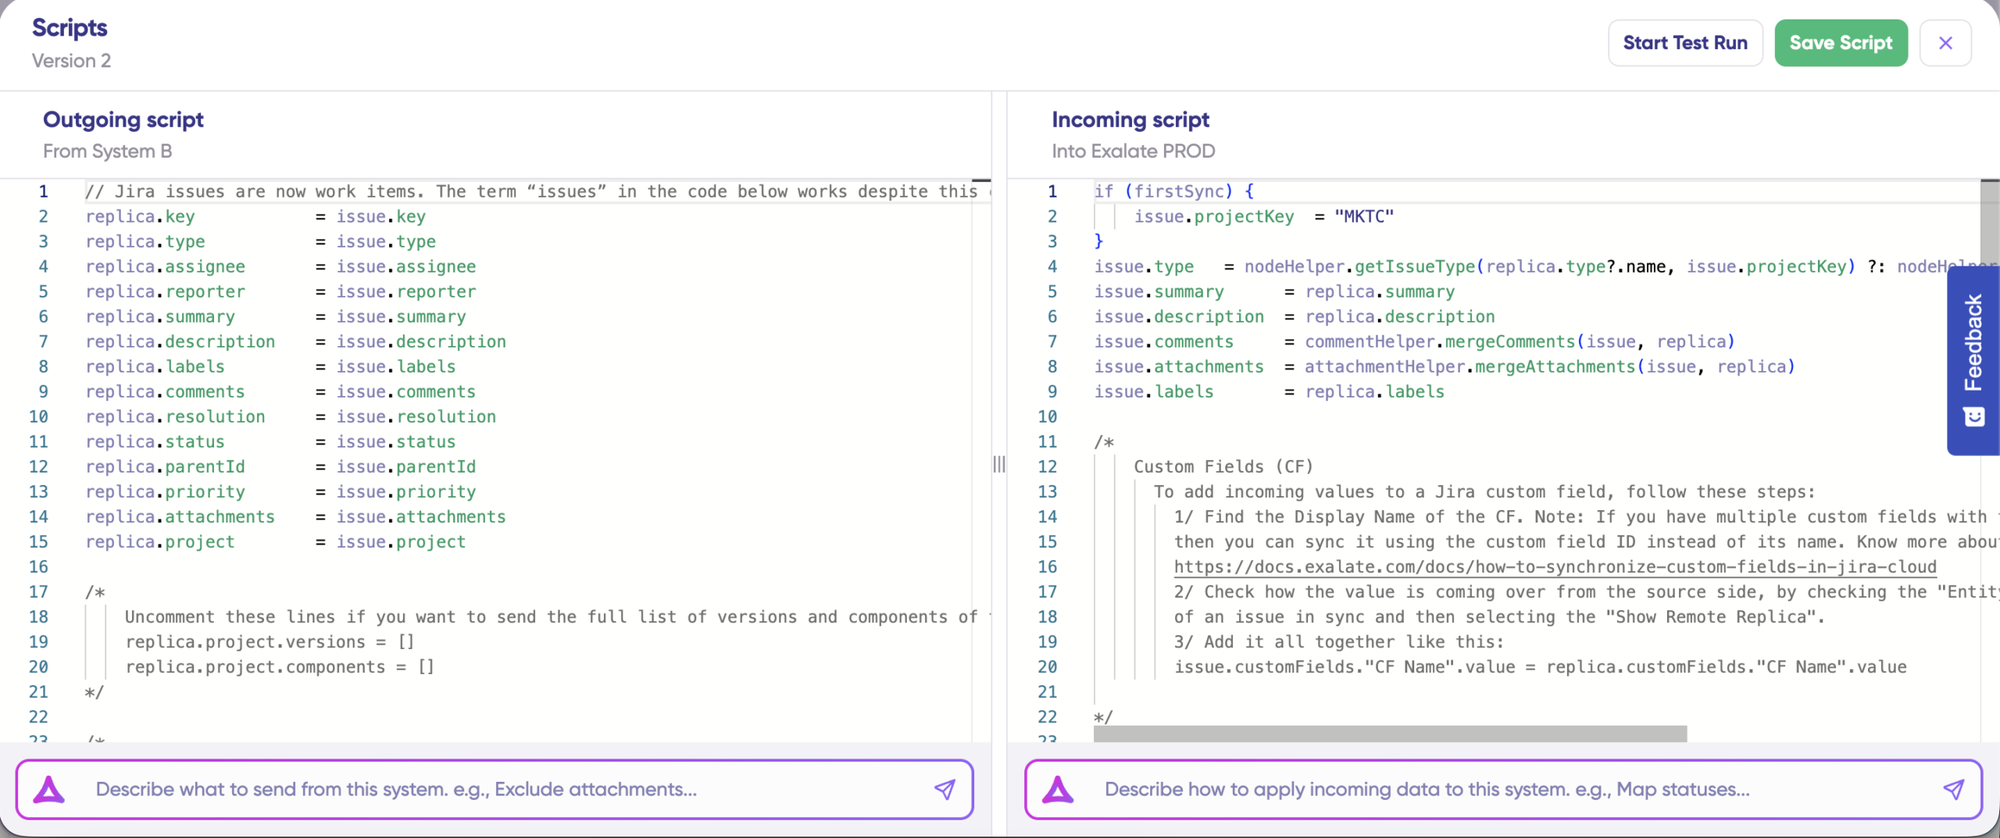
- Use Aida for AI-Assisted Configuration
If you want to save time and avoid scripting complexities (especially useful for business users), leverage Exalate’s AI-assisted configuration feature called Aida to generate your sync scripts.
Aida is available in both incoming and outgoing script sections, so select the appropriate side based on your needs. Outgoing and incoming scripts operate independently, as does Aida, so maintain separate context and direction for each prompt.
Aida assists you in two ways:
For Outgoing scripts: Describe what data should leave your Salesforce instance. For example, “Only sync Opportunities with Amount greater than $10,000.”
For Incoming scripts: Describe how incoming data should be applied to your Salesforce instance. For example, “Map Account Owner to the Contact Owner” or “Set a default Lead Status if the status doesn’t exist.“
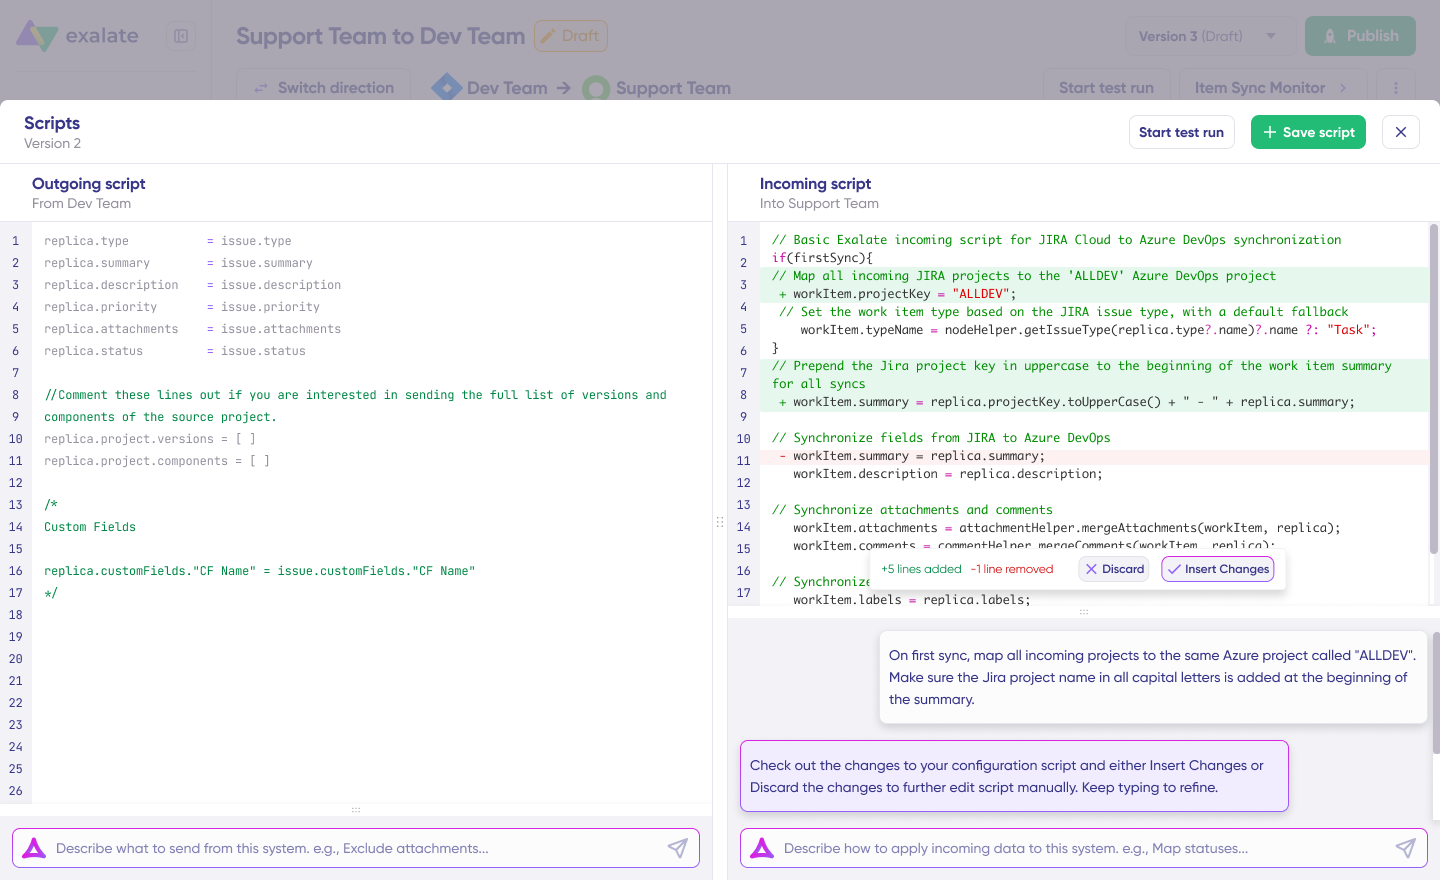
Based on Exalate’s scripting API and your existing configuration, Aida generates functional Groovy scripts with proper field mappings.
Once Aida completes your script, review the suggested changes. Green highlights indicate new lines to be added. Red highlights show lines to be removed. You can choose to “Insert” or “Discard” Aida’s suggestions.
Note: Aida is a powerful tool, but like any AI assistant, always review the generated code before applying it to production.
- TestRun: Validate Before Going Live
Once your sync scripts are ready, you can either “Save script” or validate them using the “Start Test Run” option.

To test your configuration, “Select Items” you want to apply synchronization to. You can select multiple Salesforce records. After selection, click “Start Test Run”.
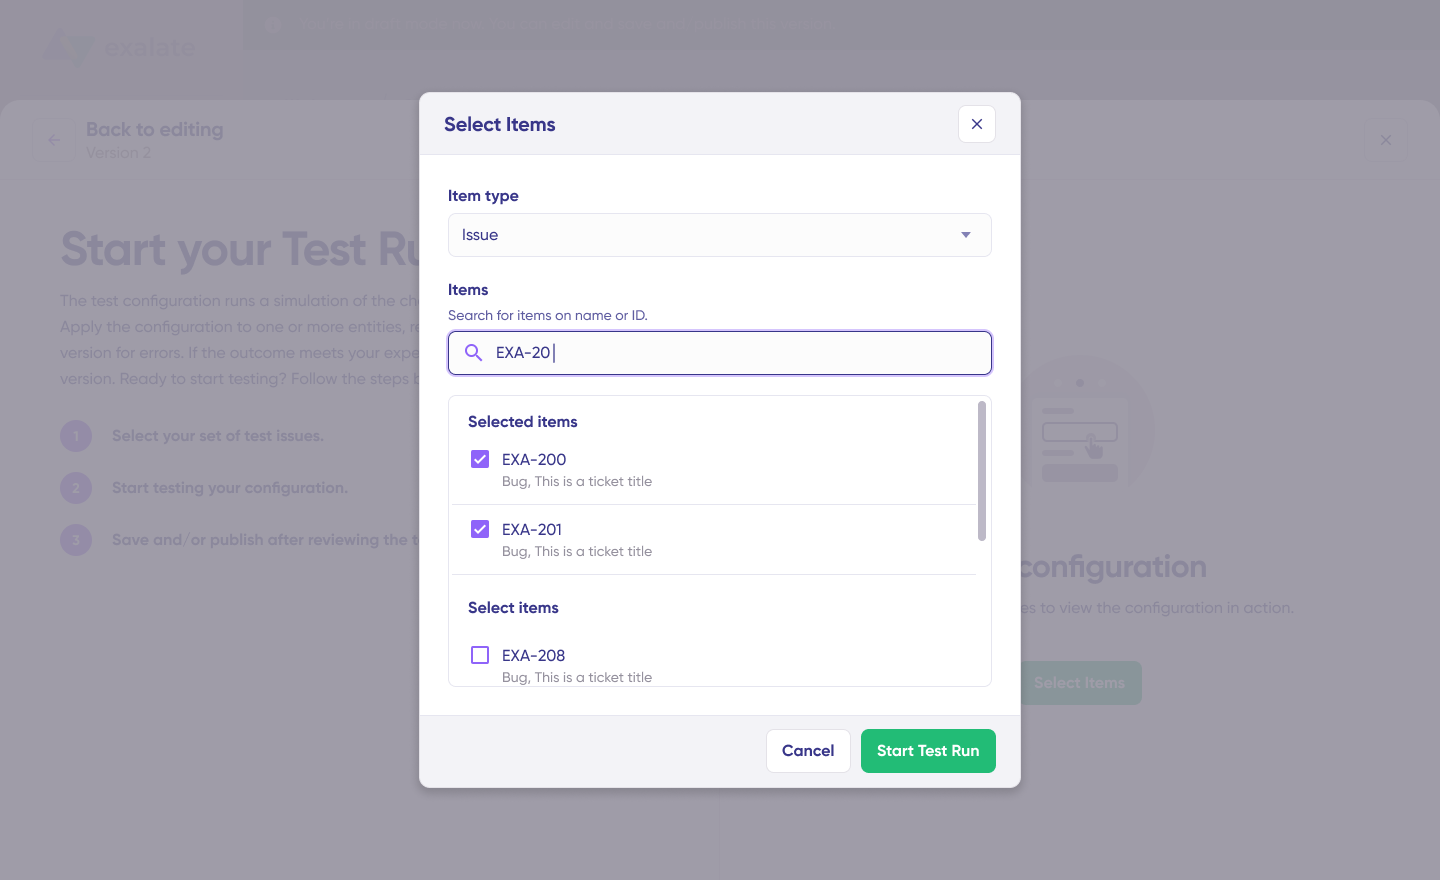
You’ll now see all incoming and outgoing replicas for each selected record. Review them in their respective tabs. Preview how the sync configuration will be applied to your records, examine the replica structure, and verify that field mappings appear correct.
If adjustments are needed, return to the editor, modify the scripts, and test again. Deploy only when you’re confident the configuration performs as expected. This validation step prevents errors from impacting production data.
- Publish Your Configuration
When everything meets your requirements, click “Publish Version” to apply your updated configuration to live synchronization. All versions for a connection are accessible in the “Version” dropdown.
- Configure Automatic Triggers
To enable automatic synchronization, configure “Triggers“—conditions or filters applied to specific records.
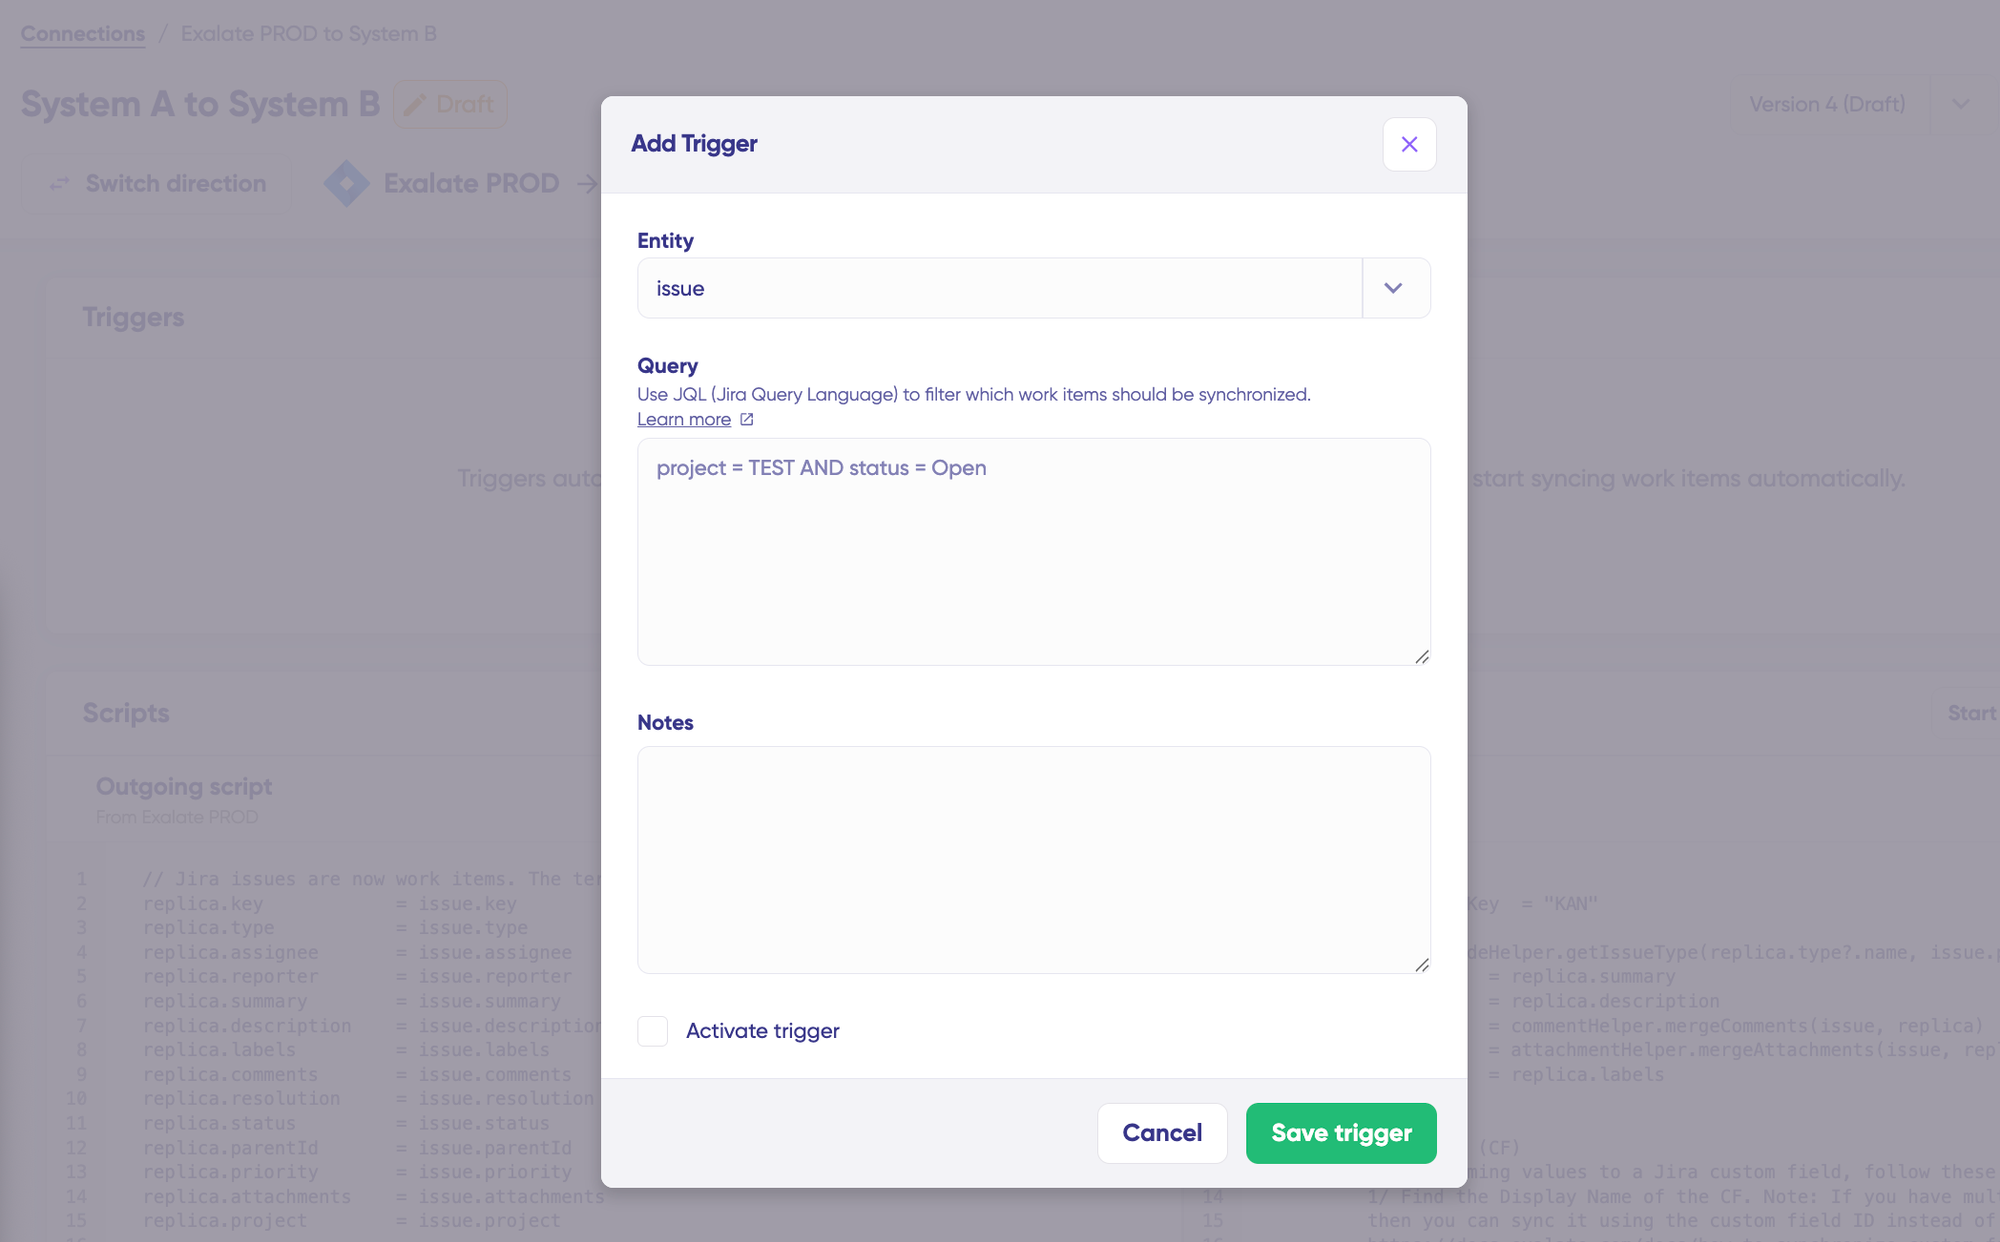
Click the “+Add trigger” button to create triggers. Exalate triggers are platform-specific. For Salesforce, you can use SOQL-style filters to specify conditions for Accounts, Opportunities, Cases, Leads, or custom objects.
StageName= 'Proposal'
This trigger will sync only Opportunities that have reached the proposal stage with your organization.
Save your changes by clicking on “Save Trigger“.
- Troubleshooting with Aida
Aida provides intelligent troubleshooting assistance to resolve errors faster. It offers clear, context-aware suggestions directly where errors appear.
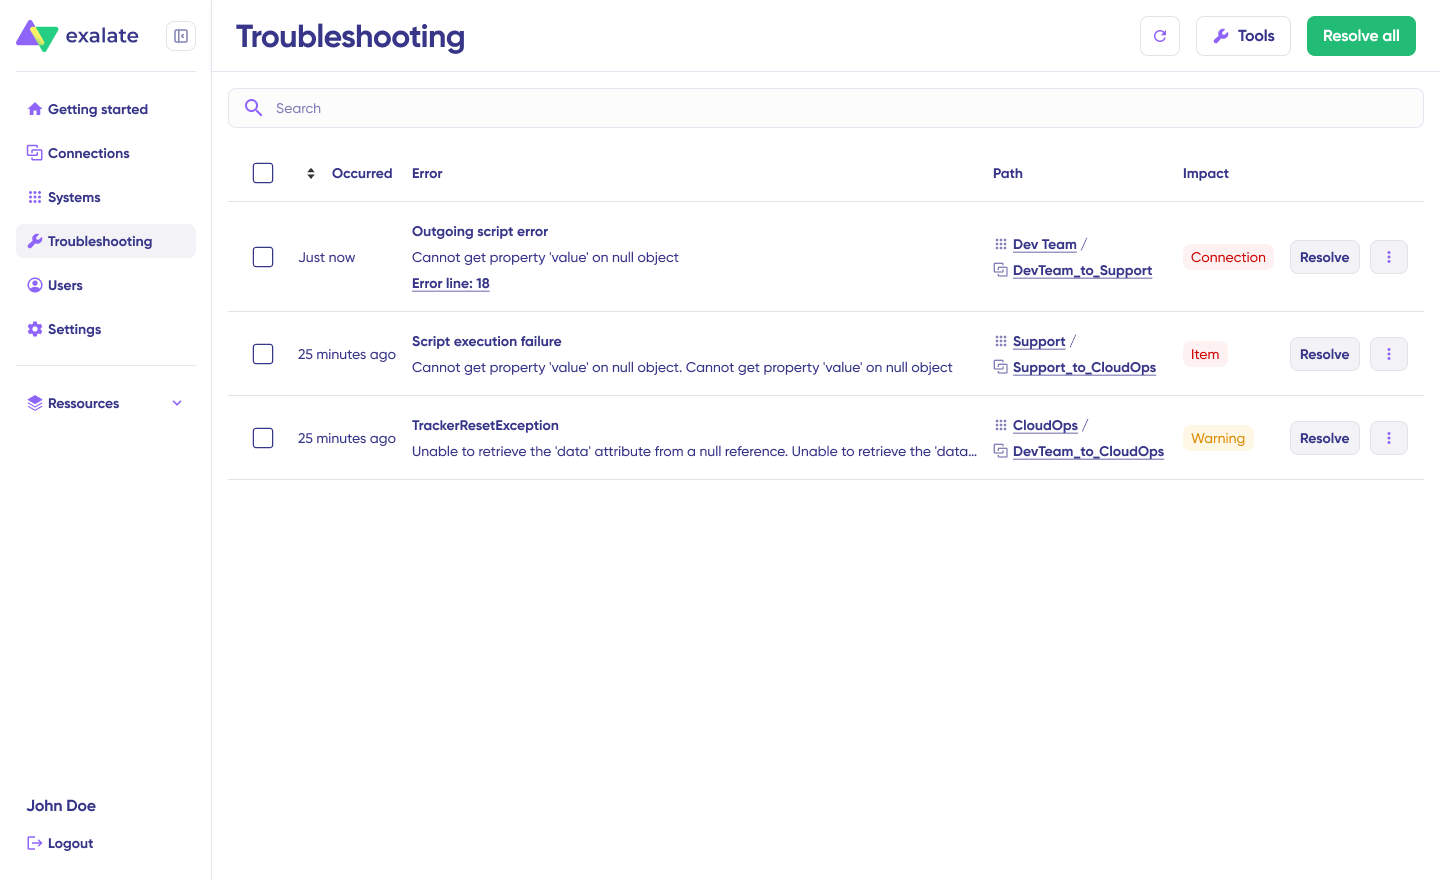
When errors occur, navigate to the “Troubleshooting” tab. Hover over the error you want to diagnose and click the Aida icon that appears. An AI-generated suggestion will display in a modal window, including a concise explanation of the error and a proposed resolution.
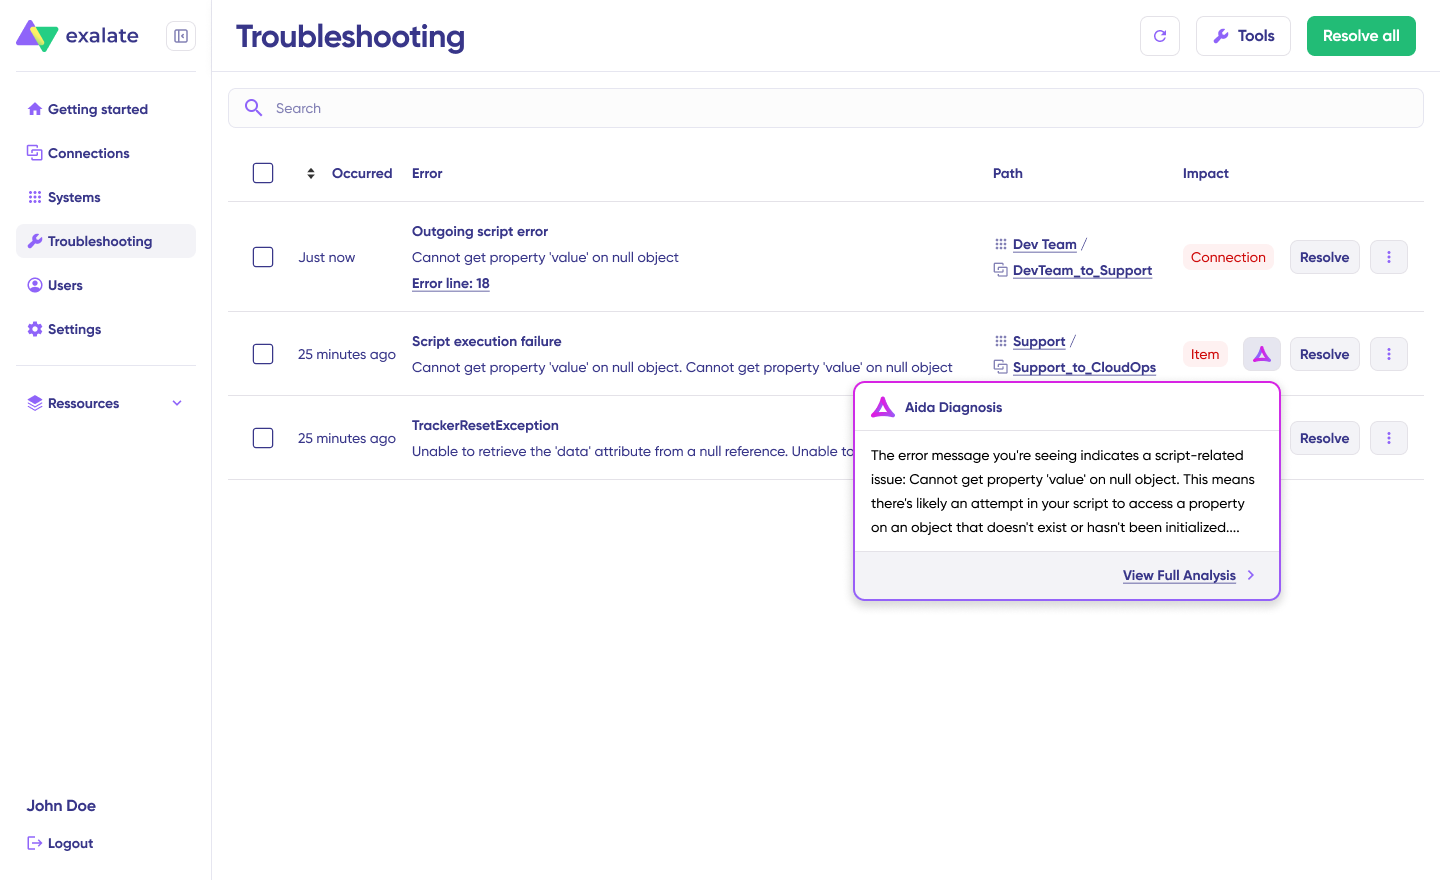
Select “View Full Analysis” for additional context. You can also access “Error details” to copy the stack trace and view “Replicas” in JSON format if needed.
Choose to “Resolve” and retry failed synchronizations.
Common Use Cases for Salesforce Integrations
Let’s explore practical integration scenarios in the form of patterns that organizations commonly need.
Use Case 1: Migrate Customer Data from External Systems to Salesforce
Challenge: Organizations often have customer information scattered across legacy CRM systems, spreadsheets, or acquired company databases that need consolidation into Salesforce.
Solution: Plan the scope of migration, define mapping rules, and carry out the actual exchange of data using an integration platform that handles data transformation and validation.
Real-World Application: A financial services company completing an acquisition needs to migrate 500,000 customer records from the acquired company’s legacy CRM into their Salesforce instance. Using a third-party integration tool, they map fields between systems, handle data deduplication, and execute the migration over a weekend with automated validation checks. This is also applicable for Salesforce to Salesforce integration scenarios.
Use Case 2: Transfer Customer Information between Salesforce and Other Systems (One to Many)
Challenge: Sales teams track customer information in Salesforce as Opportunities, Cases, or Accounts, but this information needs to flow to multiple downstream systems used by different departments.
Solution: Create bidirectional syncs that automatically push relevant Salesforce data to connected systems and pull updates back, maintaining a single source of truth.
Real-World Application: A SaaS company’s sales team closes a deal in Salesforce. The integration automatically creates a work item in Jira for the implementation team, generates a ServiceNow ticket for the onboarding specialist, and updates the Azure DevOps backlog for feature requests mentioned during the sales process. When the dev team updates status in their system, those changes sync back to Salesforce so sales can communicate progress to the customer.
Use Case 3: Present Multiple Related Salesforce Objects into External Systems (Many to One)
Challenge: Salesforce has related objects like Cases belonging to a particular Account or Contact. These relationships need to be preserved when syncing to external systems that have different data models.
Solution: Sync multiple related Salesforce objects to Jira or other systems while maintaining the hierarchical relationships through custom field mappings.
Real-World Application: A telecommunications company needs to sync customer support cases from Salesforce to their development team’s Jira instance. Each Case includes related Account information (company size, contract tier) and Contact details (technical contact, billing contact). The integration maps these related objects to custom fields in Jira, so developers can see the full customer context without logging into Salesforce. When the Account’s contract tier changes, all related work items in Jira automatically update.
Use Case 4: Sync Salesforce Records to Development Teams
Challenge: Customer queries, feedback, or reported bugs logged in Salesforce Cases need to reach development teams working in Jira, GitHub, Azure DevOps, or ServiceNow so they can act on customer insights.
Solution: Create workflow-based integrations that automatically convert Cases meeting specific criteria into work items in development systems, with bidirectional status syncing.
Real-World Application: A healthcare software company receives a critical bug report through their Salesforce support portal. The Case, marked as ‘Critical’ and belonging to an Enterprise Account, automatically creates an Azure DevOps work item with ‘Priority 1’ status. As the development team moves through their workflow (In Progress → Code Review → Testing → Done), each status change syncs back to Salesforce. When the work item is marked ‘Done’ with a release note, the Salesforce Case is updated to ‘Resolved’ with the comment: “Fix included in version 4.2.1 – releasing next Tuesday.” The support agent can immediately inform the customer without checking Azure DevOps.
Use Case 5: Correlate Data between Salesforce and External Systems
Challenge: A one-to-one connection between entities in Salesforce and other systems is needed to maintain data consistency and provide cross-functional visibility.
Solution: Establish bidirectional syncs that link specific record types across systems, keeping custom fields, statuses, and updates synchronized.
Real-World Application: A managed services provider uses ServiceNow for ITSM and Salesforce for customer management. When a ServiceNow incident is opened for a customer, it links to the corresponding Salesforce Account. Work notes, resolution times, and SLA metrics sync to Salesforce, giving account managers visibility into service quality. When a customer’s support tier changes in Salesforce, the ServiceNow incident priority rules update automatically.
Use Case 6: Cross-Company Collaboration with Partners and Vendors
Challenge: Organizations need to share selected customer data with external partners, MSPs, or vendors while maintaining control over what information leaves their system.
Solution: Implement integrations that allow granular control over which fields sync outbound versus inbound, with each party maintaining independent configuration.
Real-World Application: A software vendor partners with system integrators who implement their product. When a Salesforce Opportunity reaches the “Implementation” stage, relevant details sync to the partner’s Jira instance as a new project. The vendor controls what the partner sees (project scope, timeline, customer contact) while the partner controls what syncs back (implementation progress, hours logged, blockers). Each side maintains full control over their own sync rules, meeting both parties’ security and compliance requirements.
Use Case 7: Multi-Platform Support Escalation
Challenge: Support tickets may start in one system (like Zendesk or Freshdesk) but need escalation to engineering teams using different tools, with full context preserved throughout the lifecycle.
Solution: Create escalation workflows that move tickets across platforms while maintaining conversation history, attachments, and customer context.
Real-World Application: A fintech company’s L1 support team uses Zendesk. When a ticket requires engineering investigation, it escalates to Jira with all conversation history, attachments, and customer account details from Salesforce. The engineer resolves the technical work item, and the resolution flows back through Zendesk to the customer. Throughout this journey, the Salesforce Account record maintains visibility into ticket status, SLA compliance, and customer satisfaction scores.
Native Salesforce Integrations
Salesforce categorizes integrations through ‘Inbound’ and ‘Outbound’ messages. Inbound implies data coming into Salesforce from another system, and outbound means data leaving Salesforce and being fed into an external system.
Inbound integrations work on data-based connections. Generally used when Java, .Net, or PHP code needs to interact with Salesforce. The external system (acting as a client) prepares and submits a request to fetch data from Salesforce (acting as a server). The data is fetched, a response is generated, and the client handles this response.
Outbound integrations work on business logic integration. Here, Salesforce prepares and submits a request to an external system. The external system receives the request, sends an acknowledgment, processes the request, and provides a callback with the result.
For Inbound Salesforce integrations:
- REST API
- SOAP API
- Bulk API
- Salesforce Connect
For Outbound Salesforce integrations:
- Apex callouts
- Streaming API
- Apex Web Services
Challenges of Native Salesforce Integrations
Salesforce Connect works best for Salesforce-to-Salesforce integrations. The external objects viewed within Salesforce are read-only, and additional configuration efforts are required to make them editable. Since it’s a point-and-click interface, integrations are bound by native UI capabilities.
Apex is an alternative if deeper integrations are required, but it’s neither designed nor optimal for providing integration capabilities. To perform integration using Apex, you need technical resources, which might not be readily available. It’s also bound by governor limits.
Other limitations include restricted data durability, limited security mechanisms, and constrained read/write capabilities.
You can build custom apps using the Salesforce App Cloud platform, but it requires additional development effort with no guarantee that most integration scenarios will be covered. They also sometimes require middleware applications from AppExchange.
Third-Party Salesforce Integrations
The best alternative is to leverage the breadth of apps that Salesforce has to offer on AppExchange. These solutions provide ready-made integrations to get you up and running and support many different deployments and pricing models.
Salesforce Integration Tools: Native and Third-Party Options
Here are the leading solutions for connecting Salesforce to your tech stack:
Native/Built-in Options:
- Salesforce Connect: Displays external data as if stored in Salesforce. Best for read-heavy scenarios and Salesforce-to-Salesforce connections.
- MuleSoft Anypoint: Salesforce’s enterprise integration platform for complex, large-scale API management and orchestration.
- Salesforce Flow: Built-in automation for simple, trigger-based integrations within the Salesforce ecosystem.
Third-Party Integration Platforms:
| Tool | Best For | Key Strength |
| Exalate | Deep bidirectional syncs with Jira, ServiceNow, Azure DevOps, Zendesk, GitHub, Freshdesk, Freshservice, Asana | AI-assisted configuration (Aida), full scripting control, enterprise security |
| Zapier | No-code workflows with 5,000+ apps | Quick setup for simple automations |
| Workato | Enterprise workflow automation | IT, marketing, and finance process automation |
| Dell Boomi | Connecting modern apps with legacy systems | Hybrid integration (cloud + on-premise) |
| Jitterbit Harmony | Mid-market integration needs | Pre-built templates and visual workflow builder |
| Celigo | E-commerce and ERP integrations | NetSuite and Shopify specialization |
| Tray.io | Developer-friendly automation | Flexible API connectors with visual builder |
Specialized Connectors:
- DocuSign: E-signature integration for contracts directly from Salesforce
- Mailchimp: Email marketing with bidirectional contact syncing
- Slack: Real-time notifications and record sharing (Salesforce-owned)
- LinkedIn Sales Navigator: Lead enrichment and prospecting insights
When evaluating options, consider whether you need simple point-to-point connections (Zapier works well) or complex, bidirectional enterprise integrations (where Exalate or MuleSoft excel).
Features to Consider When Choosing a Salesforce Integration
Selecting the right integration solution requires evaluating several factors:
Security and Compliance
When two systems exchange data, security becomes paramount. Look for solutions that offer:
- ISO 27001 certification for information security management
- Role-based access control so users only see and sync data relevant to their function
- Encryption of data both in transit and at rest
- Token-based authentication using secure protocols like JWT
- HTTPS enforcement for all API communications
For enterprise deployments, verify the vendor’s security posture through their trust center and request their security whitepaper. Exalate, for example, maintains comprehensive security documentation. Visit the Trust Center for detailed compliance information.
Flexibility and Customization
Your integration needs will evolve as your business grows. Consider:
- Scripting capabilities: Can you customize data transformations beyond pre-built mappings?
- Conditional logic: Can you set rules for when and what data syncs?
- Field-level control: Can you map any field type, including custom fields and related objects?
- AI-assisted configuration: Tools like Exalate’s Aida can generate sync scripts through natural language, reducing the technical barrier while maintaining flexibility.
Independent Control
Each side of an integration should be able to control their own sync rules independently. This means you can decide:
- What information to send out
- What information to receive
- How incoming data maps to your system’s fields
This approach ensures each team maintains autonomy over their data and processes without requiring constant coordination with the other party.
Reliability and Error Handling
Integrations must handle real-world conditions like network outages and API rate limits:
- Automated retry mechanisms that recover from temporary failures
- Queue management that applies changes in the correct order after downtime
- Rate limit handling that respects API quotas without losing data
- Error notifications that alert administrators to issues requiring attention
Platform Coverage
Evaluate how many systems you need to connect now and in the future:
- Current needs: Jira, Azure DevOps, ServiceNow, Zendesk, GitHub
- Potential future: Freshdesk, Freshservice, Asana, Azure DevOps Server, custom applications
- Same-platform: Salesforce-to-Salesforce scenarios for multi-org enterprises
A solution like Exalate supports diverse platforms, including Jira, Azure DevOps, ServiceNow, Zendesk, GitHub, Salesforce, Freshdesk, Freshservice, and Asana, making it suitable for organizations with complex, evolving integration requirements.
Total Cost of Ownership
Look beyond subscription pricing:
- Implementation effort and timeline
- Ongoing maintenance requirements
- Training and onboarding needs
- Scalability as sync volumes grow
Sync Panel
Exalate also comes with a Chrome extension called Sync Panel that lets users check sync status, spot errors, trigger manual syncs, and unlink sync pairs straight from the browser, without opening the console.
It’s useful for two groups: admins who want to keep an eye on sync status without switching tabs and end users who want to confirm that the remote side received their update.
You can access this feature via the browser. But if you want to check the sync queue status or configure your sync, you still need to log into the Exalate console.

Calculate time and money savings from automated bidirectional sync.
Why Exalate is a Reliable Salesforce Integration
Exalate allows deeper integrations with the help of scripts and pre-made connectors.
- Independent control at each end: Each integrating side has complete, independent control over incoming and outgoing information. Exalate achieves this with the help of an AI-powered scripting engine with sync rules that can be configured at either end.
- AI-assisted configuration with Aida: The scripting engine offers flexible, deep integrations powered by machine learning. Aida helps generate sync scripts through natural language prompts, making advanced integrations accessible to both technical and non-technical users.
- Enterprise-grade security: Exalate uses JWT-based token mechanisms, HTTPS, and provides role-based access control. It maintains ISO 27001 certification with encryption of data both in transit and at rest. Full details are available in the security and architecture whitepaper.
- Broad platform support: Connect Salesforce with Jira, Zendesk, Azure DevOps, Azure DevOps Server, GitHub, ServiceNow, Freshdesk, Freshservice, Asana, and more. Set up Jira Salesforce integration or same-platform connections like Salesforce to Salesforce integration.
- Built-in reliability: An integrated retry mechanism automatically applies changes in the correct order after downtimes or system failures.
- Full scripting control: Maintain complete operational control over your sync side, allowing you to customize exactly what data flows in and out of your Salesforce instance.
Conclusion
Salesforce integrations connect your CRM with the tools your teams already use, whether that’s Jira for development, ServiceNow for IT operations, Zendesk for support, or Azure DevOps for engineering.
We covered what Salesforce integrations are, their benefits, and explored practical use cases from data migration to cross-company collaboration. Native options like REST API and Salesforce Connect work for basic scenarios, but third-party solutions like Exalate provide the flexibility, security, and reliability needed for enterprise integrations.
When evaluating solutions, prioritize security (ISO 27001, encryption, role-based access), flexibility (scripting capabilities, AI-assisted configuration), and platform coverage that matches your current and future needs.
Frequently Asked Questions
What applications integrate with Salesforce?
You can integrate Salesforce with work management platforms (Jira, Azure DevOps, Asana), IT service management tools (ServiceNow, Freshservice), customer support systems (Zendesk, Freshdesk), development platforms (GitHub), communication tools (Slack, Microsoft Teams), marketing platforms (Mailchimp, HubSpot), and many more. Exalate supports connections between Salesforce and Jira, GitHub, Azure DevOps, ServiceNow, Zendesk, Freshdesk, Freshservice, and Asana.
What is the advantage of Salesforce integration?
Salesforce integration provides streamlined data flow, information consistency, and reduced manual data entry. Integration enhances productivity by automating processes and providing a unified view of customer data across teams. It improves customer experience by enabling personalized interactions based on complete, synchronized information available to sales, support, and success teams.
How do I choose the correct Salesforce integration solution?
Consider these factors: security and compliance requirements (ISO 27001 certification, encryption, role-based access), flexibility for advanced use cases (scripting capabilities, AI-assisted configuration), reliability (automated retry mechanisms, error handling), platform coverage (current and future systems you need to connect), and total cost of ownership (implementation, maintenance, scaling costs). Create an assessment matrix comparing solutions against your specific requirements.
What is the REST API in Salesforce?
The REST API is a web interface allowing external applications to access Salesforce data. Through the REST API, you can interact with Salesforce by sending HTTP requests to specific endpoints. These requests enable you to create, modify, search, and retrieve various types of information. Integrating Salesforce using REST APIs requires technical resources to implement. An external integration vendor like Exalate can ensure a hassle-free implementation with pre-built connectors.
What happens to synced data if the integration goes down?
Reliable integration platforms include automated retry mechanisms. When connectivity is restored, queued changes are applied in the correct order of their initiation. This ensures no data is lost during temporary outages and that records remain consistent across systems once the connection recovers.
Is my data secure during Salesforce integrations?
Security depends on the integration solution you choose. Look for: ISO certification, encryption of data in transit (HTTPS/TLS) and at rest, role-based access control limiting who can configure and view synced data, token-based authentication (JWT), and comprehensive audit logging. Exalate maintains these security standards and publishes detailed information in its Trust Center.
Can I control what data syncs between Salesforce and other systems?
With solutions like Exalate, each side of the integration maintains independent control over sync rules. You can specify exactly which fields to send, which to receive, and how incoming data maps to your system. This granular control is especially important for cross-company integrations where each party has different security and compliance requirements.
What’s the difference between native Salesforce integrations and third-party solutions?
Native integrations (REST API, Salesforce Connect, Apex) are built into the platform but have limitations around flexibility, require technical expertise, and are bound by governor limits. Third-party solutions like Exalate, Zapier, or MuleSoft provide pre-built connectors, advanced customization options, and dedicated support for complex enterprise scenarios. Third-party tools are typically better suited for bidirectional syncs with non-Salesforce systems.
Recommended Reads:
- Salesforce Third-Party Integration: Set up a Bidirectional Sync between Salesforce and Other Tools
- Jira Salesforce Integration: How to Set up a Two-Way Sync between Different Teams
- Salesforce to Salesforce Integration: Sync Multiple Salesforce Instances Bidirectionally
- How to Set up an Azure DevOps Salesforce Integration
- How to Set up a Salesforce ServiceNow Integration
- GitHub Salesforce Integration: How to Set up a Sync in 6 Steps
- Salesforce Zendesk Integration (Step-by-Step Guide)
- How to Sync Multiple Related Salesforce Objects (Contact & Account Linked to a Case) to Jira