
Many teams use Jira for project management while developers work in Azure DevOps. When these systems don’t talk to each other, teams waste time manually updating both platforms, work gets duplicated, and critical updates slip through the cracks.
Integrating Jira with Azure DevOps eliminates these bottlenecks. Your support team can log work in Jira while developers track progress in Azure DevOps—with changes flowing automatically between both systems in real-time.
This guide walks you through connecting Jira and Azure DevOps using Exalate, covering everything from prerequisites to real-world implementation.
Note: Jira now refers to issues as work items. Throughout this guide, we use the updated terminology to reflect current Jira naming conventions.
Key Takeaways
- Developers, QA, and customer support teams can collaborate better with Jira to Azure DevOps integration.
- Exalate enables real-time bidirectional sync between Jira and Azure DevOps through AI-assisted configuration.
- The integration maintains autonomy for both teams while ensuring consistent data across platforms.
- Security features include ISO certification, role-based access control, and end-to-end encryption.
- The full scripting control allows customization for complex enterprise workflows.

Key Features to Consider When Choosing a Jira to Azure DevOps Integration
- Bidirectional vs. one-way sync: Determine whether you need changes to flow both ways or just in one direction. Support tickets might only need to go from Jira to Azure DevOps, while development work requires full bidirectional sync.
- Field-level control and mapping: Control exactly what syncs at a granular level. Script-based integration tools like Exalate let you map individual fields, apply transformations (like converting Jira priorities to Azure DevOps severity levels), and implement conditional logic for any data accessible through REST APIs.
- Trigger customization: Define when syncs occur using platform-native query languages. Automatically prompt the system to create work items only when specific conditions are met.
- AI-assisted configuration: Describe your requirements in plain language instead of writing complex scripts. Use an AI Assistant to translate natural language prompts into working sync scripts, dramatically reducing setup time.
- Encryption and certifications: Ensure data is encrypted in transit (TLS 1.2/1.3) and at rest. ISO 27001 certification indicates the solution meets international security standards for enterprise requirements.
- Automatic error recovery: Network issues and temporary downtime cause sync failures. Your integration should automatically retry failed syncs from the point of interruption without losing data.
- Multi-instance support: Connect multiple Jira instances to multiple Azure DevOps organizations, essential for MSPs, enterprises with multiple business units, or complex tool landscapes.
- Performance at scale: Ensure the solution handles your expected load, whether that’s 10 or 10,000 work items. Look for intelligent API rate limit management and caching to maintain performance as volume grows.
- Additional platform connections: If you use other tools beyond Jira and Azure DevOps, choose a solution that connects them. Exalate supports Freshservice, Freshdesk, Asana, ServiceNow, Zendesk, Salesforce, GitHub, and more.
- Sync Panel: Exalate also gives you a Chrome extension called Sync Panel for checking sync status, finding errors, running manual syncs, and unlinking sync pairs straight from the browser, no console needed.
Your choice should align with your specific requirements. If you only need basic development visibility (branches, commits, PRs) without work item sync, the native Azure DevOps for Jira app might suffice.
Exalate stands out by combining AI-assisted configuration with unlimited scripting flexibility, enterprise-grade security with operational autonomy, and proven reliability with automatic error recovery.
Exalate vs. Native Azure DevOps Integration
The official Azure DevOps for Jira app provides basic development visibility, showing commits, branches, and deployments in Jira. However, it’s designed for one-way information display rather than work item synchronization.
Native Azure DevOps for Jira:
- Shows development activity in Jira (branches, commits, PRs)
- Displays deployment status
- Limited to development visibility
- No bidirectional work item sync
- Cannot sync custom fields or complex data
- Requires work item keys in commit messages
Exalate:
- Full bidirectional sync of work items and all fields
- AI-assisted configuration for all scenarios
- Custom field mapping and transformations
- Conditional sync rules and triggers
- Supports Azure DevOps Cloud and Server
- Supports Jira software, Jira Service Management, and Jira Work Management
- Enterprise-grade security with full operational control
- Connects multiple Jira and Azure DevOps instances
- Integration with additional platforms (Freshservice, Freshdesk, Asana, ServiceNow, Salesforce)
For teams that need actual work item synchronization, Exalate provides the flexibility and control required for enterprise scenarios.
What Data Can You Sync Between Jira and Azure DevOps?
Exalate gives you complete control over what syncs and how.
From Jira to Azure DevOps:
- Work item types (bugs, stories, tasks, epics)
- Summaries and descriptions
- Comments and internal notes
- Attachments and documents
- Assignees and reporters
- Labels and tags
- Priorities and due dates
- Work logs and time tracking
- Custom fields (text, select lists, dates, numbers)
- Components and versions
- Work item links and hierarchies
- Sprint information
- Organizations and teams
From Azure DevOps to Jira:
- Work item types (user stories, tasks, bugs)
- Titles and descriptions
- States and workflows
- Comments and discussions
- Attachments
- Area paths and iteration paths
- Tags
- Priorities
- Custom fields
- Parent-child relationships
- Team assignments
- Build information
- Pull request status
- Deployment data
You can also sync priority and picklists. Check out the comprehensive list of Jira fields that Exalate supports, as well as work item fields available for Azure DevOps integration.
With Exalate’s scripting capabilities, you can implement complex transformations, conditional logic, and custom mappings for any field type.
Advanced Configuration Options For Exalate
- Conditional sync rules: Sync only specific work item types, or trigger syncs based on labels, priorities, or custom field values.
- Field transformations: Map Jira priorities to Azure DevOps severity levels with custom logic. Convert date/time formats, concatenate text fields, or split data into multiple target fields.
- Workflow automation: Automatically assign work in Azure DevOps based on Jira assignee mappings. Transition work items through statuses based on pull request approvals or deployment success.
- Hierarchy synchronization: Maintain parent-child relationships between epics, stories, tasks, and subtasks across both platforms. Link related work items automatically based on custom business logic.
- Custom field mapping: Connect unique custom fields between platforms with type conversions and validation. Handle complex field types like cascading select lists, multi-select fields, and formula fields.
- Trigger configuration: Define what events should start a sync, work item creation, status changes, field updates, or custom conditions. Set up different sync behaviors for different work item types or projects.
Full scripting control means you’re not limited to predefined templates. Build sync behavior that matches your exact workflow.
Exalate Integration Pricing
Exalate offers subscription-based plans based on items under sync, designed to scale with your integration needs. Learn more about pricing →
A Step-by-Step Setup Guide For Jira-Azure DevOps Integration With Exalate
Before connecting Jira and Azure DevOps, ensure you have:
For Jira:
- Admin access to your Jira instance
- Appropriate project permissions
For Azure DevOps:
- Admin access to your Azure DevOps organization (Services or Server)
- A Personal Access Token (PAT) with read/write permissions for work items
- Organization or collection-level permissions
You can also watch the step-by-step video to set up an Azure DevOps Jira integration using Exalate.
1. Create Your Exalate Account
Visit the Exalate integrations or the app and create an account using your business email or Google sign-in. If you already have an account, simply log in to access the dashboard.
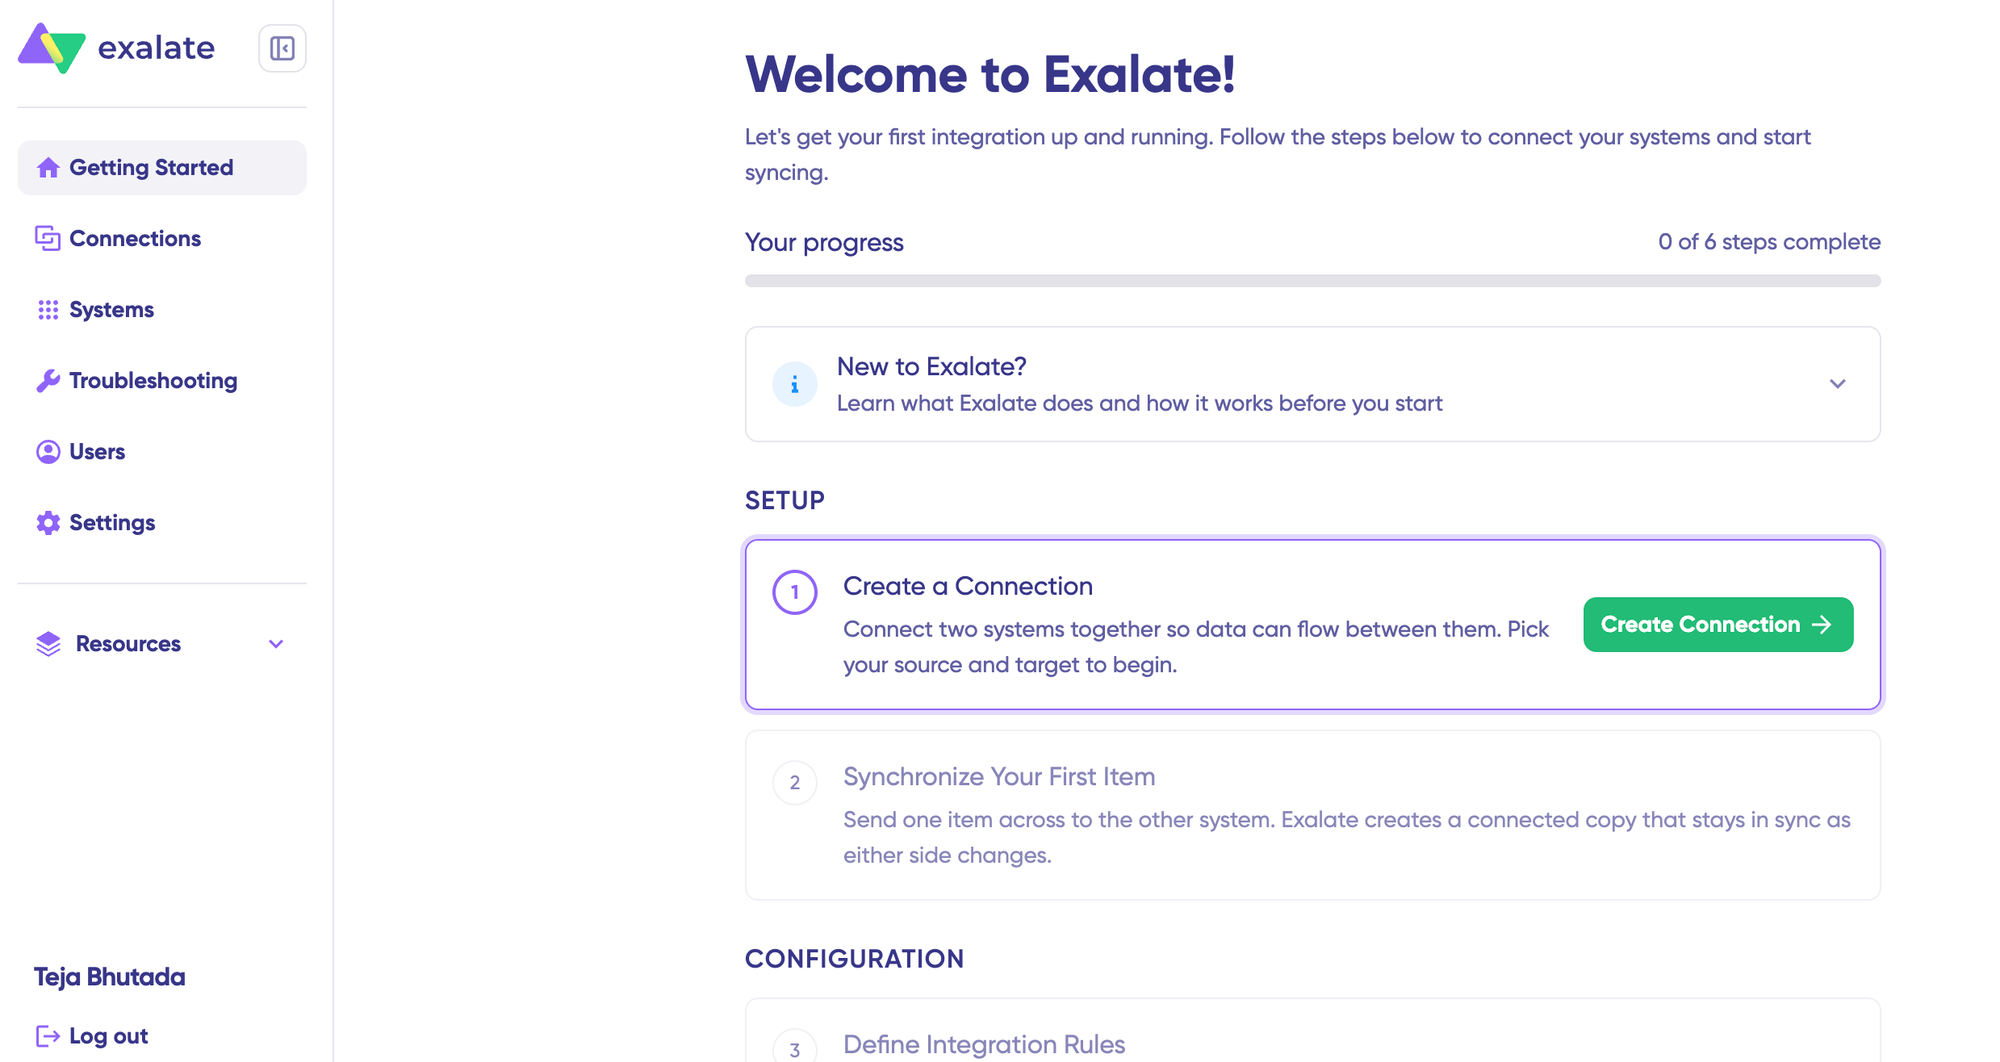
Once logged in, create and manage your integrations.
2. Connect Jira and Azure DevOps
To create a connection, you’ll need authentication credentials for both systems.
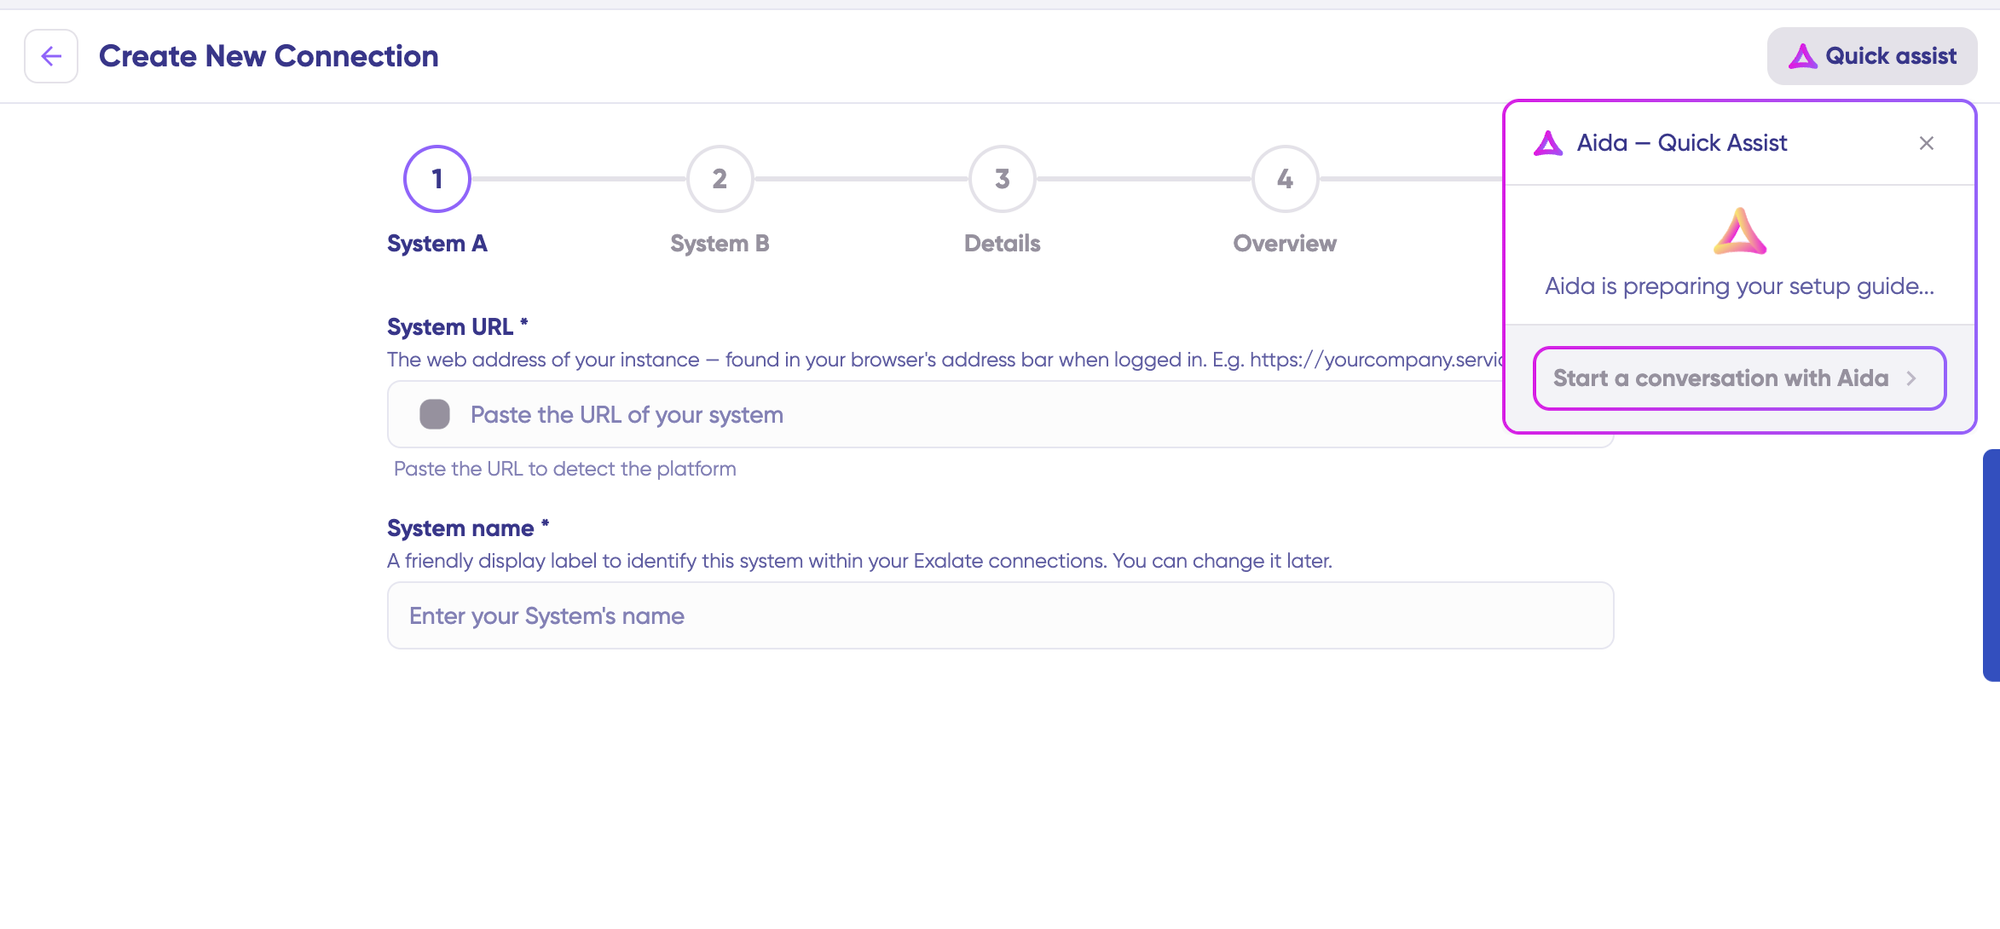
You can also speed up the process by using Aida – Quick Assist at the top right of the dashboard.
Click “+ Add connections” > “Create new connection“.
Enter the name and URL for your first system [Jira (System A)]. Exalate automatically performs authentication checks in the background.
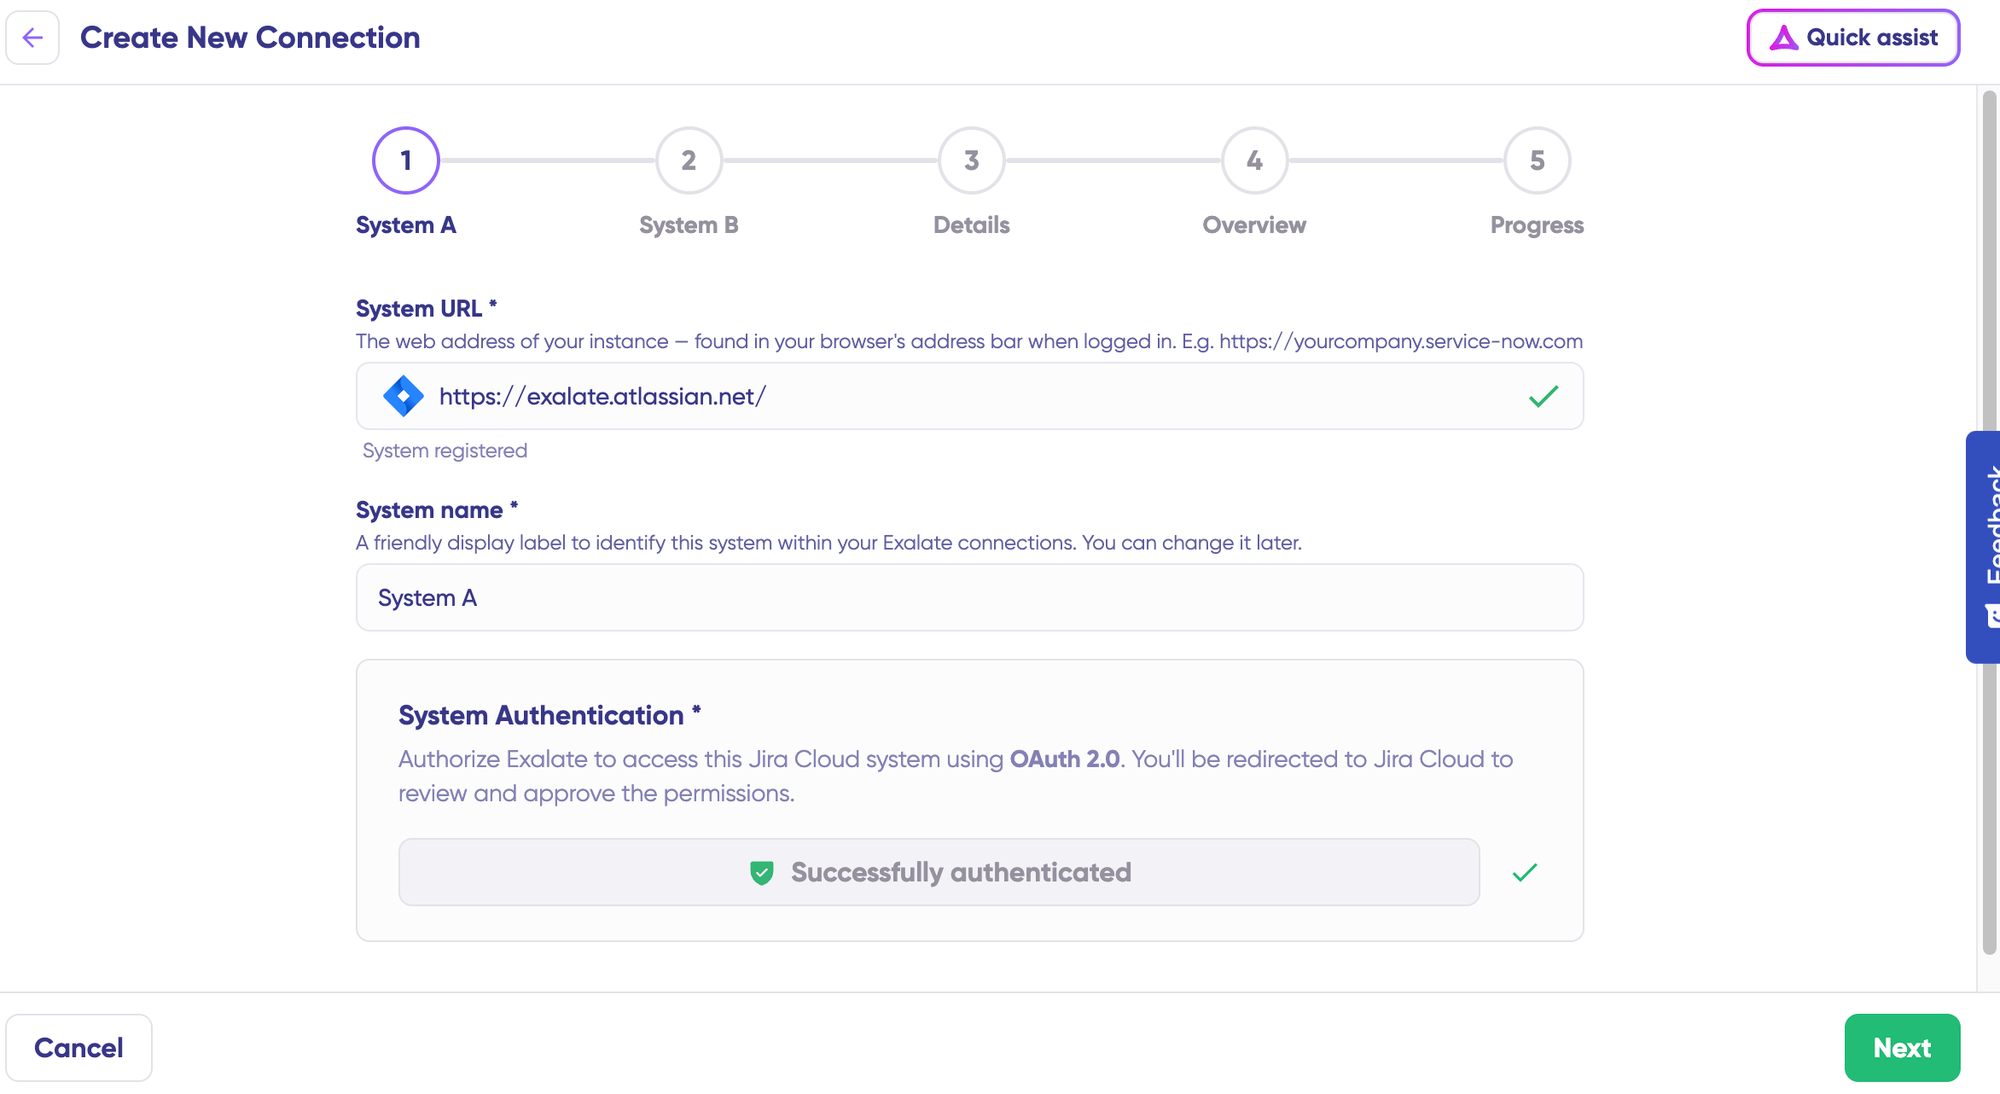
Enter the authentication details. For Jira, you need OAuth. Click on “Check Authentication”. If all is well, you’ll see “Successfully Authenticated”.
Repeat the same processes for Azure DevOps as for System B (Azure DevOps).
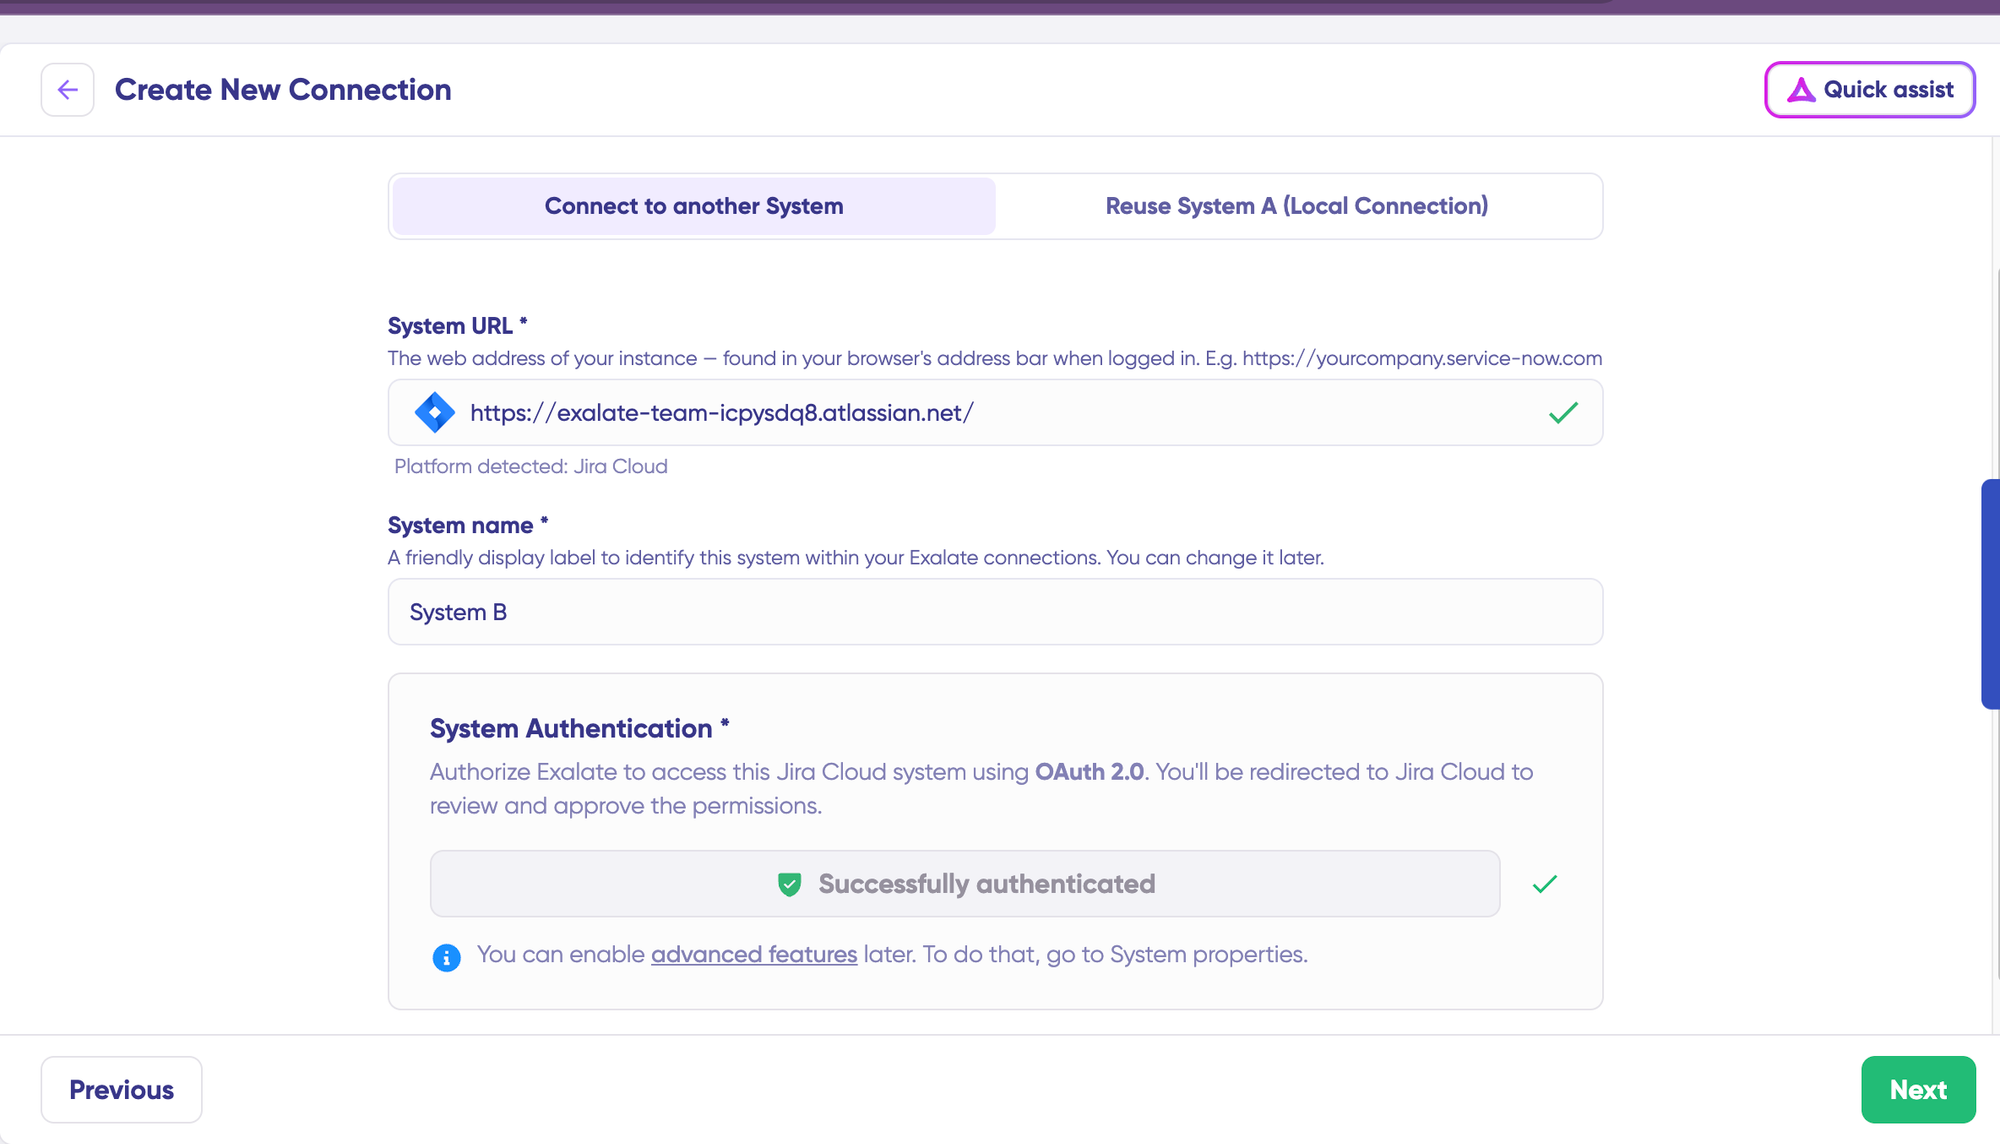
Once both systems are authenticated, confirm the connection name, add an optional description, and click “Create Connection“. Wait a few minutes for background configuration to complete, then click “Continue to Configuration“.
Local connections in Jira also let you sync work items across different Jira projects (or spaces) that share the same instance.
Example: imagine your URL https://example.net/ hosting 2 Jira projects (or spaces). Project A has work item PROJA-11, project B has work item PROJB-12. Local connections in Exalate let you sync both.
3. Configure Your Sync
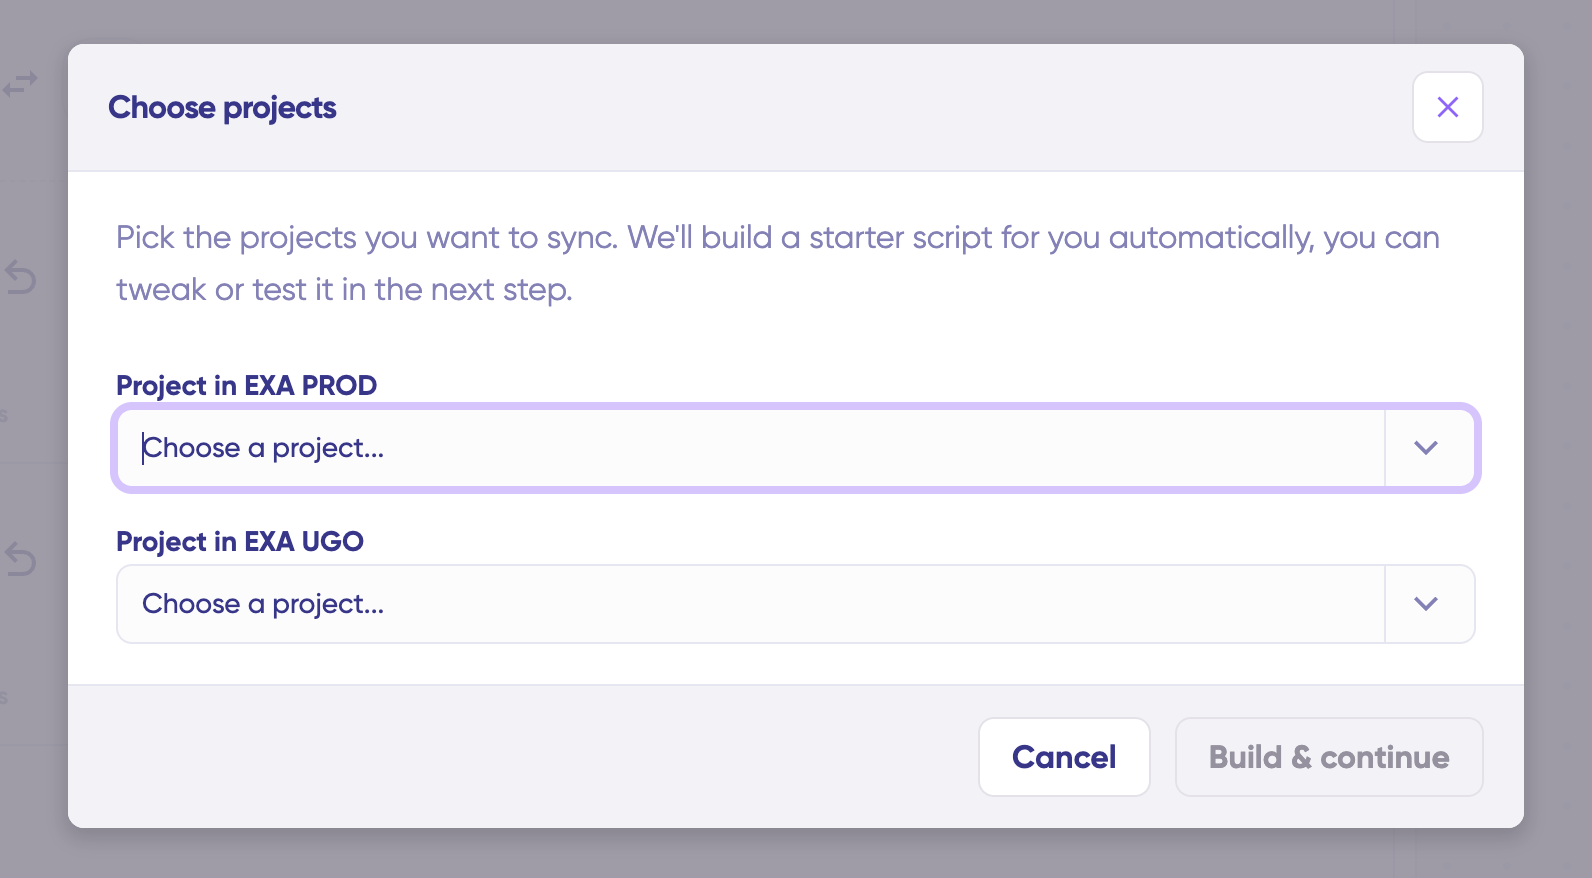
Choose the projects you want to sync from the dropdown menus on both sides, then click “Build and Continue“.
You’ll have two configuration options: Quick Sync and Edit & Test.
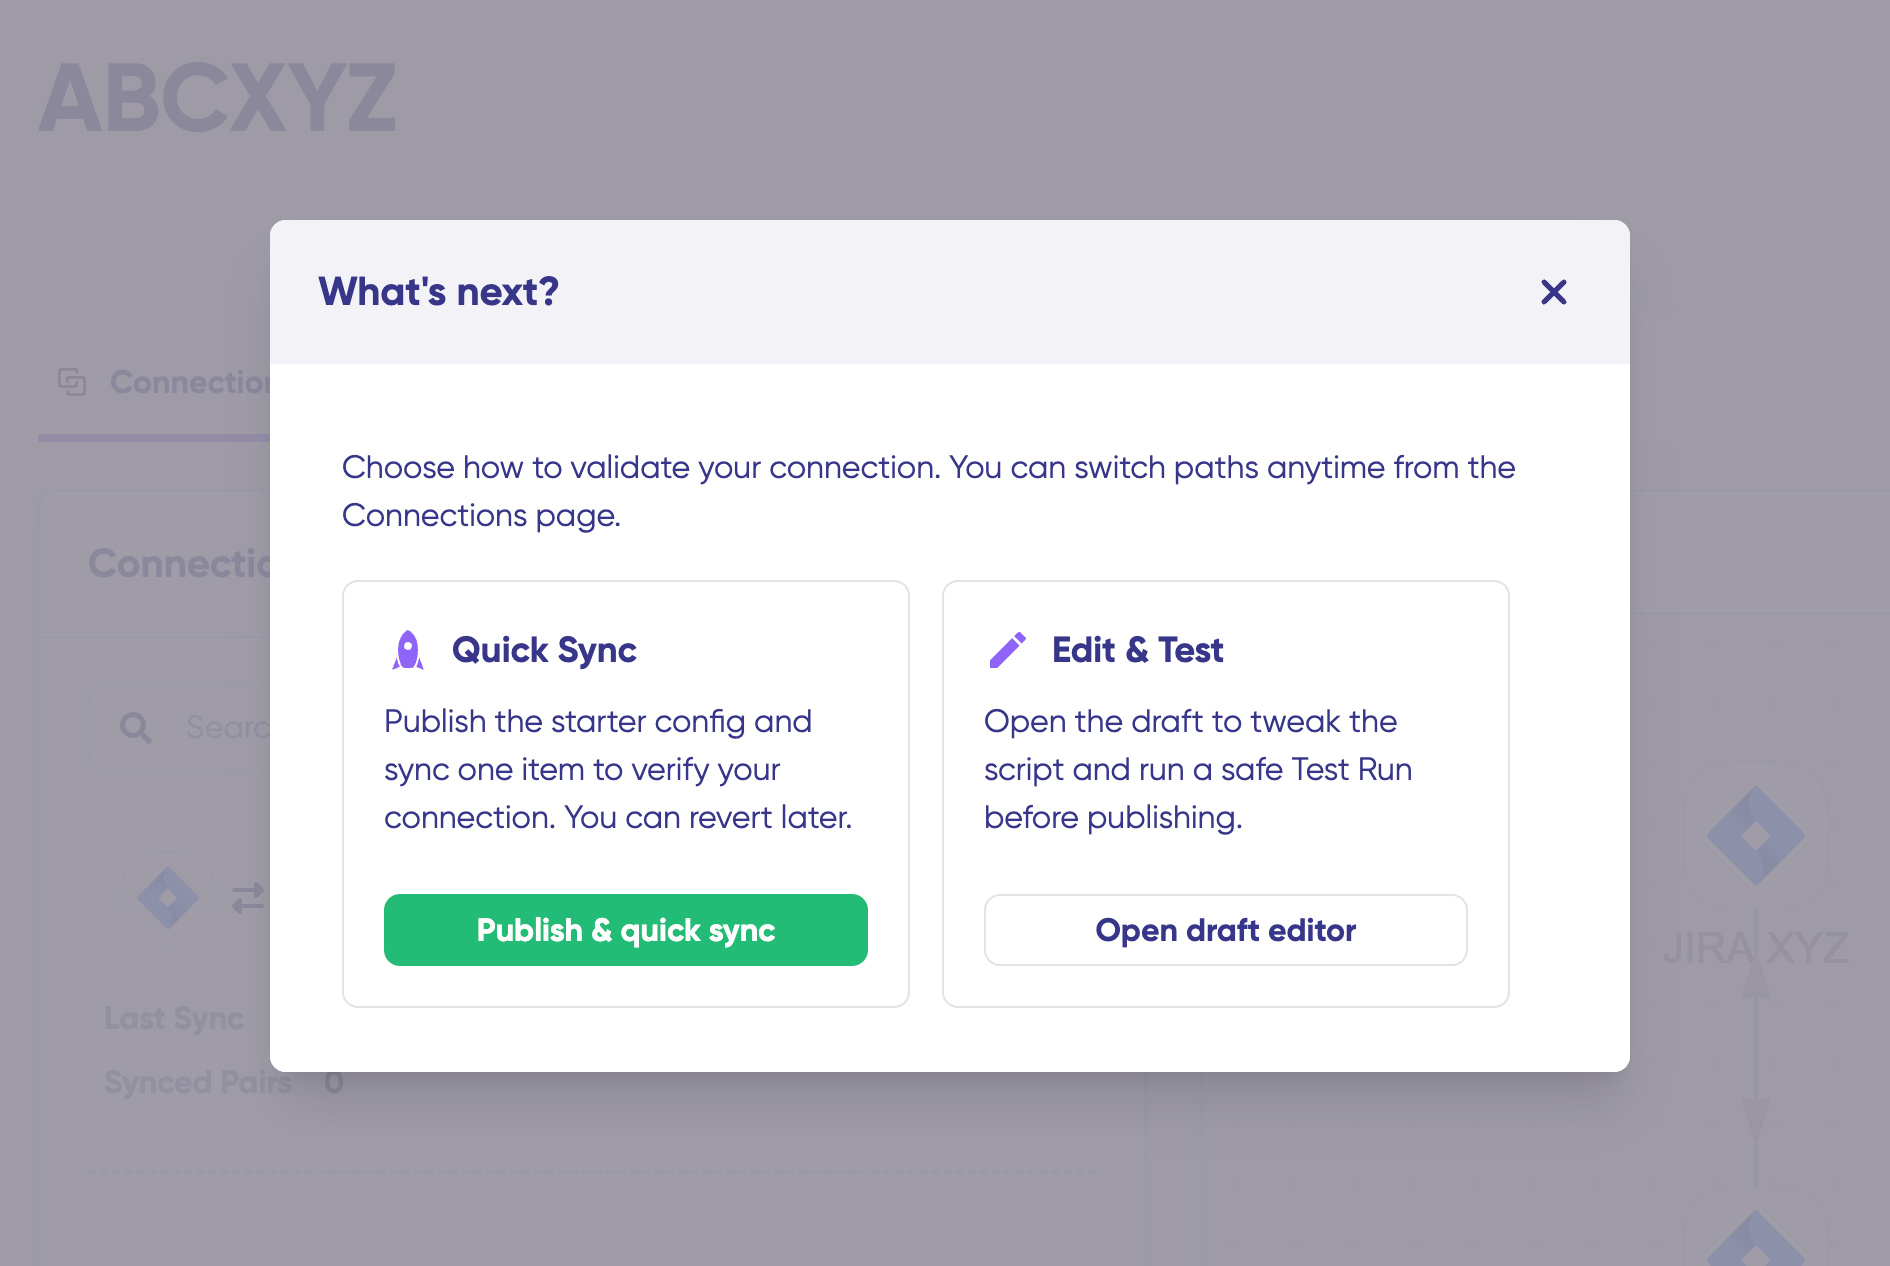
Quick Sync: Test synchronization with a single work item. Enter a work item key under “Item sync monitor” and click “Sync Now“. You can also link existing work items between systems. Once complete, view both synced items and compare changes.
Edit & Test: Customize sync rules using the draft editor. Click “Create a new version” or “Open latest draft” to modify the configuration without affecting active syncs. Use the editor to adjust Groovy-based scripts that define custom data logic and field mappings for complex workflows.
4. Use Aida for AI-Assisted Configuration
Instead of writing scripts manually, use Aida, Exalate’s built-in AI assistant, to generate Groovy-based sync rules using natural language.
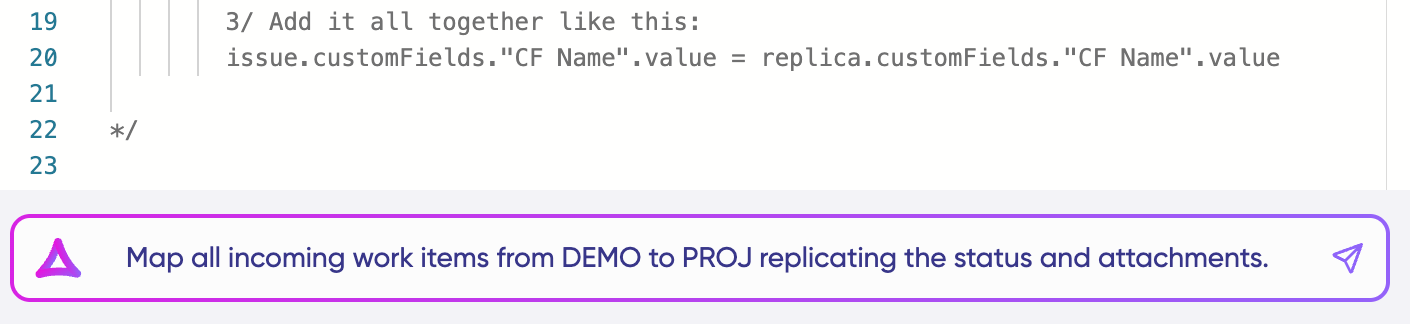
Aida appears in both outgoing and incoming script sections:
For Outgoing scripts: Describe what data should leave your system. Example: “Sync only high-priority work items.”
For Incoming scripts: Describe how incoming data should be applied. Example: “Map Jira statuses to Azure DevOps states.”
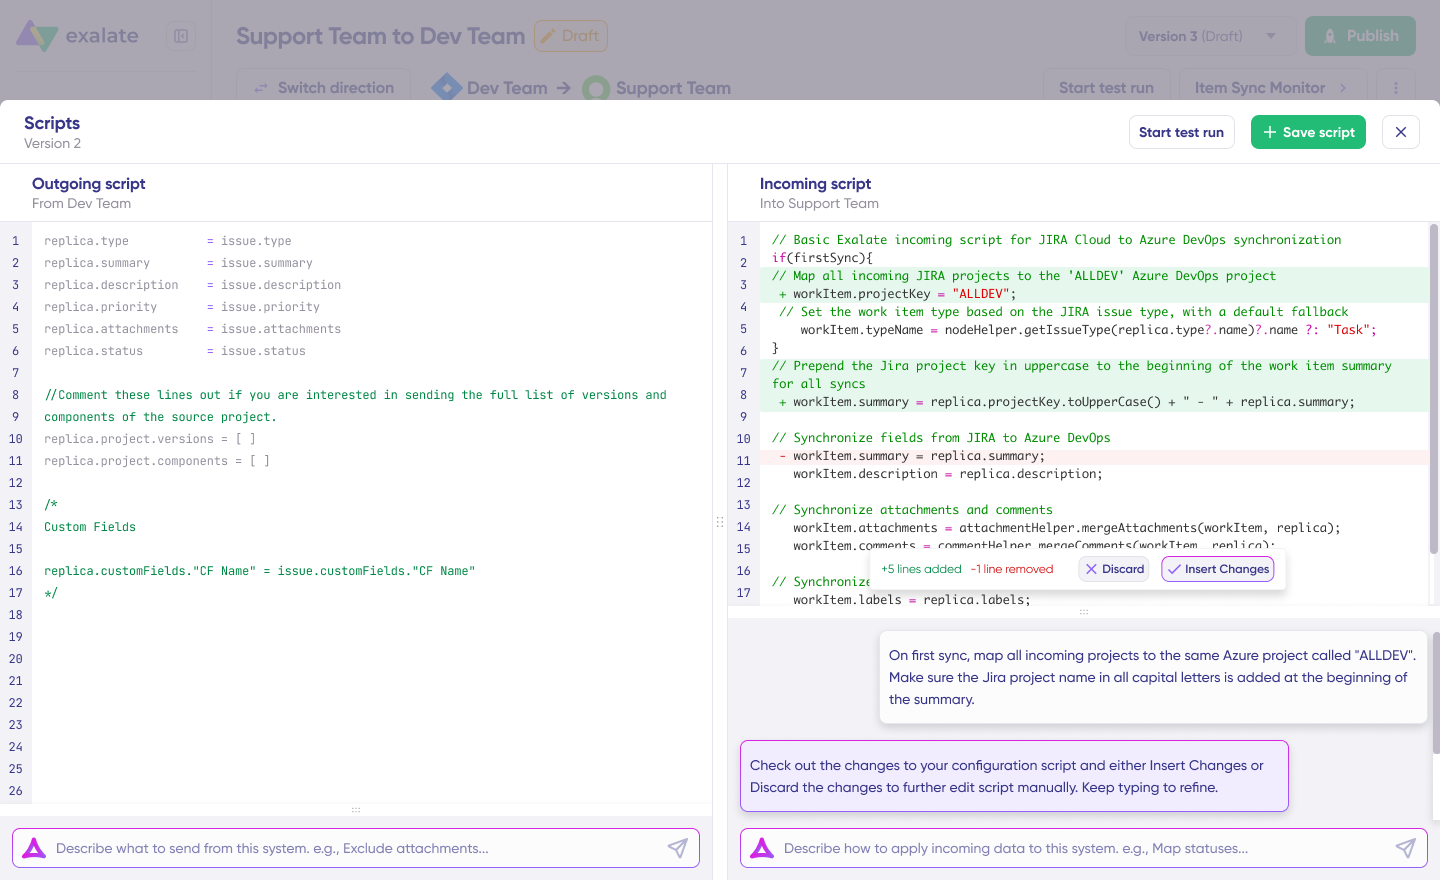
Aida generates scripts based on Exalate’s API and your existing configuration. Review the suggested changes; new lines appear in green, suggested removals in red. Choose to “Insert” or “Discard” suggestions. Always review AI-generated code before applying it.
5. Test and Publish Your Configuration
Before going live, test your sync rules with a dry run. Click “Start Test Run” and “Select items” to sync (you can choose multiple work items).

Review detailed results showing which fields synced and the payload shared between systems. If satisfied, click “Publish Version“.
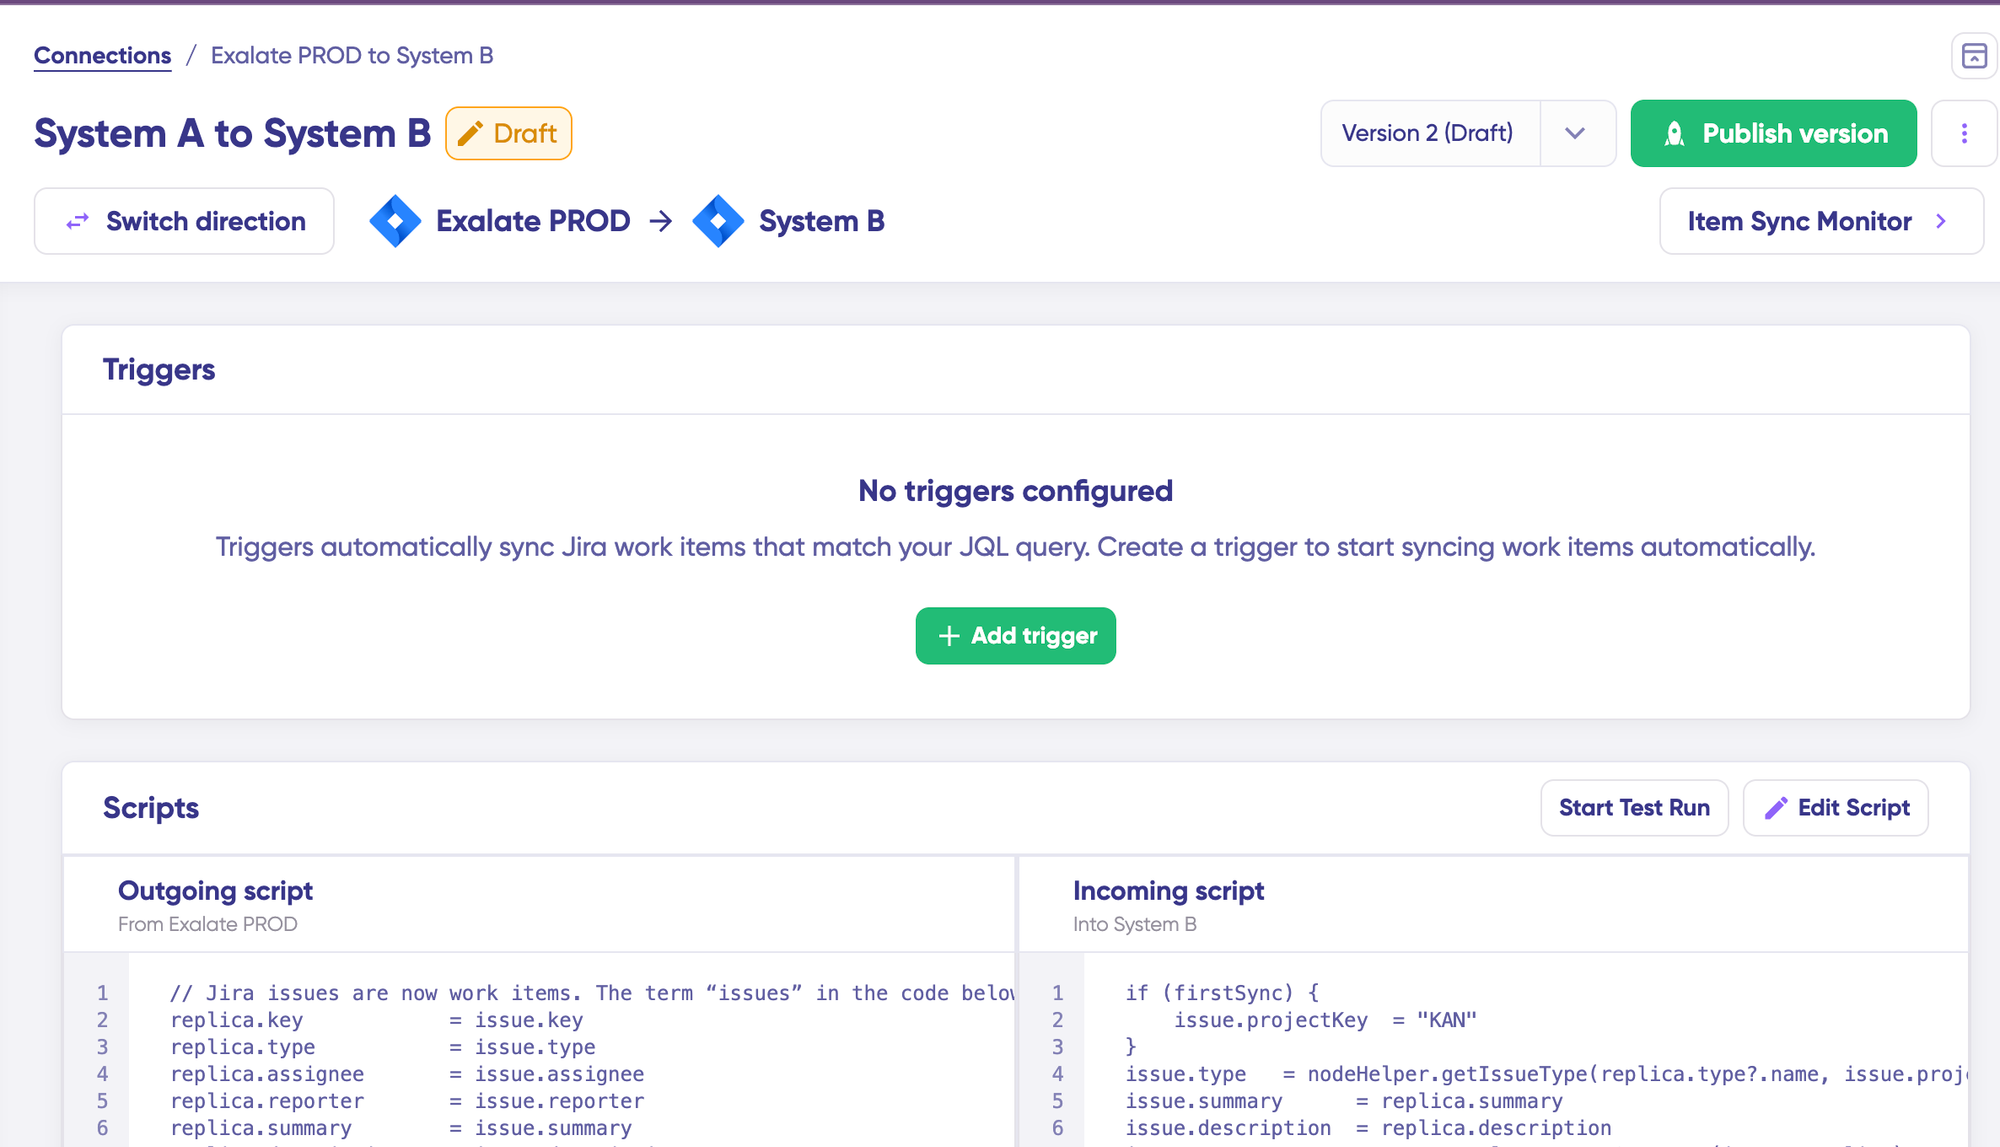
All configuration versions are accessible from the “Version” dropdown, labeled as “Active,” “Draft” (editable), or “Archived.”
6. Set Up Automated Triggers
Define conditions that automatically trigger synchronization. For example, sync all Jira work items with “label = dev” or all Azure DevOps work items in a specific area path.
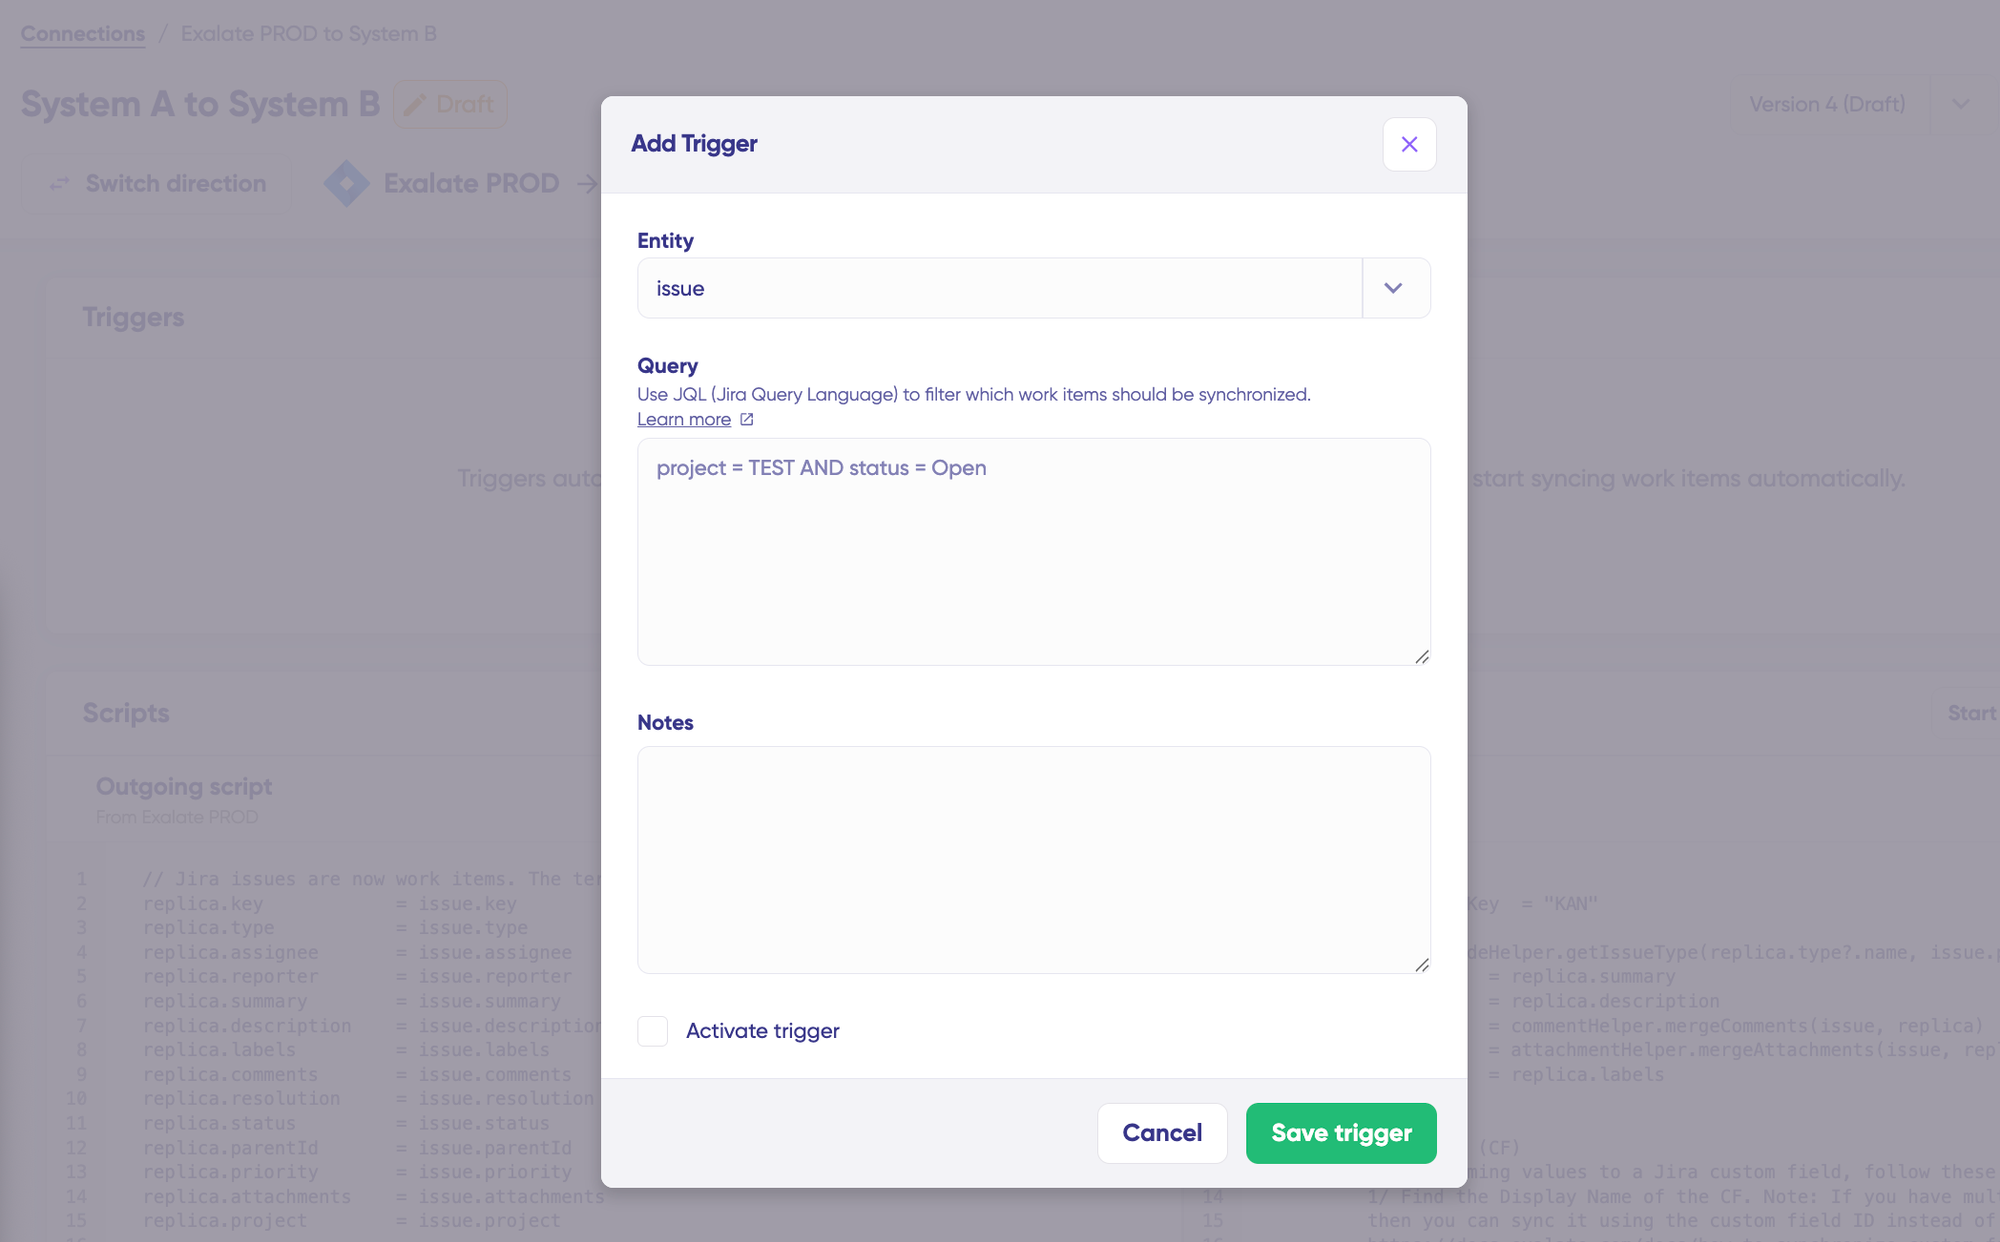
Click “+ Add trigger” to create platform-specific triggers. Choose the entity type (work item or sprint), then use platform-native query languages:
- For Jira: Use JQL (Jira Query Language). Example: “
Project = EXA”syncs only items in the EXA project. - For Azure DevOps: Use WIQL (Work Item Query Language) to specify conditions.
Save your trigger, and synchronization will run automatically based on these rules.
7. Troubleshoot with Aida
If connection errors occur, navigate to the “Troubleshooting” tab. Hover over any error and click the Aida icon for immediate analysis. Aida shows affected systems, connections, and work items, plus a brief explanation of the error.
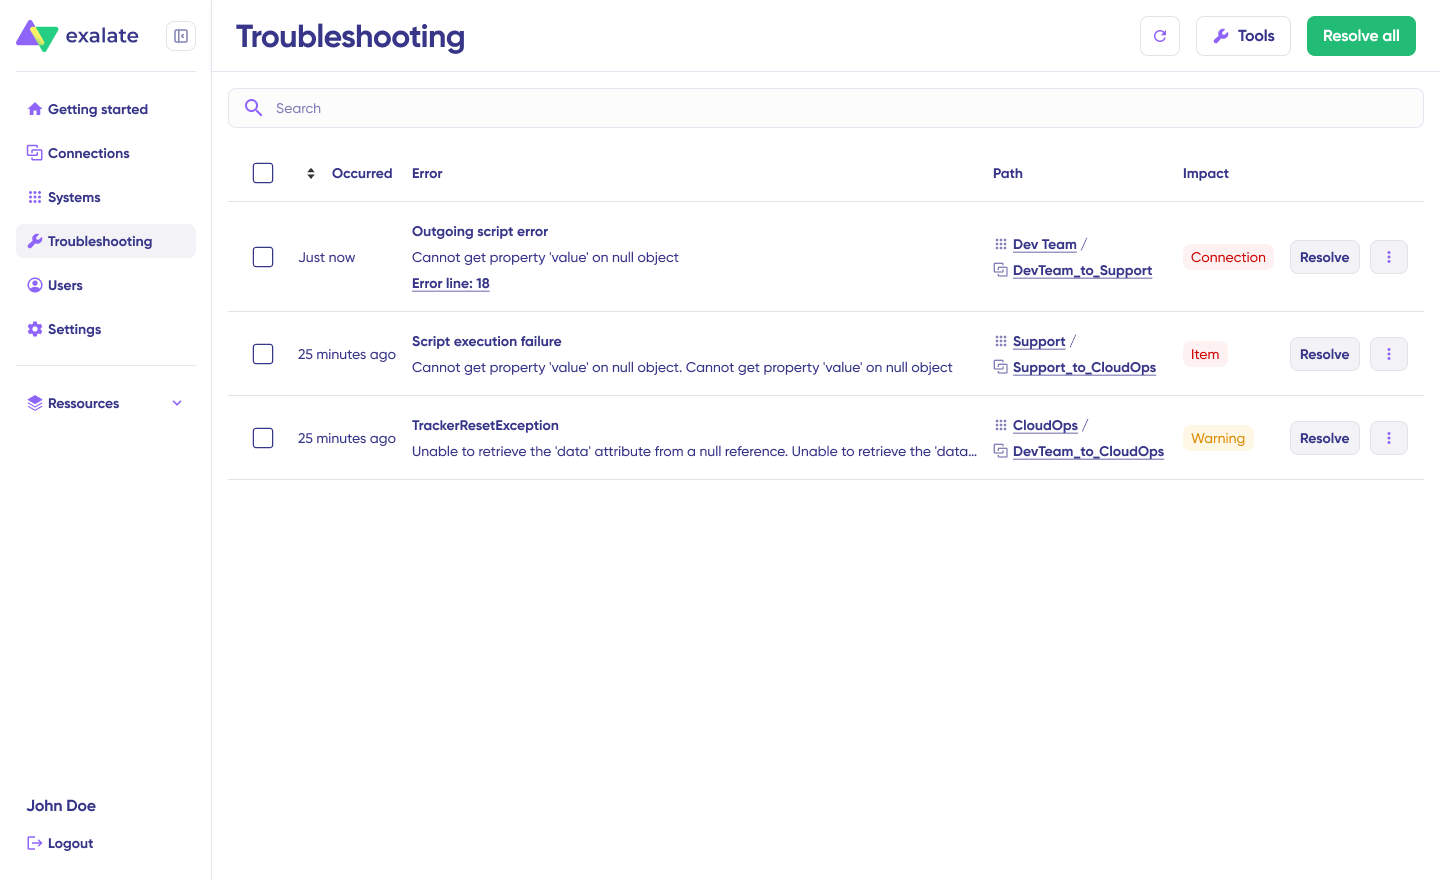
For deeper investigation, click “Error Details” to view the impact level, stack trace, error type, and occurrence date.
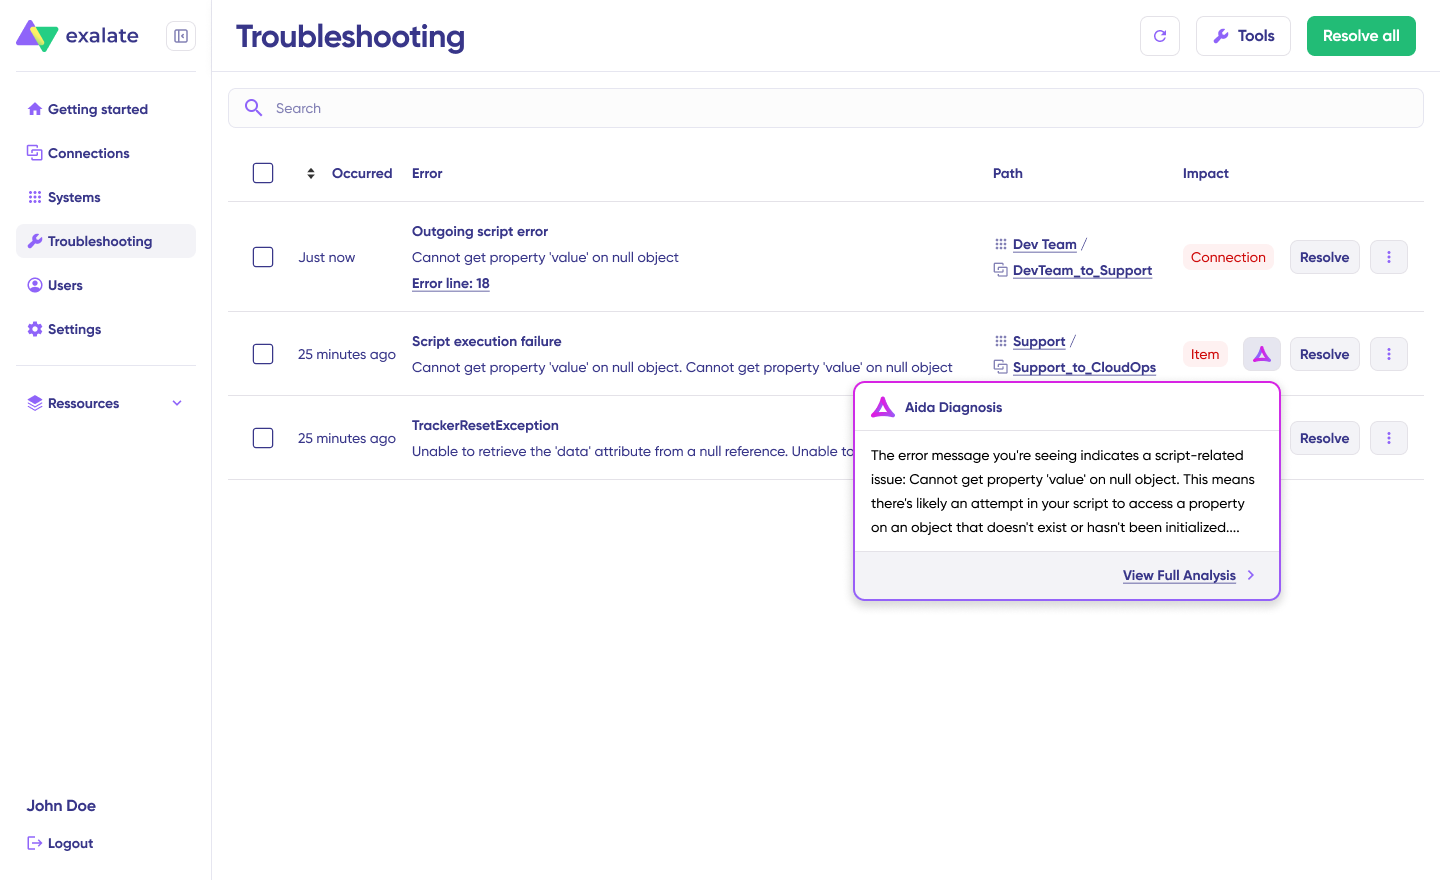
Use “View Full Analysis” for complete context. Once you’ve resolved the issue, click “Resolve” to clear the error.
Your integration is now active. Synchronization runs automatically based on your configured sync rules and triggers.
What Are Some Common Use Cases For Jira-Azure DevOps Integration?
Case 1: Support Ticket Escalation to Development
The Challenge: Support teams in Jira Service Management receive customer-reported bugs, but developers work exclusively in Azure DevOps. Critical issues get lost in email threads, delays occur while waiting for manual ticket creation, and support teams lack visibility into fix progress.
The Solution: High-priority support tickets automatically create corresponding bugs in Azure DevOps with full context: descriptions, attachments, customer impact details, and urgency levels. When developers update the bug status, add comments about the root cause, or commit fixes, that information flows back to Jira in real-time.
Real-World Application: A SaaS company receives 200+ support tickets daily. Their support team uses Jira Service Management while developers work in Azure DevOps. By integrating both systems, critical bugs flagged by support automatically appear in the development backlog within seconds.
def priorityMapping = [
    "Highest": "1",
    "High": "2",
    "Medium": "3",
    "Low": "4"
]
def mappedPriority = priorityMapping[replica.priority?.name]
if (mappedPriority) {
    workItem.customFields."Priority".value = mappedPriority
}Code language: JavaScript (javascript)
When developers mark a bug as resolved and deploy the fix, the support ticket updates automatically with the resolution and fix version, enabling support to notify affected customers proactively.
Case 2: Cross-Team Sprint Planning and Execution
The Challenge: Product managers plan work in Jira with business context, customer requirements, and ROI justification. Developers need this same work in Azure DevOps for sprint planning, capacity management, and technical breakdown. Manual copying wastes time and loses critical context.
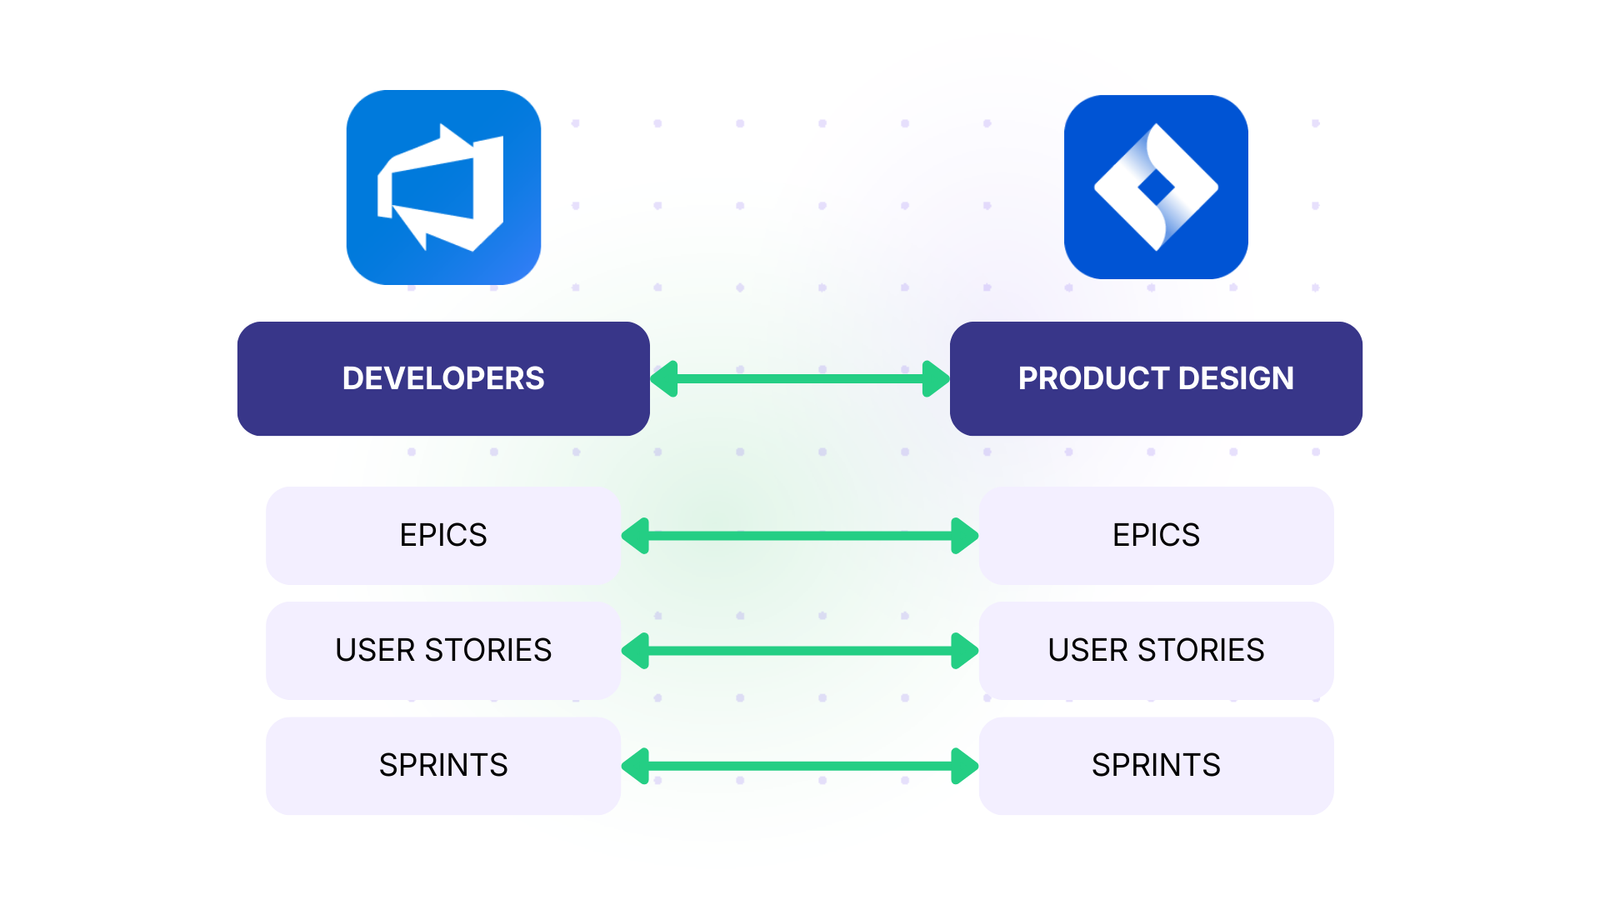
The Solution: Epics and user stories created in Jira automatically sync to Azure DevOps, where developers can link them to tasks, bugs, and technical work items. Sprint assignments, story points, and acceptance criteria flow bidirectionally. Both teams see real-time progress without context switching.
Real-World Application: A public media company has product managers who work exclusively in Jira for roadmap planning and stakeholder reporting. Their development team uses Azure DevOps for sprint management. When PMs adjust priorities or add requirements in Jira, developers see changes immediately in their Azure DevOps backlog. Similarly, when developers complete work and merge code, PMs see updated progress in their Jira dashboards.
Case 3: External Partner and Vendor Collaboration
The Challenge: Your internal team uses Azure DevOps, but external agencies, contractors, or vendors work in their own Jira instances. Granting full Azure DevOps access creates security risks, but email updates and status meetings don’t scale.
Azure DevOps Incoming:
def typeMapping = [
    "Story": "User Story",
    "Bug": "Bug",
    "Task": "Task"
]
def mappedType = typeMapping[replica.type?.name]
if (mappedType) {
    workItem.type = mappedType
}Code language: JavaScript (javascript)
The Solution: Share specific work items bidirectionally without exposing your entire codebase or infrastructure. External partners see relevant work in their Jira instance with controlled field visibility. Updates they make flow back to your Azure DevOps environment automatically.
Real-World Application: A digital agency manages website development in Azure DevOps but works with multiple client companies that track projects in their own Jira instances. The agency syncs project status, deliverable completion, and bug reports to client Jira instances while keeping internal technical details, code repositories, and infrastructure information private within Azure DevOps.
Case 4: Multi-Instance MSP Operations
The Challenge: Managed service providers (MSPs) handle IT operations for dozens of clients, each with their own Jira instance for ticket tracking. The MSP’s internal development team works in a centralized Azure DevOps environment. Manually checking multiple Jira instances and creating development work is unsustainable.
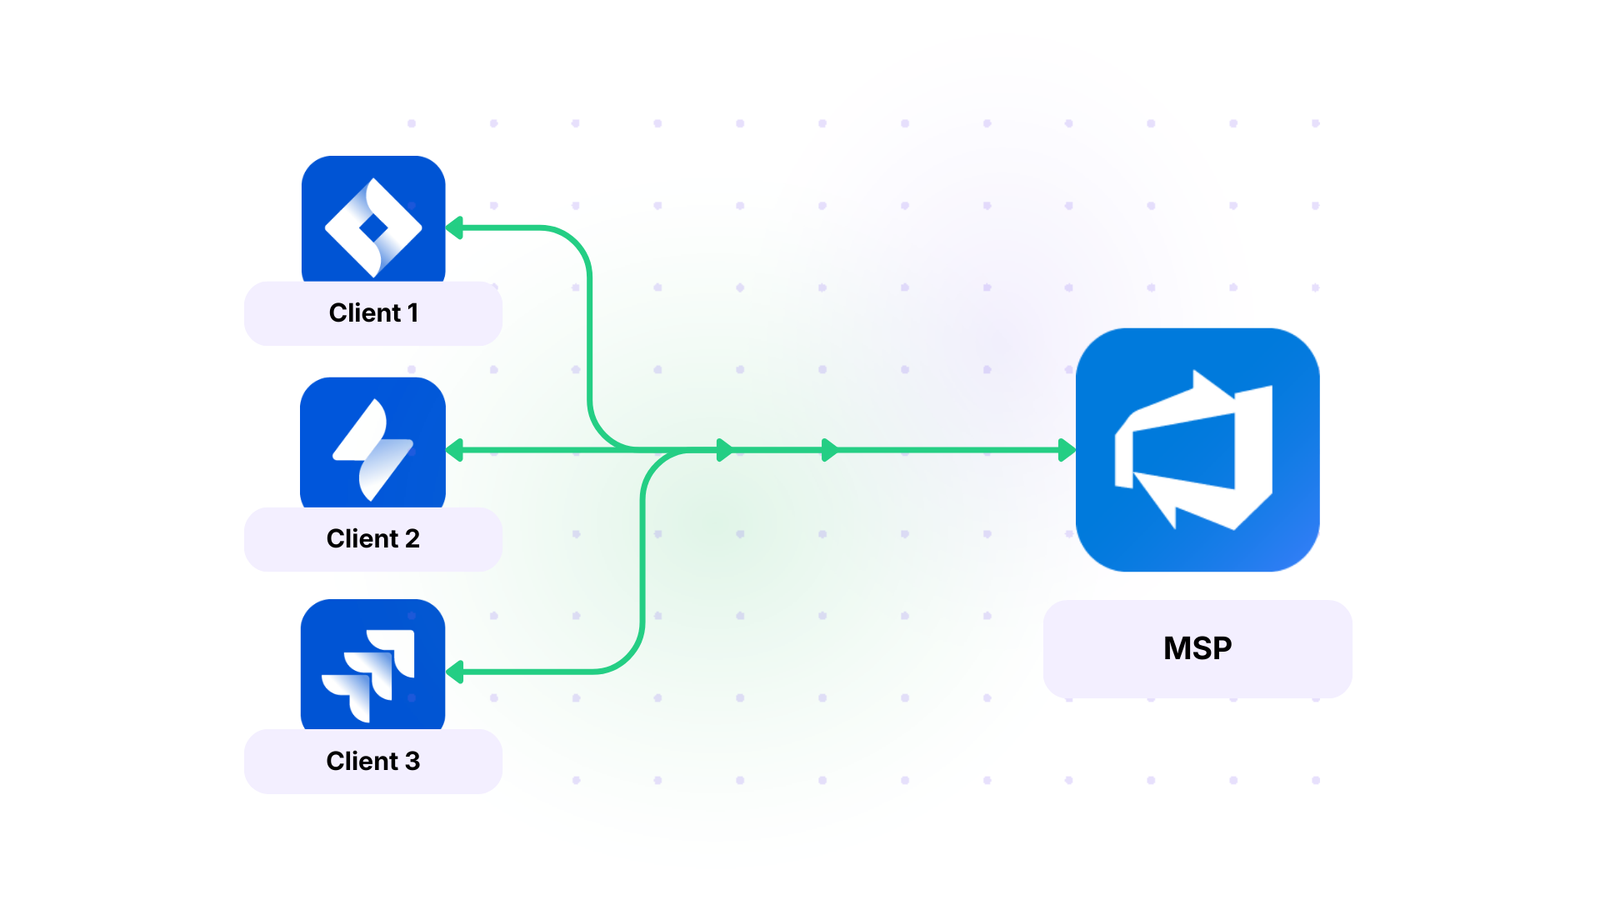
The Solution: Connect multiple client Jira instances to a single Azure DevOps organization. Work items from different clients automatically route to appropriate Azure DevOps projects with client-specific tags and area paths. Development teams get consolidated visibility while maintaining clear boundaries between client data.
Real-World Application: An MSP supports 40 enterprise clients, each using their own Jira instance. Their 25-person development team works in Azure DevOps. By integrating all client Jira instances with their central Azure DevOps hub, the MSP’s developers see all client work in one place, prioritized and organized by SLA tiers. When developers resolve issues or deploy updates, those changes automatically update the appropriate client Jira instance, maintaining compliance with client-specific reporting requirements.
Case 5: QA and Testing Workflow Integration
The Challenge: Developers complete work in Azure DevOps and mark it ready for testing, but QA teams manage test cases, test execution, and bug reports in Jira. Manual handoffs cause delays, and developers don’t know when their work has been validated.
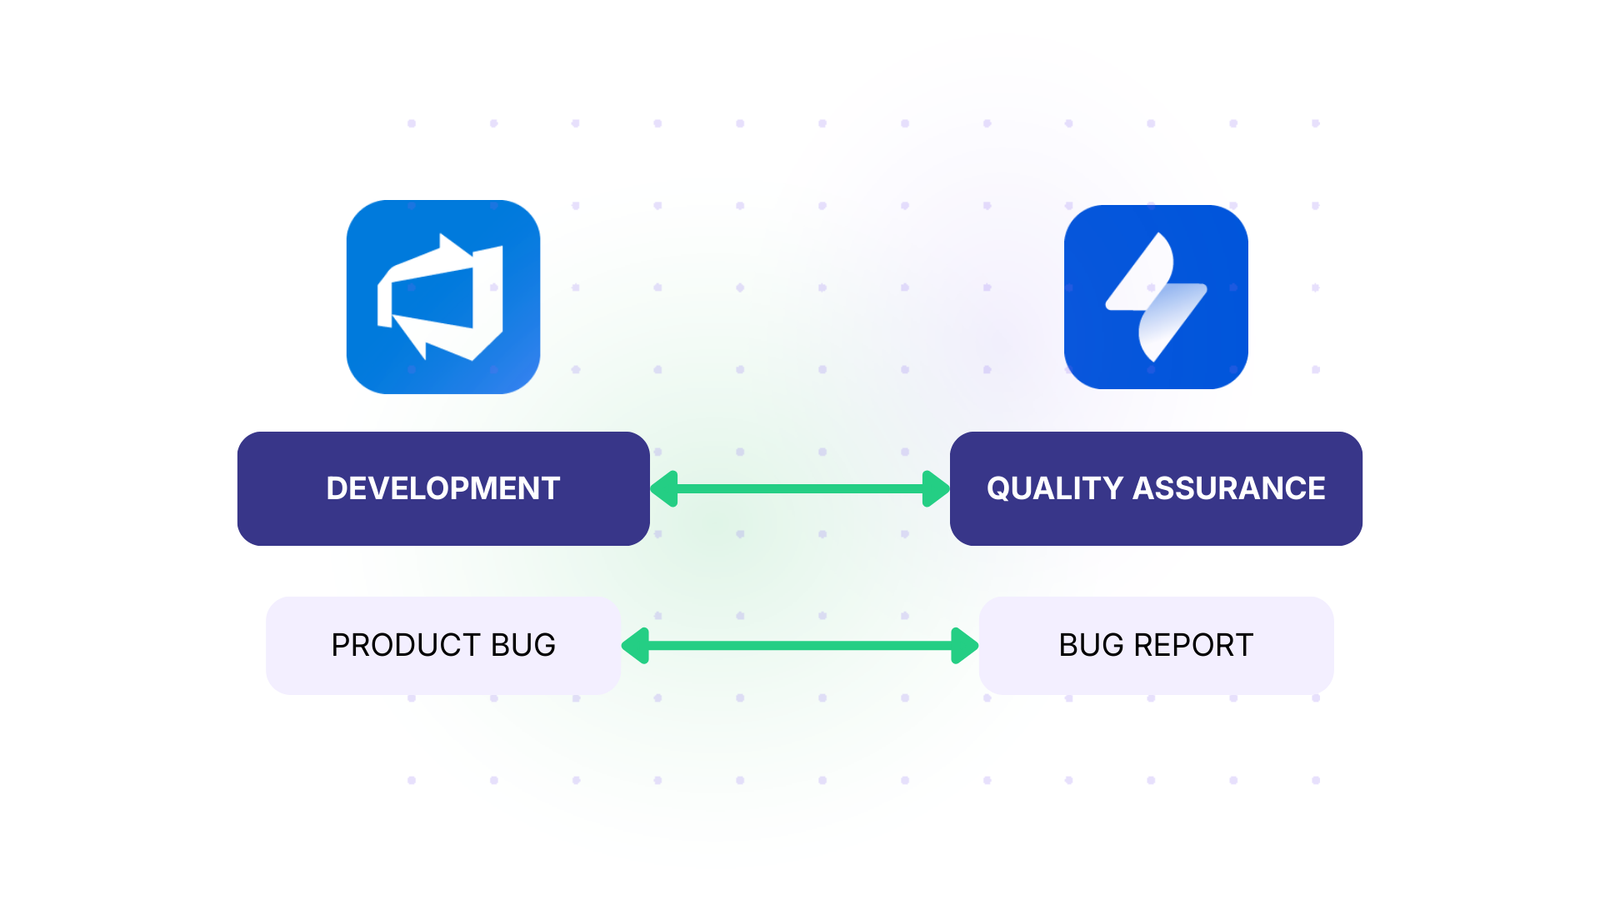
The Solution: Development work marked as “Ready for QA” in Azure DevOps automatically creates test execution work items in Jira for the QA team. Bugs discovered during testing automatically sync back to Azure DevOps as linked work items. Test results, pass/fail status, and validation notes flow bidirectionally.
Real-World Application: A mobile app development company has separate development and QA teams. When developers complete a feature in Azure DevOps and move it to “Ready for QA,” a corresponding test case automatically appears in the QA team’s Jira project with all context, feature description, acceptance criteria, and build number. QA engineers execute tests in Jira, and any bugs they log automatically appear in Azure DevOps, linked to the original feature.
Case 6: Agile Transformation Across Tools For M&A
The Challenge: During mergers and acquisitions, companies often find themselves with teams using different tools. One company uses Jira exclusively, while the acquired company has standardized on Azure DevOps. Forcing immediate tool consolidation disrupts productivity.
The Solution: Integrate both systems to allow teams to continue using their preferred tools during the transition period. Gradual migration of teams becomes possible while maintaining business continuity and cross-team collaboration.
Real-World Application: When a software company acquired a DevOps tooling startup, they found themselves with 80 employees using Jira and 30 new employees deeply invested in Azure DevOps workflows. Rather than forcing immediate tool migration and disrupting the newly acquired team’s productivity, they implemented Exalate integration.
Both teams collaborated seamlessly for 18 months while they evaluated which tool best fit the combined organization’s needs. When they finally decided on Jira as the standard, the existing integration infrastructure made the migration smooth and low-risk.

Case Study: Explore how Nevaris, a construction tech company, implemented a Jira Azure DevOps integration to decrease work handling times and optimize workflows.
Why You Need Jira to Azure DevOps Integration: Problems Solved and Benefits Gained
Jira excels at project tracking, workflow management, and Agile methodologies. Azure DevOps provides powerful development pipelines, repos, CI/CD automation, and deep Microsoft ecosystem integration.
Organizations choose both because each tool genuinely solves different problems, but using them separately creates friction that costs time, money, and team morale.
Visibility Gaps Give Way To Real-Time Transparency
Product managers tracking work in Jira have no visibility into development progress without constantly switching to Azure DevOps. Developers coding in Azure DevOps miss critical business context, customer impact details, and priority changes stored in Jira.
Connecting both systems fixes this information asymmetry by giving everyone real-time visibility from their preferred system.
Product managers now see development progress, deployment status, and actual work completion in Jira without logging into Azure DevOps. Developers also have access to customer context and priority changes in Azure DevOps without switching to Jira.
Manual Data Entry Turns into Hundreds of Hours Saved
A developer finishes a task in Azure DevOps, then manually updates the corresponding Jira ticket. Support logs a critical bug in Jira, then someone recreates it in Azure DevOps with all the attachments and context.
Your team can eliminate this entirely: work items, status updates, comments, and attachments sync automatically in real-time. Teams that previously spent 5-10 hours per week on manual updates redirect that capacity to high-value work. For a 20-person team, that’s 200-400 hours reclaimed per week, equivalent to 5-10 full-time employees.
Delayed Status Updates become Instant Data Sync
By the time someone manually updates a status change from one system to another, the information is already outdated.
Support teams can’t answer “What’s the status on my bug?” without interrupting developers. Stakeholders asking for project updates get stale information from the last manual sync, which might have been days ago.
With two-way Jira to Azure DevOps integration, automated synchronization means no updates slip through the cracks. When a developer deploys a fix, the customer ticket updates automatically. When support changes a priority, the development backlog reflects it immediately.
Scattered Information Becomes Complete Context
A support ticket in Jira has customer context, business impact, and urgency. When manually recreated in Azure DevOps, developers get a bare-bones task title with “Fix login issue”—no customer name, no revenue impact, no steps to reproduce.
When you properly map the required fields between Jira and Azure DevOps, the complete context will be preserved and transferred automatically. Developers immediately see high-priority support tickets in their Azure DevOps backlog with error logs, customer details, and business impact.
This drops the resolution time dramatically because developers have everything they need without asking follow-up questions. Complete information enables quality work that meets actual business needs.
Duplicated Work Translate to Coordinated Effort
Without synchronized data, teams unknowingly work on duplicate tasks. One development team fixes a bug in Azure DevOps, while another team addresses what looks like a different problem in Jira, only to discover later that they were the same issue reported twice in different systems.
Integration eliminates this waste by maintaining a unified view of all work. When someone creates a work item in either system, everyone sees it, preventing duplicate efforts and ensuring teams coordinate effectively.
Constant Context Switching becomes Focused Flow
When data is distributed across systems, developers interrupt their flow to check Jira for updates and changes. Product managers tab over to Azure DevOps. Support teams hunt through both systems for status updates.
This cognitive overhead compounds daily, draining productivity and focus. But when the systems are in sync, context switching will become less of a problem. Nobody wastes time switching between applications or trying to remember which system has what data.
Siloed Teams Grow into Collaborative Units
In siloed organizations, teams have to schedule meetings just to transfer information from one system to another.
That’s why integration between Azure DevOps and Jira is necessary. Integration breaks down these silos by letting teams work in their preferred tools while maintaining shared context.
As a result, each team will continue operating efficiently in its specialized environment while collaborating seamlessly across other departments.
Frustrated Teams become Happy, Productive Teams
Developers hate administrative overhead, while support teams feel ineffective when they can’t track issues to resolution. Product managers struggle with unreliable data for stakeholder communication.
But to keep every team member happy, you need an integration to eliminate tedious manual work, improve team happiness, and reduce turnover. Developers are happier when they can work efficiently in their preferred tools without administrative overhead. Also, support teams feel more effective when they can track customer issues to resolution.
Your Next Steps For Jira to Azure DevOps with Exalate
You’ve now seen how to connect Jira and Azure DevOps with Exalate. The integration eliminates manual duplication, keeps both teams aligned, and lets everyone work in their preferred tools.
Start a free trial with Exalate’s free tier and put together a working sync without a sales conversation. Connect both ends, configure rules with Aida or a Groovy engineer, and the records start syncing.
Ready to sync your Jira workflow with Azure DevOps? Start your free trial today and see the difference integrated systems make.
Frequently Asked Questions
Can I integrate multiple Jira and Azure DevOps instances?
Yes, Exalate supports multi-instance connections. You can connect multiple Jira instances to one or more Azure DevOps organizations, making it perfect for organizations managing multiple projects, business units, or collaborating with external partners.
What data can be synchronized between Jira and Azure DevOps?
You can sync work item types, titles, descriptions, priorities, statuses, comments, attachments, custom fields, area paths, iteration paths, tags, sprints, labels, assignees, reporters, work logs, and more. With scripting, you have complete control over what syncs, how it transforms, and when it triggers.
How does Exalate handle security?
Exalate provides ISO-certified security with role-based access control, end-to-end encryption for data in transit and at rest, and gives your team full operational control over sync configurations. Visit our Trust Center for detailed security documentation, compliance certifications, and penetration testing results.
Does Exalate support Azure DevOps Server (on-premise)?
Yes, Exalate supports both Azure DevOps Services (cloud) and Azure DevOps Server (on-premise) in any combination with Jira. You can even connect cloud and on-premise instances together.
How does AI-assisted configuration work?
Aida, our AI-assisted configuration tool, generates sync scripts based on natural language descriptions of your requirements. Instead of writing Groovy code from scratch, describe what you want to sync and how, and Aida generates the implementation. You can then customize the generated code for advanced scenarios.
Can I sync work between Jira and other tools besides Azure DevOps?
Absolutely. Exalate supports integrations with Freshservice, Freshdesk, Asana, ServiceNow, Zendesk, Salesforce, GitHub, Azure DevOps Server, and more. You can create a comprehensive integration ecosystem across your entire toolchain, connecting any supported platforms.
Can I control sync behavior with custom logic?
Yes, Exalate provides full scripting control using Groovy. You can implement conditional logic, field transformations, workflow automation, custom triggers, and complex business rules. This operational control means your sync adapts to your unique workflows rather than forcing you into predefined templates.
Is there a limit to how much data I can sync?
Exalate is built to scale. The platform handles everything from small teams syncing dozens of work items to enterprises managing thousands of syncs daily. Performance depends on your subscription tier and infrastructure, but the architecture supports high-volume scenarios.
Do I need coding knowledge to set up integration?
Not necessarily. Aida’s AI-assisted configuration handles most common scenarios without coding. For simple syncs, you can start without any technical expertise. For advanced customization with complex logic, Groovy scripting knowledge helps, but Aida significantly reduces the learning curve by generating code from natural language descriptions.
Can I test the integration before deploying to production?
Yes, you should always test in a sandbox environment before production deployment. Create test projects in both Jira and Azure DevOps, configure your sync rules, and validate that data transforms correctly. This approach prevents issues from affecting live work items and lets you refine mappings safely.
What’s the difference between Exalate and the native Azure DevOps for Jira app?
The official Azure DevOps for Jira app provides one-way development visibility, showing commits, branches, and deployments in Jira. Exalate provides full bidirectional work item synchronization with custom field mapping, transformations, conditional logic, and enterprise-grade control. If you need actual work item sync (not just development activity display), Exalate is the solution.
Recommended Reads:
- Jira to Jira Integration: The Comprehensive Guide to Jira Sync
- How to Set up an Azure DevOps Salesforce Integration
- Jira ServiceNow Integration: How to Set up an Integration in 6 Steps
- How to Set Up an Azure DevOps ServiceNow Integration
- How to Set up an Azure DevOps GitHub Integration
- Jira Integrations: Integrate Jira and Other Systems Bidirectionally


