
If you’re a Jira user and you want to share data with a user working in another Jira instance, you’ll need a Jira to Jira integration to ensure smooth collaboration. This software would help individual teams work flawlessly on their own while connecting and integrating with other teams.
In this article, you’ll see why connecting multiple Jira instances is useful and what technology is available to synchronize them effectively. After that, you’ll go through a step-by-step guide explaining how to set up a connection between two Jira instances.
You’ll also find use cases to show you what a Jira to Jira integration can do to help improve your workflows and keep your teams connected with your data intact.
Key Takeaways
- Connect multiple Jira instances to enable seamless cross-team and cross-company collaboration.
- Learn how to enable bidirectional (and unidirectional) sync for work items, sprints, custom fields, attachments, and much more.
- Use Jira to Jira integration to keep teams, organizations, and managed service providers connected for smooth collaboration.
- Work with a flexible Jira integration connector that offers flexibility, scalability, and security.

Why Do Teams Need Jira to Jira Integration?
Organizations typically need Jira to Jira integration in these situations:
- Facilitate Acquisition & Merger Integration: When companies merge, integrating their existing Jira instances allows teams to collaborate before (or instead of) consolidating systems.
- Break Down Data Silos: When development, support, and operations teams work in separate Jira instances, they lose visibility into each other’s work. With integrated Jira instances, teams can stay aligned and productive without constant status meetings.
- Real-Time Visibility & Faster Resolution: Development teams can focus on resolving blockers and planning sprints more effectively, knowing their data is always accurate and synchronized. Customer-reported issues get addressed efficiently and transparently when Jira Software connects with Jira Service Management (JSM).
- Maintain Autonomy & Control: Each organization controls what data it shares and what stays private. Your organization and partners only see the work items (previously known as issues) that you choose to sync. Teams can make changes independently without constant consultation, working in their familiar environment while staying connected.
- Scale Without Stress: Organizations managing multiple Jira instances or large-scale projects can scale operations effortlessly. Whether connecting two instances or 20+, each connection operates independently.
- Improve Cross-Company Collaboration: When working with partners, vendors, suppliers, or clients who maintain their own Jira instances, integration provides seamless data sharing while each organization maintains autonomy and security controls.
- Departmental Separation: Large organizations often run separate Jira instances for different departments (IT, HR, Engineering, Marketing). Integration keeps these teams aligned without requiring them to work in unfamiliar environments.
- Streamline Regional Operations: Companies with global operations may maintain regional Jira instances to comply with data residency requirements or manage different workflows while keeping headquarters informed.
- MSP & Service Provider Models: Managed service providers need to sync work items with multiple client Jira instances, maintaining separate configurations for each client relationship.
- Eliminate Manual Data Entry: Without integration, teams waste hours copying information between instances via email, spreadsheets, or manual re-entry. Automated sync eliminates this overhead, letting teams focus on actual work instead of administrative tasks.
What are the Best Jira to Jira Integration Approaches?
When connecting multiple Jira instances, you have several options. Each has different trade-offs in complexity, flexibility, cost, and maintenance.
Native Integration
Atlassian’s built-in tools work well if everything lives on the same Jira site. You can link work items across projects, share custom fields, and create automation rules that work across Jira sites without third-party tools.
However, this only works on a single site. If you’re dealing with separate instances—different cloud sites or mixing cloud with data center—native tools won’t cut it.
Atlassian also offers migration tools like the Jira Cloud Migration Assistant (JCMA). They’re effective for one-time migrations when consolidating instances, but they don’t maintain ongoing sync.
Once the migration’s complete, updates on either side won’t automatically sync. This makes them suitable for moving everything once, but not for ongoing collaboration.
Jira Automation
Jira Automation can handle basic cross-instance communication using webhooks. You can set up rules that trigger when work items change and send data to other Jira instances via REST API.
For example, you can set a rule to create a work item in another instance when it reaches a specific status on your end.
But Jira Automation has serious limitations, which means you won’t be able to handle bidirectional sync, conflict resolution, and error handling yourself.
This approach works for simple one-way scenarios if you have the technical expertise. For anything more complex, dedicated integration tools are a better investment.
Template-Based Tools
Tools like Zapier and Make offer pre-built integrations with templated mappings. They connect to both instances, handle the technical details (API authentication, sync scheduling, error handling), and provide a UI for configuring what syncs.
These tools automatically map standard fields like summary, description, priority, and status. You select which projects or work item types to sync, choose the sync direction, and the platform handles the rest.
Strengths:
- Simple to set up for straightforward scenarios with standard fields and similar configurations.
- Cost-effective for small teams, no coding required.
Limitations:
- Struggles with custom fields that don’t have exact matches.
- Can’t handle conditional logic, complex workflow mappings, and limited data transformation.
Script-Based Tools
Script-based tools like Exalate provide full programmatic control for users to define exactly which fields map where, how to transform data, what triggers synchronization, and how to handle conflicts.
Capabilities:
- Sync different fields based on work item type, project, or custom criteria
- Implement conditional logic (only sync high-priority bugs, for example)
- Transform data to restructure text, combine fields, or apply business logic
- Map custom fields that don’t match between instances
- Filter sensitive information or block specific data from crossing boundaries
These tools also handle authentication, queue changes during outages, manage conflict resolution, provide monitoring and alerts, and scale for high-volume synchronization.
Trade-off: Steeper learning curve than template-based tools. Complex configurations eventually require understanding the platform’s scripting model. But AI assistants can do the heavy lifting for you. Also, if you’re looking for a simple automation, Exalate might be overkill for your use case.
Custom API Integration
Organizations with development resources can build custom integrations using Jira’s REST API. This provides complete control over what syncs, when it syncs, and how data transforms.
Building robust integration is more complex than it initially appears. You need to:
- handle bidirectional sync without creating infinite loops,
- manage conflicts when both sides update the same field,
- queue changes during outages,
- Implement security mechanisms yourself,
- handle user mapping between instances with different accounts,
- transform custom fields that don’t match,
- and maintain the integration as both Jira instances evolve.
Apart from that, setting up a basic proof-of-concept might take a few days, but a production-ready solution that handles edge cases often takes weeks or months. You also own all the ongoing maintenance.
For most organizations, the total cost of building and maintaining custom integration exceeds the cost of commercial tools, especially when factoring in developer time.

Calculate time and money savings from automated bidirectional sync.
Choosing Your Approach
Your integration approach should match your specific situation:
- How complex are your workflows and custom fields on both sides?
- Do you need simple field copying or complex data transformation?
- What technical resources do you have available?
- How frequently do your integration requirements change?
- What’s your budget for both initial setup and ongoing costs?
There’s no universal right answer—just what works best for your current needs and constraints.
Organizations often start with simpler approaches and evolve over time. You might use native tools for initial migration, implement template-based integration for straightforward scenarios, then move to script-based integration as requirements grow more sophisticated.
Use Case: Learn how to sync multiple Jira instances.
Features to Consider When Choosing a Multi-Jira Integration Tool
When setting up your Jira to Jira integration, you need to consider potential problems and ensure your solution can handle them.
1. Complete Operational Control
This allows teams to:
- Work in different time zones without coordination bottlenecks
- Modify their sync rules without affecting the other side
- Maintain separate data governance policies
- Control access at a granular level
2. Flexibility & Scalability
Your multi-Jira integration needs will change over time. You might want to change what data is synchronized or the synchronization criteria.
For that, you need a Jira integration solution that supports:
- Custom field mapping that evolves with your workflows
- Conditional logic for complex business rules
- Different work item types and project structures
- Growing from 2 instances to enterprise-scale deployments
You can use AI-assisted configuration to generate integration scripts without extensive coding knowledge.
3. Security & Compliance
Platform security is a key consideration when choosing an integration tool for Jira. Review infrastructure to see how data storage and transfer are handled.
Since both sides intend to share and store sensitive information, invest in:
- ISO 27001 Certification – Independently verified security management
- Encryption – Data encrypted in transit (TLS 1.2/1.3) and at rest
- Role-Based Access Control – Granular permissions for who can configure syncs
- JWT Authentication, OAuth, Basic Auth – Secure token-based authentication
- Audit Trails – Complete logging of sync activities
- And much more…
4. Reliability & Resilience
You need software that works as close to 100% of the time as possible. It also needs to handle problems gracefully.
If one of your systems has downtime, the integration software should:
- Apply changes in the correct order once the issue is fixed.
- Handle the outage and resume operations when systems are back up.
- Get the systems back in sync automatically.
- Track sync events in the same order as the original work item events.

Our customers wanted to work on security tickets within their own service desks and didn’t particularly want to work in multiple vendor portals.
– MICHAEL FOWLER
ENGINEERING LEAD AT QUORUM CYBER
Why Use Exalate For Jira to Jira Integration?
AI-Assisted Sync Configuration
Exalate comes with an AI-assisted configuration – Aida, which generates sync scripts based on natural language descriptions. The scripts are written in the Groovy language.
To set up the connection, you can follow these steps:
- Describe what you want to sync in plain language.
- The AI assistant generates the appropriate script.
- Review and modify the generated code if needed.
- Test and deploy the configuration.
- Troubleshoot errors within the console.
We’ll go through the steps in further detail.
Example prompt: “Map and sync work item types between multiple Jira instances. Sync ‘Bug’ as ‘Defect’ and ‘Story’ as ‘User Story’. Include all comments and attachments.”
Exalate helps you generate field mapping scripts from your requirements and suggests optimal sync rules based on your use case. It also provides script templates for common scenarios, while providing syntax checking and validation.
Note: AI-generated scripts should always be reviewed by your technical team before implementation to ensure accuracy and alignment with your security policies.
Supported Platforms & Connectors
Beyond Jira to Jira integration, Exalate supports connections with:
- ServiceNow
- Freshservice
- Freshdesk
- Asana
- Azure DevOps (Cloud & Server)
- Zendesk
- Salesforce
- GitHub
This multi-platform capability allows you to build comprehensive integration ecosystems. For example: Jira (development) ↔ Jira (QA) ↔ ServiceNow (operations) ↔ Zendesk (support).
Security & Compliance
Exalate prioritizes data security for your Jira to Jira integration. It is ISO 27001 certified and allows role-based access control through granular user permissions.
With Exalate, data is encrypted both in transit using TLS 1.2/1.3 and at rest, protecting sensitive information throughout the sync process.
Your team maintains complete operational control over sync scripts and data transformations on your side of the integration. You decide what gets shared and how it’s mapped.
Exalate also uses secure token-based authentication to ensure that only authorized systems can access your integration endpoints. Options include (personal access tokens, JWT authentication, API Keys, and BasicAuth).
For detailed security documentation and compliance certifications, visit our Trust Center.
Sync Panel
Exalate also comes with a Chrome extension called Sync Panel that lets users check sync status, spot errors, trigger manual syncs, and unlink sync pairs straight from the browser, without opening the console.
It’s useful for two groups: admins who want to keep an eye on sync status without switching tabs and end users who want to confirm that the remote side received their update.
You can access this feature via the browser. But if you want to check the sync queue status or configure your sync, you still need to log into the Exalate console.
Supported Entities and Fields
You can sync virtually any data between Jira instances:
| Default Fields | Advanced Entities | Custom Field Types Supported |
| Work items (all types: Story, Bug, Task, Epic, Subtask) Summaries and descriptions Internal and public comments, Attachments, Statuses, Priorities, Assignees, and reporters, Due dates, Labels, Components, Fix versions, Time tracking (original estimate, time spent, remaining estimate), Links (related work, blocks, is blocked by). | Sprints (sync sprint assignments between instances), Epics (including epic hierarchies), Subtasks (maintain parent-child relationships), Custom fields (all types: text, select lists, cascading selects, checkboxes, date pickers) | Text fields (single line, multi-line) Number fields, Date and datetime fields, Select lists (single and multi-select), Cascading select lists, Checkboxes, Radio buttons, User picker fields, LabelsURL fields |
For a complete list of supported entities and fields, check the Exalate documentation.
Integration Pricing
Exalate offers subscription-based plans designed to scale with your integration needs.
Common Use Cases for Jira to Jira Integration
Let’s review practical examples of Jira-to-Jira integration that solve real business challenges.
Case 1: Connect Customer Support and Development Teams
The Challenge: Customer support teams receive feedback from customers—technical problems, unclear UI areas, and feature suggestions. Developers want to know what doesn’t work and why, and they’re open to new suggestions. However, developers don’t need all the details or internal discussions between customers and the support team.
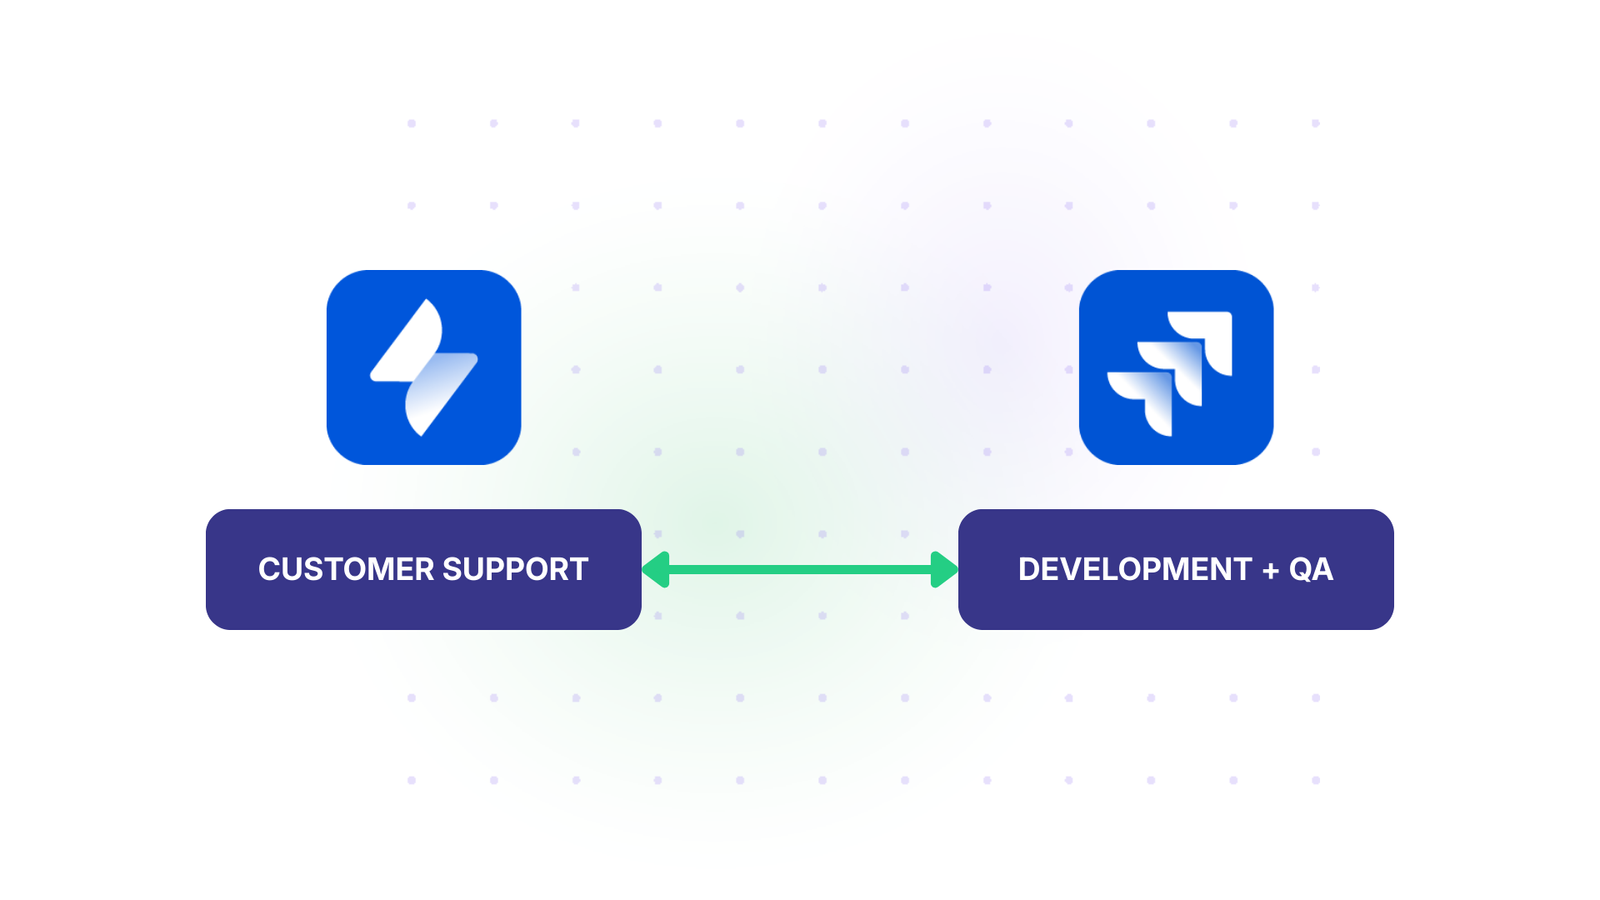
The Solution: Set sync rules to send developers only the information they need. Solutions and status updates flow back to the support team automatically. Include time limit fields or comments that support can relay to customers.
Real-World Impact: The Gantner Group used Exalate to establish a frictionless collaboration ecosystem between developers and support staff, which increased resolution speed by 50 times.
Case 2: Connect Marketing and Design Teams
The Challenge: The marketing team tracks features popular in competitor products or features that consumers respond to in campaigns. The design team analyzes these to determine whether they’d be a good fit for the product.
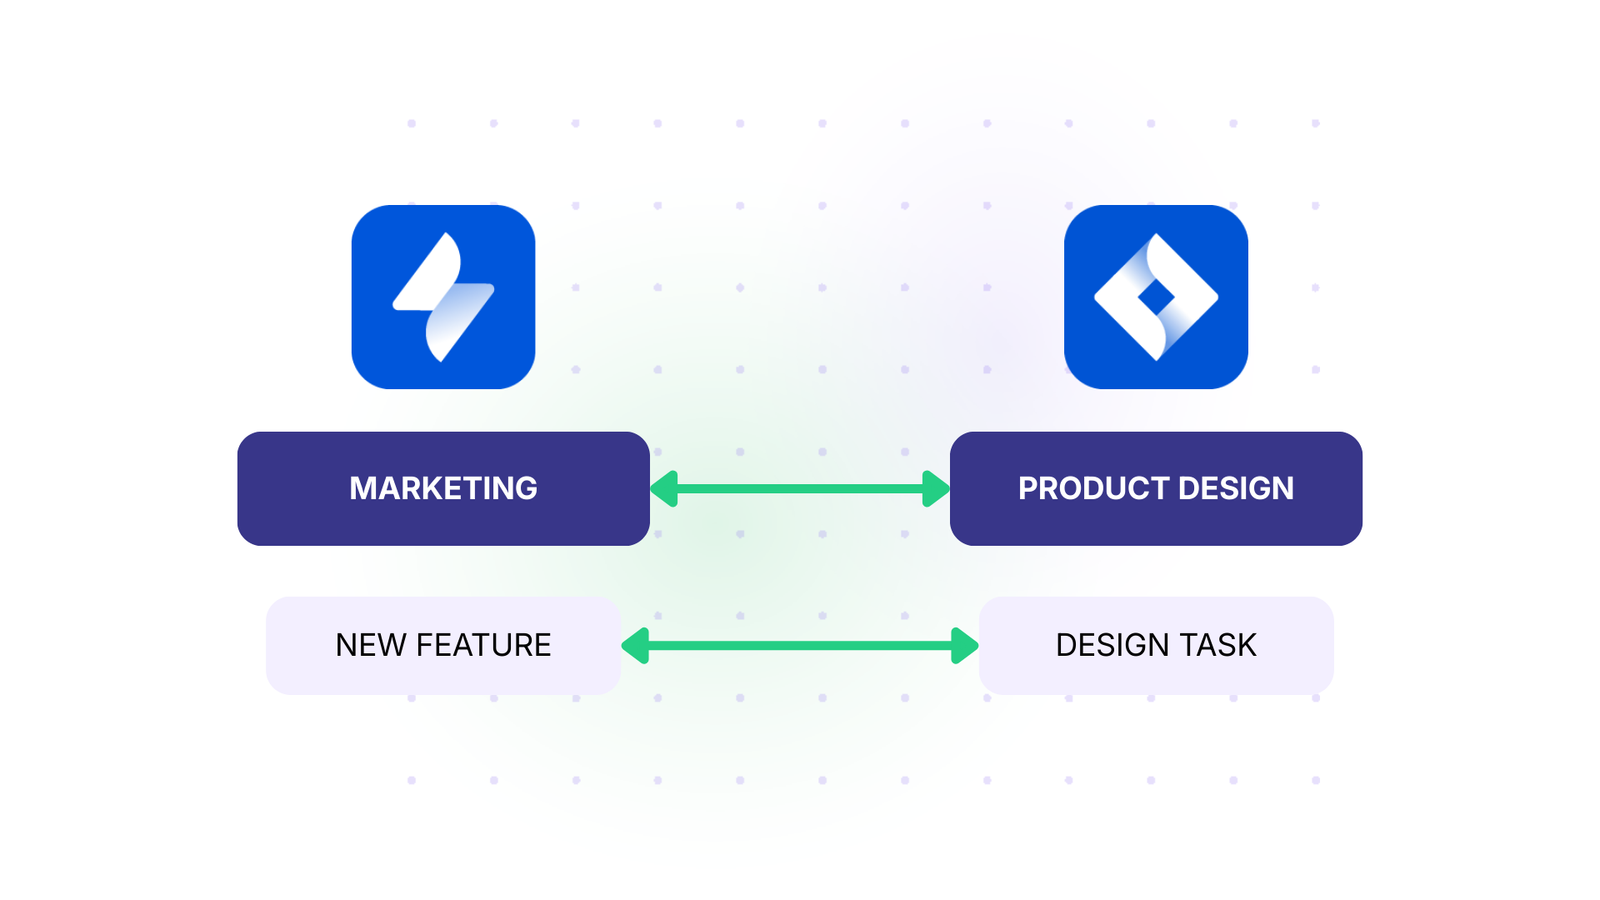
The Solution: Create a label corresponding to these features, like “new-features“, then create a trigger “label = new-features”. This should be one-way synchronization, as the marketing team doesn’t need to see the design team’s internal work.
When marketing tags something with “new-features“, it automatically syncs to the design team’s Jira instance. The design team works independently, and only final decisions or updates sync back if needed.
Real-World Impact: Vodafone leveraged Exalate’s multi-Jira integration solution to optimize the efficiency of all internal and external collaborations. This helped them achieve data consistency and visibility across multiple instances.
Case 3: Connect with Multiple Suppliers
The Challenge: When you have multiple suppliers, you need to connect your systems with theirs while keeping suppliers’ information separate from each other. Each supplier needs maximum autonomy without seeing other suppliers’ data.
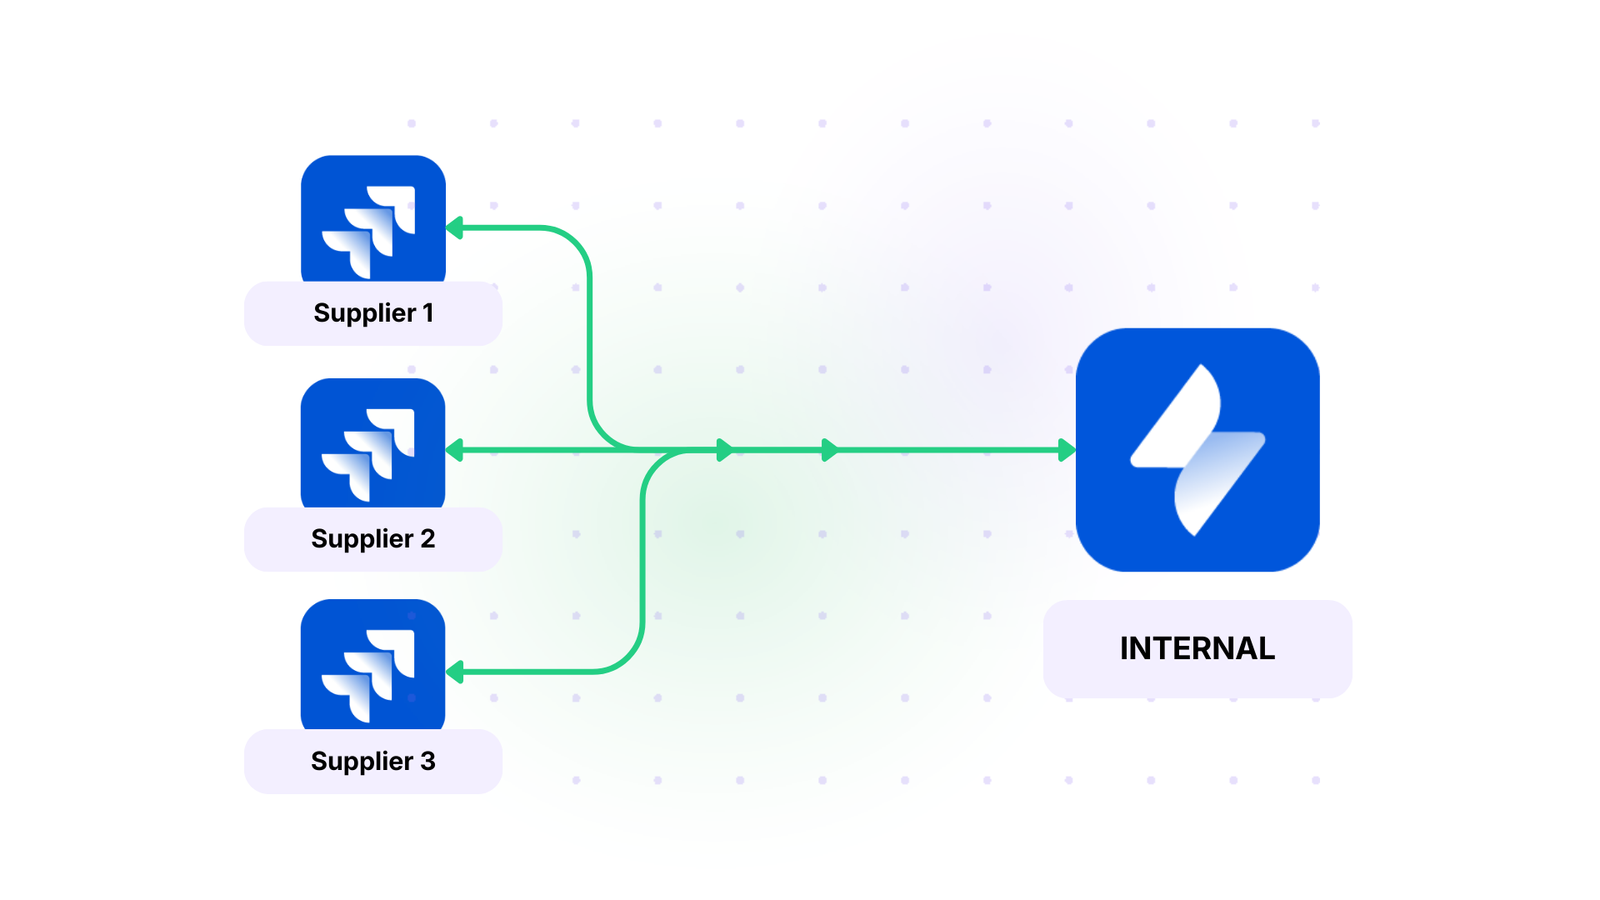
The Solution: With Exalate, you can exchange information safely with each supplier in separate, independent connections. This lets you collate information in your central instance without leaking suppliers’ data to each other.
Real-World Impact: Insurance company Turkiye Sigorta regained control and connected with multiple suppliers using Exalate. They created “safe islands” where they could work with the data they needed while maintaining customer confidentiality.
Case 4: Managed Service Providers with Customer Handling
The Challenge: Managed service providers (MSPs) need to handle work with their customers. The businesses they deal with have different contracts and expectations. MSPs must share relevant information with clients while keeping internal notes, pricing, and operations private.
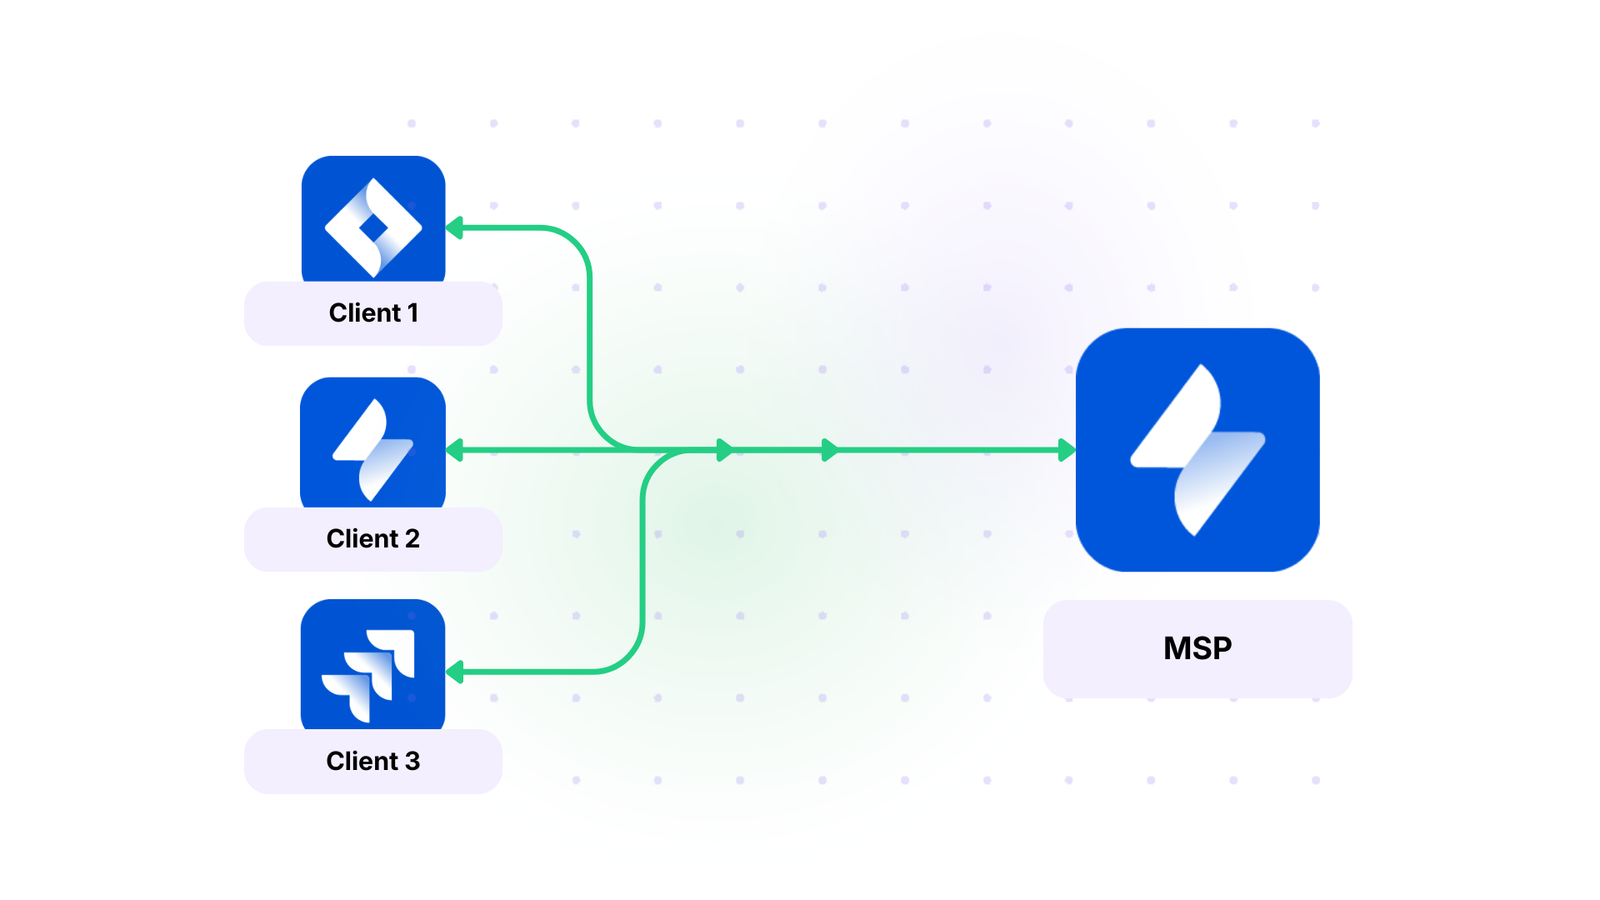
The Solution: If an MSP has a small number of large clients, they can assign specific people to handle each one. Exalate ensures relevant work items are assigned to the correct person automatically. The integration shares information between systems while keeping some data internal to the MSP.
Real-World Impact: NVISO, a cybersecurity managed security services provider (MSSP), uses Exalate as a competitive advantage to automatically generate tickets, sync comments, attachments, and statuses between platforms.
Case 5: Outsourced Quality Assurance
The Challenge: Software and game developers outsource QA to third-party teams that have their own workflows within Jira. The development team needs to track bugs reported by QA without granting full access to their development instance. The QA team needs visibility into fix status without seeing unrelated development work.
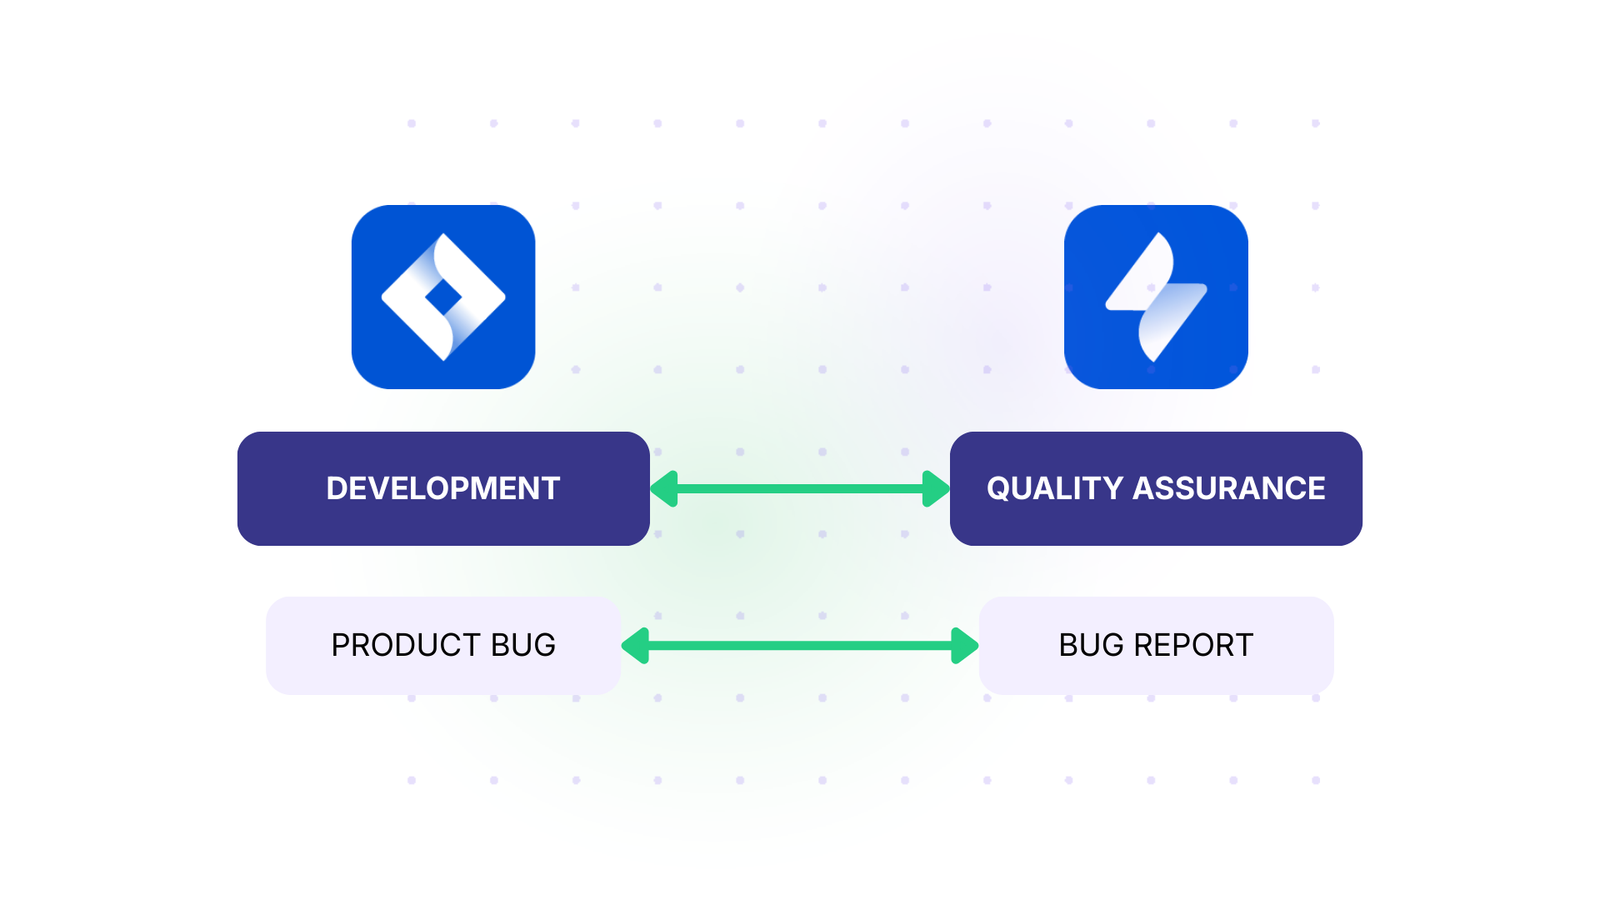
The Solution: Bidirectional sync of specific work item types (bugs only) with filtered field mapping. Bug reports flow from QA to development, while status updates and resolution notes flow back.
Case 6: Onboarding Staff Members
The Challenge: New staff members need to learn the ropes while managers ensure they’re responding to work items correctly. Manually reviewing every work item is time-consuming, but complete autonomy too early can lead to mistakes.
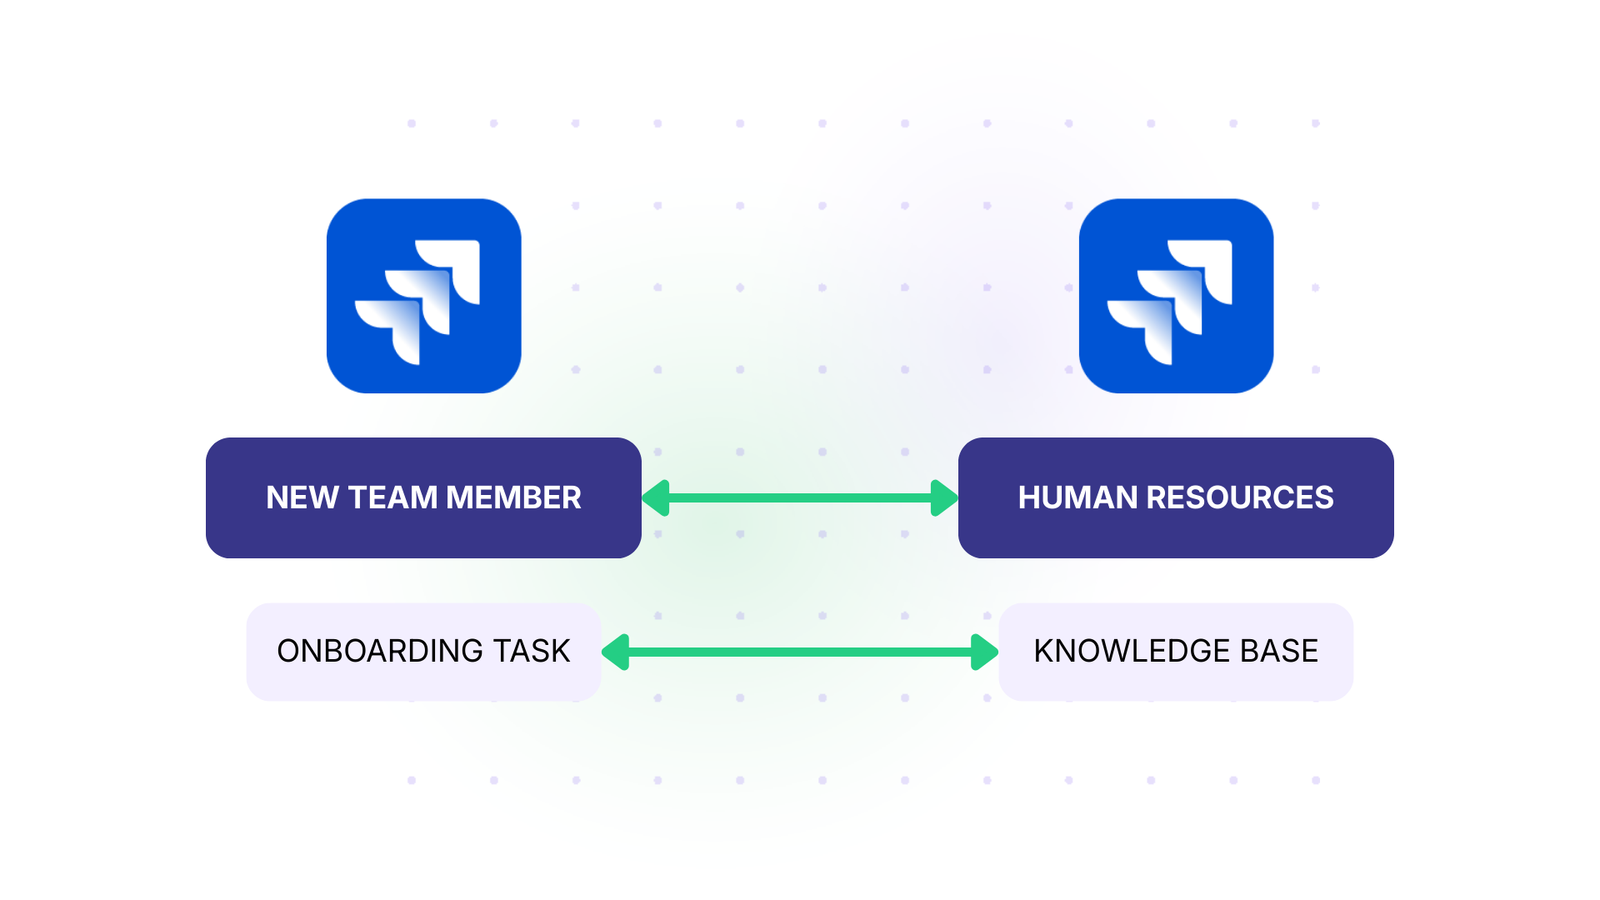
The Solution: Set up Exalate to copy work items created by newcomers to another system where managers can check their progress. Create a synchronization trigger like assignee = team-member-name, then set the sync rules to copy over whatever management wants to review. When the new team member is up to speed, delete or deactivate the trigger.
Real-World Impact: Netguru implemented Exalate’s Jira connector to link the ITSM and business teams. This reduced licensing costs and established harmony between the teams while providing effective oversight during onboarding.
Case 7: Connect Companies with Outsourcing Partners
The Challenge: When your organization outsources services like customer support or web development, you need to integrate Jira Service Management and Software instances smoothly. Both sides need autonomy while sharing essential project information.
The Solution: Using Exalate, both sides can maintain separate instances with full autonomy, guaranteeing that only essential information is shared with partners. Each side controls what data crosses the boundary through independent sync rules.
Real-World Impact: Quorum Cyber implemented this model to enhance cybersecurity operations and improve average response time. They maintained strict security boundaries between their operations and client systems while ensuring seamless collaboration.
Case 8: Create a Network of Systems
The Challenge: Complex business environments involve multiple companies and platforms. For example, a company using Jira Software syncs with another company using Jira Service Management. When they need to onboard a third party working with Jira on-premise, they need a solution that connects all three.
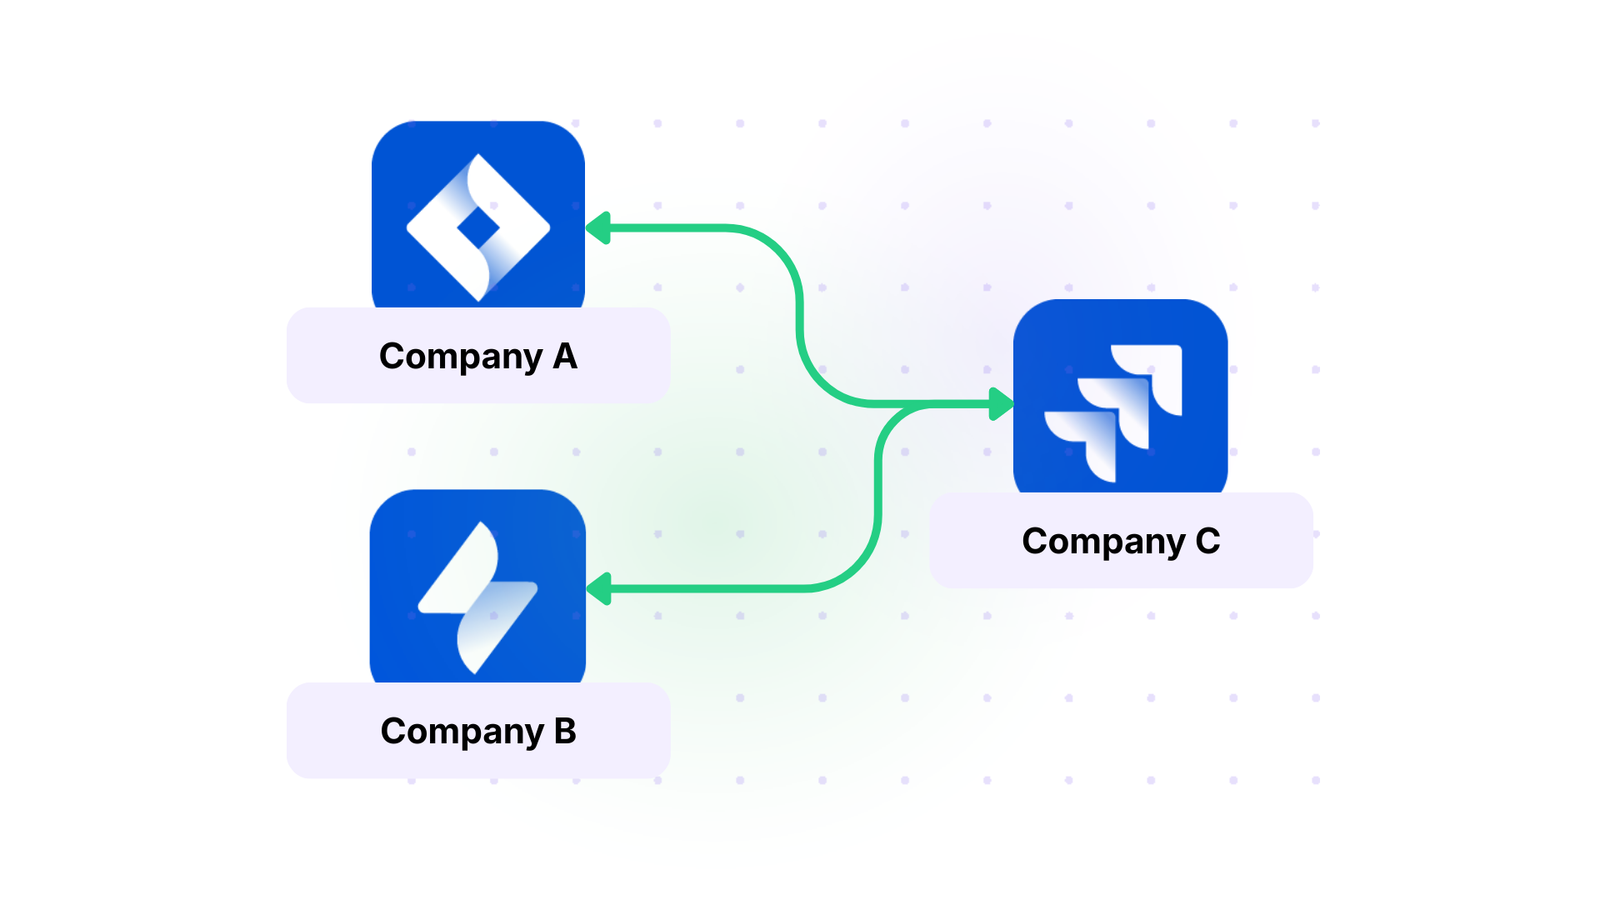
The Solution: Exalate serves as the bridge between multiple instances, creating a network where each connection operates independently. Your organization and partner organizations only see the work items each chose to sync with the others.
Real-World Impact: SPK leverages Exalate to streamline operations, saving each engineer 5 hours weekly by automating information flow across their network of systems. Teams can explore multi-platform integration using Exalate’s AI-assisted configuration to generate sync scripts for complex scenarios.
Case Study: Read why 60% of Quorum Cyber customers want service desk integration.
A Step-by-Step Setup Guide For Jira to Jira Integration With Exalate
If you prefer a video tutorial, find it here.
- Visit the Exalate integrations or create a new account. Sign up with your business email or use Google Sign-In.
If you already have an account, you can log in to access the dashboard.

- To create a connection, you’ll need an active Exalate account and the access credentials for the systems you want to connect (System A and System B).
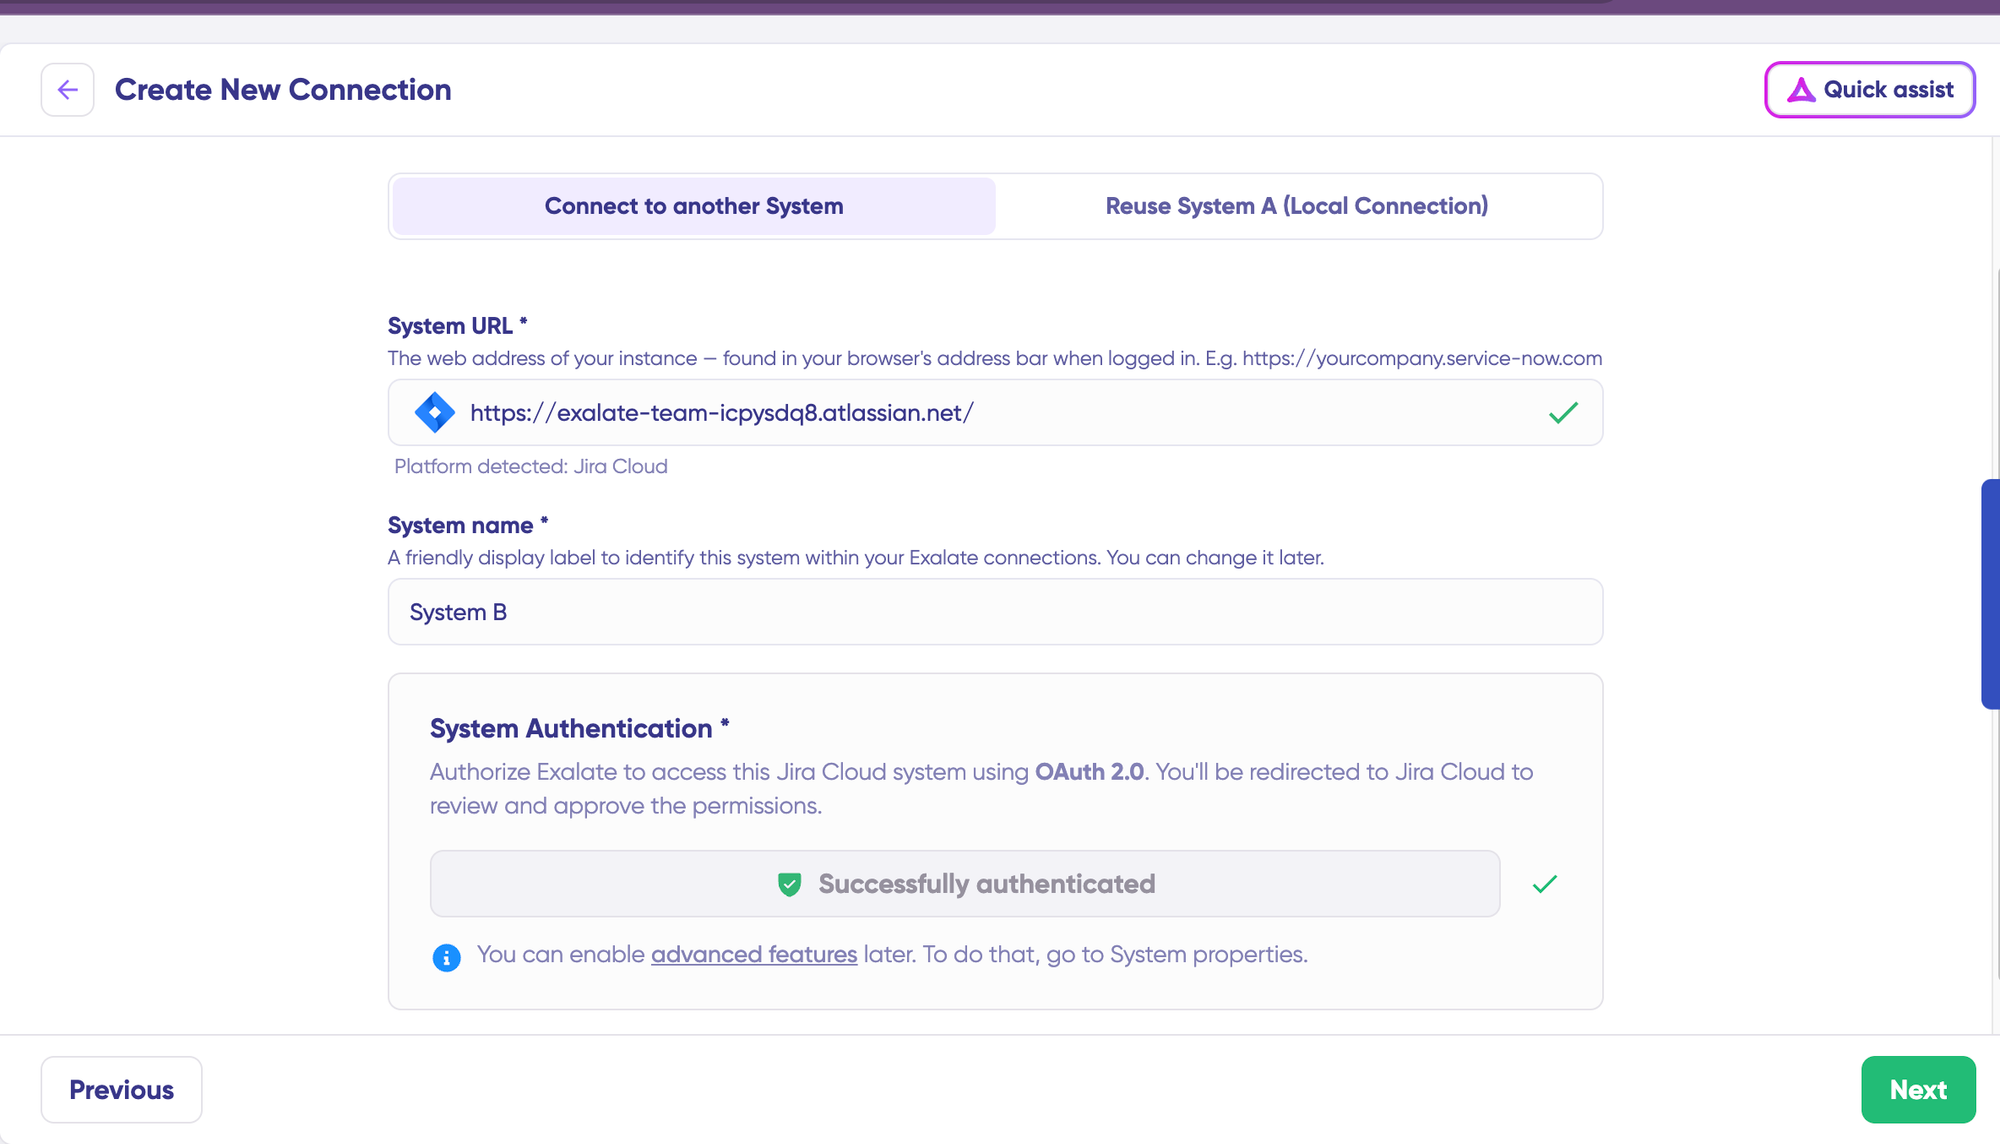
- Click on “+ Add connections” > “Create new connection”. Enter the name for your first system. Enter the URL of your system (Jira).
Wait for checks and authentication to happen automatically under the hood.
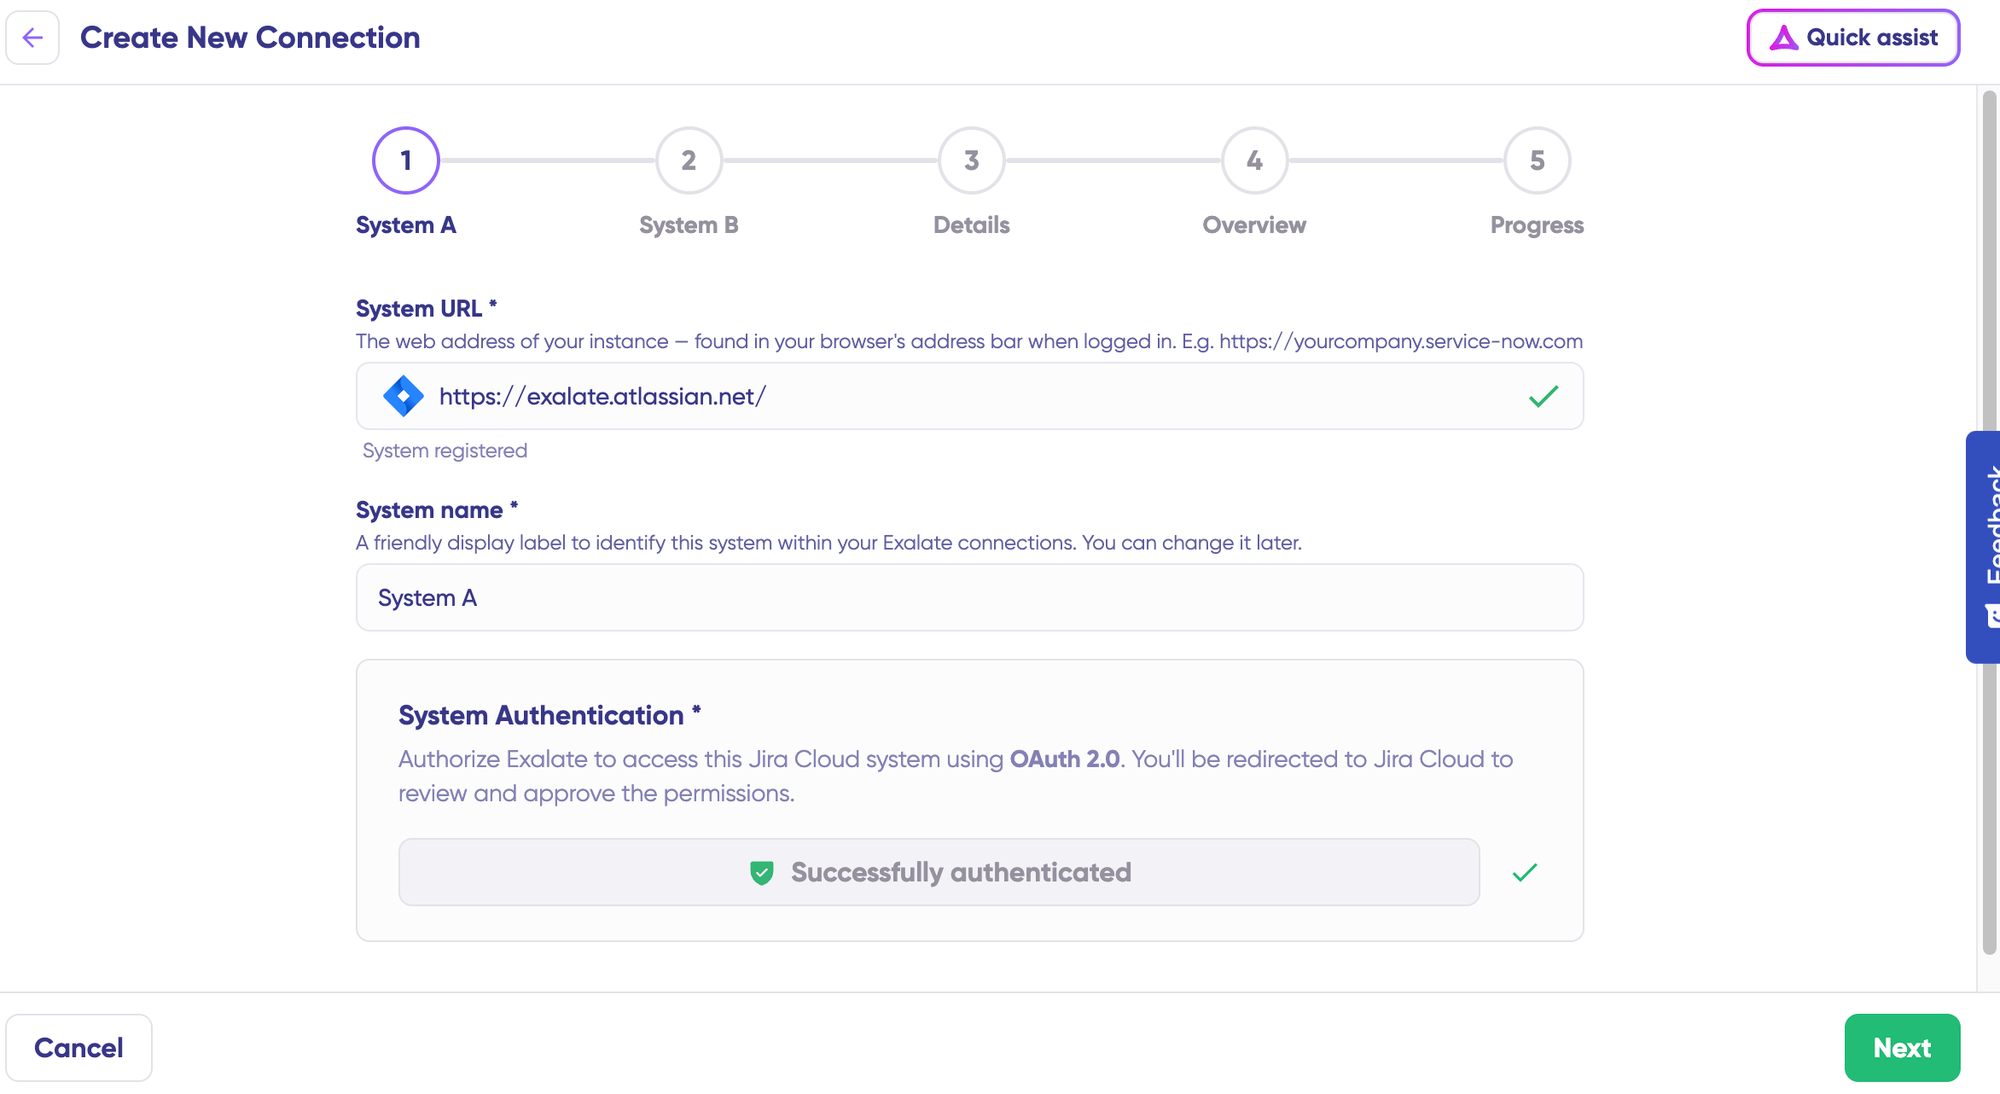
Enter the authentication details. For Jira, you need OAuth. Click on “Check Authentication”. If all is well, you’ll see “Successfully Authenticated”.
Click Next to configure System B (Jira). Follow the same procedure as for your System A (Jira) instance.
Click Next, then confirm the Connection Name and add a description (optional). Review the connection setup and click on “Create Connection”. Wait for a few minutes, so all the checks and setups will be configured in the background.
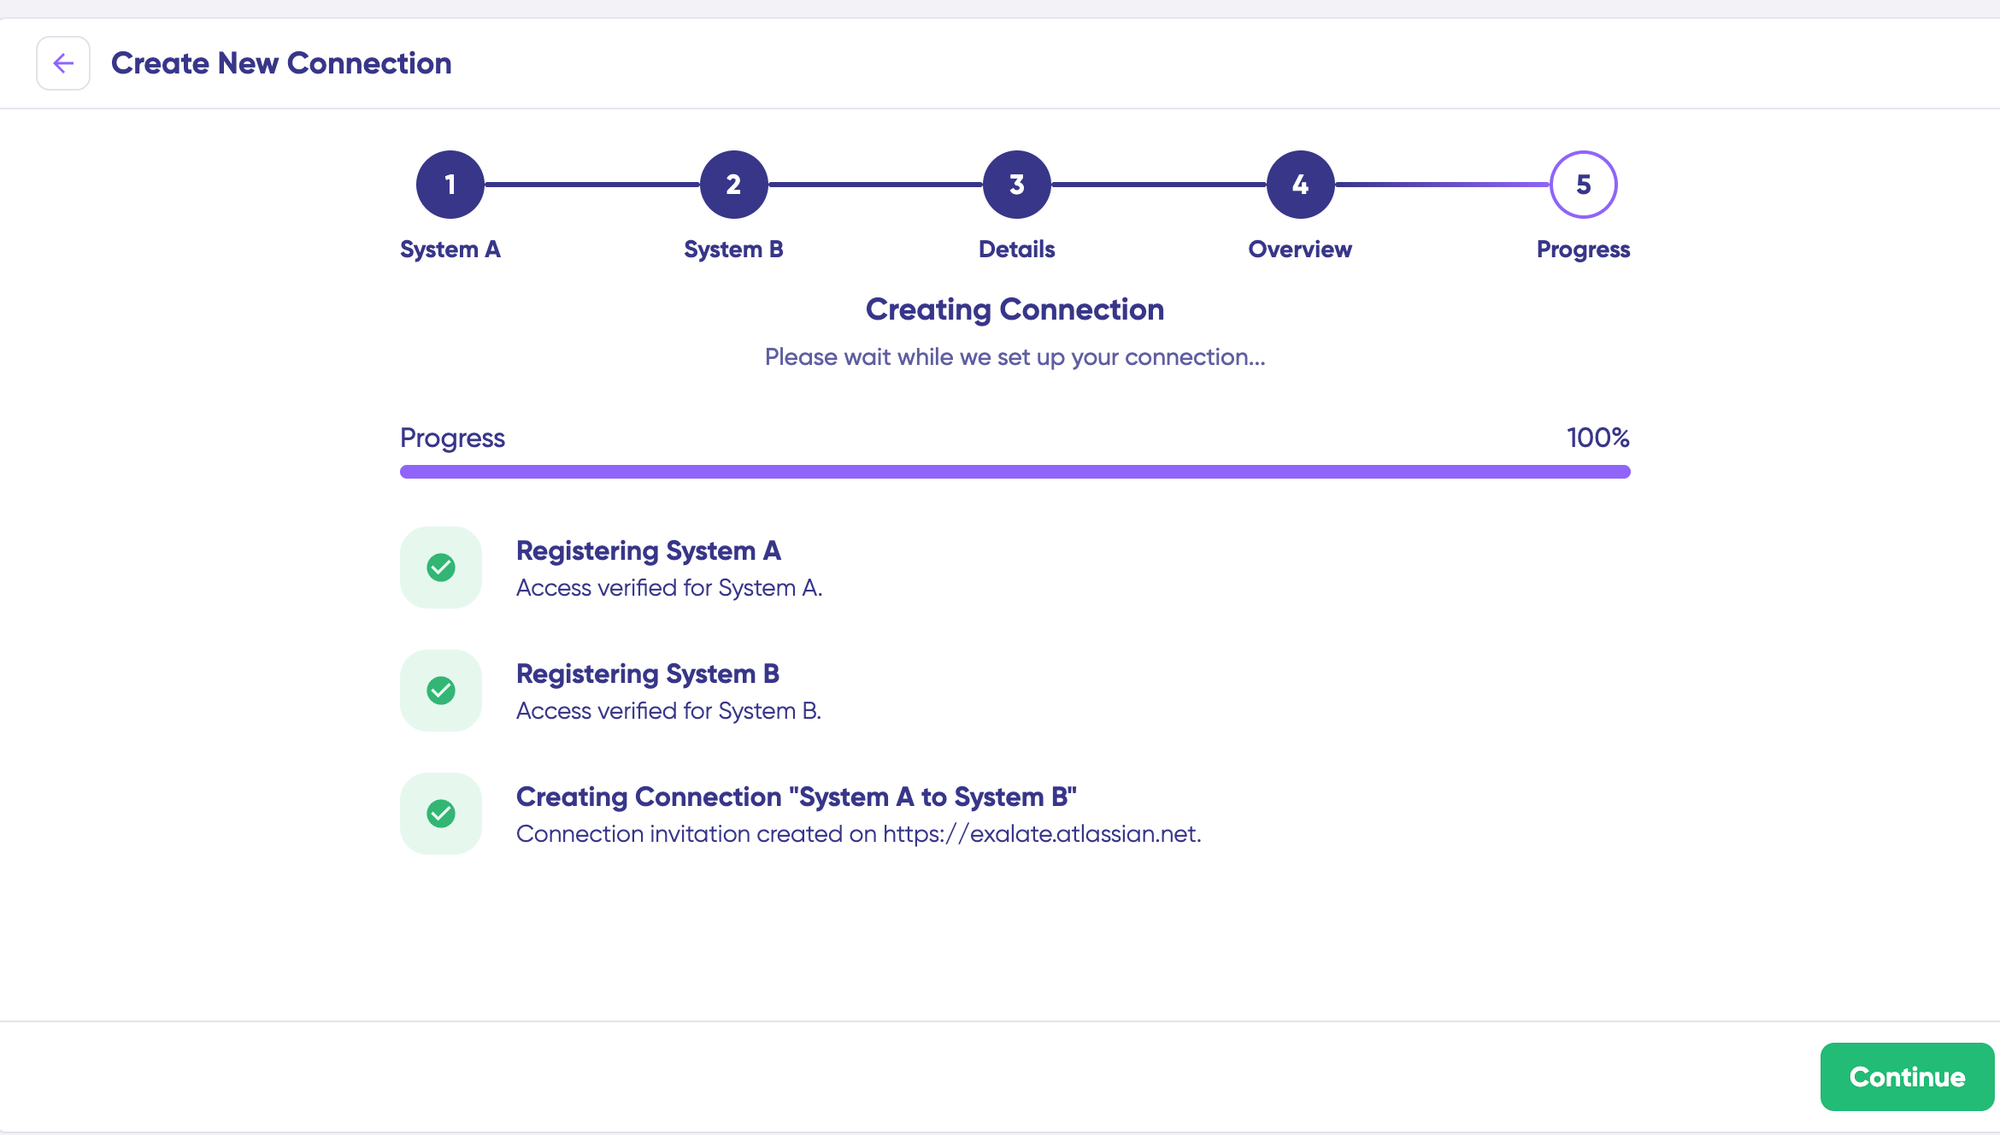
Once done, click “Continue”. Voila! Your first connection has been successfully set up.
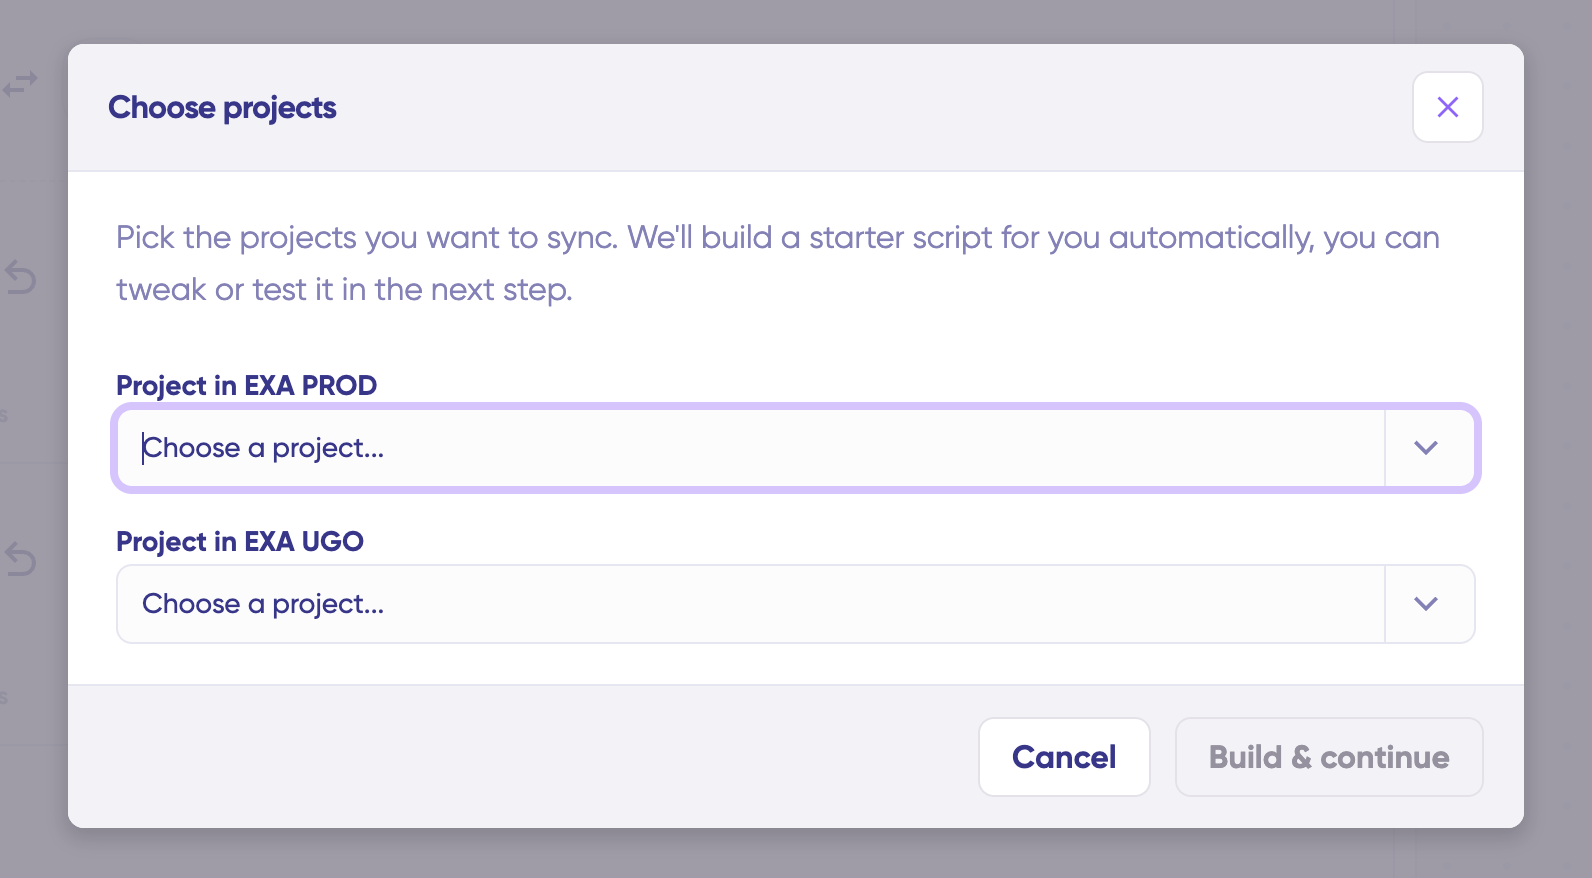
Choose a project you want to sync on both sides from the dropdown menu. Click “Build and Continue”.
Through local connections in Jira, you also have the option to sync work items between different Jira projects (or spaces) within a single instance.
Example: take a URL like https://example.net/ hosting 2 Jira projects (or spaces). Project A has work item PRA-1; Project B has work item PRB-2. Local connections in Exalate handle the sync between the two.
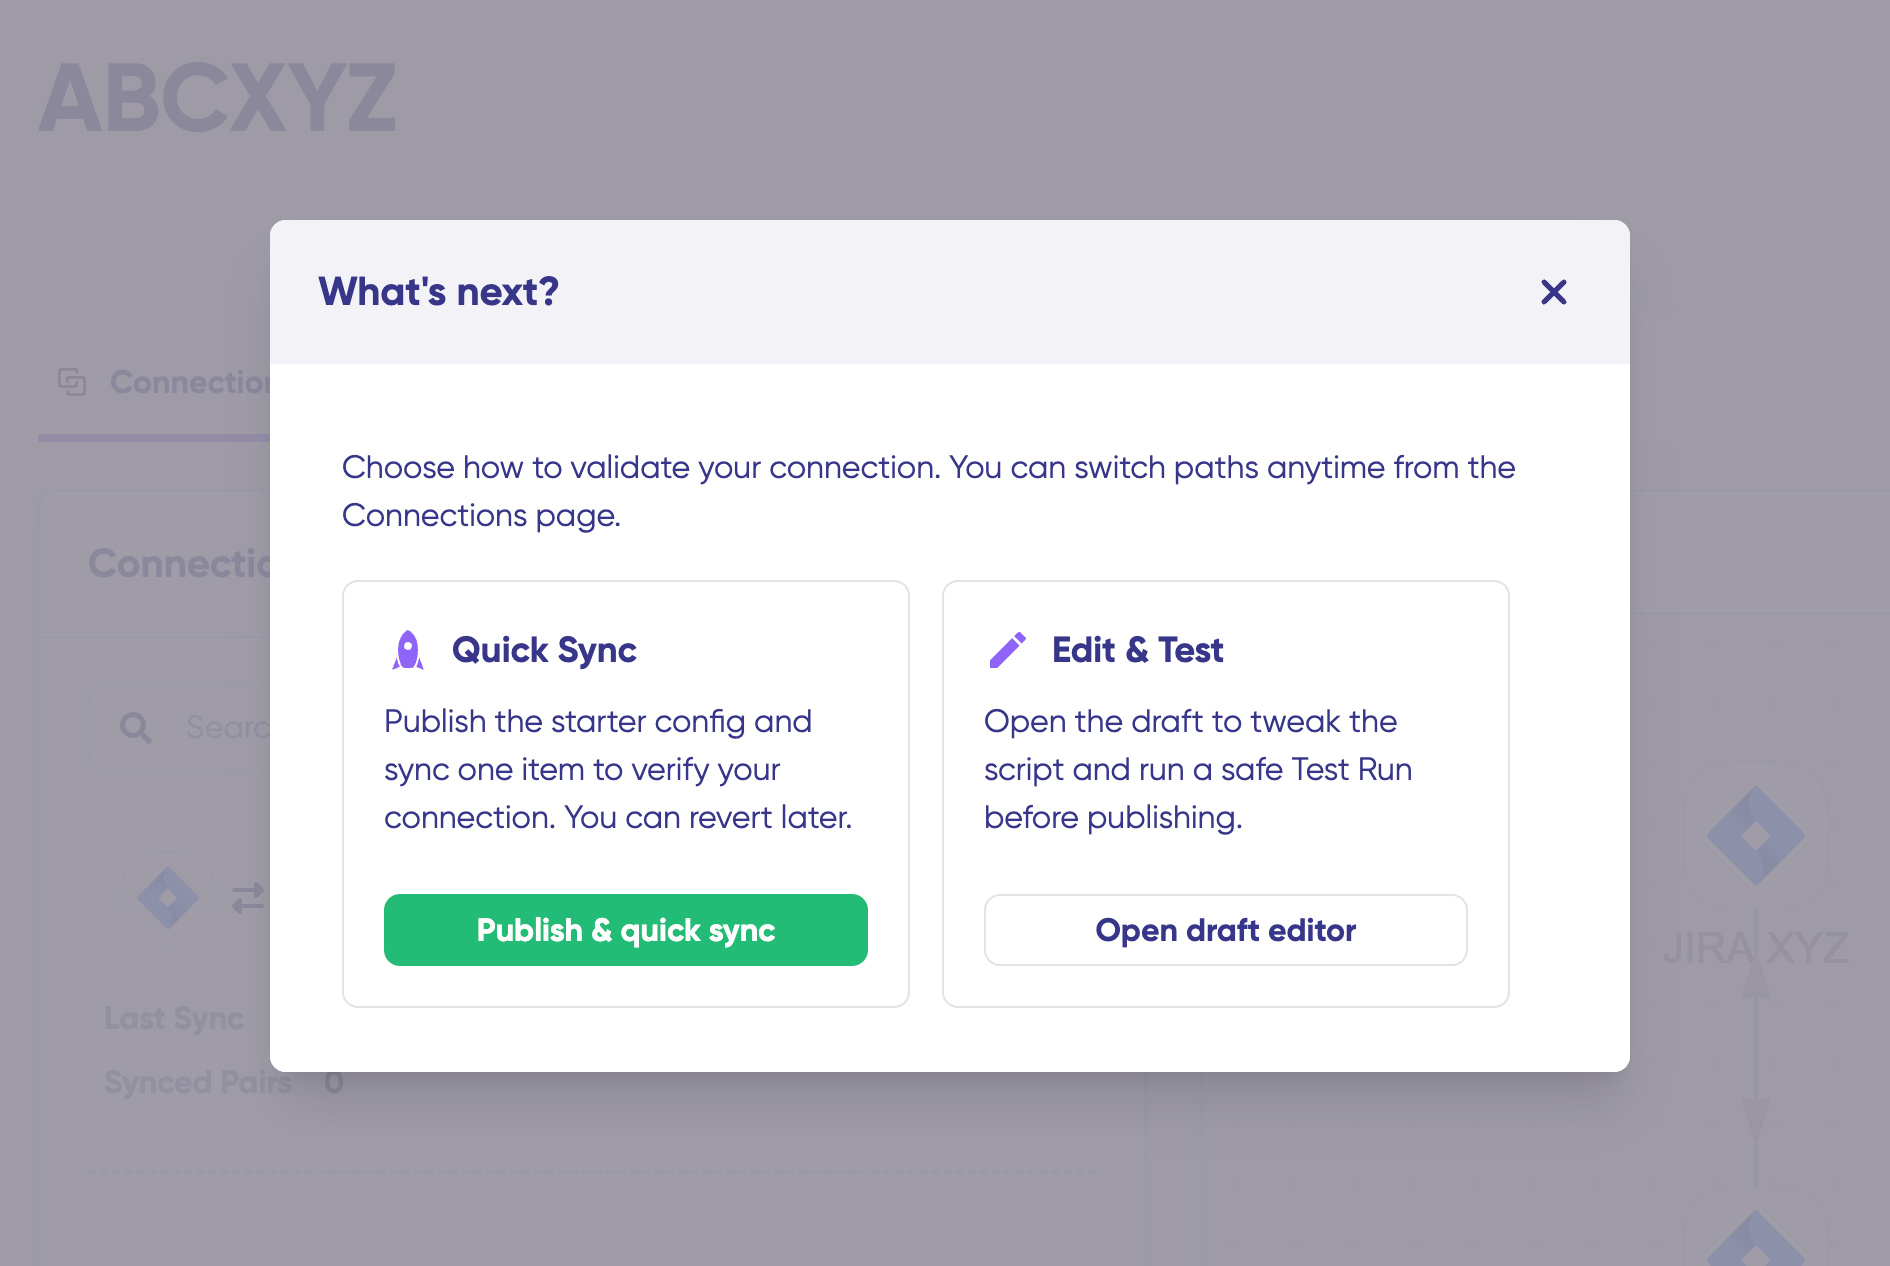
Now, you have 2 options: “Quick sync” and “Edit & Test”. Let’s proceed with them one by one.
- Quick Sync: This option allows you to sync one item between Jira instances.
Under the “Item sync monitor,” enter the work item key and click on the “Sync Now” option.
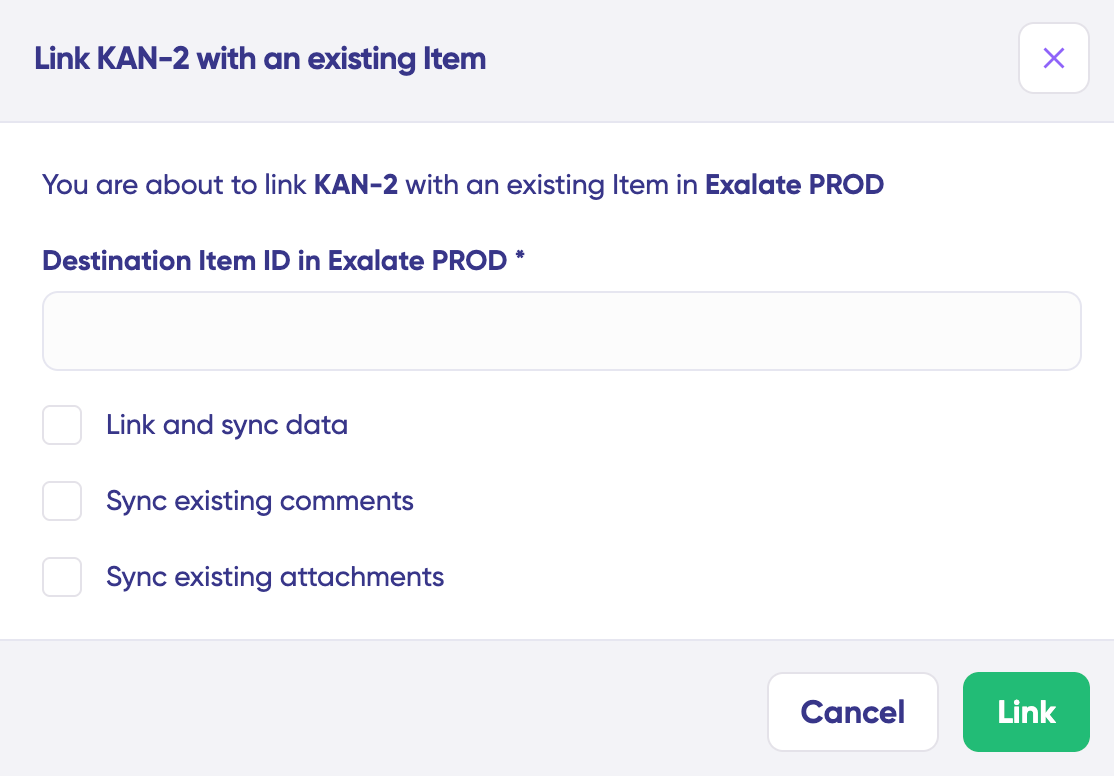
To link 2 existing items, click “Link with existing”. Once the sync is complete, you can view both the synced issues in a new window. You can also choose to compare the changes.
- Open draft editor: This option allows changes when you click “Create a new version” or select the “Open latest draft”. This ensures you don’t modify the existing configuration accidentally.
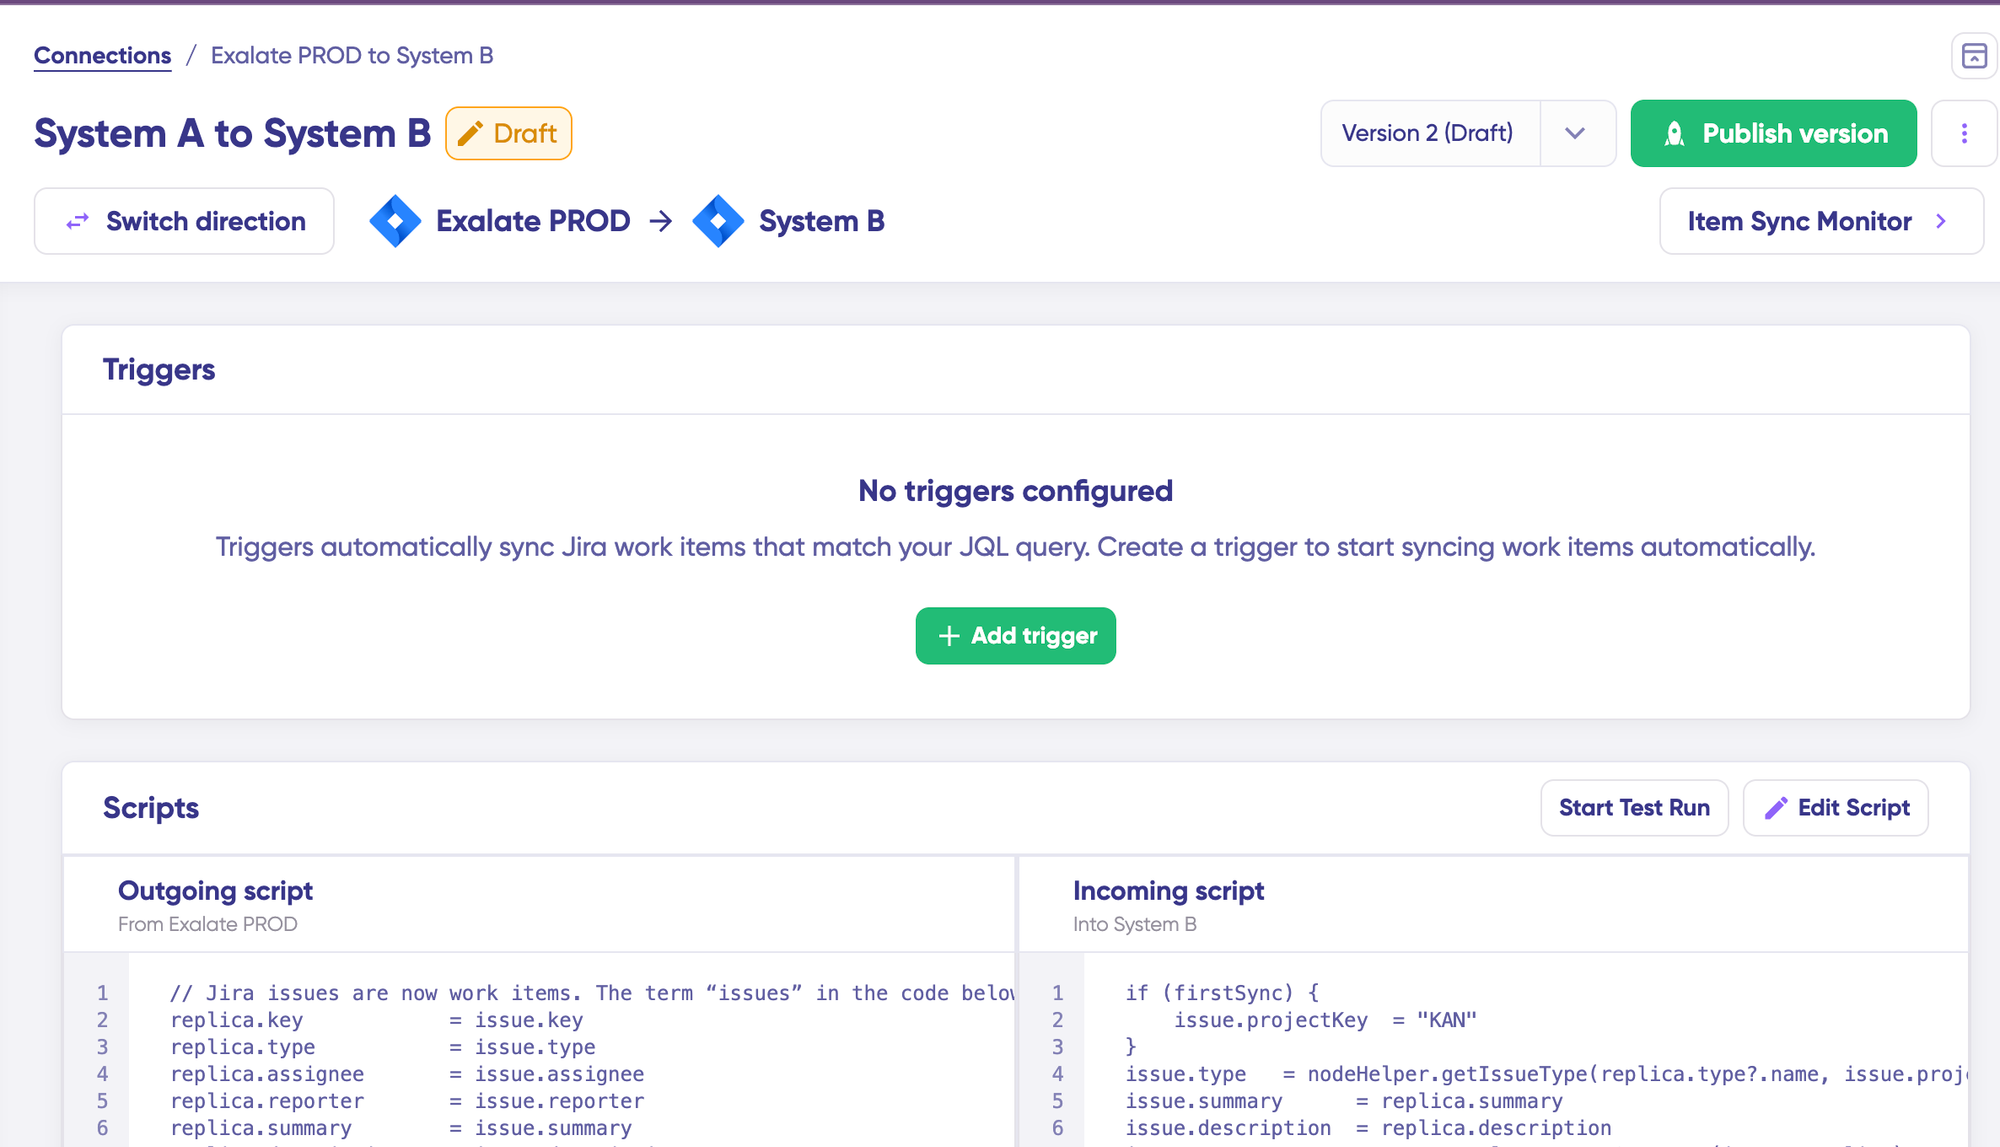
Once active, click the “Edit” button to open the editor and adjust the sync rules (Groovy-based scripts). These scripts enable users to add custom data logic and mapping for complex or advanced use cases or workflows.
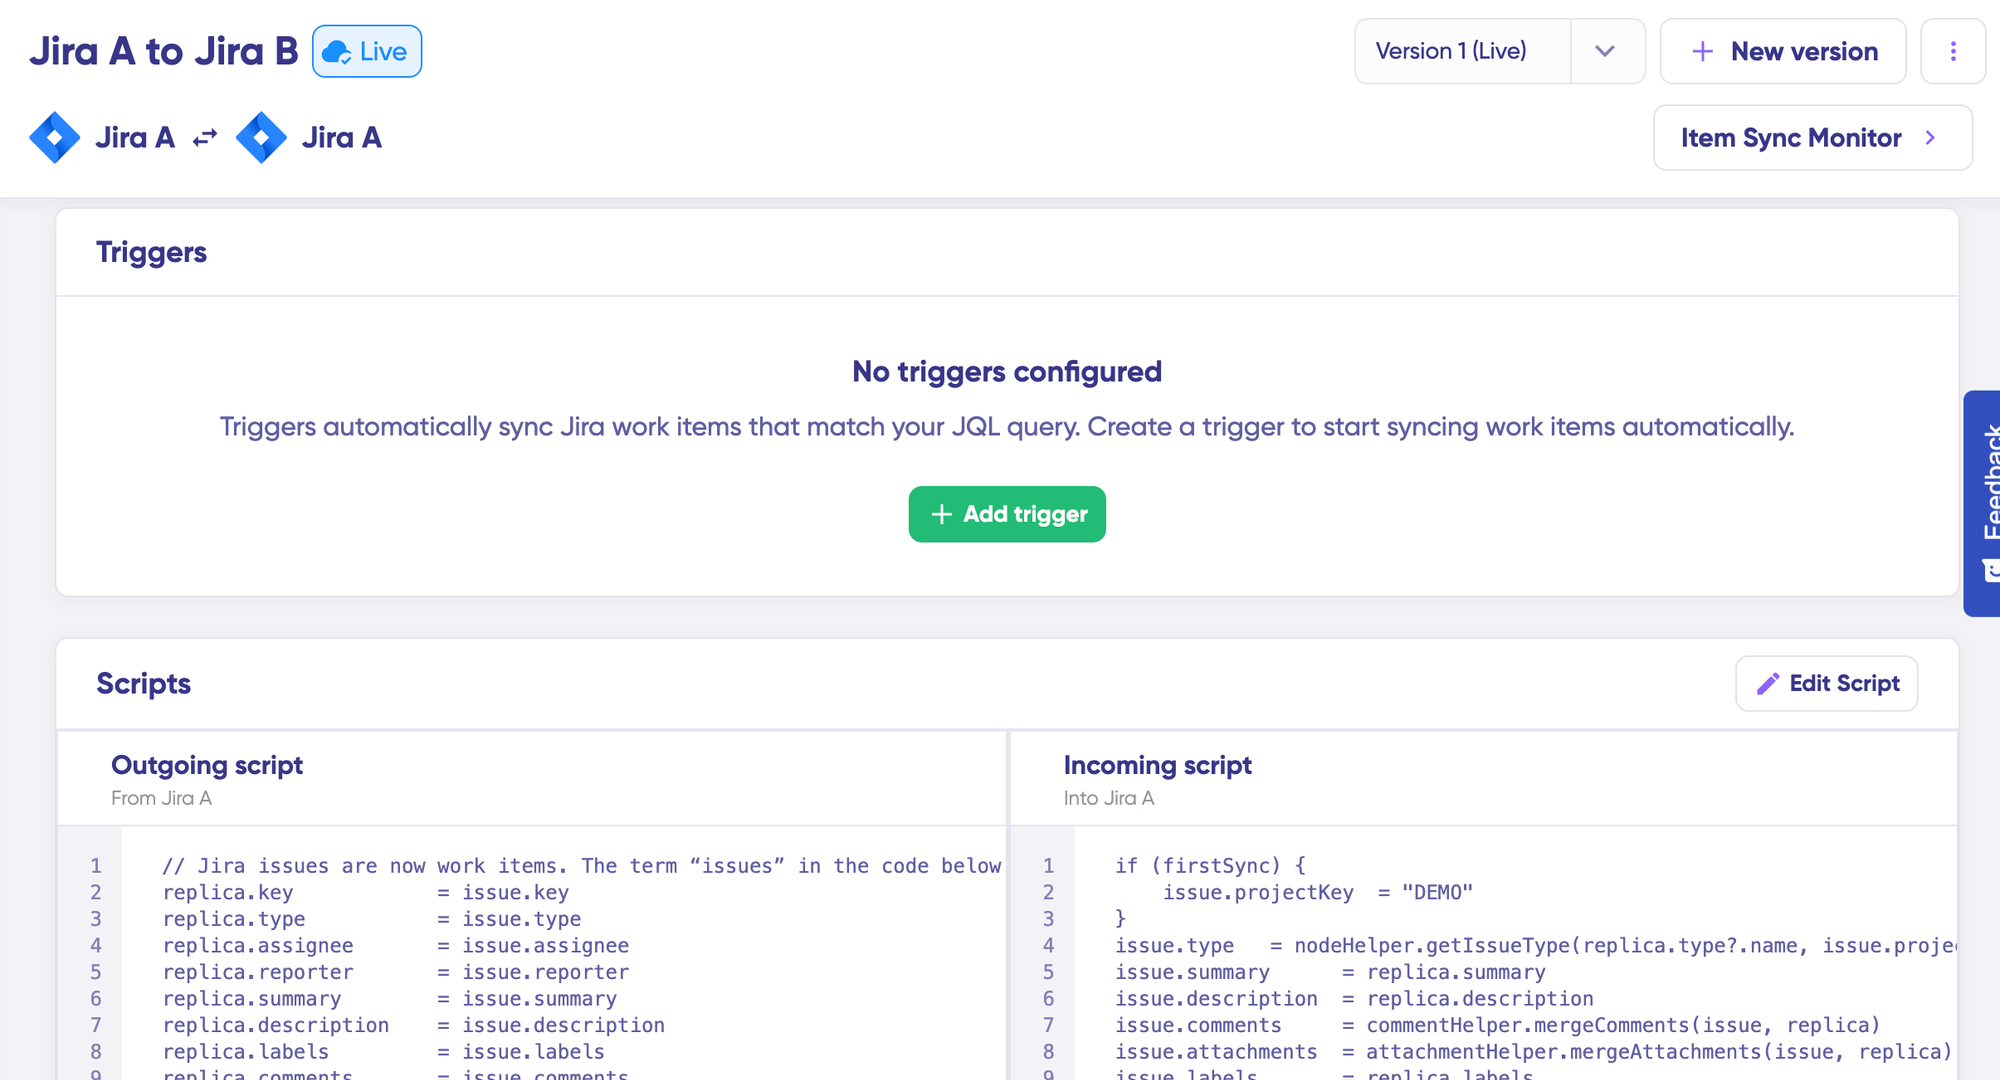
Swap the sync direction by clicking the two arrows next to the connection name.
The outgoing script will hold the values passed from Jira A to Jira B, and the incoming sync will define how the values coming from Jira B are mapped in Jira A.
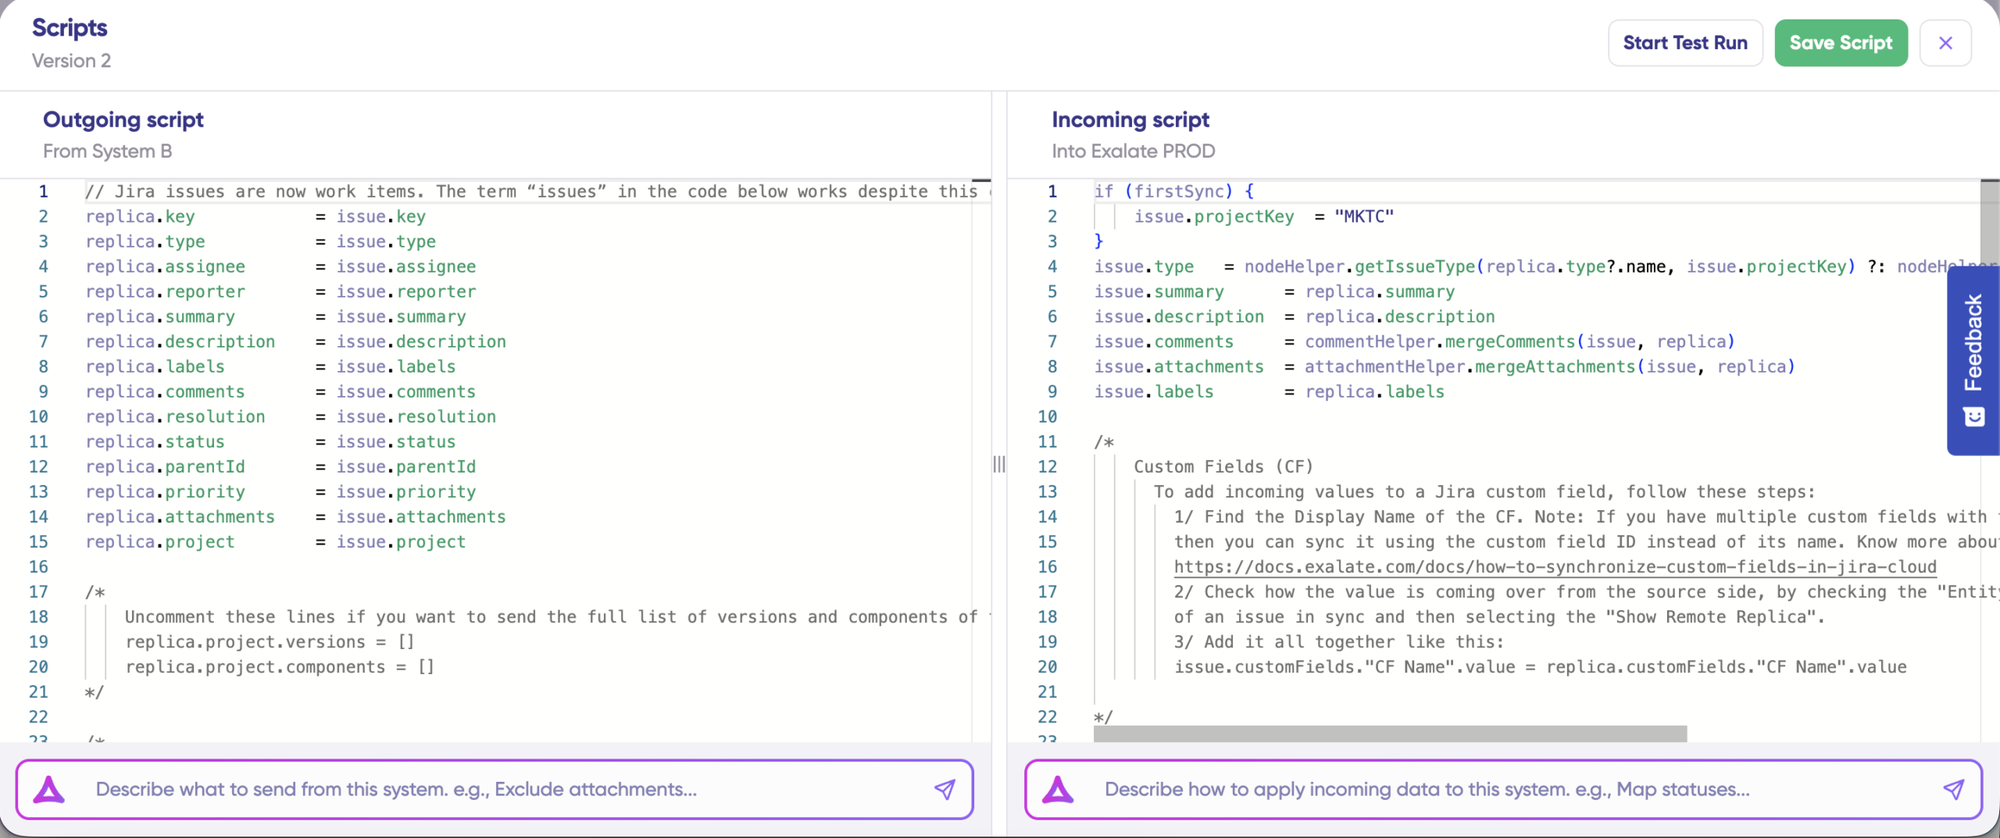
The Replica is a JSON file that carries the payload containing data being shared across entities on both Jira instances. You can adjust the sync scripts if you know the Groovy language. Otherwise, use Aida, our built-in AI assistant.
- Use Aida to generate sync scripts. Aida exists in both incoming and outgoing script sections, so choose the side accordingly.
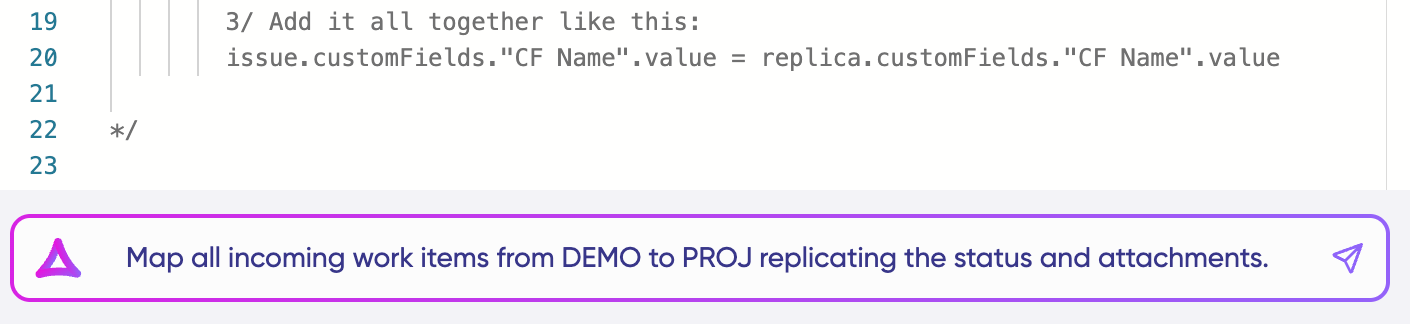
For Outgoing scripts: Describe what data should leave your system. Eg, “Exclude attachments” or “Only sync high-priority issues.”
For Incoming scripts: Describe how incoming data should be applied to your system. Eg, “Map statuses between tasks“.
The scripts are generated based on Exalate’s scripting API and your existing scripts.
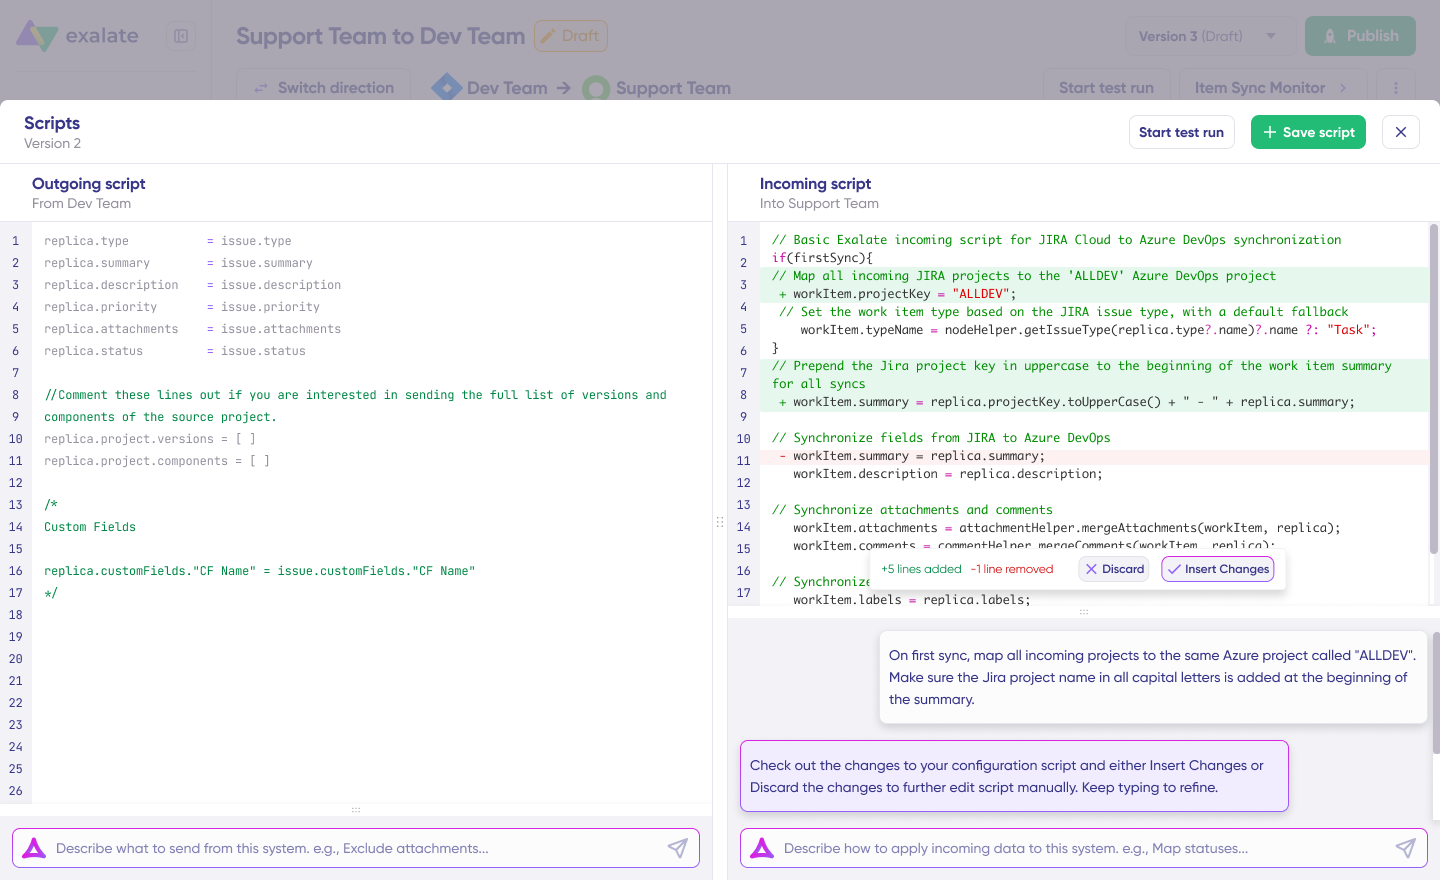
Review the output to validate the suggested changes. New lines are highlighted in green, while suggested removals are highlighted in red. Choose to “Insert” or “Discard” the suggestions.
Note: Just like with any other AI solution, please review the generated code before applying it.
Once you have your sync scripts ready, you can choose to “Save script” or proceed to dry-run them before publishing.

- Click “Start Test Run” and “Select items” to sync. You can select multiple work items. Wait for a bit, and you’ll see the detailed results of the fields synced and the payload shared between both instances or systems. If you are satisfied with the results, click “Publish Version”.
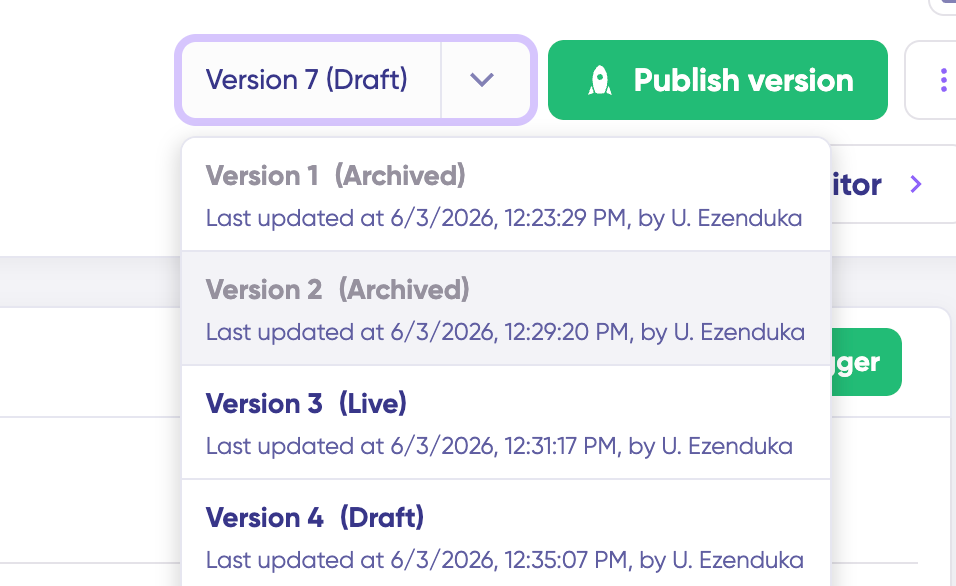
You can view all versions from the “Version” dropdown. The versions can be either “Active”, in “Draft” (editable), or “Archived”.
- Set up triggers to automate your sync. These are conditions or filters you apply to specific items. For instance, sync all Jira work items that have “label = dev”.
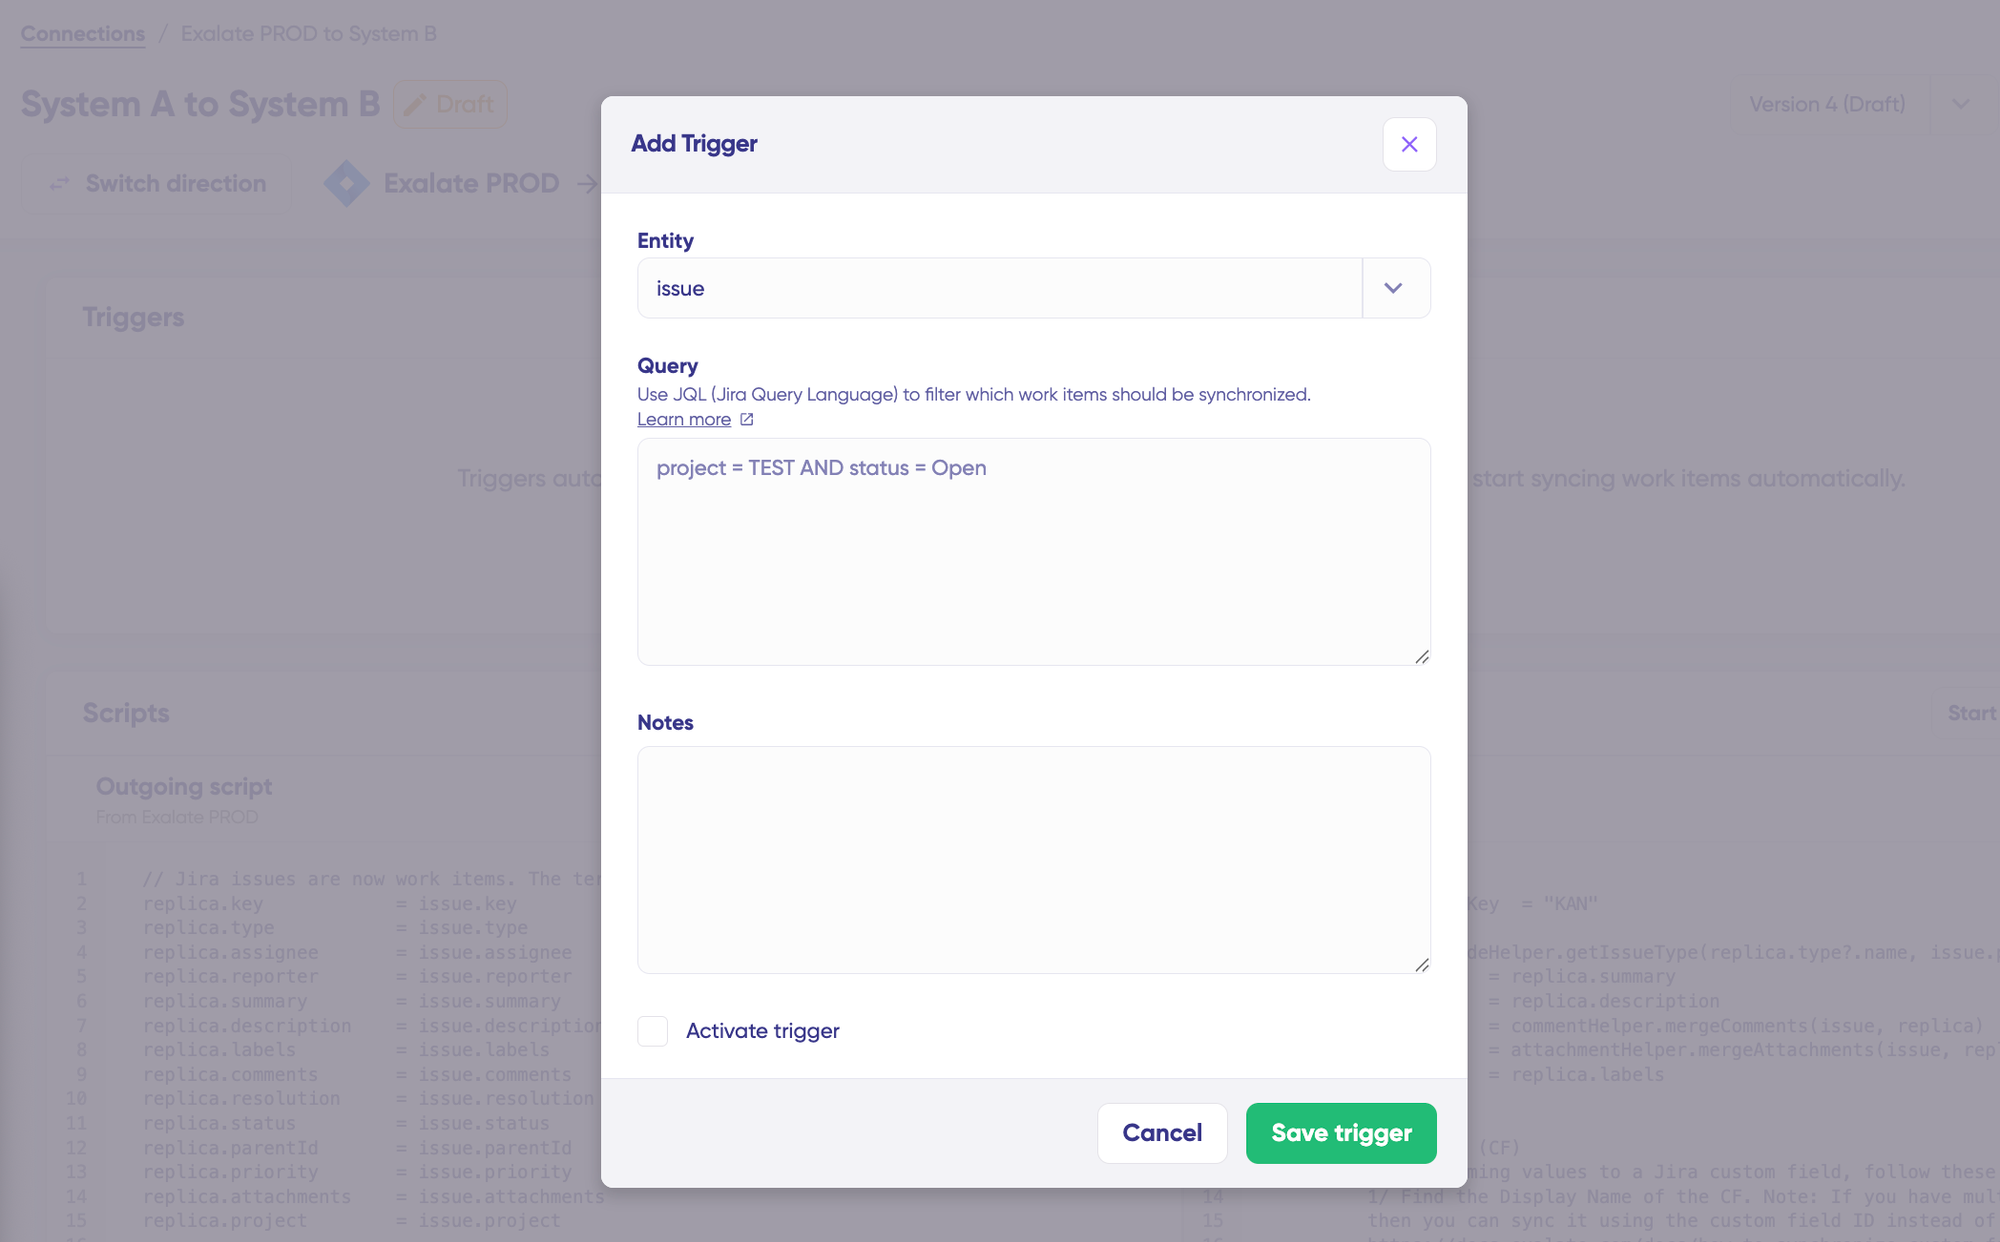
Click the “+Add trigger” button to start creating platform-specific triggers.
Choose the entity type (issue or sprint). For Jira, you can use Jira Query Language (JQL) to specify conditions for work items or sprints: “Project = EXA” will only sync when the item is in the EXA project. Then, save the trigger.
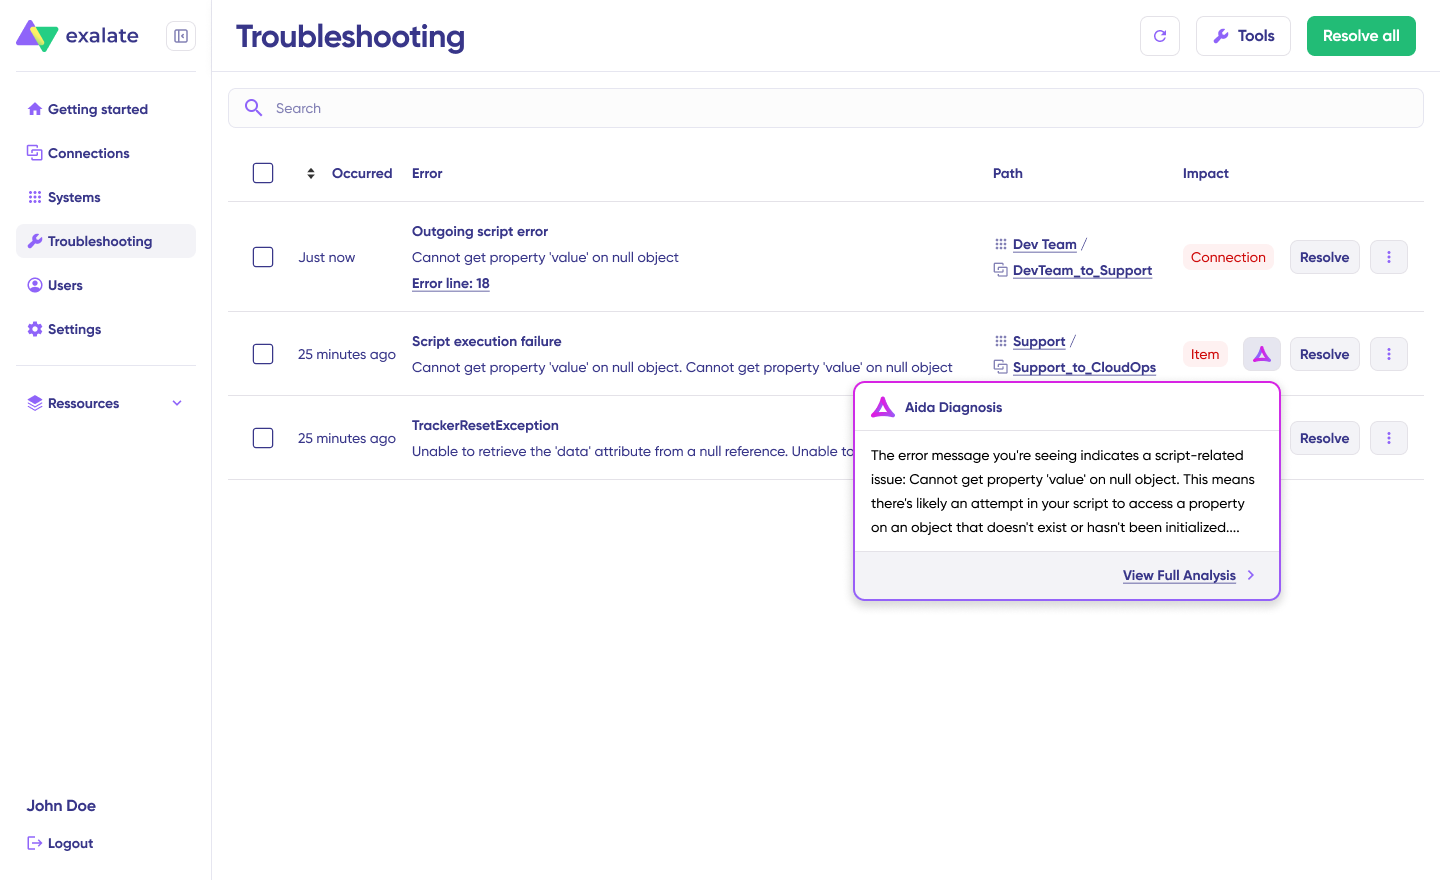
- Troubleshoot your connection with Aida. If there’s an error, go to the “Troubleshooting” tab. Hover over the error you want to diagnose and click on the Aida icon that appears next to the error.
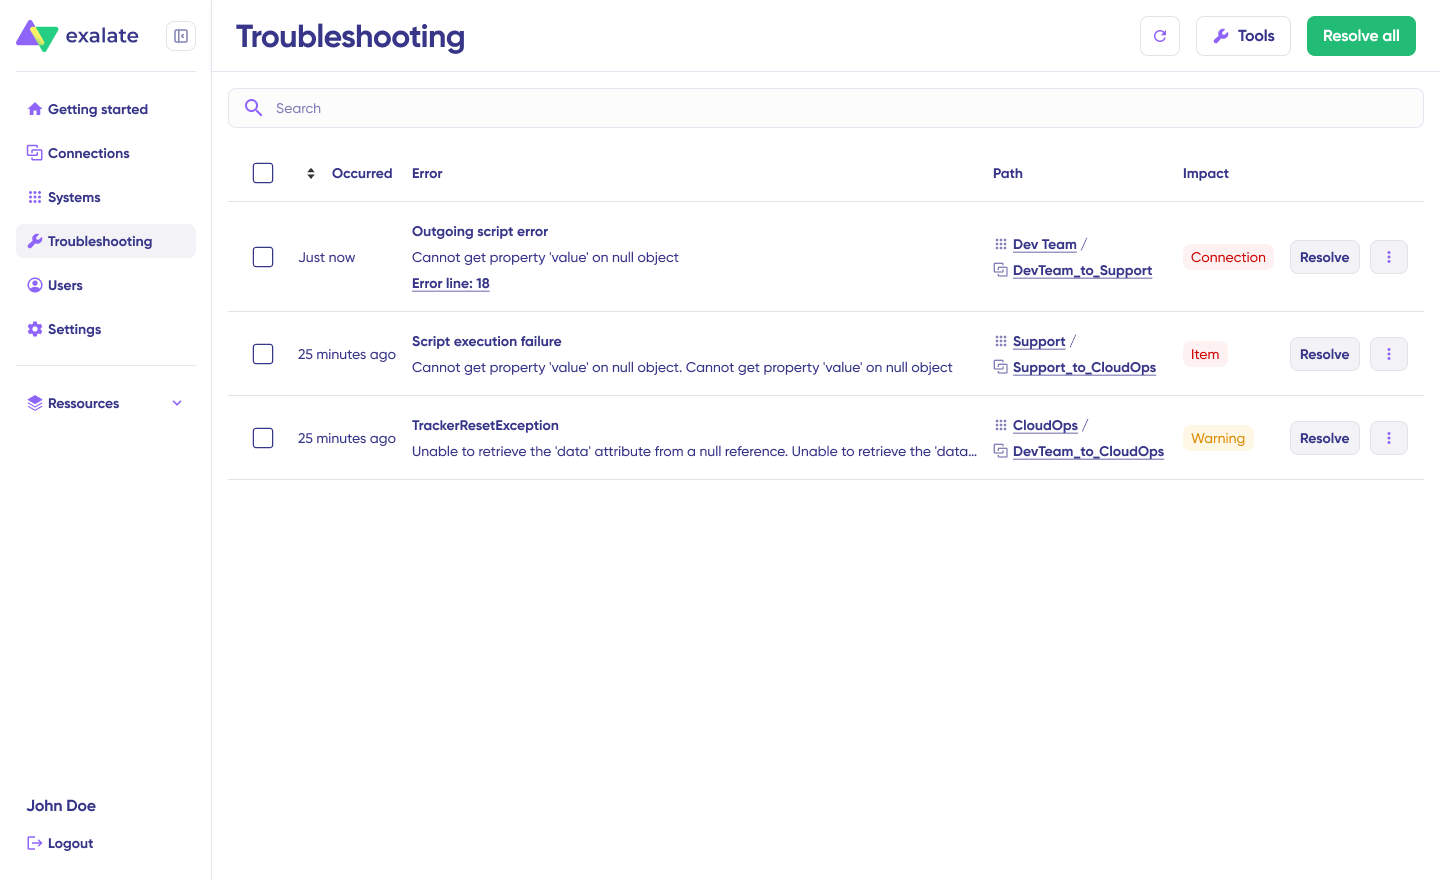
You will see all the affected systems, connections, and items. Aida will provide you with a brief analysis of the error message.
- To get more information, click on Error Details. You will see the impact level, stack trace, error type, and date of occurrence. You can also “View Full Analysis” to get more context.
Fix the error and click on “Resolve”.
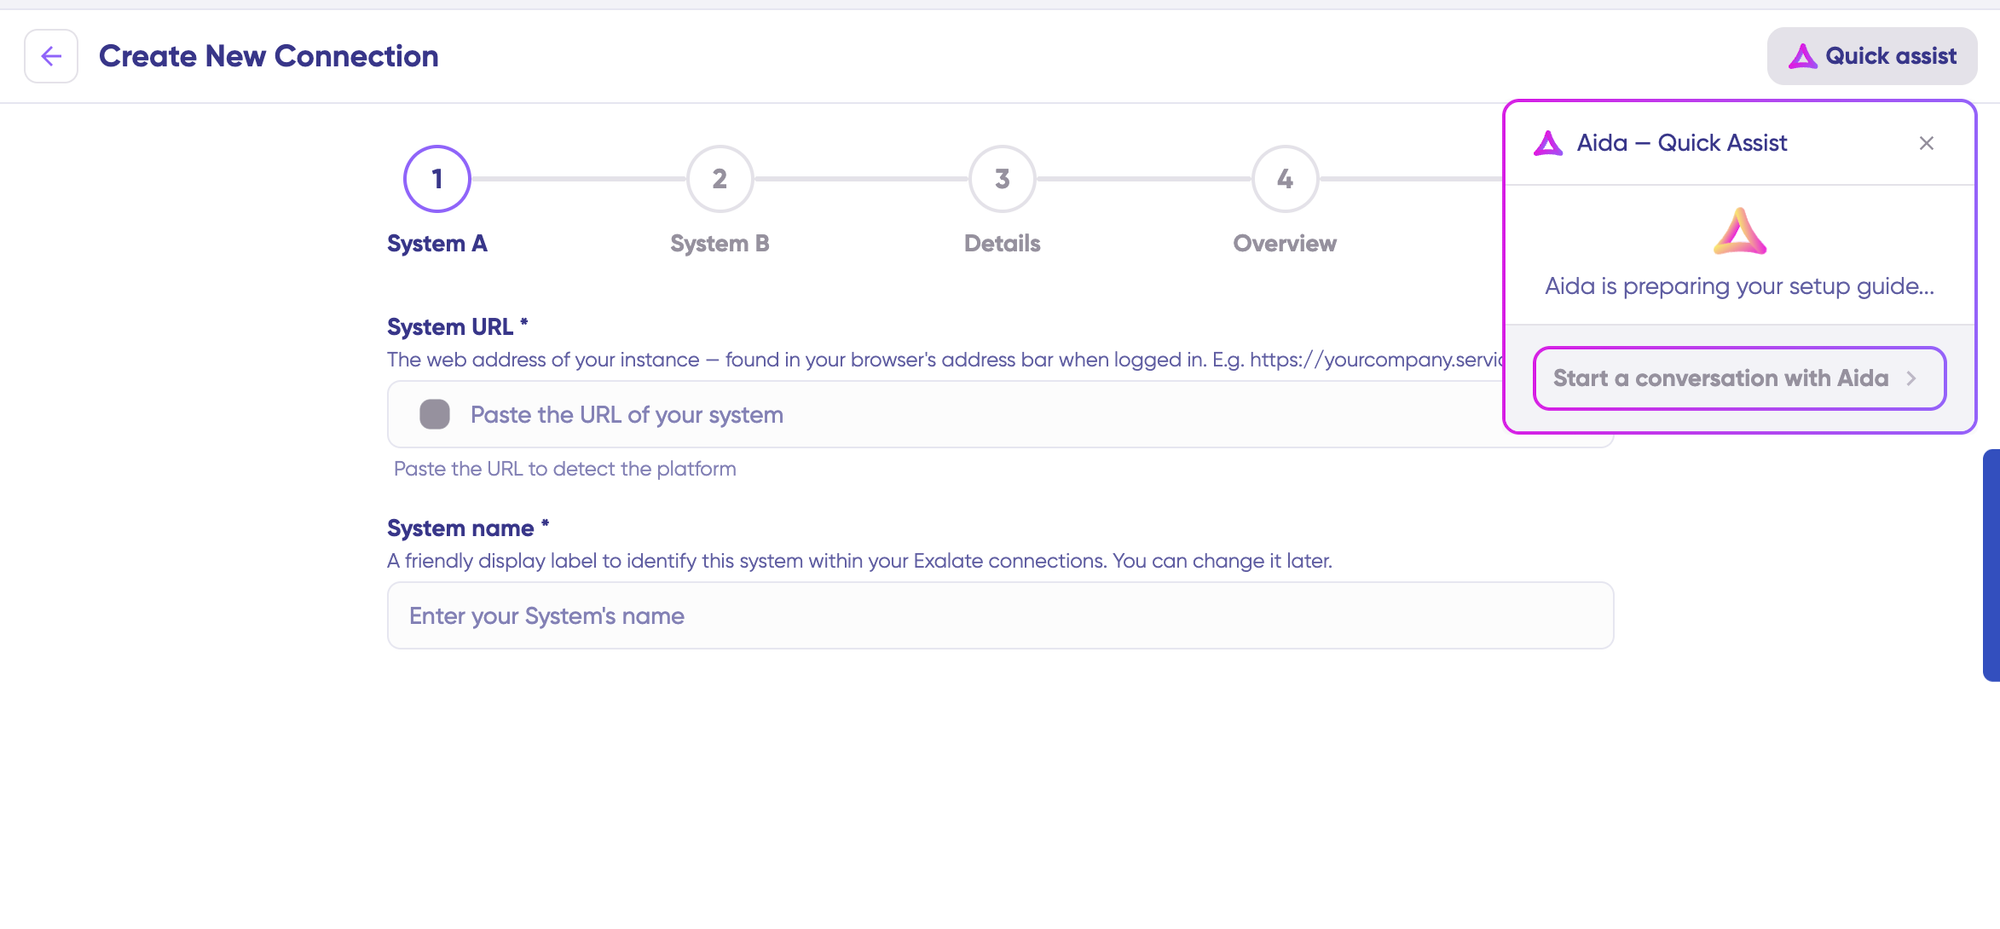
You can also speed up the process by using Aida – Quick Assist at the top right of the dashboard.
That’s it. Your first synchronization will start automatically based on the sync rules and triggers you have set. Happy syncing.
Understanding and Configuring Sync Rules (Scripts) For Exalate
Sync rules govern the flow of information between Jira instances and dictate field mapping.
Incoming & Outgoing Scripts
Outgoing Script determines what information leaves your Jira instance and how it’s prepared for the other side. The incoming script determines what information arrives from the other Jira instance and how it’s stored in your system.
Basic Sync Rule Examples
Sync item summaries:
// Outgoing
replica.summary = issue.summary
replica.description = issue.description
replica.comments = issue.comments
// Incoming
issue.summary = replica.summary
issue.description = replica.description
issue.comments = replica.comments
This script makes it possible to sync summaries, descriptions, and comments with formatting:
Advanced Sync Rules Examples
Conditional Sync Based on Labels
Use Case: Only sync work items with specific labels to keep confidential work items private.
// Outgoing – Only sync if labeled “external”
if (issue.labels.contains("external")) {
   replica.summary = issue.summary
   replica.description = issue.description}Code language: JavaScript (javascript)
Status Mapping Between Different Workflows
Use Case: Map statuses when both Jira instances use different workflow names.
// Incoming
def statusMapping = [ "To Do": "Backlog","In Progress": "Active", "Done": "Completed"]
def mappedStatus = statusMapping[replica.status.name]
if (mappedStatus) {
    issue.setStatus(mappedStatus)
}Code language: JavaScript (javascript)
What’s Next?
Connecting multiple Jira instances eliminates duplicate work, automates work item syncing, and lets teams work in their preferred environments while maintaining real-time visibility.
Exalate provides the flexibility and control you need when managing cross-company partnerships, departmental collaboration, or global operations. This ensures each side maintains autonomy over its data while enabling seamless collaboration.
Sign up for Exalate’s free tier and set up a working sync without a sales touchpoint. Connect both ends, write rules with Aida or a Groovy engineer, and records move.
If you’d rather see it on your scenario first, book a demo and the Exalate team walks the integration patterns through on a live call.
Frequently Asked Questions
Can I connect more than two Jira instances?
Yes. Exalate supports multi-instance networks. You can connect 3, 5, 10, or even 20+ Jira instances. Each connection operates independently with its own sync rules and triggers. This allows for hub-and-spoke, mesh, or hierarchical architectures.
How does Exalate ensure data security?
Exalate is ISO 27001 certified and uses role-based access control, JWT authentication, and end-to-end encryption (TLS 1.2/1.3). Each organization maintains complete control over what data is shared through independent sync configurations. Visit our Trust Center for complete security documentation.
Can I sync different work item types between instances?
Yes. You can map work item types flexibly. For example, sync “Bug” from Instance A as “Defect” in Instance B, or sync “Story” as “User Story.” Exalate allows complete control over type mapping with conditional logic.
Can I sync only certain work items and not others?
Yes. Use JQL triggers to define which work items should sync. For example: “project = DEMO AND labels = external“ syncs only work items with the “external” label. This gives you granular control over what data crosses between instances.
How do I handle different custom fields between instances?
Exalate allows you to map custom fields flexibly, even when they have different names or types. You can transform data, provide default values, or skip fields that don’t exist on the receiving side. AI-assisted configuration (Aida) can generate these mappings from your descriptions.
What level of support is available?
Exalate offers Standard and Priority Support. Standard Support covers installation, upgrades, and troubleshooting. Priority Support assigns a dedicated support engineer, aids with configurations, and provides enhanced SLAs. You can also get Service Provider packages, which include specialized support for MSP environments.
What about syncing between Jira and other platforms?
Exalate supports integrations between Jira and ServiceNow, Freshservice, Freshdesk, Asana, Azure DevOps Server, Zendesk, Salesforce, and GitHub. You can build multi-platform integration networks where Jira serves as the hub or spoke. Check our integrations page for the complete list.
Can Exalate integrate with Jira Service Management (JSM)?
Yes, Exalate can be used to synchronize tickets in Jira Service Management (JSM) with Jira Software and other platforms. This is useful for cross-functional teams or when managing customer requests between service teams and development teams.
Recommended Reading:
- Jira Integrations: Integrate Jira and Other Systems Bidirectionally
- How to Set Up a Jira Salesforce Integration
- Jira Azure DevOps Integration: The Complete Step-by-Step Guide
- How to Set up a Jira GitHub Integration
- Jira Zendesk Integration: The Step-by-Step Guide
- Jira ServiceNow Integration: How to Set up an Integration in 6 Steps


