
Jira has been around for more than a decade and is still standing strong. Agile teams love the power it brings through Scrum and Kanban projects. It’s also one of the most popular tools for work tracking and bug management, helping teams monitor, track, assign, and report day-to-day operations.
Jira integrations are what every team needs to extend the platform’s potential beyond its limits. This guide covers how Jira can be integrated with other tools, why such integrations matter, practical use cases, and how to choose the right integration solution to get the benefits you expect from Jira integrations.
Note: Jira now refers to “issues” as “work items.” Throughout this guide, we use the updated terminology.
Key Takeaways
- Jira integrations enable teams to automate information exchange with other platforms, eliminating manual data entry and context-switching between applications.
- Common integration scenarios include connecting development teams with QA, customer support, project management, sales, security operations, and managed service providers.
- Exalate supports Jira integration with Azure DevOps, ServiceNow, Salesforce, Zendesk, and more through AI-assisted configuration and full scripting control.
- Choosing the right integration tool requires evaluating security features, supported platforms, flexibility for complex use cases, and automatic handling of system downtimes.

What is Jira?
Atlassian offers several Jira products: Jira Software, Jira Work Management, Jira Service Management, and Jira Align are the most popular.
Different teams use these products: development, product discovery, project management, operations, sales, customer support, and more.
Jira Software is particularly popular among development and project teams due to the built-in templates that accommodate purpose-built agile scenarios.
Work items in Jira define a single unit of work. Workflows are tracked using boards by passing these work items across columns. That makes it easy for teams to have a uniform and consistent source of information in a single Jira interface.
Consider this common scenario: development teams often need to collaborate with project managers. They’d use a Jira GitHub integration to eliminate manual ways of working. Sometimes, Jira APIs allow data to be retrieved and synchronized between Jira and other applications like Salesforce.
There are still many native features for integrating Jira with other applications, like Confluence. Let’s discuss why Jira integrations matter.
Why Do You Need Jira Integrations?
Teams use Jira to manage their daily work, but they also need to collaborate with other teams at some point. These can be within the same company or with other companies (cross-company) that might be partners, suppliers, customers, or vendors.
Different teams are already comfortable with their own environment of software applications: ServiceNow, Salesforce, GitHub, Azure DevOps, Zendesk, Freshdesk, Freshservice, Asana, and more.
Useful information is locked away in different applications across different teams. But it can become valuable if unlocked and synchronized correctly.
For this synchronized information exchange, teams should avoid context-switching between different applications or resort to manual methods like emails or phone calls.
As a Jira user, you should be looking for integrations to help you:
- Increase visibility on critical business information that can be accessed anytime within tools you already use
- Automate information exchange and business processes to keep data coherent, consistent, and accurate
- Filter relevant information that can be accessed by authorized users whenever needed
- Improve cross-collaboration and communication across teams, helping them work together effectively towards common business goals
- Bring transparency between team members, resulting in better planning and resource allocation
Jira integrations can make this seemingly difficult task look like a walk in the park, where you take a break from manual ways of doing things to automate them.
Before we start walking that path, let’s look at different use cases you can carry out with Jira integrations.
Jira Integrations: Common Use Cases
Teams can be co-located in a single office space or miles away. If one of them uses Jira, you can definitely think about integrating it with apps other teams use.
Case 1: Development and Quality Assurance Teams
Challenge: The dev team uses GitHub or Jira, and the QA team uses Jira. The QA team needs to send bug reports and create new work to be handled by developers. Manually doing this means creating work items in both Jira and GitHub, leading to duplication and wasted time.
Solution: A Jira integration automatically creates bug reports and work items in Jira, then syncs status updates and comments bidirectionally. Only valid information useful to both teams gets passed. For instance, the QA team might not need all the attachments developers upload but only a few of them, along with status updates.
Real-World Application: seL4, an open-source foundation, drove adoption and exposure within its communities by integrating Jira with GitHub repositories attached to the project.
Case 2: Development and Project Management Teams
Challenge: The development team uses GitHub, Jira, or Azure DevOps. The project management team uses Jira. Project managers raise work items manually in the other application, and information gets passed back and forth. Sometimes they even create two projects for the same work, duplicating information manually.
Solution: A Jira integration for Azure DevOps enables these teams to pass critical information back and forth automatically. They can filter and map information across applications such that “High Priority work items should be assigned to George—a Senior Developer, while network or infrastructure work items should be handled by John—the SysAdmin.” The workflow on both sides can be mapped to synchronize information smoothly.
Real-World Application: OpenGI synced Jira with Azure DevOps to improve support delivery speed, decrease costs, and automate ticketing.
Case 3: Customer Support and Development Teams
Challenge: Customer support agents use Zendesk, ServiceNow, Freshdesk, Freshservice, or Jira Service Management. The development team uses Jira. After agents perform root cause analysis of tickets, they either respond with a workaround or forward requests through email to the development team. The dev team creates a work item and starts working. Meanwhile, support agents make frantic phone calls and send endless emails to get updates so they can update their customers.
Solution: Integration automates the entire flow. Customer tickets automatically create corresponding work items for developers. Status updates flow back to support agents in real-time, who can then update customers without chasing developers.
Real-World Application: Gartner integrated Jira with Jira Service Management to boost the effectiveness and accuracy of their customer support efforts by streamlining ticketing.
Case 4: Sales and Development Teams
Challenge: The sales team uses Jira or Salesforce, and development uses Jira, GitHub, or Azure DevOps. Sales teams have direct access to closed deals, customer queries, and feedback. If this valuable information is siloed, it becomes unproductive. Sometimes this information can also benefit other team members.
Solution: Creating work items from Salesforce or Jira helps the dev team work on them faster and improve SLA. The sales team can enhance customer experience with prompt answers to customer questions through automated data sharing.
Real-World Application: Organizations connecting Salesforce with Jira see faster response times and improved customer satisfaction scores as valuable feedback reaches development teams without manual handoffs.
Case 5: MSP Integration
Challenge: Enterprises working with managed service providers need deep ticket integration without exposing internal systems. Manual coordination slows down service delivery and introduces errors.
Solution: Integration provides a tightly-knit collaborative ecosystem for both sides. MSPs get visibility into relevant client information while clients maintain security boundaries.
Real-World Application: NVISO, a cybersecurity MSP, used Exalate to integrate Jira with ServiceNow for deep ticket integration with their customers.
Case 6: Incident Response and IT Operations
Challenge: When incidents occur, multiple teams need a coordinated response. Operations tracks incidents in one system, development investigates in another, and support handles customer communication in a third. Without integration, critical updates get lost in email chains and chat messages.
Solution: Work items created in monitoring or ITSM tools automatically generate corresponding records in Jira. Status changes, comments, and resolutions sync bidirectionally. All teams see the same information in their preferred tool.
Real-World Application: NEVARIS Build eliminated manual back-and-forth and enjoys real-time updates in their Jira to Azure DevOps integration context. The result was a significant improvement in workflow efficiency.
Case 7: Cross-Company Partner Collaboration
Challenge: Working with external partners, suppliers, or contractors often requires sharing work item information without exposing internal systems. Each organization uses their own tools and has their own security requirements.
Solution: Integration enables secure collaboration where each side controls their own configuration. Partners sync only the information they choose to share. No shared admin accounts, no API keys exchanged between parties. Each organization authenticates independently to their own system only.
Real-World Application: Organizations collaborating with external partners on joint projects use Jira integrations to maintain coordination without compromising security boundaries.
Case 8: Mergers and Acquisitions Integration
Challenge: After a merger or acquisition, different divisions operate on different platforms. Teams need to collaborate across these platforms during and after the transition period without forcing immediate tool consolidation.
Solution: Integration bridges the gap between different Jira instances or between Jira and other work management systems. Teams continue working in familiar tools while information flows automatically between systems.
Real-World Application: Organizations undergoing M&A use Jira integrations to maintain business continuity while gradually consolidating platforms.
What to Consider When Integrating Jira and Other Work Management Systems
The variety of apps available on the Marketplace can confuse even the most sorted person and eventually defeat the purpose of getting an integration tool. Walk slowly, take your time, explore your options, maybe take a free trial, and then make a decision.
Before you get started, keep the following checklist in mind.
Secure Information Exchange
Secure information exchange is non-negotiable. Look for these security features:
- Token-based authentication mechanisms
- Encryption of data both in transit and at rest
- Secure transfer protocols like HTTPS
- Role-based access control (RBAC)
- ISO 27001 certification
The whole point is to keep your information secure from “man in the middle” attacks, data being sent to the wrong destination, or being received from the wrong source. For comprehensive security documentation, visit the Exalate Trust Center.
Serve Advanced or Complex Integration Use Cases
Integration needs are dynamic. There’s always a new set of data you need to exchange periodically, new logic to sync data with, or something completely tailor-made for you.
Acknowledging these changes and having the integration tool adapt to them with ease and minimal technical tweaks should be high up on your checklist. Look for tools that offer full scripting and operational control over your sync side, allowing you to purpose-build even the most advanced or complex integration cases.
Ease of Use by Both Technical and Non-Technical Users
Integration shouldn’t be restricted to a certain IT cubicle in your organization. The beauty of an integration tool must be reflected in the way it can be handled by both technical and business users alike.
Choose tools that have both drag-and-drop interfaces or low-code configurations so that all kinds of people can use them with equal ease. Also consider the presence of AI-powered configuration assistants like Aida that generate sync configurations from natural language descriptions.
Number of Supported Applications
Since we’re talking about different Jira integrations, you can imagine a wide range of applications on the other end—another Jira instance, ServiceNow, Azure DevOps, Salesforce, Zendesk, Freshdesk, Freshservice, GitHub, Asana, and more.
This is a checklist point for obvious reasons: the more applications the tool supports, the greater the possibility of connecting with another department or a new supplier, customer, or partner.
Automatic Handling of Downtimes and Failures
Downtimes and failures are part of a software application. You can’t run away from them, but you can definitely choose a tool that handles them gracefully.
Looking for information that has changed since the last downtime and applying it in the same order as its initiation, checking if all sync updates are applied correctly without manual intervention; this is important and can be achieved if the right tool is chosen.
Flexibility for Custom Connectors
Sometimes you need to integrate with systems that don’t have pre-built connectors. Look for integration platforms that support custom connectors through APIs and scripting capabilities, allowing you to extend integration coverage to any system with a REST API.
Top Jira Integration Tools: Native and Third-Party Options
The Atlassian Marketplace hosts thousands of integration apps, which can make choosing the right one overwhelming. Here’s a breakdown of the most popular options, organized by type.
Native Atlassian Integration Options
Jira Automation
Atlassian’s built-in workflow automation tool comes with Jira Cloud, Software, and Service Management. It allows users to create automated rules that trigger actions based on specific events within Jira, which is ideal for simple internal automations that don’t require external data sync.
Atlassian Marketplace Native Connectors
Atlassian partners with technology companies like Slack, Microsoft, Google, and Zoom to provide native integrations. These include GitHub for Jira, Slack for Jira, Microsoft Teams for Jira, and others, which are useful for basic connectivity with popular business tools.
Jira REST API
Atlassian provides REST APIs for developers to build custom integrations from scratch. These offer maximum flexibility for unique requirements that don’t fit standard connector patterns, though they require significant development effort and ongoing maintenance.
Third-Party Integration Platforms
Exalate
Exalate is a script-based integration platform designed for complex enterprise requirements, cross-company collaboration, and MSP environments. It supports bidirectional synchronization with full scripting control.
Key features:
- AI-assisted configuration (Aida) for quick setup
- Full Groovy scripting for advanced customization
- ISO 27001 certification with encryption and role-based access control
- Independent configuration on each side (no shared credentials)
- Automatic retry and recovery from downtimes
- Sync Panel for checking sync status, spotting errors, triggering manual syncs, from the browser.
Learn more: Exalate Jira Integration
Getint
Getint is a no-code integration platform focused on template-driven workflows. It offers automated field mapping and supports both Jira-to-Jira and cross-platform integrations, which are well-suited for teams wanting quick setup with pre-built templates.
Key features:
- Auto-mapping for types and fields
- No-code interface with optional scripting
- Remote licensing options
Backbone Issue Sync
Backbone, developed by K15t (an Atlassian Platinum Partner), is designed exclusively for Jira-to-Jira synchronization. It’s been in the market for over a decade and focuses on straightforward Jira-to-Jira syncs within organizations.
Key features:
- Intuitive no-code UI that blends with Jira
- Basic field mapping and status synchronization
- Remote licensing for multi-instance setups
ZigiOps
ZigiOps is a standalone no-code integration platform that supports bidirectional connections between Jira and various ITSM, ITOM, and CRM tools. This integration is suitable for organizations needing quick deployment without coding.
Key features:
- No-code connector with customization options
- Real-time bidirectional sync
- Standalone deployment (not Marketplace-dependent)
Zapier
Zapier offers thousands of pre-built templates connecting Jira to popular business tools like Slack, Google Sheets, Trello, and email platforms. “Zaps” provide simple trigger-action workflows for small teams needing basic integrations with minimal setup.
Key features:
- Setup takes minutes with no coding
- Pre-built templates for common scenarios
- Wide app coverage
Unito
Unito provides two-way sync between project management tools with a visual interface for mapping fields and workflows. This integration solution is ideal for teams using multiple project management tools.
Key features:
- Visual workflow builder
- Two-way sync with field mapping
- Rules-based filtering
ScriptRunner Connect
ScriptRunner Connect allows developers to build custom integrations using JavaScript. It offers flexibility for development teams comfortable with coding who need to connect Jira with any system that has a REST API.
Key features:
- Full scripting flexibility
- Event-driven architecture
- Native Jira integration
Bottom line: Template-based solutions like Zapier work well for simple workflows, while script-based platforms like Exalate handle complex enterprise needs. Choose template-based for quick setup with standard processes, or script-based for customizable, sophisticated integrations requiring security controls and cross-company collaboration.
Features to Look for in a Jira Integration Tool
Beyond the general considerations above, here are specific features that differentiate integration tools:
- Bidirectional Synchronization: Changes on either side automatically reflect on the other. Not just one-way data pushes, but true two-way sync with conflict resolution.
- Field Mapping Flexibility: Map fields between platforms with custom transformations. Convert status names, translate work item types, or apply business logic during sync.
- Selective Sync: Filter which work items synchronize based on project, work item type, priority, labels, or custom criteria. Not everything needs to sync everywhere.
- Comment and Attachment Sync: Beyond basic field sync, ensure comments, attachments, and work logs can flow between systems for complete context.
- Real-Time Updates: Near-instant synchronization rather than scheduled batch updates. When time-sensitive work is involved, delays matter.
- Error Handling and Retry Logic: When syncs fail, the tool should automatically retry and maintain data integrity. Clear error reporting helps troubleshoot when manual intervention is needed.
- AI-Assisted Configuration: Tools like Exalate’s Aida generate configuration scripts from plain language descriptions, dramatically reducing setup time and technical barriers.
Exalate: A Solution for Jira Integrations
Exalate demonstrates Jira integrations with other tools effectively. Here’s why:
- It enables both sides to independently control information exchange through sync rules present on both sides.
- It uses an intuitive scripting engine for purpose-built, even the most advanced or complex integration cases.
- It implements a JWT-based token mechanism for source and destination authentication, uses HTTPS, and has role-based access controls in place.
- Technical users can customize with Groovy scripting, while non-technical users can generate scripts with Aida, the AI-assisted configuration tool.
- It supports Jira integration with another Jira instance (cloud) and also integrates with Azure DevOps, Azure DevOps Server, Zendesk, ServiceNow, Salesforce, GitHub, Freshdesk, Freshservice, Asana, and more
- Its transactional synchronization engine ensures all synchronizations are handled automatically in case of downtimes and system failures within the least amount of time

Calculate time and money savings from automated bidirectional sync.
How to Set Up Jira Integrations with Exalate: Step-by-Step
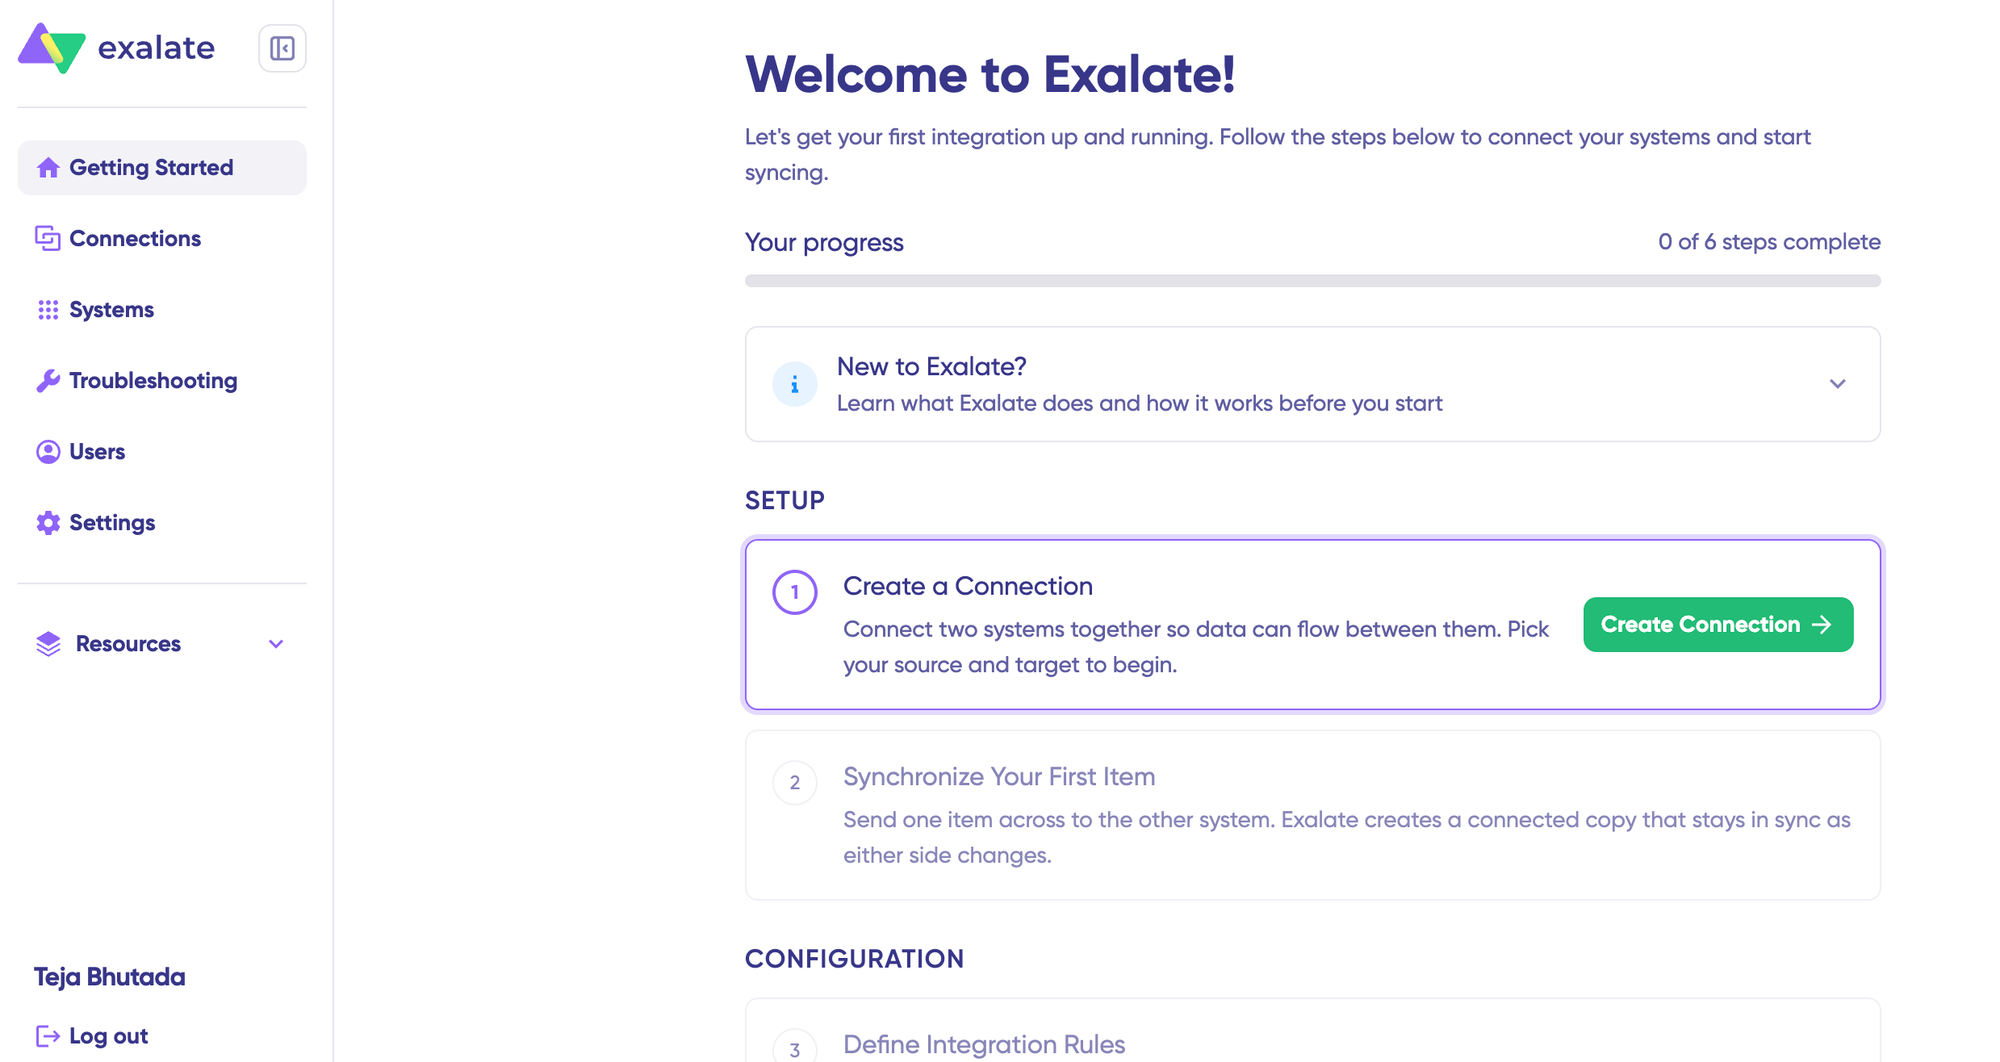
- Head to the Exalate integrations page to get started. Create a new account or log in if you already have one. You can sign up manually with business email verification or use Google authentication.
If you already have an account, you can log in to access the dashboard.
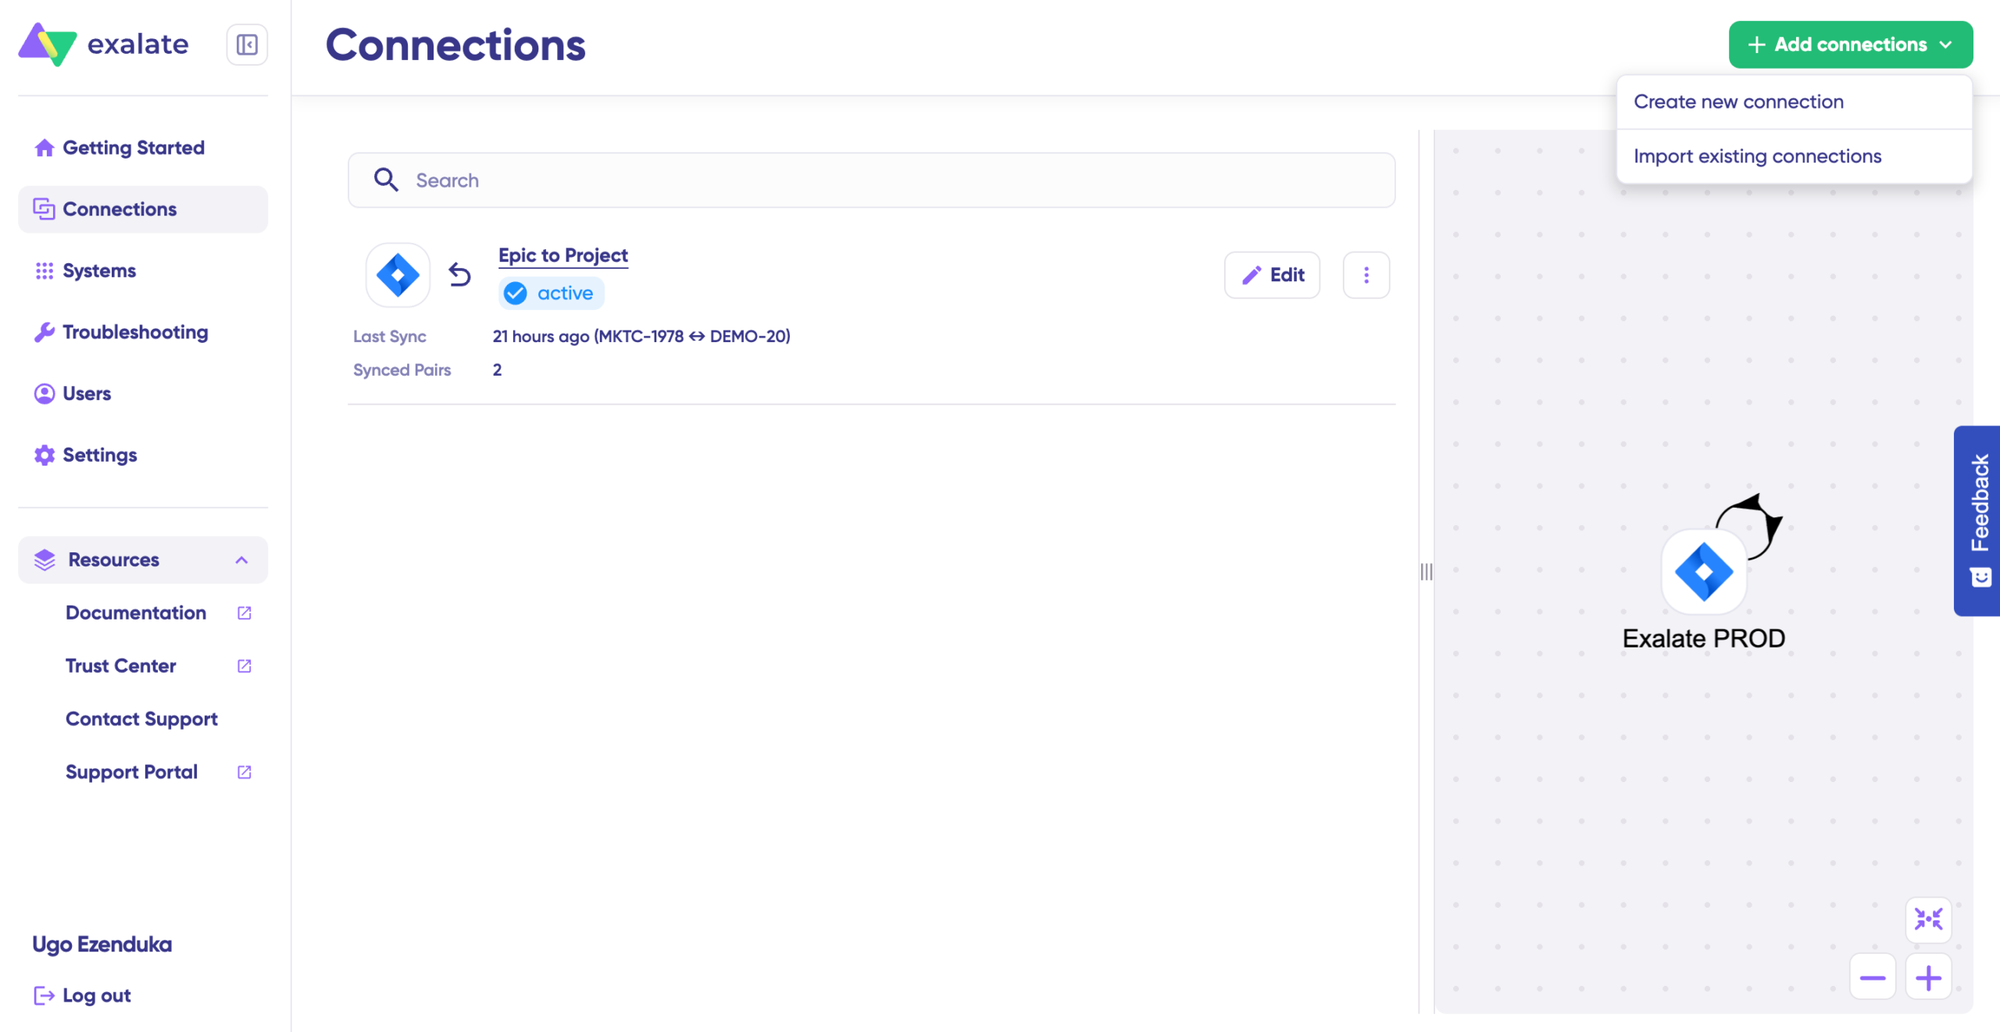
- To create a connection, you’ll need an active Exalate account as well as the access credentials for the systems you want to connect (System A and System B).
Click on “+ Add connections” > “Create new connection”. Enter the name for your first system. Enter the URL of your system (Jira).
Wait for checks and authentication to happen automatically under the hood.
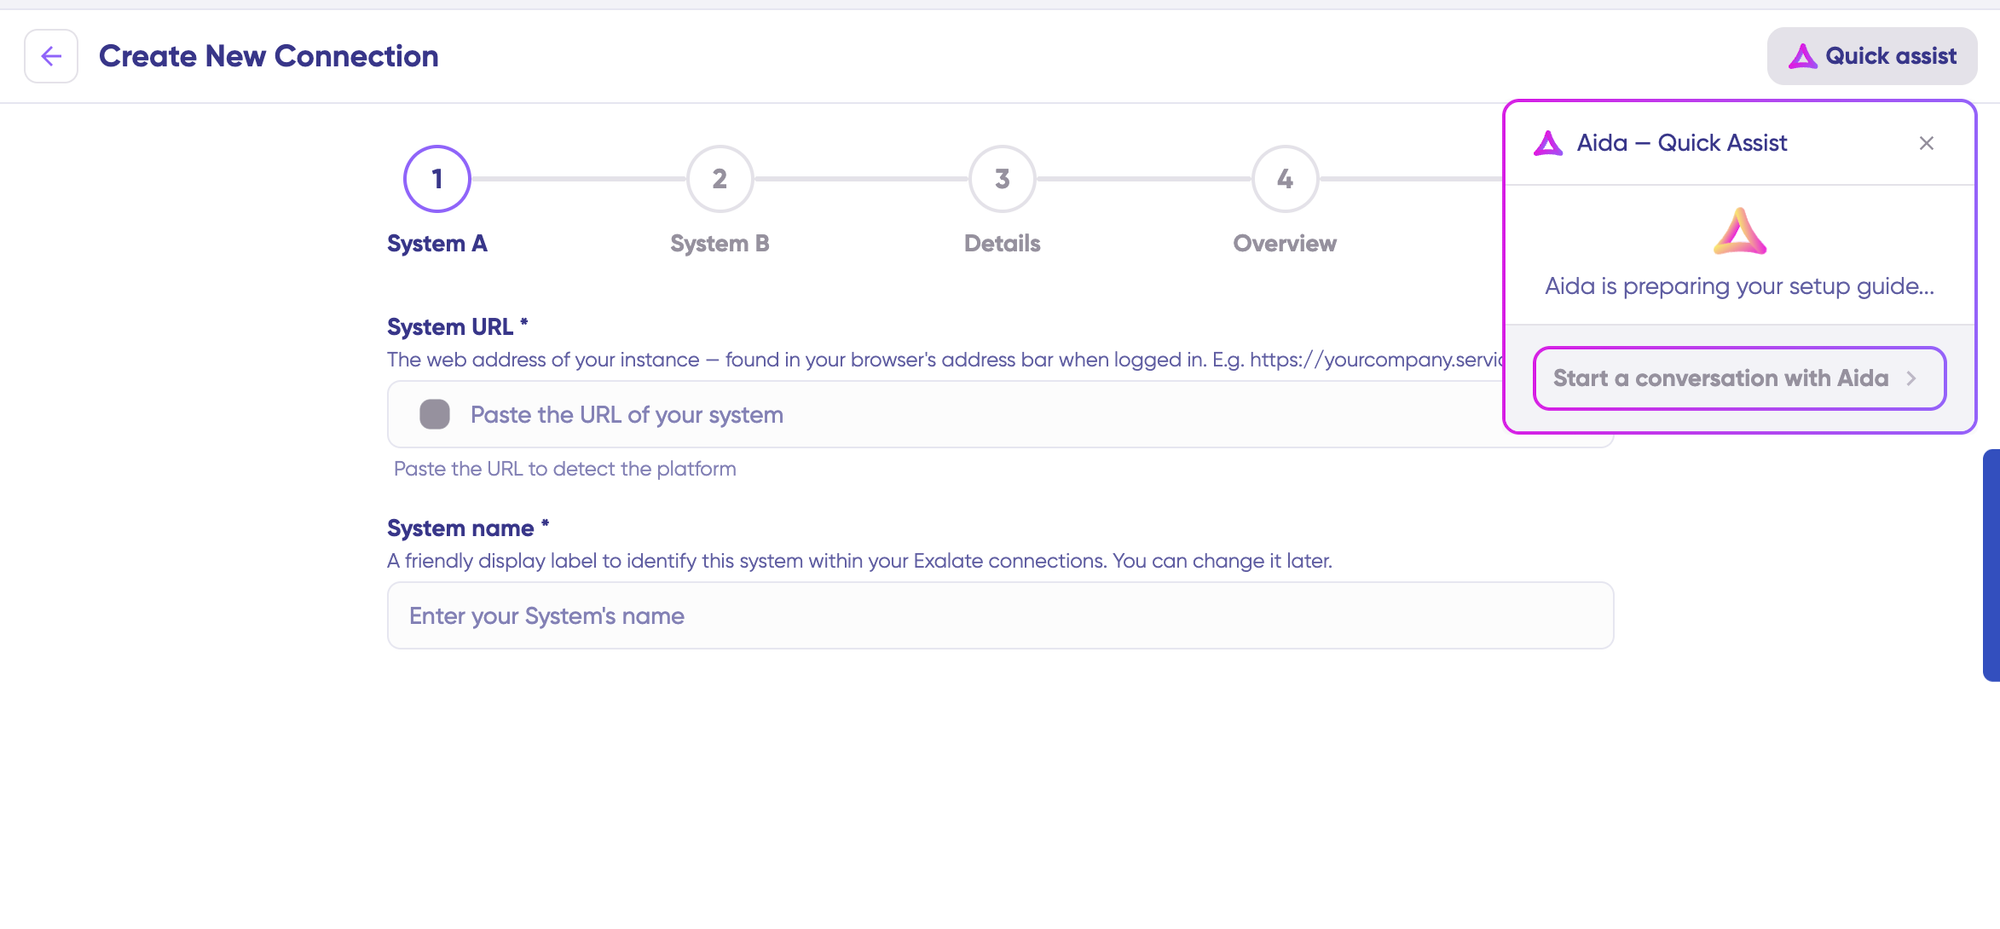
You can also speed up the process by using Aida – Quick Assist at the top right of the dashboard.
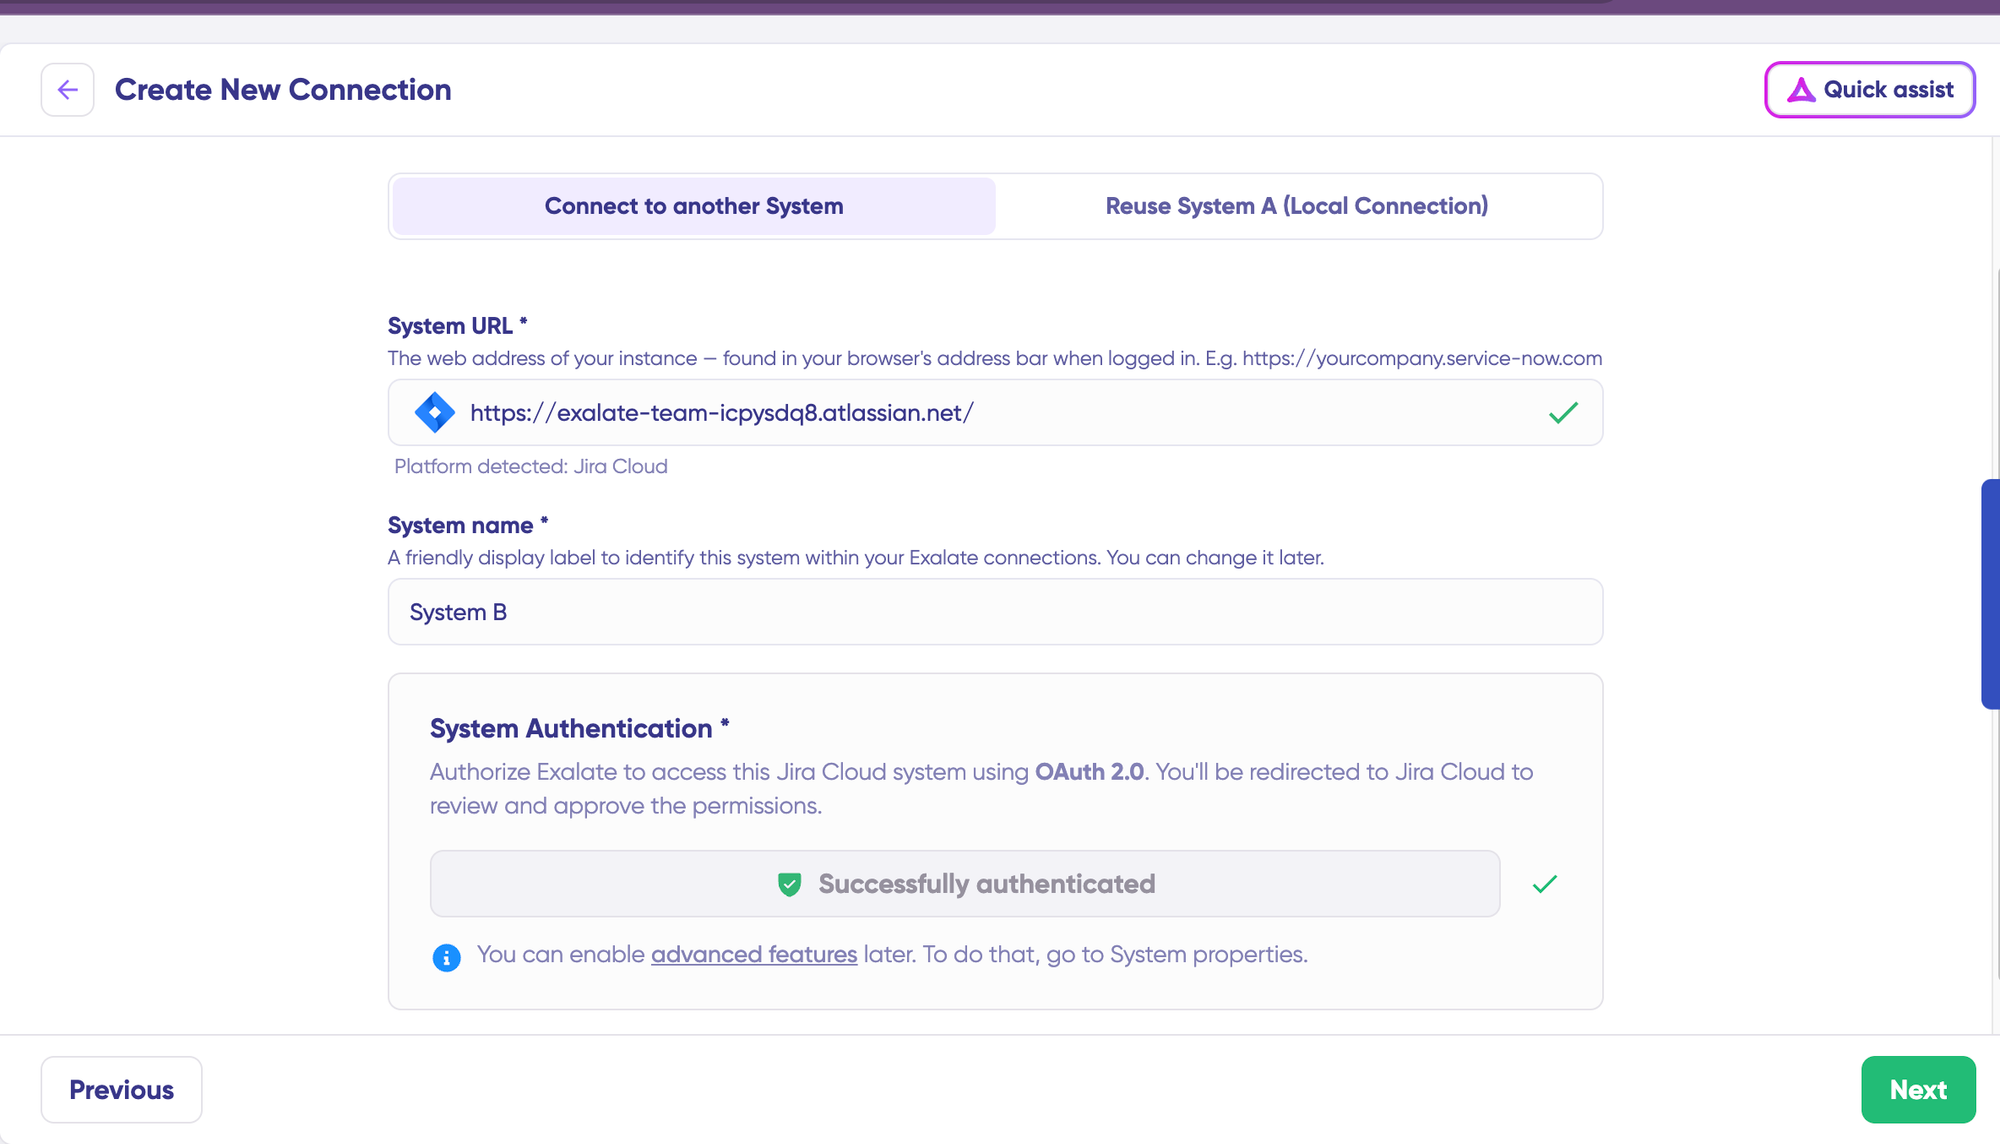
Enter the authentication details. For Jira, you need OAuth. Click on “Check Authentication”. If all is well, you’ll see “Successfully Authenticated”.
Click Next to configure System B (Jira). Follow the same procedure as for your System A (Jira) instance.
Confirm the Connection Name and add a description (optional). Review the connection setup and click on “Create Connection”. Wait for a few minutes so all the checks and setups will be configured in the background.
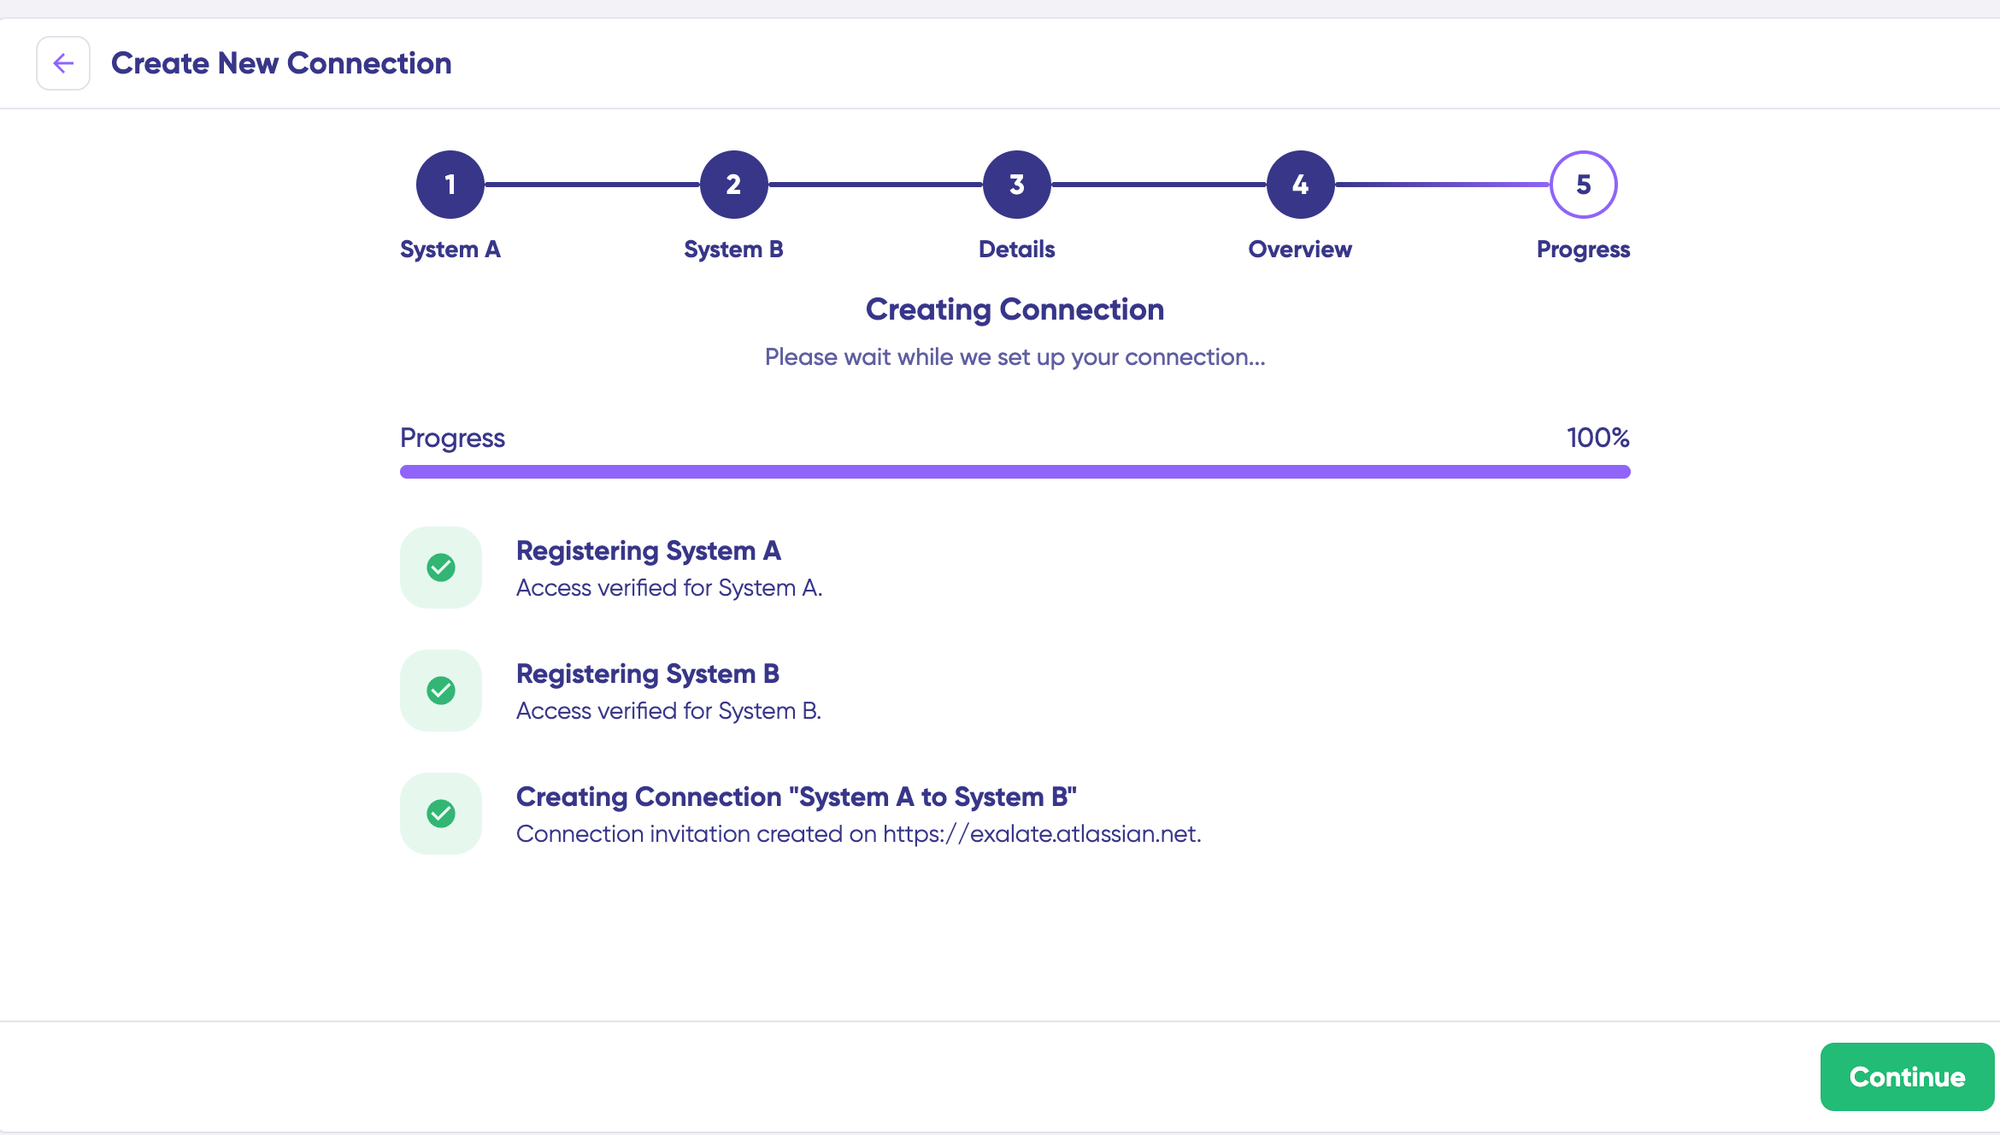
Once done, click “Continue to Configuration”. Voila! Your first connection has been successfully set up.
With local connections in Jira, you can also sync work items across different Jira projects (or spaces) sitting in the same instance.
If your URL https://example.net/ has 2 Jira spaces—one with work item PROJA-11 and the other with work item PROJB-12—local connections in Exalate let you sync both work items.
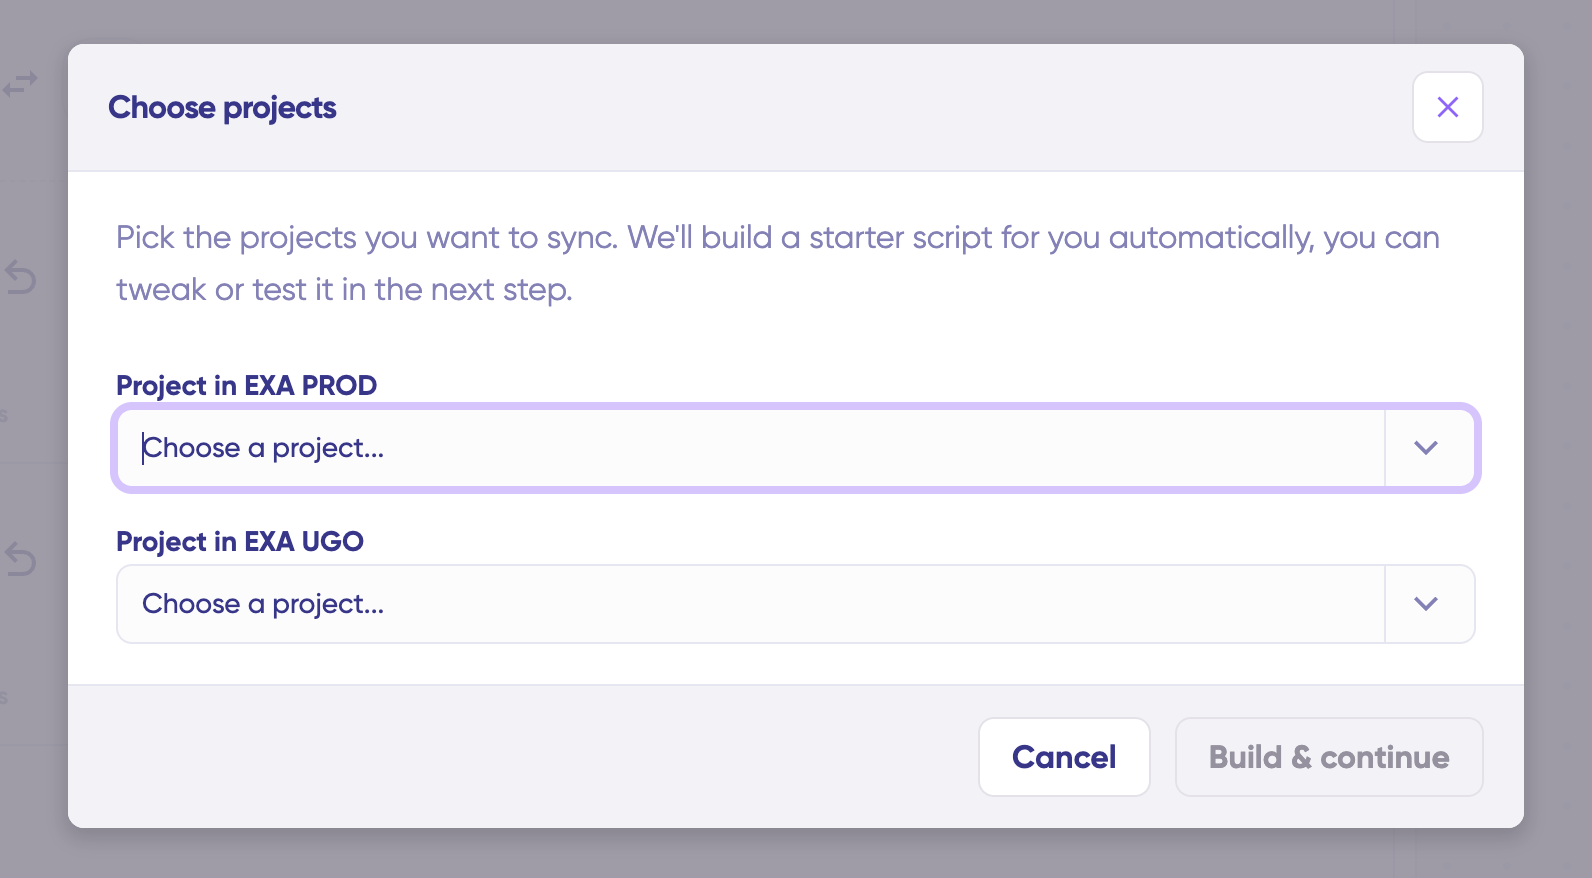
Choose a project you want to sync on both sides from the dropdown menu. Click “Build and Continue”.
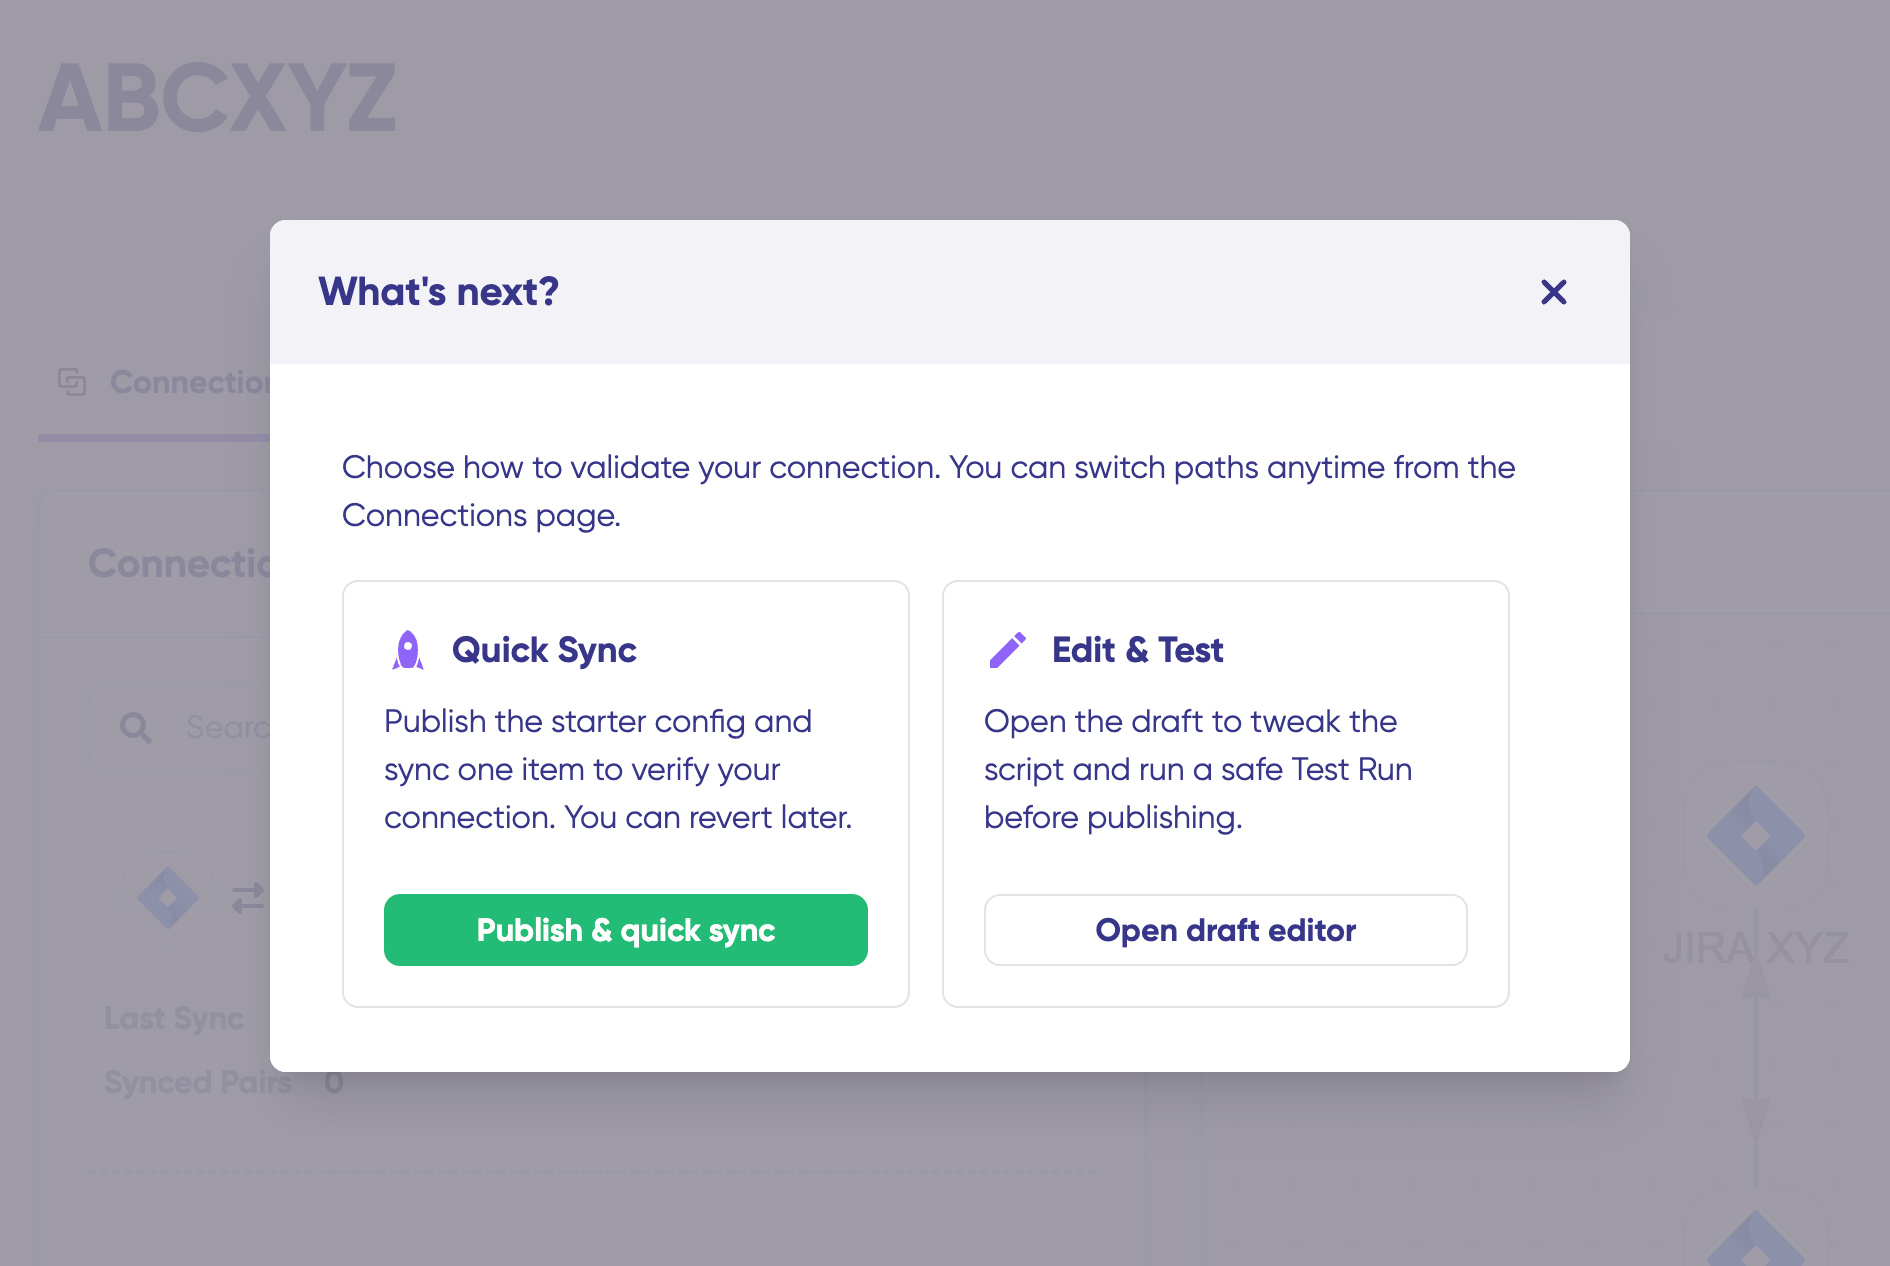
Now, you have 2 options: “Quick sync” and “Edit & Test”. Let’s proceed with them one by one.
- Quick Sync: This option allows you to sync one item between Jira instances. Under the “Item sync monitor,” enter a work item key from Jira (like PROJECT-123) or the corresponding entity identifier from your destination platform (such as an incident number in ServiceNow) and click on the “Sync Now” option.
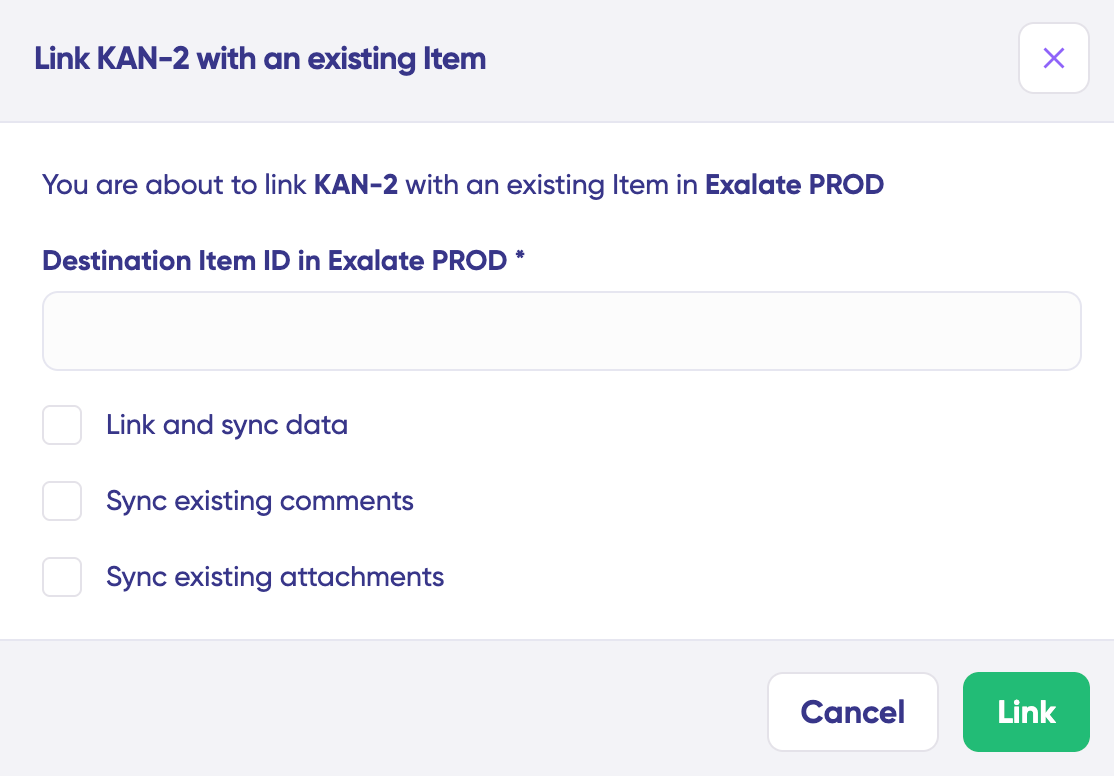
To link 2 existing items, click “Link with existing”. Once the sync is complete, you can view both the synced issues in a new window. You can also choose to compare the changes.
- Open draft editor: This option allows changes when you click “+ New version” or select the “Open latest draft”. This ensures you don’t modify the existing configuration accidentally.
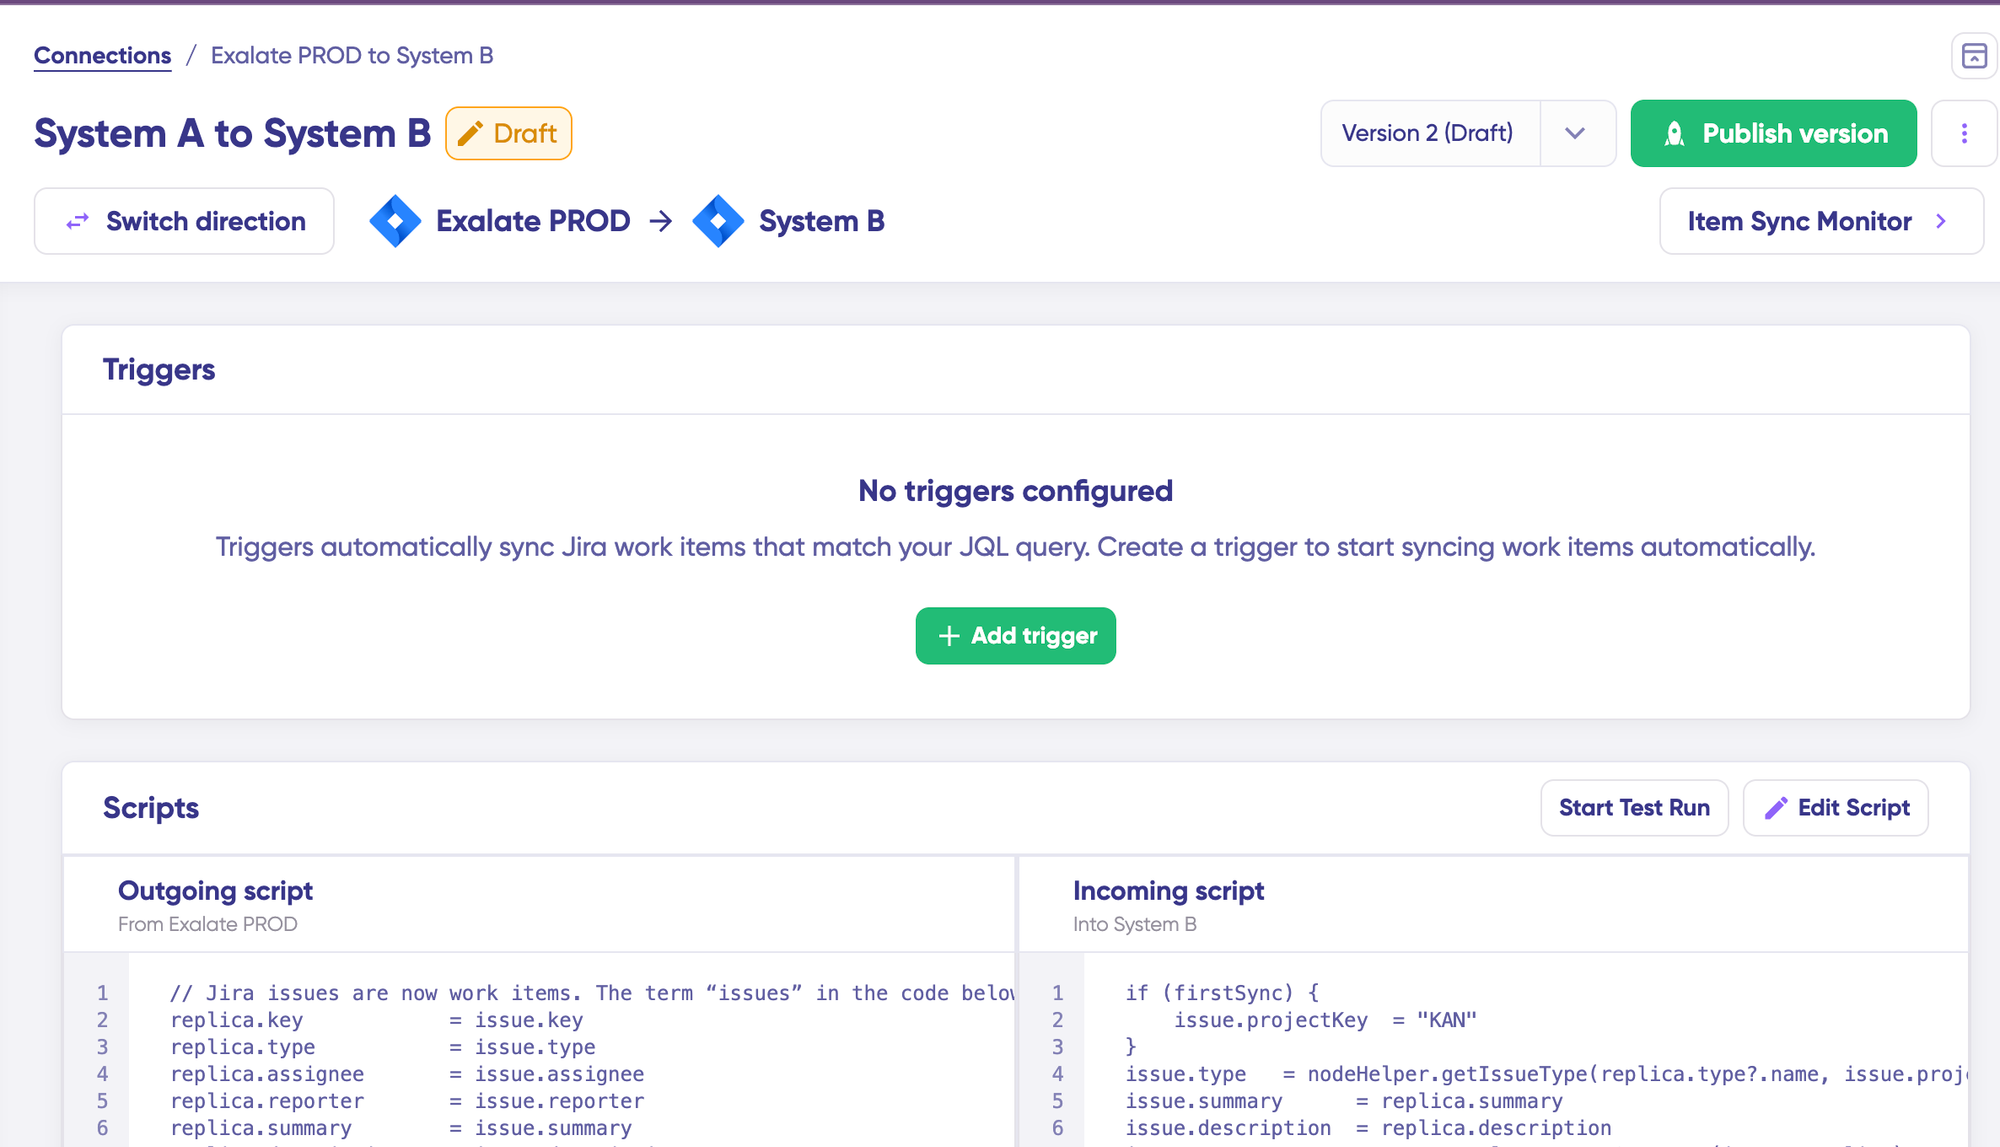
Once active, click the “Edit Script” button to open the editor and adjust the sync rules (Groovy-based scripts). These scripts enable users to add custom data logic and mapping for complex or advanced use cases or workflows.
Swap the sync direction by clicking the two arrows next to the connection name.
The outgoing script will hold the values passed from Jira A to Jira B, and the incoming sync will define how the values coming from Jira B are mapped in Jira A.
Outgoing scripts define what data leaves your system. For Jira, this might include:
replica.summary(work item title)replica.description(detailed description)replica.comments(all comments)replica.attachments(files and images)replica.priority(priority level)replica.status(current status)replica.labels(tags and labels)replica.customFields(any custom fields)
Incoming scripts define how received data maps to your local system. For example, mapping a ServiceNow incident’s short_description to a Jira work item’s summary, or mapping status values between platforms.
The Replica is a JSON file that carries the payload containing data being shared across entities on both Jira instances. You can adjust the sync scripts if you know the Groovy language. Otherwise, use Aida, our built-in AI assistant.
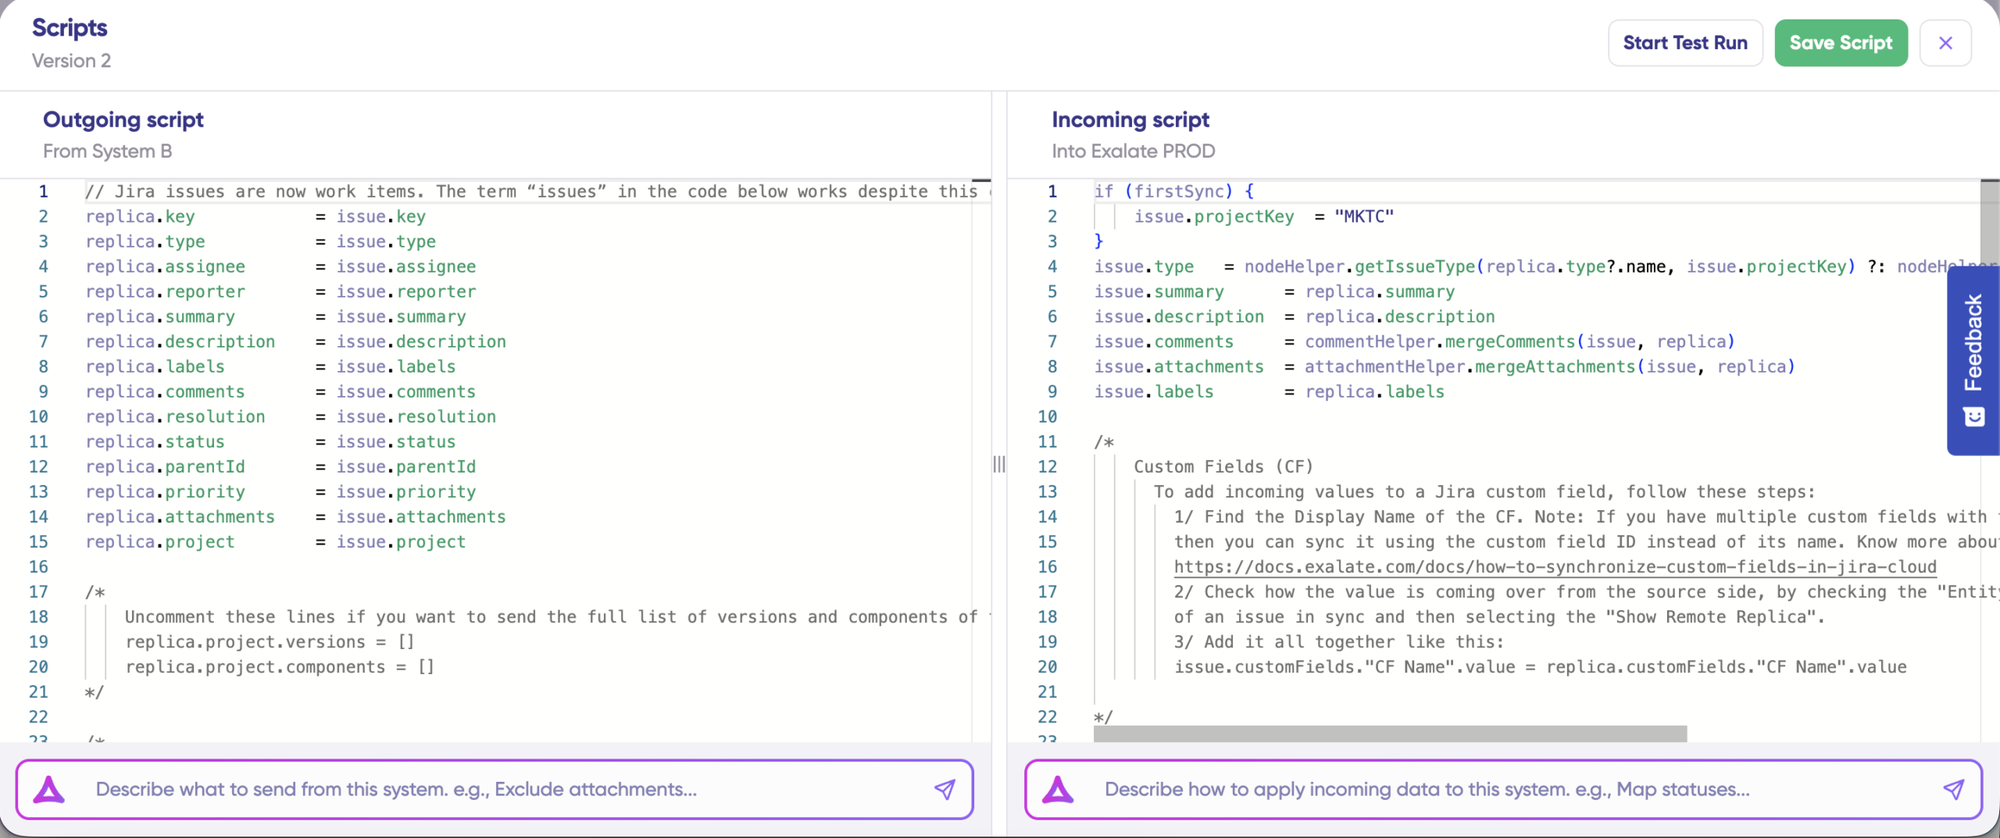
- Use Aida to generate sync scripts. Aida exists in both incoming and outgoing script sections, so choose the side accordingly.

For Outgoing scripts: Describe what data should leave your system. Eg, “Exclude attachments” or “Only sync high-priority issues.”
For Incoming scripts: Describe how incoming data should be applied to your system. Eg, “Map statuses between tasks“.
The scripts are generated based on Exalate’s scripting API and your existing scripts.
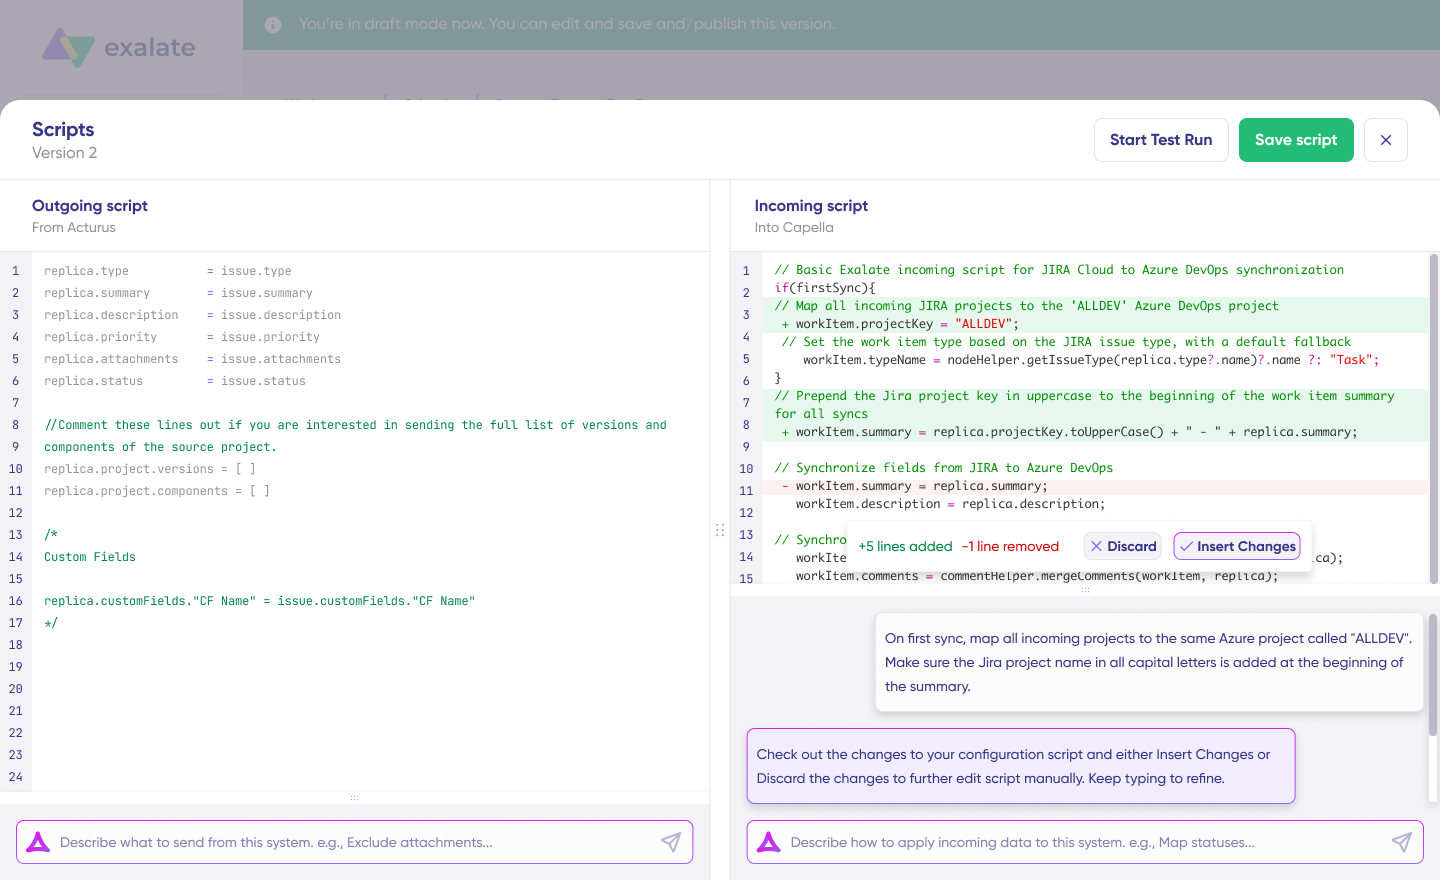
Review the output to validate the suggested changes. New lines are highlighted in green, while suggested removals are highlighted in red. Choose to “Insert” or “Discard” the suggestions.
Note: Just like with any other AI solution, please review the generated code before applying it.
Once you have your sync scripts ready, you can choose to “Save script” or proceed to dry-run them before publishing.

- Click “Start Test Run” and “Select items” to sync. You can select multiple work items. Wait for a bit, and you’ll see the detailed results of the fields synced and the payload shared between both instances or systems. If you are satisfied with the results, click “Publish Version”.
You can view all versions from the “Version” dropdown. The versions can be either “Active”, in “Draft” (editable), or “Archived”.
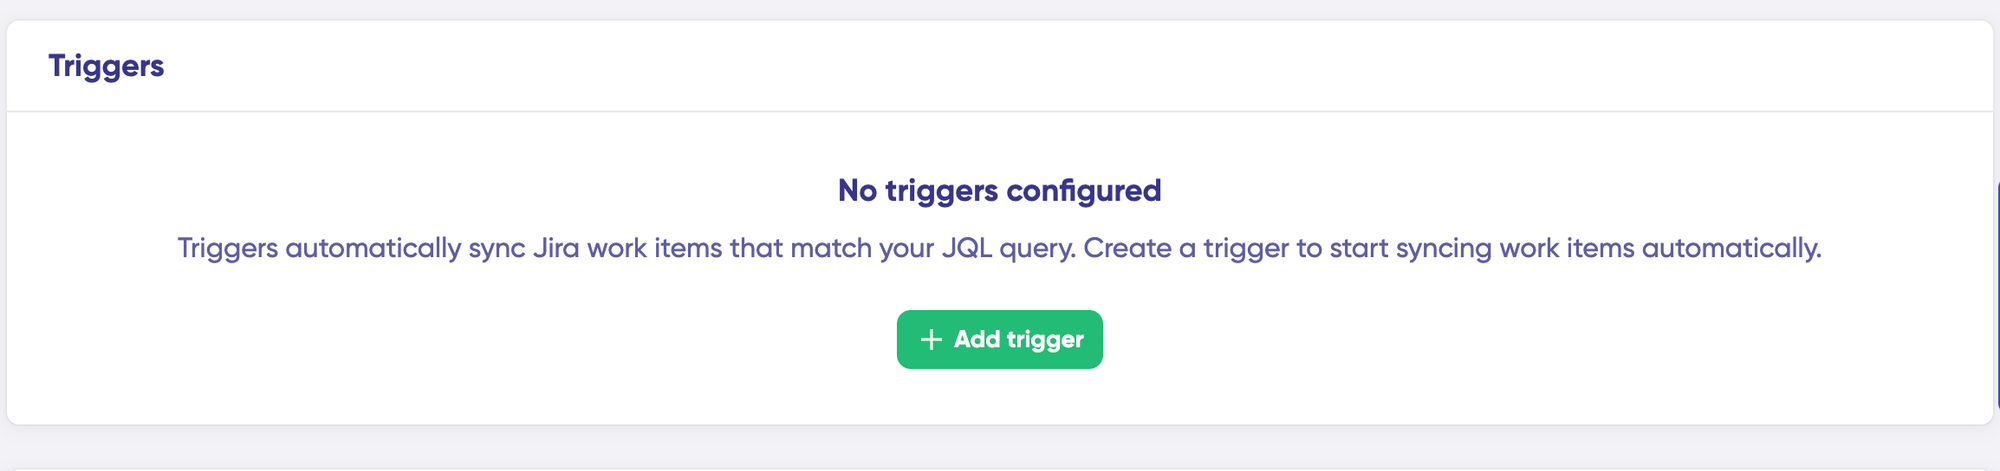
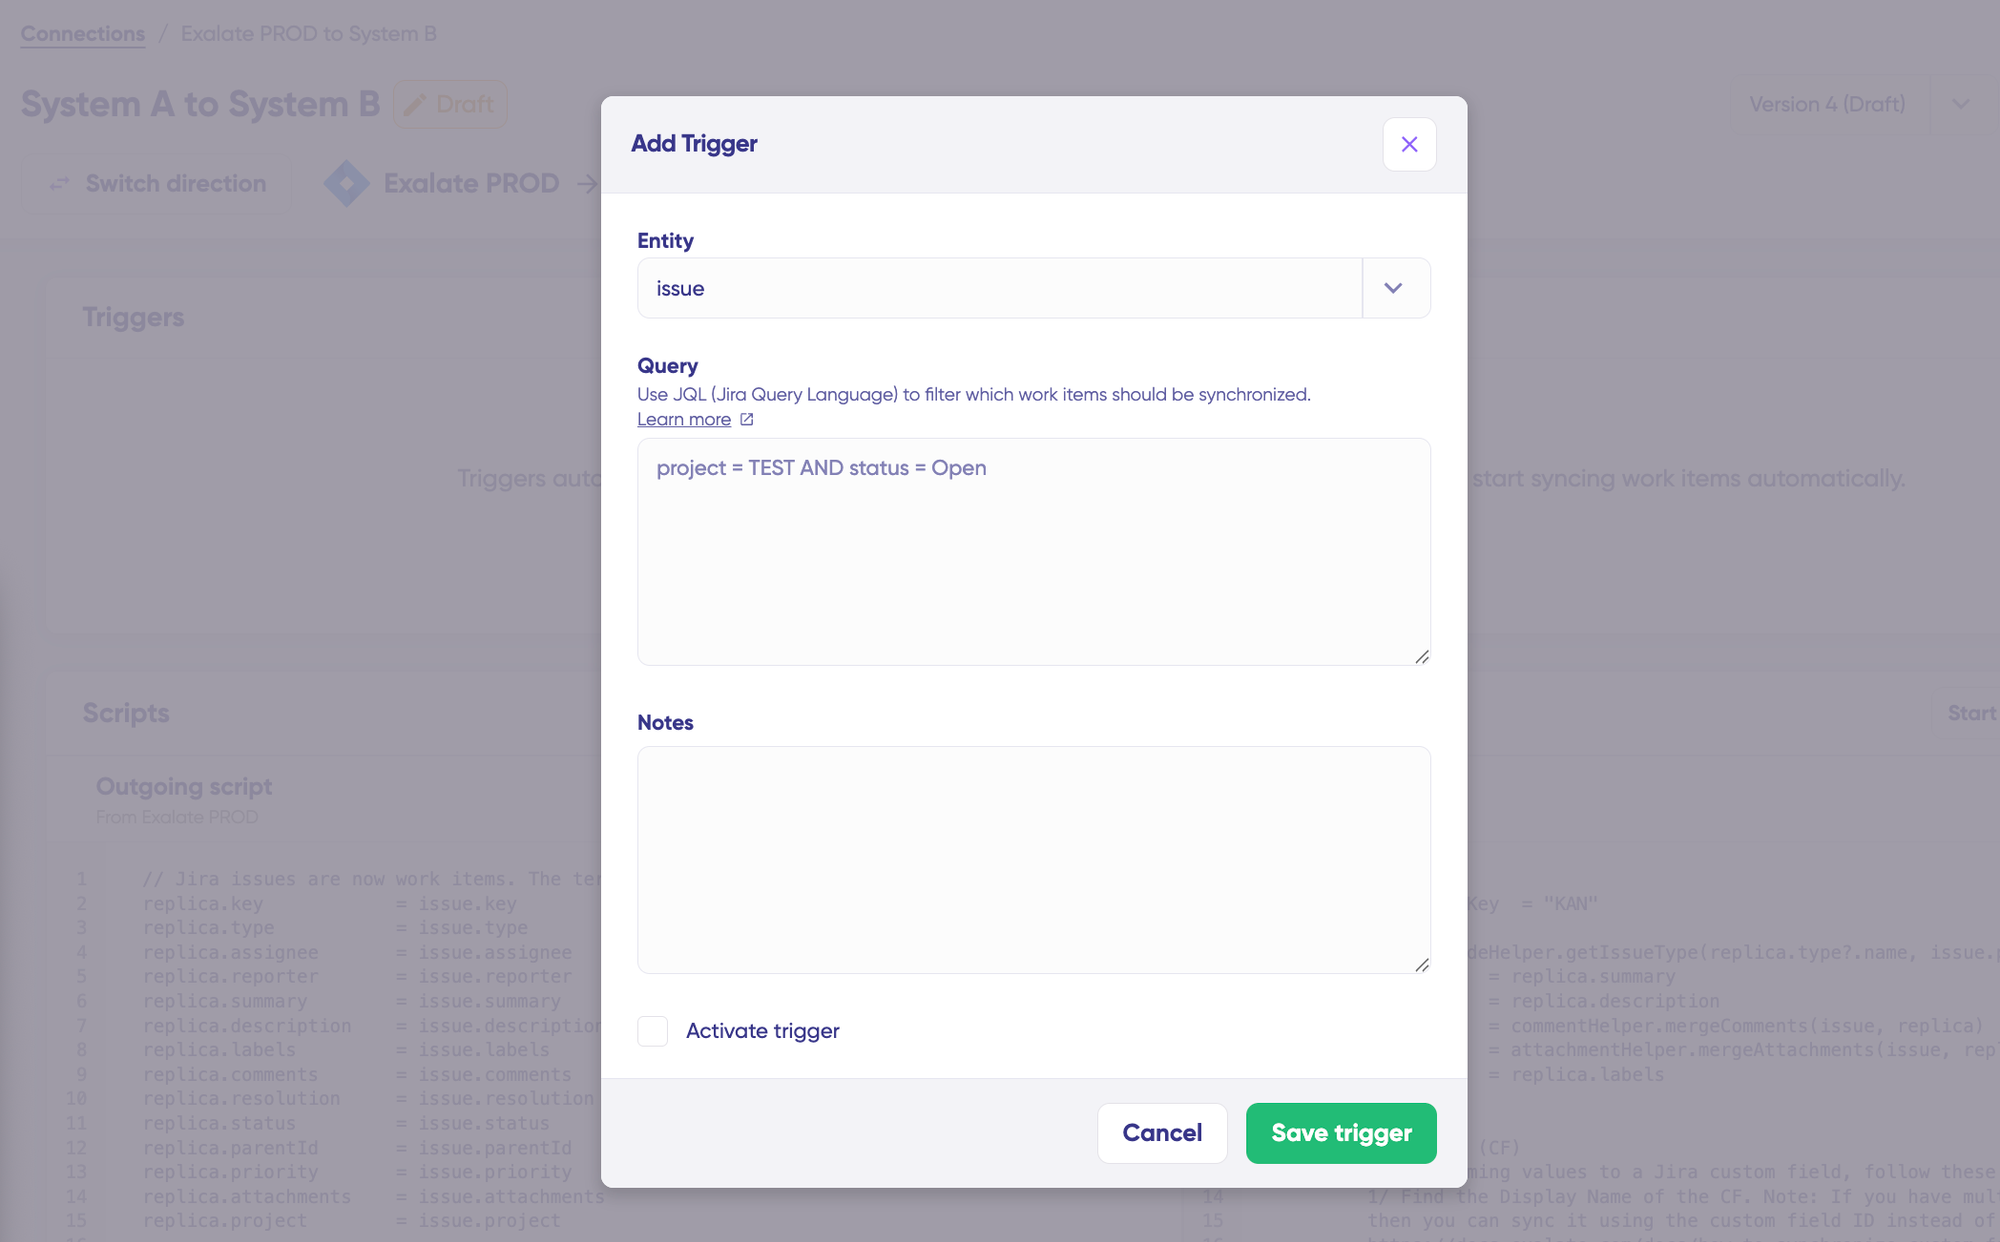
- Set up triggers to automate your sync. These are conditions or filters you apply to specific items. For instance, sync all Jira work items that have “
label = dev”.
Click the “+Add trigger” button to start creating platform-specific triggers.
Choose the entity type (issue or sprint).
For Jira, triggers use JQL (Jira Query Language). Examples:
project = "DEV" AND labels = "sync-to-servicenow"— sync work items with a specific labelpriority = High AND status != Done— sync all high-priority active work itemsissuetype = Bug AND created >= -7d— sync bugs created in the last week
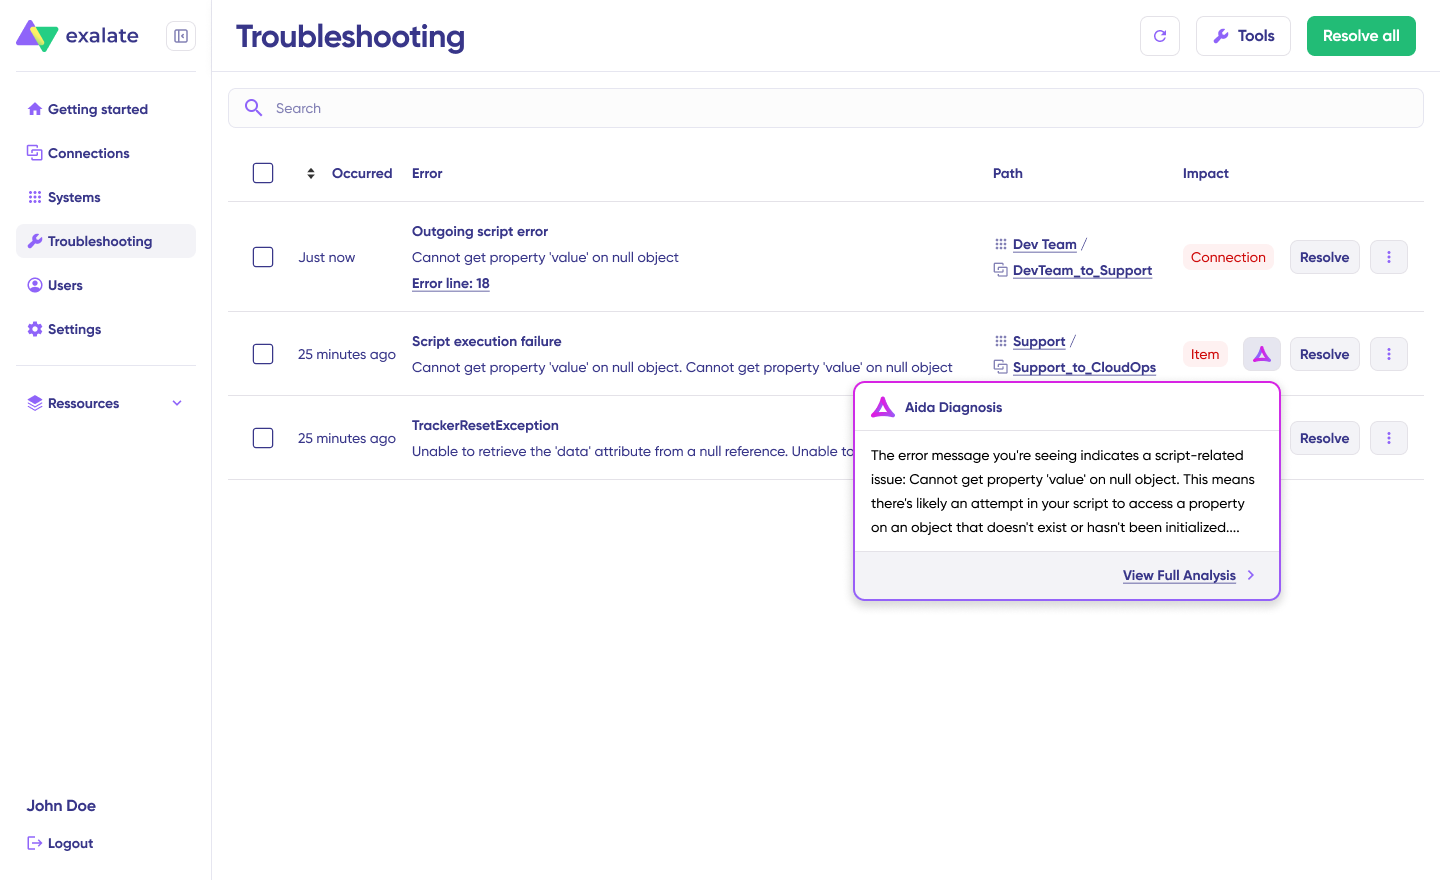
- Troubleshoot your connection with Aida. If there’s an error, go to the “Troubleshooting” tab. Hover over the error you want to diagnose and click on the Aida icon that appears next to the error.
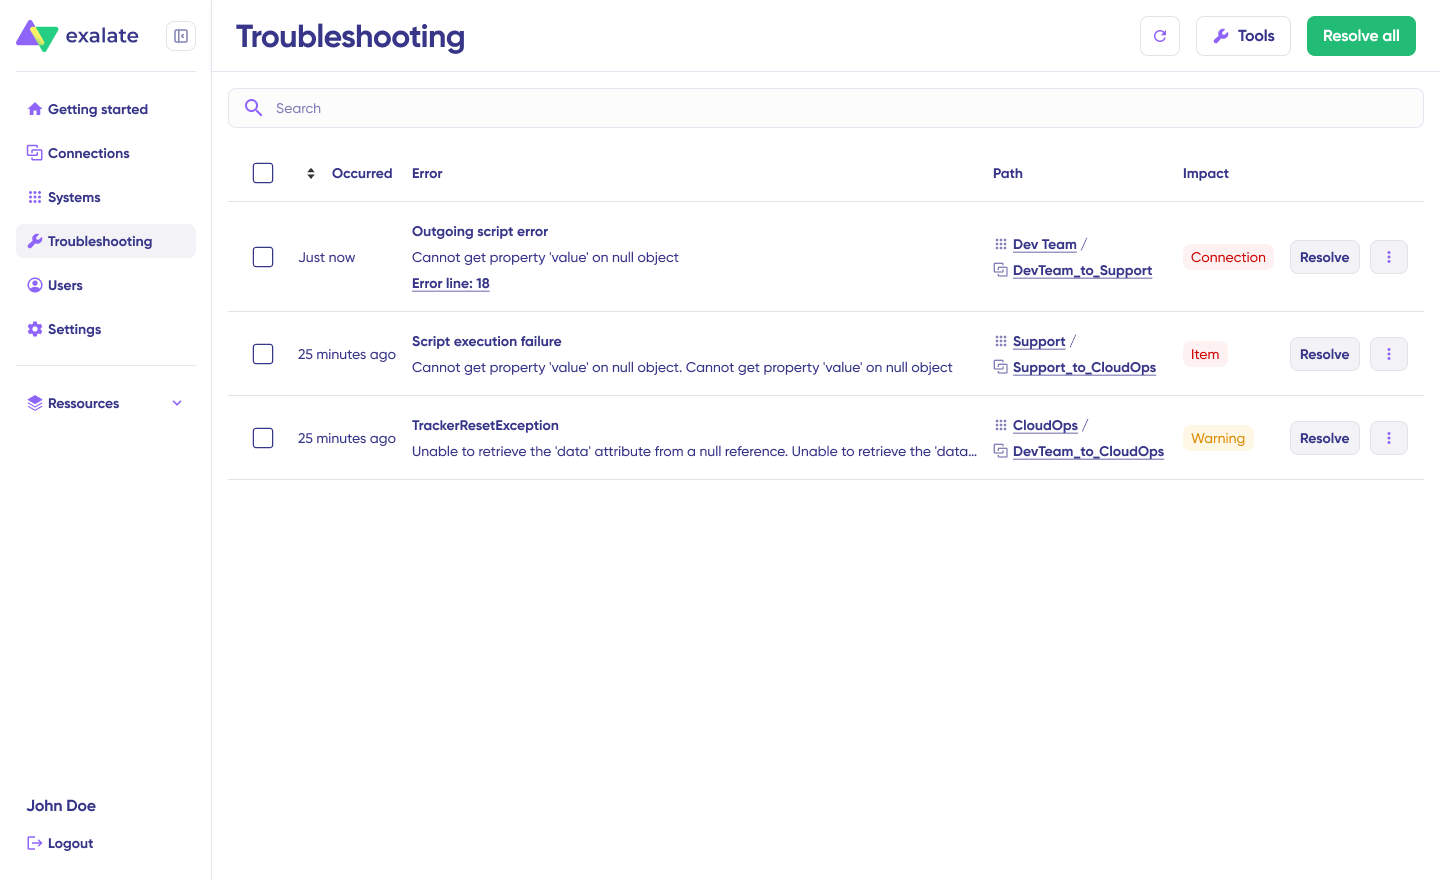
You will see all the affected systems, connections, and items. Aida will provide you with a brief analysis of the error message.
- To get more information, click on Error Details. You will see the impact level, stack trace, error type, and date of occurrence. You can also “View Full Analysis” to get more context.
Fix the error and click on “Resolve”.
That’s it. Your first synchronization will start automatically based on the sync rules and triggers you have set. Happy syncing.
For detailed configuration guides covering specific field mappings, entity types, and advanced use cases, visit the Exalate documentation.
What’s Next?
Jira is an excellent tool for many teams, and its power can be harnessed with applications available on its marketplace.
We saw how Jira integrations can help your teams un-silo themselves and collaborate with other teams to experience increased productivity and efficiency.
We also had a look at what must be considered while choosing integration tools—because you’re going to be spoilt for choice. Security features like ISO 27001 certification, encryption, and role-based access control should be non-negotiable. Flexibility for complex use cases, support for multiple platforms, and automatic handling of downtimes distinguish excellent tools from merely good ones.
Try Exalate for free without going through sales. Connect both sides, configure rules with Aida or a Groovy engineer, and the records start flowing.
If you’d prefer to see it running on your own use case first, book a demo and the Exalate team will walk through the integration patterns live.
Frequently Asked Questions
What is Jira integration?
Jira integration defines the process of connecting one or more apps to the Jira ecosystem for automated data exchange. You can download integration solutions from the Atlassian Marketplace, or you can build custom integrations using Jira’s REST API.
What tools can be integrated with Jira?
Jira can be integrated with a wide range of tools, from Microsoft Excel to Confluence and GitHub. Integration solutions range from no-code options with pre-built connectors to script-based solutions for complex requirements. Exalate connects Jira with Salesforce, Zendesk, ServiceNow, GitHub, Azure DevOps, Azure DevOps Server, Freshdesk, Freshservice, Asana, and more.
Can I interact with the Jira API?
The Jira REST API enables you to interact with Jira programmatically. You can use this API to build apps, enable script interactions with Jira, or develop any other type of integration. There are lots of REST resources available in Jira Cloud, including HTTP response codes and example requests and responses.
Do I need Jira integrations?
Yes, Jira integrations help integrate data between Jira and other systems automatically. This saves time that would otherwise be wasted on manual data entry and status update requests. Jira integrations also bring every important piece of information into one unified view, enhancing reporting and transparency between teams collaborating on a project.
How does Exalate deal with format differences between platforms?
Exalate uses Groovy scripts with built-in helper classes to convert between formats. For example, specific methods handle the HTML-markdown conversion between Azure DevOps and Jira.
Does Exalate work with Jira Service Management?
Yes, Exalate supports all standard fields across Jira Software, Jira Service Management, and Jira Work Management. It also works with Jira Align with minor adjustments.
Which work item fields can I sync?
You can sync basic fields like summary, description, work item types, comments, labels, attachments, priority, custom fields, and more. Additionally, Exalate’s advanced scripting engine allows you to sync any field available via REST APIs using the httpClient method.
Can I integrate multiple Jira instances together?
Yes, Exalate supports multi-instance connections, making it ideal for organizations managing multiple projects, merging after acquisitions, or collaborating with external partners who also use Jira.
How does Exalate handle security for cross-company integrations?
Exalate enables secure external collaboration without compromising security. Each organization uses their own authentication, no shared admin accounts, no API keys exchanged between parties. Each side maintains complete autonomy over configuration. Partners can’t see your sync scripts, and configuration changes on your side don’t require partner approval.
What makes Aida different from other AI tools?
Aida is Exalate’s AI-assisted configuration tool that converts natural language descriptions into working sync configurations. Instead of writing scripts from scratch, you describe what you want to sync, and Aida generates the configuration. This dramatically reduces setup time while maintaining full customization capabilities for technical users who want to fine-tune the output.
Can I filter which work items sync between systems?
Yes, Exalate allows granular filtering based on project, work item type, priority, labels, custom fields, or any other criteria. You configure sync rules to ensure only relevant data flows between systems—customer payment details, internal cost estimates, or proprietary notes can be excluded while other fields sync freely.
Does Exalate support Freshservice and Freshdesk?
Yes, Exalate supports both Freshservice and Freshdesk integrations with Jira and other platforms. This enables seamless collaboration between IT service management teams using Freshworks products and development teams using Jira.
What kind of support does Exalate provide?
Exalate offers documentation, community support, and direct technical support depending on your plan. Enterprise customers receive dedicated success management. For turnkey implementations, managed services provide complete configuration and ongoing support.
What’s the difference between template-based and script-based integration tools?
Template-based tools like Zapier use pre-built connectors with simple trigger-action workflows, which are ideal for basic automations that don’t require customization. Script-based tools like Exalate offer full control over sync logic through code, enabling complex field transformations, conditional routing, and enterprise security requirements. Choose template-based for quick setup with standard processes; choose script-based when you need flexibility, security controls, or cross-company collaboration.
Which Jira integration tool is best for MSPs?
For managed service providers syncing with multiple clients, look for tools that support independent configuration on each side (so clients can’t see your sync scripts), secure authentication without sharing credentials, and scalable licensing. Exalate is particularly suited for MSP environments as it allows each organization to maintain autonomy over their configuration while syncing data securely.
Can I use multiple integration tools together?
Yes, organizations sometimes use different tools for different purposes; for example, Zapier for simple notifications to Slack and Exalate for complex bidirectional sync with external partners. However, using multiple tools that sync the same data can create conflicts. Plan your integration architecture carefully and avoid overlapping sync rules on the same work items.
How do native Jira integrations compare to third-party tools?
Native integrations (like GitHub for Jira or Slack for Jira) offer basic connectivity and are often free or low-cost. They work well for simple use cases within the Atlassian ecosystem. Third-party tools like Exalate, Getint, or ZigiOps provide more advanced features: bidirectional sync, custom field mapping, cross-platform support, and enterprise security controls. For complex requirements or cross-company collaboration, third-party tools are typically necessary.
Recommended Reads:


