
Key Takeaways
- Bidirectional sync keeps Salesforce cases and ServiceNow incidents automatically aligned in real-time, eliminating manual data entry across sales, support, and IT teams
- Field mapping flexibility transforms data between platforms, for e.g, ServiceNow Priority 1 becomes Salesforce High Priority, status updates flow both ways, and custom fields sync according to your business logic
- Cross-team visibility gives sales teams immediate access to critical incidents while IT operations tracks customer context, improving resolution times by 25%
- Script-based control with AI assistance lets you handle complex workflows like SLA tracking, multi-instance architectures, and conditional data sharing without template limitations
- A unified management console provides network visualization of all connections, bulk operations across integrations, and centralized monitoring for MSPs managing multiple client environments
What is Salesforce ServiceNow Integration?
Salesforce ServiceNow integration connects your CRM platform with your IT Service Management (ITSM) system to enable seamless, bidirectional data exchange. This integration synchronizes customer data, service requests, incidents, and workflows between platforms automatically.
The integration can be implemented through native connectors, custom API development, or specialized third-party tools that facilitate the connection between Salesforce orgs and ServiceNow instances.
Salesforce manages customer relationships, sales pipelines, marketing campaigns, and service processes. ServiceNow automates IT services, operations management, and internal workflows. Connecting these platforms creates a unified ecosystem where customer-facing teams and IT operations share context without switching systems.
Why Integrate Salesforce and ServiceNow
Organizations using both platforms face specific challenges: sales teams working in Salesforce lack visibility into IT incidents affecting customers, while ServiceNow operators handling technical requests miss context from CRM records.
Use Case Example:
A customer reports a billing issue through Salesforce. The case requires backend investigation by IT operations working in ServiceNow.
Without Integration:
- Support agent manually creates a ServiceNow incident
- Updates happen independently in each system
- Customer history and SLA details don’t transfer
- Status mismatches create confusion
With Integration:
- Salesforce case automatically creates a ServiceNow incident with complete context
- Status updates sync bidirectionally (Case “In Progress” → Incident “Work in Progress”)
- Comments flow between systems while respecting visibility rules
- Resolution in ServiceNow closes the Salesforce case with proper notes
- Both teams work in preferred tools with complete visibility
Key Benefits
- Eliminate duplicate work: Automation removes manual copying between systems
- Faster resolution: Complete context transfers with each case, reducing back-and-forth
- Better collaboration: Sales and IT operations stay aligned without constant meetings
- Improved reporting: Consolidated data enables cross-functional analytics
What Does Salesforce ServiceNow Integration Do
The integration creates a bidirectional data bridge that synchronizes information automatically.
How It Works:
- Automatic entity creation: Salesforce cases create ServiceNow incidents (or vice versa) based on triggers you define
- Real-time updates: Comments, attachments, and status changes sync within seconds
- Field transformation: Salesforce “High” priority becomes ServiceNow “1 – Critical” based on your mapping rules
- Context preservation: Account details, opportunity information, and case history transfer without data loss
- Workflow independence: Sales teams stay in Salesforce, IT operations in ServiceNow, data stays synchronized
Data Typically Synced Between Salesforce and ServiceNow
Standard Objects:
- Salesforce Cases → ServiceNow Incidents
- Salesforce Accounts → ServiceNow Customer records
- Opportunities → Change Requests
- Comments and activity history
- Attachments and documents
- Status and workflow stages
- Ownership (Account Executive, Assigned To)
- Priority and urgency levels
- Dates (Created, Due, Closed)
Advanced Synchronization:
- Any data accessible via REST APIs
- Custom objects and fields
- Opportunity stages and revenue forecasts
- Customer health scores
- Contract information
- SLA commitments
- Related records (parent-child relationships)
Real-World Use Cases for Salesforce ServiceNow Integration
1. Customer Escalation with Complete Context
Scenario: Enterprise customer reports a critical issue affecting their production environment.
Workflow:
- Account Executive creates a high-priority case in Salesforce with customer details and contract SLA
- Integration automatically creates a ServiceNow incident with complete context, including:
- Customer account history
- Active opportunities
- Contract terms and SLA requirements
- Previous support interactions
- The IT operations team investigates in ServiceNow
- Status updates flow back to Salesforce automatically
- Resolution notes sync back to the Salesforce case
- Account Executive maintains visibility throughout
Outcome: 40% faster resolution time through complete context transfer and elimination of information gathering delays.
2. Opportunity-Driven Change Management
Scenario: Large deal requires infrastructure changes before customer onboarding.
Solution:
- Salesforce Opportunity reaches “Contract Signed” stage
- Automatically creates a ServiceNow Change Request with:
- Customer requirements from the opportunity
- Timeline tied to contract start date
- Stakeholder information
- IT operations schedules and tracks implementation
- Progress updates appear in the Salesforce opportunity
- Implementation completion triggers Opportunity stage advance
3. MSP Multi-Tenant Client Management
Challenge: MSP manages multiple client Salesforce orgs while centralizing operations in ServiceNow.
Solution:
- Connect 10+ client Salesforce instances to central ServiceNow
- Cases sync automatically when clients log requests
- Comments and attachments flow bidirectionally
- The unified dashboard shows all client connections
- Different sync rules per client based on contracts
- Clients work in Salesforce without ServiceNow access
Architecture:
- Single ServiceNow instance as operational hub
- Multiple Salesforce org connections
- Client-specific field mappings and triggers
- Automated routing based on account ownership
What Are the Best Ways to Connect Salesforce and ServiceNow?
ServiceNow IntegrationHub (Native Method)
ServiceNow’s IntegrationHub includes a Salesforce Spoke for connectivity.
While native, it has limitations:
- ServiceNow-centric control (limited Salesforce-side autonomy)
- Additional licensing costs
- Limited bidirectional functionality for complex scenarios
- Works well for simple, unidirectional data pushes
Best For: Basic one-way data flows when the budget isn’t constrained
Custom API Development
Building with Salesforce and ServiceNow APIs provides complete control but requires significant investment:
- Full customization capability
- No licensing fees initially
- High development costs (80-300+ hours)
- Ongoing maintenance burden
- Scaling difficulties as requirements evolve
- Manual error handling and monitoring implementation
Best For: Organizations with dedicated integration development teams and stable, long-term requirements
Read our detailed comparison: Build vs. Buy Integration Solutions | Try our Build vs. Buy Calculator
Third-Party Integration Solutions
Purpose-built integration platforms offer pre-configured connectors with flexibility for customization.
Many template-based tools handle simple scenarios but cannot adapt to complex, multi-directional workflows or custom business logic.
What to Consider When Choosing an Integration Solution
Integration tools should adapt to business needs through out-of-the-box solutions combined with custom workflows and field mappings.
Security
Look for tools offering:
- Encrypted data transfers (TLS 1.2/1.3)
- Role-based access control (RBAC)
- Compliance certifications (ISO 27001, GDPR, etc.)
- OAuth 2.0, API keys, Personal Access Tokens
- Complete audit trails for configuration changes and data transfers
Security breaches through integrations expose customer data, violate compliance, and damage trust. Certified platforms reduce risk and satisfy audit requirements.
Visit the platform Trust Centers to review security documentation, penetration test results, and compliance certificates.
Real-Time Synchronization
Delays between systems create confusion. If ServiceNow shows “In Progress” while Salesforce shows “Resolved,” which is accurate?
Why it matters: Real-time sync eliminates ambiguity. IT operations and development teams make decisions based on current data. Stale information leads to duplicate work, missed SLAs, and frustrated customers.
Flexibility
Business processes evolve. Solutions must support complex scenarios with conditional logic and advanced data mappings by default.
Integration must also support historical data exchange and legacy system integration.
Rigid integration templates force workflow changes (expensive and disruptive) or incomplete data sync (defeating the purpose).
Essential capabilities:
- Custom field mapping for standard and custom objects
- Conditional logic (sync high-priority cases only)
- Data transformation (Opportunity Amount → Budget field)
- Support for complex relationships (Account hierarchies, related cases)
AI-Assisted Configuration
Traditional integration setup requires developers to understand both platforms’ APIs, data models, and scripting languages. AI changes this.
Look for:
- Natural language script generation: Describe requirements (“sync all high-priority incidents to Salesforce as cases”), receive working code
- Context-aware suggestions: AI understands the existing configuration and recommends improvements
- Error explanations: When sync fails, AI translates technical errors into plain language with fix suggestions
This reduces implementation time from days to hours. Non-developers configure complex sync rules. Troubleshooting accelerates when errors are explained clearly instead of cryptic API messages.
Scalability
You might start with one Salesforce project syncing to one ServiceNow assignment group. Six months later, you need five instances connected to ServiceNow, plus Azure DevOps, Freshservice, and Asana.
Why it matters: Starting with non-scalable solutions means later migration: re-implementing integrations, retraining teams, and disrupting workflows. Choosing scalable platforms from the start avoids this pain.
Scaling requirements:
- Multi-instance support (multiple Salesforce orgs, ServiceNow instances)
- Unlimited connections without exponential cost increases
- Unified management console
- Bulk operations across connections
Reliability
Look for:
- Automatic retry logic: Failed sync attempts retry automatically with exponential backoff
- Rollback capability: If configuration changes break sync, revert to the previous working versions
- Safe testing: Validate configuration changes before production deployment
Broken integrations are worse than no integration, where teams see outdated data, make decisions on false information, and lose system trust. Reliability features minimize downtime and provide safety nets.
Dashboards and Monitoring
Real-time visibility into sync operations is essential. Look for:
- Activity dashboards showing sync status across all connections
- Queue monitoring to track synchronization progress
- Error notifications with context-aware troubleshooting suggestions
- Network visualization displaying how integrations connect
These features help identify issues quickly and maintain operational control.
Cost and Pricing Models
Integration pricing varies significantly. Understanding the model prevents budget surprises.
Pricing models:
- Per-user licensing: Pay based on Salesforce or ServiceNow user count
- Flat pricing: Fixed rate per integration or system
- Per-transaction (usage-based): Pay per API call or sync event
- Per-connection: Pay per integration pair (Salesforce ↔ ServiceNow)
- Outcome-based (sync pairs): Pay for work items actively synchronized at any given time
Look for pricing transparency. Estimate costs before committing.
Why Use Exalate for Salesforce ServiceNow Integration
Exalate combines flexibility with operational simplicity through unified management:
- Script-based engine: Groovy scripting for any custom workflow logic
- Unified console: Manage all integrations and connections from one interface; build multi-tier integration networks
- AI-assisted configuration: Aida (Exalate AI) generates and troubleshoots sync scripts based on natural language prompts
- Test Run functionality: Validate sync scripts before production deployment
- Script versioning: Every publish creates a new version with a full audit trail (who changed what, when) and rollback capability. Work on drafts without affecting production
- Real-time sync: Complete queue visibility and incident history
- Activity Dashboard: Monitor sync status, track performance, and identify issues across all connections
- Security-first: ISO 27001 certified, RBAC, encryption at rest and in transit. Visit Exalate Trust Center
- Supported integrations: Salesforce, ServiceNow, Jira, Jira Service Management, Azure DevOps Cloud and Server, Zendesk, Freshservice, Freshdesk, Asana, GitHub, and more. View all supported connectors
- Outcome-based pricing: Pay for active work items in sync, not user seats. Costs scale with actual usage, not team size. With each integration pair, create unlimited connections and users. Cost decreases as items under sync increase
View pricing details | Exalate Pricing Calculator

How to Integrate Salesforce and ServiceNow
This guide demonstrates Salesforce ServiceNow integration using Exalate’s unified console.
Getting Started
Visit the Exalate app. Existing users log in directly. New users create accounts by entering their business email and verifying it, or signing up with Google.
Create Your Connection
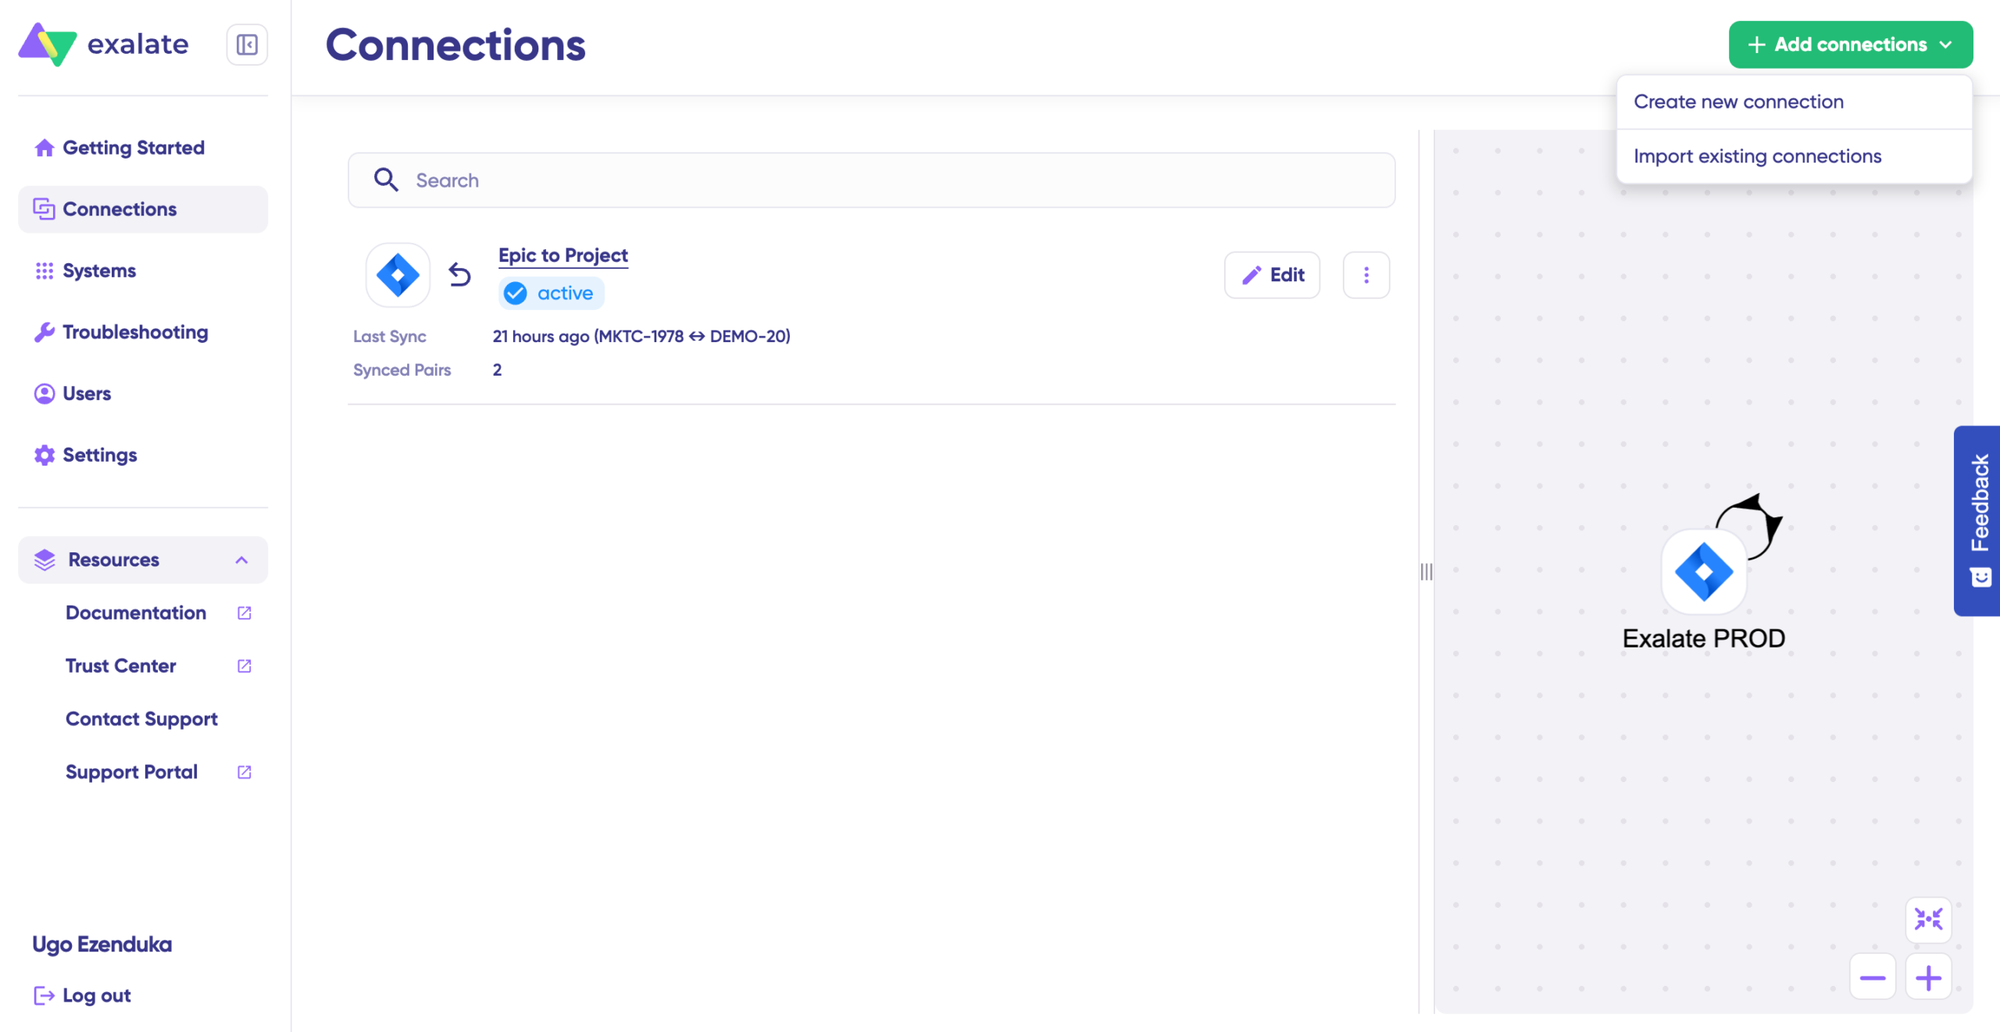
Once you sign in, you will be able to view all connections under the “Connections” tab, where you can edit settings and view connection details.
Connection Setup:
- Click “+ Add connections” > “Create new connection”
- Name your first system (System A)—either Salesforce or ServiceNow
- Enter system URL (e.g., your ServiceNow instance URL)
- Validation check occurs; existing systems will be authenticated automatically
- New systems require authentication details (ServiceNow uses Basic; Salesforce uses API tokens)
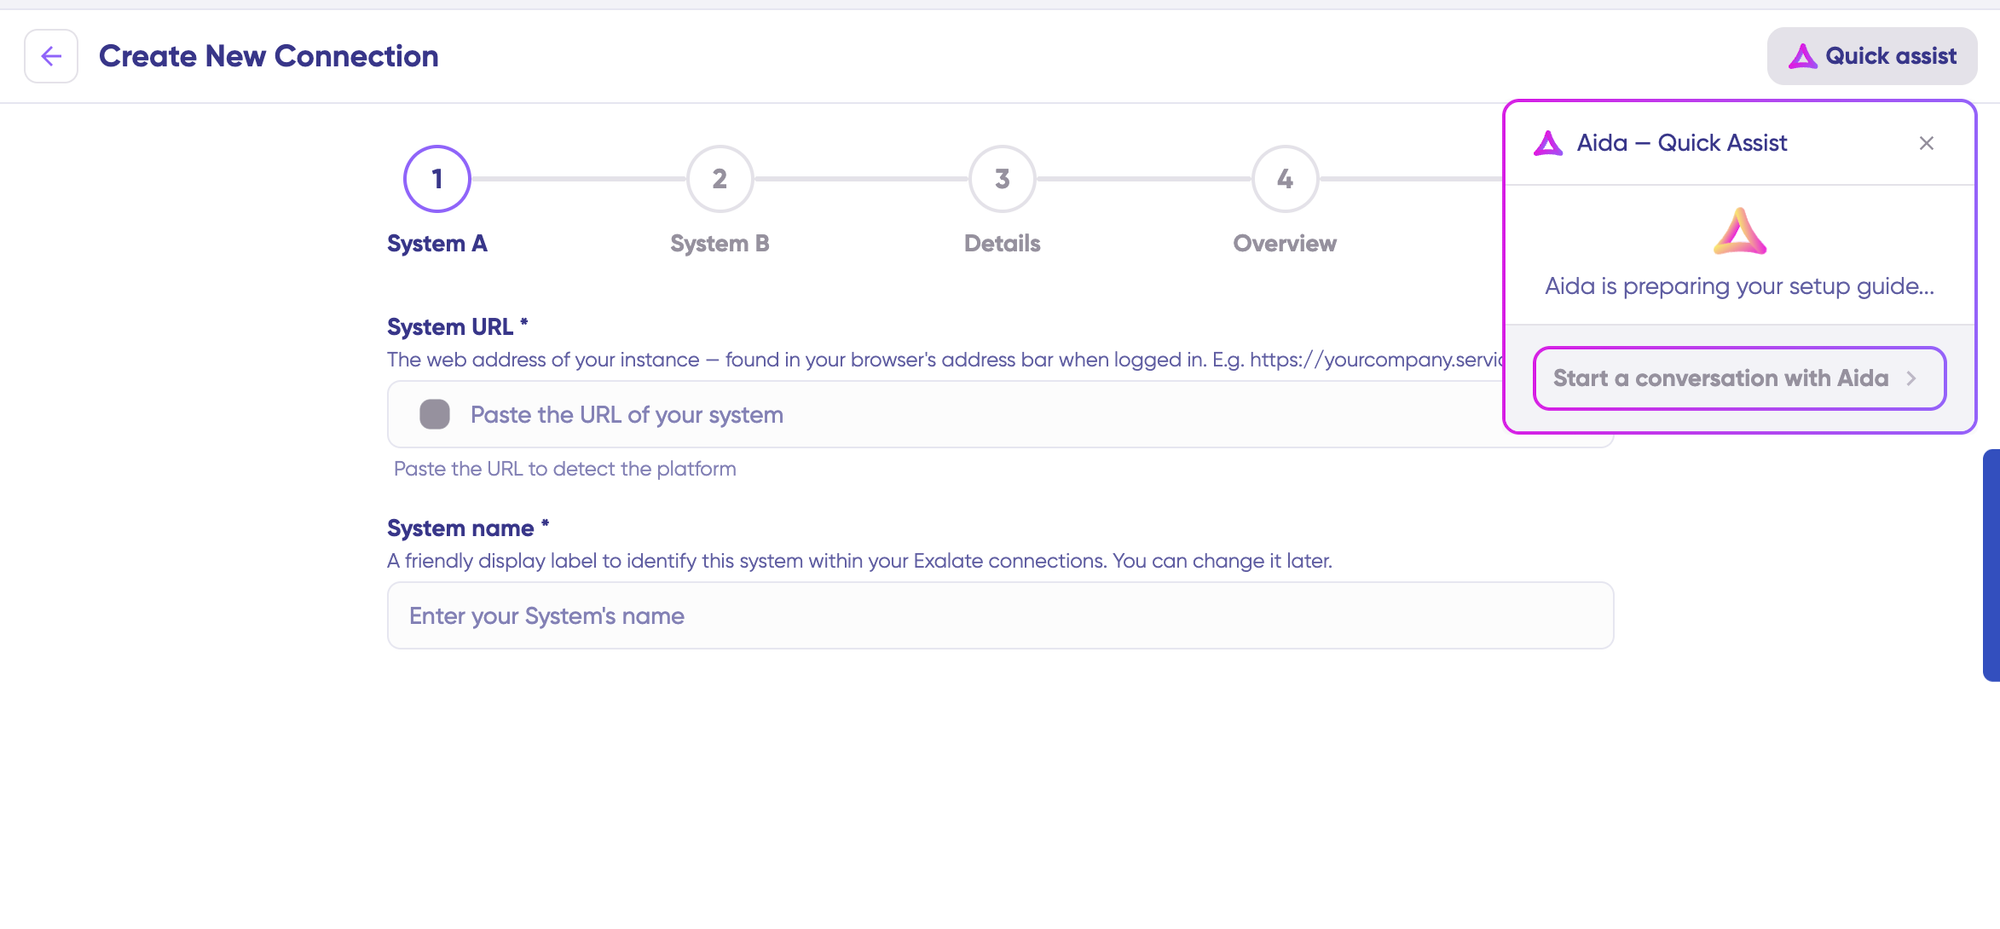
- Complete setup for the other side. You can click on Quick Assist to speed up the setup and ask Aida for assistance.
- Name and describe your connection
- Click “Next”
- Review details and click “Create connection”.
When complete, select “Continue to configuration.”
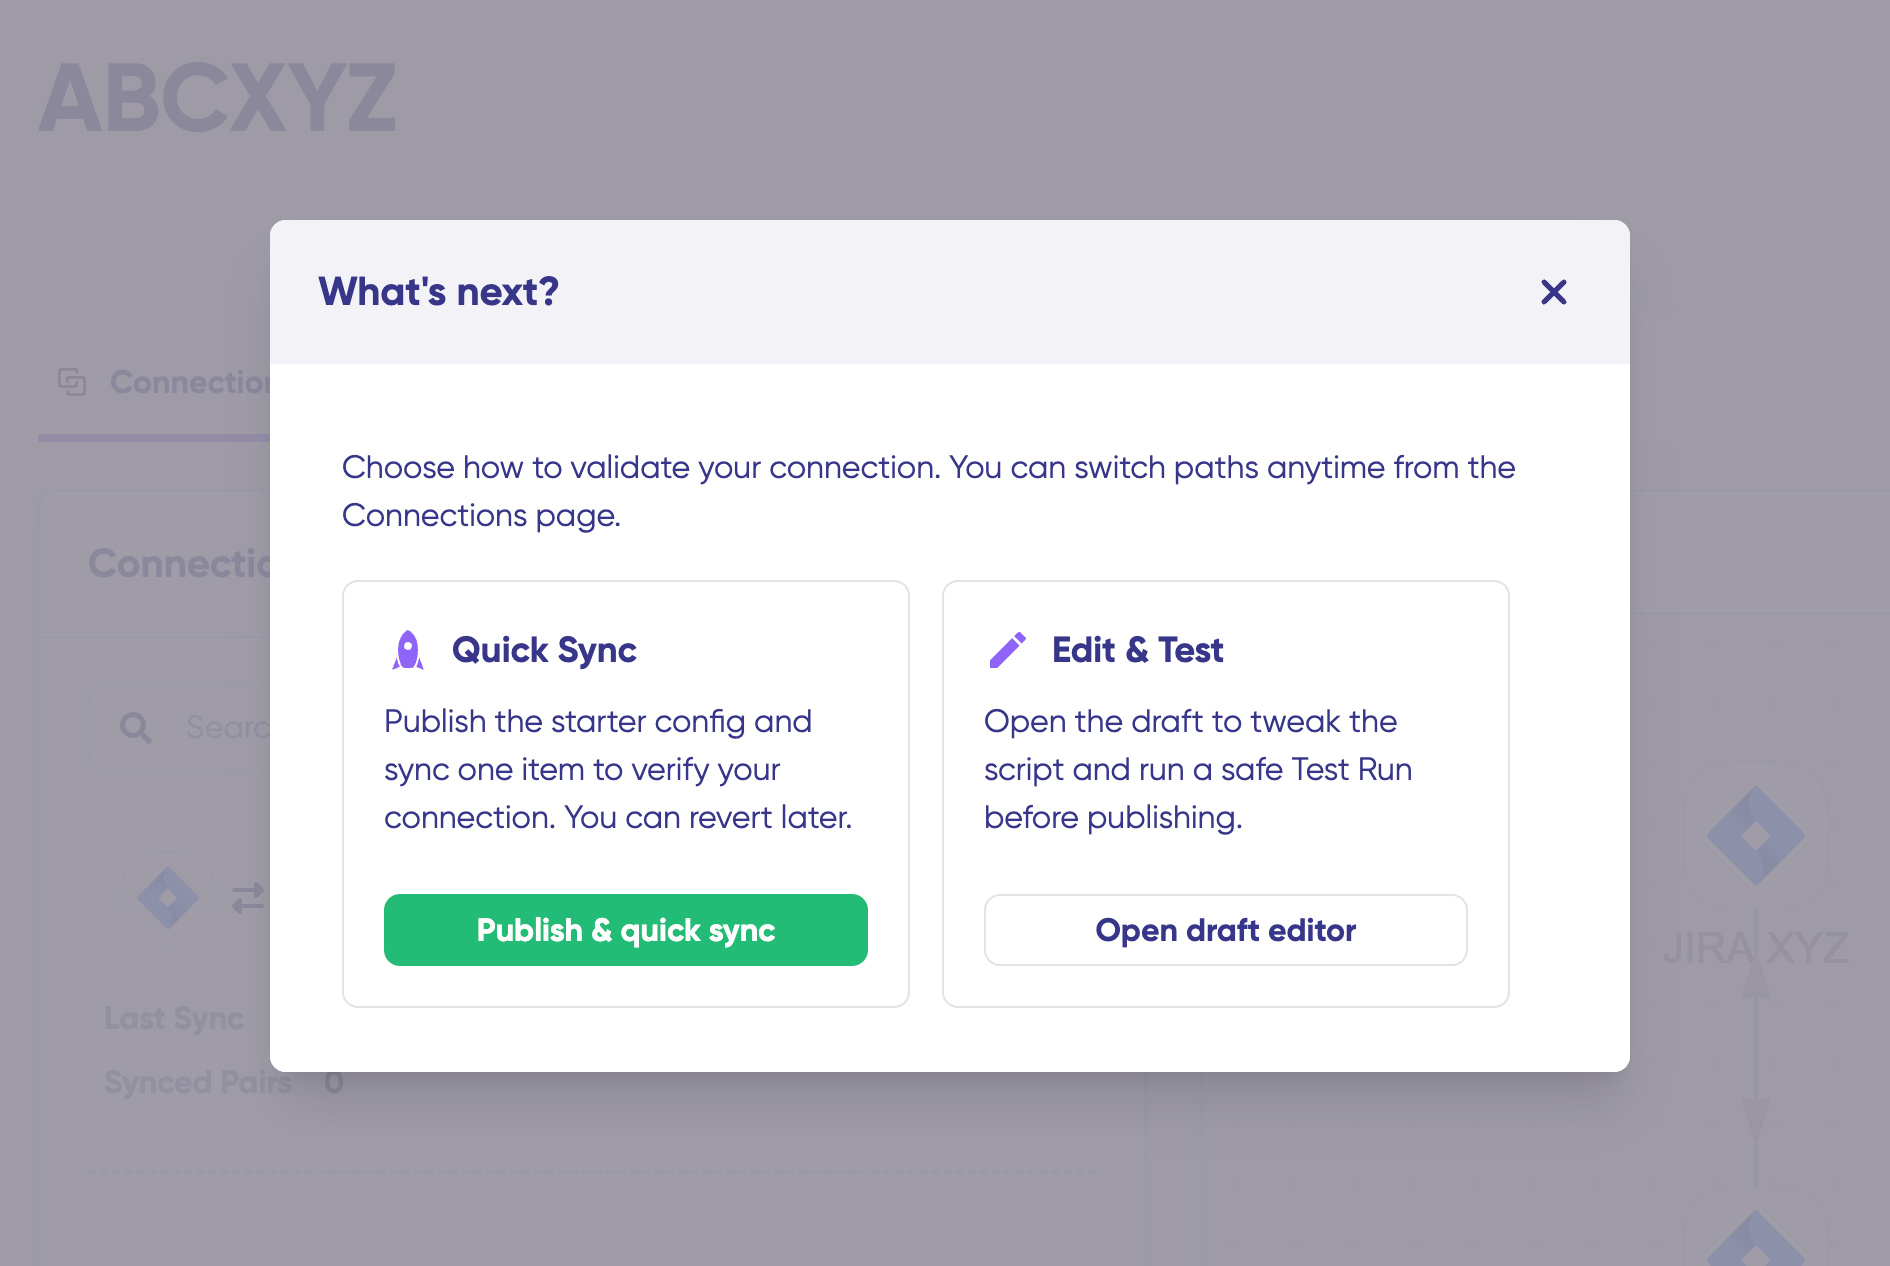
Configuration Options
After creating connections, choose between configuration approaches:
Quick Sync: Test your connection by syncing one item between Salesforce and ServiceNow. Enter work item details in the “Item sync monitor” and click “Sync Now” to sync the first item, or “Link with existing” to connect two existing items.
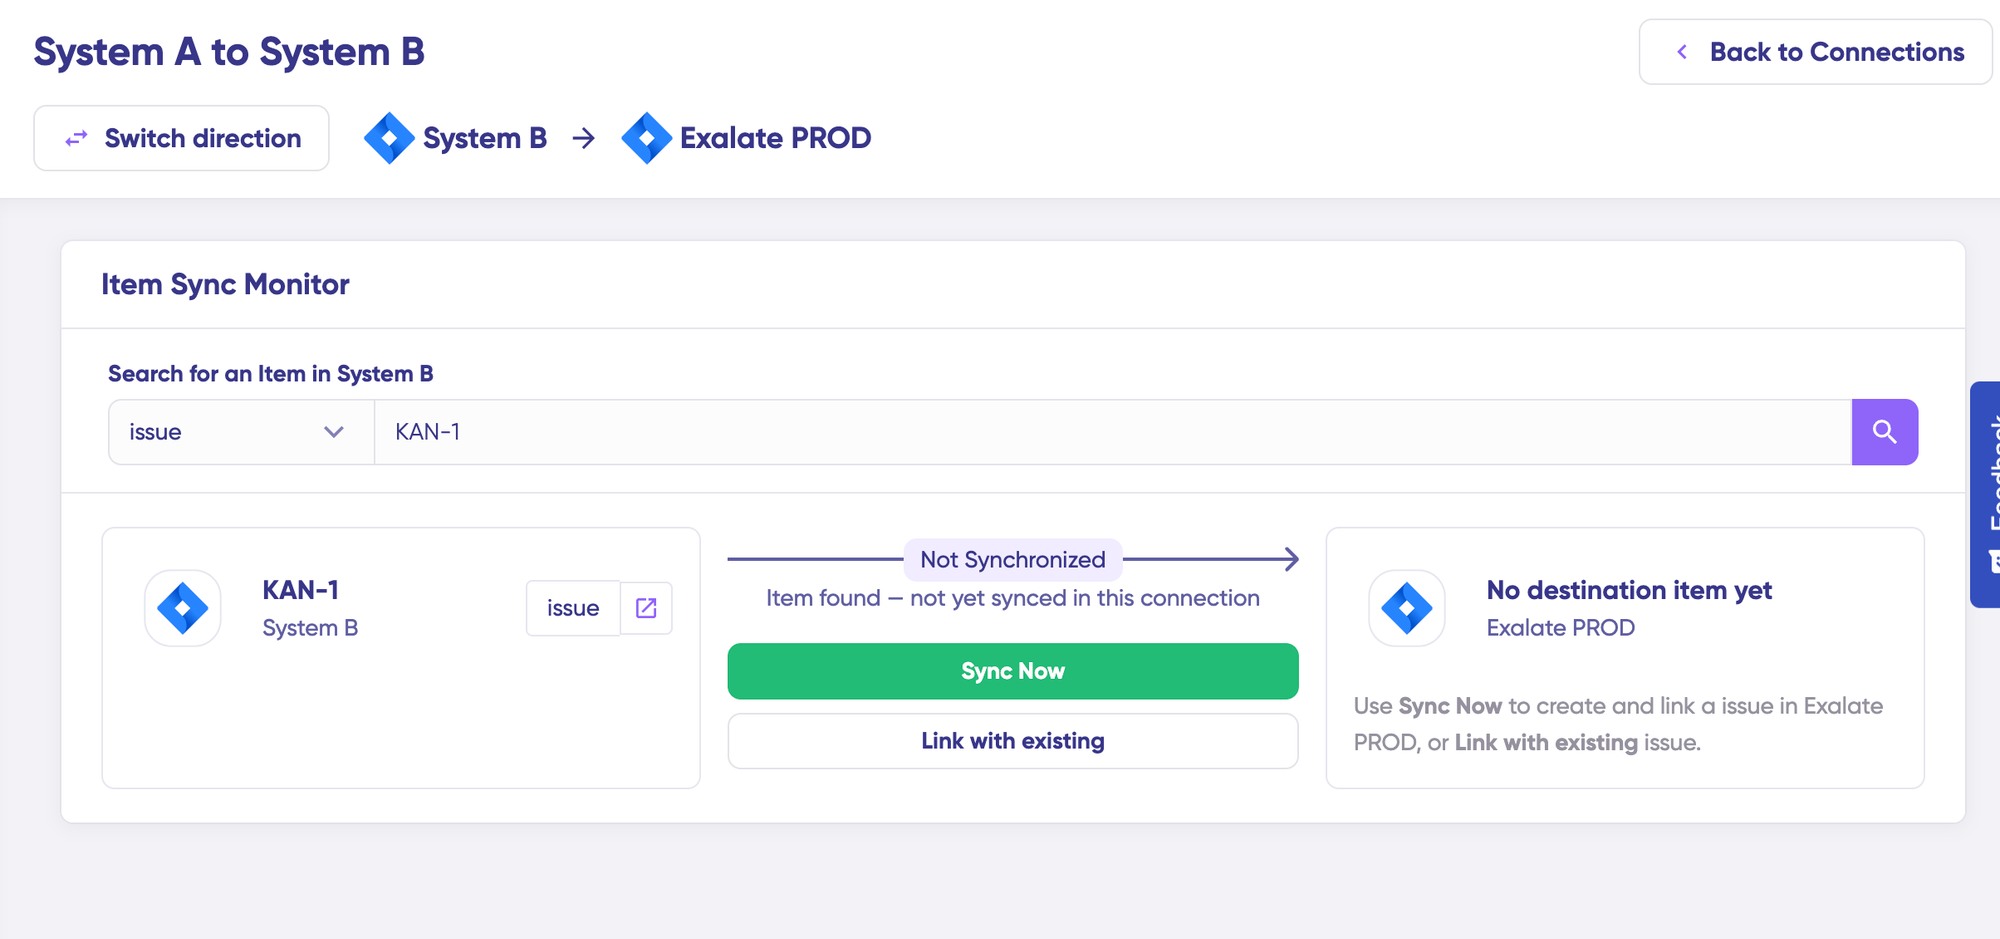
Status updates appear during sync. Once complete, view both synced items and compare how they appear with changes applied.
Edit & Test: Click “+ New version” or “Open latest draft” to modify sync configuration. This ensures you don’t accidentally modify the existing configuration. Changes in drafts save automatically.
Understanding Sync Rules
Sync rules use Groovy scripts for custom data logic, mappings, and conditional flow, adapting to any complex workflow.
Change sync direction by clicking the arrows next to the connection name.
Scripts are divided into:
- Outgoing script: Controls values passed from source to destination
- Incoming script: Defines how incoming values map to the destination
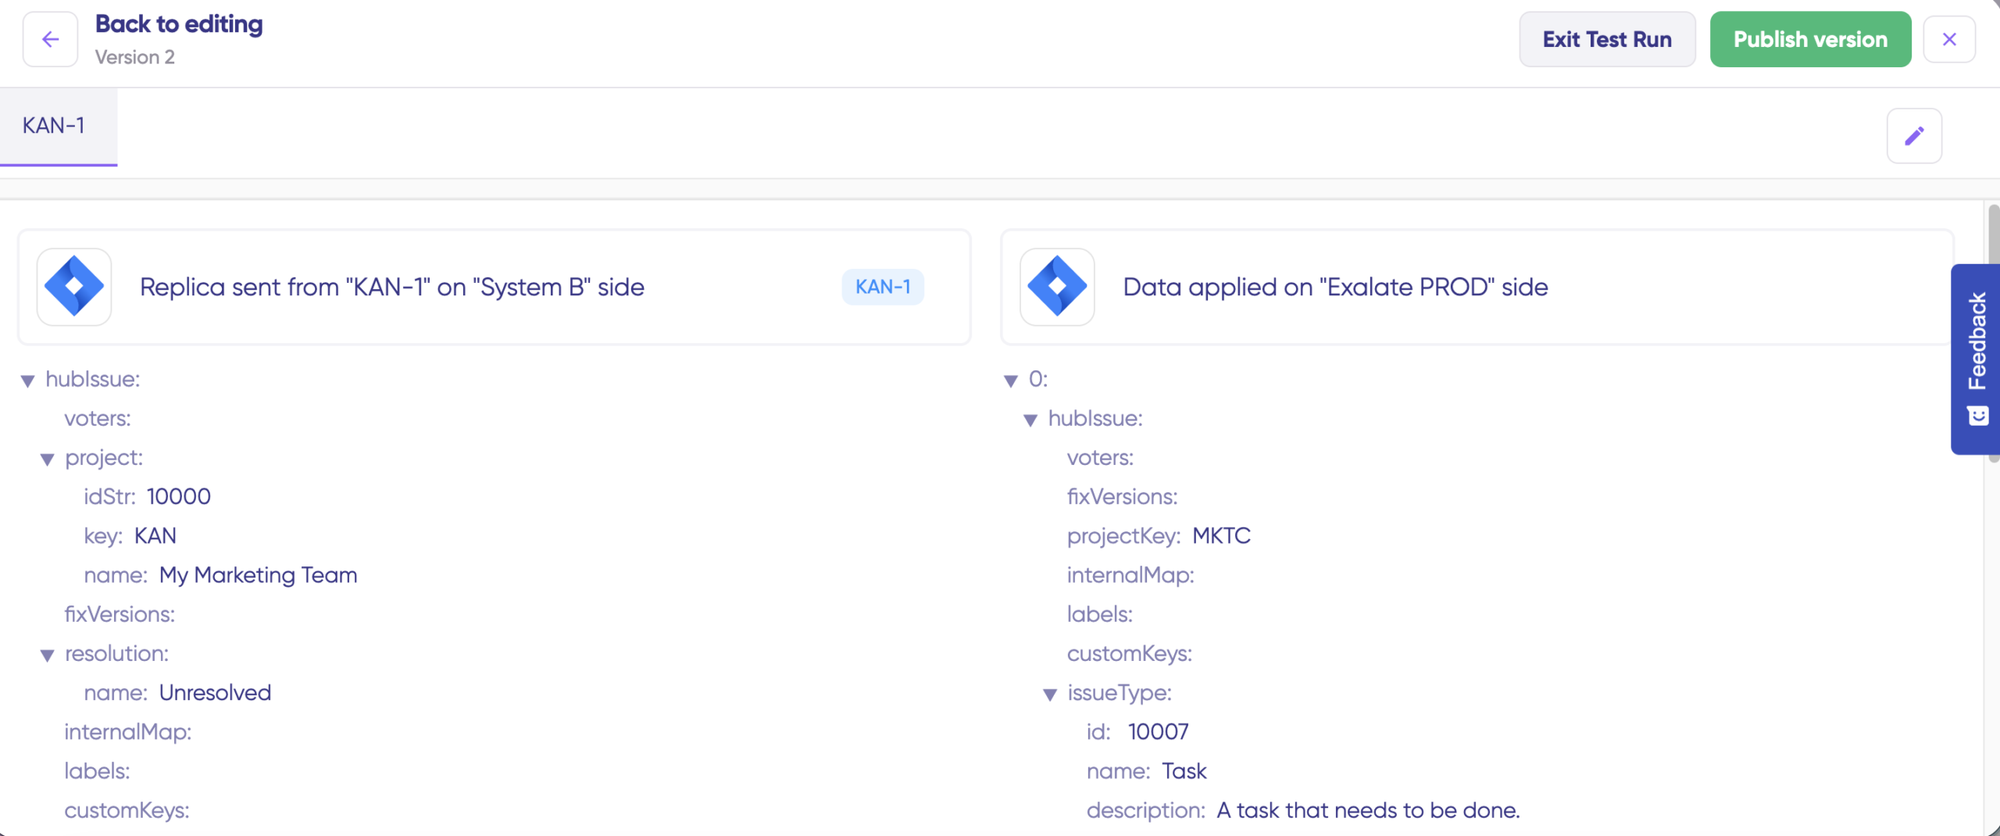
Replica works like a message payload, holding actual data passed between synced entities in JSON format.
To sync new values, enter sync scripts if familiar with Groovy. To stop something from syncing (e.g., attachments), remove that script line from the outgoing script.
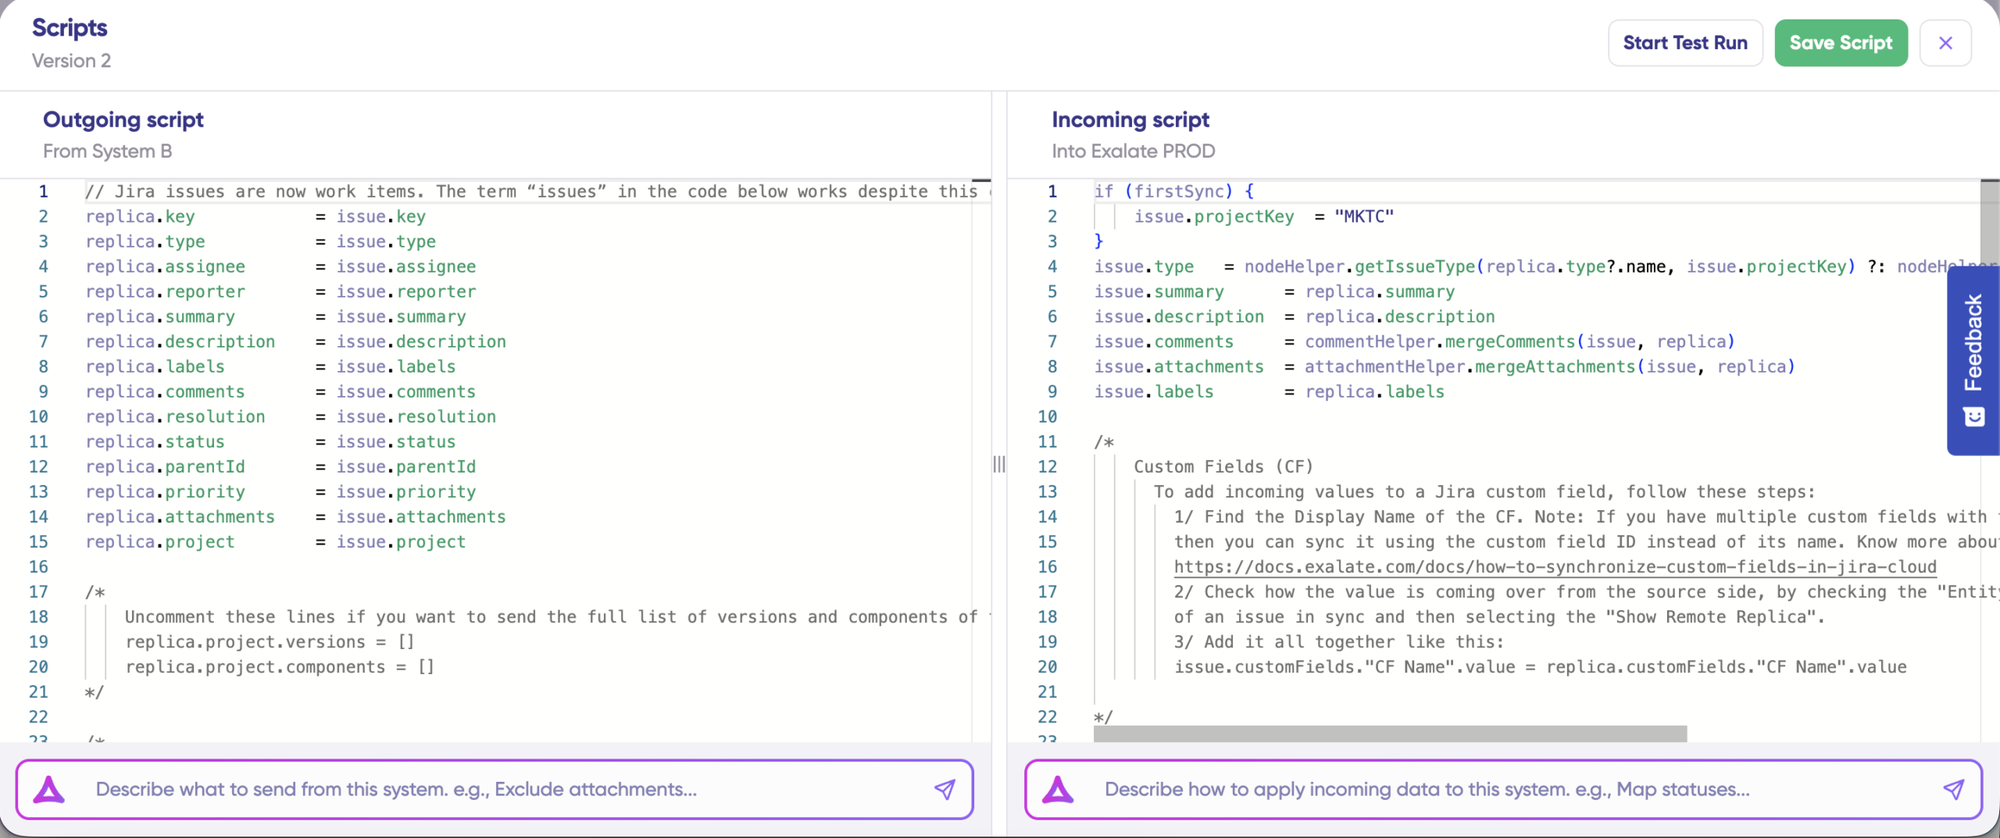
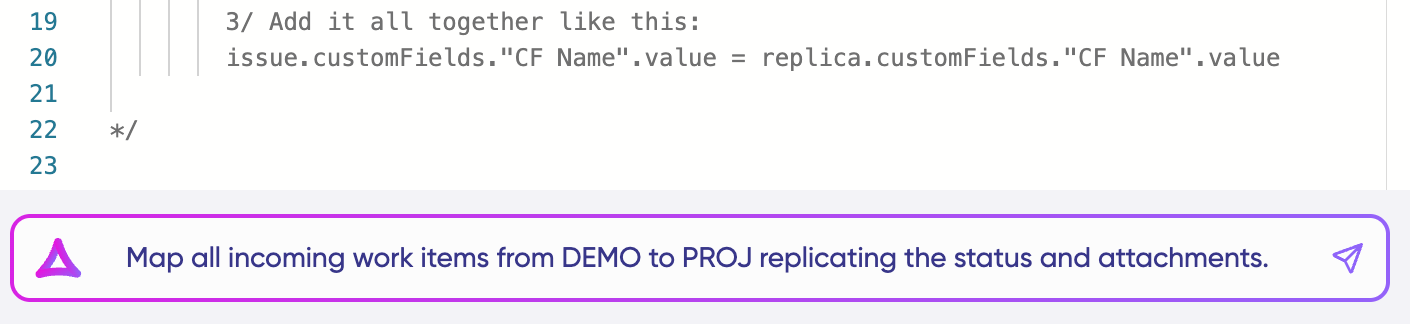
AI-Assisted Configuration with Aida
Save time and simplify scripting using Aida to generate sync scripts.
Aida is available in both incoming and outgoing script sections:
- For Outgoing scripts: Describe what data should leave your system (“Exclude attachments” or “Only sync high-priority items”)
- For Incoming scripts: Describe how incoming data should apply (“Map statuses” or “Set default assignee if user not found”)
Based on Exalate’s scripting API and existing scripts, Aida generates working Groovy scripts with proper field mappings.
Review Aida’s suggested changes. Green highlights indicate additions; red highlights show removals. Choose to “Insert” or “Discard” suggestions.
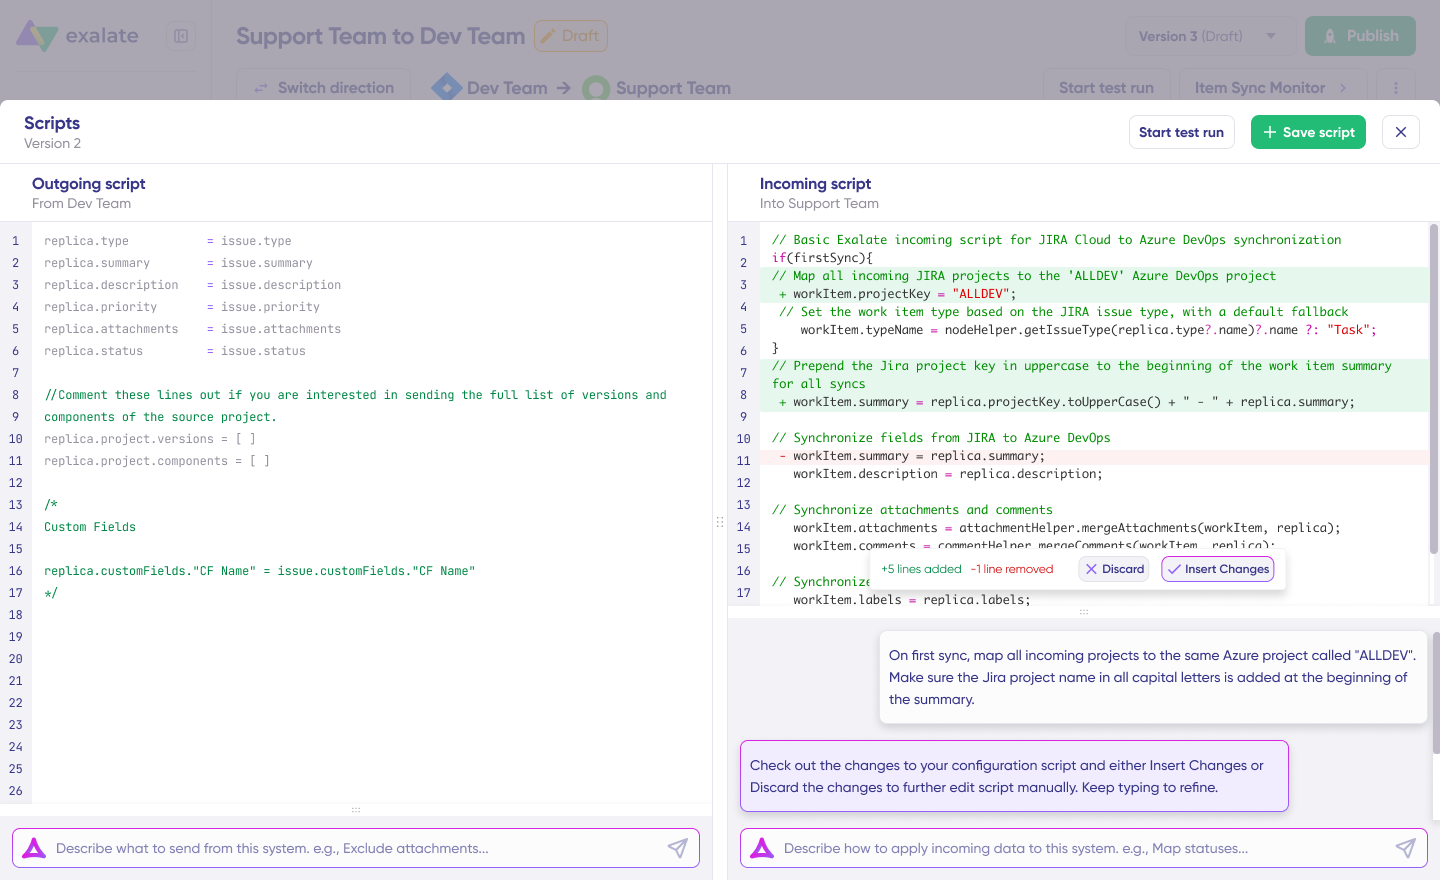
Outgoing and incoming scripts work independently, as does Aida, so maintain separate context and direction for each prompt.
Sync Panel
Exalate also comes with a Chrome extension called Sync Panel that lets users check sync status, spot errors, trigger manual syncs, and unlink sync pairs straight from the browser, without opening the console.
It’s useful for two groups: admins who want to keep an eye on sync status without switching tabs and end users who want to confirm that the remote side received their update. You can access this feature via the browser. But if you want to check the sync queue status or configure your sync, you still need to log into the Exalate console.
Test Run: Validate Before Production
Once sync scripts are ready, “Save script” or test them using “Start Test Run.”
Select items to apply sync configuration to (multiple items supported). Click “Start Test Run.” View all incoming and outgoing replicas for each selected item in the respective tabs.
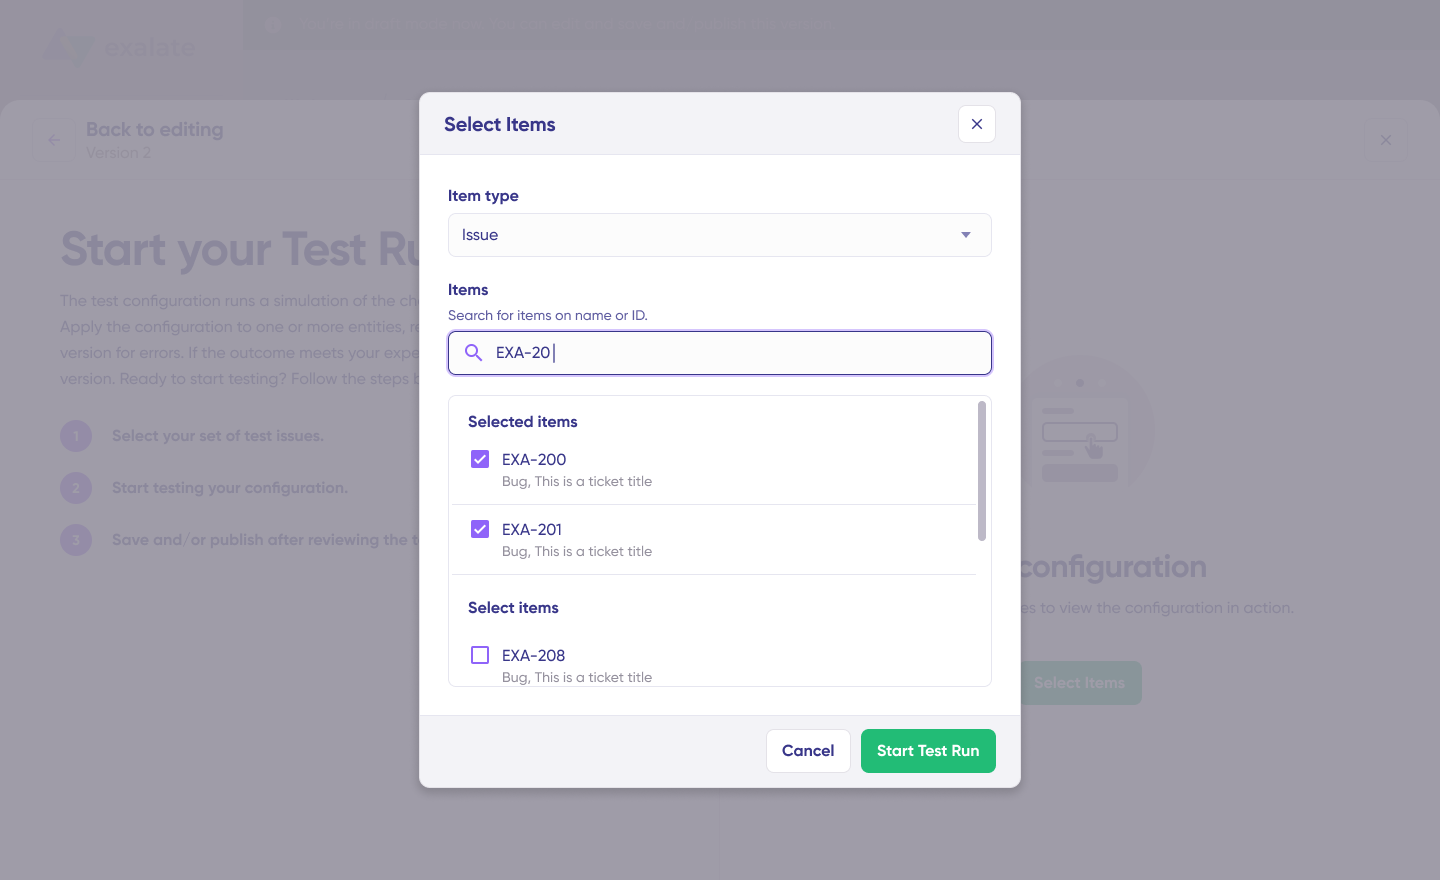
Review how sync configuration applies to items, preview replicas, and verify field mappings. Adjust scripts and test again if needed.
Deploy only when confident that everything works correctly. This safety net prevents errors from affecting live data.
When everything matches your needs, click “Publish Version” to apply the updated configuration to live synchronization.
All versions for connections are available in the “Version” dropdown. Versions can be “Active,” in “Draft” (editable), or “Archived.”
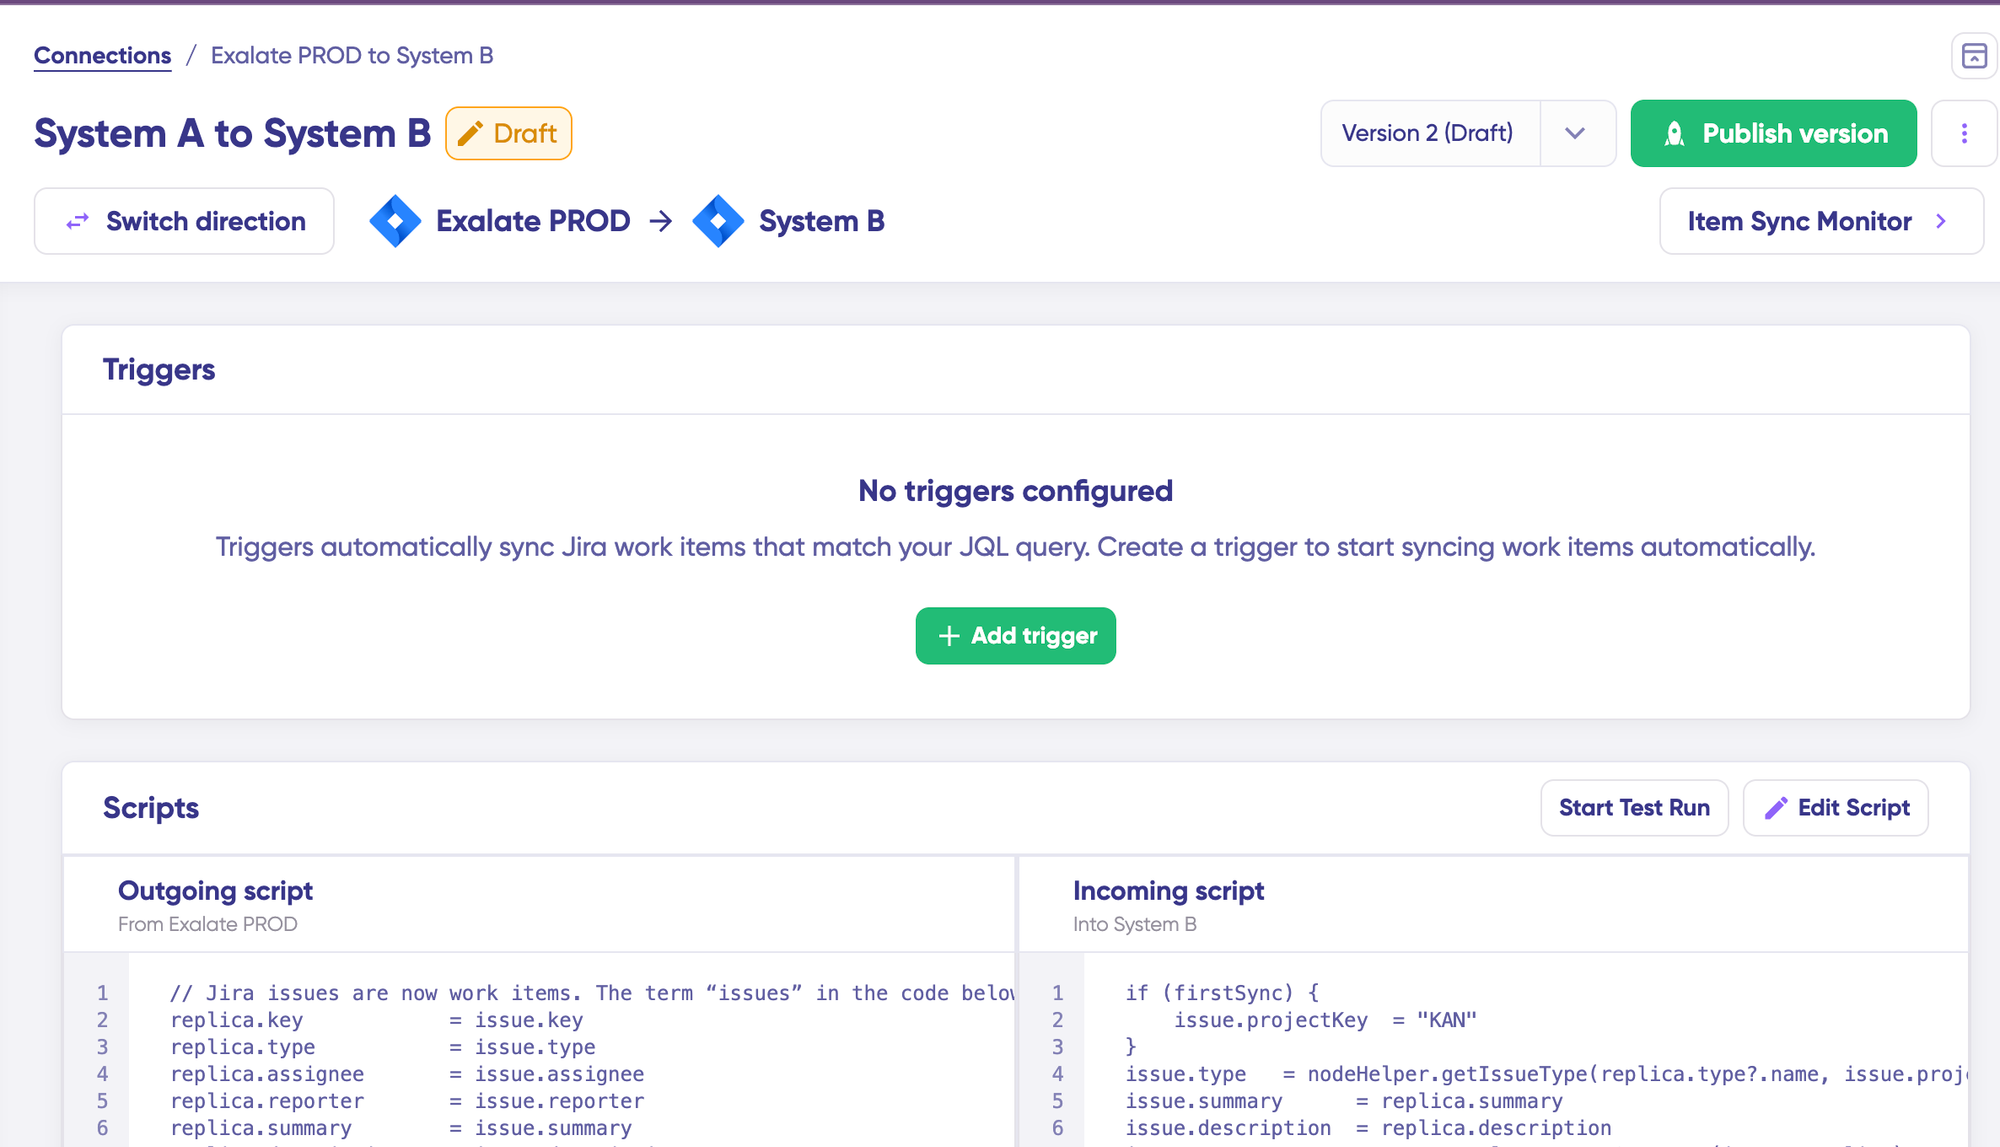
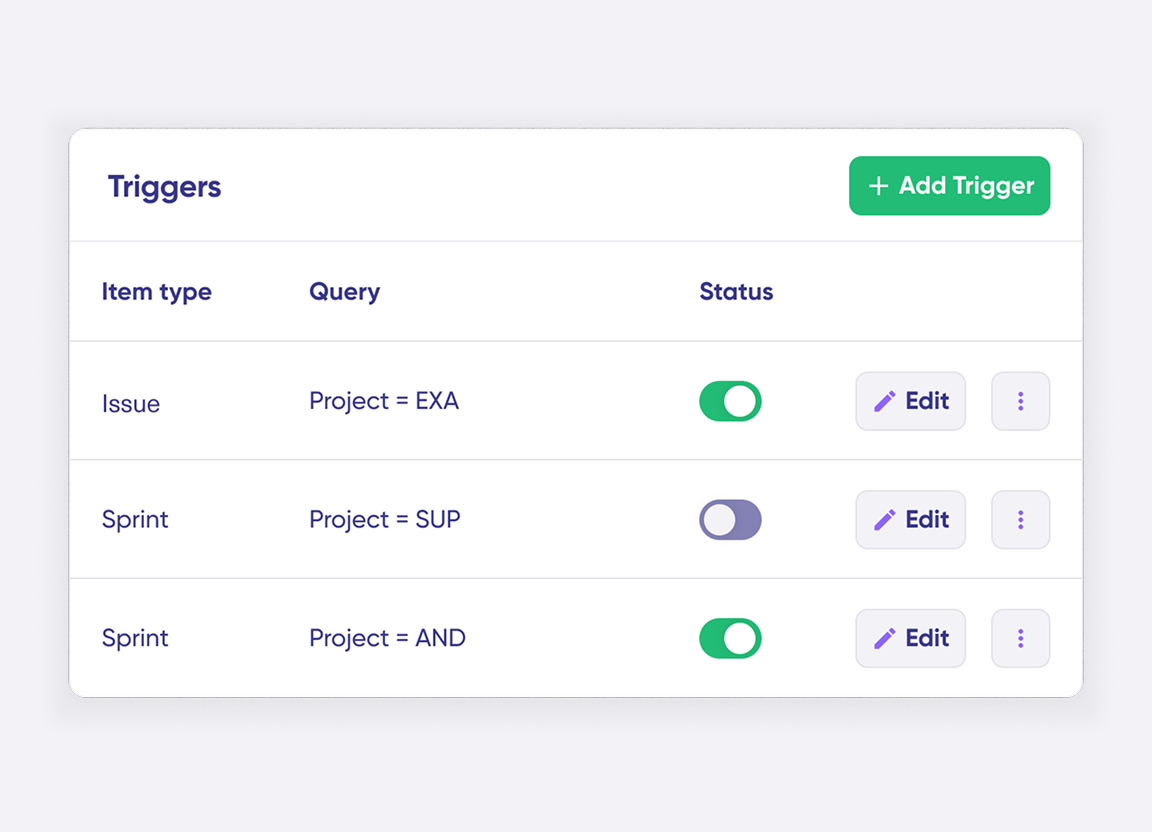
Adding Triggers
To start automatic sync, add triggers that are conditions or filters applied to specific items. For example, sync all Salesforce cases with the label “escalated” or sync all ServiceNow incidents belonging to specific assignment groups.
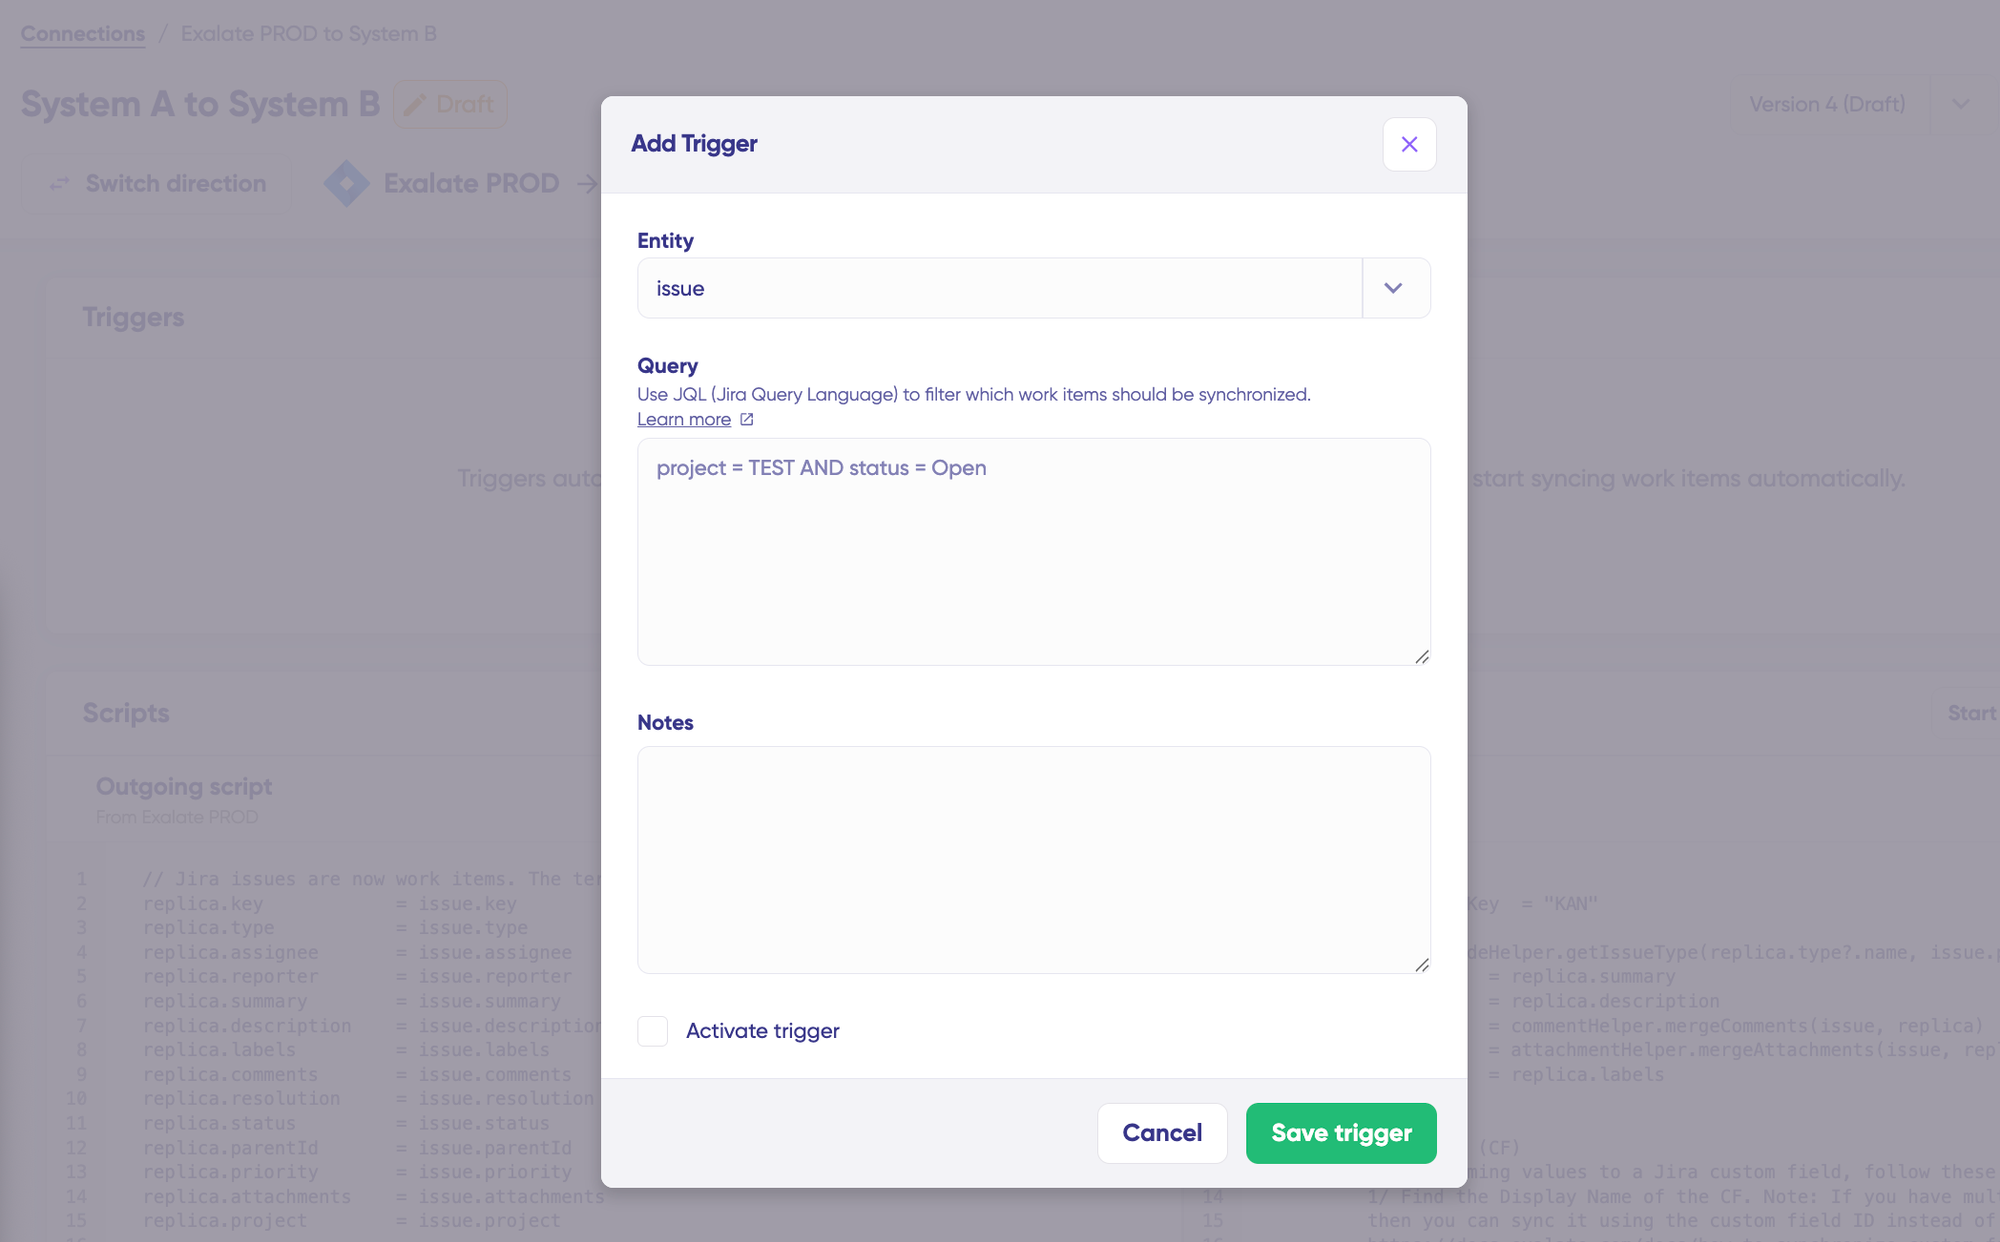
Click “+ Add trigger” to create triggers. These are platform-specific:
- For Salesforce: Use Salesforce Object Query Language (SOQL) to specify conditions
- For ServiceNow: Use advanced search syntax to apply triggers to incidents, problems, change requests, etc.
Save changes by publishing.
Troubleshooting with Aida
Aida AI helps troubleshoot errors faster with clear, context-aware suggestions.
When errors occur, go to the “Troubleshooting” tab. Hover over errors and click the Aida icon. AI-generated suggestions appear in modal windows with short explanations and proposed solutions.
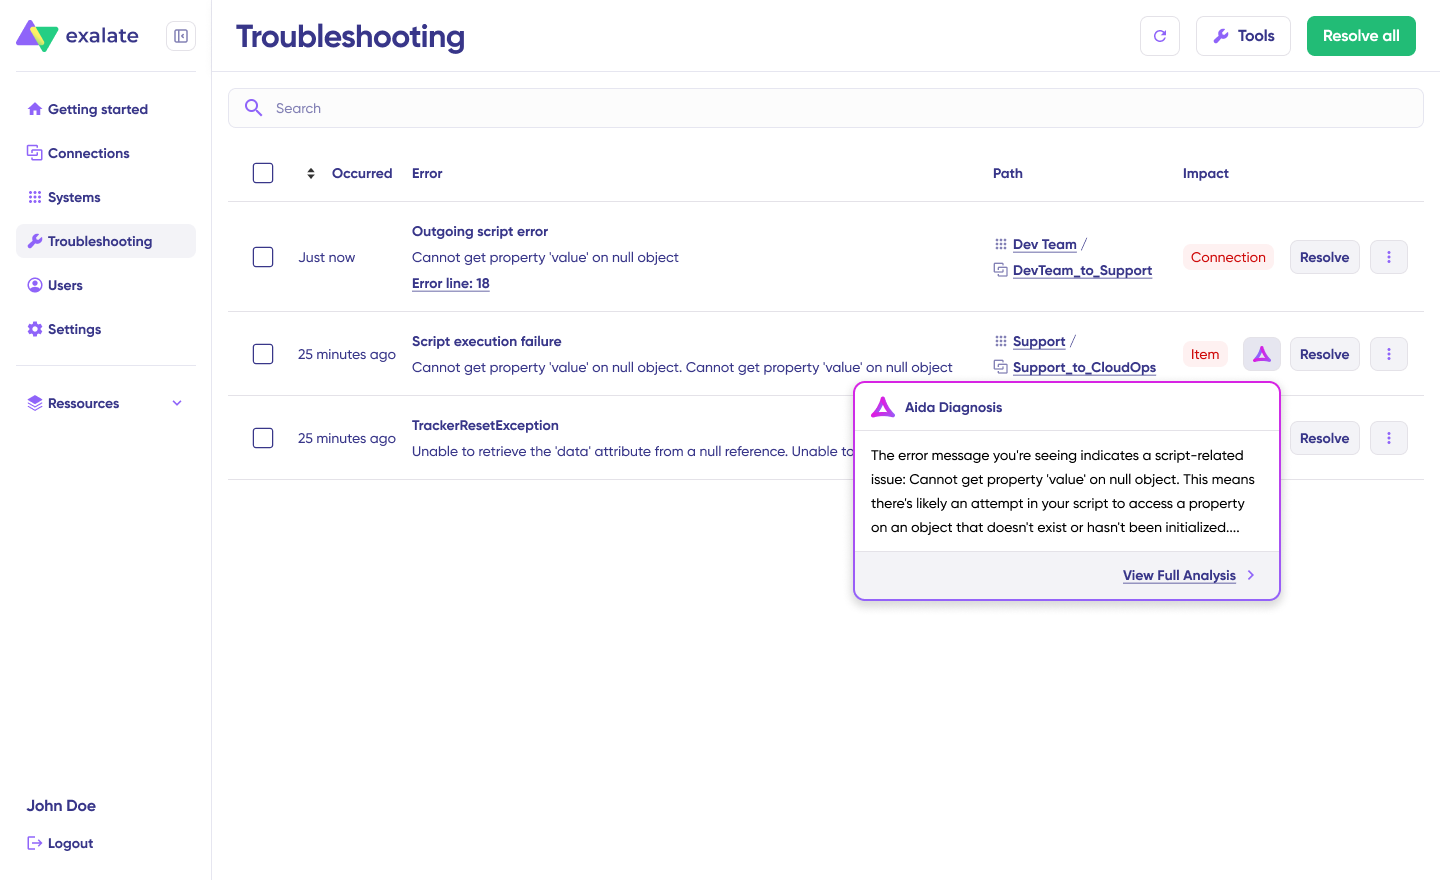
“View Full Analysis” provides additional context. “Error details” lets you copy stack traces; “Replicas” shows JSON format if required.
Choose to “Resolve” and retry errors as needed.
Advanced Salesforce ServiceNow Integration Scenarios
Multi-Instance Connections
Hub-and-spoke architecture connects multiple Salesforce and ServiceNow instances simultaneously. Central ServiceNow environments integrate with several departmental Salesforce instances, or multiple vendor-managed ServiceNow instances link into single MSP environments.
All connections are administered through the unified console, providing network-style visualization of every integration. Administrators perform bulk operations, update multiple connections at once, and apply consistent script templates across similar integrations.
Custom Field Mapping
Sync virtually any field accessible through the REST API. In ServiceNow, this includes fields across Incident, Change Request, Problem, and other tables. In Salesforce, map standard fields, custom fields, and multi-select fields.
Example: ServiceNow Configuration Item values sync into custom Salesforce fields using Groovy scripts, maintaining consistent contextual data across systems and ensuring critical attributes move seamlessly with work items.
Correlation Fields
Correlation fields define and preserve relationships between local and remote work items.
Storing Salesforce identifiers inside ServiceNow retains traceability even when titles or descriptions change. Users in either system navigate quickly back to originating items, creating a stable linkage supporting long-term auditing, reporting, and troubleshooting.
SLA and Time Tracking
Sync SLA records and maintain state updates between Salesforce and ServiceNow to ensure critical incidents are handled with priority within SLAs.
When priority incidents are raised, customer support identifies them as development work items. Along with SLA and time information, incident status syncs so agents maintain visibility and development teams know SLA and time constraints beforehand.
When work is marked resolved in Salesforce, corresponding status updates in ServiceNow are created with specific comments as resolution notes.
Private Communication Management
Internal teams working on specific problems must pass important information from ServiceNow to Salesforce, for instance, leaving notes for development teams.
Private comments remain private and sync between systems. Share only ServiceNow work notes to Salesforce so development teams have the required information.
Cross-Entity Synchronization
Sync different related entities between Salesforce and ServiceNow for better visibility and streamlined operations.
Examples: sync Salesforce customer cases related to an account as ServiceNow incidents; sync CMDB, change requests, problems, custom fields, and almost any field available via REST APIs.
Exalate integrates ServiceNow’s Agile backlogs, defects, and incidents with Salesforce, keeping everything updated in real-time.
Salesforce ServiceNow Integration Challenges
1. Data Mapping and Compatibility
Mapping fields correctly between systems is challenging. ServiceNow may track incidents with different categorizations or status codes than Salesforce.
Even when data maps correctly, formats might not align. This requires transforming and standardizing data before sending, adding complexity, especially with custom fields or complex data relationships.
2. Security and Compliance
Transferring sensitive customer data between systems requires strict security protocols. Ensure data encryption and compliance with industry standards (ISO 27001) and regulations like GDPR, HIPAA, etc., to maintain privacy and avoid security breaches.
3. Scalability
As businesses grow, the data volume exchanged between Salesforce and ServiceNow increases. Choose integration tools that scale with business needs and handle larger transaction volumes without compromising performance.
4. Data Integrity and Quality Control
Poor data quality causes inaccurate reporting, poor decision-making, and duplicate record creation, causing confusion, inefficiencies, and errors in both systems.
5. System Downtime and Synchronization Failures
Integration tool downtime halts data synchronization, resulting in delays, unprocessed tickets, and incorrect transfers.
Ensure integration tools are resilient enough to handle interruptions, including transactional synchronization during downtimes or system failures.
6. User Adoption and Training
Even seamless technical integrations fail if end-users don’t embrace the system. Training and adoption are often overlooked but play significant roles in integration success.
7. Complex Business Processes
Integrating systems handling complex workflows and business processes is particularly challenging. Ensuring complex workflows replicate accurately in integration can be difficult.
8. Cost and Resource Allocation
While integrating Salesforce and ServiceNow offers significant long-term benefits, the upfront investment can be substantial.
Initial setup costs often require hiring external consultants, purchasing specialized tools, or dedicating internal IT resources, a spending barrier for smaller organizations or those with limited budgets.
Ongoing maintenance costs add up over time and require dedicated resources once integration goes live.
Best Practices
1. Define Clear Objectives
Start with a clear understanding of why you’re integrating Salesforce and ServiceNow, whether for better incident tracking, customer support, or sales alignment. Defined goals guide setup processes.
2. Collaborate Across Teams
Involve sales, support, and IT from the start to ensure integration is tailored to their needs and everyone is on board with changes. Establish specific KPIs to measure and track during implementation.
3. Document the Integration Process
Document the entire integration setup, including workflows, data mappings, and configurations. This documentation serves as a reference for troubleshooting, future updates, or scaling as the business grows and personnel change.
4. Maintain Flexibility for Future Changes
Choose integration tools allowing easy customization and scaling as needs change. Periodically review and adjust integration to keep it aligned with changing business goals and technological advances.
5. Provide Ongoing Training
Once integration is live, train users on efficient system use. Provide training materials, workshops, and continuous support to help them get the most from integration and reduce resistance to change.
6. Set Up Automated Alerts and Monitoring
Real-time alerts enable proactive measures before minor problems escalate. Set up alerts notifying appropriate team members of potential issues like data synchronization failures, system downtimes, or security risks.
7. Test with Real-World Scenarios
Test integration for everyday workflows and edge cases, such as handling large data volumes, failed transactions, or system updates, to ensure integration resilience.
8. Optimize for Performance
Set up performance monitoring tools to track sync speed and reliability between Salesforce and ServiceNow. Optimizing API calls, limiting unnecessary data syncs, and focusing on key integration points keep integration running smoothly.
Key Metrics to Track
Monitor these metrics for continuous improvement:
Response Time: Compare average response times before and after integration to see how automation and streamlined data flows improved customer service efficiency.
Data Accuracy and Integrity: Measure the frequency and severity of data inconsistencies such as missing, incorrect, or duplicate information.
User Adoption Rates: Monitor how many users actively use the integrated system versus those relying on manual processes or outdated workflows. High adoption rates indicate user-friendly integration.
Incident Resolution Speed: Focus on how quickly issues are resolved once identified in ServiceNow and synced with Salesforce.
Integration Downtime and System Failures: Measure the frequency and duration of integration downtime or failures. Ideally, integration should be reliable and available 24/7.
Frequently Asked Questions
Can Salesforce integrate with ServiceNow?
Yes, Salesforce integrates with ServiceNow using native ServiceNow integrations or standalone tools like Exalate.
Why should I integrate Salesforce with ServiceNow?
Integrating Salesforce with ServiceNow streamlines workflows, automates data sharing, reduces manual tasks, improves customer experience, and enhances team collaboration, ultimately boosting efficiency.
What data can be synchronized between Salesforce and ServiceNow?
Exalate synchronizes custom fields, comments, attachments, descriptions, and every ServiceNow and Salesforce entity.
You can sync fields from Salesforce objects such as accounts, cases, opportunities, products, and tasks. You can also sync ServiceNow entities such as incidents, problems, RITMs, catalog tasks, etc.
What are the main challenges of Salesforce-ServiceNow integration?
Main challenges include data mapping complexities, security compliance, scalability, ensuring real-time sync, and dealing with custom fields or configurations between platforms.
Can I connect multiple Salesforce and ServiceNow instances?
Yes. Exalate supports multi-instance hub-and-spoke architectures.
Connect:
- Multiple Salesforce instances to one ServiceNow
- One Salesforce instance to multiple ServiceNow instances
- Complex mesh networks across departments or MSP client environments
All managed from a single unified console with network visualization.
What fields can I sync between Salesforce and ServiceNow?
Any field accessible via REST API:
Standard Fields: Cases, comments, attachments, status, priority, assignee, description
Advanced: Custom fields, SLA information, time tracking, correlation fields, CMDB configuration items, approval workflows
ServiceNow: Any table (Incident, Change Request, Problem, RITM, Customer Case, etc.)
Salesforce: Any Salesforce object (Account, Case, Opportunity, Task, Product, etc.)
Can I sync bidirectionally in real-time?
Yes. Exalate provides real-time bidirectional synchronization. When items update in Salesforce, they sync to ServiceNow within seconds (and vice versa).
What if I only want certain items to sync?
Use platform-native triggers for granular control:
Salesforce: SOQL (Salesforce Object Query Language) Example: priority in ('High', 'Highest')
ServiceNow: Filter queries Example: assignment_group=IT Operations^priority<=2
Triggers ensure only matching items enter sync.
Can I transform data during sync?
Yes. The Groovy scripting engine supports any transformation:
- Map ServiceNow “Critical” to Salesforce “High”
- Convert timestamps between time zones
- Concatenate multiple fields
- Apply conditional logic (e.g., sync comments only if they don’t contain “CONFIDENTIAL”)
Aida helps generate transformation scripts from natural language prompts.
Can I control what data is shared between teams?
Yes. Full operational control through scripting.
Scenario: Share case summary and status with external partner, but keep internal comments private.
Scripts give granular control over what crosses system boundaries.
How does Exalate pricing work?
Exalate offers a 30-day free trial with full functionality.
Outcome-based pricing: Pay for active sync pairs (items currently synchronized) at any given time.
Each integration is billed independently. Mix plan tiers (Starter for one integration, Pro for another).
Can I use Exalate as an MSP connecting to client systems?
Yes. Exalate is designed for cross-company integration:
MSP Scenario: Connect your ServiceNow instance to multiple client Salesforce instances. Clients work in their tools; you manage from the unified console.
Features for MSPs:
- Decoupled authentication (clients don’t need ServiceNow access)
- Role-based access control
- Single-point integration visualization of all client connections
- Bulk operations across connections
Check out the managed services offering from Exalate.
What if I need a connector that’s not currently supported?
Custom connector development is available for Enterprise customers, MSPs, or MSSPs.
We’ve built connectors for:
- Proprietary in-house systems
- Industry-specific tools (healthcare, manufacturing, etc.)
- Legacy platforms
Inquire about custom connector development
Ready to Connect Salesforce and ServiceNow?
Start your free trial to experience:
- Unified visibility across all integrations
- Operational control with full Groovy scripting flexibility
- AI-assisted setup with Aida generating scripts from natural language
- Safe deployment with TestRun validation and script versioning
- Real-time visibility through Activity Dashboard
- Enterprise security: ISO 27001 certified, RBAC, encryption
- Outcome-based pricing: pay for active sync pairs, not user seats
Integrating Salesforce and ServiceNow eliminates manual data entry, keeps development and IT operations aligned, and accelerates incident resolution.
Recommended Reads:
- How to set up a Jira Salesforce Integration
- ServiceNow to ServiceNow Integration: The Step-by-Step Guide to Setting up a Two-Way Sync
- Salesforce to Salesforce Integration: Sync Multiple Salesforce Instances Bidirectionally
- Jira ServiceNow Integration: How to Set up an Integration in 6 Steps
- How to Set up a ServiceNow GitHub Integration
- How to Set Up an Azure DevOps ServiceNow Integration


