As more and more information flows through organizations, teams working on different platforms can benefit from sharing this data. Once you pick the right Zendesk Azure DevOps integration solution, you can make these systems interact seamlessly according to your specific use case.
In this practical guide, we’re going to show you how to set up a Zendesk Azure DevOps integration between teams that work together seamlessly.
Key Takeaways
- Zendesk Azure DevOps integration enables automatic bi-directional sync between support tickets and work items without manual data entry
- Teams can sync critical fields, including descriptions, attachments, comments, status, priority, assignees, and custom fields across both platforms
- AI-assisted configuration with Aida streamlines script-based mapping for complex synchronization requirements
- Proper integration eliminates communication silos and maintains a unified view of customer issues across support and development teams
- Security-first solutions, encryption, and role-based access control protect sensitive customer and development data
- Integration reduces resolution times by 40% and eliminates duplicate data entry across teams

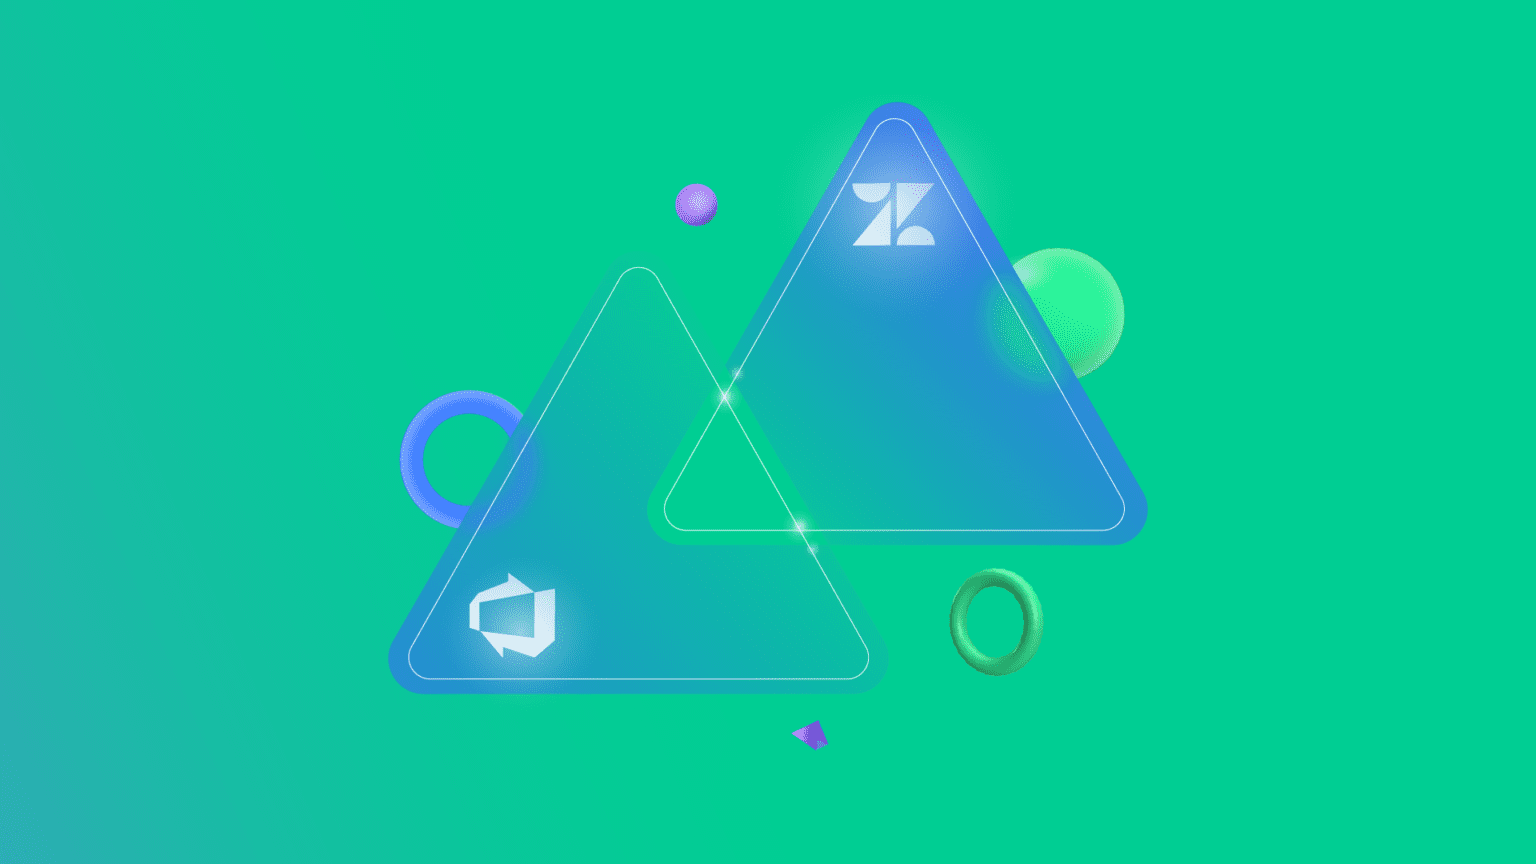
What is Zendesk Azure DevOps Integration?
Zendesk Azure DevOps integration is the process of connecting both platforms to enable automatic data sharing and real-time updates between customer support and development teams.
This creates a seamless workflow where support tickets in Zendesk can trigger work items in Azure DevOps, and development updates automatically reflect back in customer-facing tickets.
The integration typically involves customer support teams using Zendesk, collaborating with developers and engineers working in Azure DevOps. A trigger or automation dictates when data exchange occurs, with Groovy script-based sync rules defining how entities map between platforms.
Common scenario: A development team using Azure DevOps benefits from customer feedback collected in Zendesk tickets. The support team gets real-time visibility into development progress. Marketing teams can leverage both customer feedback and developer updates to enhance campaigns using data analytics to identify trends, customer sentiments, and product feedback.
With the right setup, you automate data exchange, debugging, and analysis, creating a seamless information flow that benefits development, customer support, and marketing teams simultaneously.
What Can I Sync Between Zendesk and Azure DevOps?
Azure DevOps work items support syncing multiple fields and entities, including:
- ID, Title, Description
- CreatedBy, CreatedDate, ChangedDate
- State, Reason, AreaPath, IterationPath
- Attachments, Comments, Links
- Priority, Severity, Effort
- Custom fields
Zendesk tickets support syncing fields and entities, including:
- Subject, Email, Description
- Status, Type, Priority, Group
- Assignee, Requester, Submitter
- Tags, Organization, Brand
- Due Date, Custom Fields
- Comments, Attachments
Exalate’s AI-assisted configuration with Aida and Groovy scripting engine enables advanced customization. Get the functions and expressions right, and you unlock powerful synchronization capabilities tailored to your specific workflow.
Why Integrate Zendesk and Azure DevOps?
- Enhance Cross-Team Collaboration: All stakeholders stay updated about ticket and work item status. This increases visibility for team members working on similar initiatives from different platforms, eliminating information silos.
- Automate Workflows: Configure bi-directional and unidirectional synchronizations with trigger-based automation. Reduce manual tasks and accelerate issue resolution without additional overhead.
- Reduce Errors and Improve Accuracy: Eliminate human data entry errors by ensuring only specific actions trigger data exchanges. Automated synchronization maintains data consistency across platforms.
- Maintain a Unified View: Teams working on specific issues—customer support, bug reporting, feature development—access a singular information source for accurate, timely decision-making.
- Improve Customer Satisfaction: Faster issue resolution, better communication, and proactive updates lead to higher customer satisfaction scores and reduced churn.
- Save Money and Resources: Both teams stay in their familiar environments without onboarding entirely new platforms. Reduce software licensing costs and training overhead while improving productivity.

Calculate time and money savings from automated bidirectional sync.
Features to Consider When Choosing an Integration Solution
- AI-Assisted Configuration: Look for platforms offering AI-powered scripting assistance like Aida to accelerate setup and handle complex mapping scenarios. This reduces implementation time from weeks to days.
- Full Script and Operational Control: Ensure you maintain complete control over sync logic and data transformation. Script-based approaches offer flexibility that no-code solutions cannot match for advanced requirements.
- Security and Compliance Standards: Look for ISO 27001 certification demonstrating commitment to information security management. The solution must provide encryption of data both in transit and at rest to protect sensitive information. Role-based access control (RBAC) enables granular permissions, allowing you to control who can access and modify integration configurations.
- Flexibility and Customization: The solution should support both bi-directional and unidirectional sync to accommodate different workflow requirements. Conditional sync based on field values enables smart routing and selective synchronization. Multiple sync configurations for different teams allow each department to maintain their own integration rules while sharing the same platform.
- Reliability and Error Handling: The system should recover gracefully from downtime without requiring manual intervention. Detailed logs for troubleshooting help you quickly diagnose and resolve synchronization problems. Support for testing environments like TestRun and Quick Sync allows you to validate configurations before deploying to production.
- Scalability: The integration should handle increasing ticket and work item volumes as your organization grows. Multiple team configurations running simultaneously ensure different departments can operate independently without performance issues.
- System-Based Setup: Modern integration platforms offer organization for managing multiple sync configurations, team permissions, and connection management from a unified interface.
- Support for Multiple Connectors: Beyond Zendesk and Azure DevOps, consider solutions supporting Freshservice, Freshdesk, Asana, Azure DevOps Server, Jira, ServiceNow, Salesforce, and other platforms for future integration needs.
- Sync Panel: Exalate also comes with a Chrome extension called Sync Panel that lets users check sync status, spot errors, trigger manual syncs, and unlink sync pairs straight from the browser, without opening the console.
How to Set Up Zendesk Azure DevOps Integration with Exalate: Complete Configuration Guide
This guide walks you through connecting Zendesk and Azure DevOps using Exalate’s integration platform.
Step 1: Create Your Exalate Account
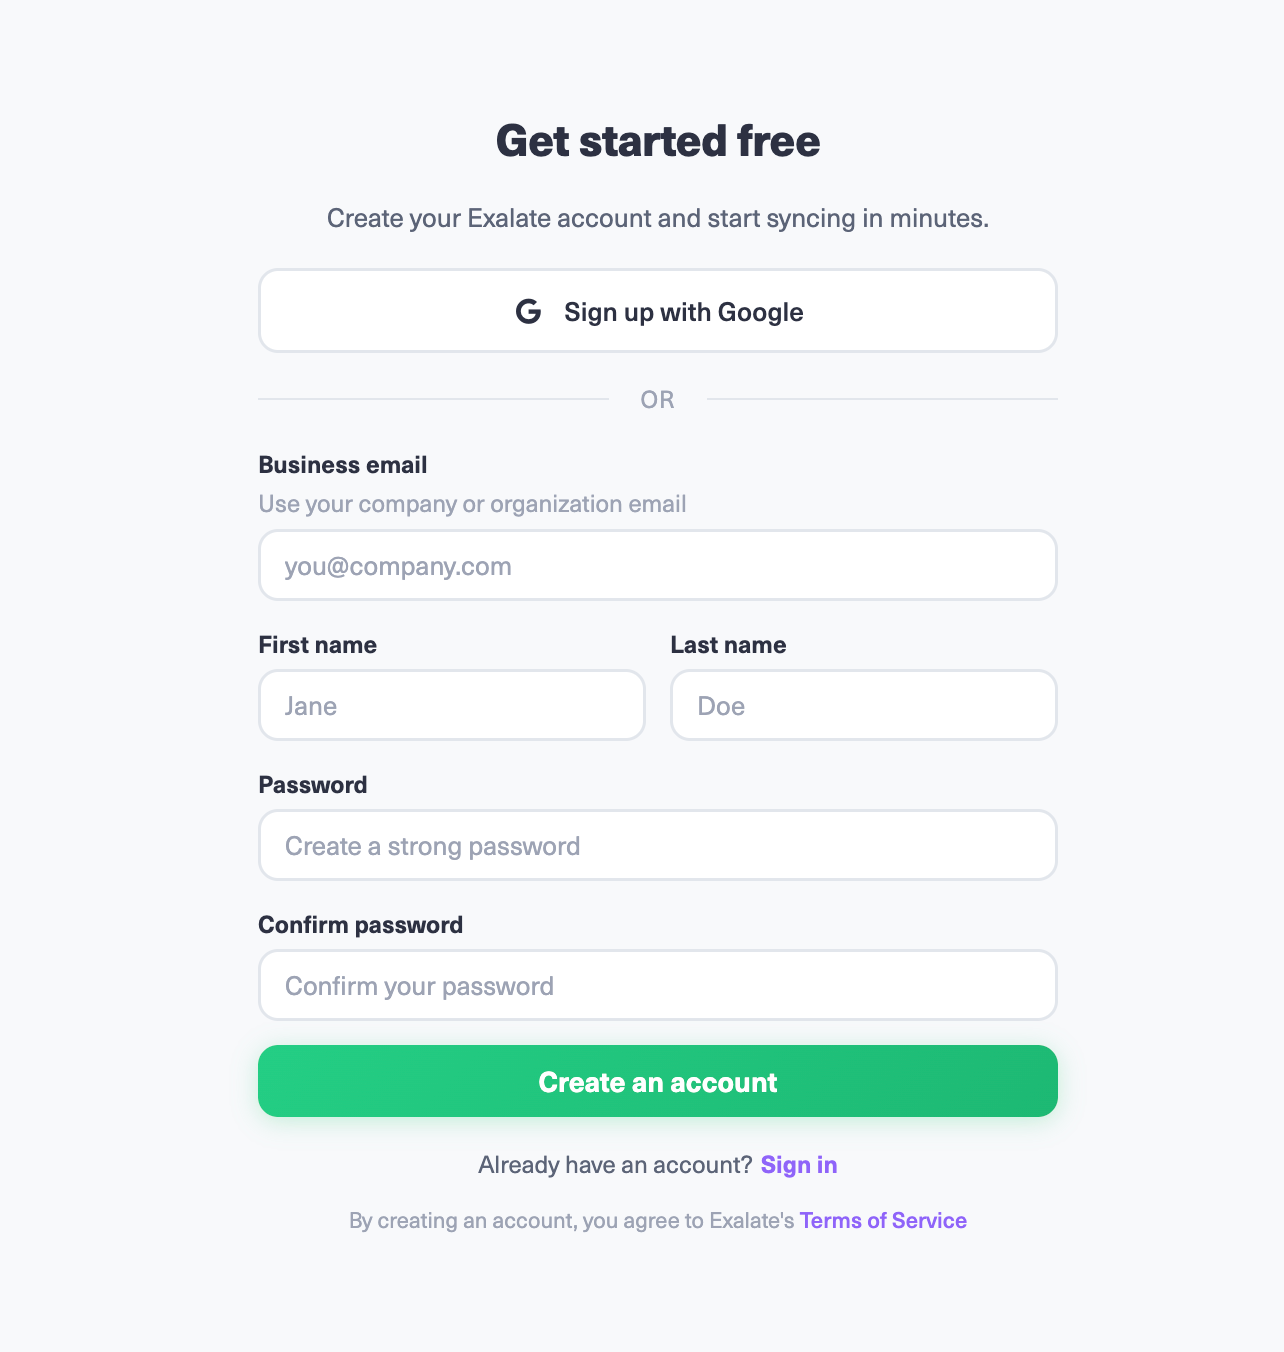
Navigate to the Exalate integrations page and create your account. You can register using your business email address with verification, or sign up quickly with your Google account. If you’re already an Exalate user, simply log in to access your dashboard.
Step 2: Configure Your Zendesk-Azure DevOps Connection
Begin building your integration between Zendesk and Azure DevOps. Navigate to the “Connections” tab to view all active integrations. From here, you can manage existing connections or create new ones.
You’ll need an active Exalate account with valid authentication credentials for both Zendesk and Azure DevOps before proceeding.
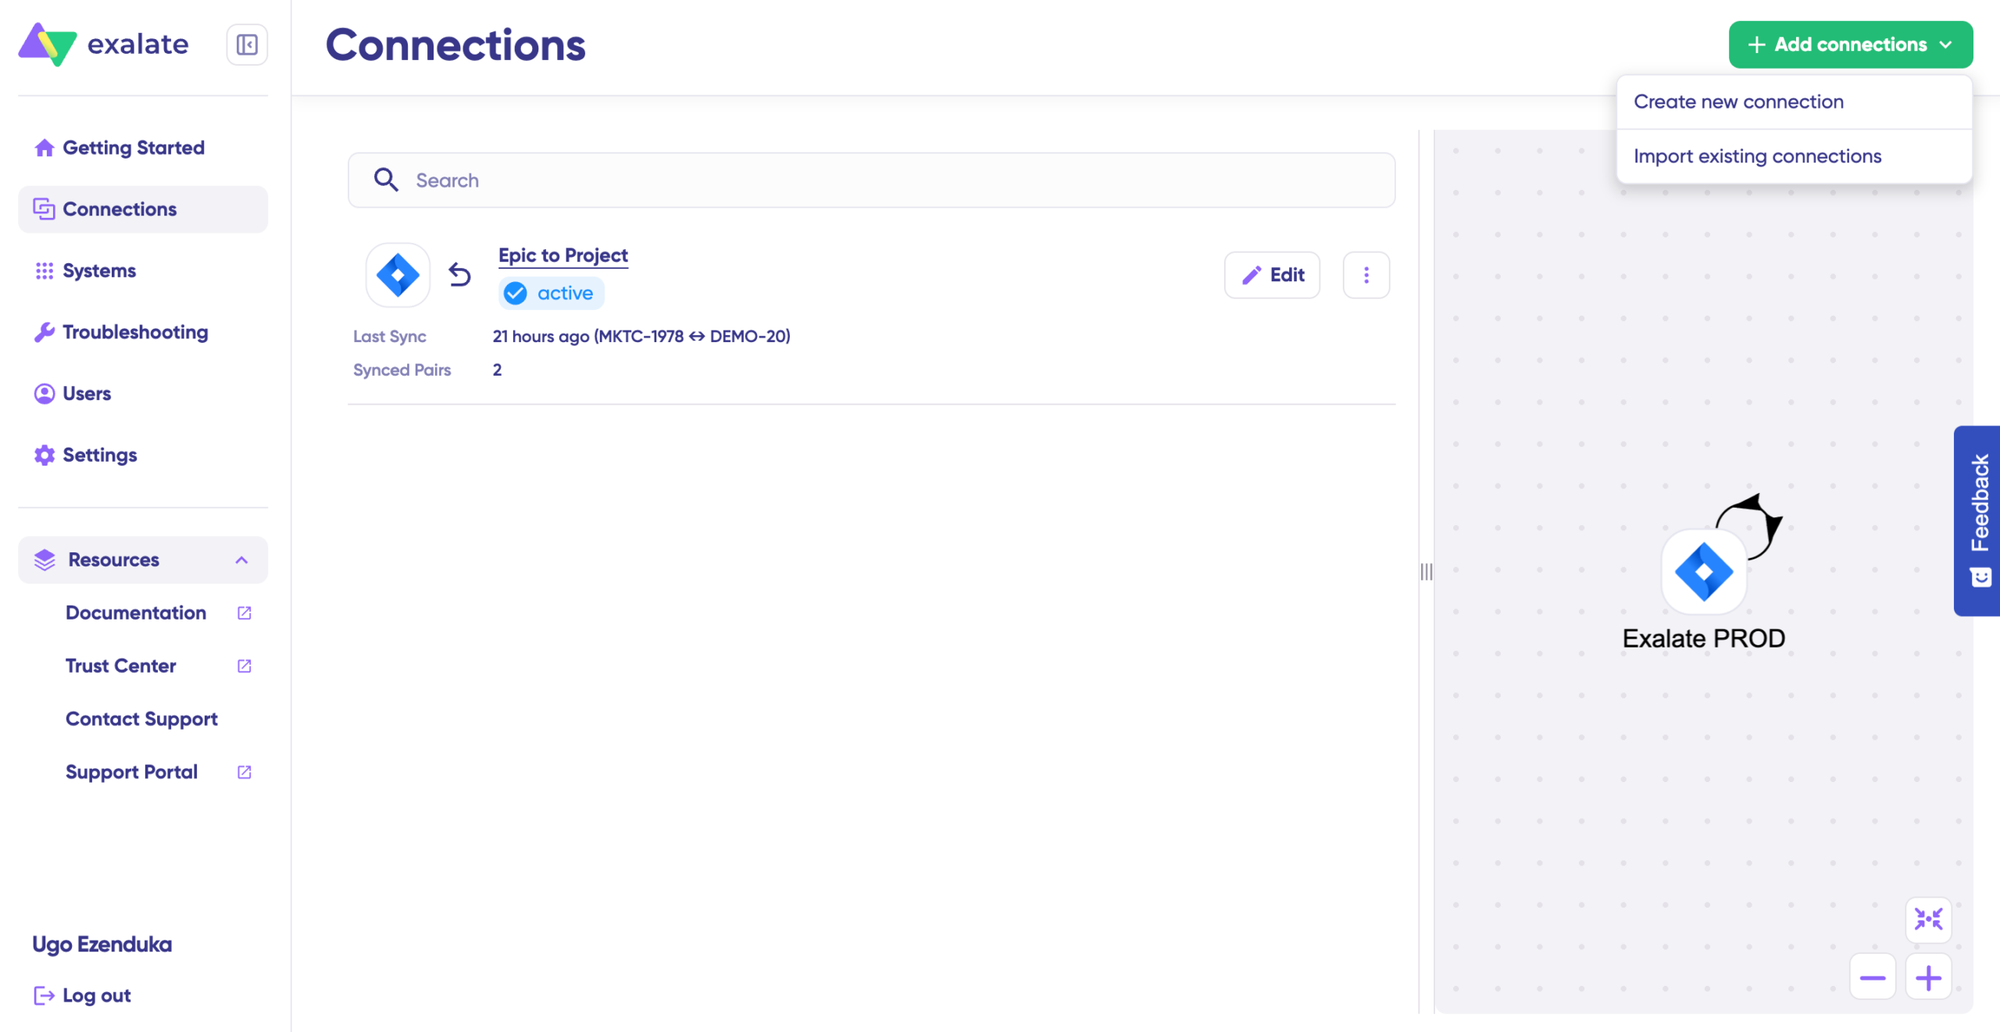
Click “+ Add connections” followed by “Create new connection.” Define System A by entering either Zendesk or Azure DevOps—the order doesn’t affect functionality. Enter your system URL. For example, if starting with Zendesk, provide your Zendesk instance URL.
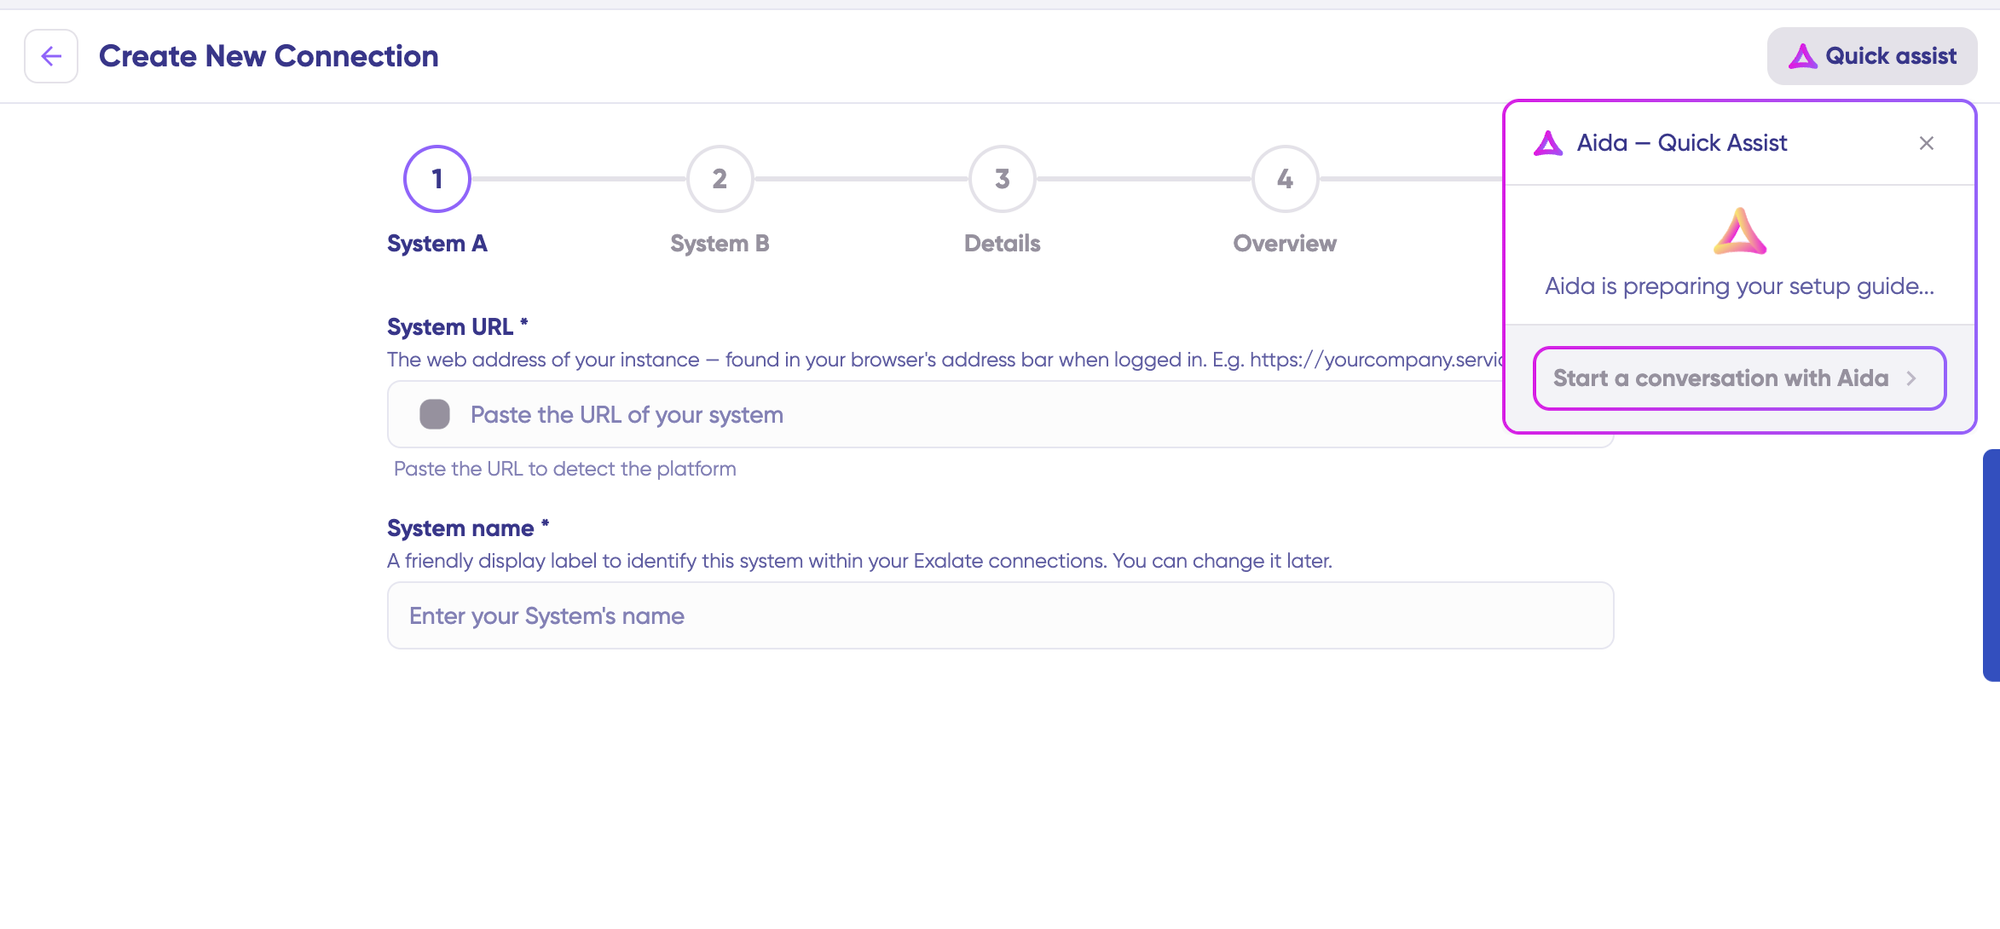
You can also speed up the process by using Aida – Quick Assist at the top right of the dashboard.
Exalate automatically validates the URL. If this system exists, authentication happens seamlessly. New systems require authentication credentials—both Zendesk and Azure DevOps support Basic authentication with username and password.
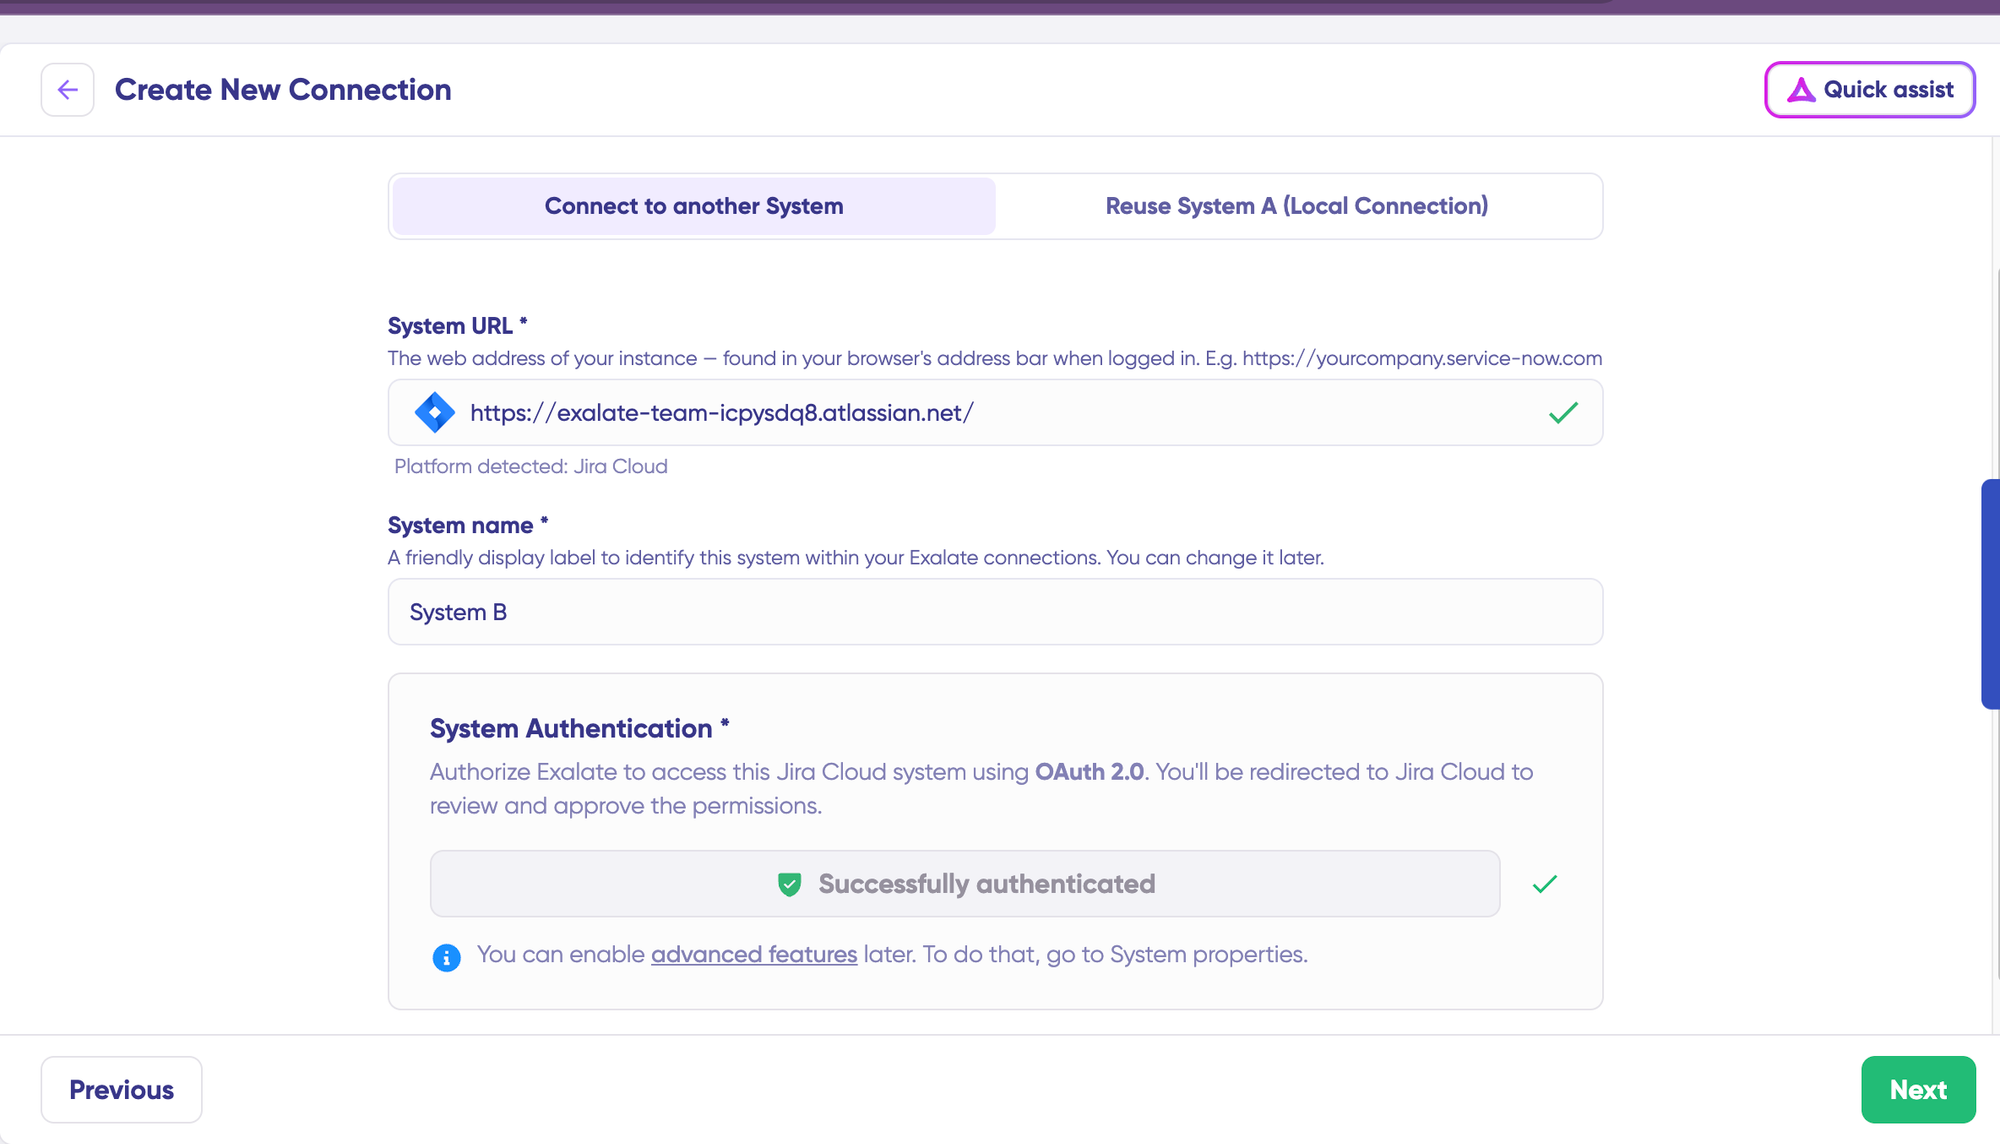
Repeat this configuration for your second system (Azure DevOps or Zendesk). Provide a connection name and description, then click “Next.”
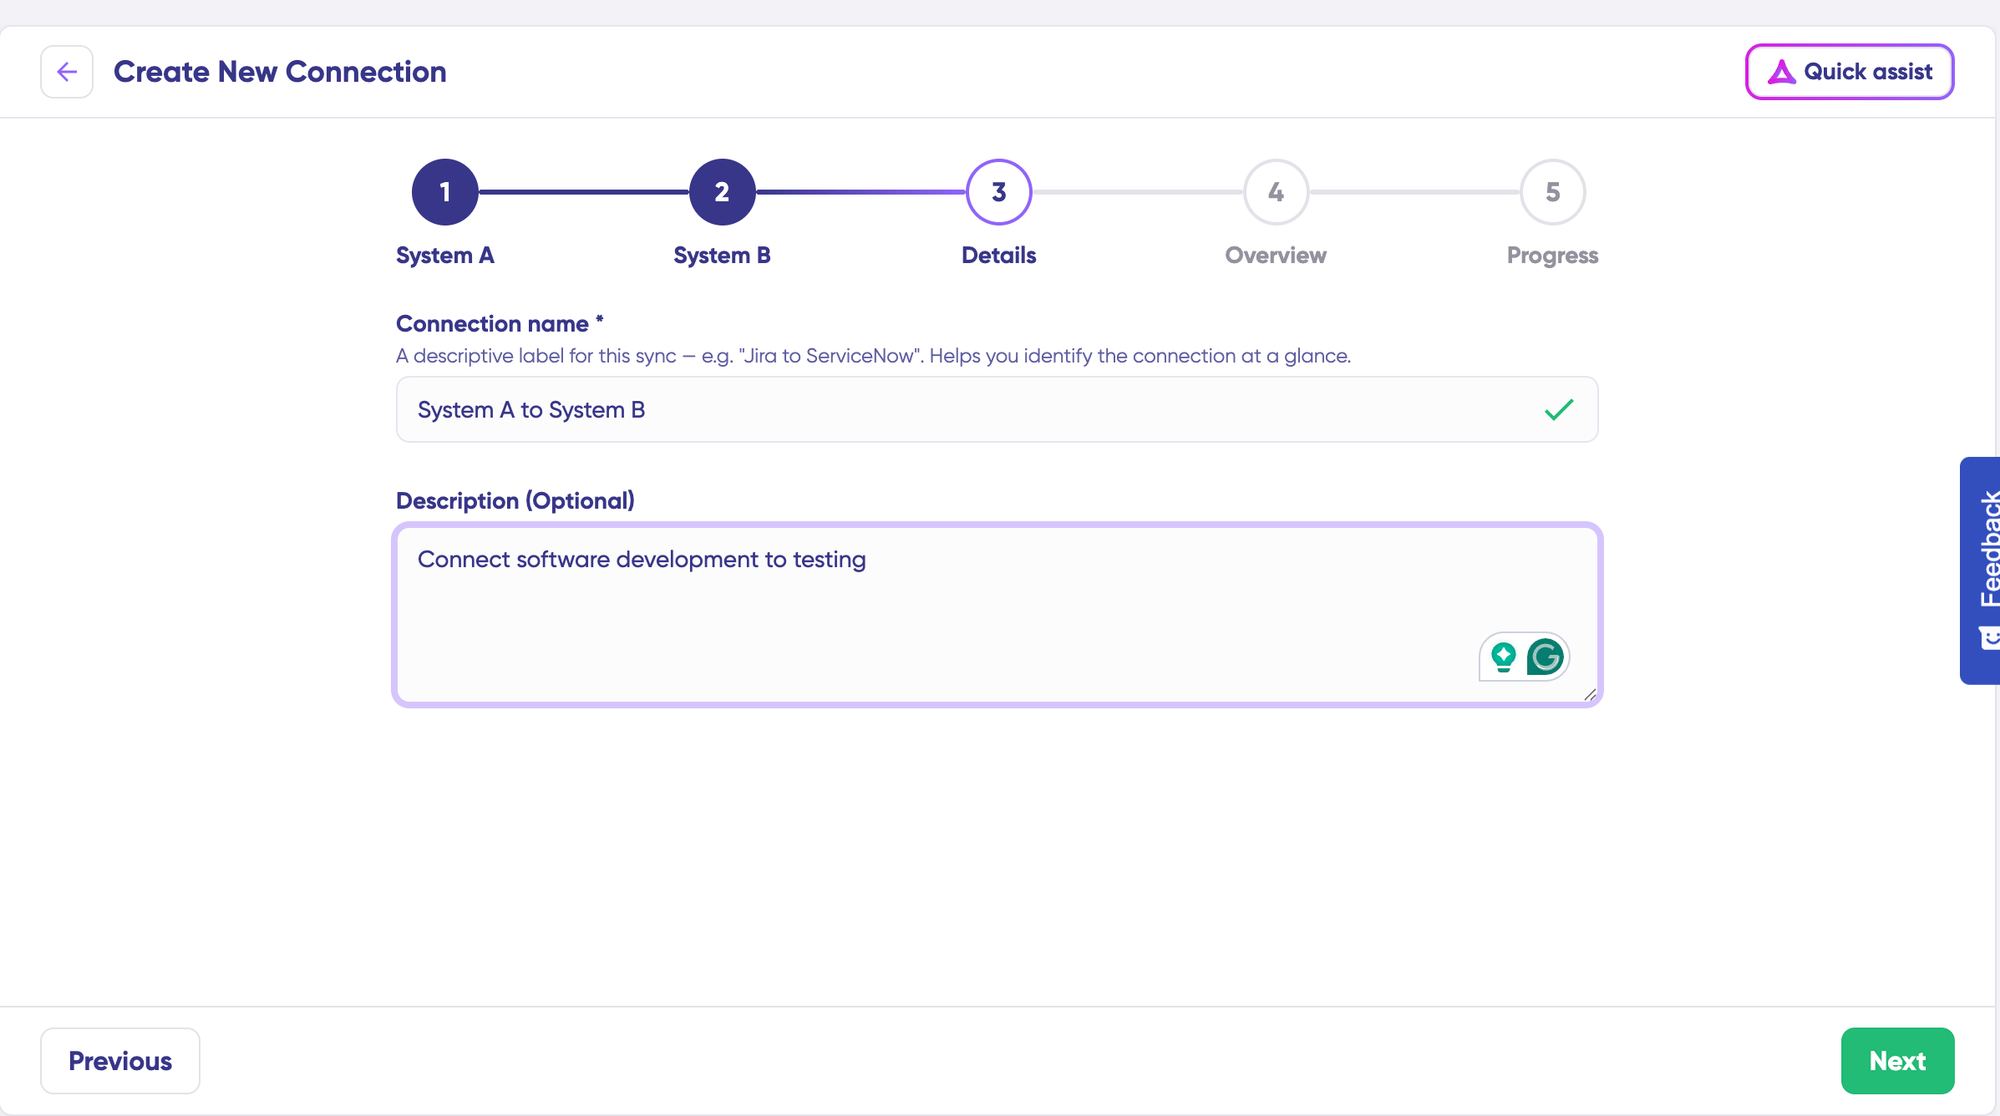
Review all connection details for accuracy and click “Create connection.“
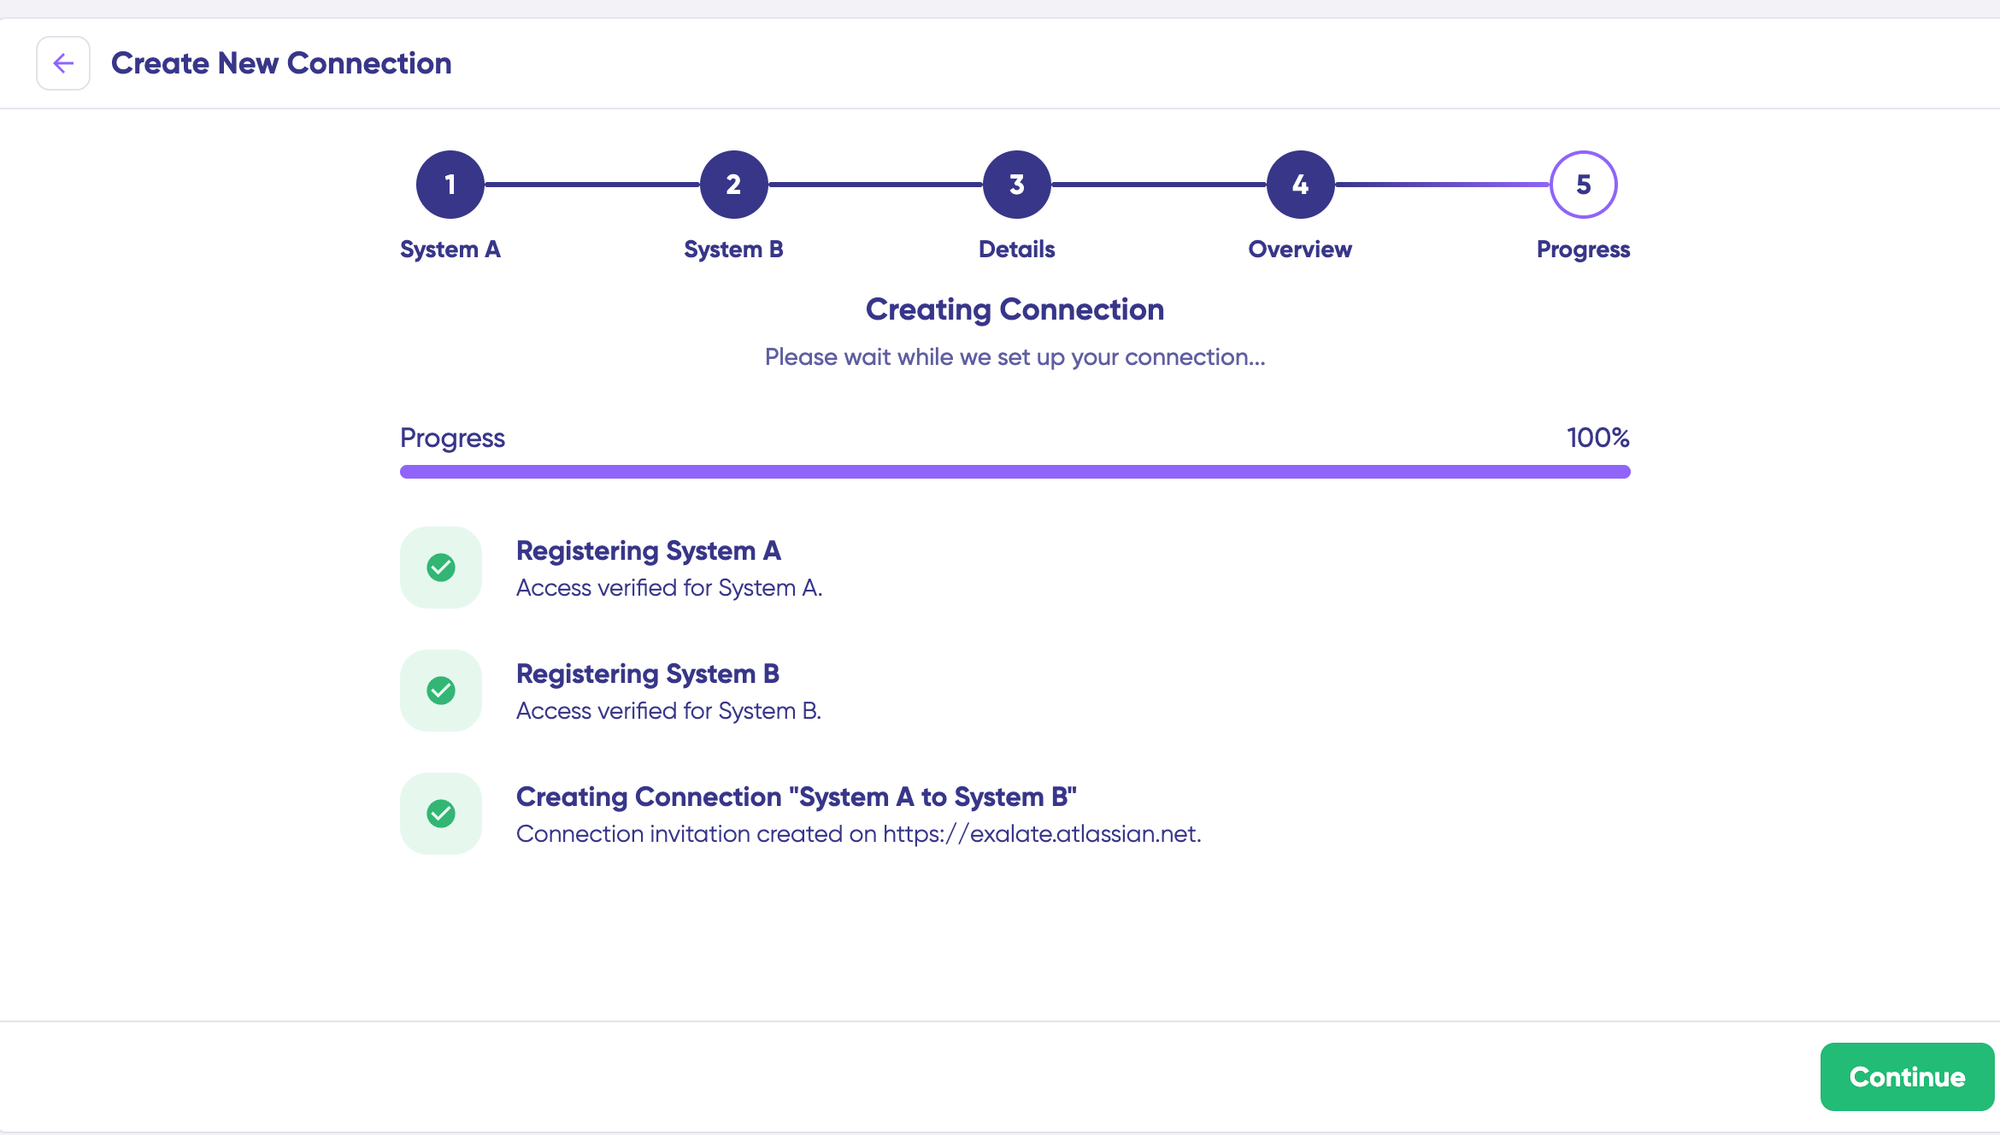
Once complete, select Continue then “Continue to configuration” and choose the Zendesk ticket group or Azure DevOps project you want to synchronize. Click “Build & continue” to proceed.
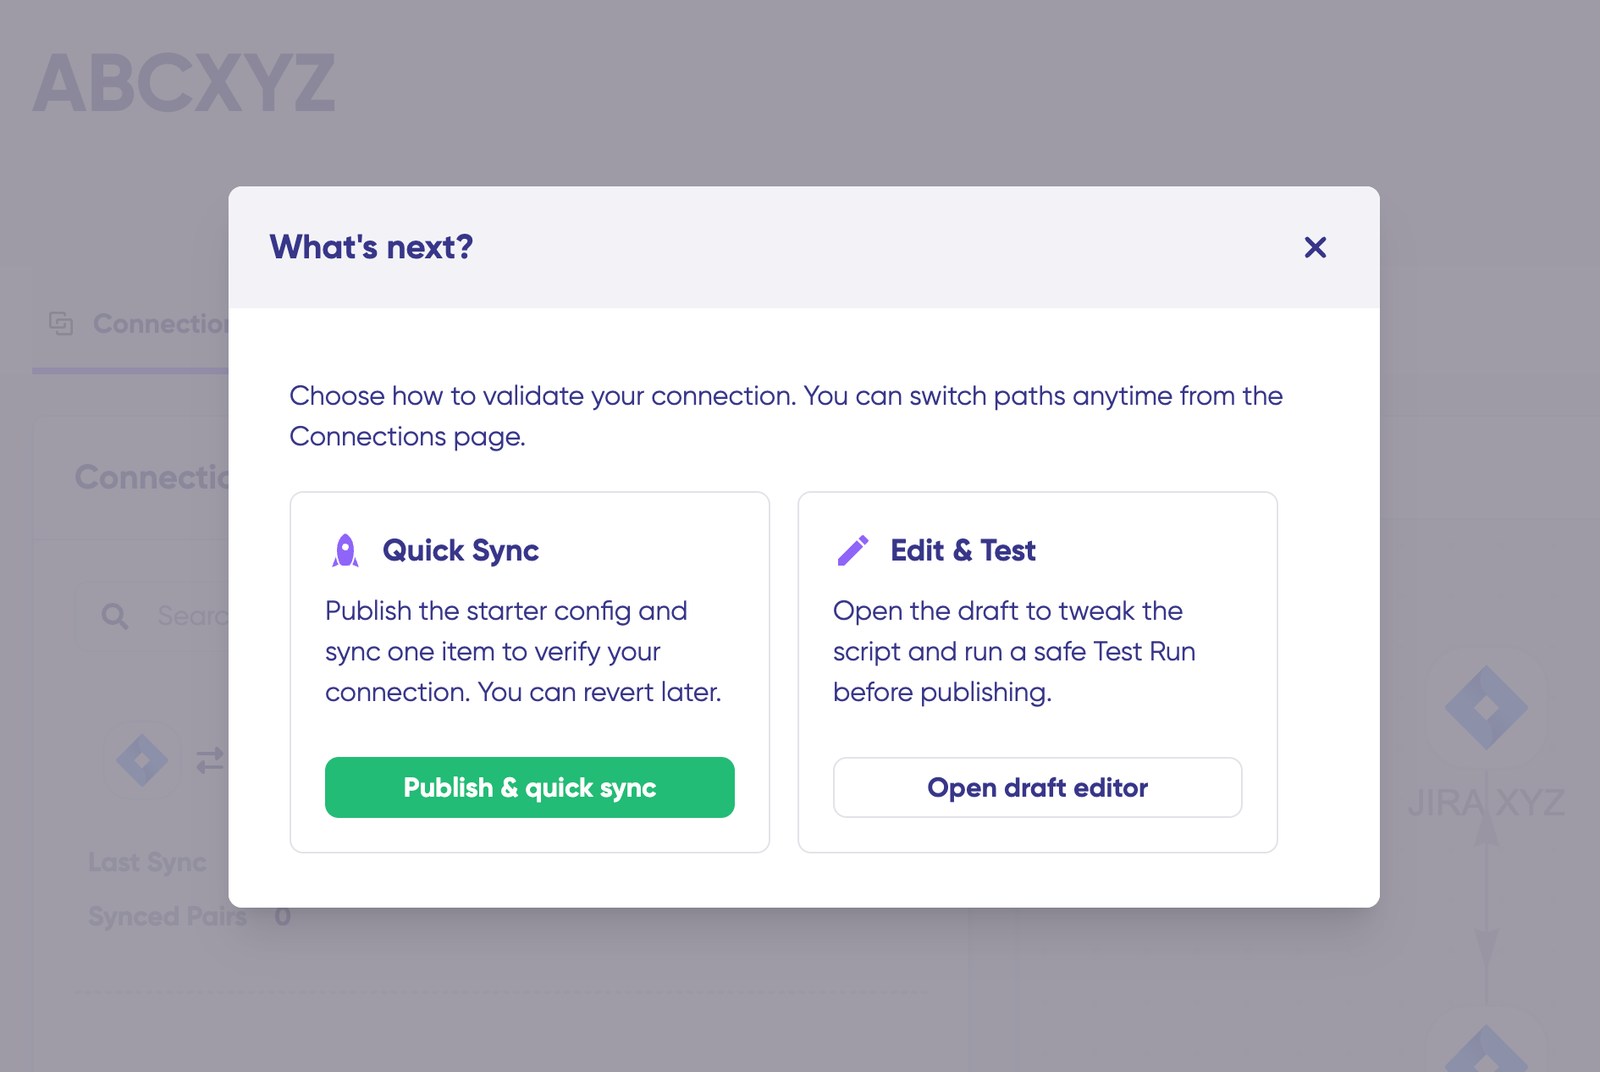
You’ll now see two configuration paths: “Quick sync” and “Edit & Test.” Let’s explore both options.
Step 3: Quick Sync – Verify Your Connection
Quick Sync lets you test the integration by synchronizing a single item between Zendesk and Azure DevOps. This optional validation step confirms your connection works correctly.
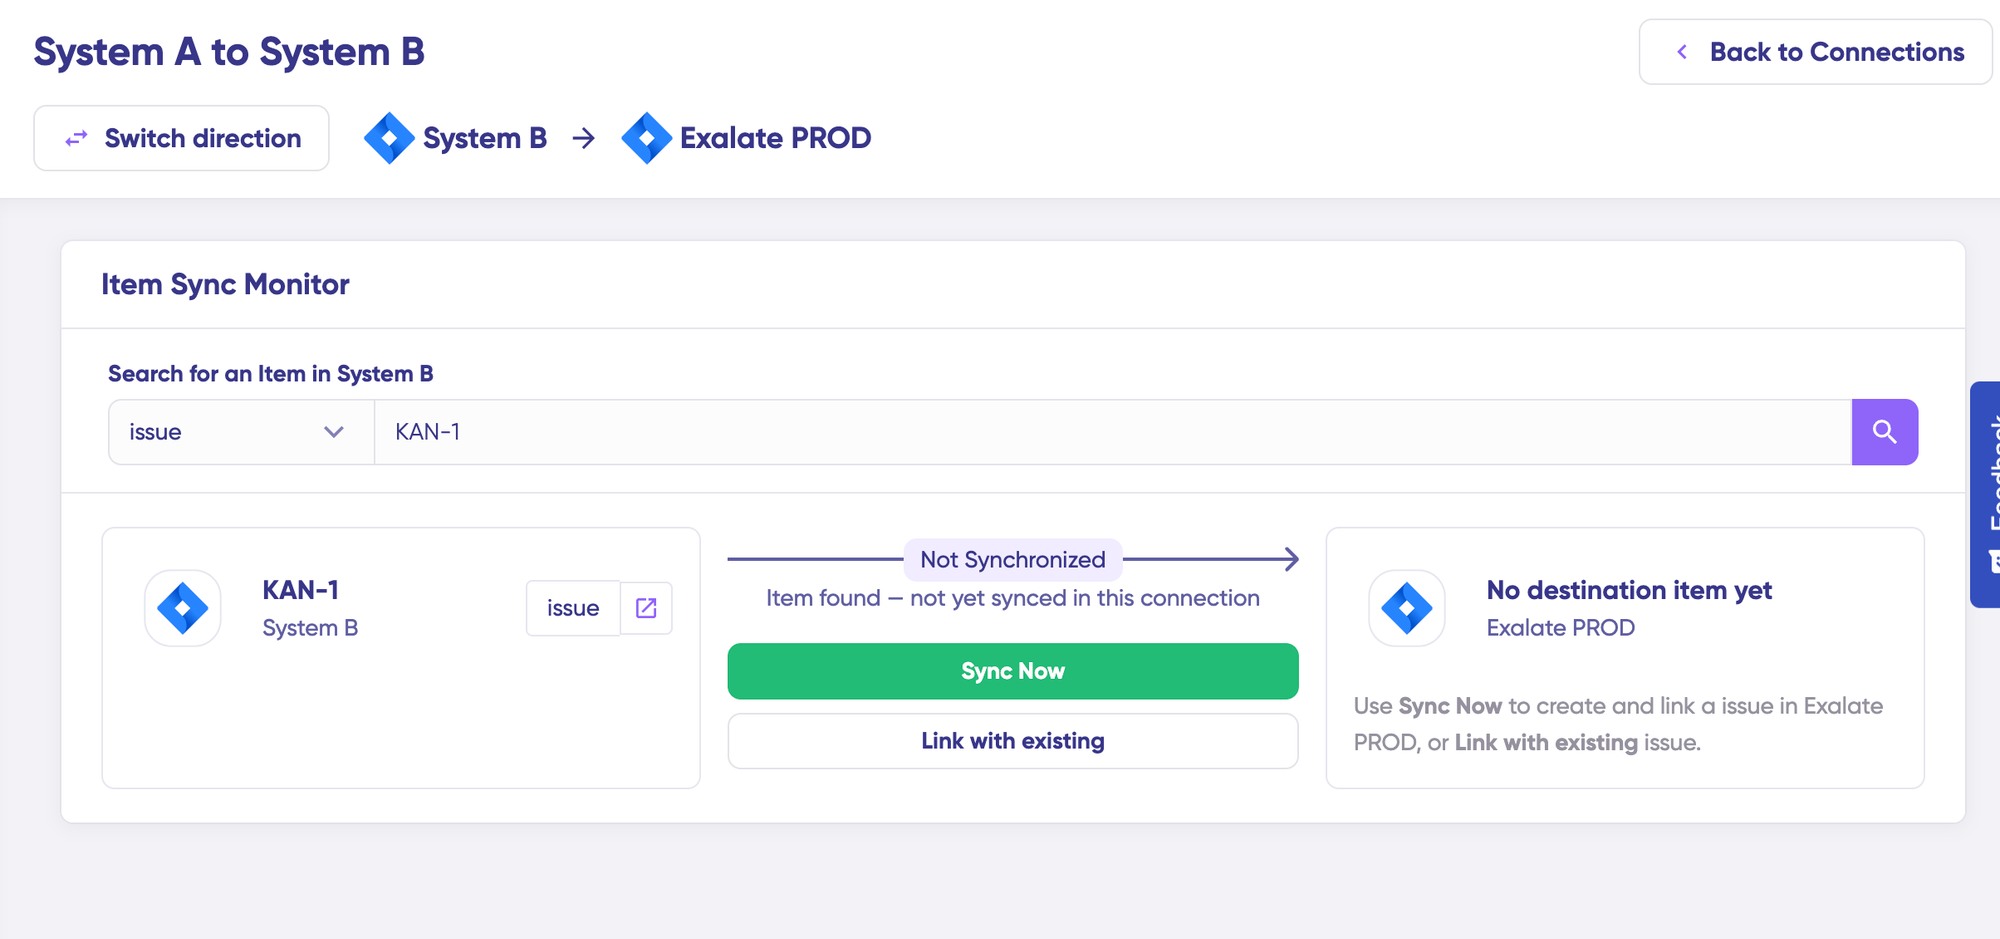
In the “Item sync monitor,” enter a Zendesk ticket number or Azure DevOps work item ID. Click “Sync Now” to synchronize the first item, or select “Link with existing” to connect two pre-existing items. Monitor real-time status updates as synchronization progresses.
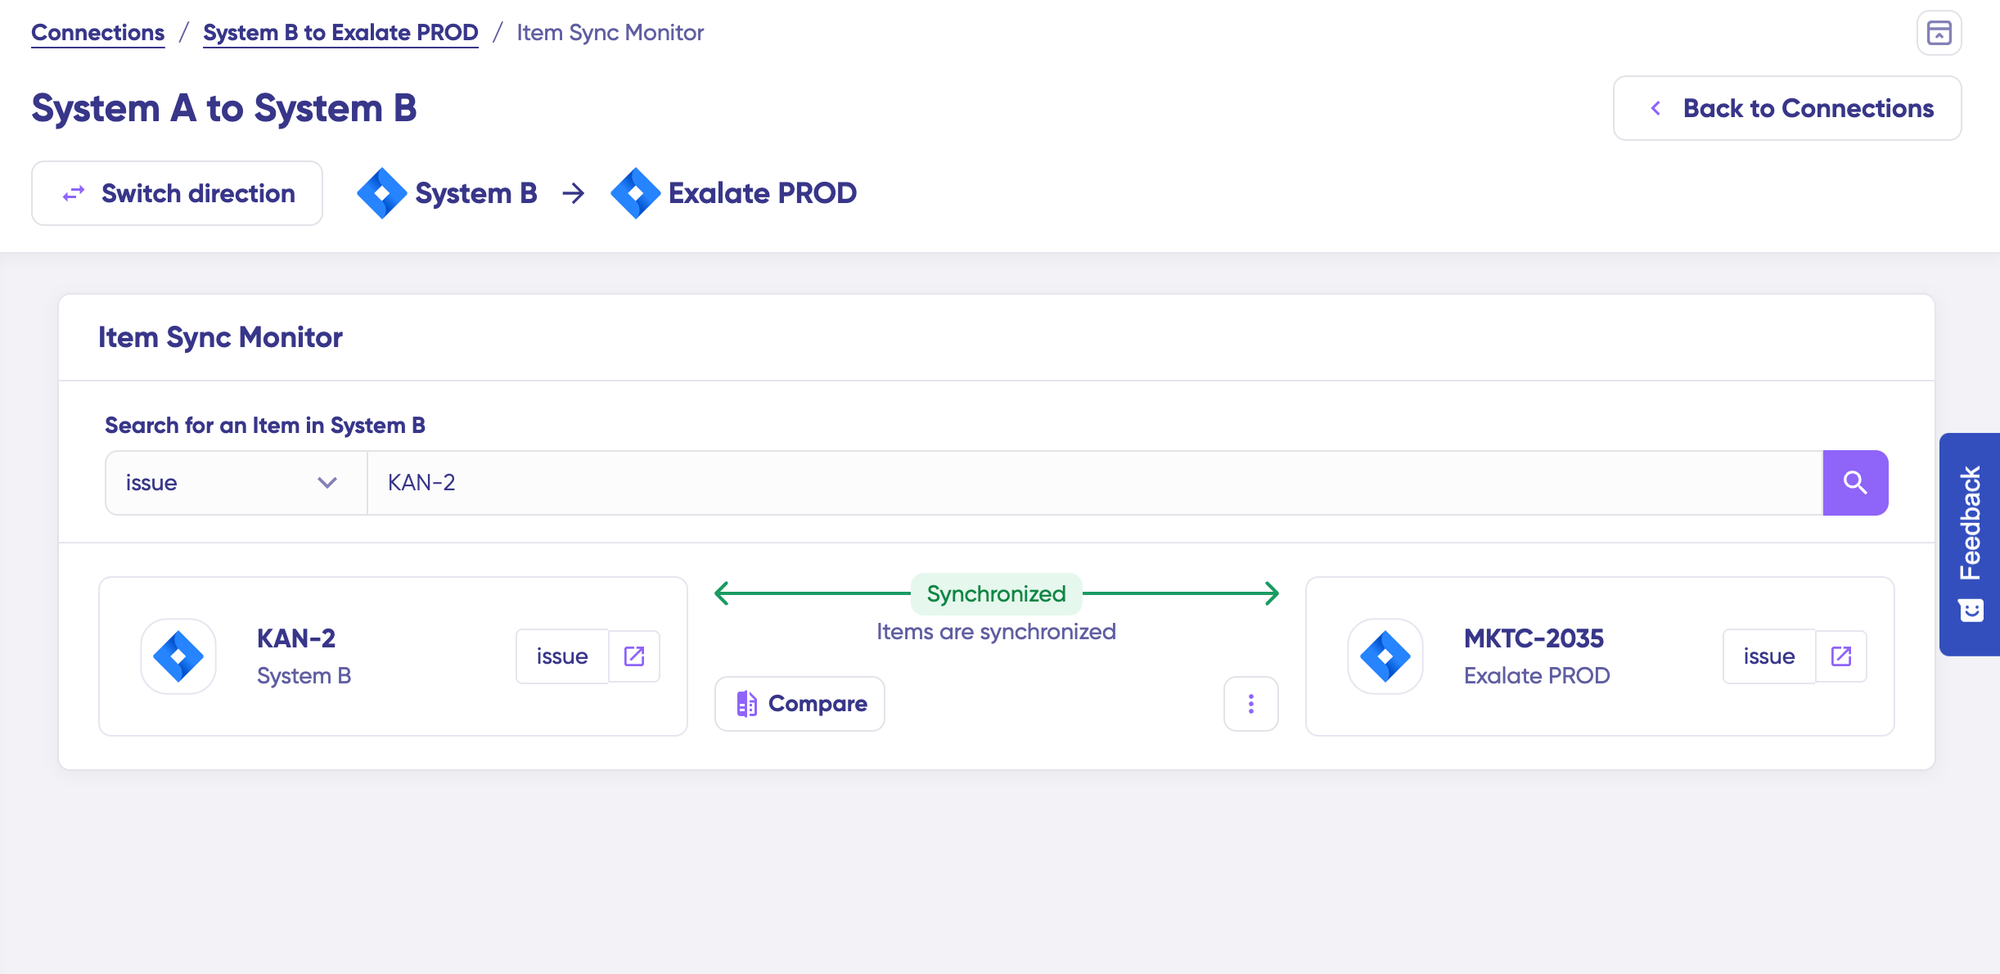
Once complete, open both synced items in new windows to verify the integration. Compare how synced items appear and review how changes were applied across platforms.
Step 4: Edit & Test – Configure Advanced Sync Rules
For detailed customization, click “Create a new version” or select “Open latest draft.” This approach prevents accidental modifications to your live configuration. The editor automatically saves draft changes as you work.
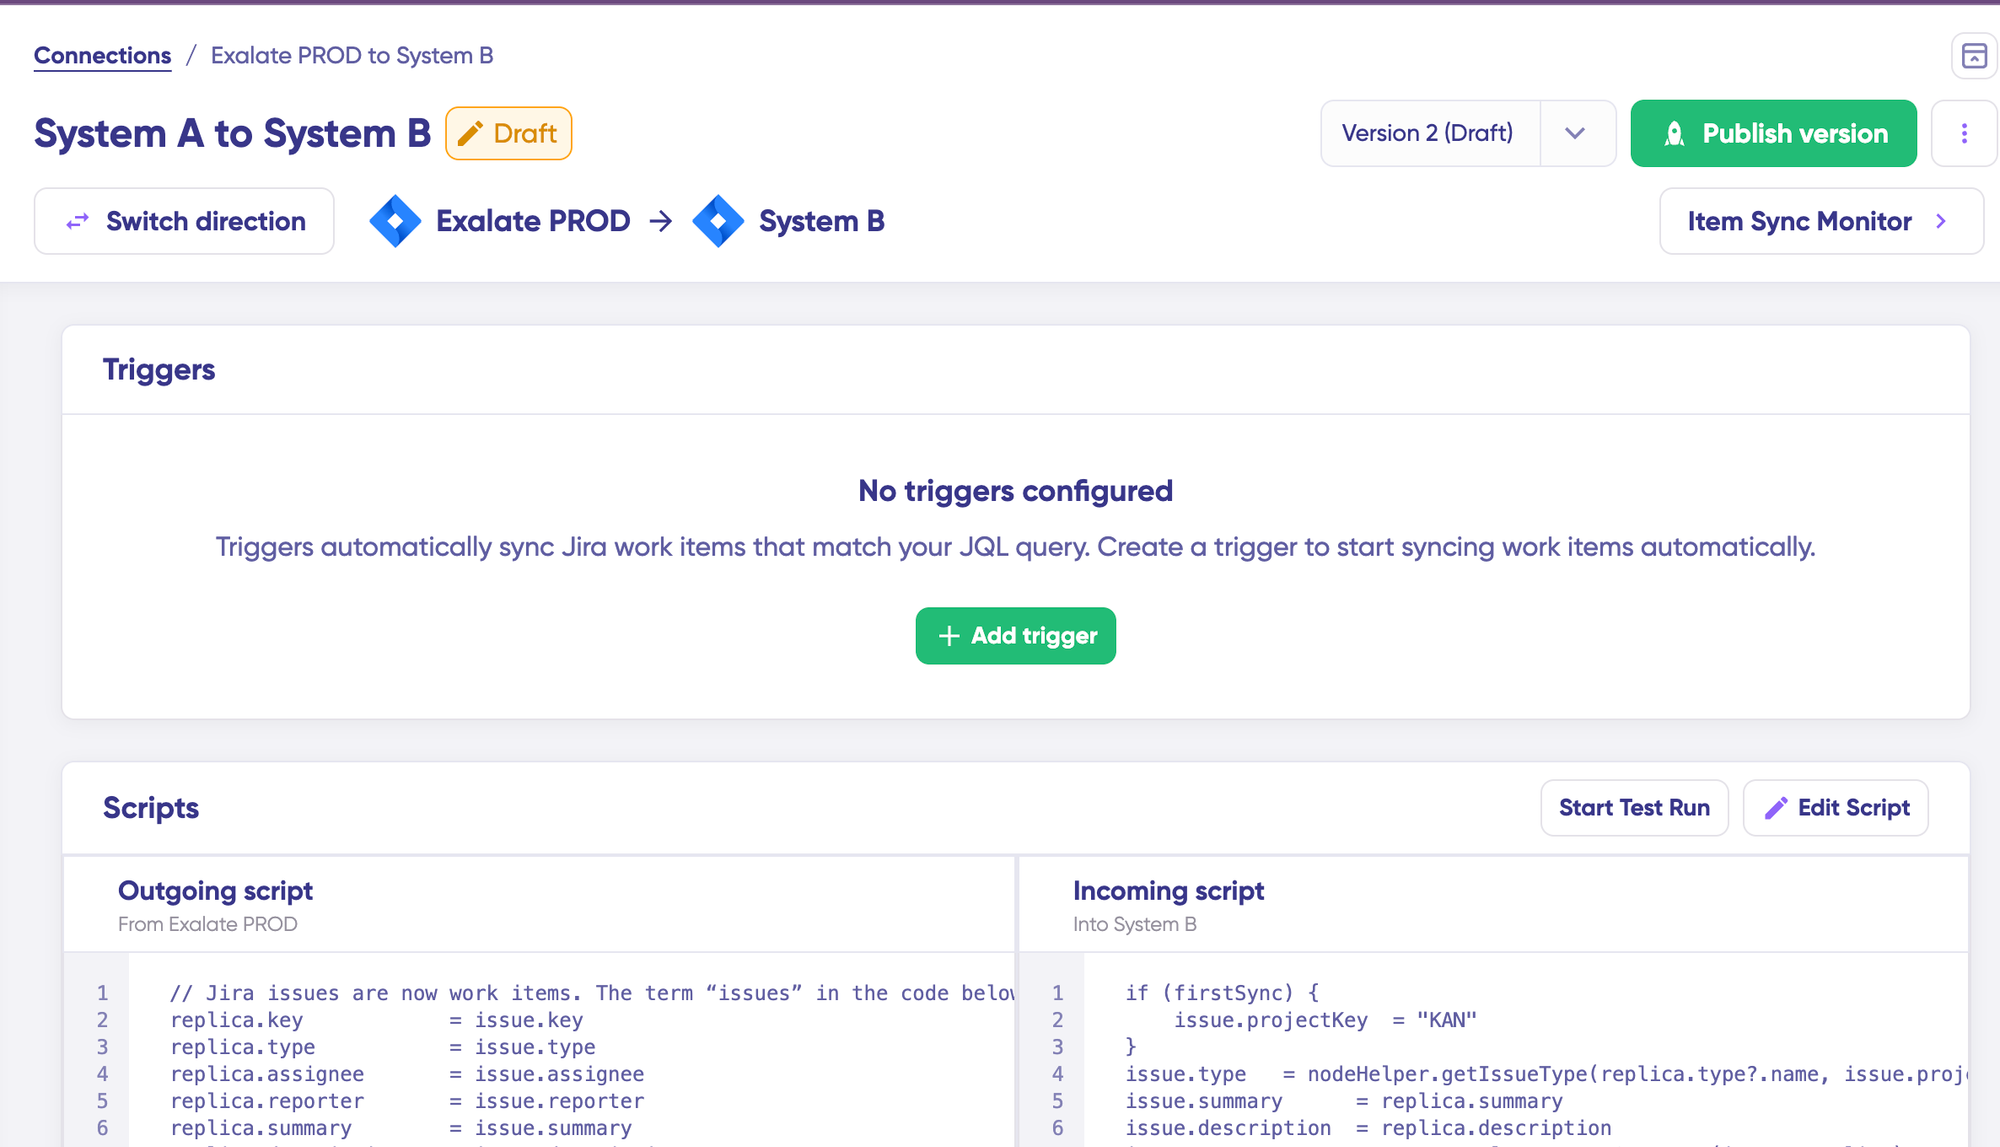
Click “Edit Script” to access the Groovy-based scripting environment. Sync rules use Groovy scripts, enabling custom data mapping, conditional logic, and complex workflow adaptations. Change sync direction by clicking the directional arrows next to the connection name. Scripts are organized into incoming and outgoing sections.
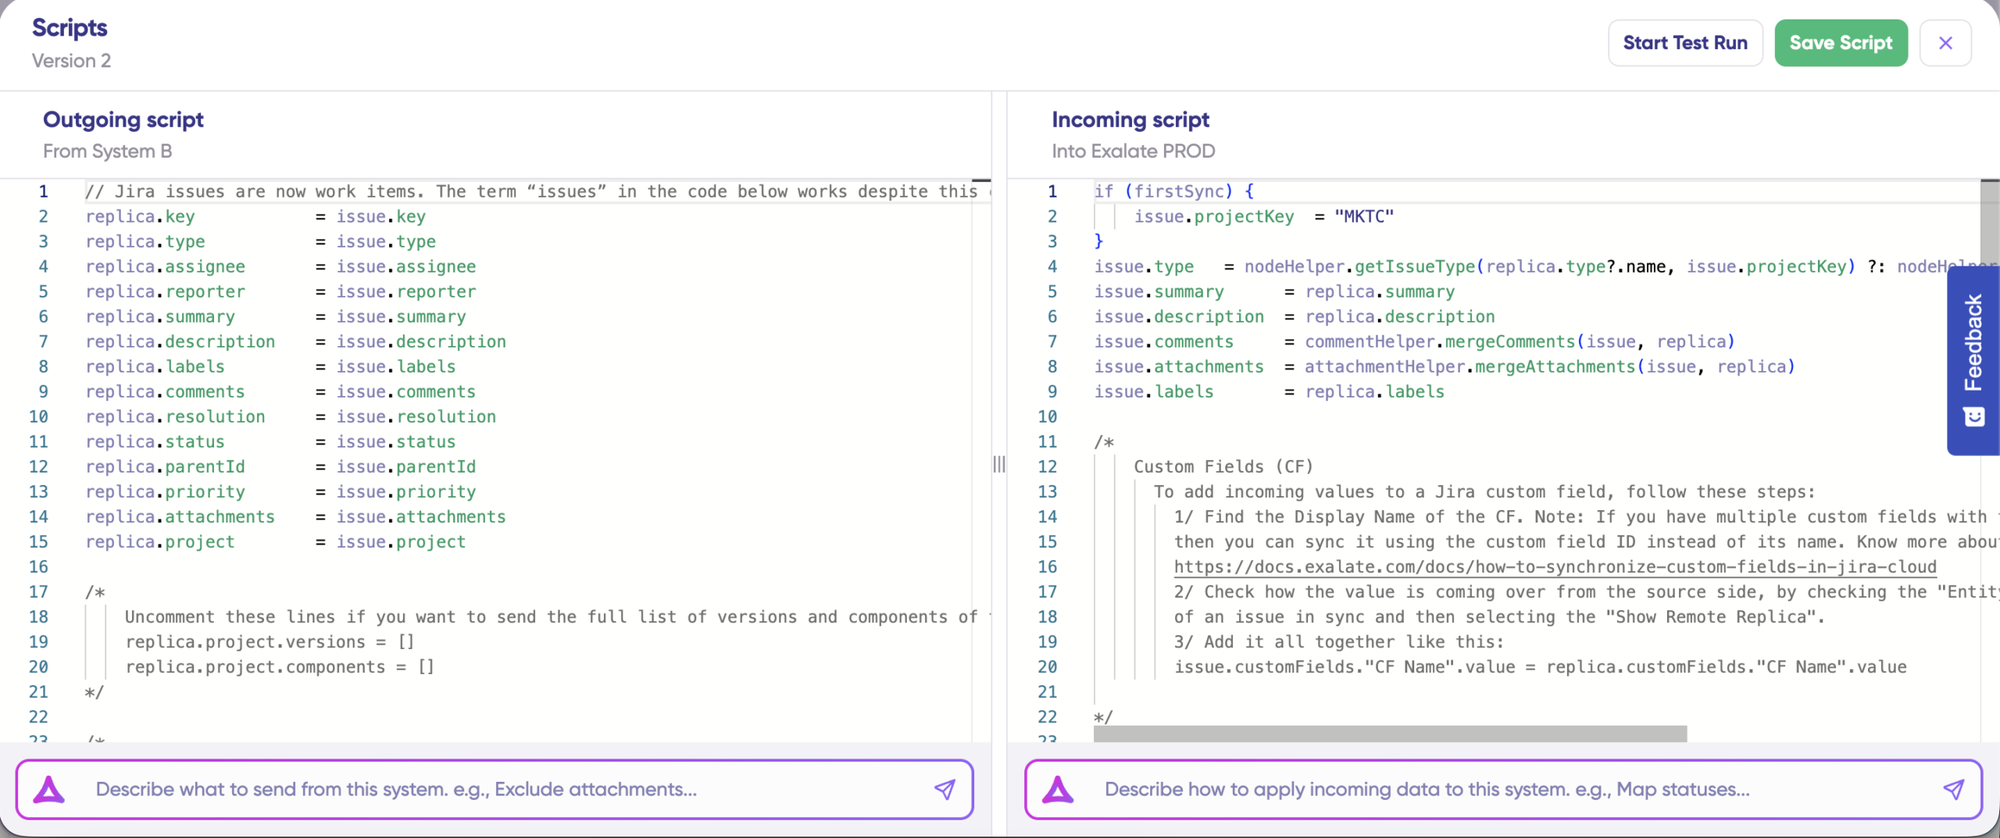
If syncing from Zendesk to Azure DevOps, the outgoing script defines what data leaves Zendesk (tickets, subjects, descriptions, priorities, assignees, attachments, comments, custom fields), while the incoming script specifies how this data maps to Azure DevOps work items (title, description, state, assigned to, priority, attachments, discussion, custom fields). The direction reverses if you change the sync flow.
The replica functions as a message payload containing actual data transferred between synced entities in JSON format. To add new field mappings, write sync scripts directly if you’re comfortable with scripting.
Step 5: Use Aida AI-Assisted Configuration
Save time and avoid scripting complexity by leveraging Exalate’s Aida AI-assisted configuration feature. Aida generates sync scripts automatically and is available in both incoming and outgoing script sections.
For outgoing scripts, describe what data should sync from your system. Examples include “Only sync urgent priority tickets”.
For incoming scripts, specify how incoming data should apply to your system. Examples include “Convert Zendesk priority levels to Azure DevOps priority values.”
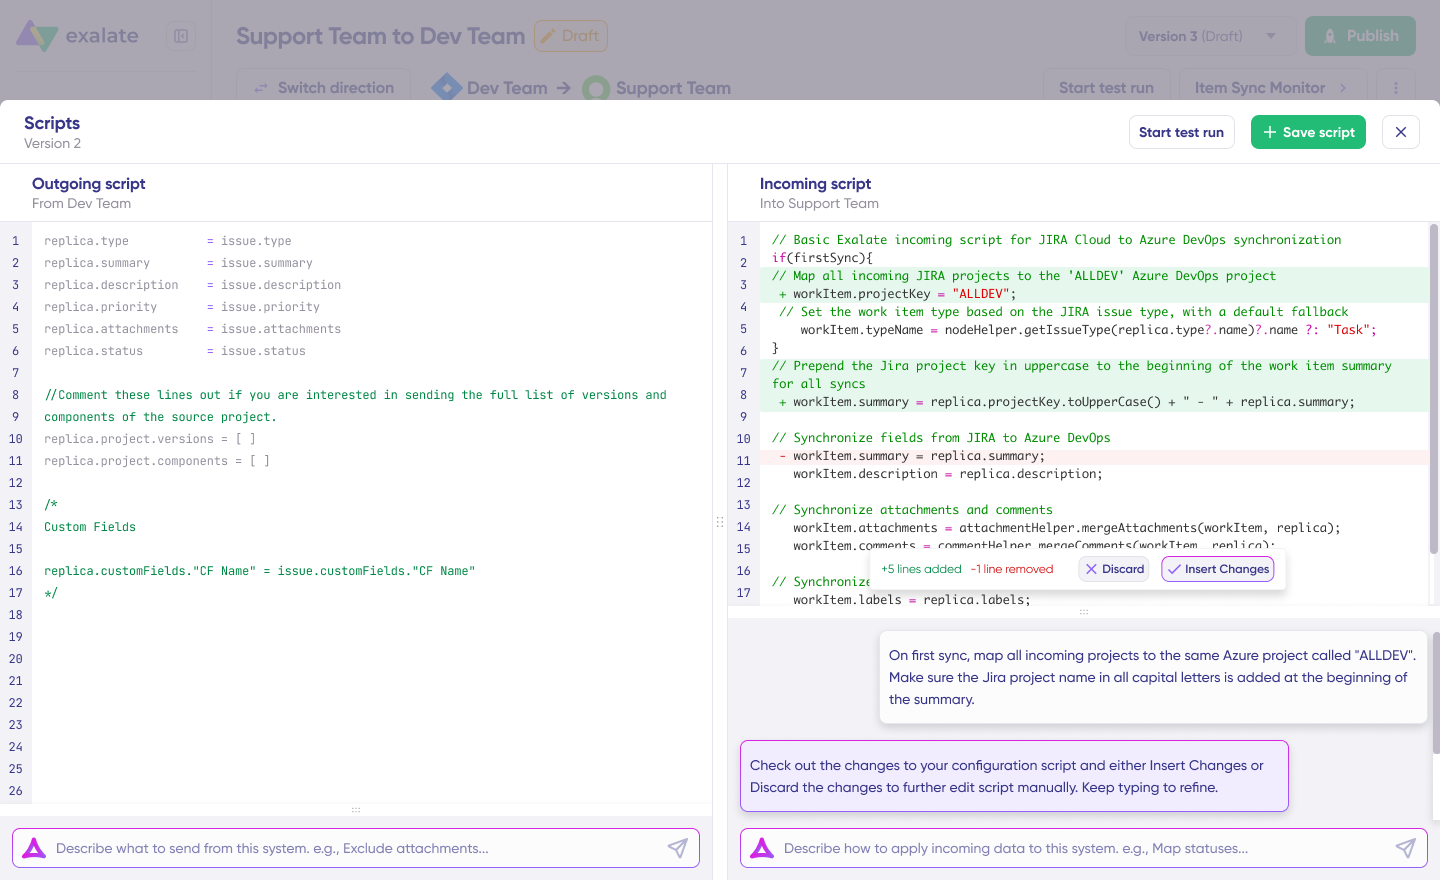
Based on Exalate’s scripting API and your existing configuration, Aida generates working Groovy scripts with proper field mappings. Review Aida’s suggestions carefully—green highlights indicate new lines being added; red highlights show lines being removed. Choose “Insert” to accept suggestions or “Discard” to reject them.
Outgoing and incoming scripts operate independently, as does Aida. Maintain a separate context and direction for each prompt. While Aida accelerates configuration, always review the generated code before applying it to production.
Step 6: Test Run – Validate Before Going Live
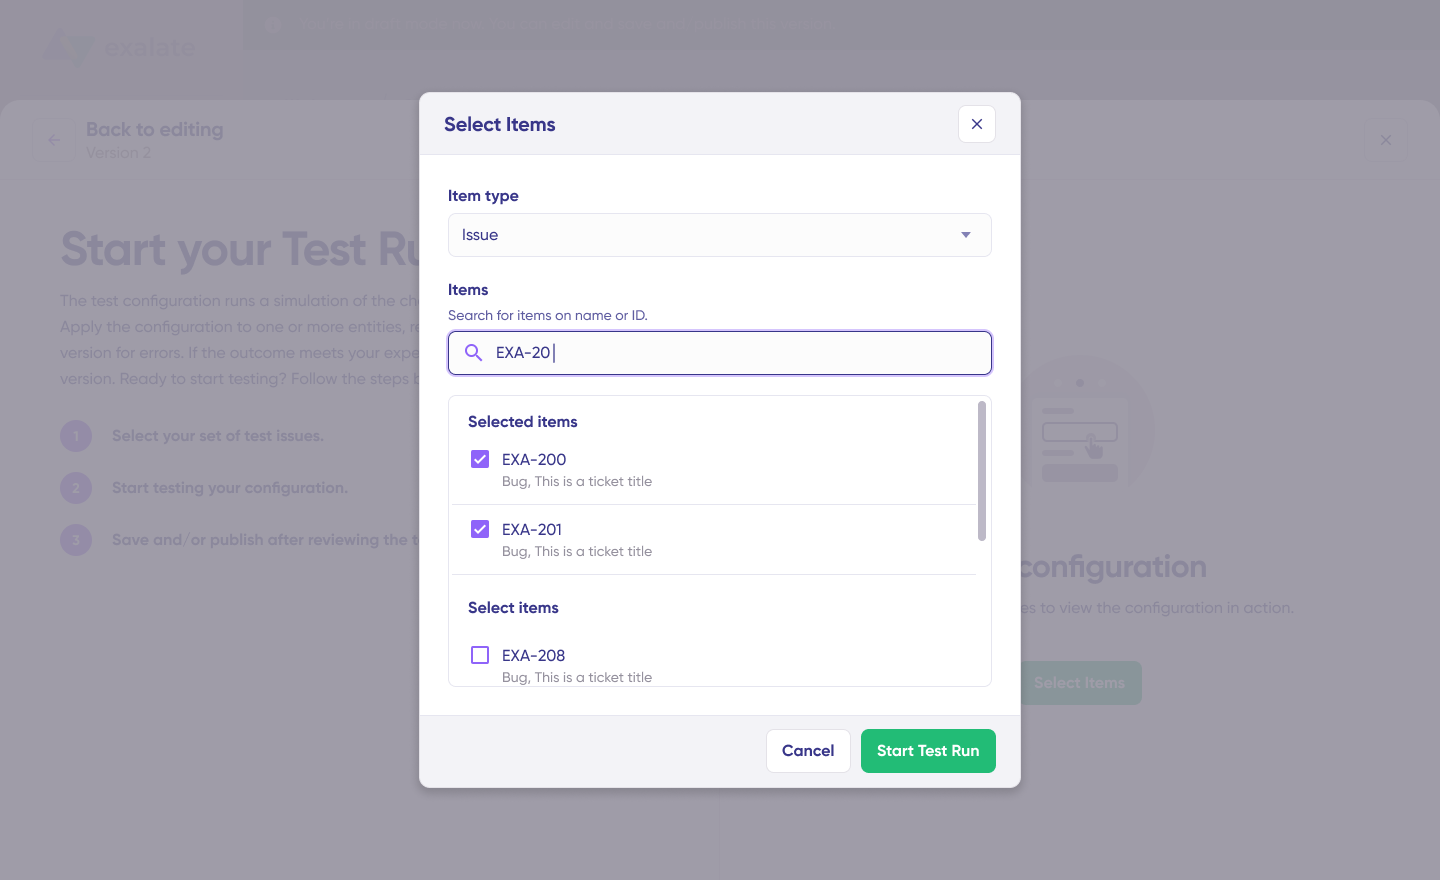
With sync scripts configured, save your work or test the configuration using “Start Test Run” before deploying to production.

Select specific items you want to test—you can choose multiple Zendesk tickets or Azure DevOps work items. Click “Start Test Run” to begin the dry run. Review all incoming and outgoing replicas for each selected item in their respective tabs.
Preview how the sync configuration will apply to your items. Verify field mappings appear correct in the replica preview. If needed, return to the editor, adjust scripts, and test again. Deploy only when you’re confident the synchronization behaves as expected.
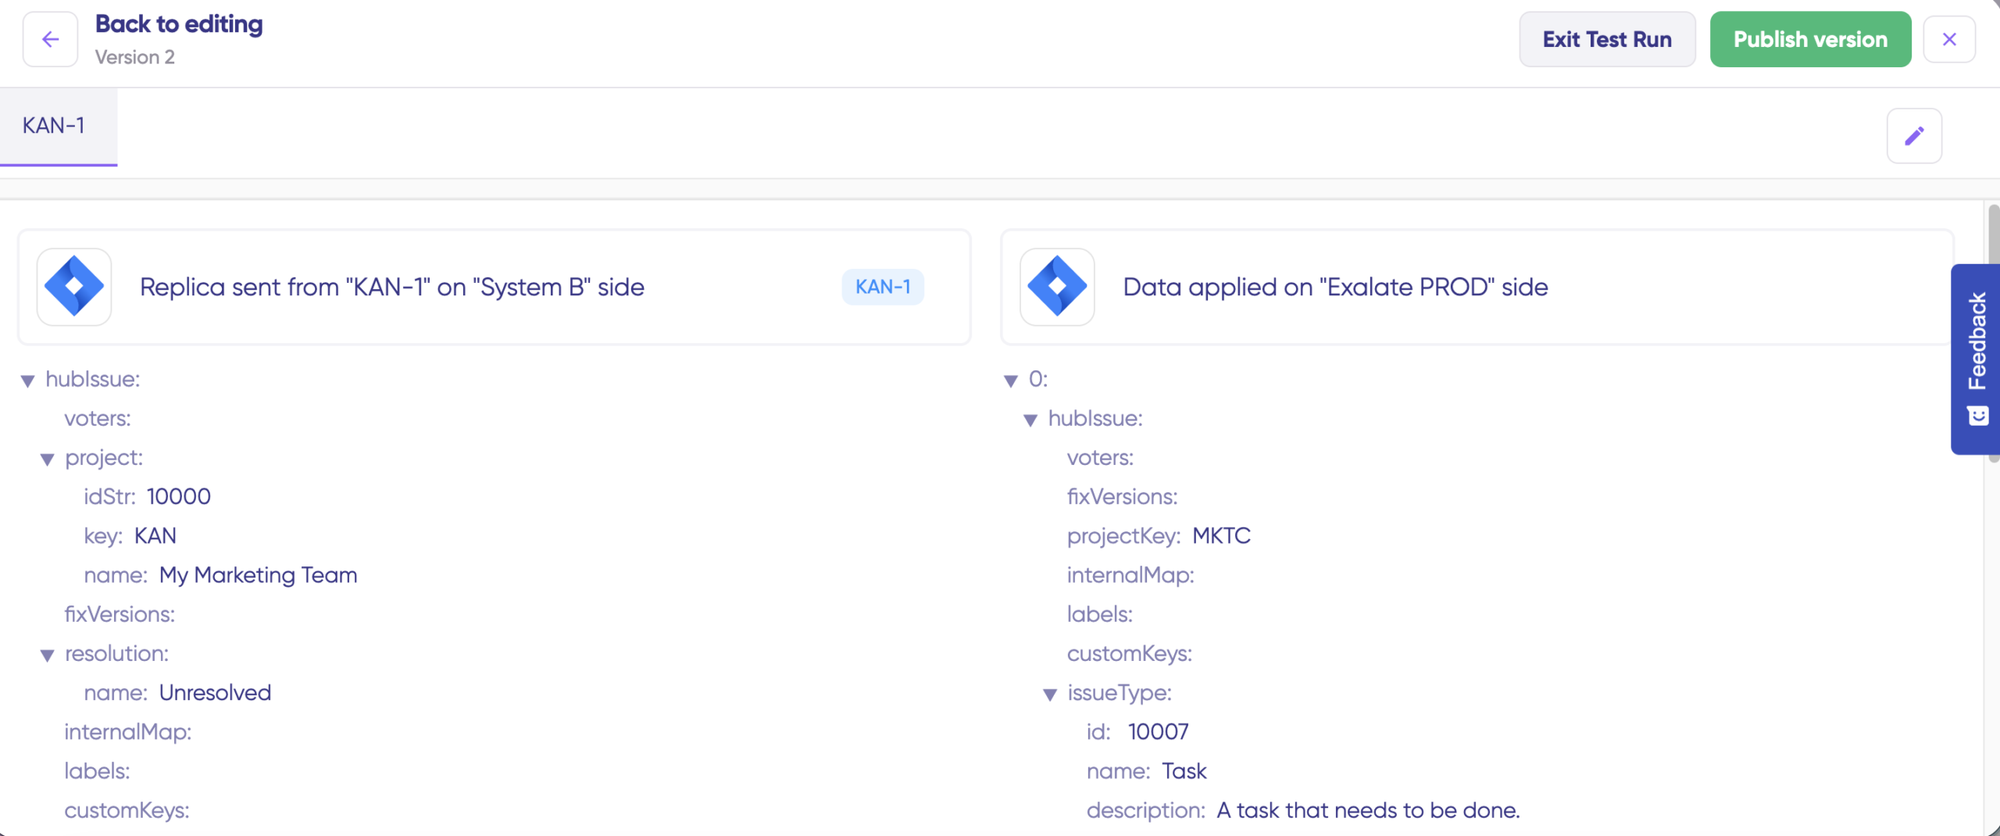
This validation layer prevents errors from affecting live customer and development data, ensuring safe deployment.
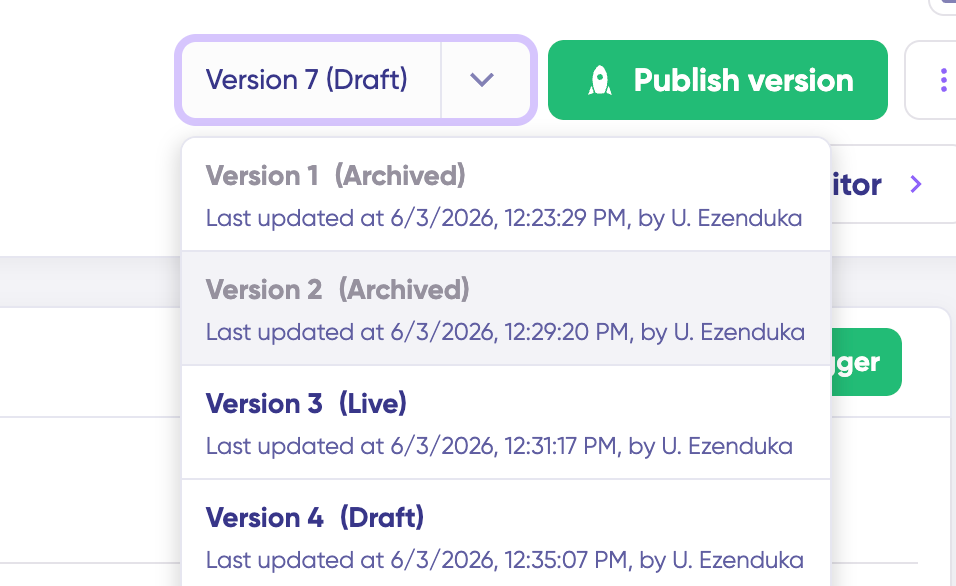
Once everything meets your requirements, click “Publish Version” to activate the updated configuration for live synchronization. All connection versions appear in the “Version” dropdown and can be “Active,” in “Draft” (editable), or “Archived.”
Step 7: Configure Sync Triggers
To automate synchronization, configure triggers—conditions that determine which items sync automatically. Examples include syncing all Zendesk tickets tagged with “engineering-escalation” or all Azure DevOps work items in the “Customer Support” area path.
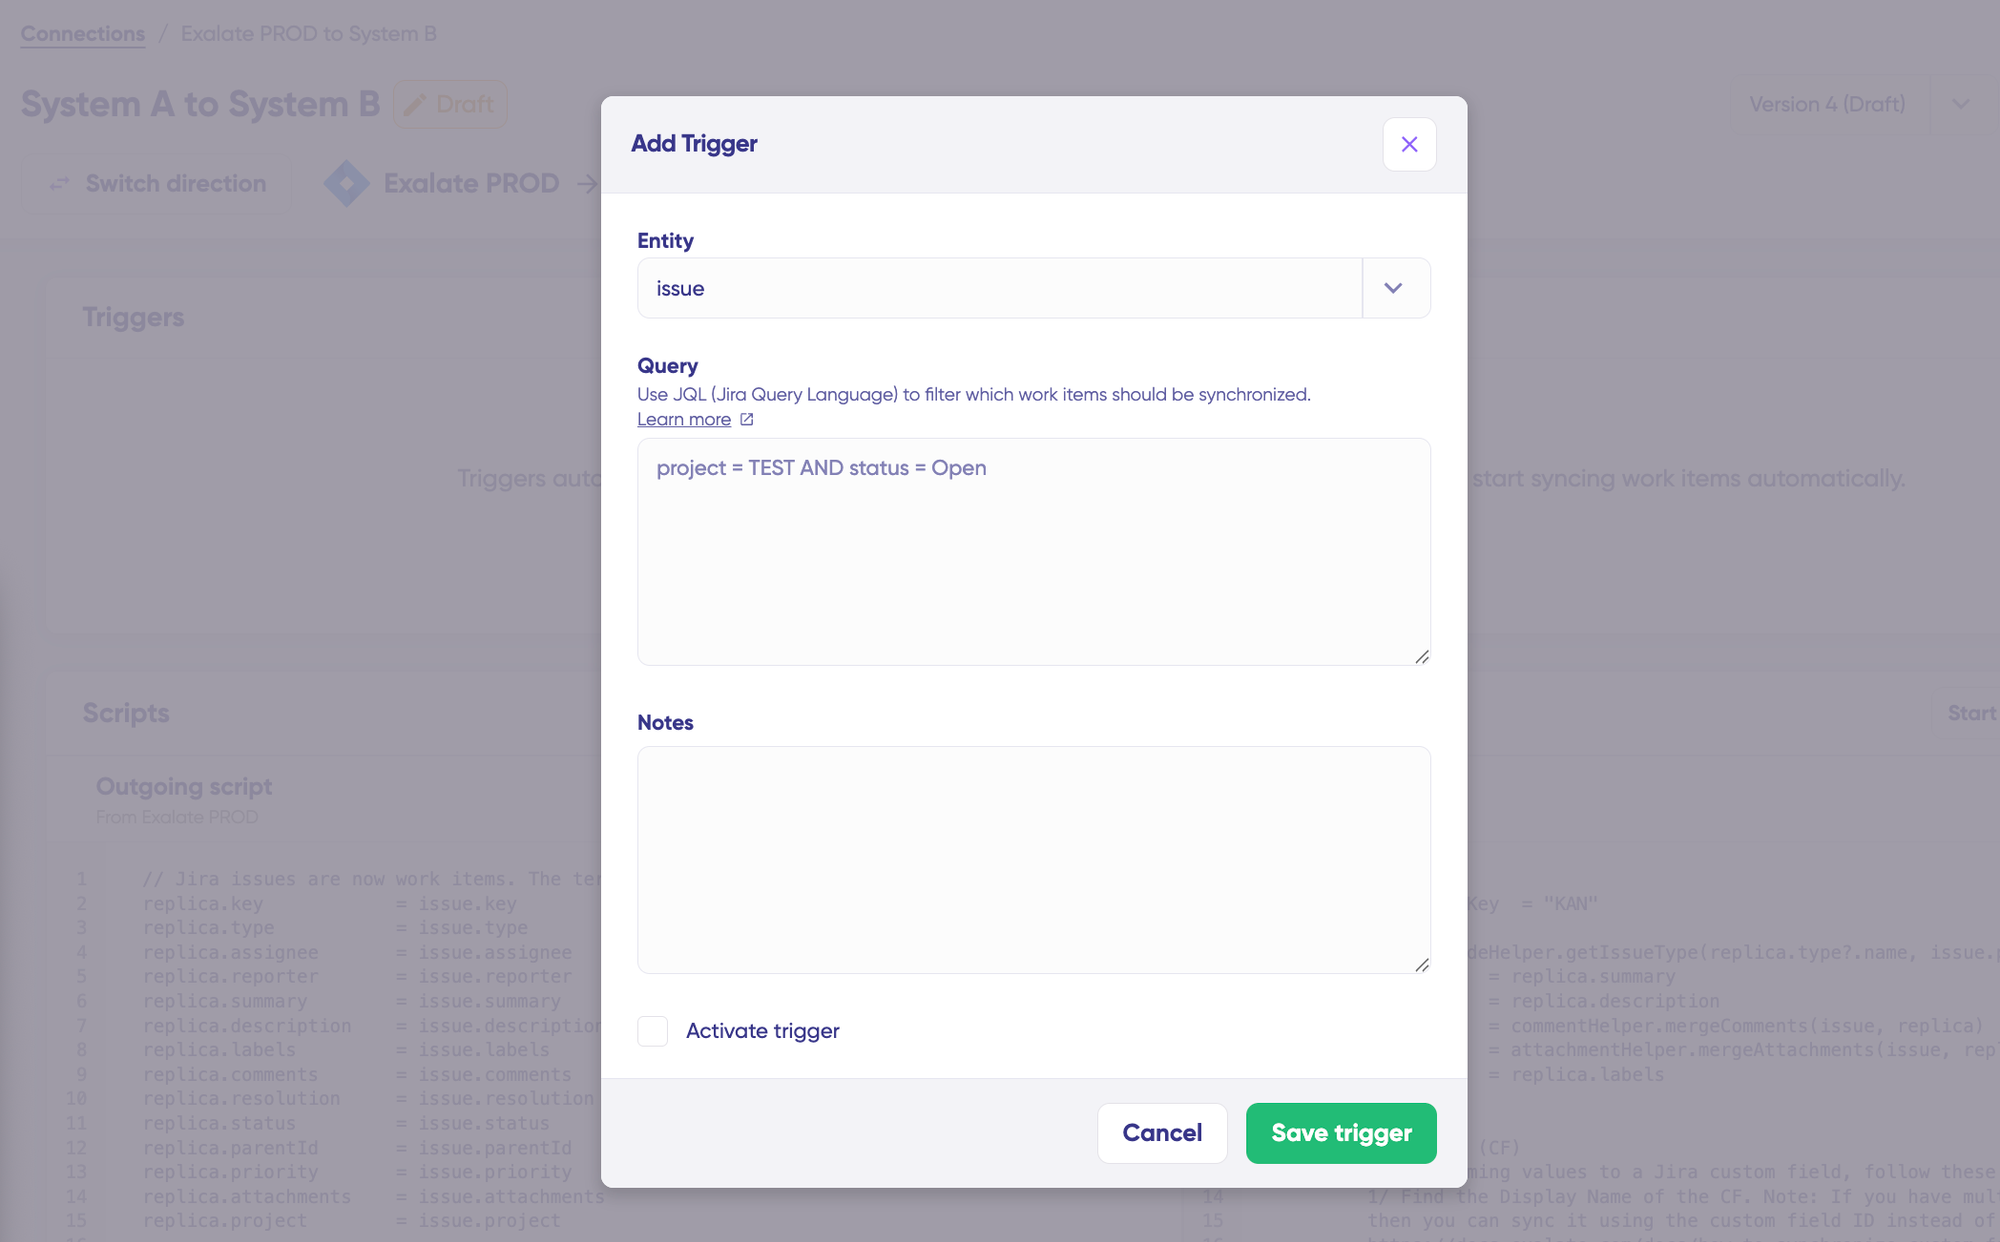
Click “+ Add trigger” to begin. Triggers are platform-specific. For Zendesk, use Zendesk’s search syntax to filter tickets by status, type, priority, group, assignee, tags, or custom fields.
For Azure DevOps, use Azure DevOps query syntax to specify conditions for work items based on state, area path, iteration path, work item type, priority, or custom fields. Save changes by publishing your trigger configuration.
Step 8: Troubleshoot with Aida AI
Aida AI accelerates error resolution by providing context-aware suggestions directly where errors occur.
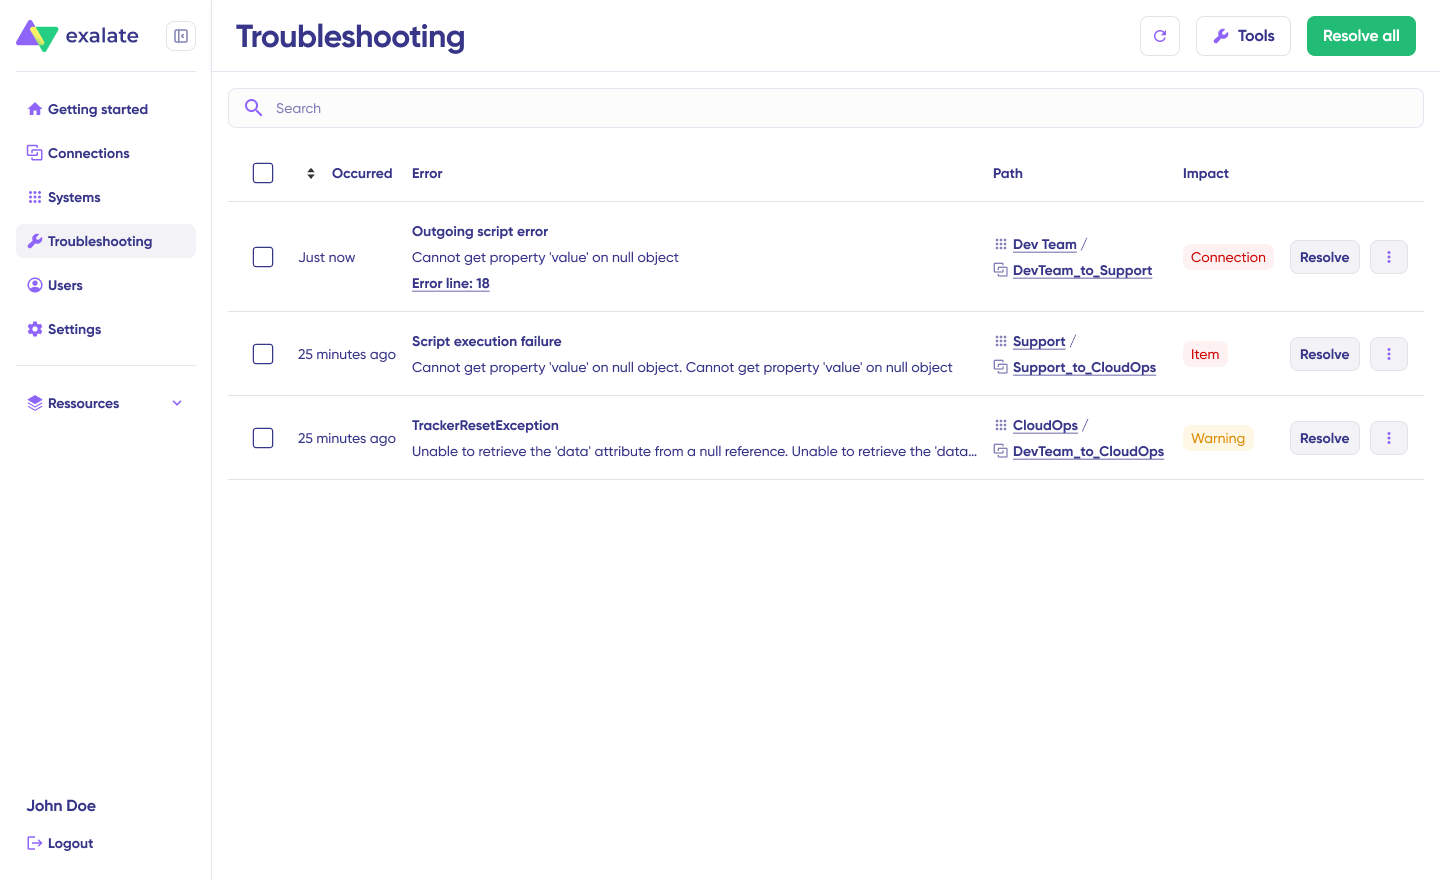
Navigate to the “Troubleshooting” tab. Hover over any error you want to diagnose and click the Aida icon that appears next to the error. Review the AI-generated suggestion in the modal window, including a concise error explanation and proposed solution.
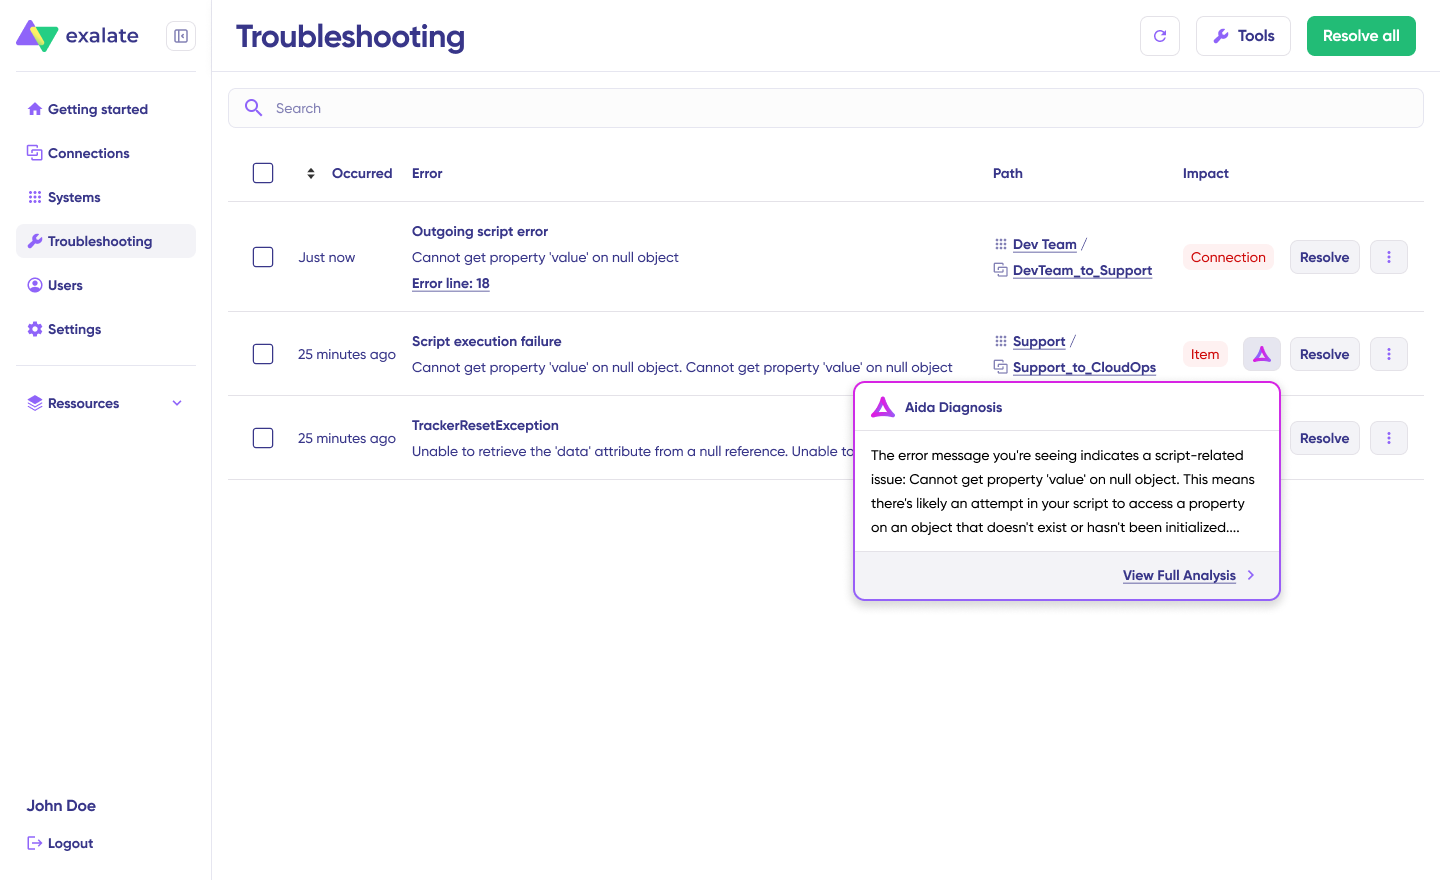
Select “View Full Analysis” for additional context. Access “Error details” to copy the stack trace, or view “Replicas” to examine the JSON format. Choose “Resolve” and retry failed synchronizations.
With this comprehensive setup, your Zendesk support tickets and Azure DevOps work items will sync seamlessly, enabling better collaboration between customer support and development teams.
Zendesk Azure DevOps Integration Use Cases
Use Case 1: Escalate Critical Support Tickets to Development
Challenge: Customer support identifies a bug affecting multiple users, but manually creating development work items causes delays and information loss.
Solution: When support agents mark tickets with specific tags or priority levels in Zendesk, Exalate automatically creates corresponding work items in Azure DevOps with all relevant context. The synchronization is selective, passing only the information developers need.
Real-World Application: A SaaS company handling 500+ daily support tickets, with automated escalation for high-priority bugs. Critical tickets tagged “bug-critical” instantly create Azure DevOps work items with complete context, attachments, and customer impact details. Development updates automatically reflect in Zendesk, keeping customers informed without manual communication.
Use Case 2: Maintain Bi-Directional Status Updates
Challenge: Support teams and developers work in silos, leading to duplicated status inquiries and inconsistent customer communication.
Solution: When developers change work item status in Azure DevOps (from “In Progress” to “Ready for Testing”), Zendesk ticket status automatically updates (from “Open” to “Pending”). Customers receive automated notifications about progress without support agents manually checking development status.
Real-World Application: An enterprise software company reduced status inquiry tickets by 60% by syncing development progress directly to customer tickets. Support agents focus on complex issues instead of providing status updates.
Use Case 3: Sync Priority Across Platforms
Challenge: Development teams struggle to align work item priority with actual customer impact and SLA requirements.
Solution: Zendesk ticket priority (Low, Normal, High, Urgent) automatically maps to Azure DevOps work item priority. When support agents escalate ticket priority based on customer SLA or business impact, development teams see the updated priority instantly.
Real-World Application: A financial services company ensured SLA compliance by syncing priority levels. High-priority tickets from premium customers automatically become Priority 1 work items, ensuring development resources align with business value.
Use Case 4: Link Multiple Related Tickets to a Single Work Item
Challenge: A product bug affects dozens of customers, creating duplicate work items and fragmented communication.
Solution: Support agents tag related Zendesk tickets with a common identifier. Exalate routes all tagged tickets to a single Bug or Epic in Azure DevOps. When developers update the work item status, all related tickets receive synchronized updates simultaneously.
Real-World Application: During a major outage affecting 150 customers, a tech company linked all incident tickets to one Azure DevOps work item. A single status update propagated to all 150 tickets, saving hours of manual communication and ensuring message consistency.
Use Case 5: Notify Support Teams About Releases and Fixes
Challenge: Support teams learn about bug fixes and new releases after customers report issues, which often damages your team’s credibility.
Solution: When developers mark Azure DevOps work items as “Resolved” or “Deployed,” corresponding Zendesk tickets automatically update with resolution details and estimated release timelines.
Real-World Application: A SaaS company improved support team confidence by ensuring agents know about fixes before customers ask. Proactive communication about resolved issues increased customer satisfaction scores by 25%.
Use Case 6: Impersonate Comments for Cross-Company Collaboration
Challenge: When working with external clients or partners, maintaining communication clarity and brand consistency is difficult.
Solution: Using comment impersonation, comments from Azure DevOps developers appear in Zendesk as if posted by a designated support representative. This maintains professional communication standards while enabling technical collaboration.
Real-World Application: A consulting firm collaborating with client development teams uses comment impersonation to ensure all customer-facing communication appears from designated account managers, while technical details flow seamlessly between internal teams.
Use Case 7: Sync Custom Fields for Workflow Automation
Challenge: Organizations use custom fields for routing, categorization, and reporting that differ between Zendesk and Azure DevOps.
Solution: Exalate’s scripting engine maps custom fields between platforms. A Zendesk “Customer Tier” field (Bronze, Silver, Gold, Platinum) maps to an Azure DevOps “Business Impact” field, enabling automated routing and resource allocation.
Real-World Application: An e-commerce platform routes tickets from Platinum customers to senior developers automatically by syncing custom tier fields, ensuring VIP customers receive priority support and development resources.
Use Case 8: Track Feature Requests from Customers
Challenge: Valuable customer feature requests get lost in support tickets without development team visibility.
Solution: Support agents tag tickets as “feature-request” in Zendesk, automatically creating User Story work items in the Azure DevOps product backlog. Product managers review customer-driven requests during sprint planning.
Real-World Application: A project management software company implemented feature request tracking, resulting in anincrease in customer-requested features in their roadmap. Customer retention improved as users saw their suggestions implemented.
Best Practices for Zendesk Azure DevOps Integration
- Document Everything Systematically: Maintain coherent documentation ensuring field names, mapping logic, and descriptions are correct and properly labeled. This accelerates troubleshooting and team onboarding.
- Conduct Security and Compliance Evaluation: Verify the integration provider has necessary compliance certifications (ISO 27001, SOC 2, GDPR). Enforce strict data handling practices, protecting user and business data.
- Establish Role-Based Permissions: Admins should configure permissions with specific roles and access levels based on individual clearance. Prevent unauthorized access to sensitive customer or development data.
- Start with Templates, Customize as Needed: Begin with pre-configured templates for common scenarios. Use AI-assisted configuration to accelerate customization for specific requirements. Leverage Groovy scripting for advanced use cases.
- Reduce Notification Overload: Configure sync to send only essential notifications. Excessive updates clog systems and drown out important information, reducing team effectiveness.
- Test Before Full Deployment: Use TestRun to verify synchronization behavior before enabling production workflows. Identify and fix mapping errors early using Aida’s diagnostic tools.
- Monitor and Optimize Continuously: Review sync performance metrics regularly. Identify bottlenecks, optimize field mappings, and refine triggers based on actual usage patterns.
- Plan for Cross-Platform Compatibility: Ensure the chosen solution supports the specific fields and entities you need to sync. Verify compatibility with your Zendesk and Azure DevOps configurations before commitment.
Conclusion
Zendesk Azure DevOps integration transforms how customer support and development teams collaborate by eliminating manual data entry, improving communication, and maintaining a unified view of customer work items across platforms.
By synchronizing critical fields, automating workflows, and providing bi-directional updates, organizations reduce resolution times, improve customer satisfaction, and empower teams to focus on high-value work instead of administrative tasks.
When selecting an integration solution, prioritize security with ISO 27001 certification, encryption, and role-based access control. Look for AI-assisted configuration to accelerate setup, full script control for customization, and reliable error handling for production environments.
Once your integration is configured, teams enjoy seamless information sharing without ongoing manual effort. Changes propagate automatically, updates reflect instantly, and you can refine synchronization as requirements evolve.
Frequently Asked Questions
Why integrate Azure DevOps and Zendesk with Exalate?
Integrating Azure DevOps and Zendesk with Exalate enables development teams to track and manage customer work items in Zendesk directly within their development workflow in Azure DevOps. Support teams gain full visibility of important customer tickets, improving transparency and cross-team collaboration.
Exalate eliminates manual data entry, reduces errors, and ensures both teams work from a unified information source through AI-assisted configuration and Groovy script-based sync rules that adapt to your specific workflow requirements.
How does Exalate connect Zendesk and Azure DevOps?
Exalate connects Zendesk and Azure DevOps through configuration. You create a connection within Exalate, authenticate both platforms, and define sync rules using either Aida AI-assisted configuration or custom Groovy scripts.
Exalate enables bi-directional or unidirectional synchronization, allowing you to customize exactly what data syncs, when it syncs, and how fields map between platforms.
Does Azure DevOps have native service desk functionality?
No, Azure DevOps does not include native service desk functionality. It focuses on development workflows, project management, and DevOps practices. Exalate bridges this gap by integrating Azure DevOps with dedicated customer service platforms like Zendesk, Freshservice, or Freshdesk, providing comprehensive service desk capabilities while maintaining development efficiency in Azure DevOps.
Is Azure DevOps similar to Zendesk?
Azure DevOps and Zendesk serve different purposes. Azure DevOps provides a complete DevOps ecosystem for software development, including version control, build automation, release management, and work tracking. Zendesk focuses on customer service, support ticket management, and customer experience optimization.
Exalate bridges these different systems, allowing their core functionalities to complement each other through seamless integration. You get the best of both worlds without forcing teams to abandon their preferred tools.
What fields can I sync between Azure DevOps and Zendesk using Exalate?
Exalate supports comprehensive field synchronization between Zendesk and Azure DevOps. Ticket descriptions and work item details maintain complete context across platforms. Comments and updates flow bi-directionally to keep teams aligned, while status and state changes synchronize automatically.
Assignee information ensures proper resource allocation and accountability. Attachments, including screenshots, logs, and files share automatically between systems. Priority and severity levels align urgency across support and development. Custom fields map using Groovy script-based transformation rules, regardless of field type.
Can I integrate Azure DevOps and Zendesk for free with Exalate?
Exalate offers subscription-based plans designed for teams of all sizes, from small startups to enterprise organizations. While both Azure DevOps and Zendesk offer free tiers with limited functionality, they don’t include native integration capabilities. Exalate’s pricing is transparent and based on the number of connections or users. Review Exalate’s pricing details to determine costs associated with your specific integration requirements.
How does bi-directional sync work in Exalate?
Exalate’s bi-directional sync enables changes in either platform to automatically reflect in the other. When a support agent updates a Zendesk ticket status, the corresponding Azure DevOps work item status updates automatically through Exalate’s sync rules, and vice versa. You configure sync direction and frequency using Groovy scripts or Aida AI-assisted configuration based on your workflow requirements, with options for real-time sync or scheduled intervals.
Can I sync multiple Zendesk groups to different Azure DevOps projects with Exalate?
Yes, Exalate’s architecture supports multiple sync configurations simultaneously. You can create separate connections within your system to route tickets from different Zendesk groups (Support, Technical, Sales) to different Azure DevOps projects. Using conditional sync rules and triggers, you can filter based on tags, priority, or custom field values. This enables department-specific workflows while maintaining organizational consistency.
How does Exalate handle time zone differences in sync timestamps?
Exalate automatically handles timestamp conversion between platforms. Zendesk ticket creation times appear correctly in Azure DevOps work items regardless of where users are located globally. The replica payload preserves original timestamp data, and Exalate’s scripting engine applies appropriate time zone transformations during field mapping.
How do I prevent duplicate work items when multiple tickets describe the same issue in Exalate?
Exalate supports linking multiple Zendesk tickets to a single Azure DevOps work item through conditional sync rules. You configure Groovy scripts to detect related tickets using tags, custom fields, or keyword matching. Instead of creating duplicate work items, Exalate adds references and consolidates information into one development task. When the work item updates, all linked tickets receive synchronized updates simultaneously.
Can I customize which comments sync between platforms using Exalate?
Yes, Exalate’s Groovy script-based sync rules allow granular comment filtering. You can write conditional logic to filter comments based on author, content keywords, tags, or privacy settings. This enables you to sync technical comments from developers to support tickets while filtering internal development discussions that aren’t customer-facing. Aida AI-assisted configuration can help generate these filtering rules if you prefer not to write scripts manually.
How secure is data during Exalate synchronization between Zendesk and Azure DevOps?
Exalate prioritizes security with ISO 27001 certification and comprehensive data protection. Role-based access control ensures only authorized users can configure and manage integrations. Exalate undergoes regular security audits and maintains compliance with enterprise security standards. Visit the Exalate Trust Center for detailed security documentation, compliance certifications, and audit reports.
Does Exalate support custom fields between Zendesk and Azure DevOps?
Yes, Exalate’s Groovy scripting engine supports unlimited custom field mapping between Zendesk and Azure DevOps. You define transformation rules specifying how custom fields map between platforms, regardless of field types (text, numbers, dropdowns, dates, multi-select). Aida can generate custom field mapping scripts based on your requirements, or you can write Groovy scripts directly for complete control over data transformation logic.
Recommended Reading: