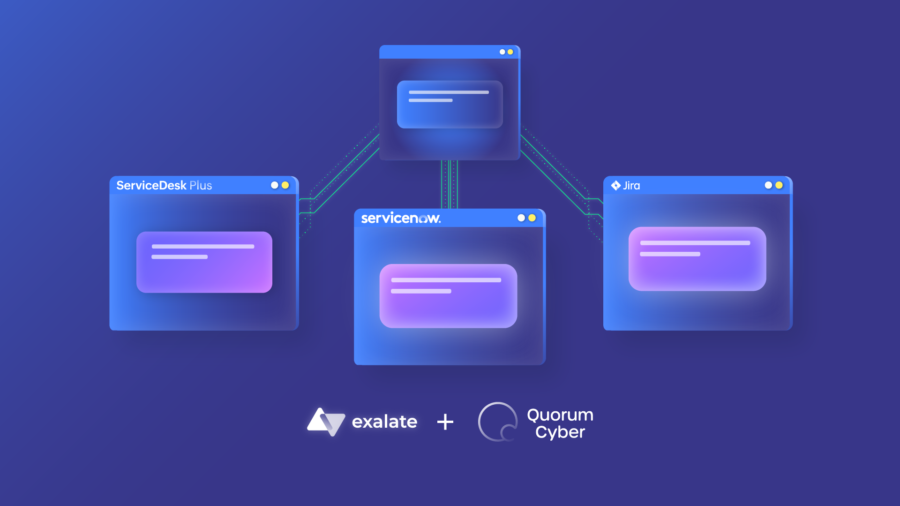
Quorum Cyber is a global cyber security company that helps organizations in any sector anticipate, detect, and fend off threats, breaches, and cyber-attacks. The company offers managed, advisory, and incidence response services.
Michael Fowler is the Engineering Lead at Quorum Cyber, a Microsoft Solutions Partner for Security and managed security services provider (MSSP).
The service they offer involves monitoring and managing high-priority and low-priority security-related aspects on their behalf. So, they wanted to connect their customer portal, Clarity, with their customers’ service desks.
This allows them to integrate various issue types (incidents, monitoring reports, vulnerabilities, and other custom requests), which are automatically synced to the end customer based on predefined criteria.
Challenges
Quorum Cyber’s primary integration challenge was getting their customers to keep their security tickets within their own service desk.
They needed an ITSM integration to avoid the end customer’s security team constantly having to check the MSP customer portal to stay up to date on new events and potentially critical security-related alerts.
Most customers want service desk integrations for their own service portals without having to give access to the MSSP.
Our customers wanted to work security tickets within their own service desk and didn’t particularly want to work in multiple vendor portals.
Michael Fowler, Engineering Lead at Quorum Cyber
They also wanted to exchange information faster without having to reach out to respondents personally. So when the data is transferred to the other side, the customer will receive an instant ping to notify them about updates.
For instance, when a customer creates a ticket for an urgent security incident, the Quorum Cyber team should get a notification on their service desk as soon as possible in order to initiate a rapid response game plan.
We didn’t go down the road of developing a solution ourselves purely due to resource limitation because if we developed it, we’d have to maintain it and make regular improvements.
Michael Fowler, Engineering Lead at Quorum Cyber
The team also wanted an integration option they could customize and maintain. Customers should also be able to decide to close and open tickets autonomously from their own end.
Solutions
They considered using different API integrations, but the task was too resource-heavy. So they tried different third-party integrations in the Jira Marketplace—none of them fit their integration use cases.
Some of the other integrations we looked at used a kind of a schedule-based approach…so every 10 minutes or whatnot.
Michael Fowler, Engineering Lead at Quorum Cyber
Eventually, they chose Exalate because its Integration as a Service (IaaS) offering fit right into what their customers wanted, as well as how Quorum Cyber handles sensitive data.
The main selling point was the customizability of the integration, which allowed each customer to make it work differently. Exalate also provided an out-of-the-box experience that relieved the burden of maintenance from MSPs and end users.
The Exalate managed service offering just sat nicely with us because it takes the burden of setting up, managing, and owning the infrastructure away from us and effectively does it on our behalf.
Michael Fowler, Engineering Lead at Quorum Cyber
Why Exalate?
Michael points out that the team chose Exalate because of the following reasons:
• It supports near real-time synchronization. • The engineers and support staff are absolute professionals. • The synchronized data doesn’t exist outside the environment. • The solution supports platform flexibility and autonomy (segregation).
What made us stay with Exalate was their professionalism and willingness to work with us when we had difficult issues.
Michael Fowler, Engineering Lead at Quorum Cyber
Results
• Increased internal sync volume to over 500 tickets per month. • Increased external syncs from a couple to around 100 per month. • 60% more customers now want service desk integration. • The Quorum Cyber team also uses Exalate for internal integrations between teams. • They now have a faster average response and resolution time. • Customers feel empowered to close low-priority tickets on their end. • Customers integrating service desks for the first time were satisfied with the experience. • They have been able to unify multiple service desks to one Jira instance while keeping the data segregated.
Future
Based on their experience working with Exalate, Michael believes that Quorum Cyber can further use Exalate to collaborate with customers.
Going forward, Michael is confident that the company will roll out the Exalate integration solution to more of their customers.
The only way for ServiceNow to interact and exchange data with other systems or instances is through a ServiceNow connector.
This connector could be a script, native solution, or third-party integration that sends requests, receives responses, and transforms the data to the correct format.
Organizations can use these ServiceNow connectors internally between teams and externally with clients and service providers.
In this article, I’ll discuss everything worth knowing about ServiceNow connectors as well as why you need them in your stack.
What is a ServiceNow Connector?
A ServiceNow connector (integration) is a solution that enables ServiceNow to interact and exchange data with other applications, databases, cloud services, etc.
With a ServiceNow connector, companies can connect internal applications with ServiceNow or sync data with external entities such as managed service providers (MSPs), clients, and suppliers.
How Do ServiceNow Connectors Work?
The core working principle of ServiceNow connectors hinges on the interaction between APIs. The ServiceNow platform relies on REST (Representational State Transfer) or SOAP (Simple Object Access Protocol) APIs.
So how do these APIs store, fetch, send, and transform data?
For APIs to interact, you need scripts or web services to connect their endpoints.
Scripts refer to code on the server or client-side that controls how the API works. To make changes to ServiceNow scripts, you must know the JavaScript syntax.
Web services could be inbound or outbound. Inbound web services give you access to ServiceNow data via a client application. You can access inbound web services via the GraphQL API framework, SOAP, JSONv2, RSS, and Scripted SOAP web services.
Outbound web services make it possible to send SOAP and REST messages to external systems using the SOAP or REST web service.
The Working Principle of a ServiceNow Connector
So let’s assume you want to connect two ServiceNow instances to share data between two incidents. Here is what happens under the hood.
The local system authenticates the user using API keys, OAuth, and other credentials.
The local system sends the request through an endpoint to retrieve data from the remote incident.
Based on the mapping and configuration, the payload is retrieved and parsed through transformers.
The transformers convert the payload to the required format (not necessary for ServiceNow to ServiceNow connections).
If triggers are active, they can fire the response in reaction to an event.
The remote incident is replicated on the local system based on data retrieved from the API headers.
If a network error occurs and blocks the queue, the system retries the process automatically.
If the mapping fails due to an error, the system admin can debug the connection in order to make changes to mappings, scripts, or naming conventions.
The standard workflow is extract, transform, load (ETL) or extract, load, transform (ELT). This can happen in real-time or at regular intervals through batch processing.
Types of ServiceNow Connectors
Any solution that can connect a ServiceNow platform with another system is a connector. But to narrow down the classification, I’ve grouped them into the following categories:
Native connectors: These solutions are native to the ServiceNow platform. IntegrationHub is the primary connector that natively integrates with ServiceNow. With IntegrationHub Spokes, you can connect with several external applications and services.
Custom connectors: These are in-house REST/SOAP API integrations created for a specific integration scenario with a ServiceNow organization. Custom scripts control how these systems work.
Third-party solutions: These are external applications that act as bridge ServiceNow with other systems. They could be ETL tools, ERP/CRM integrations, or middleware connectors.
If the connection is between the ServiceNow instances of deeply embedded companies, eBonding is the recommended solution via REST messages and business rules.
Benefits of ServiceNow Connectors
As a team, subdivision, or organization, here are the benefits of ServiceNow connectors.
Increase Productivity
Automated connectors reduce redundant administrative tasks, decreasing team members’ workload and freeing up time to focus on pressing business issues.
In addition, connecting ServiceNow with other systems reduces the time needed to manually move data between systems and unnecessary context switching between platforms.
Extend System Functionality
ServiceNow connectors extend the capability of your instance by allowing you to connect to CRMs, ERPs, SaaS applications, and databases.
These connectors allow data exchange between default incident fields (attachments, descriptions, comments, etc.) and custom fields.
For instance, you can connect your ServiceNow platform with Slack for instant updates and smooth communication. This also applies to connecting ServiceNow to Salesforce to merge account details with customer-generated incidents.
A cybersecurity MSSP used a Jira connector for ServiceNow for deep ticket integration to bridge their communication gap with customers.
Scale Operations Easily
Since ServiceNow connectors extend functionality, it makes it easier for businesses to onboard new clients without having to overhaul their systems to accommodate them. So as workloads and requests increase, the system will continue to accommodate them.
The scalability and flexibility of your system will be pushed to the limit when something breaks, and the system is flooded with tickets. Only a reliable connector will help your ServiceNow sail through these rough waters.
Migrate Data Between Organizations
Companies can use ServiceNow connectors during mergers and acquisitions to unify processes and databases without disrupting regular operating procedures.
When legacy systems are involved, you can connect them to your ServiceNow instance to ensure uninterrupted data flow.
Apart from mergers and acquisitions, ServiceNow connectors can help companies working together on a common initiative collaborate seamlessly.
Make Informed Decisions
With access to multiple data sources, organizations can get a better view and understanding of customer concerns. Stakeholders can analyze this data to make informed decisions about their business operations or customer relationships.
For instance, if a bug in Jira is linked to multiple security incidents on ServiceNow, then you need to conduct root-cause analysis right away to fix the bug.
Improve Customer Experience
As the IT service management system, ServiceNow connectors help you keep a bead on customer experience. So if the incident resolution time and satisfaction score are down, then you need to improve the services you offer.
Also, access to better data will help you improve service delivery and self-service capabilities without overwhelming your employees. The better the service, the happier the staff.
Reduce Costs
ServiceNow connection tools can help your business save money by reducing what you pay in licensing fees.
How so? Well, let’s assume you want to onboard a client who uses Jira Service Management for ITSM exclusively.
The only way to get your ServiceNow to share data with their Jira instance without paying subscription fees is through platform integration. So, you can retrieve relevant data from their Jira when needed.
How to Use Exalate’s ServiceNow Connector
Exalate is a bidirectional integration tool that allows you to connect ServiceNow with platforms such as Jira, Salesforce, Zendesk, Azure DevOps, and GitHub.
To use Exalate’s ServiceNow connector, here are the steps to follow:
Install Exalate on your instance (Instance A) by visiting the integrations page.
The other party should also have Exalate installed (it is a decentralized solution).
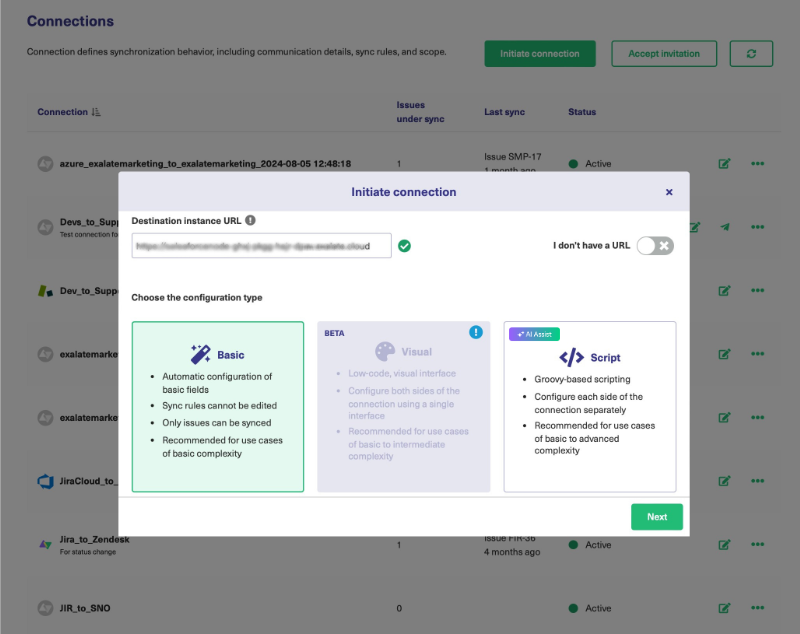
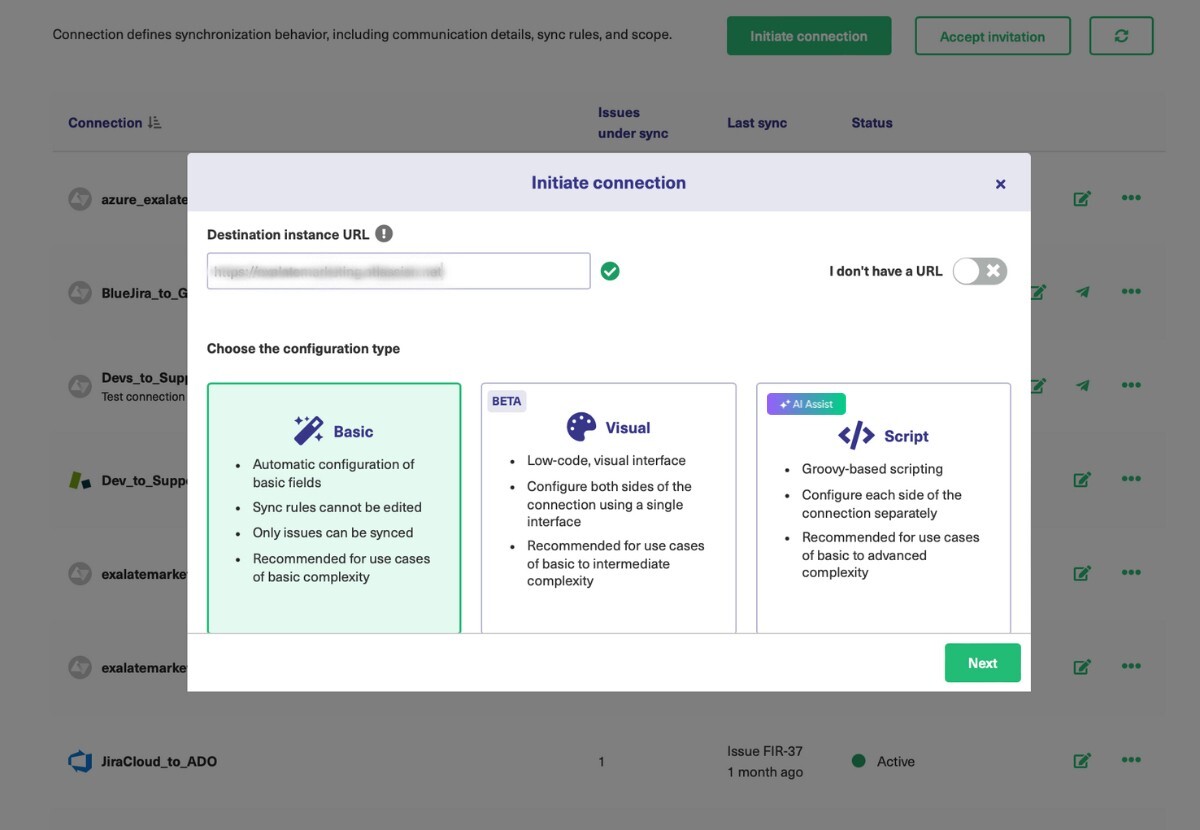
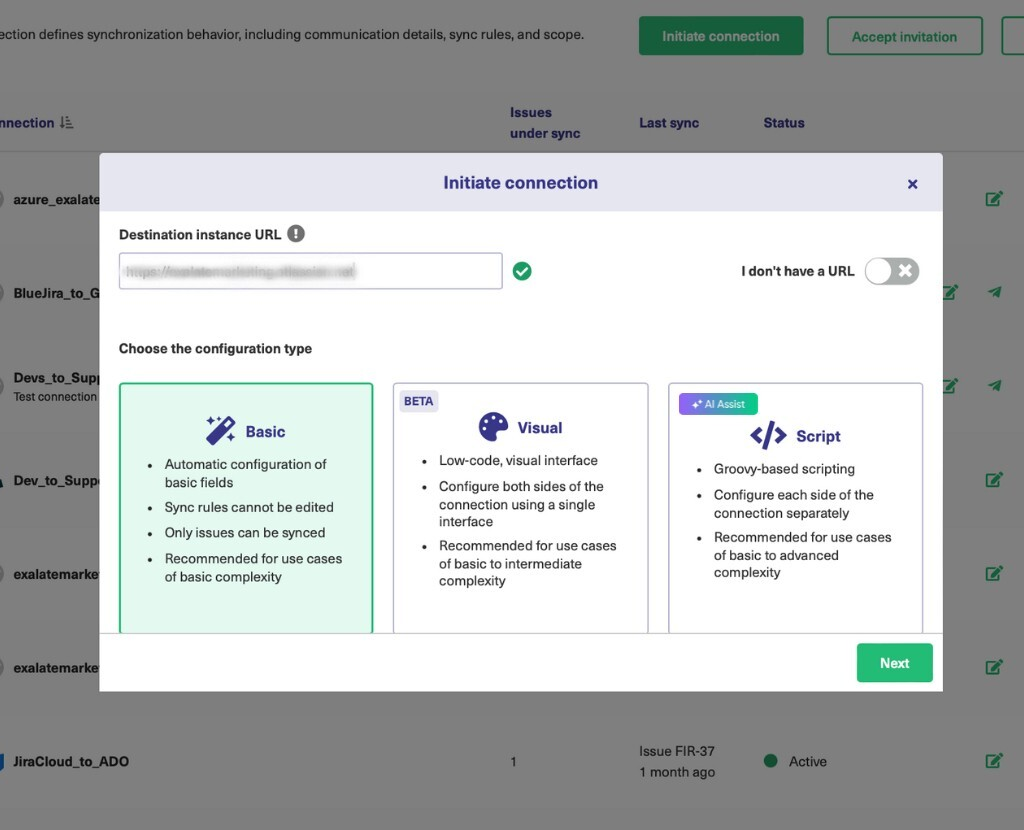
Click on Initiate Connection.
Enter the destination URL.
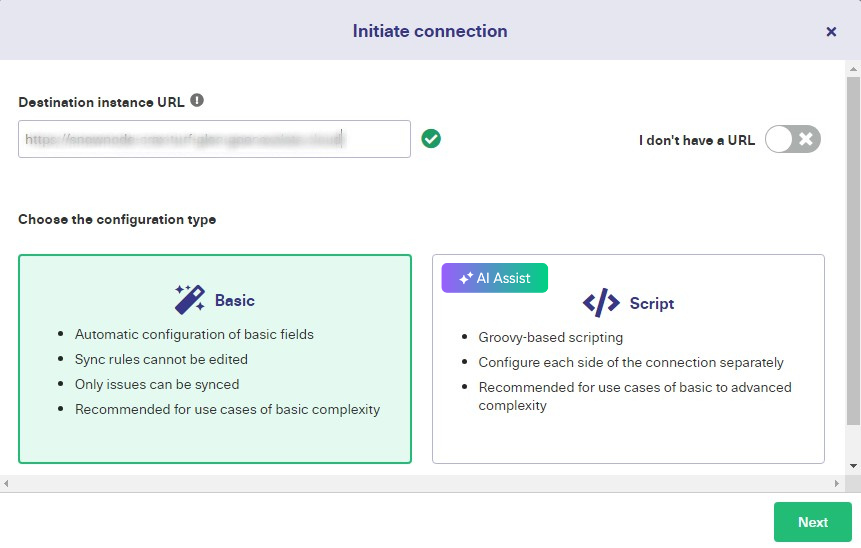
*Then choose between Script or Basic mode (go for the Script mode).
After choosing Script mode, name the connection and add a description.
Copy the invitation code from Instance B.
On instance B, click Accept invitation. Then enter the code and click Next.
The connection is set.
*Basic mode supports no-code integrations. Script mode is a script-based connector that uses the Groovy language to control how syncs function.
Select the entity type and use the ServiceNow search syntax to configure it.
Click Save to complete.
Your sync is now ready to automatically exchange data whenever the conditions are triggered.
Best Practices of Implementing ServiceNow Connectors
From my experience, here are some best practices when choosing or building a Salesforce connector.
Test the connector: Set up trial runs to determine if the ServiceNow connector is working as expected—whether the right data is being fetched and sent across.
Define the scope. Unify objectives between teams, companies, or projects on either side of the ServiceNow connector. This will define the mapping and level of access.
Assign roles to authorized stakeholders. Apply role-based access control (RBAC) when assigning permissions and different levels of access to users and stakeholders working with the interconnected systems.
Monitor API limits. Keep an eye on the rate limit per user to avoid triggering an attack alert. You should also monitor timeout limits, request allocation, and other API limits.
Choose the right integration solution for your organization. Find an affordable ServiceNow connector that is compatible with both platforms. Pay more attention to connectors that support custom scripting as well.
Beef up integration security. Apart from default security features and protocols, add extra guardrails such as firewalls, tokenization, multi-factor authentication, and pseudonymization to beef up data protection.
Educate your staff: Teach your service team how to configure the connector without exposing sensitive data.
Summing Up
Businesses can use ServiceNow connectors for B2B integration as well as internal syncs for teams and projects. This unifies data and improves the productivity of ITSM teams.
Also, ServiceNow connectors can extend the functionality of your instance by integrating with databases, CRMs, ERPs, SaaS applications, legacy systems, and a lot more.
Exalate is a reliable connector for advanced scripting and syncs between ServiceNow and other platforms. You can assign developers to come up with the scripts or opt for the IaaS package.
To find out how Exalate can be your ServiceNow connector, book a demo with us.
Organizations looking to automate processes and integrate Salesforce with other systems often choose MuleSoft as the go-to option.
Using this platform for integration gives your company or business access to the entire array of Salesforce products, including Lightning, Customer 360, and others. You also gain access to an API management platform.
Despite MuleSoft’s broad application, it might not have the exact features needed for your integration use case. In that case, you must look for MuleSoft competitors and alternatives.
Before we list the best MuleSoft alternatives, let’s discuss what the platform has to offer and where it falls short.
What is MuleSoft?
MuleSoft is a platform that allows organizations to automate processes, manage APIs, integrate data, and connect with third-party systems.
When it comes to integration, the MuleSoft Anypoint Platform is the standout product for on-premise and cloud-based connections. This platform provides features like Connectors, DataGraph, Flex Gateway, DataWeave, and Exchange. It also supports API governance, monitoring, and management.
The main advantage of MuleSoft is that it is compatible with multiple platform connectors via a no-code or low-code setup. It also works well for API management and security.
What Features Does MuleSoft Have?
Apart from Anypoint Platform, MuleSoft also offers the following features and products:
MuleSoft Composer helps users connect apps and data using templates, custom expressions, pre-built connections, and invocable actions.
MuleSoft RPA relies on robotic process automation (RPA) to make internal and external processes more efficient.
MuleSoft IDP uses intelligent document processing (IDP) to extract and import information from documents automatically.
Dataloader.io allows users to import, delete, arrange, and load data from multiple sources.
MuleSoft AI relies on machine learning and artificial intelligence to improve the accuracy of automated tasks.
API Manager prevents API sprawl by establishing a coherent system for managing APIs.
What Are the Limitations of MuleSoft?
While large corporations can afford MuleSoft, small businesses will struggle to pay for any of the subscription plans.
Besides, MuleSoft’s learning curve is steep, which means you need experts familiar with the platform to set things up.
If you want only an integration solution, you end up paying for extra MuleSoft features that your business doesn’t need.
To address these limitations, let’s review the most fitting MuleSoft Anypoint alternatives.
Boomi
Boomi is a solution that provides an integration platform as a service (iPaaS) for connecting business processes with applications, systems, and cloud services.
It provides a centralized hub for managing and configuring applications and using ready-made connectors and custom scripts.
Boomi Features
ETL (Extract, Transform, Load)
API management
B2B/EDI management
Master Data Hub for a 360-view of your data
Event Streams for scalable, high-performance use cases.
Boomi Pricing
You can start a free trial for Boomi before choosing one of these pricing plans:
Professional
Pro Plus
Enterprise
Enterprise Plus
The exact cost for your integration use case is available upon request.
Boomi Pros
Supports multiple integrations
Works well for templated integrations
Handles data integration both in real-time and in batches.
Boomi Cons
Not completely no-code
Performance issues when working with multiple connections
Complicated user interface
Exalate
Exalate is a bidirectional integration tool that allows teams to connect and sync data with other internal and external teams.
Exalate supports a 30-day free trial, after which you can get the Free, Premium, or Enterprise plan. You can choose your system on its integrations page and proceed from there.
For precise quotes and a quick demo, reach out to the sales team.
Exalate Pros
The support is excellent.
The AI assistant helps with integration challenges.
Data marketplace, a cloud-native solution for AI data sharing
Master data management (MDM) for a 360-degree view of business data.
CLAIRE, an AI co-pilot for unifying metadata intelligence.
Informatica Pricing
The pricing is available by getting a quote for your Informatica Processing Unit on demand.
Informatica Pros
Uses AI to improve syncs
Tailored pricing for businesses of all sizes
Connects with several on-premise and cloud-based applications.
Informatica Cons
Expensive to purchase.
Complex to set up and maintain
Reduced performance with increasing workloads
Zapier
Zapier is a reliable MuleSoft alternative because it allows users to automate workflows and connect systems to interact with and share data between 6,000+ apps.
Zapier Features
Zaps for automating workflows
Tables or databases
Interfaces (custom pages)
Canvas for mapping workflows using AI
Chatbots for answering customer questions
Central for building chatbots.
Zapier Pricing
Free
Starter starts from $29.99 per month ($19.99 per month paid annually)
Professional starts from $73.50 per month ($49 per month paid annually)
Team starts from $103.50 per month ($69 per month paid annually)
Company (available on-demand)
Zapier Pros
Easy to configure and use
Contains thousands of third-party integrations
Excellent customer service
Zapier Cons
Limited customizability
Needs constant monitoring and maintenance.
More expensive than other alternatives to MuleSoft.
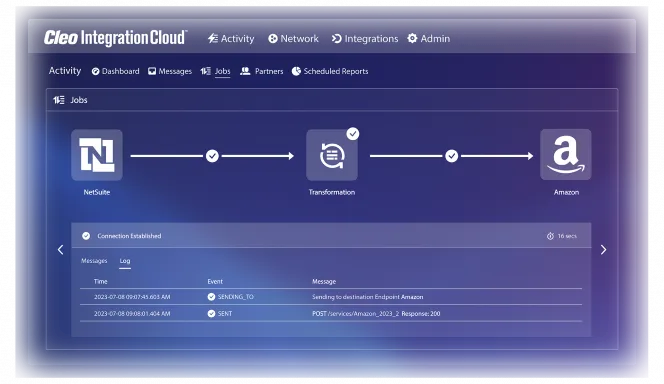
Cleo Integration Cloud
Cleo Integration Cloud is a platform that allows users to automate API and EDI integrations into any application for better visibility.
It uses a no-code solution to provide standard connectors for syncing data between applications, servers, databases, etc.
Cleo Integration Cloud Features
EDI and API integration
Managed file transfer (MFT)
B2B Gateway
Pre-built integrations
Cleo Integration Cloud Pricing
Contact the sales team to get the pricing for Cleo Integration Cloud.
Tray is a unified AI-powered iPaaS solution that automates business processes and connects with your systems on the cloud or on-premise.
You can build API integration from scratch or use the vast library of custom connectors to sync data between platforms.
Tray.io Features
Tray Build uses a low-code workflow editor to set up a sync
Tray Code uses scripts to interact with different APIs.
Tray Chat uses AI to provide on-demand assistance.
Merlin AI transforms LLM outputs into business processes.
Tray.io Pricing
Tray.io is available for the Pro, Team, and Enterprise plans. Tray support services are also split into two tiers: Tray Advantage and Tray Advantage Plus.
To get the quote for your business, contact the sales team.
Tray.io Pros
The interface is user-friendly
Makes process automation easy
Allows advanced scripting
Has a rich library of resources
Tray.io Cons
Lacks a vibrant community
Difficult to learn
Make
Make (formerly Integromat) is an integration solution that allows you to automate and connect applications, databases, web services, chatbots, and other systems.
It relies on automated workflows (scenarios) and event triggers to initiate and control data transfer between platforms.
Make Features
Integration with popular web services and systems
Visual workflow editor for no-code scenario configuration
Data management and integration
2FA and company-wide SSO
Make Pricing
Free (1000 ops per month)
Core (10,000 ops at $10.59/month or $9/month billed annually)
Pro (10,000 ops at $18.82/month or $16/month billed annually)
Teams (10,000 ops at $34.12/month or $29/month billed annually)
Enterprise (available on demand)
Make Pros
Easy to use
Intuitive drag-and-drop interface
Can handle complex tasks
Cheaper than MuleSoft.
Make Cons
Errors are difficult to handle
Has a steep learning curve
Has subpar documentation
Difficult to configure
Exalate: An Excellent MuleSoft Alternative
If you have a Salesforce integration use case with other platforms, Exalate is one of the best MuleSoft ESB alternatives available.
Exalate also supports bidirectional integration between platforms such as Jira, Salesforce, ServiceNow, Zendesk, Azure DevOps, GitHub, and many others. To find out more about Exalate’s robust integration tool, book a demo with our engineers right away.
This post has been published on the Atlassian and the Zendesk community
To sync statuses between Jira and Zendesk, you need a third-party integration solution.
I’ll show you how to implement this use case with Exalate.
Jira Zendesk Integration Use Case: Issue Status Sync
Changing the status of your Jira issue will also update the status of the corresponding Zendesk ticket.
Let me show you the requirements and challenges:
Primary Requirements
Every time a user changes the status of the Jira issue, the linked Zendesk ticket also reflects the status change.
For this to work, you’d need to establish sync rules to control the incoming and outgoing data and map the right status to each system.
You can also set triggers to update the status of all tickets linked to the connection automatically and bi-directionally.
Potential Challenges
Mapping the right statuses using the correct field name.
Writing the correct sync rules.
Setting up the right triggers to control the synchronization.
How Exalate Can Solve the Problem
Exalate is a bidirectional integration solution that works with Zendesk, Azure DevOps, ServiceNow, Jira, Salesforce, etc. With the Exalate app, you can:
Create a trigger for syncing existing issues using the Bulk Exalate feature.
Configure complex use cases using Exalate’s Groovy scripting engine.
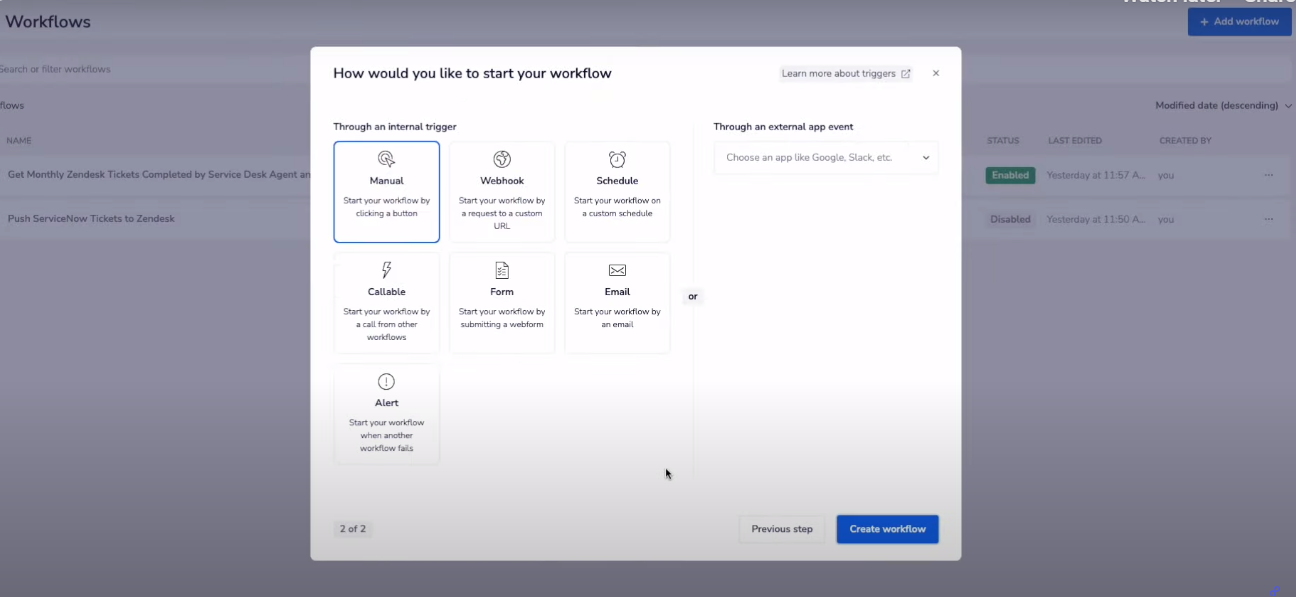
How to Implement Exalate for Data Updates
First, install Exalate on both the Zendesk and Jira sides. Next, follow the instructions in this comprehensive guide to establish a connection between them.
For advanced use cases such as this, you must set up a connection using Exalate’s Script Mode. After that, you can commence with the sync.
Go to your Jira dashboard and create a new issue.
Then, open the Exalate console in Jira. Go to the connection you want to edit and click on the “Edit connection” icon.
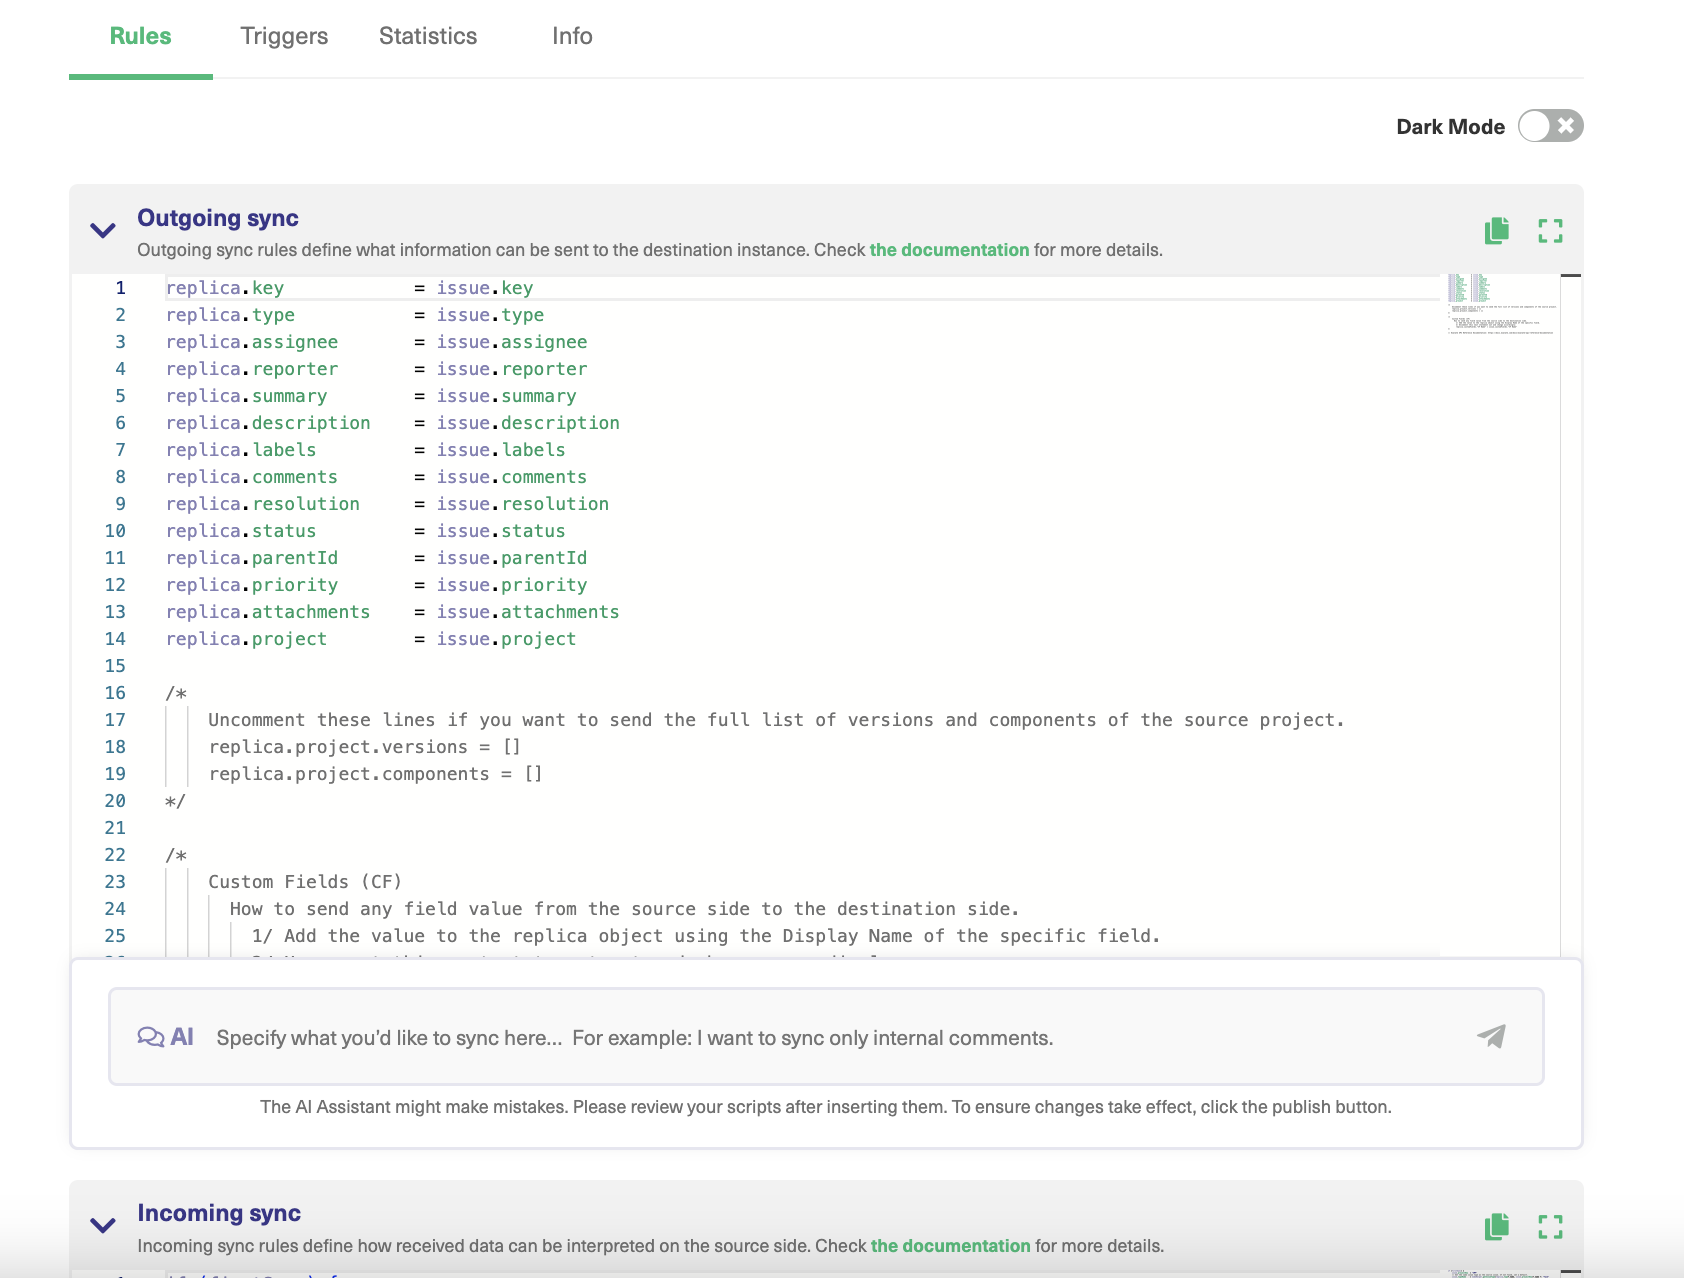
Then change the sync rules under the “Rules” tab.
You have two text boxes:
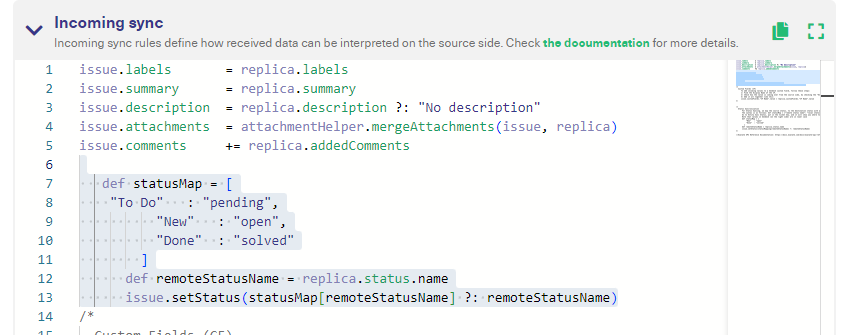
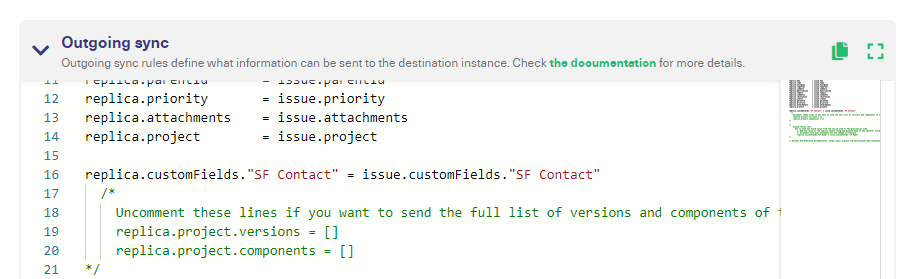
Outgoing sync (on the Jira side) refers to the data to be sent over to the Zendesk side.
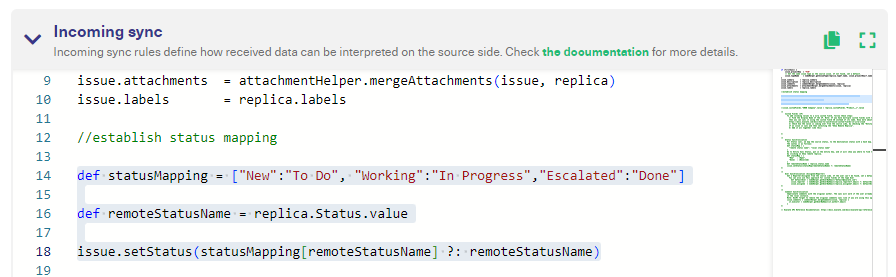
Incoming sync (on the Zendesk side) refers to the data to be received from the issue on Jira.
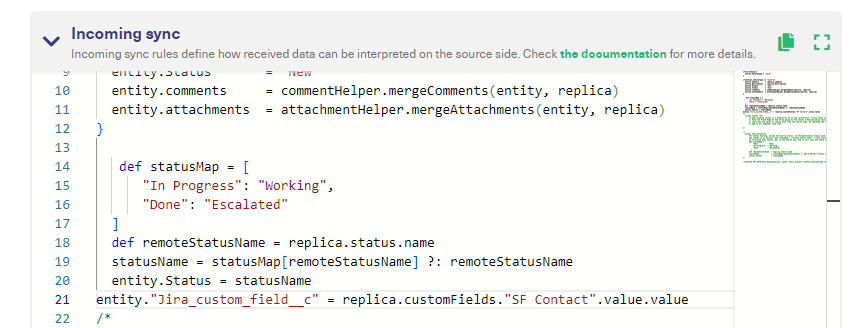
Note: The statusMap variable establishes the relationship between statuses. The remoteStatusName maps to the replica’s status. Eg., A “pending” case on Zendesk appears as “To Do” in Jira.
Once done, click “Publish” to save the changes.
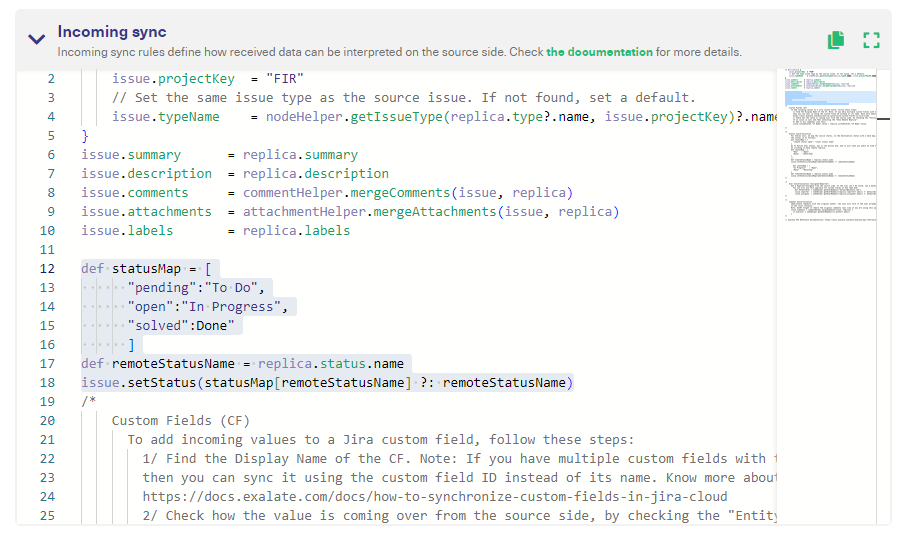
On the Jira side, enter the code in the “Incoming sync” text box.
Note: The statusMap variable establishes the relationship between statuses. The remoteStatusName maps to the replica’s status name. Eg., An “open” ticket on Zendesk appears as “In Progress” in Jira.
Once done, click “Publish” to save the changes.
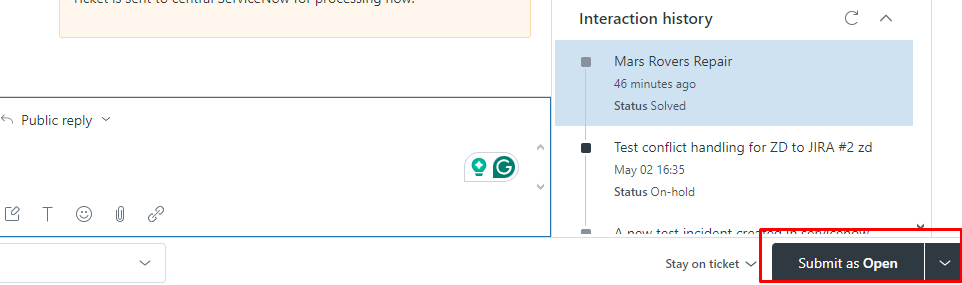
Now go back to the Zendesk ticket and set the status as “Open”.
Back on Jira, you will see the status appear as “In Progress” automatically.
Congratulations! You have now set rules to help you update the status of Jira issues with Zendesk tickets.
If you still have questions or want to see how Exalate is tailored to your specific use case, book a demo with one of our experts right away.
Connecting Jira Service Management (JSM) with Jira Software can help your organization combine IT service management with DevOps, quality assurance, and other processes.
Internal teams can use this integration scenario to stay up to date about product changes and customer feedback.
At the same time, you can link your Jira Software site with an MSP’s JSM instance in order to create a collaborative environment.
To get this right, you need to find a way — an integration or custom script — to get the API endpoints on both Jira instances to interact and share data seamlessly.
In this article, I’ll show you how to sync your JSM and Jira Software sites.
How Does Jira Software Differ from Jira Service Management?
Although both are Atlassian Jira products, Jira Service Management and Software differ in terms of functionality and application for every organization.
Jira Service Management provides you with templates and functionality for general and HR service management. You can also use it to manage equipment and facilities.
With Jira Service Management, your organization can report and resolve all ITSM incidents faster, using automated tracking and approval workflows.
It also helps admins monitor the impact of the changes downstream as well as stay in constant contact with partners and internal stakeholders.
Jira Software caters to all activities in the development pipeline, from mapping work items to tracking releases and dependencies.
Some features available on Jira Software include Agile boards (Scrum and Kanban), which are backed by timelines, as well as critical reports and insights.
Developers can also use Jira Software to view DevOps progress, track the development status, and work on code repositories.
Why Integrate Jira Service Management and Jira Software?
After clearly explaining how both products differ, I’ll now go deeper to describe why you need them.
Here is a sample scenario.
The development team is using Jira Software for a feature update, while the IT team is using JSM to monitor incidents related to the release. This is an example of a classic customer support development use case.
For both teams to share information and stay updated about changes and incidents in real time, they must find a way to integrate both platforms.
This exact scenario can be extended to cross-company collaborations with MSPs, vendors, outsourcing partners, and clients. The only difference is that the cultures of both organizations have to be factored in, as well as the access levels and roles of admins and stakeholders.
Software development teams connecting the ITSM team to address incidents,
Marketers sharing user feedback with IT staff to reduce the resolution time,
IT teams managing internal and customer-generated maintenance requests.
Managers cloning Jira Software to Jira Service Management.
Another way JSM to Jira integration can benefit your organization is by breaking down the formation of information silos between teams. All involved team members and stakeholders will be privy to project-relevant data when required.
But that’s not all.
Integrating JSM with Jira Software allows different teams to communicate about changes across multiple channels. This builds a collaborative environment rooted in trust and transparency.
And the cherry on top is customer satisfaction. Since connecting both systems leads to faster incident resolution, customers will get a better overall experience when using the product.
How To Choose the Right Integration Tool
Before selecting an integration tool for Jira Service Management and Jira Software, understand what your organization wants to achieve with this integration.
For inter-company syncs, you need to hop on a discovery call to flesh out expectations, timelines, milestones, and other issues.
Some native solutions, such as Jira Cloud Migration Assistant (JCMA) and Copy Product Data, can help you move data back and forth between instances.
However, these two solutions are limited in the functionality and customization capabilities they offer. So you need a third-party integration solution to extend the possibilities of the sync.
The customizability to adapt connections to advanced use cases
The flexibility to use AI-powered scripting options to speed up and optimize syncs.
The presence of airtight security features like ISO 27001:2002 certification, data encryption, etc
Exalate is a third-party solution that meets all the listed criteria. It supports bidirectional integration between Jira Cloud instances as well as Data Centers.
Users can also configure Exalate’s Groovy-based scripting engine to sync standard entities and fields, as well as custom fields, using a virtual AI assistant.
How to Sync Customer Request Type Field Between Jira Service Management and Jira Software
Note: This code snippet retrieves the value of the incoming request type and sends it to the designated custom field on Jira Software.
When you’re done, click the green “Publish” button to save your changes. You can read more about the sync rules here to guide your configurations.
Configure Scripts Using AI Assist
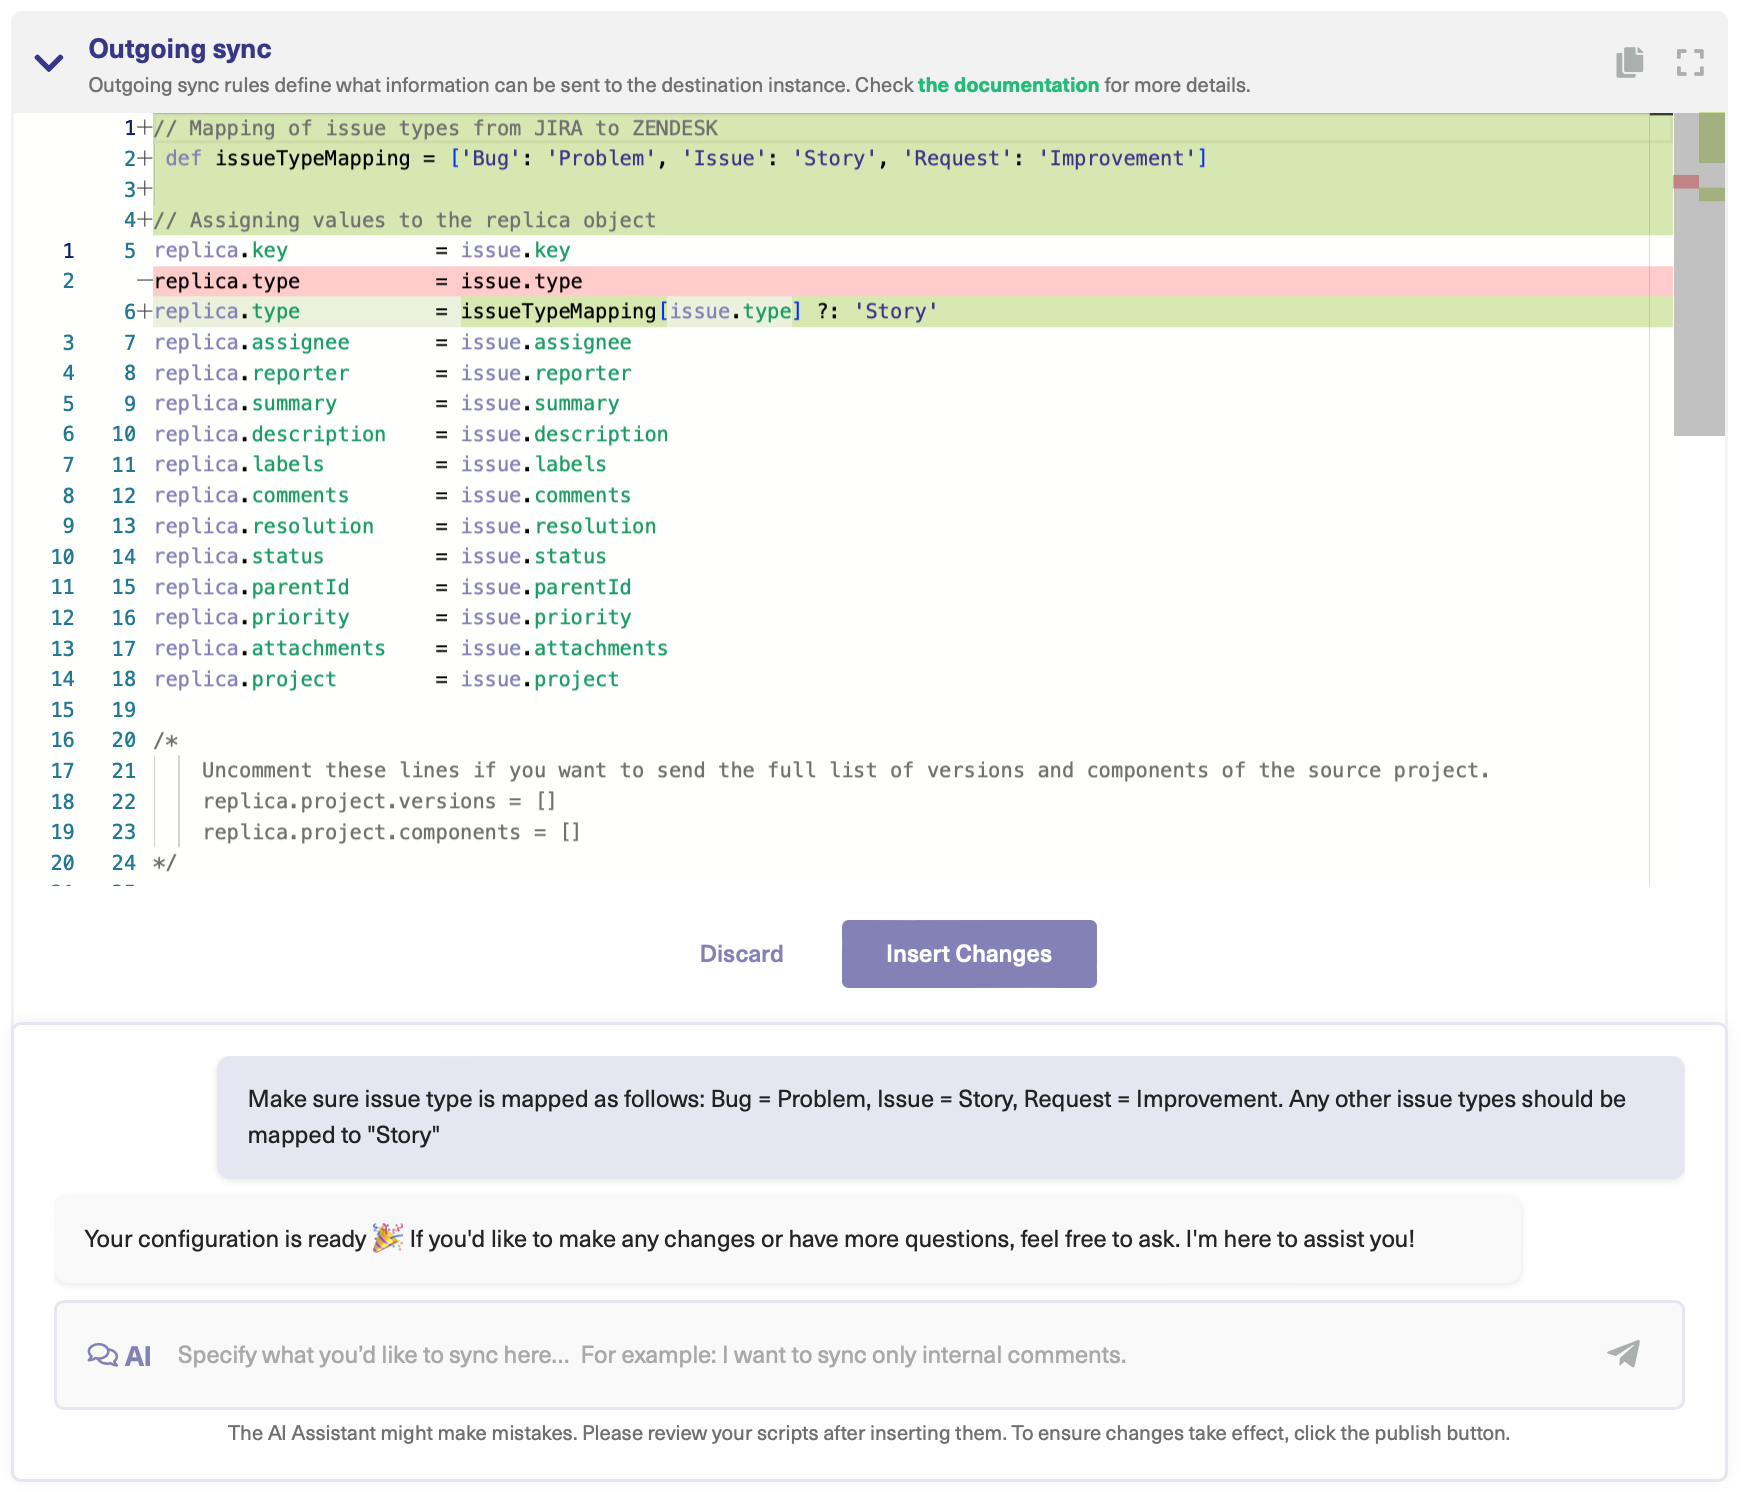
You can also use Exalate’s Script mode with AI Assist, which appears as a chat window in both your incoming and outgoing sync rules tabs.
Just type your sync requirements into the chat, and AI Assist will generate scripts based on your input, existing configurations, and Exalate’s scripting API.
Let’s say you want to map and sync custom fields between Jira Service Management and Jira Software. You can use the following prompt:
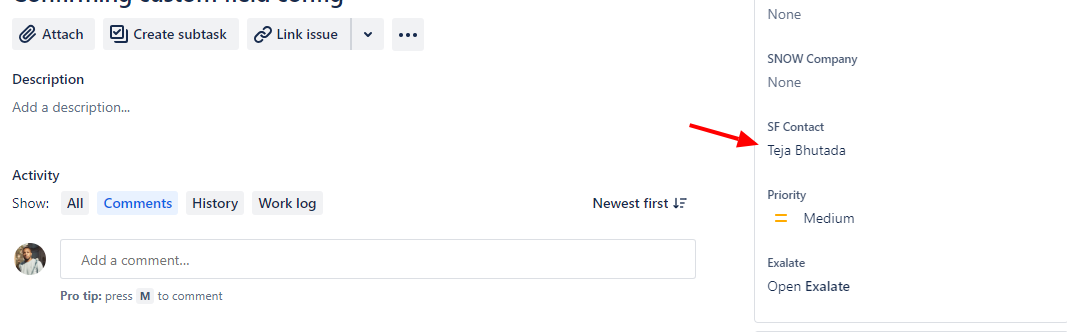
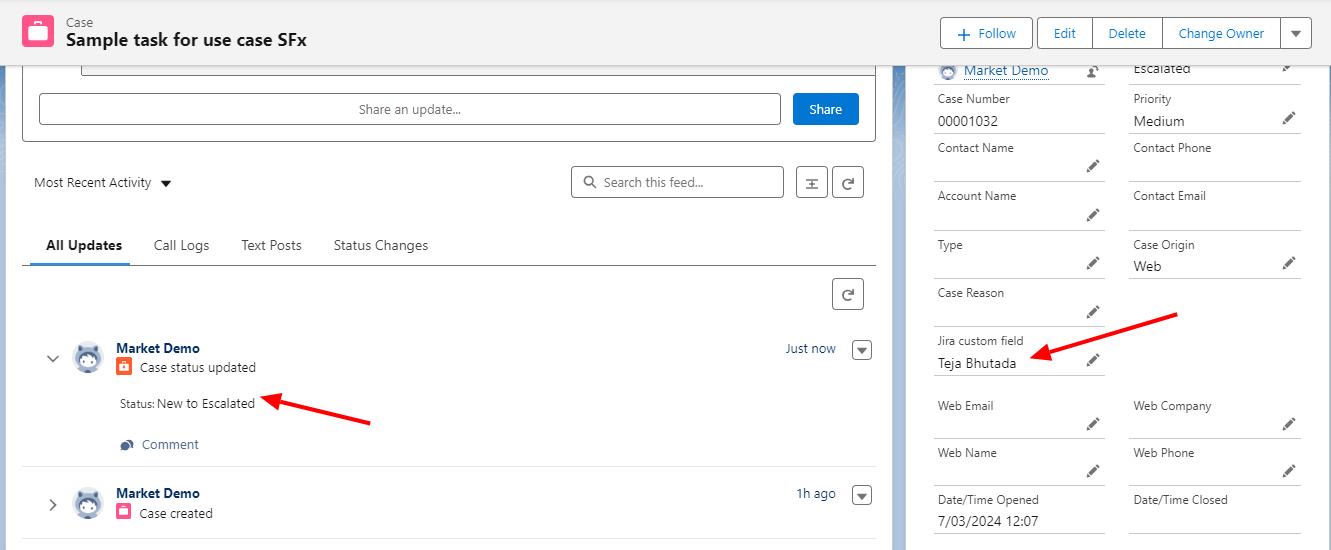
“I want to add incoming values to a Jira custom field to a custom field in a Jira task.”
The generated script will be highlighted in green and red. Green indicates suggestions to include, while red indicates suggestions to delete.
You can accept or reject these suggestions—or continue working to refine the prompt. Once everything looks correct, publish your changes.
Note: The AI assistant is not perfect. So make sure to review the changes and test the connection before implementing it.
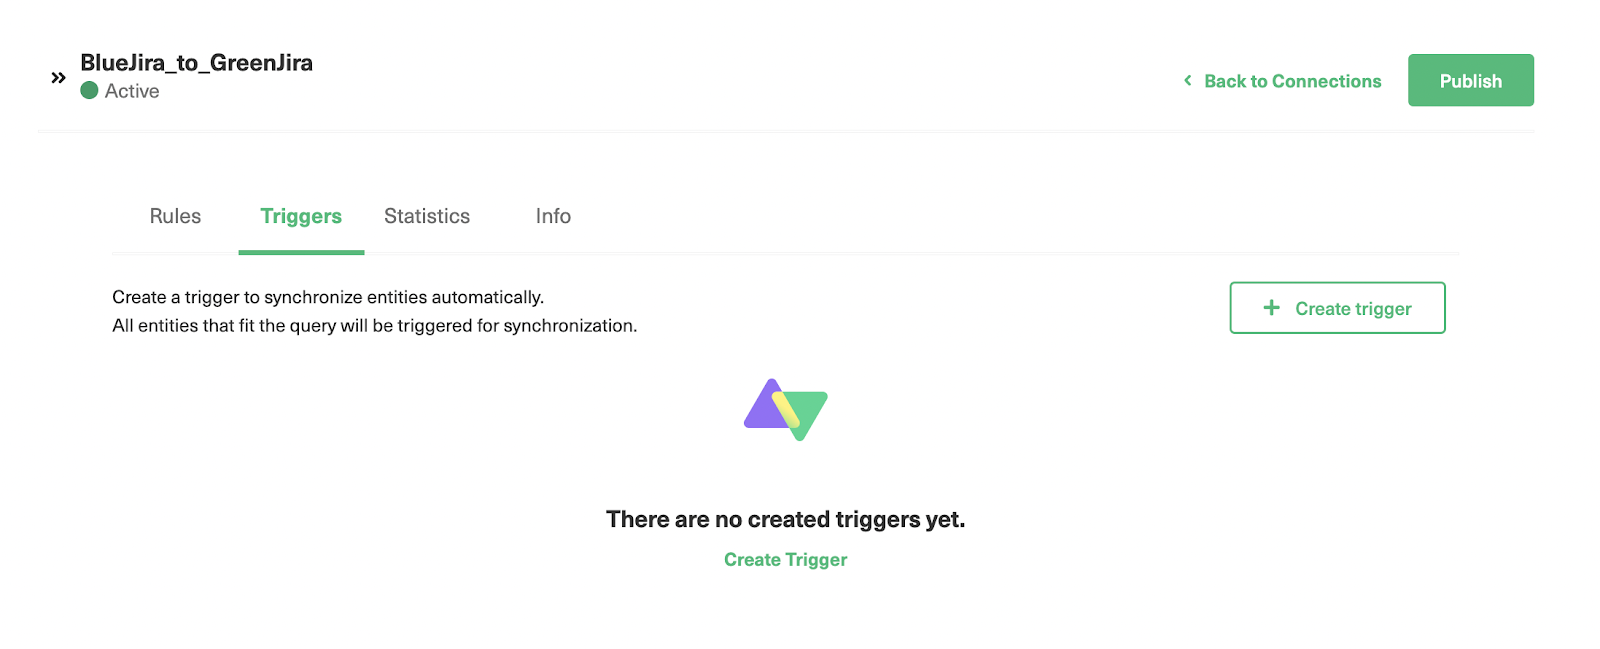
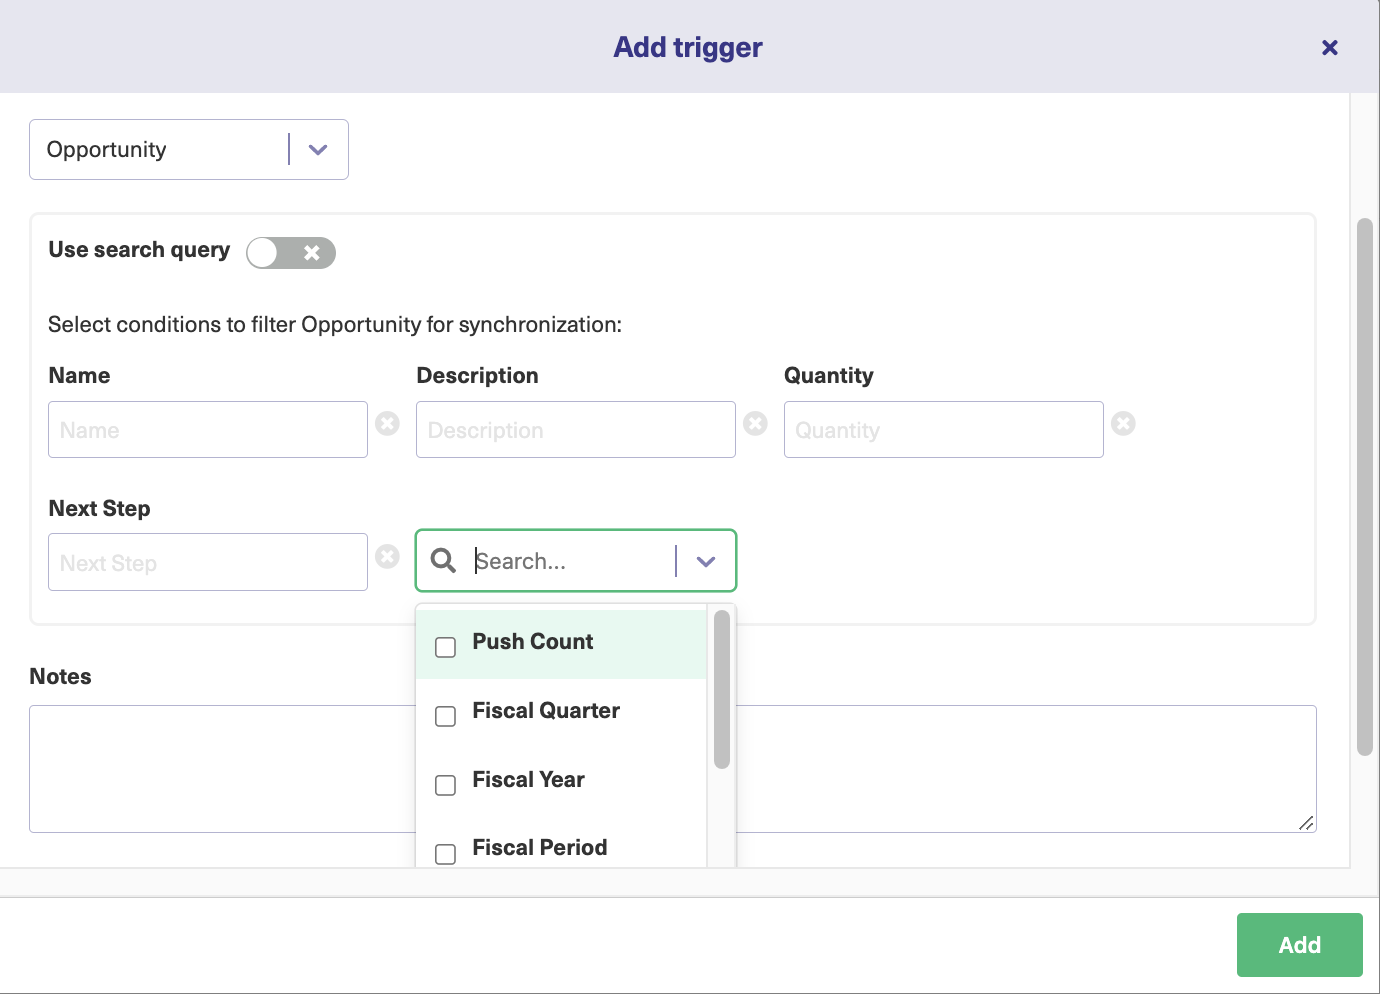
Step 4: Set Up Automated Synchronization Triggers
Triggers are automated conditions and commands that determine if specific items are synchronized or not.
You can also find a summary of all of your active triggers by clicking “Triggers” in the left-hand menu.
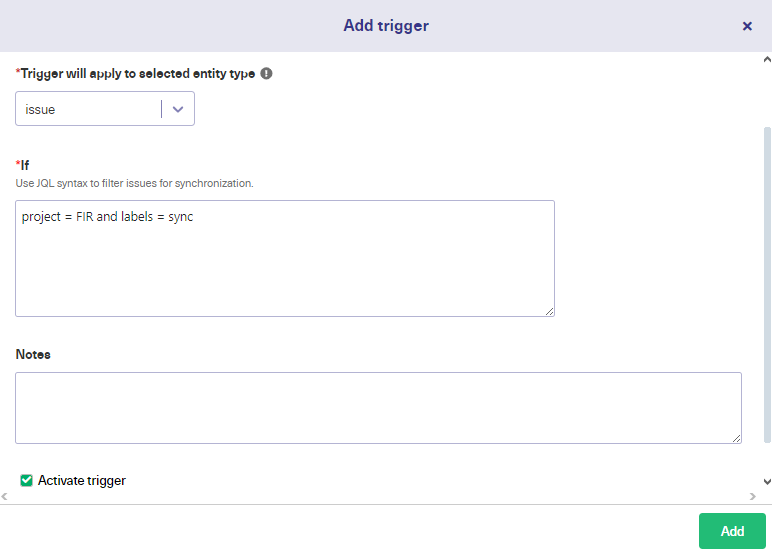
To create a new trigger, click the “Create trigger” button at the top right. Jira uses its own query language, JQL, to control the sync.
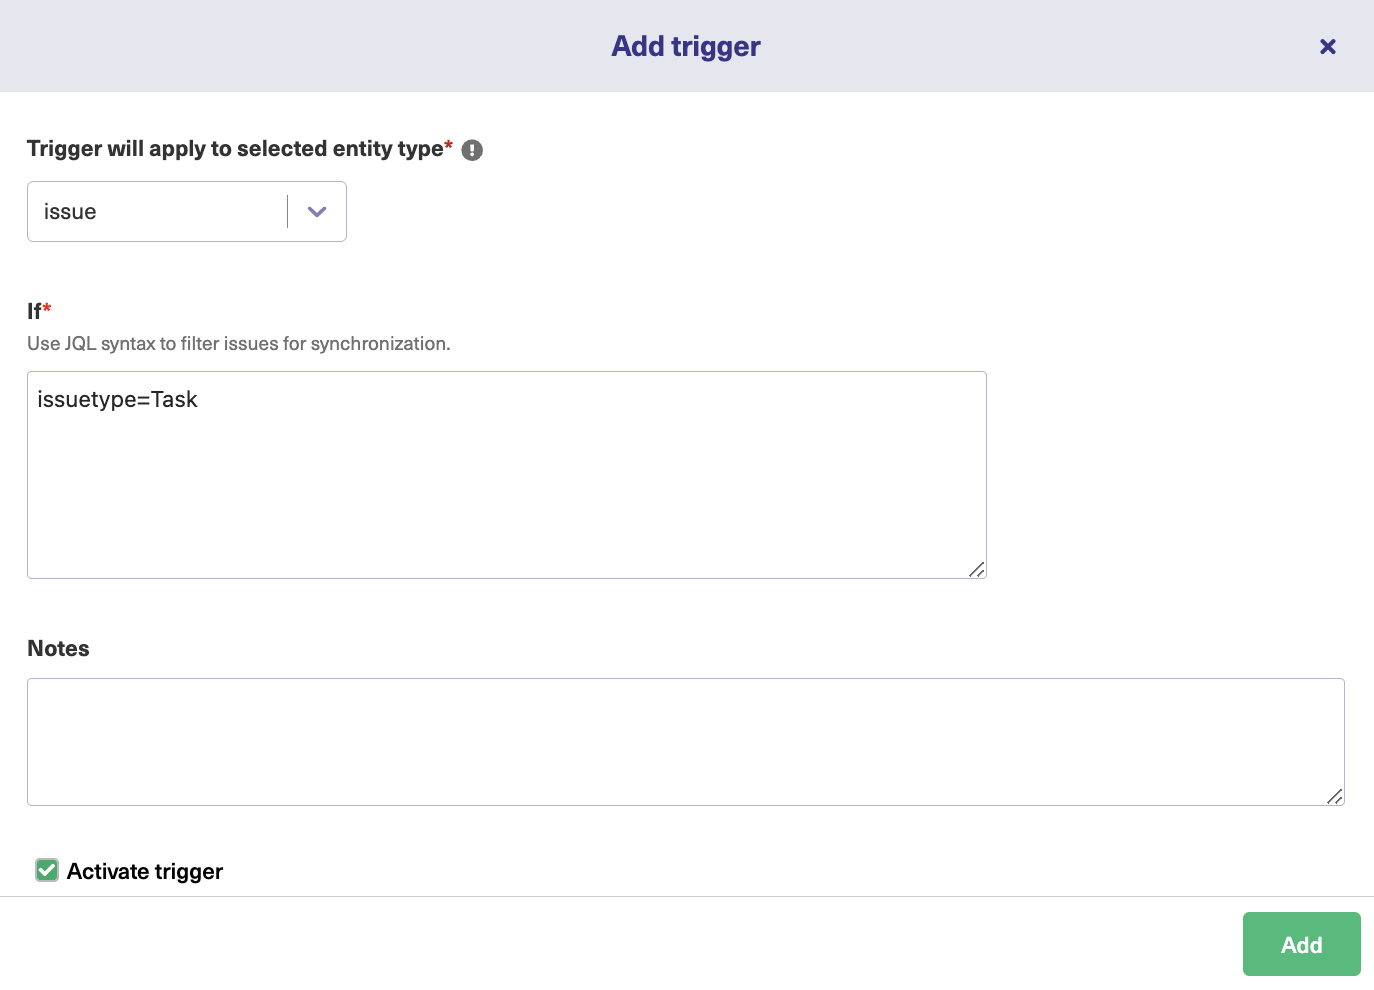
On the “Add trigger” screen, select the entity. I’ve selected “issue” in this case. In the next box, enter your query.
Here, I’ve chosen to sync issues where the type is “Task”. I’ve also added a note describing what the trigger does and set the trigger to “Active”. Finally, click the “Add” button at the bottom.
Check out some JQL triggers:
(status=resolved AND project=SysAdmin) OR assignee=bobsmith
*Finds all resolved issues in the ‘SysAdmin’ project, as well as all issues currently assigned to the an admin named “bobsmith”.
project = "TEST" AND assignee = currentuser()
*Finds all issues in the “TEST” project where the assignee is the currently logged-in user.
You can edit or delete these triggers by clicking the respective icons in the list under the “Action” heading. If you click the three dots, you also get the option to “Bulk Exalate” and “Unbulk Exalate”.
Step 5: Start Synchronizing Tasks
Exalate checks for new tasks every few minutes, so please wait for a few seconds if you don’t see them transferred immediately.
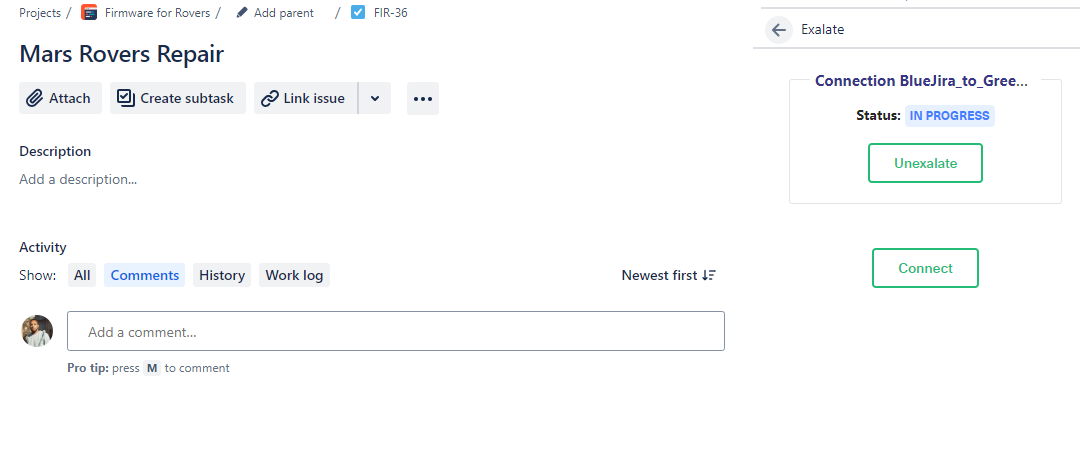
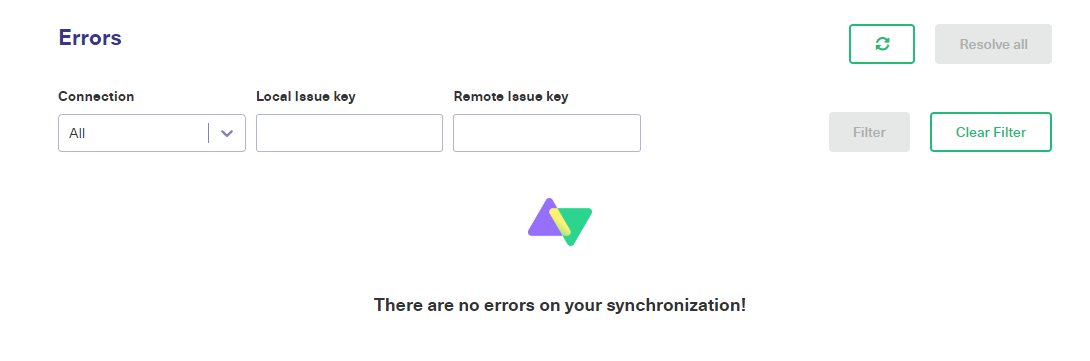
On your open issue, go to the side panel and click “Open Exalate”.
Then click “Exalate”. Select the connection and wait for the sync to complete. Once done, you can make changes to the entity and have them reflected on the other side.
If you don’t see anything after a while, take a look at the rules and make sure they exactly match the items and fields you want to exchange. You will probably see the source of the blocker in the “Error” panel for proper troubleshooting.
Jira Service Management Integration Use Cases
Other tasks and operations you can perform after syncing JSM and Jira Software include:
Syncing Jira Service Management and Jira Software requires mapping out requirements, writing scripting rules, and implementing robust security protocols.
To ensure that your sync can exchange data in real time between standard, default, and custom fields, you need to choose a solution that meets your sync requirements and is also affordable. If you want to use Exalate to sync Jira Software and JSM instances, book a demo with our engineers.
If you want to connect Salesforce with other platforms, cloud services, or applications, you need a Salesforce connector in order to retrieve payloads from the API endpoints.
This will help you extend the functionality of both systems and guarantee the accurate, seamless exchange of data between them.
I’ve broken down the working principles and practical use cases for Salesforce connectors to help you understand how this works in practice.
Let’s get started.
What is a Salesforce Connector?
A Salesforce connector is any custom script, API connector, or third-party application that connects Salesforce with other applications or systems.
Companies use Salesforce connectors to bridge the gap between internal and external teams working on a similar initiative or the same project.
For instance, sales reps can use a Salesforce connector to connect a Salesforce account to the corresponding ServiceNow incident to guarantee better customer satisfaction.
How Do Salesforce Connectors Work?
Salesforce connectors differ in terms of the underlying architecture and endpoint compatibility. However, one thing all connectors have in common is that they send requests and fetch responses from APIs.
Your Salesforce connector can interact with the following APIs and web services:
SOAP API
Bulk API
Streaming API
Metadata API
Apex SOAP Web Services
Apex REST Services
When building the Salesforce connector, pay attention to the data format and synchronization pattern supported by the API.
For example, both Metadata API and Rest API support XML, but only the Rest API is synchronous.
Another factor that determines the configuration of a Salesforce connector is the type of synchronization pattern. Here are the common examples:
Authentication protocols such as Basic authentication, OAuth 2.0, OAuth JWT, and OAuth SAML will protect the connector and connected systems from unauthorized access.
These synchronization patterns and authentication protocols are available in Salesforce Connect—which uses a protocol-specific adapter to connect to an external system and access its data.
Why Use A Salesforce Connector?
On the surface, a Salesforce connector helps you sync data between Salesforce and other systems. But it goes deeper than that. Here are reasons to use a Salesforce connector.
Share Data Seamlessly
Salesforce connectors ensure the smooth and accurate exchange of data between systems by removing manual “copy-paste”. This improves workflow and process efficiency.
Besides, most Salesforce connectors transfer data in real time or in batches—which means you always have access to the correct type of data when needed.
Protect Your Data
Verified and authenticated Salesforce connectors provide strict integration security controls for data at rest or in transit. Everything goes through HTTP or HTTPS. They also provide troubleshooting portals and retry mechanisms in case the synchronization fails.
Migrate Data Between Organizations
During mergers and acquisitions, companies can use Salesforce connectors to merge or migrate data without breaking protocol or worrying about security and compliance.
This works well for companies stuck with legacy systems that need to be integrated with modern services.
Even in temporary, short-term, or long-term collaborations, Salesforce connectors can bridge the information gap between companies, enabling a transparent and collaborative environment.
Integrate Other Systems
With Salesforce connectors, you can link other CRMs, ERPs, SaaS applications, and databases to obtain data from default fields (attachments, descriptions, comments, etc.) and custom fields.
Salesforce connectors give your admins access to data from multiple sources in order to have a well-rounded view when making critical decisions.
Even if you integrate two Salesforce instances, you’ll gain access to a broader data pool for better sales forecasting, dynamic pricing, and other opportunities.
Types of Native Salesforce Connectors
Salesforce provides several connectors that are native to the platform but used for connecting data with external systems. I’ll discuss them briefly:
Salesforce Connectors for syncing data with systems within the Salesforce org. E.g., Salesforce External Connection, and Tableau Online Connection,
Application Connectors for connecting your Salesforce org with external SaaS and legacy applications, such as Google Analytics 4 and NetSuite,
Database connectors for linking databases and standard SQL servers like Google BigQuery and Microsoft Azure,
No SQL connectors for linking object stores and non-SQL services,
Analytics Mulesoft Connectors for connecting Salesforce Data Pipelines with external analytical systems using CloudHub, the IPaaS component of Mulesoft Anypoint Platform,
Pilot and Beta Connectors provide beta features for syncing data between Salesforce Data Pipelines and external services,
Output Connectors for funneling the prepared or unprepared data from the org to remote systems.
Apart from the connectors mentioned above, there are also third-party connectors.
A third-party connector is a non-native Salesforce integration solution made by a different company. Salesforce third-party integrations often come with pre-built configurations and mappings for controlling how the sync works.
All third-party applications for integration of Salesforce with other systems answer the build vs. buy question by removing the need to build and maintain the connector from scratch.
Once you get the solution, your only responsibility is to map the projects and entities correctly—and the sync is good to go.
Valuable Tips When Choosing a Salesforce Connector
From my experience, here are some best practices when choosing or building a Salesforce connector.
Always work with a scope. Defining the scope of your integration helps you align objectives between teams or companies. This eliminates guesswork and unifies expected outcomes, milestones, and objectives.
Keep an eye on API limits. Salesforce has several limitations on API access, including Apex governor limits, concurrent API request limits, API timeout limits, and total API request allocations.
Choose the right integration solution for your organization. Whether for an M&A or internal synchronization, always look for Salesforce connectors that are compatible with both platforms and within your budget.
Give access to specific users. Apply role-based access control (RBAC) when assigning permissions and different levels of access to users and stakeholders working with the interconnected systems.
Double down on integration security. Apart from default security features and protocols, add extra guardrails such as firewalls, tokenization, multi-factor authentication, and pseudonymization to beef up data protection.
Add automated triggers. Salesforce connectors speed up data transfer, but using custom triggers and scripts can automate the connection to follow specific conditions.
Prioritize customizability and scalability. Choose Salesforce connectors that support advanced scripting and configurations beyond the defaults. This will give you more room to play around with your sync.
Above everything, teach your admins and staff how to set up and work with the connector. Don’t forget to enforce a zero-trust architecture to avoid the swapping and sharing of sensitive data.
Exalate: A Reliable Salesforce Connector
Salesforce connectors streamline collaboration by eliminating the need to manually write scripts from scratch to control incoming and outgoing data.
However, with a solution like Exalate, you can connect Salesforce orgs with external systems bi-directionally.
You can download the app to your org as well as the other platform for decentralized control. To start downloading the app on your Salesforce instance visit AppExchange. Choose the other platform you want to install the Exalate app on via its integrations page.
Apart from Salesforce, Exalate also connects with Jira, ServiceNow, Zendesk, Azure DevOps, GitHub, and more.
Exalate supports two connection modes: Basic (no-code) and Script (low-code) mode, which provides a Groovy-based scripting engine for configuring syncs. You can use it to connect both default and custom Salesforce fields and entities.
The Exalate Script Mode also supports AI-enabled script generation in order to come up with functions and expressions to control how your sync works.
You can frame your use case as a question and enter the query in the chat box to get the AI to come up with a script that works for you. This speeds up the process and helps non-technical users come up with connections.
Want to learn more about the Exalate Salesforce connector? Book a demo with our engineers now.
Any organization using more than one Jira instance understands the struggle of connecting them between interdependent teams. The same problem pops up when connecting your organization’s Jira instance with a partner’s or MSP’s instance.
The question remains: how can companies get access to multiple instances and consolidate the data?
As someone with experience working with Jira, I’ll show you how to consolidate multiple Jira instances using different applications and integration methods.
How Can You Get Multiple Jira Instances?
Your Atlassian plan determines the number of Jira instances your organization can get.
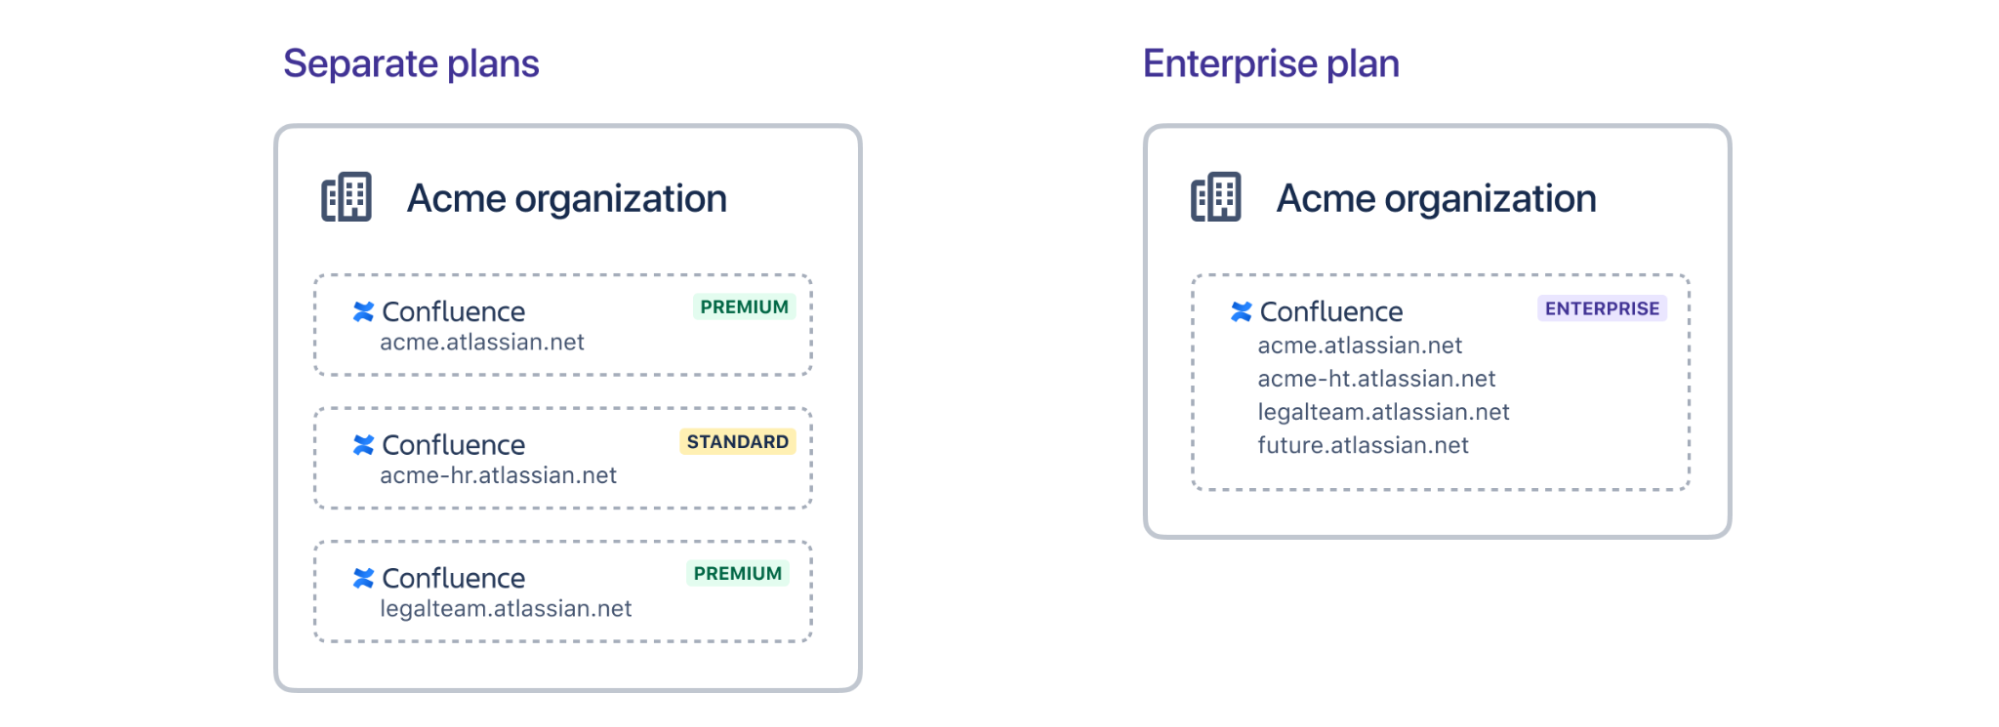
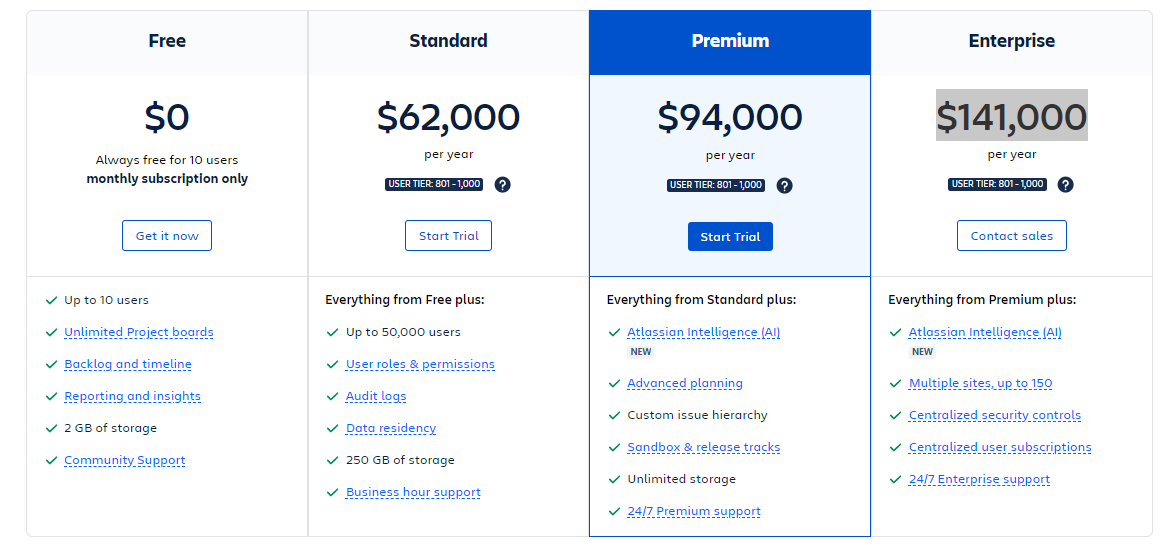
Under the Free, Standard, and Premium plans, users only have access to single instances of every Atlassian product (Jira, Confluence, Opsgenie, etc). So, you have to set up a new plan in order to add an extra instance to your organization.
However, adding multiple individual instances under different subscription plans is a management nightmare. It leads to data duplication, silo formation, and limited visibility. You’ll also end up paying more in total.
But with the Enterprise Plan, you get up to 150 individual instances for your teams or divisions. This makes it easier for managers to keep track of subscriptions and overall costs.
To determine the number of instances you need, factor in the following:
Your organization’s budget
The purpose of each instance
The number of users or teams
The apps and dependencies you need for each instance.
Who Needs to Integrate Several Jira Instances?
Entities and organizations that need to merge Jira instances include:
Large corporations and enterprises with multiple divisions and teams
Organizations from separate cultures going through a merger or acquisition
Organizations providing external service desk solutions and software support
Small organizations and startups with teams that require separate Jira environments
Here are the financial and administrative benefits of consolidating multiple Jira instances.
Simplifies Project Management
Integrating multiple Jira instances helps project managers by keeping all relevant data under one umbrella. It also makes it easier for managers and team leads to track progress updates across teams and departments.
Also, the integration of multiple Jira projects creates a unified view for stakeholders to make better decisions about ongoing initiatives.
Reduces Cost
When you unify multiple Jira instances, it reduces your company’s expenses in several ways. First, the Enterprise plan offers cheaper pricing than multiple paid options.
For instance, if your company (with over 1000 users) gets 2 Jira instances under the Premium plan, they’ll end up paying $188,000 annually. However, the Enterprise plan is $141,000 for the same number of users — and you get up to 150 sites as well as other perks.
Provides Administrative Autonomy
Even though integrating several Jira instances centralizes the data, it still gives each entity the freedom and autonomy to configure its instance as desired. This reduces the workload of IT teams since they no longer need to tweak the central Jira multiple times.
For example, developers can configure Jira Software with Marketplace apps geared towards higher performance, while support teams can set up their Jira Service Desk to improve service delivery and quality.
Secures Sensitive Data
With autonomous control over instances, admins can establish role-based access controls (RBAC) to determine who can view, edit, or copy the data from each Jira site.
IT teams can also apply all-encompassing security protocols and guidelines for all Jira instances under the same license. This will also cover updates and dependency monitoring to ensure every department is following the best data protection practices.
Improves Collaboration
Interconnected Jira instances improve cooperation between teams and companies. With access to relevant data, all stakeholders and dependent teams will work together with a transparent view of each other’s instances based on permissions.
Also, collaboration involves exchanging ideas about each side’s data management culture, which fosters cooperation, transparency, and trust.
Streamlines Mergers and Acquisitions
Companies involved in mergers and acquisitions must integrate multiple Jira instances as part of the general migration process. This will help them consolidate data, merge systems and processes, and plug all communication gaps.
Improves Reporting and Analytics
Consolidating Jira instances makes it easy for your organization to analyze data and generate detailed, accurate, and actionable reports. It provides access to analytical tools that can collate and synthesize valuable insights.
Challenges of Merging Multiple Instances of Jira
Unifying multiple Jira instances is fraught with challenges that you must address before even setting up any connection.
Keeping track of important issues
Determining high-priority projects to merge early on
Replicating transferred entities on the destination side
Getting the right IT team to handle the integration process
Choosing the right migration method or integration solution
Providing different levels of permissions and access to users
Working with third-party applications, dependencies, and plugins
Avoiding version incompatibility between different versions of Jira
Best Practices for Integrating Multiple Jira Instances
To avoid the challenges associated with consolidating several Jira sites, here are some best practices to follow:
Start with a plan: You must define the scope of the merger or integration, starting with the most important entities and working down to the least relevant. This means developing an integration strategy that factors in your current workflows and the dependencies within each Jira instance.
Involve all stakeholders: Conduct extensive discussions and planning sessions with stakeholders for internal and external integration scenarios. This will help you understand every member’s role, responsibility, and priority. It will also create a collaborative environment that encourages shareholders to voice their concerns and suggestions before the integration kicks off.
Choose the right tool: You can connect multiple Jira instances using custom API connectors, native Jira solutions, or third-party integrations. From the results of analyzing your system, you will be able to choose the solution that can integrate your Jira systems without needing extensive manual configurations—and with fewer errors and data discrepancies.
Test rigorously: Connecting your Jira instances involves getting the right endpoints to share data accurately and promptly. So after setting up the integration rules and mapping out the data transfer strategy, you need to test the endpoints to determine if everything is working as intended.
Carry out maintenance and updates: For custom solutions built in-house, you need to carry out regular maintenance updates to make sure the endpoints are working as intended. Changes in the API can affect how the data is transferred between systems. Alternatively, you can choose third-party integration tools that carry out updates automatically.
Native Integration Options Between Jira Instances
I’ve highlighted various ways to connect Jira instances. Let’s review them to determine which one best suits your use case.
Jira Cloud Migration Assitant (JCMA): This app helps users migrate data from Jira Data Center to Jira Cloud. Before the migration, JCMA assesses Marketplace apps, email addresses, and domains. It also carries out pre-migration checks and generates error logs and reports regarding the migration’s status.
Jira cloud-to-cloud migration: Also known as Copy product data, this tool allows organizations to move JSM data between Jira Cloud instances. It also gives you detailed reporting and updates about the migration progress.
Jira REST API: Experienced Atlassian developers can create custom connectors using Jira REST APIs. Although working directly with the API gives you more flexibility and customization options, the process is tedious compared to using ready-made solutions.
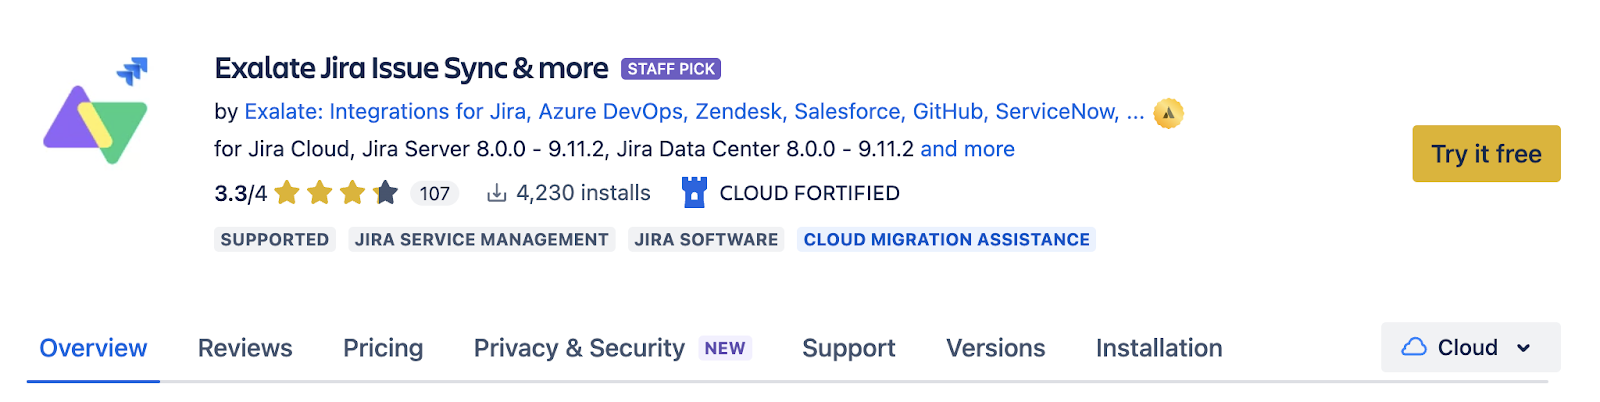
Install Exalate on both Jira instances. You can get the app from Atlassian Marketplace. If you are a Jira Cloud user, you can follow the normal flow. Docker installation is also supported. To install Exalate on Jira Data Center, follow these steps.
Establish a connection between Jira instances. For Basic mode connections, follow this guide. You can also use the drag-and-drop Visual mode (currently in BETA). Or you can use AI Assist to set up a Script mode connection and write sync rules.
Configure the connection. Use Exalate’s Groovy scripting engine to write rules that will control and define how both Jira instances will interact and share data.
Generate scripts using AI Assist. Get the best out of Exalate’s Script mode by using it to generate scripts according to user input and text-based prompts.
Set up triggers. Create automated triggers using JQL to determine how the Jira instances will handle the integration rules.
Start syncing your tasks. You can initiate the multiple Jira sync directly from the Exalate console or from the Exalate panel within the Jira issue.
For a detailed breakdown of every step of integrating multiple Jira instances, read this comprehensive guide.
Exalate: An Integration Option for Multiple Jira Instances
Companies like Gantner and Netguru use Exalate to improve internal workflows, reduce license costs, and enhance collaborations with clients. The solution also helps teams sync issue types and select lists in Jira and other advanced integration configurations. Want to find out how Exalate fits your advanced use case? Book a demo with our customer success experts.
When your organization has multiple Jira instances that need to share information, you have to implement Jira issue sync using native or third-party solutions.
Syncing Jira issues between projects and instances enables managers and stakeholders to consolidate data for better tracking, smoother workflow orchestration, and accurate analysis.
But before starting Jira issue synchronization within your company, you need to understand the benefits and challenges of this procedure. Continue reading to discover the best practices and solutions for syncing Jira issues.
What does a Jira Issue Sync Entail?
Jira issue sync involves connecting entities and fields on one issue with the entities on another Jira instance. Supported entities include descriptions, summaries, comments, attachments, assignees, priority, statuses, custom fields, and much more.
Here is how it works:
Team A receives a ticket on their Jira Service Management dashboard and maps some of its default and custom fields within a Task in Team B’s Jira Software instance.
If the mappings and scripts are correct, the entities can interact with each other and share information without both teams leaving their individual instances.
So the descriptions, summaries, and values in the custom fields will be transferred to the corresponding fields on the other side.
In most cases, the mappings contain rules that determine what should be shared or kept private on either side of the connection. You can also automate this process with JQL triggers.
You can also implement Jira issue sync with other non-Atlassian platforms. For instance, you can sync Jira issues with Zendesk tickets or Azure DevOps work items.
To get both platforms to interact, you need to write rules and scripts to control how the API sends and receives requests between both endpoints. If your team can’t handle the scripting, consider using no-code third-party solutions to sync Jira issues.
What are the Benefits of Jira Issue Sync?
Here are the advantages of Jira issue sync for organizations in different industries.
Improve Collaborations
Organizations in healthcare, manufacturing, software development, banking, eCommerce, real estate, and several other industries can sync their Jira issues internally between teams and divisions as well as externally with vendors, MSPs, and clients.
Internal teams working with multiple Jira instances can sync Jira tasks, epics, and bugs bidirectionally. When the service team logs a bug, it appears as a task on the development team’s Jira instance.
Externally, organizations can implement Jira issue sync for mergers, acquisitions, and other forms of cross-company collaborations.
Save Time and Money
When your organization adopts solutions for Jira issue sync, it can reduce the time spent on manual data transfers. Managers won’t need to navigate the clogged-up waters of requesting business data. Instead, the information exchange occurs in real-time or in automated batches.
In addition, automated integration tools allow users to implement triggers that establish the conditions that should trigger an exchange event.
And how does this save you money?
For starters, unifying data from Jira issues automatically means you get to spend less on data consolidation and migration. Customer success officials can sync issues with QA specialists under the same Atlassian plan—no need to add a separate service desk solution.
Enhance Workflows
Syncing Jira issues through endpoints removes bottlenecks from cross-team and cross-company collaborations.
With significant differences in procedures and data cultures, integrating issues will enable both sides to reduce manual tasks, avoid data duplication, and optimize internal processes.
Provides Access to More Data
Jira issue synchronization gives stakeholders and authorized personnel access to the data needed for their operations and decision-making processes.
With a clear pathway for information exchange, syncing issues on Jira can break down information silos between departments, partners, and divisions.
Improves User Experience and Autonomy
Integrating Jira issues makes life easier for both end users (customers, clients, etc.) and employees.
End users can get their problems addressed faster because all involved teams are marching towards a solution in lockstep. This slashes the resolution time and increases customer satisfaction
Also, team members with perfectly synced Jira issues enjoy a better working experience due to timely access to data, fewer manual processes, and a collaborative working environment.
And the cherry? Teams, especially those in different organizations, can maintain their autonomy by managing access controls.
Protects Sensitive Data
Whether unidirectional or bidirectional, integrating Jira issues can protect sensitive data with proper field mapping and privatization. This involves the use of TLS, HTTPs, and other integration security protocols to protect data in transit.
Besides, you don’t need to worry about compliance when syncing data across organizations. Most third-party solutions handle all compliance and regulatory concerns as a part of the product offering.
Potent Challenges When Implementing Jira Issue Sync
Here are some technical and administrative moles you must whack when implementing Jira instance sync.
The sync could fail due to network issues or user error.
API usage limits could restrict the synchronization solution.
Changes to the API could push the synchronization to failure.
Untangling the web of plugins and dependencies could take forever.
You could map the wrong entities (wrong field name or incorrect entity).
Creating a plan for integration could take time in massive bureaucracies.
Issues could get stuck in the queue during important migration scenarios.
The synchronization tool could be too complex and expensive for your organization.
Your in-house team might lack the expertise to set up and manage the Jira issue sync.
Best Practices For Syncing Jira Issues
Here are the best practices for a successful Jira instance integration:
Analyze the internal information architecture: Before syncing any issue, you need to discuss the scope with all stakeholders in order to understand the overarching project, team member roles, and dependencies. This will help you understand the entities that should be mapped and those that should stay private on your instance.
Set up a plan: You need to develop a synchronization strategy based on your analysis. This involves finding out how to map the most important entities and issue types without disrupting the flow and losing vital information.
Choose the right sync tool: You can build or buy Jira sync tools, depending on your budget, the project’s urgency, and your team’s capability. If you need a Jira to Jira integration solution that supports both custom and default mappings, choose Exalate.
Test all endpoint mappings: Use testing tools (or even trial and error) to confirm that the field and entity mappings are correct. Start with non-essentials before extending the rules to sensitive data fields.
Maintain and optimize: Monitor the performance of the solution to see if the data is still correct. You also need to check sync queues in order to unclog and troubleshoot failed transfers.
Exalate: Sync Jira Issues Bidirectionally
Exalate is a two-way solution for Jira issue sync that allows you to exchange data between multiple connected Jira instances. Jira Cloud and Data Center users can use Exalate’s Basic mode to sync descriptions, summaries, comments, attachments, assignees, priority, statuses, custom fields, and much more.
There’s more. Exalate’s Script mode supports the low-code integration of advanced issue sync cases. You can use it to sync story points fields in order to help companies establish frictionless collaboration frameworks with clients and MSPs.
Exalate’s Script mode also comes with an AI feature called AI Assist, which allows you to generate scripts for complex integration use cases by entering a detailed prompt describing the integration scenario. This feature speeds up the creation and configuration of syncs.
Exalate also helps you establish a hierarchy between Issues and Epics, which comes in handy when creating subtasks and related issues. You can also sync custom values from Issue Types and Select Lists.
How to Sync Jira Issues Using Exalate
Install Exalate on both Jira instances. You can get the app from Atlassian Marketplace. If you are a Jira Cloud user, you can follow the normal flow. Docker installation is also supported. To install Exalate on Jira Data Center, follow these steps
Establish a connection between Jira instances. For Basic mode connections, follow this guide. You can also use the drag-and-drop Visual mode (currently in BETA). You can also set up a Script mode connection and write sync rules using AI Assist.
Configure the connection. Use Exalate’s Groovy scripting engine to write rules that will control and define how both Jira instances will interact and share data.
Set up triggers. Create automated triggers using JQL to determine how the Jira instances will handle the integration rules.
Start syncing your tasks. You can initiate multiple Jira syncs directly from the Exalate console or the Exalate panel within the Jira issue.
For a detailed breakdown of every step of implementing Jira issue sync, read this comprehensive guide.
Sync Jira custom fields (Story Points, Account Info, etc.) and Epics to ensure they exchange data and contents seamlessly.
Sync user comments and mentions to make sure all necessary contributor and user data appear on both sides of the connection.
Link multiple Jira issues to one Zendesk ticket for smooth collaboration between developers and support staff using different work management systems. You can also sync Salesforce Objects and maintain issue hierarchy on Azure DevOps.
Integrate data from dropdown lists and issue types between Jira instances in order to extend the amount of data available for exchange.
Make default fields and statuses appear on the remote side as comments without affecting the status over there. This can help with deep ticket integration between organizations and MSPs.
Sync the entire contents of issues (attachments, descriptions, custom fields, etc.) between organizations using Jira while maintaining both sides’ autonomy.
Want to find out how Exalate can handle your advanced use case? Book a demo with our customer success experts.
Having a legacy application in your tech stack can be an issue when you want to integrate it with your modern stack. The application might be too valuable to abandon and too old to integrate with newer technologies. So what gives? This is where legacy system integration comes in.
You need to find technologies that can connect to endpoints of older and newer systems without needing massive changes.
But what challenges do legacy systems pose for enterprise system integration?
In this article, I’ll cover everything you need to know about legacy system integration. Continue reading to find out how to sync modern cloud and SaaS systems with legacy applications.
What is Legacy System Integration?
Legacy system integration is the process of connecting legacy infrastructure with modern databases, ERPs, CRMs, and SaaS applications.
Organizations, especially in healthcare, rely on legacy systems such as Windows 7 and Adobe Flash. Some banks and financial institutions still rely on IBM’s mainframe systems. Even in hypermodernized spheres such as aerospace, you can see some systems running on COBOL and FORTRAN.
So, the process of connecting these outdated systems with modern ones is the entire point of legacy software system integration.
When is the Right Time to Integrate Legacy Systems?
If the legacy software is running critical processes in your workflow, here are signs that you should integrate it ASAP.
Migrating to a modern alternative will cost too much.
Migrating to a new platform is a compliance hurdle, especially in healthcare or finance.
You need your data in a modernized system with a more intuitive interface or dashboard.
The processes running under the legacy system are too important for the continuity of business operations.
The legacy platform is not interoperable with modern applications, so it requires a unique integration approach.
If you attempt to modernize the system, a lack of updates and support for its infrastructure will pose a significant security threat.
Once you spot any of these telltale signs, start weighing the available integration options.
The Best Options for Integrating Legacy Systems
Here are ways to integrate legacy software:
Middleware (Enterprise Service Bus): The middleware sits between two systems and curates bidirectional data exchange. An enterprise service bus or API gateway serves as the intermediary for these transactions.
Point-to-point integration (P2P): P2P integration is used for direct connections between systems without a middleware or third party. This usually works when both systems are compatible. The connector could be a custom script or an API.
API integration: API integration involves connecting to the APIs of both systems using webhooks and other protocols to enable data exchange in real time. APIs that can be used for legacy systems integration include REST, SOAP, RPC, or open APIs. This is also called embedded integration.
Robotic Process Automation (RPA): RPA is the use of automation to handle repetitive tasks while increasing the accuracy of every action. This is also known as automated integration.
IPaaS (Integration Platform as a Service): This integration option encompasses delivery, maintenance, updates, support, and testing into a single service. IPaaS solutions for ERP legacy system integration include Zapier and Informatica.
Before choosing an integration pattern for your legacy systems, consider the cost, technical debt, and cultural fit.
What are the Challenges of Legacy System Integration?
Legacy system integration is not your run-of-the-mill integration scenario. Many challenges and hurdles await you on every corner. Let’s discuss them in greater detail:
Lack of Proper Documentation
The problem with legacy systems is that once the updates stop coming, the documentation stalls. Maybe the developers who worked on the project have moved on to other things.
Whatever the case, this leaves users of the legacy system with outdated documentation. As a result, they’d first need to decipher how the technology works before building or buying an integration.
Lack of Technical Expertise
As systems and technologies age, developers move on from them. This shrinks the pool of qualified technicians who can work with technologies like COBOL and FORTRAN.
So unless your team has one of these rare gems on standby, you’ll have to find someone with infrastructure expertise in a developer haystack.
Company Culture
Sometimes, the legacy system is embedded too deeply into the organization’s ecosystem that any attempts at integration would cause massive workflow disruption.
Other times, employees—especially those with non-technical backgrounds—would prefer using the familiar system instead of learning a new one from scratch. This is common in healthcare and logistics companies.
Security Issues and Compliance Concerns
In highly regulated industries, integrating sensitive data with a new platform could be a compliance violation.
Apart from that, a lack of updates leaves vulnerabilities that hackers can exploit. So integrating your modern software with a partner’s legacy system could open a backdoor for unauthorized users to enter your system.
Modernization Costs
Some legacy systems are so out of date that you’d need to modernize them before they are fit for integration. Most organizations would rather abandon the modernization process instead if the costs are not worth it.
Proprietary Architecture
Legacy systems often contain proprietary architecture. This means that even if you have the technical expertise to alter or modernize it, you won’t be able to do so without written permission from the original vendor. So you’re locked in.
What are the Benefits of Legacy System Integration?
Here are the reasons why you should integrate legacy systems:
Reduces Manual Workloads
Integrating legacy systems with your modern stack reduces the amount of manual work your team members have to do in order to access data.
With automated triggers and actions, teams on both sides of the integration will automatically receive all the data they need in real time.
Introduces New Functionalities
Legacy system integration expands the scope of functionalities available to users. For instance, integrating your legacy infrastructure with a cloud CRM like Salesforce gives you access to all the cool data analysis tools on AppExchange.
Provides Access to Better Data
Connecting two systems gives you access to more data. For example, say you are connecting your legacy system with a service desk application. You’ll now have access to customer concerns and feedback in addition to business data. This will help stakeholders make informed decisions and have the entire picture.
Saves Money on Full-scale Modernization
Integrating your legacy system with a contemporary solution saves you the money that could have gone into full-scale modernization. Even if you need to update some parts of the system to get the integration to work, it is better than refurbishing the entire infrastructure.
Improves Customer and Employee Experience
Legacy system integration makes life better for employees by decreasing their workload and improving the accuracy of data transfers.
This also filters down to the customer experience. Since your staff has access to customer-related data, they would be able to address pressing issues and spot potential pain points faster.
How to Choose the Best Integration Tool for Legacy Systems
Before choosing any integration solution for legacy systems, here are some factors to consider:
Compatibility: Ensure the tool is compatible with the legacy system. This will save you time and effort spent acquiring and configuring a new tool.
Reliability: The integration solution you choose should be reliable enough to produce consistent performance. It should also be able to handle downtimes and outages without clogging the queue.
Scalability: The system should be able to scale with the organization’s data and workload. So you should pay attention to usage and API limits.
Security and compliance: Choose a tool that is compliant with industry standards and regulations. You also need to check out the available security features and data encryption protocols.
Affordability: Tools for integrating legacy systems should be within your budget, whether we’re talking about purchase or maintenance costs.
Ease of use: The best integration tool should be easy to install, configure, and use. The learning curve should be seamless enough for anybody in the organization to implement.
5 Steps for Legacy System Integration
Step 1 — Define Objectives and Priorities
Before integration, you need to assess the legacy system to understand dependencies and functionalities. This will help you come up with an integration strategy as well as a roadmap.
You also need to consult with teams using the system to understand how it affects their processes. This will help you better understand potential risks.
Afterward, you will have a clear picture of all data sets, underlying system infrastructure, and interconnected services.
Step 2 — Choose the Right Tool
When you know the integration objectives and priorities, you can now choose a tool.
If you have a technician that understands the API, you can explore P2P integration or API integration.
To be on the safe side, you can use integration as a service (IaaS) solutions like Exalate to write the scripts for connecting the API endpoints. Exalate engineers can also help you write the scripts and maintain the code.
Just confirm compatibility first before choosing the tool.
Step 3 — Set Up the Integration
Setting up the integration involves mapping the endpoints on both systems to exchange data between projects, fields, work items, or entities.
Using a no-code option, you can set up default drag-and-drop mappings to establish connections. But for low-code and script-based solutions, you need to write functions and expressions to control the sync.
Step 4 — Test the Connection
Before deploying the integration, run several tests on your mappings to see if the right endpoints are interacting with each other.
When you build an integration in-house, you have to ensure that the data transformation is pinpoint accurate for the incoming and outgoing information. But with an IaaS or IPaaS solution, the tool runs the transformation for you, depending on the platform you choose.
Step 5 — Monitor and Optimize
With your legacy system integration up and running, you need to monitor performance to see when you are approaching the API limit or to determine whether the established data structure is correct.
You can also use data analysis tools to track the improvement of processes since the implementation of the integration.
Use Cases and Examples of Legacy System Integration
Organizations and individuals can integrate two legacy systems or one legacy system with a contemporary solution. Here are some legacy system integration examples:
An e-commerce retailer could decide to integrate a legacy CRM with a modern option such as Shopify, MailChimp, or Salesforce.
A manufacturing firm can decide to integrate data from its outdated CNC with a modern cloud-based database to access better analytical tools.
A hospital chain can decide to merge data from its outdated Oracle systems with a modern remote patient monitoring (RPM) system.
Customer service teams can use ServiceNow integration with legacy systems to improve ticket resolution and customer satisfaction.
How Exalate Handles Legacy System Integration
Exalate is a bidirectional integration solution that allows users to control the information entering and going out of their system.
With Exalate’s IaaS offering, you can integrate legacy systems with modern CRMs, ERPs, and ITSM tools. This option works well for internal teams and connections with partners for cross-company collaborations.
The scripting engine can help you configure the connection to suit every use case. Our engineers will help you implement, maintain, and scale your integration.
Exalate also protects your data using integration security features such as tokenization, role-based access control (RBAC), HTTPS, and other protocols.
Want to find out how Exalate can help you integrate legacy systems? Book a call with our sales engineers.
Both Jira and Salesforce support default fields and entities for conveying and displaying data—which is accessible by referencing the API key.
But what if the default fields don’t have what you need?
In that case, you can create custom fields on both platforms and adjust the mapping to sync them. In this post, I’ll show you how to sync data between custom fields on Jira and Salesforce.
How to Add Custom Fields in Jira
Jira supports different types of custom fields (checkboxes, date pickers, user pickers, radio buttons, select lists, and much more). Here are the steps for creating custom Jira fields.
Open your Jira.
Select Issues.
Go to Fields and Click Custom Fields.
Select the custom field you want to create. Then, add context and default value.
You can also change the name and assign the screens on which the field should appear.
Select Edit Default Value to change the data (for editable custom fields).
To retrieve data from the field, you need to call the custom field ID from the Jira REST API.
How to Add Custom Fields in Salesforce
Salesforce users can create custom fields for standard objects (formula, date, email, phone, picklist, etc). Here are the steps to follow:
Go to Object Manager.
Click Contact > Click Fields and Relationshionships > Click New.
Choose the data type and click Next.
Enter the values on separate lines, then click Next.
Select the Contact page layout and click Save.
The custom field will appear on the layout. To retrieve data from it, write the name without spaces and add “__c” (MyCustomField__c).
Why Sync Jira Custom Fields with a Salesforce Account?
Most organizations integrate custom field data between Jira and Salesforce in order to extend the possibilities of both platforms.
For instance, your organization’s customer success partner can add an Account custom field in Jira to store data coming from the default account field on the sales team’s Salesforce.
Doing so will help the customer success partner to exchange data in real time with the corresponding team to make timely, informed sales decisions and close deals faster.
Syncing custom field data also improves communication between connected teams, especially for cross-company collaborations that require constant communication and transparency.
You can add up to 50 custom fields to your Jira instance in order to obtain extra data points.
What are the Challenges of Syncing Custom Field Data?
In my experience working with custom fields, here are some challenges I’ve bumped into.
Remembering the corresponding field on the other side,
Finding the right API name for scripting the connection,
Getting the data transformation right for pinpoint accuracy,
Not exceeding the API usage and call limits,
Having an automatic retry mechanism for network failures,
Limiting write access to only authorized users within the project or organization.
But it doesn’t have to be this way. You can configure the sync using third-party integration solutions that require little to no extra scripting or coding.
One such solution is Exalate. This Jira Salesforce integration tool comes with a Groovy-based engine that allows you to sync custom fields bidirectionally without the hassle of writing custom transformations for both platforms.
Exalate is a two-way integration solution that works with Zendesk, Azure DevOps, ServiceNow, Jira, Salesforce, etc.
You can use it to sync Salesforce and Jira custom fields as well as several other entities.
The Bulk Exalate feature allows you to create a trigger for syncing existing issues.
Exalate’s Groovy scripting engine is apt for configuring complex use cases.
Exalate allows you to limit what goes in or comes out of your system.
With a bit of customization, you can sync data from custom fields and map them to existing or newly created default fields.
Jira to Salesforce Use Case: Custom Field Update and Status Sync
Selecting an account name for a custom drop-down field in a Jira issue triggers a sync with the corresponding Salesforce case entity.
At the same time, changing the status of your Jira issue will also update the status of the corresponding Salesforce Case.
Sounds complicated, right? Let me show you the requirements and challenges:
Primary Requirements
When a team member picks a user from the drop-down list, the selected option appears as a text value on a custom field on the Salesforce side.
For this to work, you’d need to establish sync rules to control the incoming and outgoing data in custom fields. These rules are single lines of code.
You can also set triggers to update the field on both the Jira and Salesforce instances automatically and bi-directionally
How to Implement Exalate for Data Updates
First, install Exalate on both the Salesforce and Jira sides. Next, follow the instructions in this comprehensive guide to establish a connection between them.
For advanced use cases such as this, you must set up a connection using Exalate’s Script Mode. After that, you can commence with the sync.
Go to your Jira dashboard and create a new issue.
Then, open the Exalate console in Jira. Go to the connection you want to edit and click on the “Edit connection” icon.
Then change the sync rules under the “Rules” tab.
You have two text boxes:
Outgoing sync (on the Jira side) refers to the data to be sent over to the Salesforce side.
Incoming sync (on the Salesforce side) refers to the data to be received from the issue on Jira.
The same logic applies to incoming and outgoing in the other direction.
Under the “Rules” tab, enter the following code snippet into the Jira “Outgoing sync” text box.
Note: The issue.customFields function points to the custom field name within the Jira issue. The replica works as a payload or a message. It contains information you want to pass between the two systems.
In the Jira “Incoming sync” text box, enter the following snippet:
Note: The statusMapping variable establishes the relationship between statuses. The remoteStatusName maps to the replica’s status. Eg., A “New” case on Salesforce appears as “To Do” in Jira.
Once done, click “Publish” to save the changes.
On the Salesforce side, enter the code in the “Incoming sync” text box.
Note: The statusMap variable establishes the relationship between statuses. The remoteStatusName maps to the replica’s status name. Eg., An “Escalated” case on Salesforce appears as “Done” in Jira. The entity."Jira_custom_field__c"function points to the custom field “Jira custom field” within Salesforce. The replica contains information you want to pass between the two systems.
Once done, click “Publish” to save the changes.
Set Up Automated Triggers
Triggers start your sync automatically based on the conditions you specify.
On the Salesforce side, you need to use SOQL (Salesforce Object Query Language) to configure the trigger or you can opt for filters. You can choose any entity, whether an Opportunity, Case, or Account.
Configure your trigger to the sync requirements and click “Add”.
On the Jira side, you can configure triggers using Jira Query Language (JQL).
Here are sample triggers and explanations:
Platform
Expression
Meaning
Jira
project = BLUE AND issuetype = Bug
Sync any Bug created in project “BLUE”.
Salesforce
StageName= 'Prospecting' AND Name like '%demo%'
Sync any Opportunity at the ‘Prospecting’ stage and has a name that includes the word ‘demo’.