This article was originally published on the Atlassian Community.
Frictionless work item tracking and resolution form the basis of project management tools like Jira. But when teams use different Jira instances, managing information between them can be challenging.
So how would you sync work item types and custom fields, like select lists, between Jira instances?
Enter Exalate, a synchronization solution that helps map and sync various fields between multiple Jira deployments.
Let’s dive in and see how.
The Use Case
Two Jira instances must pass the following information:
- Summary, description, labels, comments, and attachments must be synced bi-directionally.
- Work item types must be mapped and synced bi-directionally. So if a work item type in one instance is a Task, it must become an Incident in the other Jira instance. And if the work item type is Bug, then it must be a Change in the other system.
- Custom fields such as select lists (dropdowns) must be synced bi-directionally.
The Challenges
Basic fields like summary and description are easy to sync. The real challenge is mapping the work item types between two instances and syncing them properly. The same mapping logic must apply to select list entries as well.
If a user selects a particular item from the list, the other instance’s list must reflect the correct item.
Let’s take a look at why Exalate excels in a use case like this.
Exalate: A Customizable Integration Solution
Exalate is a highly customizable integration solution to synchronize data across multiple platforms like Jira, Jira Service Management, ServiceNow, Zendesk, Salesforce, Azure DevOps Cloud, Azure DevOps Server, Freshservice, Freshdesk, Asana, GitHub, and more.
With Exalate, you can control your sync at a granular level and automate the information flow based on JQL and other native query languages.
Key features of Exalate include:
- Unified management console: Access all your connections and integrations from a single interface. No more jumping between instances.
- Groovy scripting engine: Define custom sync rules, filters, mappings, and workflows. If you can write it in Groovy, Exalate can sync it.
- Aida (AI-assisted configuration): Get help generating and troubleshooting sync scripts using natural language prompts.
- Test Run: Test your sync scripts against real data before production deployment.
- Script versioning: Full audit trail with rollback capability. Work on drafts without affecting production data.
- Security: ISO 27001 certified, role-based access control (RBAC), and encryption in transit (TLS 1.2/1.3) and at rest. Learn more at the Exalate Trust Center.
- Scalability: Handles large volumes of data and supports synchronization between multiple projects, teams, and even different companies.
How to Sync Work Item Types and Select Lists Between Jira Instances
This tutorial demonstrates how to connect and sync data between two Jira instances using Exalate.
Step 1: Access the Exalate App
Go to exalate.app and log in. New users can create an account by entering their email and verifying it, or by signing up using Google. Create a workspace.
Step 2: Create a Connection Between Jira Instances
Once you have a workspace, you can start creating connections between your Jira instances.
Connection Setup Steps:
- Click “+ Add Connections” > “Create new connection”.
- Enter the name for your first Jira instance (System A).
- Enter the URL of your Jira instance.
- Once you enter the URL, a validation check occurs. If your system is already part of an existing workspace, authentication happens automatically. If the system is part of a different workspace, it will be imported into your current workspace.
- For new systems, you’ll need to enter your authentication details. Jira uses OAuth authentication.
- Complete the same setup process for the second Jira instance (System B).
- Give your connection a name and description.
- Click “Next”.
- Review the details to ensure they are correct, then click “Create connection”.
When the process is complete, select “Continue to configuration” and choose a Jira project you want to use for synchronization.
Step 3: Configure Sync Rules
After establishing the connection, click on “Edit & Test” to access the sync configuration. You’ll be redirected to the “Rules” tab, where you can decide what information you want to send and receive between the instances.
Exalate provides two sets of script windows:
- Outgoing sync: Defines what data goes out from a particular Jira instance.
- Incoming sync: Defines how to interpret data coming from the other Jira instance.
Outgoing sync
replica.key            = issue.key
replica.type           = issue.type
replica.assignee       = issue.assignee
replica.reporter       = issue.reporter
replica.summary        = issue.summary
replica.description    = issue.description
replica.labels         = issue.labels
replica.comments       = issue.comments
replica.resolution     = issue.resolution
replica.status         = issue.status
replica.parentId       = issue.parentId
replica.priority       = issue.priority
replica.attachments    = issue.attachments
replica.project        = issue.project

//Comment these lines out if you are interested in sending the full list of versions and components of the source project.

replica.project.versions = []
replica.project.components = []

/*
Custom Fields*/

replica.customFields."Support Group" = issue.customFields."Support Group"Code language: JavaScript (javascript)
Incoming sync:
if(firstSync){
    issue.projectKey   = "UD"
    // Set type name from source issue, if not found set a default
    issue.typeName     = nodeHelper.getIssueType(replica.type?.name, issue.projectKey)?.name ?: "Task"
}
issue.summary      = replica.summary
issue.description  = replica.description
issue.comments     = commentHelper.mergeComments(issue, replica)
issue.attachments  = attachmentHelper.mergeAttachments(issue, replica)
issue.labels       = replica.labelsCode language: JavaScript (javascript)
Map and Sync Work Item Types
Next, you must map the work item types between the platforms. You can perform this mapping in the “Incoming sync” script window.
In this use case, we will create a Task or a Bug in Jira Instance A, and it should be reflected as an Incident or a Change in Jira Instance B. When you create and sync a work item for the first time, a corresponding Incident or Change will be created in the other instance based on the mapping you have set.
You can also apply the same logic if the work item type is updated by creating a new mapping and mentioning it under the (!firstSync) condition. The firstSync variable determines if the work item is synced for the first time or not.
As seen in the code, a typeMap variable stores the mapping. It’s in the format remoteissuetype:localissuetype.
Then we call the getIssueType method of the nodeHelper class of Exalate. This method allows you to fetch the work item type of the replica.
Note: The replica carries the information to be passed between the systems, serving as the payload.
The getIssueType method picks up the local work item type that we have populated with the help of a map variable: typeMap, and assigns it to the work item type in the destination instance.
A fallback value is also assigned to the work item type if none of the values match. In our case, the fallback value is Task, but it can be any other value of your choice.
Incoming sync
if(firstSync){
    issue.projectKey   = "TEJA"
    //set type name from source issue, if not found set a default
    def typeMap = [
    "Task" : "Incident",
    "Bug" : "Change"
    ]
    issue.typeName     = nodeHelper.getIssueType(typeMap[replica.type?.name], issue.projectKey)?.name ?: "Task"
}
issue.summary      = replica.summary
issue.description  = replica.description
issue.comments     = commentHelper.mergeComments(issue, replica)
issue.attachments  = attachmentHelper.mergeAttachments(issue, replica)
issue.labels       = replica.labelsCode language: JavaScript (javascript)
Note: We have shown a unidirectional sync here, but it can be bi-directional as well.
Sync Select Lists (Dropdowns)
Select lists, also called dropdowns, are user-defined fields that allow you to select specific values from a list. These are called custom fields in the Exalate context.
To ensure that the information in the custom field is synced to the destination instance, you only need to add a single line of code.
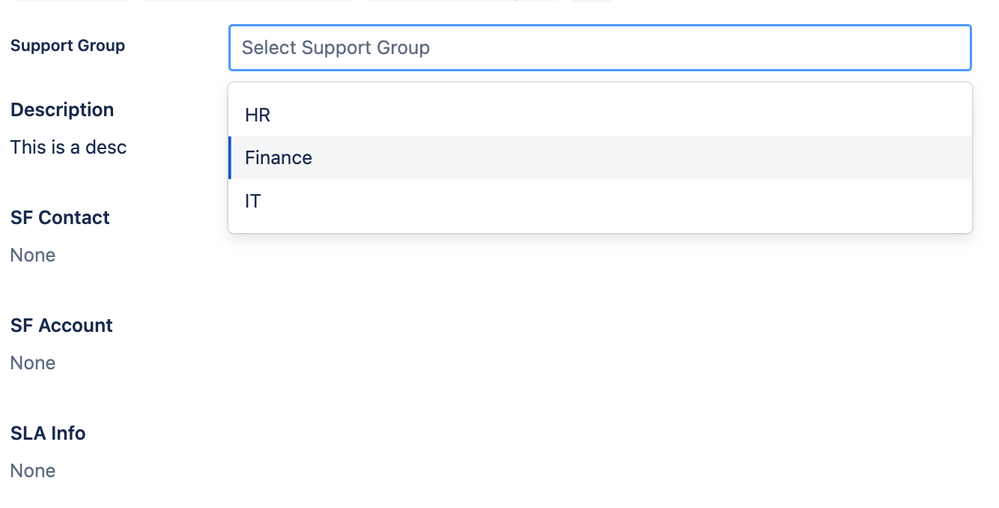
For instance, we have a dropdown called “Support Group” that holds multiple values like IT, HR, Finance, etc. When the user selects “IT” in one of the Jira instances, the corresponding value will be displayed in the other system.
issue.customFields."Support Group".value = replica.customFields."Support Group".value
Remember, just like you mapped the different work item types, you can also set up custom mappings for syncing select lists.
Output
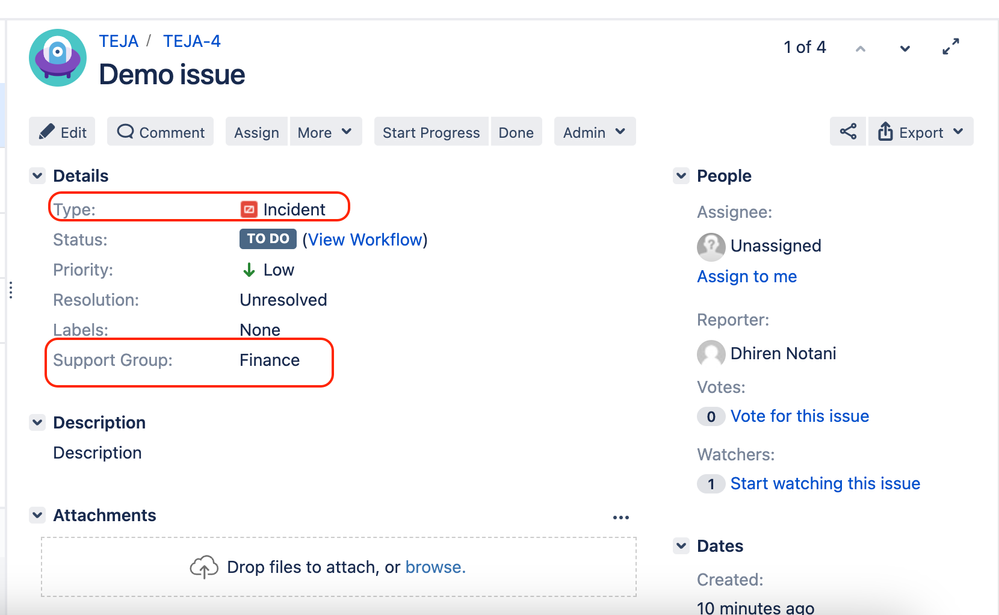
When a Task is created in Jira Instance A, an Incident is created in Jira Instance B based on the mapping configuration.
Likewise, the support group “Finance” selected in one Jira instance correctly reflects the value in the other instance.
Conclusion
By integrating platforms, modern businesses stay competitive and responsive to customer needs. This use case we demonstrated is just one example of how integration tools can enable collaboration between teams.Curious to know if Exalate is the right solution for your business? Get in touch with us, or drop a comment below.
Recommended Reads:


