This article was originally published on the Atlassian Community.
Integrating Jira and Zendesk combines the strengths of Jira’s project management capabilities with Zendesk’s comprehensive customer support features.
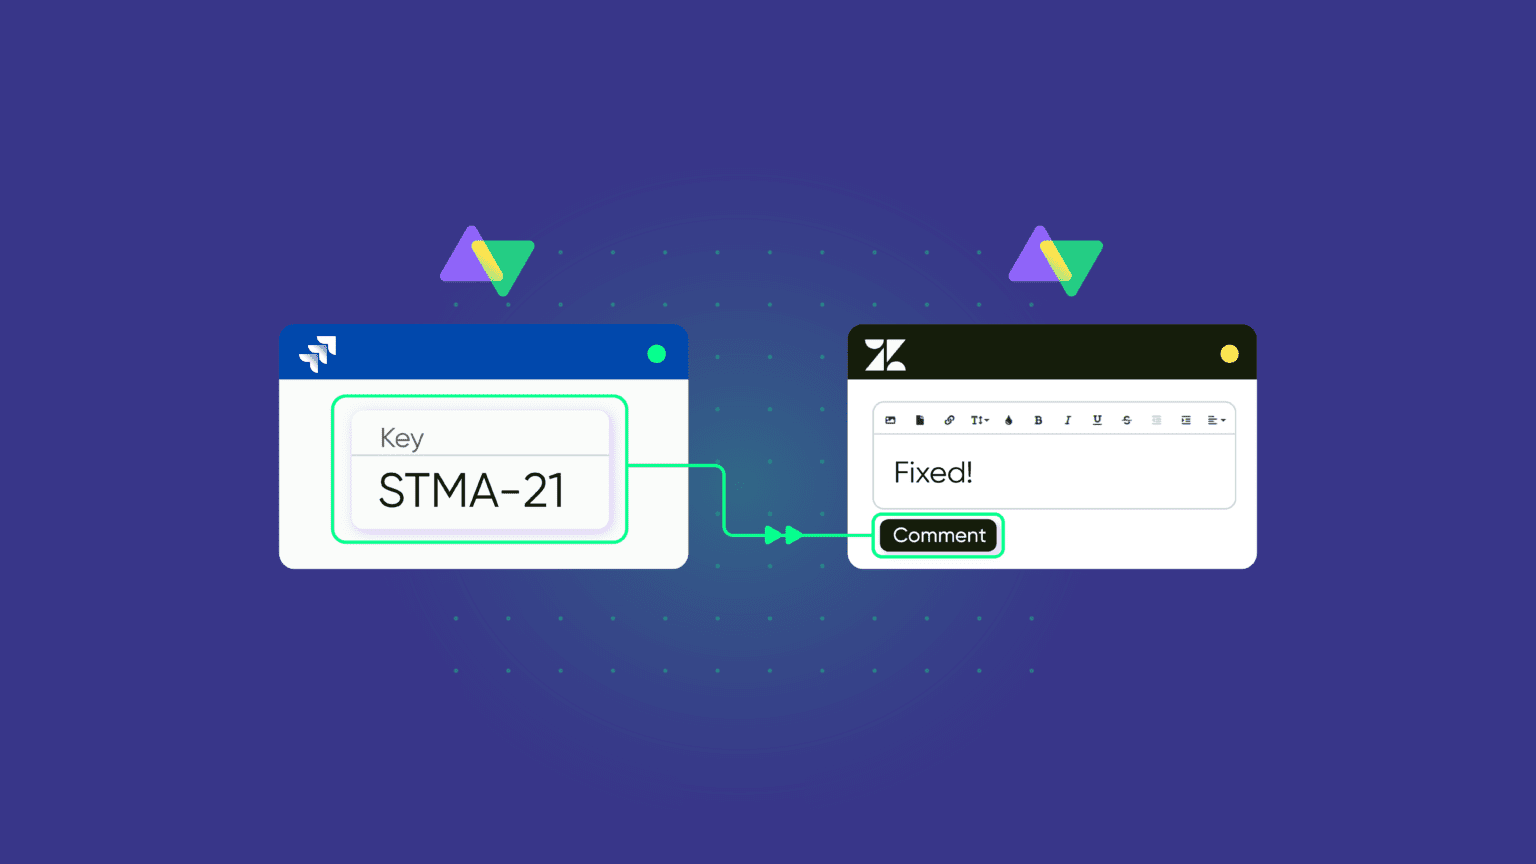
We’ll walk through a commonly encountered scenario: when a work item is resolved in Jira, a private comment containing the associated Jira work item key is automatically appended to the relevant Zendesk ticket.
In the following sections, we’ll cover the use case requirements and the step-by-step configuration to set it up using Exalate.

The Use Case
Customer support teams need visibility on the ticket status once the dev team starts working on it. One of our customers had the following requirements:
- Ticket summary, description, status, tags, and public comments must be synced from Zendesk to Jira.
- Jira work item status should be mapped to the ticket status in Zendesk. When the work item is “In Progress” in Jira, it must be changed to “Open” in Zendesk.
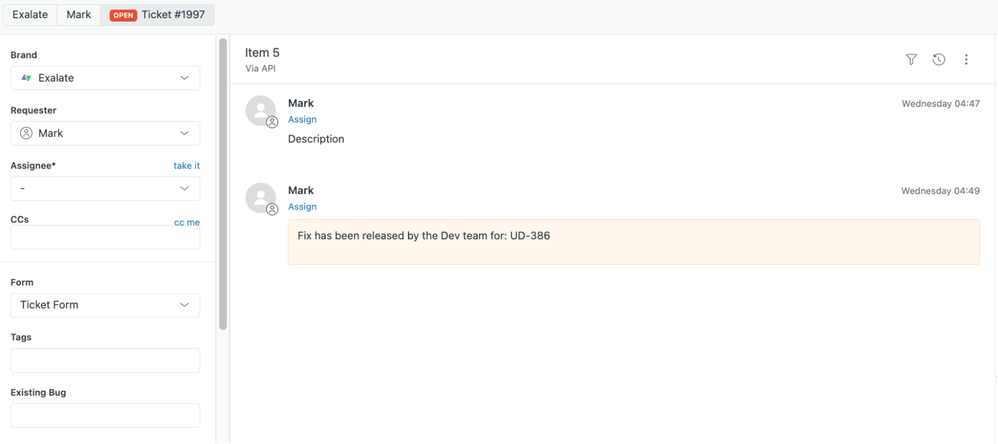
- When the work item is marked “Done” in Jira, a comment saying: “Fix has been released by the Dev team for UD-386” must be added to the private comments in Zendesk. Here, UD-386 is the Jira work item key.
The Challenge
Syncing ticket summary, description, tags, and similar fields is straightforward for most integration tools. The real challenge lies in appending a fixed comment to the private comments in Zendesk with the actual Jira work item key that resolves the ticket.
You also need code-based logic to implement this reliably, since out-of-the-box templates won’t cover this level of customization. Network timeout handling is another consideration you’ll want to factor in.
Why Use Exalate for This?
Exalate is an integration solution that supports bidirectional data exchange between work management systems. It works with Jira, Jira Service Management, Zendesk, ServiceNow, Azure DevOps Cloud and Server, Salesforce, Freshservice, Freshdesk, Asana, GitHub, and more.
Here is what makes Exalate a good fit for this use case:
- Bidirectional real-time sync between Jira and Zendesk with minimal setup
- Groovy scripting engine for custom logic, field mapping, and advanced use cases
- Bulk operations to sync multiple work items and tickets simultaneously
- Aida, Exalate’s AI-assisted configuration tool, to help generate and troubleshoot sync scripts
- Test Run to validate your scripts against real data before pushing to production
- Script versioning with a full audit trail and rollback capability
- ISO 27001 certified, with RBAC and encryption in transit (TLS 1.2/1.3) and at rest. Review the Exalate Trust Center for security documentation.
How to Append the Jira Work Item Key to a Private Comment in Zendesk
Create a Connection Between Jira and Zendesk
Create or log in to your account at exalate.app. After setting up your first workspace, click “+ Add Connections” and select “Create new connection.”
Enter the name for your first system (System A). You can set either Jira or Zendesk as System A. It does not matter which goes first.
- For Jira, authentication is handled via OAuth.
- For Zendesk, you will need to provide an API token.
Enter the URL for each system. Exalate will validate the connection and register both systems. Give your connection a name and description, review the details, then click “Create connection.” Once complete, select “Continue to configuration.”
Configure the Sync Rules
After creating the connection, select “Edit & Test” to open the script editor. Navigate to the Zendesk side of the connection and open the “Incoming sync” rules.
Insert the following code:
issue.labels = replica.labels
issue.summary      = replica.summary
issue.description  = replica.description ?: "No description"
issue.attachments  = attachmentHelper.mergeAttachments(issue, replica)
issue.comments     += replica.addedComments
def statusMapping = ["Done":"open", "In Progress":"open"]
def remoteStatusName = replica.status.name
issue.setStatus(statusMapping[remoteStatusName] ?: "open")
if(remoteStatusName == "Done")
    issue.comments += commentHelper.addComment("Fix has been released by the Dev team for: "+replica.key, issue.comments)Code language: JavaScript (javascript)
This script maps the Zendesk ticket status to the Jira work item status. When the dev team moves the work item to “In Progress” in Jira, the Zendesk ticket is set to “Open.” When the work item is marked “Done,” the script uses the commentHelper.addComment method to append a private comment with the Jira work item key.
Use Test Run to validate the script against real data before publishing. Once confirmed, click “Publish” to save and activate the configuration.
The Output
To verify the setup, open the item sync monitor in the Exalate console. You can do this by editing the connection. Enter the Jira work item number.
The ticket will sync to Zendesk, carrying over the summary, description, and other fields.
Note: We synced manually in this article, but you can set up automatic sync triggers using JQL for Jira and Zendesk’s native search syntax for Zendesk-side filtering.
Once the Jira work item is marked “Done,” Exalate automatically picks up the status change and appends a private comment with the work item key to the Zendesk ticket.
Conclusion
Exalate gives you precise control over how Jira and Zendesk stay in sync, including advanced scenarios like appending dynamic comments based on status changes. The Groovy scripting engine, combined with Aida for AI-assisted configuration and Test Run for safe deployment, makes it possible to tackle use cases that standard integration templates simply can not handle. If you want to see how Exalate can be tailored to your requirements, schedule a demo with our team or start a free trial from the marketplace.
Suggested Reading:


