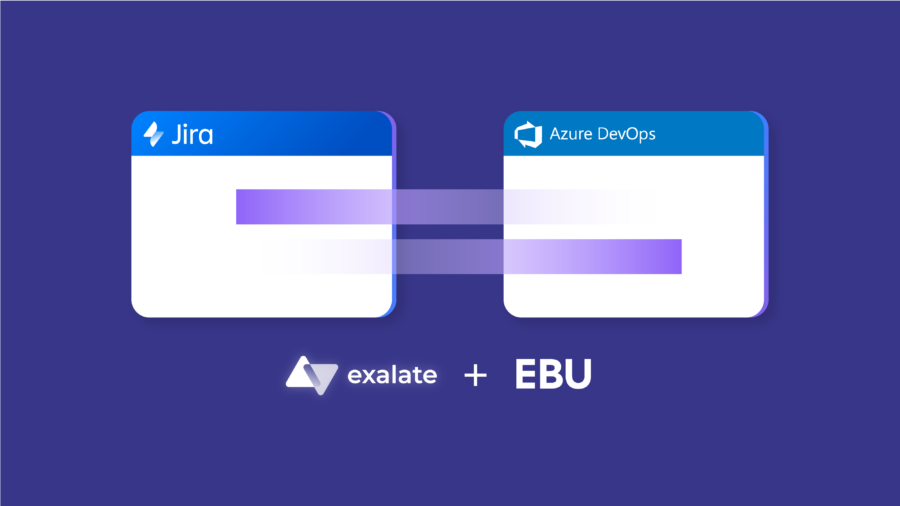
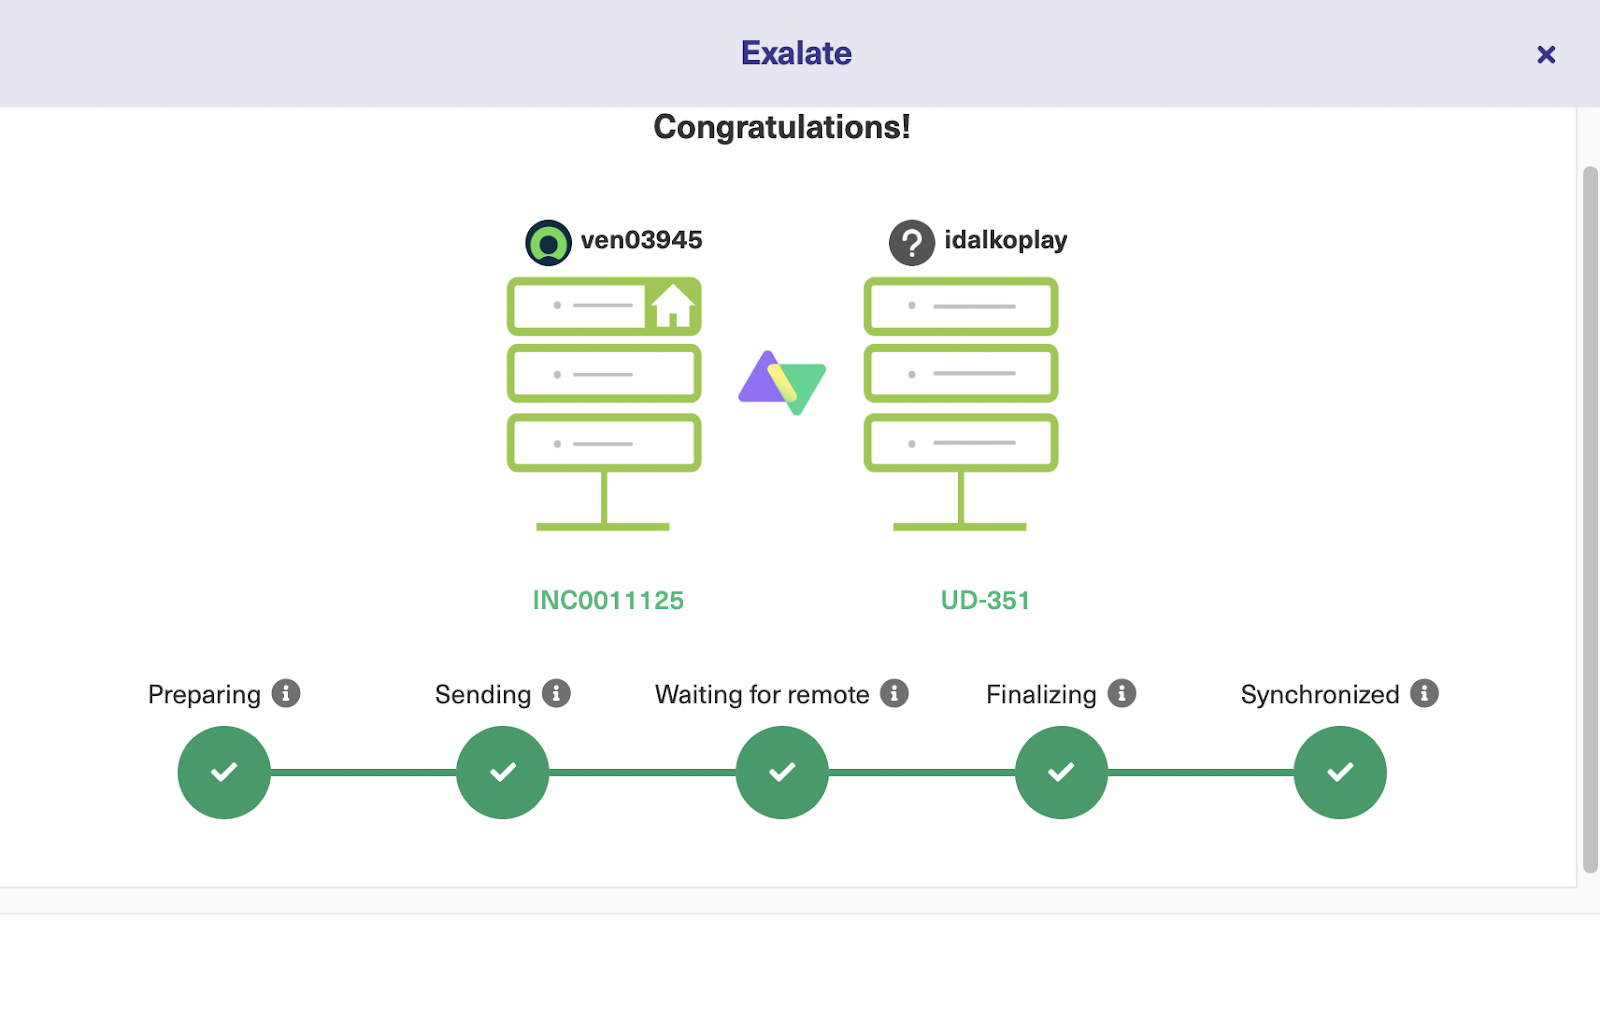
The European Broadcasting Union (EBU) is an international organization that comprises all the public media in Europe, as well as non-European members. Part of the services they provide revolve around helping media companies cooperate and organize events, including the Eurovision Song Contest.
Pierre Rebrion is the IT Applications Manager at EBU, who is responsible for all the ERPs, websites, tools, and applications used by internal teams and web services used by external entities.
Note: As part of Exalate’s licensing policy for non-profit organizations, EBU receives free licenses.
Also, Dynamics 360 mandates that they use Azure DevOps. So, all their tasks, improvements, and bugs are handled within the Azure DevOps ecosystem.
These tasks are the place where comments and all other task-related data exchanges happen.
When the consultants’ invoices come in, they compare them with the timesheets in Jira for reporting purposes.
But there is no way to gauge the time you’ve spent on a specific task in Azure DevOps.
So, they had to find a way to replicate Jira timesheets in Azure DevOps.
This is where Exalate comes in!
Challenges
Without Exalate, if someone opened a ticket in their Jira they manually created an Azure DevOps work item, and then manually put the link to recreate the ticket in the other system.
They used Exalate to bridge this gap and automate the process to save time.
This allows the creation of tickets and work items on both systems without manually moving them.
The company’s main concerns when looking for an integration solution were the following:
Finding an app that supports low-code or no-code field mapping,
Getting an affordable solution without breaking the bank,
Ensuring that all data coming from both systems is transformed correctly,
Keeping data secure both at rest and in transit,
Their biggest concerns are integration security and data privacy. Pierre pointed out that they pay attention to compliance regulations like GDPR and certifications. Exalate was the first solution that checked all the boxes, so Pierre and the team decided to go for it.
The Solutions
Initially, the team thought about developing an integration themselves. But, since they had a small team, they lacked the bandwidth to build an integration tool from scratch.
Plus, with the advent of AI and other technologies, their in-house integration would soon become obsolete.
So, they started looking for third-party Jira Azure DevOps integration tools and opted for Exalate with an MVP that was able to meet 80-90% of their requirements.
Why Exalate?
The team had basic sync needs and Exalate’s Visual mode could meet all of them, in addition to real-time data exchange.
Pierre also pointed out that the single-tenant architecture and available security measures helped make up his mind.
He also mentioned that the Exalate support team helped address issues and set up the connection.
They also saw Exalate’s potential in a situation where if the use case is complex there’s a possibility to write code and change the integration based on specific needs.
Results
After implementing Exalate, the organization noticed a significant increase in process speed and a decrease in time and effort spent opening a ticket on Jira for every Azure DevOps work item.
This also helped them keep track of tickets, timesheets, work items, and other modules related to the ongoing initiatives.
Internally, teams using Jira and Azure DevOps were able to close and open tickets on their own system with complete autonomy, which made collaboration easier.
Future
Pierre believes he’ll continue to recommend Exalate internally and externally. The company is already considering connecting GitHub and Jira down the line. He is also excited to explore the new AI Assist feature and other upcoming additions.
When you’re in the market for Workato alternatives, consider solutions that can deliver the same level of flexibility, customizability, stability, and scalability.
With the market saturated with integration solutions, picking the best Workato alternative would be like a treasure hunt on an archipelago.
In this article, I’ve covered Workato’s features and limitations to provide context for comparison and outlined the best Workato alternatives in the marketplace.
What is Workato?
Workato is an integration platform that enables users to automate connections between applications, databases, workflows, cloud services, and communication tools.
On the surface, Workato is an integration tool. But it offers more than plug-and-play integrations. It also offers API and bot management and a data hub.
Let’s go through the features in detail.
What Features Does Workato Have?
Workato automation offers the following features and components.
Generative AI tools (Process AI, Workato Agentic, Copilots, IT Genie.)
The feature list shows that Workato offers way more than simple integrations, which makes it a popular choice for organizations like Booking, CISCO, Monday, NOKIA, etc.
In addition, Workato supports connectors for over 1000 apps, including HR, accounting, DevOps, and machine learning systems.
What Are the Limitations of Workato?
Despite the popularity of Workato, customers have reported some flaws and challenges experienced when using the integration tool.
Workato struggles with complex data import/export between disparate systems, which can be an extra headache for admins handling large data volumes.
The pricing might not fit small organizations looking for simple integration solutions. It is more suited for large organizations with massive budgets.
Since Workato is cloud-based, you can’t access it offline. Besides, it requires extensive programming (Ruby) experience to configure and use.
Even with the vast library of pre-built connectors, Workato offers little to no customization opportunities for users looking for niche requirements and use cases.
You might end up having to work with the universal connector, which could turn into a massive chore for your IT team.
Things to Consider When Choosing Workato Alternatives
Having understood the limitations, here are things to consider when choosing alternatives to Workato.
Current business goals in alignment with the specific use case
Cost of licensing, onboarding, and subscription
The learning curve for system administrators
User-friendliness of the interface
Accuracy of data transformations
Scalability and flexibility to handle changing workloads
Availability of security and privacy features
The presence of a reliable error-handling mechanism
Customization options, as well as ready-to-use templates for connections
Platform support, community, and documentation.
Using this checklist will help you choose the best Workato alternative that aligns with your business requirements and budget.
The Best Workato Alternatives
Let’s go through some Workato competitors that can serve as viable alternatives.
Tray.ai
Tray is an AI-powered integration platform that provides an automation cloud for connecting business processes.
This solution uses event triggers and automation to connect apps and streamline workflows between organizations and systems.
You can set up your own connections or work faster with reusable templates from the extensive Tray library.
Tray.ai Features
Connector Hub
Data integration
API management
Merlin Intelligence
Enterprise core
Event-based automation
Tray.ai Pros
Tray provides a massive library of connectors for different platforms and systems.
Tray uses AI features to speed up the configuration of connectors.
It provides a user-friendly interface for setting up connections.
It supports triggers for automating processes.
Tray.ai Cons
The error-handling mechanism is challenging to navigate.
The pre-built connectors are difficult to customize.
You can’t test connections before deployment.
Exalate
Exalate supports bidirectional synchronization between systems in order to enable them to exchange data. It supports various popular platforms like Jira, Salesforce, Azure DevOps, ServiceNow, etc.
Exalate’s Script mode is based on a powerful scripting engine that can be used to implement the trickiest use cases.
AI Assist in Script mode relies on human prompts to generate reliable and accurate sync scripts. This reduces the time spent in writing a script from scratch or searching for the relevant one.
Exalate supports only a handful of applications as compared to Workato but allows deep integrations via its scripting engine.
As with any AI, the AI Assist feature still needs close supervision.
You need to have a basic knowledge of the Groovy language to use the code-based console but with the AI Assist feature the learning curve is simpler.
Boomi
Boomi is an iPaaS solution that supports the integration of internal and external workflows and business processes.
Beyond simple integration, Boomi also supports data management, API management, intelligent integration mapping, error testing, and multi-source consolidation.
Boomi Features
API management
B2B/EDI management
Master Data Hub
Event Streams
Boomi Pros
Boomi has a supportive community.
It supports over 200,000 connector variations.
It can be deployed in private or public cloud platforms.
It provides multiple templated integrations.
Boomi Cons
It struggles to support multiple connectors.
Boomi’s API management is limited to basic functionality.
The pricing structure might not be the best fit for small businesses.
The error reporting is subpar.
Mulesoft Anypoint Platform
Mulesoft, owned by Salesforce, is the native integration solution for synchronizing data between Salesforce and other platforms.
Its integration solution, Mulesoft Anypoint Platform, supports the creation of connectors, APIs, and workflows.
Mulesoft Anypoint Platform Features
Pre-built connectors
Custom integrations
Anypoint CLI
API Governance
Flex Gateway
Studio
API Designer
Partner Manager
Code Builder
etc.
Mulesoft Anypoint Platform Pros
It gives you access to other Salesforce CRM tools.
You can adapt it to your use case.
It centralizes the development, monitoring, and deployment of APIs and integrations.
It provides a massive library of template connectors.
Mulesoft Mulesoft Anypoint Platform Cons
It requires an extensive understanding of the Salesforce architecture to use.
It has many vestigial features that you never get to use.
It is too Salesforce-centric.
SnapLogic
Users working with SnapLogic get access to a low-code integration platform for creating and automating business processes and workflows.
Although SnapLogic focuses on system integration, it also supports API creation and management.
With a comprehensive library of over 700 pre-built connectors or “Snaps”, IT admins can unify their SaaS sprawl.
SnapLogic Features
SnapLogic AutoSync
GenAI Builder
API Management (APIM)
AutoSuggest
AutoPrep
Snaps (pre-built connectors)
ELT/ETL
SnapLogic Pros
It provides a vast library of pre-built Snaps.
It uses AI solutions like SnapGPT to improve the quality of connections.
SnapLogic Cons
The interface often lags and crashes.
The error handling mechanism is too complex.
Zapier
Zapier provides a drag-and-drop builder for setting up integrations between systems and organizations.
With Zapier as the Workato alternative, companies can boost operational and workflow efficiency, as well as automate manual tasks.
Zapier also supports Zaps with over 6000 apps, making it the go-to solution for companies looking for affordable, no-code connectivity.
Zapier Features
Zaps (automated connections)
Tables
Interfaces (custom pages)
Canvas (AI-powered workflow mapping)
Chatbots
Zapier Pros
Zapier is accessible for users without advanced technical experience.
It supports event-based automation.
It supports more connectors than Workato.
Zapier Cons
You need to pay extra to access advanced connections.
Zaps can malfunction during important integration or migration scenarios.
Jitterbit Harmony
This iPaaS solution supports low-code integration between applications and cloud services. Jitterbit supports API management and low-code application development.
Jitterbit Harmony integration grants you access to over 400 templates for connecting and automating workflows and business logic.
Jitterbit Harmony Features
IPaaS
EDI
API Manager
App Builder
Salesforce Data Loader
Jitterbit Harmony Pros
It supports Extract, Transform, Load (ETL).
It allows you to build and customize APIs.
The platform is user-friendly and intuitive.
Jitterbit Harmony Cons
The learning curve is steep.
It doesn’t support version control and event logs.
Only large corporations can afford it.
Informatica
This enterprise data management platform allows users to sync data and systems in order to consolidate and orchestrate workflows.
Informatica uses AI capabilities to speed up integrations and optimize connections in order to eliminate human error and data duplication.
Informatica Features
Data Catalog
Data Integration & Engineering
Data Marketplace
API & App Integration
Data Quality & Observability
MDM & 360 Applications
Governance, Access & Privacy
CLAIRE AI Engine
Informatica Pros
It is applicable across multiple industries and processes.
It supports in-depth data integration between multiple platforms.
Informatica supports complex information lookup and data transformation.
The interface is user-friendly.
Informatica Cons
You have to handle data quality management manually.
The pricing model is too complex.
You can only generate mappings through a GUI without writing code.
Celigo
Celigo is a popular option among other Workato alternatives because it offers drag-and-drop features and advanced scripting capabilities.
As a Workato alternative, Celigo offers a vast library of connection templates, which you can use as a jumping-off point.
Celigo Features
Celigo AI
API Management
Error Management
B2B Manager
Celigo pros
It provides a vast library of templated connectors.
It provides clear integration backlogs.
Celigo has a dedicated error management feature.
Celigo cons
Celigo has fewer enterprise features than Workato.
It has a limited product offering.
ONEiO
ONEiO provides an iPaaS solution that centralizes the connection of tools and integration of processes.
As a Workato alternative, this solution provides a fully managed interface for setting up connections between applications and services.
ONEiO Features
Over 10,000 applications by default.
No-code editor
Attachment handling.
Data anonymization and transformation.
ONEiO Pros
It provides a stacked library of connectors.
The editor supports no-code connections.
ONEiO Cons
You cannot deploy ONEiO on-premise.
It doesn’t have API management capabilities.
The partner network is small compared to Workato.
Why Exalate is an Excellent Workato Alternative
Exalate is one of the best Workato alternatives on the market when it comes to integrating data bidirectionally between systems.
The Exalate integration as a service option allows users to connect with Salesforce CRM, ServiceNow, GitHub, Jira (Cloud, On-Premise, and Data Center), Zendesk, and Azure DevOps.
In addition to these main connectors, you can request custom connectors and solutions from scratch for specific service desk applications and CRMs.
MSPs can also use Exalate to improve collaboration with clients. This could be a bidirectional sync with a supplier or deep-ticket integration with a cybersecurity MSP.
Exalate’s crown jewel is the AI-powered Groovy-based scripting engine that allows you to configure your scripts and map connections however you want. You can also set triggers for action-based synchronization. To find out more about Exalate and how it can help your use case, book a demo with our engineers right away.
Jira admins and Salesforce users configure both platforms to share data with a reliable, secure integration solution. This is called a Salesforce Jira connector.
But why use a dedicated connector?
A Jira to Salesforce connector allows users to sync data without having to leave their environments. Every data exchange and interaction has to pass the configuration and security smell test before it goes through.
In this piece, I’ll discuss Salesforce Jira connectors in detail. Continue reading to learn about the benefits, practical use cases, and best practices for implementing these connectors.
What is a Salesforce Jira Connector?
A Salesforce Jira connector is a solution that allows you to share data and map fields, objects, and entities between Salesforce and Jira.
The connector—whether a custom solution, native integration, or third-party iPaaS tool—acts as a bridge between both platforms. It will also handle authentication and transformation to ensure the accuracy and consistency of every data exchange.
Key Features of a Jira Salesforce Connector
The available functionality can vary depending on the integration service provider, but here are some standard features of a Salesforce connector for Jira.
Security features such as encryption protocols, access tokens, API keys, firewalls, and others,
Automation and triggers to automatically initiate exchanges once the outlined conditions are met,
Intuitive dashboard to visualize and set up connections,
Error console for troubleshooting and debugging faulty connections,
Detailed reporting to track activity logs and keep admins informed about the status of syncs,
Connection templates to speed up the configuration process,
AI assistance to suggest mapping rules and scripts.
Why Use a Salesforce Jira Connector?
Using an app to connect Salesforce and Jira comes with several technical and business benefits.
It reduces the manual workload of having to request data from other teams or external partners.
Salesforce Jira connectors speed up information exchange between both platforms by automating transactions to occur in near-real time.
Since both platforms are in sync, decision-makers will have a better view of projects and customers from a CRM and a work management perspective.
A Salesforce and Jira connector can save you costs by eliminating the need for licensing and subscription fees for both platforms.
It makes collaborations more transparent and seamless because both sides have access to necessary information whenever needed.
Both systems being in sync improves the sales process and customer experience through faster resolution times and tailored responses.
Businesses can enjoy other granular benefits, depending on the specific use case and scope of integration.
Practical Use Cases for a Salesforce Jira Connector
We’ve discussed the overall benefits of Salesforce Jira connectors. I’ll now show you practical use cases for such connectors.
You can keep the customer and case owner updated about the status of the bug reported through a Jira Service management portal.
A Jira Salesforce connector allows you to sync attachments and comments from multiple Salesforce objects between both systems to make sure the bug comes with detailed descriptions and context.
To do so, you can transfer the contents of a Salesforce entity (Account, Case, Opportunity) to the corresponding Jira issue. This also includes picklists, checkboxes, and custom fields.
This also makes it possible to update the customer’s account records from the designated Jira custom field. This includes details like account ID, date/time, user mentions, comments, etc.
Admins can use data from Jira to understand the efficiency and quality of their customer service efforts, as well as to identify improvement opportunities.
They can also move the Salesforce entity to a resolution by changing its status and priority from the Jira issue.
Types of Salesforce Jira Connectors
As mentioned, every connector for Jira and Salesforce varies in terms of architecture, functionality, and configuration. I’ve grouped them into three categories.
Platform Native Connectors
This refers to a classic connector for Salesforce & Jira, which is hosted by either platform natively. For example, Salesforce provides MuleSoft as the default integration solution.
So, you can use MuleSoft Composer or Anypoint Platform to integrate your Jira issues with a Salesforce CRM.
The drawback to such connectors is that users are limited to the default features. You basically have to limit your configurations to supported fields and objects.
Custom Connectors
A custom connector could be a simple script or a fully-fledged application designed by your team to connect Jira with Salesforce.
As part of the “build vs. buy” debate, companies opt for custom Jira Salesforce connectors because they guarantee ultimate control over the development, maintenance, and security of their tool.
Obviously, this requires significant financial and administrative investment in R&D. Then, you have to worry about hiring, licensing, and maintenance fees.
Third-party Connectors
These are standalone applications for connecting non-compatible platforms like Jira and Salesforce. The connector processes data requests and carries out data transformation to ensure the correct format is received.
Exalate is a third-party Salesforce to Jira connector that supports two-way data exchange. You can also use it to write Groovy scripts to control advanced connection use cases.
I’ll discuss Exalate in more detail later.
Challenges of Implementing Salesforce Jira Connectors
Here are some challenges that can hinder the implementation of a Jira connector for Salesforce.
API Limits
Most APIs have enforced governance and usage limits, which means you can only process a specific number of requests within a certain time frame.
For businesses looking to expand their workload, this could limit their ability to scale operations and collaborate with others.
Data Conflicts
Without proper data transformation, you’ll end up with jumbled-up data that doesn’t provide any significant value for your business.
Other factors, such as mapping conflicts, inconsistencies, and scripting mistakes, can also affect the connector’s performance.
Say you mistakenly map the “name” and “account ID” fields from a Salesforce case to the “user” field in a Jira bug. The conflicting data will override the value in the user field after every exchange.
Security and Privacy
The Salesforce and Jira cloud connector introduces more areas of vulnerability; if a malicious actor gets access to the solution, they can obtain sensitive information.
That’s why compliance and privacy regulations, as well as security best practices, are necessary considerations when choosing a connector for Salesforce and Jira CRMs.
Insufficient Monitoring
Most admins make the mistake of setting up a Jira and Salesforce connector and expecting it to run on autopilot. However, you need to monitor every connection to determine whether it is performing as intended.
Lack of Documentation
Some integration vendors neglect documentation, which could be a nightmare for users trying to make simple configurations.
For instance, you can consult the Salesforce Jira connector documentation to learn how to implement custom field mappings without waiting for professional assistance.
If the documentation lacks structure and substance, fixing simple errors and conflicts will turn into a time-consuming headache.
How to Set Up a Salesforce Jira Connector
For this illustration, I’ll use Exalate.
Exalate offers a free 30-day trial, so you can try it out right away. A free plan is also available when the trial expires. You can also use AI-assisted integration with Exalate’s Script mode. We’ll learn more about it in the coming section.
For a detailed breakdown of the installation process on both systems, follow the video tutorials from this playlist.
Step 2: Set Up the Connection
You can start from either platform, as the process is almost the same. I’ll start with Salesforce here.
Note: If you prefer a video tutorial, here it is!
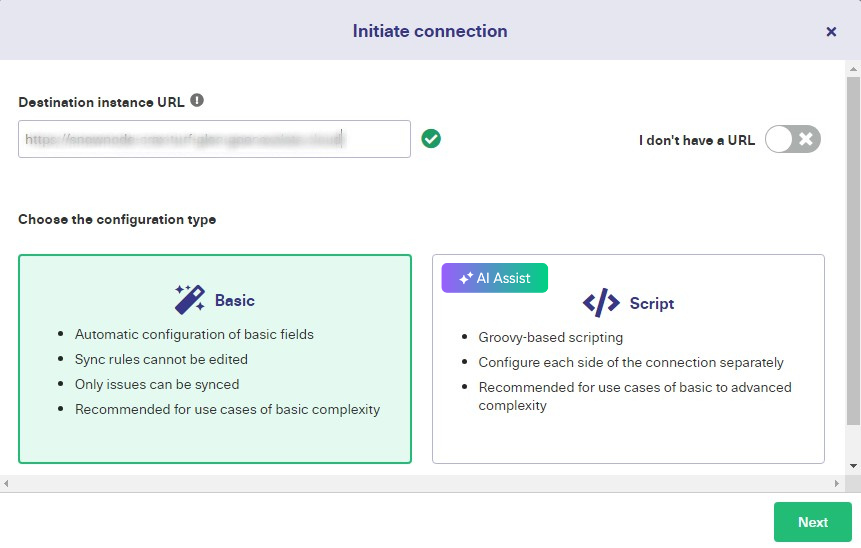
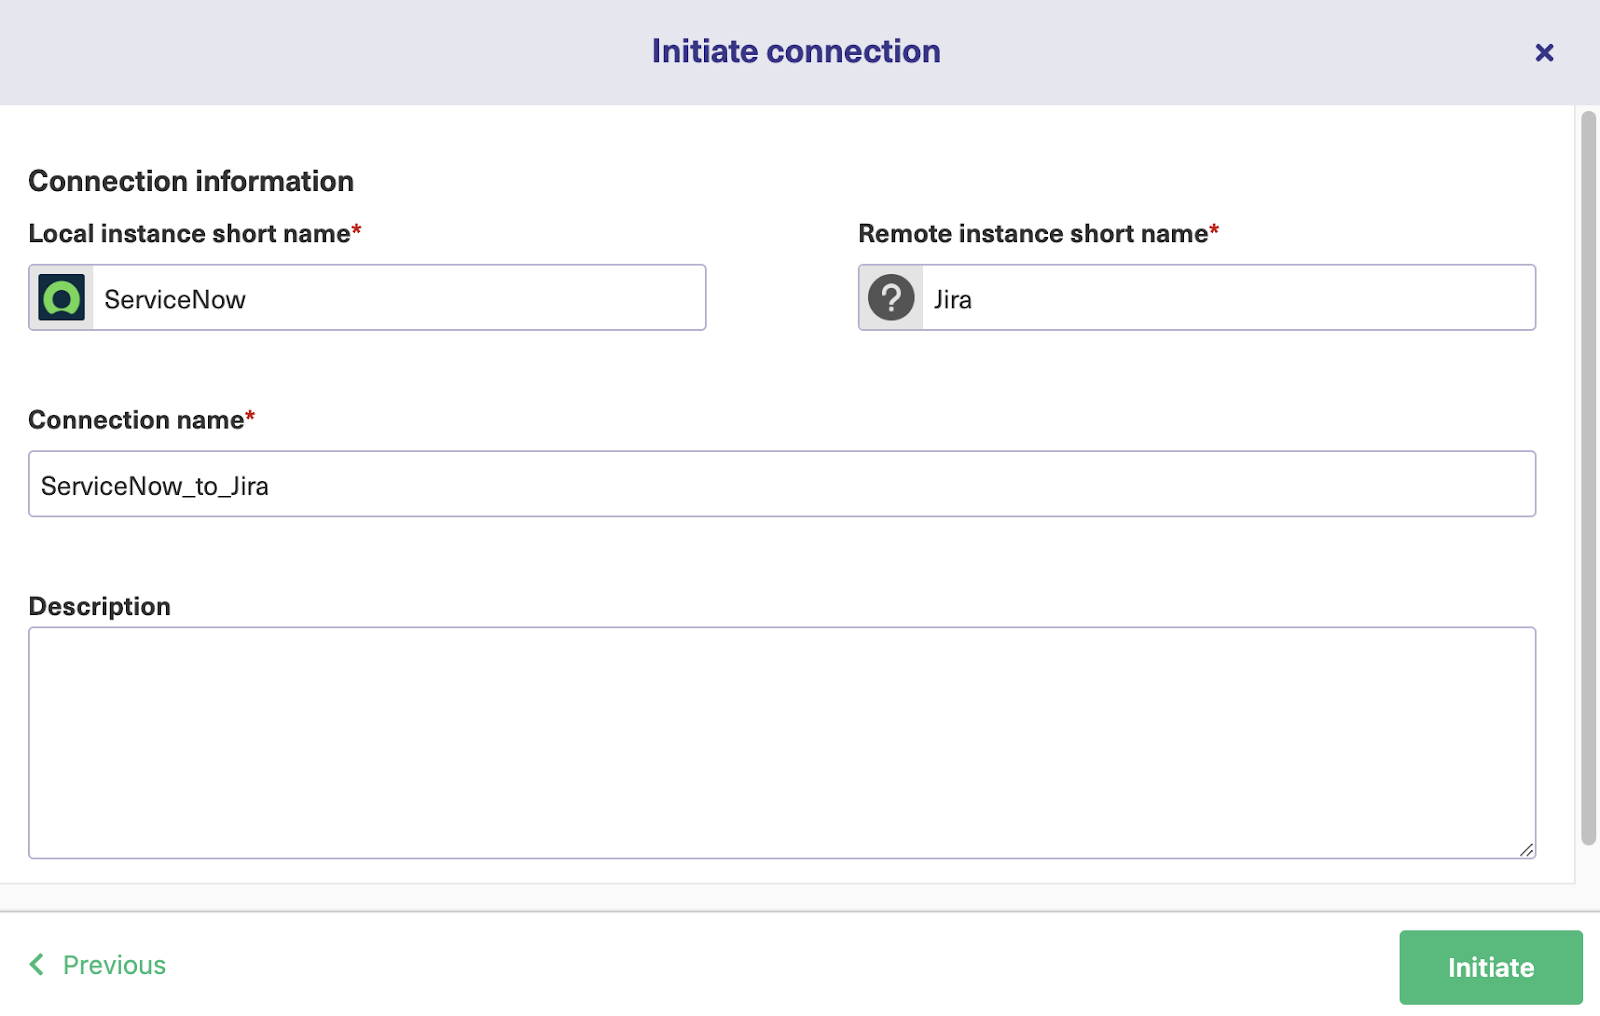
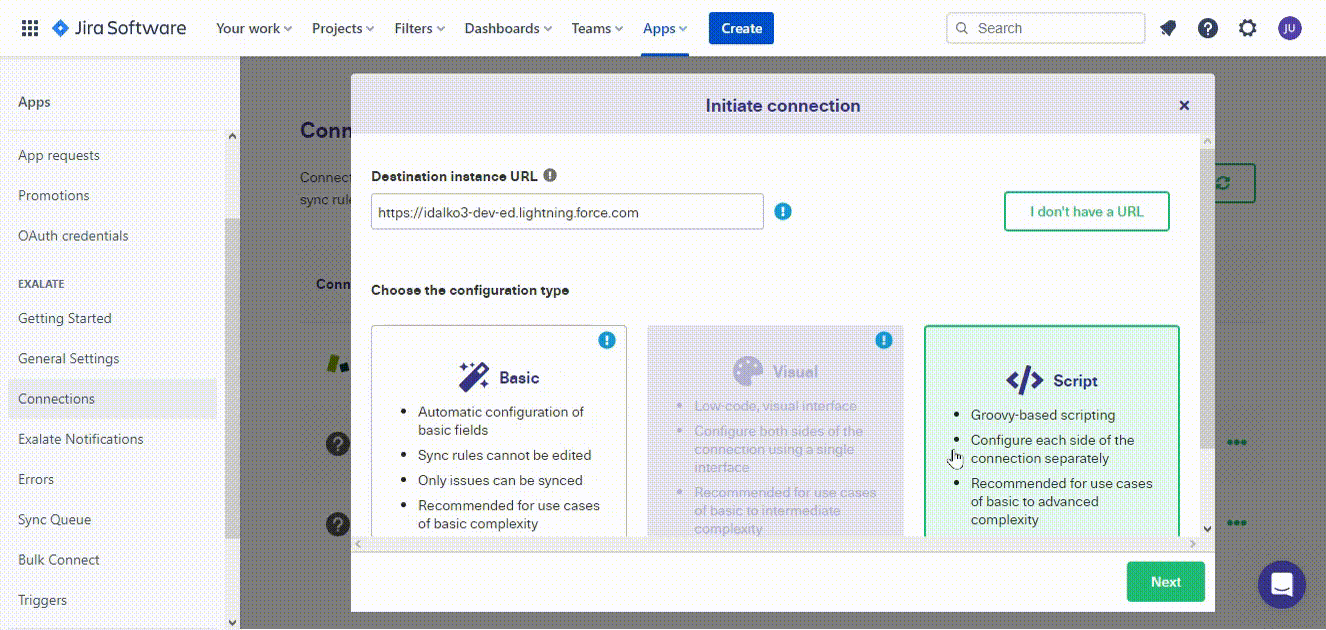
Navigate to “Exalate” in your Salesforce org, then select “Connections” from the left-hand menu. Click the green “Initiate connection” button.
Next, enter the address of the other instance (Jira in this case) in the “Destination instance URL” box. Exalate will verify that it is installed on the other instance.
Then you have to choose between the Basic mode, which configures things automatically for you, or the Script mode, which allows you to configure and customize your integration using the Groovy scripting language.
Working with the Basic Mode
With Basic mode, you have the option to automatically head to the other instance if you have admin access. If you don’t have admin access, then you can follow the steps in the Script mode.
After granting admin access, choose a project to sync, and when you click the “Confirm” button, the connection will be created.
You can then test the connection by entering an issue or a case key to sync.
You can create triggers or sync entities in bulk in the Basic mode.
Working with the AI-assisted Script Mode
The Script mode allows you to write custom expressions for your sync. With the help of the AI-enabled chatbot, you can come up with sample script suggestions for use cases of any complexity.
To set up a Script mode connection, choose Script from the configuration screen and click “Next”.
Name your connection and add a description, especially if you have multiple connections performing different functions.
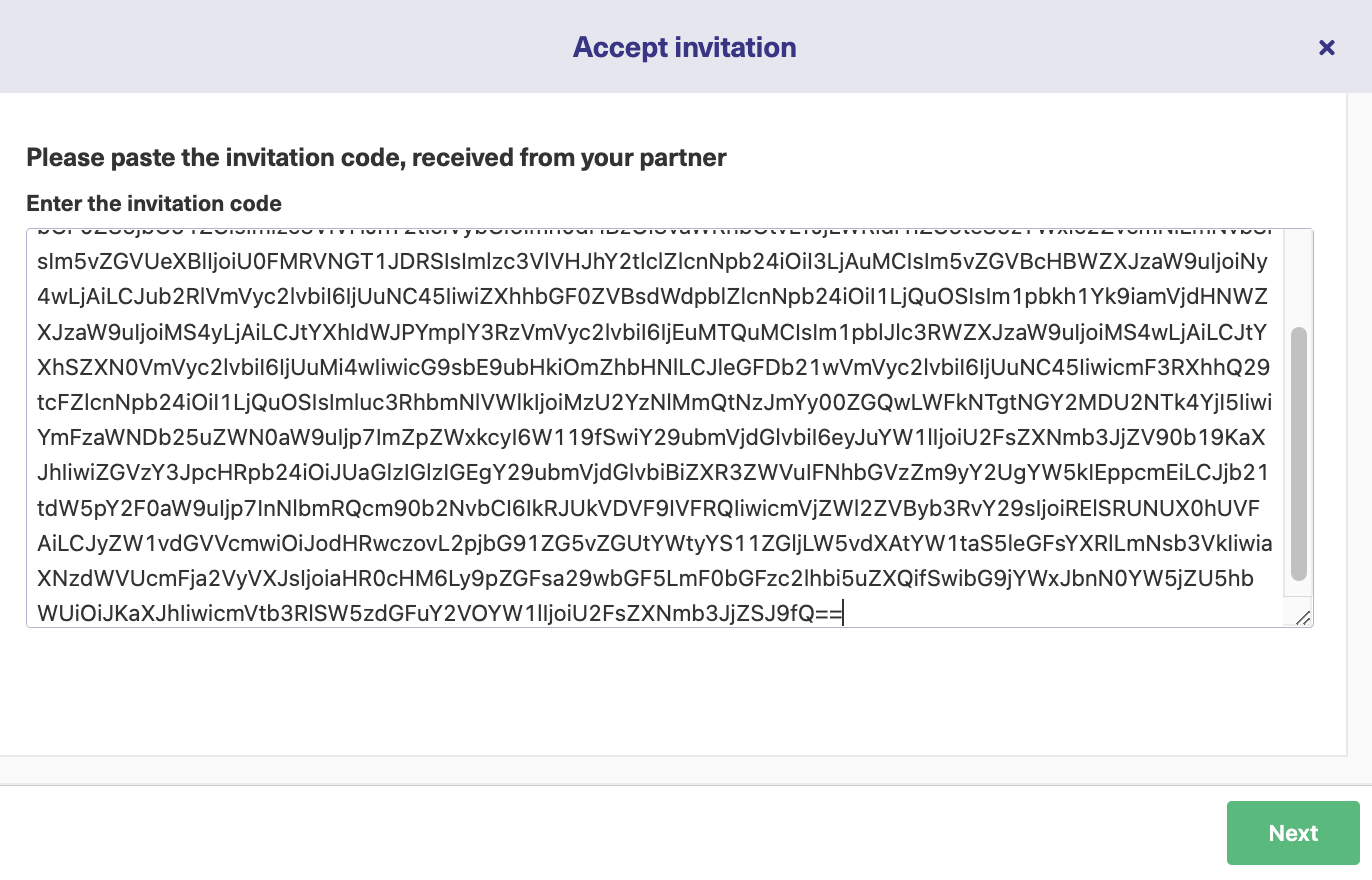
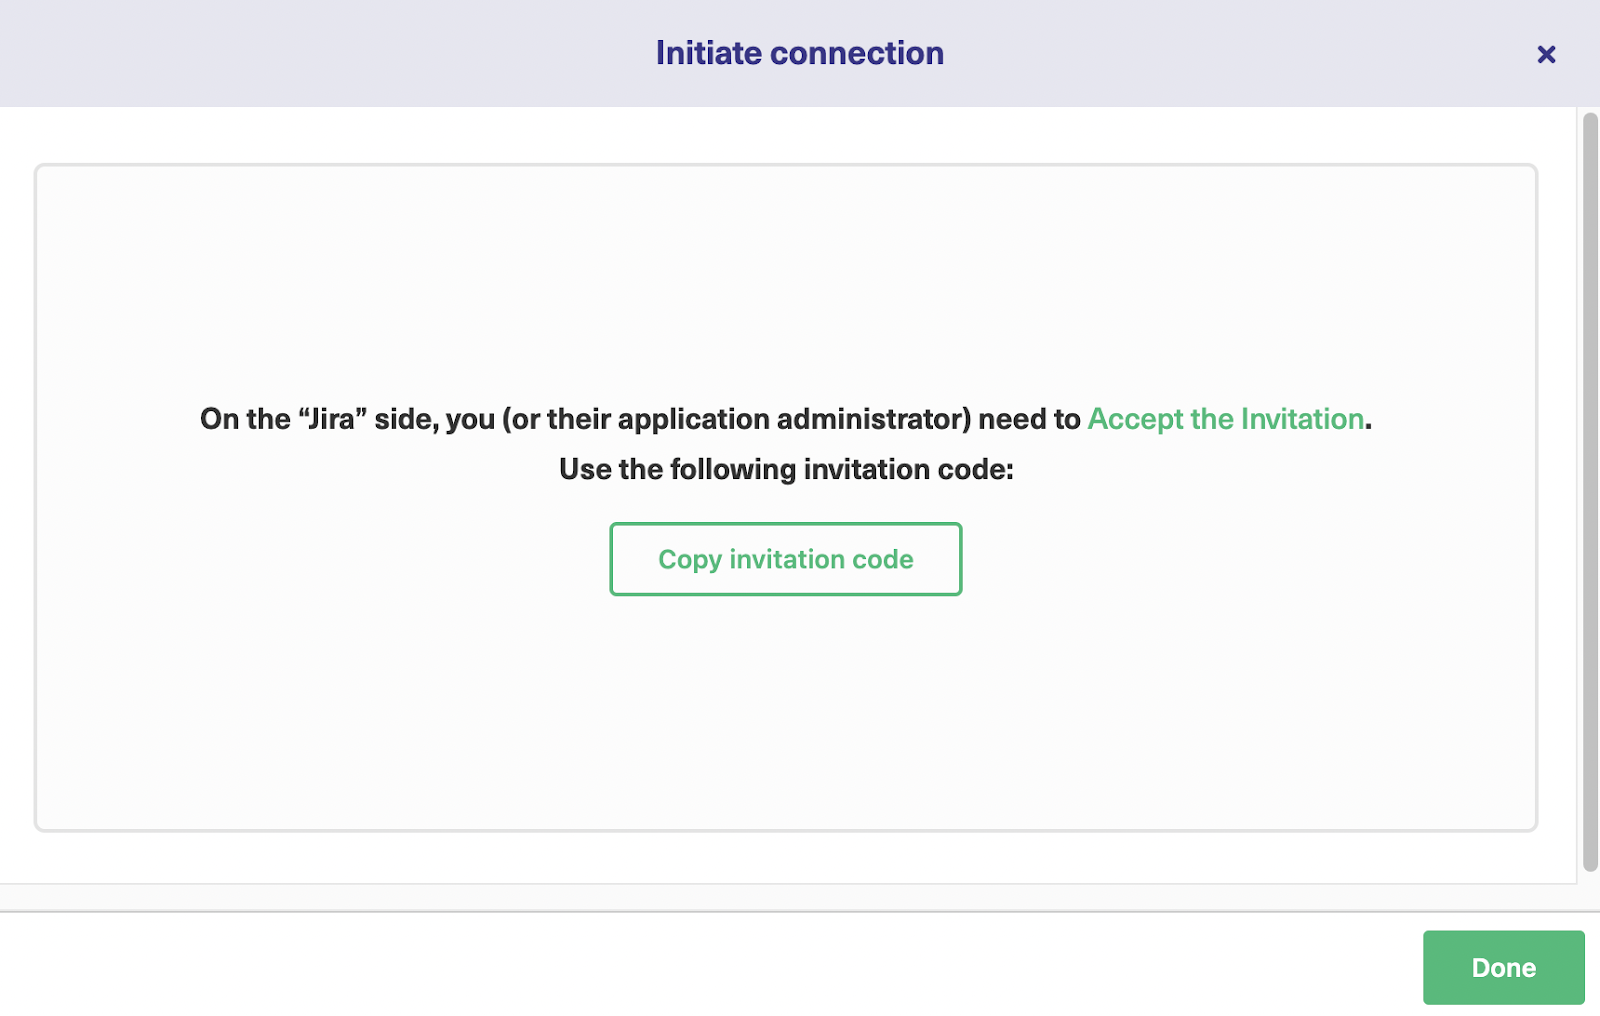
Click the “Initiate” button. Exalate creates an invitation for you, which you can copy to the clipboard by clicking the button. Then, switch to your Jira instance.
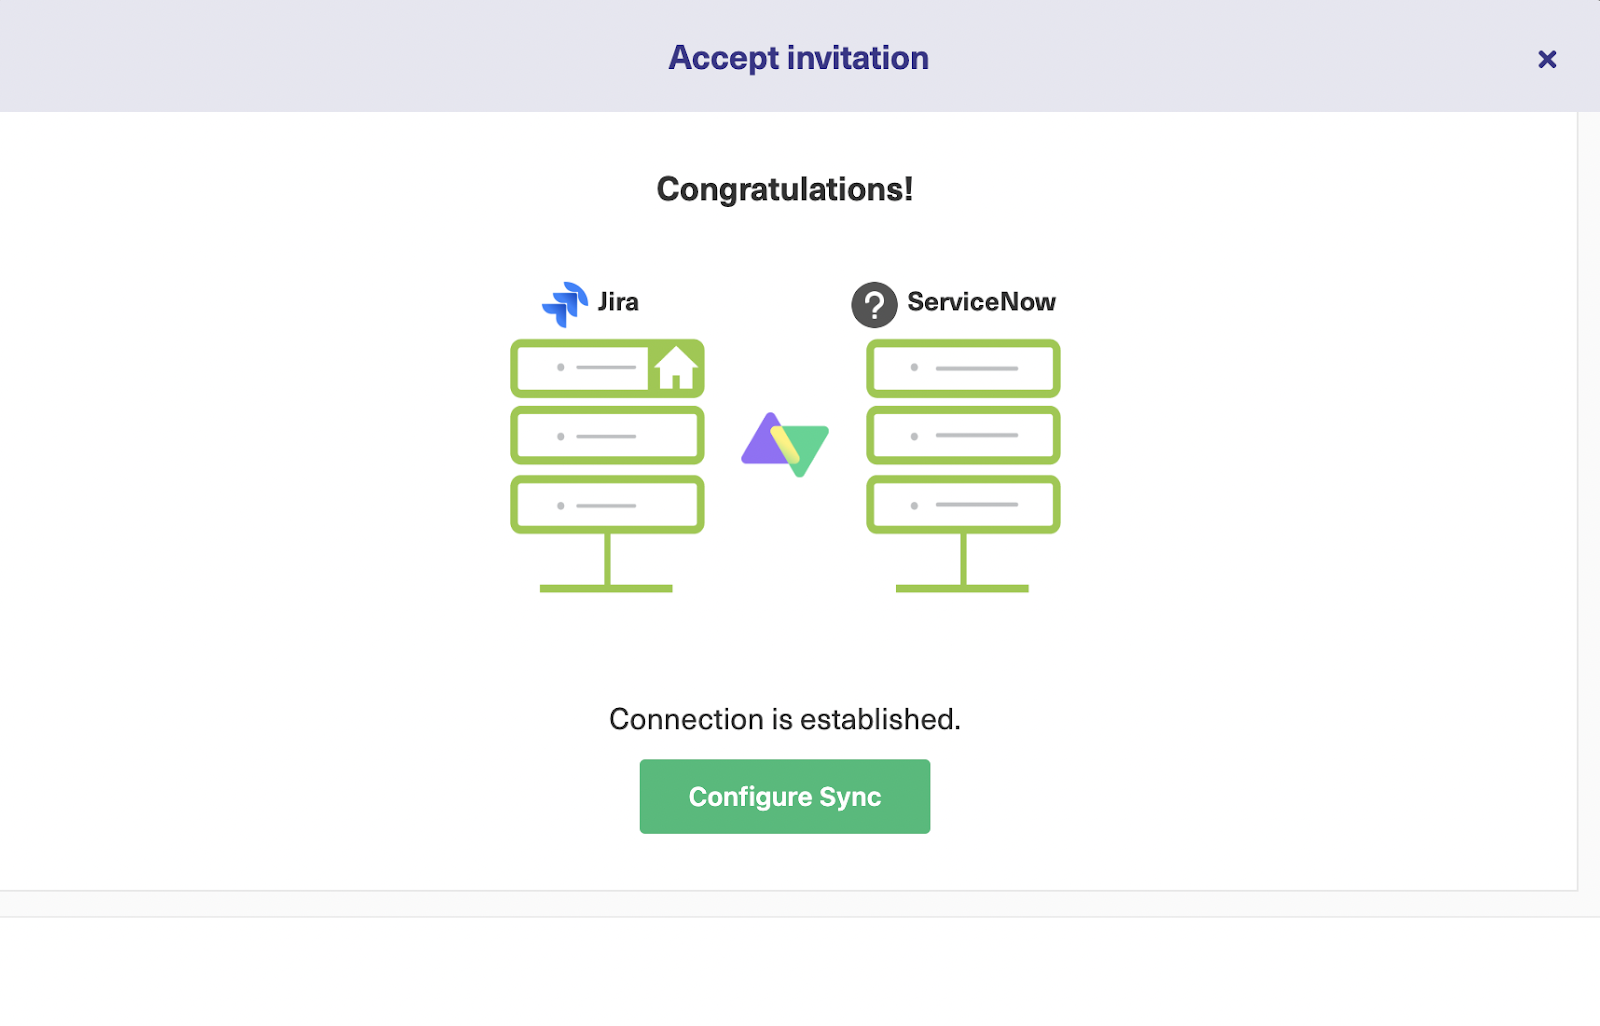
Navigate to the Exalate “Connections” screen on the Jira issue and click “Accept invitation.”
You’ll see a text field where you can paste the invitation code you just copied to the clipboard. After that, click “Next” and configure your connection to be in Basic mode.
Now your connection is ready.
From here, you can follow some optional Jira Salesforce connector configuration steps. You can return to these at any time by finding your connection and clicking the edit button.
Step 3: Configure the Sync Rules
The “Edit connection” screen has several tabs. To proceed, click the “Rules” tab.
The Outgoing sync controls how items in the platform we’re looking at are shared with the other platform.
The Incoming sync refers to the incoming data from the other platform and defines how that data is mapped to items on the current system.
You can also explore advanced ‘script helpers’ that can help you with complex processing.
Exalate AI Assist can also suggest sample scripts for your sync. Enter a prompt for the use case, and the engine will generate suggestions for alteration, which you can accept or reject.
If you don’t fancy writing code at all, our human solutions assistants will help you out.
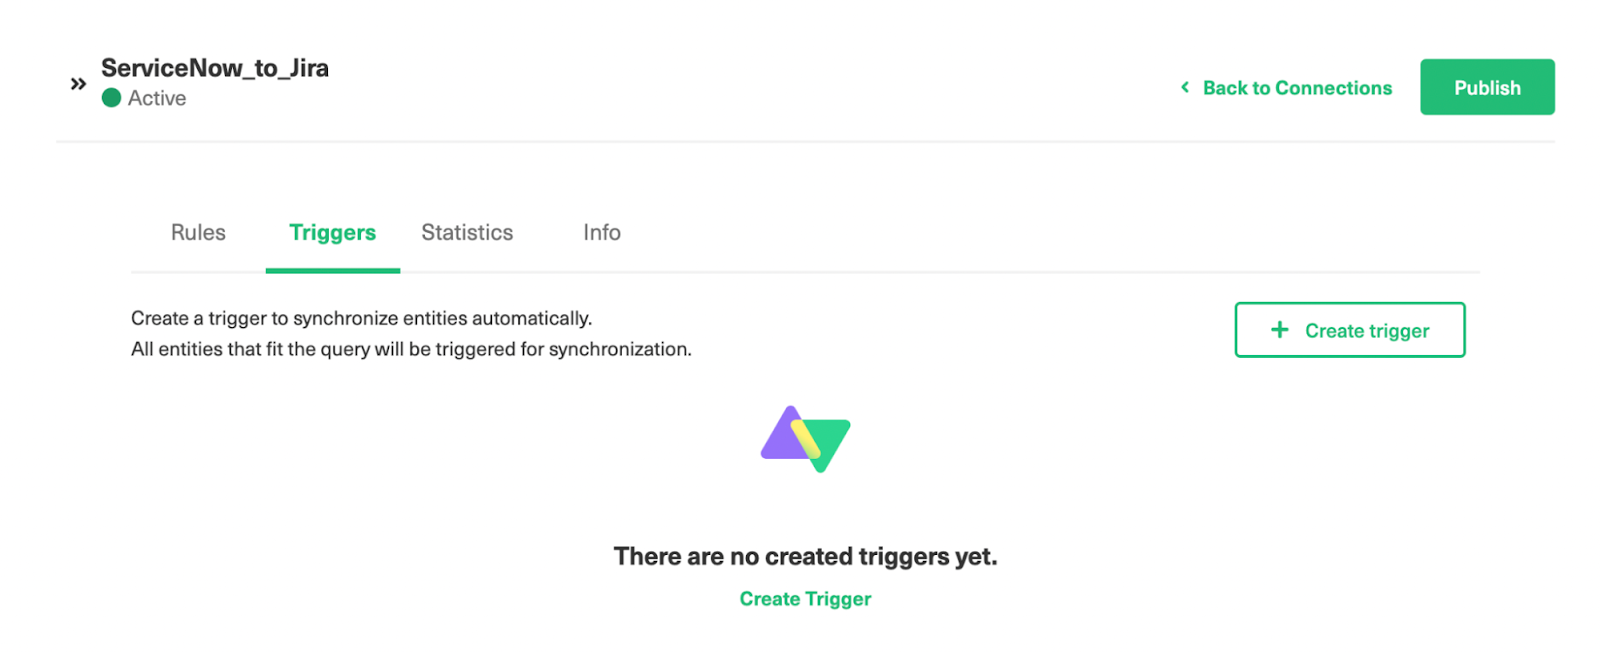
Step 4: Set Up Triggers
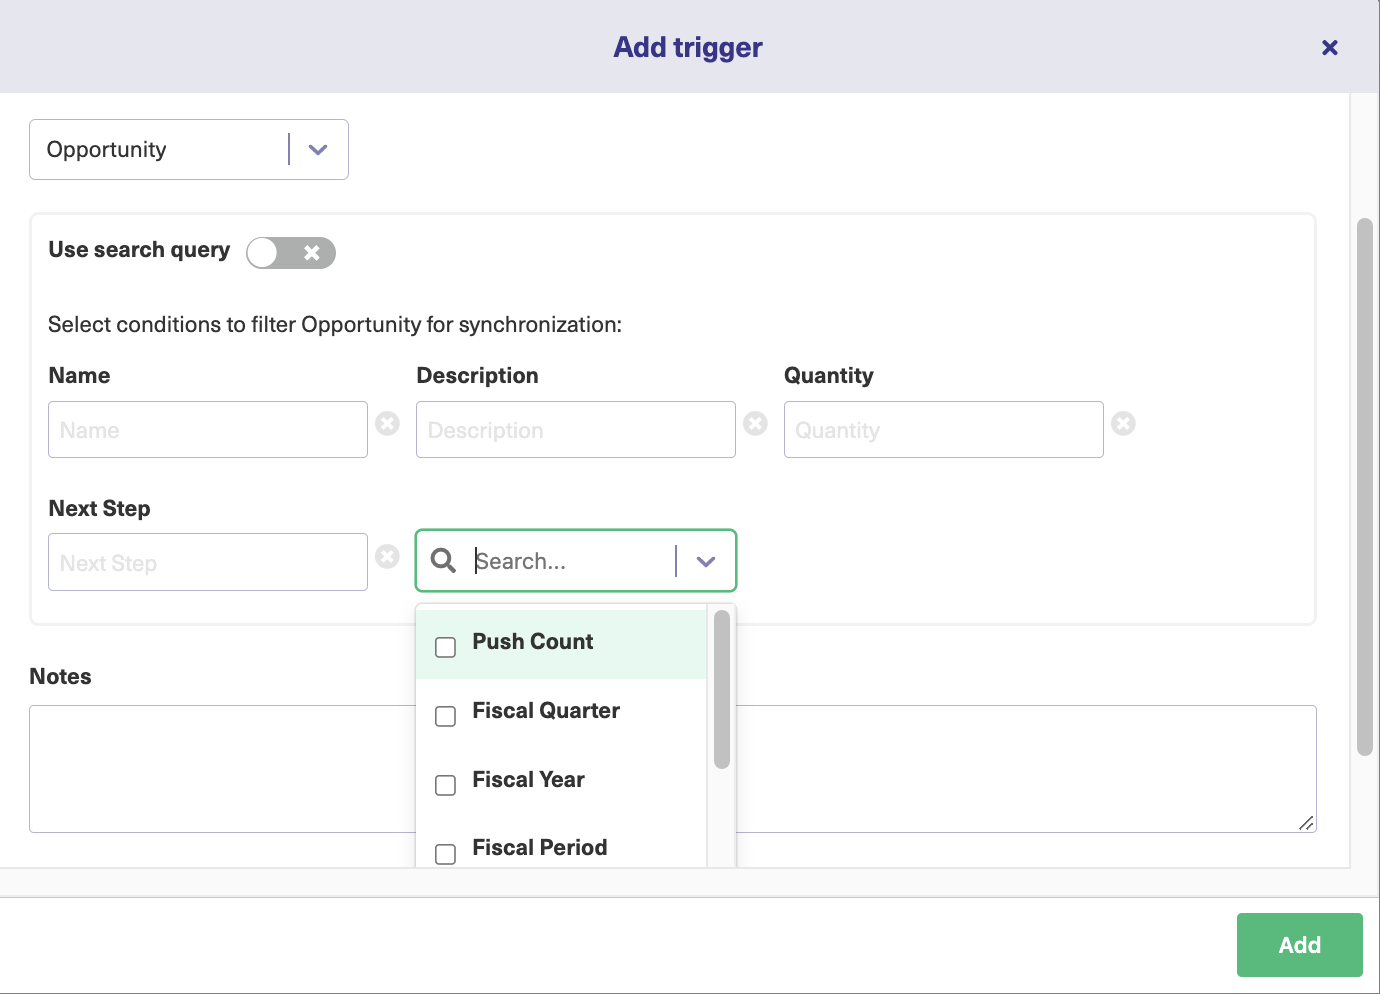
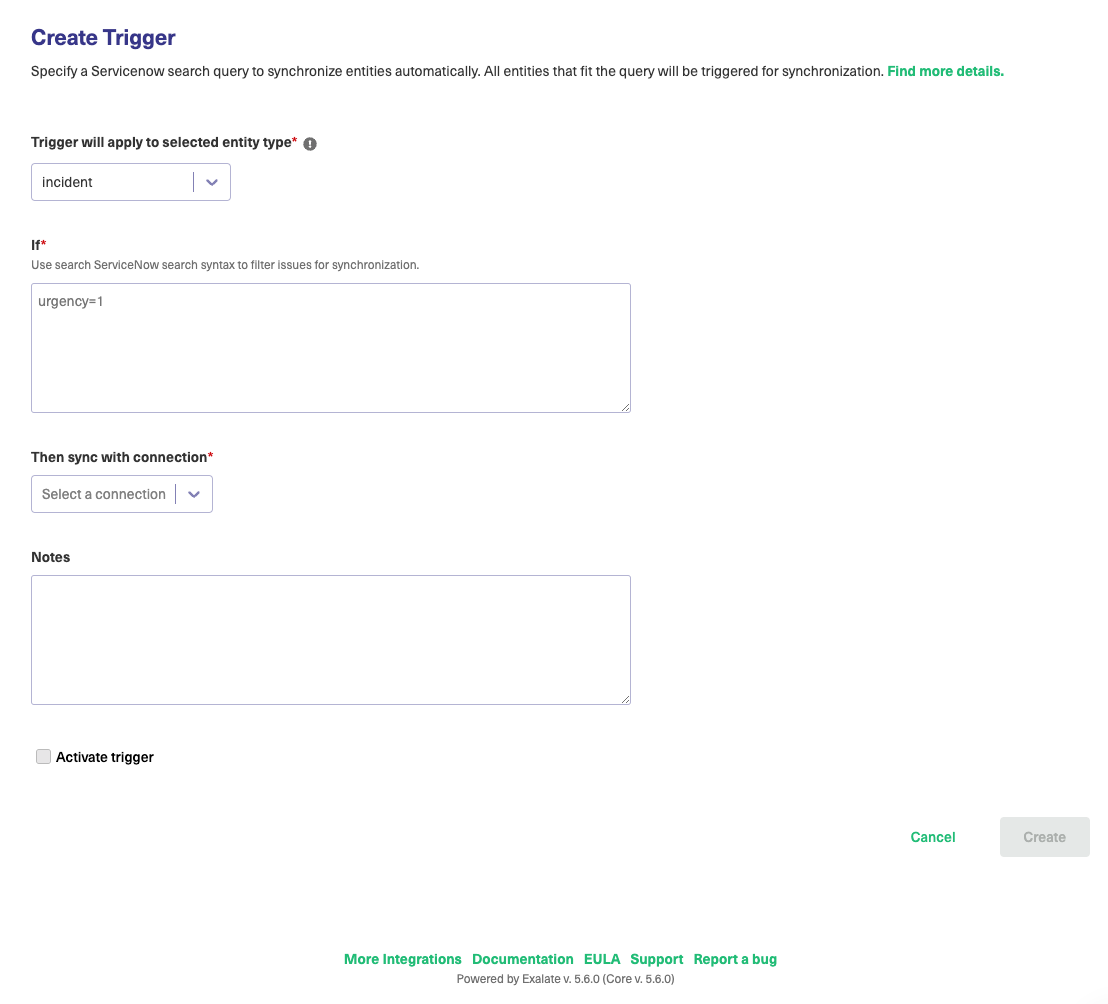
Click the “Triggers” tab on the edit connection screen to work with them. You can create multiple triggers for each connection.
Click the “Create trigger” button to begin. On the next screen, select the type of entity the trigger applies to. You can also choose whether to use a search query or not.
If not, you enter values into specific fields in order to find matching items. That’s the simple way to do things.
Search queries are more complicated. Each platform uses a different language: JQL (Jira Query Language) for Jira and SOQL (Salesforce Object Query Language) for Salesforce.
You have to enter the necessary code into the “If*” field that is used to filter matching queries. It takes only a basic understanding of programming concepts to write these triggers.
Finally, there’s a checkbox to turn your trigger on and off. When you’re done, click the green “Add” button.
Note: Creating triggers is straightforward and intuitive. You can always learn more about setting triggers in Jira and Salesforce.
Step 5: Start Synchronizing Your Platforms
Now, your platforms are connected, and information will be synchronized automatically. To test the synchronization, create a test issue that meets the criteria. Wait a while, or trigger synchronization manually, and verify that the issue is shared correctly.
Best Practices of Using a Salesforce Jira Connector
Let me give you expert tips for using a Salesforce Jira connector.
Outline the integration goals and ensure they align with your business goals. For instance, the connector could help you fetch SLA records for specific users.
Choose a Salesforce Jira connector that supports the specific use case. For example, select a solution that supports custom field mapping instead of generic syncing of default fields.
Ensure that both platforms meet the minimum requirements for installing the third-party connector.
Anticipate increasing workloads and requests by opting for a scalable and reliable Salesforce Jira Connector.
Specify access and permissions for users based on their roles. Enforce authorization protocols for every system admin. (Exalate works on any Jira product, including Cloud, Server, and Data Center).
Train your team to set up the configuration in order to increase their efficiency in using the solution.
Back up data on both sides in case the connector fails during high-priority data exchange. This will bail you out if something goes wrong with the exchange or configuration.
Use alerts and notifications to track the connector’s performance and fix all configuration and network issues on time.
Why Exalate is a Reliable Salesforce Jira Connector
Exalate is a reliable Salesforce Jira connector because it supports custom, bidirectional syncs between both platforms, as well as other ITSM and work management systems like Zendesk, GitHub, ServiceNow, Azure DevOps, and the like.
Users can also set up advanced integrations with the AI-enabled Exalate Groovy scripting engine. Multiple fields, objects, and entities are available for mapping on both ends.
In terms of security plus the fact that it is ISO certified, Exalate uses a single-tenant architecture to isolate each user to their own environment. Admins also get autonomous control to set up their configs as they want without affecting the other side’s instance.
Want to learn more about the Exalate Jira to Salesforce connector? Book a demo with an integration engineer and discuss your use case in detail.
How do you get a ServiceNow incident to reflect on a Jira task? Get a ServiceNow Jira connector.
Sounds straightforward, right? Well, not so fast.
Before connecting a ServiceNow instance with a Jira site, you need a connector or integration that can fetch, transform, and encrypt the data correctly from both sides.
Tag along as I explain the working principles of a Jira ServiceNow connector. But to get the full picture, I’ll start with a few use cases.
Use Cases for a ServiceNow Jira Connector
Here are some scenarios where your organization or team might need a ServiceNow Jira connector:
Sync different ServiceNow entities to a Jira bug in order to get the customer support team to share data with the developers and QA experts.
Get attachments from incidents, and problems, or request items to appear on the corresponding Jira issue. This provides better visibility for the user’s pain points.
Use automated status updates to keep two internal and external teams working on the same project updated. Maintain the priority and urgency of tasks across both Jira and ServiceNow.
Sync stories, scrum tasks, and epics to provide more details to external partners, suppliers, vendors, and MSPs.
Use synced change requests to keep customers and clients informed about upcoming product changes.
Obtain data about reported problems and defects to a comprehensive root cause analysis.
The application areas for ServiceNow Jira connectors go as far as human imagination and API limits allow. You can see a list of all the supported entities and fields for both Jira and ServiceNow integration.
How Does a ServiceNow Jira Connector Work?
To understand the basic working principles of a ServiceNow connector for Jira, let’s explore a sample use case.
Team A creates an incident on their local ServiceNow instance. This action triggers a webhook request to send the information to a bug on Team B’s Jira site.
But for that to happen, the user has to pass authentication to ascertain their identity. The connector deploys OAuth or Basic authentication and verifies the API token.
Once the user ID records are validated, the payload will then undergo a transformation from HTML (ServiceNow) to Markdown (Jira).
With the correct mapping, the Jira bug will reflect the user’s comments, incident description, attachments, and other fields to put ServiceNow and Jira in sync.
This is the basic working principle of a Jira ServiceNow connector.
Main Features of a Jira ServiceNow Connector
Here are some features to look out for in any connector for Jira and ServiceNow.
Dashboard: The solution should include a visual interface and dashboard for monitoring connection performance and availability.
Automation: Triggers and actions should determine how data exchange occurs without interference from human users.
Notifications: The connector must send out notifications and alerts to indicate high-priority actions for time-sensitive projects.
Security and Compliance: Security features such as single-tenancy, encryption protocols, API tokens, and multi-factor authentication should be present. ServiceNow Jira Connectors for handling user data should also be compliant and ISO-certified.
Error handling: The error handling console should provide detailed descriptions of failures and mapping errors to speed up troubleshooting and debugging.
Pre-built connections: The connector library should include connection templates with standard fields. These could be drag-and-drop options or sample scripts for frequently requested connections.
Custom connections: The connector must also support custom scripting and advanced mapping in alignment with the business needs.
Hybrid hosting: Modern multi-platform connectors support cloud and on-premise hosting. For variable applicability, the Jira ServiceNow connector should support hybrid hosting.
Four (4) Reliable Jira ServiceNow Connectors
The market for connectors and integration solutions is becoming saturated. However, after thorough evaluations, I’ve selected the best options based on rankings, personal preferences, available features, and user reviews.
I paid particular attention to third-party solutions with the following characteristics:
Reliability
Scalability
Customizability
Security
Reputation
After evaluating a few third-party solutions, here are four reliable ServiceNow Jira connectors.
You can also use AI along with the Script mode that will help you generate sync scripts based on your inputs, existing configurations, and Exalate’s scripting API. This feature is called AI Assist.
Exalate also supports automated integrations, using platform-native triggers that rely on the search syntax to establish granular control over connections.
To obtain any other information related to Exalate, you can always ask Aida, the AI-enabled documentation assistant.
#2 – OpsGenie
OpsGenie is an Atlassian software that acts as a ServiceNow to Jira connector. Devs and Ops teams can use it to gather actionable data and stay ahead of service disruptions and incidents.
OpsGenie also provides advanced reporting and analysis tools for monitoring productivity and performance metrics. Teams can also use it for post-incident analysis.
Apart from ServiceNow and Jira, OpsGenie supports integration with over 200 apps and web services.
Teams using MuleSoft also get access to advanced Salesforce Service Cloud features for in-depth analysis and insights for delivering better support services across both internal and external systems.
#4 – Skyvia
Skyvia is a platform for backing up cloud services and integrating ITSM systems. It is an excellent ServiceNow to Jira connector that supports scalable batch integration from multiple data sources and various data formats.
With Skyvia, you can import, replicate, automate, and synchronize data between Jira and ServiceNow to guarantee that both sides of the exchange get the correct information on time.
Why Use Exalate to Connect Jira and ServiceNow?
I’ll share some benefits of using Exalate’s ServiceNow Jira connector.
Exalate’s connector for Jira and ServiceNow improves customer satisfaction by reducing the resolution time and increasing the quality of the services they receive.
ServiceNow Jira connectors reduce the manual work of having to request or transfer information when needed. Nviso gained a competitive advantage through deep ticket integration across multiple teams.
Exalate speeds up data exchange and decision-making processes within the organization. Wirelesscar used Exalate to streamline collaborations with other automotive brands.
Connectors that can sync data between Jira and ServiceNow make incident management a breeze by establishing automated updates and seamless workflow integration.
It improves the collaborative environment and streamlines processes between teams working on a similar project, e.g., the customer support team working with the developers.
Exalate supports a single-tenant architecture, which keeps your system separate from other tenants and bodes well for infrastructure security.
Exalate can scale with your increasing workload thanks to the scripting engine that supports custom integration mapping.
How to Set Up a ServiceNow Jira Integration with Exalate
Exalate is easy to set up and use for Jira and ServiceNow integration. Here is a quick breakdown of the steps to follow.
Note: You can also request a trial for the ServiceNow Jira connector directly by clicking the button below.
Install the Exalate app on both Jira and ServiceNow, following the guidelines provided in the documentation.
Go to Connections and click the “Initiate connection” button.
Enter the destination URL and select the configuration type you want > Choose Basic Mode.
Select the project you want to synchronize > Enter the issue key and click “Exalate”.
The connection is set.
If you’re looking for advanced integration mappings, choose the Script Mode instead.
Enter the name and description > click “Initiate”.
Copy the invitation code to your clipboard.
Go to the remote side and click “Accept invitation” > Enter the activation code and click “Next”.
Select the project and click “Confirm”.
Go to the connection and click “Edit Connection”.
In the “Outgoing sync” text field, enter the script to control the fields and entities you want to share.
In the “Incoming sync” text field, enter the script to control the fields and entities you want to receive.
Click “Publish” to save the changes and implement the sync rules.
Go to the Triggers section.
Click “Create trigger”.
Choose the entity type > Enter the rules or search syntax and click “Add”.
Your connection and trigger are both set. The connector will now start working automatically.
Sample Use Case For Using a Jira ServiceNow Connector
Say you want both teams mentioned earlier to connect their Jira and ServiceNow platforms. Go to the incoming mapping rules and specify that all data coming from Team A’s ServiceNow should be mapped to a specific bug on Team B’s Jira.
To ensure both sides keep track of the statuses, establish rules to control and map the incident state with the bug status. This will keep both sides updated in a timely manner.
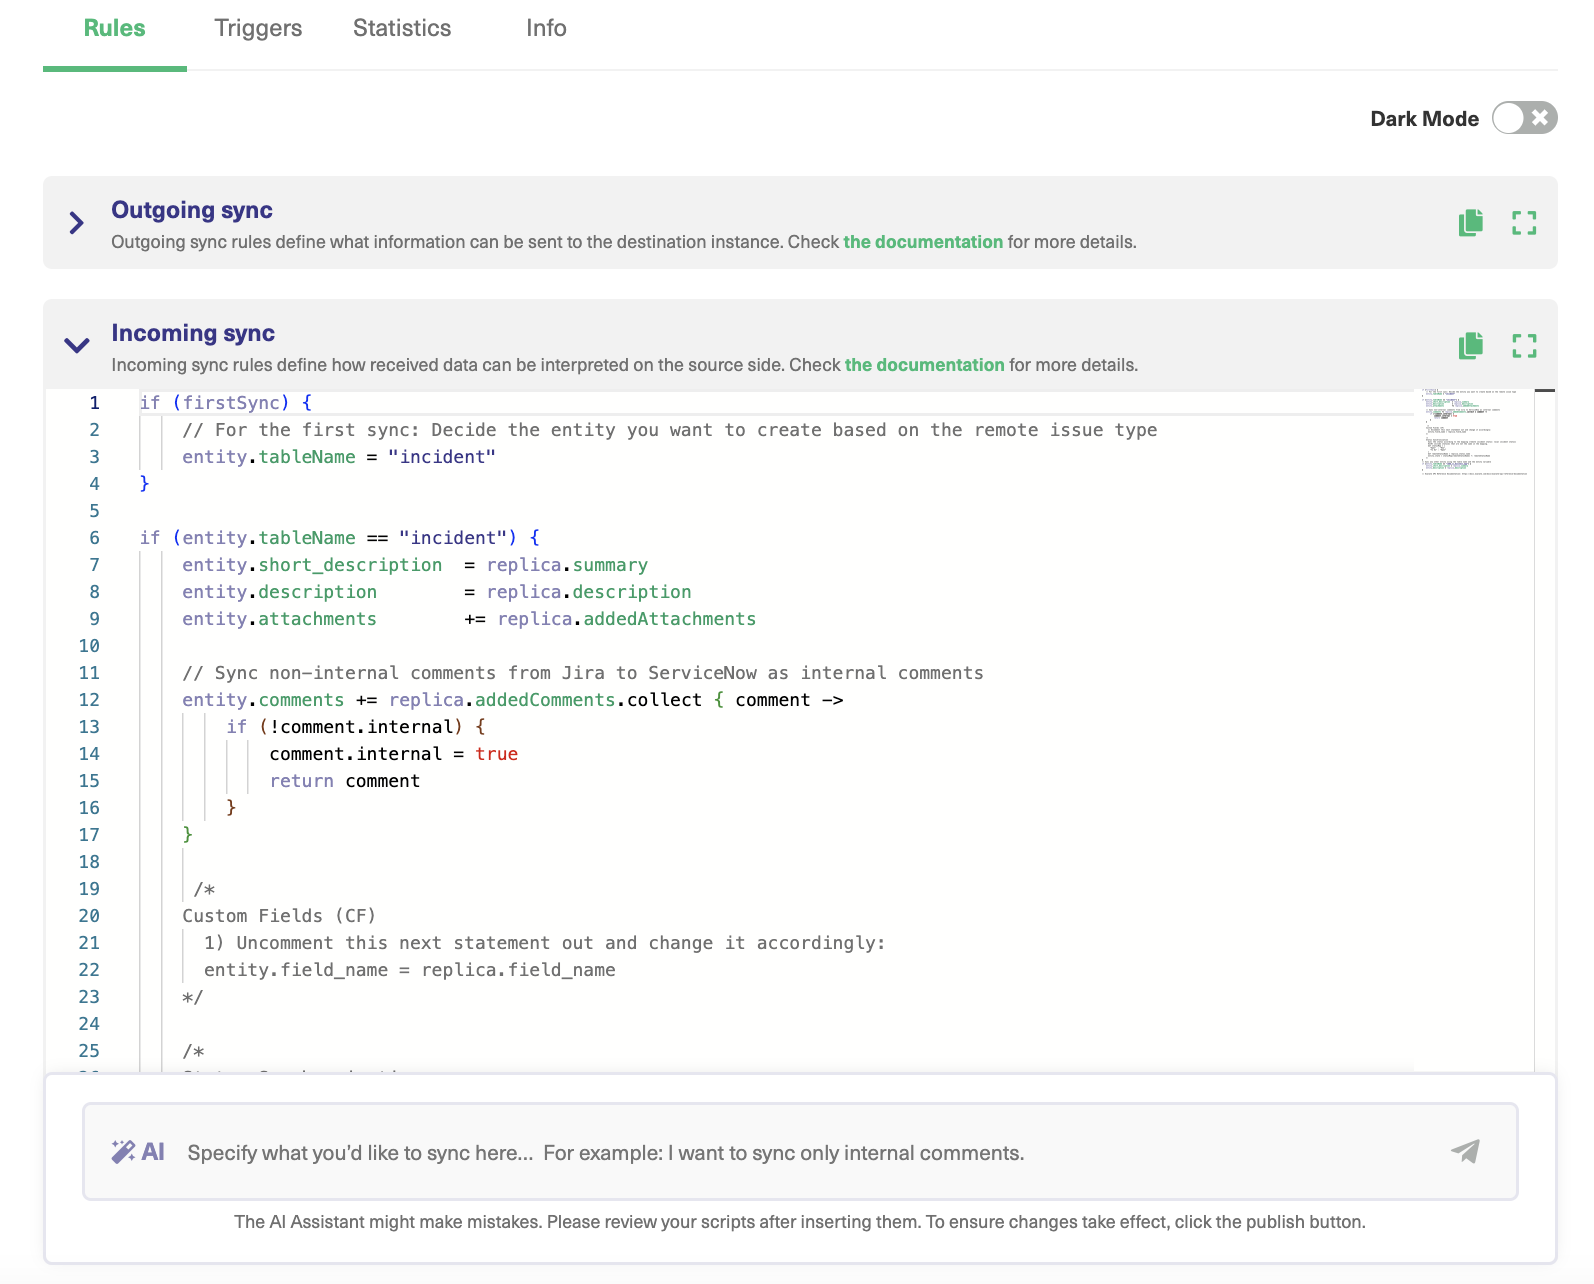
if (firstSync) { issue.projectKey = "FIR" // Set the same issue type as the source issue. If not found, set a default.
issue.typeName = "Bug"
def statusMap = [ "remote status name": "local status name" ]
This code snippet shows that for every first sync, the incoming data from ServiceNow will go to the project “FIR” as a Bug. Then, the status of the bug issue should match the state of the reported incident.
Admins on both teams can also add triggers to make incidents more urgent and improve the delivery speed for Jira and ServiceNow users.
Exalate uses Jira Query Language and ServiceNow search syntax for triggers on both platforms, respectively.
For example: project = FIR AND urgency = 1
The code snippet above indicates that every Jira issue with the highest priority (or urgency) will be automatically updated.
If the connection doesn’t work as expected, go to the “Error” tab to figure out what went wrong and make quick changes.
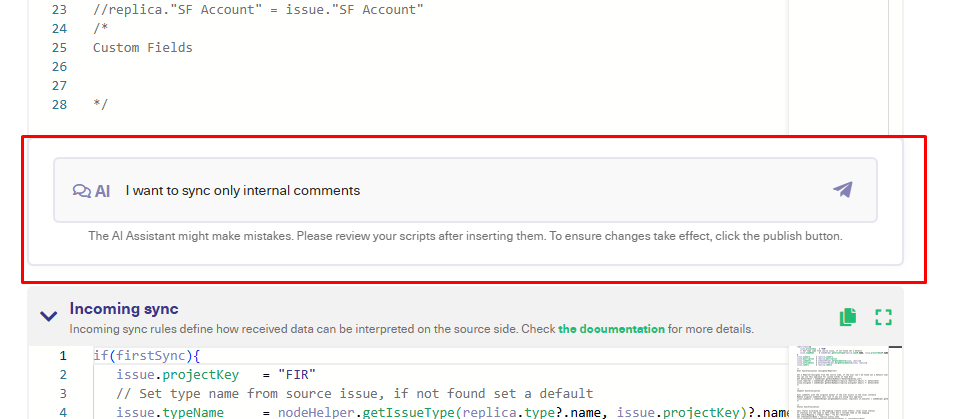
Use AI Assist in Script Mode
If you want to implement everything we just discussed in this section using AI, you can also use AI Assist with the Script mode.
With AI Assist, you can generate sync scripts faster and more efficiently. The AI chat window sits inside both the incoming and outgoing sync sections. Enter what you want to sync or don’t want to sync in the chat and AI will generate script suggestions for you. It will consider your input, your existing configuration, and Exalate’s scripting API while doing so. Review the scripts before publishing changes because just like any other AI, it’s possible there might be some mistakes.
Need help setting up a ServiceNow Jira Connector? Contact our sales team to get started with a demo right away.
Syncing data between Jira and Azure DevOps allows organizations to unify data without context-switching or manual requests.
Since neither platform can share data natively, you’d need native or third-party solutions to get the exchange to work. These integration solutions bridge the communication gap and handle data transformation across platforms.
Without wasting much time, let me show you how to sync Jira issue priority with Azure DevOps picklists using Exalate, a bidirectional third-party solution.
Priority and Custom Field Sync: Jira to Azure DevOps Use Case
When you change the priority of a Jira issue, the value appears in a picklist custom field on the corresponding Azure DevOps work item (task).
Why is this necessary?
It provides more context about the user or issue for both Jira and Azure DevOps users.
You can share Jira issue priority with teams monitoring a task on Azure DevOps.
Once done, create an issue in Jira. Add the description and populate the required fields. You can start syncing manually or automatically via triggers.
To configure the sync, open Exalate in your Jira dashboard, go to the connection you want to edit, and click on the “Edit connection” icon.
You have two options:
Outgoing sync (on the Jira side) refers to the data to be sent over to the Azure DevOps side.
Incoming sync (on the Azure DevOps side) refers to the data to be received from the issue on Jira.
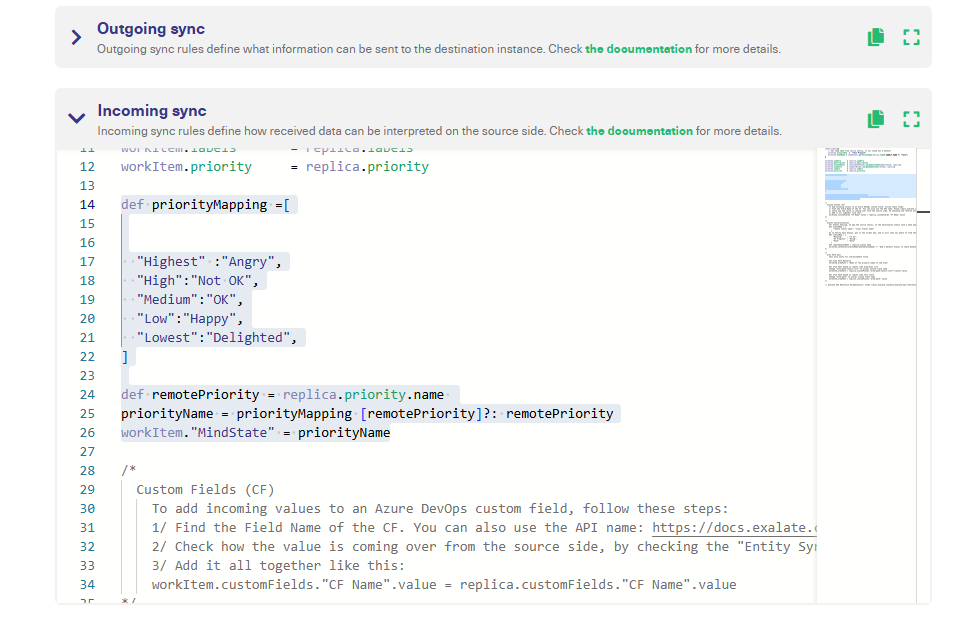
Under the “Rules” tab on the Azure DevOps side, enter the following code snippet into the “Incoming sync” text area.
The priorityMapping is a hash map that maps the default Jira issue priorities to the picklist options in the Azure DevOps task.
Once done, click “Publish” to save and implement changes.
To set connection triggers, you must use Azure DevOps WIQL (Work Item Query Language) or JQL (Jira Query Language).
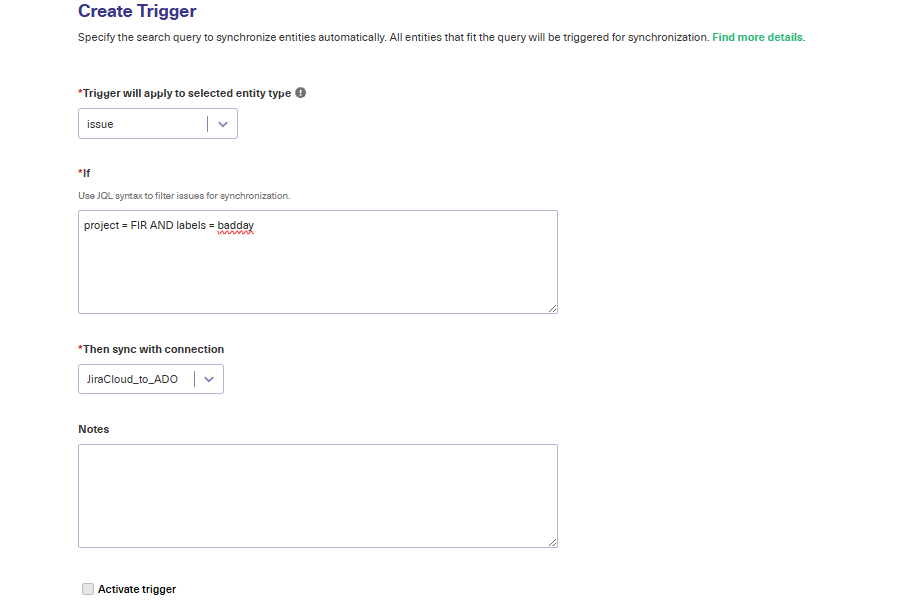
Go to the Jira side and click on “Triggers” in the side panel. Click on “Create trigger” to add your automation.
Select the entity type, enter the JQL conditions, and choose the connection. Then, check the activate trigger option and click “Add” to complete the trigger configuration.
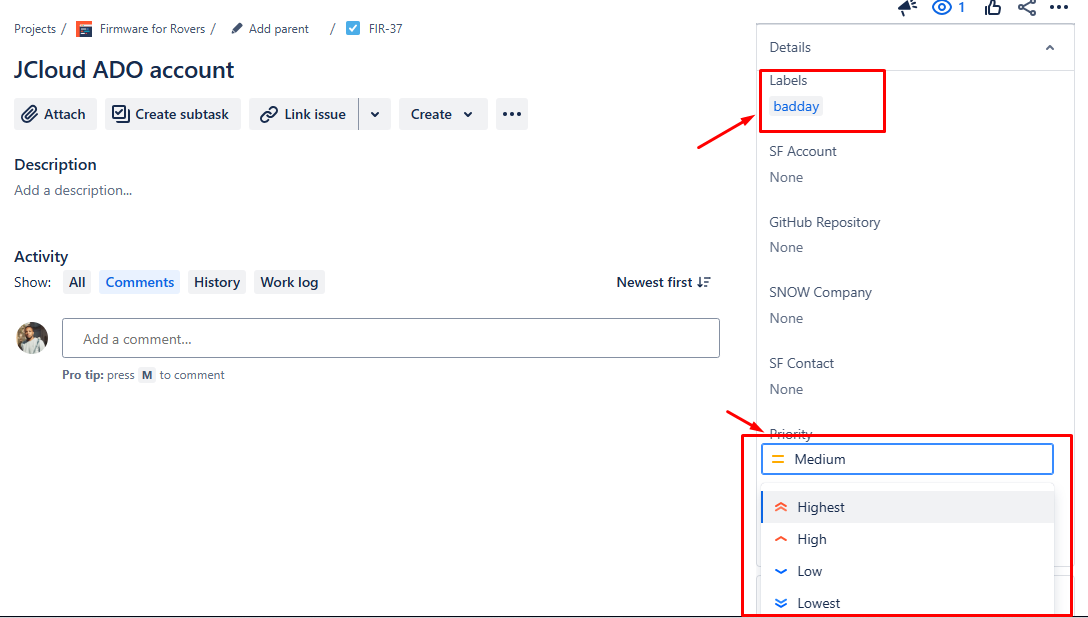
project = FIR AND labels = badday
Once a Jira issue is created in the “FIR” project with the label “badday”, the priority will be reflected on the MindState custom field on Azure DevOps.
Congratulations! You have now set rules and triggers to help you sync custom Azure DevOps task fields with Jira issue priority.
Start monitoring things in order to adjust the rules according to the demands of specific projects and issues.
You can also watch the video to see a comprehensive implementation of the use case.
If you still have questions or want to see how Exalate is tailored to your specific use case, book a demo with one of our experts right away.
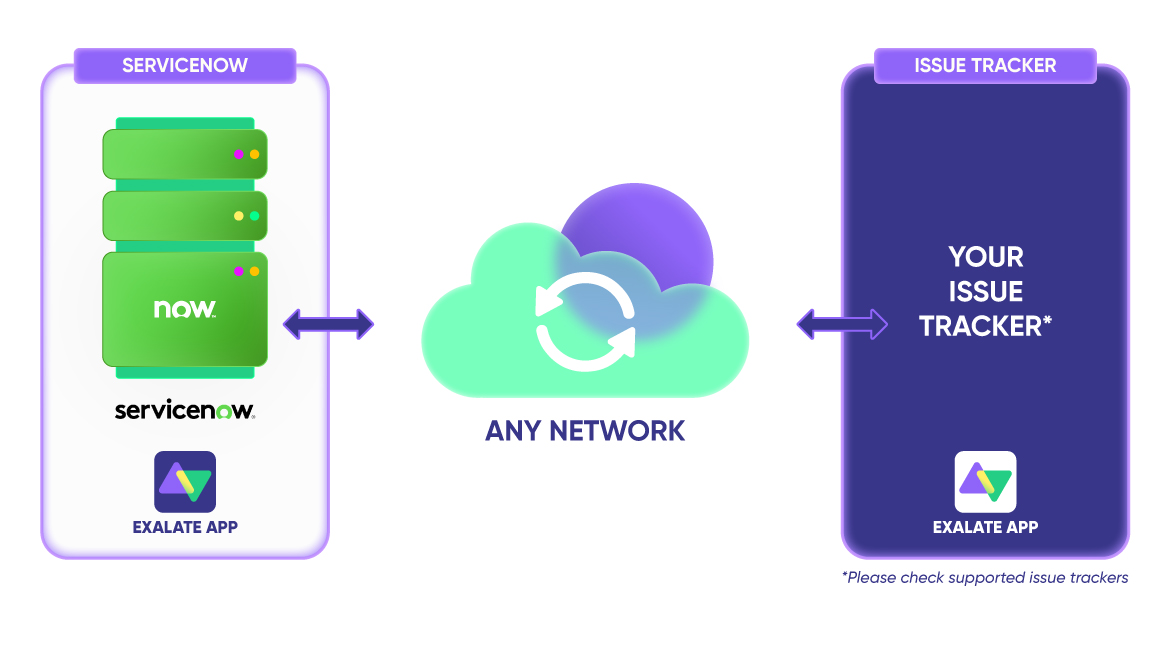
Companies looking to unify ServiceNow data with other applications or ServiceNow instances need to find an integration solution or build one from scratch.
Regardless of your choice, the ServiceNow data integration must be able to process requests and fetch accurate data without exposing the system infrastructure to security vulnerabilities.
If you want to learn how ServiceNow data integration works and the benefits of integrating ServiceNow with other platforms, I’ll help you go through everything you need to know.
A Quick Overview of ServiceNow Data Integration
ServiceNow data integration is the process of consolidating data from multiple sources to your ServiceNow instance to gain a centralized view of project-relevant insights, which can be used to make decisions.
Enterprises and organizations in different industries rely on ServiceNow to manage IT services (ITSM), business processes (ITBM), operations (ITOM), and customer service (CSM).
This broad application makes ServiceNow a fountain of internal service-oriented and customer-specific data.
ServiceNow has a service-oriented architecture (SOA), which allows it to connect with other systems bidirectionally via direct and mapped web services or technologies such as SOAP, REST, etc.
It also supports data sources such as HTTP(s) and FTPs and formats such as CSV, XLS, and XML.
To ensure the user or system requesting information is authorized, ServiceNow provides a JWT-based OAuth 2.0 authentication protocol and stores the data in remote tables, forms, and lists.
Key Components and Features of ServiceNow Data Integration
Here are some must-have features for ServiceNow data integration tools.
Pre-built connections: A library of default connections or data flow templates for handling simple synchronization use cases. For example, a connection between ticket descriptions.
Connection dashboard: A centralized dashboard for viewing all connections and monitoring their performance and statuses.
Security features: This usually involves authentication and authorization protocols (Basic Auth and OAuth). Other options include API keys, tokens, and HTTPs. Firewalls can also boost integration security between ServiceNow and third-party applications.
Data mapping console: This console could be a visual configurator or a scripting engine for establishing the sync rules between two platforms.
Reporting and analytics: The dashboard could also support detailed reporting by providing performance metrics for every connection.
Event triggers: These are automated scripts or controls that determine what happens when an event occurs—say the user creates a new ticket. Triggers give both sides granular control over their respective ends of the connection.
Self-service portal: Some solutions contain AI-enabled assistants for admins looking for scripting help to avoid writing rules from scratch.
Notifications and automation: These components keep admins updated about events or user actions. Setting up notifications helps you know when a ticket is raised, or a connection fails.
Other features and components of ServiceNow API integration include support portals, error handling mechanisms, configuration spokes, etc.
The Best ServiceNow Data Integration Solutions
Let’s go through some of the best ServiceNow data integration tools. We considered factors like reliability, platform compatibility, customizability, and performance.
Integration Hub
ServiceNow Integration Hub is the native ServiceNow solution that enables users to build integrations to connect with third-party systems and services.
Integration Hub allows users to build spokes—event-driven configurations—using the Spoke Generator. You can also use it to define event inbound and outbound trigger endpoints after the webhook has been authenticated.
The Workflow Studio also allows users to sync data across multiple instances and build custom integrations using a REST or Script step. You can also connect your Apache Kafka.
As part of security, ServiceNow Integration Hub stores information and credentials when connecting with external systems using aliases. This reduces the work of manually setting up aliases for specific systems.
Third-party Integration (Exalate)
Integration Hub works well for ServiceNow-to-ServiceNow integrations because both platforms are compatible. However, for non-compatible applications, admins still need to establish the integration logic and framework.
That’s where third-party integration solutions like Exalate come in.
Exalate supports bidirectional integration between ServiceNow instances, as well as ServiceNow with other ITSM, CRM, or CMS solutions.
What differentiates Exalate from Integration Hub is that you can install the app on both sides of the connection, which makes it completely decentralized. Unlike Integration Hub, Exalate also supports deep integration.
Custom Code
Organizations opt for custom code when they want to keep integration development in-house—or if they can’t find a fitting solution for their specific use case.
To get custom code to work, hire or assemble a team of developers with in-depth knowledge of the platform. Connection options include SOAP and REST web services, which can send and receive data via HTTP POST requests.
You can also set up event triggers by configuring webhooks to notify you about system changes, record updates, and workflow completions. The data loader fetches and transforms massive data sets in the appropriate format.
The drawback to ServiceNow data integration using custom code is that you need to worry about compliance and industry regulatory requirements. You also have to account for security and privacy.
iPaaS Solutions
iPaaS solutions act as middleware that bridges the compatibility gap between different systems in order to get them to exchange data and unify workflows.
These solutions combine no-code configuration with code-based algorithms and triggers to control how the configuration works.
Modern iPaaS solutions for ServiceNow data integration are hosted on a cloud, hybrid, or on-premises architecture.
ServiceNow iPaaS integration solutions include Boomi, Perspectium, Mulesoft, Make, and Jitterbit Harmony.
Benefits of ServiceNow Data Integration
Organizations can benefit from ServiceNow data integration in several ways. Let’s go through them.
Access to better data quality
Integrating ServiceNow with other applications enables the automatic transfer of data between them. This eliminates the need for manual data entry and ensures strict adherence to mapping rules and synchronization workflows.
As a result, the data obtained from such integration scenarios has a higher level of accuracy and overall quality.
Informed decision-making
With access to better-quality data, managers, stakeholders, and executives can make decisions based on actual insights.
Say you implement Zendesk ServiceNow data integration; stakeholders will be able to determine how your customer support efforts translate into user satisfaction.
Broader access to analytical tools
One benefit of ServiceNow data integration with other systems is to gain access to other analytical tools.
For instance, organizations that integrate ServiceNow and Salesforce will be able to generate insights from tools like Tableau Cloud and Einstein Predictions.
Better business relationships
External teams working with different systems can establish transparent, symbiotic relationships with partners and clients. For instance, Nviso, a cybersecurity MSP, uses Exalate to connect Jira and ServiceNow to maintain deep ticket integration with clients.
Similarly, the shipping company MAERSK used the Exalate ServiceNow integration app to streamline processes between their call center and support teams.
Improve customer experience
Integrating CRMs and help desk applications makes it possible for support teams to address customer complaints promptly with a clear view of their interactions.
ServiceNow CRM integration ensures access to multiple data sources, which provides a broader data set to help decrease resolution times and improve overall service delivery.
Challenges of ServiceNow Data Integration
Setting up a ServiceNow API integration could get stressful because of the following reasons:
The absence of real-time data availability
Simple changes can happen in real time. However, for projects and organizations with massive data sets, finding a solution that can perform real-time ServiceNow data integration can be difficult.
Most times, you’d need to process the transactions in batches to avoid clogging up the sync queues and overloading the integration solution.
Performance issues
Most iPaaS and third-party integrations are built to scale and maintain consistent performance levels—however, the larger the data volume, the less predictable the system.
Network timeouts, sync failures, data loss, and data inconsistency are also challenges that can reduce the efficacy of ServiceNow data integration.
The alternative is to schedule massive data transactions outside of business hours, which doesn’t bode well for time-sensitive exchanges.
Complicated error handling
You can map the wrong objects or entities, or an error in your script can prevent the operation from running.
Without a proper error-handling mechanism, system admins can only rely on experience and trial and error to figure out what’s gone wrong with the sync. This can be frustrating.
Lack of technical expertise
When the person or team in charge of configuration doesn’t know the programming language for the system, they won’t be able to get the integration to work.
For instance, ServiceNow uses JavaScript, while Salesforce relies on the Java-based Apex. If your devs don’t know the syntax of one of these programming languages, they’ll be unable to build the integration.
Information security
Since the integration would handle sensitive business data, you must pay extra attention to security and privacy. This also involves ensuring that only authorized users have access to the system configuration.
When connecting with other organizations, it is impossible to account for their data management practices. This puts the data you share with them at risk of exposure.
ServiceNow Data Integration Use Cases
Here are common business and technical use cases for ServiceNow data integration:
ServiceNow to ServiceNow: This involves connecting multiple ServiceNow instances to share information. Supported integrations include CMDB, change requests, problems, RITM, and different field types between two ServiceNow instances.
ServiceNow to service (help) desks: This involves connecting ServiceNow with a service desk or help desk such as Jira Service Management. One implementation is the use of Jira ServiceNow data integration to share sync urgency and priority between Jira and ServiceNow.
ServiceNow to third-party CRM or ITSM solutions: Admins can sync CRM solutions by exploring Salesforce ServiceNow integration to share incident entities with Salesforce objects.
ServiceNow to database or version control systems: ServiceNow can also connect with version control systems such as GitHub. This GitHub ServiceNow integration provides a link between the ongoing resolution and the customer request.
ServiceNow to communication tools: You can sync ServiceNow with communication tools like Slack and email messengers to get instant updates.
How to Use Exalate for ServiceNow Data Integration
Follow these steps in this ServiceNow data integration tutorial to set up Exalate for integrations between ServiceNow and other platforms.
Step 1: Install Exalate on ServiceNow and the Other Application
The first step is to install Exalate on ServiceNow and then on the other platforms (Jira, Azure DevOps, ServiceNow, GitHub, Zendesk, Salesforce, etc).
To start installing Exalate visit its integrations page, choose your system, and proceed from there.
Note: Exalate for ServiceNow can also be installed on docker.
Step 2: Connect ServiceNow and the Other Application
One side initiates the connection and generates an invitation code. The other side accepts the connection invitation using this invitation code. It doesn’t matter which side initiates the connection, the Exalate UI remains the same.
Assume we start initiating the connection from ServiceNow.
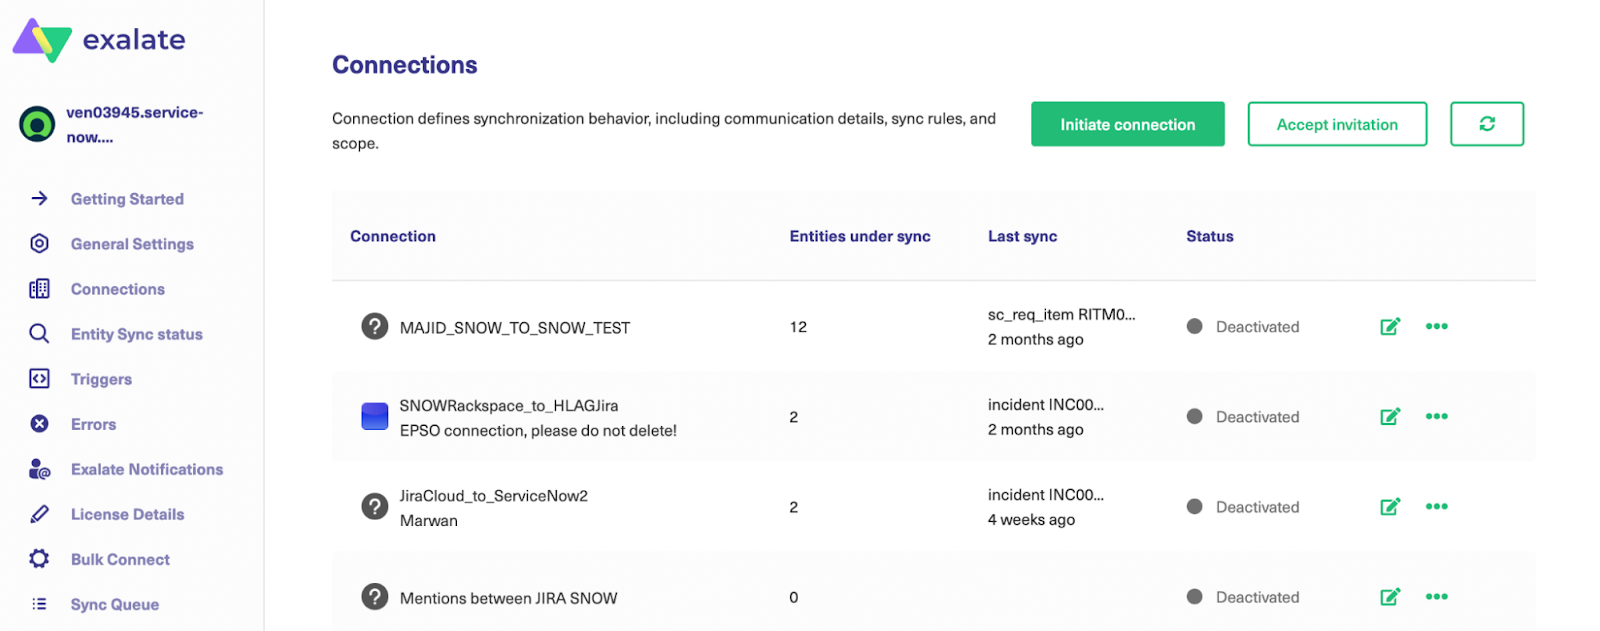
Navigate to the “Connections” screen in the Exalate console on the left-hand side menu bar.
Click on the “Initiate Connection” button.
Enter the “Destination Instance URL”.
You will need to choose between the Basic and the Script mode.
The Basic mode supports pre-defined field mappings between the different systems that cannot be configured. The Script mode uses a Groovy-based scripting engine to configure fields and define how to map them.
The Basic Mode
Select “Basic” in the option above and click “Next”.
You will need to verify if you have admin access to the destination instance or not.
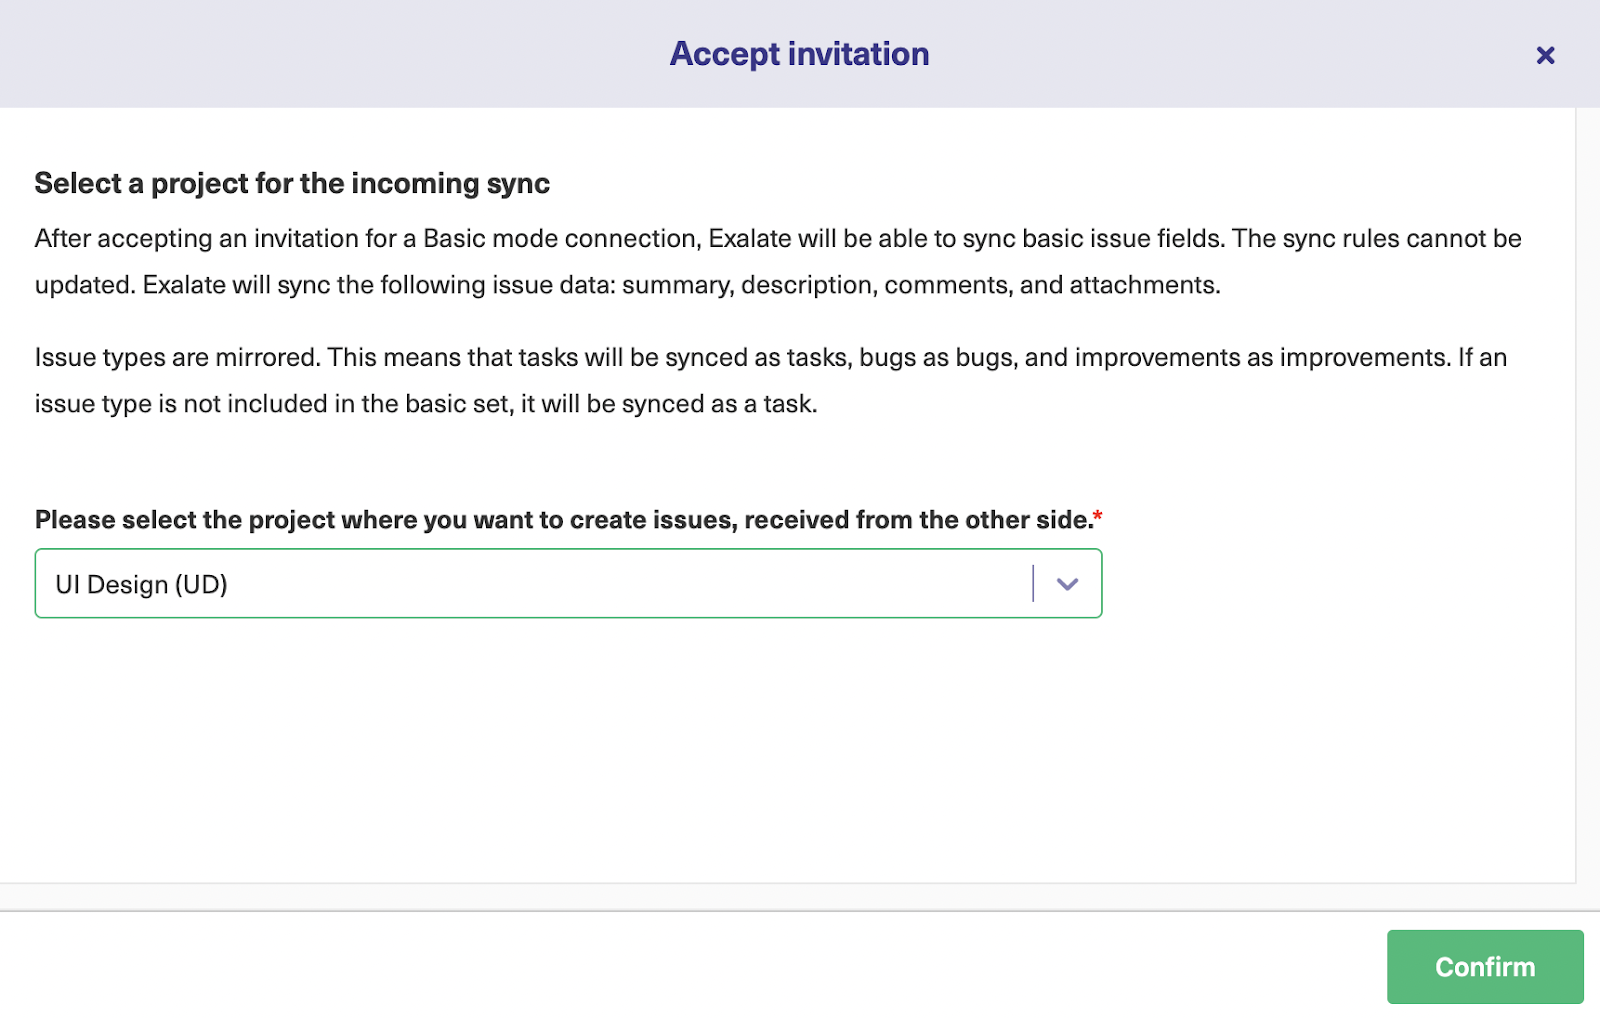
Once that is done, depending on the destination instance, you would either need to select a project in Jira and Azure DevOps or a repository in GitHub. If no such concept exists, then the connection is successfully established.
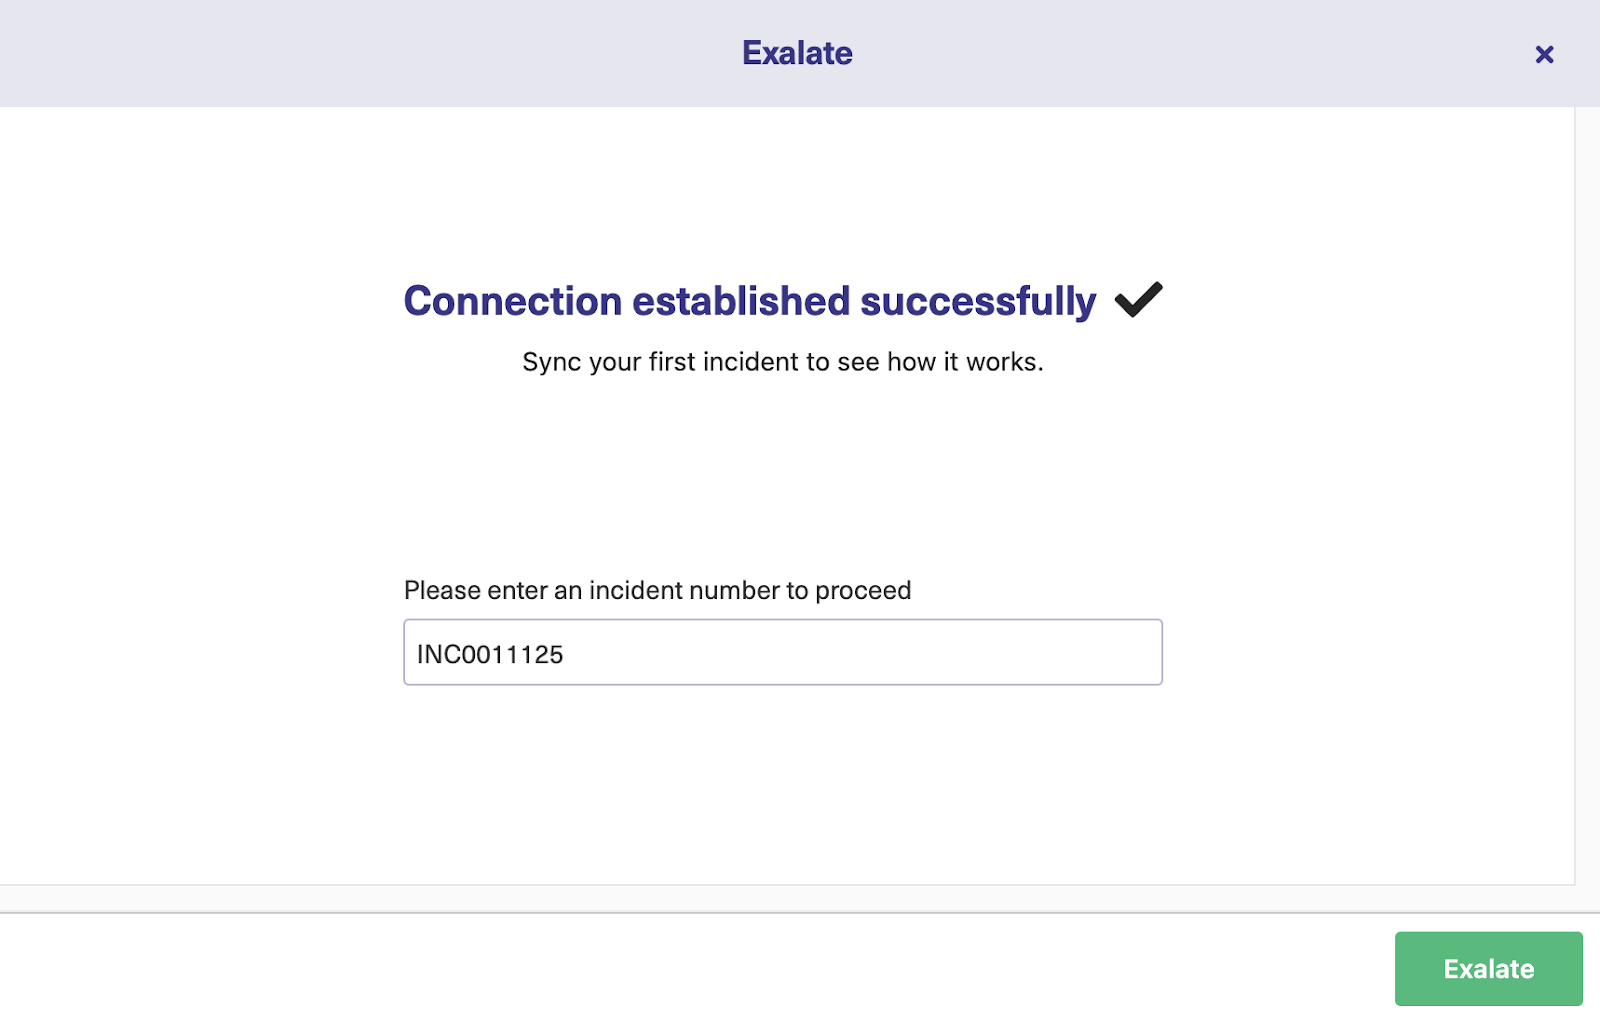
You can enter the incident number.
And see the result of your synchronization immediately.
You can also choose to filter incidents that can be synced using the Basic mode automatically with the help of triggers, or you can even sync entities in bulk.
The Script Mode
Choose “Script” and click “Next”.
Enter the connection details. Give a short name to the local instance and a short name to the remote instance. A connection name is automatically generated. You can change it if you want to.
Click “Next”.
An invitation code is generated. This needs to be copied and pasted into the destination instance.
So click on “Copy invitation code” and save it somewhere safe. Then click “Done”.
On the destination instance, go to the Exalate console and select the “Connections” tab.
This time around, click the “Accept invitation” button.
Paste the code you have just copied. Again, depending on the destination instance, you will either be required to choose a project or a repository, or the connection will be successfully established.
Step 3: Configure the Connection to Decide What to Share
On the previous screen, if you click “Configure Sync” you will be shown a panel that looks like this:
“Rules” and the “Triggers” tabs are the ones we need here.
Rules are Groovy scripts that let you control the information flow.
In the “Outgoing sync” on the ServiceNow side, the line replica.description=entity.description, means that the description of the ServiceNow entity is copied into something called a replica — an empty container that carries the payload.
In the “Incoming sync” on the remote side, you’ll also see similar mappings, which you can edit for your specific use case.
Check out the Getting Started guide on the Exalate documentation to see how these initial steps work out with Exalate, or refer to the Script Helpers for advanced scripting logic.
Step 4: Start Automatic Synchronization Using Triggers
Triggers are platform-specific and need to be set on both sides of the integration if you want a two-way sync.
To create one, click the “Create Trigger” button.
Choose the entity you want to set the trigger for.
On the ServiceNow side, you can choose between incidents, RITMs, problems, change requests, etc. In the “If” section, use the ServiceNow search syntax. Entities that meet the conditions are automatically synced.
You can write advanced triggers for events, such as syncing incidents assigned to a particular person or syncing incidents that have a particular text in a comment or description.
Once done, leave some notes and activate the trigger. You can see the trigger you just created in the list.
Exalate allows you to sync all the existing entities that satisfy the trigger conditions using the “Bulk Exalate” option.
After making the changes, hit the “Publish” button to apply them.
Step 5: Start the Synchronization
The sync will start automatically based on the triggers you have set up. If, for some reason, it doesn’t start instantly, grab some coffee, and by the time you are back, it will be working just fine.
If there are some issues with the triggers or rules, you can also troubleshoot and find out what’s going wrong.
Key Takeaways
In our exploration of ServiceNow integration capabilities, we found out that:
Organizations rely on ServiceNow integrations to ensure quality data management, transformation, and security.
A ServiceNow integration solution could be a native application on the Now platform, a custom API code-based integration, a third-party application, or an iPaaS solution.
Some of the challenges encountered while implementing ServiceNow service desk integration include a lack of technical expertise, performance issues, and technical debt.
Choosing the right ServiceNow connectors will help your business scale, improve the customer experience, reduce workloads, and increase workflow efficiency.
Want to find out how Exalate handles ServiceNow data integration? Book a demo with our solution engineers.
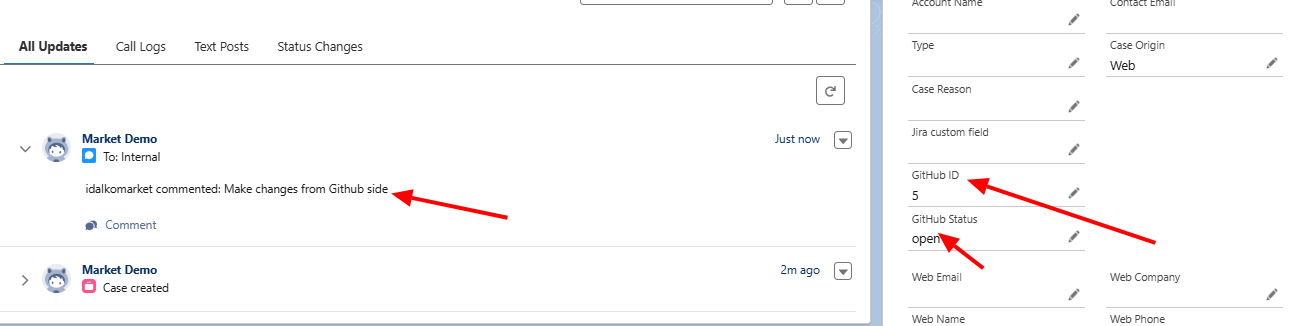
Organizations can sync data between GitHub and Salesforce in order to allow teams on both ends to collaborate easily and access vital data.
For this to happen, you’d need native or third-party solutions. I’ll show you how to sync statuses and custom fields between GitHub and Salesforce using Exalate.
Status and Custom Field Update: GitHub to Salesforce Use Case
You can create a custom field in your Salesforce case to reflect data from a GitHub issue. These custom fields will reflect values from GitHub default fields.
For this illustration, we want to fetch the ID and Status of a GitHub issue and make them appear in custom text fields on Salesforce.We’ll also discuss how to change the status of the Salesforce case based on the status of the GitHub issue.
Here are the requirements and challenges:
Primary Requirements
Fetching the right API name from fields and entities on both sides.
Mapping the correct statuses on both Salesforce and GitHub.
Establishing sync rules for the incoming and outgoing data in custom fields.
How to Implement Exalate for Status and Custom Field Updates
First, install Exalate on both Salesforce and GitHub. Then, follow the instructions in this comprehensive guide to establish a connection between them.
Use the Script Mode—which allows for the advanced integration and scripting that this use case demands.
Once the connection is set, open Exalate in Salesforce and go to the connection you want to edit. Click on the “Edit connection” icon. The process is similar on GitHub.
If you prefer videos, watch this tutorial on how to implement the use case.
Under the “Rules” tab, you’ll see two options:
Outgoing sync (on the GitHub side) refers to the data to be sent over to Salesforce.
Incoming sync (on the Salesforce side) refers to the data to be received from the GitHub issue.
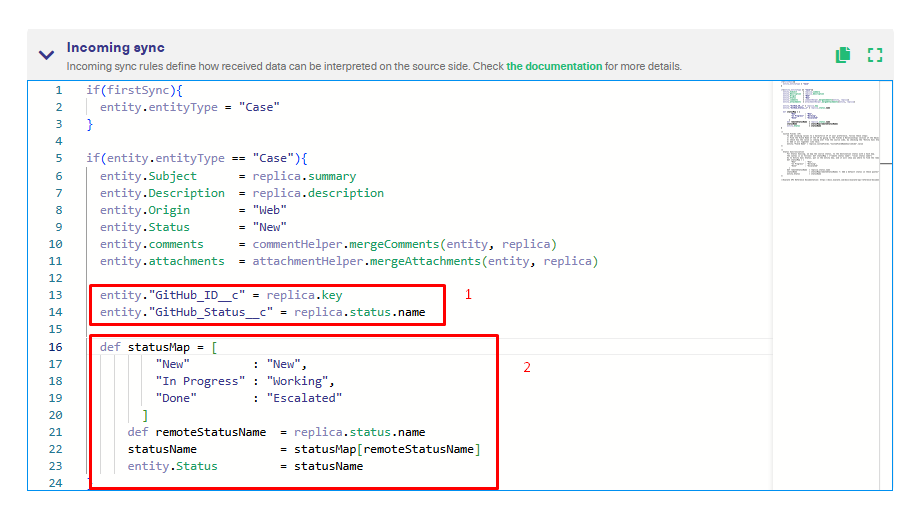
Enter the following code snippet into the Salesforce “Incoming sync” text area.
The entity.”GitHub_ID__c” function points to the custom field name within the Salesforce case. The replica.key expression contains a payload of the GitHub issue key.
The entity.”GitHub_Status__c” function points to the custom field name within the Salesforce case. The replica.status.name expression contains the payload name value of the GitHub issue status.
If you want the Salesforce Case status to change automatically when you change the GitHub issue status, you need to map the statuses. In this case, enter the following snippet to the Salesforce “Incoming sync” text area.
Next, go to “Triggers” and click “Create a trigger” to automate the sync.
Exalate for Salesforce uses the Salesforce Object Query Language and advanced search syntax to configure event triggers. So if you want to trigger the sync for any Salesforce case with the status “Working”, here is the code for it:
Status = “Working”
Tick the “Activate trigger” checkbox and enter notes before clicking on “Add”. Your trigger is set.
Now head to your GitHub issue and drop a comment.
You can see the current status, comments, and issue ID. Now head back to Salesforce to see that the corresponding fields have been populated automatically.
Congratulations! You have now set rules and triggers to help you update statuses and sync custom Salesforce case fields with GitHub issues.
Start monitoring things in order to adjust the rules according to the demands of specific projects and issues.
If you still have questions or want to see how Exalate is tailored to your specific use case, book a demo with one of our experts right away.
Application integration involves using a third-party solution to connect apps, CRMs, ERPs, work management systems, cloud services, etc, in order to get them to interact and share data.
Since most of these apps are not compatible, you’d need application integration platforms to help you bridge the interconnectivity gap between them.
The platform could be a code-based engine or a drag-and-drop integration builder, which you can get off the shelf or build from scratch.
But let’s not skip too far ahead. Come along as we explore application integration platforms as well as their benefits and key features.
What is Enterprise Application Integration (EAI)?
Enterprise application integration is the process of connecting multiple enterprise systems using a reliable, secure middleware connector or standalone app.
It involves tracking events on one system, forwarding the request, and receiving a response from the other side before transforming the result—this is the basic working principle of enterprise integration solutions.
What is an Enterprise Application Integration Platform?
Enterprise application integration platforms are software programs that provide a suite of tools and features for handling the entire lifecycle of creating connectors.
For instance, EAI platforms could be native solutions provided by companies or open-source contributors. Other times, they are cloud-native solutions delivered by dedicated companies under the iPaaS model.
Types of Application Integration for Enterprises
According to our application integration overview, here are some common concepts and types.
Internal Application Integration
This involves connecting two applications within the same organization. For example, the customer service team could integrate their Zendesk with the development team’s Jira Service Management instance.
For internal teams, this integration usually goes smoothly, especially with companies that have procedural documentation on data management and process orchestration. In the span of a few meetings, both teams can iron out the details and come up with an integration plan.
External Application Integration
This involves connecting applications across organizations—cross-company integration. Think of the same Zendesk to Jira integration scenario mentioned earlier. But this time, both teams are in different organizations.
The main challenge to external application integration is getting both sides to agree on what to share and what to keep private. For the collaboration to occur, both teams need granular control over the sync on their side.
For example, a team using Salesforce can explore payment gateway integration for another team that processes payments using Stripe.
Legacy Application Integration
The approach to integration is different when you have a legacy application that needs to be updated.
First, admins must determine whether the legacy system should be modernized and balance the pros and cons of doing so. Based on their findings, the involved parties can decide how to configure the legacy system integration solution.
Legacy system application integration can end up saving you money instead of modernizing the solution to get it up to par with SaaS applications.
B2B Integration
When two businesses integrate applications, they need dedicated middleware to manage the exchange according to mappings, rules, conditions, and triggers.
As B2B integration requires trust and transparency, the two entities need to agree on how to configure the system down to specific fields and objects.
If both teams don’t want to dedicate a team to configuration, monitoring, and maintenance, they can outsource this problem to third-party application integration vendors.
Hub and Spoke Integration
This type of application integration routes all the data coming from multiple nodes through “spokes” and into the central hub or dashboard.
This model works best for external application integration, where an admin monitors the data flow from multiple organizations or applications.
iPaaS
Integration Platform as a Service (iPaaS) is a delivery model that organizations rely on to unify data from multiple applications. Most iPaaS solutions combine point-to-point integration with the hub-and-spoke pattern.
Essential Components and Features of Application Integration Platforms
Let’s check out some features and components of enterprise application integration architecture.
Data transformation: Every EAI platform should be able to transform data to the native format on either end of the integration. For instance, the platform needs to convert Jira values from Wiki before sending them to Salesforce as HTML.
Intuitive interface: The platform must provide a central interface where you can see all active connections. This interface will also help you configure the mappings using a visual editor.
Automation: Enterprise SaaS application integration platforms require automated triggers and actions to reduce the manual work needed for data exchange.
Monitoring: A central dashboard helps users monitor the performance of active integrations in order to detect any activity on the application node.
Error handling: The error handling mechanism allows you to visualize malfunctioning syncs and network outages as part of performance monitoring. It should also provide detailed bug reporting.
Scalability and flexibility: Cloud-native application integrations should be able to scale to fit increasing data volumes and onboard new users and applications.
Security and compliance: Encryption protocols, role-based access control, endpoint detection and response (EDR), and multi-factor authentication are some security features needed for application integration. The platform should also be ISO certified and compliant with industry standards.
The Best Application Integration Platforms for Enterprises
This list factors in independent reviews from G2, Capterra, and other sites. I also compared available functionality and security features and weighed them against the pricing. Some tools here are dedicated to a specific genre of application integration, while others are multi-purpose.
With that said, here are some of the best enterprise application integration examples.
The visual builder provides an intuitive interface for self-starters with little technical experience and experts who want to configure complex workflows.
Zapier also supports the use of AI to create Zaps and Actions, as well as the development of chatbots and databases. When your Zap hits a snag, admins will receive instant alerts so they can start troubleshooting right at the source.
With over 7000 applications in the Zapier integration library, you’ll be able to connect almost any database, SaaS application, or communication tool.
Workato
As an application integration platform, Workato offers advanced customer support and robust automation capabilities for complex workflow configurations.
With coverage for over 2000 applications, Workato facilitates the exchange of multiple data formats such as CSV, HTTP, JSON, XML, and YAML.
Since Workato supports batch processing, enterprises can use it to reduce the workload and scale operations conveniently. Workato also uses event listeners to activate triggers and a retry mechanism for failed transactions.
Workato’s scalability comes from being a cloud-native enterprise application integration. So you can expand transaction volumes without worrying about DevOps.
This solution also combines B2B integration, API management, low-code development, and LLMs to improve how enterprises coordinate workflows internally and externally.
Informatica
As far as application integration solutions go, Informatica contains the most features catered towards enterprise workflow orchestration.
The list of features is endless, from API management to MDM & 360 applications and the CLAIRE AI engine. This AI copilot recommends source datasets and transformation alternatives.
Enterprises and corporations can rely on Informatica’s unique approach to ELT/ETL, data replication, and change data capture to ensure every data exchange is accurate and secure. While Informatica is a leading solution, businesses can explore alternatives to Informatica based on their needs and budget.
Informatica also provides multiple application integration patterns that require no coding or scripting, which is also supplemented by the GenAI LLM.
Exalate
Exalate provides a solution for integrating platforms, CRMs, version control tools, and work management systems. Although it supports standard integrations, Exalate also provides a Groovy-based scripting engine for complex workflows.
If you have any other specific questions regarding Exalate, you can use the Artificial Intelligence Documentation Assistant (Aida).
Enterprises can automate data exchange with partners in real time with the help of Exalate triggers, which you can configure for different events or user actions.
The retry mechanism and error panel also help admins restart and troubleshoot connections when they malfunction.
IFTTT
IFTTT allows users to create automation, triggers, and actions to control how applications interact with each other. This integration application can bundle multi-layered conditions to dictate how an integration should work.
Applets from IFTTT can help you establish an interconnected ecosystem between applications without having to open each one individually. In one go, you can find out the weather forecast and learn when the International Space Station sails over your location.
If you are in the market for application integration services for mobile devices and smartphones, download IFTTT from the App Store or Play Store.
IBM App Connect
IBM App Connect is application integration software that connects with multiple services and data sources, regardless of where they reside.
It supports two experiences: You can work with the advanced, customizable code-based platform to build scalable integrations, or you can opt for the AI-enabled no-code integration option.
Either way, you get access to the the customizable dashboard to view and track the progress of integrations in real time.
This EAI solution supports 200+ custom connectors for standard applications. It can also be deployed on AWS as a fully managed iPaaS for integrating apps, ERPs, CRMs, etc.
Tray.ai
Tray.ai is an AI-powered solution used by application integration engineers to automate business processes and workflows.
Tray Build allows developers to develop integrations and automation faster using a no-code builder fitted with a drag-and-drop editor. It also supports multiple connectors, snippets, templates, callable workflows, and file formats.
Tray Code gives you access to the Universal Automation Cloud so you can write the code for the Connectors API, Authentications API, and Triggers API.
With the help of Merlin AI, developers can augment the builder to reduce the time spent on projects and get rid of mapping errors.
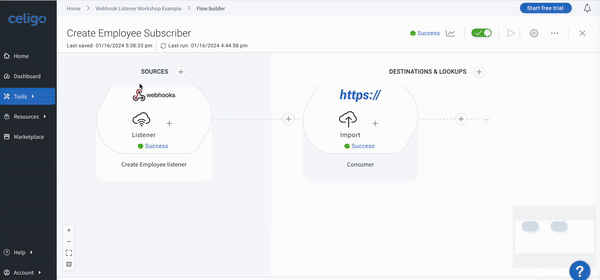
Celigo
Celigo is a cloud application integration for enterprises looking to consolidate their SaaS sprawl in order to share data.
The Celigo AI solution assists users with workflow design and error handling. It uses advanced LLMs to convert instructions into Javascript handlebars, expressions, SQL queries, and filters.
Enterprises can also use Celigo for full-cycle API management to forge new partnerships and make company data available through secure filters. You can also observe API usage in real time.
Benefits of Enterprise Application Integration Platforms
Organizations use integrations to consolidate data from applications and systems. Check out the advantages of enterprise application integration platforms.
EAI platforms use enterprise-level security features to protect sensitive business and user data in transit and at rest.
These solutions reduce the licensing and acquisition costs for onboarding new applications. It also eliminates potential expenses on R&D for a solution built from scratch.
Teams and organizations using integration platforms can increase productivity thanks to access to accurate data sources and less human error.
It also breaks down data silos and streamlines collaborations between organizations, MSPs, and other external partners.
Companies like WirelessCar use Exalate to connect with other automotive brands. Similarly, Maersk uses Exalate to orchestrate internal workflows between customer support and call center staff.
How Exalate Handles Enterprise Application Integration
Now that you understand why application integration is important, let’s explore how Exalate handles it.
Say you have two enterprise applications, Salesforce and Jira, and you want them to share data.
Exalate will provide you with an integration platform to make this happen. Here is how it works:
Install the Exalate app on both Salesforce and Jira. The process for different Jira deployments is documented. You can also start requesting your trial by clicking the Request a trial button below.
Set up a Script mode connection and authenticate both sides with a unique key.
Edit the connection to ensure the sync rules align with your expectations, e.g., updating account records between Jira and Salesforce custom fields.
With the connection set, change the values of the connected fields to test if the right API endpoints are interacting with each other.
Once set, configure triggers using SOQL (Salesforce Object Query Language) and JQL (Jira Query Language), respectively.
Your connection is ready to use. If an error occurs, go to the troubleshooting panel and make changes to the code. Then save and retry.
A detailed description of this process is available on our website. If this is too much of a hassle, you can book a demo with our application integration engineers.
Enterprises and organizations can take close collaboration one step further through embedded iPaaS integration.
This goes beyond using an iPaaS solution to connect disparate systems. This form of integration involves getting deeply embedded in the other side’s processes.
What does this mean in practice?
In this article, I’ll explain how embedded iPaaS works and the challenges of adopting it, as well as provide some practical examples.
What is Embedded iPaaS?
Embedded iPaaS is an integration model that allows users to connect their SaaS applications and other systems using a white-label solution. Under this model, you can build multiple integration scenarios with the help of templates and management consoles.
Organizations can use embedded iPaaS to establish a one-way flow of notifications and updates. For instance, get updates on Jira whenever a new Salesforce account is created.
The other option is to implement a bidirectional connection between your organization and other companies, vendors, MSPs, and partners by connecting their cloud CRMs and on-premise systems.
Any company that wants to connect internal teams or sync data with external entities can benefit from embedding iPaaS solutions.
Low-code integration builder: Most embedded integration systems combine no-code visual editing with scripting to reduce the amount of coding needed to configure a connection.
Pre-built connectors: These connection templates contain default logic and algorithms for simple connections. For example, pre-built connectors are used to sync ticket descriptions, titles, and summaries.
System infrastructure: The software vendor could offer a single-tenant or multi-tenant system architecture. They can always exist across loosely coupled systems or a monolithic architecture.
Triggers and automation: Real-time updates and exchanges are only possible when admins write conditional event triggers or use iPaaS automation.
Management console: A dashboard for handling the connections, error messages, monitoring tools, event triggers, and everything related to the sync.
Full authentication: Embedded iPaaS also covers authentication by handling API keys, access tokens, and other protocols for verifying user identity and permissions.
Visualization dashboards: This gives the admin a clear view of all existing (active and failed) syncs through charts, graphs, and other visuals.
Support documentation: Users can consult the documentation to fix problems before escalating them to support engineers.
Modern iPaaS solutions for embedded integration also incorporate AI assistants and bots to make scripting easier and faster.
Traditional iPaaS vs Embedded iPaaS vs Unified API
Before I compare embedded iPaaS with other integration models, here is a definition.
Integration platform as a service (iPaaS) is an integration delivery model that provides companies with a system for connecting applications within their SaaS sprawl.
A unified API is an abstraction layer or solution that connects with multiple endpoints in order to extract information. It acts as a hub that manages the request-response traffic from multiple systems and applications.
Embedded iPaaS is an amalgamation of the unified API integration and traditional iPaaS models. This integration framework provides a platform for connections and handles API standardization and data transformation.
While iPaaS solutions often provide connectors, embedded iPaaS systems allow you to build and modify them from scratch.
The next key differentiator is in the name: iPaaS solutions are isolated from the connected systems, while embedded iPaaS systems are intrinsically connected with both systems or applications.
Some embedded iPaaS products even allow you to build and make changes to APIs when developing native integrations.
Benefits of Embedded iPaaS
Your company can reap the following embedded iPaaS benefits:
Speed up decision-making processes: When the iPaaS system is embedded into your infrastructure, all relevant data will become available at a moment’s notice. This will help stakeholders make informed decisions faster.
Increase productivity: With embedded integration, your developers will free up their schedules to focus on core tasks. The vendor will take charge of building, updating, and maintaining the iPaaS solution.
Improve scalability: When the solution is deeply embedded within your SaaS ecosystem, you can scale business operations at will to align with current needs and market trends.
Build custom integrations: If you have complex use cases, embedded integrations will give you the platform to configure and customize the sync rules. For instance, Exalate uses a Groovy scripting engine to customize integrations.
Keep your customers on board: Deep integration with your customers and partners will help you address their pain points promptly. The Gantner Group uses Exalate to connect support and development teams.
Consolidate partnerships: When working with MSPs or going through a merger and acquisition, embedded iPaaS tools can create a collaborative environment for the prompt and accurate exchange of data, ideas, and insights.
Things to Consider When Choosing an Embedded iPaaS Solution
Embedding the wrong iPaaS solution into your organization is a disaster waiting to happen. To avoid these issues, here are things to consider and questions to answer:
Is the platform code-based or no-code?
What is the vendor’s reputation?
Is the iPaaS solution secure and compliant?
What data governance and privacy models are available?
Are there visualization tools and dashboards?
Is the solution hosted on the cloud or locally?
Is the platform compatible with existing systems?
What embedding options are available?
Can my development team handle the configuration?
Is the documentation detailed enough?
Would it be cheaper to build or buy the iPaaS solution?
Choose only embedded iPaaS solutions that can answer all or most of the questions positively.
Challenges of Embedded iPaaS Implementation
Embedding iPaaS solutions sounds simple. But, in practice, this integration framework involves a lot of moving parts and managerial decisions.
The first challenge is to decide which solution works for everyone. For internal integrations, the teams involved must reach a consensus. However, due to preferences, pricing, and security concerns, these decisions could take longer for external integration scenarios.
The next obstacle is to assemble the right team or appoint the right person to manage the embedded iPaaS product. Your developers need to understand how the system works—how the solutions integrate with the API and how to work with the native programming language.
Next, you need to determine which processes, projects, issues, tickets, data fields, and entities to integrate without exposing sensitive business data. Most times, partners agree on this issue beforehand. Other times, use your discretion.
Another challenge of embedded iPaaS is compliance. The solution must comply with data regulations and industry-specific compliance standards such as GDPR, HIPAA, and others.
Finally, you need to consider whether it is cheaper to build the integration from scratch or buy a white-label enterprise iPaaS solution.
Should you Build or Buy iPaaS Solutions?
When you build an iPaaS solution from scratch, you have to cater to the following requirements:
A team of dedicated developers,
Security and authentication features,
Software licensing and compliance,
Maintenance and updates,
Cloud or on-premise hosting,
API and governance limits, and much more.
But when you buy embedded iPaaS software, the pricing covers all these requirements. You can even pay the support engineers to help you set up the infrastructure.
Unless you are a massive corporation with an R&D department or a company with data safety concerns, I recommend buying iPaaS integrations from trusted vendors.
Examples of Best Embedded iPaaS Tools
Here are some of the best embedded iPaaS companies.
Zapier
Zapier is an iPaaS solution that allows companies to keep their applications, social media platforms, CRMs, ERPs, databases, and communication tools connected.
This system automates workflows using Zaps, Tables, and Interfaces and provides AI automation for 7000+ app connections.
Exalate
Exalate is an embedded integration solution that facilitates data exchange between work management systems such as Jira, Salesforce, Zendesk, ServiceNow, GitHub, Azure DevOps, and many more.
Customer support teams can use the Zendesk embedded iPaaS offering to improve customer experience. Salespeople can rely on the Salesforce embedded iPaaS to manage accounts and opportunities.
Exalate supports bi-directional integration with pre-built connectors as well as custom Groovy-based integrations.
Exalate also provides advanced features that use the power of AI and machine learning to increase the productivity of custom configurations. The AI Assist chatbot allows users to generate various forms of Groovy code snippets and mappings for complex use cases.
Jitterbit Harmony
Jitterbit Harmony is a low-code iPaaS platform that allows the fast-paced development and publishing of APIs and embedded integrations.
Harmony provides an EDI, Cloud Studio, and API management console for establishing granular rules for connectivity.
Informatica
Informatica is a data management cloud that handles API creation and management, data integration, governance, and compliance policies.
It uses the CLAIRE AI engine to automate and manage data workflows using both no-code and low-code options. Informatica also handles data management, engineering, and analysis.
Tray.io
This embedded iPaaS company uses artificial intelligence to create an ecosystem of interconnected integrations between your workforce, partners, and customers.
Features like Tray Build allow organizations to develop custom automation with low-code technologies. Merlin AI also uses natural language models to transform LLM outputs into complete business processes.
Adopt Embedded iPaaS for Your Organization
Choosing the right implementation model for your embedded iPaaS system will streamline your business’s collaborations with partners and customers.
You just need to choose the best embedded iPaaS software vendor with a proven track record of data security, compliance, and customer support.
Exalate is an embedded integration solution for connecting internal and external teams to share important data through a compliant, secure architecture. Depending on your business needs, you can use the IaaS package or the MSP offering.
Are you looking for an embedded integration solution? Contact our team to get started with a demo right away.
To connect your Salesforce instance with other applications, databases, and work management systems, you need dedicated Salesforce integration apps.
These apps come as either multi-platform Salesforce connectors or single-platform solutions that connect with one specific application.
In this article, I’ll explore the working principles of Salesforce integrations. Then I’ll discuss the best Salesforce integration apps for enterprises and large organizations.
These apps are usually third-party applications that serve as bridges between incompatible applications or platforms.
For example, Salesforce integration apps allow marketers to transfer leads from marketing campaigns to Zendesk for further nurturing and feedback generation. This will help the marketing and support teams exchange lead updates and contact information.
How Do Salesforce Integration Apps Work?
When you have two applications — say Salesforce and Jira — the only way for them to interact and share data is through API endpoints and web services.
However, since both systems have disparate infrastructure, you need an integration app processing incoming and outgoing requests while running transformations to fetch the correct data format for both platforms.
Depending on the configuration and field entity, the object shared between both platforms could be editable or read-only. You can restrict access based on user permissions and authorization.
Salesforce uses the following patterns for retrieving and requesting data:
Regardless of the integration pattern, the application can function as a point-to-point connector, hub-and-spoke mechanism, or an enterprise service bus (ESB).
API and governance limits also restrict the number of calls any user can make to the Salesforce APIs within a specific time period.
Types of Salesforce Apps
Salesforce has over 4500 free and premium apps that can be integrated into your organization. I’ve grouped them into the following categories:
Help and service desk applications (ServiceNow, Talkdesk, Zendesk)
Analytic tools (Cloudingo, FunnelSource, Power BI)
Communication apps (Slack, Zoom, ScreenMeet)
Payment gateways (Stripe, Square, QuickBooks)
AppExchange has a dedicated connector for each of these platforms—these are called Salesforce native integrations.
But if you want a solution that can connect Salesforce to multiple systems and applications at the same time, look for third-party Salesforce integration apps.
10 Things to Look For in Salesforce Integration Apps
As you search the internet for reliable Salesforce connectors, here are some things to look out for:
Decentralization: The integration app should enable users to make changes to their side of the connection without affecting the other side’s configurations.
Scalability: Look for integration apps that offer flexibility to add extra projects, systems, and partners without crapping out.
Reputation: Read user reviews to get a feel of what people are saying about the Salesforce integration tool.
Affordability: Choose a solution that offers a favorable pricing model for your use case. Consider subscription and licensing fees.
Support: Prioritize the presence of timely and extensive support services in case the solution breaks down or becomes faulty.
Security and privacy: Check the integration security features and data transfer and storage policies for sensitive information. Verify that the solution is compliant with regulations.
Extensive library: A tool with a vast library of connectors and mapping templates will cut down the workload and speed up configuration processes.
Documentation: Look for a Salesforce integration app with extensive documentation. This will help you find important technical solutions faster.
Customizability: If you can customize the mapping, this opens up multiple possibilities and connection scenarios for Salesforce objects, fields, and entities.
Automation: Verify the availability of automated integration triggers, actions, events, and other forms of automation, which is necessary for reducing manual work.
Any solution with a combination of these factors is a welcome addition to your integration pool.
10 Best Salesforce Integration Apps For Enterprises
Here are the most relevant Salesforce integration apps for businesses, MSPs, and enterprises.
Celigo
Celigo is a next-gen integration platform that unifies data and applications in order to optimize business processes, improve data consistency, and clear backlogs faster.
Celigo Features
Celigo AI for handling errors
API management for smoother policy enforcement and user onboarding
Error management for ML-powered troubleshooting
CloudExtend for syncing emails and files from external storage.
SnapLogic
SnapLogic is an iPaaS solution for connecting cloud services, SaaS applications, and legacy systems. The iPaaS application comes with API management solutions.
SnapLogic Features
SnapLogic Autosync to automated data ingestion
Application integration with Snaps (pre-built connectors)
API management and development for self-service creation and management of APIs.
Appy Pie Automate
Appy Pie Automate is a no-code automation platform that connects Salesforce with multiple platforms, streamlining business processes without any coding. It empowers users to build automated workflows that enhance productivity and simplify task management. Appy Pie Automate Features
Workflows (automated sequences of tasks that integrate Salesforce with other popular apps)
Triggers (event-based initiators that launch automation processes, including Salesforce events)
Actions (instant responses that execute tasks across connected applications)
Exalate is a bidirectional integration solution that supports two-way syncs between Salesforce and other systems such as Jira, GitHub, Azure DevOps, Zendesk, and ServiceNow. It supports both standard and custom configuration modes.
You can explore all the integrations it supports here.
Chatbots (AI chatbots for smoother customer conversations)
Workato
Workato is an integration solution that allows businesses to automate workflows and connect all cloud and on-premise apps.
Workato Features
Workflow apps for building no-code applications
Enterprise iPaaS for integrating business data and processes
Data orchestration for controlling how data moves between platforms
API management for controlling how your business works with APIs
Recipes (Triggers and Actions): automated instructions for complex workflows
Workbots for engaging in intelligent conversations and cutting down response times.
Unito
Unito is a fully featured integration solution that connects teams using multiple tools to cut costs and improve collaboration efficiency.
Unito Features
Unito Sync Platform
Unito Sync Embed
Unito Spreadsheet Sync
Skyvia
Skyvia is an all-inclusive cloud data platform for backing up cloud data, integrating systems, and managing spreadsheets.
Skyvia Features
Backup for handling data backups
Integration (tools for integrating cloud databases)
Connectors (custom pre-built integrations for different platforms)
Query Builder for visually obtaining queries and exporting cloud data
Skyvia Connect for syncing data from different sources on a unified interface.
Talend
Talend is an enterprise data management solution that supports the entire data lifecycle. Owned by Qlik, this solution combines data integration, data quality, and data governance in a single, low-code platform.
Talend Features
Talend Data Fabric is a unified platform for data integration, application and API integration, data integrity, and governance
Stitch ETL, a fully-managed data pipeline for analytics
Informatica
Informatica is a low-code, AI-powered cloud data management platform for connecting and managing data across multi-cloud, hybrid environments.
Informatica Features
Intelligent data management cloud
Data integration and engineering
API and application integration
Customer 360
Data catalog
MDM and 360 applications
CLAIRE AI Engine
Benefits of Salesforce Integration Apps
Still fence-sitting? Here are the benefits of Salesforce integration apps for your business:
Better connectivity with other systems: Salesforce integration apps expand Salesforce’s functionality by enabling connections with other traditionally incompatible systems.
Better data management: Integrating Salesforce with other systems unifies all business data, including leads, accounts, opportunities, and cases, to a singular source of truth for the organization.
Increased productivity: Salesforce integration tools make it possible to automate repetitive tasks, eliminating manual work. You can also improve productivity by integrating Salesforce with Jira, Asana, and other work management solutions.
Improved customer service: When you integrate Salesforce with customer service portals, you get a unified view of all support tickets, backlogs, and entities, which will help your support team generate insights for improving resolution times and customer satisfaction.
Lower expenses: Syncing multiple platforms with Salesforce allows you to access data without paying separate licensing and subscription fees for these applications.
Smoother collaboration: Cross-company collaborations with MSPs or outsourcing partners can flourish when a Salesforce integration can provide real-time updates for both sides of the connection.
Best Practices for Implementing Salesforce Integration Apps
When implementing Salesforce integration apps, here are some best practices to follow:
Create a Plan
The Salesforce integration plan should factor in specific business objectives as well as timelines, milestones, and responsibilities.
For instance, Salesforce integration with Zendesk should feature a plan created by both the support team and salespeople. Both sides will decide which fields, accounts, and objects to exchange back and forth.
Set a Budget
After devising a plan, the next step is to create a budget for your integration. This budget should cover the cost of building or buying the integration, licensing fees, maintenance costs, developer salaries, and other expenses.
Choose a Salesforce Integration App
Your choice of Salesforce integration application depends on your budget and business goals. Follow the recommendations when choosing your preferred application: check cost, reputation, security, and customizability.
If you decide to build from scratch, hand the requirements to your developers so they can start working on the prototype. But if you want to buy a ready-made solution, the options are app-native Salesforce integrations or third-party apps.
Prepare Your Data for Transfer
Clean up your data by arranging all objects and setting sensitive information to private or need-to-know. Map all dependencies and plugins on your end to prevent data duplication or loss.
For example, when mapping Jira custom field data to a Salesforce account, you must create a corresponding field or choose one of the defaults.
Test the Connection
Try the integration in a sandbox environment to verify if the right entities are interacting and that the data is transformed into the correct format.
For instance, if you want user mentions on Salesforce to appear in Jira, make sure the value coming over is the actual name rather than the ID from the API endpoint.
Automate the Sync
To reduce the manual task of initiating exchanges every time people on the other side need information, set automated triggers to control the sync.
Salesforce connectors use SOQL to configure the triggers. But, you can configure your integration solution for granular control over data exchanges.
Monitor Performance
Keep an eye on the sync to determine if it is working as expected. Check the quality of incoming data on both sides to verify the accuracy of all transformations.
Use the error-handling mechanism to debug faulty syncs and confirm whether network interruptions or user errors are the cause of the malfunction.
Why Exalate is the Best Salesforce Integration App
Exalate is a highly recommended integration app for Salesforce because it supports all default and custom entities. For instance, you can use Exalate to sync multiple Salesforce entities to one Jira ticket.
Users can also connect with Exalate’s Groovy scripting engine to write specific expressions and custom code to control how syncs work.
This scripting engine is also AI-enabled, which makes it the perfect option for non-technical (and tech-savvy) users looking to set up advanced integration use cases.
The best part is that you can automate your syncs using triggers that are native to the platform you are working on, such as Salesforce, Jira, Zendesk, ServiceNow, Azure DevOps, and GitHub.