Jira is a data gold mine when used and configured correctly. That’s why you need to keep it in sync with other internal and external systems (or instances) as part of any collaboration.
For companies looking to connect their Jira with other systems unidirectionally or bidirectionally, the vast library of Jira integration tools will always be at your disposal.
But who wants to deal with all that paradox of choice, anyway? If only there was a way to choose the perfect Jira integration based on features and requirements.
Oh wait, there is!
In this article, I’ll explore the best Jira integration tools for enterprises, starting with the essential features to look for when making your choice.
What are the Must-Have Features of Jira Integration Tools?
When choosing tools for Jira integration, consider the following features and capabilities.
Automation: Modern integration solutions require automation to improve system synchronization accuracy and efficiency. Whether you use conditional triggers or AI-powered scripting, look for tools that can automate your workflow.
Data transformation: Jira integration solutions should be able to transform data fetched from the APIs of other systems while retaining contextual information, e.g., they should maintain the same date-time format when integrating Jira with Salesforce.
Level of support: When things go wrong with the integration tool or your admin gets caught up in a technical quagmire, the vendor’s support engineers should be on hand to guide you through the fix.
Security and privacy: Since most integrations occur between systems that contain sensitive information at rest, always prioritize security features and compliance.
Ease of integration: The Jira solution might have the best cutting-edge features, but if users are unable to configure or make changes to it, it will also increase the technical department.
Collaboration features: Teams working on the same project should focus on integration solutions with dashboards, threaded comments, debugging consoles, and accessible sync queues.
Customization options: The solution should be able to handle custom connections beyond the default fields. This includes drag-and-drop interfaces for API management and scripting consoles for establishing the mapping.
Scalability: The features on the Jira data integration tool should be able to handle increasing workloads and user counts without experiencing any significant service disruptions.
If the Jira integration solution ticks all these boxes, then it’s the perfect tool for cross-team and cross-company integration scenarios.
Start off your integration journey by connecting two Jira instances to share data with each other.
10 Best Jira Integration Tools For Smooth Collaborations
Based on the must-have features mentioned earlier, we’ve gathered a list of tools that support Jira integration with other Jira instances and non-compatible systems.
I’ll also share their features to give you a broader view of their product offering and unique selling points.
ScriptRunner for Jira
ScriptRunner for Jira is an integration solution that helps users connect Jira projects and workflows to establish a hitch-free uni- or bi-directional sync.
Apart from Jira Cloud and Data Center, ScriptRunner also supports connections with other Atlassian apps such as BitBucket, Confluence, and Monday.com.
It allows users to work with Bitbucket Cloud and Jira Cloud integration tools for their projects.
ScriptRunner for Jira Features
Script Console for building and managing APIs,
Workflow Extensions for controlling issue transitions in Jira Cloud,
Script Listeners for triggering actions based on specific events,
Scheduled Jobs for automating the creation of issues and reports,
Scripted fields for customizing how the information is displayed,
Enhanced Search for easy searching using JQL functions and subqueries.
Exalate
Exalate is a Jira integration solution that enables the connection of Jira Cloud and Data Center instances with each other as well as with other systems. Platforms supported by Exalate include Salesforce, Zendesk, ServiceNow, GitHub, Azure DevOps, and many more.
As an AI-powered integration solution, Exalate allows users to script their connections using human prompts. Your data is also secure with Exalate, thanks to multiple layers of security, which is backed by ISO 27001:2022 certification.
AI-enabled Groovy engine (AI Assist) for scripting custom connections
Aida, an AI-powered documentation assistant for locating vital information in seconds.
Power BI Connector for Jira
This no-code solution for integrating Jira and Power BI helps you build custom Jira reports and dashboards in Power BI. It works for Jira Work Management, Service Management, and Software.
The Power BI connector for Jira Cloud is free. However, the version for the Data Center connection costs $1600 per year (for 50 users).
The only limitation to this solution is that it only connects Jira with Power BI and no other platforms. So, its scope of applicability is limited.
Power BI Connector for Jira Features
Pre-configured Jira dashboard templates
Scheduled refreshes for actual Jira reporting
Custom data exports using JQL and BASIC filters.
Data export from Tempo suite, Xray, and other marketplace apps
Zapier is one of the most versatile and accessible automation tools for Jira integration. It supports cross-platform integration using pre-configured connectors.
Although Zapier supports Jira connection, it also provides access to a vast library of connections between CRMs, work management systems, databases, and others.
One major disadvantage of using Zapier is that you can’t explore custom connections or script them based on your own rules.
Zapier Features
Zaps for automating workflows
Tables or databases for storing data
Interfaces (custom pages) for creating your own workflows
Canvas for mapping workflows using AI
Chatbots for answering customer questions.
Workato
As integration solutions go, Workato is one of the best tools for integrating Jira with other platforms. It automates complex workflows by using a specified set of instructions.
Workato has a vast library of pre-built connectors used to integrate thousands of SaaS apps, databases, and ERPs, both on-prem and in the cloud.
Workato Features
Actions — conditions for controlling every connector
Triggers — automatic action prompters configure events to occur automatically.
API Platform — an all-in-one console for building, running, and managing APIs.
Workflow Apps — a drag-and-drop editor for creating custom workflows between teams.
Tray.ai
Tray is a platform for building AI-powered agents that connect communication tools, work management systems, online databases, payment solutions, and more.
The Jira connector provided by Tray can connect with ERPs, CRMs, and other platforms to automate data transfer and speed up ticket resolution.
Tray.ai Features
Merlin Agent Builder — an AI-powered solution for delivering production-ready AI agents.
API Management for visual low-code development for any integration, automation, or API.
Merlin AI-powered chat
Mulesoft Anypoint Platform
Mulesoft is an all-in-one platform that provides Anypoint connectors for controlling how Jira, Salesforce, and other systems interact with each other.
The Anypoint Jira Connector uses the Jira REST API v3 to synchronize data and automate business processes between Jira and third-party applications, either on-premises or in the cloud.
Although this connector uses OAuth2 and Basic authentication, it doesn’t support personal access tokens (PATs).
Mulesoft Anypoint Platform Features
Anypoint Flex Gateway and API Governance
Anypoint API Manager and API Experience Hub
Anypoint API Designer and Code Builder
Anypoint Studio – an IDE for integration and API development
Anypoint Runtime Manager
Anypoint Monitoring and Security.
Make
Make is a visual-first integration solution for synchronizing data between Jira and multiple other platforms. Its marketplace supports over 2000 applications, including social media apps, CRM tools, design platforms, databases, email, and communication tools.
The drag-and-drop editor allows you to visualize the connections and set up triggers with a no-code toolkit.
Make Features
Flow control and data filtering
Smooth error handling
Integration with popular web services and systems
Visual workflow editor for no-code scenario configuration
Data management and integration
2FA and company-wide SSO
How Exalate Outshines all Jira Integration Tools
Exalate uses AI-powered scripting assistance to set up mapping rules between default and custom fields. It supports real-time connections between multiple Jira instances and Jira with systems like ServiceNow and Zendesk.
For instance, you can connect Jira Service Management with Jira Software to keep devs and support staff in sync. The data from the Service Management instance can be “exalated” to Zendesk or even Azure DevOps for further attention.
Exalate also works well for several Jira to ServiceNow use cases and connections with Salesforce cases. Most importantly, the data stays secure throughout the pipeline.
Want to discuss your Jira integration use case? Contact our solutions engineers for more details.
The aim of syncing Zendesk and Jira is to get both systems to share data about updates automatically. But when more than one Jira instance is involved, you need to find a way to keep some comments private from the purview of the other Jira instance.
I’ll show you how to sync these side conversations using Exalate.
Use Case Description
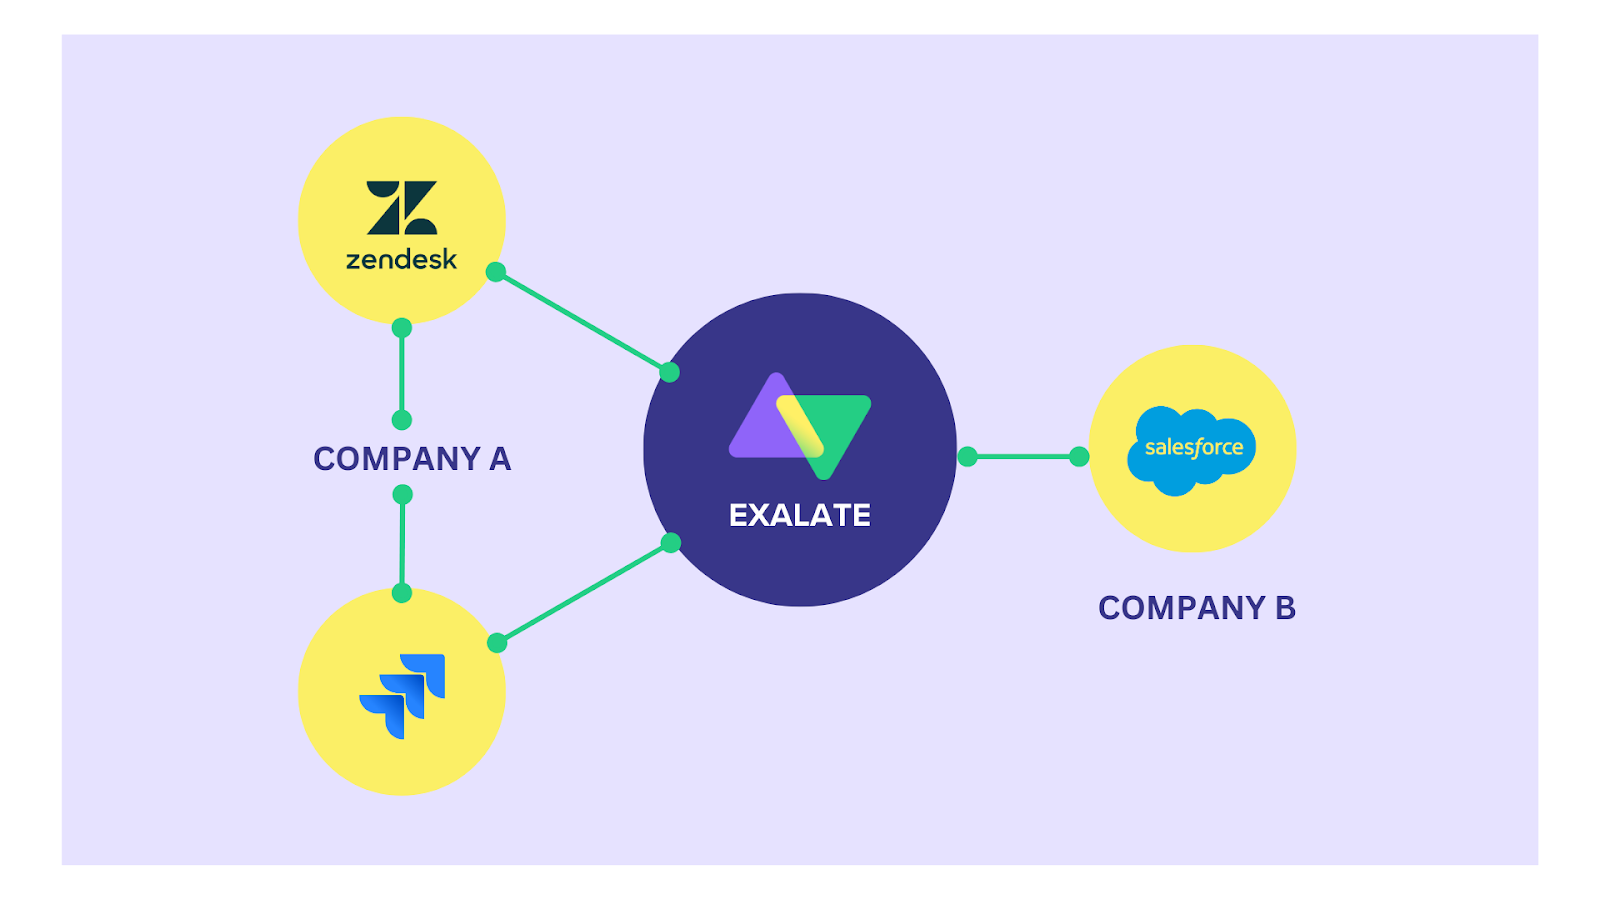
A customer support team (Zendesk) is in contact with a team of developers (Jira D) and a QA team (Jira Q).
When a comment is made on the Zendesk ticket, the admin can apply macros, and configuration will determine whether it is meant for Jira D or Jira Q.
The macros action contains the name of the group, the subject, and the message body. You can label them respectively:
Jira D (“Send to Developers”)
Jira Q (“Send to QA”)
Therefore, the comment will appear only in the Jira instance to which the macros have been applied, with a comment specifying the source.
What are Side Conversations?
Side conversations are spaces in a Zendesk ticket where agents can discuss an issue or a resolution with a specific group of people. Admins use them to organize and channel information about a ticket.
Your team can also use it to segregate information when your system is in sync with multiple platforms at the same time.
Why Sync Side Conversations?
Implementing and curating side conversations can be a headache, but they can actually make things easier for your organization.
Integrating side conversations provides the following advantages:
It allows you to organize and manage information based on specific issues or concerns.
It ensures that only authorized users get access to specific pieces of information.
It makes it easier for users in the system to filter information only to essentials.
It declutters the system and makes it easy for teams to become more productive.
Usually, you can configure the system to send side conversations via email or Slack messages. But with Exalate, you can convert the side conversations to Jira comments or information tables.
In addition to Jira, Exalate can create side conversations for other systems, such as Salesforce, Zendesk, ServiceNow, etc.
How to Sync Side Conversations with Jira Issues Using Exalate
Set up another Exalate Script mode connection between Zendesk and Jira Q.
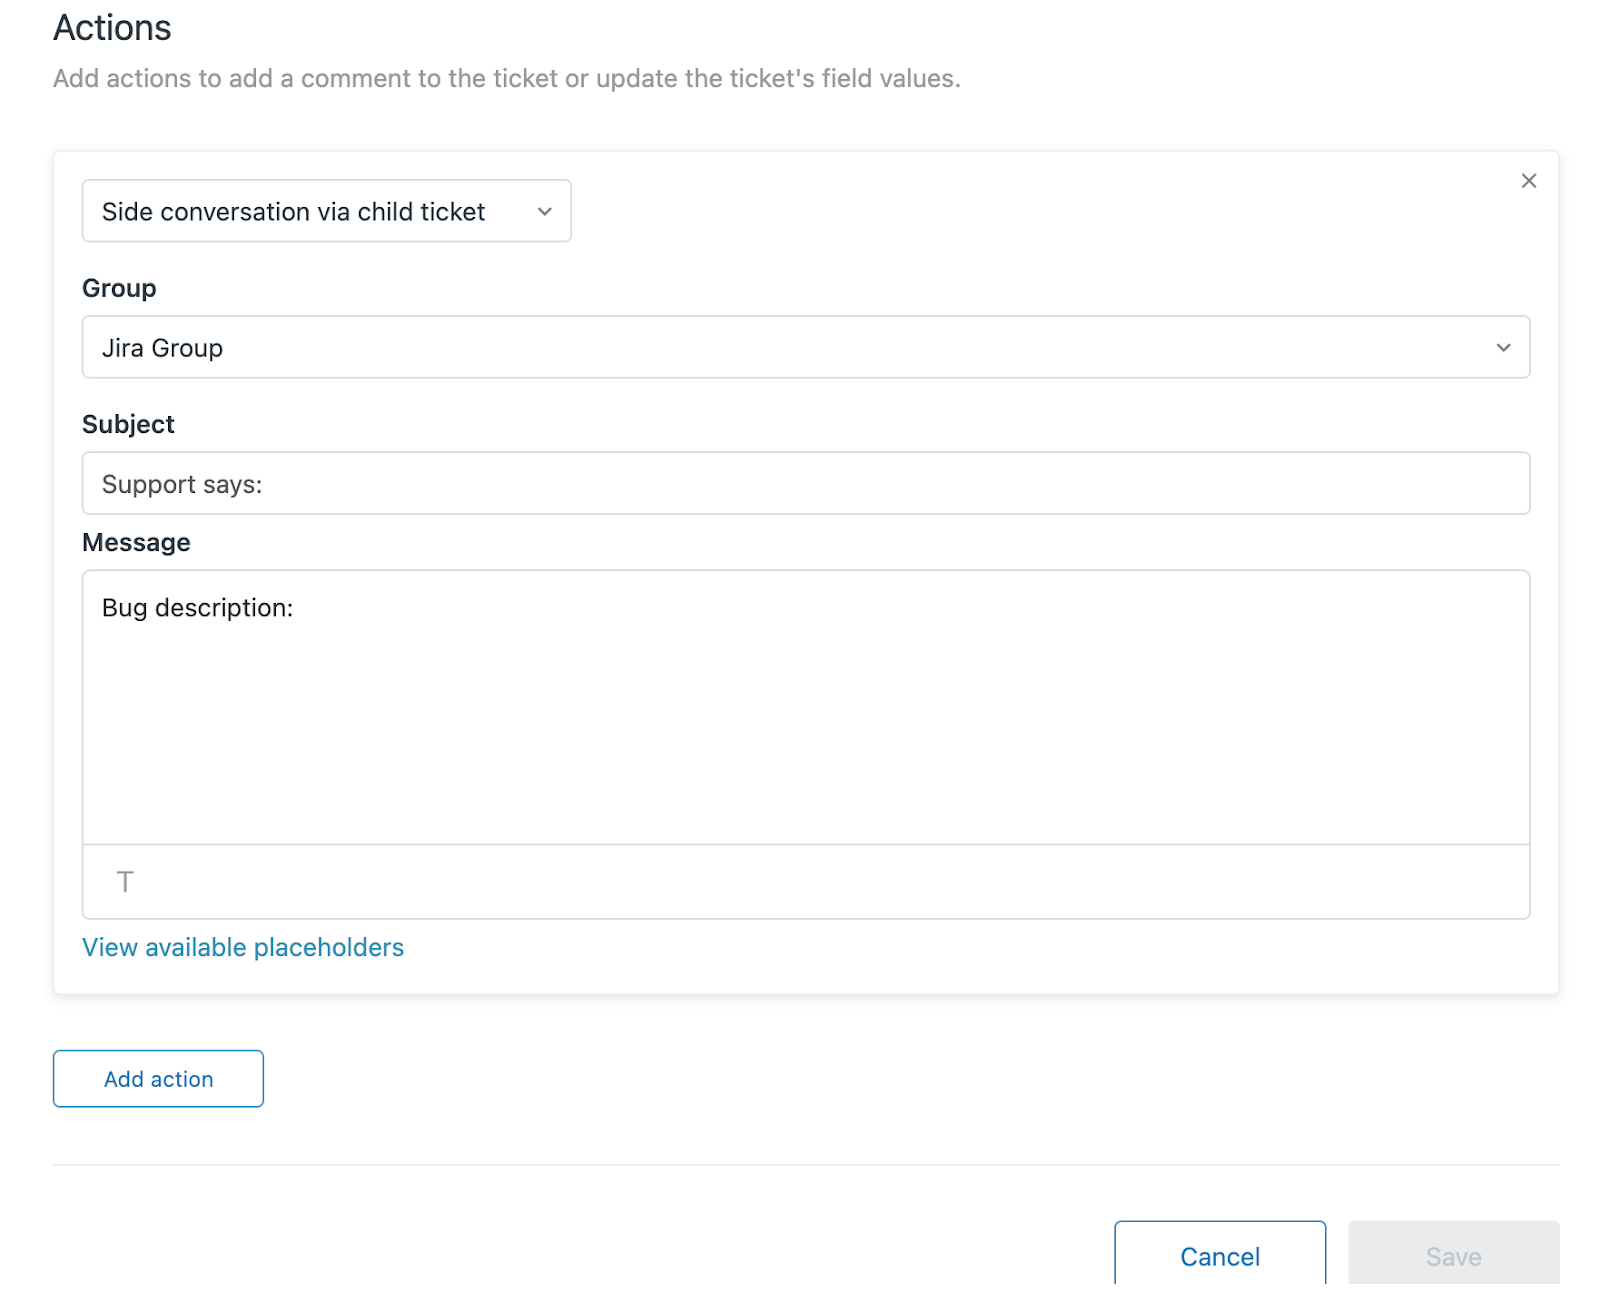
Create a macro called “Send to Developers”, and include the following in the Action
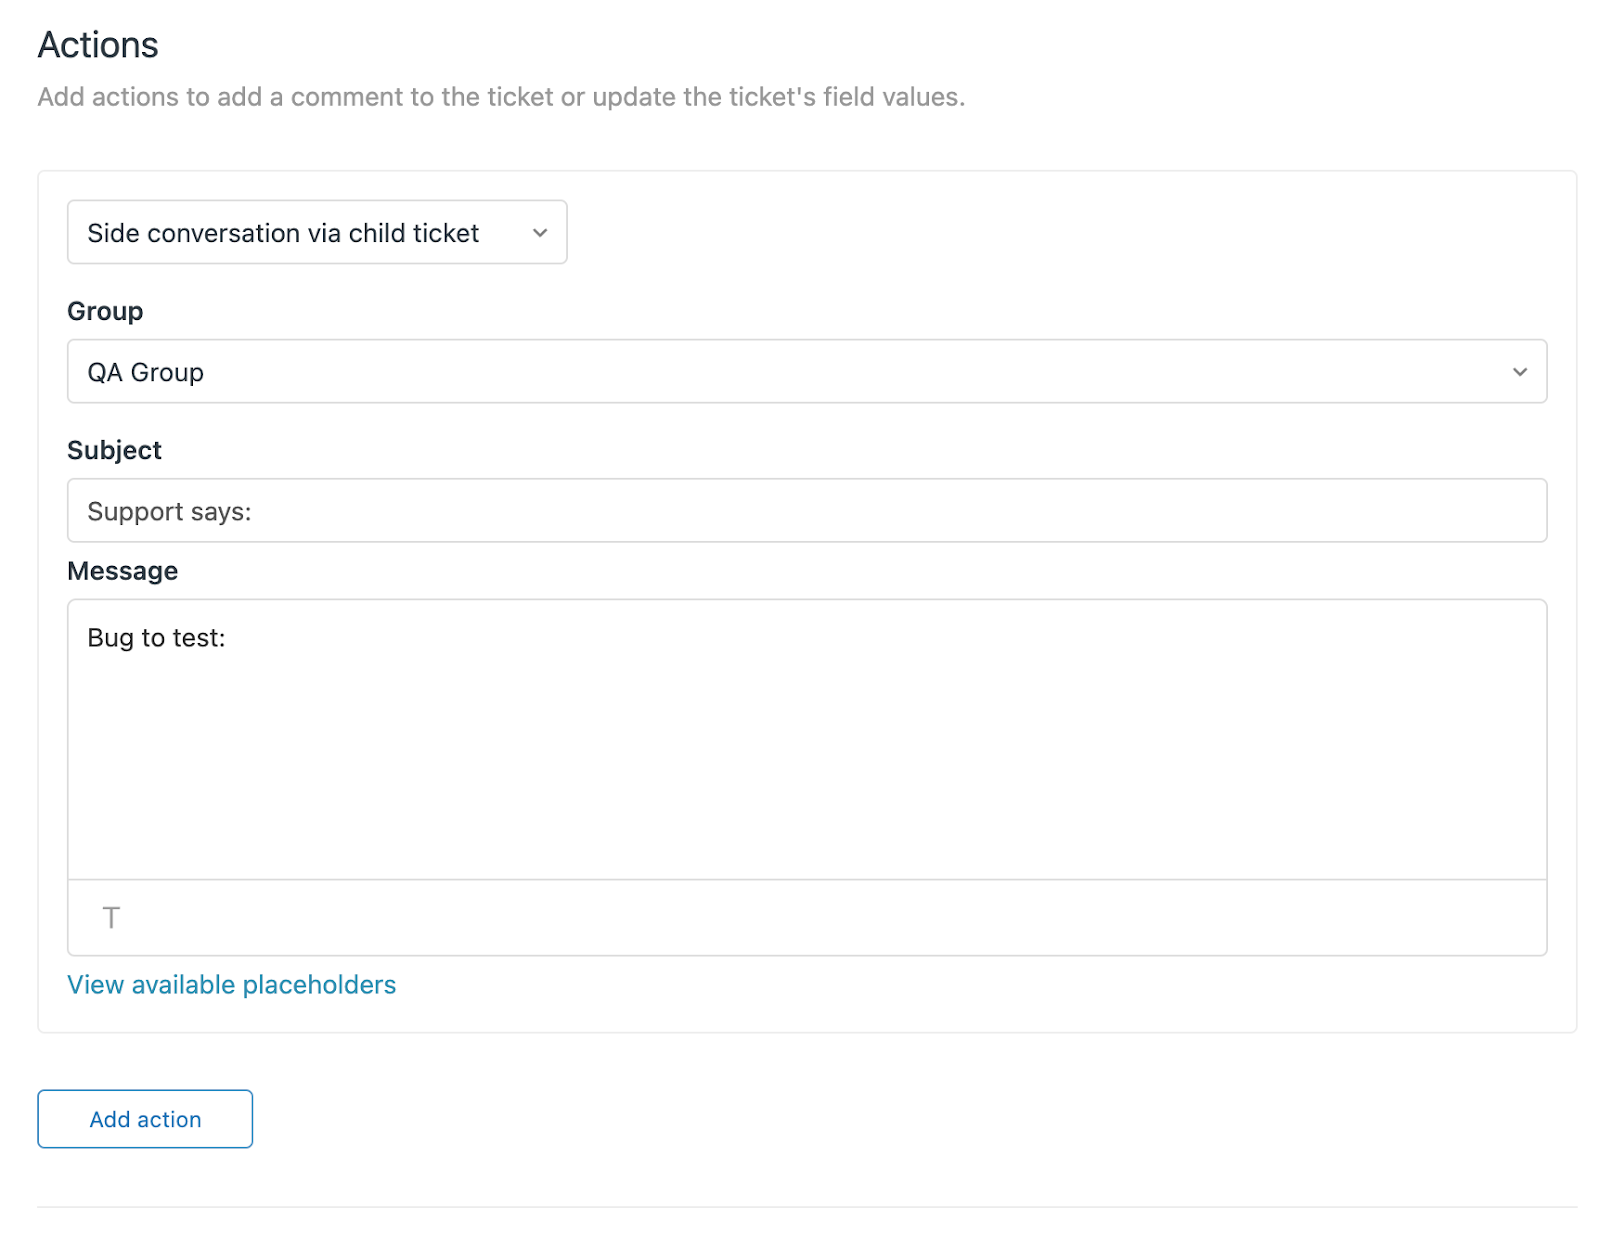
Create another macro called “Send to QA”, and include the following in the Action:
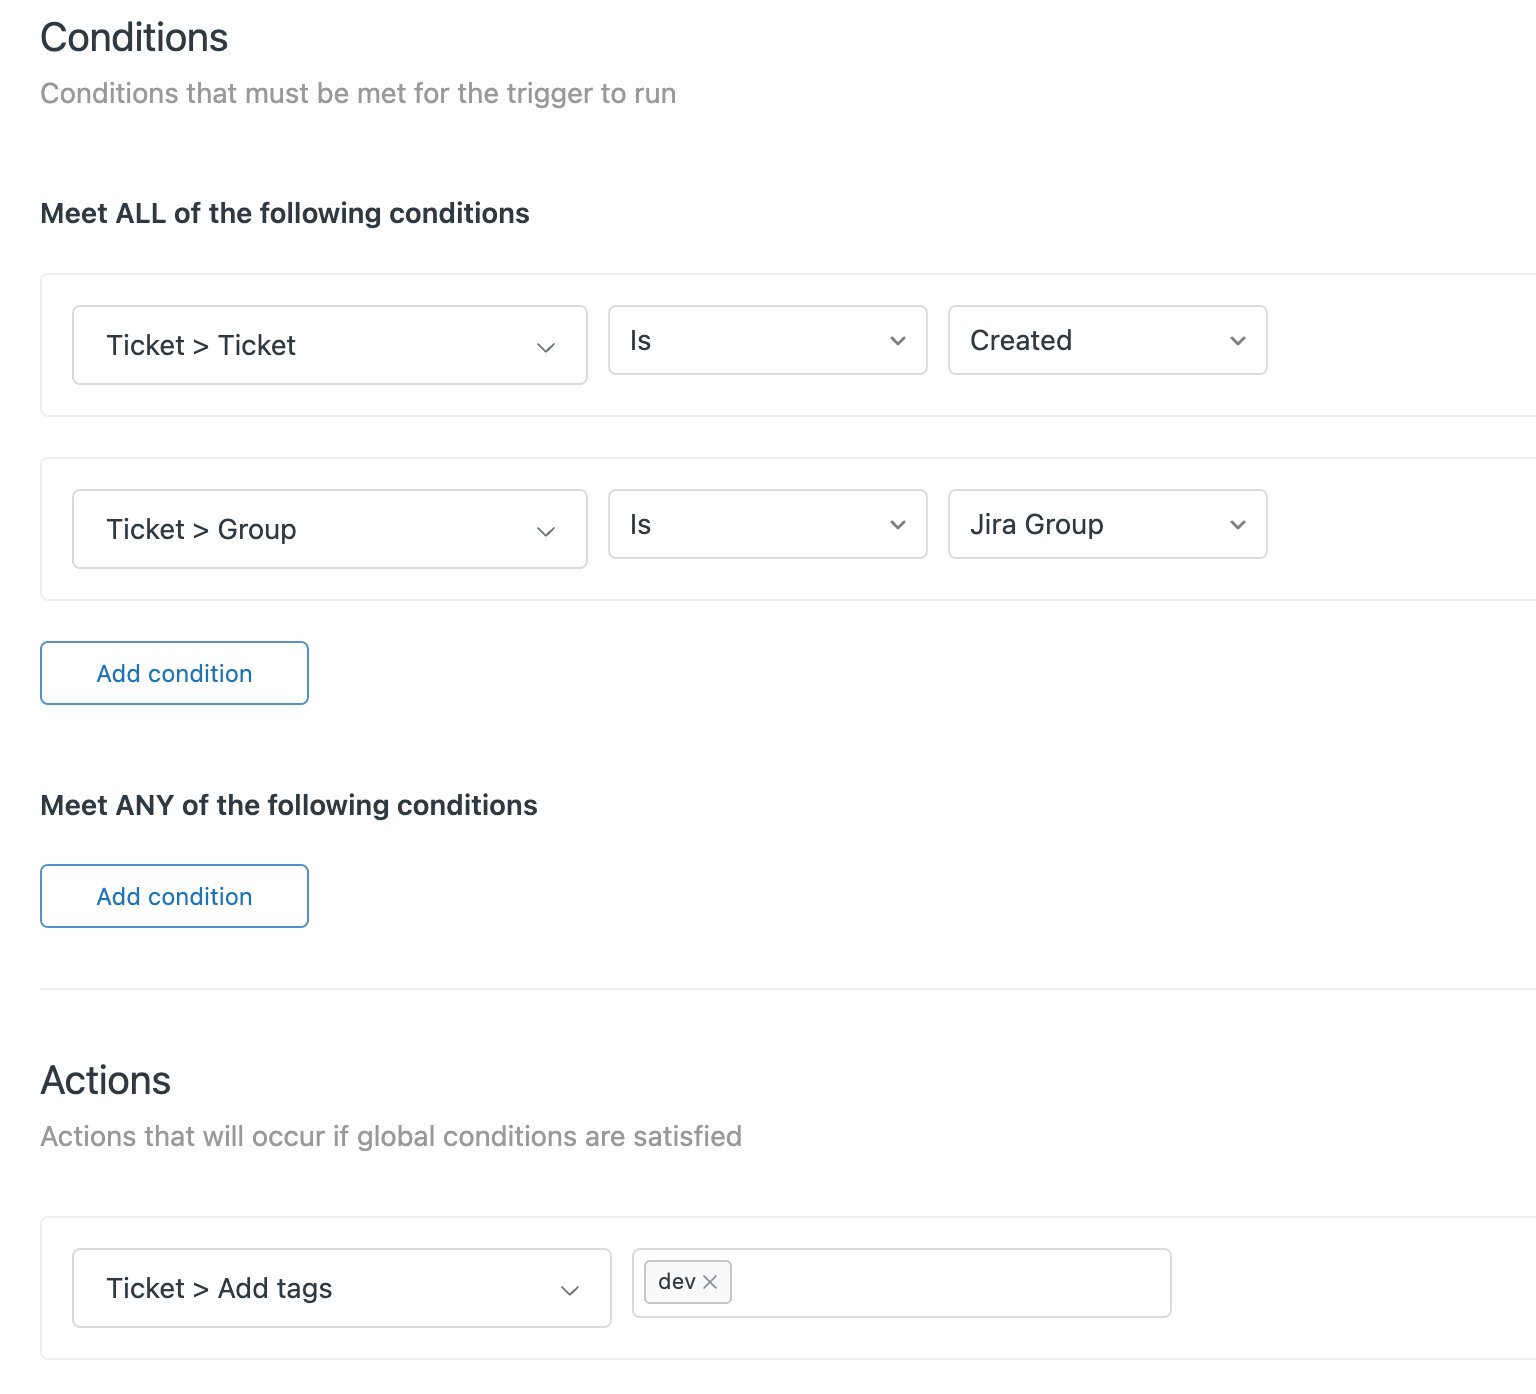
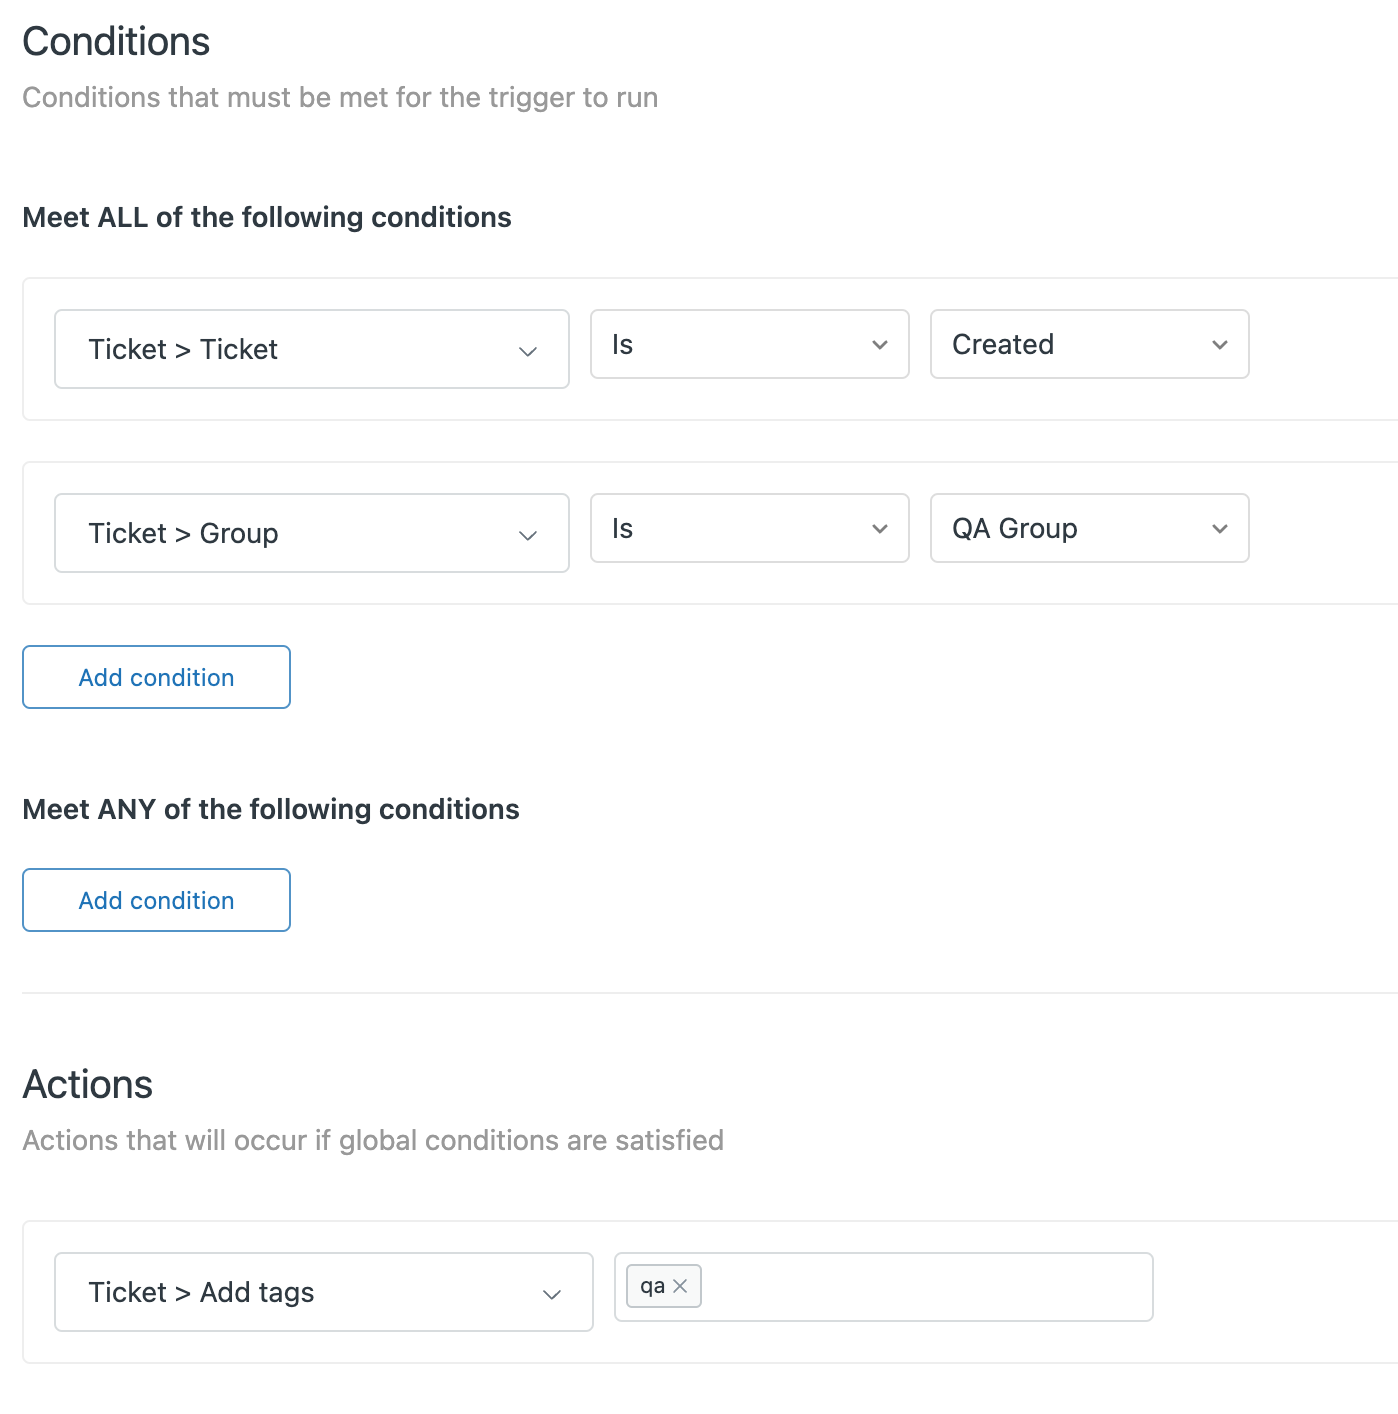
Now create Zendesk triggers to add a custom tag if a new ticket is created in one of the Groups assigned in steps 3 and 4:
The final piece is to create Exalate triggers based on the tags added via Zendesk triggers, i.e. in the respective connections.
tags:dev
tags:qa
Now support agents are able to run macros and create side conversations to talk to the Development and QA teams on separate threads, and no one ever has to leave their favored work system.
To watch a detailed explanation of how to set up macros and sync side conversations from Zendesk to two Jira instances, check out the video above.
Need help to sync side conversations or have some other use case in mind? Book a call with our solution engineers.
Cross-platform integration is the answer to the ever-increasing SaaS sprawl in modern organizations.
Whether software or hardware, you need to find a way to connect non-compatible systems and make sure they interact smoothly.
When integrating two platforms with entirely different architectures, a lot of transformations and conversions have to take place under the hood.
Depending on the complexity, integrating such systems could be a breeze or pose a massive hurdle.
This article discusses the benefits of cross-platform systems integration as well as some use cases and examples.
What is Cross-Platform Integration?
Cross-platform integration is the process of connecting two or more systems that are not compatible with each other in order to get them to interact.
Think of the classic case of getting PlayStation consoles to interact with Xbox consoles and PCs. It’s not magic; it’s cross-platform integration.
For organizations, cross-platform systems integration usually features a middleware solution that bridges the interoperability gap.
This middleware could be a third-party solution, a custom script, or an embedded application that enables time-regulated data sharing or polling.
The integration could be between a help desk application and a CRM application to improve the quality of service delivered. The applications are limitless.
What are the Applications of Cross-Platform Integration?
Companies in different industries can integrate platforms to collect, extract, transform, clean, and analyze data. There are other applications of cross-platform integration.
E-Commerce
Vendors and shop owners can regulate sales by connecting their inventory to update the values and quantities reflected in their online stores.
Connecting CRM tools like Salesforce with ERPs or e-commerce platforms will make it possible for online sellers to collect vital user behavior and sales information.
Further applications of cross-platform marketing integration in e-commerce and retail can be seen in invoice management and quote generation.
Supply Chain
Logistics companies implement cross-platform shipping integration by connecting time-tracking software with the central dashboard to manage their fleets and monitor driver activity.
Logistics giant Maersk used cross-platform service desk integration between Jira and ServiceNow to keep their support and development teams updated in real time. This helped them reduce expenses by avoiding additional licensing costs for onboarding ServiceNow.
Healthcare
Doctors and nurses within the same hospital ecosystem can gain access to patient records for more accurate diagnosis, treatment, and prescriptions.
Using the best EMR for small practices, hospitals and healthcare institutions can integrate prescription data with customer support portals to understand how people are reacting to a new drug.
Banking and Finance
Banks can integrate payment systems with e-commerce platforms using a secure payment gateway. Once the end user passes authorization, the transaction is initiated automatically.
Insurance company Turkiye Sigorta used cross-platform synchronization software to iron out disruptions within its ticketing system. This gave them a better view of suppliers’ demands and customer response.
Manufacturing and Construction
The success of a construction or manufacturing project hinges on close collaboration between different teams. And this is only possible if the platforms they use are in sync.
For instance, the inspection team can forward their findings to the quality control and supervisory teams without physically meeting them.
Following this example, Nevaris Build was able to get its internal teams to work in tandem. This helped them reduce conversion times and decentralize the control of the integration.
Service Delivery
ServiceNow and Zendesk are platforms for connecting the help desk with the development or IT team.
With cross-platform service desk integration, users on both sides can stay up to date about the customer. The help desk will have updates about incident resolution, while the development team can scale up their efforts depending on consumer response or overall business impact.
When Qualco used this integration framework, they were able to cut down resolution times and increase the overall customer satisfaction score.
What are Examples of Cross-Platform Integration?
Here are some technical use cases for cross-platform integration:
Connect multiple help desk applications to speed up and automate triage and incident escalation/resolution. Admins can connect the internal Jira Service Management instance with an external supplier’s ServiceDesk application.
Shuffle data between multiple platforms by allowing them to share entities and objects between their disparate systems, including attachments, comments, formatting, and summaries.
Obtain additional context by syncing data from custom fields. Any information that cannot be conveyed through standard fields can still reach the other side through custom field mapping. For instance, you can update Salesforce account information from a Jira custom field.
Connect multiple instances to a single platform or get a single application to connect and interact independently with multiple systems simultaneously. For example, you can connect multiple Zendesk tickets to a single Jira Service Management issue to provide visibility for all stakeholders.
Bridge the feature gap between two systems by extending functionality that doesn’t exist on one. One instance of this is the establishment of hierarchy and parent-child relationships. This functionality is available by default in Jira but not in Azure DevOps.
Get instant updates about security incidents, including the entire context and impact of the breach. Cybersecurity service providers can use this integration model to connect with clients.
Read technical use cases and practical applications of Exalate for cross-platform integration
Cross-company integration is the process of establishing a collaborative ecosystem between two companies or organizations.
By contrast, cross-platform integration involves connecting two systems (applications, hardware, cloud services, etc.) with disparate architecture to get them to interact.
The commonality between both concepts is that they involve an intricate configuration of aspects of two entities that normally would be incompatible.
Why? Because when trying to get two organizations to collaborate, you must connect whatever platforms they’re using to interface with each other.
Let’s say you want to outsource all customer support efforts to an MSP. A perfect connection is only attainable through weeks of planning and configuration to get your company’s Jira in sync with the MSP’s Zendesk.
So, cross-company integration starts with cross-platform integration.
What are the Challenges of Cross-Platform Integration?
If you have to connect systems with completely different time/date formats, APIs, system configurations, transformation logic, and native programming languages, then you’ll definitely be running into a litany of problems.
Let’s address a few of these cross-platform integration challenges:
Figuring out the tech: As mentioned earlier, the main headache of cross-platform integration is figuring out how the system works. Now imagine if you have to do the same thing for two or more systems with starkly different infrastructure. The technical debt will only continue to pile up.
Finding a compatible solution: If you can figure out the underlying infrastructure of both systems, the next challenge is to find a solution that is compatible with them. This means getting a solution that can handle the transformations and conversions accurately and in real time.
Mapping the correct entities and fields: Once the tech is figured out, the next obstacle is to figure out how to map the objects and fields with a cross-platform synchronization solution. This requires a deep understanding of both systems’ APIs.
Keeping your data secure: Another significant hurdle is security. When data moves between platforms, it becomes vulnerable to unauthorized access. Therefore, you must worry about keeping the data secure in transit and at rest.
Maintaining consistent quality performance: The cross-platform help desk integration tool needs to deliver consistent performance and data transformation. This includes handling downtimes and errors without significant service disruption.
Locking in with a specific vendor: When choosing a solution for cross-platform sync, pay attention to not locking in with one vendor, as decoupling later will be a massive pain.
What are the Benefits of Cross-Platform Integration?
Challenges aside, implementing cross-platform integration is a no-brainer for modern companies because of the multitude of advantages they provide.
I’ll go through them in detail.
Increase Productivity
Cross-platform integration increases the efficiency of processes and workflows by making data available as quickly as possible to all parties involved in the sync.
Since every member of the collaboration has access to data, this improves their ability to address the issue faster.
Enhance Data Consistency and Accuracy
With the cross-platform API integration doing the heavy lifting under the hood, the accuracy of the data transformation and exchange is all but guaranteed.
Compare that to when a human has to exchange the data manually, and you’ll see that the risk of duplication, errors, and inconsistencies is massively reduced.
Maintain Flexibility
Integrations across platforms make it possible for collaborative environments to maintain their flexibility.
For starters, modern cross-platform integration tools come with automation, which allows admins to explore different configuration scenarios and use cases.
You can customize your mappings based on user prompts. This gives you the flexibility to play around with custom configurations and scripts without going through the grind of writing code and debugging.
Save Money
It’s a no-brainer that integrating more platforms is more financially favorable than having to pay for them individually.
Let’s say your team uses Jira Service Management, but your potential partners are contractually allowed to use only ServiceNow.
What we now have is a classic administrative impasse. So, the only way out is to keep both teams on their preferred platform while getting them to share data.
The upside? Your team would no longer have to pay for ServiceNow licensing to keep the collaboration alive.
Scale at will
Cross-platform brand integration makes it possible for both sides to scale at will, thanks to the flexibility it provides.
Let’s say an e-commerce company wants to expand into a new market segment. They can sync their platform with an external customer service team without worrying about their capacity to accommodate the expected surge in support tickets and user complaints.
Make Informed Decisions
Access to multiple data sources can only help your organization make critical business and administrative decisions.
For instance, a surge in support tickets after a product release could indicate a defective feature or widespread customer dissatisfaction.
If the decision-makers have access to the data, they can decide to roll back some of the changes or invest in addressing user concerns in future iterations.
Collaborate Better
Generally, collaborations can only become more fruitful when all involved parties can get what they want from the cooperation.
Cross-platform integration, whether internal or external, allows both parties access to essential data needed to optimize workflows and fine-tune processes.
Also, it increases the transparency of collaborations by making the data available to both teams and organizations.
Stay Compliant
Certain industries have specific provisions regarding the platforms that can be used for handling customer or business data.
In such cases, onboarding a non-sanctioned application or system might get you in serious trouble.
The alternative? Use cross-platform integration to obtain only the necessary information while keeping the rest private.
Improve Customer Experience
The goal of cross-platform integration is customer satisfaction. You want to automate every data exchange to improve the accuracy and delivery speed.
For the customer, this means faster resolution times for complaints, change requests, and critical incidents.
What are Cross-Platform Integration Solutions?
Cross-platform integration solutions are tools that facilitate the simultaneous connection of two or more platforms, thereby bridging the compatibility and interoperability gap.
Let’s start with some third-party integration solutions.
Exalate
Exalate is an AI-powered cross-platform integration solution that allows users to map and exchange data between disparate systems, such as Salesforce, Zendesk, Jira, ServiceNow, Azure DevOps, GitHub, and many more.
Exalate helps with scripting by providing a scripting console powered by AI Assist. Technical users can also refer to the documentation assistant Aida for quick configuration tips.
Zapier
Zapier is a cross-platform integration solution that automates workflows and processes between applications, cloud services, and more.
The main selling point for Zapier is that it supports no-code integration and has a vast library of connectors for multiple simple use cases.
Workato
Workato is a solution for the integration of data and workflow management systems. This solution provides Recipes and Actions that can be referenced for automating complex workflows between disparate systems.
Make (Integromat)
Make is a visual automation solution that connects multiple platforms to ensure they share data based on specific conditions or instructions.
You can automate workflows and processes between systems and teams using the Make drag-and-drop builder.
Custom Cross-Platform Connectors
Some companies opt for custom connectors when the available third-party tools cannot handle their cross-platform integration use case.
This could be an API connector or custom script written by the in-house development team for a specific scenario.
However, the problem with custom connectors is that they are limited in applicability. Also, the team has to maintain the system infrastructure to keep it up and running.
If your organization’s technical debt is too high, a third-party tool is the best option for cross-platform data integration.
Ready to build you own custom integration? Find out whether your budget can allow you to build or buy the solution.
What are the Keys to Successful Cross-Platform Integration?
Here are some best practices to follow in order to guarantee hitch-free cross-platform data integration:
Agree on the fundamentals. Work closely with team admins from both sides to figure out the goal of the integration, as well as the entities, workflows, and processes that will become part of the sync.
Get your budget right. Consult with accountants and tech leads to confirm the target budget spend. This will help you choose the correct solution within your bracket.
Choose the right tool. The perfect solution for integrating multiple platforms has to be secure, compliant, flexible, customizable, and scalable. So, check out the features and user reviews before finalizing your choice.
Work with automation. Triggers and automated actions speed up connections and data sync by removing the need for manual oversight.
Decide on real-time vs. batch integration. As part of the planning process, make sure to outline whether the systems within the sync should exchange data in real time or leave the transfer to happen in batches at designated timelines.
Run tests for every sync. Set up and try out new connections in a sandbox environment before rolling out the changes to actual systems. This will help you identify errors and potential issues before they affect the entire ecosystem.
Train your team. Dedicate enough time and money to get your team up to speed with running and configuring the cross-platform data integration. Even if you’re using a third-party solution, your engineers should have basic knowledge of how it works.
Exalate: The Best Cross-Platform Integration Tool
Exalate works well for cross-platform integration because it provides a decentralized console so that both sides can configure their sync as they wish.
When you choose the Script mode, you can decide to make comments private on one side and share the attachments with the other side.
In terms of security, Exalate is ISO 27001:2022 certified. The solution also uses tokens and secret keys to limit access to only authorized users.
And if you are in a bind with little time to maneuver, Exalate’s AI Assist can help you script your syncs in minutes. All you need to do is provide a detailed user prompt describing your use case, and the code will appear on your console. Want to try out Exalate’s cross-platform integration capabilities? Book a demo with our engineers right away.
Business process automation helps organizations improve the efficiency and quality of the services they provide.
It encapsulates every technology that allows teams and managers to eliminate all manual user input or interference in specific business processes.
When automating business processes for your organization, you’ll run into administrative and technological issues.
So, this article will cover everything worth knowing about business process automation, its real-world applications, and best practices for implementation.
What is Business Process Automation?
Business process automation (BPA) is the process of using technological solutions to automate specific (or entire) components of an organization’s operations.
Companies in different industries automate processes. The most common targets are repetitive, mundane, time-consuming, and high-volume tasks that humans would usually perform.
Healthcare institutions use automation for predictive diagnosis and prescription. Manufacturers automate distribution and inventory management. Marketers automate lead acquisition and nurturing pipelines.
The list goes on.
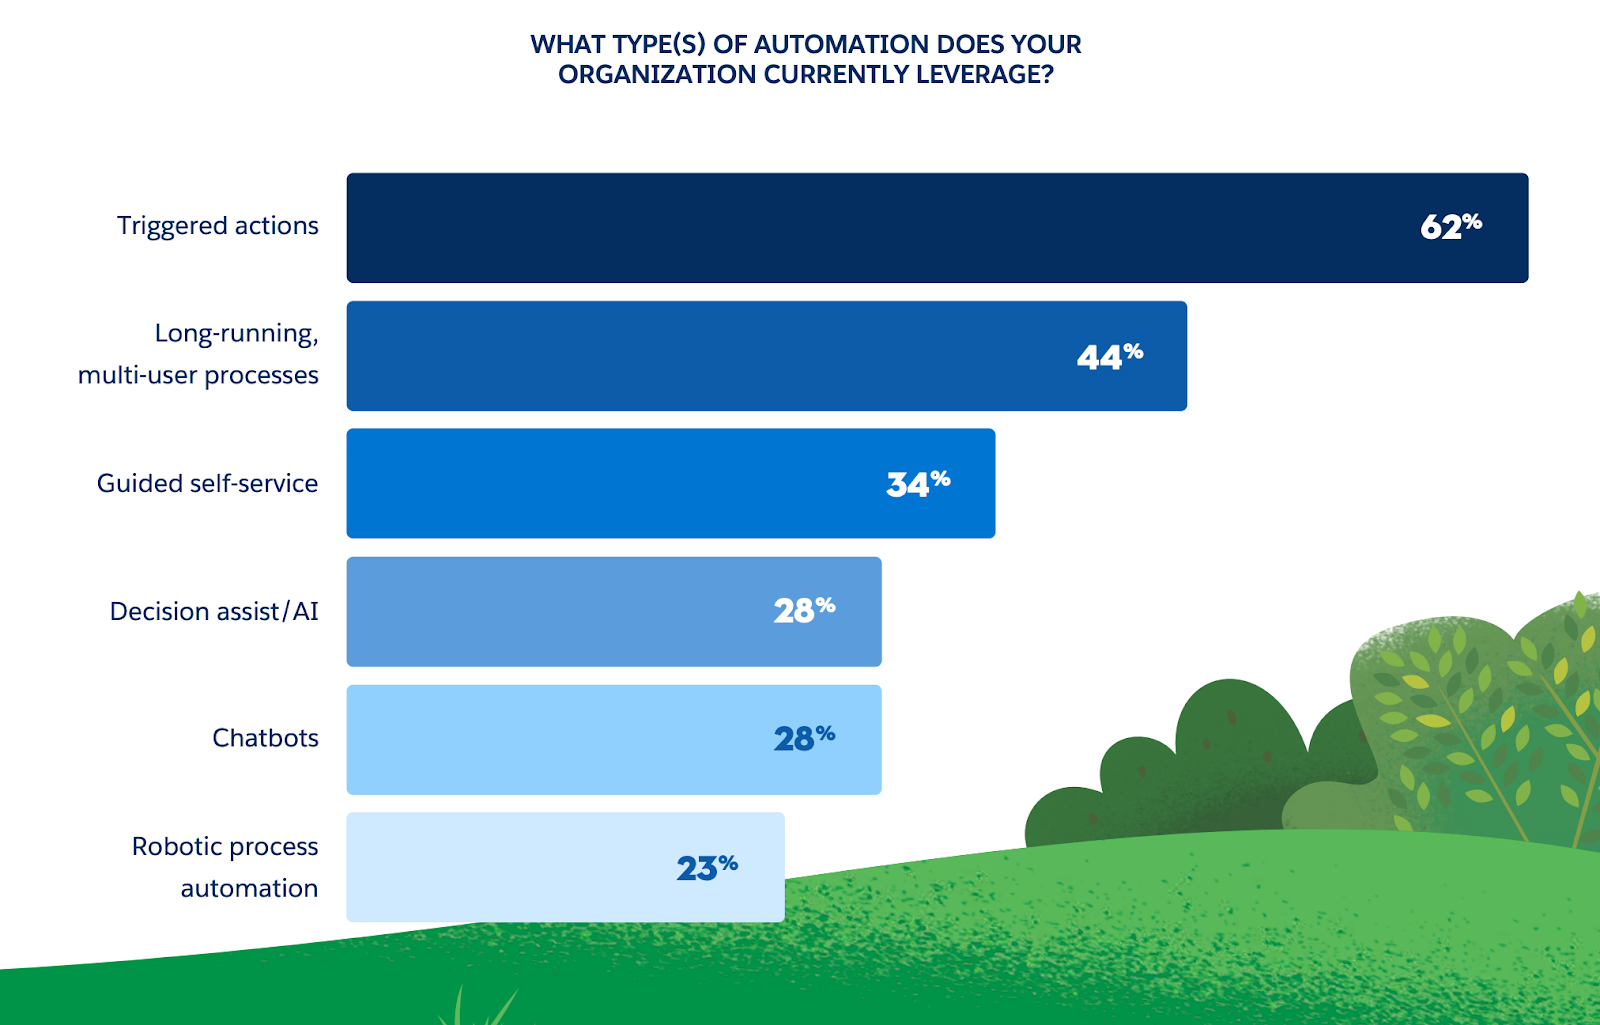
That brings us to the consideration of different types of business process automation.
Triggered actions: Uses set conditions to control how the automation works.
User-activated automation: A set of user actions will trigger the next event in the chain.
Robotic process automation (RPA): Processes involving bots are automated by default.
Artificial Intelligence: Relies on the use of AI solutions to speed up decisions.
Chatbots: Provides templated responses without human input.
Self-service portals: Combines the efficiency of chatbots and AI to improve service delivery.
There are other variations of BPA that you can apply to internal and external business processes and workflows. The key is to find the right combination for your use case.
BPA vs RPA: What’s the Difference?
RPA (robotic process automation) involves the use of code, bots, and similar technologies to automate specific tasks or processes within the organization.
For instance, you can create a bot to automate payroll so that your employees’ salaries are disbursed at the right time.
However, while RPA focuses on automating individual processes, BPA covers the entire spectrum of tasks and processes and arranges them into an automated workflow.
Both BPA and RPA rely on tools (usually low-code or no-code) to control how the ecosystem works via a user interface. They also rely on AI and machine learning tools to analyze and arrange data, text, media files, and others.
In general, robotic process automation is a subset of business process automation.
Why Do You Need Business Process Automation?
When you automate processes within your business, you’ll gain the following advantages.
Better Accuracy
Automating data transfer and analysis reduces human interference and increases the accuracy of the obtained insights.
Let’s say you want to move data from a CRM to an analytical solution. Automating the process will help prevent data duplication or inconsistencies.
Speeds Up Decision-Making
BPA makes it possible for managers and shareholders to get access to vital information needed for making critical decisions.
For instance, if there is a spike in ServiceNow incidents after a new release, quickly glancing at the data will show the feature responsible for the failure.
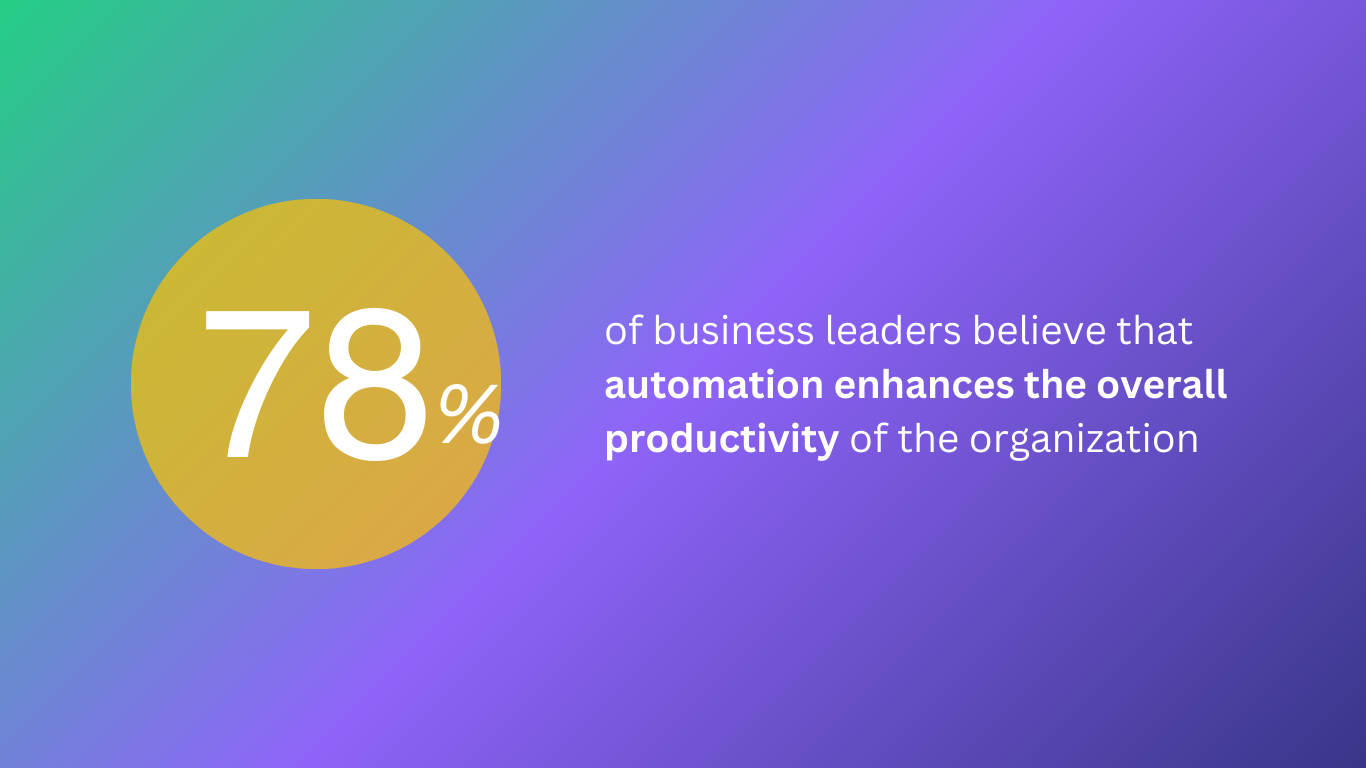
Improves Productivity
With faster decision-making comes increased productivity. At least 78% of business leaders believe that automation enhances the overall productivity of the organization.
And think about it: Instead of waiting for someone to manually complete a process (like generating a sales invoice), the automation will trigger the next event in the chain.
As a result, your employees will end up completing more tasks within a given timeframe.
Simplifies security and compliance
For automation to work, you need to standardize processes using standard operating procedures.
You also need to improve infrastructure security and adhere to compliance standards. Before being released to the marketplace, some business process automation tools must pass a compliance evaluation.
Enhances customer satisfaction
The direct product of automation is enhanced service delivery.
Here is how:
When the service provider has access to all the information in record time, they can proffer personalized solutions to customers faster.
The result? Fast response times, swift resolution, and better overall customer satisfaction.
What are the Use Cases for Business Process Automation?
Organizations can use various types of business process automation to streamline workflows or save money. Let’s go through some BPA examples and real-life applications.
Employee Onboarding
HR can make onboarding smooth for employees by automating every task and step of the process. So, new employees can go through all the necessary steps at their own pace.
Also, an important part of it is integrating business referral program software, which encourages existing employees to refer qualified candidates, streamlining recruitment alongside onboarding.
Apart from in-house onboarding, BPA helps organizations to onboard partners and service providers. Turkish insurance company Turkiye Sigorta used business process automation to connect with suppliers.
Sales and Payroll Automation
You can set a trigger to generate an invoice or quote any time a customer creates a sales request.
Another application of BPA can be seen in payroll management. The HR manager can set the parameters and let the automation handle the payments and bonuses.
In this manner, generating pay stubs online through integrations ensures that employees receive accurate and timely payment records, streamlining payroll management and improving transparency.
Customer Service
You can configure your help desk application (Zendesk, Freshdesk, etc.) to create an issue on Jira Software whenever the customer opens a ticket. Customers can also get faster assistance from chatbots or voice AI phone support on self-service portals.
For instance, when a high-priority Zendesk ticket is raised by an angry customer, the Jira Service Management issue will be escalated to the engineering team with a similar priority.
The engineering team can now escalate the issue further by setting it to “In Progress” so that the Azure DevOps work item will receive all the required data and context from the customer.
Logistics and Inventory Management
Automation helps sales managers keep track of stock to know when to restock on low supplies. The solution can also analyze availability and demand for dynamic pricing.
Logistics company LF Logistics used a BPA solution to connect their ServiceNow instance with the logistics department of one of their subsidiaries.
When the delivery person marks the package as “Delivered”, the attached Jira Service Management ticket will be marked “Done” by default—no need for the back-and-forth.
Lead nurturing and Analytics
Salespeople can nurture leads and opportunities from Salesforce by syncing them with the service team and other related teams.
QA teams can automatically escalate bugs containing all details and attachments to developers using Jira Software.
With modern automation tools, companies can organize their business process to limit the impact of human error.
What are the Challenges of Automating Business Processes?
BPA tools are designed to reduce bottlenecks and make the lives of customers and employees easier. But the reality is that the journey to business process automation is filled with hurdles.
First, you need a BPA solution that can scale to accommodate increasing workloads and customer demands.
Another challenge is synchronization. The automation should be able to connect with other systems using direct connectors or third-party solutions such as Exalate and Zapier.
Also, keeping the automation tool secure can be a massive challenge for companies worried about privacy and security.
For example, AI solutions require access to vital business information, which could jeopardize privacy (and customer confidentiality).
If the BPA solution’s documentation is lacking, your team will have more trouble getting it to work as intended.
And most importantly, you need a team of engineers who understand how to set up and debug the business process automation tool.
Just imagine if the automation fails to generate invoices on a weekend, and no team member can figure out what’s wrong. You’d have to wait until Monday for a solution. That’s two days’ worth of deals lost.
What are the Best Practices for Business Process Automation?
To get your automation to fit your business process like a glove, here are a few best practices to follow.
Set specific goals: The objective might be to gather more data or speed up sales generation. Whatever the goal, consult with shareholders and team members to determine whether you have the capacity for this change.
Establish limits to automation: Automated systems can malfunction. That’s why you can’t let automation take over all your business processes. Assign a human (usually a manager) at the end of the process for supervision in case things spiral out of control.
Document every stage: When setting up a new business process automation framework, map every entry, workflow, responsibility, and timeline. This will help you understand what went wrong and provide additional context to future employees trying to decipher the framework.
Evaluate your tech stack: Review the tools within your organization to determine the level of process automation you can accommodate. You can start with simple tasks and scale to entire workflows, such as invoice generation and sales enablement.
Educate your employees: Managers and team members should undergo rigorous training to understand how automation works. This will democratize the system, allowing any available person to configure or troubleshoot it when necessary.
Double-up on security: Some organizations trust the security of the automation services provider. To be on the safe side, add additional security measures and technologies to restrict access to only authorized users.
Measure and optimize: Use the acquired data and performance metrics to identify potential areas for improvement. For example, the customer satisfaction score can tell you when to change your approach. Provided they align with your ultimate goal, these optimizations can occur in phases or as a one-time adjustment.
If you don’t have a high-level development team, consider third-party automation tools like Exalate. These reduce maintenance costs and guarantee longer automation uptimes.
Exalate for Business Process Automation
Exalate is an AI-powered integration solution that allows you to automate and customize syncs between work management systems and CRMs such as Salesforce, Jira, Zendesk, GitHub, ServiceNow, Azure DevOps, and the like.
With the help of query-based triggers, users can configure their syncs to any use case.
For example, a Jira issue should be created whenever a ServiceNow incident of “urgency=1” is created by the support team.
In terms of security plus the fact that it is ISO certified, Exalate uses a single-tenant architecture to isolate each user to their own environment. Admins also get autonomous control to set up their configs as they want without affecting the other side’s instance.
The Exalate Basic mode allows the syncing of basic fields and comment threads. But users can also set up advanced integrations with the AI-enabled Script mode using the powerful Exalate Groovy scripting engine.
Other automation available to Exalate users includes the documentation assistant Aida and the scripting assistant AI Assist, which is embedded directly in the Exalate UI.
Want to learn how Exalate helps with business process automation? Book a demo with an integration engineer and discuss your use case in detail.
Azure DevOps area and iteration paths do not have a direct replica on the Jira side. So to sync information between both systems, the area and iteration path data has to be mapped to a custom field in the Jira issue.
For this to work, you need a customizable AI-powered integration solution like Exalate. This solution will help you generate the script for mapping paths and maintaining the relationships between the work item and the issue.
What is an Area Path?
An area path establishes a hierarchy for work items related to a specific project. It helps you group work items based on team, product, or feature.
Organizations working on a product or feature can use area paths to establish a hierarchy between teams at every level of involvement. You can assign the same area path to multiple teams.
What is an Iteration Path?
An iteration path assigns work items at the project level based on time-related intervals. Teams can share them to keep track of ongoing projects, specifically for sprints, releases, and subreleases.
When new work items are added to the Sprint backlog, they become accessible via the existing iteration path. You can add up to 300 iteration paths per team.
Sync Area and Iteration Paths: Jira to Azure DevOps Use Case
You can create a custom field in your Jira instance to reflect the data from the iteration and area paths.
How does this help your organization?
Syncing this data gives more context about the teams involved on the Azure DevOps side.
It provides context about the timelines and stages of progress for the mapped projects and entities.
Primary Requirements
Obtaining the right information from the API on both sides.
Writing or generating the correct sync rules for both the incoming and outgoing data.
Creating triggers to update the custom fields on Jira automatically.
Fetching the right string from the area or iteration path.
How Exalate Handles Jira to Azure DevOps Syncs
Exalate supports one-way and two-way integration between Jira and Azure DevOps as well as with Zendesk, ServiceNow, Salesforce, GitHub, etc.
Exalate also supports AI-powered Groovy scripting with the help of a chatbot. Users can also create trigger-based integrations for real-time syncs and bulk operations.
Since this use case requires scripting, you need to choose the Exalate Script Mode.
To configure the sync, open Exalate in your Azure DevOps dashboard, go to the connection you want to edit, and click on the “Edit connection” icon.
You have two options:
Outgoing sync (on the Azure DevOps side) refers to the data being sent over to Jira.
Incoming sync (on the Jira side) refers to the data to be received from the work item on Azure DevOps.
Outgoing Sync (Azure DevOps): Send Area and Iteration Path Details from Azure DevOps to Jira
To send out the area and iteration paths from the Azure DevOps work item, use the code below:
replica.areaPath = workItem.areaPath
replica.iterationPath = workItem.iterationPath
The replica retrieves the values of the area and iteration paths from the work item and saves them as a string.
On the remote side, you can store the area/iteration path in a custom field using a type string or select list.
Incoming Sync (Jira): Set Area Path from Azure DevOps as a Custom Field in Jira
Let’s start with the area path.
The area path starts with the name of the project. For example, an Azure DevOps project called AzureProject handled by Exalate’s dev team could have an area path: AzureProject\\ExalateDev.
To set the area path based on the value received from the remote side text field, use the code below:
The issue.customFields."iPath".value retrieves data from the work item and stores it in the designated custom field on Jira.
Congratulations! You have successfully mapped the area and iteration path to a Jira custom field. If you still have questions or want to see how Exalate is tailored to your specific use case, discuss it with one of our experts right away.
The success of any help desk relies on its ability to connect with other systems in order to process customer concerns, such as issues, incidents, bugs, etc.
When two teams are working with Freshdesk and Jira, they have to find a way to consolidate data to keep every stakeholder up to speed.
That’s why they need a Freshdesk Jira integration solution, whether it is a third-party tool, an in-house solution, or a native connector.
In this article, I’ll discuss the core principles of Jira Freshdesk integration using real-world use cases. Is this a viable integration option for your organization? Continue reading to find out.
Why Integrate Jira With Freshdesk?
Jira is a work management platform used in most IT companies to track bugs and issues, as well as projects.
Apart from managing progress, Jira also has a service desk solution known as Jira Service Management (JSM), which organizations can use to track support tickets.
Freshdesk is a service desk (help desk) solution and ticketing system used by support teams to handle customer feedback, requests, and concerns.
Also, Freshdesk’s omnichannel support and advanced analytics dashboards are its most eye-catching features.
But why would teams be using Freshdesk and Jira at the same time?
Teams in different organizations might prefer one platform over the other because of internal culture or personal preferences. This is common in cross-company collaborations.
Teams in the same organization might be using different platforms because it has the functionality they need. E.g., omnichannel support (Freshdesk) vs. agile project management (Jira).
Whether cross-company or intra-company collaborations, admins and managers must find a way to integrate Freshdesk with Jira.
Here are the benefits of Jira integration with Freshdesk:
It gives dependent teams a better view of ongoing operations, open tickets, and trending customer concerns.
Help desk integration increases transparency, operational efficiency, ticket resolution metrics, and the speed of decision-making.
It improves the customer satisfaction score by addressing actual pain points faster and predicting consumer trends more accurately.
Integrating Jira and Freshdesk breaks down silos by establishing clear communication channels between teams (e.g., developers and support staff).
It reduces the amount of money you spend on adopting new technologies instead of integrating data from existing platforms.
It helps you double up on security through advanced encryption, tokenization, endpoint encryption, and other integration security features.
What Are the Use Cases for Freshdesk Jira Integration?
Here are some practical applications for Freshdesk to Jira integration for organizations:
Case 1: Sync Freshdesk Ticket Status with Jira Service Management
You can sync the status of a ticket or incident created by a customer in Freshdesk so that it appears on the Jira Service Management (JSM) side.
So when the Freshdesk ticket is “Open”, it will appear as “New” or “To do” on the Jira issue instantly. The issue will then be escalated by the support team to the engineering team to reflect the current status on all systems automatically.
Multiple ITSM tools connected in such a fashion will ensure seamless collaboration, streamlined service workflows, and consistent data synchronization across teams and platforms.
Sometimes, it’s also necessary to sync read-only entities like organization name, createdDate, versions, and custom fields between Freshdesk and Jira Service Desk.
Case 2: Manage Freshdesk Incidents from a Jira Dashboard
Streamline incident response by automatically triggering Jira alerts based on the urgency of the Freshdesk ticket.
Say a user opens up a ticket that needs urgent action and sets its priority as “critical”. The corresponding issue in the JSM instance should also reflect that same urgency or priority.
That way, admins on both platforms will have a better understanding of the potential impact and urgency of addressing the ticket.
Case 3: Arrange Sprints on Jira to Address Urgent Customer Requests
When customer requests come in from Freshdesk, the admin or manager in charge of Jira can use the information to organize a sprint. User stories created under these sprints in Jira can also be tracked from within the Freshdesk instance.
This is where agile project management truly shines. Jira enables teams to adopt an agile framework, such as Scrum or Kanban, allowing them to handle work items iteratively and respond faster to high-priority customer requests. You can then plan sprints based on real customer needs and close the feedback loop efficiently.
If necessary, the user who opened the request will be able to receive updates in the form of comments, attachments, and other entities at every stage of the sprint.
Case 4: Map Multiple Change Requests to A Single Issue
When multiple customers or organizations generate change requests on a Freshdesk instance, the information gets synchronized to a single Jira issue (task or request) in order to consolidate everything in a single truth source.
Companies providing customer support as a dedicated service can use this to consolidate information from multiple users instead of duplicating concerns and causing confusion.
Case 5: Escalate Freshdesk Ticket as a Jira Issue or Bug
Whenever a customer ticket needs dev intervention, all the necessary contents go to the escalated Jira issue.
Besides, you can map multiple Freshdesk tickets related to the same bug to a single Jira issue to avoid duplication and confusion. This means you can stay in your own environment and get timely updates for all related bugs, incidents, etc.
However, most simple integrations do not support the mapping of advanced fields and entities, including sub-tasks and comments. This means you have to script the custom connection to fetch and transform the correct values from the API.
What are the Freshdesk Jira integration Options?
You can go native, custom, or third-party when choosing integrations. But before choosing, learn what each option entails.
Native Integrations
Freshdesk comes with an out-of-the-box native integration for different apps: e-commerce integrations for Stripe and Shopify, integrations for messengers such as WhatsApp and Slack, as well as integrations for management apps such as Teams, Salesforce, and Zendesk.
The one for Jira is called Atlassian Jira Plus. This integration allows users to connect multiple Jira accounts to a Freshdesk account or multiple Jira issues to a Freshdesk ticket.
The integration also lets you assign roles and put restrictions in place to control the information going back and forth between both platforms.
You can map Freshdesk fields such as source, group, ticket number, email address, and custom fields.
Sounds like an excellent option. But there is one issue with native solutions.
Just like Atlassian Jira Plus, native solutions restrict you to template connections, which could be a dream scenario for simple use cases or a nightmare for complex use cases.
You don’t get the flexibility of scripting your own connection that works beyond the default settings.
Third-party Applications
Unlike native integrations, third-party apps allow bidirectional data exchange between CRMs, ERPs, and cloud solutions.
The biggest advantage of third-party integrations is that they can support connections with multiple platforms simultaneously. The solution can also scale with your system and adapt to increasing workloads.
And most importantly, it gives you the autonomy to set up your own scripts; this is a dream scenario for most organizations.
One third-party solution that supports bidirectional Jira Freshdesk integration is Exalate.
Exalate is an AI-powered integration tool that supports one-way and two-way custom connections between Jira and service desk platforms such as Freshdesk, Zendesk, and ServiceNow.
It also supports integrations with work management and sales platforms such as Salesforce, Azure DevOps, and GitHub.
Let’s look at the standout reasons why enterprises choose Exalate:
It supports Groovy-based scripting mode for advanced integration scenarios. This feature improves the flexibility of the integration by allowing your engineers to explore intricate mapping possibilities. It also comes with an AI chatbot called AI Assist to automate the process of generating scripts.
Exalate supports point-to-point integration as well as many-to-one and one-to-many connections, which is a valuable asset for companies connecting with multiple partners, vendors, MSPs, customers, or suppliers. This ensures your integration is never left behind as your business grows.
It uses a single-tenant architecture to isolate your system (and data) from other companies. The system also uses JWT-based authentication, role-based access controls, and secure data encryption protocols.
Exalate uses automated triggers to streamline the replication of tickets and other desired actions on either side of the connection.
The IaaS option allows you to offload the integration and configuration hassle to experienced engineers.
Exalate also scales according to the ticket volume or the number of issues without needing additional maintenance or upgrades.
How to Implement Freshdesk Jira Integration Using Exalate
If you prefer a video, watch this tutorial instead.
Log in to your Jira instance and find the Exalate app in the Atlassian marketplace. To do that, click the cog in the top right and select “Apps” from the menu.
If you aren’t taken straight to the marketplace, click “Find new apps” in the left-side menu and type “Exalate” into the search field. A list of Exalate add-ons appears with “Exalate Jira Issue Sync & more” at the top.
Click that, and choose “Try it free”. A confirmation screen will appear. Click the “Start free trial” button.
After a brief pause, you’ll see a pop-up appear saying that Exalate has been installed successfully. Click “Get started”.
You can host Exalate for Jira Cloud on your own server. To do so, you need to install Exalate on Docker.
Step 2 – Install Exalate on Freshdesk
Next, you can request your Freshdesk Exalate node from the integrations page. Enter your basic information, and our team will reach out to you with further details for the trial.
Check this video tutorial on how to install Exalate on Freshdesk.
After submitting the form, you will be redirected to your new node in a separate tab. Save the link to this node, as it serves as your permanent access point to the Exalate Freshdesk node.
Next, fill in and save the General Settings fields by providing your Freshdesk instance and the credentials of the Exalate proxy user.
Note: A proxy user is a Freshdesk account that is responsible for accessing the information stored on your instance and applying any incoming changes.
The form fields signify the following:
Tracker URL: a URL of your Freshdesk account where you install Exalate.
Exalate URL: a Freshdesk node URL, provided by Exalate.
User: an account of a proxy user.
Password / API Token: an API key generated for your Freshdesk proxy user. See details here.
To complete the registration, provide the details and credentials of the user who will configure synchronization in the Exalate console. Then, read and agree to the End User License Agreement.
An email confirmation has been sent to your mailbox. If you can’t find it in your inbox, check the spam or junk folder.
In the confirmation email, click “Verify Exalate Instance.” This will redirect you back to the Exalate console application to configure your first sync.
To change the proxy user in Exalate for Freshdesk, log in to the Exalate admin console. Then go to Settings and input the following details: Input details:
Freshdesk instance URL.
Proxy user email.
Proxy user API key.
Once done, click Save to complete the Freshdesk installation process.
Step 3 – Connect Your Jira and Freshdesk Instances
Now that you’ve installed Exalate on both platforms, you can connect the two.
A connection in Exalate defines a secure channel for information exchange. Once the systems are connected, you can choose the modes to configure your connection.
Exalate allows you to set up your connection using 2 modes: the Basic Mode and the Script Mode.
Exalate’s Basic Mode allows you to work with preset sync rules that are generated automatically and cannot be modified. These connections are recommended for use cases with basic synchronization needs.
The Script Mode allows you to sync almost anything. You can modify the sync rules using the “Groovy Scripting” language. This mode is also AI-assisted. We will learn more about it in the coming section.
Basic Mode Connection
To kick things off, let’s start with the simple Basic Mode connection from the Jira side.
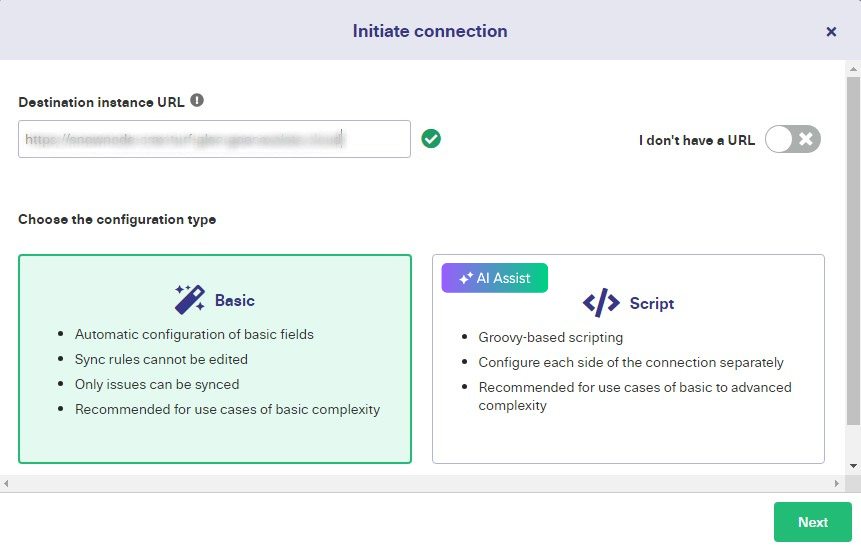
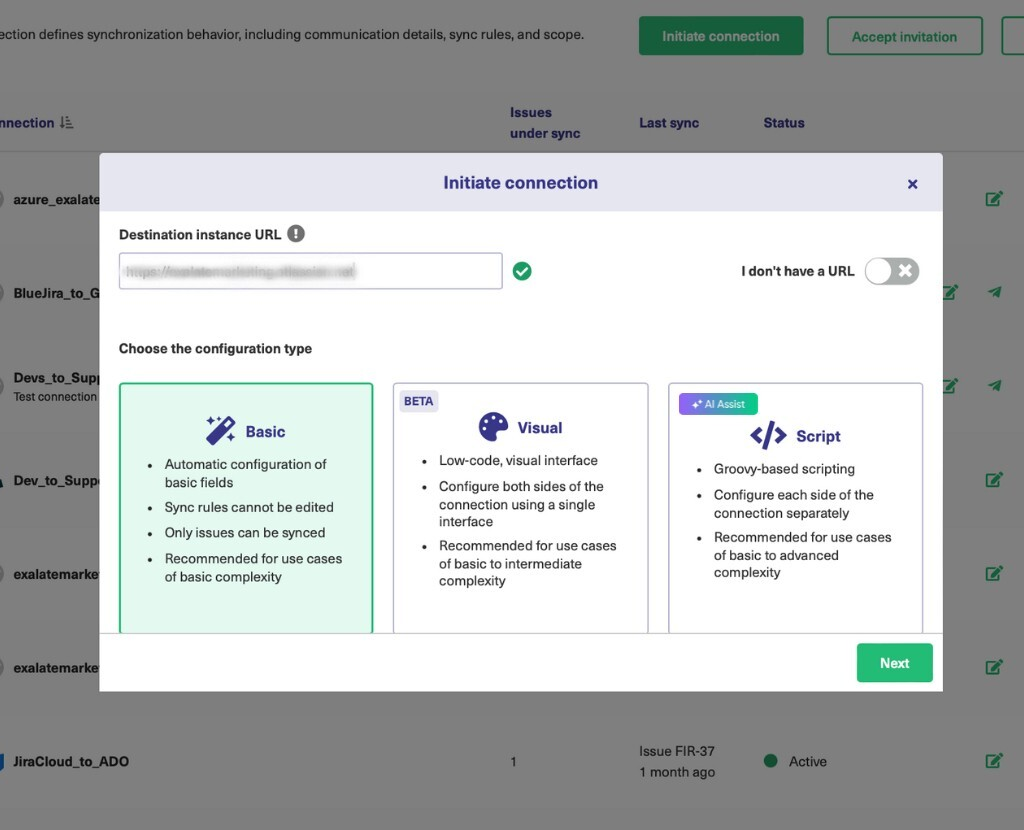
Click the “Initiate connection” button. Then enter the destination URL and select the Basic Mode.
Confirm if you have admin access to the destination instance. The flow is different depending on the user’s access level. We’ll cover both instances.
If you have admin privileges, click on “Yes, I have admin access” and then click “Next”. You’ll be redirected to the destination instance to establish a connection.
Select a project from the dropdown menu where you would like to sync entities received from the destination side, then click “Next”.
On the destination instance, select the project and then click “Confirm”. After establishing the connection, you can sync your first issue in Exalate to see how it works.
If you don’t have admin privileges, then click “No, I have admin access”. Click on “Initiate”.
Copy the invitation code to your dashboard.
You can send the invitation code to the destination instance admin and click “Done”.
Next, go over to the destination instance. Click on “Accept Invitation” under the Connections tab in the Exalate Admin Console in the destination instance and paste the invitation code.
Once past, click “Next” and select the project where you want to sync issues.
Click “Confirm” to complete the configuration and set up the connection.
You can now start your first sync by entering an issue key or ticket number.
Script Mode Connection
Enter the Destination Instance URL, then select Script Mode and click “Next”.
After selecting Script Mode, you will see a screen where you can enter the details of the connection.
Enter the names and description of the connections for both the local and remote instances. Click “Next” once you’re done.
Select a project where you would like to sync issues received from the destination side. Then click “Initiate”.
Copy the invitation code to your clipboard and click “Done” before heading over to the destination instance.
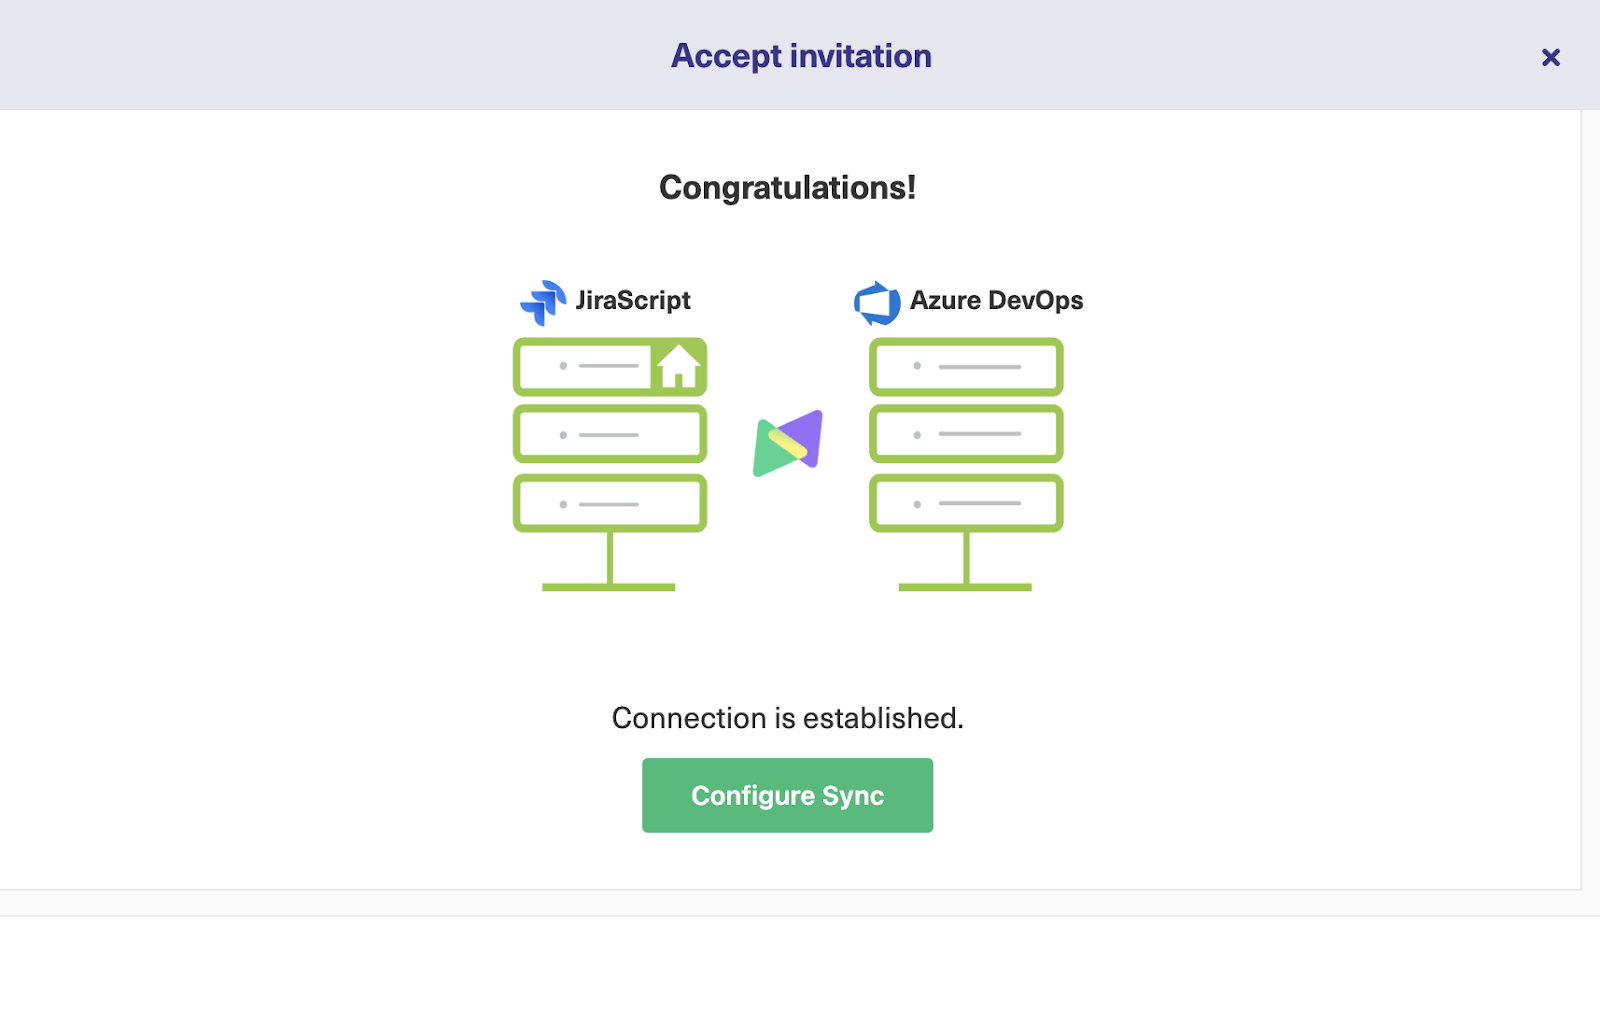
To finish setting up the connection, the partner needs to accept the connection invitation.
Navigate to the Connections tab in the Exalate console and click on “Accept Invitation.”
Paste the invitation code and click “Next”.
Select a project where you would like to sync issues received from the other side and click “Confirm”.
Congratulations! The connection is set up.
You can now start making changes to the sync by clicking on “Configure Sync”.
Step 4 – Configure Your Connection to Determine What Gets Shared
Exalate also allows you to configure the sync rules using the “Rules” tab.
You can choose to send or not send specific information between Jira and Freshdesk. For instance, you can choose not to send attachments from Jira to Freshdesk.
Click on the “Edit Connection” icon next to the Script mode connection to get started. This will redirect you to the “Rules” tab.
Rules are divided into Incoming and Outgoing sync rules. The above image shows the rules for the Jira instance.
Similar rules exist on the Freshdesk side.
Here, the Outgoing sync decides what information leaves the Jira instance, whereas the Incoming sync decides how the information coming from the Freshdesk instance is mapped.
The rules use the Groovy language, so if you already have some experience, all the better.
Each rule shows how fields are mapped onto each other. As this is a Jira to Jira connection, the field names are identical, such as replica.labels = issue.labels.
For example, helper functions help you map lists of comments or attachments from one instance to another, such as issue.comments = commentHelper.mergeComments(issue, replica).
You can adjust these lines to change anything you like. If there are fields you don’t want to sync, delete them.
It is also possible to switch field mappings. For example, you might want to change replica.labels = issue.labels to replica.labels = 'synced from Jira Server'.
When you’re done, click the green “Publish” button to save your changes.
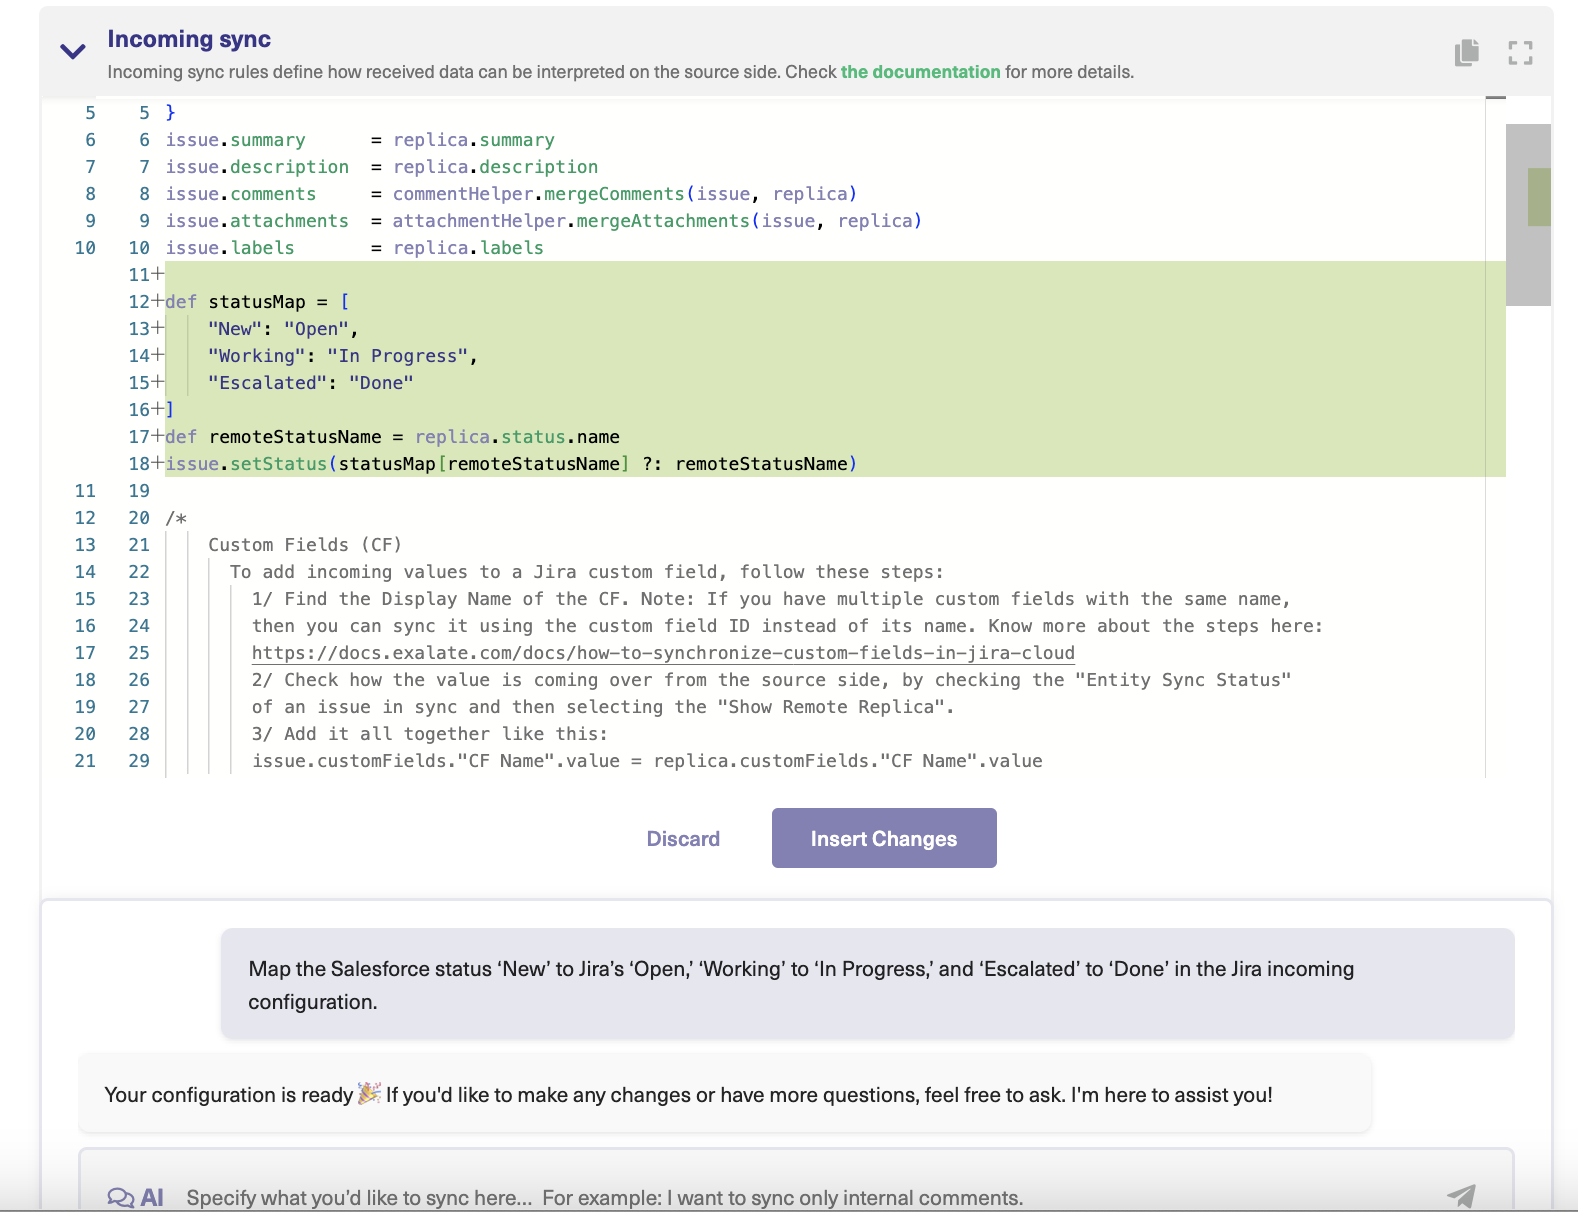
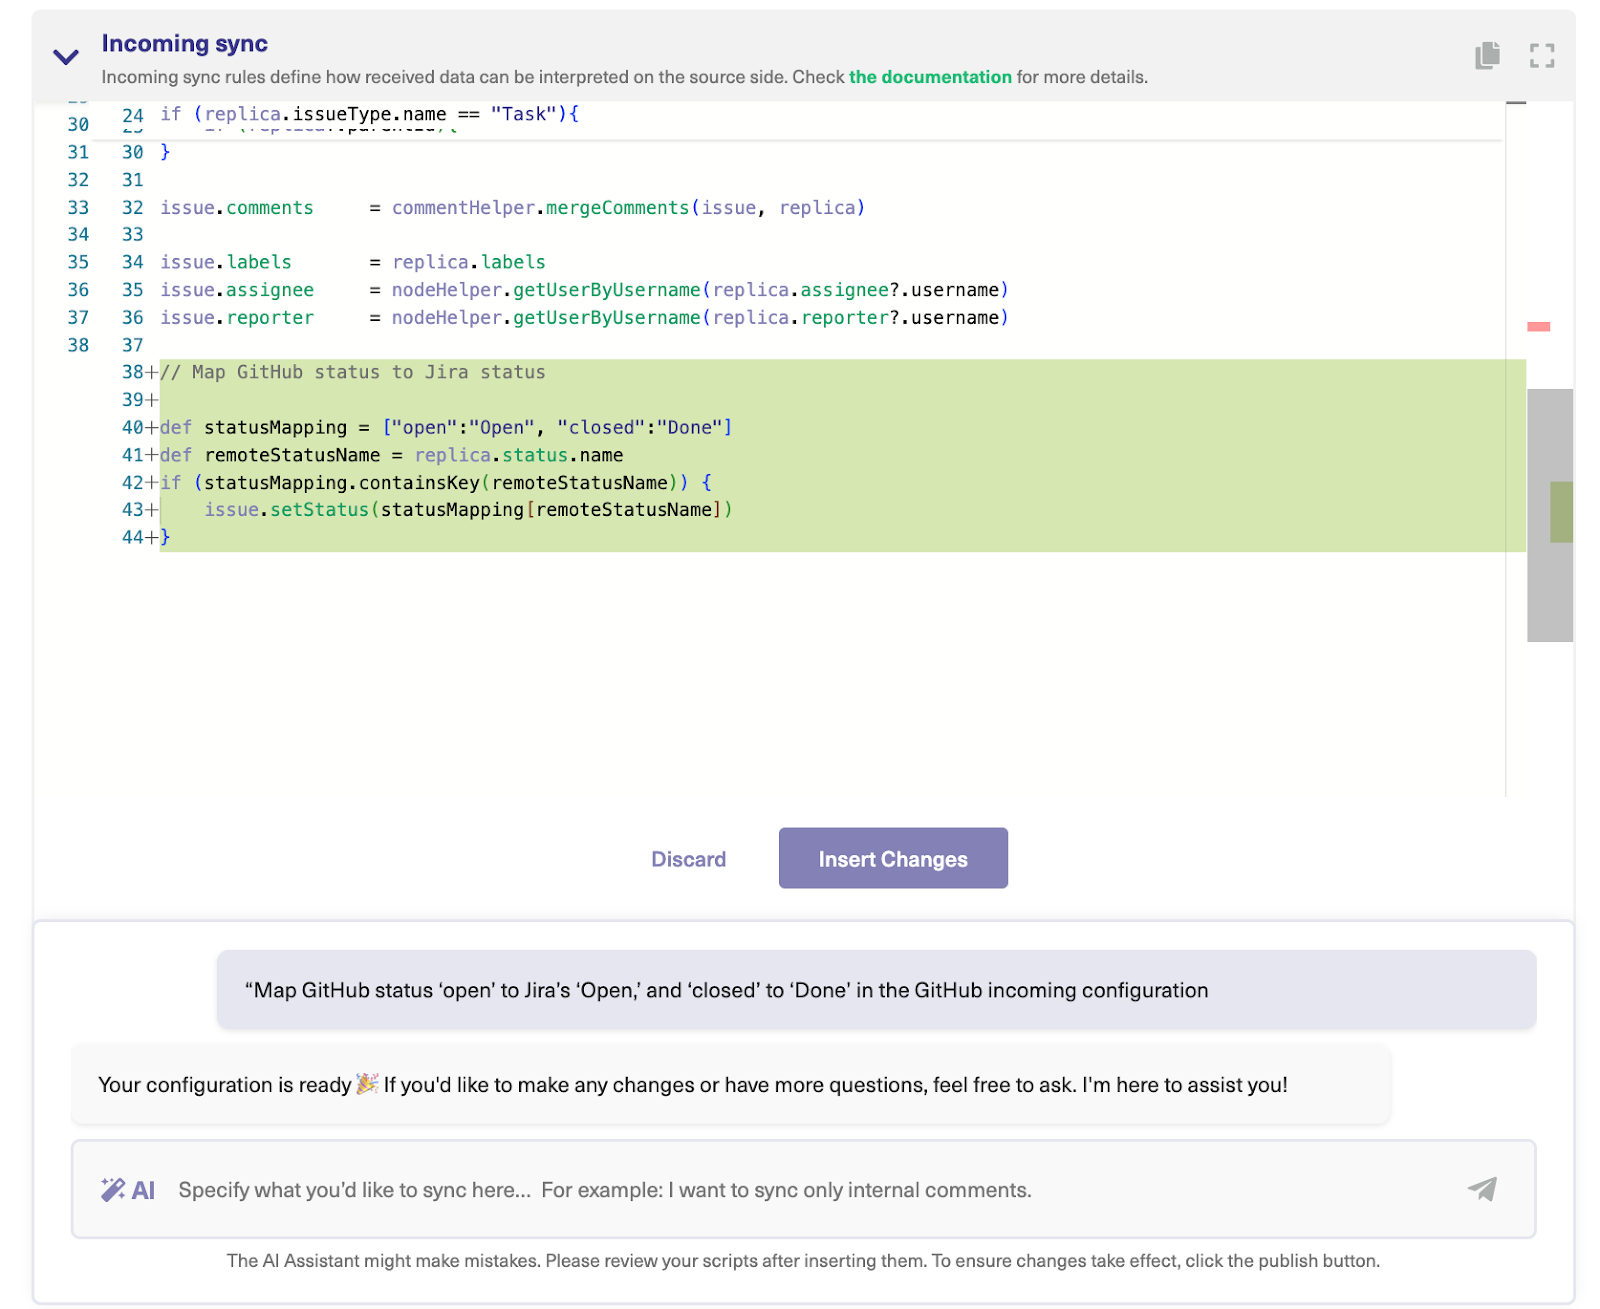
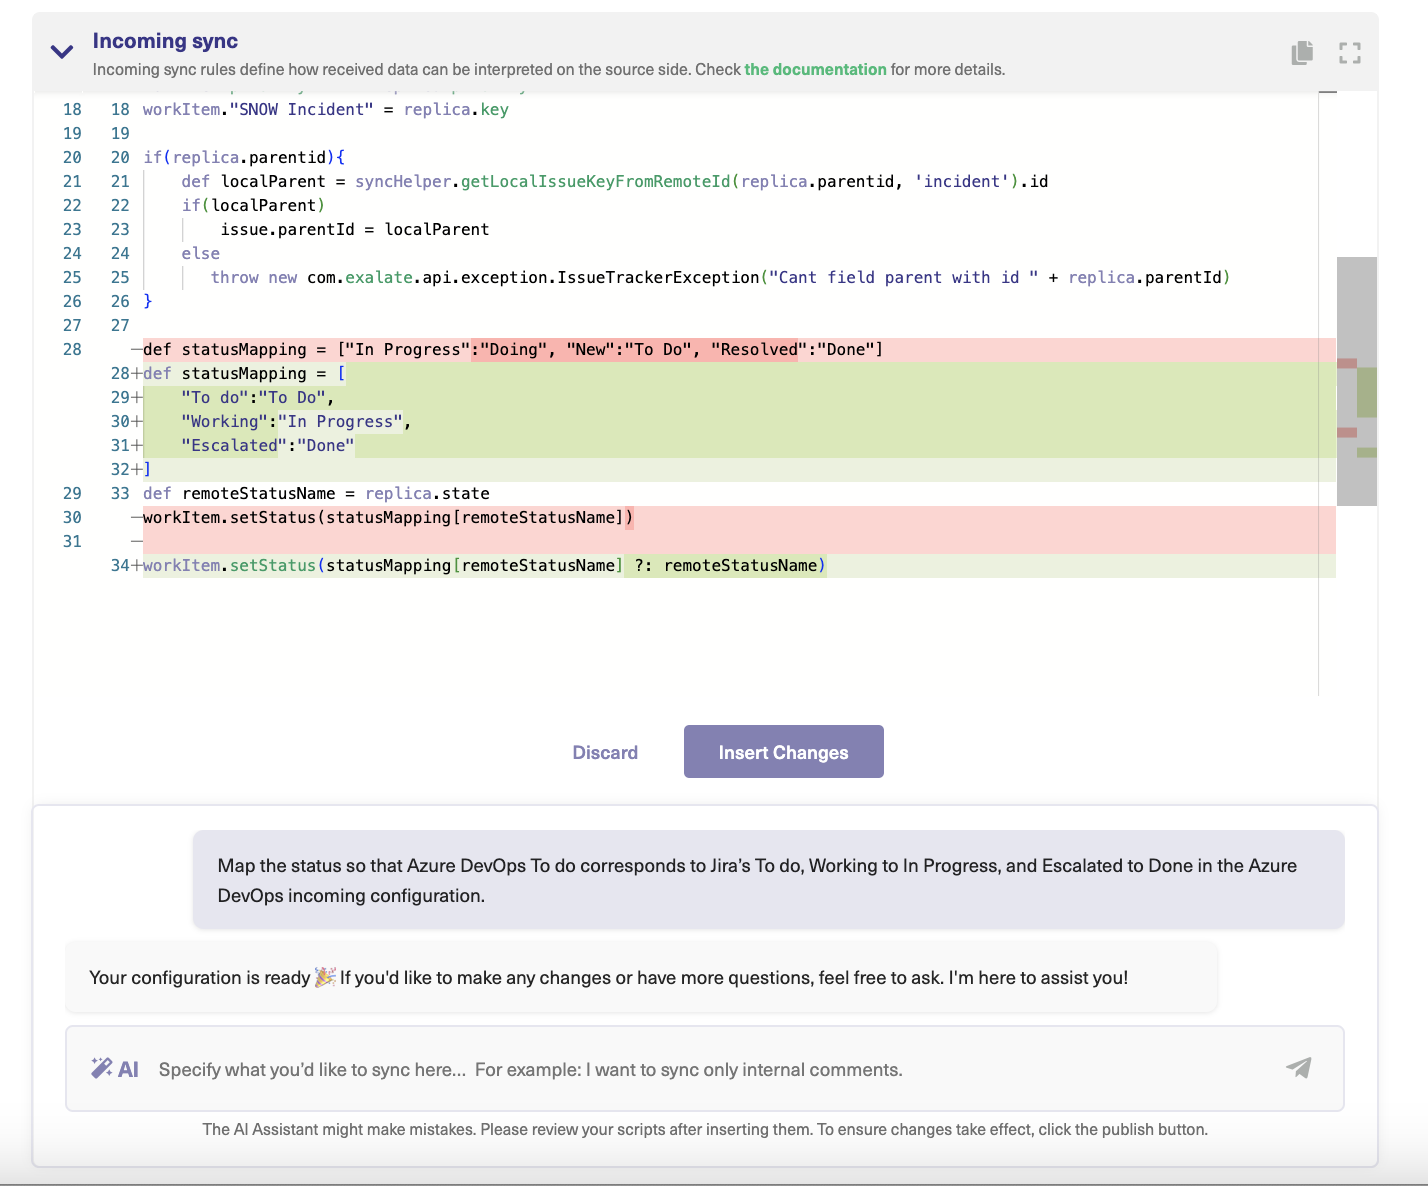
Use AI to Generate Sync Rules in Script Mode
Exalate’s Script mode now utilizes AI, with AI Assist appearing as a chat window in both your incoming and outgoing sync rule tabs. All you have to do is enter your sync requirements, and AI Assist will automatically generate the scripts for you.
The part highlighted in green is the added code, while the part highlighted in red is the deleted portion. If you’re satisfied with the output, click “Insert Changes”. Otherwise, click “Discard”
These scripts are built based on your inputs, existing settings, and Exalate’s scripting API.
Keep in mind that AI Assist isn’t foolproof. To get the best results, be as precise and detailed as possible when crafting your prompts.
Step 5 – Set Up Automated Synchronization Triggers
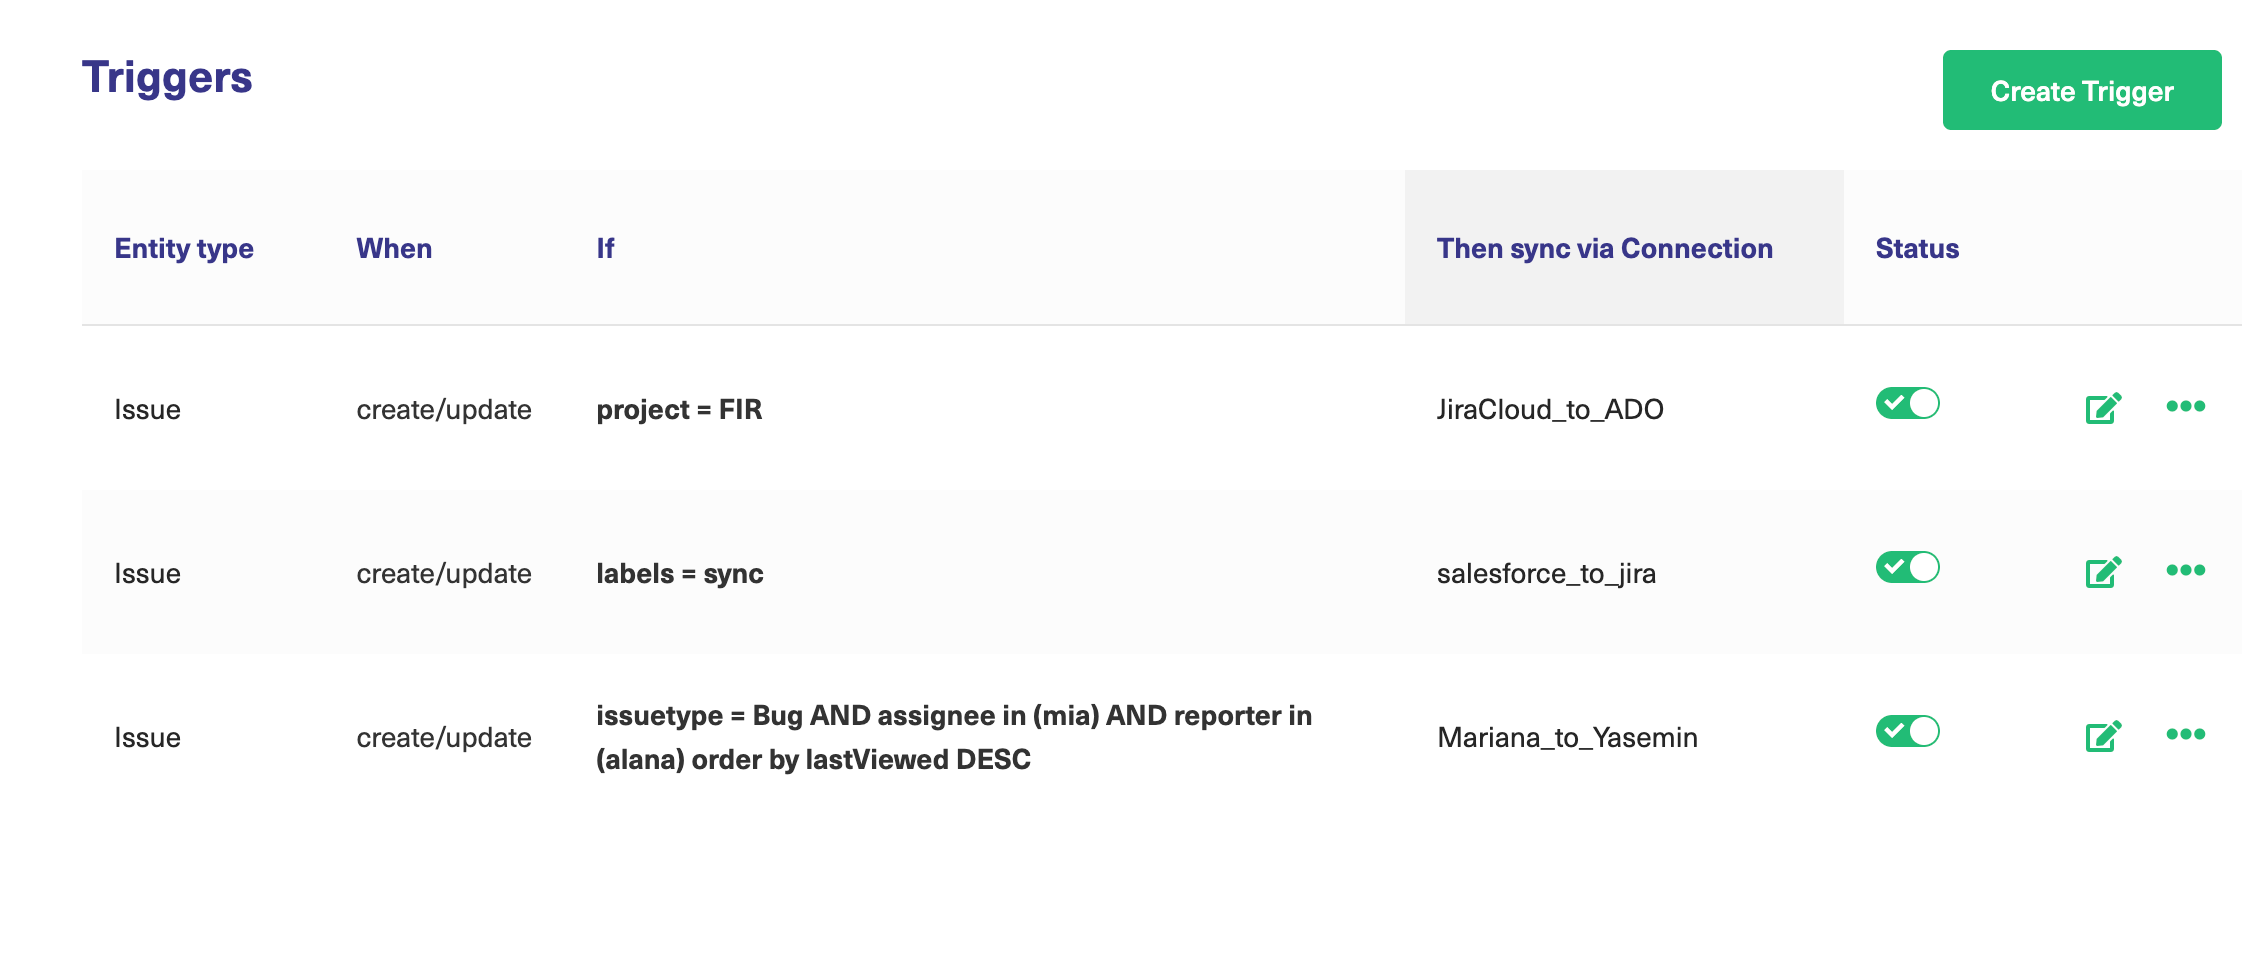
Triggers define the synchronization conditions. If you click the “Triggers” tab in the edit connection screen, you can access the automated synchronization triggers.
You can also find a summary of all of your active triggers by clicking “Triggers” in the left-hand menu.
If you follow the first method and want to create a new trigger, click the “Create Trigger” button at the top right.
Triggers are written in a different language depending on the platform. Jira uses its own query language, JQL (which is different from Groovy). Read more about it in the documentation.
On the “Add trigger” screen, there’s a drop-down box at the top where you can select what kind of entity the trigger applies to.
I’ve selected “issue” in this case. In the next box, below the “If”, you enter your query. For instance, sync only the Jira issues marked with the issueType = Task. Here, I’ve chosen to sync issues where the type is “Task”.
I’ve also added a note describing what the trigger does and set the trigger to “Active”. If you don’t do that, it won’t work! Finally, click the “Add” button at the bottom.
You can also set up triggers on the Freshdesk side to control how the solution works.
This query filters for tickets that are new and open that are assigned to the user (with ID 103099112292), making the query.
Back in the trigger list, you can see the entry you just created. Now, items that match the condition will be synced automatically.
You can edit or delete these triggers by clicking the respective icons in the list under the “Action” heading. If you click the three dots, you also get the option to “Bulk Exalate” and “Unbulk Exalate”.
Step 6 – Start Synchronizing Tasks
You’ve set up your Freshdesk Jira integration and defined what is shared. You’ve also set the conditions for synchronization. When an issue meets those conditions, it will be synced.
For performance reasons, Exalate checks for matching items periodically, so if you don’t see the sync begin immediately, check again after a few minutes.
After a while, you should see the synced items reflected in the connection entry in the connections list. If not, make sure your sync rules and triggers are set up correctly. Don’t be afraid to make adjustments and test them until everything is working as you intend.
How to Get the Best Out of Freshdesk Jira Integration
Here are some of the best practices and tips for a successful integration of Jira with Freshdesk
To ensure your help desk solutions are integrated properly, you need to follow certain tips and guidelines.
Discuss the projects, fields, issues, or entities that should be part of the integration or those that should be excluded. This will help you protect sensitive information, especially for cross-company integrations.
Establish mapping rules for each use case and document them properly for future reference.
Train your administrators on how to adopt the best security practices and manage syncs on their own.
Use the automation features available on both the Freshdesk and Jira platforms.
Communicate regularly with the other side of the organization to ensure they are maintaining healthy data practices and staying compliant.
Set up a feedback mechanism to send and receive updates about tickets and issues in real-time or near real-time.
Make use of analytics tools on both Jira and Freshdesk to monitor performance metrics such as resolution speed, customer satisfaction score, API call limits, ticket volume, and transfer rate.
Invest in self-service portals to reduce the workload of the support staff.
Get Started with Your Freshdesk Jira Integration
Jira and Freshdesk integration can help your organization provide better support and improve customer satisfaction. At the same time, it can improve employee engagement and morale by reducing their workload and improving their performance metrics.
But before choosing any integration solution, you have to consider your budget and how it fits into your organization’s vision and objectives.
A tool like Exalate can provide you with seamless two-way connectivity with partners, clients, MSPs, and internal teams. You just need to set up the connection and configure the triggers to kick things off. Want to learn more about Exalate? Find out how it works. To discuss your use case and see if Exalate is the right choice, book a demo with our integration engineer.
SaaS sprawl is a challenge for every enterprise. The more applications and systems in the workforce, the wider the communication gap between teams.
The only solution is to explore viable enterprise applications integration tools to create an interconnected web of work management systems and CRMs (customer relationships management).
Done right, enterprise integration applications can make collaborations silky smooth. Done wrong, it could create more issues for the involved teams and enterprises.
To help you ace the integration of enterprise applications, I’ll cover everything worth knowing about this topic. You’ll find out the benefits, challenges, use cases, and best practices to follow.
What is Enterprise Application Integration (EAI)?
Enterprise application integration is the process of using a custom script, API middleware, or a third-party tool to connect multiple systems used within or across organizations to create an interconnected ecosystem.
Companies depend on EAI for smooth cooperation between teams and cross-company collaborations with MSPs, suppliers, and clients.
The integration solution, by bridging the compatibility and communication gap between systems, also helps exchange data and provide real-time updates.
What are the Goals of Enterprise Applications Integration?
The specific goal of using enterprise data integration applications varies by company and objectives. Some of them include:
Data integration between systems to unify formats and avoid duplication. This, for instance, can include syncing sales data between Salesforce and Jira. Data formats in these systems can be “dd/mm/yyyy” or “mm/dd/yyyy”. So, unifying them makes sure the data stays and means the same on both sides.
Workflow integration between teams or organizations to increase productivity and efficiency of collaborations. IT teams can improve service management by syncing data from the support team’s ServiceNow instance.
Interface integration between both sides of the integration in order to provide a unified view, with either of them having to leave their respective environments.
How Does Enterprise Application Integration Work?
Let’s use a sample connection scenario between Salesforce and ServiceNow to explore how enterprise application integration works.
On one end, you have a Salesforce org. On the other end, you have a ServiceNow instance. But since both platforms cannot interact natively, you’d need an integration solution to mediate between them.
So here is a breakdown of what happens:
The Sales team (using Salesforce) creates a Case for a customer.
The third-party integration solution analyzes the newly created entity to determine if it meets the conditions for synchronization. It then interacts with the Salesforce API to fetch the response.
The solution converts the record from Salesforce to a ServiceNow-readable format.
A ServiceNow Incident, Change Request, or Problem is created to replicate the Salesforce Case based on the custom mappings.
The support agents can now escalate the new Incident to the development team via Jira Service Management while making sure the Sales team gets timely updates with the designated fields in the Salesforce Case.
What are the Types of Enterprise Applications Integration?
The working mechanism differs for several EAI solutions. Here they are:
Point-to-point integration: Also called peer-to-peer integration, this involves connecting the endpoints of two separate software applications or systems directly to exchange data and communicate without intermediaries.
Hub-and-spoke integration: This involves a central hub and different spokes. The central hub connects with multiple systems simultaneously to process the data upon request. Hub-and-spoke integrations are usually unidirectional. So, if the MSP has a system integrated with clients, the flow of updates goes only from the MSP to the client and not the other way around.
Microservices integration: This involves breaking down the entire system architecture into small, lightweight applications. It allows you to integrate only the needed services instead of the entire system. For example, you can integrate only the ticketing system in Zendesk with Jira instead of the entire solution.
Enterprise service bus (ESB) integration: This is a variation of the hub-and-spoke approach that allows applications to interact with each other and perform message transformation, protocol transformation, routing, and authentication.
Why is Enterprise Application Integration Important?
Organizations explore integrating their enterprise applications for various generic and specific reasons.
One drawback of having SaaS applications isolated within an organization is that data gets siloed. But by integrating these systems, your company can break down these siloes and get all the teams to access data freely according to their permissions.
Improves Process Efficiency
If a process involves multiple enterprise applications—say the sales enablement team uses both Salesforce and Jira—integrating them would make the sales process more efficient.
So your team would have access to all the sales and customer data in order to streamline the process and avoid duplication of efforts.
Construction company Nevaris Build used an EAI tool to improve workflow efficiency between their QA experts and devs. The result was decreased issue-handling times.
Reduces Expenses
Instead of paying to onboard new applications, teams can continue using their existing enterprise application.
For instance, when you integrate ServiceNow and Zendesk, either side won’t have to pay the extra licensing and infrastructure fees to get the data they need.
Piotr Radtke confirmed the cost savings as the Senior Project manager at Netguru.
The company significantly reduced license costs and connected DevOps with its ITSM and business teams.
Improve the Overall Experience
When all the teams have a clear view of customer data, they’ll be able to provide a consistent experience on all channels. The admins will also have access to information in real time to get updates.
Daniel Miks, the Atlassian Solutions Expert at WirelessCar, explained how Exalate helped them improve the user experience.
WirelessCar was able to improve the experience of the brands working with them. They synced their internal Jira with their customers’ ServiceNow instances for efficient ticket handling.
Automate Syncs
Tools for integrating enterprise applications come with cutting-edge technologies, such as AI-powered scripting assistants. These tools can optimize and automate syncs and workflows between systems and teams.
You can consult the AI assistant with your prompt or query to generate a script that will help you map the statuses between the two systems.
What are the Use Cases of Enterprise Application Integration?
The general application of EAI is to connect multiple systems to share data. But to understand what this entails, let’s go through some common use cases for enterprise applications integration:
Supply Chain Management
Integrating ERPs and digital inventories allows organizations to manage supply chains, coordinate supply and delivery, and track product inventory.
Sales Coordination
As mentioned earlier, connecting CRMs and sales software can help the sales team learn more about customers and deals.
Integrating the SLA details from Jira with the user information field in Salesforce will provide more insights about the deal value and the customer priority.
IT Service Management
The IT team can manage services with ServiceNow by logging incidents, problems, requests, and other concerns.
For internal syncs, the team using Jira Service Management can get updates from the ServiceNow instance to learn the status of their concern.
For external syncs, the MSP using ServiceNow will send timely progress updates to customers in their system (Zendesk or Jira Service Management, for example) in real time without going back and forth.
Marketing Automation
Marketing managers can set up the sync to be triggered whenever a high-priority ticket comes into Zendesk from Jira. They can also map the statuses, so when the ticket is set to Open, the Jira issue is set as To Do. When the ticket is Resolved, the issue is marked as Done.
Legacy System Integration
The right integration solution can let you synchronize legacy systems with modern enterprise applications.
Sometimes, this would require modernizing the legacy system first. But other times, the application solution can address the disparity in architecture to create a functional synchronization.
What are the Key Considerations in Enterprise Application Integration?
Here are things to bear in mind when choosing an EAI platform.
Platform Security
You need a robust security framework to ensure that the data stages of the synchronization are secure, whether in transit or at rest.
Some integration security measures to implement include multi-factor authentication, role-based access controls, firewalls, endpoint detection, and much more.
In general, stay up to date with compliance regulations to maintain top-notch privacy and security.
Usability and Flexibility
The solution should be accessible to every team member regardless of technical expertise. This means that they can set up and configure syncs independently without external help.
This can get tricky when scripting is involved.
However, with features like AI Assist, users can generate context-relevant scripts in minutes by relying on user prompts.
Scalability
The EAI solution should be able to scale with your infrastructure as the number of users, platforms, and operations increase. Once the solution can distribute the load across the system, the performance will stay consistent and flexible to demand.
Cost
Whether you decide to build or buy the integration solution, the cost should be within your budget and needs. Look for solutions that offer features you actually need to achieve your integration goals.
Team Expertise
Only go for enterprise application integration, which your available team can configure and set up. This will reduce the overhead cost of hiring engineers and training staff to use it.
The Best Enterprise Integration Applications
Here are some of the best applications for enterprise integration.
Exalate
Exalate is a bidirectional integration solution that supports two-way syncs between work management systems and CRMs such as Jira, Salesforce, Azure DevOps, Zendesk, and ServiceNow.
Exalate comes in two configuration modes: the Basic mode and the Script mode.
With the Basic mode, you get pre-built sync mappings that cannot be configured. For instance, you can create a Jira issue from a Salesforce case and only sync the basic fields. This mode is available for free.
The Script mode allows you to set up simple to advanced use cases, such as connecting multiple Zendesk tickets to a single Jira issue.
It comes with a Groovy scripting engine and an embedded AI chatbot. This AI-enabled integration feature is helpful if you want to generate scripts based on the prompts you provide.
You can also set up triggers for automating synchronization events, which you can manage in the Sync Queue where all active and pending connections can be viewed.
SnapLogic
SnapLogic is an iPaaS that supports the connection of enterprise cloud services, SaaS applications, and legacy systems.
It comes with API management solutions and SnapLogic Autosync for automated data ingestion. You can also integrate applications with pre-built connectors or “Snaps”.
SnapAI includes several modules that use artificial intelligence, such as AutoSuggest, GenAI Builder, SnapGPT, and AutoPrep.
Jitterbit Harmony
Harmony is an EAI platform that allows you to build applications and establish automated connections between systems and interfaces.
The Harmony API manager speeds up API creation. Harmony EDI also helps users manage electronic data interchange between organizations through a repository of pre-built connectors.
The main selling point of Zapier is that it allows the integration of systems without writing any code. You can use custom workflow automation called Zaps to connect multiple systems.
Zapier also supports custom workflow visualization pages called Interfaces and AI chatbots, highlighting the future of AI Chatbots with smooth customer conversations.
Workato
Workato is an enterprise integration solution that allows businesses to automate workflows and connect all cloud and on-premise apps.
When using Workato, you can connect the Enterprise iPaaS feature to integrate business data and processes. You can manage API and orchestrate data exchange between platforms.
Workato Workbots can also improve response time, while Recipes allow you to create automated triggers and actions for complex workflows.
What are some Challenges of Implementing Enterprise Application Integration?
The first challenge associated with implementing EAI platforms is complexity. Since the underlying technologies are complex and different, you need to account for these variations when choosing or building an integration solution.
Another challenge is legacy applications. If you don’t have a dedicated engineering team to understand the legacy system’s infrastructure, the sync might end up leading to data loss and inaccuracies.
Security is also a major challenge when implementing EAI systems. Since sensitive business and customer data is being exchanged across systems, they are vulnerable to external threats.
Whether for external or internal practices, both sides must employ robust security and data encryption measures to guarantee safety and privacy.
What are the Best Practices of Enterprise Integration?
If you want the enterprise integration to work smoothly, here are some best practices to follow:
Carry out an extensive evaluation to discover the best approach for integrating the involved systems. Involve stakeholders on both sides of the connection to make sure they share their concerns and ideas.
Run tests before implementing any integration on a broader scale. This will help you fix minor issues before they snowball into company-wide disasters. If you map the wrong fields or values, data could get lost.
Document every process and action pertaining to the EAI implementation to guarantee smooth continuity.
Conduct extensive training exercises to ensure your team members understand the necessary security measures and configuration rules required to achieve the best results.
Analyze usage and performance data to determine if the integration is performing as expected. This will also show you areas of improvement and suggestions for optimization.
Exalate: Your Reliable Enterprise Application Integration Solution
Enterprises, suppliers, outsourcing companies, MSPs, and e-commerce entities rely on Exalate to connect their applications.
Exalate uses AI to make scripting easier and more accurate:
Aida is a standalone AI documentation assistant that you can use to fetch vital information from the Exalate documentation.
AI Assist is a dedicated AI script builder intrinsically embedded in the configuration console.
Both systems accept user prompts and process them in order to generate code snippets for scripting connections and mappings, but the expected output from each can be different.
If you have specific enterprise applications you want to integrate using Exalate, contact our solutions engineers for a free demo.
Work management and version control can work hand-in-glove when properly integrated. For companies using Jira and GitHub to handle development, this can be a headache.
While Jira is a popular solution for managing work, GitHub has a lesser-known equivalent for issue management, known as GitHub Issues.
To get both systems to interact and exchange data, consider using a Jira GitHub Issues integration solution.
Want to find out how that works? Continue reading to discover how to set up and manage integrations between both systems and the use cases for integrating Jira and GitHub issues.
Jira vs. GitHub Issues
Jira is a project management software owned and managed by Atlassian. Developers use Jira products to manage production, deployment, testing, and other related tasks.
GitHub Issues is lightweight task management software for all issues related to a GitHub repository. Developers can use GitHub Issues to track tasks and milestones and link issues with pull requests and commits.
One major drawback to using GitHub issues is the lack of a unified dashboard for viewing multiple repositories. However, you can view multiple projects on your Jira site with custom views, such as Kanban, Scrum, Agile, etc. GitHub Issues only provides a simple Kanban board.
Developers using GitHub for version control would quickly opt for GitHub Issues because of its lean design without the unnecessary bells and whistles provided by Jira.
Jira makes it easier to estimate the amount of work needed by tracking story points, which are not available on GitHub Issues.
Most importantly, you can customize your own dashboard with rules, widgets, and other features. When using GitHub Issues, what you see is all you get; no customization is allowed.
It is also important to point out the differences between issues in GitHub and Jira.
While they perform the same function of representing development-related tasks, issues (specific tasks, bugs, stories, etc.) on Jira and GitHub are different.
For example, Jira has way more default fields and plugins than GitHub issues, and it’s not even close.
The good side is that both platforms support custom fields in issues, which is essential for cross-team and cross-company collaborations.
What are the Use Cases for Jira GitHub Issues Integration?
Some business scenarios for Jira GitHub Issues integration include the following:
The development team (using GitHub) wants to share product change updates with the project manager (using Jira).
The attachments containing product defects, as well as comments (from Jira Service Management), need to be forwarded to the developers.
Updates made to the GitHub issue (attachments, comments, etc.) will instantly be reflected in the assigned field for the Jira task issue or bug.
Information from a user-created custom field (picklist, checkbox, textbox, etc.) in Jira appears on the GitHub issue based on JQL trigger configurations and field mapping.
Control the status of issues from both ends (“Closed” in GitHub is “Done” in Jira, and vice versa).
Adding AI automation to the mix significantly expands the scripting and mapping possibilities. We’ll discuss this in detail later.
Why Integrate Jira and GitHub Issues?
Teams and companies decide to integrate GitHub Issues and Jira for different operational reasons.
Smooth collaboration: Integrating both platforms makes it possible for teams to collaborate and streamline their internal processes.
Better management: Having both Jira and GitHub Issues interact seamlessly makes it easier for managers to track the progress updates for ongoing projects while maintaining the backlog without context switching. This means both sides can create issues from their own instance.
Cost savings: It helps organizations save licensing fees and other related costs by allowing them to avoid paying for platforms they don’t need.
Extend functionality: When you integrate Jira and GitHub Issues, you get access to the features available on Jira, which will extend the limited functionality available on GitHub Issues. For instance, GitHub doesn’t have a native time-tracking functionality, but it is available in Jira.
What are the Solutions for Integrating Jira and GitHub?
The options for Jira GitHub integration are limited because most companies opt to develop such solutions in-house. However, the issue with this approach is that most companies cannot afford to build integrations from scratch because of the overhead and maintenance costs.
So, let’s explore some GitHub to Jira integration solutions.
GitHub for Jira
This is the default Atlassian-owned product for integrating GitHub Issues and Jira. It helps users to track branches, PRs, commits, builds, and deployments.
GitHub for Jira also allows you to use Smart Commits to automate Jira syncs, such as transitioning issues, adding comments, or logging time.
This app is available on the Atlassian and GitHub marketplaces.
Exalate
Exalate is an app that supports Jira to GitHub Issues integration by acting as a bridge between both platforms.
Non-technical Jira users can set up Basic mode connections with Exalate to control the synchronization of basic fields.
Developers enjoy Exalate’s Script mode because it provides them with an opportunity to explore multiple synchronization possibilities using a scripting engine.
Exalate outshines GitHub for Jira because it allows developers to work with an AI-powered Assistant (AI Assist) to decrease the time spent on writing code snippets for advanced use cases.
Apart from Jira and GitHub, Exalate also supports the integration of other systems such as Azure DevOps, Salesforce, ServiceNow, and Zendesk.
How Exalate Handles Jira GitHub Issues Integration
Let’s check out how you can configure syncs between GitHub and Jira using Exalate.
Exalate provides two modes for connecting Jira with GitHub Issues.
The Basic mode allows you to sync issues on both sides, primarily descriptions, attachments, comments, and other default entities.
The Script mode is the code-based option for syncing complex use cases, including statuses, priorities, and custom fields. This mode also supports AI-based integration, which is an excellent addition for both technical and non-technical users.
To use Exalate, you must first install it in your GitHub repo and Jira. Use access key configurations to limit the app’s level of access.
Both connectors are available in the Atlassian and GitHub marketplaces.
After installation, you can now set up the connection starting from either side. For this specific demonstration, I’ll start with Jira.
On the connection screen, choose Script mode. Then, enter the name and description of the connection for clarity.
A code will be generated. Copy it and head over to GitHub. Then click “Accept Invitation” and paste the code there. All done. You can now configure the connection.
Click the “Edit connection” icon, then click on the “Rules” tab.
Here, you can see two sets of rules. At the top, the outgoing sync rules control how data in Jira issues is sent to GitHub. Below that, the incoming sync rules show how Jira interprets data Exalate fetches from GitHub.
Rules are written in the Groovy scripting language, with each line referring to a specific field or entity.
For example, in the incoming sync rules, you can see the line issue.summary = replica.summary. You could change that to issue.summary = "from GitHub". Doing that would mean all synced issues would have “from GitHub” as their summary value.
Use AI Assist with Script Mode
Exalate’s Script mode now has the AI-powered AI Assist available as a chat window within both your incoming and outgoing Sync rules tabs. Simply type in your sync requirements, and AI Assist will generate the scripts for you.
Here’s an example of how to use AI Assist:
Suppose you want to sync issue statuses from GitHub with issue statuses in Jira. In the AI chat, you could input:
“Map GitHub status ‘open’ to Jira’s ‘Open,’ and ‘closed’ to ‘Done’ in the GitHub incoming configuration.”
Give it a moment to generate the script based on your input, current configurations, and Exalate’s scripting API.
Changes will be highlighted: red lines represent deletions, while green lines show new additions. You can choose to accept or reject these suggestions. If necessary, adjust your prompt. Once satisfied, you can publish your changes.
What are the Best Practices for Jira GitHub Issues Integration?
To ensure the integration between Jira and GitHub issues works according to plan, here are some best practices to follow.
Outline the fields you need to map to determine whether you have permission to view them and the correct API endpoint to call.
Create a consistent format for labeling and linking fields, issues, and other entities. This will make it possible for other users (with the right permissions) to make changes.
Properly describe every connection or code snippet to make it easier for anyone using the system to identify.
Specify user permissions using role-based access controls to allow only authorized admins to make changes to the connection configuration.
Automate the connection to speed up data exchanges between Jira and GitHub Issues. Consider adding AI scripting automation and triggers to control syncs.
Document the integration approach in order to capture the guidelines and visual entity mapping.
Train team members to set up and configure connections using the Jira to GitHub Issues integration solution.
Always test every solution before applying it to your project or GitHub repository in order to avoid mapping the wrong thing and causing catastrophic problems.
Summing Up
Integrating Jira issues with GitHub Issues allows both platforms to share data bidirectionally regarding field mappings and permissions.
Teams can use third-party solutions for Jira GitHub Issues integration to extend functionalities and explore multiple complex synchronization scenarios. This works for both internal and external collaborations.
Looking for a reliable solution for Jira GitHub Issues integration? Book a demo with our engineers.
AI is becoming part of everything, including collaborations with other teams and organizations. In the integration context, AI acts as a partner or assistant to help make sure every system is connected correctly. This assistance is more relevant in script-based integrations.
So, suppose you have a Jira Service management instance and want to integrate with your Azure DevOps instance. In that case, an AI-powered integration can triple the scripting and implementation speed and reduce human errors.
We’ll be focusing on the role AI plays in specific integration use cases between Jira and Azure DevOps.
What is AI-Powered Jira Azure DevOps Integration?
AI-powered Jira Azure DevOps integration involves using AI solutions to map fields, generate codes, and automate triggers for any connection between both systems. This allows you to implement any kind of use case.
This applies explicitly to script-based integration solutions that allow admins to customize syncs with their custom script or code. AI-powered integration tools level the playing field so both experienced developers and non-technical users can rely on them.
For instance, the QA team might want to send information from a Jira bug as a work item in Azure DevOps. With an AI-powered Jira to Azure DevOps integration tool, the admins in charge can generate the script using user-created natural language prompts.
Of course, the process is not straightforward, but the applications of this technology are quite extensive.
What are the Use Cases for AI-powered Integration?
System admins and developers can use AI-driven Jira to Azure DevOps integration solutions for the following use cases:
#1 – Map Jira Issues to Azure DevOps Work Items
When a user creates a Task, Epic, or Feature on the Azure DevOps side, it should be mapped to a Story, Task, or Bug on the Jira on-premise side. You can also replicate a 3-level hierarchy between all 3 work items.
For this use case, here is a sample prompt:
“I want to create a mapping so that when a user creates a task in Jira, it is mapped as a feature in Azure DevOps, when a user creates a story, it is mapped as an Epic in Azure DevOps, and when a Jira bug is created, it is mapped as an Azure DevOps task.”
The resulting code could contain something like this:
So, stories in Jira should arrive as user stories (work items) in Azure DevOps that show links to tasks and bugs. This relationship should be replicated for stories, bugs, tasks, and sub-tasks in a coherent hierarchy that makes sense to first-time users.
You can prompt the AI on the Azure DevOps incoming side using this example:
“I want Jira stories to come in as User Stories (work items) in Azure DevOps, showing links to tasks and bugs. This relationship should be replicated for stories, bugs, tasks, and sub-tasks in a hierarchy.”
The output could contain this fragment:
… workItem.parentId = null if (replica.parentId) { def localParent = syncHelper.getLocalIssueKeyFromRemoteId(replica.parentId.toLong()) if (localParent) workItem.parentId = localParent.id } …
#3 – Syncing Epics from Azure DevOps to Jira Cloud
Let’s say you want to transfer an Epic from Azure DevOps and make some of the content from its custom fields appear on the related Jira Cloud Epic. The AI prompt for scripting this connection could look like this:
And the generated output for the outgoing sync rules:
“I want to transfer an Epic from an Azure DevOps project named “Project X” and make some of the content from custom fields named “User Info” and “Contact Name” appear on the related Jira Cloud Epic.”
#4 – Aligning CreatedDate Field between Jira and Azure DevOps
The CreatedDate field in Jira is read-only since it tells the day the issue was created. So, how do you get it to appear in Azure DevOps? Use the integration solution to write mapping rules in order to link it to a custom field.
The prompt for generating sync rules:
“I want to sync the created date of a Jira issue to a custom field named “Original Created Date” in my Azure DevOps work item.”
The final output:
issue.customFields."Original Created Date" = replica.created
Note: As every platform environment and architecture is different, the code snippets might not be perfectly suited to your specific use case and might need to be adjusted.
What are the Benefits of AI-powered Integration?
Companies looking to explore AI-powered Azure DevOps Jira integration can benefit in the following ways:
Improve the speed of configurations: Instead of unnecessary back-and-forth and countless iterations to get a snippet for your use case, the AI can scour multiple sources to provide you with a relevant solution within minutes.
Increase the accuracy or mappings: AI-driven integrations for Jira and Azure DevOps limit human input to only prompting. It all comes down to how detailed, clear, and concise your prompt is.
Speed up data extraction: Instead of manually sifting through multiple lines of code and fields, the AI can fetch the data from the fields or through interactions with the API.
Improve error handling: AI-powered integration solutions can also find errors in your script by running quick scans to locate the bug or typo, refine it, and suggest improvements.
What are the Challenges of Using AI for Jira and Azure DevOps Integration?
AI-driven solutions can save your organization a lot of time and effort, but they also come with a unique set of challenges.
For instance, AI-generated scripts could contain errors and hallucinations. So you should always review every suggestion and test it rigorously before implementing it to your core environment.
Also, vague prompts can affect the quality of the output. Which means you have to dedicate enough energy to fine-tune the prompt. A prompt engineer might be the only solution to this issue.
AI models usually need internet connectivity to work. So, if the model goes online, it will become unusable and inaccessible, which could be a nightmare for time-sensitive syncs.
When you add AI features, you also introduce privacy and compliance issues. This is clear in cross-company collaborations, where one side has a “no-AI” policy.
Considering these challenges will help you understand how to implement AI-powered Jira Azure DevOps integration for your team.
How Exalate Handles Jira and Azure DevOps Integrations
Exalate is an AI-powered integration solution that connects Jira and Azure DevOps instances. It also supports integrations with systems such as ServiceNow, GitHub, Zendesk, Salesforce, etc.
Exalate has two AI features:
Aida is a standalone AI documentation assistant that you can use to fetch vital information from the Exalate documentation.
AI Assist is a dedicated AI script builder intrinsically embedded in the configuration console.
Both features accept user prompts and process them in order to generate code snippets for scripting connections and mappings.
Aida cannot embed the script in the UI or generate sync scripts for you, but AI Assist is directly embedded in the scripting console and takes your existing sync rules into consideration while suggesting scripts.
How to Set Up a Jira Azure DevOps Integration Using Exalate AI Assist
Here are the steps to follow according to our documentation:
Exalate supports three configuration modes: the Basic mode, the Visual mode (BETA), and the Script mode.
The Basic mode is for simple Jira Azure DevOps integration use cases and cannot be configured.
The Visual mode is a drag-and-drop interface and is available as a BETA version.
The Script mode unlocks the full potential of Exalate where you can generate sync rules based on Groovy scripts. You can set up advanced use cases to integrate Jira and Azure DevOps using this mode.
Since the AI Assist feature is only available for Script mode, we will discuss that mode.
Note: To learn the steps for configuring the connection in Visual mode, refer to this guide. While setting up a connection, one side initiates the connection and the other side accepts the connection invitation.
Start setting up the connection from the “Connections” tab in the Exalate admin console and click “Initiate connection”. You can start from any side. Then enter the destination instance URL. Choose your mode and follow the steps in the wizard.
For accepting the connection on the other side, click “Accept invitation” and follow the steps from that point.
Once the connection is set up, you need to configure it. For this, click the “Configure sync” button that is displayed when Step 2 is successful or edit the connection.
You can explicitly edit the connection in the “Connections” tab.
Go to the “Rules” tab. You can define your sync rules here. The rules are divided into incoming and outgoing sections. Both these sections have an AI chat feature.
You can edit the sync rules yourself by following the steps in this guide or using the AI feature to enter a detailed prompt.
For instance, enter a prompt describing the sync requirements, such as “I want to map the state of Azure DevOps work item to the status of a Jira issue to reflect “New” as “To Do”, “Resolved” as “Done” in the Jira incoming configuration.”
The AI will generate an output in the incoming and outgoing sync rules depending on how you want to map the information.
The green highlights are suggested additions, while the red highlights are the suggested deletions.
If the output is to your satisfaction, click Insert Changes.
If the output is incorrect, click Discard.
You can also set up triggers to automate your sync. For instance, sync all Jira issues that have the label “todev” and are assigned to “James”.
These triggers are platform-specific. So, you can use Jira Query Language (JQL) to set them up in Jira and use Work Item Query Language (WIQL) to set them up in Azure DevOps.
Once, issues or work items that satisfy the condition are created, they are automatically synced based on the rules you have set.
Once done, publish the changes.
Now, the established connection is ready to start syncing data between Jira and Azure DevOps.
If you have a specific use case in mind and are wondering how AI Assist can help you set it up faster and easier, reach out to our solutions engineers for a free demo.
Conclusion
So, how do you integrate Jira and Azure DevOps using AI?
Follow these simple steps:
Install Exalate on Jira and Azure DevOps
Set up a script mode connection. The script mode connection helps you set up advanced Jira Azure DevOps integration use cases with the help of Groovy scripts.
Configure the sync rules in the Script mode with the help of AI Assist. Enter what you wish to sync and AI Assist will generate the output.
This article was originally published on the Zendesk and Salesforce communities.
Syncing data between Zendesk and Salesforce allows organizations to unify both sales and support data without context-switching or manual request processing.
Since neither platform can share data natively, you’d need native or third-party solutions to get the exchange to work. These integration solutions bridge the communication gap and handle data transformation across platforms.
Without wasting much time, let me show you how to map and sync Zendesk and Salesforce custom fields and statuses using Exalate, a bidirectional third-party solution.
Status and Custom Field Update: Zendesk to Salesforce Use Case
You can create a custom field in your Salesforce Case to reflect data from a custom field in a Zendesk ticket.
Why is this necessary?
Syncing user data from Zendesk to Salesforce can give more context and information about user accounts.
You can share Zendesk ticket status with teams monitoring a Salesforce Case.
Customer service teams can use this case configuration to obtain customer account data from a custom field created in a Salesforce Case.
For this illustration, I want to fetch the day of the week from a “Weekday” picklist on Salesforce and have it reflect as a text in the custom “Weekday” field in Zendesk.
Then, we also want to change the status of a Salesforce case and have it reflected on the corresponding Zendesk ticket.
Here are the requirements:
Primary Requirements
Fetching the right API name from fields and entities on both sides.
Mapping the correct statuses and custom fields on both Salesforce and Zendesk.
Establishing sync rules for the incoming and outgoing data in custom fields.
Setting triggers to update the field on the Salesforce side automatically.
If you prefer watching a video demonstrating the use case, it’s all here:
How Exalate Can Map and Sync Statuses and Custom Fields Between Zendesk and Salesforce
Exalate is a two-way integration solution that works with Zendesk, Azure DevOps, ServiceNow, Jira, Salesforce, GitHub, etc.
Why Exalate?
It supports trigger-based integration and bulk operations.
To set a connection between Zendesk and Salesforce that supports advanced integration, choose the Script Mode.
Once done, open a Case in Salesforce. Add the description and populate the required fields. These changes won’t reflect on the other side because the mapping rules have not been set.
To configure the sync, open Exalate in your Zendesk dashboard, go to the connection you want to edit, and click on the “Edit connection” icon.
You have two options:
Outgoing sync (on the Zendesk side) refers to the data being sent over to Salesforce.
Incoming sync (on the Salesforce side) refers to the data to be received from the issue on Zendesk.
Under the “Rules” tab, enter the following code snippet into the “Outgoing sync” text area.
replica.Weekday__c = entity.Weekday__c
The entity.Weekday__c function points to the custom field name in the Zendesk ticket. The replica works as a payload or a message containing information you want to pass between the two systems.
For the status mapping between custom fields on Zendesk and Salesforce, enter the following code snippet.
The statusMap variable maps different statuses by fetching the replica.status.name and mapping it to the statusName variable of the corresponding entity.Status. Make sure the names match the corresponding statuses.
Once done, click “Publish” to save and implement changes.
Now head to the Zendesk “Incoming sync” text area and add the following line of code.
The issue.customFields.”Weekday”.value fetches the string value of the field based on the name. The replica saves the value from the Salesforce Case.
Once done, click “Publish” to save the changes.
Now, it’s time to set event triggers to control the sync.
Salesforce uses Salesforce Object Query Language (SOQL), while Zendesk uses the Zendesk search syntax.
To set an event trigger for the sync, go to “Triggers” and click “Create trigger”.
Status = “Working”
Enter the following code to dictate when the exchange should be triggered. Say, when the admin sets the Case status to “Working”.
Click “Add” to complete the trigger configuration.
Back in Salesforce, select a day from the “Weekday” picklist and change the status to “Working”.
Now, back in Zendesk, you’ll see that the status has changed to “Pending”, which corresponds with the rules established earlier. You can also see that the “Weekday” field has been populated by the same value selected from the Picklist.
Congratulations! You have now set rules and triggers to help you update statuses and sync custom Salesforce case fields with Zendesk tickets.
Start monitoring things in order to adjust the rules according to the demands of specific projects and issues.
If you still have questions or want to see how Exalate is tailored to your specific use case, book a demo with one of our experts right away.