In today’s software development workflows, keeping Jira and GitHub connected is essential. Your development teams work in GitHub, managing code, pull requests, and version control. Meanwhile, your project management, QA, and business teams operate in Jira, tracking work items and project progress.
Without integration, critical information gets siloed, pull request updates don’t reach Jira, work item status changes miss GitHub, and team members constantly switch between platforms to stay informed.
A Jira and GitHub integration bridges this gap, synchronizing work items, pull requests, comments, and statuses across both platforms in real time. Teams get unified visibility into development progress without abandoning their preferred tools.
Key Takeaways
Real-time visibility reduces context switching: Teams stay informed about work progress without constantly jumping between Jira and GitHub.
Flexible field mapping ensures autonomy: Each team controls what data they receive and how it appears in their workflow.
Automated synchronization eliminates manual updates: Triggers ensure relevant work automatically syncs when specific conditions are met.
Security remains intact across platforms: Role-based access control and encrypted connections keep sensitive data protected at both ends.
Custom integrations support your specific tech stack: Beyond GitHub and Jira, Exalate supports Freshservice, Freshdesk, Asana, Azure DevOps, and other platforms in your environment.
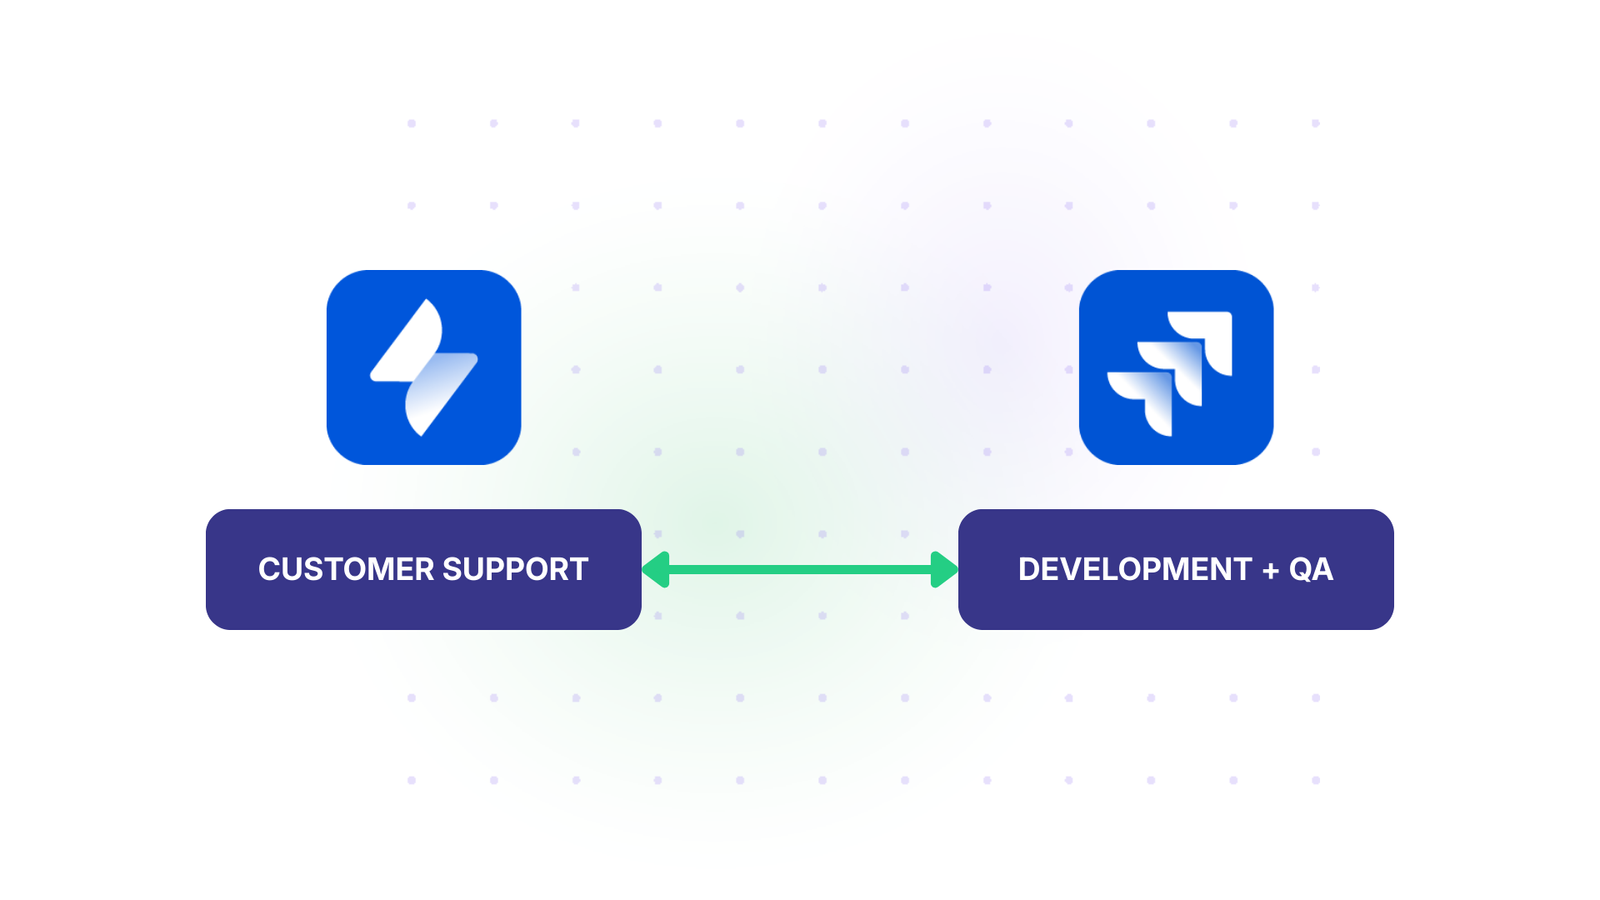
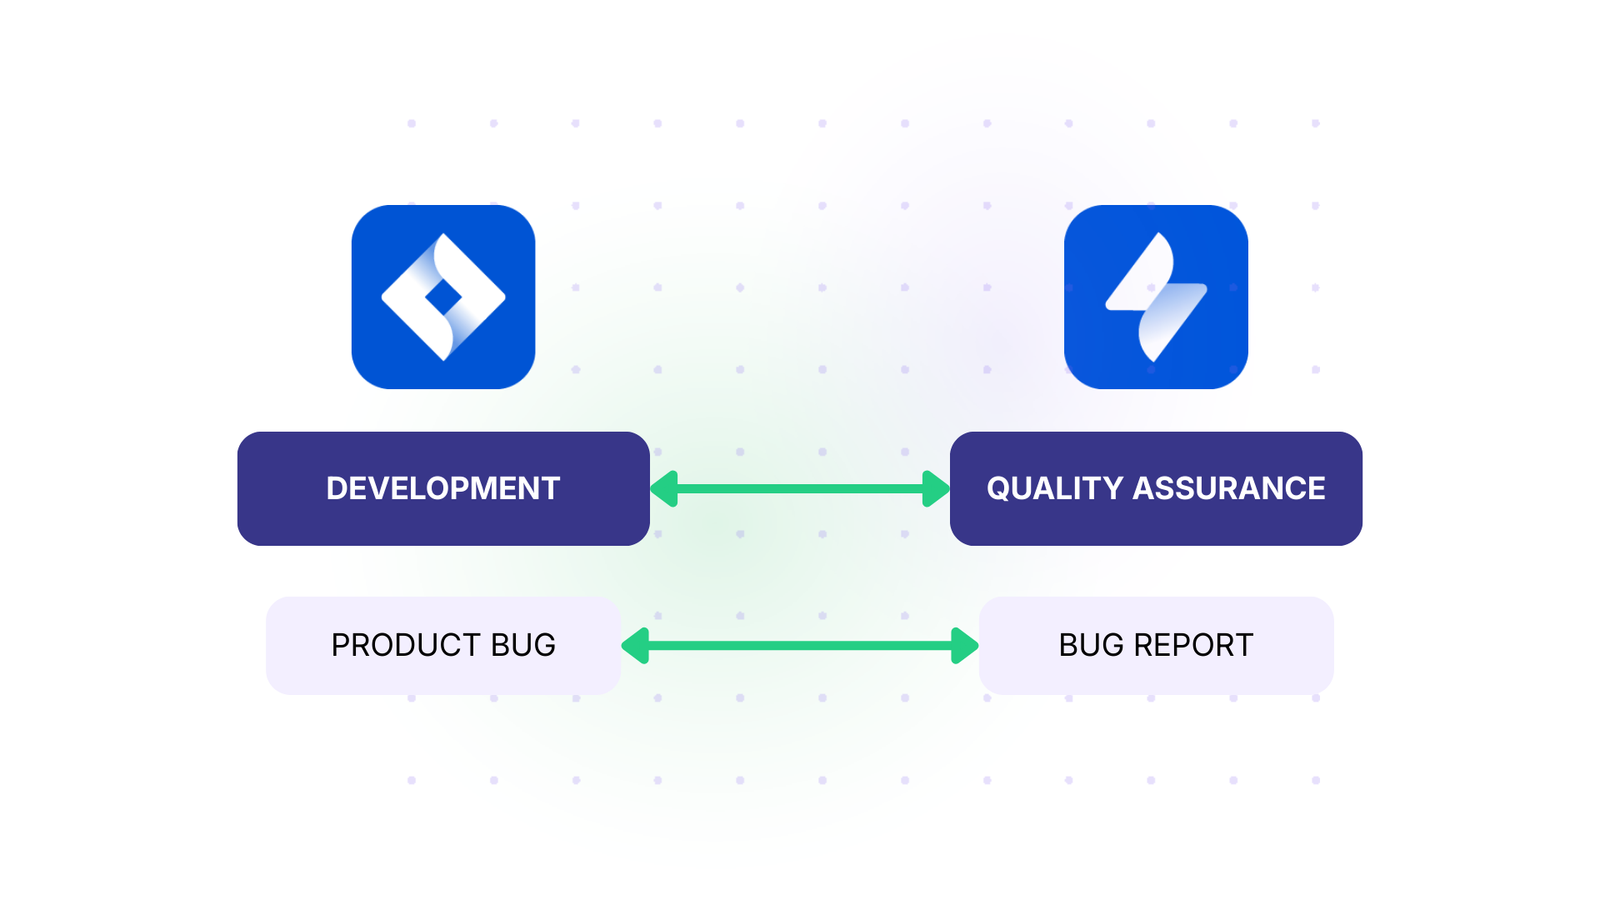
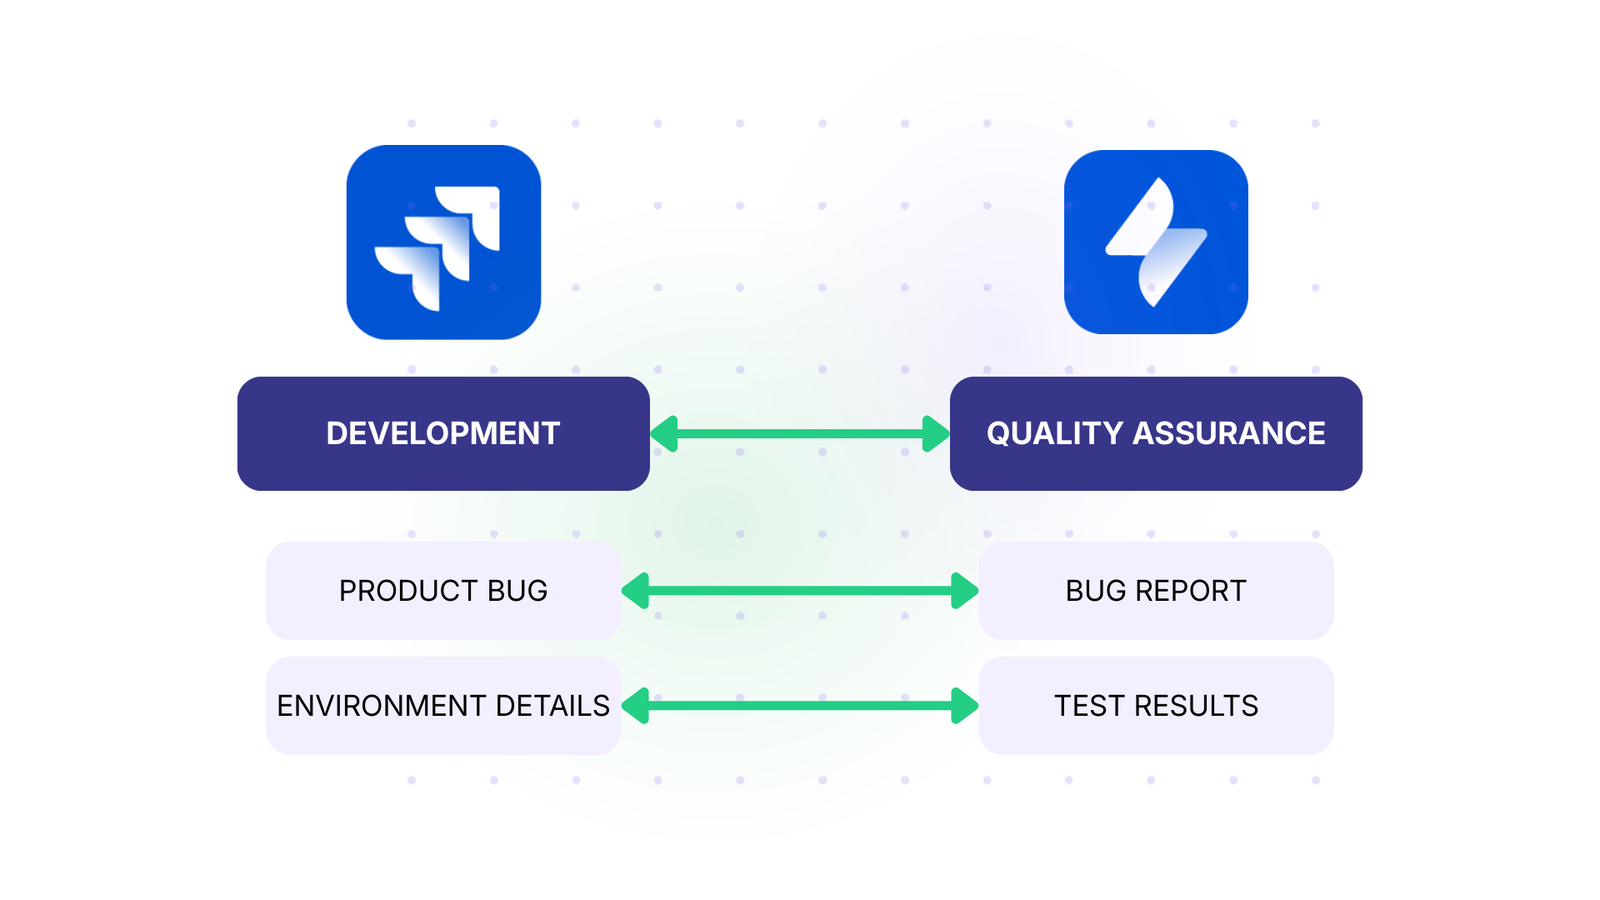
GitHub and Jira serve different teams with different needs. Developers need GitHub’s pull request management and code review capabilities. Non-technical stakeholders need Jira’s roadmap views, release planning, and portfolio management. When you integrate them, each team sees the data that matters to them without drowning in irrelevant details.
For example, your QA team in Jira can automatically receive work items from GitHub that need testing, while your developers see the testing status and bug reports without leaving GitHub.
Reduced manual context switching
Without integration, team members spend time copying work details between systems. A developer creates a pull request in GitHub and manually updates the linked Jira work item. A tester finds a bug and recreates it in both systems.
These repetitive manual steps waste time and introduce errors: a work item status doesn’t match its actual progress because someone forgot to update it.
Integration eliminates this busywork. When a work item’s status changes in Jira, it updates automatically in GitHub pull requests. When a pull request is merged in GitHub, the linked work item status updates without anyone having to touch it.
Better traceability from requirement to production
For compliance, auditing, and post-mortems, you need a clear trail: which work item led to which code changes, which pull requests were merged to fix it, and when it went to production.
An integrated Jira-GitHub system provides this automatically. Every pull request links to its originating work item, every comment surfaces in both systems, and every status change is visible across platforms.
Understanding Your Integration Options
What an integration actually does
A Jira GitHub integration syncs specific data based on rules you define. When work items are created in Jira, the integration can create corresponding GitHub issues. When pull requests are merged in GitHub, it can update the Jira work item status. The key is that you control:
What fields sync (summary, description, assignee, labels, status, custom fields)
Which work items are included (triggered by specific conditions you set)
How data transforms as it moves between platforms (rename statuses, reassign ownership, add context)
This flexibility means your developers in GitHub don’t see unnecessary Jira fields, and your project managers in Jira don’t get flooded with GitHub-specific technical data.
Synchronization scope: bidirectional vs. one-way
Most teams benefit from bidirectional sync: data flows in both directions. A work item created in Jira syncs to GitHub, and when developers update that GitHub issue, changes come back to Jira. This keeps both systems current without requiring teams to maintain separate systems of record.
Some scenarios call for one-way sync: your support team in Jira automatically creates GitHub issues for engineering, but engineering updates don’t flow back to support. You define this behavior based on your workflow.
How to Choose an Integration Solution
When evaluating tools for Jira-GitHub integration, consider these core features:
Field mapping flexibility: Can you choose which fields sync and transform them as needed? If your GitHub labels don’t match Jira priority levels, can the integration translate “critical” on GitHub to “Highest” in Jira?
Trigger-based automation: Can you set conditions that control when sync happens? “Only sync work items with the label ‘backend'” or “sync only when status changes to ‘In Progress'” prevents unnecessary data duplication and keeps your systems focused.
Error handling and recovery: What happens when GitHub has an outage? Does the integration queue change and replay them when the connection recovers, or do you lose data? A robust integration maintains an ordered queue of changes and replays them in sequence when systems reconnect.
Role-based access control: Can you restrict who can sync certain work items? A developer shouldn’t sync confidential roadmap items to GitHub, but they should sync their day-to-day work.
Native support for your tech stack: Beyond Jira and GitHub, do you use Asana, Freshdesk, Azure DevOps, or other platforms? An integration platform that supports multiple connectors lets you build a unified view across your entire tech stack, not just Jira and GitHub.
Security and compliance: Is the connection encrypted? Does it support OAuth for secure authentication? Is the vendor ISO-compliant? For regulated industries, these certifications matter.
How to Get Started With Jira to GitHub Integration Using Exalate
If you’re on Exalate Classic, then you can import your existing nodes and connections using the “Import connection” feature.
This will help you retain existing configurations and sync rules as you move to New Exalate.
To get started with Exalate for GitHub or discuss your use case and requirements, please contact sales.
Configuring synchronization rules
Once connected, you define what data flows between systems. Exalate uses a sync rules configuration where each line handles a specific field mapping. For incoming data from GitHub to Jira, you might have:
If you’re not comfortable writing code, Exalate’s AI-assisted configuration through Aida can generate these rules for you. You describe what you want (“Sync all open work items from Jira to GitHub with high priority marked as critical”), and Aida generates the configuration. You review it, adjust if needed, and publish.
Setting up synchronization triggers
Triggers determine when sync happens. Instead of syncing all work items constantly, you create specific conditions:
“Sync work items with the label ‘engineering’ to GitHub”
“Sync work items that change status to ‘In Progress’ within the next 5 minutes”
“Sync pull requests from the ‘main’ repository when they’re marked as ‘ready for review'”
In Jira, triggers use JQL (Jira Query Language). In GitHub, they use GitHub’s advanced search syntax. You can combine multiple conditions with AND/OR logic.
For example, to sync bugs related to a specific project:
project = "MyProject" AND type = Bug AND status = "To Do"
When work items match these conditions, they automatically sync according to your mapping rules. If a work item no longer matches (status changes to “Done”), you can configure whether it should unlink, stay linked, or continue syncing.
Common Real-World Integration Scenarios
Scenario 1: Product development with distributed teams
The situation: Your engineering team in GitHub needs visibility into product requirements. Your product management team in Jira defines roadmaps and priorities. Without integration, developers either miss context or get flooded with product management details they don’t need.
The solution: Sync only the work items marked “engineering-ready” from Jira to GitHub. Include summary, description, and acceptance criteria. When developers update status or comment, those changes flow back to Jira. Product managers see real-time progress without developers seeing unfinished roadmap items.
Scenario 2: Support and engineering collaboration
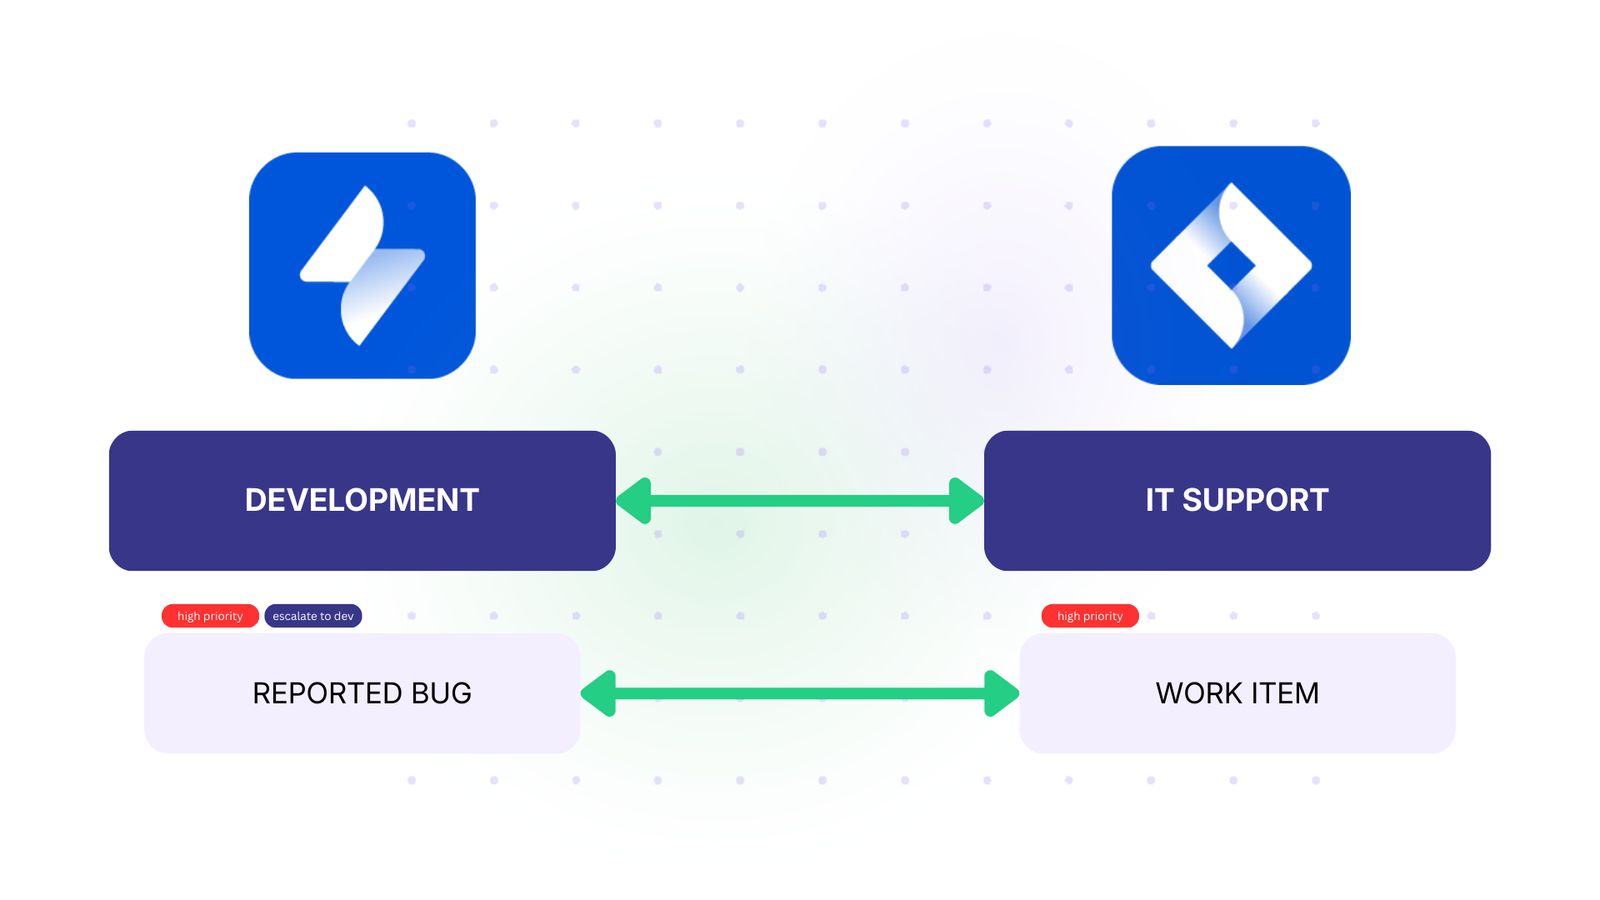
The situation: Your support team in Jira receives customer bug reports. Engineers in GitHub need to address the critical ones quickly, but they shouldn’t be distracted by low-priority requests or feature requests.
The solution: Create a trigger that syncs only high-priority bugs (and above) from Jira to GitHub. When synced, add a “from-support” label so engineers know the source. When engineers resolve the GitHub issue, the status change flows back to Jira, and support can contact the customer immediately.
Scenario 3: Testing and development handoff
The situation: Your QA team in Jira finds bugs during testing. Engineers in GitHub need to prioritize their work. Without good handoff, bugs sit in backlog, or developers waste time context-switching between systems.
The solution: Sync only bugs found in the current sprint from Jira to GitHub. Include reproduction steps, environment, and any attachments. When engineers fix it and mark as resolved in GitHub, the status updates in Jira automatically. QA can immediately retest without waiting for manual updates.
Scenario 4: Multi-team ecosystem integration
The situation: You use Jira for project management, GitHub for code, Freshservice for support, and Asana for marketing campaigns. Each team works in their preferred tool, but they need to see how work across teams impacts their own.
The solution: A multi-platform integration connects all four systems. Marketing campaigns in Asana automatically create engineering work in GitHub when they need development support. Customer issues from Freshservice create bugs in Jira. Completed work in Jira updates project status in Asana.
Real-Time Sync vs. Scheduled Sync: What You Actually Need
Some integration tools only sync on a schedule (every hour, every 4 hours). Real-time sync means changes propagate within seconds. For development teams, real-time sync matters because a developer wants to know immediately when a status changes or a comment is added. A one-hour delay in sync can mean an hour of wasted work or repeated effort.
Exalate offers real-time event-based sync. When you change a work item in Jira, GitHub is updated within seconds. This keeps teams aligned without artificial delays that slow down collaboration.
Security Considerations for Jira-GitHub Integration
When data flows between Jira and GitHub, security must not be an afterthought. Here’s what matters:
Encryption in transit: All data moving between Jira and GitHub should use TLS 1.2 or higher. This prevents man-in-the-middle attacks and keeps credentials safe.
Role-based access control: The integration itself should respect your Jira and GitHub permission structures. A developer with read-only access to certain projects shouldn’t be able to sync work they can’t see.
OAuth authentication: Instead of storing passwords or long-lived API keys, use OAuth, which grants temporary, revocable access tokens. This prevents credential compromise from exposing your entire system.
Audit capabilities: You should be able to see which work items were synced, when, and by which integration. This isn’t audit trails for compliance; it’s operational visibility into what your integration is doing. Some platforms, like Exalat,e provide connection statistics and sync logs so you can debug issues.
Vendor security credentials: Check whether your integration vendor is ISO-compliant and maintains a public Trust Center. Exalate meets these standards and publishes its security practices at the Trust Center.
For sensitive data or regulated environments (financial services, healthcare), ensure the integration supports your data residency requirements and encryption standards.
Getting Started with Your Integration
The best time to integrate was when you first adopted both tools. The second-best time is now. Start small: pick one workflow (maybe syncing bugs from Jira to GitHub), set it up, and let it run for a week. See how it feels. Then expand to other workflows.
Don’t try to sync everything on day one. You’ll overwhelm your teams with noise. Sync strategically. Ask each team: “What information do you need from the other platform?” Build your integration around that.
And if you get stuck, the documentation and support for integration platforms like Exalate are usually solid. Most issues are configuration questions, not platform limitations.
Frequently Asked Questions
How can I connect Jira with GitHub?
You can connect Jira with GitHub using third-party integration tools like Exalate. Install the app on both sides (Jira Cloud and GitHub), create a connection between your instances, and configure which work items and fields sync based on your workflow needs. The setup takes minutes and doesn’t require code if you use AI-assisted configuration.
Why should I integrate Jira and GitHub instead of using native features?
GitHub’s native Jira integration is limited; it syncs basic information when you mention Jira work items in pull requests, but it doesn’t create bidirectional workflows or filter what data each team sees. A dedicated integration platform like Exalate gives you field mapping, role-based access, real-time sync, and automation triggers that the native feature lacks.
Can I sync comments and pull requests between Jira and GitHub?
Yes. You can sync comments between work items and GitHub issues, and pull request information (status, author, merged-by) can sync to Jira work items. This creates a complete audit trail from planning through code review to deployment, all visible in both systems.
What if I use GitHub Enterprise Cloud instead of GitHub.com?
The process is the same. Exalate supports both GitHub.com and GitHub Enterprise Cloud. The OAuth connection flows are identical, and the configuration is no different. If you’re using GitHub Enterprise Server (self-hosted), check with your integration vendor about support.
Can I use Exalate to connect multiple Jira and GitHub instances?
Yes, you can use Exalate to connect multiple Jira and GitHub instances. This integration solution helps to streamline collaboration between developers, salespersons, marketers, and support agents. Exalate also supports other ITSM tools like ServiceNow, Zendesk, Salesforce, and Azure DevOps. Check out our integrations for more information.
How often does sync happen, and can I control timing?
Exalate syncs in real time; changes propagate within seconds of being made. You control what syncs through field mapping and triggers, but not the timing. If you need batch sync on a schedule instead, other tools offer that, but real-time sync is faster for team collaboration.
What data should I sync and what should I leave out?
Sync the data your teams need to stay informed: summaries, descriptions, status, assignees, and comments. Leave out internal-only fields, confidential data, or fields that don’t make sense across platforms. Use role-based access control to ensure sensitive work stays visible only to authorized teams.
Is it safe to integrate GitHub and Jira? What about security?
Yes, if you choose a vendor that prioritizes security. Use tools with OAuth authentication (not passwords), TLS encryption, and ISO 27001 compliance. You can also restrict which work items sync based on user permissions.
What happens if the integration connection breaks or one system is down?
A robust integration queues changes while the connection is down and replays them in order when the connection recovers. This prevents data loss and inconsistency. You won’t lose information, and you won’t end up with duplicate data. Exalate handles this automatically.
Can I use the same integration tool for Jira-GitHub, and also connect to other platforms?
Yes. Exalate supports Freshservice, Freshdesk, Asana, Azure DevOps, and many other platforms. You can build a multi-platform ecosystem where Jira talks to GitHub, Freshservice, and Asana simultaneously. This is helpful if you manage work across support, engineering, product, and marketing teams.
How much does Jira-GitHub integration cost?
Exalate pricing factors in the cost of your time—if your team spends hours per week manually syncing data, integration quickly pays for itself. Check out our pricing page to see which plan works best for your use case.
Teams within your organization usually use different platforms (let’s say Jira and ServiceNow) to handle business-critical or user-centered information. You might also want to share some data with other companies you do business with. To this end, you’ll need a Jira ServiceNow integration to connect internal and external teams.
With the integration in place, you’ll be able to boost your productivity and save yourself time if you understand how to set up a Jira ServiceNow integration with the least fuss possible.
So in this step-by-step guide, you’ll learn how to integrate Jira with ServiceNow.
Key Takeaways
Integrating Jira and ServiceNow lets you:
Automatically sync all your work between platforms, incidents in ServiceNow become trackable work in Jira without manual data entry
Keep teams aligned with real-time updates to comments, attachments, statuses, and priorities across both systems
Map ServiceNow urgency levels to Jira priorities (Critical → High, Moderate → Medium) so both teams see consistent prioritization
Escalate incidents from IT operations to development teams with complete context, including SLA timelines, work notes, and history intact
Enable cross-company collaboration where partners, suppliers, or MSPs can work in their preferred tool while staying synchronized
Reduce resolution time by eliminating context switching; developers work in Jira, operations in ServiceNow, and data flows automatically
Common use cases: Incident escalation, change request management, MSP client coordination, multi-team collaboration
Why Integrate Jira and ServiceNow
Teams using Jira and ServiceNow can benefit by collecting, organizing, and exchanging data between these platforms.
Use Case Example:
A customer logs an incident in Jira Service Management (JSM) (e.g., “System Outage”) with Summary, Description, Priority, and Attachments, with correct transformations applied (e.g., JSM’s “High” Priority maps to ServiceNow’s “Critical” Urgency, and so on). The support team needs to escalate this to IT operations in ServiceNow for resolution.
Without Integration: Manual copying of work item details from Jira to ServiceNow, which is time-consuming and error-prone.
With Integration:
An incident is automatically created in ServiceNow with all fields mapped correctly.
Any updates, such as a status change in JSM to “In Progress”, sync to ServiceNow as “Work in Progress.” Similarly, updates in ServiceNow sync back to JSM with proper field mappings.
Comments sync bidirectionally, but visibility rules ensure customer-facing comments in JSM remain internal work notes in ServiceNow.
If the incident is marked “Critical,” additional fields like Service Owner and Resolution SLA synchronize in real time.
Once the incident is resolved in JSM, the resolution code and resolution notes are automatically assigned to the incident based on the selection the agent makes.
This triggers the status change in the ServiceNow instance. The resolution code and resolution notes for the incident are automatically filled. The incident is now ‘Resolved’.
Both teams work in their preferred tool while maintaining complete visibility.
Key Benefits
Real-Time Visibility: Track synchronization progress and keep all the team members up-to-date
Reduced Manual Work: Automation eliminates duplicate data entry, saving hours per week
Better Collaboration: Development and IT teams stay aligned without constant context switching
Faster Resolution: Improve incident resolution time
But before that, let’s see a few practical use cases. If you don’t find what you’re looking for here, you can always set up a call with our integration engineers to discuss further.
What Does Jira ServiceNow Integration Do
A Jira ServiceNow integration creates a bidirectional data bridge between the two platforms, automatically synchronizing information without manual copying.
How It Works
When you integrate Jira and ServiceNow:
Automatic sync: ServiceNow incidents create corresponding Jira work items (or vice versa) based on triggers you define
Real-time updates: Comments added in ServiceNow appear in Jira within seconds. Attachments, status changes, and field updates flow automatically
Field mapping: ServiceNow “Priority 1 – Critical” automatically becomes Jira “High Priority” based on the transformation rules you configure
Context preservation: SLA timelines, work history, escalation notes, and other details transfer between systems without information loss
Workflow autonomy: IT operations continues using ServiceNow, development teams stay in Jira, but everyone sees synchronized data
What Data Is Typically Synced Between Jira and ServiceNow
Standard fields:
Entities: ServiceNow incidents, change requests, RITMs, problems, and other entities available in tables → Jira stories, bugs, tasks, epics → work items (previously called issues)
Comments and notes: Work notes, internal comments, customer-facing comments
Attachments: Files, images, documents (transferred or linked)
Status and workflow: Open → In Progress → Resolved → Closed (with custom mapping), any status transition based on your workflows
People: Assignee, reporter, watchers (with user mapping between systems)
Dates and times: Created date, due date, resolution date, SLA breach times
Priorities and urgency: ServiceNow urgency (1-5) → Jira priority (Highest to Lowest). Map according to your needs
Advanced synchronization:
Custom fields: Sync any custom field available via REST API between Jira and ServiceNow
SLA information: Breach times, SLA status
Related work items: Parent-child relationships, linked incidents, blocked by/blocks
Time tracking: Work logs, time spent, original estimates
CMDB data: Configuration items from the ServiceNow asset database
Any data available via REST APIs
Real-World Use Cases for Jira ServiceNow Integration
A Jira ServiceNow integration will ensure all the daily tasks are synced between different teams using these systems, increasing transparency and trust. It will also simplify reporting by keeping both teams aligned.
Let’s see a few practical use cases of integrating Jira and ServiceNow.
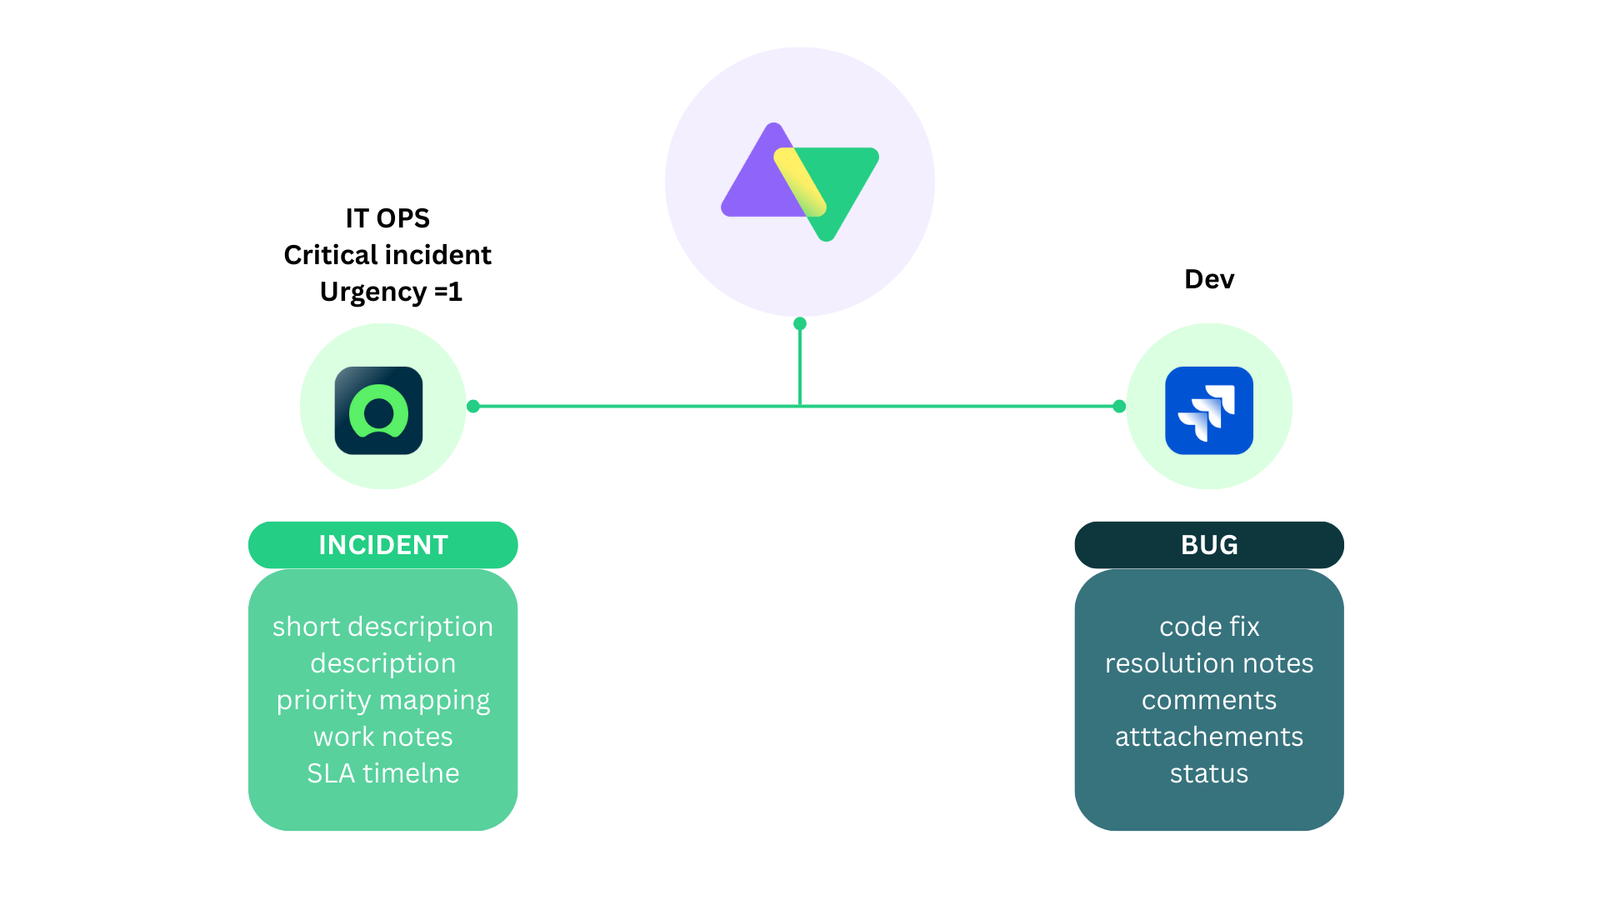
1. Customer Support to Development Incident Escalation with SLA Tracking
Scenario: A critical item (Urgency=1) occurs in your IT infrastructure.
Workflow:
Incident logged in ServiceNow with urgency, assignment group, and SLA details. Incident investigated by support
Root cause identified: requires code fix
Automatically creates a corresponding Jira work item with:
Complete incident history
SLA timeline information
Priority mapping (Critical → High, etc.)
Work notes transformed to Jira comments
The development team fixes the issue
Resolution notes sync back to ServiceNow
Incident closed with proper resolution code
The IT operations team handles incidents in ServiceNow
The development team tracks progress simultaneously in Jira
Status updates, comments, and attachments sync bidirectionally in real-time
SLA breach alerts notify both teams automatically
Outcome: Collaboration without context switching, complete visibility, faster resolution.
Jira ServiceNow Integration Use Cases: Learn how to implement some advanced technical use cases.
Challenge: Clients use Jira; MSP uses ServiceNow for centralized operations. Setting up a Jira ServiceNow integration for ITSM workflows will help solve this challenge.
Solution:
MSP connects its single ServiceNow instance to 5+ departmental Jira instances
Work items sync automatically when clients log requests
Comments, attachments flow bidirectionally
Integration visualization in a unified console shows all connections and how they connect
Different sync rules per department (connection) based on workflow needs
Clients work in their preferred tools without ServiceNow access
Security Features:
Role-based access control (RBAC) ensures proper permissions
Data encryption in transit (TLS 1.2/1.3) and at rest
The moment the ticket enters the help desk in ServiceNow, Exalate routes it to my team working in Jira. My team then provides feedback, which is immediately reflected in ServiceNow.
– Ms. TEO TEAM LEAD, LF LOGISTICS
Outcome: Transparency, simplified reporting, trust across organizations.
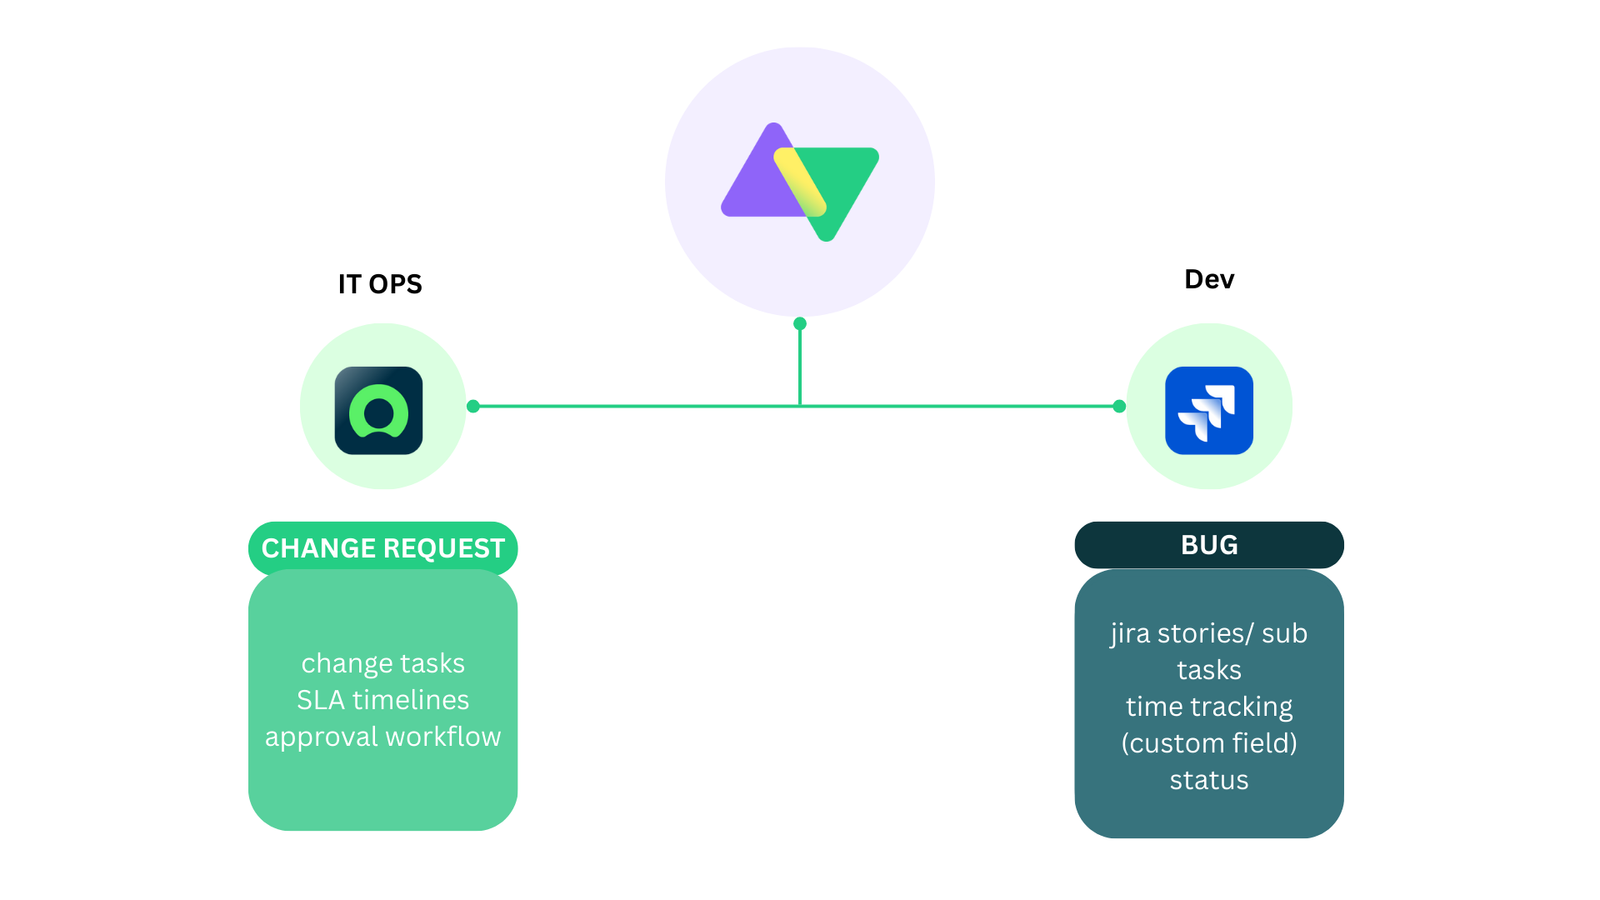
3. Change Request Management
Scenario: Your e-commerce platform requires upgrading.
Workflow:
Change request created in ServiceNow with approval workflow
Once approved, it automatically syncs to Jira as an Epic or a Story
Development team breaks down into tasks, tracks time
Progress updates flow back to ServiceNow in real-time
Completion triggers change request closure in ServiceNow
Advanced Mapping:
ServiceNow Change Request → Jira Epic
ServiceNow Change Tasks → Jira Stories/Sub-tasks
Time tracking aggregated from Jira stories returned to the ServiceNow custom field
What are the Best Ways to Connect Jira and ServiceNow?
Before you jump right into the integration, it’s important to understand the ways in which you can integrate Jira and ServiceNow.
ServiceNow IntegrationHub (Native Method)
ServiceNow’s IntegrationHub uses Jira Spoke for connectivity.
While native, it has limitations:
Limited bidirectional functionality
Longer onboarding journey
Additional package costs
ServiceNow-centric control (limited Jira-side autonomy)
Works for simple, unidirectional use cases
Best For: Basic, one-way data pushes when cost isn’t a constraint
Custom Code Development
I have often observed that ServiceNow users prefer to build their integration from scratch. Honestly, ServiceNow APIs do make the task easy, but this option isn’t always cost-effective. It also leads to significant maintenance costs and difficulty scaling your integration requirements.
Building with ServiceNow and Jira APIs gives complete control but requires ongoing investment:
Full customization capability
No licensing fees (initially)
High development costs (50-200+ hours)
Significant ongoing maintenance
Scaling difficulties as requirements grow
No built-in error handling, security, or monitoring. Has to be handled by the dev team
Best For: Organizations with dedicated integration teams and stable requirements
From my experience, I have observed that companies try to build their own solution initially, but then eventually switch to a third-party integration solution.
Also, when it comes to third-party solutions, you will see a lot of no-code, template-based tools to integrate Jira with ServiceNow. They may work for simple use cases, but cannot be used to implement advanced integration scenarios.
There are a lot of third-party Jira ServiceNow integration solutions available in the market with flexible license plans, various deployment models, extensive documentation, and other custom-made features. With such solutions, you can get your integration project up and running in no time.
However, it’s a good practice to consider some factors while choosing the solution.
What to Consider When Choosing an Integration Solution
Sharing data between Jira and ServiceNow sounds straightforward, but the approach you choose determines whether your integration becomes a productivity multiplier or a maintenance headache. The right solution keeps teams aligned, preserves data context during escalations, and scales as your organization grows.
When evaluating integration options, focus on these critical capabilities.
Security
Your integration handles sensitive operational data like incident details, customer information, SLA commitments, and internal work notes. Security isn’t optional.
What to look for:
Compliance certifications: ISO 27001, GDPR, compatibility
Data encryption: In transit (TLS 1.2/1.3) and at rest
Access control: Role-based permissions that separate integration management from system access
Authentication options: OAuth 2.0, API keys, Personal Access Tokens (no shared credentials)
Audit trails: Complete logs of configuration changes and data transfers for compliance
Why it matters: A security breach through your integration could expose customer data, violate compliance requirements, and damage trust. Choosing a certified platform reduces risk and satisfies audit requirements.
Look for platforms with public Trust Centers where you can review security documentation, penetration test results, and compliance certificates.
Real-Time Synchronization
Delays between systems create confusion. If a ServiceNow incident shows “In Progress” while Jira shows “Resolved,” which is correct? Real-time sync eliminates this ambiguity.
Why it matters: IT operations and development teams make decisions based on current data. Stale information leads to duplicate work, missed SLAs, and frustrated customers. Real-time sync means both teams always see the same truth.
Flexibility
Many companies look for integration solutions that can support complex or advanced use cases. Using predefined integration templates doesn’t always work. Look for solutions that offer support for complex integration use scenarios with minimum hassle. Adding conditional logic, advanced data mappings should be included as a default. The solution must also support historical data exchange or legacy system integration.
Why it matters: Your business processes have evolved over the years. Forcing them into rigid integration templates means either changing your workflows (expensive, disruptive) or accepting incomplete data sync (defeats the purpose).
AI-Assisted Configuration
Setting up integrations traditionally requires developers who understand both platforms’ APIs, data models, and scripting languages. AI changes this equation.
What to look for:
Natural language script generation: Describe what you want (“sync all high-priority incidents to Jira as bugs”), get working code
Context-aware suggestions: AI understands your existing configuration and recommends improvements
Error explanations: When sync fails, AI translates technical errors into plain language with fix suggestions
Learning from best practices: AI trained on thousands of successful integrations suggests optimal approaches
Why it matters: Reduces implementation time from days to hours. Non-developers can configure complex sync rules. Troubleshooting becomes faster when errors are explained clearly instead of cryptic API messages.
Scalability
You might start with one Jira project syncing to one ServiceNow assignment group. Six months later, you need five Jira instances connected to ServiceNow, plus Azure DevOps and Salesforce in the mix.
Why it matters: Starting with a solution that can’t scale means migration later: re-implementing integrations, retraining teams, and disrupting workflows. Choosing a scalable platform from the start avoids this pain.
Reliability
Downtimes are hard-hitting. It’s important to consider solutions that offer an integrated retry mechanism that doesn’t need manual intervention. Also, the two-way synchronization must resume from the point of interruption without having to worry about data being lost during system failures.
Rollback capability: If a configuration change breaks sync, revert to the previous working version
Uptime guarantees: SLA commitments for platform availability
Safe testing: Validate configuration changes before production deployment
Why it matters: A broken integration is worse than no integration; teams see outdated data, make decisions on false information, and lose trust in the system. Reliability features minimize downtime and provide safety nets.
Cost & Pricing Model
Integration pricing varies wildly. Some charge per user, some per transaction, some per connection. Understanding the model prevents budget surprises.
Pricing models explained:
Per-user licensing: You pay based on how many people have access to Jira or ServiceNow
Flat pricing: Charged a flat rate for the entire integration or per system
Per-transaction (usage-based): You pay per API call or sync event
Per-connection: You pay per integration pair (Jira ↔ ServiceNow)
Outcome-based (sync pairs): You pay for the number of work items actively synchronized at any given time
Cost per item decreases as scale increases: The more work items you sync, the lower the per-item cost. This aligns incentives; the platform wants you to get more value, not artificially limit your usage.
Look for transparency in pricing. You should be able to estimate costs before committing. An ROI calculator helps quantify benefits (time saved, errors reduced) against costs.
Note: You can also have a look at the complete comparison between IntegrationHub and Exalate if you prefer.
Why Use Exalate to Integrate Jira and ServiceNow
Exalate combines flexibility with operational simplicity through a unified management console:
Script-based engine: Groovy scripting for any custom Jira ServiceNow workflow
Side-by-side view: Manage all integrations and connections from one interface. Form 2-tier or multi-tier Jira ServiceNow integration networks.
TestRun functionality: Test your sync scripts before production deployment
Script versioning: Every script publish creates a new version. Full audit trail of who changed what and when, with rollback capability. This also allows you to work on drafts without affecting production data.
Real-time sync: Complete queue visibility and work item or incident history
Security-first: ISO 27001 certified, RBAC, encryption at rest and in transit. Visit Exalate Trust Center.
Supported Integrations: Jira, Jira Service Management, ServiceNow, Azure DevOps Cloud and Server, Salesforce, Zendesk, Freshservice, Freshdesk, Asana, GitHub, and more. View All Supported Connectors
Outcome-based pricing: Exalate uses sync-based (outcome-based) pricing, i.e., you pay for active work items in sync, not user seats, ensuring costs scale with actual usage, not team size. With every integration pair (Jira ServiceNow, in this case), you can create as many connections and users as you want. Also, the cost decreases as items under sync increase. View pricing details → | Exalate Plan Calculator
Now that you understand what makes an effective integration and why this guide uses Exalate, let’s walk through the actual setup process.
How to Integrate Jira and ServiceNow: A Step-by-Step Guide
This tutorial demonstrates how to integrate Jira and ServiceNow using Exalate.
Go to the Exalate app. If you already have an account, you can log in directly.
New users can create an account by manually entering their email and verifying it, or by signing up using Google.
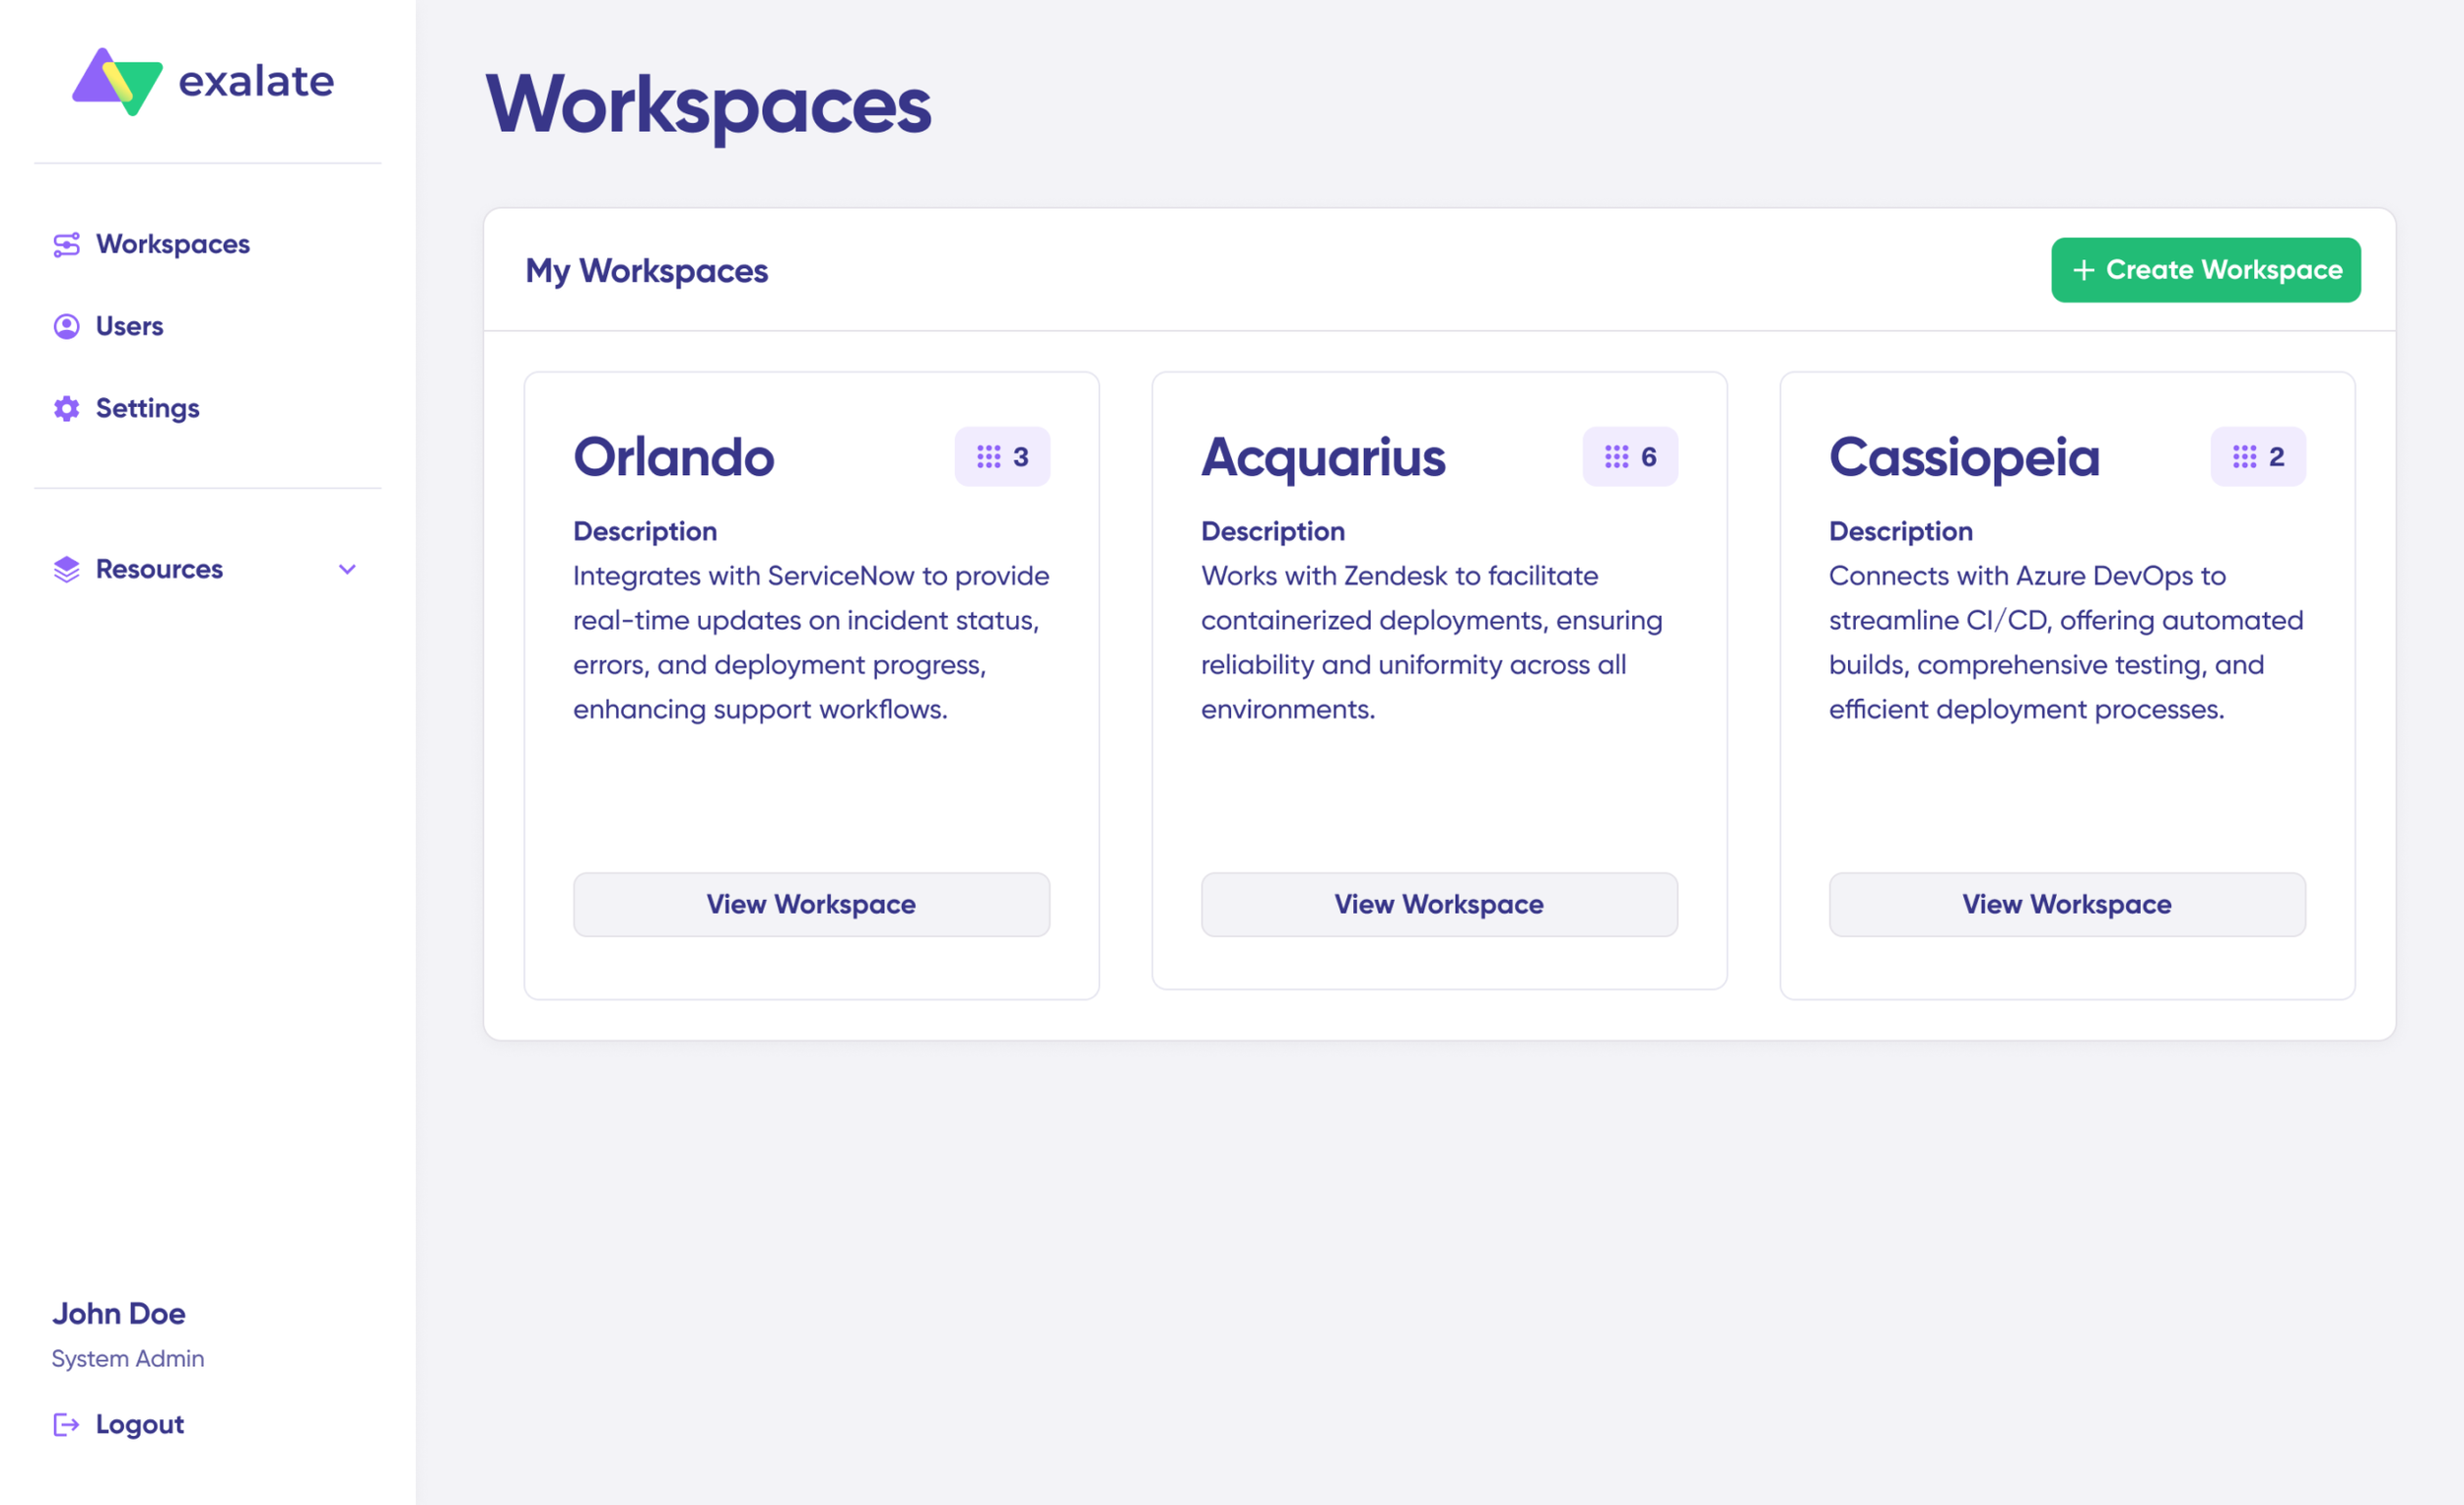
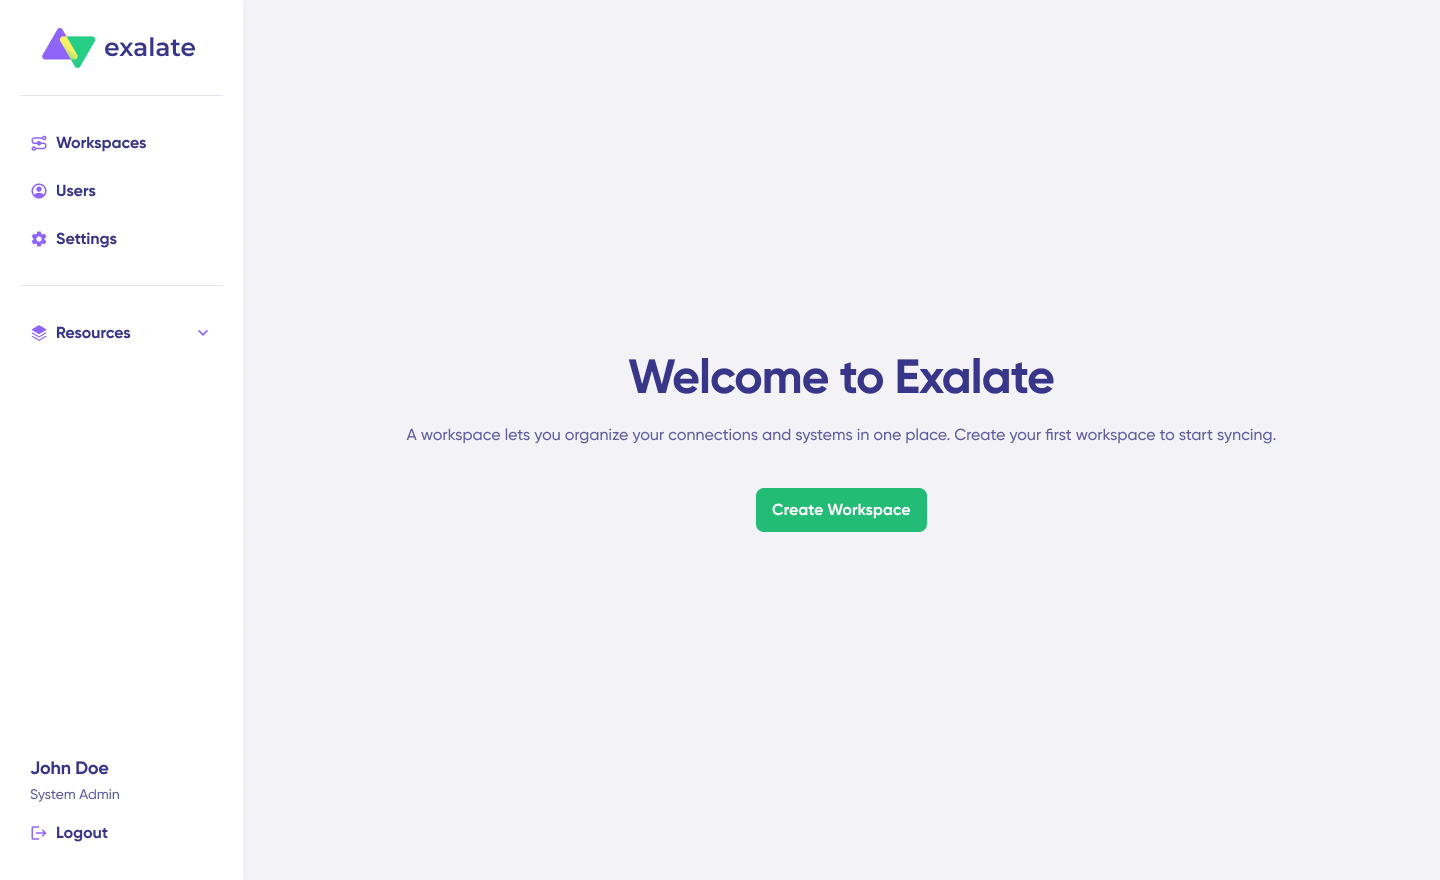
Creating a Workspace
Workspaces help you organize and manage your integrations and connections in a single place. You can find all your existing workspaces under the “Workspaces” tab.
To create your first workspace:
Click the “+ Create Workspace” button.
Enter a name and description for your workspace.
Click “Create workspace” to confirm.
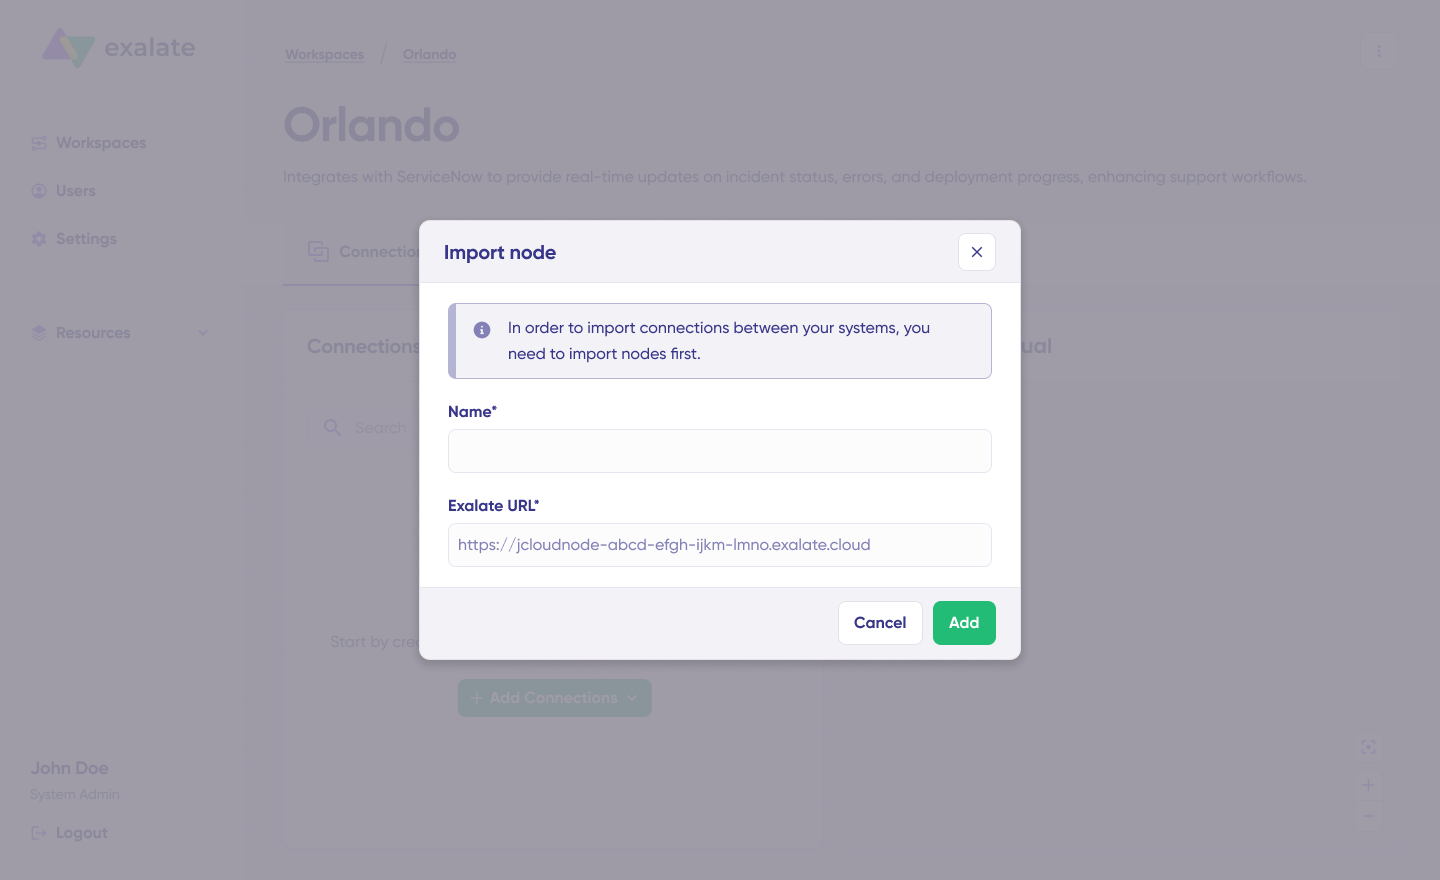
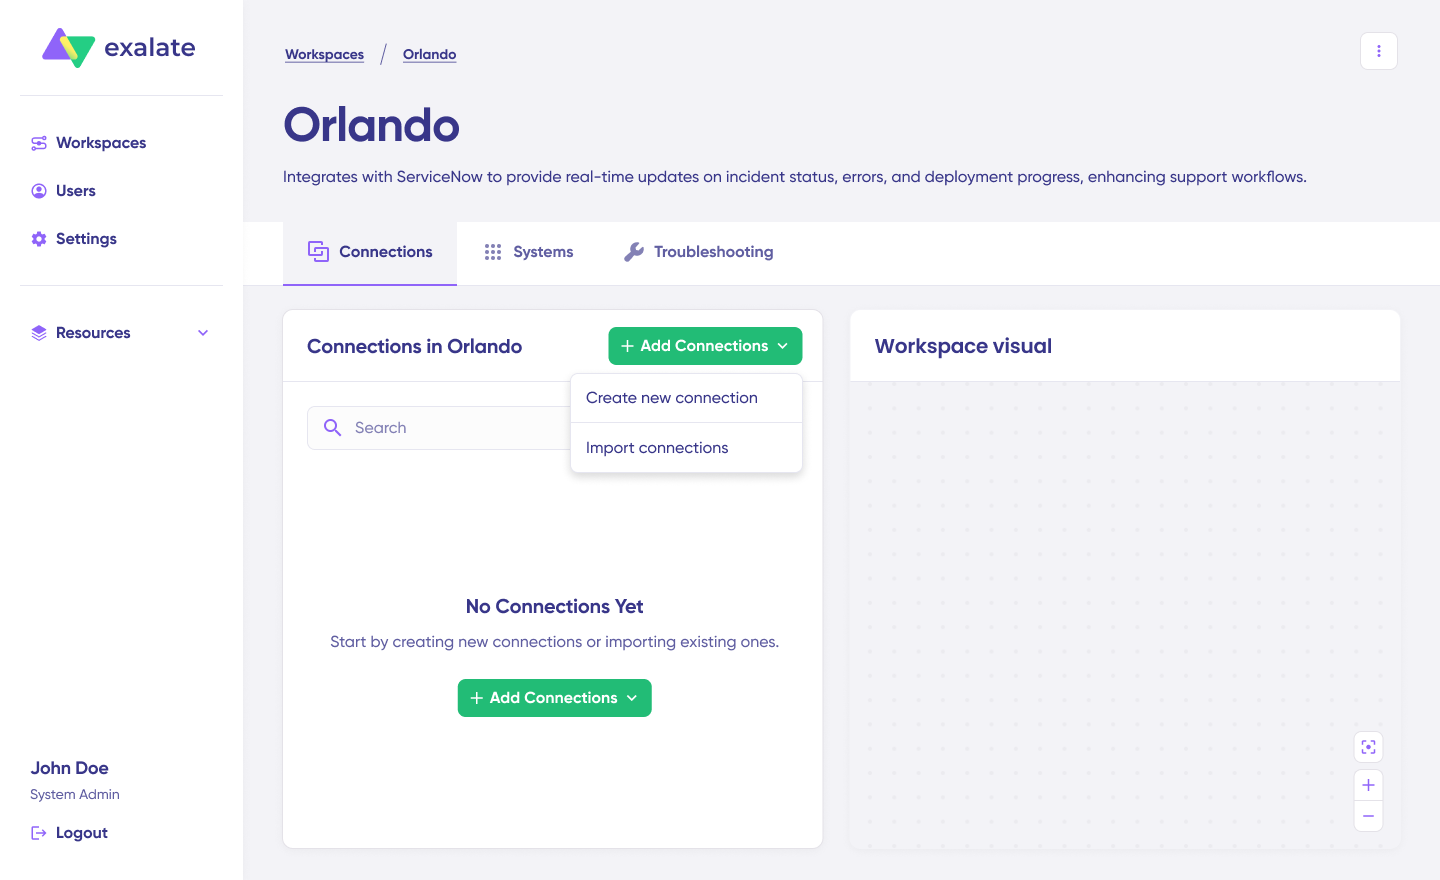
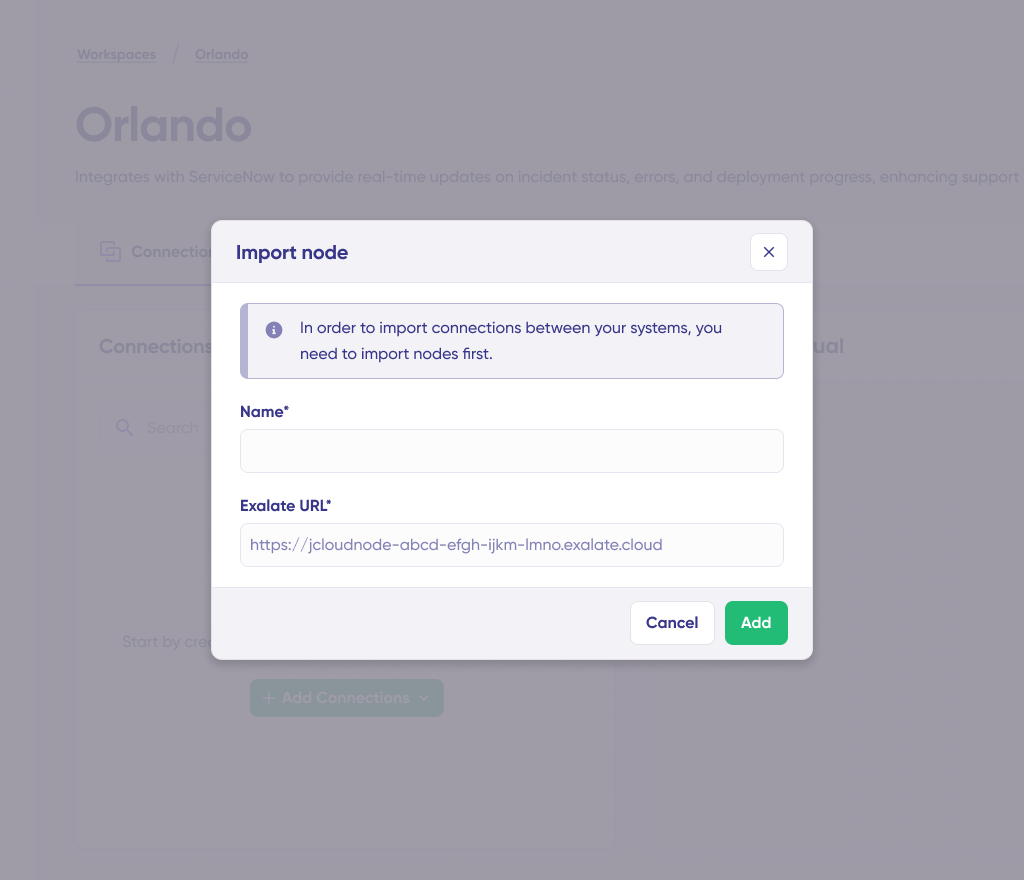
Creating Your First Connection
Once you have a workspace, you can start creating connections between Jira and ServiceNow. If you already have an existing workspace, you can view all your connections under the “Connections” tab, where you can edit connection settings and view other connection details.
Note: To create a connection, you’ll need an active Exalate account with at least one workspace and the access credentials for the systems you want to connect.
Jira ServiceNow Connection Setup Steps
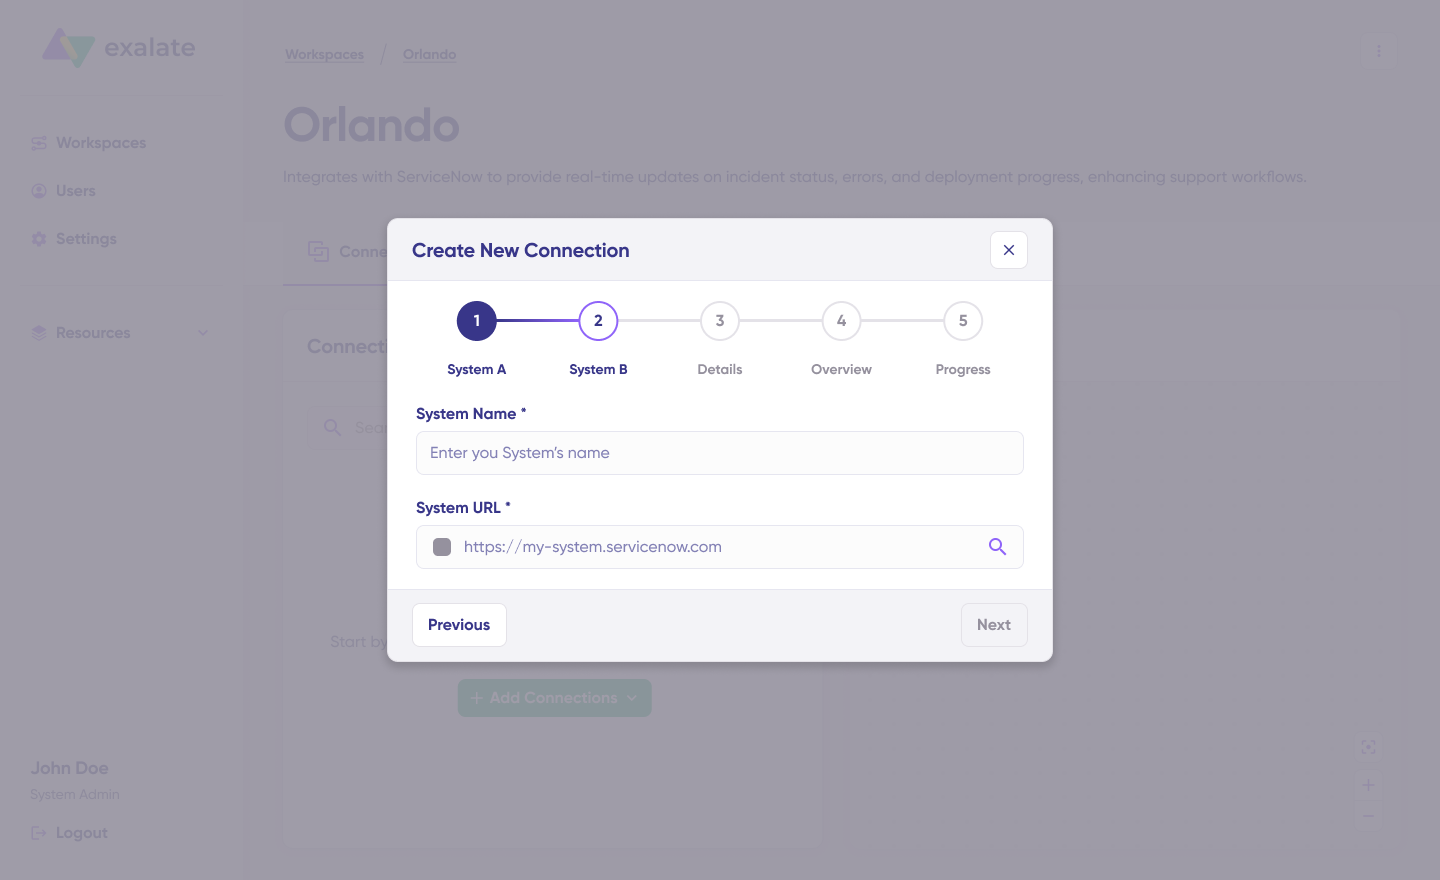
Click “+ Add connections” > “Create new connection”.
Enter the name for your first system (System A). You can name either Jira or ServiceNow as System A—it doesn’t matter which one goes first.
Enter the URL of your system. For example, if you start with ServiceNow, enter your ServiceNow instance URL.
Once you enter the URL, a validation check occurs. If your system is already part of the existing workspace, authentication happens automatically. If the system is part of a different workspace, it will be imported into your current workspace.
For new systems, you’ll need to enter your authentication details. ServiceNow uses Basic authentication, and Jira uses OAuth.
Complete the same setup process for the Jira side.
Give your connection a name and description.
Click “Next”.
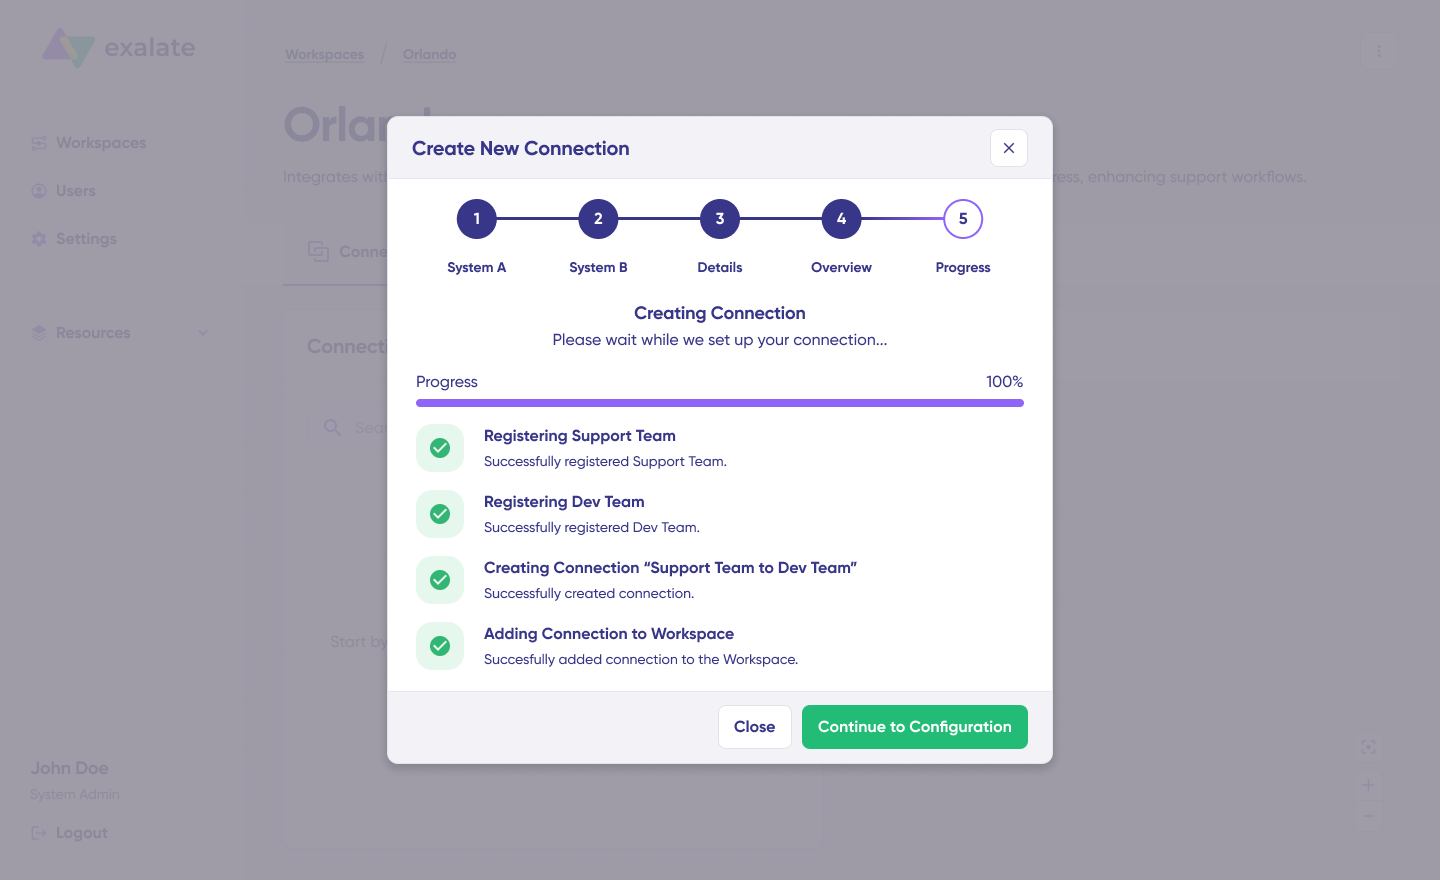
Review the details to ensure they are correct, then click “Create connection”.
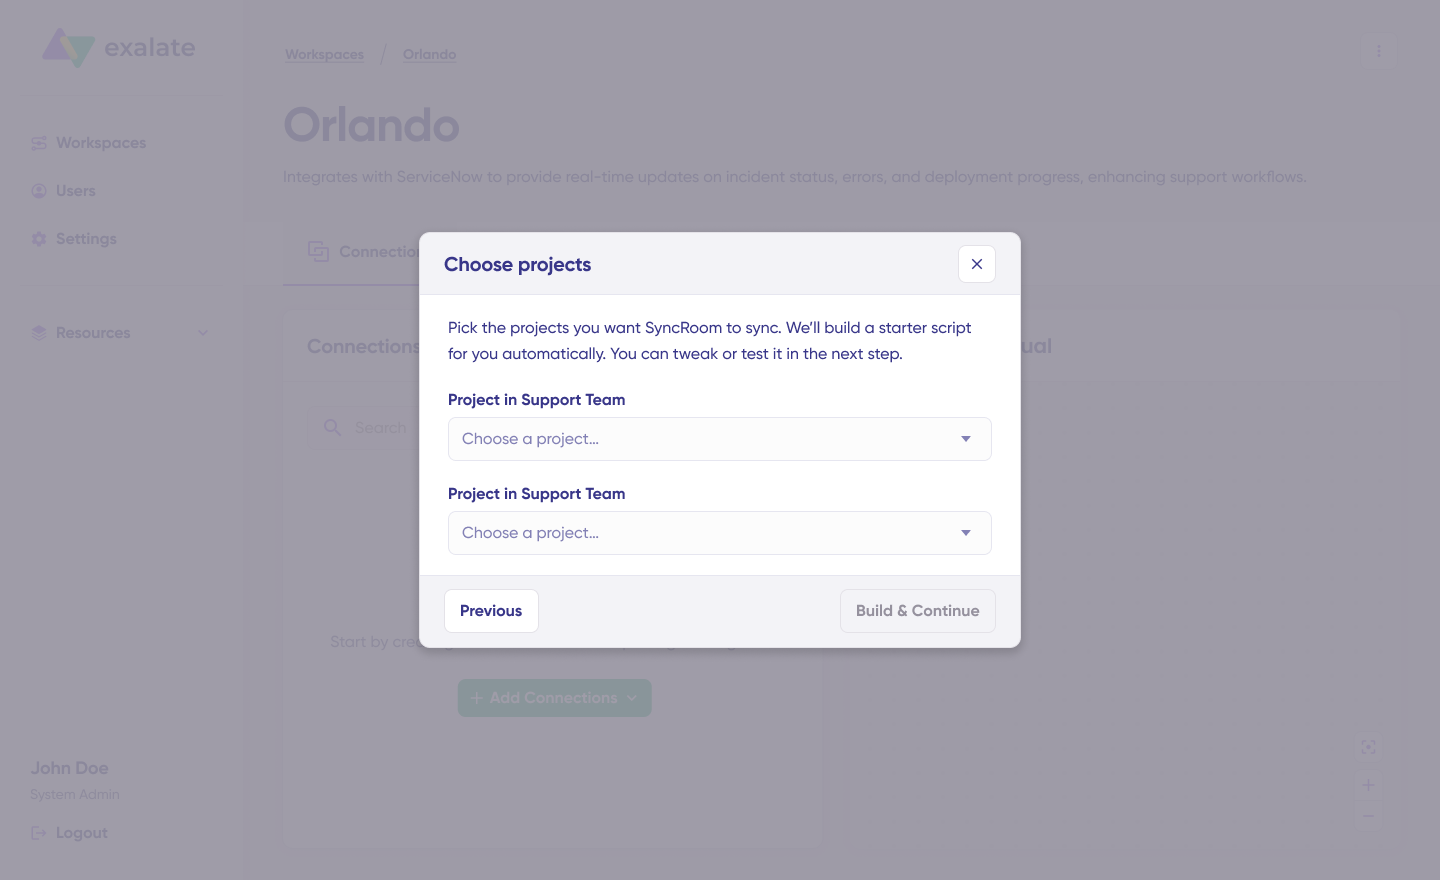
When the process is complete, select “Continue to configuration” and choose a Jira project you want to use for synchronization.
Then click “Build & continue”.
Jira ServiceNow Configuration Options
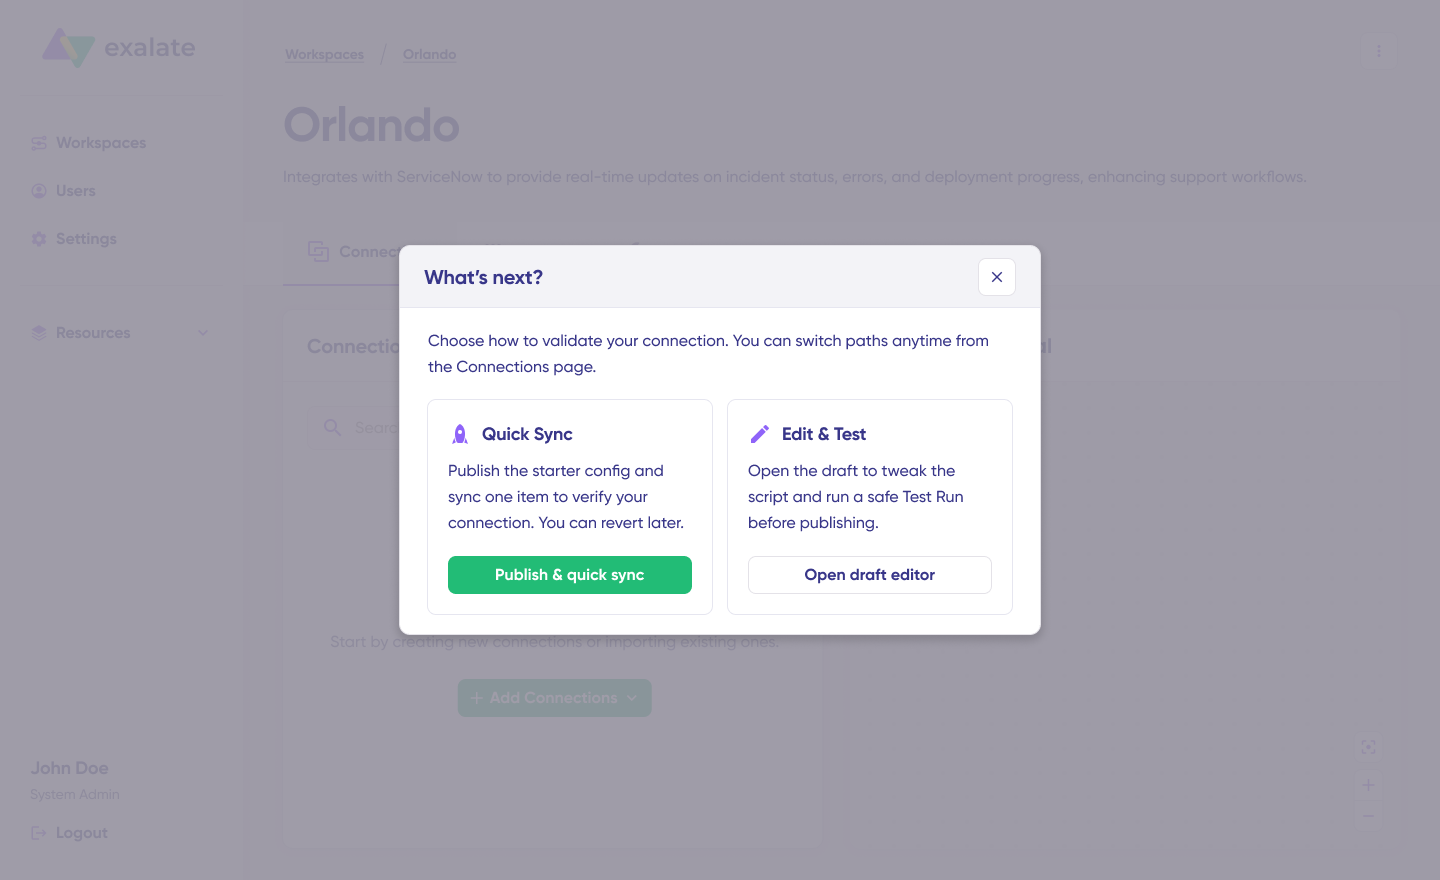
After creating your connection, you have two configuration options: “Quick Sync” and “Edit & Test”.
Let’s explore both.
Quick Sync: Publish & Quick Sync
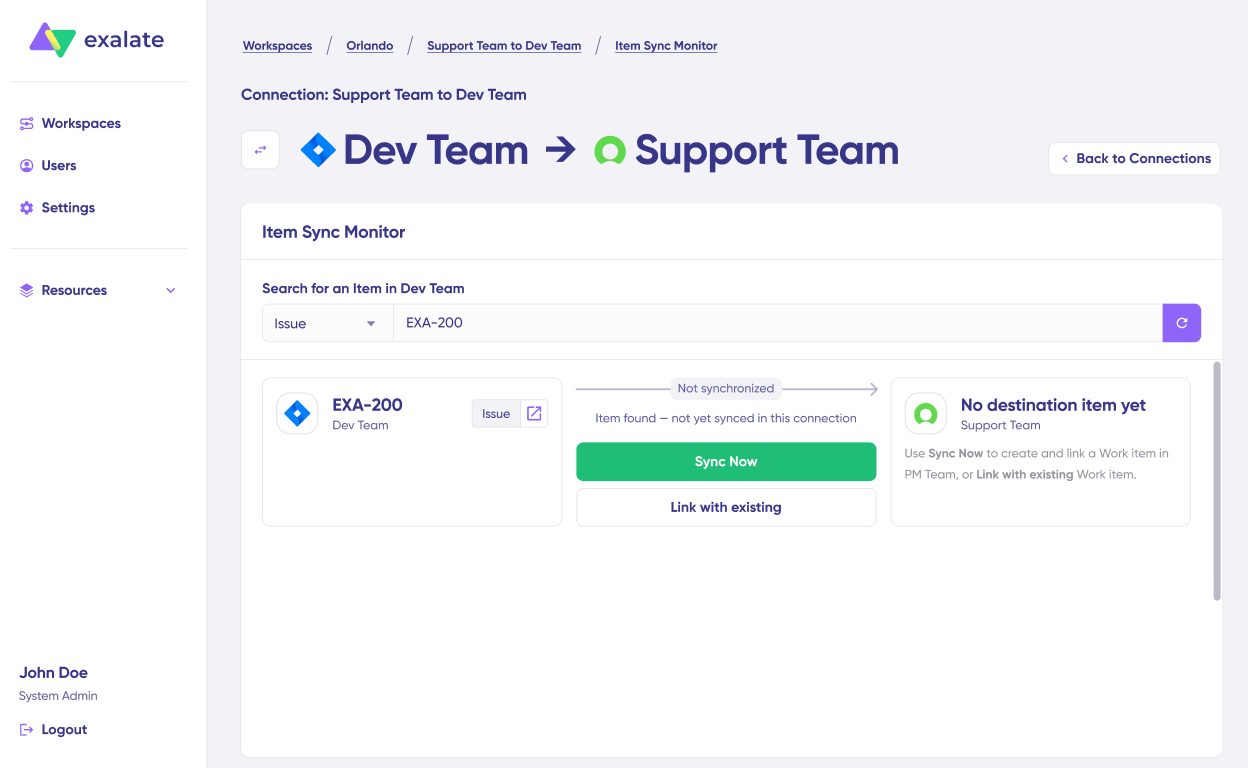
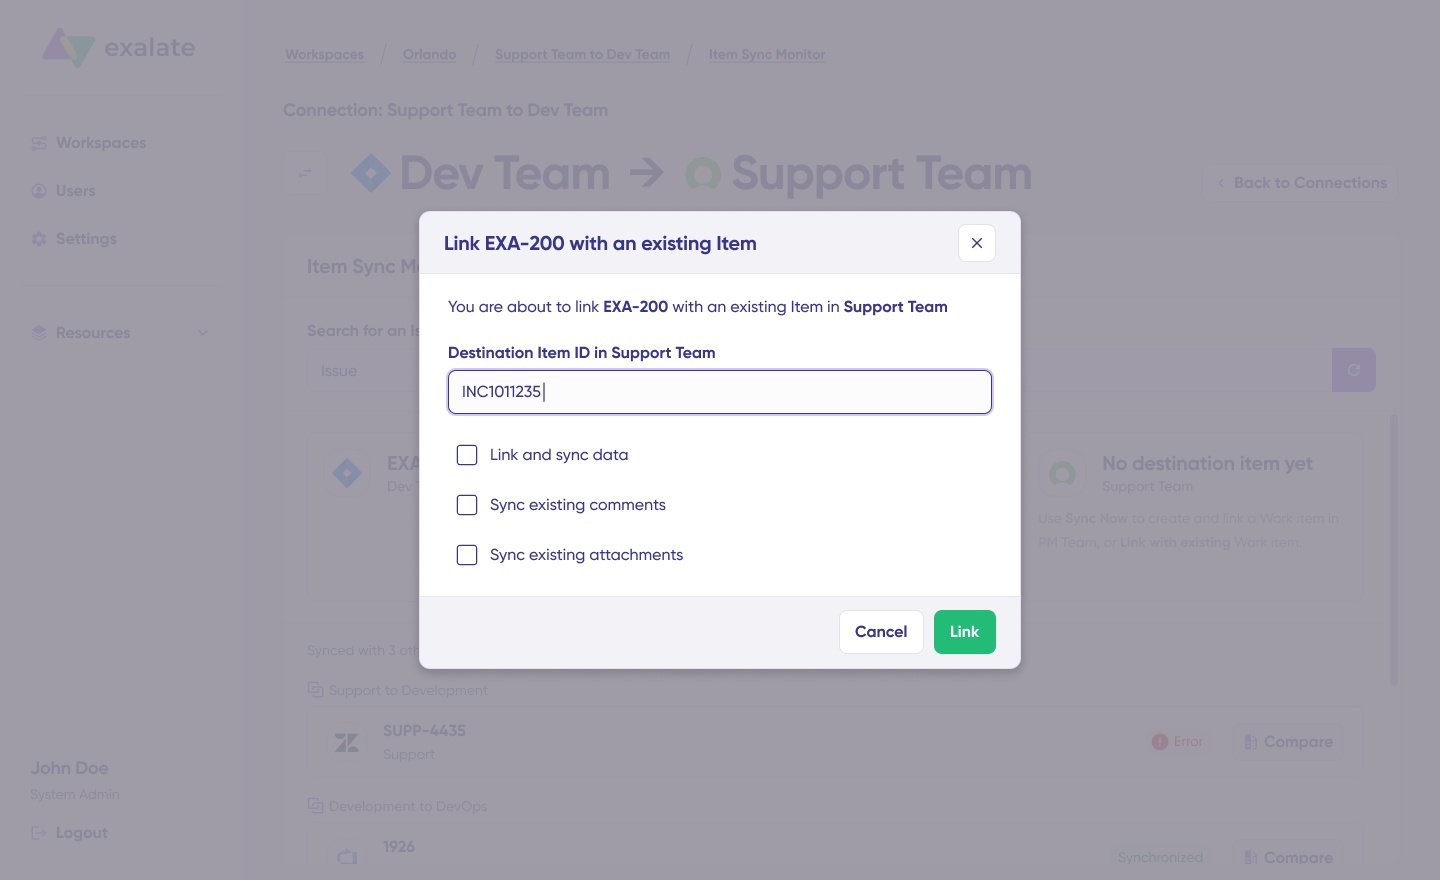
This option allows you to sync one item between Jira and ServiceNow to verify that your connection works properly. This is an optional step, but recommended for initial testing.
Under the “Item sync monitor,” enter the work item key in Jira or the incident number in ServiceNow.
To sync the first item, click “Sync Now”. To link two existing items, click “Link with existing”.
You’ll receive status updates while the items sync, and once the sync is complete, you can view both synced issues by opening them in a new window.
You can also compare how the synced items will look and how the changes will be applied.
Edit & Test: Open Draft Editor
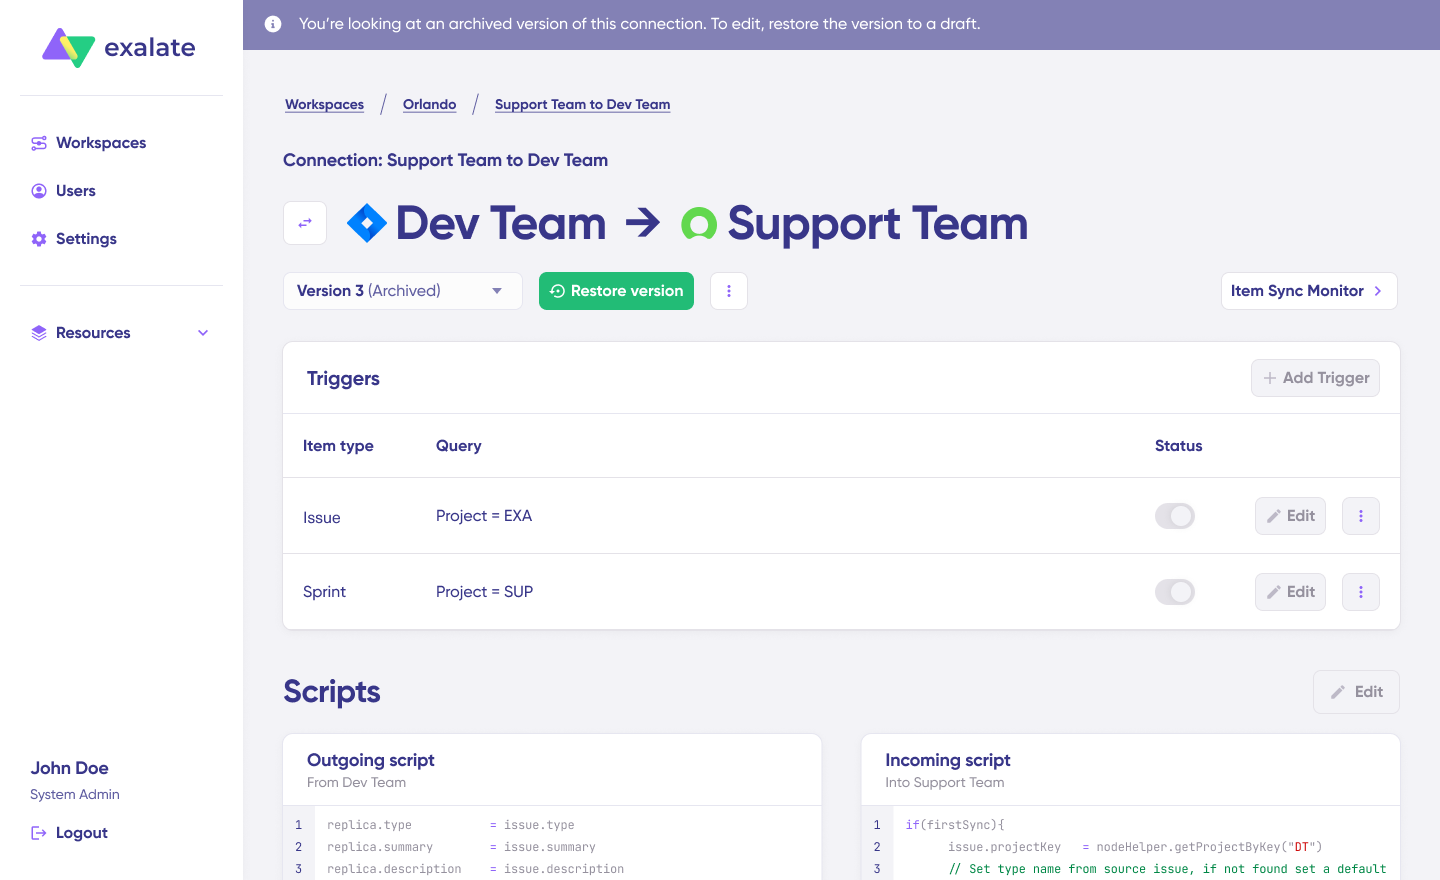
To start making changes to your sync configuration, click “Create a new version” or select “Open latest draft”.
This ensures you don’t accidentally modify the existing configuration. Changes in the draft are saved automatically.
Click the “Edit” button to open the editor and modify the sync rules.
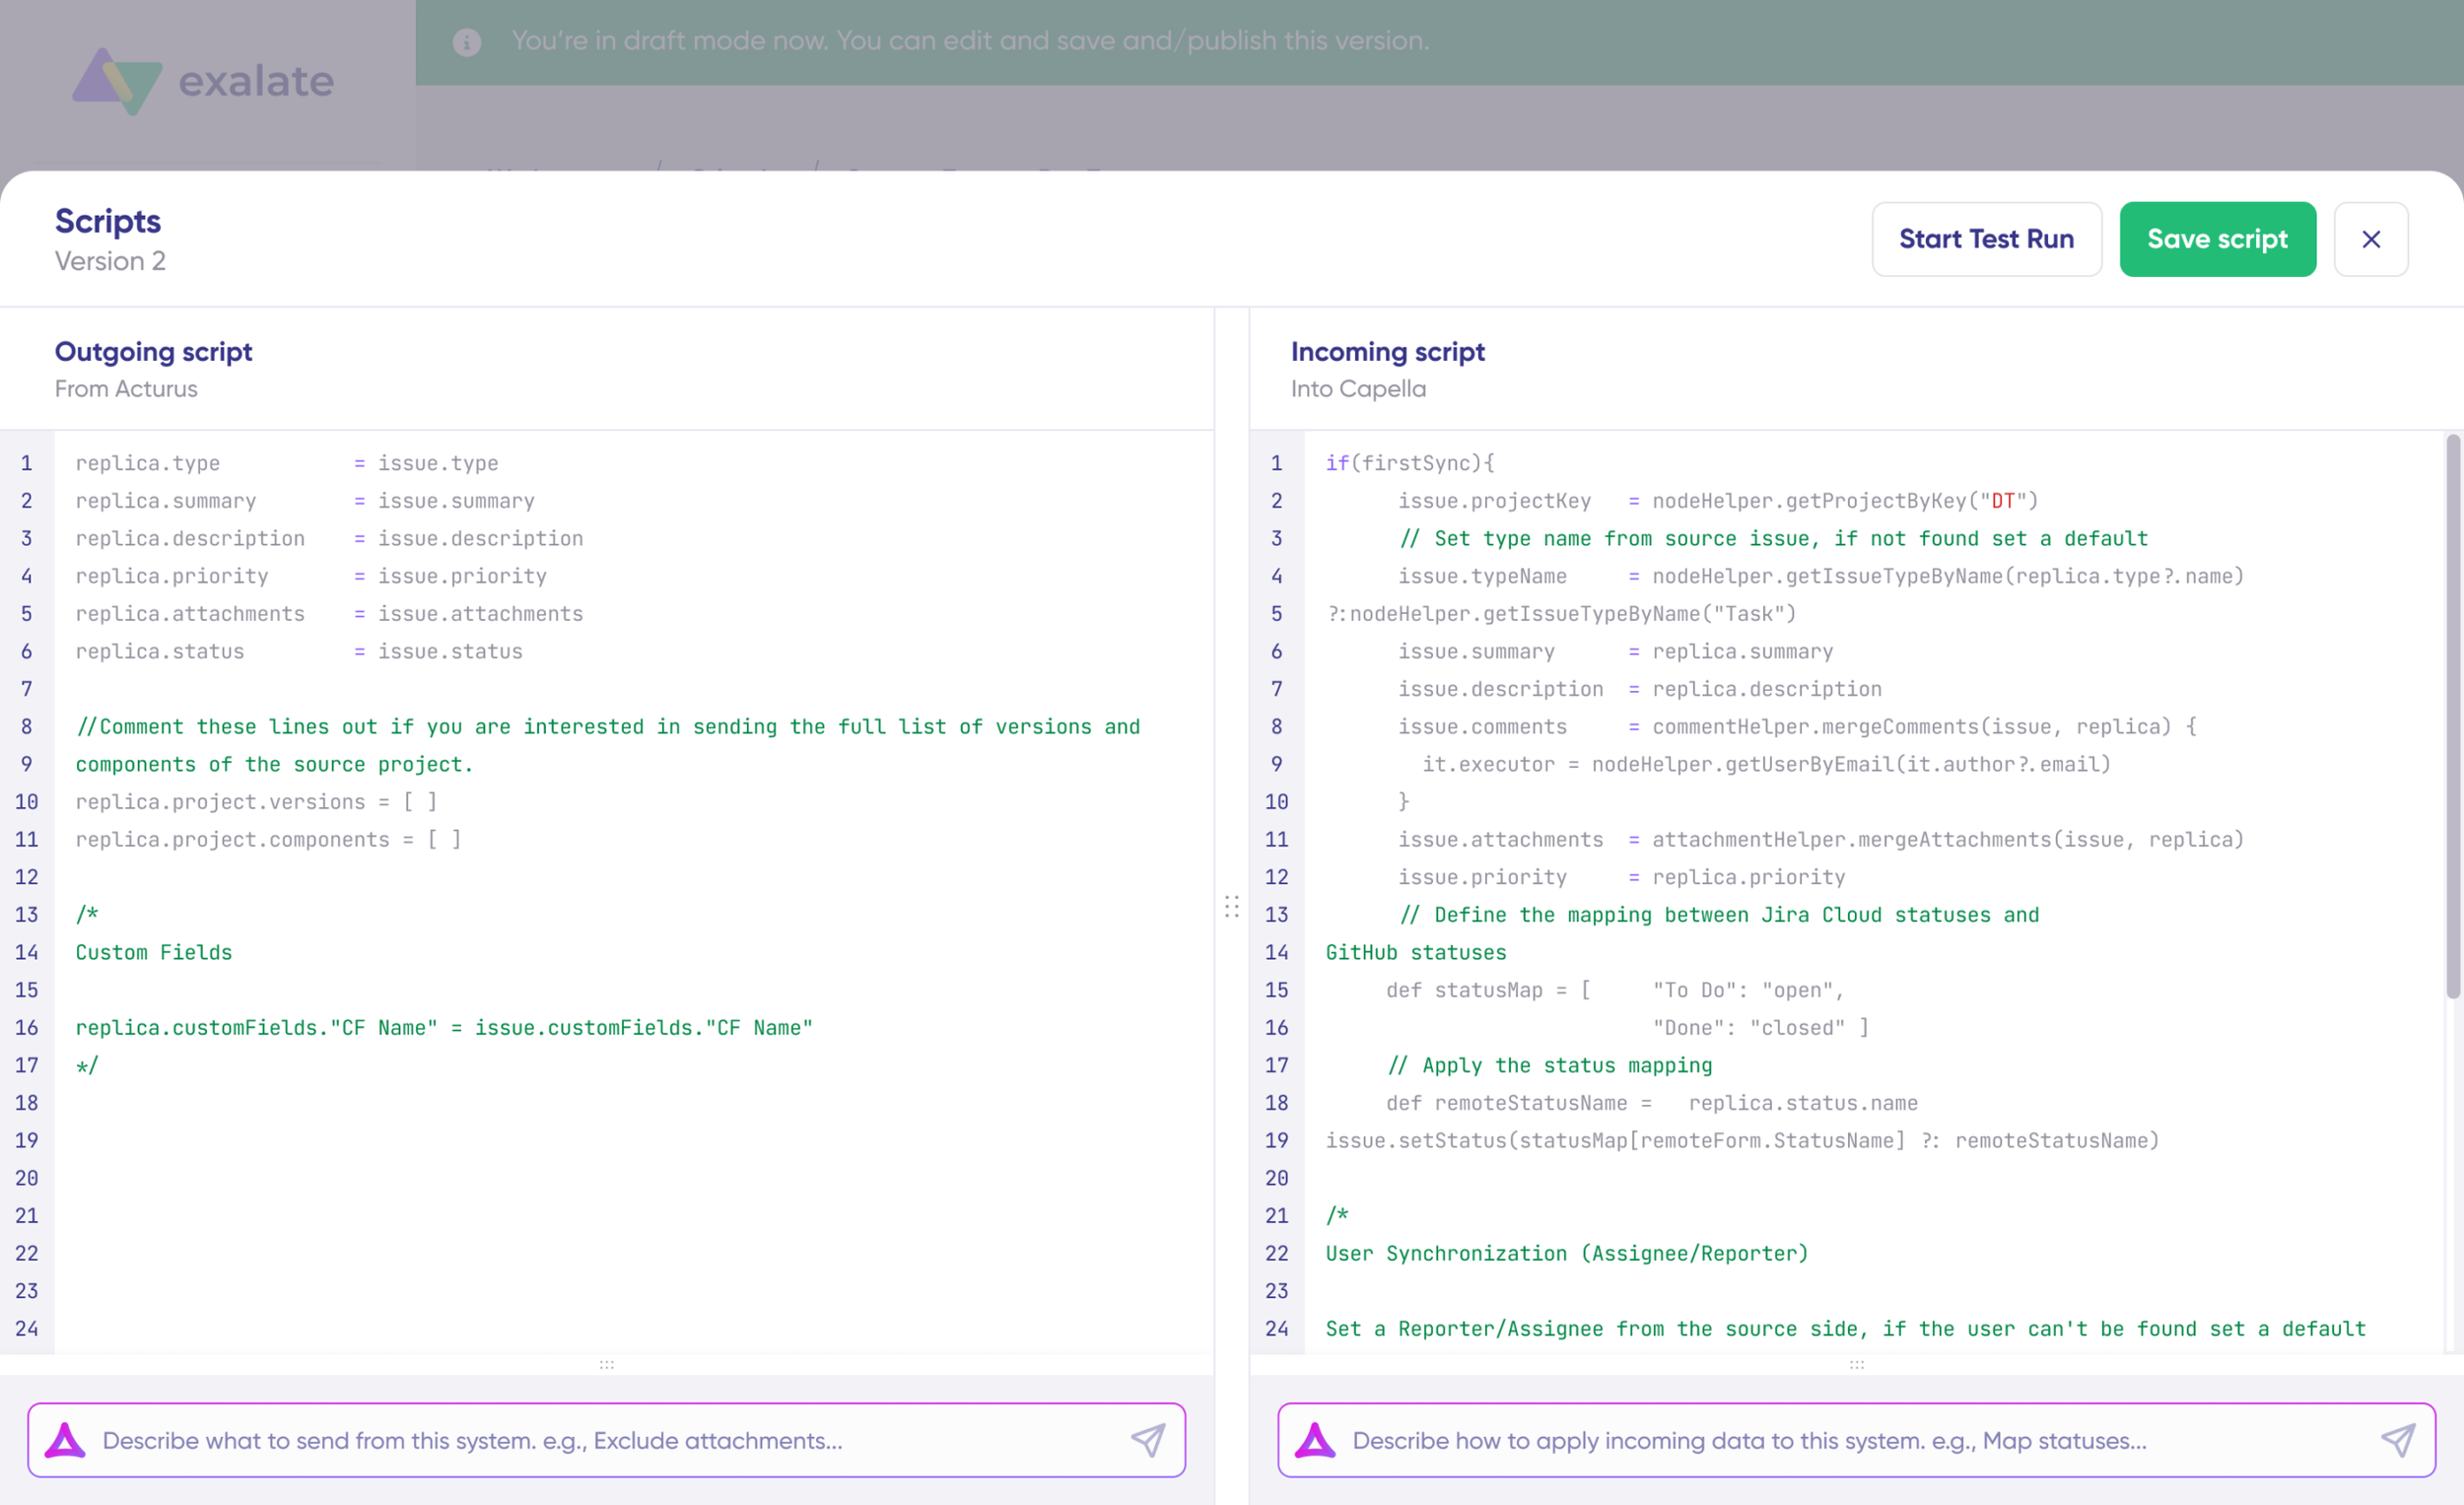
Understanding Sync Rules
Sync rules are based on Groovy scripts. With these scripts, you can add custom data logic and mapping, along with conditional flows, allowing you to adapt for any complex or advanced use cases and workflows.
The direction of the sync can be changed by clicking the two arrows next to the connection name.
The scripts are divided into incoming and outgoing scripts:
Outgoing script: If the sync direction is from Jira to ServiceNow, the outgoing script will hold the values passed from Jira to ServiceNow.
Incoming script: The incoming script defines how the values coming from Jira are mapped in ServiceNow.
These scripts will be reversed if the direction changes.
Replica works like a message payload and holds the actual data passed between the synced entities. It exists in JSON format.
To sync new values, you can enter the sync script yourself if you are familiar with Groovy.
To stop something from syncing (for instance, attachments from Jira to ServiceNow), simply remove that script line from the corresponding script.
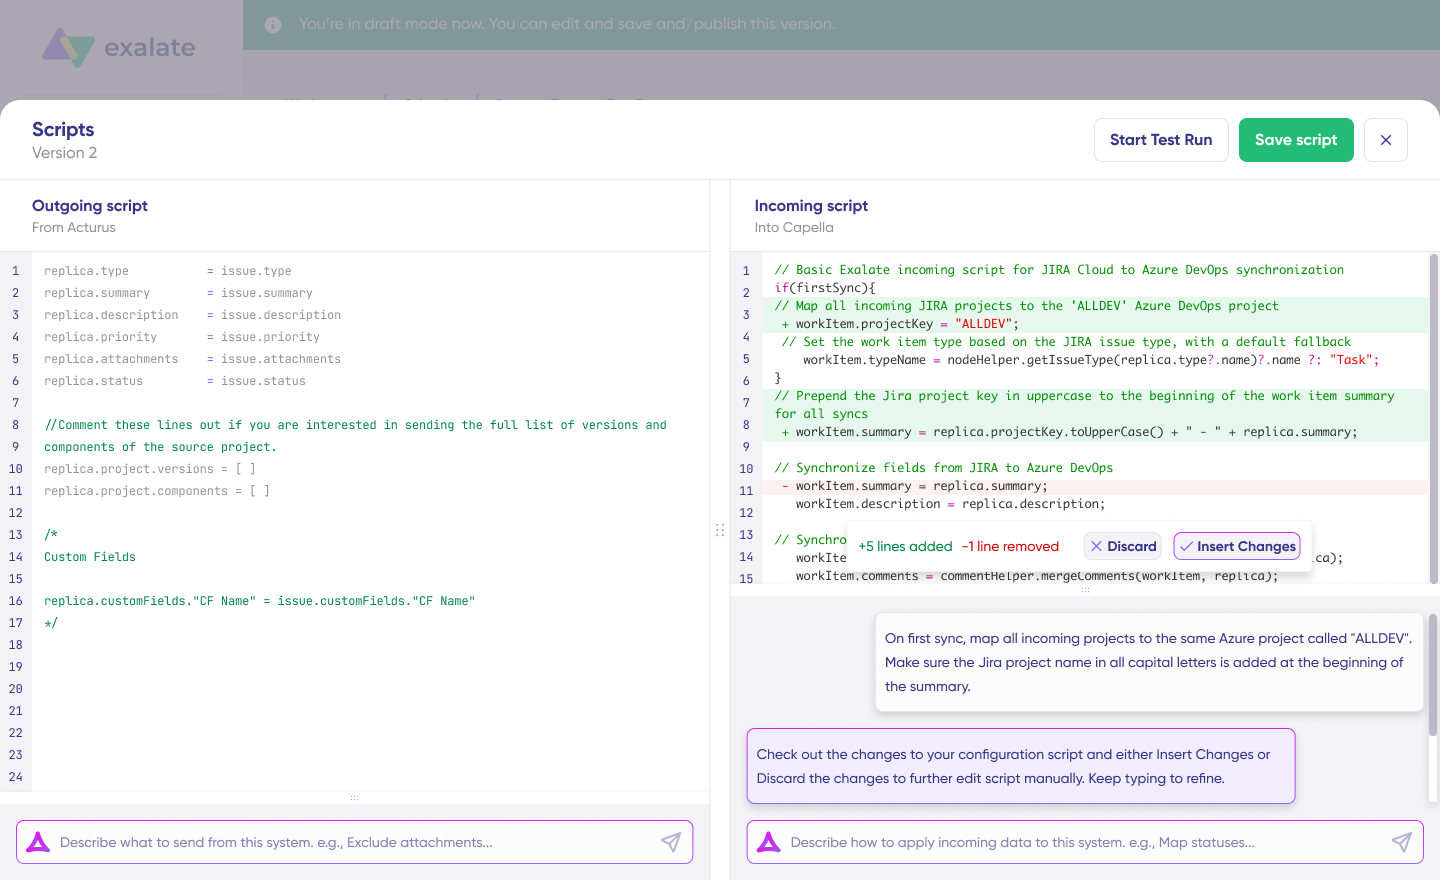
AI-Assisted Configuration
To save time and simplify the scripting process, you can use Exalate’s AI-assisted configuration feature called Aida to generate sync scripts.
Aida is available in both incoming and outgoing script sections, so choose the appropriate side accordingly.
Aida helps you in two ways:
For Outgoing scripts: Describe what data should leave your system. For example, “Exclude attachments” or “Only sync high-priority issues.”
For Incoming scripts: Describe how incoming data should be applied to your system. For example, “Map statuses” or “Set a default assignee if the user can’t be found.”
Based on Exalate’s scripting API and your existing scripts, Aida generates working Groovy scripts with proper field mappings for you.
Once Aida finishes drafting your script, review the suggested changes. Green highlights indicate new lines that will be added, while red highlights show lines that will be removed from your script. You can choose to “Insert” or “Discard” Aida’s suggestions.
The outgoing and incoming scripts work independently, as does Aida, so maintain separate context and direction for each prompt.
Note: While Aida is helpful, like any AI tool, please review the generated code before applying it.
TestRun: Validate Before Production
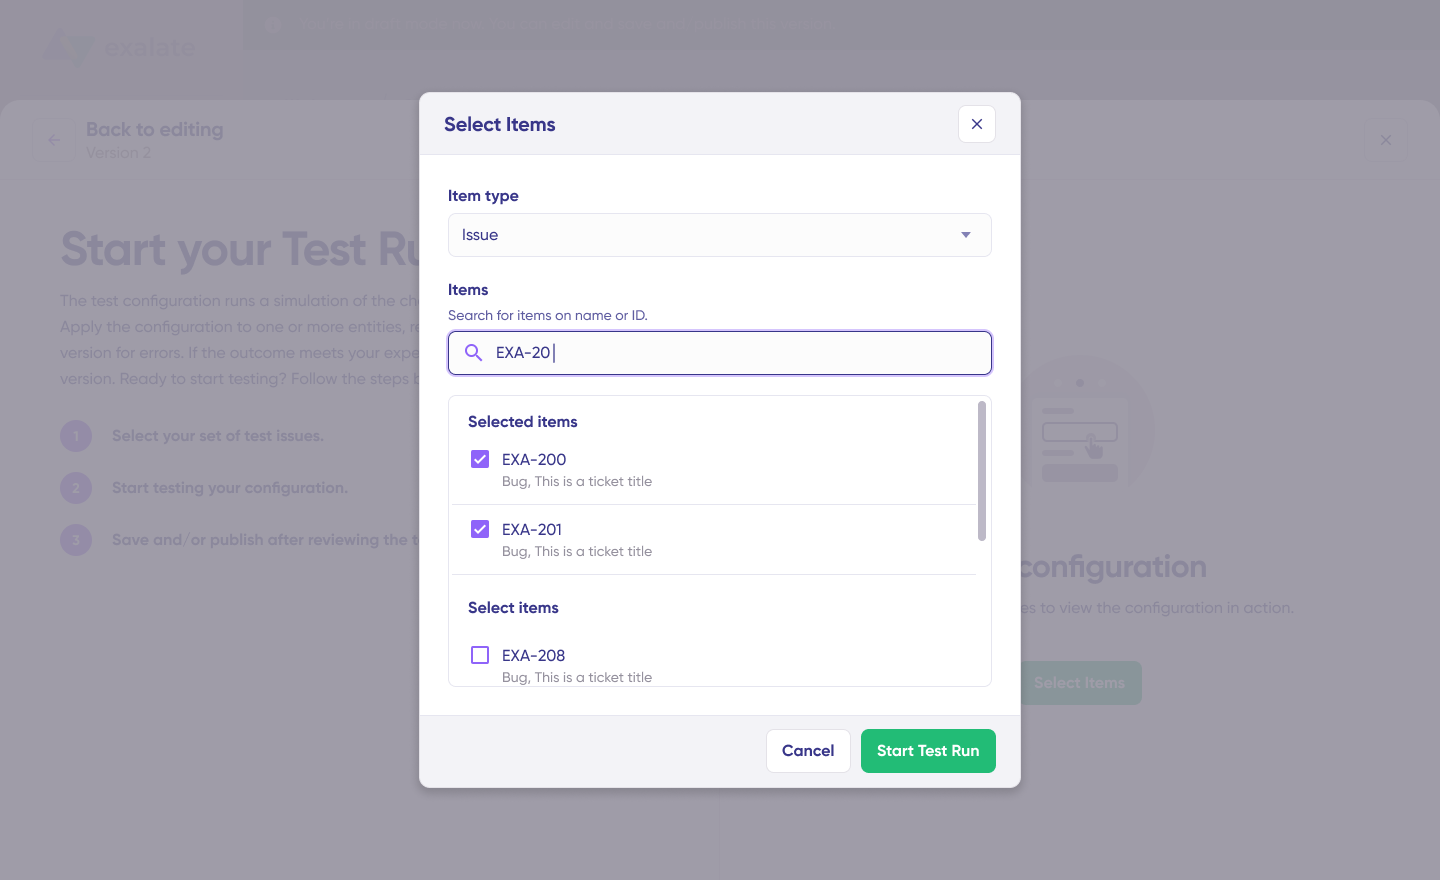
Once your sync scripts are ready, you can choose to “Save script” or proceed to test them using the “Start Test Run” option.
To test the configuration, select the items you want to apply the sync to. You can select multiple items. Once selected, click “Start Test Run”. You can now view all the incoming and outgoing replicas for each item you selected in their respective tabs.
Review how the sync configuration will be applied to your items, preview the replica, and verify that the field mappings look correct. If needed, go back, adjust the scripts, and test again. Deploy only when you’re confident everything works correctly.
This safety net prevents errors from affecting live data.
Once everything matches your needs, click “Publish Version” to apply the updated configuration to your live synchronization.
All versions for a connection are available in the “Version” dropdown. Versions can be either “Active”, in “Draft” (editable), or “Archived”.
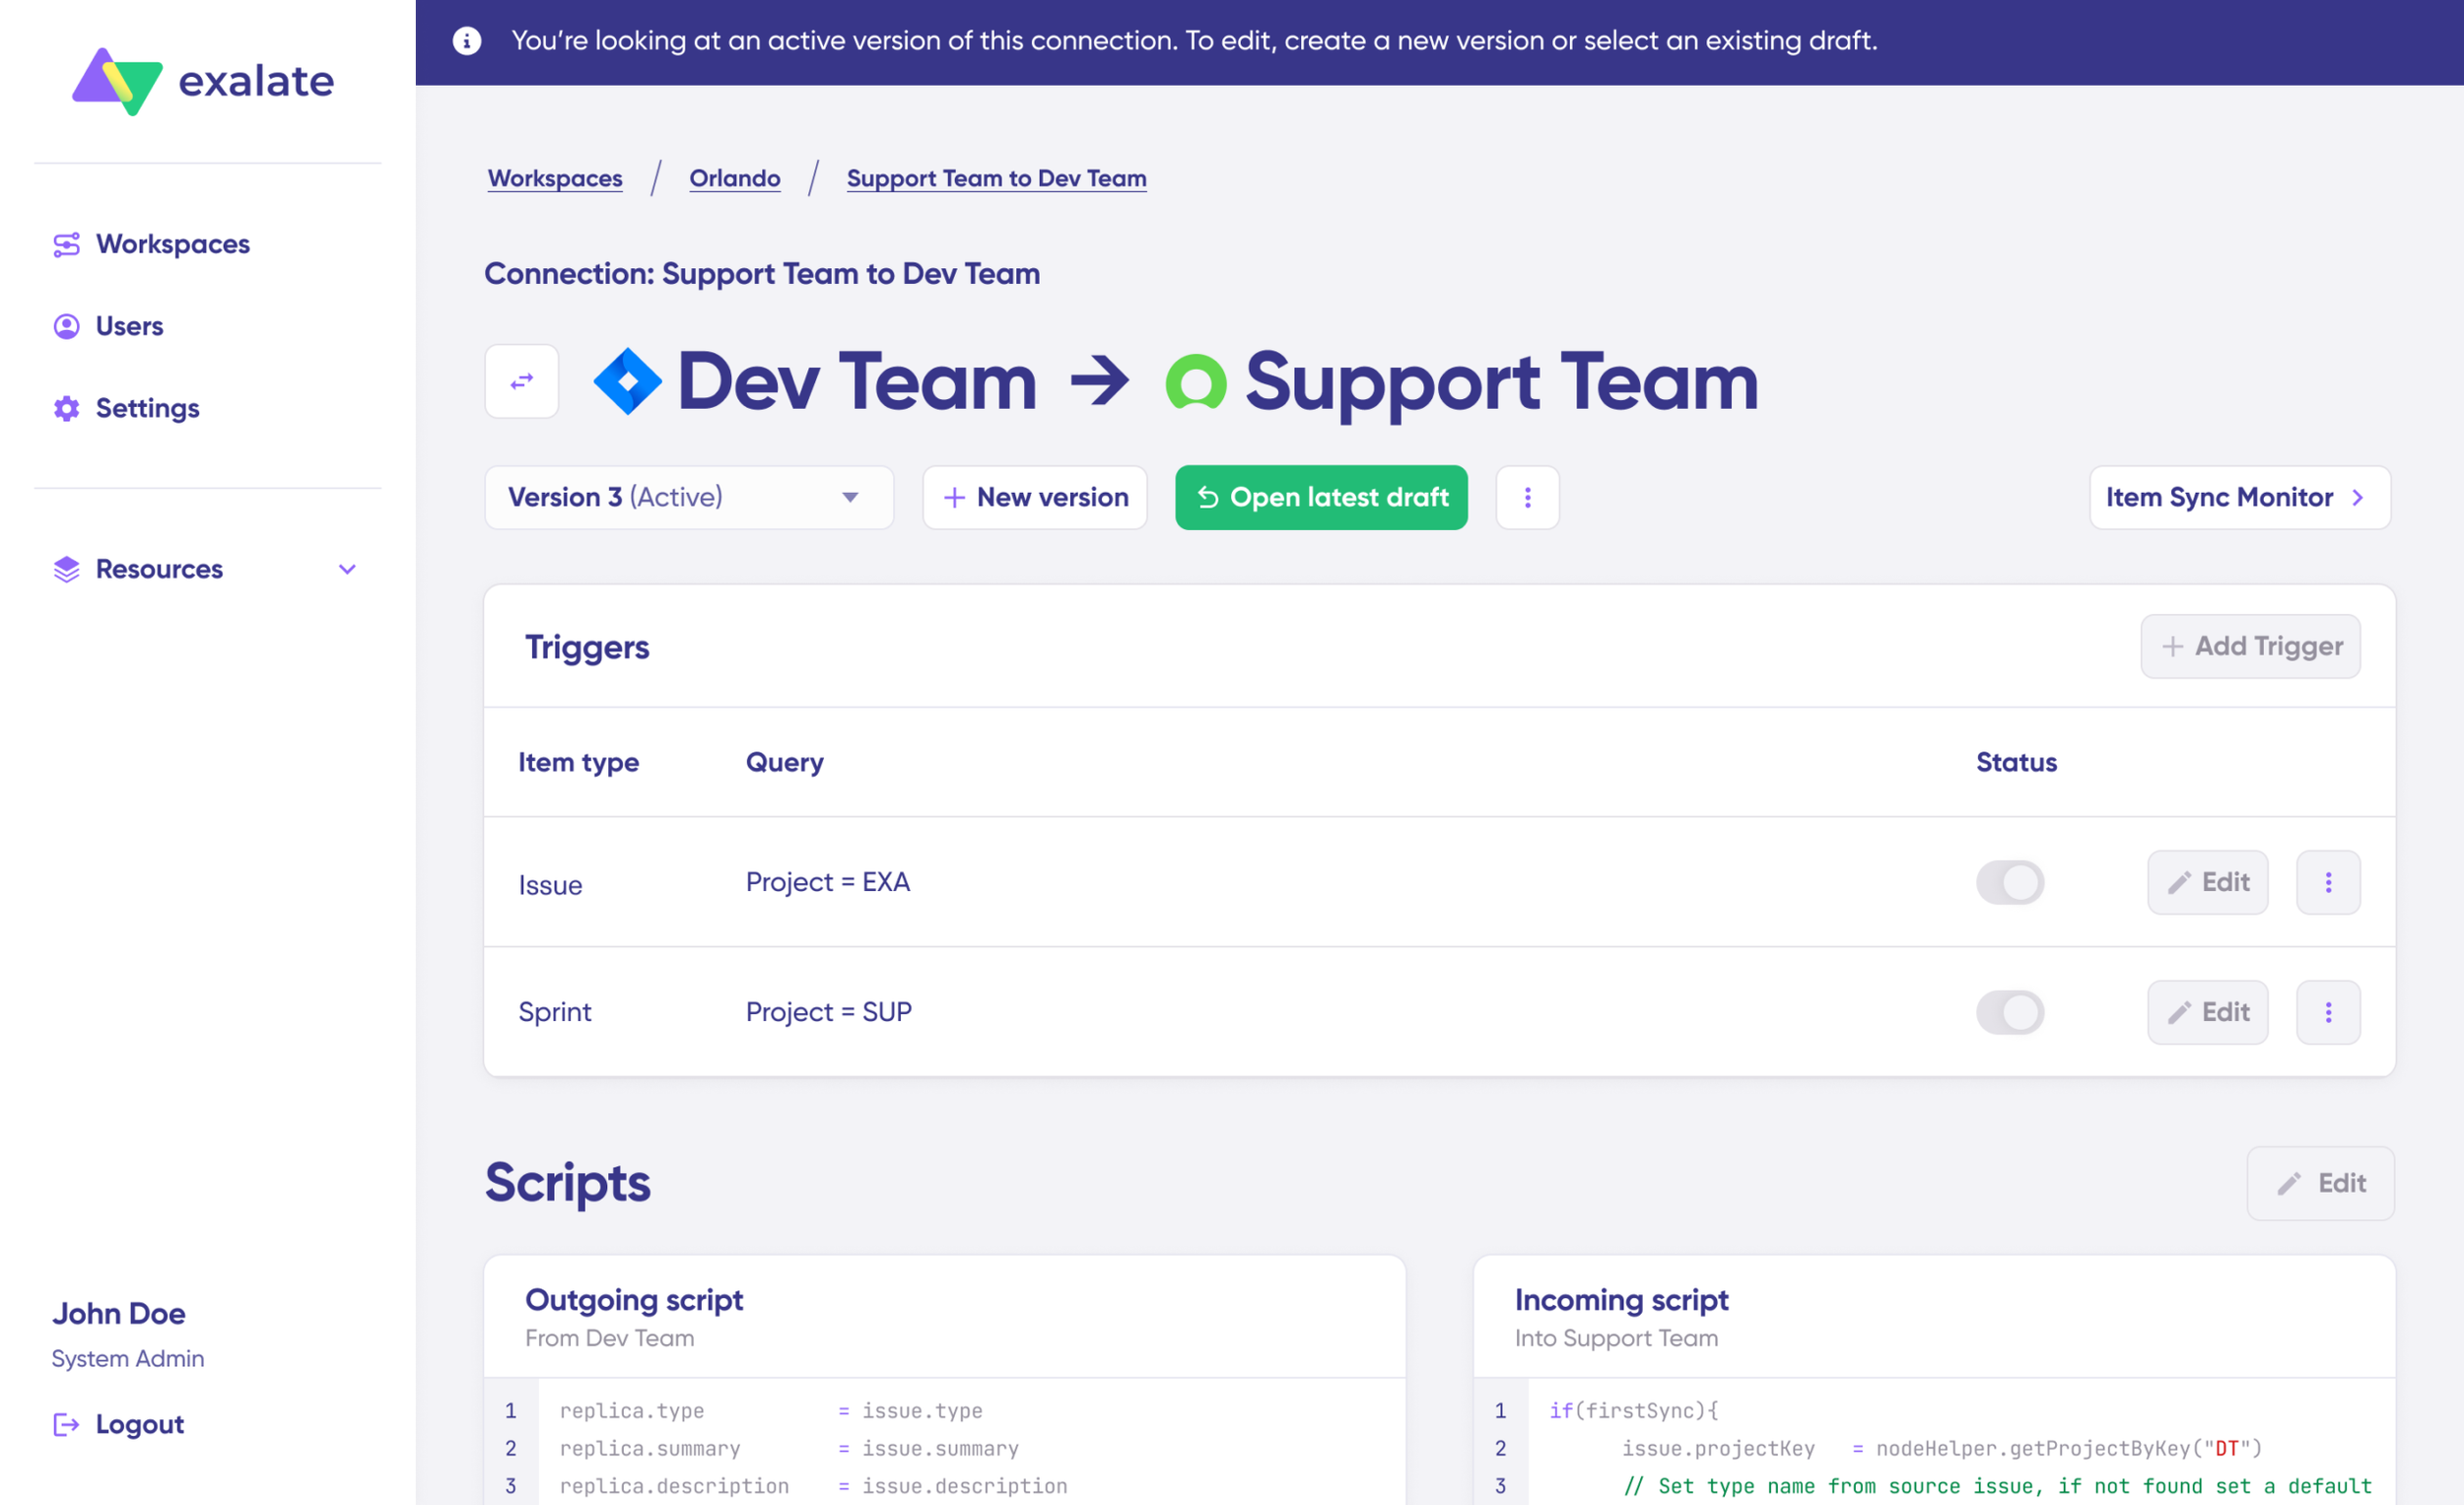
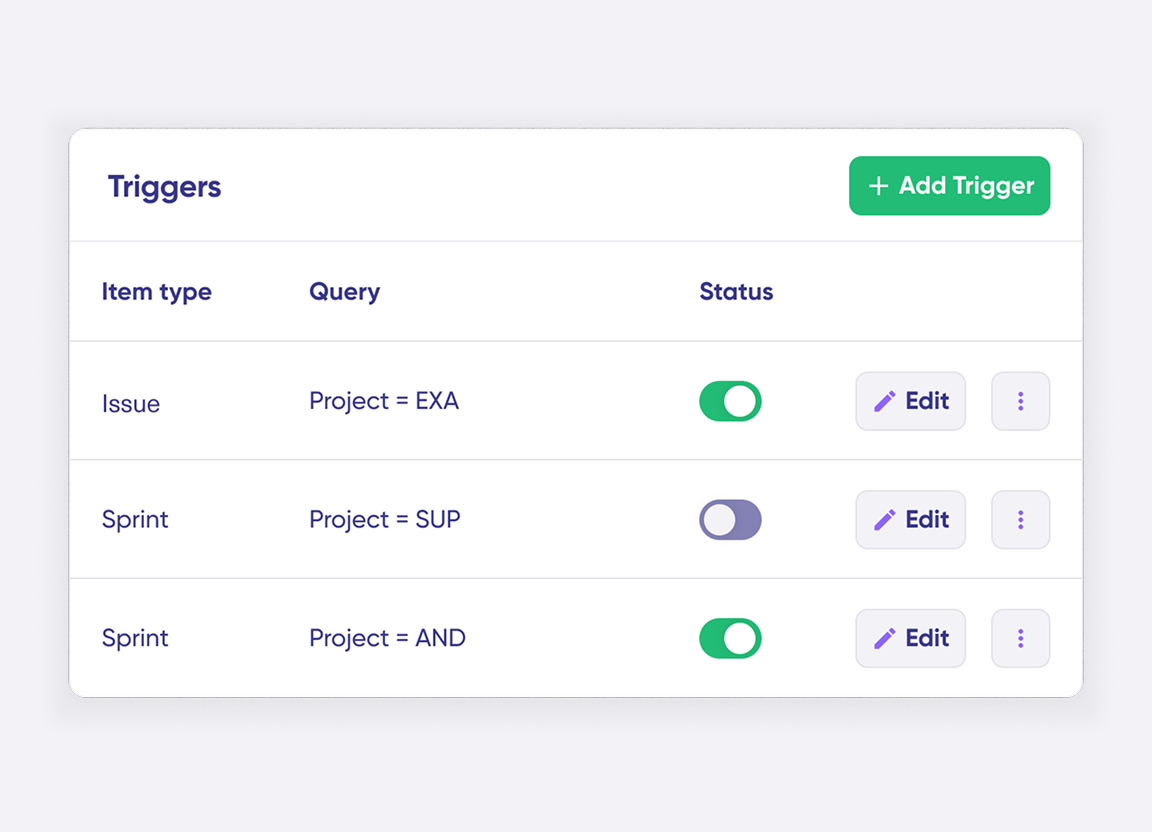
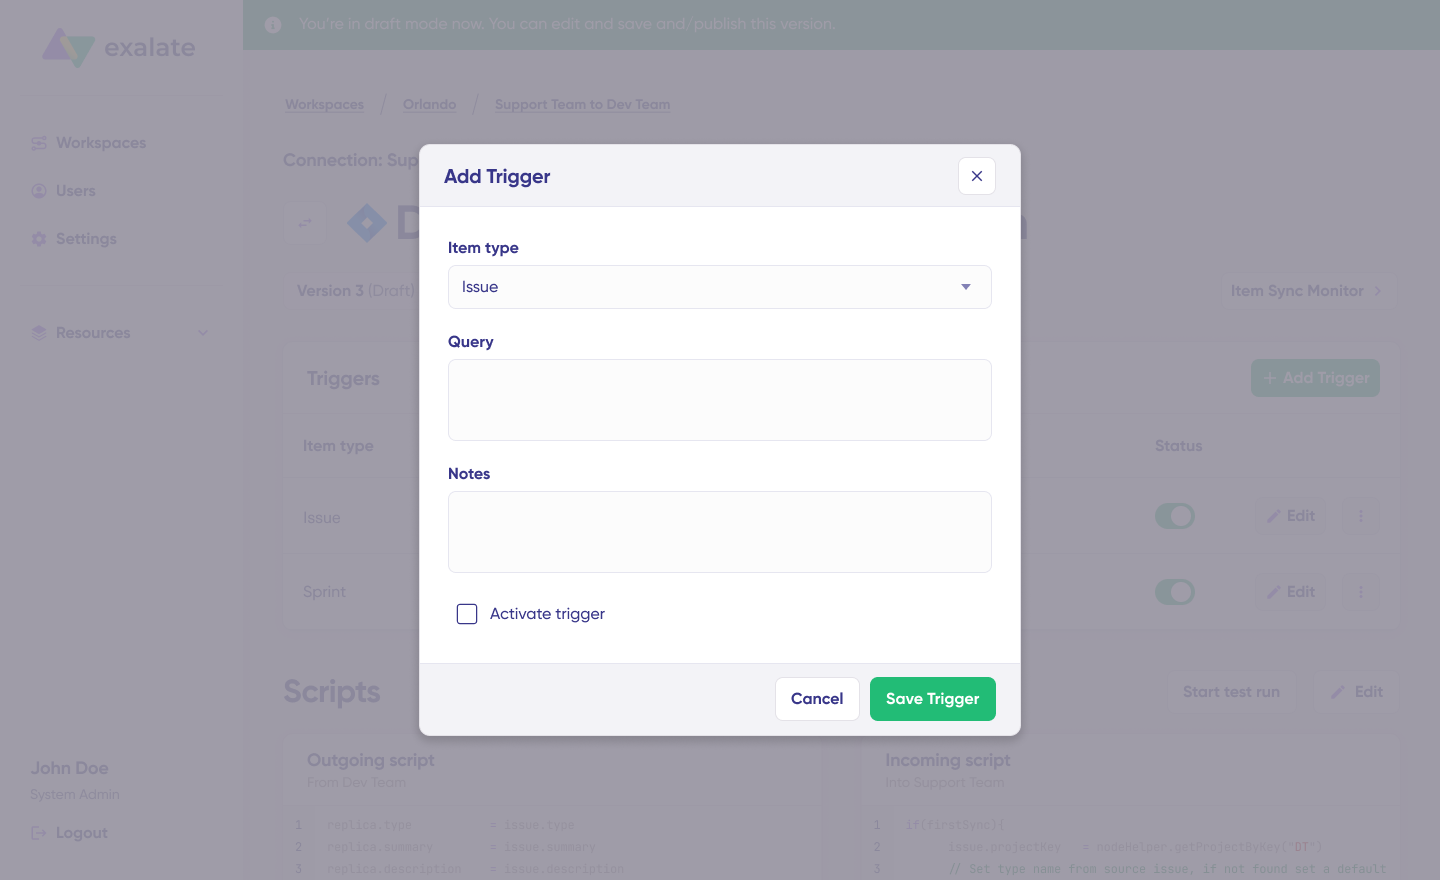
Adding Triggers
To start your sync automatically, it’s important to add triggers, which are conditions or filters you apply to specific items. For instance, you can sync all Jira work items that have a label “dev”, or sync all incidents in ServiceNow that belong to a specific assignment group.
Click the “+ Add trigger” button to start creating triggers. These triggers are platform-specific:
For Jira: You can use Jira Query Language (JQL) to specify conditions for work items or sprints.
For ServiceNow: You can use the advanced search syntax to apply the trigger to incidents, problems, change requests, etc.
Save your changes by publishing them.
Deploy and Monitor
That’s it! Your first synchronization will start automatically based on the sync rules and triggers you have set. Happy syncing!
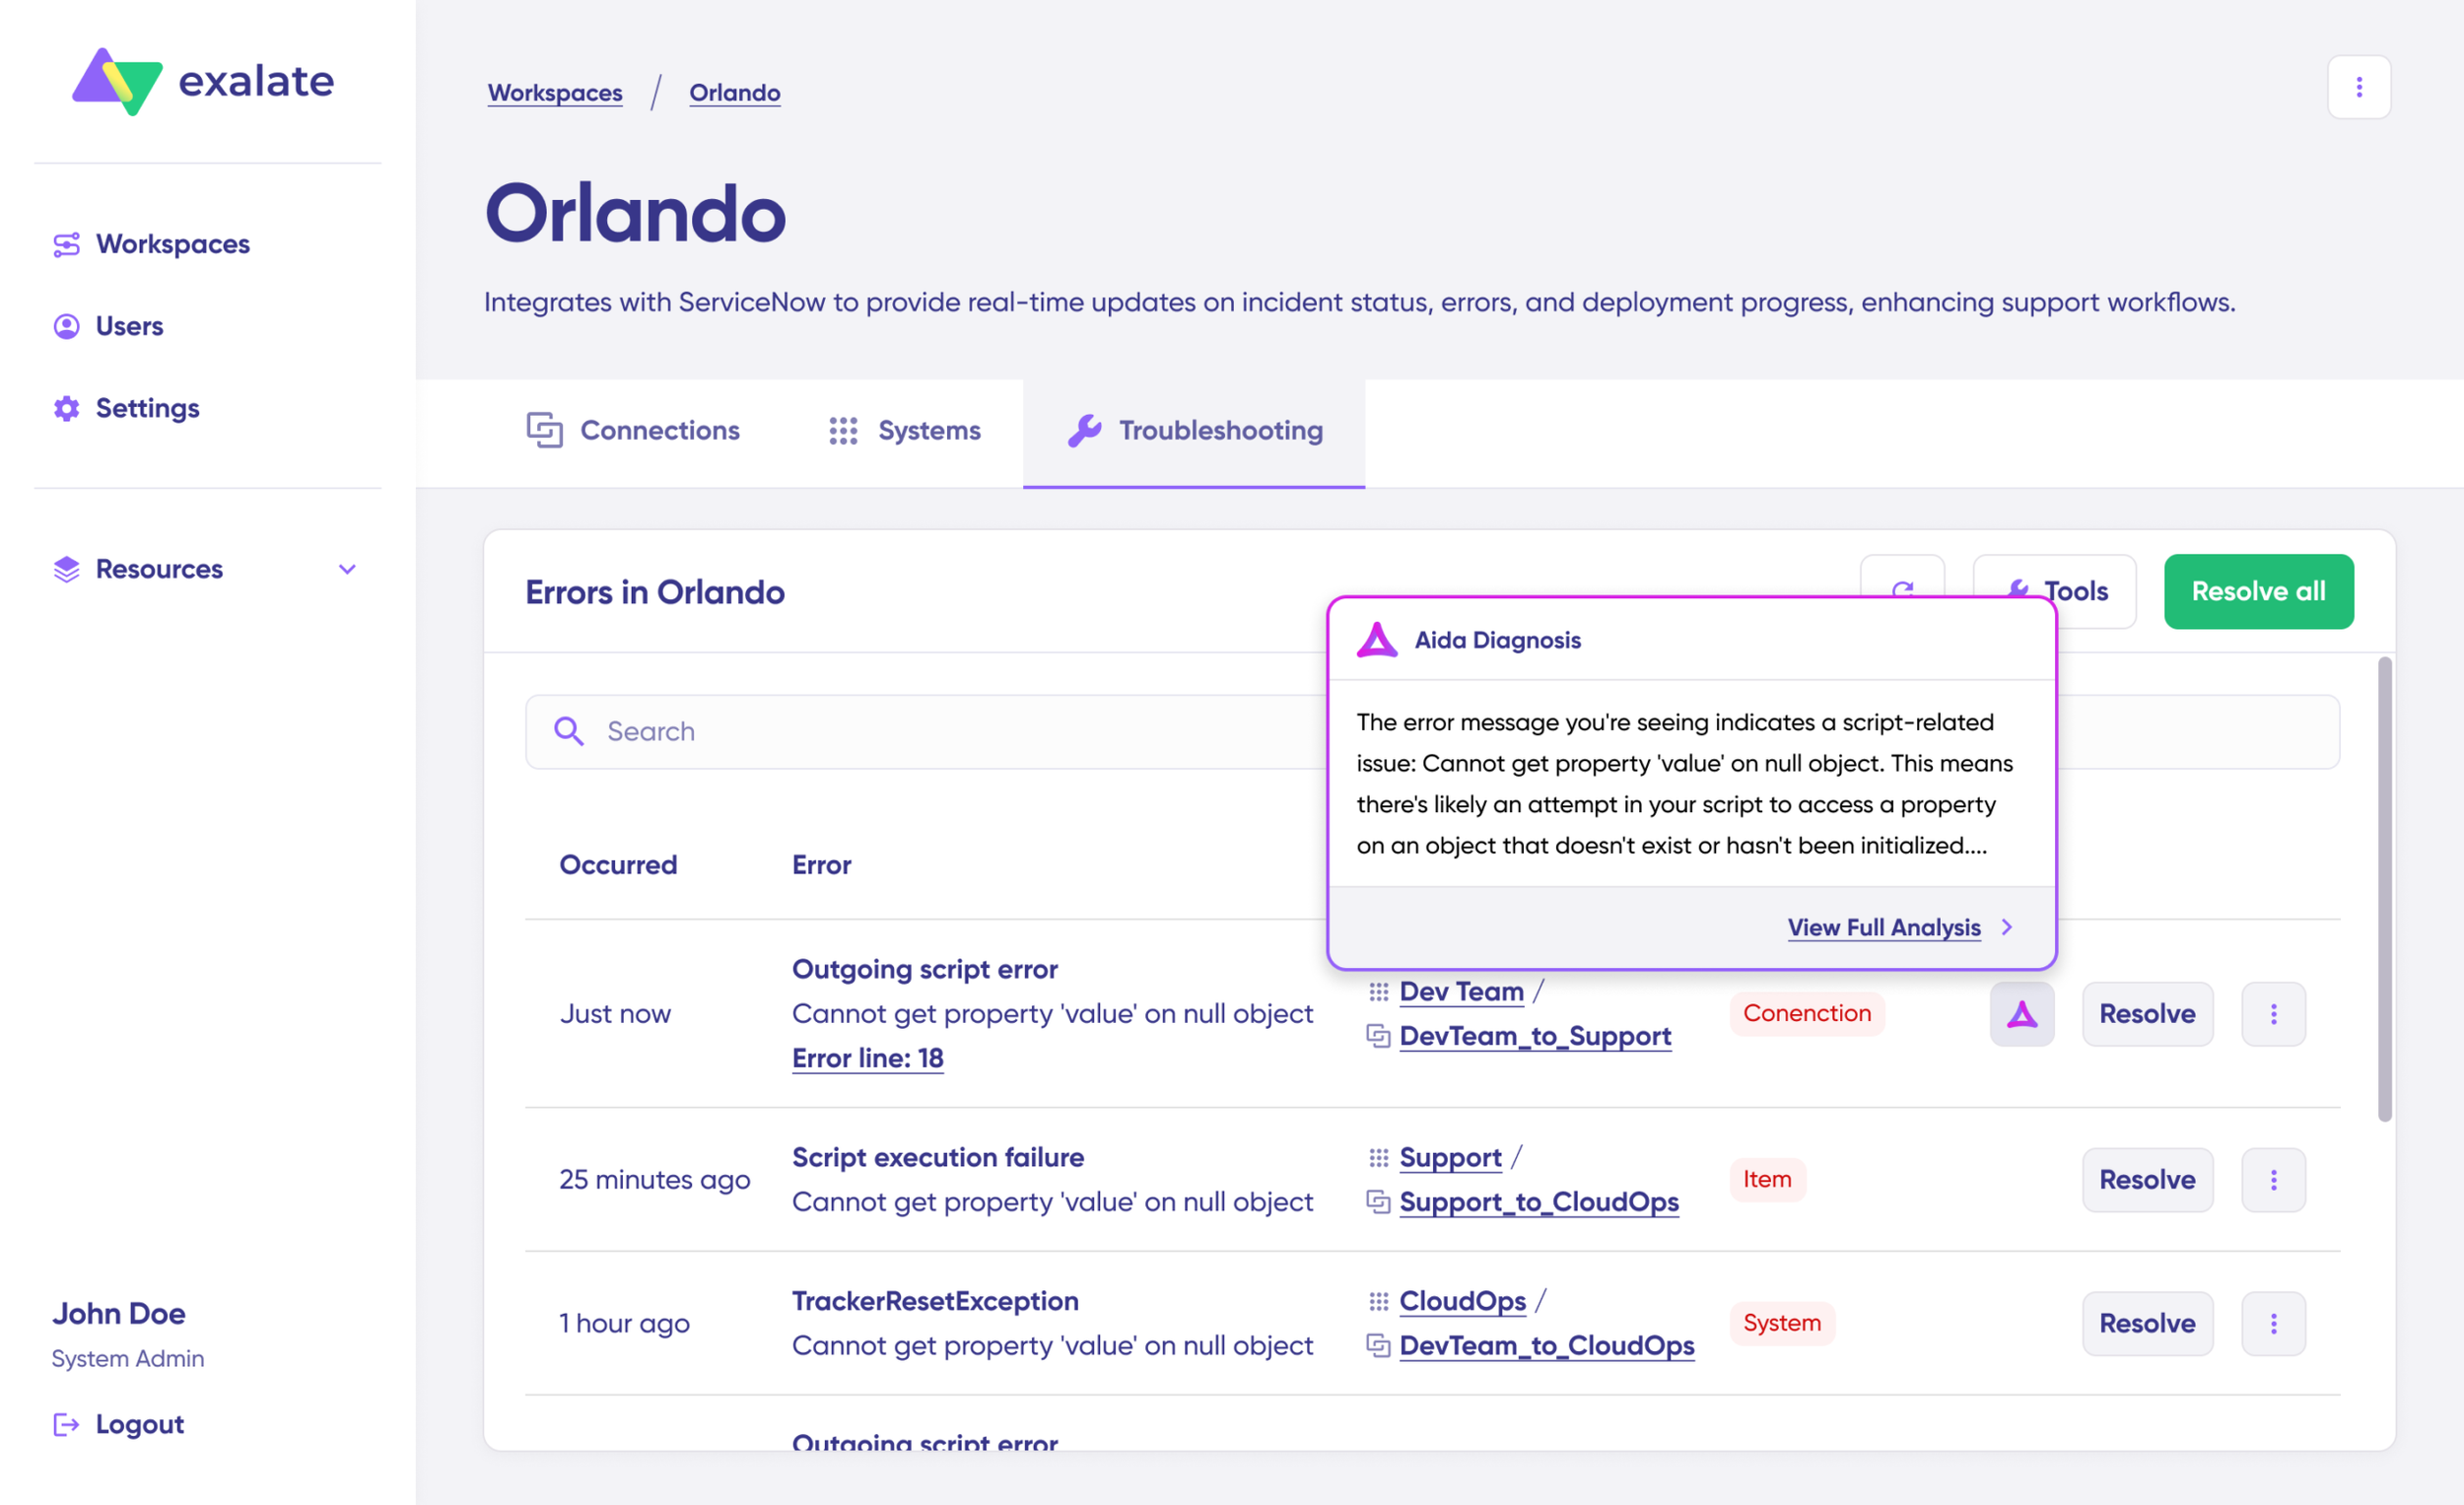
Unfortunately, troubleshooting errors is a significant part of synchronization, especially in script-based tools like Exalate, which allow the flexibility of setting up complex workflows.
Troubleshooting with Aida
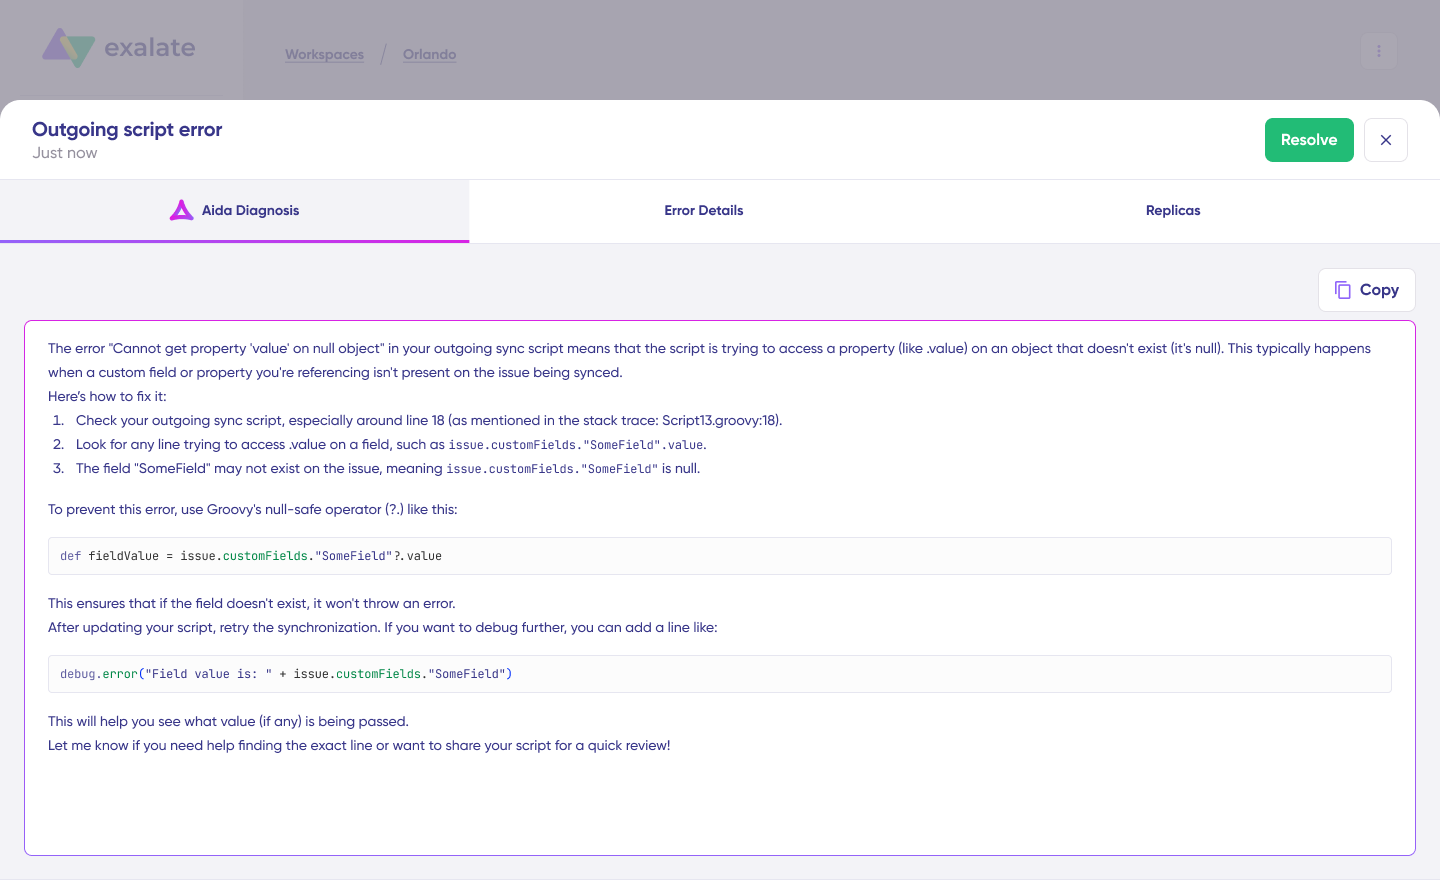
Aida AI helps you troubleshoot errors faster by offering clear and context-aware suggestions to resolve errors right where you see them.
If there’s an error, go to the “Troubleshooting” tab of your workspace. Hover over the error you want to diagnose and click on the Aida icon that appears next to the error. You will see the AI-generated suggestion in the modal window. This includes a short explanation of the error and a proposed solution for it.
You can also “View Full Analysis” to get more context.
Additionally, you can view “Error details” to copy the stack trace and “Replicas” to view the JSON format, if required.
Choose to “Resolve” and retry errors as needed.
Advanced Jira ServiceNow Integration Options Using Exalate
Exalate gives you the flexibility to adapt and adjust your synchronization to handle different kinds of Jira ServiceNow integration use cases. We’ll discuss a few integration scenarios that are commonly implemented using Exalate.
Multi-Instance Connections
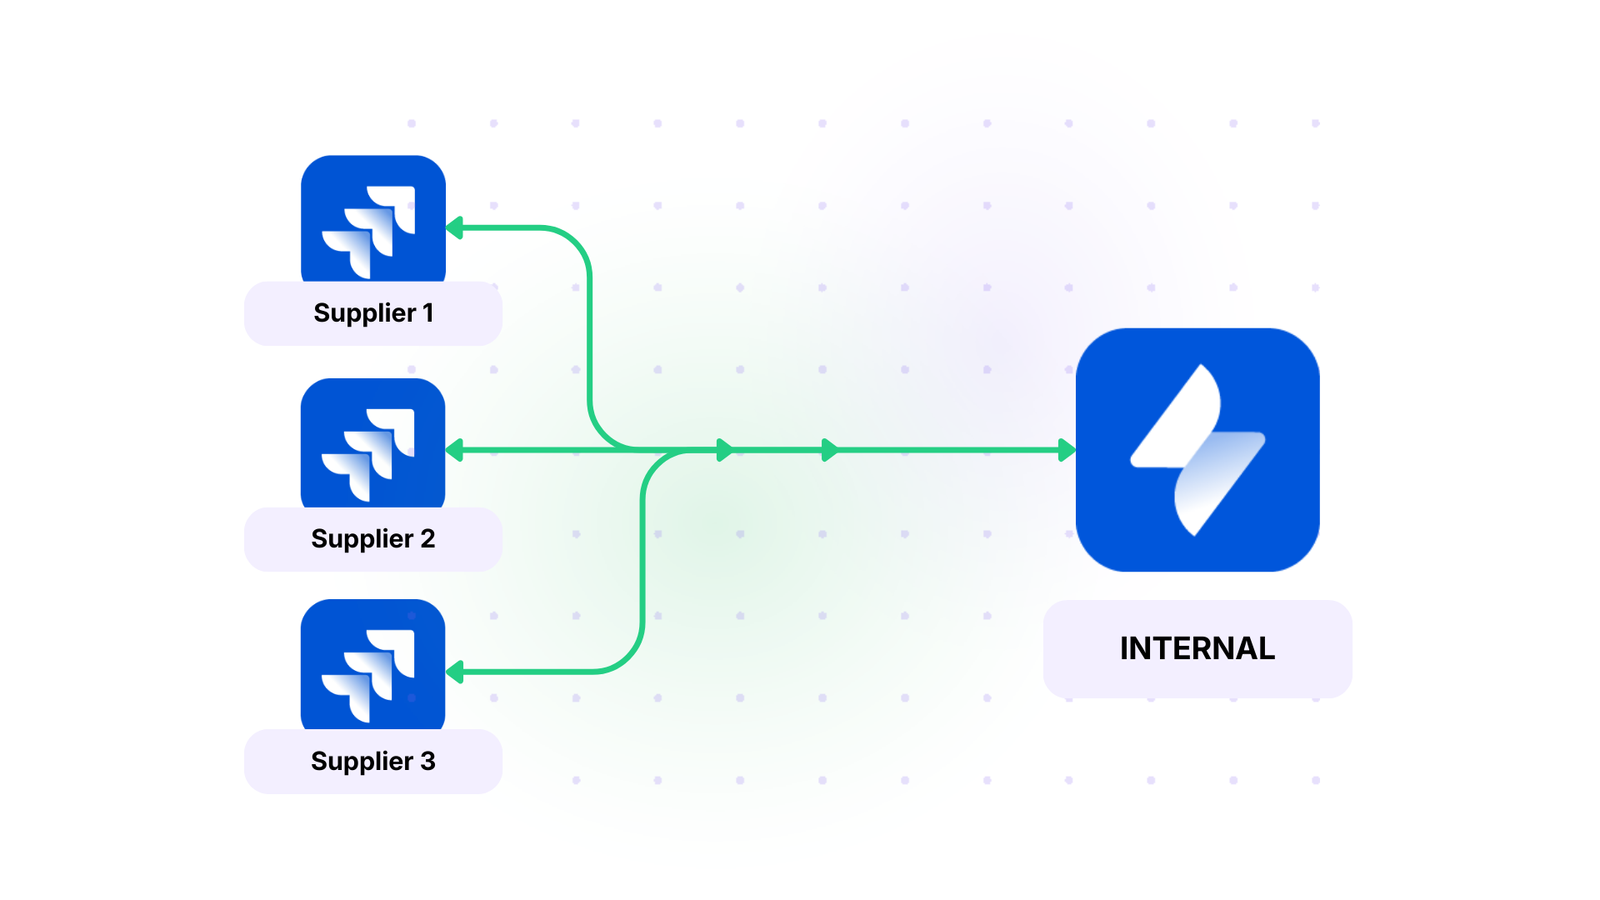
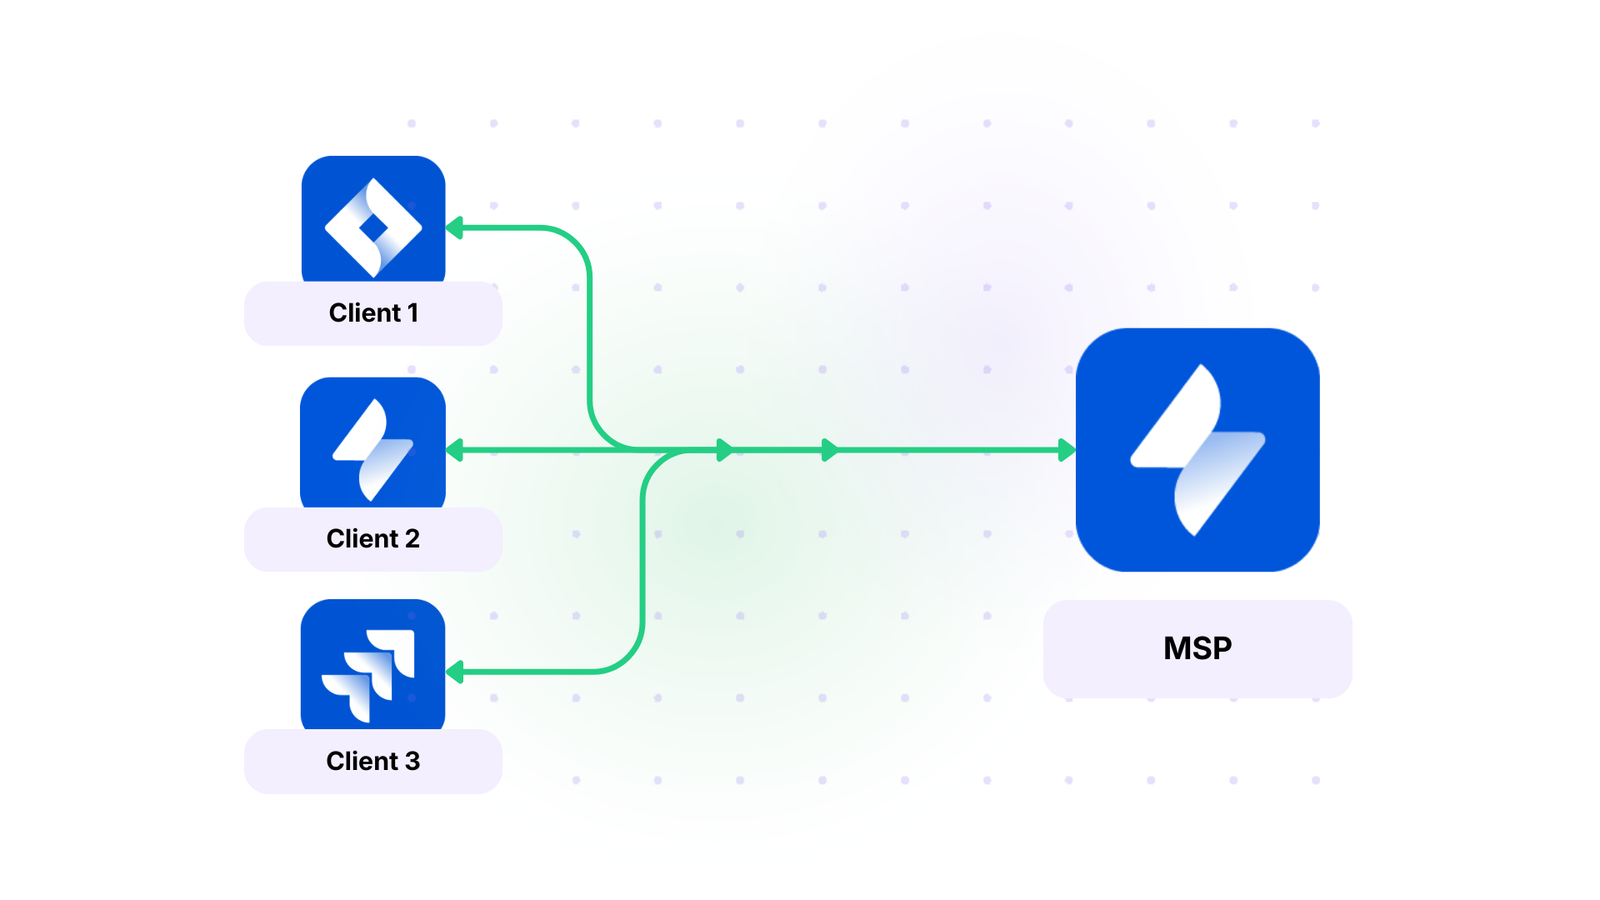
A hub-and-spoke architecture makes it possible to connect multiple Jira and ServiceNow instances simultaneously. For example, a central ServiceNow environment can integrate with several departmental Jira instances, or multiple vendor-managed ServiceNow instances can link into a single MSP Jira environment.
All of these connections are administered through a unified console, which provides a network-style visualization of every integration. Administrators can perform bulk operations, such as updating multiple connections at once, and apply consistent script templates across similar integrations to streamline maintenance and configuration.
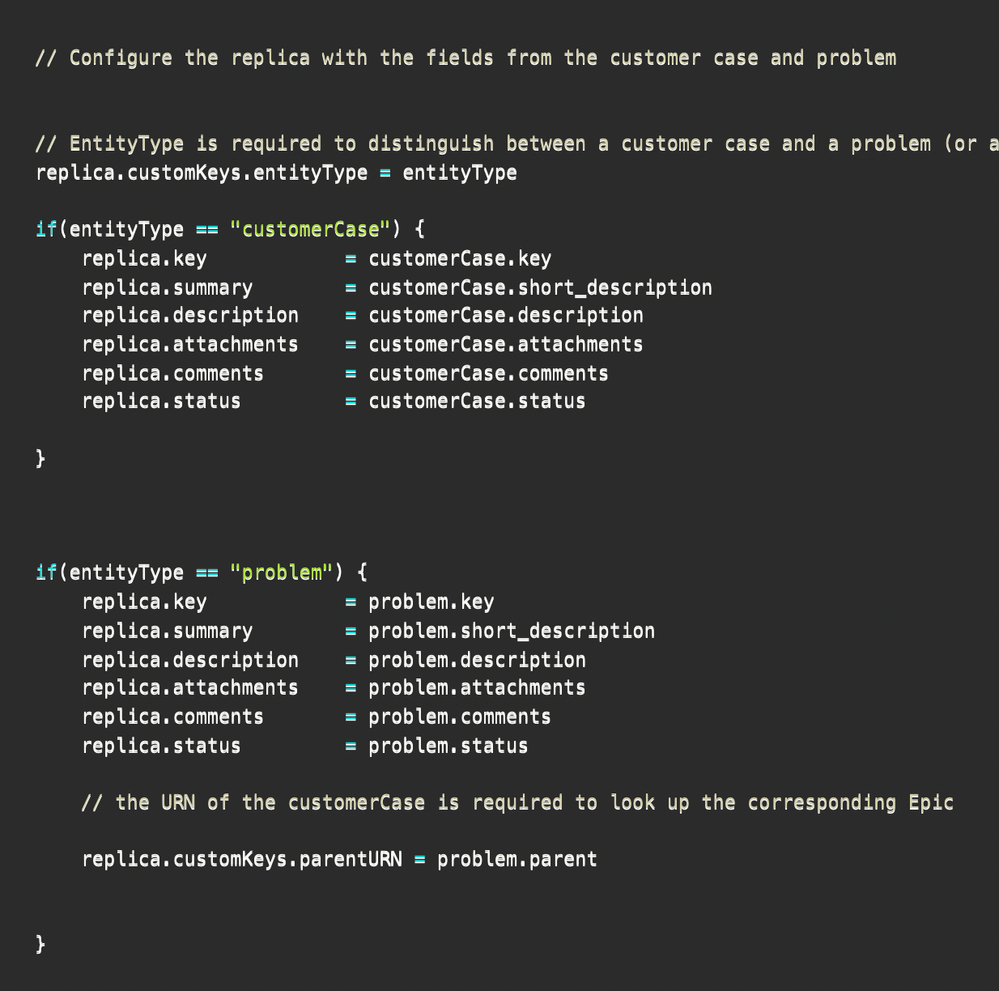
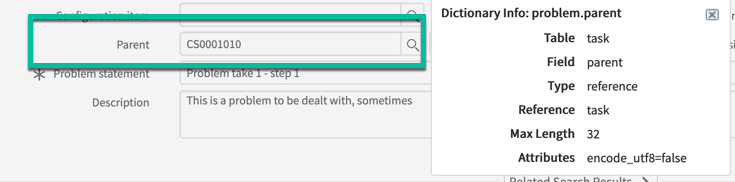
Custom Field Mapping
The platform supports syncing virtually any field accessible through the REST API. In ServiceNow, this includes fields across tables such as Incident, Change Request, Problem, and others. In Jira, you can map standard fields, custom fields, and even multi-select fields.
For example, the ServiceNow Configuration Item value can be synchronized into a custom Jira field using a Groovy script such as:
This allows teams to maintain consistent contextual data across both systems, ensuring that critical attributes move seamlessly with the work items.
Correlation Fields
Correlation fields make it possible to define and preserve relationships between local and remote work items.
By storing identifiers from Jira inside ServiceNow, teams retain traceability even if titles or descriptions change over time.
A typical approach uses a script like:
// Store Jira work item key in ServiceNow correlation field entity.correlation_id = replica.key entity.u_issue_key = replica.key entity.correlation_display = issueUrl
This method allows users in either system to navigate quickly back to the originating item, creating a stable linkage that supports long-term auditing, reporting, and troubleshooting.
Epic and Story Time Tracking
ServiceNow incidents can be converted into Jira Epics while preserving detailed time-tracking information. A common pattern is to aggregate story-level estimates and time spent, then push those values back into ServiceNow for increased visibility. For example:
// ServiceNow → Jira Epic with time aggregation def ced = new CollectEpicData(issue.key) replica.customKeys.totalTimeSpent = ced.storyTotalTimeSpent replica.customKeys.totalOriginalEstimate = ced.storyTotalOriginalEstimate replica.customKeys.totalEstimate = ced.storyTotalRemainingEstimate
These aggregated values can then be returned to a ServiceNow custom field, ensuring teams on both platforms share a unified view of progress and effort across related stories.
Maintain Updates between SLA and the Attached Account
Imagine a priority 1 incident is raised, and the customer support agent identifies it as a dev work item to be passed to the dev team working in Jira. Along with the SLA and time-related information, if the incident status is also synced, the agents would always have visibility over it at all times, and the dev team would know the SLAs and time constraints they must adhere to beforehand.
So, when the work is marked resolved in Jira, the corresponding state is updated in ServiceNow with specific comments left as resolution notes.
Keep Internal Comms Private
Sometimes, internal teams working on specific problems or incidents must pass important information from ServiceNow to Jira, for instance, leaving notes for the dev team to help them with the work item.
In such a case, private comments must be kept private and synced between the two systems. It’s possible to do that with simple code. Share only ServiceNow work notes to Jira, such that the dev team has all the required information handy.
Sync Anything between Jira and ServiceNow
You can also sync different entities or work types between Jira and ServiceNow for better visibility and streamlined business operations.
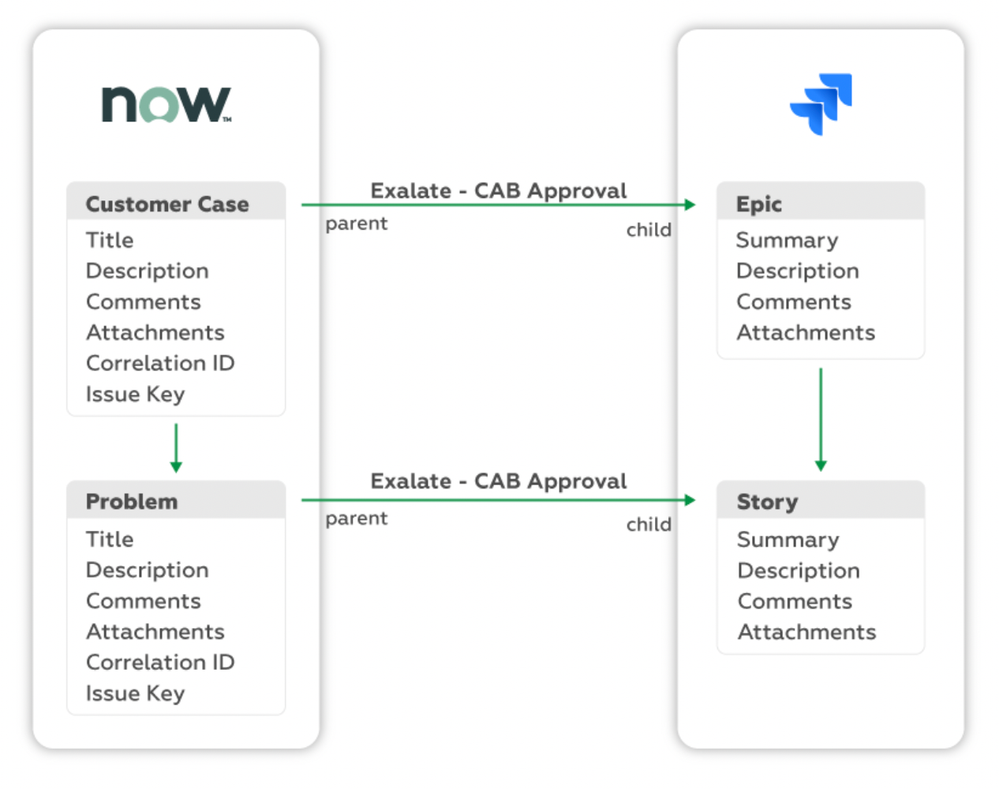
For instance, sync a ServiceNow customer case to a Jira epic. You can also sync incidents, CMDB, change requests, problems, custom fields, and almost any field available via REST APIs.
Exalate also allows you to integrate ServiceNow’s Agile backlogs, defects, and incidents with Jira, allowing your teams to keep everything updated in real time. No more redundant data entry or siloed information.
With seamless bidirectional communication, support agents can focus on what really matters—providing support, without the headache of toggling between multiple systems.
Automate Incident Creation in ServiceNow from Jira Labels
With Exalate, you can automatically create ServiceNow incidents directly from Jira tickets using predefined labels. This ensures that your critical issues, required by contractual obligations, are created in ServiceNow without manual intervention, saving time and reducing errors.
Also, you can now automate change request workflows between ServiceNow and Jira with Exalate. Whether it’s syncing statuses, updating records, or auto-creating tasks, Exalate ensures a seamless flow of data, saving your team the pain of switching between platforms.
Exalate can also automatically send email notifications based on change completion, and even display the change details as a Jira ticket—keeping your team in the loop with minimal effort.
Case Study: Learn how Maersk uses Jira ServiceNow integration to streamline processes between their call center and support teams.
Integrating Jira and ServiceNow can help teams reduce information silos. It reduces manual errors like misplaced statuses, wrong escalations, etc. You can ensure data is exchanged automatically and is accessible to the right stakeholders when they need it. You can also control exactly how much data to share.
What’s the difference between Exalate and ServiceNow IntegrationHub?
IntegrationHub is ServiceNow’s native solution with limitations:
ServiceNow-centric control (limited autonomy for the Jira side)
Higher costs (additional package fees)
Limited bidirectional functionality
Best for simple, unidirectional use cases
Exalate provides:
Unified console with operational control for both sides
Full bidirectional sync with unlimited customization
AI-assisted configuration (Aida)
Outcome-based pricing (active sync pairs, not user seats)
Script versioning and TestRun for safe deployment
You can read the detailed comparison between Exalate and IntegrationHub here.
Can I connect multiple Jira and ServiceNow instances?
Jira: Jira Software, Service Management (Cloud, Data Center)
View the detailed documentation for fields supported here.
Can I sync work items bidirectionally in real-time?
Yes. Exalate provides real-time bidirectional synchronization. When a work item updates in Jira, it syncs to ServiceNow within seconds (and vice versa).
What if I only want certain work items or incidents to sync?
Use platform-native triggers for granular control:
Jira: JQL (Jira Query Language) Example: project = SUPPORT AND priority in (High, Highest)
If you’re a Jira user and you want to share data with a user working in another Jira instance, you’ll need a Jira to Jira integration to ensure smooth collaboration. This software would help individual teams work flawlessly on their own while connecting and integrating with other teams.
In this article, you’ll see why connecting multiple Jira instances is useful and what technology is available to synchronize them effectively. After that, you’ll go through a step-by-step guide explaining how to set up a connection between two Jira instances.
You’ll also find use cases to show you what a Jira to Jira integration can do to help improve your workflows and keep your teams connected with your data intact.
Key Takeaways
Connect multiple Jira instances to enable seamless cross-team and cross-company collaboration.
Learn how to enable bidirectional (and unidirectional) sync for work items, sprints, custom fields, attachments, and much more.
Use Jira to Jira integration to keep teams, organizations, and managed service providers connected for smooth collaboration.
Work with a flexible Jira integration connector that offers flexibility, scalability, and security.
Why Do Teams Need Jira to Jira Integration?
Organizations typically need Jira to Jira integration in these situations:
Facilitate Acquisition & Merger Integration: When companies merge, integrating their existing Jira instances allows teams to collaborate before (or instead of) consolidating systems.
Break Down Data Silos: When development, support, and operations teams work in separate Jira instances, they lose visibility into each other’s work. With integrated Jira instances, teams can stay aligned and productive without constant status meetings.
Real-Time Visibility & Faster Resolution: Development teams can focus on resolving blockers and planning sprints more effectively, knowing their data is always accurate and synchronized. Customer-reported issues get addressed efficiently and transparently when Jira Software connects with Jira Service Management (JSM).
Maintain Autonomy & Control: Each organization controls what data it shares and what stays private. Your organization and partners only see the work items (previously known as issues) that you choose to sync. Teams can make changes independently without constant consultation, working in their familiar environment while staying connected.
Scale Without Stress: Organizations managing multiple Jira instances or large-scale projects can scale operations effortlessly. Whether connecting two instances or 20+, each connection operates independently.
Improve Cross-Company Collaboration: When working with partners, vendors, suppliers, or clients who maintain their own Jira instances, integration provides seamless data sharing while each organization maintains autonomy and security controls.
Departmental Separation: Large organizations often run separate Jira instances for different departments (IT, HR, Engineering, Marketing). Integration keeps these teams aligned without requiring them to work in unfamiliar environments.
Streamline Regional Operations: Companies with global operations may maintain regional Jira instances to comply with data residency requirements or manage different workflows while keeping headquarters informed.
MSP & Service Provider Models: Managed service providers need to sync work items with multiple client Jira instances, maintaining separate configurations for each client relationship.
Eliminate Manual Data Entry: Without integration, teams waste hours copying information between instances via email, spreadsheets, or manual re-entry. Automated sync eliminates this overhead, letting teams focus on actual work instead of administrative tasks.
What are the Best Jira to Jira Integration Approaches?
When connecting multiple Jira instances, you have several options. Each has different trade-offs in complexity, flexibility, cost, and maintenance.
Native Integration
Atlassian’s built-in tools work well if everything lives on the same Jira site. You can link work items across projects, share custom fields, and create automation rules that work across Jira sites without third-party tools.
However, this only works on a single site. If you’re dealing with separate instances—different cloud sites or mixing cloud with data center—native tools won’t cut it.
Atlassian also offers migration tools like the Jira Cloud Migration Assistant (JCMA). They’re effective for one-time migrations when consolidating instances, but they don’t maintain ongoing sync.
Once the migration’s complete, updates on either side won’t automatically sync. This makes them suitable for moving everything once, but not for ongoing collaboration.
Jira Automation
Jira Automation can handle basic cross-instance communication using webhooks. You can set up rules that trigger when work items change and send data to other Jira instances via REST API.
For example, you can set a rule to create a work item in another instance when it reaches a specific status on your end.
But Jira Automation has serious limitations, which means you won’t be able to handle bidirectional sync, conflict resolution, and error handling yourself.
This approach works for simple one-way scenarios if you have the technical expertise. For anything more complex, dedicated integration tools are a better investment.
Template-Based Tools
Tools like Zapier and Make offer pre-built integrations with templated mappings. They connect to both instances, handle the technical details (API authentication, sync scheduling, error handling), and provide a UI for configuring what syncs.
These tools automatically map standard fields like summary, description, priority, and status. You select which projects or work item types to sync, choose the sync direction, and the platform handles the rest.
Strengths:
Simple to set up for straightforward scenarios with standard fields and similar configurations.
Cost-effective for small teams, no coding required.
Limitations:
Struggles with custom fields that don’t have exact matches.
Can’t handle conditional logic, complex workflow mappings, and limited data transformation.
Script-Based Tools
Script-based tools like Exalate provide full programmatic control for users to define exactly which fields map where, how to transform data, what triggers synchronization, and how to handle conflicts.
Capabilities:
Sync different fields based on work item type, project, or custom criteria
Implement conditional logic (only sync high-priority bugs, for example)
Transform data to restructure text, combine fields, or apply business logic
Map custom fields that don’t match between instances
Filter sensitive information or block specific data from crossing boundaries
These tools also handle authentication, queue changes during outages, manage conflict resolution, provide monitoring and alerts, and scale for high-volume synchronization.
Trade-off: Steeper learning curve than template-based tools. Complex configurations eventually require understanding the platform’s scripting model. But AI assistants can do the heavy lifting for you. Also, if you’re looking for a simple automation, Exalate might be overkill for your use case.
Custom API Integration
Organizations with development resources can build custom integrations using Jira’s REST API. This provides complete control over what syncs, when it syncs, and how data transforms.
Building robust integration is more complex than it initially appears. You need to:
handle bidirectional sync without creating infinite loops,
manage conflicts when both sides update the same field,
queue changes during outages,
Implement security mechanisms yourself,
handle user mapping between instances with different accounts,
transform custom fields that don’t match,
and maintain the integration as both Jira instances evolve.
Apart from that, setting up a basic proof-of-concept might take a few days, but a production-ready solution that handles edge cases often takes weeks or months. You also own all the ongoing maintenance.
For most organizations, the total cost of building and maintaining custom integration exceeds the cost of commercial tools, especially when factoring in developer time.
Calculate time and money savings from automated bidirectional sync.
Your integration approach should match your specific situation:
How complex are your workflows and custom fields on both sides?
Do you need simple field copying or complex data transformation?
What technical resources do you have available?
How frequently do your integration requirements change?
What’s your budget for both initial setup and ongoing costs?
There’s no universal right answer—just what works best for your current needs and constraints.
Organizations often start with simpler approaches and evolve over time. You might use native tools for initial migration, implement template-based integration for straightforward scenarios, then move to script-based integration as requirements grow more sophisticated.
Use Case: Learn how to sync multiple Jira instances.
Features to Consider When Choosing a Multi-Jira Integration Tool
When setting up your Jira to Jira integration, you need to consider potential problems and ensure your solution can handle them.
1. Complete Operational Control
This allows teams to:
Work in different time zones without coordination bottlenecks
Modify their sync rules without affecting the other side
Maintain separate data governance policies
Control access at a granular level
2. Flexibility & Scalability
Your multi-Jira integration needs will change over time. You might want to change what data is synchronized or the synchronization criteria.
For that, you need a Jira integration solution that supports:
Custom field mapping that evolves with your workflows
Conditional logic for complex business rules
Different work item types and project structures
Growing from 2 instances to enterprise-scale deployments
You can use AI-assisted configuration to generate integration scripts without extensive coding knowledge.
3. Security & Compliance
Platform security is a key consideration when choosing an integration tool for Jira. Review infrastructure to see how data storage and transfer are handled.
Since both sides intend to share and store sensitive information, invest in:
ISO 27001 Certification – Independently verified security management
Encryption – Data encrypted in transit (TLS 1.2/1.3) and at rest
Role-Based Access Control – Granular permissions for who can configure syncs
Audit Trails – Complete logging of sync activities
And much more…
4. Reliability & Resilience
You need software that works as close to 100% of the time as possible. It also needs to handle problems gracefully.
If one of your systems has downtime, the integration software should:
Apply changes in the correct order once the issue is fixed.
Handle the outage and resume operations when systems are back up.
Get the systems back in sync automatically.
Track sync events in the same order as the original work item events.
Our customers wanted to work on security tickets within their own service desks and didn’t particularly want to work in multiple vendor portals.
– MICHAEL FOWLER ENGINEERING LEAD AT QUORUM CYBER
Why Use Exalate For Jira to Jira Integration?
AI-Assisted Sync Configuration
Exalate comes with an AI-assisted configuration – Aida, which generates sync scripts based on natural language descriptions. The scripts are written in the Groovy language.
To set up the connection, you can follow these steps:
Describe what you want to sync in plain language.
The AI assistant generates the appropriate script.
Review and modify the generated code if needed.
Test and deploy the configuration.
Troubleshoot errors within the console.
We’ll go through the steps in further detail.
Example prompt: “Map and sync work item types between multiple Jira instances. Sync ‘Bug’ as ‘Defect’ and ‘Story’ as ‘User Story’. Include all comments and attachments.”
Exalate helps you generate field mapping scripts from your requirements and suggests optimal sync rules based on your use case. It also provides script templates for common scenarios, while providing syntax checking and validation.
Note: AI-generated scripts should always be reviewed by your technical team before implementation to ensure accuracy and alignment with your security policies.
Supported Platforms & Connectors
Beyond Jira to Jira integration, Exalate supports connections with:
ServiceNow
Freshservice
Freshdesk
Asana
Azure DevOps (Cloud & Server)
Zendesk
Salesforce
GitHub
This multi-platform capability allows you to build comprehensive integration ecosystems. For example: Jira (development) ↔ Jira (QA) ↔ ServiceNow (operations) ↔ Zendesk (support).
Security & Compliance
Exalate prioritizes data security for your Jira to Jira integration. It is ISO 27001 certified and allows role-based access control through granular user permissions.
With Exalate, data is encrypted both in transit using TLS 1.2/1.3 and at rest, protecting sensitive information throughout the sync process.
Your team maintains complete operational control over sync scripts and data transformations on your side of the integration. You decide what gets shared and how it’s mapped.
Exalate also uses secure token-based authentication to ensure that only authorized systems can access your integration endpoints. Options include (personal access tokens, JWT authentication, API Keys, and BasicAuth).
For detailed security documentation and compliance certifications, visit our Trust Center.
Supported Entities and Fields
You can sync virtually any data between Jira instances:
Default Fields
Advanced Entities
Custom Field Types Supported
Work items (all types: Story, Bug, Task, Epic, Subtask) Summaries and descriptions Internal and public comments, Attachments, Statuses, Priorities, Assignees, and reporters, Due dates, Labels, Components, Fix versions, Time tracking (original estimate, time spent, remaining estimate), Links (related work, blocks, is blocked by).
Text fields (single line, multi-line) Number fields, Date and datetime fields, Select lists (single and multi-select), Cascading select lists, Checkboxes, Radio buttons, User picker fields, LabelsURL fields
For a complete list of supported entities and fields, check the Exalate documentation.
Integration Pricing
Exalate offers subscription-based plans designed to scale with your integration needs.
Let’s review practical examples of Jira-to-Jira integration that solve real business challenges.
Case 1: Connect Customer Support and Development Teams
The Challenge: Customer support teams receive feedback from customers—technical problems, unclear UI areas, and feature suggestions. Developers want to know what doesn’t work and why, and they’re open to new suggestions. However, developers don’t need all the details or internal discussions between customers and the support team.
The Solution: Set sync rules to send developers only the information they need. Solutions and status updates flow back to the support team automatically. Include time limit fields or comments that support can relay to customers.
Real-World Impact: The Gantner Group used Exalate to establish a frictionless collaboration ecosystem between developers and support staff, which increased resolution speed by 50 times.
Case 2: Connect Marketing and Design Teams
The Challenge: The marketing team tracks features popular in competitor products or features that consumers respond to in campaigns. The design team analyzes these to determine whether they’d be a good fit for the product.
The Solution: Create a label corresponding to these features, like “new-features“, then create a trigger “label = new-features”. This should be one-way synchronization, as the marketing team doesn’t need to see the design team’s internal work.
When marketing tags something with “new-features“, it automatically syncs to the design team’s Jira instance. The design team works independently, and only final decisions or updates sync back if needed.
Real-World Impact: Vodafone leveraged Exalate’s multi-Jira integration solution to optimize the efficiency of all internal and external collaborations. This helped them achieve data consistency and visibility across multiple instances.
Case 3: Connect with Multiple Suppliers
The Challenge: When you have multiple suppliers, you need to connect your systems with theirs while keeping suppliers’ information separate from each other. Each supplier needs maximum autonomy without seeing other suppliers’ data.
The Solution: With Exalate, you can exchange information safely with each supplier in separate, independent connections. This lets you collate information in your central instance without leaking suppliers’ data to each other.
Real-World Impact: Insurance company Turkiye Sigorta regained control and connected with multiple suppliers using Exalate. They created “safe islands” where they could work with the data they needed while maintaining customer confidentiality.
Case 4: Managed Service Providers with Customer Handling
The Challenge: Managed service providers (MSPs) need to handle work with their customers. The businesses they deal with have different contracts and expectations. MSPs must share relevant information with clients while keeping internal notes, pricing, and operations private.
The Solution: If an MSP has a small number of large clients, they can assign specific people to handle each one. Exalate ensures relevant work items are assigned to the correct person automatically. The integration shares information between systems while keeping some data internal to the MSP.
Real-World Impact:NVISO, a cybersecurity managed security services provider (MSSP), uses Exalate as a competitive advantage to automatically generate tickets, sync comments, attachments, and statuses between platforms.
Case 5: Outsourced Quality Assurance
The Challenge: Software and game developers outsource QA to third-party teams that have their own workflows within Jira. The development team needs to track bugs reported by QA without granting full access to their development instance. The QA team needs visibility into fix status without seeing unrelated development work.
The Solution: Bidirectional sync of specific work item types (bugs only) with filtered field mapping. Bug reports flow from QA to development, while status updates and resolution notes flow back.
Case 6: Onboarding Staff Members
The Challenge: New staff members need to learn the ropes while managers ensure they’re responding to work items correctly. Manually reviewing every work item is time-consuming, but complete autonomy too early can lead to mistakes.
The Solution: Set up Exalate to copy work items created by newcomers to another system where managers can check their progress. Create a synchronization trigger like assignee = team-member-name, then set the sync rules to copy over whatever management wants to review. When the new team member is up to speed, delete or deactivate the trigger.
Real-World Impact: Netguru implemented Exalate’s Jira connector to link the ITSM and business teams. This reduced licensing costs and established harmony between the teams while providing effective oversight during onboarding.
Case 7: Connect Companies with Outsourcing Partners
The Challenge: When your organization outsources services like customer support or web development, you need to integrate Jira Service Management and Software instances smoothly. Both sides need autonomy while sharing essential project information.
The Solution: Using Exalate, both sides can maintain separate instances with full autonomy, guaranteeing that only essential information is shared with partners. Each side controls what data crosses the boundary through independent sync rules.
Real-World Impact: Quorum Cyber implemented this model to enhance cybersecurity operations and improve average response time. They maintained strict security boundaries between their operations and client systems while ensuring seamless collaboration.
Case 8: Create a Network of Systems
The Challenge: Complex business environments involve multiple companies and platforms. For example, a company using Jira Software syncs with another company using Jira Service Management. When they need to onboard a third party working with Jira on-premise, they need a solution that connects all three.
The Solution: Exalate serves as the bridge between multiple instances, creating a network where each connection operates independently. Your organization and partner organizations only see the work items each chose to sync with the others.
Real-World Impact:SPK leverages Exalate to streamline operations, saving each engineer 5 hours weekly by automating information flow across their network of systems. Teams can explore multi-platform integration using Exalate’s AI-assisted configuration to generate sync scripts for complex scenarios.
Case Study: Read why 60% of Quorum Cyber customers want service desk integration.
A Step-by-Step Setup Guide For Jira to Jira Integration With Exalate
Visit the Exalate integrations page to get started. Create a new account by manually entering your email and verifying it, or sign up using Google.
If you already have an account, you can log in to access the dashboard.
Create a workspace where you can manage your integrations and connections. All your existing workspaces are accessible from the “Workspaces” tab.
To create your own workspace, click the “+ Create Workspace” button. Enter a name and description for it. And click “Create workspace.”
To create a connection, you’ll need an active Exalate account with at least one Workspace and the access credentials for the systems you want to connect (System A and System B).
Click on “+ Add connections” > “Create new connection”. Enter the name for your first system. Enter the URL of your system (Jira).
Wait for checks and authentication to happen automatically under the hood. Systems from a different workspace will be newly registered for the current workspace.
Enter the authentication details. For Jira, you need OAuth. Click on “Check Authentication”. If all is well, you’ll see “Successfully Authenticated”.
Click Next to configure System B (Jira). Follow the same procedure as for your System A (Jira) instance.
Confirm the Connection Name and add a description (optional). Review the connection setup and click on “Create Connection”. Wait for a few minutes so all the checks and setups will be configured in the background.
Once done, click “Continue to Configuration”. Voila! Your first connection has been successfully set up in your workspace.
Choose a project you want to sync on both sides from the dropdown menu. Click “Build and Continue”.
Now, you have 2 options: “Quick sync” and “Edit & Test”. Let’s proceed with them one by one.
Quick Sync: This option allows you to sync one item between Jira instances. Under the “Item sync monitor,” enter the work item key and click on the “Sync Now” option.
To link 2 existing items, click “Link with existing”. Once the sync is complete, you can view both the synced issues in a new window. You can also choose to compare the changes.
Open draft editor: This option allows changes when you click “Create a new version” or select the “Open latest draft”. This ensures you don’t modify the existing configuration accidentally.
Once active, click the “Edit” button to open the editor and adjust the sync rules (Groovy-based scripts). These scripts enable users to add custom data logic and mapping for complex or advanced use cases or workflows.
Swap the sync direction by clicking the two arrows next to the connection name.
The outgoing script will hold the values passed from Jira A to Jira B, and the incoming sync will define how the values coming from Jira B are mapped in Jira A.
The Replica is a JSON file that carries the payload containing data being shared across entities on both Jira instances. You can adjust the sync scripts if you know the Groovy language. Otherwise, use Aida, our built-in AI assistant.
Use Aida to generate sync scripts. Aida exists in both incoming and outgoing script sections, so choose the side accordingly.
For Outgoing scripts: Describe what data should leave your system. Eg, “Exclude attachments” or “Only sync high-priority issues.”
For Incoming scripts: Describe how incoming data should be applied to your system. Eg, “Map statuses between tasks“.
The scripts are generated based on Exalate’s scripting API and your existing scripts.
Review the output to validate the suggested changes. New lines are highlighted in green, while suggested removals are highlighted in red. Choose to “Insert” or “Discard” the suggestions.
Note: Just like with any other AI solution, please review the generated code before applying it.
Once you have your sync scripts ready, you can choose to “Save script” or proceed to dry-run them before publishing.
Click “Start Test Run” and “Select items” to sync. You can select multiple work items. Wait for a bit, and you’ll see the detailed results of the fields synced and the payload shared between both instances or systems. If you are satisfied with the results, click “Publish Version”.
You can view all versions from the “Version” dropdown. The versions can be either “Active”, in “Draft” (editable), or “Archived”.
Set up triggers to automate your sync. These are conditions or filters you apply to specific items. For instance, sync all Jira work items that have “label = dev”.
Click the “+Add trigger” button to start creating platform-specific triggers.
Choose the entity type (issue or sprint). For Jira, you can use Jira Query Language (JQL) to specify conditions for work items or sprints: “Project = EXA” will only sync when the item is in the EXA project. Then, save the trigger.
Troubleshoot your connection with Aida. If there’s an error, go to the “Troubleshooting” tab of your workspace. Hover over the error you want to diagnose and click on the Aida icon that appears next to the error.
You will see all the affected systems, connections, and items. Aida will provide you with a brief analysis of the error message.
To get more information, click on Error Details. You will see the impact level, stack trace, error type, and date of occurrence. You can also “View Full Analysis” to get more context.
Fix the error and click on “Resolve”.
That’s it. Your first synchronization will start automatically based on the sync rules and triggers you have set. Happy syncing.
Understanding and Configuring Sync Rules (Scripts) For Exalate
Sync rules govern the flow of information between Jira instances and dictate field mapping.
Incoming & Outgoing Scripts
Outgoing Script determines what information leaves your Jira instance and how it’s prepared for the other side. The incoming script determines what information arrives from the other Jira instance and how it’s stored in your system.
Connecting multiple Jira instances eliminates duplicate work, automates work item syncing, and lets teams work in their preferred environments while maintaining real-time visibility.
Exalate provides the flexibility and control you need when managing cross-company partnerships, departmental collaboration, or global operations. This ensures each side maintains autonomy over its data while enabling seamless collaboration.
Looking to connect multiple Jira instances without much stress? Book a call with us to get started.
Frequently Asked Questions
Can I connect more than two Jira instances?
Yes. Exalate supports multi-instance networks. You can connect 3, 5, 10, or even 20+ Jira instances. Each connection operates independently with its own sync rules and triggers. This allows for hub-and-spoke, mesh, or hierarchical architectures.
How does Exalate ensure data security?
Exalate is ISO 27001 certified and uses role-based access control, JWT authentication, and end-to-end encryption (TLS 1.2/1.3). Each organization maintains complete control over what data is shared through independent sync configurations. Visit our Trust Center for complete security documentation.
Can I sync different work item types between instances?
Yes. You can map work item types flexibly. For example, sync “Bug” from Instance A as “Defect” in Instance B, or sync “Story” as “User Story.” Exalate allows complete control over type mapping with conditional logic.
Can I sync only certain work items and not others?
Yes. Use JQL triggers to define which work items should sync. For example: “project = DEMO AND labels = external“ syncs only work items with the “external” label. This gives you granular control over what data crosses between instances.
How do I handle different custom fields between instances?
Exalate allows you to map custom fields flexibly, even when they have different names or types. You can transform data, provide default values, or skip fields that don’t exist on the receiving side. AI-assisted configuration (Aida) can generate these mappings from your descriptions.
What level of support is available?
Exalate offers Standard and Priority Support. Standard Support covers installation, upgrades, and troubleshooting. Priority Support assigns a dedicated support engineer, aids with configurations, and provides enhanced SLAs. You can also get Service Provider packages, which include specialized support for MSP environments.
What about syncing between Jira and other platforms?
Exalate supports integrations between Jira and ServiceNow, Freshservice, Freshdesk, Asana, Azure DevOps Server, Zendesk, Salesforce, and GitHub. You can build multi-platform integration networks where Jira serves as the hub or spoke. Check our integrations page for the complete list.
Can Exalate integrate with Jira Service Management (JSM)?
Yes, Exalate can be used to synchronize tickets in Jira Service Management (JSM) with Jira Software and other platforms. This is useful for cross-functional teams or when managing customer requests between service teams and development teams.
From time to time, we at Exalate receive customer requests for advanced integration cases. One such request was to synchronize Customer Cases in ServiceNow as Epics in Jira, while preserving parent-child relationships and keeping comments private.
This post walks through the use case, the configuration logic, and how to implement it with Exalate.
The Use Case
The requirements looked like this:
When a Case is assigned to the “CAB Approval” assignment group in ServiceNow, an Epic on the Jira side must be created automatically through triggers. The Epic name, which is a mandatory Jira field, must be set to the Case identifier.
On the ServiceNow side, the Correlation ID field for the Case must include the Jira work item key, and a custom field called “Issue Key” must provide a direct link to the Jira work item.
When a Problem is created under that specific Case, it must be automatically synced under the corresponding Epic in Jira as a Story. Correlation ID and the “Issue Key” field must also be set for Problems.
Comments and attachments need to sync between both platforms, but Jira comments on the ServiceNow side must reflect as “Work Notes” and remain invisible to customers.
The Integration Solution: Exalate
Exalate handles this use case through its Groovy-based scripting engine, giving you the flexibility to map any data, transform entity types, and control comment visibility across both systems.
With Exalate’s unified management console, you configure both the incoming and outgoing sync scripts for each side independently. These scripts on both Jira and ServiceNow control what information is sent and received.
The steps for implementing this use case are:
Setting up your Exalate account and creating a workspace
Creating a connection between Jira and ServiceNow
Configuring sync scripts (incoming and outgoing for both sides)
Setting up triggers for automatic synchronization
Testing and deploying
Implementation with Exalate
Getting Started
To begin, go to the Exalate app and log in or create a new account. New users can sign up with their email or Google account.
Once logged in, create a workspace to organize your integrations. Workspaces let you manage all your connections in a single place.
Creating a Connection
Inside your workspace, click “+ Add connections” > “Create new connection” to set up your Jira and ServiceNow connection.
Enter a name for your first system (System A) and its URL. You can name either Jira or ServiceNow as System A. Once the URL is entered, Exalate validates the system and prompts for authentication. ServiceNow uses Basic authentication, while Jira uses OAuth.
Complete the same setup for the second system, give the connection a name, review the details, and click “Create connection.”
After the connection is created, select “Continue to configuration” and choose the Jira project you want to use for synchronization.
Configuration Options
After creating your connection, you have two paths:
Quick Sync lets you publish the default configuration and sync one item to verify the connection works. Under the “Item sync monitor,” enter a work item key from Jira or an incident number from ServiceNow to test.
Edit & Test opens the draft editor, where you can customize sync scripts. Click “Create a new version” or “Open latest draft” to begin editing without affecting the active configuration.
Configuring Sync Scripts
Sync rules in Exalate are based on Groovy scripts. Each connection has outgoing scripts (what data leaves a system) and incoming scripts (how data is applied on the receiving side).
Exalate uses a Replica, which works like a message payload in JSON format and holds the actual data passed between synced entities.
ServiceNow: Outgoing Script
The outgoing script on the ServiceNow side uses entityType to determine whether the entity is a Case or a Problem. Depending on this, information is packaged differently.
If the type is “customerCase,” then the short description, description, comments, attachments, and status are sent. If it is “problem,” in addition to the above, “problem.parent” is also sent.
This parent reference is the Case number used to locate the corresponding Epic on the Jira side.
ServiceNow: Incoming Script
The default incoming configuration syncs summary, description, comments, and attachments. To keep Jira comments private on the ServiceNow side, the following code is used:
Additional Groovy scripts fetch the work item key and URL from the Jira side, so the ServiceNow record displays a direct link back to the corresponding Jira work item.
No changes to the default configuration are needed on the Jira outgoing side.
Jira: Incoming Script
The incoming script on Jira handles the entity type mapping:
A firstSync variable determines what happens when an entity from ServiceNow syncs for the first time. Based on the entityType from ServiceNow, the script creates the appropriate Jira work item type: Case becomes an Epic, Problem becomes a Story, and anything else becomes a Task. A switch case handles the logic and applies the correct field mappings for each type.
Using Aida for Script Generation
To simplify scripting, you can use Aida, Exalate’s AI-assisted configuration feature, to generate sync scripts. Aida is available in both incoming and outgoing script sections.
For outgoing scripts, describe what data should leave your system (e.g., “Send short description, comments, and attachments for customer cases”). For incoming scripts, describe how data should be applied (e.g., “Map customer cases to Epics and problems to Stories”).
Aida generates working Groovy scripts with proper field mappings based on your existing configuration. Review the suggested changes (green for additions, red for removals) and choose to insert or discard them.
Testing with Test Run
Before publishing your configuration, use TestRun to validate your sync scripts against real data without affecting production. Select the items you want to test, click “Start Test Run,” and review the incoming and outgoing replicas. Check the field mappings and adjust scripts if needed.
Once everything looks correct, click “Publish Version” to apply the configuration to your live synchronization. All versions are accessible in the Version dropdown, with statuses of Active, Draft, or Archived.
Setting the Triggers
Once the sync scripts are configured, set up triggers to automate synchronization.
Click “+ Add trigger” to create a trigger condition. Triggers are platform-specific: for Jira, use JQL (Jira Query Language); for ServiceNow, use filter queries.
For this use case, create a trigger so that whenever a Problem or a Case is assigned to the “CAB Approval” assignment group, it syncs automatically to Jira.
Syncing Information
That is all that is needed. Create a Customer Case and assign it to the CAB Approval Group. The Sync Queue in Exalate shows the different stages the sync goes through, and you can check the status of all sync requests there.
After the sync completes, the work item key and Correlation ID appear in ServiceNow. On the Jira side, an Epic is created with a name matching the Case in ServiceNow.
When a Problem is created under the same Case and assigned to “CAB Approval,” it appears in Jira as a Story with the correct Epic link, maintaining the parent-child relationship across both systems.
Troubleshooting with Aida
If sync errors occur, navigate to the “Troubleshooting” tab in your workspace. Hover over the error and click the Aida icon for an AI-generated diagnosis. Aida provides a short explanation of the error and a proposed solution, with the option to view a full analysis, error details, or replicas in JSON format.
Conclusion
This walkthrough showed how an advanced integration use case like Case-to-Epic synchronization can be handled flexibly with Exalate. The Groovy scripting engine lets you map any entity type, maintain parent-child relationships, and control comment visibility, while features like Aida, TestRun, and script versioning keep your configuration safe and manageable. If you want to learn more, you can book a demo with our integration experts or start your free trial.
Teams that manage IT service workflows across multiple platforms evaluate ServiceNow IntegrationHub and Exalate for cross-platform synchronization. Both tools connect ServiceNow to external systems, but they serve different purposes and offer different levels of flexibility, control, and ease of management.
This comparison breaks down their technical capabilities, pricing models, setup processes, and ideal use cases so you can determine which solution fits your integration requirements.
Quick Comparison Table: ServiceNow IntegrationHub vs. Exalate
Feature
ServiceNow IntegrationHub
Exalate
Primary Purpose
Workflow automation within the ServiceNow ecosystem
Bidirectional cross-platform, cross-team, and cross-company sync
Unified console setup in minutes; moderate learning curve for complex use cases
AI Capabilities
Spoke Generator (GenAI for building Spokes)
Aida AI for scripting, troubleshooting, and error resolution
Maintenance Overhead
Custom Spokes require ongoing maintenance as systems evolve
Standardized platform with script versioning and rollback
Transaction/Rate Limits
Subject to transaction limits per subscription tier
Standalone solution; no inherited transaction constraints
Supported Platforms
175+ Spokes (ServiceNow-centric)
Jira, ServiceNow, Salesforce, Azure DevOps, Zendesk, GitHub, Freshservice, Freshdesk, Asana, and more
Key Takeaways
If you need a quick answer, here are the essential points:
Choose IntegrationHub if you are already invested in the ServiceNow ecosystem, need simple one-way automations, and have ServiceNow developers on staff who can build and maintain custom Spokes.
Choose Exalate if you need true bidirectional integration, work with external partners or multiple teams on different platforms, want predictable pricing based on actual sync outcomes, or need flexibility beyond what pre-built Spokes can offer.
Important: Exalate runs as a standalone solution and does not rely on IntegrationHub. You do not inherit IntegrationHub transaction consumption or rate-limit constraints when using Exalate.
Organizations using IntegrationHub plus custom development often find the combination becomes maintenance-heavy over time. Exalate provides a path to expand integrations to additional teams faster with less ongoing effort.
What is ServiceNow IntegrationHub?
ServiceNow IntegrationHub is a low-code integration platform built into the Now Platform. It enables ServiceNow users to connect their instance with external systems through pre-built connectors called Spokes and automate workflows using Flow Designer.
Core Capabilities
IntegrationHub provides over 175 pre-built Spokes for common platforms like Slack, Microsoft Teams, Salesforce, AWS, and Jira. These Spokes offer plug-and-play integrations for standard use cases without requiring custom code.
For more advanced requirements, organizations can build custom Spokes using JavaScript, REST APIs, SOAP, JDBC, or PowerShell. ServiceNow also offers Spoke Generator, a GenAI-assisted tool that helps users create Spokes through a visual interface.
Limitations to Consider
Bidirectional sync challenges: IntegrationHub is primarily designed for one-way integrations where ServiceNow triggers actions in external systems. True bidirectional sync requires additional configuration on the connected system side, which ServiceNow does not support directly.
Transaction-based pricing: Every API call counts toward your transaction limit. The Starter Pack includes 1,000,000 transactions per year for free, but organizations with high-volume integrations can quickly exceed this limit and face unexpected costs.
Custom Spoke maintenance: While pre-built Spokes work out of the box, custom Spokes require ongoing maintenance as external systems evolve. This creates technical debt over time.
Learning curve: G2 reviews consistently cite troubleshooting challenges and complexity for first-time users. The platform requires ServiceNow expertise to use effectively.
Vendor lock-in: IntegrationHub is tightly coupled to the ServiceNow ecosystem, limiting flexibility for organizations that need to integrate with systems outside ServiceNow’s Spoke library.
What is Exalate?
Exalate is a bidirectional integration platform designed for synchronizing incidents, change requests, problems, RITMs, and other ServiceNow entities across different platforms. It connects teams working on Jira, Salesforce, Azure DevOps, Zendesk, GitHub, Freshservice, Freshdesk, Asana, and other systems.
Exalate is purpose-built for scenarios where two systems need to stay in sync continuously, including cross-company collaboration between vendors, partners, MSPs, and customers.
Core Capabilities
Unified Console: Exalate provides a single interface to manage all your integrations. Setting up a connection takes minutes: enter your source and destination URL, verify them, name your connection, and start configuring. No installation required on both systems.
Groovy Scripting Engine: Exalate handles any custom workflow through its script-based engine. If you can write it in Groovy, Exalate can sync it. You control incoming and outgoing sync rules separately on each side, giving you full operational control over what data flows where.
Aida AI: Exalate includes Aida, an AI assistant that helps with scripting, troubleshooting, and error resolution. Aida can generate scripts based on your requirements, explain errors in plain language, and suggest context-aware solutions.
Test Run: Before deploying changes to production, you can test your sync configurations against real data without creating actual entities on the destination side. This reduces the risk of errors affecting live operations.
Script Versioning and Rollback: Every configuration change creates a new version with full history. If something goes wrong, you can roll back to a previous version instantly.
Side-by-Side View: View script rules, active queues, and errors for both sides of your connection simultaneously from a single screen.
Exalate Runs Independent of IntegrationHub
Exalate operates as a standalone solution. It does not use IntegrationHub infrastructure, does not consume IntegrationHub transactions, and is not subject to IntegrationHub rate limits. This means you can run Exalate alongside an existing IntegrationHub implementation without any conflicts or additional transaction costs.
Core Feature Comparison
Customization and Flexibility
IntegrationHub offers a low-code approach through Flow Designer and pre-built Spokes. For standard use cases like sending Slack notifications or creating Salesforce records, this works well. However, when you need custom logic, conditional mappings, or complex field transformations, you must build custom Spokes using JavaScript. ServiceNow recommends that only organizations with appropriately skilled development resources create custom Spokes.
Exalate provides full scripting control through Groovy. You can define exactly what data gets sent, how it transforms during transit, and how it maps to the destination system. The Aida AI assistant accelerates this process by generating scripts from natural language descriptions and explaining existing scripts in plain terms.
Verdict: Exalate offers deeper customization without the maintenance burden of custom Spoke development. IntegrationHub is simpler for basic use cases but hits limits quickly for complex scenarios.
Supported Integrations and Connectors
IntegrationHub supports 175+ pre-built Spokes covering major platforms. However, Spoke availability depends on your subscription tier, and some Spokes offer limited actions. Creating integrations for platforms without existing Spokes requires custom development.
Custom connector development: Enterprise customers can request custom connectors for platforms not yet supported
Verdict: IntegrationHub has more pre-built options, but many are limited to basic actions. Exalate focuses on deep, bidirectional sync for the platforms it supports and offers custom connector development for enterprise needs.
Setup and Ease of Use
IntegrationHub requires ServiceNow platform expertise. Users must understand Flow Designer, Spoke configuration, and ServiceNow’s data model. Initial setup involves requesting plugin activation, configuring connections, and building flows. For custom Spokes, expect significant development time.
Exalate uses a unified console accessible via a web browser at exalate.app. The setup process is straightforward:
Enter your source system URL and verify the system
Enter your destination system URL and verify the system
Name your connection
Configure sync rules using AI-assisted Groovy scripts
Activate and start syncingin
No installation on individual systems is required for cloud deployments.
Verdict: Exalate is significantly easier to set up and manage, especially for users without deep ServiceNow expertise.
Pricing Comparison
IntegrationHub Pricing:
Starter Pack: Free with 1,000,000 transactions per year
Higher tiers: Paid subscriptions based on transaction volume and Spoke access
Pricing model: Transaction-based (each API call counts)
Hidden costs: Exceeding transaction limits, additional Spoke access, custom Spoke development and maintenance
IntegrationHub pricing is not publicly listed. Organizations must contact ServiceNow for custom quotes based on their requirements.
Exalate Pricing:
Exalate uses outcome-based pricing. You pay for active items currently in sync, not transactions or user counts. If you sync 50 items between Jira and ServiceNow, you pay for those 50 items regardless of how many updates occur.
Verdict: Exalate offers transparent, predictable pricing based on actual sync outcomes. IntegrationHub’s transaction-based model can lead to unpredictable costs at scale.
Considering build vs. buy? Use the Build vs. Buy Calculator to compare the total cost of building custom integrations versus using Exalate.
Use Cases: Who Should Choose What
Choose IntegrationHub If:
You are fully invested in the ServiceNow ecosystem and need to automate workflows within ServiceNow
Your integration needs are primarily one-way (ServiceNow triggering actions in external systems)
You have ServiceNow developers on staff who can build and maintain custom Spokes
Your use cases are covered by existing pre-built Spokes
IntegrationHub is Not Ideal For:
True bidirectional synchronization where both systems need equal update capabilities
Cross-company integrations with external partners, vendors, or MSPs
Organizations without dedicated ServiceNow development resources
High-volume sync scenarios where transaction limits become costly
Teams that need to connect platforms outside ServiceNow’s Spoke ecosystem
Choose Exalate If:
You need true bidirectional sync between ServiceNow and other platforms
You collaborate with external partners, vendors, MSPs, or customers who use different tools
You want predictable pricing based on actual sync outcomes, not transaction volume
You need deep customization without the maintenance burden of custom Spoke development
Your current IntegrationHub setup has become maintenance-heavy, and you want to expand to additional teams with less effort
You are hitting IntegrationHub transaction limits or rate-limiting constraints, and need a solution that operates independently
You work across multiple platforms (Jira, ServiceNow, Salesforce, Azure DevOps, Zendesk, etc.)
Exalate is Not Ideal For:
Simple one-way automations that existing IntegrationHub Spokes handle well
Organizations that only use ServiceNow and have no external integration requirements
Teams looking for a no-code solution
Handling Common Objections
“Exalate requires scripting skills”
Exalate gives you full Groovy scripting control. Aida AI can generate scripts from natural language descriptions, reducing the learning curve significantly. For organizations that prefer hands-off implementation, Exalate offers managed services where the team handles the entire integration setup.
“IntegrationHub is already included with ServiceNow”
The Starter Pack is free, but it has a 1,000,000 transaction limit. High-volume integrations can exceed this quickly. Additionally, many useful Spokes require higher-tier subscriptions. Custom Spoke development adds cost. Compare the total cost of ownership, including development and maintenance time, against Exalate’s predictable pricing.
“We already have IntegrationHub in place”
Exalate runs independently and does not conflict with existing IntegrationHub implementations. You can use Exalate for bidirectional sync scenarios while keeping IntegrationHub for ServiceNow-specific automations. Many organizations use both tools for different purposes.
“Exalate seems complex”
The unified console simplifies management significantly. Setting up a connection takes minutes, not days. Test Run lets you validate configurations before going live. Script versioning means you can always roll back if something breaks. Aida AI provides troubleshooting assistance in plain language.
“We need enterprise-grade security”
Exalate is ISO 27001 certified. Data is encrypted in transit and at rest. The platform uses flexible authentication models (API keys, OAuth, PAT) that decouple integration access from ticketing system credentials. Visit the Exalate Trust Center for complete security documentation.
“What if we need a connector that doesn’t exist?”
Enterprise customers can request custom connector development. Exalate also maintains an early access program for connectors in development, including TOPdesk, Xurrent, ManageEngine ServiceDesk Plus, Ivanti, ConnectWise, SolarWinds, and HaloITSM.
Customer Reviews and Testimonials
Exalate Reviews
“The flexibility of the Groovy scripting engine lets us handle sync scenarios that no other tool could manage. Complex field mappings, conditional logic, custom transformations—it handles everything.” — Verified G2 User, Enterprise IT
“Aida cut our troubleshooting time in half. When something breaks, it explains the error and suggests exactly what to fix.” — Verified G2 User, Mid-Market
“We sync incidents between our ServiceNow instance and our partner’s Jira. Exalate handles the bidirectional updates seamlessly. Both teams stay in their preferred tool.” — Verified G2 User, IT Services
Key stats from Exalate’s 2025 field report:
82% of users report eliminating manual copy-paste between systems
70% use Exalate for cross-company collaboration
Over 70% classify their Exalate integrations as mission-critical
IntegrationHub Reviews
Positive feedback:
Pre-built Spokes enable quick setup for standard use cases
Tight integration with Flow Designer and the ServiceNow ecosystem
Low-code approach reduces development time for basic automations
Challenges noted:
Troubleshooting is difficult for first-time users
Learning curve is steep
Custom Spoke development requires significant expertise
Data residency options available on the Enterprise plan
Data residency options available on Enterprise plan
Both platforms maintain enterprise-grade security. Exalate’s decoupled access control means you can grant integration management access without compromising ticketing system credentials.
Support, Documentation, and Community
IntegrationHub Support
ServiceNow documentation and knowledge base
ServiceNow Community forums
Support tied to the ServiceNow subscription
ServiceNow training and certification programs
Exalate Support
Plan
Support Level
Starter& Scale
Community support + Standard Support(no SLA)
Pro
Standard support with SLA + proof-of-concept assistance
Managed services for organizations that want hands-off implementation
Final Verdict
ServiceNow IntegrationHub works best for organizations deeply invested in ServiceNow who need simple, one-way automations covered by existing Spokes. It is a sensible choice when you have ServiceNow developers on staff, and your integration needs stay within the ServiceNow ecosystem.
Exalate is the stronger choice for:
True, real-time bidirectional intra and cross-company synchronization
Cross-company collaboration with external partners
Predictable, outcome-based pricing
Deep customization without custom Spoke maintenance
Teams that need to expand integrations to additional platforms faster
If you are currently using IntegrationHub plus custom development and finding it maintenance-heavy, Exalate provides a path to simplify operations while gaining more flexibility.
Frequently Asked Questions
1. Does Exalate use IntegrationHub or inherit its transaction limits?
No. Exalate operates as a standalone solution completely independent of IntegrationHub. It does not consume IntegrationHub transactions, is not subject to IntegrationHub rate limits, and can run alongside an existing IntegrationHub implementation without conflicts.
2. Can Exalate handle bidirectional sync between ServiceNow and Jira?
Yes. Bidirectional sync is Exalate’s core capability. Both ServiceNow and Jira can create and update items that sync to the other system in real time. You control exactly what data flows in each direction through separate incoming and outgoing sync rules.
3. How does Exalate’s pricing compare to IntegrationHub?
IntegrationHub uses transaction-based pricing where each API call counts toward your limit. Exalate uses outcome-based pricing where you pay for active items in sync, regardless of how many updates occur. This makes Exalate costs more predictable, especially for high-volume sync scenarios.
4. What platforms does Exalate support besides ServiceNow?
Exalate supports Jira Cloud, Azure DevOps (Cloud and Server), Salesforce, Zendesk, GitHub, Freshservice, Freshdesk, and Asana. Early access connectors include TOPdesk, Xurrent, ManageEngine ServiceDesk Plus, Ivanti, ConnectWise, SolarWinds, and HaloITSM. Enterprise customers can request custom connector development.
5. Can Exalate help reduce maintenance overhead from custom integrations?
Yes. Unlike custom Spokes that require ongoing maintenance as systems evolve, Exalate provides a standardized platform with script versioning, rollback, and Test Run capabilities. This reduces the maintenance burden compared to custom development.
6. Is Exalate secure enough for enterprise use?
Yes. Exalate is ISO 27001 certified. Data is encrypted in transit and at rest. The platform uses SentinelOne for endpoint protection. Visit trust.exalate.com for complete security documentation.
7. Can I use Exalate for cross-company integrations with external partners?
Yes. Cross-company collaboration is one of Exalate’s primary use cases. Trust Levels provide granular control over what data external collaborators can access and modify.
8. Does Exalate offer a free trial?
Yes. Exalate offers a 30-day free trial with access to all connectors. You can test your specific use case before committing to a paid plan.
Ready to see how Exalate handles your integration requirements?
Software teams working on different platforms face a familiar challenge: keeping everyone aligned without forcing them into a single tool. Azure DevOps excels at project management and CI/CD, while GitHub dominates version control and open-source collaboration. When your organization uses both, you need integration that keeps work synchronized without creating bottlenecks.
This guide explains how to integrate Azure DevOps and GitHub, what features matter most when choosing integration tools, and how to avoid common pitfalls that create more problems than they solve.
Note: This guide uses Exalate as the integration platform. Exalate provides real-time bidirectional sync between Azure DevOps work items and GitHub issues, with AI-assisted configuration to handle complex mapping requirements.
Key Takeaways
Azure DevOps and GitHub serve different team needs—integration lets you use both without creating information silos
Bidirectional sync ensures changes made in either platform are automatically in the other
AI-assisted integration configuration reduces setup time from weeks to hours
Role-based sync control prevents teams from depending on each other’s workflows while maintaining visibility
Real-time triggers control exactly when work items sync based on status, labels, assignees, or custom conditions
Why Integrate Azure DevOps and GitHub
Azure DevOps
Azure DevOps provides comprehensive DevOps capabilities: project management, version control, CI/CD pipelines, test management, and artifacts. It integrates tightly with Microsoft’s ecosystem and supports both agile and waterfall methodologies.
Teams using Visual Studio or Eclipse benefit from native integration, and the platform scales from small teams to enterprise deployments.
You can deploy Azure DevOps in the cloud (Azure DevOps Services) or on-premises (Azure DevOps Server). The marketplace offers thousands of extensions for custom workflows.
GitHub
GitHub leads in version control and distributed development. It handles code hosting, pull requests, code review, and project milestones.
GitHub’s collaboration features make it the default choice for open-source projects and distributed teams. Microsoft acquired GitHub in 2018, but it remains independent from Azure DevOps with distinct features and workflows.
GitHub Enterprise adds enterprise-grade security, compliance, and deployment options for organizations needing self-hosted solutions.
Why Teams Use Both
Different teams need different tools. Backend developers might prefer Azure DevOps for its pipeline orchestration and test management, while frontend teams work in GitHub for its pull request workflow and community integrations. Product teams track work in Azure Boards, but engineering teams manage sprints in GitHub Projects.
Using both platforms without integration creates silos. Backend teams lose visibility into frontend progress. Support tickets in Azure DevOps disconnect from the GitHub issues that engineering teams use. Updates get duplicated manually, leading to inconsistencies and wasted time.
Integration solves this by syncing work items between platforms automatically. Your Azure DevOps sprint board shows GitHub issue status in real time. Comments made in GitHub appear in Azure DevOps work items. Engineers working in their preferred tool automatically keep stakeholders informed in the other system.
What to Consider When Choosing an Azure DevOps GitHub Integration Tool
Not all integration solutions work the same way. The right tool depends on your sync complexity, team size, security requirements, and how much customization you need. Here’s what matters:
Bidirectional Sync
Changes should flow in both directions automatically. When someone updates an Azure DevOps work item, the corresponding GitHub issue should update within seconds. When a developer closes a GitHub issue, the linked Azure DevOps item should close too. One-way sync forces teams to work in a specific platform, defeating the purpose of integration.
Field Mapping Flexibility
Different platforms use different field names and structures. Azure DevOps has “State” while GitHub uses “Status.” Azure DevOps work items have rich custom fields; GitHub issues have labels. Your integration tool needs to map these fields correctly, including custom fields your organization created.
AI-assisted configuration (like Exalate’s Aida) generates field mapping automatically from natural language descriptions, reducing setup time significantly.
Trigger-Based Control
Real-time sync is powerful, but you don’t always want to sync everything immediately. Triggers let you define conditions: sync only when a work item reaches “In Progress,” sync issues with specific labels, sync to certain repositories based on assignee. This prevents incomplete work from syncing prematurely and reduces noise.
Security and Compliance
Development data is sensitive. Your integration tool should use OAuth for authentication (never store passwords), encrypt data in transit with TLS 1.2 or higher, and ideally hold certifications like ISO 27001.
Check whether the vendor publishes security documentation. Exalate maintains a Trust Center with current certifications and security practices. Role-based access control also prevents unauthorized users from syncing sensitive work items across platforms.
Scalability Across Platforms
Your tech stack will evolve. Today, you need Azure DevOps and GitHub; next quarter you might add Freshservice for support tickets or Asana for marketing project management.
Choose an integration platform that supports multiple connectors—Jira, ServiceNow, Freshdesk, Azure DevOps Server, Asana, GitHub Enterprise, and custom REST APIs. This prevents you from managing multiple integration tools as your stack grows.
Connection Reliability
Outages happen. Your integration should queue changes when one platform goes offline and replay them in order when connectivity returns. This prevents data loss and keeps teams working during downtime.
Common Azure DevOps GitHub Integration Use Cases
Development Team Visibility Across Platforms
Case: A company’s backend team uses Azure DevOps for sprint planning and pipeline management, while the frontend team works entirely in GitHub. Product managers track progress in Azure Boards but have no visibility into frontend work happening in GitHub issues.
Solution: Integrate Azure DevOps work items with GitHub issues bidirectionally. Map Azure DevOps “State” to GitHub “Status,” sync comments, and link pull requests to work items. Configure triggers to sync only when work items move to “In Progress” or “Done” to avoid syncing planning-stage work.
Cross-Functional Project Coordination
Case: An enterprise runs a multi-team project spanning DevOps (Azure DevOps), engineering (GitHub), and support (Freshservice). Each team works in its preferred platform, but dependencies create coordination overhead. Status meetings consume hours each week just to align on what’s completed.
Solution: Sync Azure DevOps work items with GitHub issues and Freshservice tickets in a unified integration setup. When support escalates a ticket, it creates a linked work item in Azure DevOps and a GitHub issue for engineering investigation. Updates in any platform sync to the others automatically.
Open Source and Internal Development Integration
Case: A software company maintains open-source projects on GitHub.com while managing internal enterprise development in Azure DevOps. External contributors submit pull requests on GitHub; internal teams need to track these contributions in Azure DevOps for release planning and compliance.
Solution: Set up one-way sync from GitHub to Azure DevOps for external contributions, and bidirectional sync for internal repositories. Use triggers to sync only pull requests with specific labels (e.g., “ready-for-review”) to avoid syncing every draft PR.
Multi-Repository Development Coordination
Case: A platform team maintains infrastructure code across 12 GitHub repositories. Product teams create feature requests in Azure DevOps, but the platform team doesn’t monitor Azure DevOps—they work exclusively in GitHub Projects. Feature requests get lost or delayed because the platform team never sees them.
Solution: Sync Azure DevOps feature requests tagged “platform-team” to GitHub issues in a central coordination repository. The platform team triages these issues in GitHub Projects and distributes work across their 12 repositories. Status updates sync back to Azure DevOps automatically.
How Exalate Handles Azure DevOps GitHub Integration
Exalate provides real-time bidirectional sync between Azure DevOps and GitHub with AI-assisted configuration, flexible field mapping, and trigger-based control.
If you’re on Exalate Classic, then you can import your existing nodes and connections using the “Import connection” feature.
This will help you retain existing configurations and sync rules as you move to New Exalate.
To get started with Exalate for GitHub or discuss your use case and requirements, please contact sales.
AI-Assisted Configuration
Instead of manually writing mapping rules, describe what you want in natural language. Aida, Exalate’s AI-assisted configuration assistant, generates the field mapping automatically.
Example prompt: “Sync Azure DevOps work item title to GitHub issue title, sync State to Status, and add Azure DevOps comments as GitHub comments.”
Aida generates the mapping code, highlights changes, and lets you review before applying. For complex mappings—like converting Azure DevOps tags to GitHub labels or syncing custom fields—Aida handles the transformation logic.
This reduces configuration time from days (writing and testing custom scripts) to minutes.
Field Mapping and Data Transformation
Exalate syncs standard fields (title, description, status, assignee) and custom fields. You control which fields sync and how they transform between platforms.
Common mappings:
Azure DevOps “State” → GitHub “Status”
Azure DevOps “Tags” → GitHub “Labels”
Azure DevOps “Assigned To” → GitHub “Assignee”
Azure DevOps “Description” → GitHub “Body”
Azure DevOps “Comments” → GitHub “Comments”
Custom transformations handle differences in field format. For example, Azure DevOps stores priority as “1, 2, 3, 4” while GitHub uses labels like “priority: high.” Exalate maps these automatically if you specify the relationship.
Trigger-Based Sync Control
Triggers define when sync happens. You can sync based on:
Status changes: Sync only when work items reach “In Progress” or “Done”
Labels or tags: Sync GitHub issues with label “sync-to-azure” or Azure DevOps work items tagged “external-team”
Assignee: Sync work assigned to specific users or teams
Custom fields: Sync when a custom field meets certain conditions
Triggers prevent premature sync of draft work and reduce noise by syncing only relevant items.
Common Integration Pitfalls and How to Avoid Them
Syncing Too Much Too Soon
Teams often start by syncing every field, every work item, and every repository. This creates noise, slows down performance, and overwhelms teams with irrelevant updates.
Solution: Start small. Sync one project to one repository with basic field mapping. Add complexity gradually as you understand what your teams actually need. Use triggers to filter sync to relevant items only.
Unclear Ownership
When the same work item exists in two platforms, teams sometimes duplicate effort or both assume the other team is handling it.
Solution: Define ownership clearly. If a work item originates in Azure DevOps, the Azure DevOps assignee owns it. GitHub shows the work for visibility, but the owner makes decisions in Azure DevOps. Document this in your integration setup and communicate it to all teams.
Notification Overload
Every sync generates notifications in both platforms. Multiply this across hundreds of work items and you create alert fatigue.
Solution: Configure notification settings in both Azure DevOps and GitHub to reduce noise. Turn off notifications for automated updates or sync-related comments. Use digest notifications instead of real-time alerts. Let your integration tool handle the sync; your team doesn’t need to watch every update.
Ignoring Security Configuration
Default sync often syncs everything to everyone. This exposes sensitive work items to teams or users who shouldn’t see them.
Solution: Use role-based sync control. Configure triggers to sync only work items visible to specific users or teams. Review your connection permissions regularly and audit who can create or modify sync rules.
Treating Integration as “Set and Forget”
Team needs to change. New custom fields get added, workflows evolve, and new teams join the organization. Integration that worked six months ago might not fit current needs.
Solution: Schedule quarterly reviews of your integration setup. Check if new fields need mapping, if triggers still match current workflows, and if new teams need access. Integration is a living process, not a one-time setup.
Frequently Asked Questions
How does Exalate integrate Azure DevOps and GitHub?
Exalate connects Azure DevOps work items and GitHub issues with real-time bidirectional sync. You authorize Exalate to access both platforms using OAuth (no passwords stored), then configure which projects and repositories sync.
Aida, Exalate’s AI-assisted configuration assistant, generates field mapping from natural language prompts—describe what you want synced, and Aida creates the rules automatically. Setup takes hours instead of days or weeks.
Can Exalate sync Azure DevOps work items with GitHub issues in real time?
Yes, Exalate provides real-time bidirectional sync. When someone creates or updates a work item in Azure DevOps, the corresponding GitHub issue updates within seconds. The same happens in reverse—changes in GitHub are reflected immediately in Azure DevOps. You control which fields sync (title, description, status, assignee, comments, custom fields) and define triggers to control when sync happens based on status, labels, or other conditions.
Does Exalate support GitHub Enterprise and Azure DevOps Server?
Yes, Exalate supports all deployment combinations: Azure DevOps Services with GitHub.com, Azure DevOps Server with GitHub Enterprise Server, and any cloud-to-server or server-to-server configuration. Whether you’re running entirely in the cloud or have on-premises requirements, Exalate handles the connection securely with the same features and performance.
How does Aida help configure Azure DevOps GitHub sync in Exalate?
Aida is Exalate’s AI-assisted configuration assistant. Instead of manually writing mapping rules, you describe what you want in natural language. For example: “Sync Azure DevOps State to GitHub Status, and add Azure DevOps comments as GitHub comments.” Aida generates the field mapping code, highlights suggested changes, and lets you review before applying. For complex transformations—like converting Azure DevOps tags to GitHub labels or handling custom fields—Aida writes the logic automatically.
What fields can Exalate sync between Azure DevOps and GitHub?
Exalate syncs standard fields like title, description, status, assignee, priority, and comments. It also handles custom fields you’ve created in either platform. Common mappings include Azure DevOps “State” to GitHub “Status,” “Tags” to “Labels,” “Assigned To” to “Assignee,” and “Description” to “Body.” Exalate handles format differences automatically—for example, converting Azure DevOps priority numbers to GitHub priority labels.
How much does Exalate cost for Azure DevOps GitHub integration?
Exalate pricing scales with the number of synced items. There’s a free plan for basic use cases and paid plans based on sync volume. Check out our pricing page to see which plan works best for your use case.
Can Exalate connect one Azure DevOps project to multiple GitHub repositories?
Yes, you can sync one Azure DevOps project to several GitHub repositories, multiple Azure DevOps projects to one GitHub organization, or any combination that fits your workflow. Each connection can have different field mappings and triggers, so one project might sync differently from another based on team requirements.
How secure is Exalate for Azure DevOps GitHub integration?
Exalate is ISO 27001:2022 certified. It uses OAuth for authentication (never stores passwords), encrypts all data transfers with TLS 1.2 or higher, and implements role-based access control to restrict who can create connections and define sync rules. Exalate publishes detailed security documentation, certifications, and compliance information from our Trust Center.
Can Exalate integrate Azure DevOps and GitHub with other platforms simultaneously?
Yes. Exalate supports multi-platform ecosystems. You can integrate Azure DevOps with GitHub for engineering, Freshservice for support, Asana for marketing, Jira for product management, and ServiceNow for IT operations. This creates a unified view across your entire tech stack without managing multiple integration tools or learning different sync configurations for each platform.
In the global knowledge economy, companies need agility to stay competitive. To achieve it, corporations continuously improve their business workflows for products and services. That’s given rise to work management systems that depend heavily on integrating data and information within the company to optimize internal processes.
But today’s corporations also live in an interconnected world. From large enterprises to small and medium businesses, companies exchange data with one another at many stages of their workflows, and integration between internal teams, while important, stops at company borders.
Different organizations run different work management systems. Different data models. Different processes. And it’s this data in these different systems that must be connected if companies want to reduce friction and improve efficiency.
So the question remains: how do companies integrate data between themselves in the most efficient way possible? In an earlier article, The Journey of Software Integration, we concluded that to optimize work management systems without sacrificing internal processes, automated integration was the only viable answer.
But what’s the best method of cross-company integration? Should companies build their own integration or buy a best-of-breed software package? This article breaks down the advantages and disadvantages of each approach by walking through the phases of an integration project, and the hidden costs most teams don’t anticipate until it’s too late.
Key Takeaways
Building integration in-house gives you control but creates compounding costs in customization, maintenance, and knowledge transfer that far exceed initial estimates.
Buying commercial integration software reduces long-term costs because vendors handle upgrades, documentation, and support across the lifecycle of the project.
The real cost difference between build and buy shows up after launch—during customization, maintenance, and system upgrades—not during initial development.
Cross-company integration adds layers of complexity that in-house teams rarely plan for, including coordinating changes across independent organizations with different systems and processes.
Autonomy, flexibility, and reliability are the three features that matter most when evaluating a commercial integration solution for cross-company scenarios.
AI-assisted configuration and pre-built connectors dramatically compress implementation timelines and reduce the scripting expertise required to get integrations running.
When Does Build vs. Buy Become a Real Decision?
Not every integration scenario requires a formal build vs. buy evaluation. If you’re connecting two internal tools with a simple one-directional data push, a lightweight script might be enough.
The build vs. buy decision becomes critical when:
Your integration crosses company boundaries. Cross-company integrations introduce variables you don’t control: your partner’s system upgrades, their security requirements, their data model changes. Building for these scenarios means building for unpredictability.
You need bidirectional synchronization. One-way data pushes are straightforward. Bidirectional sync where changes on either side propagate to the other—while respecting each organization’s internal rules—is exponentially more complex.
Multiple platforms are involved. If your integration spans Jira, ServiceNow, Salesforce, Azure DevOps, Zendesk, GitHub, Freshservice, Freshdesk, Asana, or combinations of these, the permutations of data mapping, field transformations, and error handling grow fast.
You expect your integration needs to evolve. Business processes change. New partners come on board. Systems get upgraded or replaced. If your integration can’t adapt without a development sprint, you’ll spend more time maintaining it than using it.
If any of these apply, the build vs. buy analysis is worth doing seriously.
The True Cost of Building Integration In-House
Building integration in-house looks attractive on paper. The development team is already on payroll. Initial costs seem manageable. It’s just another project, right?
Not quite. The actual cost of building an integration unfolds across several phases—and the expenses compound at each stage.
Phase 1: Requirements and Architecture
Before writing a single line of code, the team has to define the integration requirements in detail. This includes determining the communication path between environments (deployment model, authentication, authorization, network security), establishing a common data model with proper field mapping and data transformations, defining failure handling and notification protocols, and planning for data synchronization delays and rollback procedures.
This phase is foundational. A three-character text field won’t map to a two-digit field, no matter how much you want it to. That sounds trivial until your team spends days troubleshooting exactly this kind of mismatch, which happens more often than anyone admits.
For cross-company integration, the complexity multiplies. You’re not just aligning your own systems. You’re negotiating data models, security protocols, and change management processes with an external organization that has its own priorities and constraints.
Phase 2: Development and Validation
Assuming requirements are solid, development can start. But the real work isn’t coding the happy path; it’s handling errors and exceptions. Sophisticated integration applications capture and process data anomalies without crashing. They route integration problems back to the right technical personnel. And they do this reliably across different systems, data formats, and edge cases.
Validation is equally demanding. The integration must be tested for functionality, performance, stability, and availability. Tests must confirm that duplication or unintentional errors don’t corrupt data or crash the system. A country code like KOR won’t fit into a two-letter field expecting KR, and if your validation suite doesn’t catch that before production, your users will.
Phase 3: Production Rollout
Rolling out an integration application to production systems across multiple companies requires precision. Both sides must deploy simultaneously. The rollout must be transparent to end-users because unplanned disruptions to production work management systems can cost thousands or millions in lost revenue.
Every production rollout needs rollback plans. And ongoing monitoring must be in place to catch data anomalies and service interruptions before they cascade. Trained personnel need to know what to look for and how to respond.
Phase 4: Customization
This is where reality sets in. Business processes are dynamic. The integration you built last quarter doesn’t match today’s requirements because someone added a new data field, restructured a workflow, or onboarded a new partner.
Unless the original development team designed for end-user customization, every change request goes back to the development queue. For cross-company integrations, customizations must be coordinated between DevOps teams at both organizations. That’s a long, drawn-out process even in the best case.
The worst case? Your development team is juggling multiple projects. Customization requests compete with other priorities. Changes languish for months unless someone escalates them. Meanwhile, the business is working around the integration’s limitations instead of benefiting from it.
Phase 5: Maintenance
In software engineering, it’s well-established that maintenance accounts for the majority of total project costs. For cross-company integrations, those costs are even higher.
When underlying systems get upgraded or replaced entirely, applications built for the original systems need to be modified or completely rewritten. Documentation needs updating. And when the developers who built the integration leave, knowledge transfer to new personnel becomes a problem in itself.
Here’s a real case: a large corporation running in-house custom integration software faces maintenance difficulties every year with a major partner. The partner relies on short-term contractors to maintain their workflow systems. There’s no continuity between contractors from year to year. Every time the corporation tries to customize or upgrade the integration, it has to re-educate a new contract development team from scratch.
On one occasion, the corporation had to deploy its own developers to the partner’s site just to help with upgrades needed on their end. The integration is essential for the business, but these difficulties have caused costs to skyrocket.
This “perfect storm”—system upgrades, staff turnover, documentation gaps, cross-company coordination—dramatically drives up costs and makes custom integrations increasingly difficult to sustain.
Calculate time and money savings from automated bidirectional sync.
Rather than defaulting to one approach, evaluate the decision against specific criteria.
Factor
Build In-House
Buy Commercial Software
Initial cost
Lower (team is already on payroll)
Higher (licensing and subscription fees)
Customization cost
High (requires dev team coordination across companies)
Lower (vendor provides tools and support for changes)
Maintenance cost
Very high (compounds over time with system upgrades and staff turnover)
Predictable (included in support agreements)
Time to deploy
Months to years depending on complexity
Weeks to months with pre-built connectors
Adaptability to change
Low (changes require development cycles)
High (designed for evolving requirements)
Cross-company coordination
Heavy (both sides must coordinate DevOps efforts)
Lighter (each side configures independently)
Knowledge risk
High (dependent on specific developers)
Low (vendor handles documentation and training)
Security and compliance
Self-managed (must build and maintain your own controls)
Vendor-managed with certifications (e.g., ISO 27001:2022)
Platform coverage
Limited to what you build for
Broad (pre-built connectors for major platforms)
The pattern is clear: building looks cheaper at the start, but the cost curve inverts during customization and maintenance. Buying looks more expensive upfront, but the total cost of ownership is significantly lower over the life of the integration.
What Makes Commercial Integration Software Worth Buying?
Not all commercial integration platforms are equal. The features that matter most for cross-company integration, where complexity, independence, and reliability are non-negotiable, fall into a few categories.
Autonomy Over Configuration
Configurations evolve. Workflows change on one side, and the integration needs to accommodate that without forcing changes on the other side. The right commercial solution gives each organization independent control over how they send and receives data. Changes to internal processes on one side don’t break the integration or require the other side to reconfigure.
This autonomy is especially critical when integrating across company boundaries. Your partner shouldn’t need to modify their workflows just because you changed yours.
Flexibility for Unknown Future Requirements
With cross-company integrations, you never know what requirements will come next. Maybe you start with a simple mapping between Jira work items and ServiceNow incidents. Then you need to add Salesforce cases. Then a partner requests Zendesk ticket sync. Then someone wants to pull in GitHub pull requests.
A rigid integration that handles today’s requirements but can’t scale to tomorrow’s is a liability. The commercial solution you choose should handle multi-platform scenarios without requiring a rebuild every time you add a new system.
The ability to connect ITSM tools (ServiceNow, Freshservice, Freshdesk, Zendesk), development platforms (Jira, Azure DevOps, Azure DevOps Server, GitHub, Asana), CRM systems (Salesforce, HubSpot), and additional platforms through custom connectors for any REST API-enabled system is what separates enterprise-grade platforms from point solutions.
Reliability Under Real-World Conditions
Systems go down. Your partner upgrades their Jira instance over a weekend. A network issue causes a six-hour outage. A data spike overwhelms the sync queue.
The integration must handle all of this gracefully. Changes need to sync in the same order they occurred, even after downtime. Data integrity can’t be compromised because of a temporary failure. Retry mechanisms, queueing, and ordering guarantees aren’t optional, but foundational.
AI-Assisted Configuration
Modern integration platforms use AI to compress implementation timelines and reduce errors. AI-assisted configuration converts natural language requirements into working sync rules, making complex integrations accessible without deep scripting expertise. This is particularly valuable for cross-company scenarios where each side may have different technical resources available.
Security Without Compromise
Cross-company data exchange demands robust security. When evaluating a commercial solution, verify that it supports data encryption in transit (TLS 1.2/1.3), JWT-based authentication, and role-based access controls. Look for platforms with certifications like ISO, which provide independent validation of security practices.
For sensitive integrations, check the vendor’s Trust Center documentation to understand data handling, residency options, and compliance posture before committing.
Build vs. Buy in Practice: Use Cases
Use Case 1: Multi-Partner Service Delivery
Case: A managed services provider supports 15 clients, each using a different combination of ServiceNow, Freshservice, Freshdesk, and Zendesk. Internal work is tracked in Jira. Every client has unique escalation paths, SLA requirements, and data sensitivity rules.
Solution: Rather than building and maintaining 15 separate custom integrations—each requiring coordination with the client’s IT team—the MSP deploys a commercial integration platform with pre-built connectors for all five platforms. Each connection is configured independently, so adding a new client doesn’t require rewriting existing integrations.
Real-World Application: The MSP eliminated manual ticket mirroring that was consuming 20+ hours per week across the support team. New client integrations went from a 3-month development cycle to a 2-week configuration process. When one client migrated from Zendesk to Freshservice, the integration was reconfigured without affecting any other client connections.
Use Case 2: Engineering Collaboration Across Organizations
Case: An automotive OEM collaborates with a tier-1 supplier on embedded software development. The OEM uses Azure DevOps for work item tracking. The supplier uses Jira. Both need to share work item status, priorities, comments, and attachments—but neither organization will expose their full project data to the other.
Solution: A commercial integration platform with independent configuration on each side. The OEM controls exactly what data leaves their Azure DevOps environment. The supplier controls how incoming data maps to their Jira work items. Neither side sees the other’s internal workflows.
Real-World Application: The integration reduced the supplier’s status update cycle from weekly email reports to real-time sync. Escalations that previously took 48 hours (because they required someone to manually create a corresponding work item in the other system) now happen in minutes. When the OEM added a new custom field for regulatory classification, they updated their outgoing sync rules without requiring any changes on the supplier’s side.
Use Case 3: Scaling Integration After a Merger
Case: Two mid-size SaaS companies merge. One runs entirely on Salesforce and Jira. The other uses HubSpot, GitHub, and Asana. Leadership needs unified reporting across both tech stacks while keeping teams on their preferred tools during the transition.
Solution: A commercial integration platform connects Salesforce to HubSpot for customer data, Jira to GitHub for development work items, and Jira to Asana for cross-team project coordination. Each connection is configured independently and can be adjusted as teams gradually consolidate tools.
Real-World Application: Instead of forcing an immediate tool migration, which would have disrupted both teams’ productivity, the integration provided a unified view of customer and development data across both tech stacks. Over 18 months, teams migrated tools at their own pace while the integrations ensured no data was lost during the transition.
Hidden Costs of Building That Most Teams Miss
Beyond the obvious development and maintenance costs, building in-house integration has several costs that rarely make it into the initial budget estimate.
Opportunity cost. Every sprint your development team spends on integration is a sprint they’re not spending on your core product. For most companies, integration isn’t a differentiator—it’s plumbing. Buying a solution frees your team to work on what actually drives revenue.
Security overhead. Building and maintaining enterprise-grade security—encryption, authentication, access controls, compliance certifications—is a full-time effort. Commercial platforms invest millions in security infrastructure and maintain certifications like ISO 27001 that would be prohibitively expensive for a single company to achieve for an internal integration tool.
Partner friction. Every time you need to coordinate a change with a partner’s development team, both organizations incur scheduling, communication, and testing overhead. Commercial solutions that give each side independent configuration eliminate most of this friction.
Scalability cost. Your first integration might connect two systems. But integrations tend to multiply. Once the business sees value in one connection, requests for more follow. Custom-built integrations rarely scale gracefully—each new connection is essentially a new project. Commercial platforms with pre-built connectors and reusable configurations scale horizontally with minimal incremental effort.
Compliance risk. As regulatory requirements evolve, your in-house integration must evolve with them. Commercial vendors bake compliance into their platform updates. With an in-house build, compliance is your ongoing responsibility, and the cost of getting it wrong is steep.
Calculate time and money savings from automated bidirectional sync.
If you’ve decided to buy, here’s what to look for based on what actually matters for cross-company integration.
Independent configuration per side. Each organization should control its own sync rules without requiring the other side to make changes. This is non-negotiable for cross-company scenarios.
Pre-built connectors with depth. Check that the platform supports native connectors for the systems you use today (Jira, ServiceNow, Salesforce, Azure DevOps, Zendesk, GitHub, Freshservice, Freshdesk, Asana, HubSpot) and offers custom connectors for systems with REST APIs. But don’t just count connectors—verify depth. Can you sync custom fields, attachments, comments, and relationships? Or just basic ticket data?
AI-assisted configuration. Platforms that offer AI-assisted setup—like Aida, which helps scope integration requirements and generates configuration logic from natural language—significantly reduce implementation time and the scripting expertise required to get started.
Error handling and reliability. Ask about retry mechanisms, message ordering guarantees, and how the platform handles downtime on either side. These aren’t edge cases—they’re everyday realities of cross-company integration.
Vendor security posture. Review the vendor’s security certifications (ISO 27001:2022), encryption standards (TLS 1.2/1.3), authentication methods (JWT, RBAC), and Trust Center documentation. Cross-company data exchange demands enterprise-grade security.
Total cost of ownership. Compare the subscription cost against your estimated build cost over 3-5 years. Include maintenance, staff turnover, system upgrades, customization requests, and security overhead. Use a pricing calculator to quantify the comparison based on your specific data volumes and team sizes.
Conclusion
When cross-company integration becomes essential to optimizing workflows and work management systems, companies face a classic make-or-buy scenario.
Confronted with the upfront costs of enterprise integration software, many corporations are tempted to build internally. The development staff is already there. Initial costs seem manageable. But the cost curve tells a different story.
While initial costs for an in-house project may appear cheaper, the difficulties during customization and maintenance drive costs exponentially higher. Customizations must be coordinated across both organizations. System upgrades require application rewrites. Staff turnover creates knowledge gaps. And every one of these problems compounds over time.
Commercial integration platforms flip this equation. The upfront acquisition cost is higher, but it drops off dramatically in customization and maintenance. Vendors provide documentation, training, best practices for customization, and support at every phase. The software is built with underlying system changes in mind and operates independently of those changes.
The most critical advantage? Integration transparency. Your focus stays on optimizing your business, not wrestling with messy integration projects. The right commercial integration solution gives you the autonomy, flexibility, and reliability to execute cross-company integrations while keeping your attention where it belongs—on running your business.
Exalate was built to meet exactly these criteria. To find out how Exalate fits into your enterprise plan, book a call with our experts.
FAQs
What is the main difference between building and buying an integration solution?
Building in-house gives you full control over the integration but creates compounding costs in maintenance, customization, and staff-dependent knowledge. Buying a commercial solution like Exalate costs more upfront but dramatically reduces long-term expenses because the vendor handles upgrades, documentation, security certifications, and support. Research suggests self-maintained integrations exceed the investment in third-party solutions by 40-70% over time.
When should a company build integration in-house instead of buying?
Building makes sense when your integration is purely internal, involves a single connection between two systems you fully control, and is unlikely to change significantly over time. Once you’re dealing with cross-company scenarios, multiple platforms, bidirectional sync, or evolving requirements, a commercial solution typically delivers better ROI.
What platforms does Exalate support for cross-company integration?
Exalate supports native connectors for Jira, ServiceNow, Salesforce, Azure DevOps (Service and Server), Zendesk, GitHub, Freshservice, Freshdesk, Asana, and HubSpot. For any platform with an available REST API, Exalate offers custom connectors that extend its reach beyond the pre-built options.
How does AI-assisted configuration help with cross-company integration?
AI-assisted configuration tools like Aida convert natural language requirements into working sync rules. Instead of writing integration scripts from scratch, you describe what you need in plain language, and the AI generates the appropriate configuration for review and refinement. This cuts implementation time significantly and makes complex integrations accessible to teams without deep scripting expertise.
How does Exalate handle security for cross-company data exchange?
Exalate is ISO 27001:2022 certified and implements TLS 1.2/1.3 encryption for data in transit, JWT-based authentication, and role-based access controls. Each side of the integration controls exactly what data is shared, so sensitive internal information stays internal. The platform’s security posture is documented in its Trust Center.
Can each side of the integration configure independently with Exalate?
Yes. Each organization controls its own outgoing and incoming sync rules. If you restructure a workflow on your side, you update your own configuration. The other side doesn’t need to change anything unless they want to handle the new data differently. This independence is what makes Exalate particularly effective for cross-company integration, where neither organization wants to depend on the other’s development schedule.
How long does it take to deploy Exalate compared to building a custom integration?
Custom integrations typically take months to years, depending on complexity, number of platforms, and cross-company coordination requirements. Exalate deployments with pre-built connectors typically take weeks. AI-assisted configuration through Aida compresses that further by generating sync rules from natural language descriptions rather than requiring manual scripting.
What’s the best way to calculate whether building or buying integration makes financial sense?
Compare the total cost of ownership over 3-5 years, not just initial development costs. Include maintenance hours, staff turnover and retraining, system upgrade adaptation, customization request turnaround, security overhead, and opportunity cost of developer time diverted from core product work. Exalate’s pricing calculator can help quantify this comparison based on your specific data volumes and team sizes.
Calculate time and money savings from automated bidirectional sync.
Can Exalate handle integration for managed service providers with multiple clients?
Yes. MSPs commonly use Exalate to manage integrations across dozens of clients, each running different platforms (ServiceNow, Freshservice, Freshdesk, Zendesk, Jira). Each client connection is configured independently, so adding a new client doesn’t affect existing integrations. When a client changes platforms, the relevant connection is reconfigured without touching others, which eliminates the rebuild cycle that makes custom MSP integrations so expensive to maintain.
Tracking and storing information across customer service and development tools is essential for team productivity. The challenge is keeping Zendesk tickets and GitHub work synchronized without manual data copying.
When customer support tickets contain details that engineering needs to see—and vice versa—misaligned data creates delays, duplicated effort, and missed context. A reliable integration solution like Exalate connects these platforms so both teams stay on the same page with current information.
This guide walks you through the benefits of integrating Zendesk and GitHub, what to look for in an integration tool, and why Exalate is built to handle this specific need.
Key Takeaways
Zendesk and GitHub store overlapping data that both teams need to see, making automatic synchronization critical for operational efficiency.
Without integration, manual data transfer between customer support and engineering wastes time and introduces errors.
An effective integration platform needs bidirectional sync, flexible field mapping, and the ability to work independently on both sides without breaking the connection.
Exalate handles this through AI-assisted configuration, allowing you to map fields and sync rules without writing code.
Integrating these platforms reduces response times, prevents duplicate work, and improves transparency between support and product teams.
Why Integrate Zendesk and GitHub
Zendesk handles customer support tickets while GitHub tracks code changes and development work. Though they serve different functions, the information they store often overlaps.
A customer report in Zendesk about a bug might relate directly to a GitHub issue or pull request. Without integration, someone has to manually copy that information between systems.
GitHub is the standard platform for code collaboration, issue tracking, and pull request management. When both are used by different teams in the same company, they need a way to exchange data seamlessly.
Consider a real scenario: Your support team receives a customer complaint about a feature in Zendesk. An engineer sees the same complaint in GitHub as a separate work item because someone had to manually copy it over.
Days later, both teams are working on solutions independently. With integration, that ticket appears in both places automatically, and updates from either platform sync back, keeping everyone aligned.
The Cost of Not Integrating
Manual data transfer isn’t just inconvenient—it’s expensive. Teams spend hours copying information between platforms. Information gets lost or duplicated. Status updates miss one side entirely.
DPG Media, a large media organization, assigned a full-time employee just to copy Zendesk data to GitHub before they implemented Exalate. After integrating, they eliminated that task entirely and freed up that employee for higher-value work.
Beyond time savings, integrated platforms improve decision-making. When support teams have access to the development status of reported issues, they can give customers accurate timelines.
When engineers see the actual customer impact of a bug, they can prioritize better. When work items stay synchronized across platforms, duplicate effort disappears.
Calculate time and money savings from automated bidirectional sync.
Features to Consider When Choosing an Integration Tool
Not all integration platforms work the same way. When evaluating which tool is right for your Zendesk-GitHub setup, look for these key capabilities:
Bidirectional Synchronization: Changes from either side should automatically sync to the other. If a GitHub issue gets closed, the related Zendesk ticket should close too. This prevents stale data and keeps both systems as the source of truth for their respective workflows.
Flexible Field Mapping: Different platforms use different field names and structures. Zendesk has “tickets” while GitHub has “issues” (or now “work items” in some systems). Your integration tool needs to let you map custom fields intelligently. Priority levels in Zendesk might need to become labels in GitHub. A tool that forces rigid mapping will frustrate both teams.
AI-Assisted Configuration: Writing synchronization rules manually requires scripting knowledge. Exalate’s Aida feature helps generate mapping rules based on your requirements, speeding up configuration from days to hours. You describe what you want to sync and the AI helps build the rules.
Trigger-Based Automation: You shouldn’t have to manually run syncs. Set rules that automatically synchronize work items when certain conditions are met (like when status changes to “open” or “in progress”). This ensures fresh data without human intervention.
Role-Based Access Control: Your support team doesn’t need to see every GitHub field, and engineers don’t need every Zendesk field. A good integration lets you filter what information flows where based on user roles and team needs.
Connector Coverage: Beyond Zendesk and GitHub, you likely have other tools (ServiceNow, Freshdesk, Freshservice, Asana, Azure DevOps Server, or custom APIs). Choose an integration platform that supports your full tech stack, so you can expand synchronization without changing tools later.
What Data Can Be Synchronized Between Zendesk and GitHub
When you integrate Zendesk and GitHub with Exalate, you can synchronize across a range of data types. The core fields include work item titles and descriptions, status updates, priority levels, assignees, and comments. Custom fields from either platform can also be included, so you’re not limited to standard fields.
Attachments and linked references transfer too, so if a GitHub pull request relates to a Zendesk ticket, that relationship can be visible in both places. This prevents silos where critical context lives in only one system.
The flexibility of field mapping means you decide what flows. Your support team might sync only certain ticket types to GitHub, while engineering syncs all work items back to Zendesk. Different teams have different needs, and a quality integration tool respects that autonomy.
How Exalate Handles Zendesk-GitHub Integration
Exalate connects Zendesk and GitHub through independent agents that sit between the two platforms. Each system maintains its own autonomy: Zendesk doesn’t need to know GitHub’s internal structure, and GitHub doesn’t need to conform to Zendesk’s format. Exalate translates between them.
This matters because teams evolve. If your company switches from GitHub to Azure DevOps Server next year, Exalate’s agents can handle that transition without forcing changes to your Zendesk setup. Each platform can change independently while the integration keeps working.
The platform uses AI-assisted configuration to simplify setup. Instead of manually writing synchronization rules, you describe your requirements through Aida, and it generates the mapping logic. For example, you might say: “Sync all open Zendesk tickets to GitHub where the priority is high or critical.” Aida translates that into the necessary field mappings and filters.
Data security is built in. Exalate uses industry-standard encryption (TLS 1.2 and higher) for all data in transit. Authentication relies on OAuth tokens and API keys specific to each platform, so Exalate never stores your Zendesk or GitHub credentials directly.
The platform holds ISO 27001:2022 certification and conducts regular security audits. For full details, review the Exalate Trust Center.
Integration Use Cases and Real-World Applications
Case 1: Rapid Support-to-Engineering Handoff
A customer reports a critical bug in your product through Zendesk. The support agent marks it as “urgent” in the ticket. Your engineering team in GitHub needs to see this immediately. Without integration, the ticket sits in Zendesk until someone manually creates a GitHub issue and copies over the details.
With Exalate, the ticket syncs to GitHub automatically, labeled as urgent based on your field mapping rules. Engineers see it in their regular workflow, and if they comment or change the status in GitHub, the update flows back to Zendesk instantly. The support team can tell the customer the current status without asking an engineer separately.
Case 2: Multi-Vendor Service Management (MSP Use Case)
Large IT service providers manage customer environments across multiple platforms: ServiceNow for incident management, Zendesk for customer-facing support, GitHub for internal tooling, and Freshservice for asset tracking.
Teams spend time re-entering the same incident data across three systems. Exalate consolidates this by syncing critical fields across ServiceNow, Zendesk, GitHub, and Freshservice.
When an incident is logged in ServiceNow, a corresponding ticket appears in Zendesk automatically, and the engineering team in GitHub can track related code fixes. Asset information from Freshservice enriches the context. No duplicate entry, no missing details.
Case 3: Cross-Company Partner Collaboration
Your company partners with agencies or vendors who use different tools. You run Zendesk internally; your partner manages work in GitHub. You want to sync specific project information without exposing internal tickets or allowing your partner to see all your support data.
Exalate lets you filter what syncs. Only tickets tagged with the partner’s project name sync to their GitHub instance. Comments from internal support teams stay internal. The partner’s GitHub updates come back to you, but in a read-only view. Each organization stays independent while collaboration stays seamless.
Common Challenges When Integrating Zendesk and GitHub
Even with integration tools, certain challenges come up. Understanding these ahead of time helps you configure more effectively.
Data Mapping Conflicts: Zendesk uses status values like “Open,” “Pending,” and “Closed.” GitHub uses “Open” and “Closed.” When you sync between them, you need rules for what “Pending” in Zendesk maps to in GitHub. Exalate’s field mapping features handle this, but you need to define the logic upfront. Aida helps by suggesting mappings based on your platforms.
Sync Failures and Retries: If GitHub’s API is temporarily down when Exalate tries to sync, what happens? A robust platform queues the sync and retries automatically. Exalate does this, but you should monitor your connection’s health. Most sync failures are temporary and resolve on retry.
Scope Creep: You start syncing just ticket titles and status. Then you add custom fields, comments, attachments, and linked work items. Each addition increases complexity and can introduce subtle bugs in your field mappings. Define your sync scope clearly upfront and expand incrementally. Test each addition before rolling it out.
Performance and Scale: If you’re syncing thousands of work items, sync performance matters. An integration that works fine with 100 tickets might slow down with 10,000. Exalate is built for enterprise scale, but you should monitor sync times and adjust your configuration if needed. For example, instead of syncing all historical tickets, you might sync only new items going forward.
Security and Compliance in Your Zendesk-GitHub Integration
When data flows between systems, security and compliance become real concerns. Exalate is designed with security as a foundational layer, not an afterthought.
Data Encryption: All data in transit between Zendesk, GitHub, and Exalate uses TLS 1.2 or higher. Data at rest is encrypted using industry-standard algorithms. Your customer information and code references stay protected during synchronization.
Authentication and Authorization: Exalate uses OAuth tokens and platform-specific API credentials. Neither Zendesk nor GitHub credentials are shared with or stored by Exalate. Instead, each platform grants access through tokens that can be revoked anytime. Role-based access controls ensure that users see only the data their role permits.
Compliance Certifications: Exalate holds ISO 27001:2022 certification, demonstrating that information security management meets international standards. If you operate in regulated industries (finance, healthcare, government), these certifications help meet your own compliance requirements. For detailed security information, visit the Exalate Trust Center.
Audit and Accountability: Every sync event is tracked. If you need to understand what data moved when, Exalate’s logging provides that visibility. While audit trails are logged, the focus is on understanding what was synchronized and whether it succeeded, not on creating excessive administrative overhead.
Getting Started with Exalate for Zendesk and GitHub
Exalate simplifies the setup process. You don’t need to understand API endpoints or write complex scripts. Instead, you describe your sync requirements, and Exalate handles the technical details.
Consider your team’s workflow during setup. Does support always create tickets first, or do issues sometimes originate in GitHub? Does one team own certain fields while the other team owns different ones? These details influence your field mapping and trigger configuration.
If you’re on Exalate Classic, then you can import your existing nodes and connections using the “Import connection” feature.
This will help you retain existing configurations and sync rules as you move to New Exalate.
To get started with Exalate for GitHub or discuss your use case and requirements, please contact sales.
Frequently Asked Questions
Does Zendesk integrate with GitHub?
Zendesk doesn’t have a built-in, native integration with GitHub. However, both platforms expose APIs and webhooks that third-party integration tools like Exalate can connect to. Exalate acts as the bridge, reading from one platform’s API and writing to the other’s, enabling true bidirectional synchronization.
What’s the difference between Exalate and GitHub’s native integrations?
GitHub’s app marketplace includes limited integrations, mostly focused on notifications. These don’t provide the work item synchronization that Exalate offers. Exalate specializes in bidirectional data synchronization with field mapping, so data stays consistent across systems. GitHub’s native tools usually handle one-way notifications.
Can I filter which Zendesk tickets sync to GitHub?
Yes. When you configure your Exalate connection, you define rules that determine which tickets sync. You might sync only tickets with a specific tag, assigned to certain teams, or above a certain priority level. Only matching tickets will be synchronized, keeping your GitHub instance focused on relevant work.
How long does it take to set up the integration?
Setup time depends on complexity. A basic bidirectional sync with standard fields takes a few hours. If you have custom fields, complex filtering rules, or need to coordinate with multiple teams, plan for a day or two. Aida accelerates the process by suggesting field mappings and sync rules based on your platform configurations.
What happens if the integration breaks or disconnects?
Exalate monitors connection health and alerts you if issues occur. Most disconnections are temporary (like API timeouts) and resolve automatically with retries. If there’s a persistent problem, you can pause the integration until it’s fixed. Work items that fail to sync are queued and will retry once the connection is restored.
Is there a free trial for Exalate?
Yes. Exalate offers a free 30-day trial. You can set up a full Zendesk-GitHub integration and test it with your actual data during the trial period. This lets you evaluate whether the tool fits your needs before committing to a paid plan.
How much does Zendesk GitHub integration cost?
Exalate pricing factors in the cost of your time—if your team spends hours per week manually syncing data, integration quickly pays for itself. Check out our pricing page to see which plan works best for your use case.
Can I sync with other platforms besides GitHub?
Exalate supports integrations with many enterprise platforms: Jira Cloud, ServiceNow, Freshdesk, Freshservice, Asana, Azure DevOps (Server and Service), Salesforce, and more. You can build a multi-platform synchronization setup with Exalate as the central orchestrator. For a full list of connectors, check the Exalate integrations page.
How is my data secured when syncing between systems?
All data in transit is encrypted using TLS 1.2+. Exalate uses OAuth tokens and API credentials specific to each platform—it never stores your passwords. The platform is ISO 27001:2022 certified and undergoes regular security audits. Sensitive data like passwords or API keys are handled securely and never logged. For details, visit the Exalate Trust Center.
Can I customize which fields sync between Zendesk and GitHub?
Absolutely. Exalate’s field mapping feature lets you specify exactly which fields sync in each direction. You control whether custom fields are included, how standard fields are translated between platforms, and which fields are read-only on each side. Aida can help generate mapping rules, or you can configure them manually.
When your IT operations team works in ServiceNow, and your development team tracks work in Jira, keeping time tracking data in sync between the two platforms becomes critical for budget visibility and resource planning. Here’s how to set up automated time tracking synchronization between ServiceNow and Jira using Exalate.
The Question
We have the following workflow:
An incident is raised on ServiceNow.
This incident escalates towards Jira, where an Epic is created.
The Epic is broken down into stories. Every story has a time estimate and the actual time spent information.
The question is: Is it possible to synchronize this time-related information back to the incident, so that we can keep track of the budget consumed by the development activities?
The Answer
Overview
This use case is an advanced synchronization scenario and needs some explanation. The overall flow is as follows:
The incident is escalated to Jira using an Exalate trigger.
Exalate creates an epic in Jira.
This epic is broken down into stories.
Whenever a story is created or modified, sync is triggered on the parent epic.
During the sync from the Epic to the incident, the time tracking information is tallied and included in the message to the incident.
This information is included in custom fields on the incident.
The Details
Step 1: The Incident is Escalated to Jira
In Exalate for ServiceNow, you can define a trigger that regularly checks if an incident should be synchronized. Triggers use platform-native filter queries, so you can target specific assignment groups, urgency levels, or any condition available in ServiceNow’s advanced search syntax.
In this case, an additional state has been added so the user has an easy way to send over the incident. The incident gets wrapped into a message, and the message is sent over to Jira.
Step 2: Exalate Creates an Epic in Jira
Exalate receives the message, determines if this is the first time the incident is being synced, and processes the incoming script to:
Create the epic
Fill in the epic name custom field (which is mandatory for Epics)
Create a synchronization relationship between the incident and the epic
A link is also added to the incident.
Step 3: The Epic is Broken Down into Stories
This is something the development team does manually, resulting in a detailed mini project plan with time estimates on each story.
Step 4: Story Changes Trigger a Sync on the Parent Epic
Using a script listener, update events on stories are escalated into the sync of the parent epic. This ensures that any time logged on a child story automatically triggers an update back to ServiceNow.
Step 5: Time Tracking Information is Tallied and Sent to ServiceNow
Whenever an epic is synced, all the relevant time tracking information is collected from the underlying stories (and optionally subtasks). This includes:
Total time spent across all stories
Total original estimates
Total remaining estimates
The outgoing script on the Jira side handles this aggregation using externalized logic, then includes the tallied values in the replica sent to ServiceNow.
Step 6: Custom Fields on the Incident are Updated
The incoming script on the ServiceNow side maps the aggregated time data to custom fields on the incident.
This gives IT operations and project managers full visibility into the budget consumed by development activities, without anyone having to manually update ServiceNow.
Why This Matters for Budget Tracking
This approach solves a common pain point for organizations running ServiceNow for IT operations and Jira for development. Without this kind of integration, tracking how much development time an incident consumes requires manual updates or separate reporting tools.
With Exalate syncing time data automatically, you get:
Real-time visibility into development efforts directly within ServiceNow
Accurate budget tracking per incident without duplicate data entry
Aggregated time from multiple Jira stories rolled up into one ServiceNow view
Historical data for capacity planning and cost allocation
How Exalate Handles This
Exalate uses a Groovy scripting engine that gives you full control over what data flows between Jira and ServiceNow and how it’s transformed. For this use case, the key capabilities are:
Triggers: Define conditions using JQL on the Jira side and filter queries on the ServiceNow side to control which work items enter the sync.
Custom field mapping: Sync any field available via REST API, including time tracking fields, custom fields, and computed values.
Aida (AI-assisted configuration): Describe what you want to sync in plain language, and Aida generates the Groovy scripts for you. For example, you could tell Aida “aggregate time spent from all child stories of an epic and send it to ServiceNow.”
Test Run: Before deploying your time tracking sync to production, test the scripts against real data to verify the field mappings are correct.
Script versioning: Every time you publish a configuration change, a new version is created. If something breaks, roll back to the previous working version.
Setting Up This Integration
To get started with syncing time tracking data between Jira and ServiceNow:
Go to exalate.app and create an account (or log in if you already have one).
Create a workspace and add your Jira and ServiceNow instances by entering their URLs and authenticating.
Create a connection between Jira and ServiceNow.
Configure your sync rules. You can use the “Edit & Test” option to open the draft editor and customize the outgoing and incoming scripts for time tracking fields.
Use Aida to help generate the time aggregation logic, or write the Groovy scripts yourself.
Run a Test Run to verify that the time data flows correctly before publishing.
Add triggers to automate the sync based on your conditions (for example, sync all incidents with a specific assignment group or urgency level).
Publish and monitor.
For the detailed configuration scripts used in this use case or any other help, reach out through our community channel.
When your development team works in one Jira instance while your support team operates in another, information gets siloed. Manual updates become routine, work items fall through the cracks, status changes require email notifications, and context gets lost in transit.
Jira to Jira sync solves this by creating real-time, bidirectional data flow between separate Jira instances. Your teams stay in their familiar environments while critical information flows automatically where it’s needed—no duplicate entry, no version conflicts, no communication delays.
The right integration maintains team autonomy while eliminating silos. Each side controls what they share and how incoming data appears in their instance. Security stays intact, workflows remain independent, and collaboration becomes frictionless.
Note: Jira now refers to issues as work items. Throughout this guide, you’ll see references to work items, which represent individual tasks, bugs, stories, or any trackable unit of work in Jira.
Key Takeaways
Jira to Jira sync enables seamless real-time collaboration between separate Jira instances without manual updates or duplicate data entry.
Exalate provides flexible, secure synchronization with full control over what data flows between instances and independent configuration on each side.
Organizations can sync any work item field, custom field, sprints, and epics using AI-assisted or script-based configuration tailored to specific workflows.
Security features to look out for when choosing a multi-Jira sync tool include ISO 27001 certification, role-based access control, and encryption of data both in transit and at rest.
Common use cases for Jira to Jira sync include cross-team collaboration, external partner coordination, multi-region operations, and hybrid cloud-to-data-center scenarios.
Get the Jira to Jira Sync Guide
Learn how to achieve a seamless integration between multiple Jira instances, step-by-step.
Eliminate Information Silos – Different teams tracking work in separate instances creates isolation that blocks collaboration. Jira-to-Jira synchronization enables real-time, automated data flow, so when a developer marks a work item “In Progress,” the corresponding work item updates immediately in the project manager’s instance. No delays. No manual intervention.
Stop Manual Work – Copying work items between instances, forwarding updates via email, and maintaining duplicate records wastes time and introduces errors. These redundant tasks become even more tedious as projects grow more complex and teams become more distributed. Automated sync eliminates this overhead entirely.
Maintain Team Autonomy – Each team controls its configuration independently without affecting the other side. Your internal team manages what they share outbound. Your partner configures what they accept inbound. Neither side’s changes break the other’s setup.
Protect Sensitive Data – Selective sync means you share only what’s needed while keeping confidential information protected. Sync public work item details with external partners while internal comments, attachments, and custom fields stay private. No shared credentials or admin access required between instances.
Enable Unified Visibility – Stakeholders gain accurate project status without switching contexts or requesting updates. Leadership sees progress across all teams. Product managers track features spanning multiple groups. Everyone works from the same current information.
Scale Across Organizations – The same technology that syncs two project teams supports multinational organizations coordinating across continents. The architecture handles 2-person teams and 10,000+ user enterprises with complex field mappings and conditional sync rules.
What Are Some Practical Use Cases For Jira to Jira Sync?
Use Case 1: Development and QA Team Coordination
Challenge: Your internal dev team builds features while an external QA agency tests them in separate Jira instances. Creating duplicate work items means double entry, which leads to conflicts when both sides update simultaneously.
Solution: Set up bidirectional sync with triggers. When a developer moves a work item to “Ready for Testing,” it automatically appears in QA’s backlog with acceptance criteria and environment details. QA’s test results and bug reports flow back instantly. Field-level sync rules share public information while keeping internal notes, time estimates, and sprint planning private.
Real-World Application: A gaming studio with 50 developers and 30 QA testers reduced bug-tracking overhead by 60%. New builds trigger automatic work item creation in QA’s instance with all required context. Both teams work in familiar environments while maintaining perfect synchronization.
Use Case 2: IT Support to Development Escalation
Challenge: Support logs work items in Jira Service Management. Critical bugs need escalation to the dev team’s Jira Software instance, but the current process involves manual copying and email forwarding. Information gets lost. Resolution times suffer.
Solution: Configure trigger-based sync that automatically creates dev work items when tickets meet escalation criteria—”priority = High AND issueType = Bug AND labels = ‘escalate-to-dev’“. The sync pulls customer impact, reproduction steps, and environment details. When developers mark the work item “Resolved,” the support ticket updates automatically.
Real-World Application: A SaaS company processing 500+ monthly support tickets reduced escalation time from 4 hours to 15 minutes. Support agents simply add an “escalate” label—no manual work item creation required. Customer satisfaction improved as resolution times dropped.
Use Case 3: Partner and Vendor Collaboration
Challenge: You’re building with an external partner who needs project requirements and status updates, but your internal Jira contains confidential roadmap features, competitive analysis, and financial projections. Full access violates security policies and duplicated projects create maintenance overhead.
Solution: Implement selective field synchronization. Sync summaries, descriptions, and status while keeping attachments, internal comments, and custom fields like “Revenue Impact” private. Configure comment filtering so external-facing comments sync bidirectionally while internal discussions stay private.
Real-World Application: A fintech company collaborates with three offshore partners across different Jira instances. Each partner sees only their assigned work items. Internal fields tracking compliance requirements and revenue projections remain private. Admins can use Groovy scripts to filter comments by author group for granular control.
Use Case 4: Acquisition and Merger Integration
Challenge: You acquired an organization with completely different Jira workflows, custom fields, and project structures. Leadership demands unified visibility immediately, but an overnight migration would disrupt both teams. Neither side wants to abandon their setup.
Solution: Implement gradual integration, connecting specific projects without wholesale migration. Start with high-priority shared initiatives. Use AI-assisted configuration to map mismatched fields—their “Severity” to your “Priority.” Expand sync scope incrementally as teams acclimate and workflows stabilize.
Real-World Application: After acquiring a 200-person competitor, a software company integrated operations over six months.
Month one: sync executive-level epics.
Month two: add cross-company initiatives.
Month three: integrate customer-facing requests.
By month six, teams had naturally aligned, making eventual consolidation straightforward.
Use Case 5: Sprint and Epic Synchronization Across Teams
Challenge: Your platform team plans epics spanning multiple specialized teams—mobile, backend, infrastructure—each with separate Jira instances and sprint cadences. Epic owners manually check each team’s Jira and update spreadsheets. By the time reports reach stakeholders, information is outdated.
Solution: Sync epics and associated work items bidirectionally across team instances. When the platform team breaks down an epic, relevant stories appear automatically in each specialist team’s backlog. Sprint progress rolls up automatically—mobile team closes stories, epic completion updates; backend hits a blocker, epic reflects the risk.
Real-World Application: A product organization with eight engineering teams reduced planning overhead by 40%. Epic owners get real-time dashboards showing progress across all teams. Cross-team initiatives that required weekly sync meetings now use automated status roll-up. The organization ships complex features faster with less coordination overhead.
Calculate time and money savings from automated bidirectional sync.
Atlassian Marketplace apps install directly into Jira and are embedded within its interface. They benefit from Atlassian’s security review and integrate with Jira’s authentication. Organizations wanting solutions vetted by Atlassian with deep native integration typically choose this approach.
Enterprise Service Bus (ESB) solutions like MuleSoft or Dell Boomi route Jira data through central integration layers. Large enterprises with complex IT landscapes integrating multiple applications beyond just Jira use these platforms for unified monitoring and governance.
Custom Script-Based Solutions – Development teams build custom integrations using Jira’s REST API. This approach offers complete control and zero licensing costs but requires ongoing maintenance as Jira evolves. Specialized platforms like Exalate focus exclusively on multi-instance synchronization. They understand Jira’s data model deeply, handle complex field mappings, manage bidirectional updates with conflict resolution, and provide granular control.
Jira Automation Rules – Jira’s built-in automation triggers webhooks or API calls to other instances for simple one-way scenarios. This native approach works without additional tools but lacks sophisticated sync capabilities like bidirectional updates or complex field mapping.
Middleware and iPaaS Solutions – Integration Platform as a Service (iPaaS) offerings provide cloud-based connectivity through pre-built connectors. Organizations preferring cloud-managed integrations and needing integration with multiple applications beyond Jira use these platforms.
Features to Consider When Choosing an Integration Solution
Bidirectional vs. Unidirectional Sync – The ability to configure one-way data flow (source → destination only) or two-way synchronization where changes flow in both directions is fundamental. One-way sync suits reporting scenarios; bidirectional sync enables true collaboration.
Field-Level Control – Granular control over which specific fields synchronize matters for security and compliance. You might share summaries and statuses but exclude financial fields, time estimates, or internal comments.
Custom Field Support – Integration solutions should handle Jira’s specialized field types—select lists, cascading fields, checkboxes, multi-user pickers, date ranges—plus custom fields from third-party plugins like Tempo Worklogs, ScriptRunner calculated fields, or Insight asset data.
Entity-Level Sync – Comprehensive solutions synchronize more than just work items—they handle sprints with their dates and goals, epics with progress tracking, components, versions, and attachments. This reduces the need for manual coordination.
No-Code Configuration – User-friendly configuration reduces dependency on developers and speeds up implementation for straightforward use cases. AI assistants such as Aida generate sync scripts from natural language descriptions—non-technical teams describe requirements, and Aida produces a working configuration.
Script-Based Customization – Technical teams need support for conditional mappings, data transformations, field concatenation, and custom validation rules for advanced scenarios. Exalate uses Groovy-based scripts for advanced conditional logic, data transformations, and API integrations.
Cloud Support – Solutions should work with Jira Cloud instances to accommodate different organizational infrastructure preferences.
Scalability – Performance should remain consistent from small team deployments to enterprise-scale implementations with thousands of users as workload increases. Exalate scales from small teams to 10,000+ user enterprises with consistent performance.
Multi-Platform Integration – Organizations rarely use Jira in isolation, so broader platform support for non-Jira systems like ServiceNow, Azure DevOps, or Salesforce enables comprehensive integration strategies.
Security and Data Encryption – End-to-end encryption protects sensitive information throughout the sync process, both in transit and at rest. Granular permissions control who configures sync rules, triggers changes, or views sync logs to prevent unauthorized configuration changes. Also, third-party certifications like ISO 27001 indicate that security practices meet established standards.
How Exalate Enables Secure, Flexible Jira-to-Jira Sync
What Jira Fields and Entities Can Be Synced With Exalate?
Default work item fields: Summary, description, status, priority, assignee, reporter, due date, resolution, affects versions, fix versions, etc.
Custom fields: Select lists, cascading selects, checkboxes, radio buttons, date pickers, text fields, number fields, URL fields, user pickers, multi-user pickers
Work item relationships: Parent-child links, blockers, dependencies, duplicates, related work items
Work item types, components, labels, and versions with automatic or custom mapping between instances
Comments with user mention preservation, formatting retention, and optional filtering by author or content
Attachments and inline images (embedded) with file size limits and type restrictions as needed
Sprints with start/end dates, goals, state (active/future/closed), and board association
Epics with progress tracking, color coding, and hierarchical work item relationships.
Exalate Tools Available for Security and Control
ISO 27001 certified infrastructure with annual third-party audits verifying security practices
Role-based access control for configuration management—restrict who can create connections, modify sync rules, or view sync logs
Encryption of data using TLS 1.2+ for all data traveling between instances
Full script and operational control over your integration
No requirement to share credentials or admin access between instances. Each side authenticates independently
Selective field sync with granular control. You get to share only the necessary fields and keep sensitive data private.
Comment filtering to sync external communication while keeping internal discussions confidential
Attachment control to exclude specific file types or sizes from synchronization
Visit the Trust Center for detailed security documentation, compliance certifications, and security questionnaire responses.
Platform Supported By Exalate
Jira Cloud (all versions currently supported by Atlassian)
Jira Software for development teams tracking features, bugs, and technical work
Jira Service Management for support teams managing incidents, requests, and customer issues
Jira Work Management for business teams coordinating projects and operations
Integration with other platforms: ServiceNow, Azure DevOps, Azure DevOps Server, Salesforce, Asana, Freshservice, Freshdesk, Zendesk, GitHub, and more.
Custom connectors available for proprietary systems, legacy platforms, or specialized industry software
A Step-by-Step Setup Guide For Jira to Jira Sync With Exalate
Go to the Exalate integrations page to get started. Create a new account by manually entering your email and verifying it, or sign up using Google.
If you already have an account, you can log in to access the dashboard.
Create a workspace where you can manage your integrations and connections. All your existing workspaces are accessible from the “Workspaces” tab.
To create your own workspace, click the “+ Create Workspace” button. Enter a name and description for it. And click “Create workspace.”
To create a connection, you’ll need an active Exalate account with at least one Workspace and the access credentials for the systems you want to connect (System A and System B).
Click on “+ Add connections” > “Create new connection”. Enter the name for your first system. Enter the URL of your system (Jira).
Wait for checks and authentication to happen automatically under the hood. Systems from a different workspace will be newly registered for the current workspace.
Enter the authentication details. For Jira, you need OAuth. Click on “Check Authentication”. If all is well, you’ll see “Successfully Authenticated”.
Click Next to configure System B (Jira). Follow the same procedure as for your System A (Jira) instance.
Confirm the Connection Name and add a description (optional). Review the connection setup and click on “Create Connection”. Wait for a few minutes so all the checks and setups will be configured in the background.
Once done, click “Continue to Configuration”. Voila! Your first connection has been successfully set up in your workspace.
Choose a project you want to sync on both sides from the dropdown menu. Click “Build and Continue”.
Now, you have 2 options: “Quick sync” and “Edit & Test”. Let’s proceed with them one by one.
Quick Sync: This option allows you to sync one item between Jira instances. Under the “Item sync monitor,” enter the work item key and click on the “Sync Now” option.
To link 2 existing items, click “Link with existing”. Once the sync is complete, you can view both the synced issues in a new window. You can also choose to compare the changes.
Open draft editor: This option allows changes when you click “Create a new version” or select the “Open latest draft”. This ensures you don’t modify the existing configuration accidentally.
Once active, click the “Edit” button to open the editor and adjust the sync rules (Groovy-based scripts). These scripts enable users to add custom data logic and mapping for complex or advanced use cases or workflows.
Swap the sync direction by clicking the two arrows next to the connection name.
The outgoing script will hold the values passed from Jira A to Jira B, and the incoming sync will define how the values coming from Jira B are mapped in Jira A.
The Replica is a JSON file that carries the payload containing data being shared across entities on both Jira instances. You can adjust the sync scripts if you know the Groovy language. Otherwise, use Aida, our built-in AI assistant.
Use Aida to generate sync scripts. Aida exists in both incoming and outgoing script sections, so choose the side accordingly.
For Outgoing scripts: Describe what data should leave your system. Eg, “Exclude attachments” or “Only sync high-priority issues.”
For Incoming scripts: Describe how incoming data should be applied to your system. Eg, “Map statuses between tasks“.
The scripts are generated based on Exalate’s scripting API and your existing scripts.
Review the output to validate the suggested changes. New lines are highlighted in green, while suggested removals are highlighted in red. Choose to “Insert” or “Discard” the suggestions.
Note: Just like with any other AI solution, please review the generated code before applying it.
Once you have your sync scripts ready, you can choose to “Save script” or proceed to dry-run them before publishing.
Click “Start Test Run” and “Select items” to sync. You can select multiple work items. Wait for a bit, and you’ll see the detailed results of the fields synced and the payload shared between both instances or systems. If you are satisfied with the results, click “Publish Version”.
You can view all versions from the “Version” dropdown. The versions can be either “Active”, in “Draft” (editable), or “Archived”.
Set up triggers to automate your sync. These are conditions or filters you apply to specific items. For instance, sync all Jira work items that have “label = dev”.
Click the “+Add trigger” button to start creating platform-specific triggers.
Choose the entity type (issue or sprint). For Jira, you can use Jira Query Language (JQL) to specify conditions for work items or sprints: “Project = EXA” will only sync when the item is in the EXA project. Then, save the trigger.
Troubleshoot your connection with Aida. If there’s an error, go to the “Troubleshooting” tab of your workspace. Hover over the error you want to diagnose and click on the Aida icon that appears next to the error.
You will see all the affected systems, connections, and items. Aida will provide you with a brief analysis of the error message.
To get more information, click on Error Details. You will see the impact level, stack trace, error type, and date of occurrence. You can also “View Full Analysis” to get more context.
Fix the error and click on “Resolve”.
That’s it. Your first synchronization will start automatically based on the sync rules and triggers you have set. Happy syncing.
Conclusion
Jira to Jira synchronization transforms how distributed teams collaborate. When your development, support, operations, and partner teams work in separate Jira instances, Exalate creates the real-time data flow that eliminates silos without forcing everyone into a single system.
The right integration preserves team autonomy while enabling seamless collaboration. Your developers keep their workflows. Your support team keeps theirs. Your partners work in their own environment. Critical information flows automatically where it’s needed. Security stays intact. Each side maintains control.
From two-person startups coordinating with an external QA agency to multinational enterprises managing thousands of users across five continents, Exalate scales to match your requirements. Start with simple field mappings using AI-assisted configuration. Grow into complex multi-instance architectures with conditional logic and custom transformations.
Secure, flexible, and built for real-world complexity, Exalate lets your teams work the way they want while staying synchronized on what matters.
If you need some help setting it up, we can schedule a demo on how to use it for your particular use case.
Frequently Asked Questions
How do I prevent confidential data from syncing to external partners?
Configure field-level sync rules that specify exactly which fields cross the boundary. In your outgoing sync script, explicitly map only the fields you want to share. Fields not mentioned in your outgoing sync configuration don’t transmit to the remote side, regardless of what their incoming sync requests.
This configuration shares only summary, description, and status. Attachments, comments, custom fields, time tracking, and all other fields remain private because they’re not included in the replica object sent to the remote side.
For comments, implement filtering logic that syncs only comments from users in specific groups or containing specific tags. Internal comments marked with “[INTERNAL]” can be excluded while external communications sync bidirectionally.
Does Exalate slow down Jira performance?
No, Exalate operates asynchronously without blocking Jira operations. When you update a work item that has an active sync, Jira processes your update normally and immediately returns control to you. Sync processing happens in background queues and doesn’t impact the user interface’s responsiveness.
How does Exalate handle custom field mapping between different Jira configurations?
Aida suggests field mappings based on field names, types, and context. When setting up a new connection, Aida analyzes custom fields on both sides and proposes mappings for fields with similar names or purposes. You review suggestions and accept, modify, or reject them.
Advanced scenarios use Groovy scripts for complex transformations. If one side uses a single-select “Priority” field with values [Low, Medium, High] and the other uses a number field “Priority Score” with values [1, 2, 3], you write transformation logic converting between them.
Can I sync sprints and epics, not just individual work items?
Yes, Exalate syncs sprints with their complete metadata: start date, end date, goal, state (active/future/closed), and the board they’re associated with. When you create a sprint on one side and add work items to it, the sprint appears on the remote side with the same dates and goals. Work items join the corresponding sprint automatically.
Epics sync bidirectionally with progress tracking. When you create an epic on one side and add child work items across multiple instances, the epic maintains relationships with all its children regardless of where they physically reside.
This enables true cross-instance initiative tracking. Your platform team plans an epic in their instance. Mobile, backend, and infrastructure teams create implementation work items in their own instances.
What security certifications does Exalate maintain?
Exalate is ISO 27001 certified, demonstrating adherence to internationally recognized information security management practices. The certification covers infrastructure, development practices, data handling, access controls, and incident response procedures.
Additional security features include:
Role-based access control for configuration management
Encryption in transit (TLS 1.2+) for all data traveling between instances
Encryption at rest for temporarily stored data in sync queues
Regular third-party penetration testing
Security monitoring and incident response procedures
Compliance documentation for common security questionnaires
Visit the Trust Center for detailed security documentation, compliance certifications, security white papers, and responses to standard security questionnaires.
Can non-technical teams set up basic syncs without scripting?
Yes, Aida provides an AI-assisted configuration where you describe sync needs in plain language. “Sync all high-priority bugs from Project Alpha to Project Beta, sharing summary, description, and status fields” generates an appropriate configuration automatically.
Aida handles common scenarios without requiring scripting knowledge:
Field mapping between standard Jira fields
Basic filtering by project, work item type, or priority
Status mapping between different workflows
Comment synchronization with or without filtering
For more complex requirements—conditional logic based on custom fields, data transformations, or integration with external systems via API—technical teams can customize the generated scripts using Groovy.
What other platforms can Exalate integrate with Jira?
Beyond Jira-to-Jira synchronization, Exalate connects Jira with ServiceNow, Zendesk, Freshservice, Freshdesk, Azure DevOps, Azure DevOps Server, GitHub, Salesforce, and Asana. Each platform connector is purpose-built rather than a generic REST adapter.
This means field mappings understand platform-specific concepts—ServiceNow’s incident fields, Azure DevOps’ work item types, Salesforce’s object relationships—and provide appropriate transformation logic.
Custom connector frameworks enable integration with internal tools, legacy platforms, or specialized industry software. If you have a proprietary system with a REST API, Exalate can integrate it with Jira using custom connector development.
Can I use Exalate with Jira Service Management?
Yes, Exalate fully supports Jira Service Management, including service-specific fields like request types, organizations, SLAs, and customer portal settings. You can sync service desk tickets with other Jira instances or with external ITSM platforms like ServiceNow.
It allows you to:
Connect service desks with external partners who report issues via their own service management tools
Sync support tickets to the development Jira when bugs need engineering escalation
Integrate customer-facing service desk with internal IT operations
Synchronize service requests across regional service desks for multinational support operations
Field mappings handle Service Management-specific concepts, and configuration can filter based on request types, organizations, or SLA status to ensure only appropriate tickets synchronize.
Jira migration involves moving data, configurations, workflows, and users from one Jira instance to another.
This guide covers three migration approaches—Big Bang, project-by-project, and live migration—explains the risks of each, and shows why live migration with real-time synchronization is the safest option for most teams.
Important terminology note: Atlassian renamed “issues” to “work items” and “projects” to “spaces” in Jira Cloud. This guide uses the updated terminology throughout.
Key Takeaways
Three migration approaches exist: Big Bang (fast but risky), project-by-project (gradual but complex), and live migration (recommended for zero downtime).
Big Bang migrations fail frequently because of missed customizations, inadequate testing, and no rollback option once teams start using the new system.
Live migration eliminates downtime by keeping both instances synchronized while teams gradually transition.
Migration costs include more than tools: factor in staff training, workflow recreation, testing, and potential productivity dips during transition.
Security during migration matters: choose tools with ISO certification, encryption, and role-based access control to protect sensitive project data.
Atlassian Data Center End of Life: What You Need to Know
Atlassian announced that Data Center products, including Jira Data Center, will reach end of life on March 28, 2029.
Key Dates
March 30, 2026: No new Data Center license sales for new customers
March 30, 2028: Existing customers can no longer purchase licenses or expansions
March 28, 2029: All Data Center licenses expire and become read-only
What This Means
After March 28, 2029, Data Center instances become read-only with no technical support or security updates. Organizations running Data Center must plan migration to Jira Cloud or alternative platforms.
Starting migration planning now rather than waiting until deadlines approach provides time for proper testing, staff training, and gradual transitions. Last-minute migrations under deadline pressure are exactly the high-risk Big Bang scenarios that cause problems.
What Is Jira Migration?
Jira migration is the process of transferring work items, configurations, workflows, custom fields, user permissions, and historical data from one Jira instance to another.
Migrations happen for several reasons: consolidating multiple instances after mergers, moving from on-premises to cloud infrastructure, splitting instances for regulatory compliance, or switching platforms entirely (such as moving from Jira to Azure DevOps or ServiceNow).
A successful migration preserves data integrity, maintains workflow continuity, and minimizes disruption to teams who depend on Jira for daily operations. The complexity varies based on instance size, customization level, third-party app dependencies, and the migration approach you choose.
Jira Migration Approaches Compared
Big Bang Migration
Big Bang migration moves everything in a single operation. All data transfers at once, and access redirects to the new system immediately.
When it works: Small teams with fewer than 50 users and minimal customizations. Simple configurations where testing can cover all scenarios.
Why it fails: Preparation time gets underestimated. Teams discover missing functionality only after the migration completes. No rollback option exists once users start creating new work items. Downtime affects everyone simultaneously.
Project-by-Project Migration
This approach migrates individual projects incrementally rather than the entire instance at once.
When it works: Organizations wanting gradual transitions. Teams with independent projects that don’t share many cross-project dependencies.
Why it’s complicated: Access to each project stops during its migration window. Cross-project reporting breaks until all projects move. Teams operate in two systems simultaneously, creating confusion about where to log updates.
Live Migration with Real-Time Synchronization
Live migration uses synchronization tools to keep both instances updated while teams transition gradually.
When it works: Enterprise teams who can’t afford downtime. Complex environments with extensive customizations. Organizations that need time to validate the new system while keeping production running.
Why it’s recommended: Teams choose when to switch. Both instances remain operational throughout. Issues discovered in the new system don’t block work—teams continue using the original until problems are resolved. Rollback is always possible.
Migration Approach Comparison Table
Factor
Big Bang
Project-by-Project
Live Migration
Downtime
Hours to days
Per-project windows
None
Risk Level
High
Medium
Low
Rollback Option
No
Limited
Yes
Team Disruption
Significant
Moderate
Minimal
Best For
Small teams (<50 users)
Medium teams
Enterprise teams
Typical Timeline
1-2 days
2-8 weeks
2-6 weeks
Testing Flexibility
Limited
Moderate
High
Why Jira Migrations Fail
Underestimating Preparation Time
Teams assume migration is primarily a technical task. In reality, ensuring the new system meets operational requirements takes significantly longer than the data transfer itself. Custom fields need recreation. Workflows require adaptation. Permissions need verification. Third-party app compatibility must be confirmed.
Missing Customizations
Testing in a staging environment never catches everything. Users discover missing functionality only when they try to complete their actual work. By then, the Big Bang had already happened. The dissatisfied team either waits for fixes, invents workarounds, or loses productivity.
No Rollback Path
Once new work items exist in the destination system, rolling back becomes nearly impossible. Any blocking issues discovered post-migration must be resolved while teams struggle with a compromised system. A live migration approach avoids this trap entirely.
Inadequate User Training
Migration changes how teams work, even when functionality remains identical. New navigation patterns, different interfaces, and altered workflows require adjustment time. Rushing this transition creates frustration and productivity losses that compound over weeks.
Why Live Migration Is the Better Approach
Live migration removes the high-stakes gamble of Big Bang approaches. Instead of hoping everything works perfectly on the first attempt, teams can:
Validate gradually: Move a pilot project first. Let power users identify issues before the broader rollout. Fix problems without impacting everyone.
Maintain productivity: Both instances stay operational. Teams work wherever they’re most comfortable while the new system gets refined.
Roll back safely: If the destination environment has unexpected problems, teams simply continue using the source system. No data loss. No emergency fixes under pressure.
Reduce staff frustration: Incremental change is easier than an overnight transformation. Teams adopt the new system at their own pace rather than being forced into an unfamiliar environment.
Synchronization tools like Exalate keep work items updated across both instances in real time. Users find the same data regardless of which system they access. When the new configuration is validated and teams are comfortable, the old instance can be retired.
Feature
Big Bang
Project-by-Project
Live Migration
Downtime
Yes (hours to days)
Yes (per project)
No
Risk Level
High
Medium
Low
Rollback Option
No
Limited
Yes
Team Impact
High disruption
Medium disruption
Minimal disruption
Best For
Small teams (<50 users)
Medium teams
Enterprise teams
Timeline
1-2 days
2-8 weeks
2-6 weeks
When Should You Migrate Jira?
Consolidating Multiple Instances
After mergers or acquisitions, organizations often inherit multiple Jira instances. Different departments may have purchased separate instances before IT established standards. Consolidation simplifies administration, provides a unified view across teams, and reduces licensing costs.
Moving to Cloud Infrastructure
Atlassian’s strategic focus on cloud products means new features often appear in Jira Cloud before (or instead of) on-premises versions. Organizations moving to the cloud benefit from automatic updates, reduced infrastructure maintenance, and elastic scalability.
Splitting Instances for Compliance
Some organizations need to isolate sensitive projects due to regulatory requirements. Healthcare, finance, and government contractors may need separate instances with different security configurations or data residency requirements.
Switching Platforms
Migration isn’t limited to Jira-to-Jira moves. Organizations sometimes switch between platforms entirely: Jira to Azure DevOps for development teams, Jira to ServiceNow for IT operations, or consolidating from multiple tools into a single platform. These cross-platform migrations benefit from synchronization tools that support both source and destination systems.
Features to Consider When Choosing a Migration Tool
Real-Time Synchronization
The ability to keep both source and destination instances synchronized during the migration period eliminates the false choice between speed and safety. Real-time sync means teams can work in either system while migration proceeds.
Selective Data Control
Migration tools should let you choose exactly what migrates. Some organizations want complete work item history, including all comments, attachments, and status changes. Others prefer clean-slate migrations that transfer only current state data. The tool should support both approaches.
Custom Field Mapping
Jira instances rarely have identical configurations. Custom fields on the source need mapping to appropriate fields on the destination. Look for tools that handle field type differences and allow transformation logic during sync.
Security Certifications
Migration involves transferring potentially sensitive project data. Choose tools with proper security credentials, including ISO 27001 certification, encryption of data in transit and at rest, and role-based access control. Verify compliance with your organization’s security requirements. Visit the Exalate Trust Center for detailed security documentation.
Cross-Platform Support
If your migration involves switching platforms (not just Jira versions), the tool must support both source and destination systems. Exalate connects Jira Cloud with Azure DevOps, ServiceNow, Salesforce, Zendesk, Freshdesk, Freshservice, GitHub, Asana, and other platforms.
Scripting Flexibility
Complex migrations often require conditional logic: sync only certain work item types, transform field values during transfer, and apply different rules based on project or status. Groovy-based scripting provides the flexibility to handle edge cases that rigid mapping tools can’t accommodate.
AI-Assisted Configuration
Aida, Exalate’s AI-assisted configuration feature, helps teams create sync rules without deep scripting knowledge. Describe what you need in plain language, and Aida generates the appropriate configuration, reducing setup time and making powerful customizations accessible to non-developers.
Validation and Testing
Before running production migrations, you need ways to test configurations safely. Look for features like TestRun that let you validate sync rules against sample data before applying them to your entire instance.
Jira Migration Tools: Native and Third-Party Options
Atlassian Cloud Migration Assistant (Free)
Atlassian’s native tool for moving from Server or Data Center to Jira Cloud. Handles basic migrations with user mapping, project selection, and configuration transfer.
Best for: Straightforward Atlassian-to-Atlassian migrations with standard configurations.
Limitations: No cross-platform support. Limited transformation capabilities. Requires downtime for each migration batch.
Exalate
Bi-directional synchronization platform supporting live migrations between Jira instances or cross-platform moves to Azure DevOps, ServiceNow, Salesforce, and others.
Best for: Enterprise migrations requiring zero downtime, cross-platform migrations, or scenarios needing custom transformation logic. Organizations require ISO 27001-certified tools with full scripting control.
Key capabilities: Real-time synchronization, Aida AI-assisted configuration, Groovy scripting for complex mappings, TestRun validation, support for Jira Cloud plus Azure DevOps (including Azure DevOps Server), ServiceNow, Salesforce, Zendesk, Freshdesk, Freshservice, GitHub, and Asana.
Backbone Work Sync
Synchronization tool specifically for keeping Jira instances in sync during phased migrations.
Best for: Organizations using phased migration approaches who need both instances updated throughout the transition period.
OpsHub Integration Manager
Enterprise migration platform with incremental migration capabilities.
Best for: Large enterprises with complex migration requirements needing professional services support.
CSV Import (Manual)
Jira’s built-in CSV import allows manual data migration through exported files.
Best for: Simple, one-time data transfers where real-time sync isn’t required.
Limitations: Labor-intensive for large instances. No ongoing synchronization. Relationships between work items may not be preserved correctly.
Practical Use Cases for Jira Migration
Post-Merger Instance Consolidation
Challenge: Two companies merge, each with its own Jira instance. Both instances have years of historical data, custom workflows, and active projects. Management wants a unified view across all teams.
Solution: Use live migration to sync both instances to a new consolidated destination. Keep source instances operational while teams validate the combined environment. Gradually retire source instances as teams confirm their data and workflows transferred correctly.
Real-World Application: A software company acquires a competitor. Rather than forcing immediate migration, they synchronize both Jira instances to a new environment while keeping the original instances running. Development teams continue working without interruption. After three weeks of parallel operation, all stakeholders confirm the consolidated instance works correctly. Source instances are archived.
Compliance-Driven Instance Separation
Challenge: A healthcare software company needs to isolate patient-related development work items from general product development to meet requirements.
Solution: Create a separate Jira instance with enhanced security controls for healthcare projects. Migrate relevant work items while maintaining references to related general development items. Configure ongoing sync for work items that cross boundaries.
Real-World Application: The compliance team identifies 12 projects containing patient data references. These projects migrate to a new instance with additional access controls, encryption requirements, and audit logging. Cross-project dependencies sync through secure connections with field-level filtering to exclude sensitive data from non-compliant environments.
Cloud Migration Under Deadline Pressure
Challenge: An organization running Jira Data Center must move to Cloud before the 2029 end-of-life date. The instance has 50,000+ work items, extensive customizations, and 15 integrated third-party apps.
Solution: Start migration 18 months before the deadline. Begin with non-critical projects to learn the process and identify issues. Progressively migrate higher-priority projects while maintaining sync between environments. Use the extended timeline to address app compatibility issues and retrain users.
Platform Switch: Jira to Azure DevOps
Challenge: A development team acquired through a merger uses Azure DevOps while the parent company uses Jira. Rather than forcing developers to switch tools, leadership wants both teams to collaborate seamlessly.
Solution: Configure bidirectional sync between Jira and Azure DevOps. Work items created in either system appear in both. Status updates, comments, and attachments sync automatically.
Real-World Application: The acquired team continues using Azure DevOps for development while management views all work in Jira dashboards. When parent company stakeholders comment on requirements in Jira, developers see those comments in Azure DevOps. When developers update status or add technical notes, Jira reflects those changes. Neither team changes its preferred tool, but collaboration works seamlessly.
MSP Multi-Tenant Migration
Challenge: A managed service provider supports 20 clients, each with separate Jira instances. They want to consolidate client management into a single platform while maintaining strict data isolation between clients.
Solution: Configure independent connections for each client’s Jira instance to the MSP’s central management platform. Each connection has isolated sync rules, ensuring Client A’s data never appears in Client B’s view.
Real-World Application: The MSP creates a master Jira instance with 20 separate projects, one per client. Each client’s external Jira connects only to their specific project. Work items sync bidirectionally with full isolation. The MSP gains unified visibility across all clients while each client sees only their own data in their original instance.
Common Jira Migration Problems and Fixes
Custom Fields Not Migrating
Custom fields exist on the source but don’t appear on the destination.
Fix: Create matching custom field definitions on the destination before migration. Field types must be compatible (you can’t map a text field to a numeric field). Configure explicit field mappings in your sync rules.
Attachments Missing After Migration
Work items transfer successfully, but attachments don’t appear.
Fix: Check file size limits on the destination instance—Jira Cloud has different limits than Data Center. Large attachments may need separate transfer or compression. Verify sync rules include attachment handling.
User Accounts Not Matching
Work items migrate, but the assignee and reporter fields show incorrect users or generic accounts.
Fix: Create user mapping before migration. Match accounts by email address when possible. Create placeholder accounts for users who won’t have destination access. Configure sync rules to handle unmapped users appropriately.
Work Item Links Breaking
Links between work items are not preserved during migration.
Fix: Use migration tools that handle link relationships. Migrate linked items together rather than separately. Verify link types exist on the destination instance.
Workflow Status Mismatches
Source and destination use different workflow statuses, causing sync failures.
Fix: Map statuses explicitly in sync configuration. Create any missing statuses on the destination before migration. For statuses that don’t have direct equivalents, define transformation rules.
Migration Running Slowly
Large instance migration takes longer than expected, extending the downtime window.
Fix: Migrate during off-peak hours. Reduce batch sizes in the sync configuration. Archive completed or inactive projects before migration to reduce volume. Consider phased migration to spread the load.
Conclusion
Jira migration complexity depends on your approach. Big Bang migrations promise speed but deliver risk: one chance to get everything right, no rollback option, and guaranteed downtime. Live migration with real-time synchronization eliminates these risks by keeping both instances operational while teams transition gradually.
With Atlassian’s Data Center end-of-life approaching in 2029, organizations running on-premises Jira should start migration planning now. Early preparation provides time for proper testing, staff training, and gradual transitions—avoiding the high-stakes scramble of last-minute migrations.
Choose your migration approach based on organizational needs: tolerance for downtime, customization complexity, team size, and timeline flexibility. For most enterprise scenarios, live migration with synchronization tools like Exalate provides the safest path from source to destination.
Ready to plan your migration? Start a 30-day free trial of Exalate to test synchronization with your specific configuration and validate your migration strategy before committing.
Frequently Asked Questions
Can I migrate from Jira Data Center to Jira Cloud?
Yes. With Atlassian ending Data Center support in March 2029, many organizations are planning this transition. Exalate supports migration from Data Center to Cloud while maintaining data synchronization throughout the process. The live migration approach means teams continue working without downtime.
What data can be migrated between Jira instances?
Most migration tools support: work items (summary, description, type, priority, status), custom fields, comments, attachments, work item links, sprint and epic associations, workflows and statuses, user assignments, and labels. Historical data, including change history and timestamps, can typically be preserved depending on the tool capabilities.
Can I migrate only specific projects or work items?
Yes. Modern migration tools support selective migration using filters. You can migrate specific projects, work items matching certain criteria (JQL queries in Jira), or exclude items based on labels or status. This flexibility enables phased migrations and allows you to leave archived or obsolete data behind.
Can I migrate work item history and change logs?
Yes, most enterprise migration tools preserve historical data, including comments, status changes, and modification timestamps. Configure your sync rules to include history if needed, or exclude it for faster, cleaner migrations. Preserving history increases migration time and storage requirements but maintains full audit trails.
How do I handle different workflows between source and destination?
Map workflows in your migration configuration. Create any statuses that don’t exist on the destination before migration. For statuses without direct equivalents, define transformation rules that specify how source statuses translate to destination statuses. Complex workflow transformations may require scripting logic.
What if I need to migrate to a non-Jira platform?
Cross-platform migrations are common. Exalate supports migration and ongoing synchronization between Jira and Azure DevOps, ServiceNow, Salesforce, Zendesk, Freshdesk, Freshservice, GitHub, and Asana. Configure the connection between source and destination, define field mappings, and run the migration using the same synchronization approach.
Should I use Atlassian’s native migration tools or third-party options?
Atlassian’s Cloud Migration Assistant works well for straightforward Jira-to-Jira Cloud moves with standard configurations and acceptable downtime windows. Choose third-party tools like Exalate when you need: zero-downtime migration, cross-platform support, complex data transformations, or ongoing synchronization between environments.
How do I prepare my team for migration?
Start with communication: share timelines, explain what changes and what stays the same, and set expectations for the transition period. Identify power users who can validate the new environment early. Provide training on new interfaces or changed workflows. Plan for a productivity dip during adjustment and don’t schedule migration during critical business periods.
Can I keep both instances running after migration?
Yes. Live migration approaches maintain synchronization between instances indefinitely. Some organizations keep both instances operational for months after migration as a safety net. When you’re confident the destination works correctly, you can stop synchronization and archive or decommission the source instance.
What security considerations apply to Jira migration?
Migration involves transferring potentially sensitive data. Choose tools with ISO 27001 certification, encryption of data in transit and at rest, and role-based access control. Verify the migration tool meets your organization’s security policies. For highly regulated industries, confirm compliance with specific requirements (GDPR). Review the tool vendor’s security documentation; Exalate’s Trust Center provides detailed security information.
How do I validate that the migration completed successfully?
Compare work item counts between source and destination. Verify sample work items transferred correctly with all fields, comments, and attachments. Test workflows by transitioning items through their lifecycle. Confirm user assignments and permissions work as expected. Have key users validate their projects before declaring migration complete.