Nevaris software has been in construction technology solutions for over a decade and covers all aspects like financial accounting, ERP, extensive construction wages, etc.
One of their products, Nevaris Build, is used for construction management and supports all functions and data for your entire construction project in a single software.
The Struggle
The fundamental issue Nevaris Build faced was unclear and ineffective communication between different teams working on the software.
For instance, the dev team was using Azure DevOps, but the Quality Assurance (QA) team wanted to keep working in Jira for test cases and release management.
So they wanted to look for a solution that allowed the dev team to work in Azure DevOps but still have the important data reflected in Jira for the QA team.
We reached out to David Müehlenhoff, the development team lead at Nevaris Build, to talk about his experience with Exalate.
Why Exalate?
Streamlined collaboration between teams
Enhanced customization capability through scripting engine
Flexibility to adapt different workflows
Cost efficiency and reasonable price
Adapters for other systems like Salesforce
“We evaluated different products and Exalate was the one. It was also the most cost effective overall.”
David Müehlenhoff, development team lead at Nevaris Build
Challenges
Inefficient collaboration between different departments
Siloed Information flow across teams
Initially, most of the teams worked in Jira and each department had its own issue types, tasks, rules, and boards. But there wasn’t a single interface that could give an overview of where the entire team, as a whole, stood.
Further on, the tools changed and the development team switched to Azure DevOps. This increased manual work of copying and sending information between Jira ( QA team) and Azure DevOps.There were almost 30 tickets that were copied on a daily basis.
The dev team needed visibility on the test cases and releases that were planned and executed by the QA team, whereas the QA team needed to see the dev team’s progress.
The biggest issue Nevaris Build faced was information flow. Every team wanted visibility on each other’s issue types, rules, and workflows. They also didn’t want to leave the tool they were currently using.
“For us, flexibility with a large margin is the most important feature of Exalate.”
David Müehlenhoff, development team lead at Nevaris Build
That’s why they started looking for a solution to help them bridge the information gap between applications.
Solutions
An In-house tool
3-rd party synchronization solutions
Nevaris Build started connecting the 2 systems (Jira and Azure DevOps) with a tool they owned, which was just a once-off replication.
The tool allowed pushing issues from Jira to Azure DevOps. They had visibility on the issues that were being pushed, but the synchronization wasn’t real-time. Plus, comments or changing specifications never reached the other system without manual communication or making the change manually in both systems.
They also decided to not pursue building a synchronization solution, because it required a lot of development effort on their part.
At this point, they started exploring other solutions in the market. They chose Exalate to integrate Jira and Azure DevOps.
The reason they chose Exalate was its scripting capabilities. They could easily customize their processes and implement their own logic to transfer data.
“A lot of our peers liked the scripting feature of Exalate because they rightfully think they can solve complex mappings with it, although the other solutions in the market might be a bit easier.”
David Müehlenhoff, development team lead at Nevaris Build
Results
Decentralized control of the integration (avoiding a single point of failure)
Decreased issue-handling times thanks to automatic and accurate information exchange between teams
Optimized costs as developers for Exalate were assigned and workflows ran smoothly
Initially, teams working on Nevaris Build had to spend a lot of time and effort manually transferring information or syncing information in batches.
Using Exalate, the admins could orchestrate the information exchange without the teams even realizing what goes on behind the scenes.
“It is also nice to have this distributed architecture that Exalate supports so failure on one side can’t affect the other side.”
David Müehlenhoff, development team lead at Nevaris Build
They now continue getting the information they want in Jira and Azure DevOps since Exalate continues working in the background whenever needed.
Earlier the developers had to spend a lot of their working time sending information back and forth between systems and keeping track of all the synced information and its related processes. And of course, issue-handling times increased because of this.
“The company doesn’t realize we’re using Exalate, which is a good thing. We have 3 people trained in Exalate, so they administer the solution whenever there’s a sync requirement or an error. The rest of the team doesn’t even notice because it just works.”
David Müehlenhoff, development team lead at Nevaris Build
With Exalate in place, the issue-handling time is reduced. Additionally, they get to spend time on tasks that really matter.
The teams have actually become more productive in managing their time and issues.
Use Case
Nevaris used Exalate for an internal use case where it wanted to connect 3 departments. The dev team, the product management team, and the QA team.
Every department has its own processes, workflows, and tools that it uses, and they were looking for a way so that all of them could work as one and have a centralized view of user stories, issues, bugs, etc.
“Exalate works pretty smoothly. And With the scripting engine, we could implement our own logic and transfer the data however we wanted.”
David Müehlenhoff, development team lead at Nevaris Build
Certain reports within Jira used by the QA team needed to be worked on in Azure DevOps used by the dev team.
So they used Exalate to implement a synchronization that helped pass the required information between Jira and Azure DevOps. They also wanted to orchestrate workflows between the Dev, the QA, and other teams.
They used Exalate for its configurability, specifically for user mentions in comments.
Future
Having connected the development and the QA team with a Jira Azure DevOps synchronization, Nevaris Build aims to expand further.
It wants to connect its support team using Salesforce with Azure DevOps to streamline communication between them.
“Exalate is a winner there because it supports Salesforce Integrations. In our case, Salesforce is used by our support team and we want to set up synchronization between Salesforce, Jira, and Azure DevOps.”
David Müehlenhoff, development team lead at Nevaris Build
Their vision is to smoothen information flow and increase transparency between teams using disparate applications so that internal and external workflows are processed automatically.
Companies often need to set up advanced or customized integrations between Jira and Azure DevOps. Such integrations are commonly used to streamline communication between disparate applications.
In this article, we discuss how to maintain issue links and their relationship types between Jira and Azure DevOps. We also see a secondary requirement of syncing the parent-child equation of issues and sub-tasks.
We use a synchronization solution called Exalate to implement this use case.
The Use Case
The following are the use case requirements:
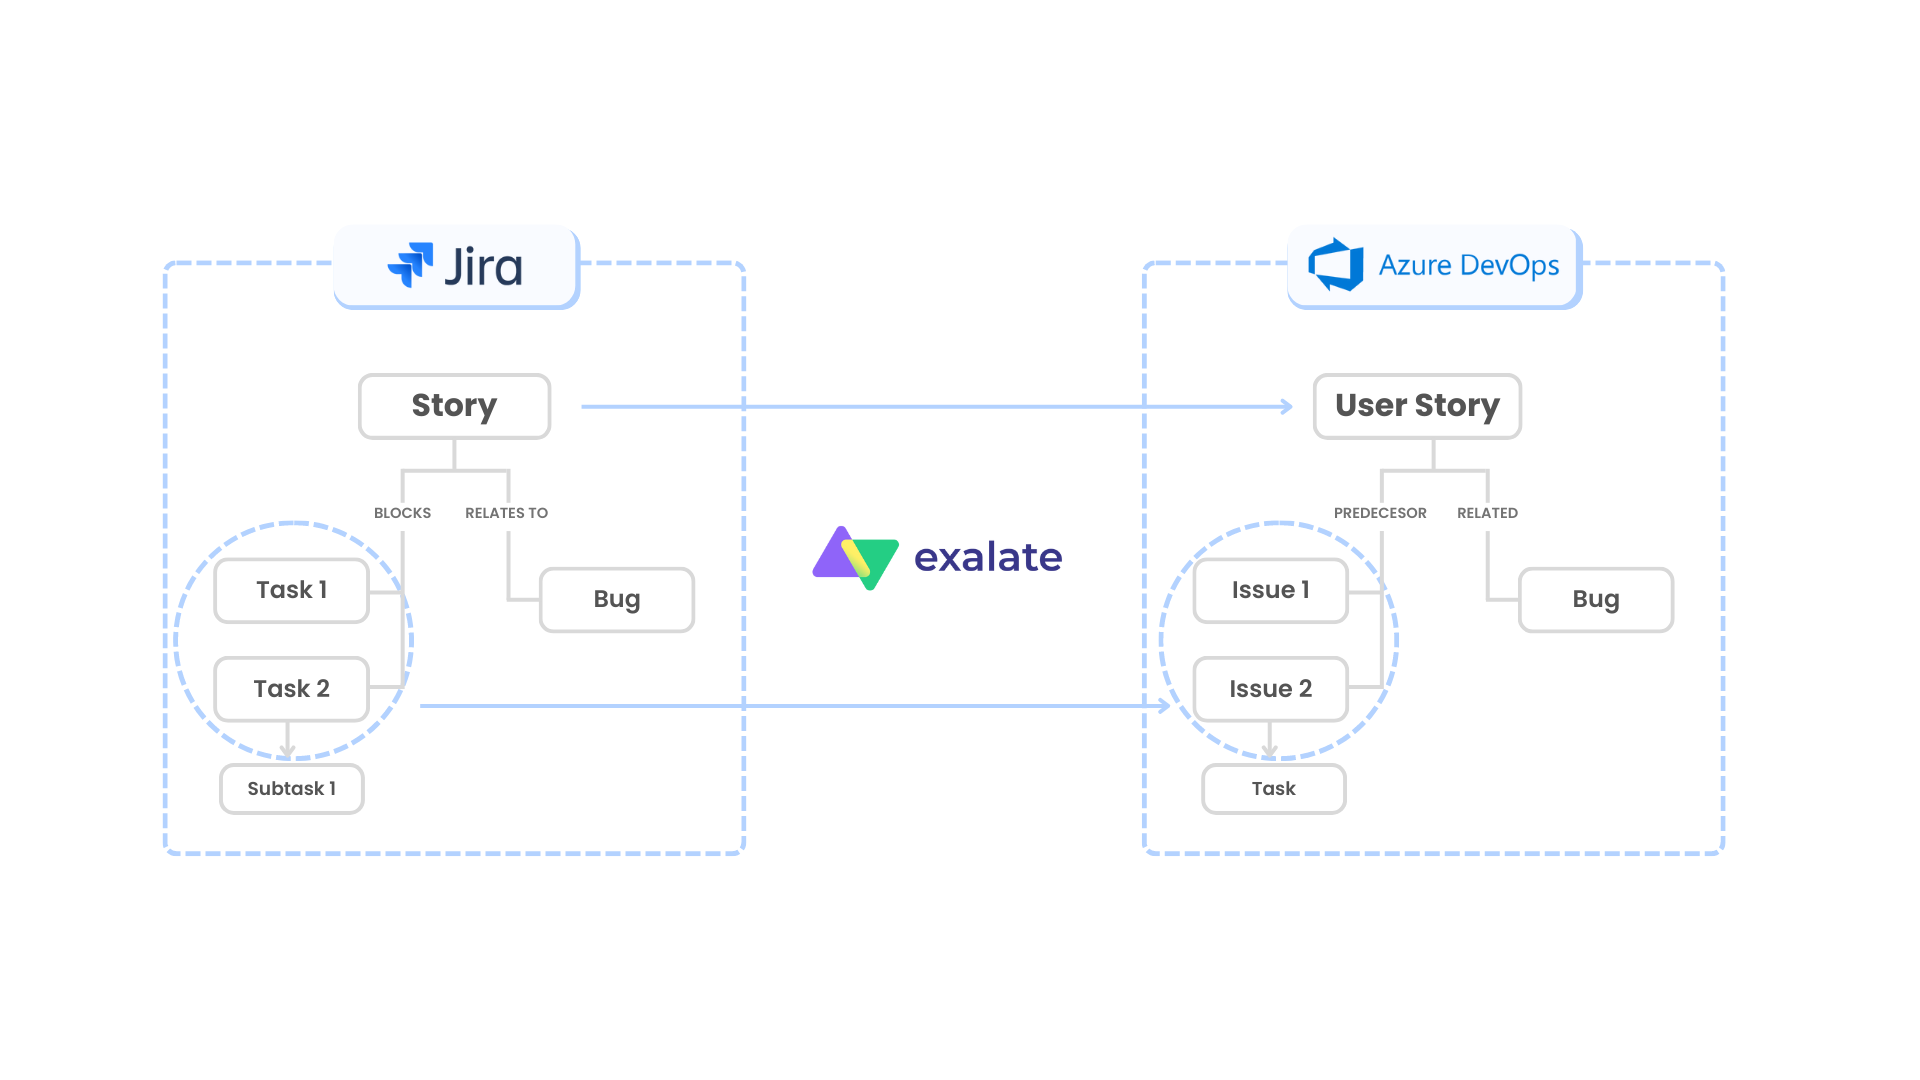
Stories in Jira should arrive as a User Stories (work item) in Azure DevOps.
Stories have issue links: Tasks and Bugs. These need to be reflected in Azure DevOps under the corresponding User Story as issues and Bugs.
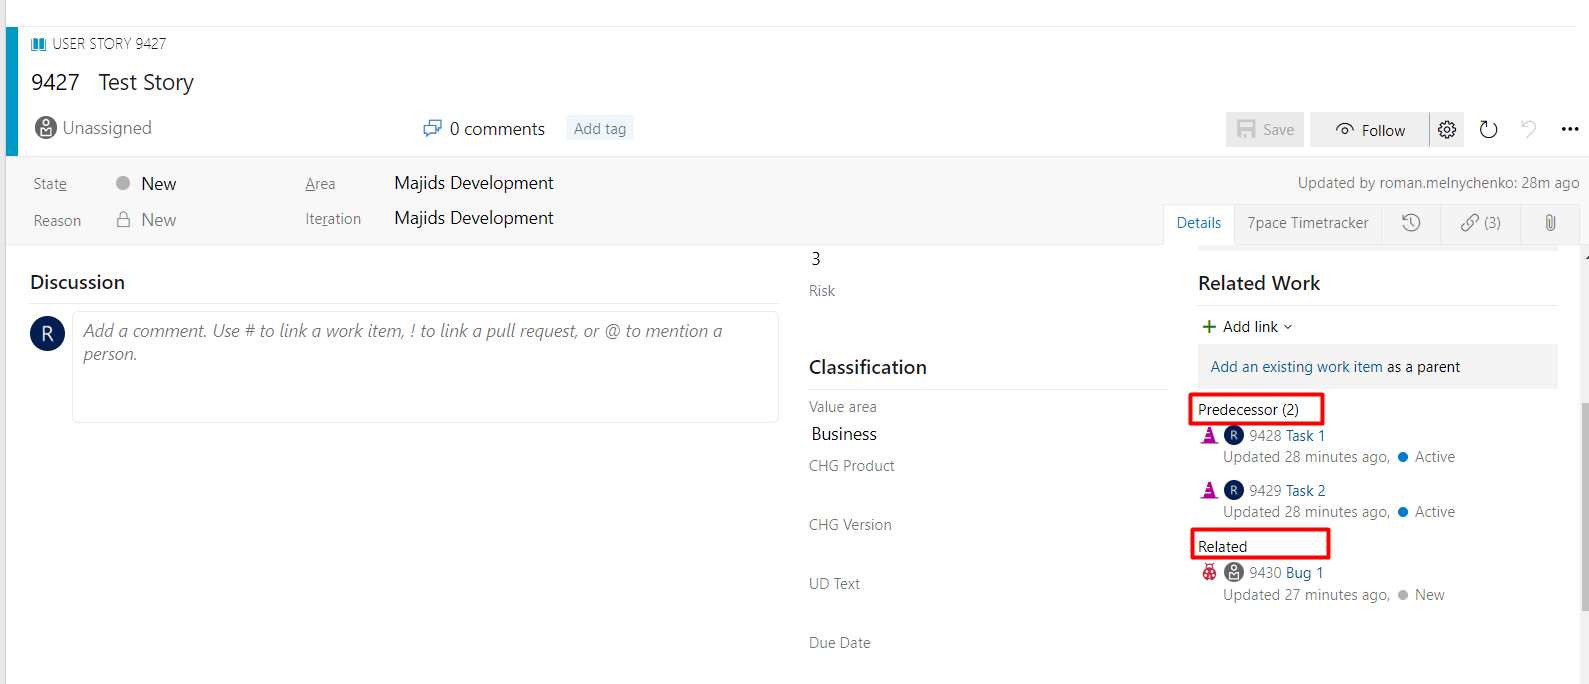
Tasks have a “blocks” relationship type with the Story. They must be synced over as issues with a “predecessor” relation to the User Story in Azure DevOps.
Bugs in Jira have a “relates to” relationship with the Story. They should be reflected as bugs work item type with a relation “related” to the User Story in Azure DevOps.
Sub-tasks of Tasks in Jira are to be mapped to Tasks (as a child relationship) under the corresponding issues in Azure DevOps.
A visual depiction of the use case will make things clearer.
Potential Challenges
The requirements are unique and advanced. So there are a couple of challenges we need to address first:
Syncing a Story in Jira to User Story in Azure DevOps Tasks in Jira fly as issues in Azure DevOps. Bugs are to be kept as Bugs. Maintaining these mappings is important.
Mapping of the parent-child relationship between the sub-tasks and Tasks in Jira to Tasks and issues in Azure DevOps
Customizing the relationship types fully You can define and map them as you want. For instance, the “blocks” relationship type is mapped to “predecessor” in Azure DevOps. Or the “relates to” relationship type is mapped as “related” in Azure DevOps. These are just examples, the actual mappings will depend on your synchronization requirements.
After taking note of these challenges, it’s time to implement the use case.
But first, we need to understand why we chose Exalate.
3rd-Party Synchronization Solution: Exalate
Exalate is a 3rd-party synchronization solution that supports integrations for various work management systems like Jira, ServiceNow, Azure DevOps, Salesforce, Zendesk, GitHub, etc.
Why Exalate
We chose Exalate to implement this advanced integration use case for the following reasons:
Intuitive Scripting Engine It has Groovy-based scripts that help set up complex logical mappings between the entities to be synced.
Advanced automatic sync triggers It supports triggers that can be fine-grained to advanced levels and enable automatic synchronization of data. These are native to the systems under sync. For instance, you can create triggers in JQL if you use Jira and in WIQL if you use Azure DevOps.
Independent control of information flow Since the use case we want to implement needs complex mappings in both Jira and Azure DevOps, we need independent control of the information to be sent and received. This ensures that you don’t mess with each other’s synchronization.
Bulk synchronization of entities
Sometimes there is a need to sync entities in bulk if a particular condition is satisfied.
Sync Issue Links, Relations, and Sub-task Mappings between Jira and Azure DevOps Using Exalate
Start by installing Exalate on the integrating systems, Jira and Azure DevOps in our case.
Then you can establish a connection between the 2 instances in the Script Mode.
The Script mode has Groovy-based scripts in the form of “Incoming sync” and “Outgoing sync”.
When a connection is established, click on the “Configure Sync” button or edit the connection to access the “Rules” tab. This is where the syncs we just talked about reside.
These syncs are present in both Jira and Azure DevOps instances. That means:
Outgoing sync defines what information is sent from the source to the destination.
Incoming sync defines how information must be received from the source.
The Scripts
Let’s look at the actual scripts required to implement this use case.
Outgoing Sync: Jira
Essentially, the only information that must move out of Jira are the issue links and the parent ID for the sub-tasks.
Once you have set all of this up, it’s time to see the output.
Output
You can set up automatic sync triggers to start the sync whenever a Story is created in Jira.
In Jira
Create a story in Jira.
Create the issue links
Create 2 tasks: Task 1 and Task 2 with the required relationship types.
Create a bug with the required relationship type.
In Azure DevOps
Work items and the relations are synced and the parent-child hierarchy is maintained.
Note: For additional information about Exalate, watch the Exalate Academy videos.
Conclusion
Integrating Jira and Azure DevOps can bring in a lot of benefits. It can reduce manual efforts, increase the visibility of important information, and bring everyone on the same page. You can use 3rd-party tools like Exalate to implement similar integrations.
Book a demo with us to see how it works for your specific scenario.
You can integrate custom data between Jira and Azure DevOps with the help of secure third-party tools. Such custom integrations are necessary to maintain the hierarchy of data when moving between both sides of the integration.
For better clarity, we’ll explore a sample use case. We’ll also use an integration solution called Exalate.
Custom Integration: ADO to Jira Use Case
Any work item (Epic, Task, or Feature) created on Azure DevOps is reflected as a ticket (Story, Task, or Bug) on the Jira side. Making any adjustments to the ticket name or description is reflected automatically on the other side.
You will also see a link between work items or tickets based on the established hierarchical structure.
Let’s go through the requirements and challenges:
Primary Requirements
When a user creates a task, epic, or feature on the Azure DevOps side, it should be mapped to a story, task, or bug on the Jira on-premise side. You also need to create a 3-level hierarchy between all 3 work items.
In addition, you need to establish sync rules for the incoming and outgoing data on both sides.
Potential Challenges
Inaccurate mapping of fields
Network failure
Triggers with errors
Poorly written rules
The Solution: Exalate
Exalate is an integration solution that enables bidirectional synchronization with work and service management platforms such as Zendesk, Azure DevOps, ServiceNow, Jira, Salesforce, etc.
Why Use Exalate?
It allows you to sync fields between Jira and Azure DevOps.
You can configure your use cases with the help of the Groovy engine.
It allows you to set custom triggers for automatic syncs.
Using the bulk connect option, Bulk Exalate will save you time when you have multiple syncs to complete.
How to Implement Exalate for Data Updates
Before using Exalate, you need to install it on both the Jira and Azure DevOps sides. To establish your first connection, follow the instructions in this comprehensive guide.
Considering that this specific use case requires advanced integration and some coding, you must establish the connection using the Script Mode.
When setting up a connection, you need to configure the incoming and outgoing syncs:
Outgoing sync (on the Azure DevOps side) refers to the data to be sent over to the Jira side.
Incoming sync (on the Jira side) refers to the data to be received on the Azure DevOps side.
Under the “Rules” tab on the Azure DevOps side, enter the following code snippet into the “Outgoing sync” text area.
replica.parentId = workItem.parentId
Note: The workItem.parentId function refers to the unique ID of any work item created on the Azure DevOps side. The replica.parentId function contains the information you want to pass between the two instances.
def res = httpClient.get("/_apis/wit/workitems/${workItem.key}?\$expand=relations&api-version=6.0",false)
if (res.relations != null){
    replica."relation" = res.relations[0].attributes.name
    replica."relationid" = (res.relations[0].url).tokenize('/')[7]
    }
The code snippet above uses httpClient to call the API for the work item using the GET method. It picks up information about the relationships for work item attributes such as name and description.
Once done, click “Publish” to save the changes.
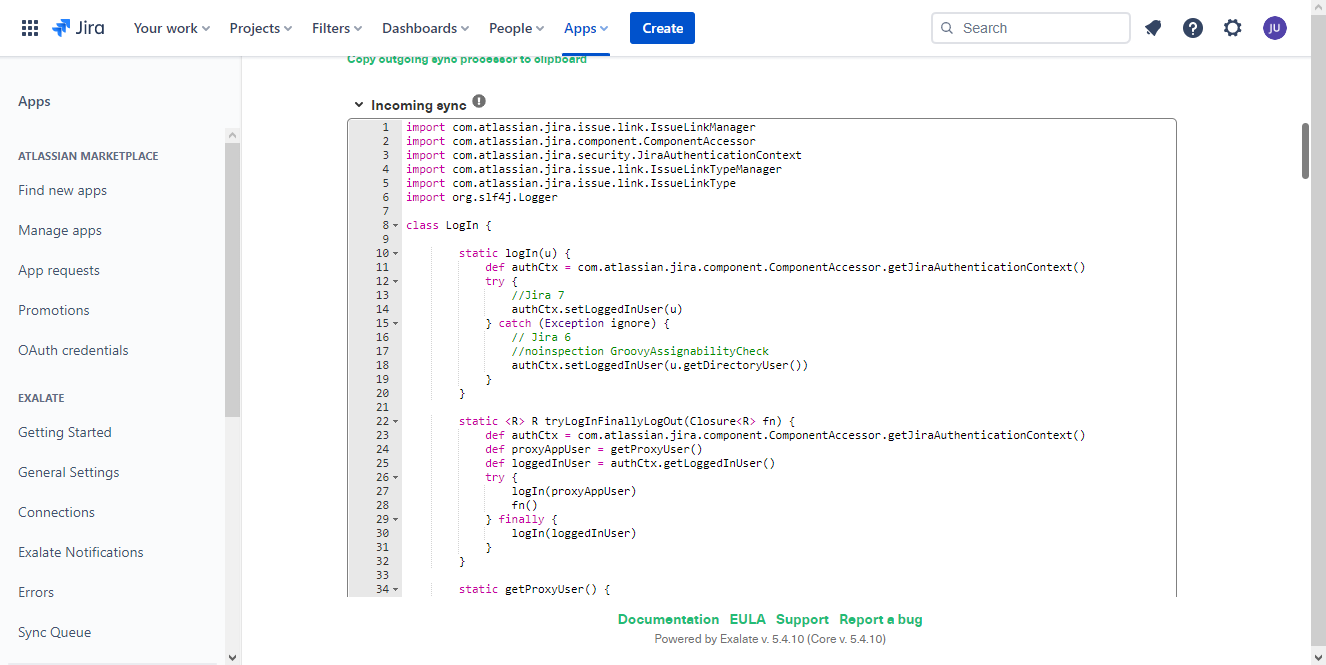
On the Jira side, go to the “Incoming Sync” text area under the “Rules” tab. Replace the placeholder code with default functions for handling the syncs.
This linkTypeMap object specifies how the relationships between work items and issues should be mapped between Azure DevOps and Jira (Parent-Relates, Duplicate-Duplicate).
Congratulations! Your connection is set. You can now set triggers to help you automatically update and sync Jira issues with Azure DevOps. Subsequently, you can tweak the code for specific projects.
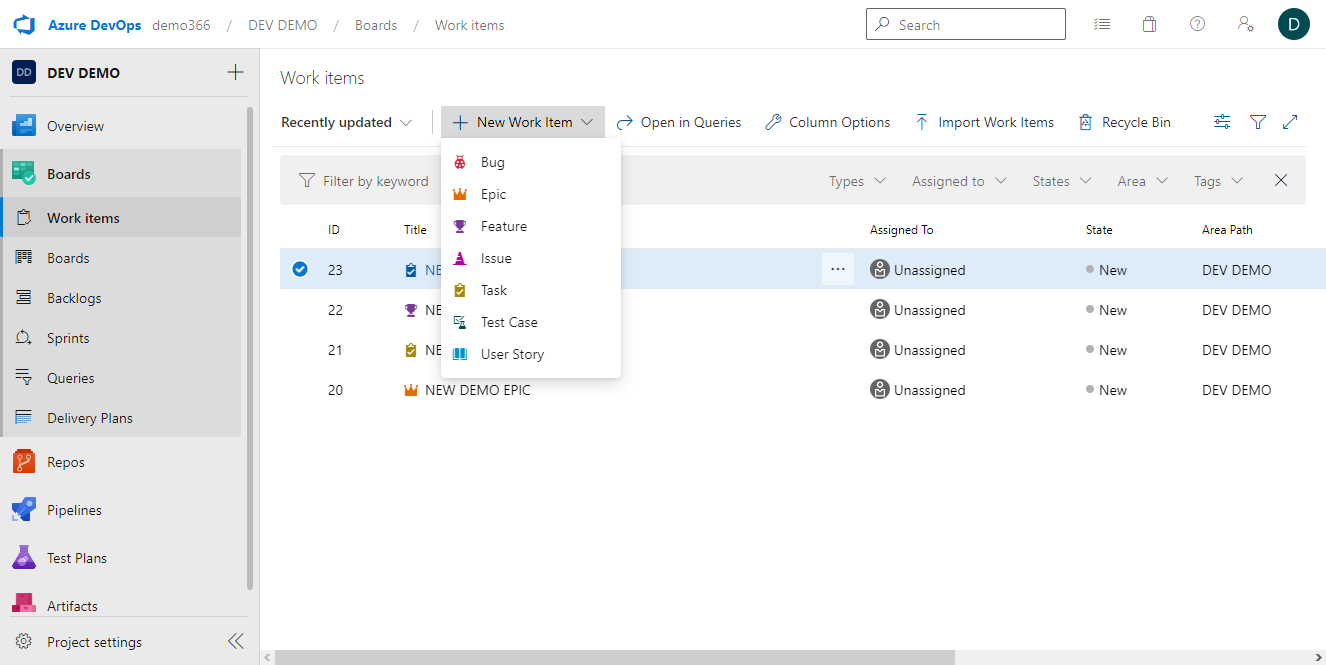
With your connection in place, go to your Azure DevOps dashboard and create a new work item.
Click on “New Work Item” on your selected board. Select “Epic” from the dropdown menu.
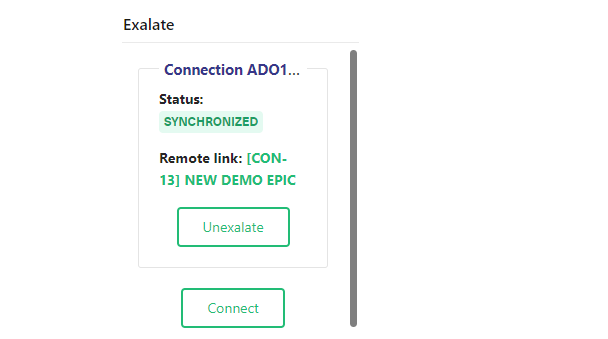
Change the name and click on “Save” to effect the changes. Afterward, you can scroll down to the bottom of the Epic to see that the connection has started syncing automatically.
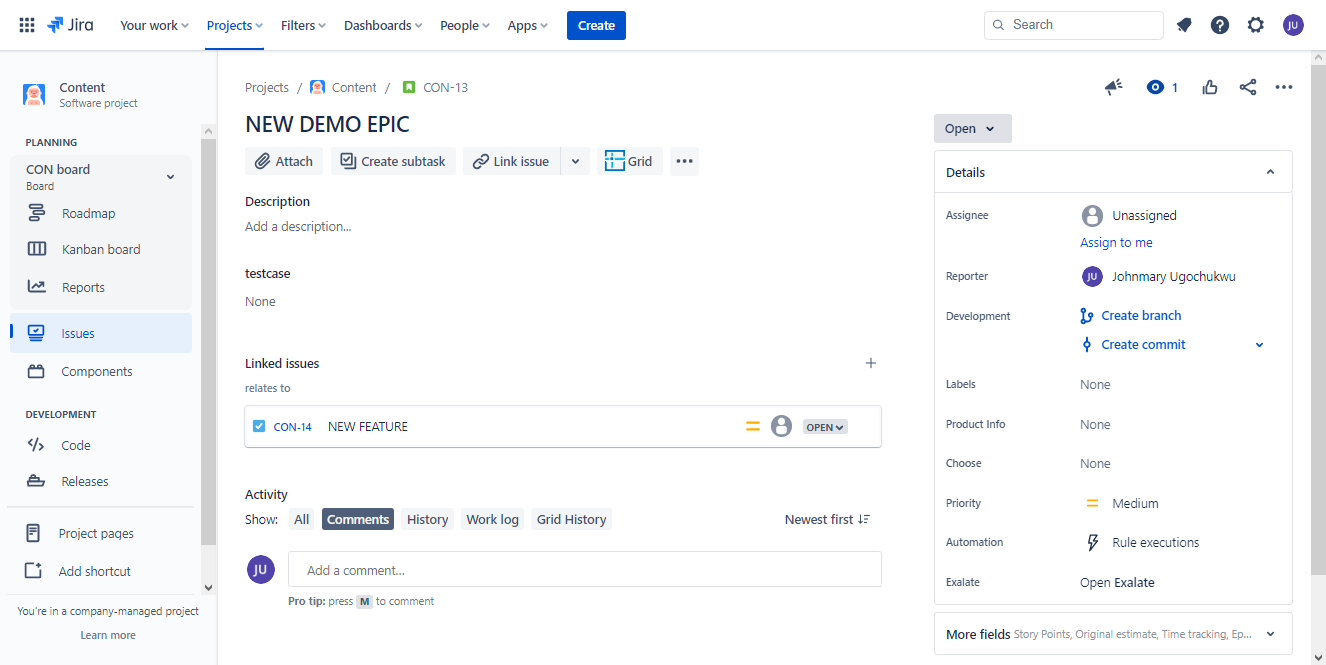
When this is complete, you can click on the link to view the ticket on the Jira side.
Follow the same steps to create a Task and a Feature.
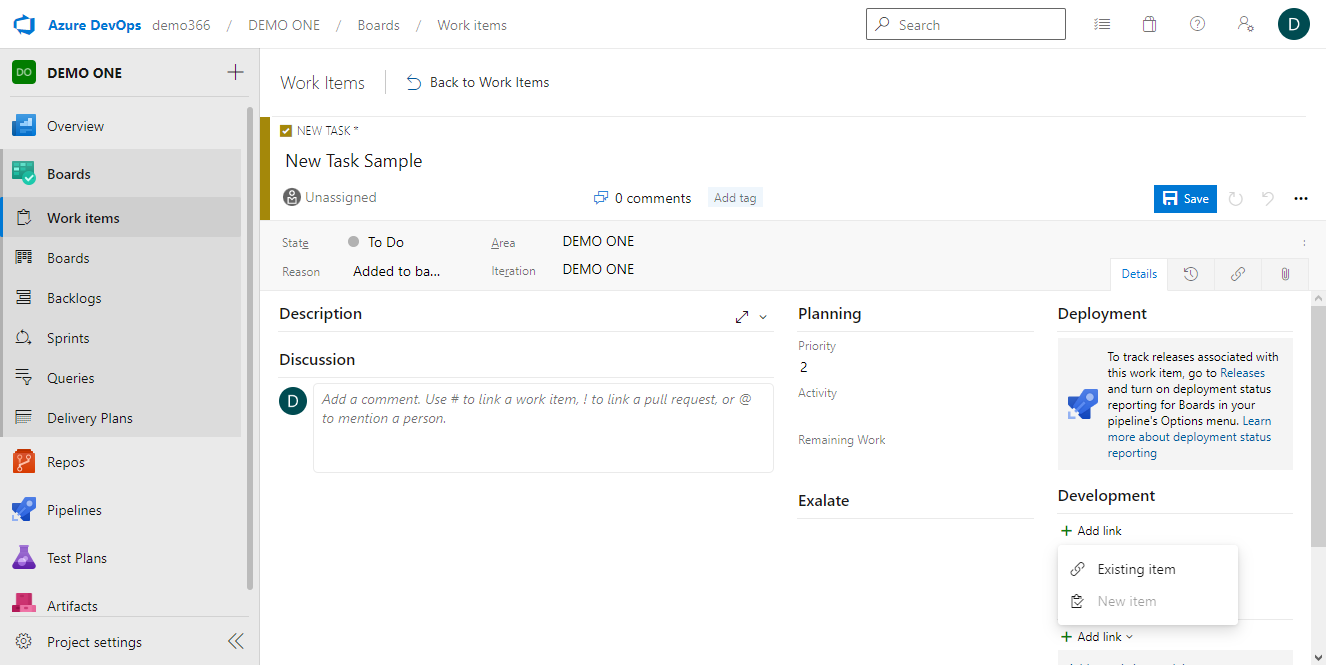
With the Feature tab open, add a name and description. Then, go to the “Related Work” section on the right and click on “Add link” then select “Existing Item”.
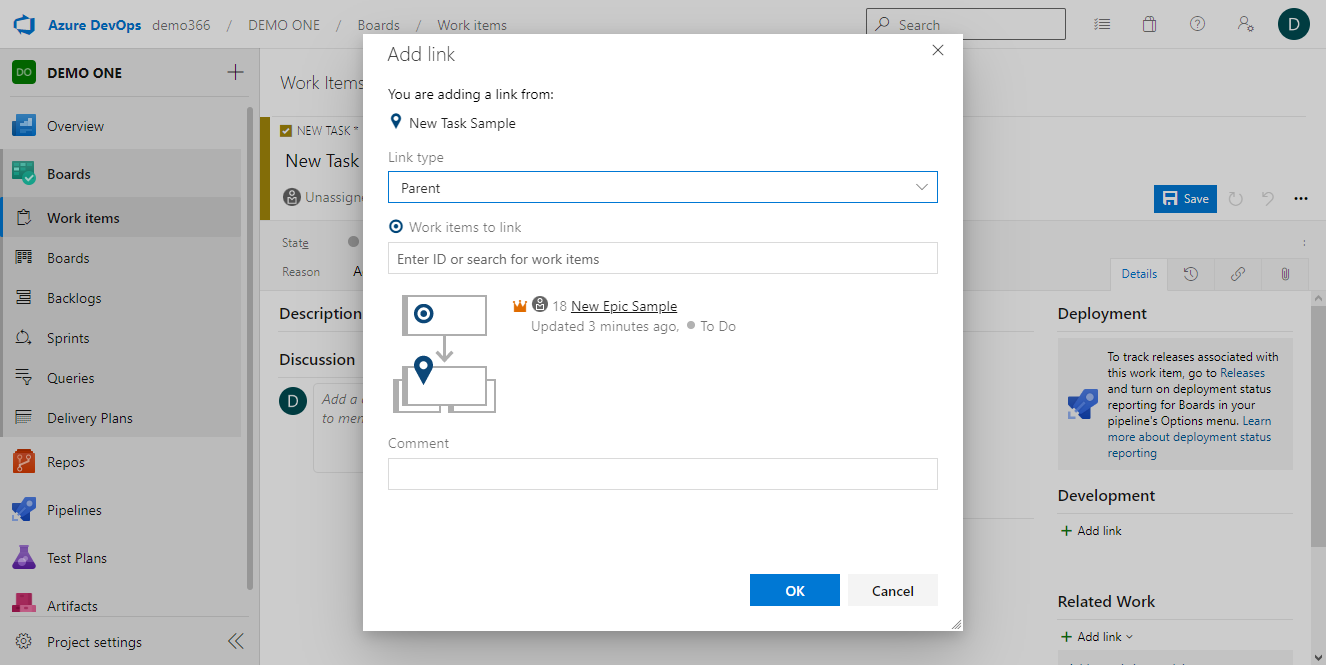
You will see a pop-up modal. Select “Parent” as the link type and make the Epic you created earlier the parent. Click on “OK” to complete the process and save the changes.
Next, create a Task and make the Feature its parent. Afterward, you can view them on Jira to see the established hierarchy.
Conclusion
Exalate is a solution that enables you to update custom Azure DevOps work items with Jira issues. It also allows you to set custom rules and triggers to meet the requirements of any specific use case.
If you still have questions or want to see how Exalate is tailored to your specific use case, book a demo with one of our experts.
Zendesk is a customer service platform that over 100,000 businesses rely on to create a complete, pleasant customer experience. This tool makes it easy for companies to connect with customers, talk to them, and address their concerns as fast as possible.
But using Zendesk presents an issue: businesses find it difficult to integrate other tools with this CRM platform. Let’s say you want to integrate Zendesk with Salesforce Service Cloud or a Jira ticket; using native Zendesk CRM integrations won’t deliver the required robustness and flexibility.
You’d still need a third-party integration to guarantee your sync’s success.
This blog will explore the benefits and shortcomings of existing Zendesk native integrations. Continue reading to discover the right third-party integration solution for syncing your customer service data across independent platforms.
Why Use Zendesk Integrations?
Development and customer support teams use Zendesk for Service to handle customer support issues. The ticketing system enables support agents to track all communications in order to provide better assistance in the future.
Similarly, marketers can use Zendesk for Sales to attract prospects and nurture existing leads, regardless of where they are in the buying journey. Team managers can also use Zendesk to improve team productivity and keep the entire organization on the same page.
But on its own, Zendesk has several limitations. The most common one is that you cannot create follow-up tickets for messaging – and many other problems, which we’ll discuss later.
Notwithstanding, integrating Zendesk with other CRM and ticket management tools is a no-brainer because of the following reasons:
Automate all synchronizations: Teams need essential Zendesk integrations so they can automatically sync their data with other internal and external teams without the need to migrate the data manually.
Centralize information: Using Zendesk integrations to gather information from Salesforce, GitHub, Jira, etc., helps you establish a single source of truth – which is Zendesk in this case.
Choose what matters: Integration tools for Zendesk usually come with filters and triggers that help you configure what needs to be synced and what should stay separate.
Enhance collaboration: With Zendesk support integrations, teams can improve collaboration and communication instead of allowing the creation of information silos due to a lack of a centralized data source.
Increase transparency: Since every team member now has access to the central data source (depending on role and authorization), useful Zendesk integrations will foster an atmosphere of openness. As a result, this will encourage seamless cooperation toward achieving the business goals.
Zendesk Integrations: Common Use Cases
As promised earlier, let’s cover the common scenarios for using Zendesk integrations:
Store and Track Information
Keeping track of information is easier with Zendesk integrations for customer support since your business has a centralized source of truth. All user comments and attachments are synced (and stored) bi-directionally, making it possible for teams to have a 360-perspective when communicating with clients.
For instance, the sales team can view a customer support ticket to figure out potential issues that users face at every stage of their journey with the product. This will help the sales team tailor their processes to the customer experience.
Zendesk app integrations are valuable to interdependent teams, whether internally or externally. Here is a typical scenario between development teams and customer support representatives.
Assuming a customer opens a Jira ticket about a failing sync, the support agent could analyze the root of the problem and then forward the ticket to the development team. In turn, the development team will start working on a fix while providing real-time feedback and updates in the same ticket.
Teams in different organizations can also use Zendesk integrations externally to create a harmonious environment for collaboration.
Migrate Customer Data
If you want to migrate data from an external system, or vice versa, you’ll need an integration to bridge both systems.
Let’s say you want to move your customer service tickets from Zendesk to ServiceNow; this is where third-party integrations shine.
Note: Before migrating your data out of Zendesk, always back up every file, ticket, or line of code. This will help you retrieve them if anything goes wrong during migration. You also need to plan the migration scope and map the fields that should be shared to avoid losing data during the process.
Native Ways to Implement Zendesk Integrations
The Zendesk Marketplace contains a lot of solutions that integrate with GitHub, Asana, Jira, Azure DevOps, Slack, Salesforce, and other platforms.
A ZIS Flow is a JSON-based object that defines the number of steps to follow when passing data between states. This includes flow timeouts (usually 100 seconds) and state transition limit (250 max). Flow states can obtain information from configuration settings and OAuth tokens.
ZIS Actions are wrappers for HTTP requests, typically used for simple data transfers. ZIS Actions allow you to send requests (or create external actions) to 3rd-party APIs for systems like Slack.
Finally, a Job Spec object specifies the event triggers and the flow to run. JobSpecs covers native Zendesk events, 3rd-party events, and custom Zendesk events.
Let’s have a look at some of the benefits of using Zendesk native integrations:
Installation is swift and easy.
The integration focuses on one specific tool.
You can sync with the remote side instantly.
You have absolute control over what syncs–and what doesn’t.
You can map multiple issues to one Zendesk ticket.
Potential Challenges of Native Zendesk Integrations
Here are some of the drawbacks of using native Zendesk API integrations:
Error reporting is non-interactive.
You can’t set automatic triggers on the remote side.
Field mappings are limited to uni-directional syncs.
Configuration options are minimal. You cannot sync issues in bulk.
The system is not flexible for other scenarios outside support and development.
The integration is centered around one Zendesk admin account, which could break the integration once the account owner leaves the organization.
Bearing these constraints in mind, you’ll need a third-party integration tool that guarantees a smooth bidirectional synchronization between different work management systems.
What to Consider When Choosing a Third-Party Solution for Integration
The best Zendesk integrations must have the following attributes:
Security
Using a third-party integration to synchronize your data across systems presents security risks; hackers can exploit vulnerabilities in the connector or on the remote side. So when choosing a third-party solution for integration, look for one with a proven track record of protecting sensitive communications.
Also, check if the solution has role-based access, OAuth verification, and multi-factor authentication (MFA), as well as uses HTTPs and other secure protocols to fetch and send data. Additionally, solutions that are ISO 27001:2002 certified must be your top choice.
Versatility
Every company uses a preferred tool for their stack: some prefer ServiceNow over Salesforce, while others find Jira more convenient than Trello.
So, instead of getting a different tool for every platform, you can find Zendesk apps and integrations that interconnect multiple platforms. This will give you the leeway to connect with any client or partner without having to add another tool to your workflow.
Ease of use
Remember that your sales and customer service teams might lack the coding skills required for advanced configurations. To make things easy for everyone, look for a tool that is easy to install and use.
Although some tools require advanced scripting to get some functionalities to work, always look for solutions with an intuitive, low-code, user-friendly interface with drag-and-drop functionality.
Reliability
Automating your syncs doesn’t make it foolproof. One mistake can muddle up the entire synchronization process. To ensure your syncs are successful, use Zendesk channel integrations with a longstanding reputation for reliability. You can read customer reviews from independent sources to get a broader picture of the solution’s competence.
Support
The availability of fast-paced support can make or break your business process. To be on the safe side, look for solutions with excellent customer support. This will save you time by quickly getting your workflow back and running whenever a feature stops working.
One integration tool that fits all these criteria is Exalate. It helps you achieve bi-directional sync across work management platforms, including Zendesk, Jira, ServiceNow, Salesforce, GitHub, and others.
Brands use Exalate for the following reasons:
It provides a secure synchronization environment by using role-based access controls, HTTPS, and a JWT-based token mechanism.
Exalate is a versatile tool that supports integrations between Zendesk and other platforms like Jira, Salesforce, Azure DevOps, ServiceNow, HP ALM, GitHub, and others. You can also use AI Assist with Exalate’s Script mode to simplify the process of creating advanced integration use cases. We’ll discuss more about this in the upcoming section.
It is easy to use, thanks to a user-friendly interface. Besides, the interface is the same on all platforms, which makes it easier to use.
Exalate allows you to create rules and triggers, as well as to customize the code for specific (outgoing and incoming) integration scenarios on both sides.
How to Set up Zendesk Integrations Using a 3rd-Party Solution
To set up any integration with Exalate, you need to install it on each side of the connection.
Here are the steps to follow when installing Exalate as a third-party solution for Zendesk.
Step 1: Start with a plan
Like every other business process, you need to establish a plan and outline the expected outcomes. This plan will help you tailor your data exchange to specific needs.
You also need a properly vetted Zendesk integrations workflow for cross-company integrations because you need to factor in authorizations, API limits, and differences in architecture.
Step 2: Install Exalate on both sides
To start, you must install Exalate as a dedicated app on the Zendesk side. You can do that by visiting the Exalate integrations page or via the Zendesk marketplace.
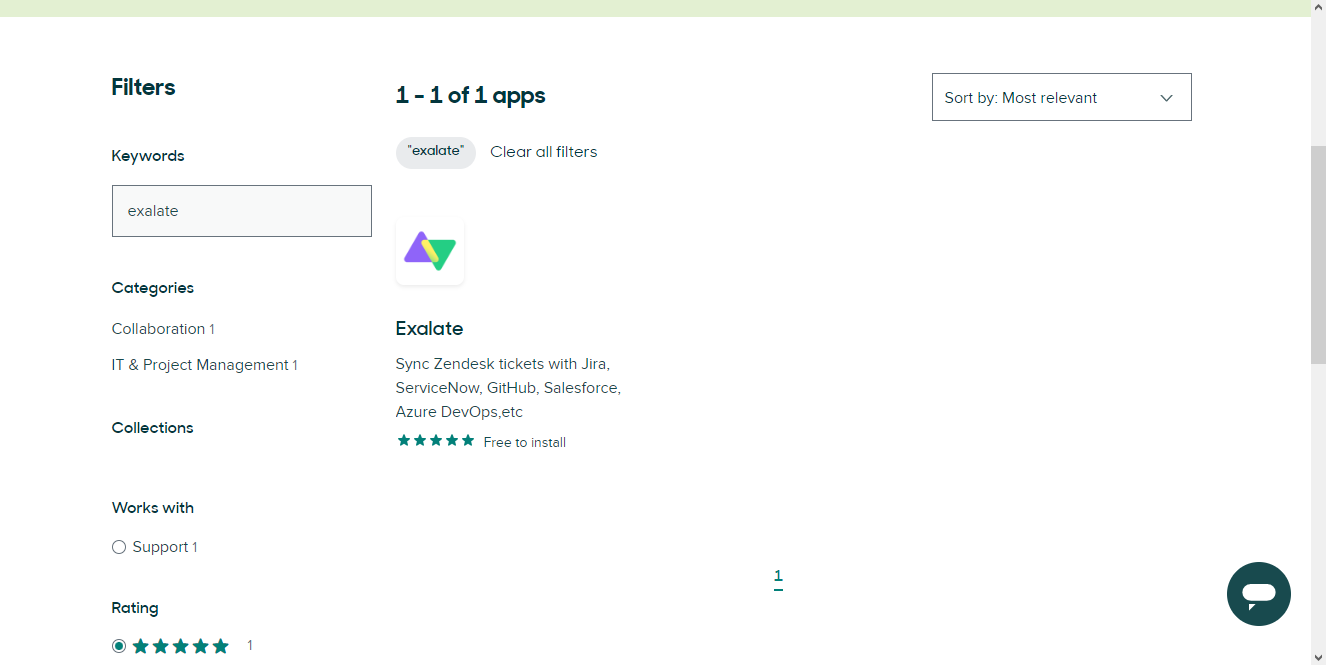
In the Zendesk Marketplace enter “Exalate” into the search bar.
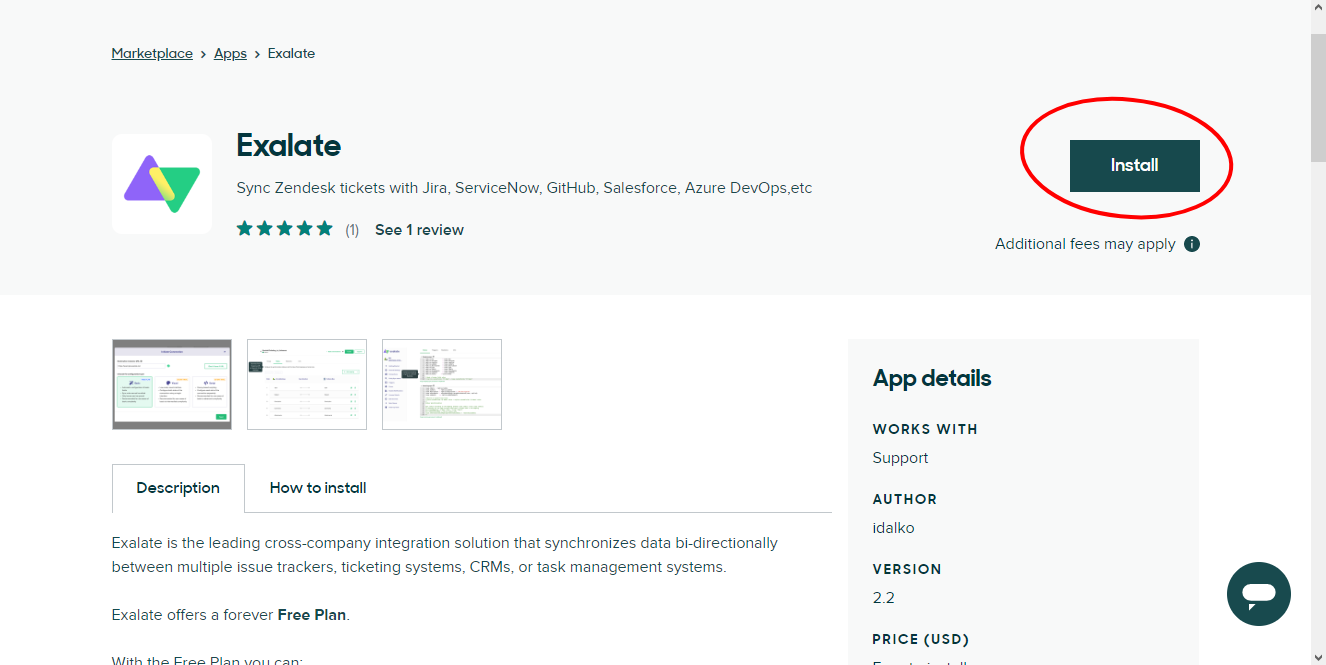
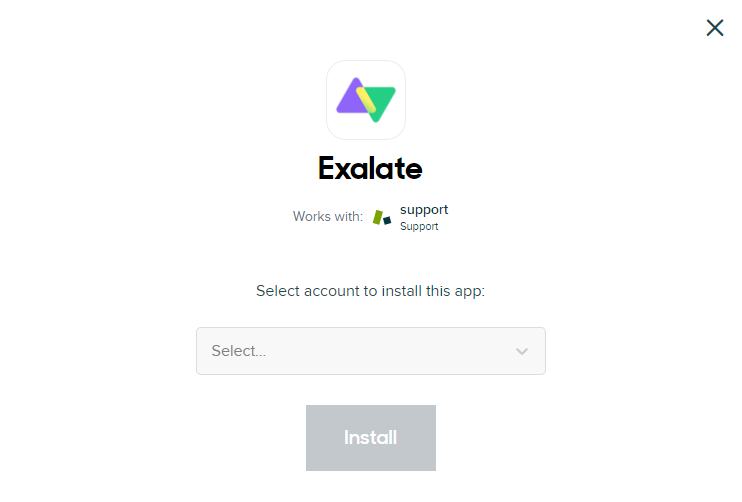
Click on “Install” on the right side.
On the pop-up modal, select the account where you want to install Exalate. Click “Install”.
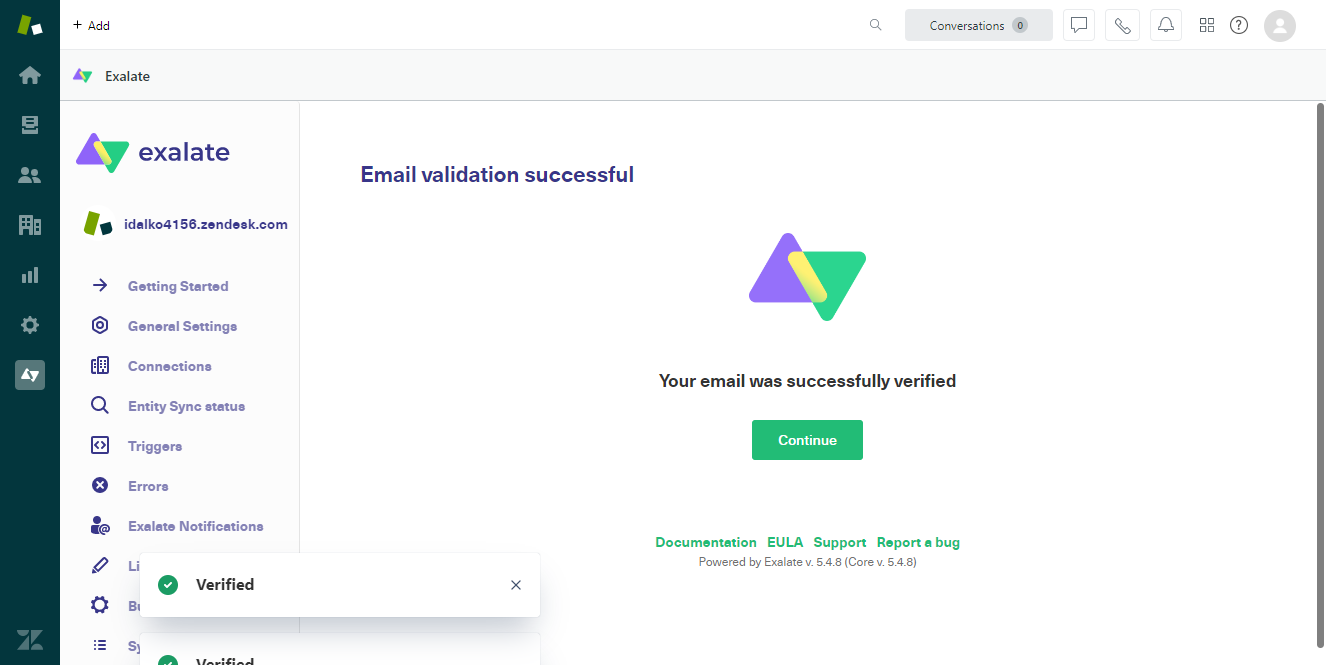
The system will ask you for authorization to access your Zendesk account.
You will then receive a verification email. Click on the link in your email to complete the verification.
Voila! You’ve now successfully installed Exalate on Zendesk.
To do the same on other platforms, go through this documentation and choose the instance that works for you. Alternatively, you could watch the installation videos for different platforms.
Step 3: Establish a Connection
The process of setting up connections in Exalate is similar for Zendesk, Azure DevOps, Salesforce, ServiceNow, Jira, and other work management systems.
For the purpose of this article, let’s say you want to sync your Zendesk with Azure DevOps.
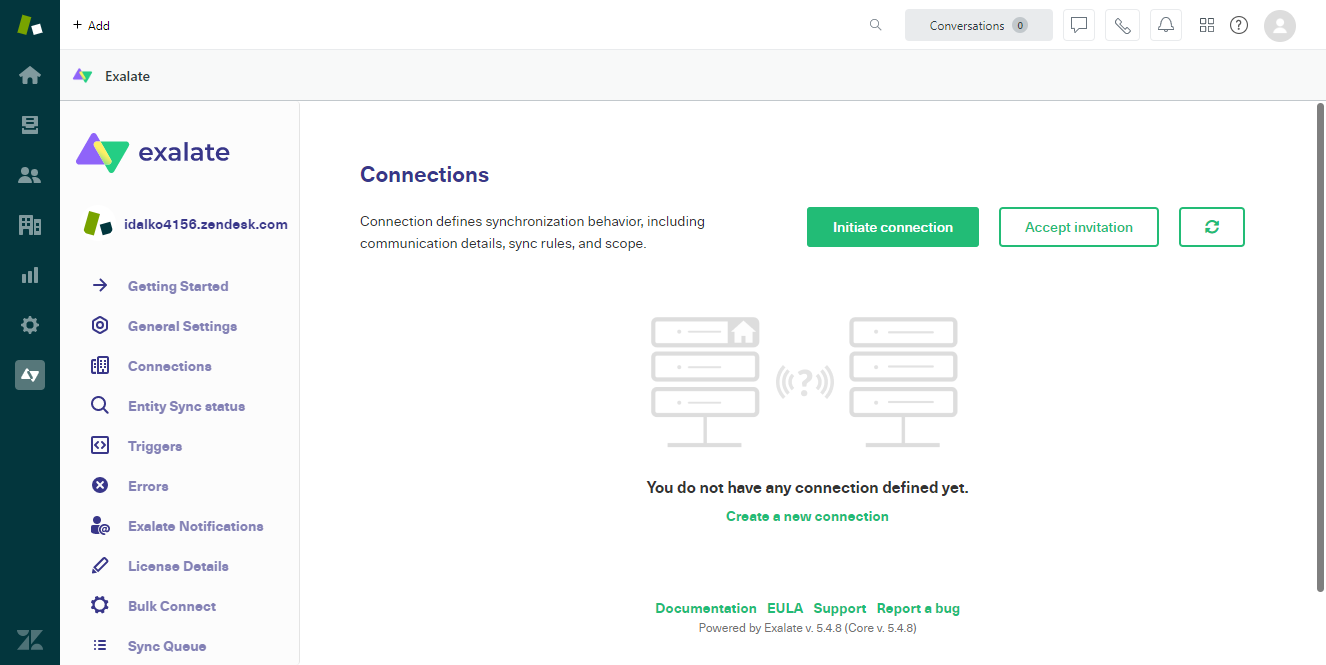
Click on “Initiate Connection” to start creating your first sync.
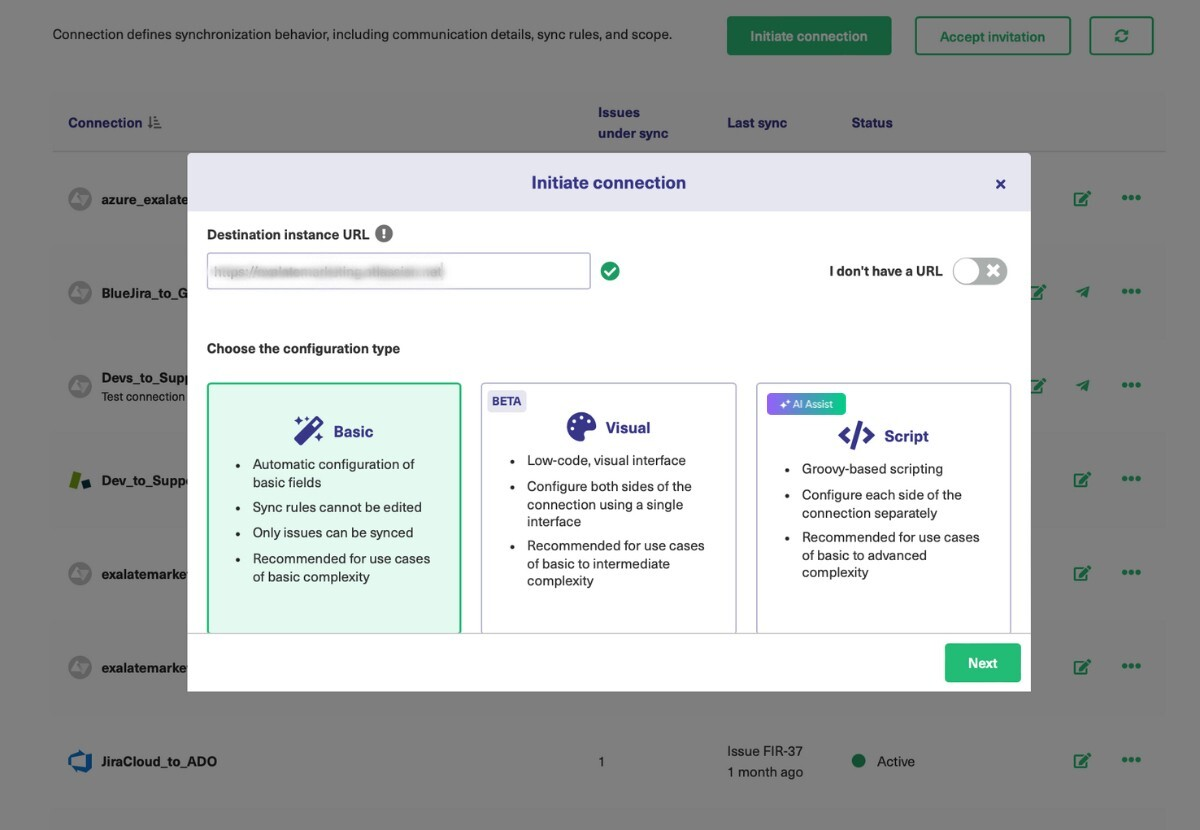
Enter the URL of the destination instance to confirm if Exalate has been installed there. You will receive a pop-up confirmation regarding the status of the destination instance.
You will also see the option to choose between the Basic or Script Mode.
Here is the difference between both installation modes:
The Basic Mode handles simple integrations between 2 platforms, but you won’t be able to customize your configurations. This mode is perfect for trials because it gives you 1000 free monthly syncs.
The Visual Mode is a low-code version of Exalate that allows you to configure both sides of the sync from a single interface.
If you want more flexibility, then the Script Mode is the perfect option for you. Using this mode allows you to configure your (incoming and outgoing) sync on both ends by mapping specific objects to each other. As discussed earlier it also comes with the option of AI-assisted integration.
You can also establish rules and set triggers to control and filter the data being exchanged between Zendesk and other platforms.
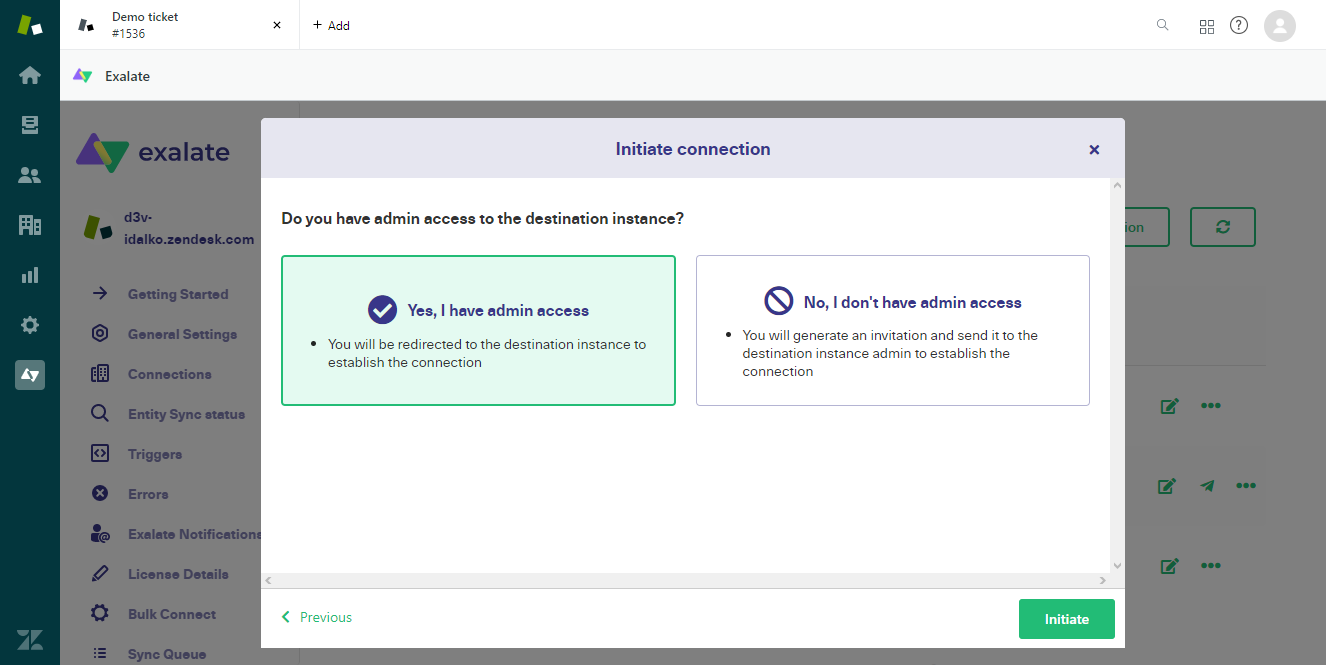
Back to the installation. Let’s explore the Basic Mode first. You’ll need admin access to sync data with the destination instance.
If you are the admin, select “Yes, I have admin access” and click “Initiate”.
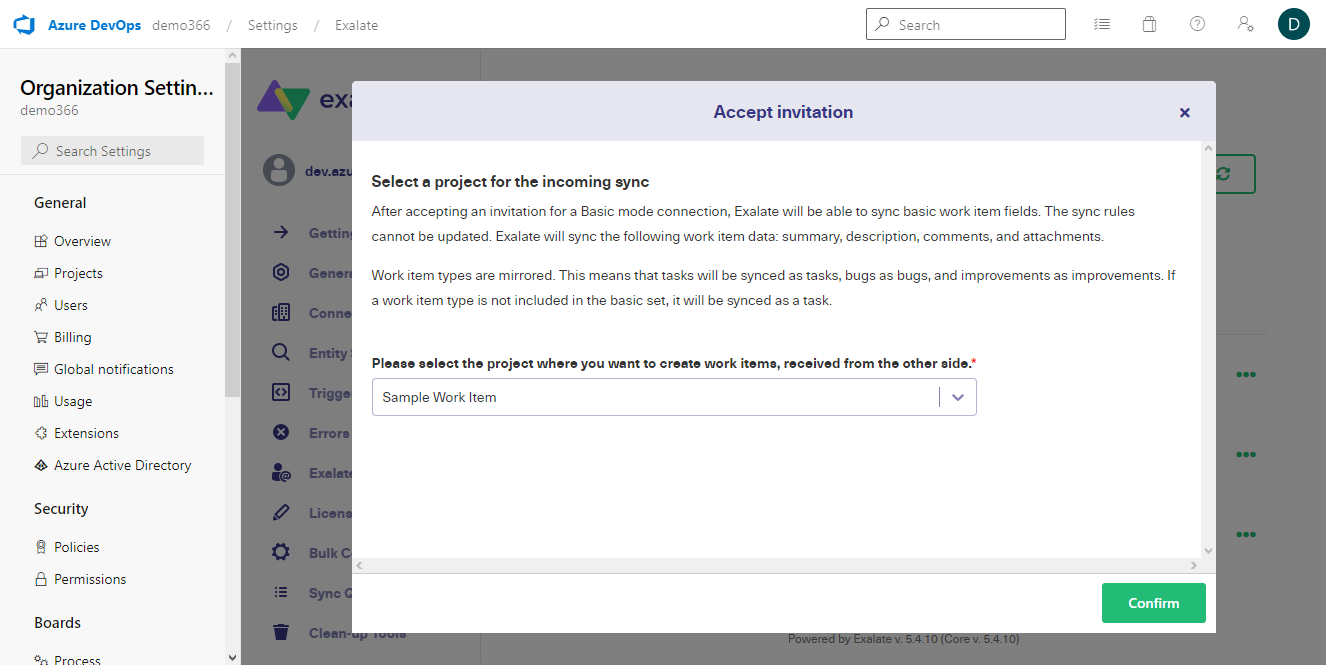
You will be redirected to the Azure DevOps instance, where you will be prompted to select the project you want to sync.
Select the project and click “Confirm” to proceed. Your connection will be established instantly.
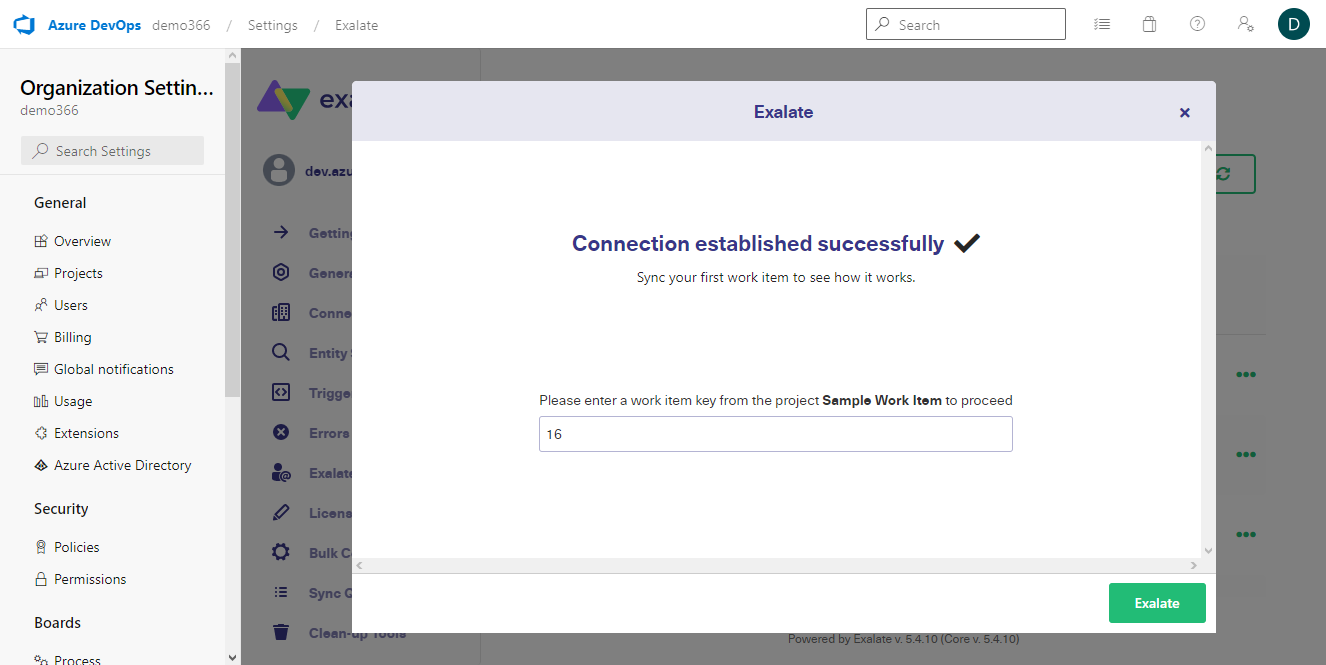
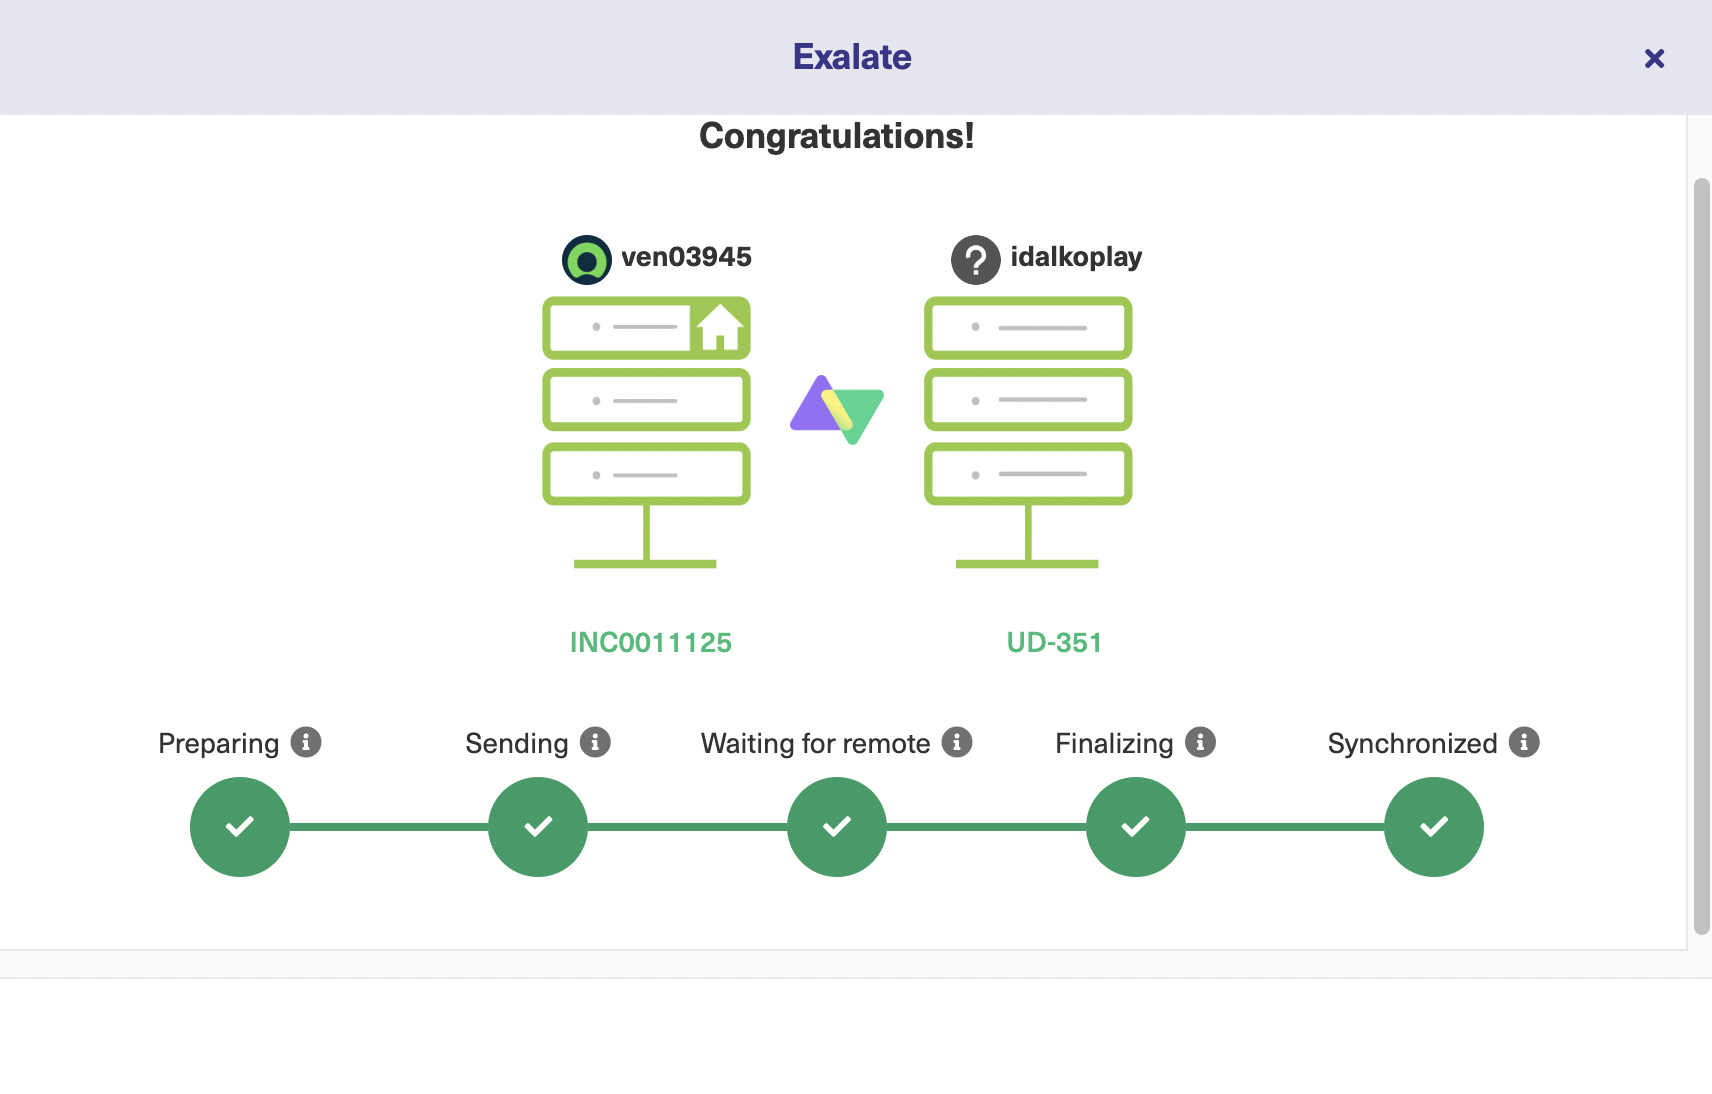
Enter a work item key and click “Exalate” to proceed.
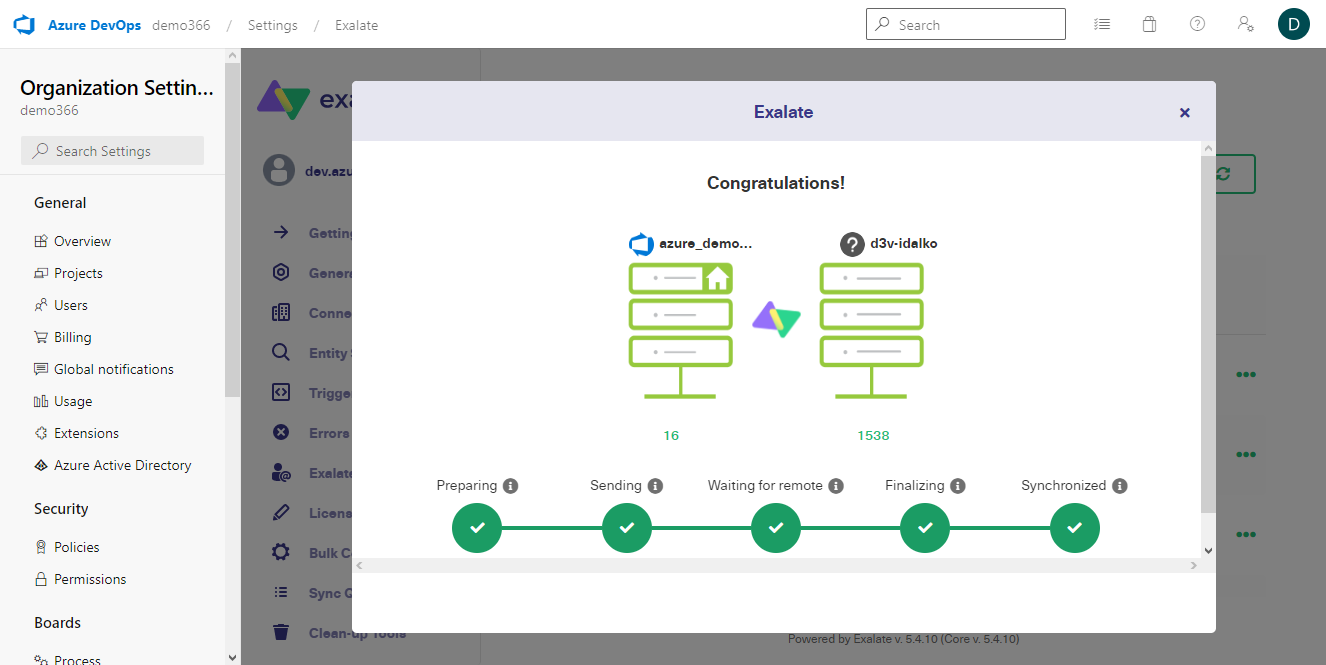
Congratulations! You’ve successfully set up your first Zendesk – Azure DevOps sync.
Now, let’s try this with the Script Mode:
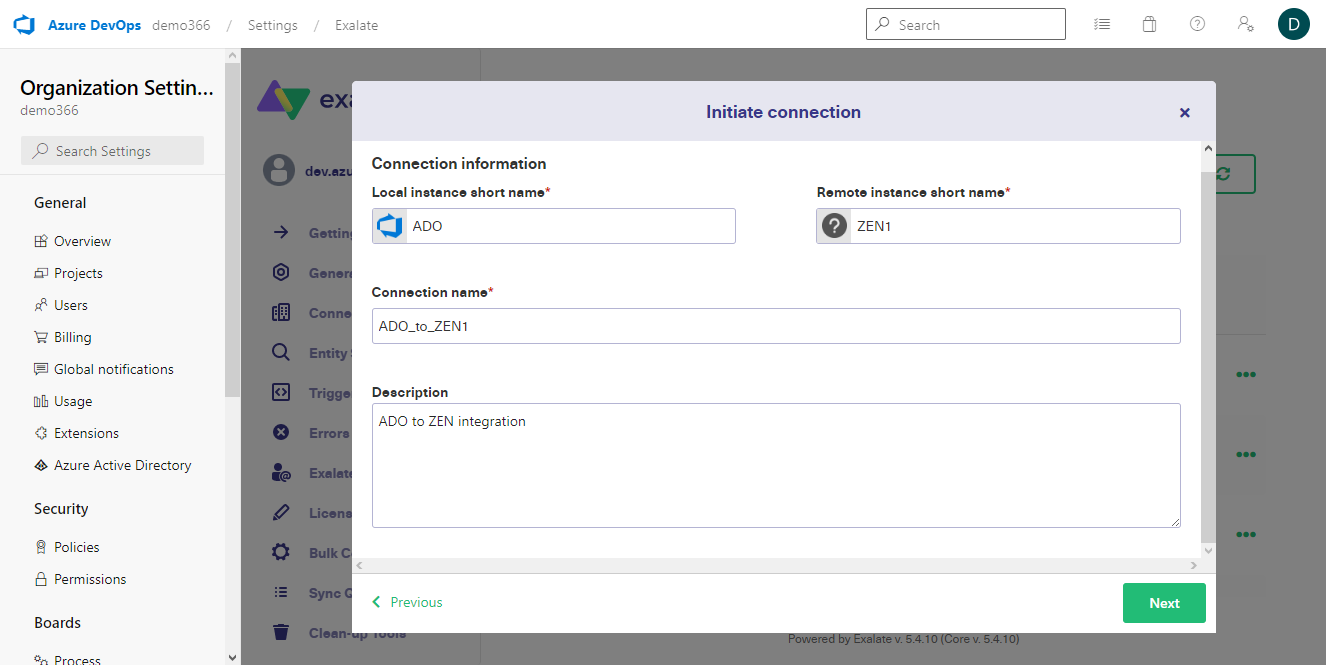
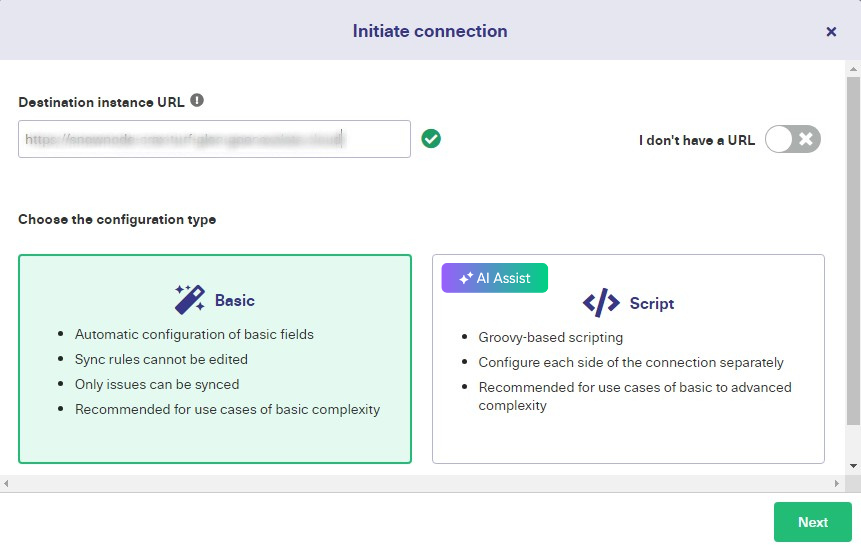
Initiate a connection, enter the destination URL, and select the “Script Mode” before clicking “Next” to proceed.
Enter the names of both the local and remote instances. Add a name and description for the connection and click “Next” to continue.
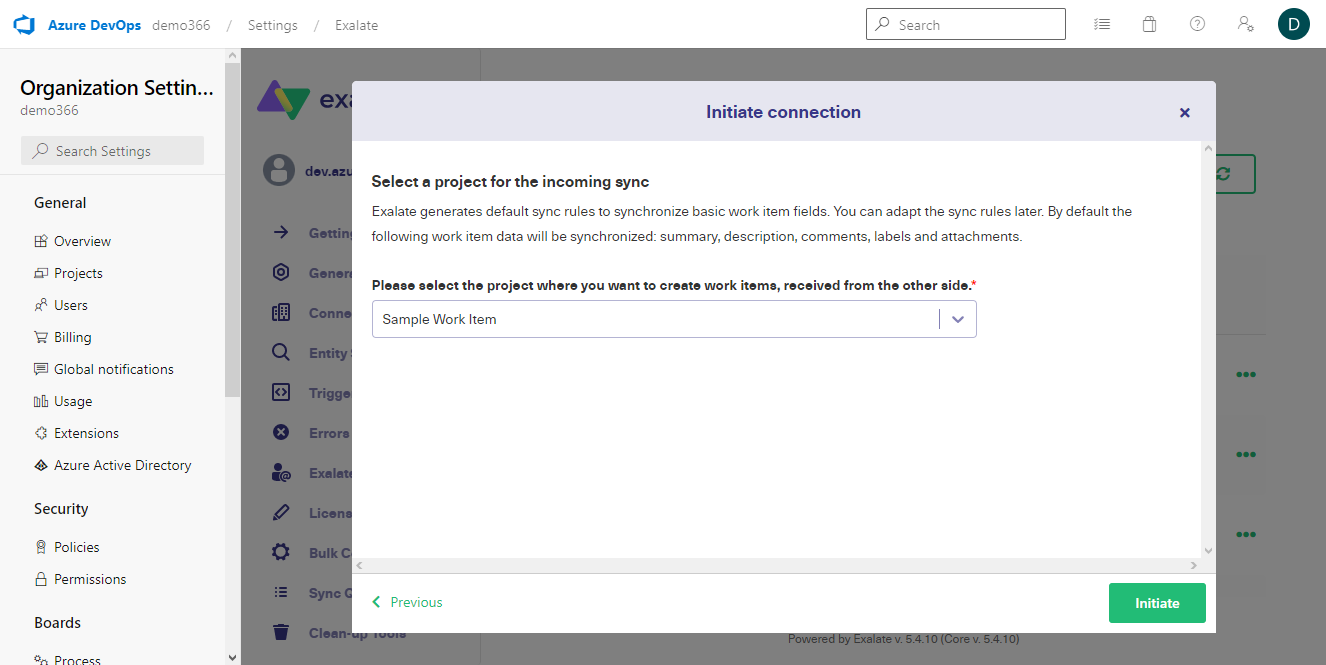
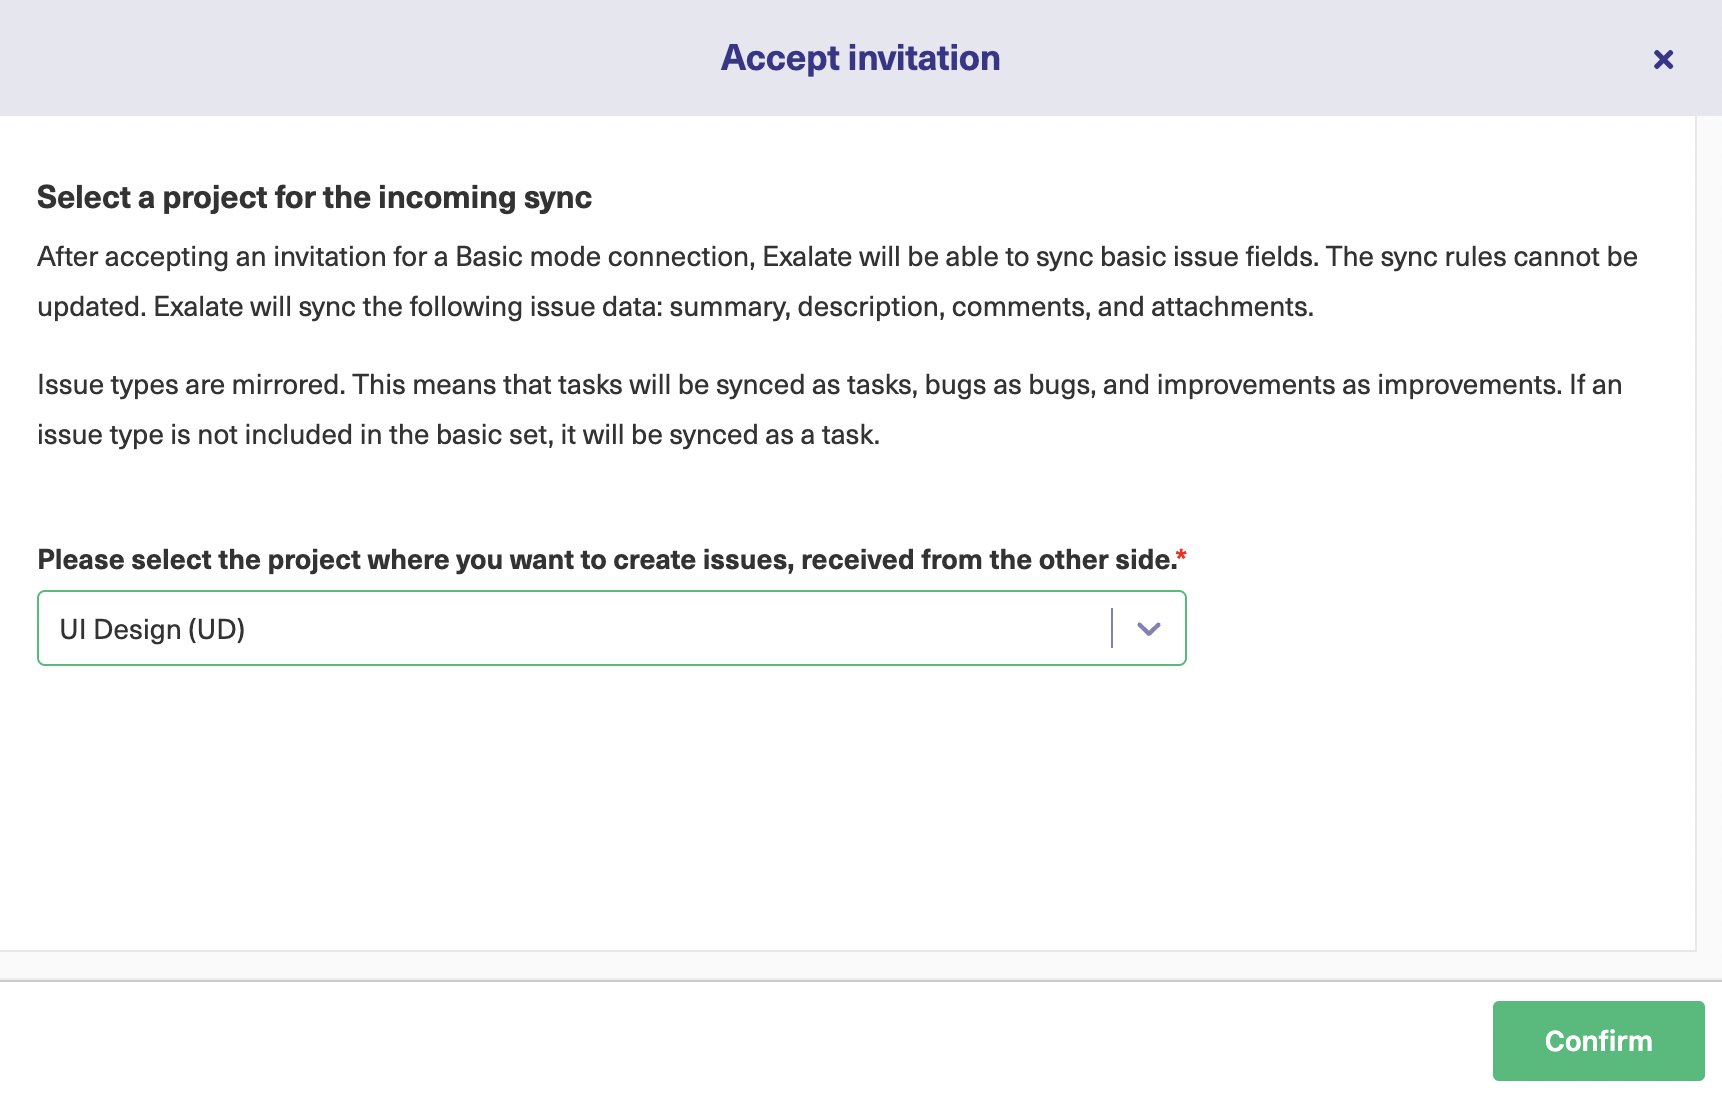
Select a project for the incoming sync and click “Initiate”.
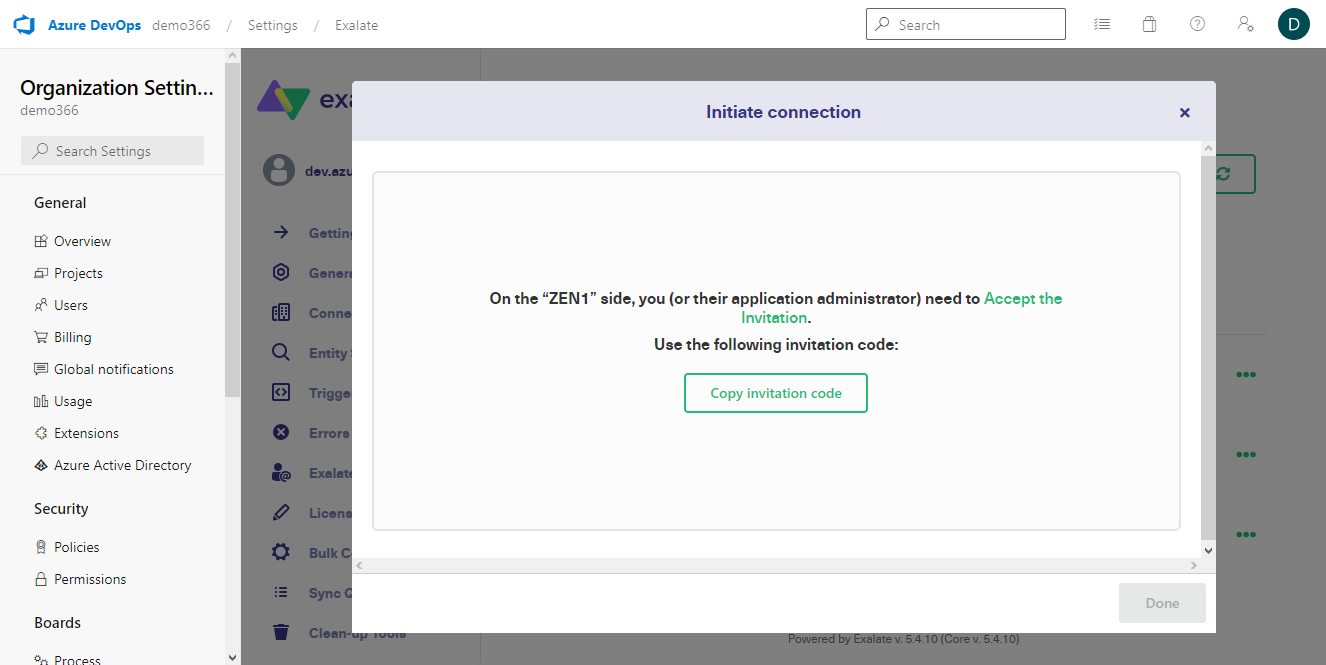
An invitation code (acting as a secret key) will be generated automatically. You will need to copy this code to the buffer for authentication.
Click on “Copy invitation code”.
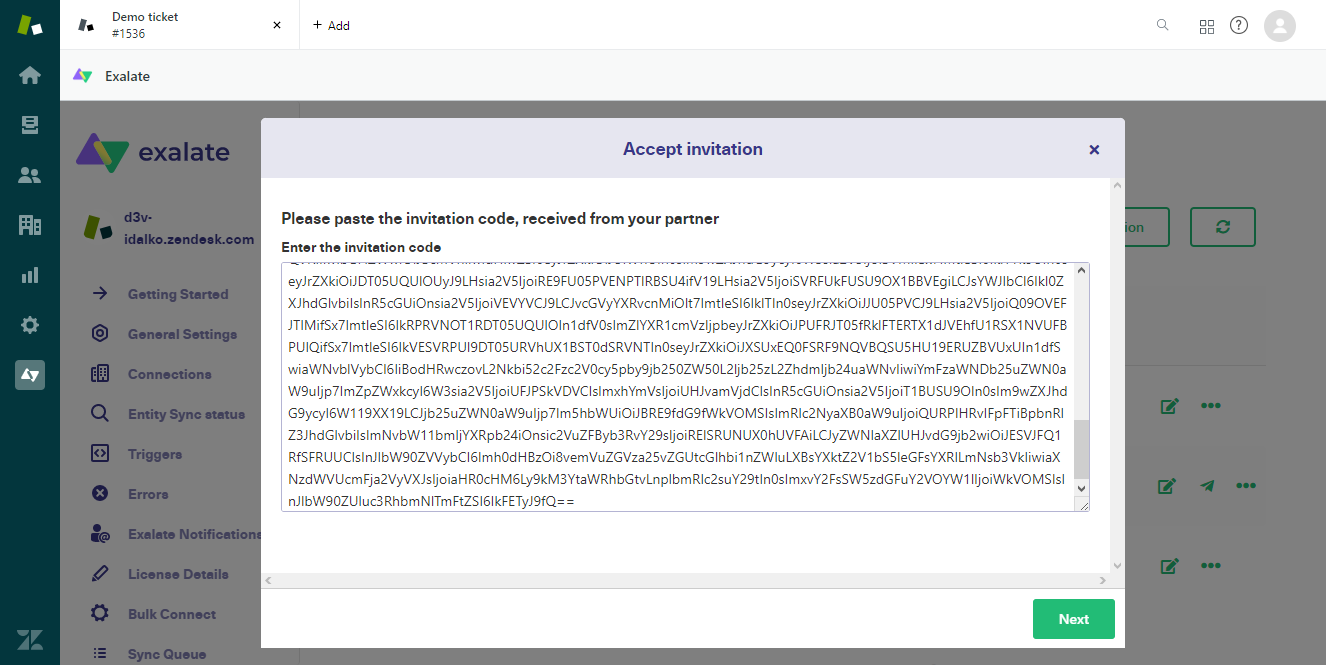
On the Zendesk side, click “Accept invitation” and enter the code from the buffer.
Click “Next” to continue.
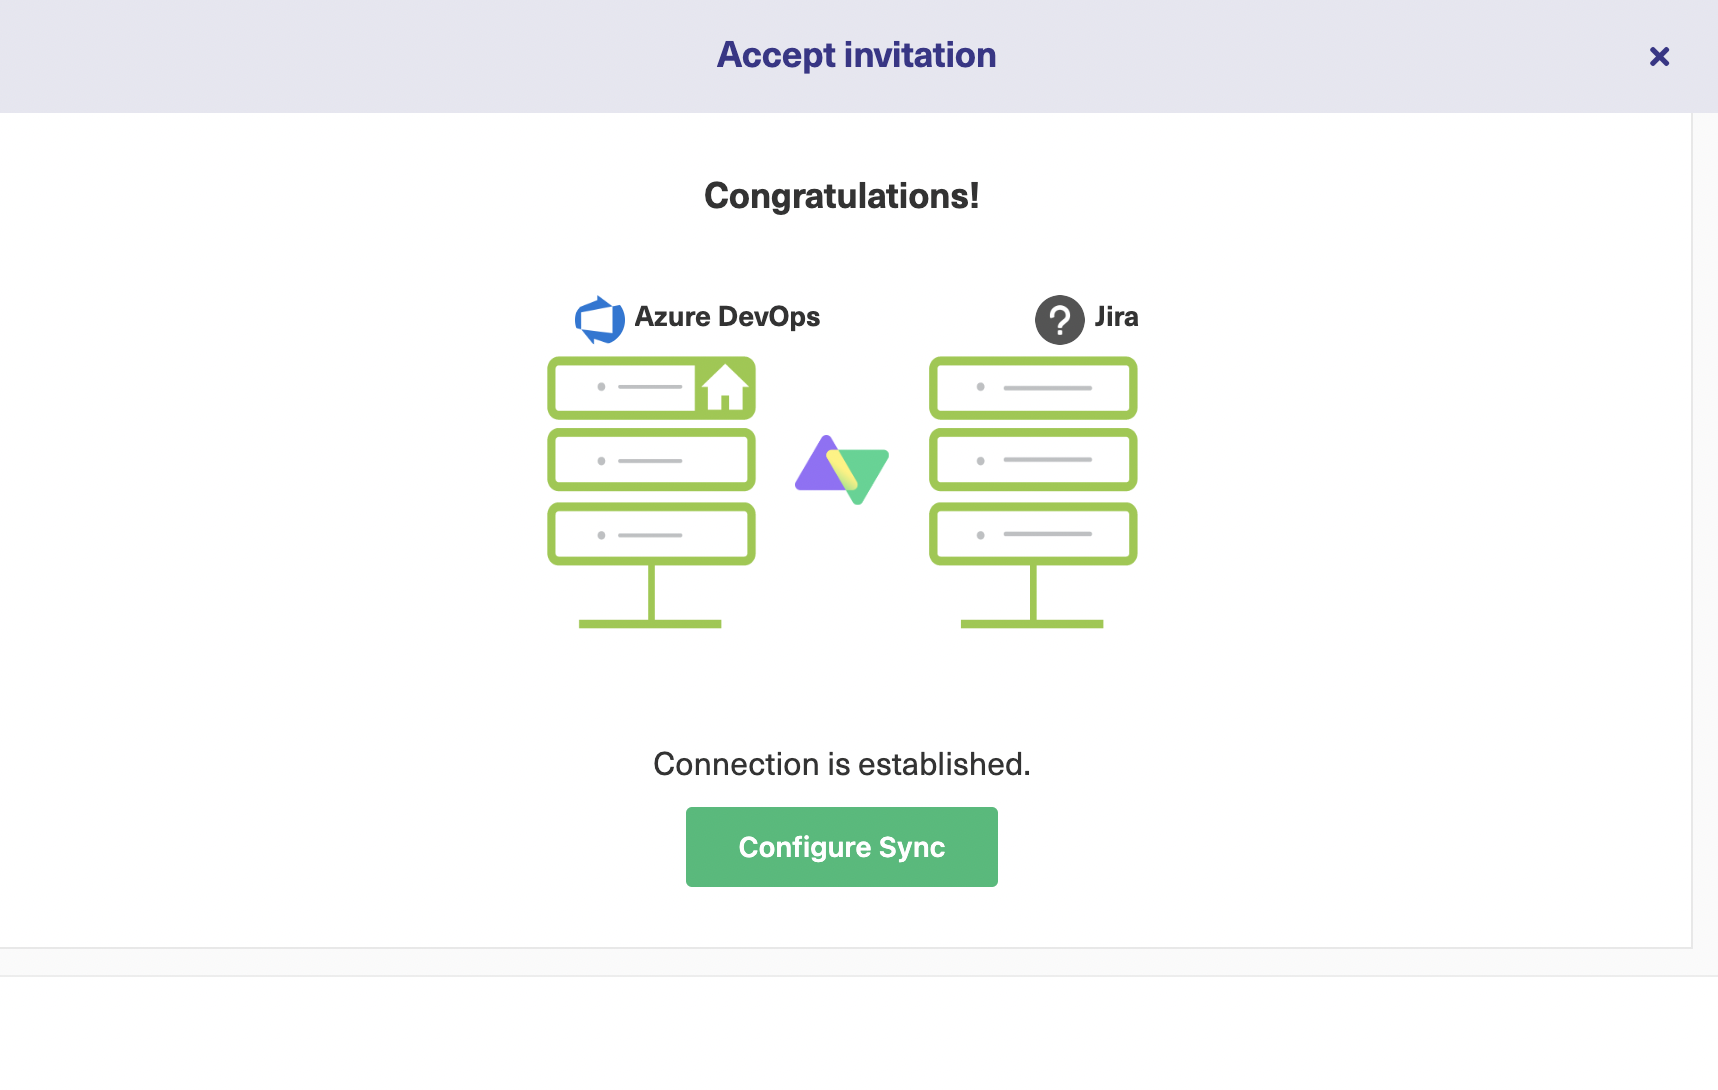
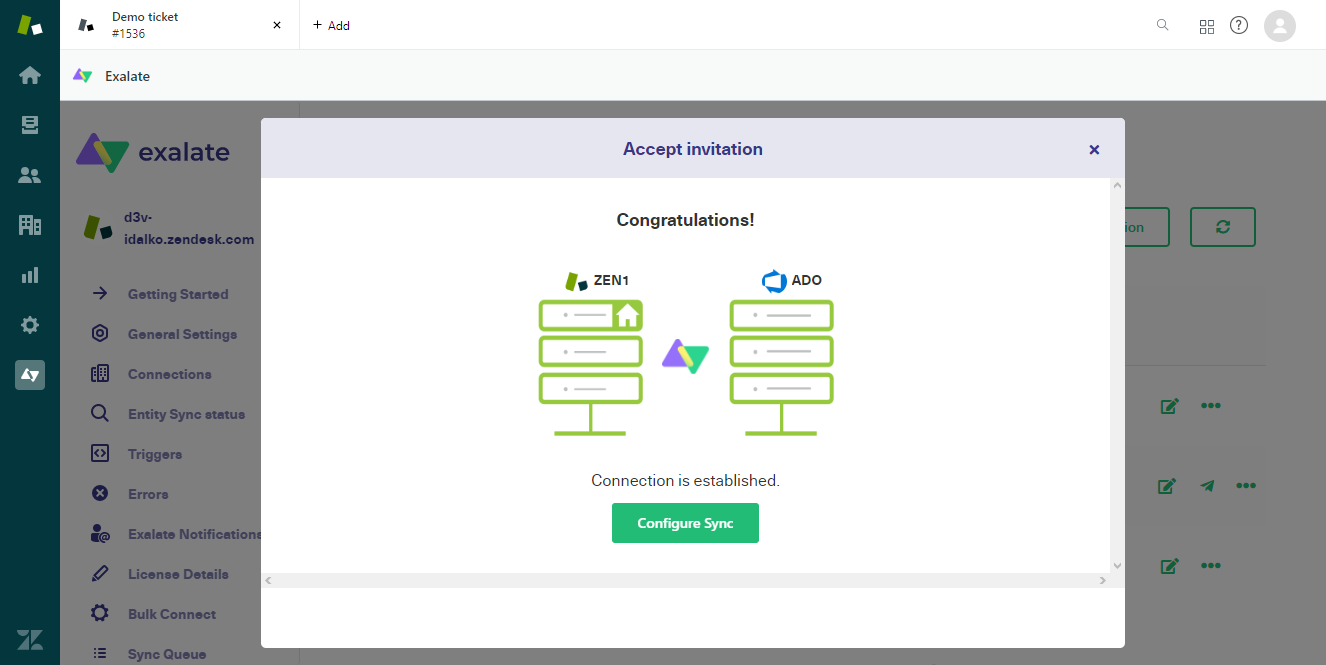
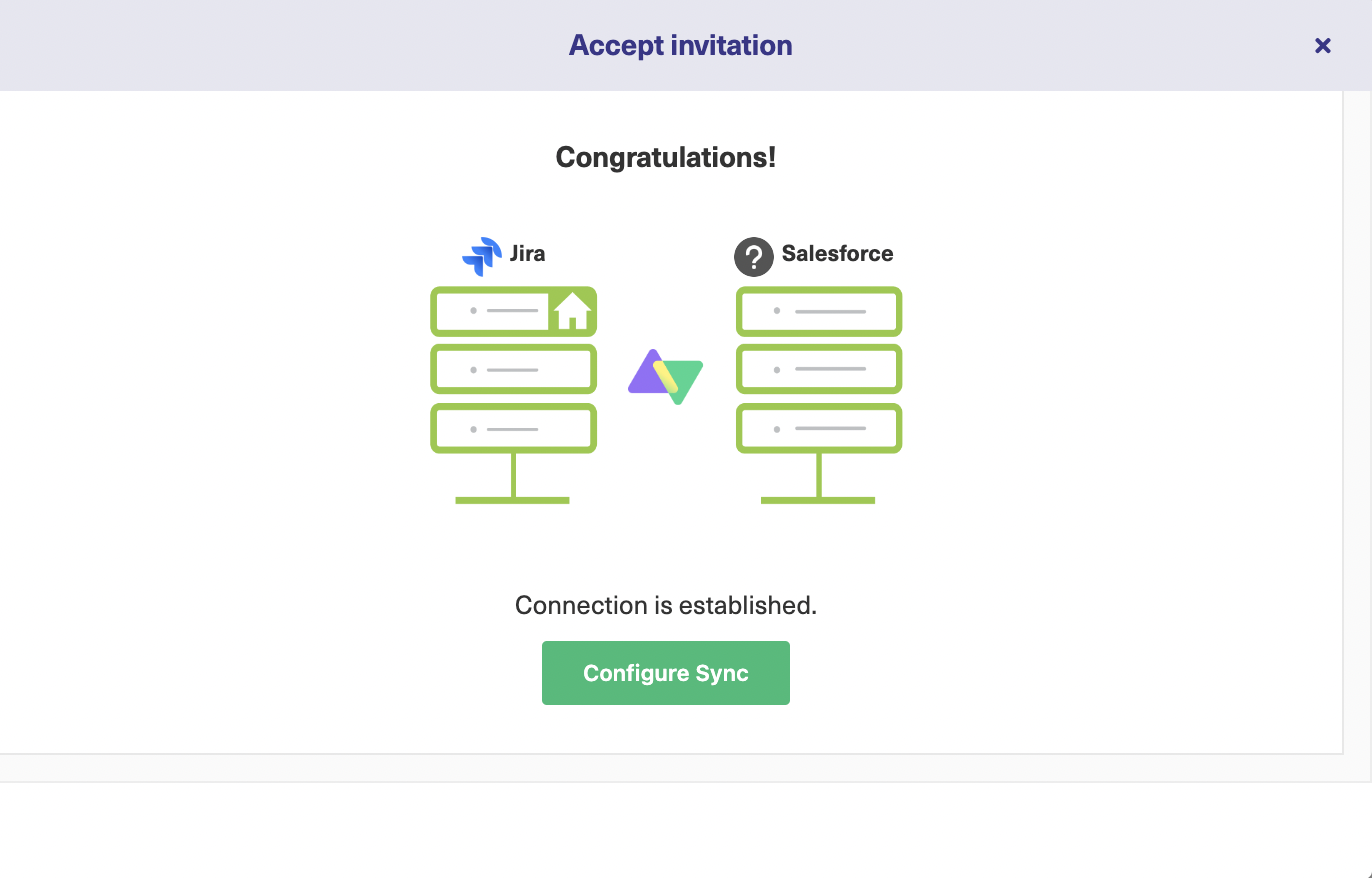
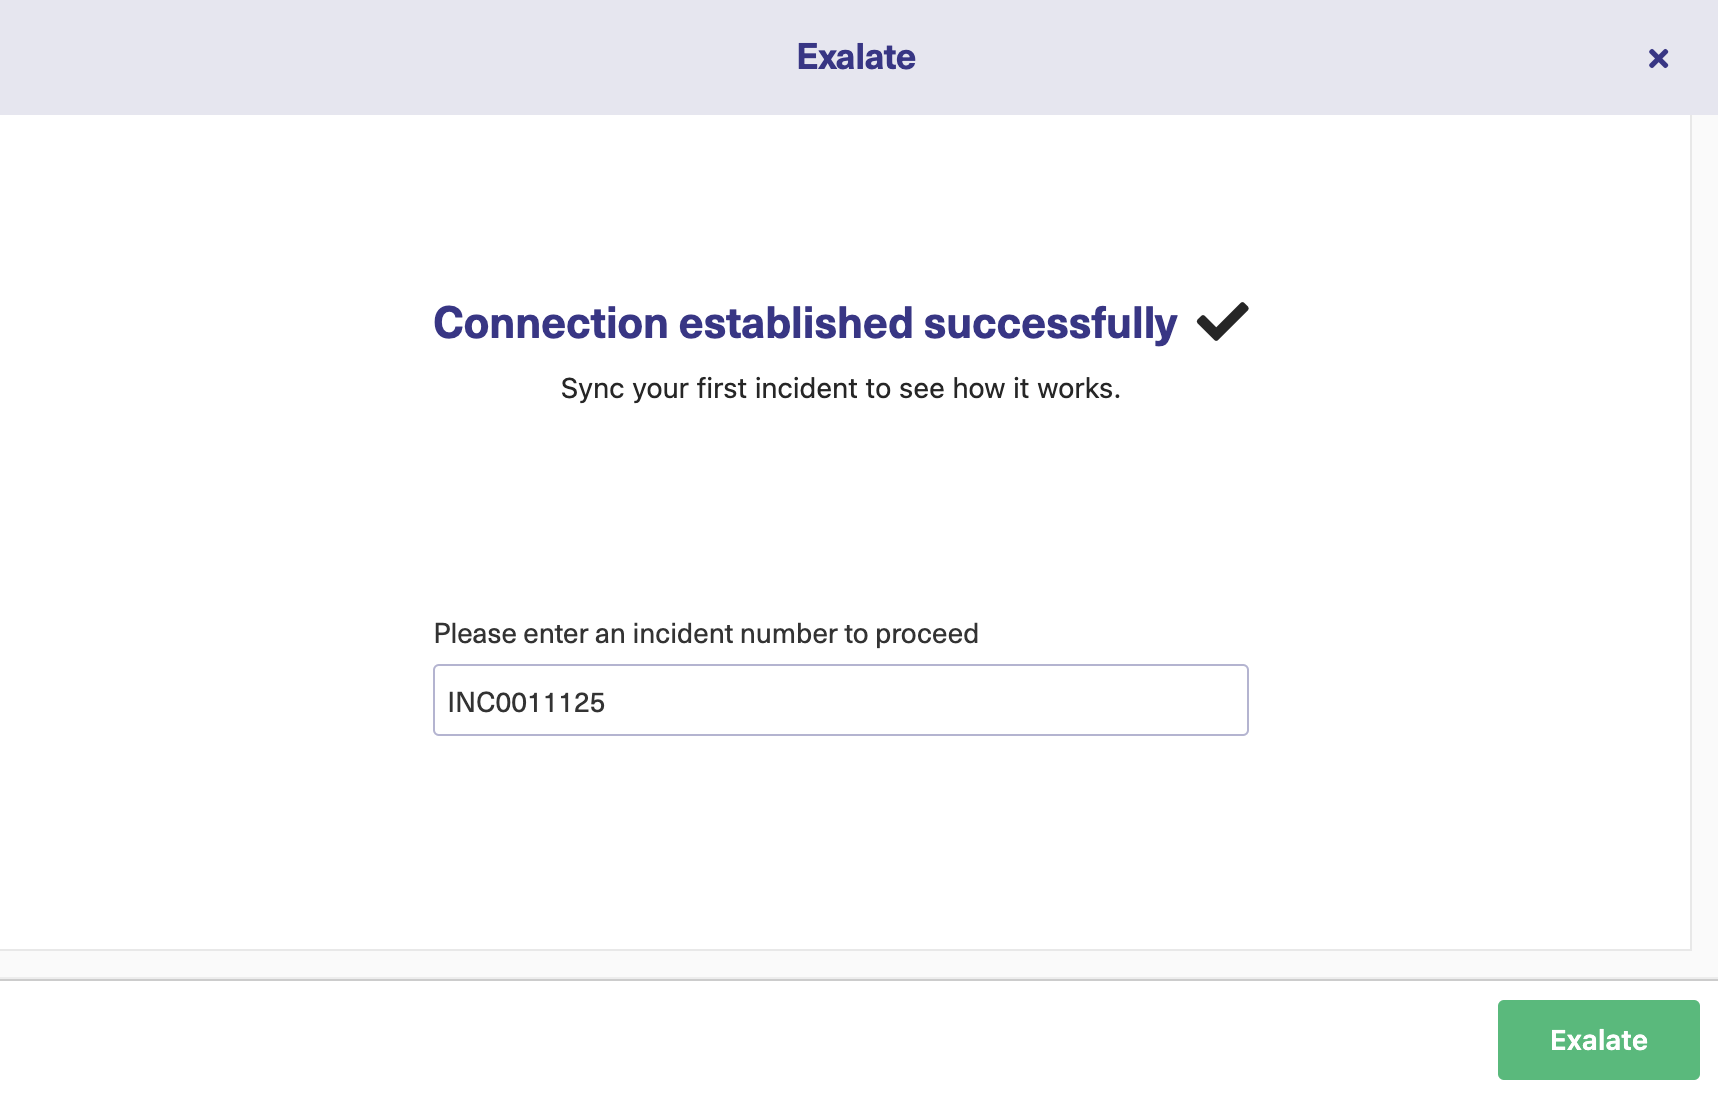
A modal will appear, confirming that you’ve successfully connected both instances.
Step 4: Configure the Synchronization
Click the “Configure Sync” button to change the synchronization settings. Alternatively, you could go to the “Connections” page on your Exalate console and click the “Edit” icon.
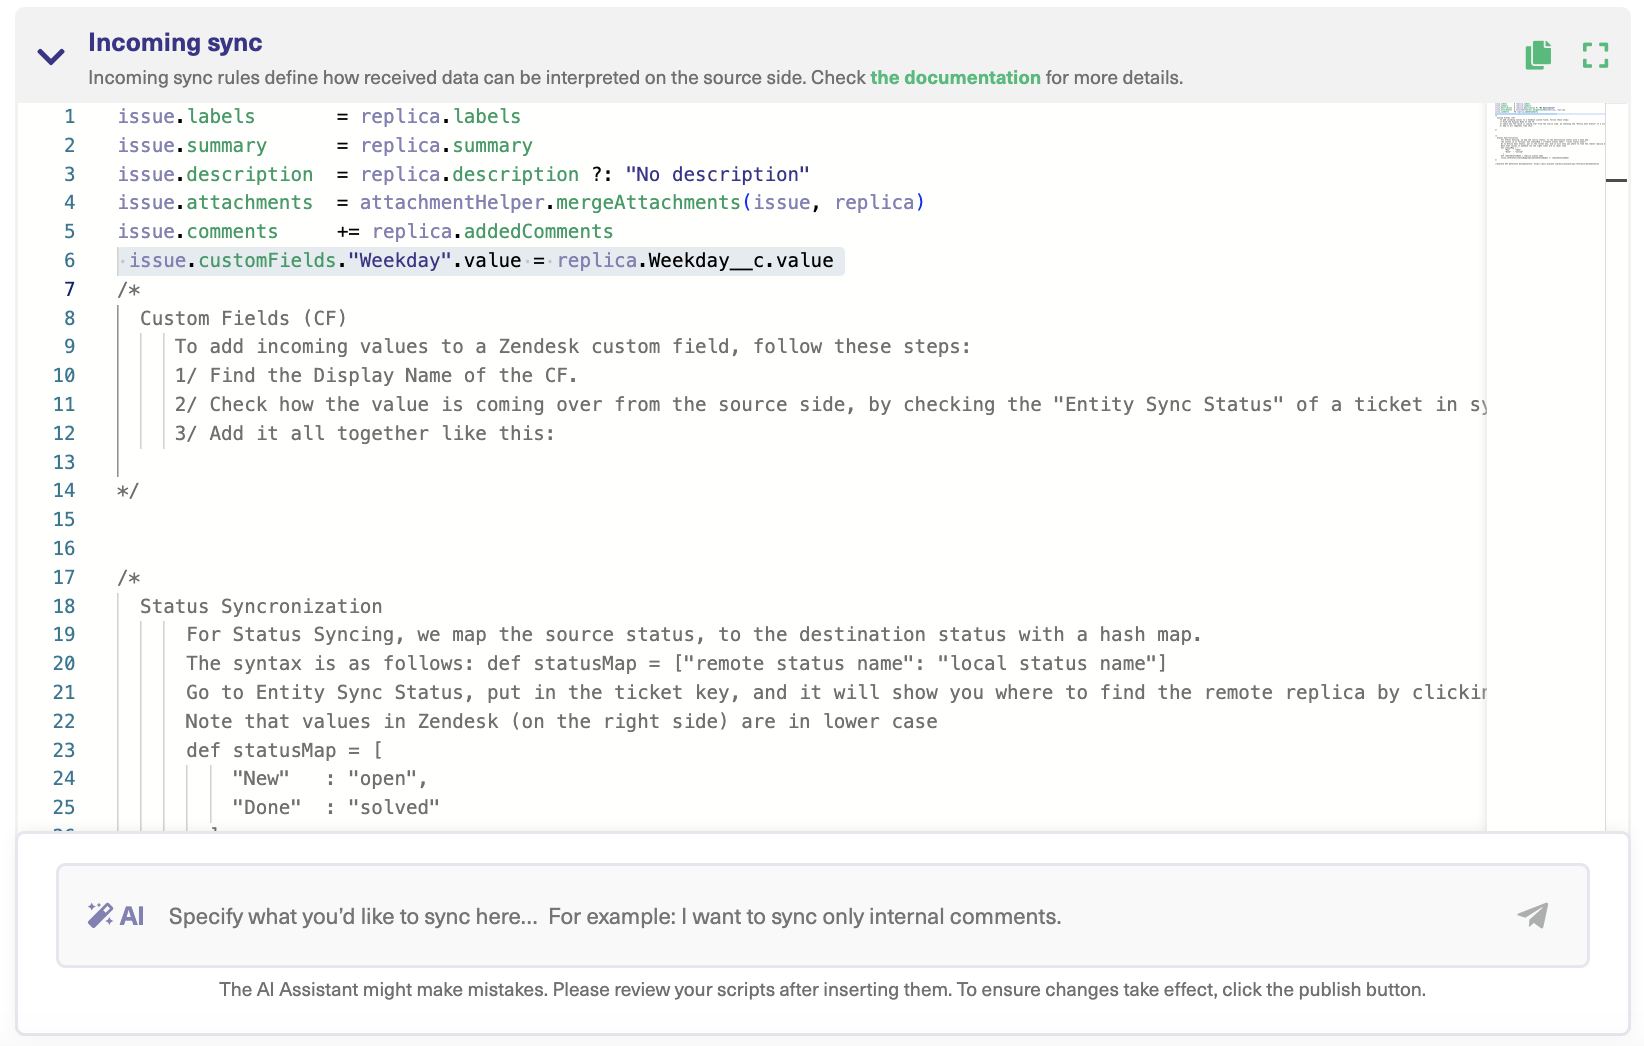
In both cases, you will be taken to a screen with 4 tabs: Rules, Triggers, Statistics, and Info.
We need to focus on Rules for now to configure the rules governing the outgoing and incoming syncs.
The “Outgoing Sync” specifies rules governing the information that the Zendesk side should send. For instance, replica.reporter = issue.reporter means that the reporter of the issue is mapped onto the reporter on the other side.
You can delete any line of code for any entity or object you don’t want to be transmitted to the other side.
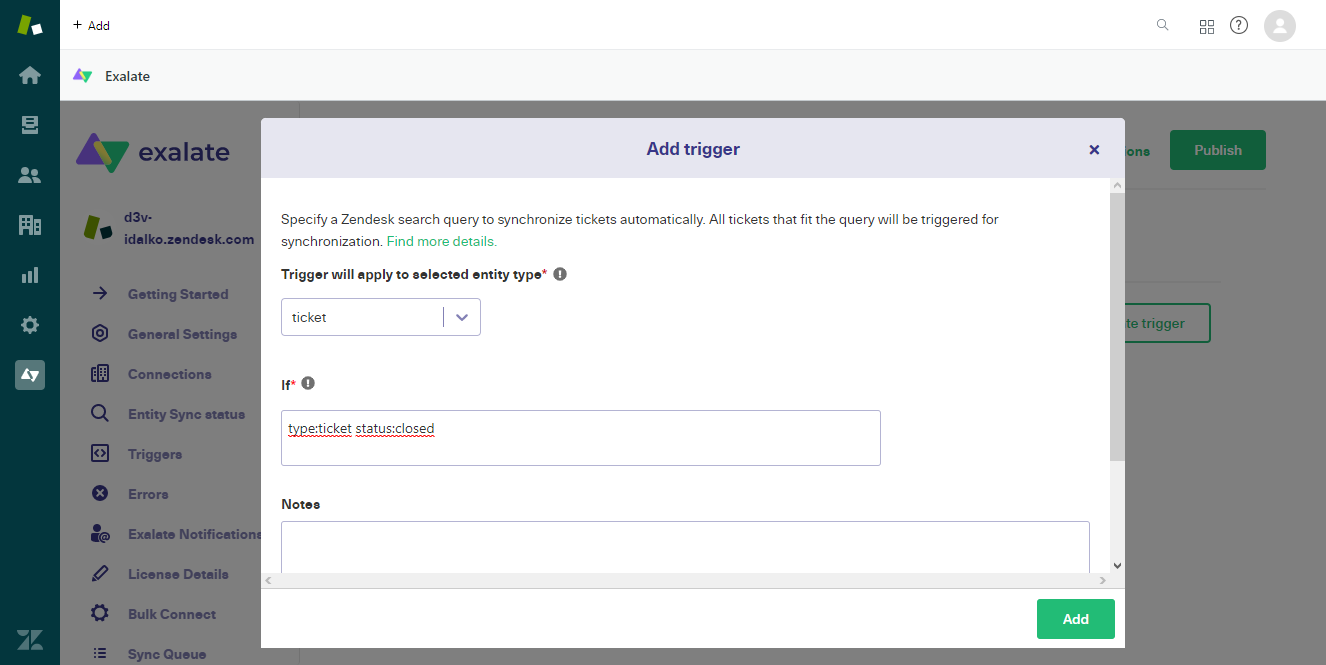
Step 5: Set up Triggers
Triggers specify conditions for data exchange between two instances.
To create a trigger, go to the “Trigger” tab and click on “Create Trigger”.
Choose the type of entity you want the trigger to apply to. Then set the conditions for the trigger to work. You can also enter notes to explain how it works.
Click “Add” to complete the process.
Once you are creating the triggers, go back to the connection page and press “Publish” to save and implement the changes.
Step 6: Let the Sync Begin!
There are several ways to sync your Zendesk tickets with other platforms:
Enter the case number in Salesforce (available in Basic Mode) to verify if it exists and initiate the sync from there. The Basic mode works for the most common platform entities like issues in Jira, work items in Azure DevOps, tickets in Zendesk, etc.
Sync the object from its dashboard in the object view (available for Jira, Zendesk, Salesforce, and Azure DevOps).
Use the “Bulk Exalate” or “Bulk Connect” to sync multiple objects with the help of advanced custom options.
Conclusion
Zendesk integrations help improve internal and cross-company communication and collaboration. You can use a properly curated Zendesk integration workflow to sync data and exchange information between platforms like Jira, Salesforce, etc.
Although Zendesk provides native integrations, they present challenges in terms of functionality and flexibility. So, we proposed using a third-party solution like Exalate, because of its user-friendly interface, airtight security, reliability, and extensive support.
Follow the steps outlined in this blog post to install and configure Exalate on Zendesk and other platforms.
Frequently Asked Questions
What is Zendesk integration?
Zendesk integration is the process of connecting your Zendesk CRM with other applications, services, cloud infrastructure, or databases in other to share data from standard and custom fields. Connecting Zendesk with other systems helps organizations to streamline processes and automate workflows, which also improves the quality of services delivered and the overall customer experience.
How many apps does Zendesk have?
According to the data from the Zendesk marketplace, the CRM has over 1500 apps and themes. These apps cover different functionalities, including analysis and reporting, email & social media, time-tracking, quoting, and billing.
Can you integrate Salesforce and Zendesk?
Yes, you can integrate Salesforce with Zendesk using Zendesk for Salesforce integration. Alternatively, you can integrate Salesforce and Zendesk using a bi-directional, third-party integration tool called Exalate. This tool allows you to sync information from fields, including custom fields, in order to unify the efforts of the sales and customer support teams.
What are Zendesk Integration Services?
Zendesk Integration Services (ZIS) refers to a system of different systems that handle integrations within the Zendesk ecosystem. ZIS handles business logic and workflow automation between Zendesk and other work management systems. Using ZIS simplifies the process of building integrations. With the ZIS Connections Service, you can fetch and store API credentials.
Should I use Zendesk integrations?
You should use Zendesk user integrations to automate redundant processes such as manually copying and transferring data between systems. Zendesk integration tools also come with triggers and filters that give you granular control over what you want to share between systems. These features are vital for cross-company integration scenarios where you want to keep some of your data private.
POSaBIT is the premier cannabis point of sale (POS) and payments platform. The system relies on a robust back-end infrastructure and responsive customer support to solve customers’ problems and keep them satisfied.
As a QA Engineer at POSaBIT, Adrian Salazar is responsible for ensuring that the product delivers on its promise of handling robust payments with minimal interruptions. Adrian works with the internal team of developers to test products and features before release.
After months of using Exalate, we reached out to Adrian to ask him about his experience with the product.
Why Choose Exalate?
Asked about the reasons for choosing Exalate over other integrations, Adrian mentioned the following:
Makes the flow of information seamless and flexible.
Facilitates the sharing of tickets with the right department instantly.
Ensures secure communication and information transfer.
Saves cost because you no longer need to add developers on the Salesforce side.
Makes it possible to gather more information from tickets.
Offers excellent product support and online community assistance.
“I’d definitely advise people to join the Exalate community. I was able to figure out a lot from what was going on there. I remember at one point, I had to map specific status from Salesforce to GitHub, and there was already a community question asked there.”
Adrian Salazar, QA Engineer at POSaBIT
Challenges
Challenging communication between dependent teams
Manual data extraction, mainly through Slack
Security of sensitive data
Rigid workflow due to the difficulty in tracking issues
Operating in the cannabis industry is a challenging task for any startup or company, especially when it comes to establishing seamless communication between different teams. Prior to using Exalate, the communication systems between dependent teams at POSaBIT were overcomplicated, rigid, and tedious.
“We needed to get information about what is going on with the dispensaries through Slack and back-and-forth communications. It was quite long, busy, and overcomplicated work.”
Adrian Salazar, QA Engineer at POSaBIT
For example, getting the needed data from support tickets for the sales team had to occur manually on Slack. As a result, internal teams struggled to track and update issues effectively, resulting in a lack of structure within the company’s communication channels. Moreover, their data was at risk of getting lost in transactions.
Also, POSaBIT needs to factor in security when choosing any integration to ensure that sensitive information doesn’t fall into the wrong hands.
So, adopting an integration solution that could sync multiple teams and tickets seamlessly (without them having to leave the platform they worked on) while providing airtight information security was an absolute necessity for POSaBIT.
Solutions
The first attempt to address the issues was to use third-party integrations on individual platforms.
Developers and sales reps at POSaBIT tried to connect cases and internal documentation with GitHub using Zenhub. But it had only limited components for GitHub integration, which made it difficult to add epics and file release reports.
Additionally, teams at POSaBIT started using Zapier when a case was created, but they couldn’t gather enough information from Salesforce and the integration was not as deep as they required.
“Before the PM team had to create tickets for any information that came in through Slack, but now the PM team does not have to worry about that…They’d do their triage to put that information down every other morning. So that increases their chances of not having to go back and forth. If you were doing this without Exalate, you’d have to create the ticket from Salesforce to GitHub manually.”
Adrian Salazar, QA Engineer at POSaBIT
After trying out these solutions to no sustainable avail, they ended up using Exalate because it made it possible to gather more information from Salesforce. They were able to use instances for dev teams, specifically for GitHub and Salesforce.
Optimization of the workflows of independent teams
Faster and easier calls to the client library
Enabling developers and engineers to make changes to cases on GitHub and vice versa
Optimizing costs by adding developers on the Exalate side
Easy mapping of specific statuses from Salesforce to GitHub
High-quality support and an active community
Adopting Exalate helped POSaBIT improve expectations as a startup because it allowed them to create tickets faster without manually generating them on Salesforce–or tracking them individually in Slack threads. This also helped internal teams optimize workflows and stay in perfect sync with one another.
Adrian also marveled at the speed of response from the Exalate support staff whenever the team encountered problems.
“Learning how to map specific statuses from Salesforce to GitHub was easy because we were able to find solutions from community posts and user guides.”
Adrian Salazar, QA Engineer at POSaBIT
Thanks to Exalate’s secure system infrastructure, POSaBIT engineers were able to call the http client library faster and make changes to cases on GitHub and vice versa. And by adding developers on the Exalate side, they were able to save more costs compared to adding them on the Salesforce side.
“Without Exalate, we would have had to add each developer to Salesforce to be able to track that information, which would have been a huge cost on our side.”
Adrian Salazar, QA Engineer at POSaBIT
Future
Based on the current experience, the company is considering using more instances for internal and external support issues. As the company continues to grow, Exalate will help them create a network of connected teams, clients, and companies.
A Jira Salesforce integration use case can be an interesting one, an amalgamation of business and technical teams.
In this article, we’ll discuss an advanced comment use case that allows syncing threads of comments and user mentions between these 2 platforms so that they speak the same language.
The use case is implemented between a Jira Cloud and a Salesforce instance.
The following are the key requirements:
An issue (or a ticket) created in Jira is synced over to the Salesforce instance as a Case. It might as well be any other Salesforce object.
Basic fields like summary, description, and comments are synced between Jira Cloud and Salesforce.
Threaded replies to comments (chatter feed capability) from Salesforce are synced to Jira. Comments from Jira are reflected in Salesforce.
User mentions in Jira tags the correct corresponding user in Salesforce (if the user exists on both systems).
Comment formatting is maintained.
The Challenges
There is a transformation challenge between the 2 instances. Since Salesforce uses HTML internally to represent comments and Jira uses Wiki Markup, there are inherent differences in formatting between these 2 platforms. These must be addressed correctly.
There is a fully supported “chatter feed” functionality in Salesforce that allows threaded replies to comments. Jira does not have similar functionality. The challenge then is to reflect these replies back in Jira.
The Solution: Exalate
Exalate is a one-way or two-way synchronization solution that supports multiple platforms like Jira, Salesforce, Azure DevOps, GitHub, Zendesk, etc.
Its intuitive Groovy-based scripting engine allows you to implement advanced use cases. The Sync rules can be modified to set up deeper integrations. In addition to this, you can use Triggers and set up advanced automatic synchronization too.
Note: The Exalate Academy is a great way to learn more about Exalate. Give it a try!
How to Implement Advanced Comment Sync Using Exalate
You should create in Script Mode a connection between the platforms.
Note: You can learn more about setting up a connection between Jira and Salesforce through the Getting Started guide or read this complete Jira Salesforce Integration guide.
The Implementation Using Exalate
Once the Connection has been created, you need to configure the Sync Rules.
These rules are Groovy-based scripts that control what information to send and receive between the 2 platforms.
You can click on the “Configure Sync” button after the Connection has been set up to configure these rules or you can also edit the Connection in the “Connections” tab in the Exalate Console.
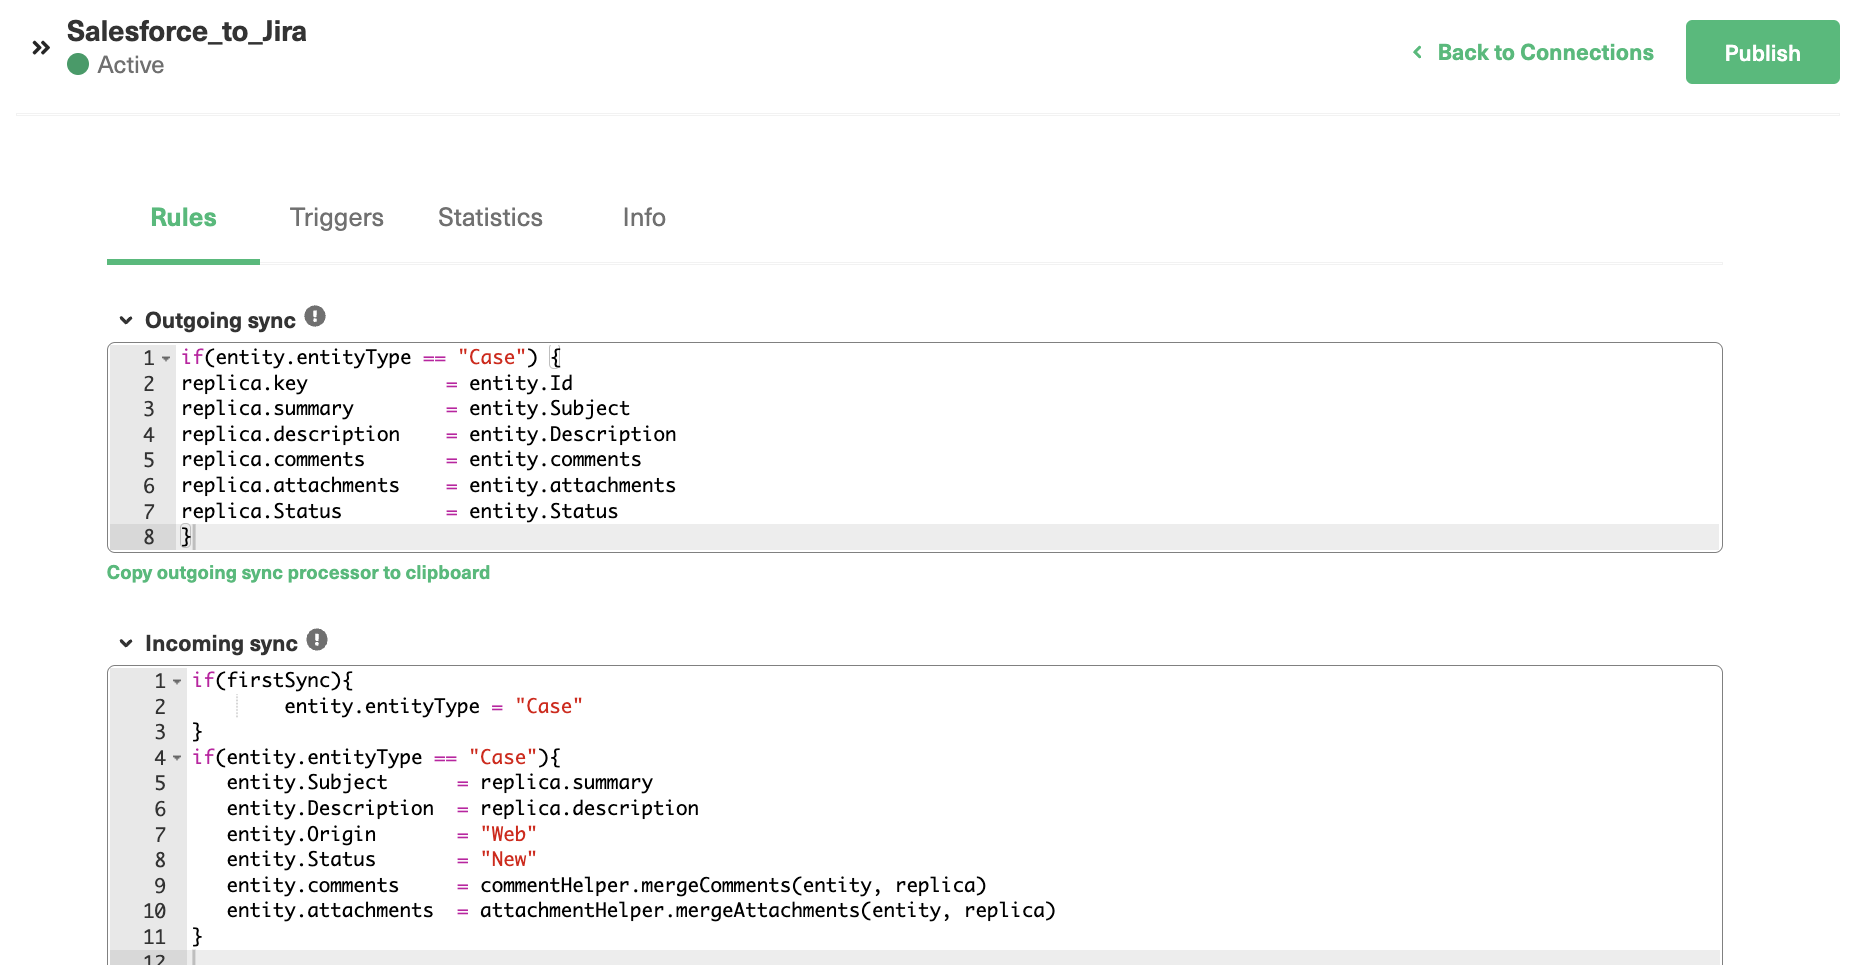
Rules are present at both ends of the synchronization. The “Outgoing Sync” on the Jira side decides what information must be sent from Jira to Salesforce and the “Incoming Sync” decides what and how information must be received from Salesforce.
The same exists in the Salesforce instance.
The scripts you see are generated by default when the Connection has been created. So common fields like summary, description, comments, etc are already there and can be synchronized out-of-the-box.
Now, we need to edit them to accommodate our sync requirements.
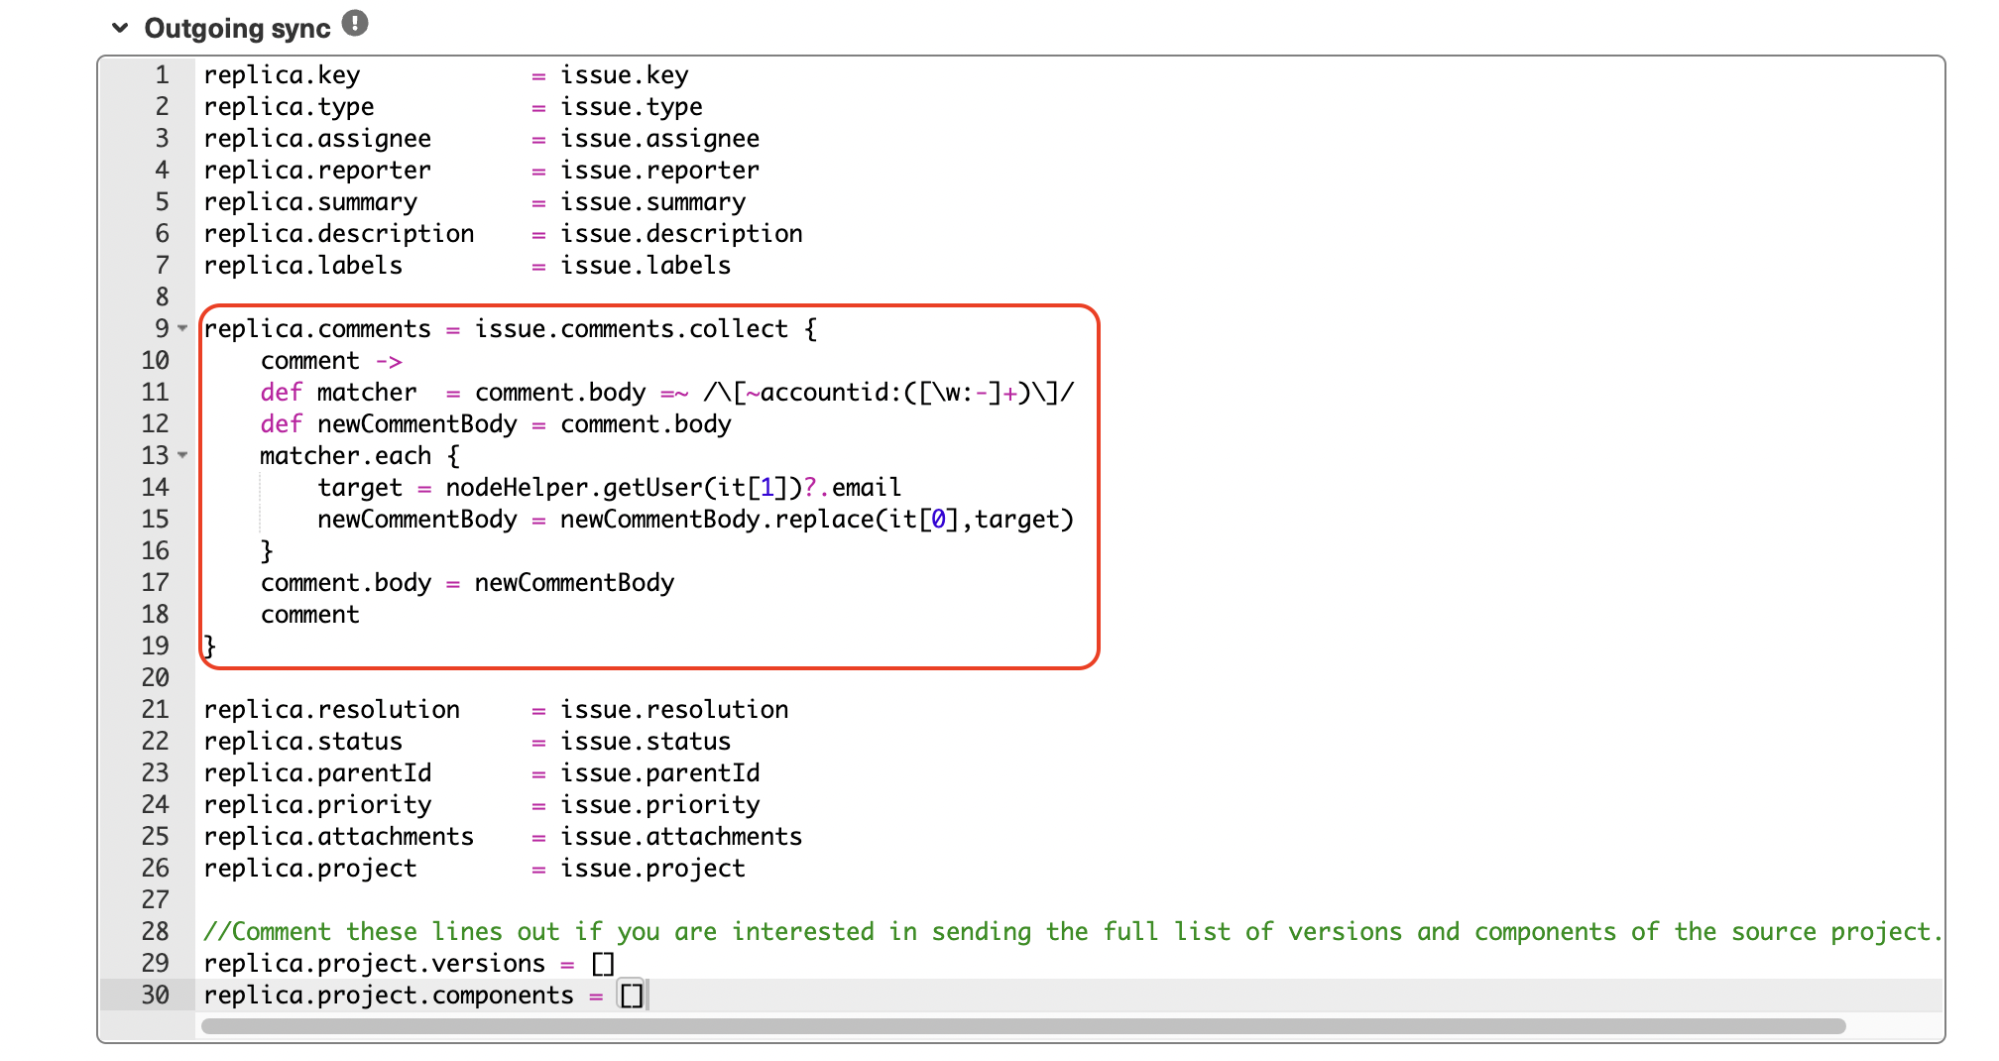
Jira: Outgoing Sync
replica.key        	= issue.key
replica.type       	= issue.type
replica.assignee   	= issue.assignee
replica.reporter   	= issue.reporter
replica.summary    	= issue.summary
replica.description	= issue.description
replica.labels     	= issue.labels

replica.comments = issue.comments.collect {
    comment ->
    def matcher  = comment.body =~ /\[~accountid:([\w:-]+)\]/
    def newCommentBody = comment.body
    matcher.each {
        target = nodeHelper.getUser(it[1])?.email
        newCommentBody = newCommentBody.replace(it[0],target)
    }
    comment.body = newCommentBody
    comment
}

replica.resolution 	= issue.resolution
replica.status     	= issue.status
replica.parentId   	= issue.parentId
replica.priority   	= issue.priority
replica.attachments	= issue.attachments
replica.project    	= issue.project

//Comment these lines out if you are interested in sending the full list of //versions and components of the source project.

replica.project.versions = []
replica.project.components = []
The Outgoing sync looks like this.
Here’s what happens in the script:
The collect method iterates over the comments array of the Jira issue and transforms them before assigning them to the replica (to be sent to the other side).
The transformation taking place is at the heart of handling user mentions. The script extracts them in the comment body and replaces them with the email address of that user instead. The replica will now contain the comment not with the Jira-specific mention, but rather with an email address corresponding to the mentioned user.
Note: Replica works as a payload to pass information between the two applications.
Salesforce: Outgoing Sync
if(entity.entityType == "Case") {
replica.key = entity.Id
replica.summary = entity.Subject
replica.description = entity.Description
replica.attachments = entity.attachments
replica.Status = entity.Status
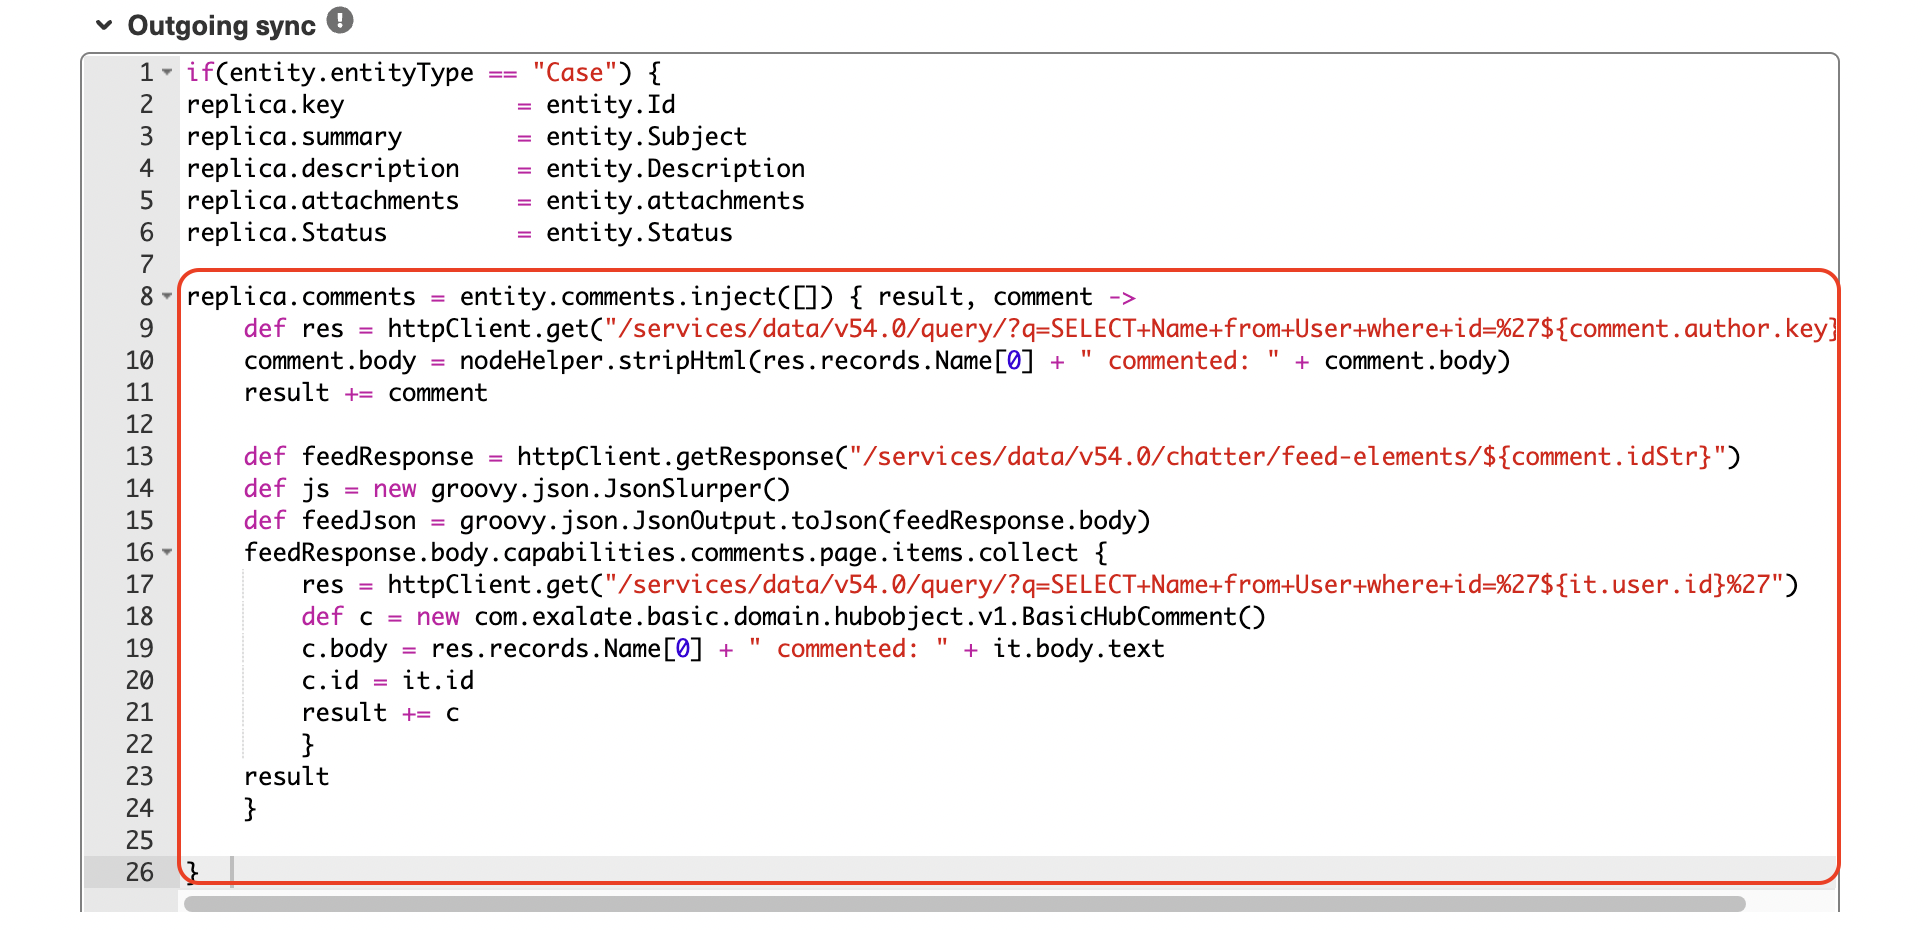
replica.comments = entity.comments.inject([]) { result, comment ->
def res = httpClient.get("/services/data/v54.0/query/?q=SELECT+Name+from+User+where+id=%27${comment.author.key}%27")
comment.body = nodeHelper.stripHtml(res.records.Name[0] + " commented: " + comment.body)
result += comment
def feedResponse = httpClient.getResponse("/services/data/v54.0/chatter/feed-elements/${comment.idStr}")
def js = new groovy.json.JsonSlurper()
def feedJson = groovy.json.JsonOutput.toJson(feedResponse.body)
feedResponse.body.capabilities.comments.page.items.collect {
res = httpClient.get("/services/data/v54.0/query/?q=SELECT+Name+from+User+where+id=%27${it.user.id}%27")
def c = new com.exalate.basic.domain.hubobject.v1.BasicHubComment()
c.body = res.records.Name[0] + " commented: " + it.body.text
c.id = it.id
result += c
}
result
}
}
The Outgoing Sync script looks like this.
Here’s what happens in the script:
The inject method iterates over all the comments and performs several operations:
For each Salesforce comment, the script first fetches the username of the comment author and appends it to the comment body (so that it can be reflected on Jira as such). In addition, the script employs the stripHtml() method to transform the HTML formatted Salesforce comments into plain text to be properly reflected on the Jira side. We add this main comment to the result variable temporarily.
For each Salesforce main comment, the script then fetches associated threaded replies and populates them in the feedResponse. Each of these threaded replies is then sanitized by removing HTML and appending the author’s name to the comment body. They are then added to the result variable.
This result, once the iterations are over, contains the main comments and threads that have already been transformed. It is then assigned to the replica to be sent over to the Jira side.
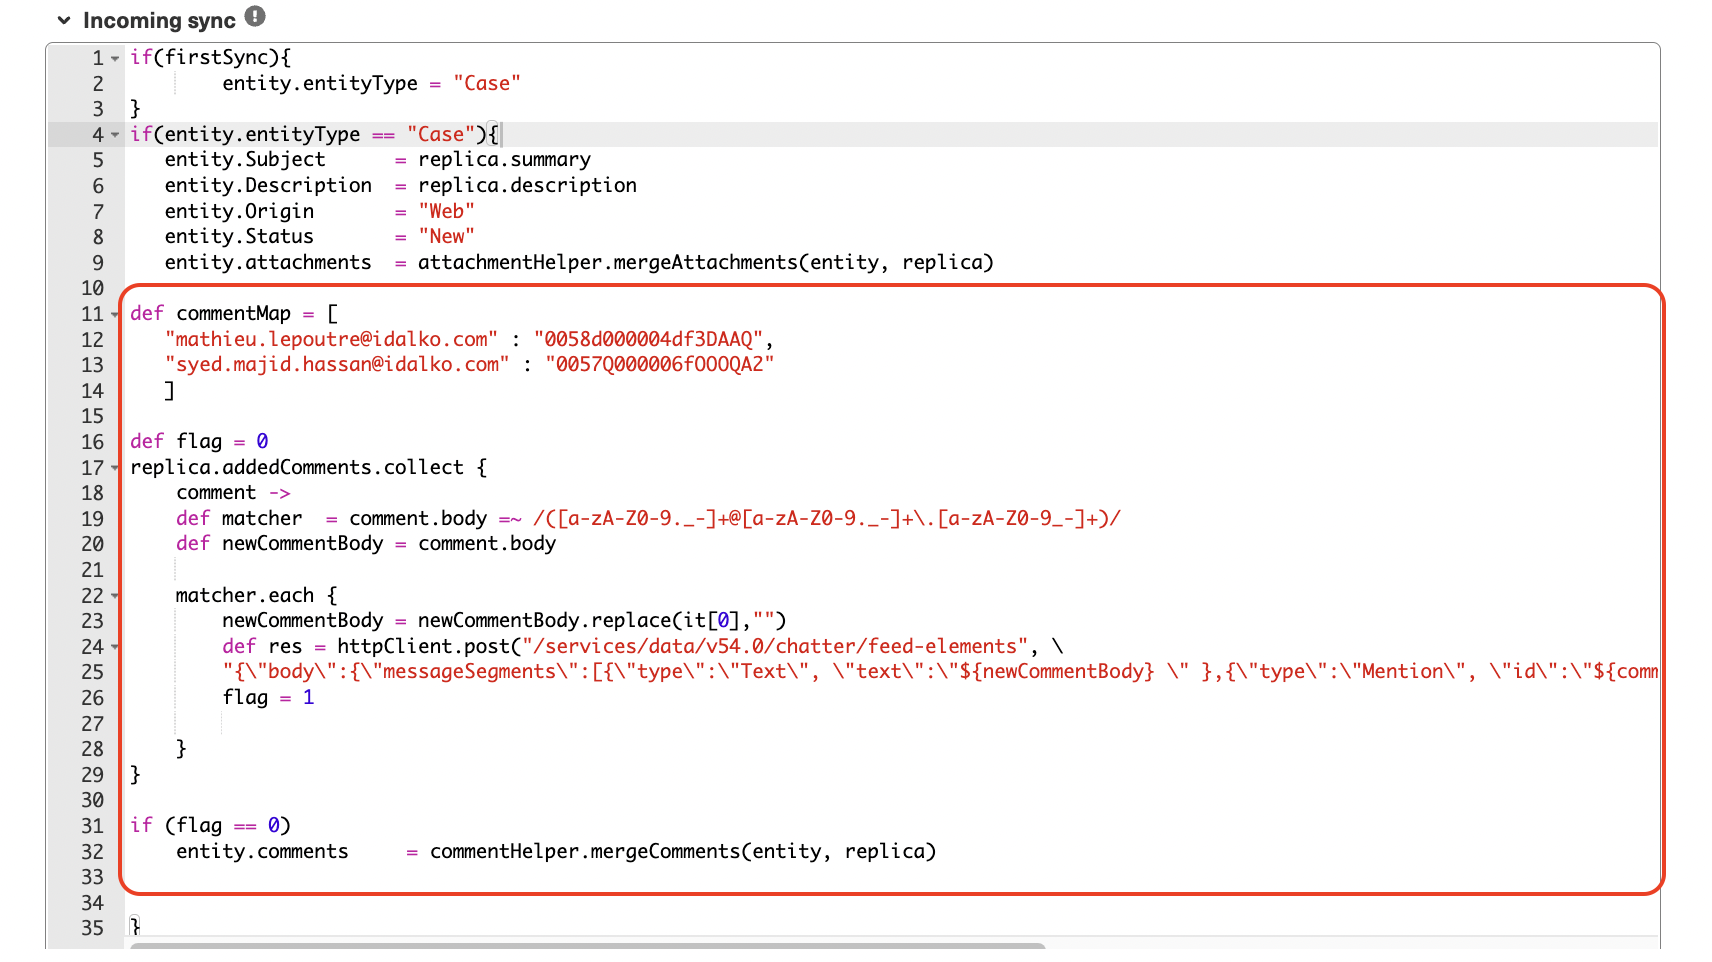
Remember that when sending comments from the Jira side, we replaced the user mentions with the email addresses. So, in Salesforce we create a mapping called commentMap that maps the email addresses to the corresponding Salesforce User IDs.
The next step is to iterate over the comments contained in the replica and for each comment extract the email address, map it using the commentMap and then replace the email address in the comment with the Salesforce mention of the mapped user.
Jira: Incoming Sync
There is no need to modify this since the default behavior is sufficient for our use case.
Output
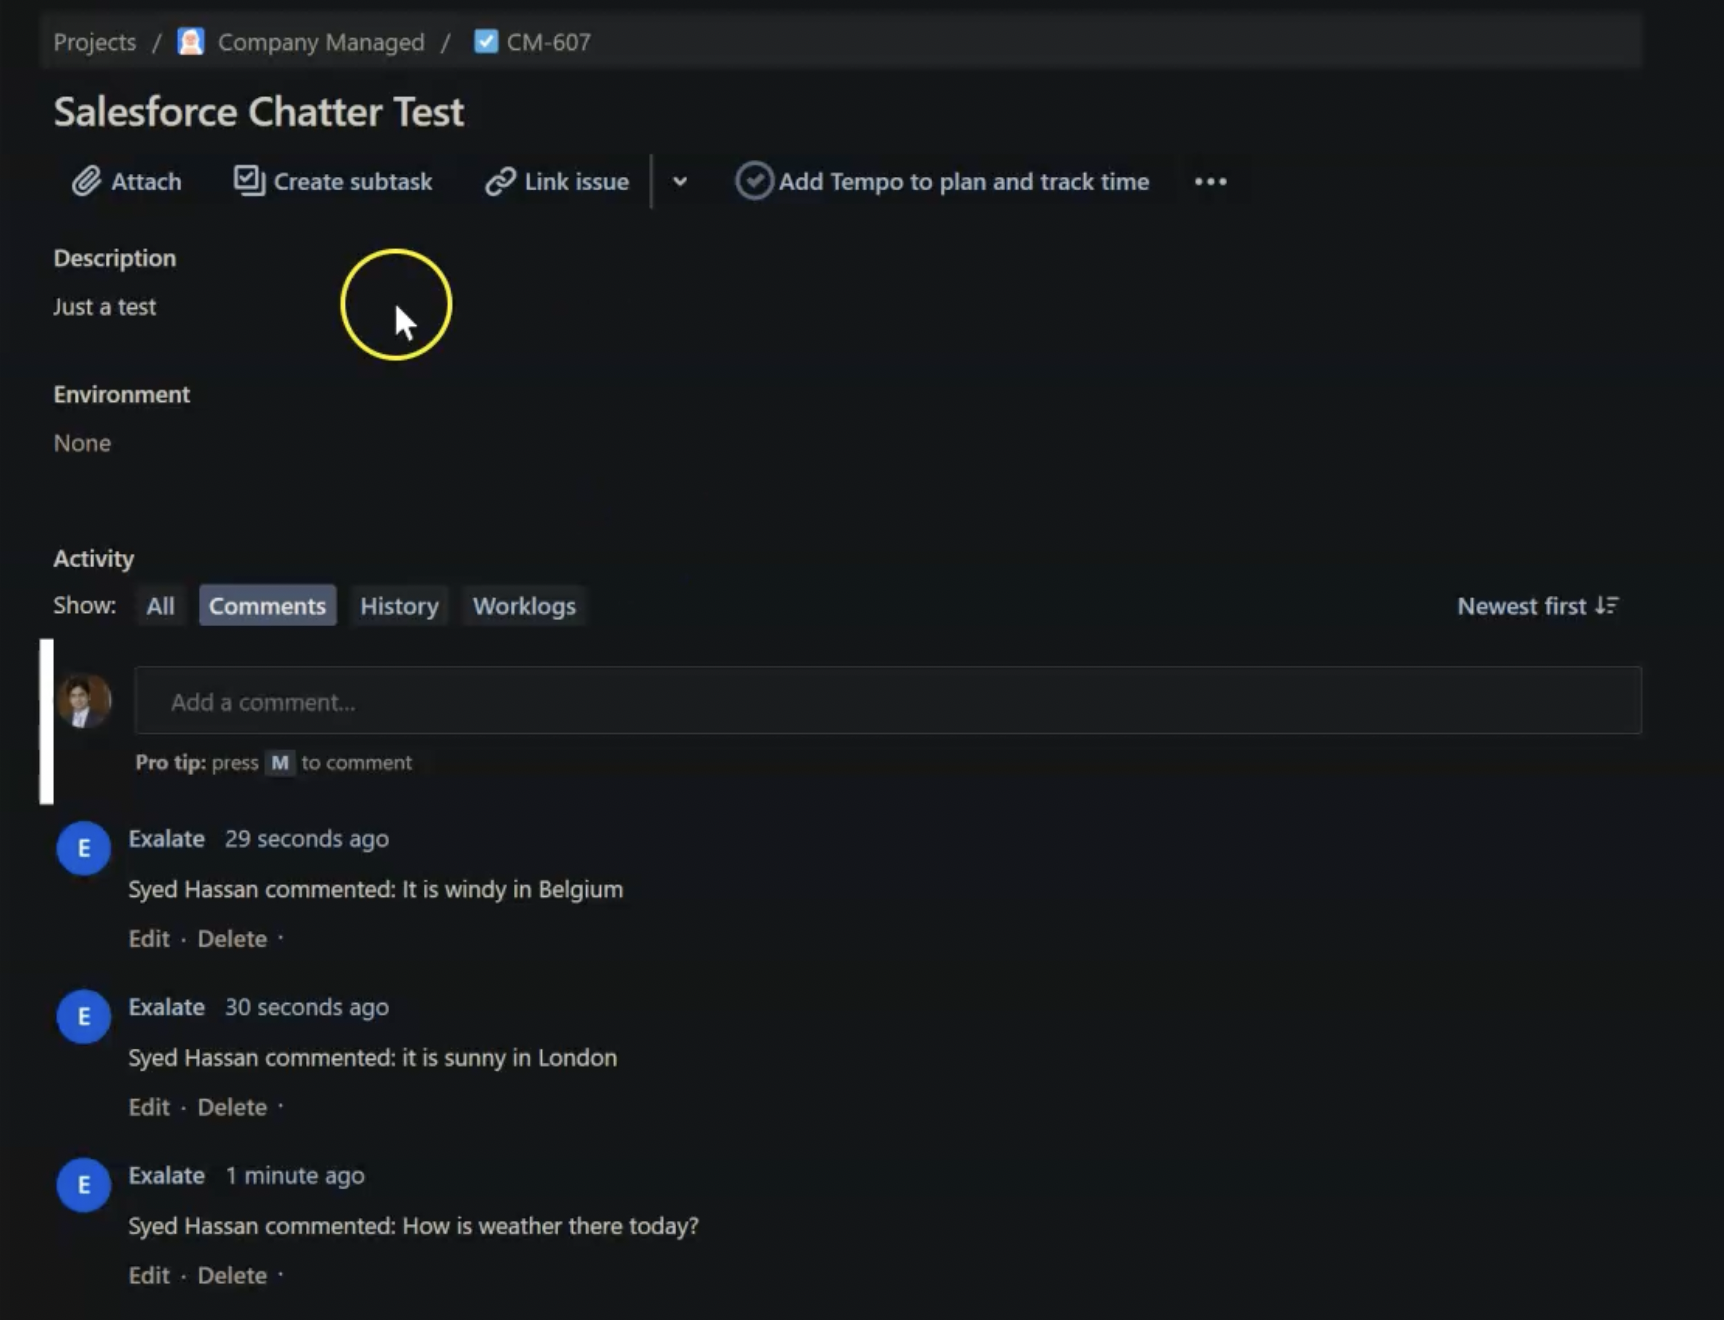
Once the code is inserted into the respective outgoing and incoming syncs, comments, and threaded replies will automatically be reflected in Jira.
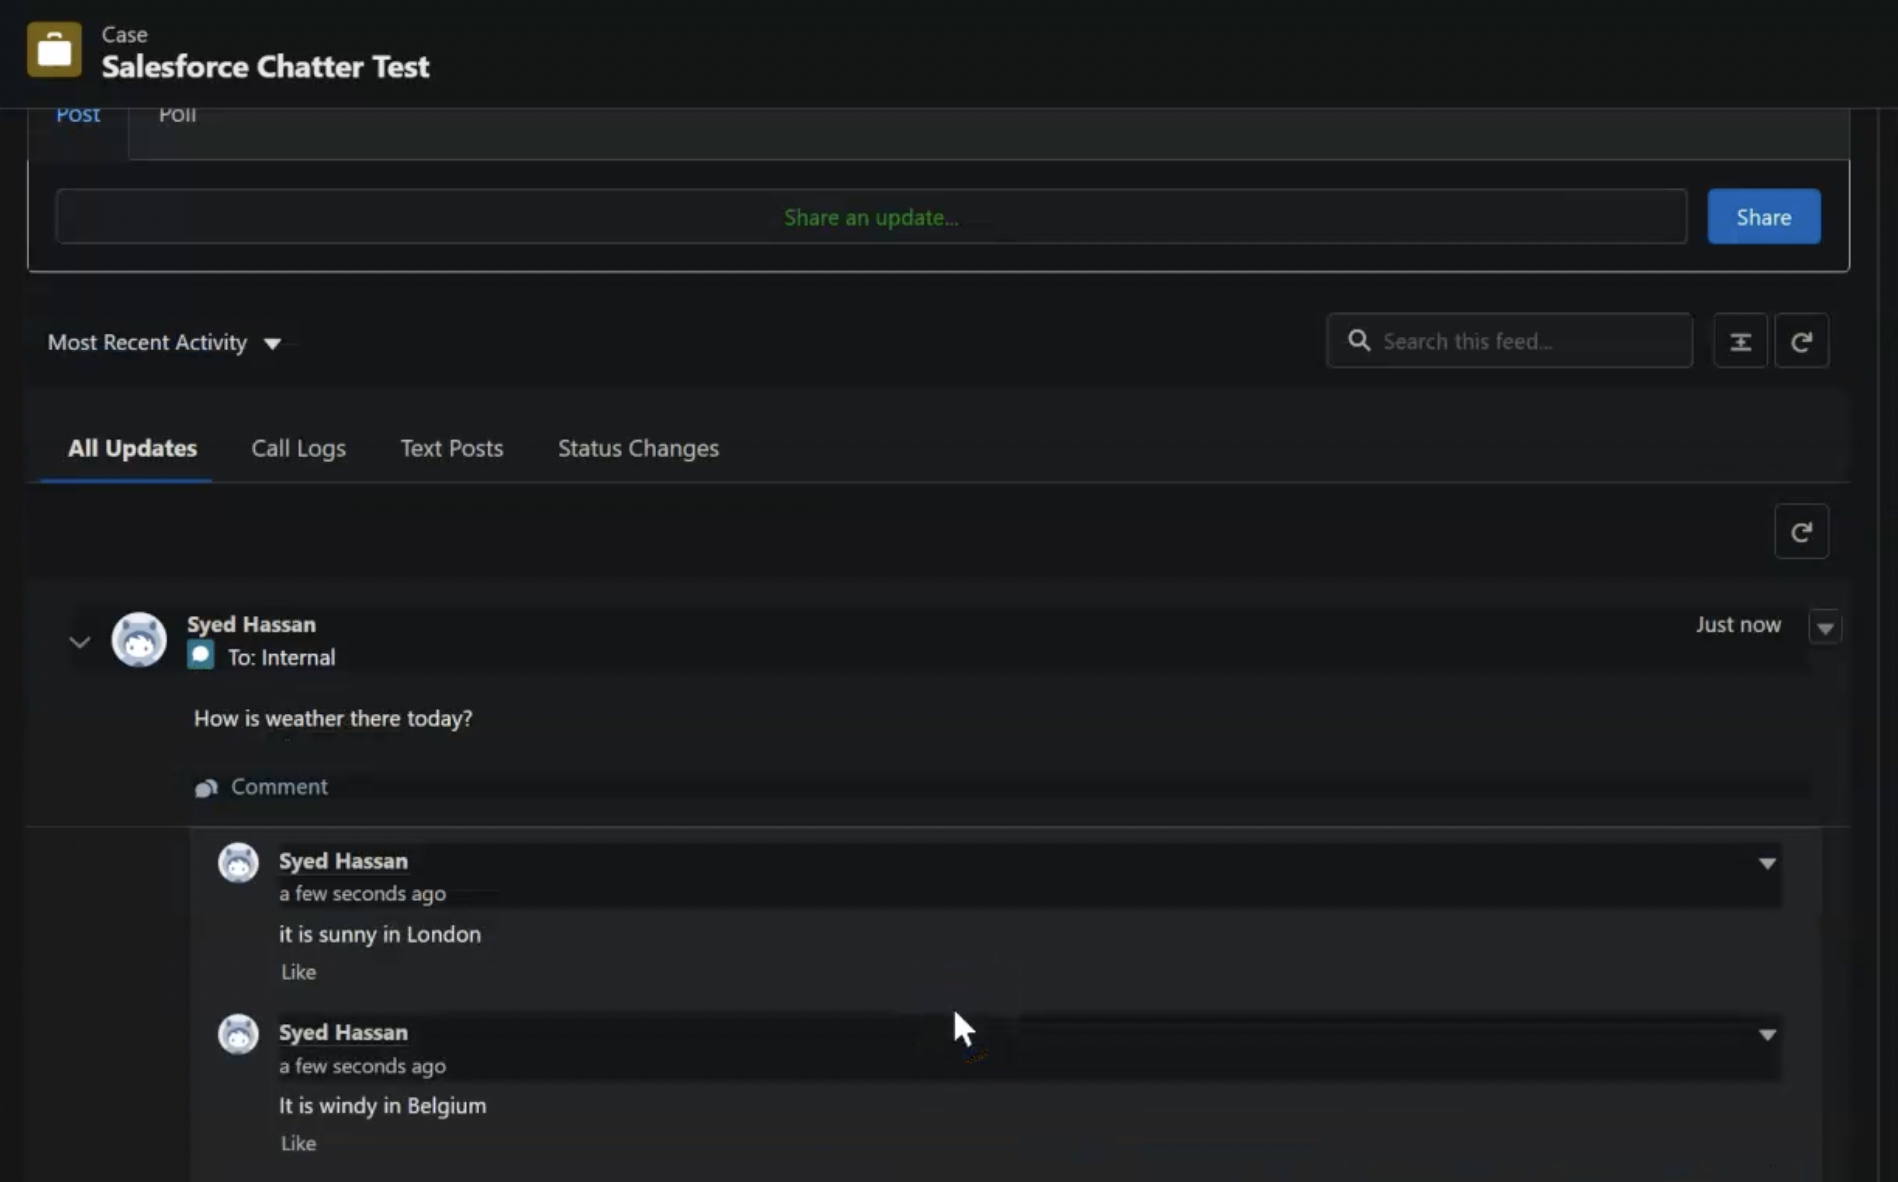
So when you insert a threaded comment in Salesforce.
All of them get reflected in Jira.
Also, user mentions in Jira will tag the corresponding user in Salesforce, if he/ she exists.
So mention a user in Jira.
And see the corresponding user being tagged in Salesforce.
Conclusion
In this article, we just saw an example of an advanced comment sync between Jira and Salesforce. A lot of other advanced sync requirements can also be implemented using Exalate because of its support for Groovy-based scripts.
Book a demo with Exalate to learn more about how it can be customized for your specific scenario.
ServiceNow has grown considerably from IT infrastructure services to supporting security, development, customer service, HR, and other teams. It has set a benchmark for its potential to detect anomalies and automate digital workflows and processes.
ServiceNow integrations extend the ability of ServiceNow by reducing siloed functional areas to increase productivity and efficiency.
So information can flow from other 3-rd party systems or applications into ServiceNow. At the same time, information from within ServiceNow can be displayed in other apps or systems.
This blog aims to explain why there is a need for ServiceNow integrations and the benefits it brings to teams. It also discusses the technologies ServiceNow natively offers for such integrations and explores other alternatives.
We then see a practical implementation of ServiceNow integrations using a 3-rd party app called Exalate. And finally, we end the blog by discussing a few best practices for ServiceNow integrations.
So let’s get started.
The Need for ServiceNow Integrations
ServiceNow’s bread and butter is incident management and resolution. However, it is not limited to only that. It also extends to other functional areas. So different teams like HR, software development, operations, etc. can use it just as easily.
These teams also need to interact with other teams using completely different applications like Jira, Salesforce, Azure DevOps, GitHub, etc. In fact, they might also want to interact with other ServiceNow instances their partners or suppliers use.
Maybe your service desk agents using ServiceNow need to escalate incidents to the dev team using Jira after they perform a root cause analysis. You want to resolve incidents faster to be more efficient.
But if you rely on transferring these incidents manually, then it’s easy to make errors and introduce delays for customers, further impacting your incident resolution times.
So there is a need for Jira and ServiceNow integrations to automate business functions between both platforms. All the information exchange is automatic, in real-time, and visible to the correct stakeholders within their own application. It will digitalize workflows and enrich the customer experience.
This is what ServiceNow essentially stands for and believes in the first place.
And who knows, this might just be the beginning! With the right technology and approach such ServiceNow certified integrations can enable a global network of B2B integrations blurring information boundaries.
ServiceNow Integrations: An Interconnected ServiceNow Ecosystem
Remember, the main aim of cloud integrations with ServiceNow is not to take the teams away from their original source of information but to streamline procedures and workflows to make their day-to-day operations easier.
Essentially, this means pulling data from external systems and displaying it within ServiceNow. It also includes displaying data from ServiceNow into these external systems.
ServiceNow integrations can take place in different ways:
Data is moved across ServiceNow and different applications such that processes are automated end-to-end. For instance, sending ServiceNow incidents to Jira or Azure DevOps to facilitate the development workflows. ServiceNow coins this as Process integrations.
Simple data exchange between different applications and ServiceNow. The transfer of such data can either be one-way or two-way, depending on the requirement. It can be pulling data from a data source (or database) and displaying it within ServiceNow. This is called Data integrations by ServiceNow.
Display publicly available information within the ServiceNow platform. This is an example of UI Integration. In this case, a certain <iframe> in ServiceNow is launched into another portal or vice versa. For instance, display a live report in another system.
ServiceNow integrations can either be batch-based or event-based.
Batch-based integrations allow you to exchange information in batches or in bulk. This can include information stored in CSV, Excel, or any other format.
Whereas, event-based integrations allow data to be exchanged whenever a certain event occurs. For instance, when an incident of urgency=1 and Priority=High, belonging to a specific Assignment group is encountered, a ServiceNow record needs to be passed over to the development team using Azure DevOps or Jira. Alongwith the required information, time-related information can also be synced for high-priority incidents.
Let’s look at the benefits of ServiceNow integrations.
Benefits of a ServiceNow Integration
If ServiceNow, as an ITSM solution, becomes the single source of truth for your organization connecting different teams and increasing collaborations, it can reap a lot of benefits:
Easily route or reroute incidents within platforms you use and automate processes across different departments or even across different companies (cross-company integration). Give away tedious, manual, repetitive tasks and let go of Excel sheets and to-do lists.
Better insights and reporting capabilities through data analytics tools that ServiceNow provides can help track customer requests, identify patterns, and deal with problems early on. It can also measure key performance indicators like problem resolution times and agreed-on SLAs so as to develop an overall rich customer experience. Also, all the team members will have better visibility of every operation and process and can take advantage of this transparency to work efficiently.
The customization capabilities of ServiceNow are well-known and scalable. If these advantages are percolated to other platforms through integrations, it can increase productivity and enhance its performance further.
Sometimes you need to connect multiple ServiceNow instances such that its pre-built applications like ITSM, HRSM, or CSM must integrate. This can bring diverse ServiceNow instances supporting diverse functions to be tied together within a single (or multiple) enterprise(s). This can help MSPs or MSSPs (using these instances) come together under a single workflow and increase productivity.
Further dwelling on the practical aspects of ServiceNow integrations, let’s see a few common use cases.
Common Use Cases for ServiceNow Integrations
Integration between ServiceNow and Other Applications
Let’s have a look at a few use cases when ServiceNow is connected to other commercially available work management systems like Jira, Azure, GitHub, Salesforce, Zendesk, etc.
Service Desk and Development Teams
Streamlined workflows and faster resolutions between the support and the development teams are the most important measures of delightful customers and increased business. This can happen when all the necessary – and only the required information – is passed between applications they use.
The time taken for an incident to flow across to the development team and be pushed back to the support team for resolution can open up insights. Insights where you can identify bottlenecks and patterns early on and take corrective actions.
Due to this increased transparency, efficiency increases by default. For instance, patch releases, if required, can be expedited, keeping the customer at the center of the business.
After all, this is what sound business judgments are all about.
IT and Business Teams
ServiceNow Integrations can provide end-to-end connectivity between IT and business teams. Business teams get valuable feedback (queries, problems, feature requests, etc) from customers, for instance, cases, in Salesforce.
If this feedback is handed over to the IT teams, they can help in making the product more valuable, incorporating proactive improvements. Information can then pass between these multiple applications such that all the teams work towards common business goals.
Integration between Different ServiceNow Instances
Sometimes, there is a need to connect multiple ServiceNow instances. Such integrations are often viewed as snaps (duplicate snapshots of 2 ServiceNow instances) of each other, but in reality, it is more than that.
Connecting MSPs to Multiple Clients
Managed service providers have to deal with multiple clients often not using the same application as the provider. Maybe they both use different ServiceNow instances. There is a need to pass some (not all) data between them.
Also, multiple clients can have different information requirements. Managing all this information through ServiceNow HR integrations can strengthen the relationship between the MSPs and their clients and make everyone’s life easier.
Having got an idea about the what and why of ServiceNow integrations, let’s get into the practical aspects of how such integrations can be achieved.
Native Ways to Implement ServiceNow Integrations
There are different technologies and methods it supports for integrating ServiceNow with external systems.
Exploring Various Integration Technologies Offered by ServiceNow
Depending on the most popular scenarios, like Incident Management, CMDB, Problem Management, etc., here is a comprehensive ServiceNow integrations list:
Web Services
ServiceNow allows all data objects to be used as web services for one or two-way data integration. Dynamic modifications to existing and new objects are directly published as Direct Web Service.
Another way is through its Mapped Web Service, which allows mapping the incoming data into final target tables.
There is a Scripted Web Service where data is sent and received between systems through triggers. So it’s more of an event-based service like we discussed above.
External data can also be loaded via import sets in ServiceNow.
Information can be pulled via a data source directly using a JDBC connection. Various data sources can be loaded, like Excel and CSV files, etc.
ServiceNow can also pull user data from your instance’s existing LDAP server for integration.
Other industry standard technologies like SOAP, REST, or WSDL are also supported.
ServiceNow API integrations and command-line functions can also be done using a MID Server.
A few single-sign-on technologies have been identified and provided integration for. This facilitates faster assimilation into the platform you use. This technique is also customizable through scripting, so you can incorporate it for your own SSO environment.
ServiceNow Store Integrations that are built by ServiceNow or its partners. The support for the integration is usually provided by the vendor.
IntegrationHub allows you to integrate ServiceNow with any API-enabled systems. By far, this is the most popular option for ServiceNow integrations.
It reflects the customization capability of ServiceNow for integrations by extending the functionality of its Flow Designer. IntegrationHub uses 3rd party APIs as a part of its flow and triggers information exchange. An example of such a trigger can be an incident being created or updated. It achieves this in the form of different spokes. Each spoke is application-specific. There are spokes for Jira, GitHub, GitLab, Salesforce, etc., to connect ServiceNow with these platforms. There are around 175+ pre-built integration spokes. ServiceNow also realizes the need to connect multiple ServiceNow instances with the help of an eBonding Spoke. This allows you to connect different ServiceNow instances with almost no code and is available OOB (no need for a subscription) with ServiceNow.
Custom Integrations in ServiceNow allow you to use the platform’s own interfaces and build an integration from scratch. These are beneficial for very specific use cases but generally need to be maintained for the long term by the customers themselves. So they aren’t recommended.
As seen, there are a lot of ways to achieve integrations with ServiceNow natively, so it’s safe to say that you can choose to let your ServiceNow instance communicate with any other application of your choice.
But there are also a few caveats we must consider here.
Challenges of Implementing ServiceNow Native Integrations
Though at the onset, it may sound simple to implement the ServiceNow-provided integrations, often it is not.
When it comes to business decisions like these, it is important to have a look at what you expect from such an integration and whether it would be of any value, functionally and economically.
With ServiceNow-provided integrations, ServiceNow often sits at the orchestrating seat and drives them forward. Systems involved in such an integration are tightly coupled, creating dependencies and additional overheads for maintenance.
The main requirements of integrations in ServiceNow that can be fulfilled are limited at times in terms of capabilities since they are based on templates and patterns that are inherently provided. So they are perfect if you just want to automatically pull data from an external system and display it within ServiceNow or vice versa.
Nevertheless, for some advanced requirements, data mapping can be done using different technologies and methods we saw above. But then doing so requires additional coding efforts and additional resources. Not to mention the time taken to even get started is huge. It’s like building a bazooka to kill a mosquito!
For certain customizations in IntegrationHub, a request to the creator of the Spoke needs to be made. So it’s not always very simple.
Most of the ServiceNow-provided integrations are available for free, but some, like IntegrationHub, require a separate subscription. At times, the cost for this is too high, considering the efforts required to set up a simple integration.
Moreover, in IntegrationHub, since you aren’t able to pick a single integration, you can end up paying for the 175+ integration spokes that you might not even use.
And we still haven’t explored the role of 3-rd party vendors who also provide ServiceNow integrations. It’s time we do that.
Using 3rd-Party Apps for ServiceNow Integrations
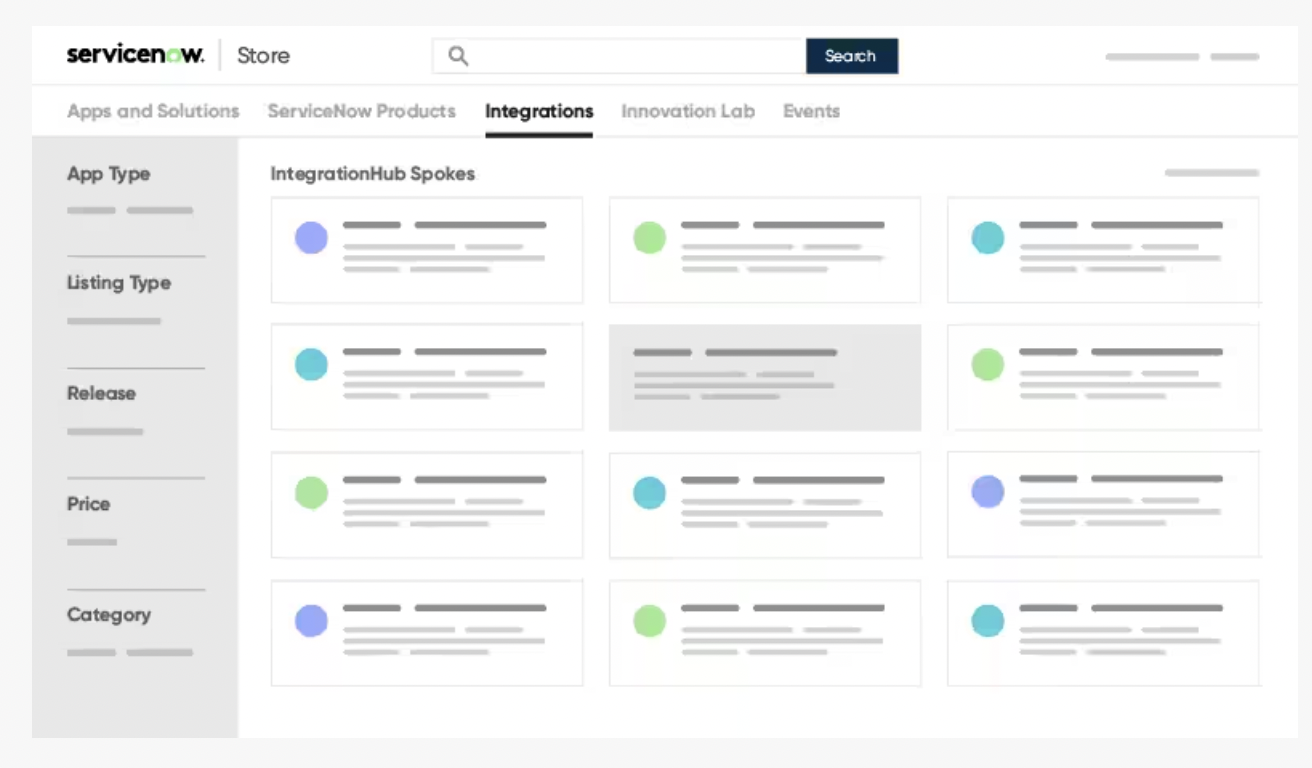
There are various integrations in ServiceNow, which you can find in the store.
They are professionals and experts in ServiceNow integrations so it makes sense to discuss how we can use them to integrate ServiceNow with other applications.
But we must not be shooting in the dark.
To even reach a conclusion, there must be thorough research and an understanding of what the solution would bring to the table. Keep a few guidelines in your mind.
Checklist for Selecting the Right ServiceNow Integrations App
Security
The most important part of any integration, without any doubt, is security. This is because the entire essence of any integration lies in sharing data across different applications, and you don’t want unauthorized access to that data or accidental leaking of information.
So having an integration solution supporting encryption, secure file transfer protocols, role-based access control, etc., is a must. A common application can be found in ServiceNow security operations integrations.
A lot of companies are also concerned about where, what, and how data, would reside once it leaves their company or their ServiceNow instance.
Decentralized Integration
An important requirement for many scenarios is for the solution to support decentralized integration. All the solutions, including the ones provided by ServiceNow are centralized, meaning a single interface works as a controller for the integration.
And trust me, there is nothing wrong with this approach.
But now imagine a scenario where both the integrating platforms have equal and independent rights to choose how they want to send and receive information. This can happen without messing with each other’s integration setups or even informing the other side (unless required).
So you simply choose to send (or filter) information that is absolutely necessary to the other side and also decide what you want to receive from the other end independently.
Loosely- Coupled Systems
Continuing the point above, the systems in a decentralized integration setup are intrinsically loosely coupled. When systems don’t depend on each other (avoiding a single point of failure) it increases the overall scalability.
So it’s very easy to add just another point of integration and connect with a new partner.
Flexibility
With integrations, you always have a lot of options. Because there is no “one-size-fits-all” kind of scenario. Requirements change and so does the way in which data exchange is handled. Sometimes, you might have extremely complex needs that have to be implemented by integrating at a deeper level with the platforms.
Now, all of this, as I mentioned before, can also be achieved with ServiceNow-provided integrations or with other solutions in the market.
But the point here is the ease with which this can be achieved.
How much time and effort would the task require? Is it something that the solution can achieve in less time with minimal tweaking and native support for deep integrations? Is there an option to use AI? And in the end, is it all even worth it? Would it help in reducing your organization’s technical debt?
Having a solution flexible enough to implement any and every integration requirement should be your best shot.
Price
Last but not least, perhaps the most important point businesses want to consider is the price of the integration solution. Please be mindful: this is not the same as the cost of an integration, which is a completely different ball game.
Are you paying too much for a simple integration, or are you paying a reasonable price for an advanced integration? These are just some of the few questions you must ask yourself.
Well, are we getting somewhere with all of this?
Yes, I have an integration solution that can be a fit here.
Exalate: a 3-rd Party Integration Solution for ServiceNow Integrations
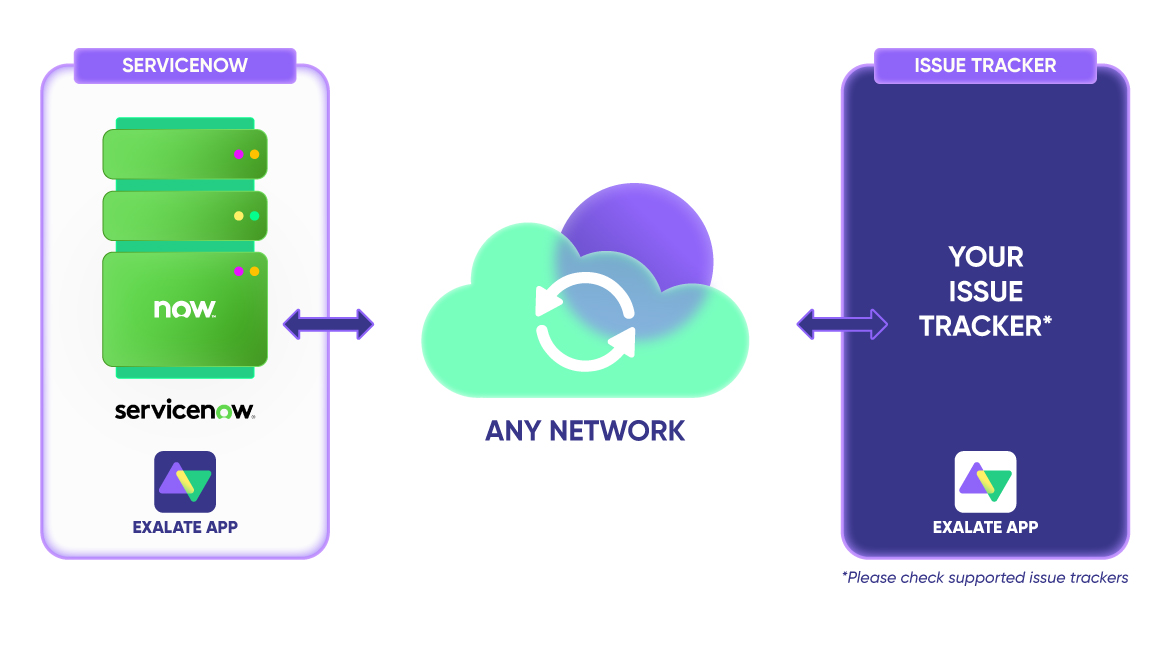
Exalate is a one or two-way integration solution with the capability to provide bespoke integrations for different ITSM, ITOM, CRM, or other work management systems.
It supports integrations for ServiceNow, Jira, GitHub, Azure DevOps, Salesforce, Zendesk, etc, and you can use its Integration as a Service to set up an integration between any two platforms, including legacy systems.
It supports a smaller range of platforms as compared to IntegrationHub but the integration that can be delivered is way deeper. Because it comes with a built-in intuitive scripting engine that allows you to customize mappings and the overall logic to an advanced level.
It is also the only solution that supports decentralized integration, and as we discussed, gives equal and independent rights to either side of the integration.
Plus, it keeps the integrating systems loosely coupled and increases security since both sides decide what information they want to expose.
Let’s see a step-by-step walkthrough on how to use Exalate to set up ServiceNow integrations.
How to Set up ServiceNow Integrations with Other Apps or Systems
Note: You can watch the Exalate Academy tutorials if you are a visual learner.
Step 1: Install Exalate on ServiceNow and the Other Application
The first step is to install Exalate on ServiceNow and then on the other platforms (Jira, Azure DevOps, ServiceNow, GitHub, Zendesk, Salesforce, etc).
You can request your Exalate for ServiceNow and other instances via the integrations page. Fill in the required information and our team will reach out to you with the Exalate node.
Note: Exalate for ServiceNow can also be installed on docker.
Step 2: Connect ServiceNow and the Other Application
To start syncing information, you first need to set up a connection between ServiceNow and the other application.
One side initiates the connection and generates an invitation code. The other side accepts the connection invitation using this invitation code. A connection generates a link between the 2 platforms so you can synchronize information.
It doesn’t matter which side starts initiating the connection, the Exalate UI remains the same.
Assume we start initiating the connection from ServiceNow.
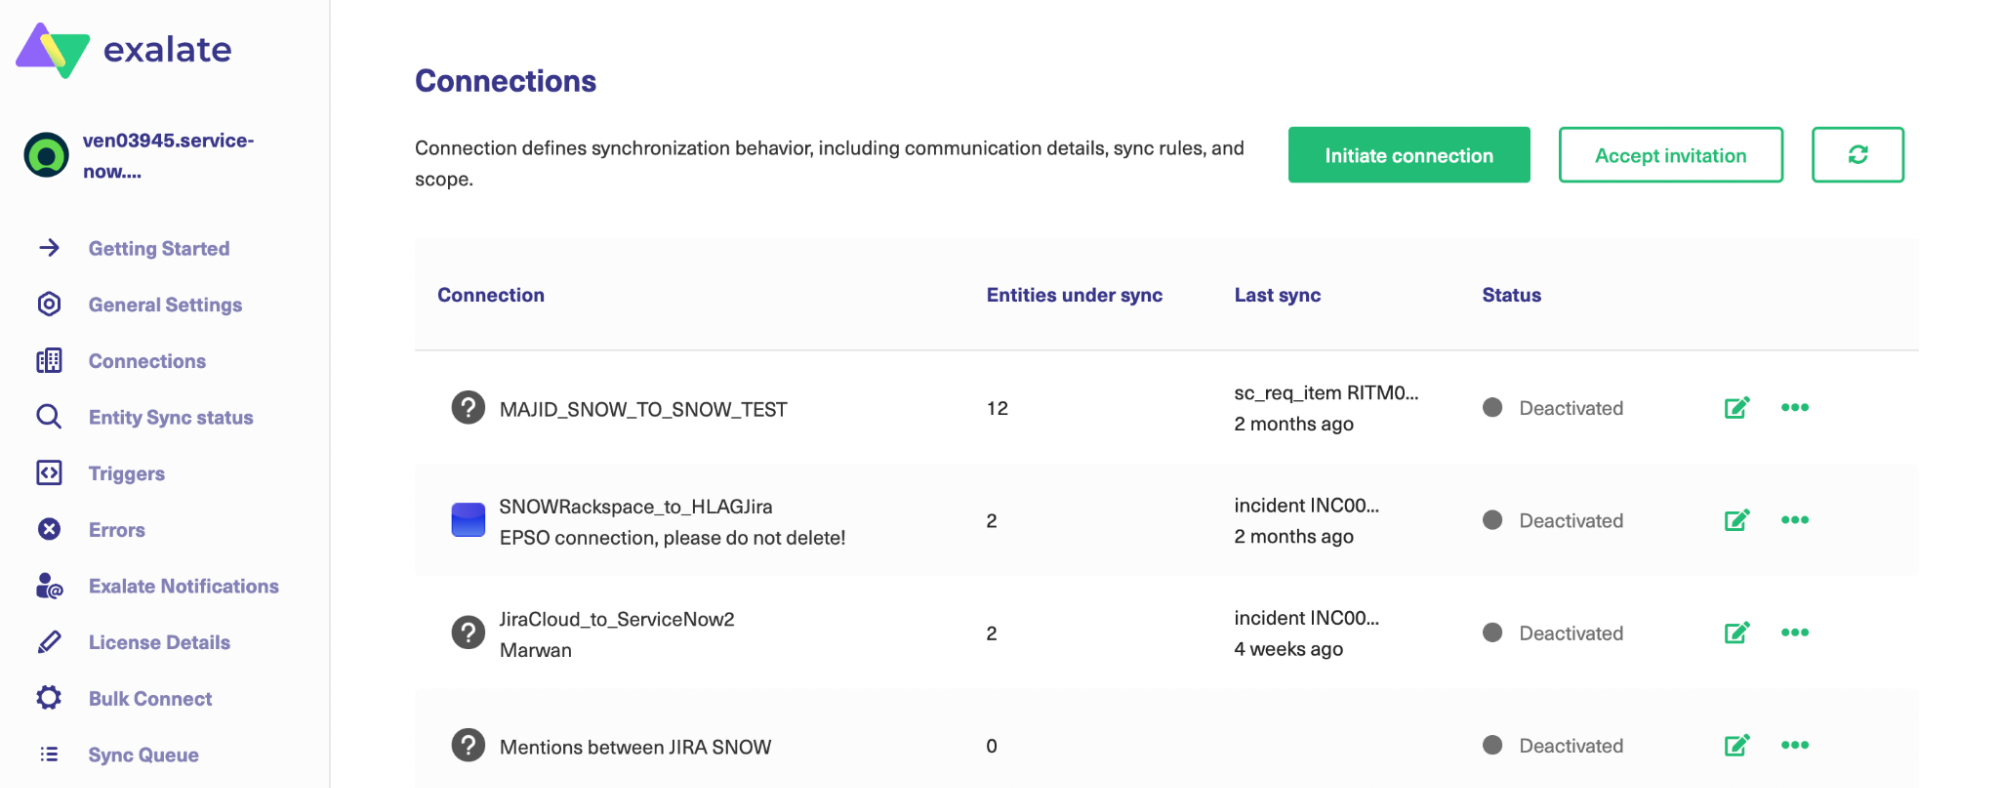
Navigate to the “Connections” screen in the Exalate console on the left-hand side menu bar.
Click on the “Initiate Connection” button.
Enter the “Destination Instance URL”. The destination instance URL is the URL of the application you need to sync with. I have considered Jira in this example. But it can be any other application Exalate supports.
You will need to choose between the Basic and the Script mode.
The Basic mode supports pre-defined field mappings between the different systems that cannot be configured. You can sync only incidents in ServiceNow using the Basic mode. It comes with a Free Plan that allows you 1000 free syncs per month. It lets you test out your sync easily.
The Script mode is where the real power of Exalate lies.
It works on a Groovy-based scripting engine and you can specify and manipulate the fields you want to share. You can also define how to map them and automatically control the sync the way you want. This mode also comes equipped with AI. We will see how that works in the Script mode section.
Let’s have a look at the Basic mode first before we go to the Script mode.
The Basic Mode
Select “Basic” in the option above and click “Next”.
You will need to verify if you have admin access to the destination instance or not.
Once that is done, depending on the destination instance you would either need to select a project in Jira and Azure DevOps or a repository in GitHub, or if no such concept exists then the connection is successfully established.
You can enter the incident number.
And see the result of your synchronization immediately.
You can also choose to filter incidents that can be synced using the basic mode automatically with the help of triggers or you can even sync entities in bulk.
The Script Mode
Choose “Script” and click “Next”.
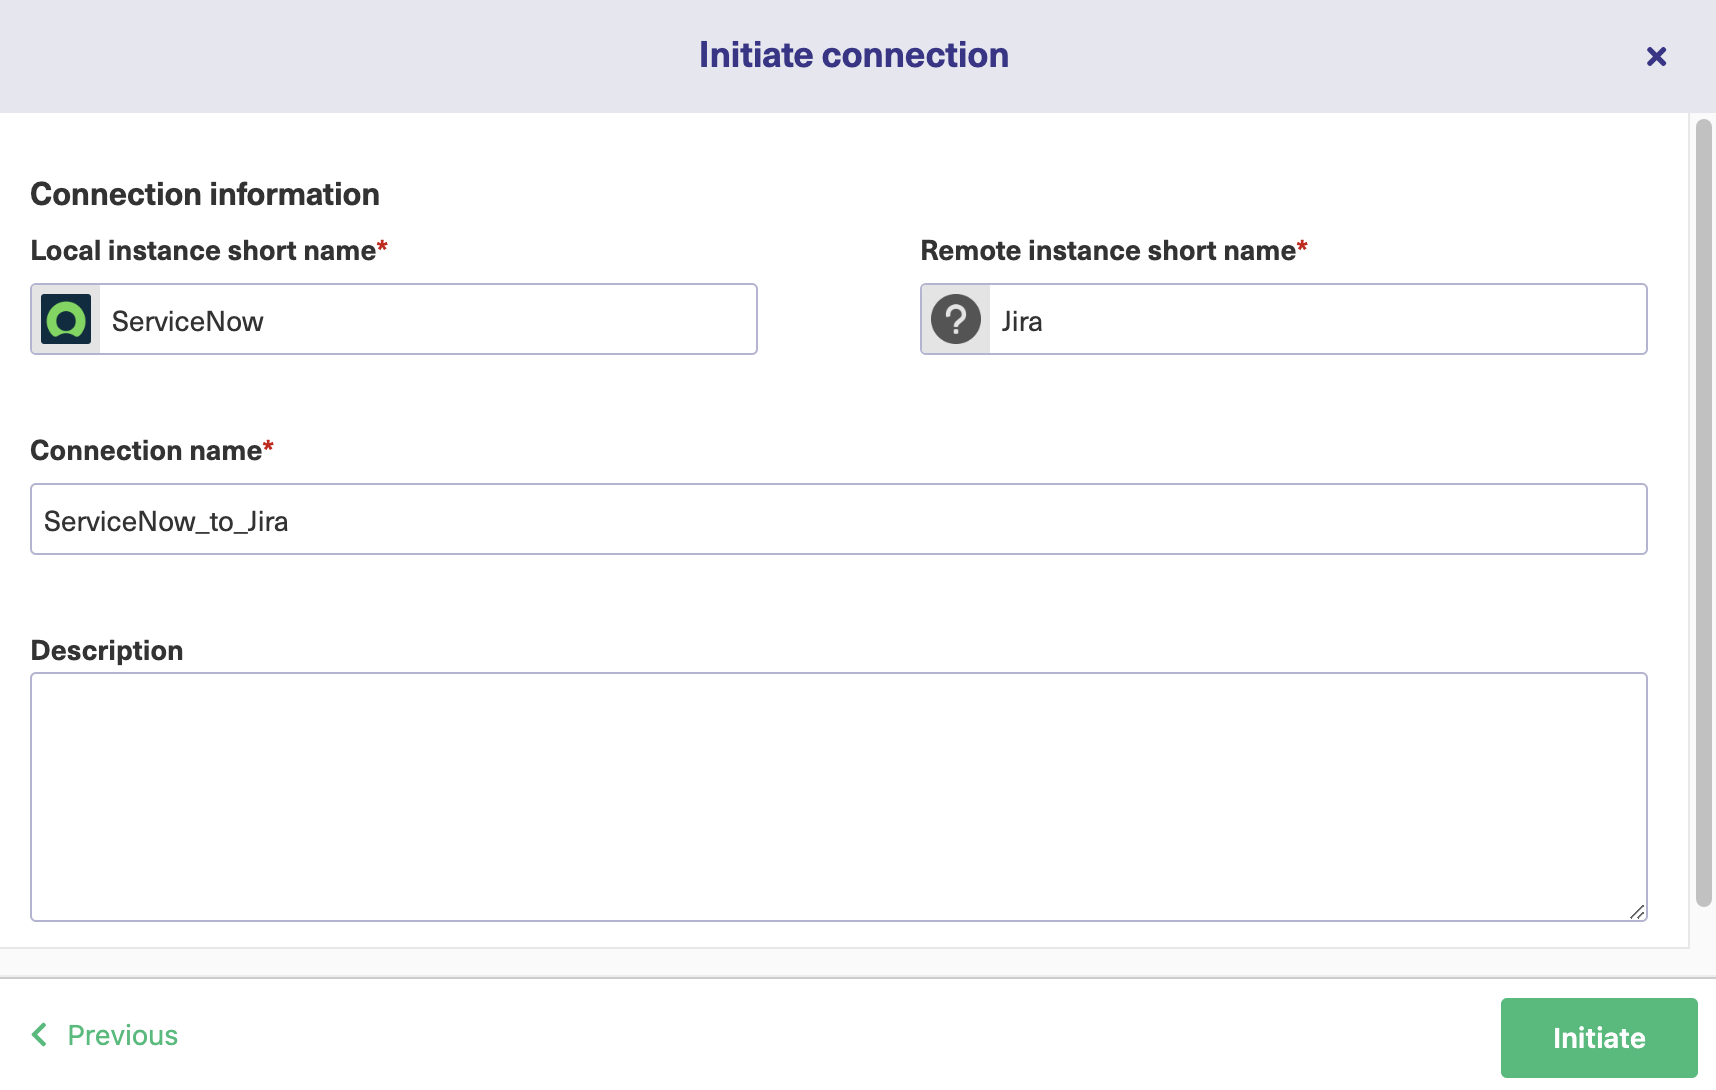
Enter the connection details. Give a short name to the local instance and a short name to the remote instance. A connection name is automatically generated. You can change it if you want to.
Click “Next”.
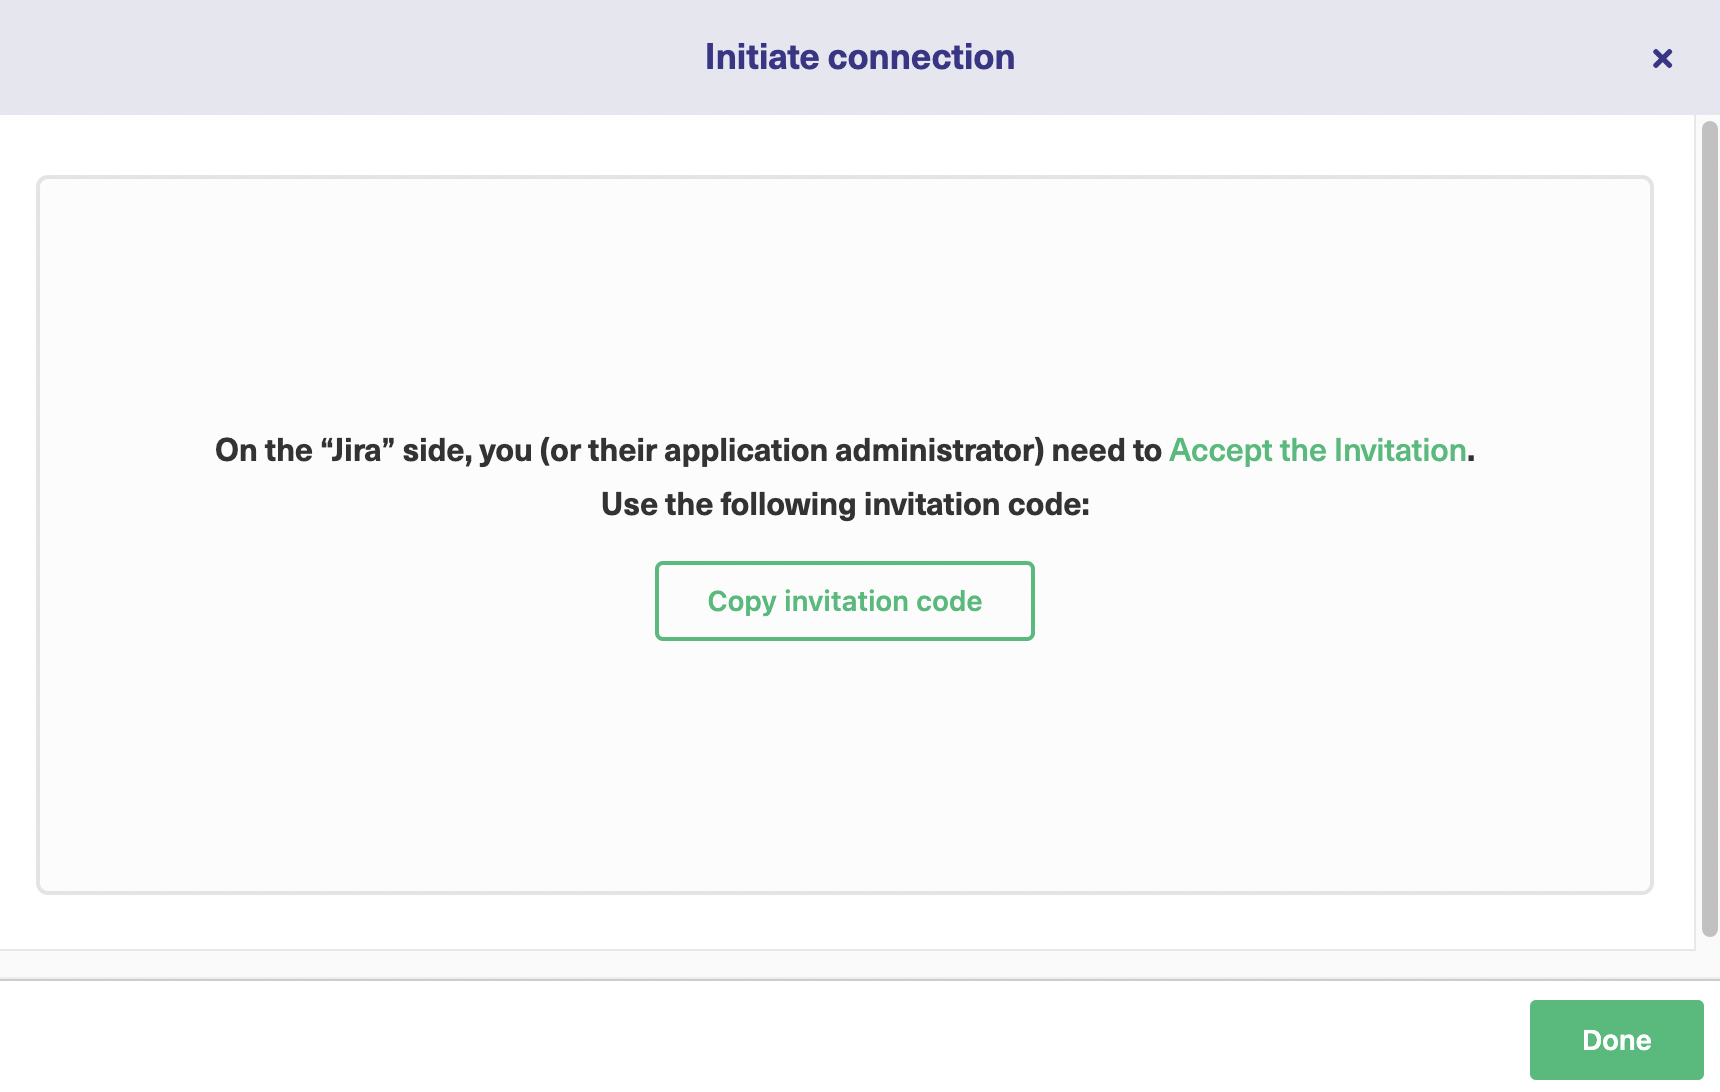
An invitation code is generated. This needs to be copied and pasted into the destination instance.
So click on “Copy invitation code” and save it somewhere safe. Then click “Done”.
On the destination instance, go to the Exalate console and select the “Connections” tab.
This time around, click the “Accept invitation” button.
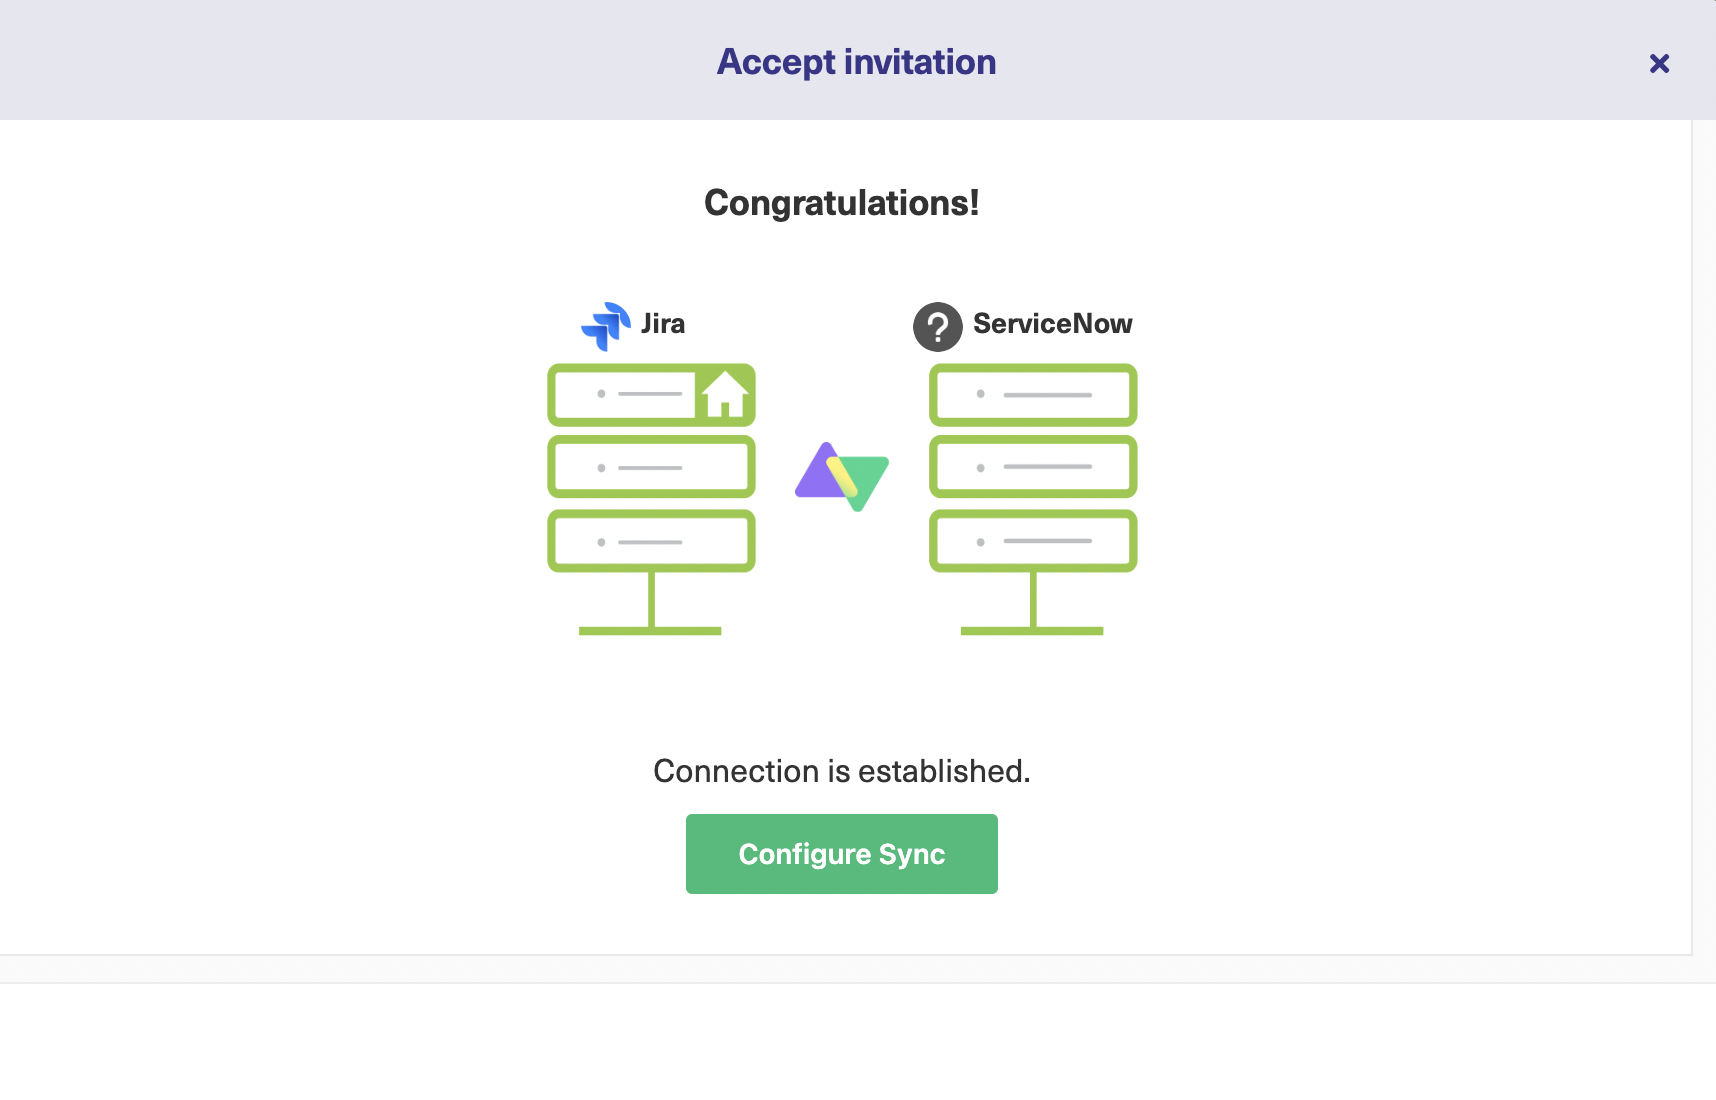
Paste the code you have just copied. Again, depending on the destination instance, you will either be required to choose a project or a repository, or the connection will be successfully established.
Step 3: Configure the Connection to Decide What to Share
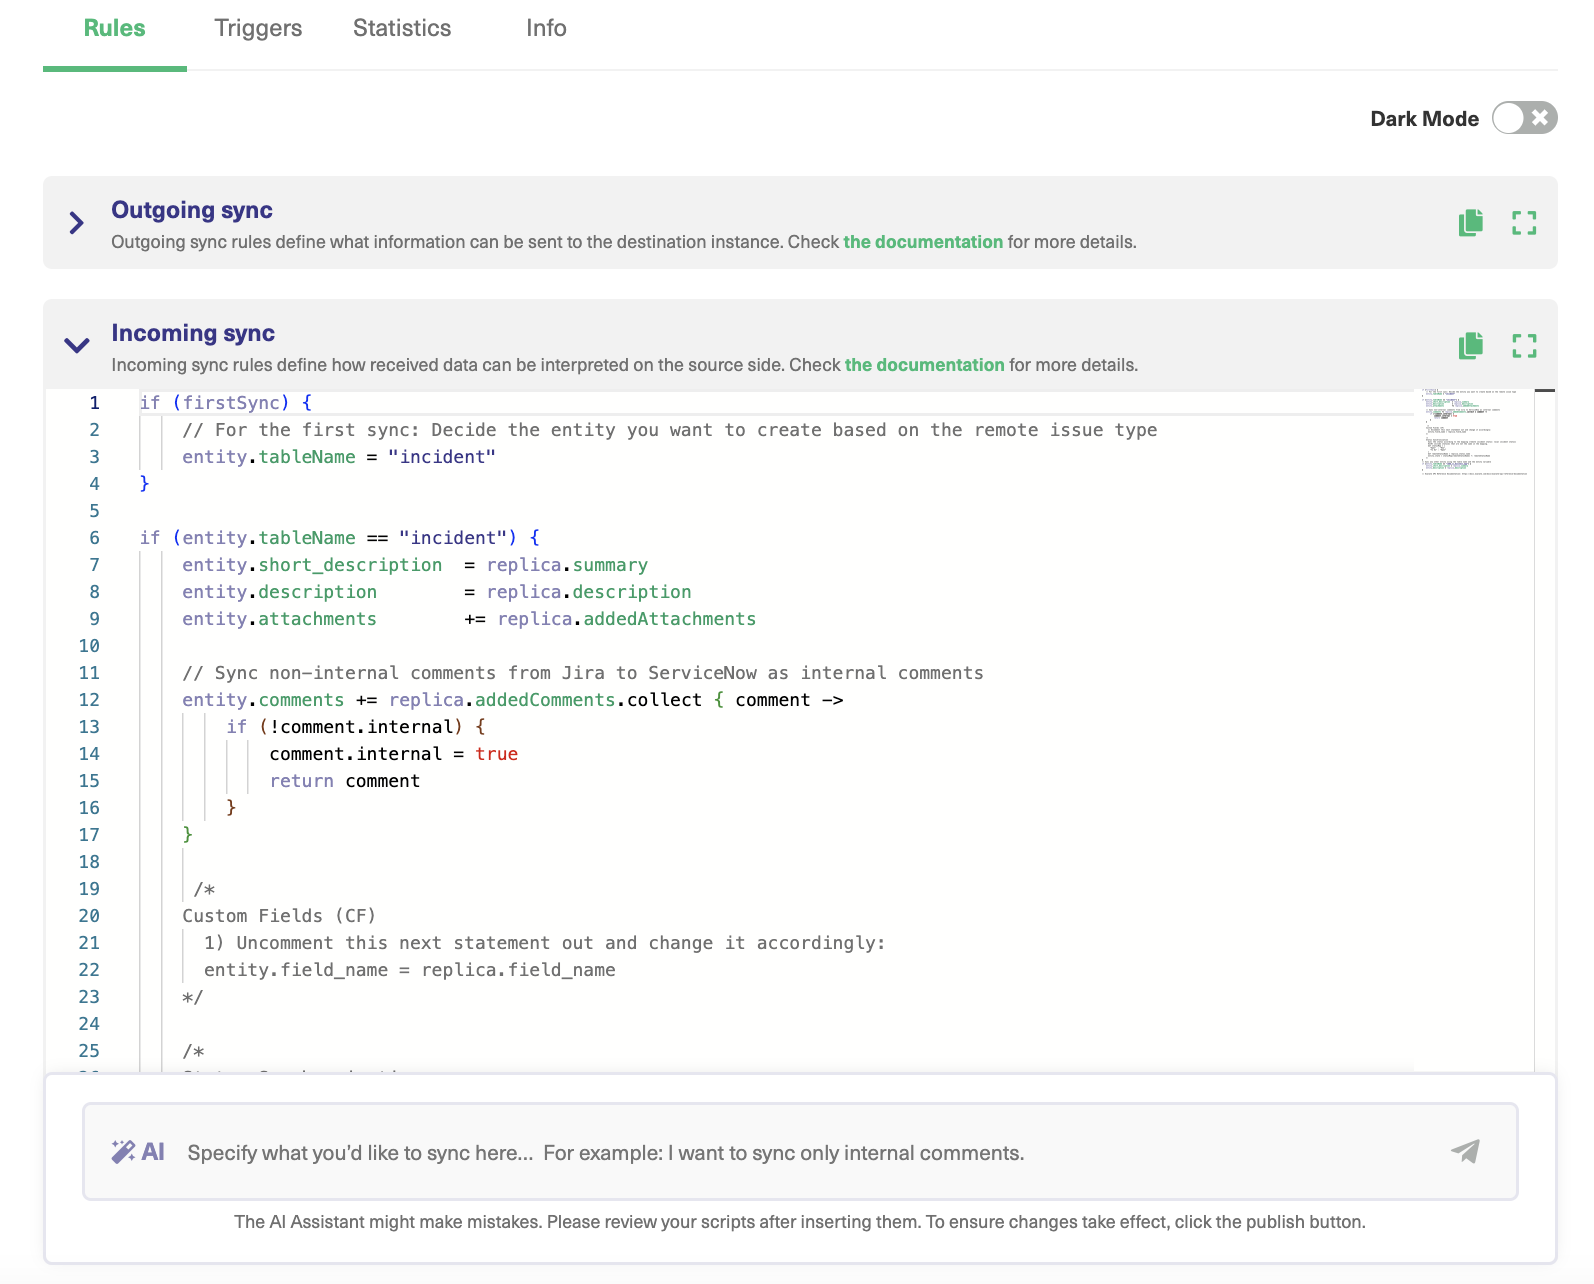
On the previous screen, if you click “Configure Sync” you will be shown a panel that looks like this:
“Rules” and the “Triggers” tabs are the ones we need here.
Rules are Groovy scripts that let you control the information flow.
There are Incoming and Outgoing sync scripts present on both integrating sides. They control the information flowing out and coming into the platforms. Each line corresponds to a particular field that needs to be synced.
In the “Outgoing sync” on the ServiceNow side, the line replica.description=entity.description, means that the description of the ServiceNow entity is copied into something called a replica.
Replica acts like an empty envelope in which you fill in the contents you need to transfer to the other side. This content is unraveled at the destination instance and applied according to the rules defined in its “Incoming sync”.
If you don’t want to send a particular field, simply delete the line.
You can also choose to add new lines of code to send or receive new information.
Check out the Getting started guide on the Exalate documentation to see how these initial steps work out with Exalate or refer to the Script Helpers for advanced scripting logic.
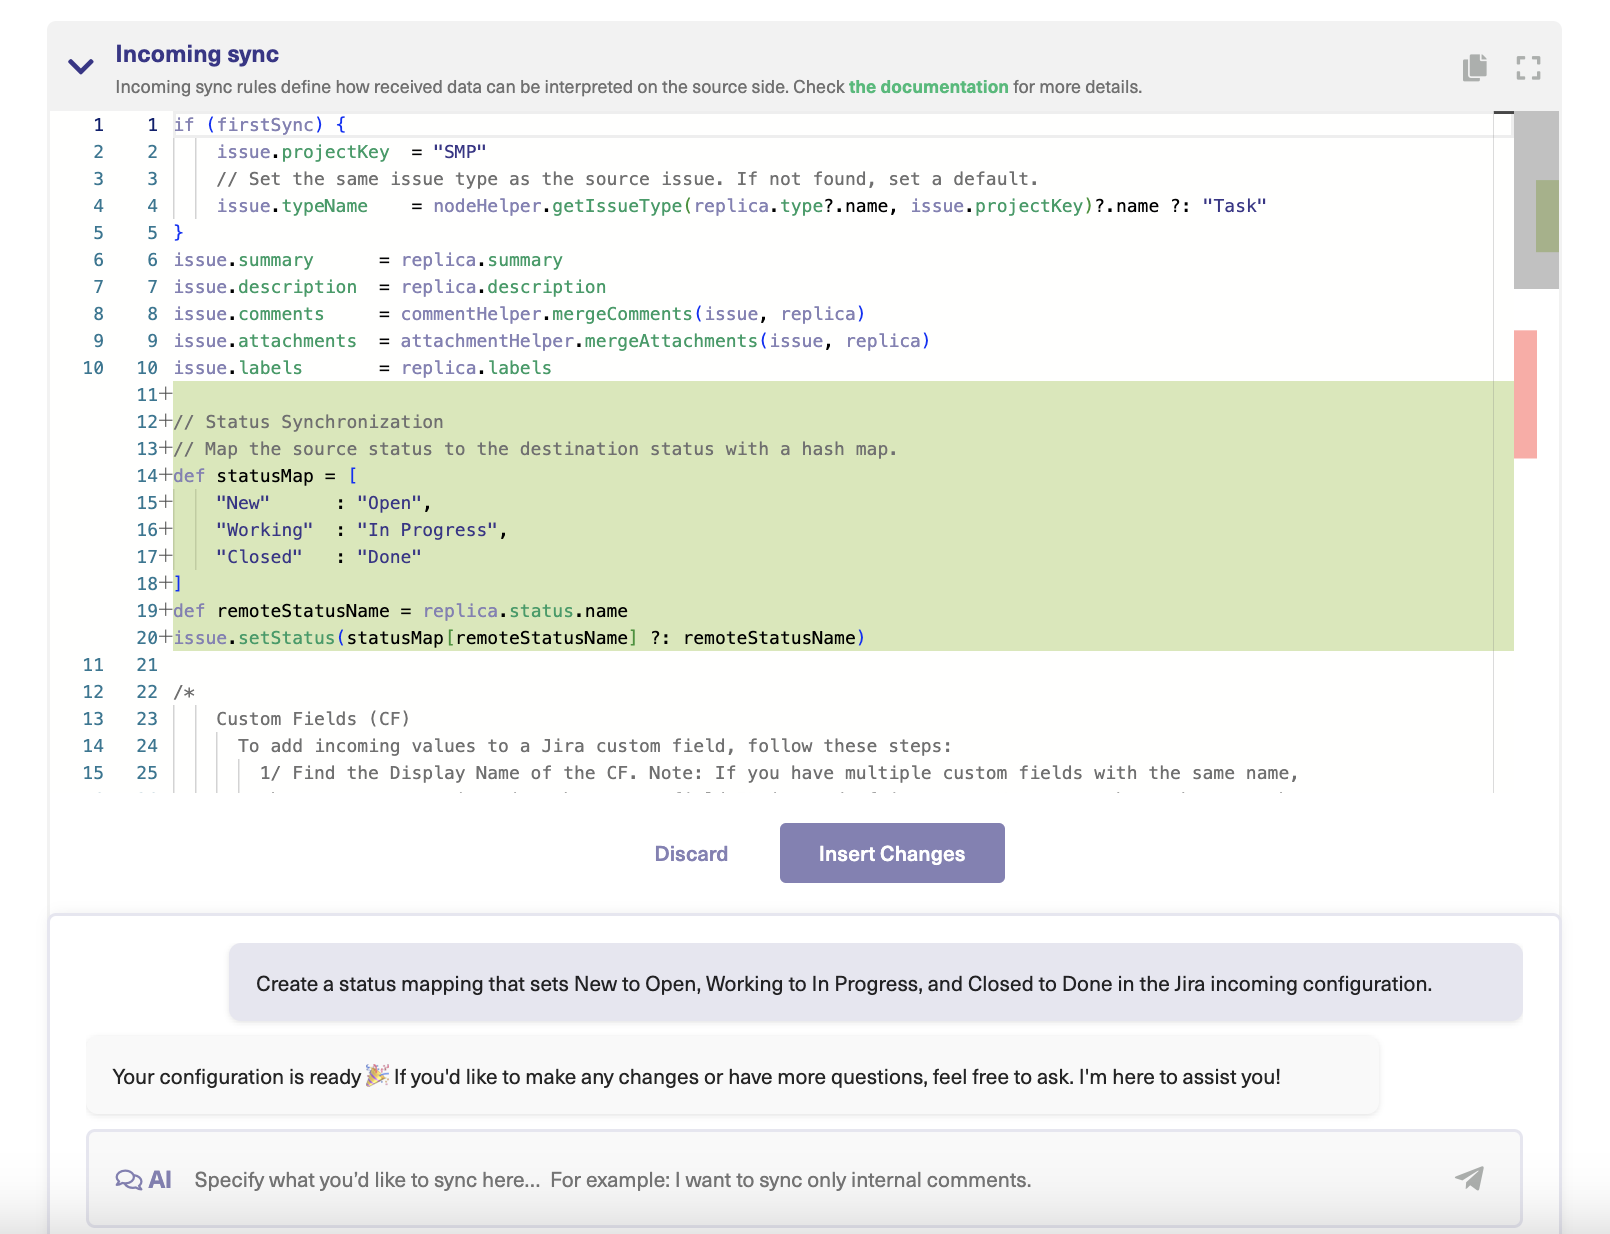
Use AI Assist for Configuring Your ServiceNow Integrations
Exalate’s Script mode now features AI Assist, accessible via a chat window in both the incoming and outgoing sync rules tabs. Simply type in your sync requirements, and AI Assist will generate the necessary scripts for you.
The scripts are created based on your input, current configurations, and Exalate’s scripting API, and should appear shortly.
In the generated script, red lines show what will be removed, while green lines indicate new additions. You have the option to accept, reject, or refine these changes, adjusting your prompt as needed. Once you’re satisfied, remember to publish your changes.
Like any AI tool, AI Assist isn’t perfect and can sometimes miss the mark. To achieve the best results, ensure your prompts are as clear and specific as possible.
For instance, if you need to map statuses between Jira and ServiceNow, you could enter something like this into the AI chat:
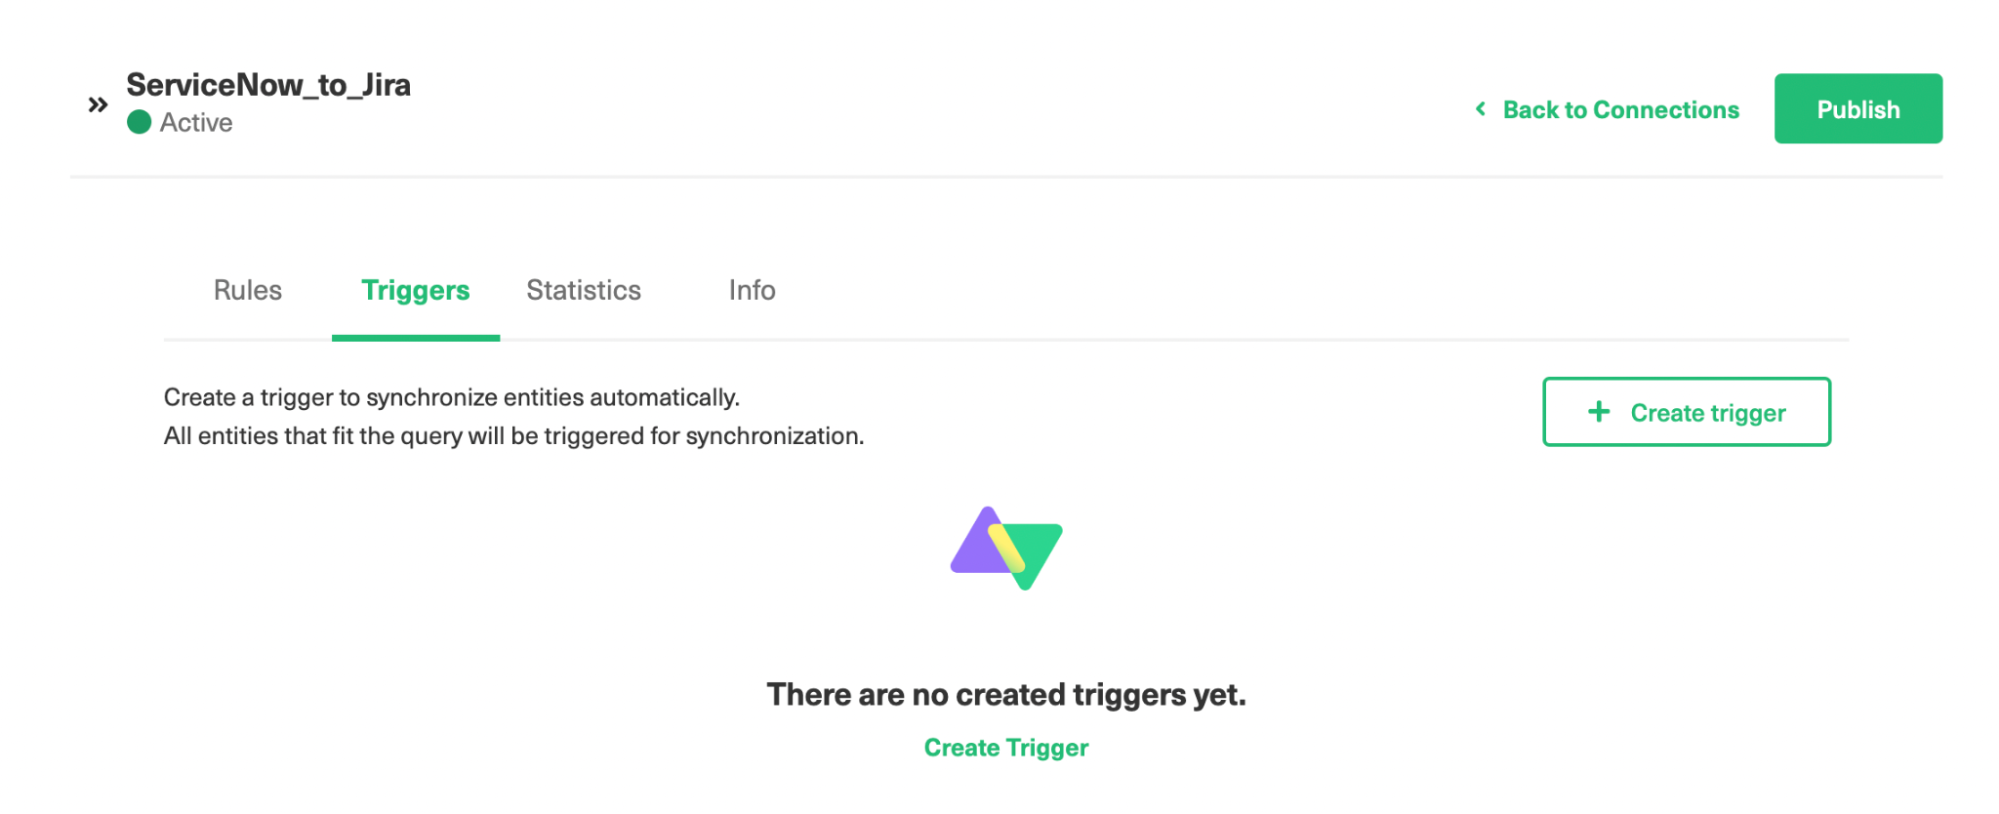
Step 4: Start Automatic Synchronization Using Triggers
Once you have decided what information must be sent and received, you might want to start the synchronization process automatically based on certain events.
This is done via Triggers in Exalate. Based on the conditions (filters) you set, sync will happen in accordance with the Sync Rules.
Triggers are platform-specific and need to be set on both sides of the integration if you want a two-way sync.
To create one, click the “Create Trigger” button.
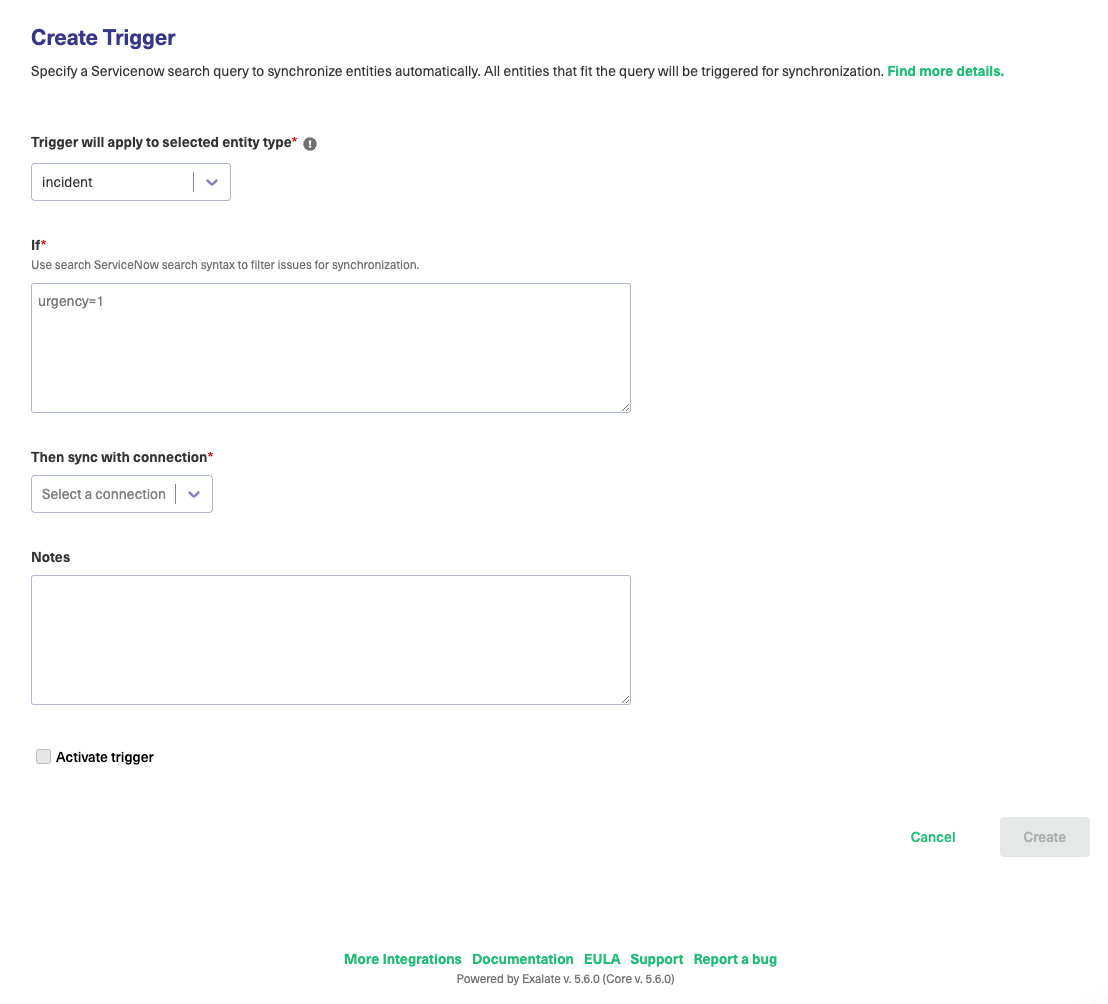
Choose the entity you want to set the trigger for.
On the ServiceNow side, you can choose between incidents, RITMs, problems, change requests, etc. In the “If” section, use the ServiceNow search syntax. Entities that meet the conditions are automatically synced.
You can write advanced triggers like syncing incidents assigned to a particular person or syncing incidents that have a particular text in a comment or description.
Once done, leave some notes and activate the trigger.
You can see the trigger you just created in the list.
You can choose to sync all the existing entities that satisfy the trigger conditions using the “Bulk Exalate” option.
After you have made changes to the Connection in Steps 3 and 4, hit the “Publish” button to apply them.
Step 5: Start the Synchronization
Honestly, there is nothing you need to do in terms of starting the sync.
It will start automatically based on the triggers you have set up. If for some reason it doesn’t, grab some coffee and by the time you are back, it will be working just fine.
If there are some issues with the triggers or rules, you can also troubleshoot and find out what’s going wrong.
Best Practices for ServiceNow Integrations
The possibilities with integrations are huge and you can go downhill in a short amount of time without realizing what went wrong.
So let’s look at a few best practices and see how you can make the most out of your ServiceNow Integration.
To be honest, these are not specific to only ServiceNow, they stand true for all kinds of integrations.
Set a goal for your integration and define the requirements early on. Ask questions like:
Do I really need integration in the first place?
What other ways are there to connect the platforms I use every day?
What business value will the integration bring?
Which processes will the integration have an impact on? If all the answers point towards integration, you know you have headed the correct way.
Stressing on the above point a little, make sure you chalk down to the finest details what data needs to be exchanged, at what time, what workflow is expected to be automated, how it is mapped to the destination instance, and so on.
Involve the right stakeholders in the process from the beginning. Right from the inception, design, and implementation to the maintenance of the integration. They can be the platform admins, the implementation team, data architects, solution architects, information security consultants, or absolutely anyone you think can add value to the project.
Explore the technologies and options available for integrating your systems. We have discussed ServiceNow integrations here (and I hope it brought some clarity) but they might as well be Jira integrations or Salesforce integrations. This is an important step to put your integration in full throttle. Also, check how the integration handles your data and GDPR requirements since it is an important part of an integration.
Make sure to not rush through the integration. It is a time-consuming process, accept it, especially the trial and error or the POC part. So give it that kind of time. Your integration can be complex and can take time to set up. Acknowledge that instead of rushing through and being left with a clumsily-working high-maintenance result.
Sometimes, you can have obvious solutions to your problems. For instance, JDBC works really well if you want a one-way integration between a data source and ServiceNow, i.e., just pulling the data from the source and displaying it in ServiceNow. For two-way integrations between different platforms, you can use a web service or a MID server, or a third-party app like Exalate.
Determine how and where the system you want to connect with is located. Is it inside the customer’s network and needs update via a MID server or is it across company borders? You can involve a subject matter expert and get the right direction in this case.
With ServiceNow, you already have basic system integrations like eBonding, Google Maps, etc. Understand and use these technologies. For advanced integrations, go to the experts.
Some tools like IntegrationHub support workflow automation and focus on that alone, whereas some others like Exalate focus on deeper integrations that involve a lot of advanced integration requirements. Be sure to have this understanding from the beginning. If in doubt, check how you can make the right decision between IntegrationHub and Exalate.
There is a lot that can happen with integrations and the sky’s the limit. And with the right approach, it becomes unstoppable. So choose wisely and decide what works best for you.
Conclusion
We have come a long way. Having started with understanding the needs and benefits of ServiceNow Integration, we also saw a few use cases to get a practical view of how such integrations can be envisioned.
You also learned all about the native ServiceNow-provided integration technologies and methods. As opposed to these, we had a look at why 3-rd party applications can also be a good choice.
We then briefly touched on an integration solution called Exalate, which has a distributed architecture and supports decentralized integration, an intuitive scripting engine, and so on.
Finally, we saw how ServiceNow integrations can be implemented using Exalate before closing the journey with a few best practices.
There is always more to learn, so feel free to book a demo with Exalate if you think it can be the right solution for you and see where that leads you.
Frequently Asked Questions
What are ServiceNow Integrations?
ServiceNow integrations help establish connections between ServiceNow, a popular ITSM platform, and other applications, databases, or services. These integrations help automate workflows and tasks, centralize information, and improve overall organizational efficiency by connecting ServiceNow with other critical business systems.
What is REST API integration in ServiceNow?
REST API integration in ServiceNow refers to the capability of ServiceNow to interact with other systems using the Representational State Transfer (REST) architectural style. ServiceNow provides a RESTful API that allows developers to make HTTP requests to perform operations on ServiceNow data and functionalities.
However, this method of integration requires a lot of development effort and technical resources. It’s also difficult to scale the integration. Hence, external integration software vendors like Exalate can help achieve the same results with minimal effort.
ServiceNow integrates with various applications, including CRM systems (Salesforce, Microsoft Dynamics), collaboration platforms (Microsoft Teams, Slack), project management platforms like Jira, development platforms like GitHub and Azure DevOps, other ServiceNow instances, and many more.
Which tool is used to integrate ServiceNow?
You can use third-party integration tools such as Exalate to integrate ServiceNow with other applications uni or bi-directionally. This tool allows you to create custom Groovy scripts to sync any kind of ServiceNow entities like Incidents, Problems, Change Requests, RITM, etc.
Starting February 15, 2023, we are increasing prices for all Exalate products and services by approximately 15%.
Exalate infrastructure relies on many other tools, which have already increased their prices. We also want to ensure that the level of service delivery remains in line with your expectations and beyond.
What does it mean for you?
The current pricing will apply to quotes and purchases made before February 15, 2023.
Once the pricing change goes into effect on February 15, new customers will pay updated prices immediately
The new prices also apply to renewals after February 15, 2023. If you decide to renew before this date, the current pricing is retained. That includes Server maintenance renewals as well.
Exalate for Jira Cloud
Exalate for Jira Server
Exalate for Jira Data Center
Exalate for Other Systems
FAQs:
Can I still purchase Exalate at an old price if my quote is already issued? Yes, if your quote is still valid.
Can I request a quote with an old price before February 15? Yes, you can still request a quote before February 15. Quotes are valid for 30 days.
Can I purchase a subscription for more than 1 year at the old price? Yes, that is possible, if you ask for a quote before 15 February and the payment is done before the quote is expired.
Does it mean I should pay the new price when the renewal time comes? Yes, after February 15, 2023, the new prices apply to renewals.
This article was written by Celina Kuziemko from Appsvio.
HubSpot is one of the most popular and intuitive CRM platforms. It powers customer support, sales, marketing, and other teams by using customer data. You can simply examine the data you need for automated reporting on sales activity, productivity, and salesperson performance.
Now imagine it in combination with Jira, one of the best project management tools used by different teams. Yes, it’s time for a HubSpot Jira integration.
How to Boost your CRM with a HubSpot Jira Integration
HubSpot Jira integration is all about speeding up the ticket service and Support Team’s daily work. Teams using HubSpot and Jira separately had to hop between tabs to check out clients’ deals, contact data, etc.
It’s a challenge for marketing, sales, and support teams to manage data correctly in order and find the data you need right away and not do it manually back and forth (like asking or looking around for some customer’s data).
Imagine a situation where the Support Team works with Jira and HubSpot, toggling between the two. And there are new tickets from customers waiting to be resolved.
First, you need to check who the customer is, which company that is, what deals you have with them, and how you can contact them.
You simply waste your time going back and forth between Jira and HubSpot looking for information you already have.
Wouldn’t it be more convenient to have all the data you need in Issue view? It would simplify data management and please your customers with fewer questions and faster service.
There are some significant benefits of a HubSpot Jira integration that are worth mentioning before we move to setting up the integration:
The service agent doesn’t lose context.
Service representatives can avoid hopping back and forth between Jira and HubSpot to look up information about the client who is filing the problem. Furthermore, they would need to check this information in available reports on the Vendor profile without integrating data from Atlassian Marketplace with HubSpot. Only some agents have access to do so.
Additionally, product owners can benefit from customer data. Additionally, they typically do not have access to the Marketplace.
The customer doesn’t feel overwhelmed by the number of questions.
On the issue view, you have immediate access to all the customer-related data you require. By doing this, you may avoid adding a dozen or more fields to the request form that would question the client about the apps or hosting they use. The agent is under no obligation to converse with the requester and inquire about licensing concerns. The service representative is totally committed to assisting the reporter and resolving the issue.
You have access to data from HubSpot.
Each team member has access to data in HubSpot. The Jira administrator chooses which values are displayed on the issue for security concerns. As a result, no one will need to be given access to HubSpot.
Agents also don’t need to bombard the sales team members who have access to HubSpot because they already have access to all the data they require. It’s important to note that the integration functions whether the business employs a free or premium HubSpot license.
As you can see, it’s not overstated to say that a HubSpot Jira integration means a single source of truth for customers’ data.
Thousands of contacts, data, and deals can be automatically displayed in one tool (Jira). Tickets can be solved faster by giving your teams easy access to the data they need.
You can set up a Hubspot Jira integration with apps available on the Atlassian Marketplace. Depending on whether you need to use HubSpot or Jira more, choose the one that suits you.
In this article, we focus on an app that supports Jira.
It fills the gap of missing integration for companies that use both tools: Jira Cloud and HubSpot CRM.
This tool is dedicated to teams that use Jira at first and then HubSpot because integration is done in Jira views. This integration works for free and paid HubSpot accounts. So let’s check how it can help boost your CRM.
The integration lets you view rich customer data within Jira Cloud issues without switching between tools.
Users can choose HubSpot properties to display on the issue view. All groups from Hubspot are available to select. It is possible to view the reporter’s properties from the following objects:
Contact
Company
Deals
Users can customize and choose which properties should be displayed on the Issue View. As you can see, plenty of them and every single one existing in HubSpot can be added to Jira. Deals Type, revenue, activity, content, email, .etc.
It is also possible to choose another user whose data is displayed. Not only the reporter’s data can be used, but also the person in whatever user picker field with email in a textbox can (it all depends on the configuration the user needs).
HubSpot CRM for Jira provides 2 custom fields: single and multi-select type.
The user defines which object it should display: Deal, Contact, or Company. After adding the field to the view, it is possible to mark that the specific ticket refers to a particular company.
The objects are linked with the HubSpot object right away on the issue view, so it’s easy to find it in the CRM system.
What’s more, thanks to the fact that it is a custom field, it’s possible to use this data in the issue navigator, quickly search for requests, create filters, and later show them in fields on the dashboard.
The screenshot below displays all support tickets that have the HubSpot Company field filled in. This way, we can easily make some boards with statistics.
The properties are displayed right in the issue view. But what if data in properties has changed?
When the data is altered in HubSpot, for example, when a contact person is replaced or changes last name due to marriage or when a client has a new phone number, it will automatically update in the Jira issue view. So what’s happening in HubSpot reflects in Jira.
All HubSpot contacts are matched to Jira users and customers via their email addresses. As a result, you can see information about the reporter in all types of projects: business (from Jira Work Management), software (from Jira Software), and service (from Jira Service Management).
HubSpot Jira Integration Common Use Cases
Optimizing Support Service
One of the typical use cases is actually the case of the app developers themselves which led to the birth of HubSpot CRM Integration for Jira.
Appsvio deployed a CRM after forming their business and they went for HubSpot CRM. In addition, they use Jira Service Management’s support channel for communicating with customers. Obviously, they needed to switch between the 2 platforms all the time.
For instance, a customer would have a query about licensing an app without mentioning it specifically in the ticket. So the team had to copy the customer’s email, sign into HubSpot, and check his information there, including details regarding the product he had purchased.
Appsvio initially entered all the information of their clients, both potential and current, manually. Obviously, checking for changes requires a lot of effort and regular attention.
After reading the reports, they copied the data from the Vendor profile on the Atlassian Marketplace. Each license, whether evaluation-only or commercial, is designated as a Deal in HubSpot.
To maintain order, they made a new properties group that gathered information from the Marketplace, such as App, Hosting type, Maintenance window, and License size. Getting Atlassian Marketplace and HubSpot CRM to synchronize was too much manual work and Appsvio wanted to display this data on Jira problems. But that presented one additional issue.
That’s how the app was born. Creating a HubSpot Jira integration app allowed them to improve the support experience directly, impacting customer experience indirectly as well.
Improving Processes
The other case is a story of 2 employees working in different teams. Only one has access to HubSpot due to license limitations.
Kate is a service agent, and she receives a ticket from a customer about an app license. The customer hasn’t mentioned which application he is referring to. So Kate has to ask the Sales team for help because she doesn’t have access to HubSpot. It takes 3 emails to find somebody who can help and to get an answer.
Now, if a HubSpot Jira integration was in place, Kate could still have the data she needed without needing HubSpot access.
And the whole process would have been much faster and less time-consuming for others.
Speeding up the ticket service means customer satisfaction and eventually reduces the costs, too.
With a HubSpot Jira integration, Kate could do it on her own and answer the customer faster without involving other teams.
Conclusion
HubSpot CRM allows you to handle an unlimited amount of users and data and guarantees effective activity management within the marketing and sales teams. Jira on the other hand is the go-to tool for many developers and engineering teams.
So in this article, we discussed why we need to integrate these 2 systems and how a HubSpot Jira integration can make collaboration much smoother between different teams without them needing to leave their environment. The teams no longer need to manually copy and paste data from one platform to another.
This article was written by Anna Odrynska from AlphaServe.
Customer service is much more than a warm and pleasant greeting, it requires a strategy and tools that facilitate communication between customers and companies. One of these platforms is Zendesk which offers customer interactions, anticipates needs, optimizes profitability, increases sales, and runs new customer acquisition campaigns.
But what happens when customer service needs in-depth professional analysis? Out of this need, Zendesk Power BI Integration creates common ground for deeper business analysis and better customer understanding.
5 Reasons to Connect Zendesk to Power BI
Zendesk is one of the biggest and most famous Customer Service tools in the world. This platform connects different modes of communication between the customer and the company through a ticketing system.
Power BI is a Microsoft analysis service that offers interactive visualizations and business intelligence in a simple interface so that users can create charts and dashboards by themselves.
For companies that need more reporting power and analytical muscle than the Zendesk system offers by default, Zendesk Power BI connection is the next level in business intelligence.
With this integration in place, you can gather, analyze, and visualize Zendesk data in Microsoft Power BI, giving better insight into business operations and customer interactions, therefore enabling companies to make more informed decisions based on real data.
Connecting Zendesk to Power BI provides an analytic solution with a number of benefits:
Generate Zendesk Custom Reports and Data Panels
Integrating BI tools with Zendesk allows for optimizing, cleaning, exporting, and transforming Zendesk data into visual dashboards. That will make it possible to analyze all the information in depth and find patterns. For example, export tickets from Zendesk to Power BI provide its visual Zendesk custom reports that help create successful projects and make informed predictions. That increases the service level and productivity of the company.
Create, Direct, and Optimize Marketing Strategies
Zendesk data export to Power BIoffers a global vision of the customer support process, which provides insight into the purchasing behavior of each client with dashboards, diagrams, and reports. As a result, it enables companies to correct and redirect those that did not have good results and promote those that have.
Control Team Productivity
Zendesk controls your sales and customer service activities, hunts down important data about the team’s productivity, and signs the amount of work. In the case of Zendesk Power BI integration, you achieve key insights that aid the customer service team with a detailed review of ticket metrics, statistics, adjustments, etc.
Increase Data Range
Zendesk works well for statistical data reports of customer interactions. But it’s lacking when a business needs to create insightful and comprehensive reports for complex business analytics.
Exporting Zendesk data to Power BI and combining it with other software data sources permits receiving in-depth structured charts and multiple data visualization with focused insights for further complete analysis.
Update Data in Real Time
The Power BI platform allows users to update the dashboards in real-time once in a certain time frame. It provides an opportunity to point out problems in Zendesk customer service and to identify opportunities for further solutions.
Any report or dashboard can display and update data and images in real-time when Power BI offers scheduled refreshes for this.
How to Set up Zendesk Power BI Integration
There is no native integration between Zendesk and Power BI. In this case, a solution like Power BI Connector for Zendesk by Alpha Serve comes into play. It provides an easy setup to get started.
So here we will show in detail how to connect Zendesk to Power BI.
You don’t have to be techy to be able to set up this integration. It takes just a few minutes to start working.
So let’s get started!
First, you need to install the application. So go to Power BI Connector by Alpha Serve page, select the plan and press the Free trial button.
Follow the installation steps. After the application has been installed, it should be accessible in the Navigation panel.
Configure Power BI Connector for Zendesk
You need to configure the application once you’ve installed it.
Follow these steps:
Connect the Power BI Connector app to your Zendesk account;
Enable the application and set up plans and billing. Roles and restrictions for Zendesk users can also be applied on this step.
If you haven’t ever created a Zendesk API Access token, you need to create it as it will be requested during the login process to Power BI.
You will now be able to create data sources and export your Zendesk Support data to Power BI.
In addition, you can connect your Zendesk Sell module to the Power BI Connector app and export your sales data from Zendesk Sell to Power BI using Power BI Connector.
Now you’re ready to start your first Zendesk data export – you just need to create your first data source!
How to do that?
In the Navigation panel, click and open the Power BI Connector for the Zendesk app. Next, choose Connectors.
In the newly opened page, select Create a Data Source. Add the Name, and Description, and choose User or Groups to Share Settings.
You can easily navigate between the Support and Sell tabs where you’ll see all the fields available for export.
To narrow down the data selection, pick only the fields you need for your Power BI Zendesk report. You can also apply filters to choose a certain date range (for example, by ticket status, type, tag, etc):
Press the Save button to confirm the changes.
Import Zendesk Data to Microsoft Power BI
To work with Power BI, use a URL to import data to your Power BI Desktop, generated by Power BI Connector for Zendesk.
Copy the URL of your connector, generated by the app.
Open Power BI Desktop and click Get Data (1) > OData feed (2) and paste the URL.
Sign up by basic authorization in Power BI with your personal Zendesk login information (Email as a username and API token as a password).
Choose the necessary tables and press the Load button.
Thereupon, Zendesk data will be loaded into Power BI.
Now you can start creating visual dashboards and graphs based on imported Zendesk data.
To do this, select the visualization type and choose the data you want to display.
Power BI Zendesk Connector Use Cases
As businesses grow, it becomes quite difficult for companies to manage the data that is generated regularly. That becomes a challenge when a user wants to engage Zendesk data to drive business decisions.
For this reason, there is a need to implement a BI system that effectively analyzes data and helps businesses discover useful information, makes reports, suggests conclusions, and supports better decision-making.
Here are the most common use cases for the Zendesk Power BI connector.
Zendesk Ticket Analysis and Support Agent Performance
Integrating Zendesk with Power BI permits you to visualize your data into dashboards with complex Zendesk ticket reports and support agent performance analysis. The power BI service desk is crucial in terms of individual performance control as well as agent use.
Performance index can help customer support departments determine which support agents are doing the best, just as to insight ways for additional required refinement. These metrics will help increase your team’s efficiency, and as a result, it will improve employees’ and customer service together.
Identify Trends In Zendesk Ticket Volume by Support Channel
The number of tickets resolved is one more important indicator of success. If things go well, open and solved tickets trend lines go parallel in the service desk. Tracking these metrics per week ensures that you are up to date with the latest market trends according to ticket volume.
For instance, if solutions are steadily behind, obviously you will have to recruit more employees or search for different solutions to improve efficiency.
Customer Evaluation Survey
Zendesk in cooperation with Power BI offers a global vision of the sales process and other departments in one place.
Another critically important metric for customer service is customer satisfaction ratings. Companies can measure indicators of satisfaction with customer opinion polls which can manage following ticket solutions. As soon as customers complete them, the dashboard will change according to successful interactions or will point out tickets that should be improved in terms of customer expectations.
Final Word
Zendesk is a platform with a lot to offer. However, its integration with Power BI can give the best of both worlds in the same console upgrade customer service, and raise sales targets.
Zendesk Power BI integration allows us to improve the relationship with a potential customer, deeply learn customer interaction, and identify weak points through multiple dashboards with complex reports and the ensuing insights.
Real-time visualization of Zendesk data on the same dashboard makes it easy to find and suggest immediate solutions based on reviewed information that improves sales optimization efforts.
As a result, all this makes it possible to improve your sales and customer service.