This article was written by Anna Odrynska from Alpha Serve.
ServiceNow is renowned for the digital workflows that enhance productivity and help manage IT, human resources, field services, and more across enterprises. But have you ever thought to use the data it contains in the BI analytics and reporting tools that you have already been using?
In this article, we’ll walk you through connecting the ServiceNow platform to Microsoft’s Power BI, today’s most widely used analytical tool.
First, we will explain how ServiceNow Power BI integration may help develop your business. Then we will speak about the easiest ways to connect these two powerful tools. And, finally, we will show some examples of using ServiceNow and Power BI together for analysis, better planning, and growth.
5 Reasons to Connect Power BI to ServiceNow
1. Combine Multiple Data Sources for Better Control and Business Management
Power BI is designed to bring, process, and analyze data from various organization sources (e.g. website traffic, ServiceNow incidents, Jira (Power BI Jira integration), Shopify, Excel spreadsheets, on-premise, etc) in one place as well as provide appropriate access to all these data and insights to all the stakeholders.
For example, it is possible to customize and combine data from multiple sources to organize visuals on the dashboard according to your business’s needs. In such a way, users can build and use a centralized set of data to trace operations history, make reports and forecasts, or make appropriate decisions.
This solution allows you to explore data with incredible detail and save more time to focus on other priorities, i.e. automate business processes or incorporate AI technologies.
2. Visualize Information to Focus on Key Areas
Data is key, but it is nothing until you make good sense of it. And when you are dealing with trillions of data sets you cannot rely only on improvised means.
As far as our brain perceives visual information better, in the age of big data, data visualization tools like charts, cards, and maps, provide an easy way to see and trace necessary trends and patterns.
With Power BI you can build multi-channel dashboards and create custom visualizations to view ServiceNow and other suitable data in a tailored business-oriented way.
3. Make Better Business Decisions with Data Automation
Access to the latest information is a key to success in today’s fast and highly competitive environment. No matter what your business goals are, automated reports will help to speed up decision-making and focus on the right areas every time. Your team will be able to dig through the data for deeper insights while spending more time driving growth or optimizing existing processes.
With Power BI you can configure a scheduled refresh of the data so that users view and process it online as needed. The platform also makes it possible to send notifications to users once the reports are ready to view.
4. Fill the Gap between the Technical and Non-Technical Users
With Microsoft Power BI you do not need special knowledge or coding skills. The platform’s architecture allows non-technical users to get useful insights, and understand the current state of the business and ways to improve it right on the go, using such visualization tools as charts and graphs.
5. Share Data with all the Stakeholders Safely
Power BI empowers users to share reports with anyone and everyone across your team as well as with the management, customers, and other stakeholders.
Moreover, the platform ensures that only people with an appropriate level of access can view and interact with the data to retrieve information for making business decisions, notifications, or fulfilling the function of their job. Reports and dashboards may be accessed directly via password or, otherwise, be part of the data-driven subscription.
How to Set Up ServiceNow Power BI Integration (the Step-by-Step Process)
The most obvious methods to connect ServiceNow to Power BI are to utilize either REST APIs or CSV files, however, these ways of integration limit the further data processing capabilities and may require additional time and human resources. Specialized plugins are far more comfortable and safe ways to link these two platforms together seamlessly because there are no intermediaries in between.
Rather than spending hours building your own apps from scratch, you can use a third-party solution. And for the purpose of this tutorial, we have chosen the app Power BI Connector from Alpha Serve to feed the ServiceNow data directly into the comprehensive BI tool.
So what are some of the benefits of using such an app?
1. The plugin doesn’t require coding or any other technical skills so users without special knowledge may easily export suitable data masses and use them in Power BI appropriately.
2. Contrary to the REST API or SVC files, it is not time-consuming. The whole process -beginning with installation and ending with data export- takes less than 10 minutes.
3. It is safe. Power BI Connector works directly within the ServiceNow environment, and does not collect, store, or share any personal or other sensitive data.
4. There are broad filtering options allowing users to export only suitable data tables and fields.
5. The app supports Power Query so the users can combine ServiceNow and other data sources for complex data models.
6. There are no limitations in exported data amounts.
7. Permission settings and access management allow you to control the data access with the provided roles within the app.
8. The data exported with the application is already typed so you don’t need to spend time converting data types.
Now let’s see how to set up ServiceNow Power BI integration using Alpha Serve’s Power BI connector.
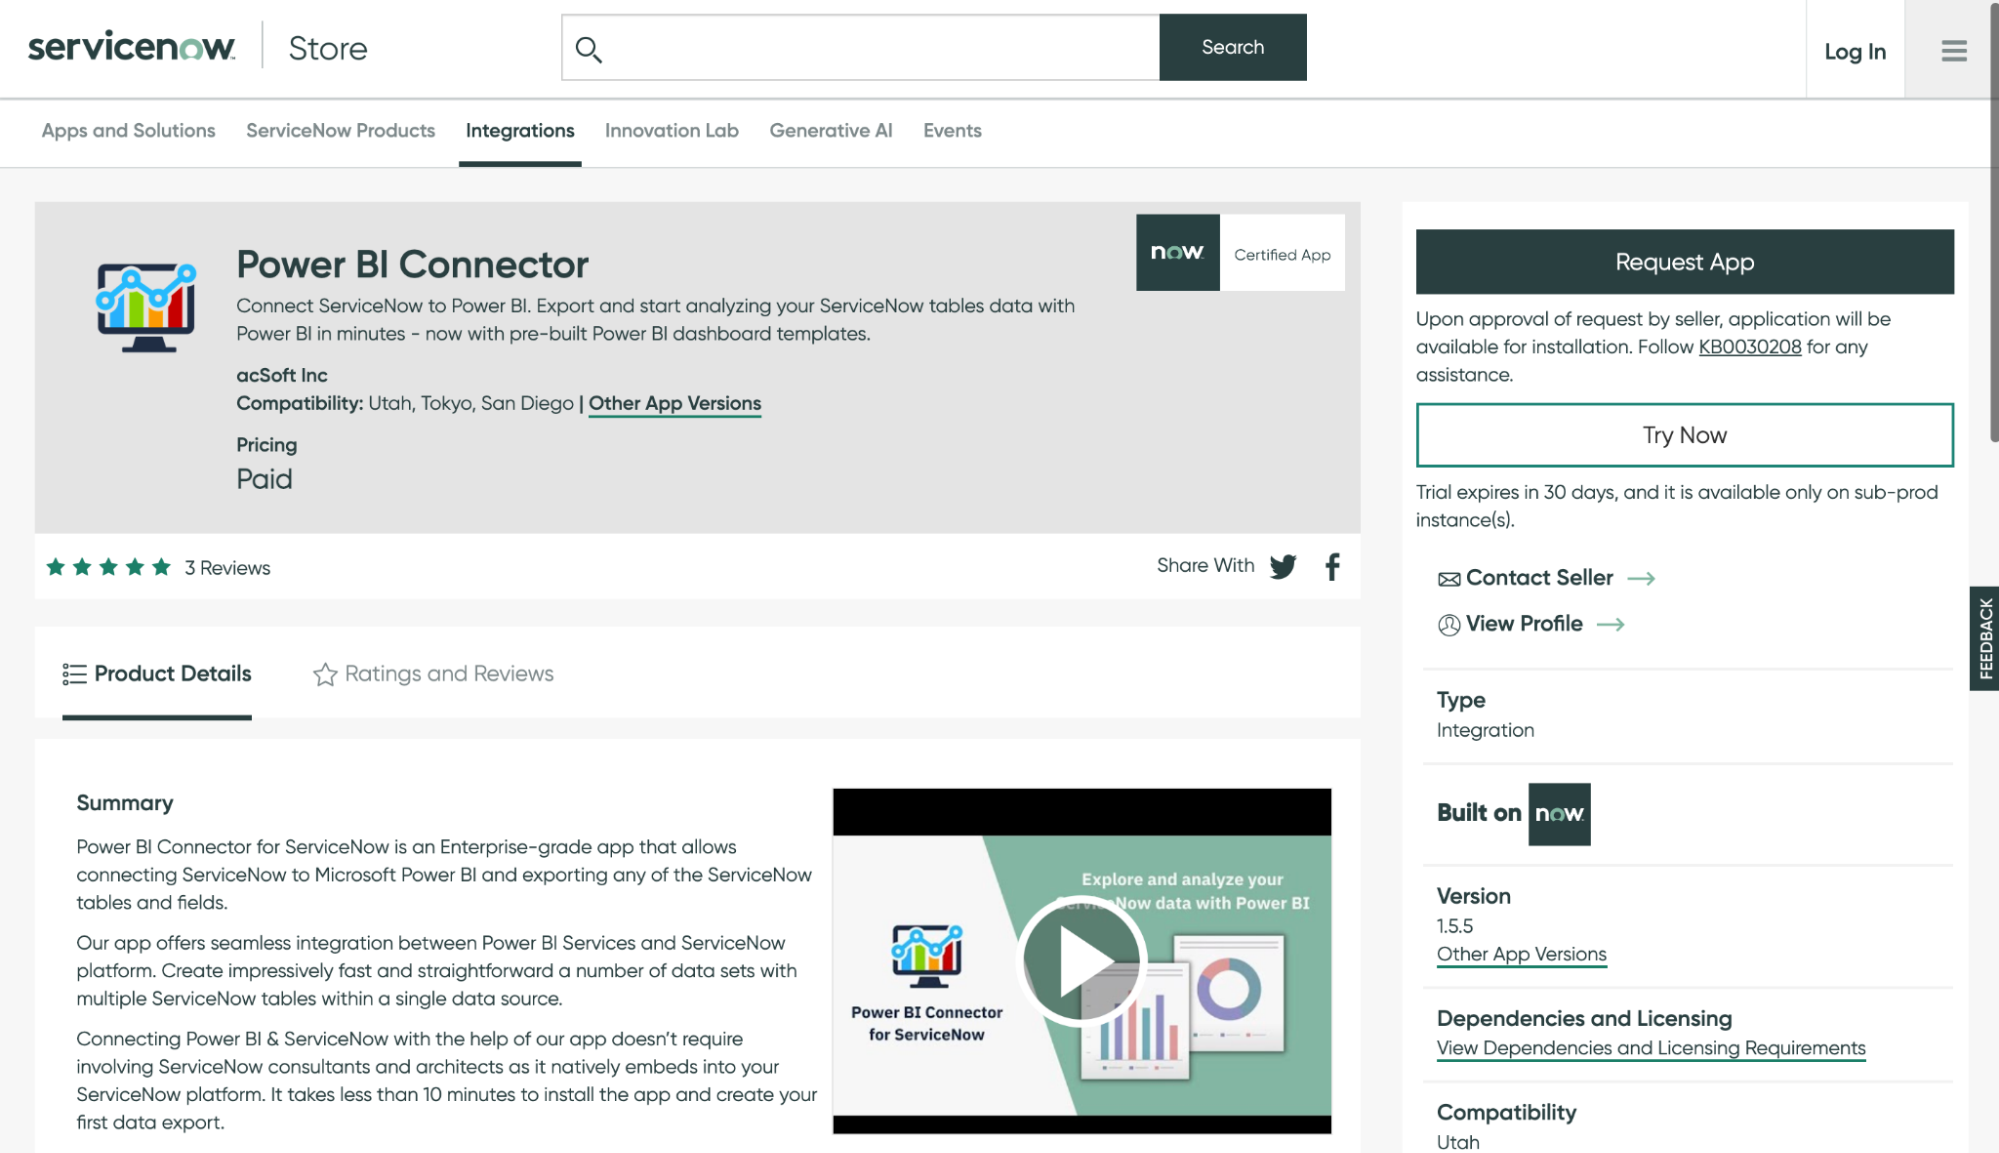
Step 1. Find and Acquire a Power BI Connector on the ServiceNow Store
1. Go to the product page directly here or type Power BI Connector in the search box on the ServiceNow Store.
2. Click the “Request an app” button and use your HI credentials to log in. Once the app is requested, you will receive instructions via email. The email will point you to the Installation Overview page.
Otherwise, you can try the product for free. For this, click “Try Now” and follow the instructions.
Note that the trial version of Power BI Connector for ServiceNow provides the same functionality as the paid version of the app.
Step 2. Install Power BI Connector on Your ServiceNow Instance
Remember: This procedure may be performed by a user with an admin role only.
1. Follow the route: System Applications > All Available Applications > All.
2. Find the app using the filtering options or search bar. You can use either its name or ID. Click “Install”.
Now the application is ready to use on your production instance and you can find it in the ServiceNow menu.
Step 3. Create your ServiceNow Data Source
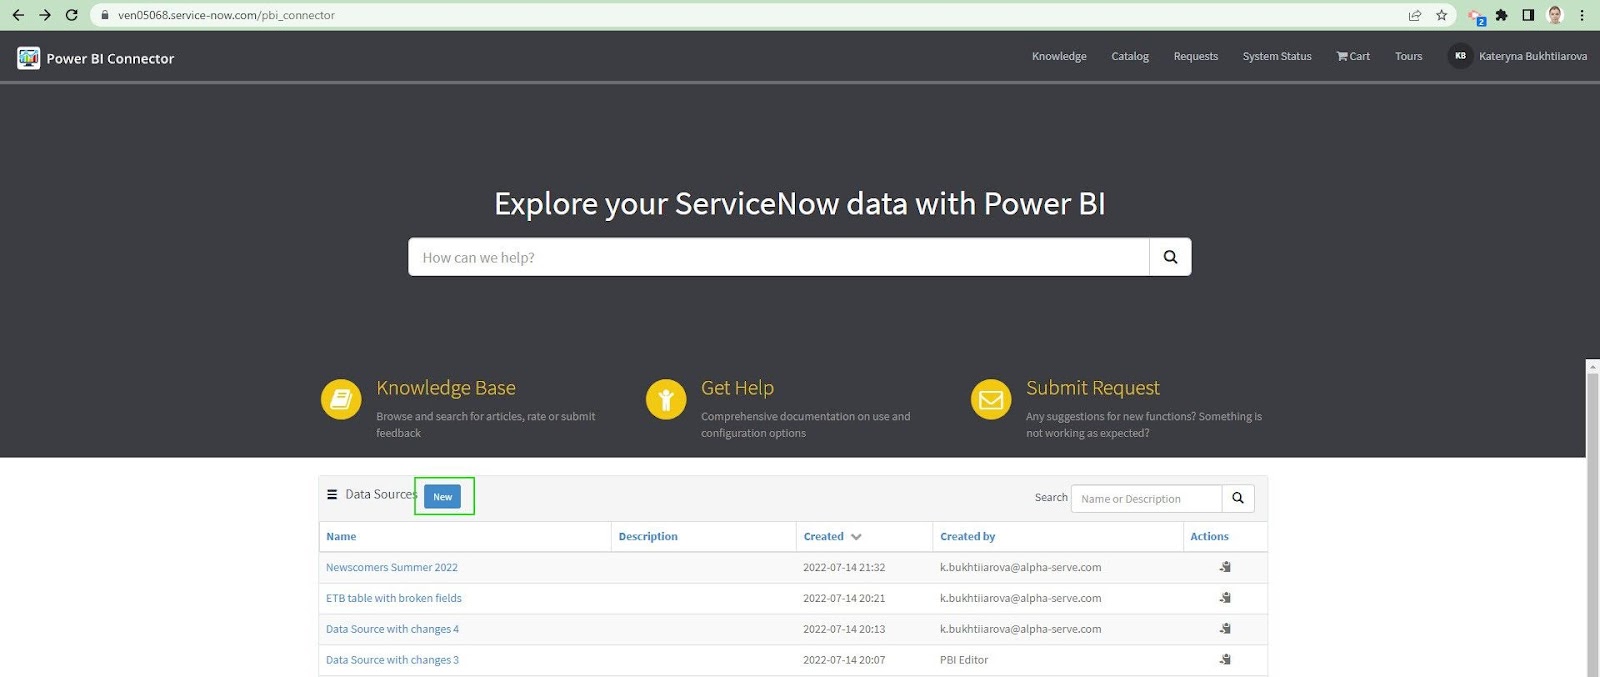
Depending on the role of PBI ADMIN or PBI EDITOR (assigned by ServiceNow System Admin), the user can start either from the Data Sources table at the Service Portal Instance-Name.service-now.com/sp page (available only if the administrator has previously configured this in the interface) or from the Power BI Connector page Instance-Name.service-now.com/pbi_connector (available by default).
1. Click the “New” button.
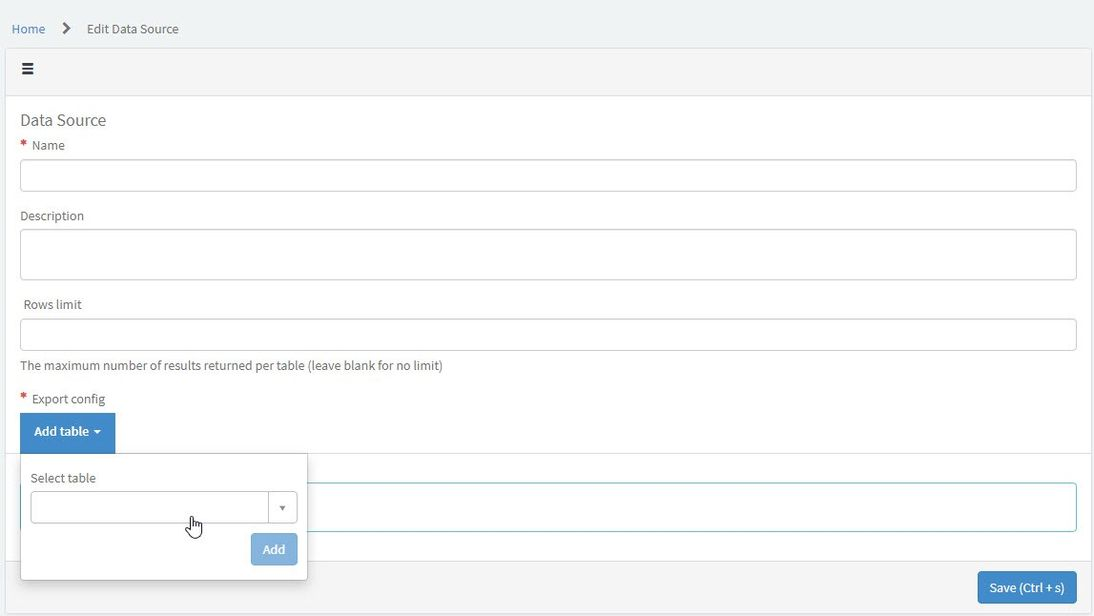
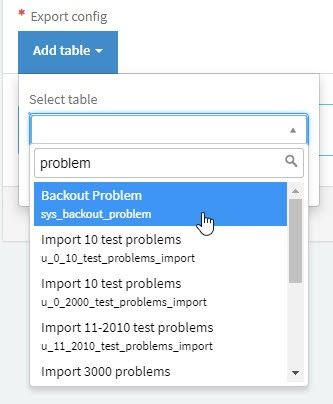
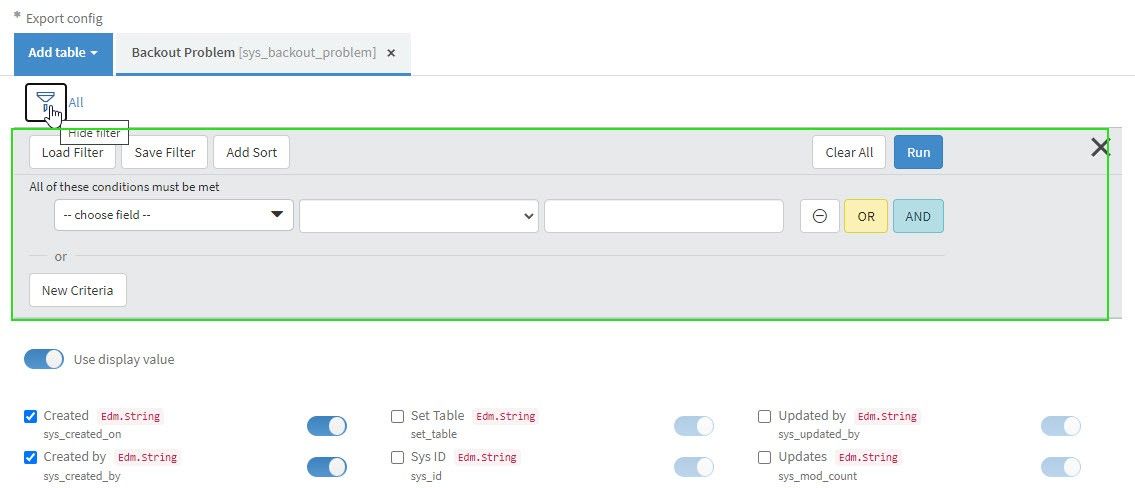
2. Enter information into the required fields i.e. Data Source name, Description, etc, set Rows limit and add suitable tables by typing their names or looking through the list provided and select fields you need using filtering options.
Set the “Use” display value to export data in string format. If necessary you can modify filters according to your needs.
3. Click the “Save” button to apply the changes.
Step 4. Import Your ServiceNow Data into Power BI
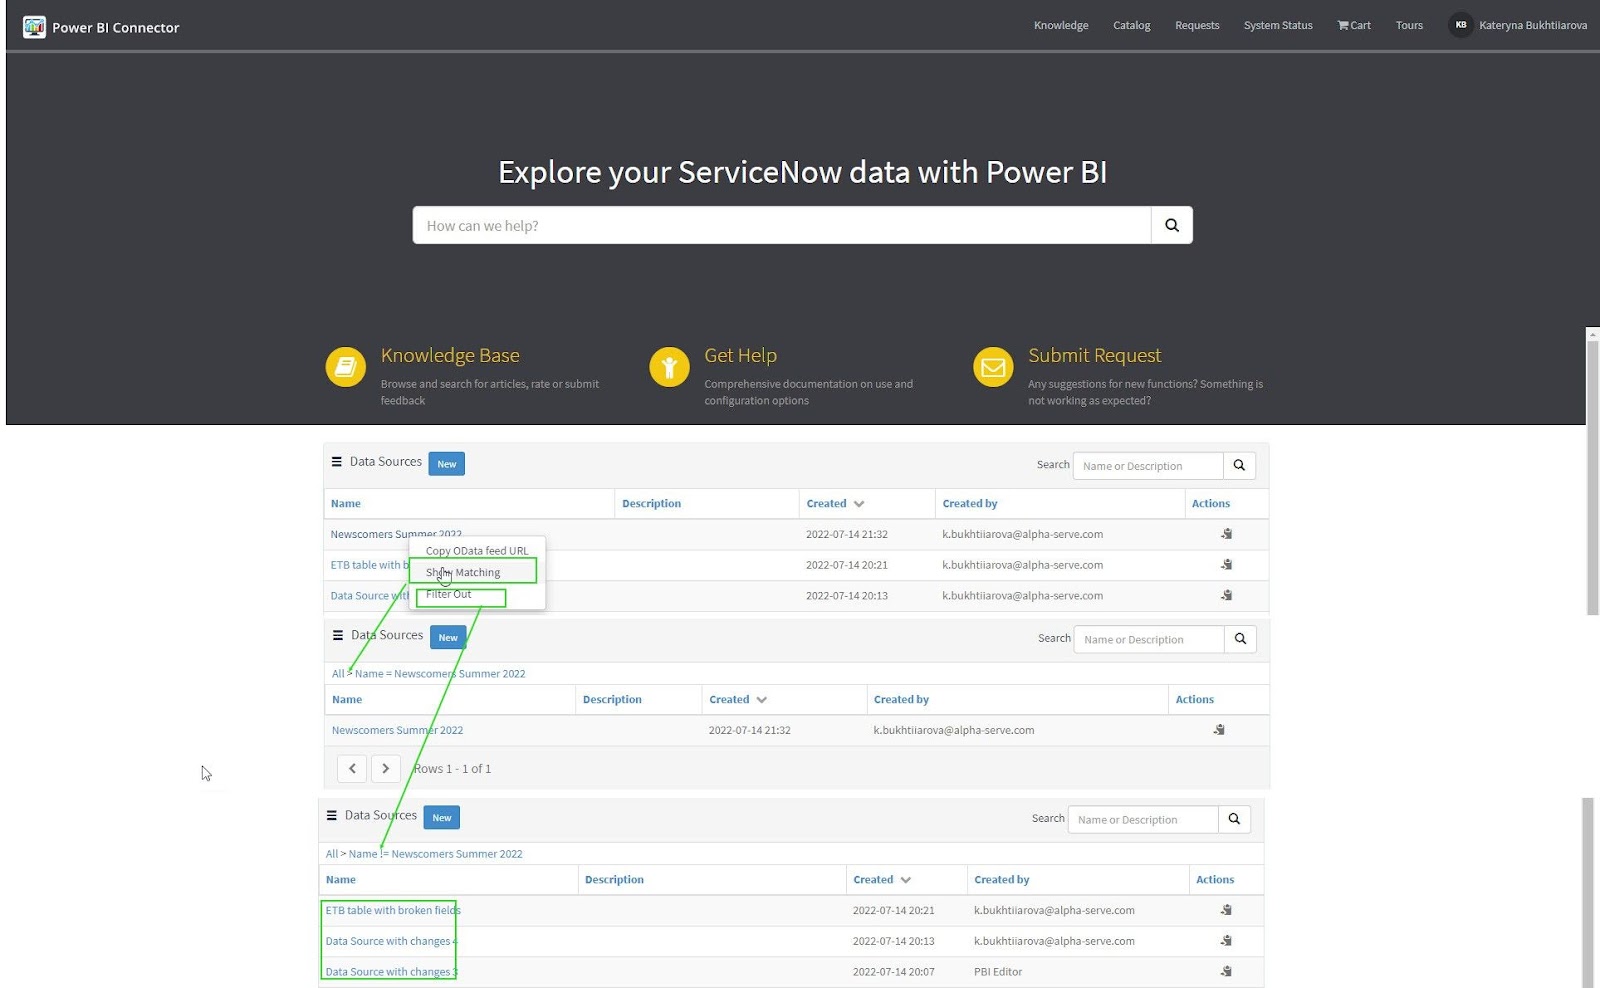
1. Find the data source created in the previous step. Depending on the role, you can access data sources either from the Service Portal Instance-Name.service-now.com/sp or Power BI Connector page Instance-Name.service-now.com/pbi_connector pages.
In the first case, you need to go to the Data Sources table and search for the right one in the list. And, in the second case, you can find your data source using Show Matching or Filter Out filters.
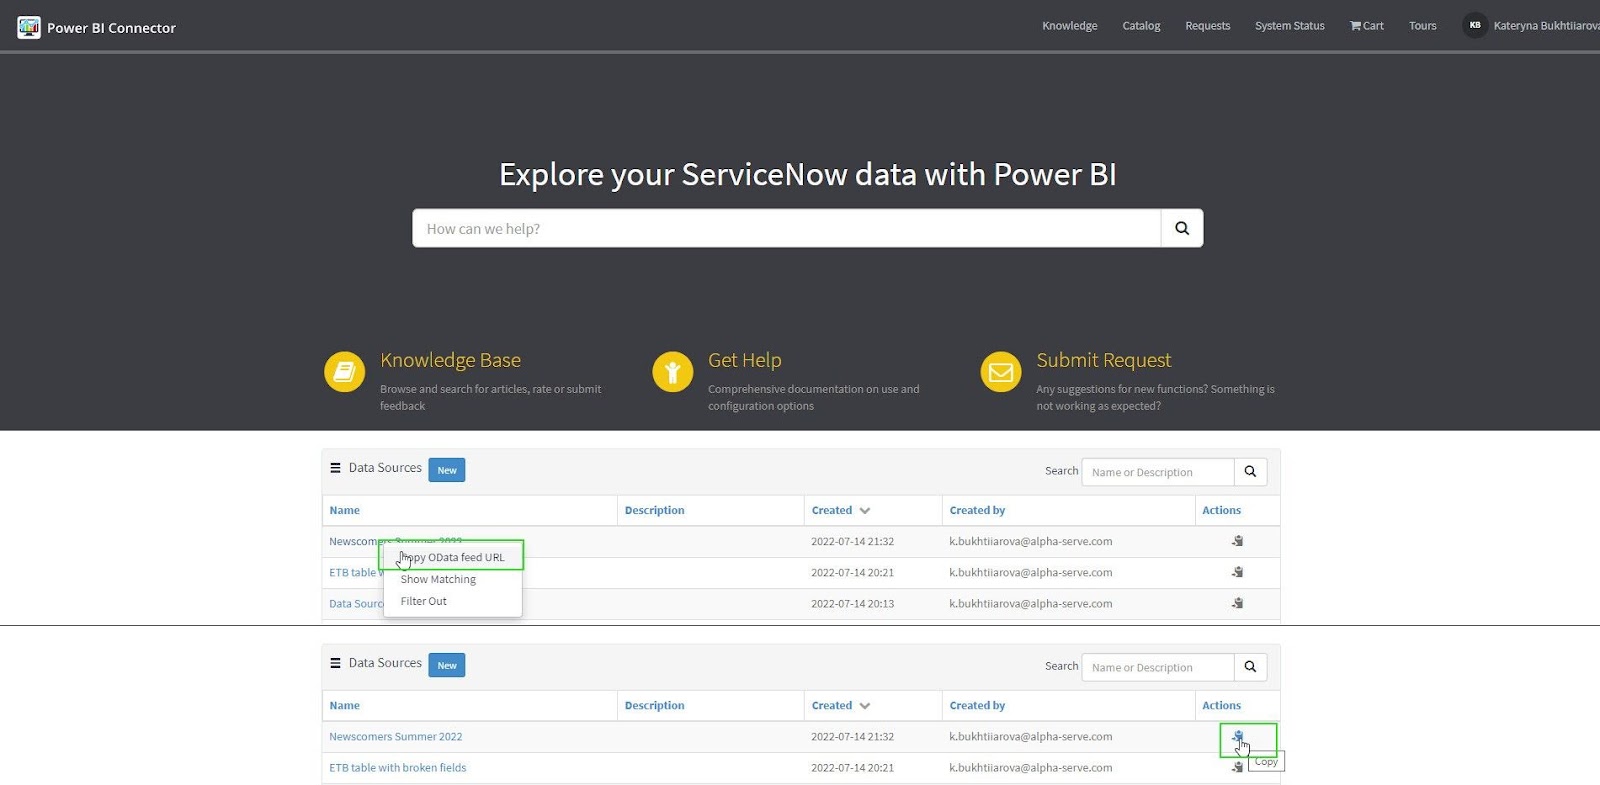
2. Right-click on the data source. The menu will open. Copy “OData” feed URL.
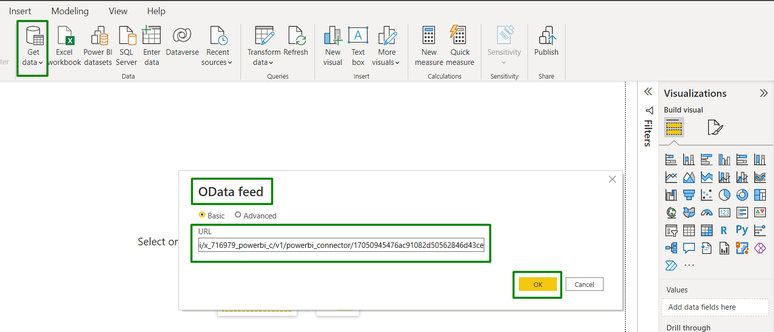
3. Go to the Power BI Desktop and hit the “Get Data” button.
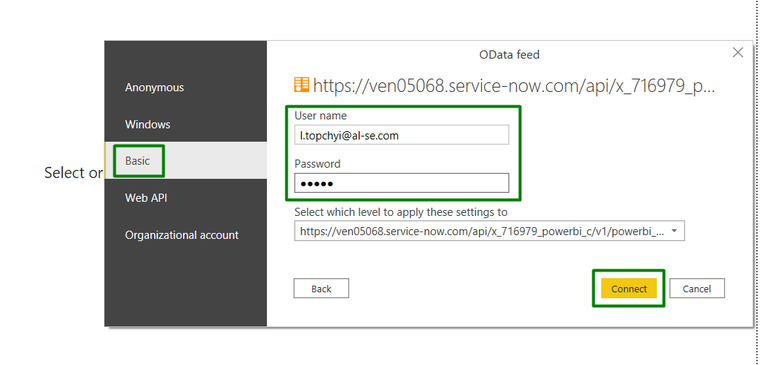
4. Select OData feed
5. Enter the URL and confirm with the “OK” button.
A new window will open.
6. Go to the “Basic” authentication tab.
7. Login with your ServiceNow credentials and click “Connect”.
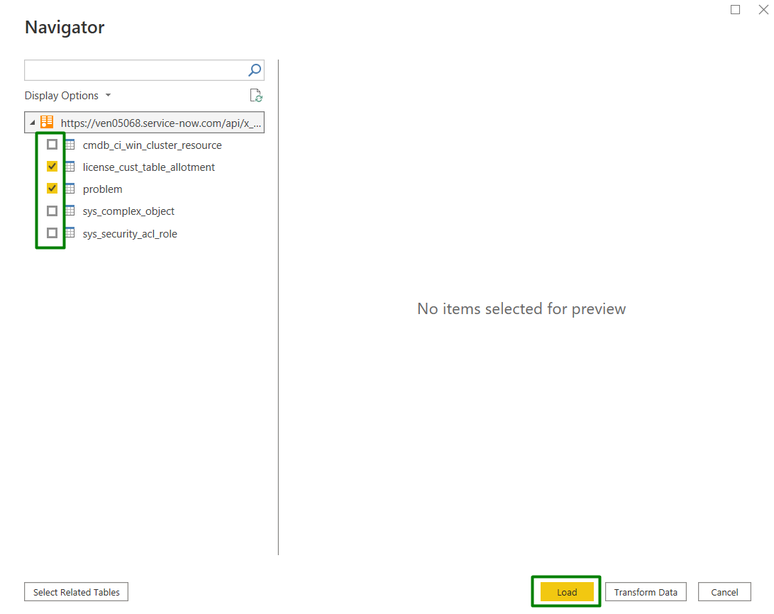
You will see the Navigator preview.
8. Check the tables for loading and hit the “Load” button.
If the connection has been made successfully, you can start creating Power BI dashboards based on the imported ServiceNow data.
Power BI ServiceNow Integration Common Use Cases
Build a ServiceNow Incident Management Monitoring Dashboard for a Better Team or Customer Experience
One of the products ServiceNow includes is IT Service Management (ITSM). It allows users to improve experiences for IT teams, employees, and customers across all areas of the business. Managers can use the data generated by this tool in a more efficient way.
ServiceNow Power BI integration will give you the chance to learn deeper all the available information about incidents filtered by priority, categories, assignment groups, state, etc., and prepare appropriate reports.
More specifically, by creating a specially designated dashboard in Power BI with appropriate performance metrics and analytics, it will be possible not only to trace issues and monitor an incident management process but also to ensure continuous improvements in service.
Trace Key Performance Indicators and metrics that support your business for better decisions
Tracing Key Performance Indicators and metrics is a good way both to set targets for your team and to get useful insights that help business owners and C-level management make better strategic decisions.
If creating a KPI-driven culture and boosting data literacy across your organization is one of your key priorities, you can use Power BI ServiceNow integration for this specific task. With KPI Compose by ServiceNow you can easily select the right KPIs and align them with the responsible employees and desired business outcomes, and Power BI visualization and reporting solutions will help to trace the performance on a scheduleв basis as well as refine your KPIs with time.
Combine All Your Business Data Sources for the Fullest accounting and Most Comprehensive Insights
If your organization uses Power BI for comprehensive analysis and planning, you can add ServiceNow as an additional data source.
With Microsoft’s BI platform, business analysts can build custom dashboards and models that align with your organization’s targets and objectives to trace the performance and get useful insights for improvements and growth.
Conclusion
ServiceNow provides a lot of data on your business. But you do not know how to benefit from it? By integrating this complex management tool with a powerful BI platform you will have a chance to get a clear understanding of business performance and keep a pulse of everything that is going on at your organization from team interaction to client servicing.
You can connect ServiceNow to Power BI either to use this integration more specifically for problem-solving in any particular area or for combining all available data sources with building consolidated reports across all business functions, including Sales, Finance, Marketing, Human Resources, etc, and to ensure better strategic decision making.
Ready-to-use plugins like Alpha Serve’s Power BI Connector will help fetch the needed data from ServiceNow to your analytical platform and create customized visualizations and reports according to business processes and workflows. You can also use it to schedule exports and ensure data safety.
iDalko has lately been referred to as “a hidden gem from Belgium” and “one of the best-kept secrets in the Belgian tech sector” by the press. Indeed, a gem, but one that is no longer hidden.
Having grown significantly over a decade, we now have even more ambitious plans and goals for the future, and we naturally needed more space to put them into action.
This May we opened the doors of our new HQ in Antwerp, Belgium, and here we’ll continue to build our supportive and inclusive culture where all of us belong, contribute, and can thrive.
We have a great deal to be proud of! iDalko Licensing and Consulting, and iDalko’s products – Table Grid and Exalate, have a global impact with over 2,000 customers, including almost 30% of the Fortune 500’s Top 50, locations in five countries, and a powerful team of +90 (and counting) wonderful people. We speak more than 25 languages and represent more than 30 different nationalities, but understanding is our common language.
We are keeping our remote-first approach and global presence, but we are now also able to meet with our teammates, partners, and clients in our larger, brighter, and more welcoming new location.
Let’s have a peek:
First things first – as soon as you walk into our office, you’ll find yourself in our favorite room – the kitchen. We’ve always enjoyed sharing some good vibes around the table. Here we spice up our workdays with nice lunches, IT Culinary masterclasses, and we simply enjoy being together.
Great ideas and insights are often generated during pleasant conversations over a good meal. We chose to have a bright and open main office space because we are anything but close-minded.
Our “I need to focus” rooms are also available because, in the fast-paced tech world, we all need some quiet space from time to time.
We created comfy common areas……
and lively meeting rooms, where we can share inspiration and put our greatest ideas into action. And we named them after various spices from throughout the world to reflect our diverse mix of cultures & personalities functioning perfectly together.
But even more important than our workspace are the people that make it so exciting and fun to work here. People with ambitious goals and vast to-do lists, but also kind personalities, various talents, brave souls, and generous hearts.
Meet some of our great team!
Here you can work with people who encourage you to be more excited, happy, and effective at your craft.
People who care and share…
smile a lot…
connect and build…
play to win…
stretch boundaries…
and make great plans together.
And our Founders, whose vision inspires us all and who have the strength to lead with kindness and compassion.
“We believe in the multiplying power of a great workplace culture. This office is meant to be a location where people may come together and “sync”; where we are enjoying the journey as we continue to grow, and remember to appreciate each other’s efforts along the way. At the end of the day, nothing beats a pat on the shoulder for a job well done.”
Francis Martens & Hilde Van Brempt, Co-founders
Moving to our new location marks the beginning of an exciting new chapter for all of us.
As we sincerely believe here:
“It is such a nice company!”
Manuel Pattyn, L&C Business Unit Manager
Along with our team, our network of great partners and clients is also expanding, as more and more are trusting our +10 years of vast IT experience and integration expertise.
We want to thank you for your trust, support, and commitment, and we look forward to meeting you, whether here at our brand new headquarters, online, or anywhere else in the world!
The new address is Roderveldlaan 2, 2600 Antwerp, Belgium
If you’re in the area, feel free to stop in and say hi!
The popularity of Salesforce is evident in the increasing user base, enhanced customer experience, better sales cycles, and customizability.
When such a powerful CRM platform needs to be integrated with other tools like GitHub, Jira, or Azure DevOps, you need a solution that can make their APIs interact and transform data in the correct format.
That’s why you need Salesforce integrations. They allow users the comfort of staying in the tool they already use and still getting the information they are looking for.
So this blog will highlight the importance of Salesforce integrations. And then we’ll move on to see an actual implementation using a third-party integration solution called Exalate.
What Are Salesforce Integrations?
Salesforce integrations are tools that allow users to connect multiple applications and share information using automated triggers and mappings.
Information needs to flow between all these different platforms. However, if done manually, it can be time-consuming and prone to errors.
Here are some common integration scenarios: Data can be converted to a common format and be synced or exchanged between applications.
Business processes, aka business logic, can be automated end-to-end. This helps streamline collaboration across different teams. This is also known as B2B integration.
Also, Salesforce integrations provide a centralized user interface to teams using different applications so that they can access or manage the information through it.
These integrations can be either synchronous or asynchronous, depending on the use case in question. You can also classify integrations in Salesforce based on the timing of the information exchange:
Frequency: monthly, daily, hourly, etc. Say an Opportunity is ‘Won’; triggers activate the system to transfer the details to another application, say Jira, for escalation to the license management team.
Most use cases depend on real-time integrations with Salesforce and other platforms. This kind of exchange gives insights to the sales team since ‘time’ is of the essence to them.
Near real-time integration: When there is a confirmation about a purchase order that needs to be passed between 2 systems, then near real-time can be a safe bet.
Benefits of Salesforce Integrations
Let’s have a quick look at the benefits of Salesforce integration:
It prevents context switching or toggling between applications to look for information. Have it handy in the platform you are already familiar with.
Salesforce integration increases team productivity and reduces friction by automating business processes and bidding adieu to manual ways of doing things.
It allows you to exchange information accurately through integrations, which in turn provides teams with better decision-making insights.
Salesforce API integration guarantees efficient communication across teams as diverse tools start interacting and collaborating with each other.
Integrations are as much for business teams as they are for technical teams, so a range of audiences can benefit and get aligned on common business goals.
Transparency between teams and visibility of critical information comes naturally through Salesforce integration solutions.
After understanding the what and why, let’s explore a few practical use cases of Salesforce integrations.
Common Use Cases For Salesforce Integrations
We will see these use cases in the form of popular patterns that are often demanded from an integration.
Use Case 1: Migrate Customer Data from External Systems to Salesforce
Sometimes information residing in external systems needs to be migrated to Salesforce. In such a case, you need to plan the scope of the migration, define mapping rules, and carry out the actual exchange of data.
Often, such a use case is suitable for migrating from a legacy system to Salesforce or consolidating different CRM systems (a Salesforce to Salesforce integration).
Use Case 2: Transfer Customer Information between Salesforce and Other Systems (One to many)
The sales team, for example, is keeping track of customer information in their Salesforce instance in the form of Opportunities, Cases, or Accounts. There can be a need to reflect this information into systems like Jira, GitHub, or Azure DevOps. This usually falls to the back office and development teams respectively.
The back office teams using Jira might handle the licensing and contract management tasks whereas the dev team can look into customer cases raised as issues in GitHub or Azure DevOps. And all this information can then flow back and forth smoothly between these systems increasing visibility for the teams involved.
Use Case 3: Present Multiple Related Salesforce Objects into External Systems (Many to One)
Salesforce has related objects like Cases belonging to a particular Account or Contact. And then these need to be reflected onto other systems, maybe under Jira as issues. Since these 2 systems have different fields and entities, information coming from Salesforce can be reflected in custom fields.
Here, maintaining the Case and its related Account and Contact information under the correct Jira issue is important. Changes or updates on the Salesforce data must reflect correctly on the Jira side.
Use Case 4: Sync Salesforce Records to the Development Team
Customer queries, feedback, or issues are often logged into Salesforce Cases. When these useful customer insights are converted into Jira or GitHub issues or Azure DevOps work items, then they can be taken up by the development team to be worked on further.
Comments, statuses, and attachments (if any) can be bi-directionally synced between all these systems. This can give visibility to the sales teams so they can communicate correctly to the customer about the status of their query and enhance their overall experience.
You can also envision a workflow orchestration between Salesforce and other systems. For instance, when a customer case belonging to a particular Account, under the State = ‘New’ is created, then it is sent over to Jira.
When the dev team starts working on it, an ‘In Progress’ status in Jira puts the case under ‘Working’ in Salesforce. Comments and attachments are synced. Then when the dev team finally resolves the issue and puts it under ‘Done’ they pass a comment: ‘Issue is fixed, marked for release’ over to the sales team.
Then the case is marked ‘Solved’ in Salesforce and the comment from Jira is reflected too.
Use Case 5: Correlate Data between Salesforce and External Systems
A one-to-one connection between entities residing in Salesforce and other systems is sometimes needed.
Say incidents, problems, RITMs, etc. in ServiceNow need to be connected to a particular case in Salesforce. Then the proper status updates, work notes, and other custom fields need to be synced. This can bring useful insights for the customer support and sales teams.
As you might have already guessed, the possibilities are endless. So keeping them in mind, we move forward with how Salesforce integrations can be implemented.
Native Salesforce Integrations
Salesforce categorizes integrations with other 3rd-party applications through ‘Inbound’ and ‘Outbound’ messages. Inbound implies data coming into Salesforce from another system, and outbound means data leaving Salesforce and being fed into an external system.
Inbound messages work on data-based integrations. Generally used when Java, .Net, or PHP code needs to interact with Salesforce.
The external system (acting as a client) prepares and submits a request to fetch data from Salesforce (acting as a server). The data is fetched from the server, and a response is generated. The client, i.e., the external system, then handles this response.
Outbound messages work on business logic integration. Here, Salesforce prepares and submits a request to send to an external system. The external system receives the request and sends an acknowledgment, but the request hasn’t been processed yet. After processing the request, a callback is provided with the result of the initial request. The result is then processed by Salesforce.
For Inbound Salesforce integrations:
REST API
SOAP API
Bulk API
Salesforce Connect
For Outbound Salesforce integrations:
Apex callouts
Streaming API
Apex Web services, etc.
Challenges of Native Salesforce Integrations
Salesforce Connect works best for Salesforce to Salesforce integrations. The external objects viewed within Salesforce are read-only, and additional configuration efforts are required to make them editable. Since it is a point-and-click interface, Salesforce API integrations are bound by the native UI capability.
Apex is an alternative if deeper integrations are required, but honestly, it is neither designed nor optimal for providing integration capabilities. To perform integration using Apex, we need technical resources, which might not be readily available. It is also bound by governor limits.
The other pitfalls for the alternatives we discussed above are limited data durability, lack of strong security mechanisms, and limited read/ write capabilities.
You can still build your own apps using the Salesforce App Cloud platform. But it comes down to additional development efforts and still no guarantee that most integration scenarios will be covered. They also sometimes require to be complemented by middleware applications on AppExchange.
3rd-Party Integrations
Third-Party Salesforce Integrations
The best alternative will be to leverage the breadth of the apps that Salesforce has to offer on AppExchange. These solutions provide ready-made integrations to get you up and running and support a lot of different deployments and pricing models.
Factors to Consider When Choosing Third-Party Salesforce Integrations
Decentralized Integration
Almost all the solutions out there in the market are centralized. The major problem with a centralized solution is that the integration requirements need to be mapped out over a central system, so there is an increased dependency on it.
Also, the centralized solution becomes the driving force for carrying forward the integration and thus becomes a single point of failure.
In contrast, a decentralized integration offers the benefit of independent control at either end of the integration. This makes the systems less dependent on each other, and such loosely coupled systems then offer greater security, flexibility, and scalability.
Security
When two systems are not dependent on a central UI to manage their integration, they get to decide what information must be sent and received independently of one another.
In essence, you do not send the information you don’t want the other party to access and receive only the information you need. This avoids the possibility of unauthorized access to information.
In addition, necessary security measures like token-based authentication, use of HTTPS, role-based access, etc. are mandatory. It also helps if the solution is ISO 27001:2002 certified.
Flexibility
Support for basic to advanced integrations is what these tools are made for. So, the more flexible the solution, the greater the possibility of assimilating it into your ever-growing integration requirements. This acknowledges the fact that businesses grow and so do integration requirements.
Another aspect to consider is the kind of users the solution caters to. Commonly, the integration is run by business and technical teams, so it should be equally useful to both.
The great equalizer for the skill gap between non-technical and tech-savvy users would be a copilot or AI-powered virtual chatbot assistant.
Reliability
Automated integration replaces manual interactions and thus avoids errors. It also ensures the data exchanged is accurate and consistent. So reliability plays an important role in determining better results for your integration. An automated mechanism to retrieve changes from the last downtime or system failure and apply them in the correct order of their initiation must be at the core of the solution.
Number of Supported Integrations
You want a solution that supports a number of diverse platforms. Think Jira, Azure DevOps, GitHub, and the like. This will give you the liberty to connect to just another of your customers, partners, suppliers, or vendors without having to build or configure a completely new integration by yourself.
The 6 Best Salesforce Integrations
Here are some of the best Salesforce integration solutions for increased business efficiency.
Exalate: A bidirectional integration solution that connects Salesforce to exchange sales and customer data with users on Jira, Zendesk, Azure DevOps, GitHub, and other platforms. It uses AI Assist to improve scripting for connections.
Zapier: A no-code platform that allows seamless integration between multiple applications, databases, work management systems, and service desks.
Jitterbit Harmony: A workflow automation that allows you to integrate your applications and cloud services with Salesforce.
Dell Boomi: An integration platform that makes it possible to connect modern applications and legacy systems in order to automate business processes and expand access to data.
Workato: An iPaaS solution that allows IT, marketing, and finance teams to facilitate automated ticket escalation, employee onboarding, compliance governance, and threat detection.
Mulesoft Anypoint: A Salesforce application that integrates natively with external systems, enabling organizations to combine AI and CRM analytics to get a comprehensive view of customers.
How to Set up Salesforce Integrations Using a 3rd-Party Solution
In this section, we are going to set up a Salesforce integration using Exalate.
Exalate is one of the top salesforce integrations that allows you to set up a flexible 2-way sync between different tools like Jira, Salesforce, GitHub, etc. It helps unlock collaboration between teams across company borders, or even between different departments or projects within a single company.
But as a general rule, before starting with the implementation, it is important to lay the foundations of integration well.
Let us now walk through the step-by-step approach for a Salesforce integration using Exalate.
Step 1: Lay the Groundwork
Start with extensive planning of technical/ business resources and docs, map the data flow, orchestrate the workflows end-to-end, and set the data exchange requirements. Consider your integration as just another project, having specific roadmaps, guidelines, goals, roles, and responsibilities.
Chalking out a detailed integration plan either within a company (intra-company integration) or across different companies (cross-company integration) is important to deliver the benefits sooner.
When it comes to Salesforce integrations, it is also important to consider the type of integration desired (as discussed above) and review the API limits.
Proper authorizations and authentications must also be in place. A major point here is also to ensure that the difference in the architecture of the 2 integrating systems is taken into account.
Having undertaken this, prepare to get started with Exalate and move to the next step.
Step 2: Install Exalate on Salesforce and the Other Application
Exalate needs to be installed as a dedicated app on Salesforce and the other application you want to integrate it with. It can be any one of the different integrations Exalate supports.
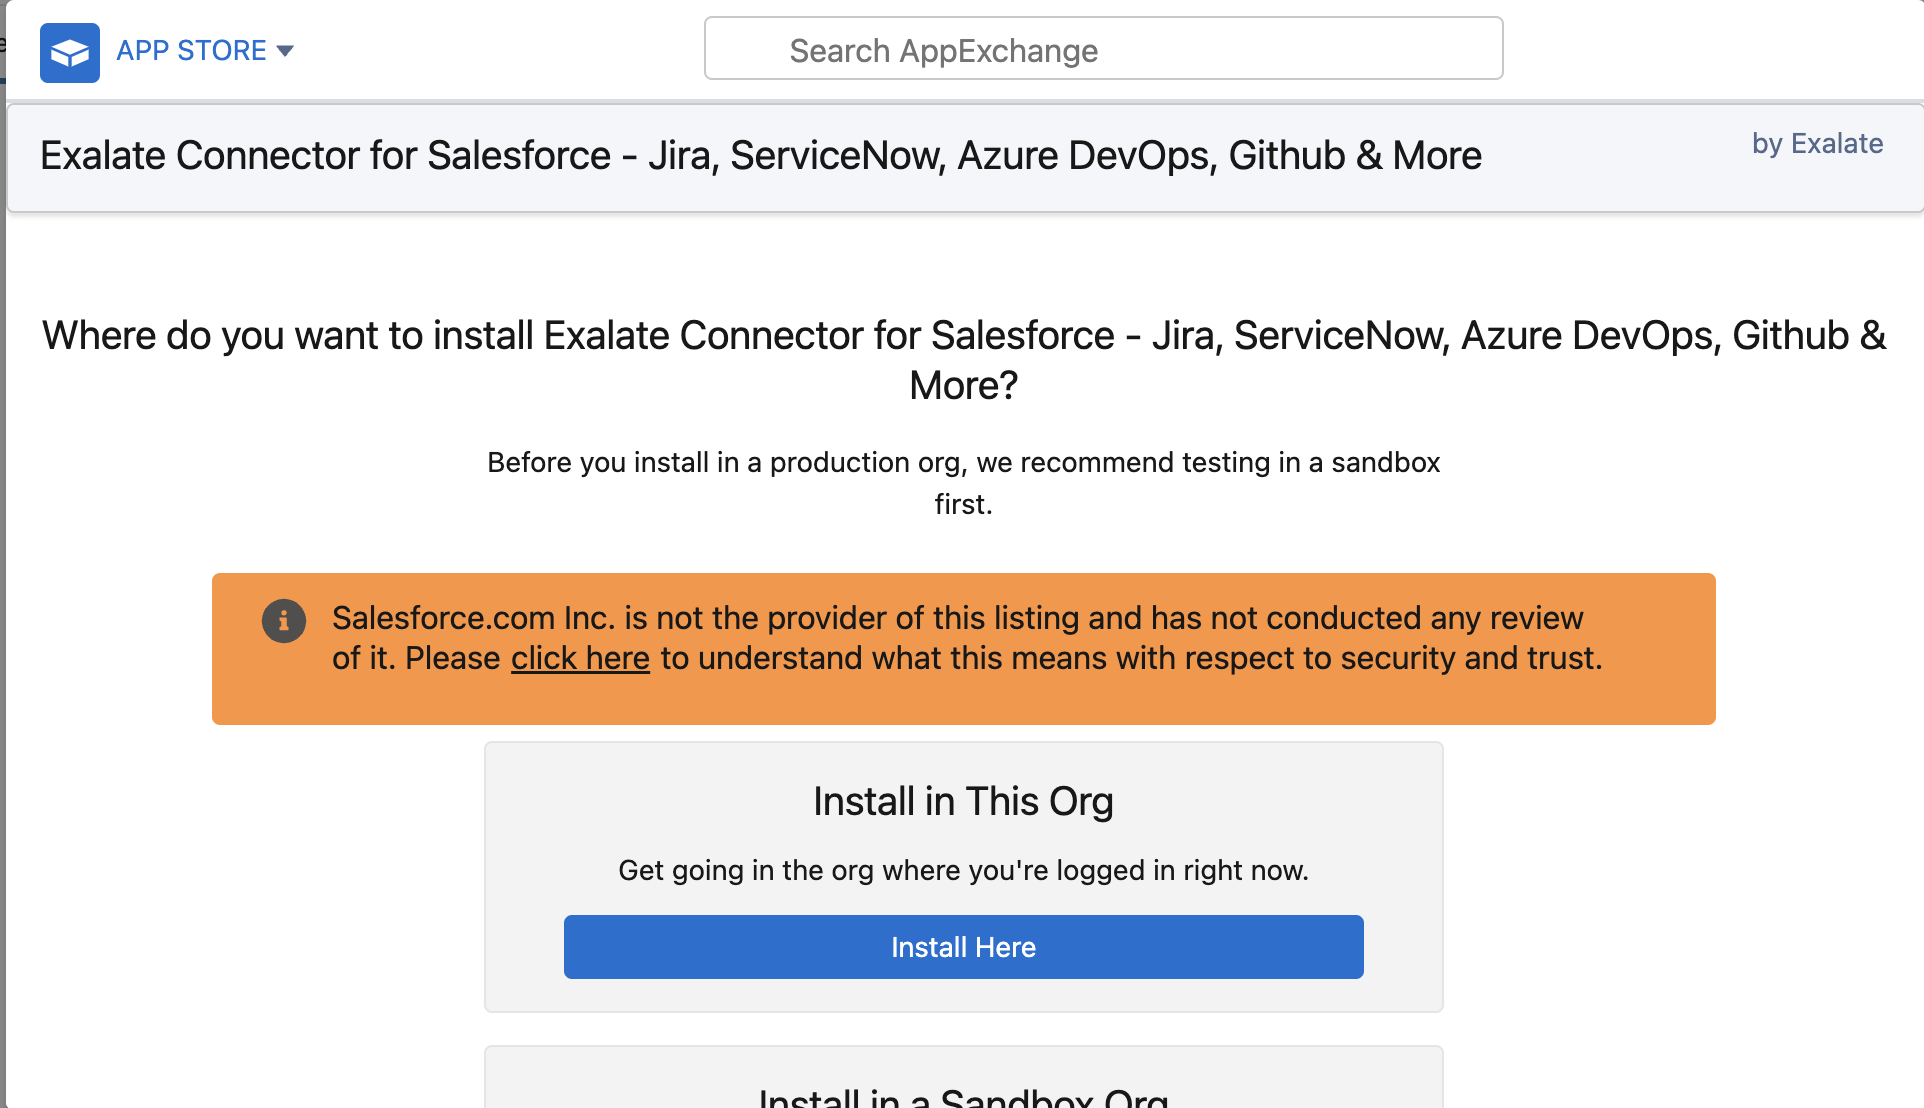
You will then need to decide where you want to install Salesforce: either “Install in This Org” or in a Sandbox org. My preference was to install it in the current org.
After making your selection, scroll down to review and agree to the terms and conditions. When you’re ready, click on “Confirm and Install” to initiate the installation process.
Next, you’ll be asked to specify the users for whom you want to install Salesforce. Keep in mind that you can always modify this later on. In my case, I chose “Install for All Users” and then clicked “Install”.
Now, you’ll need to “Approve Third-party Access” by clicking on “Continue”. This step allows Exalate to access the required data. Once the approval is given, the installation process will be completed. Click on “Done” to finalize the setup.
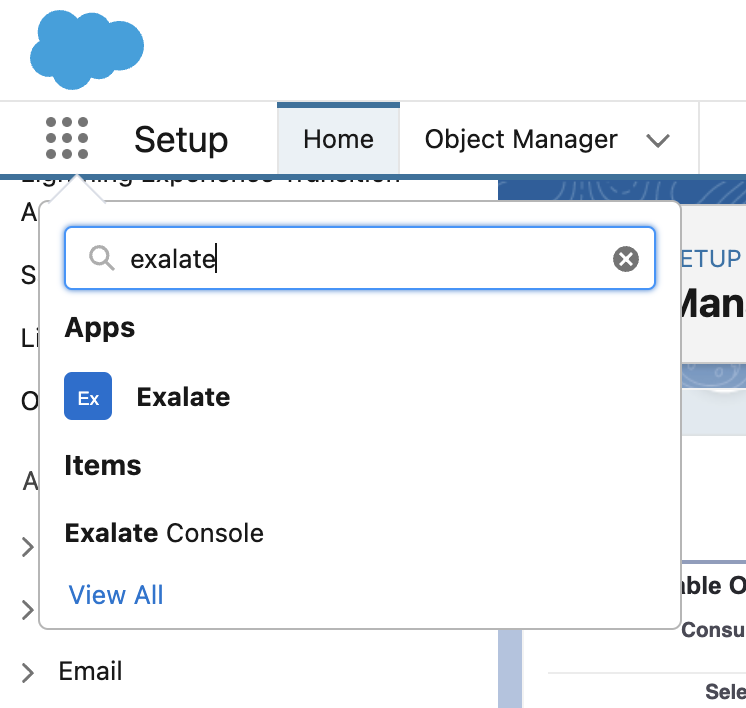
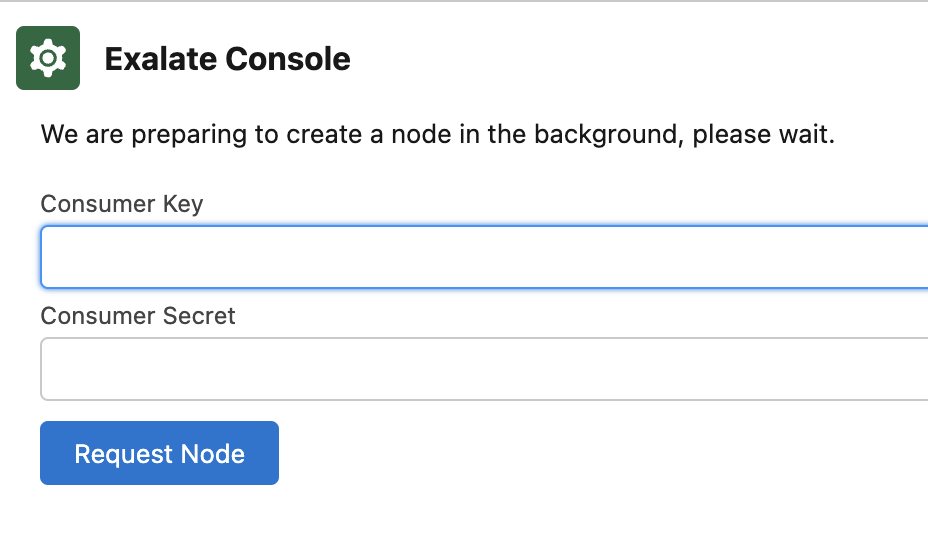
Next, go to your Salesforce instance and create a connected app. Make sure to save the “Consumer Secret” and “Consumer Key” generated during this process. Then, within your Salesforce instance, navigate to “Apps” and search for “Exalate”.
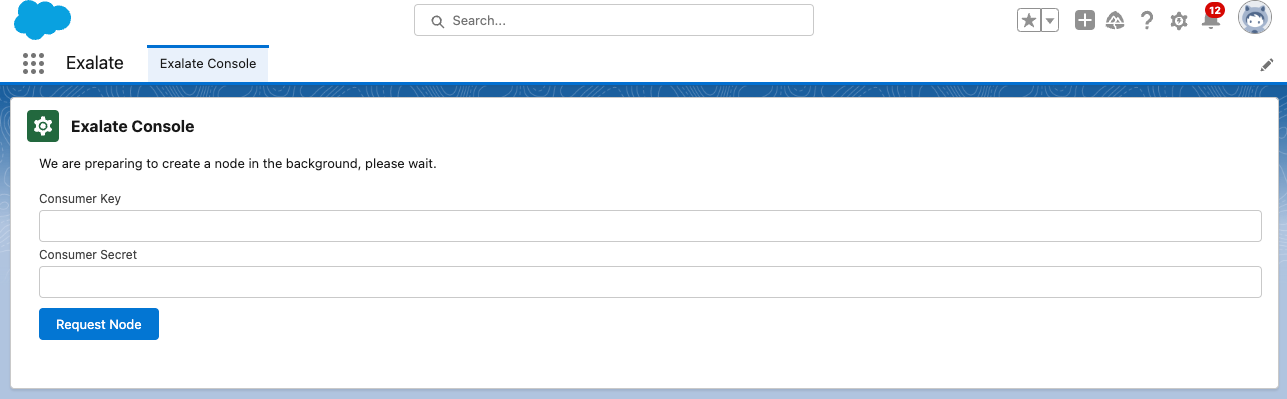
For requesting an Exalate node, provide the “Consumer Secret” and “Consumer Key” you saved earlier, and then click on “Request Node”.
Now, go to the “Setup” tab in your Salesforce instance and search for “Trusted URLs”. Then, click “Add new trusted URL”.
Fill in the following information in the “Trusted URL information” section, API name: free input string and URL: *.exalate.cloud
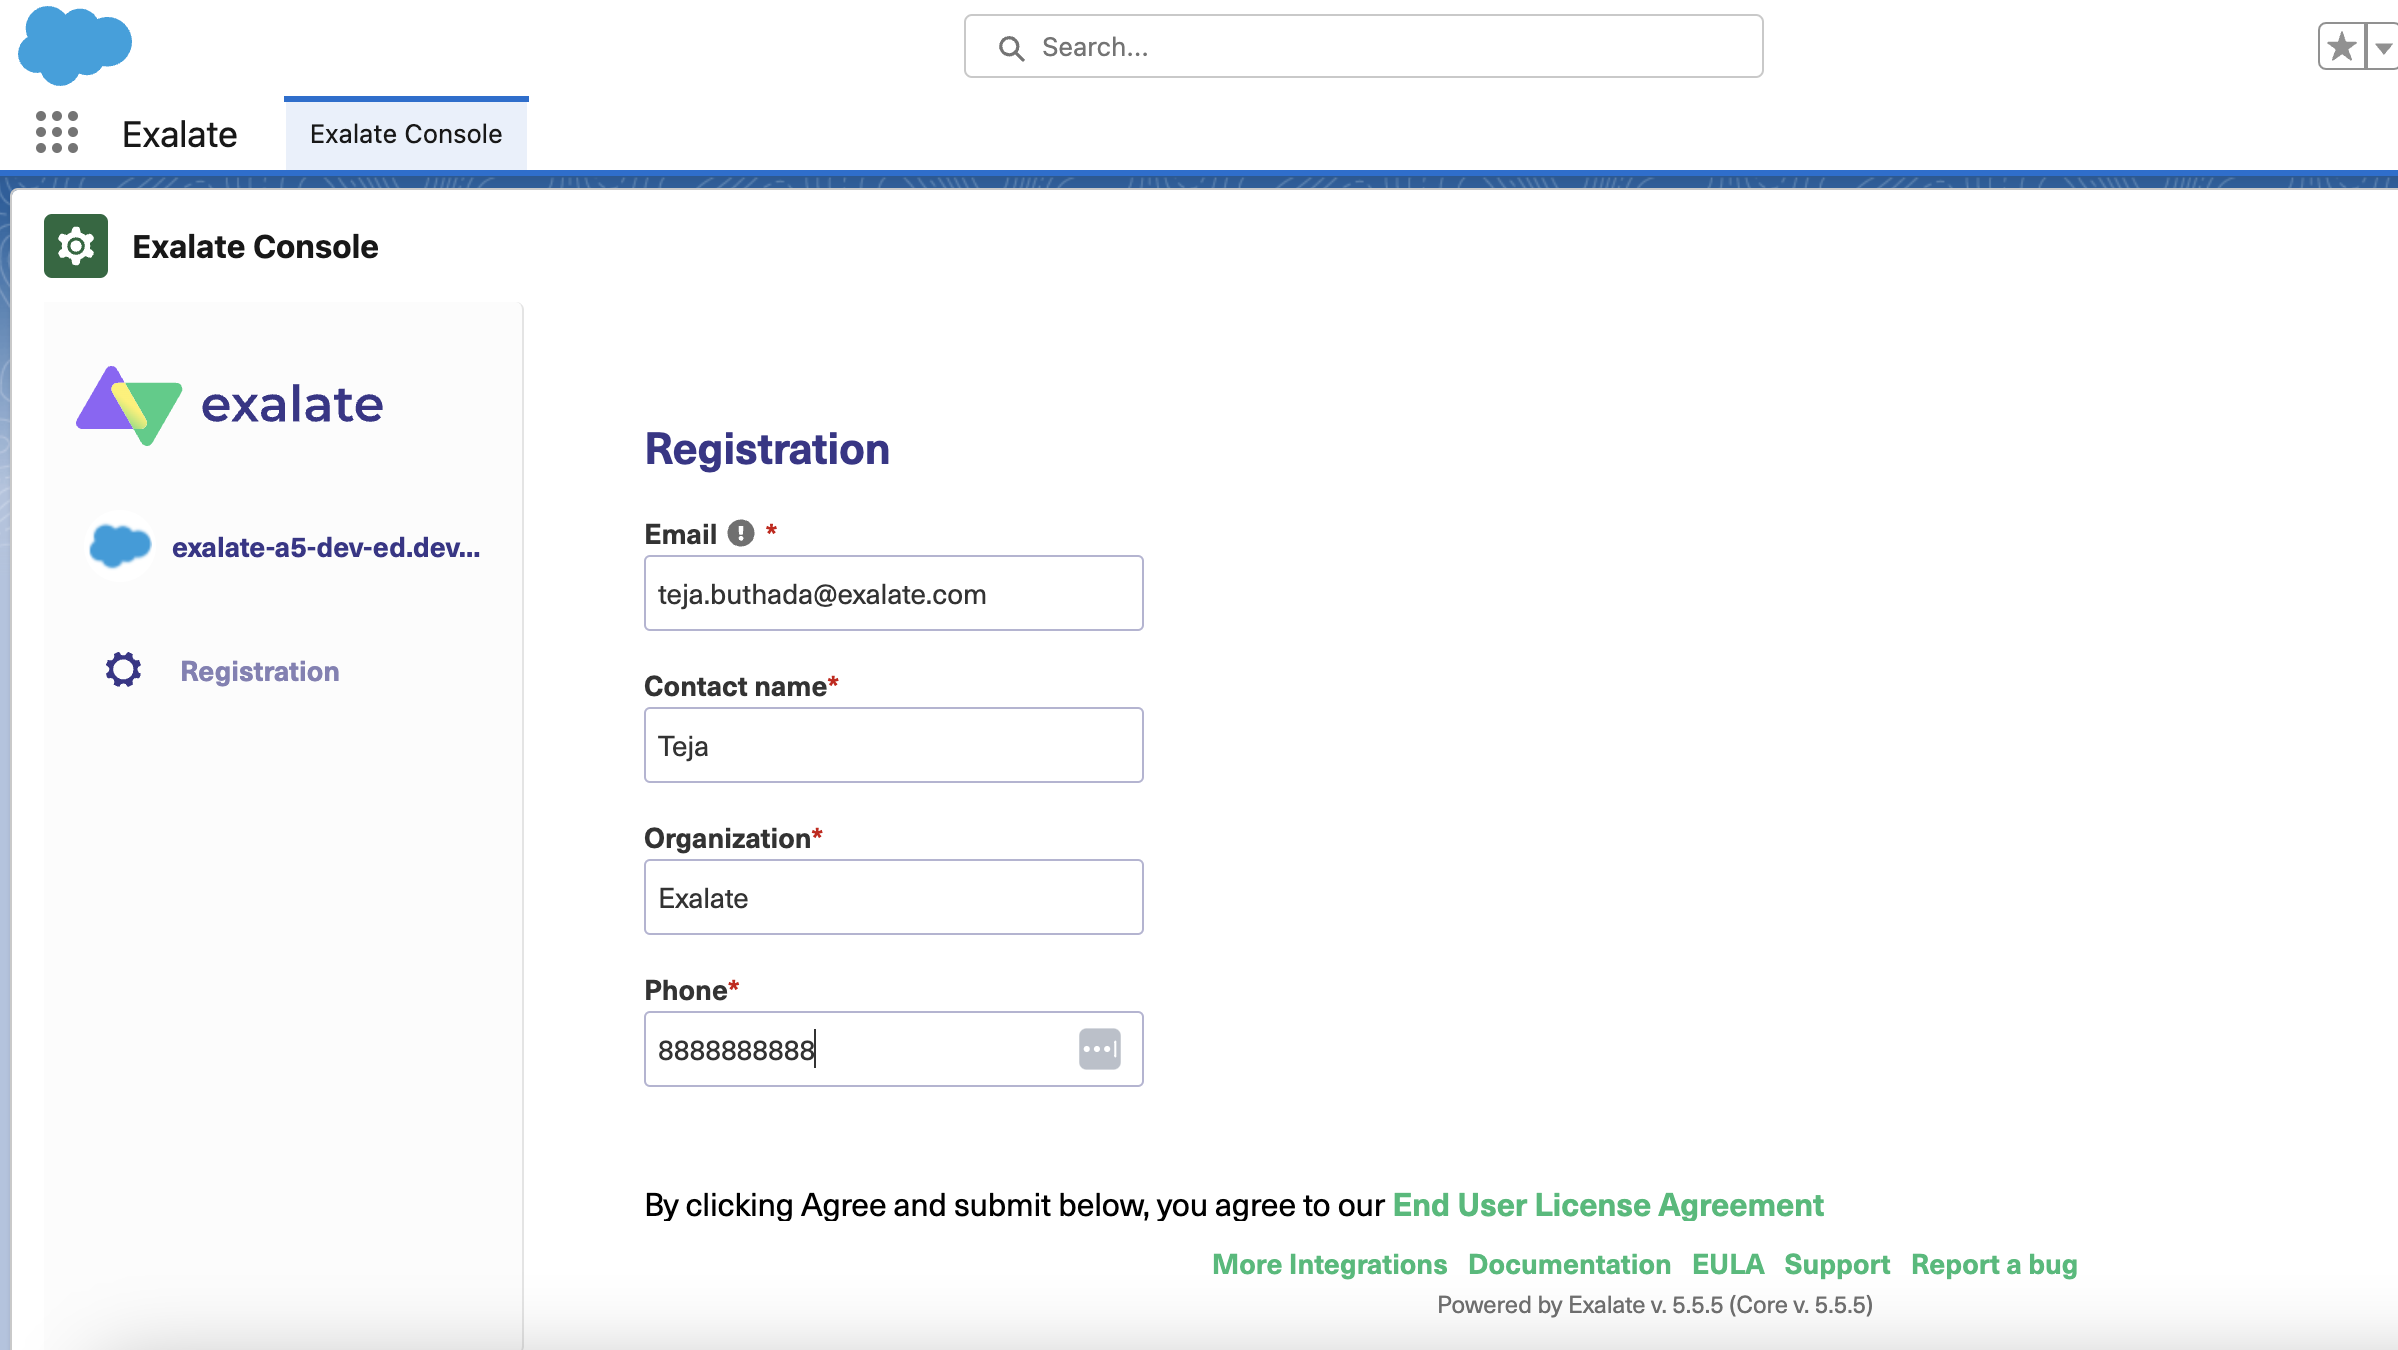
To grant access permissions to Exalate, click on “Allow”. Afterward, enter your personal details and click on “Agree and Submit”. Now, simply wait for an email from the Exalate License Manager.
Once you receive the email, click on “Verify Exalate instance” to be redirected to the Exalate admin console.
If you ever get logged out of your Salesforce instance, you can refer back to these steps to log in again.
Step 3: Connect Salesforce and the Other Application
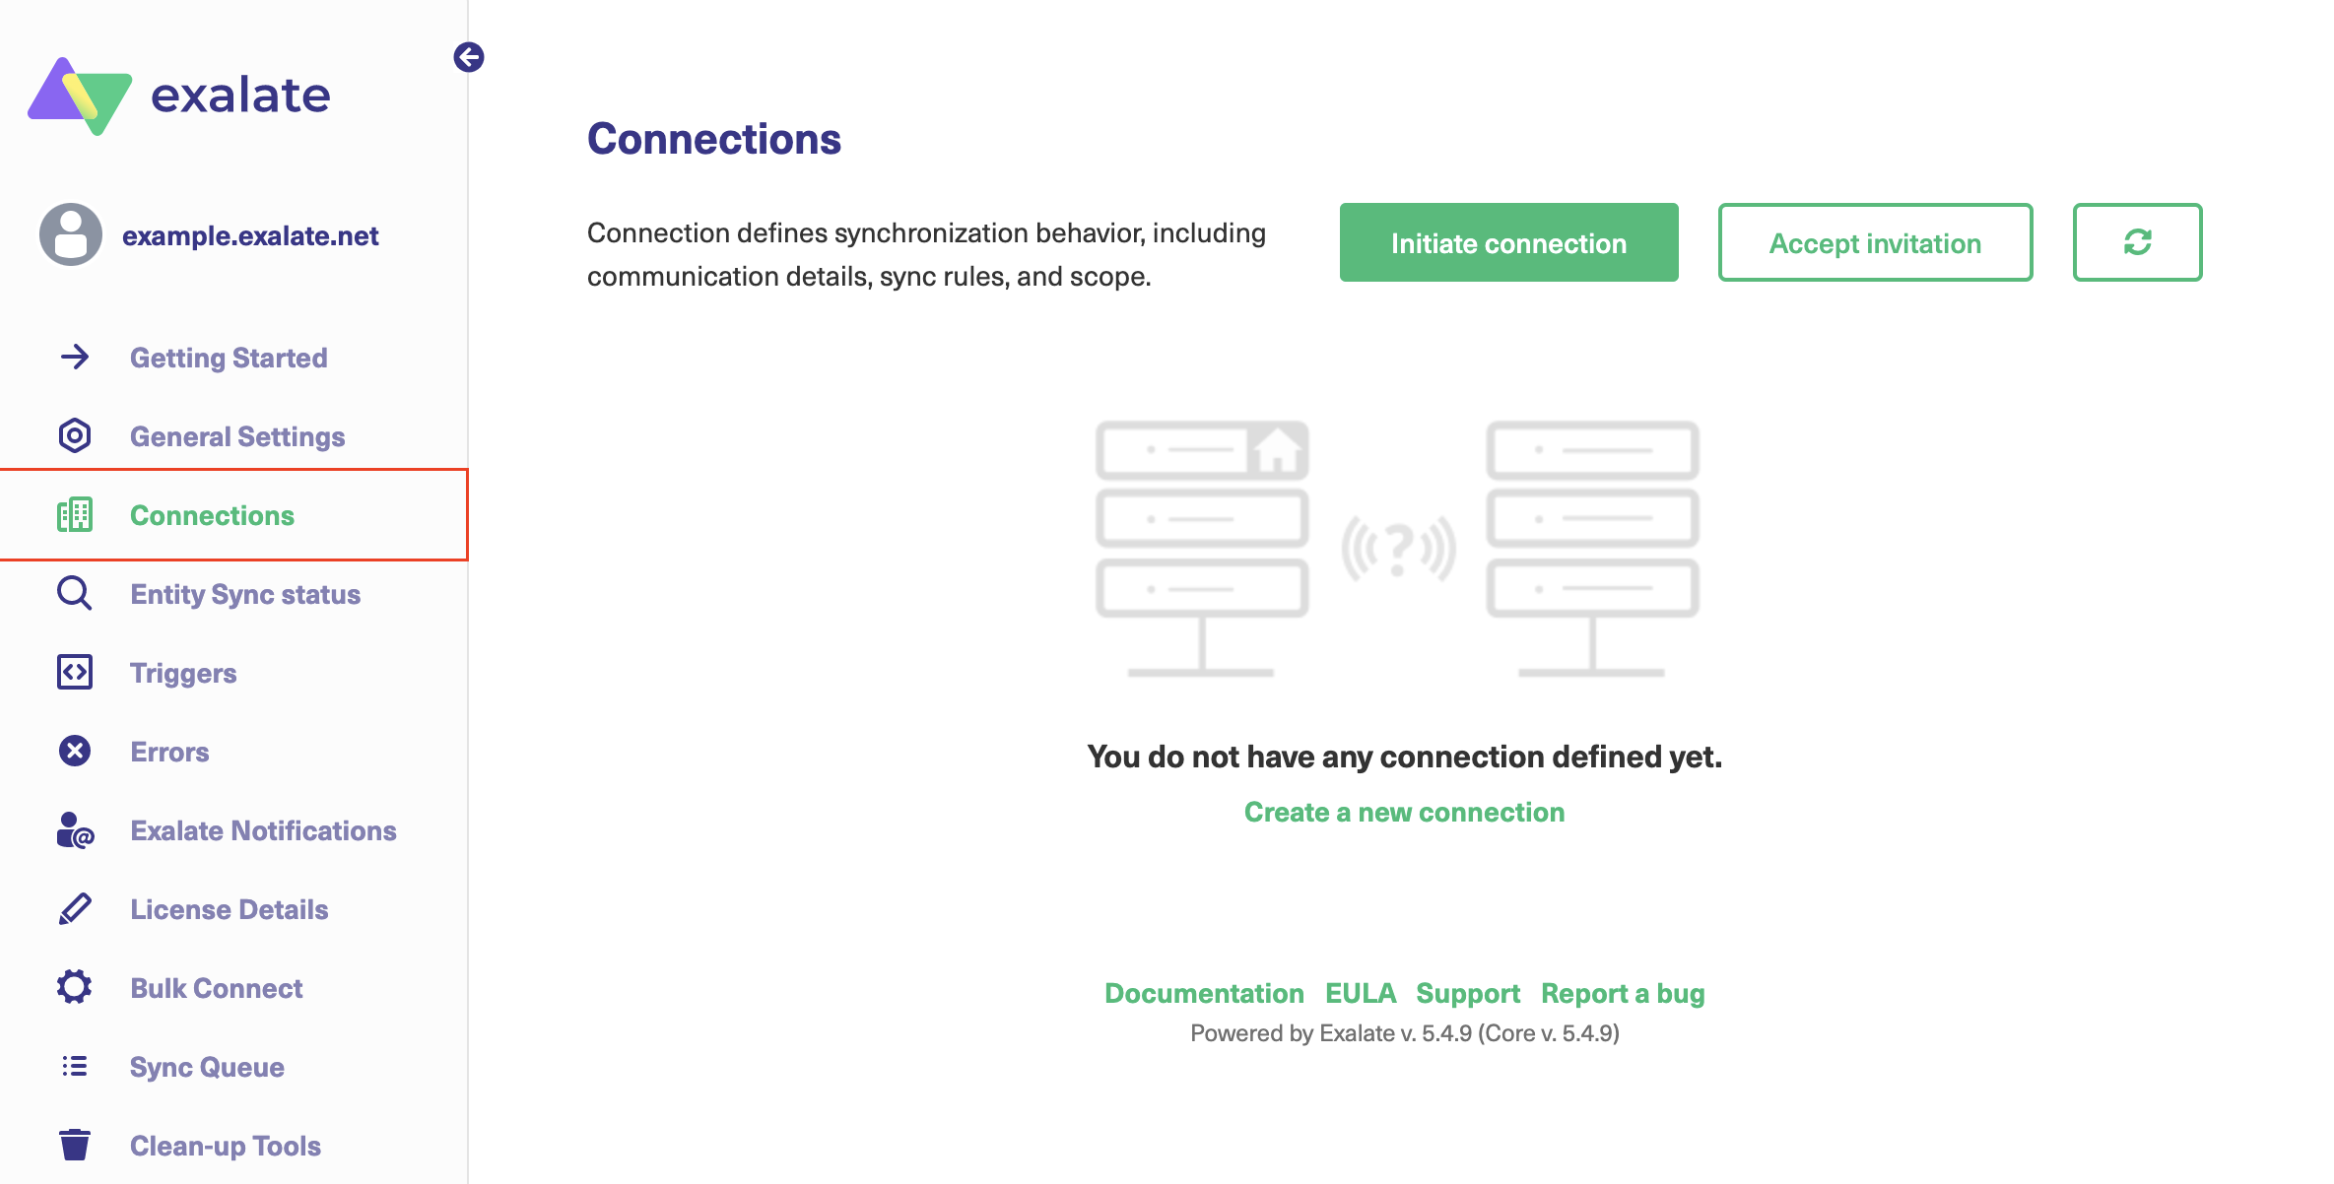
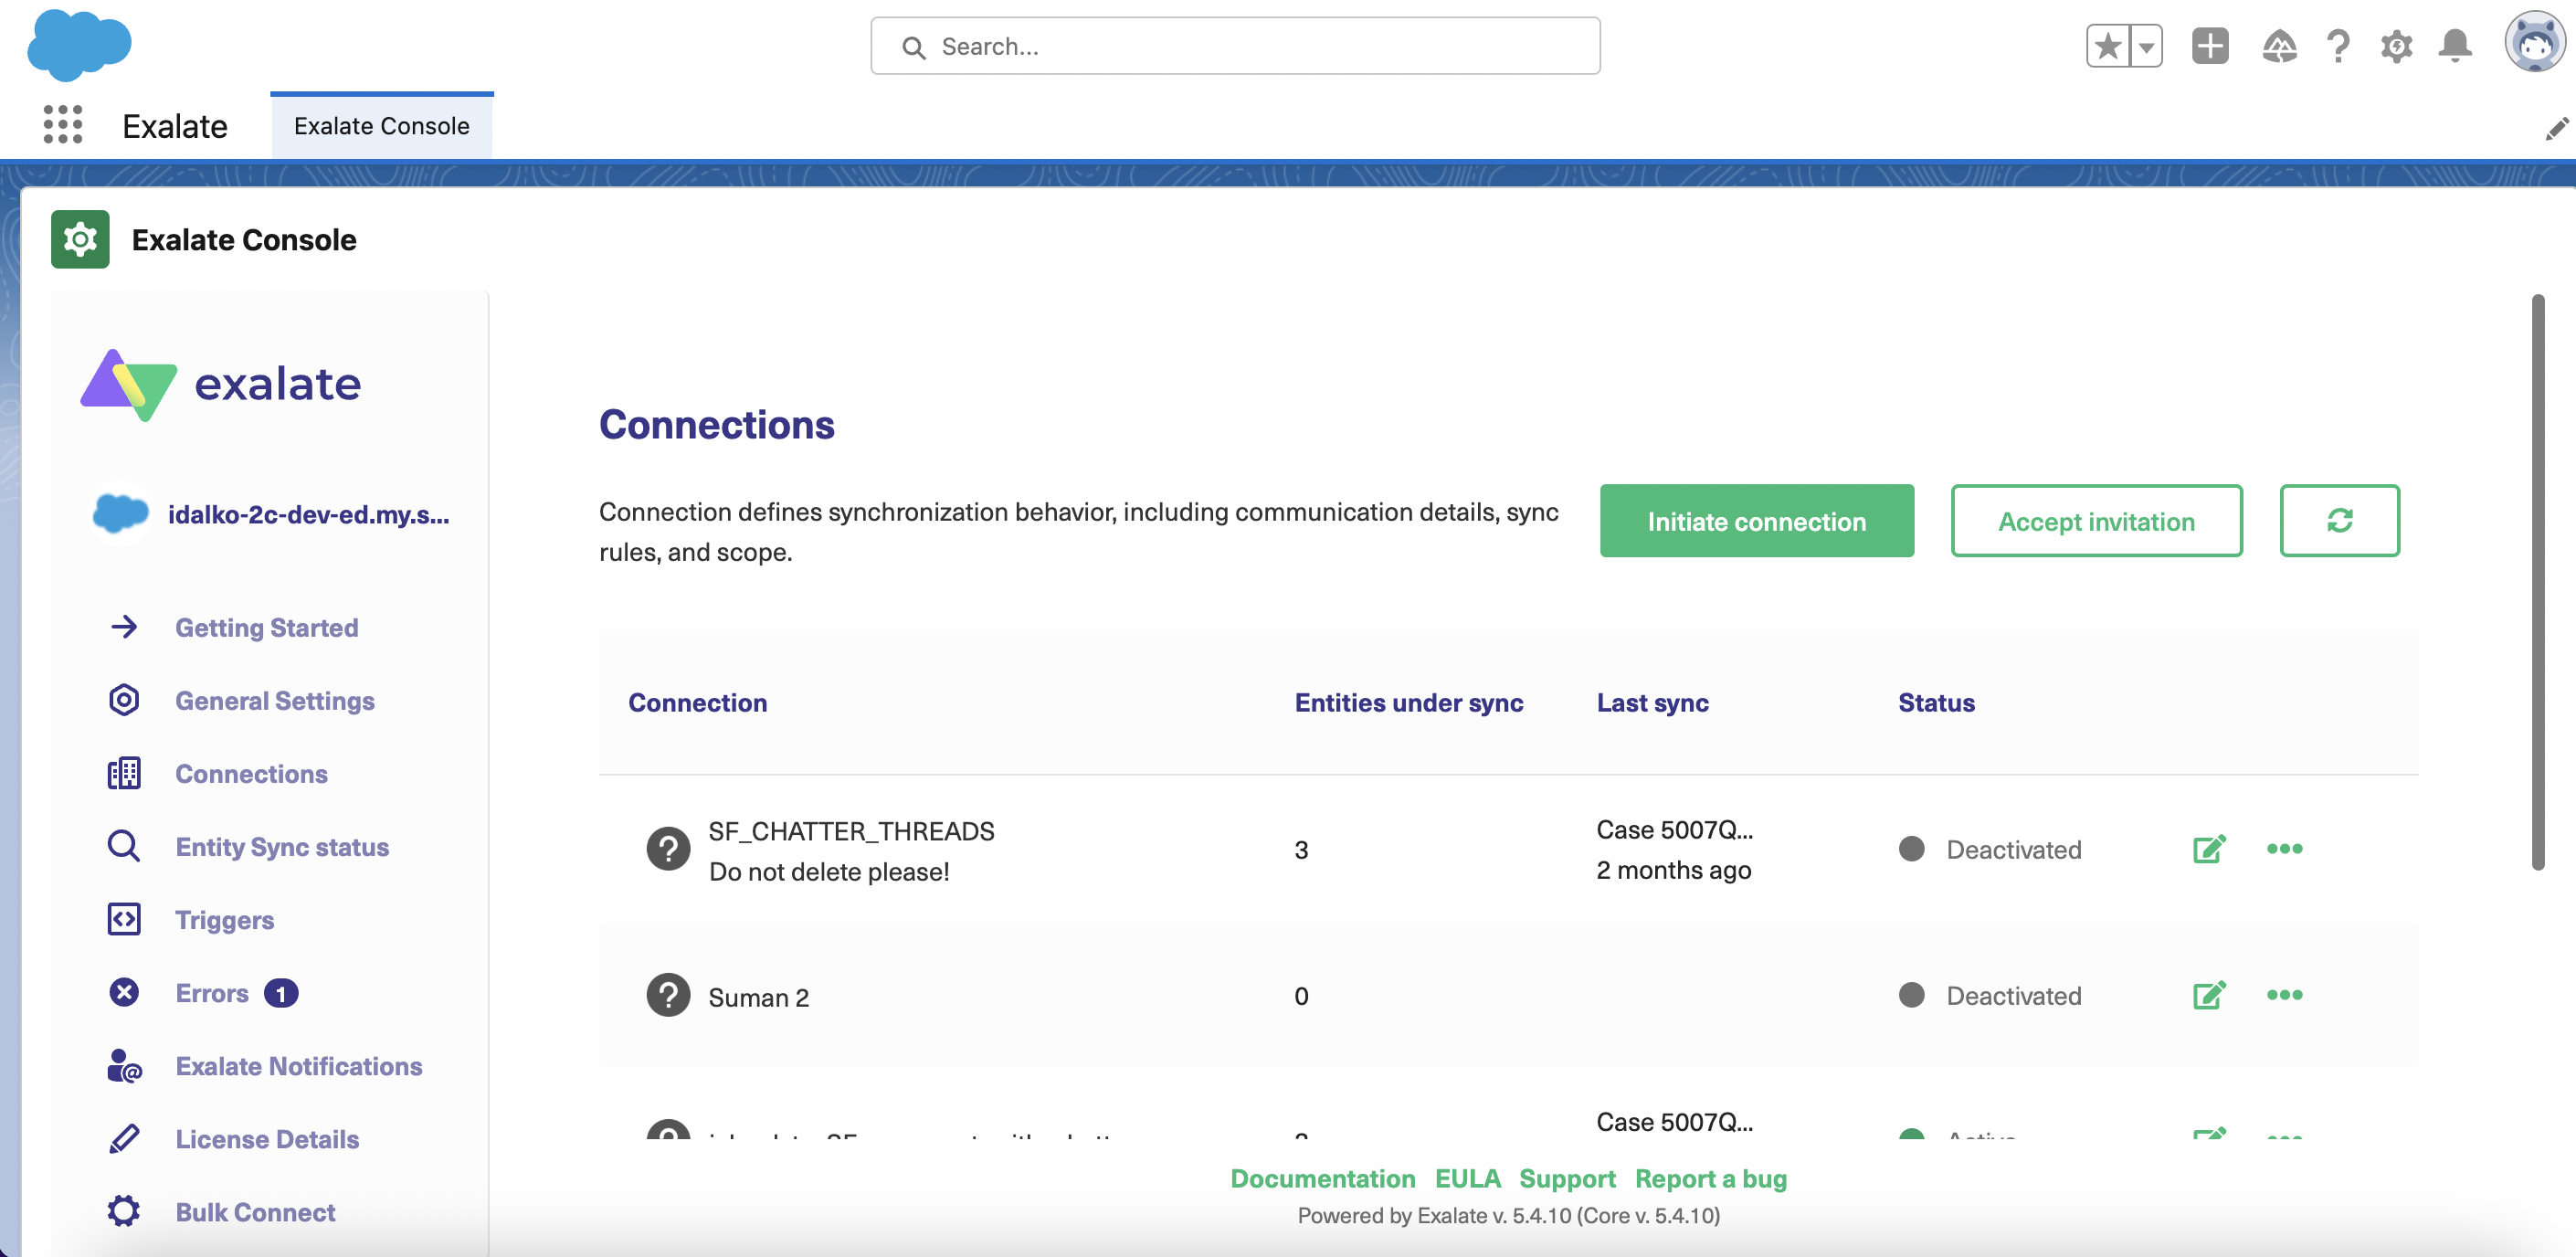
Once Exalate is installed on both sides, you need to go to the ‘Connections’ tab in its console. A connection needs to be created.
It first authenticates both the source and the destination platforms and then creates a secure passage through which data can be transferred back and forth according to the rules you have set.
One side initiates the connection, and the other side accepts the invitation to connect.
The Exalate UI is the same for all platforms, so it doesn’t matter which side you start from.
From your Salesforce instance, click ‘Initiate connection’ under the ‘Connections’ tab.
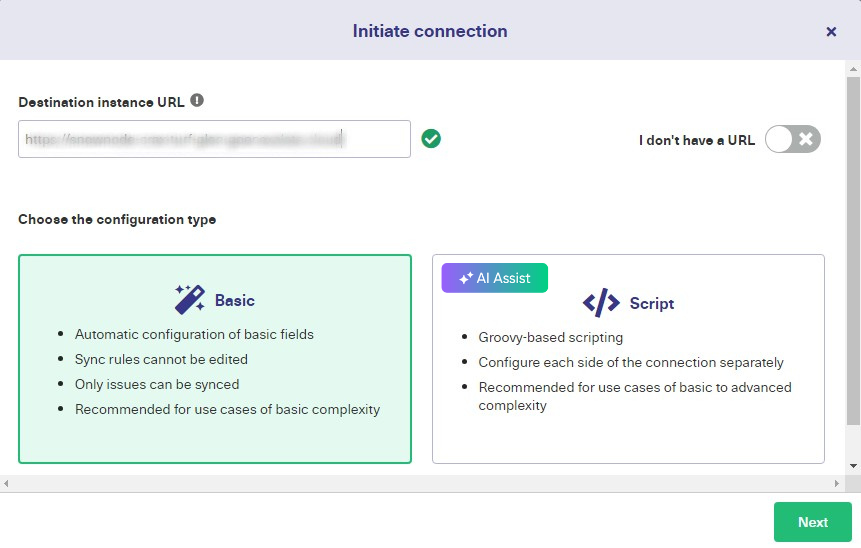
On the next screen, enter the destination instance URL. This can either be another Salesforce instance or Jira, GitHub, Azure DevOps, etc.
Once done, a quick check is performed to check if Exalate is installed on the destination side.
Based on the destination instance you will be prompted to choose between 2 different modes.
The Basic mode and the Script mode.
The Basic mode is for simple integrations like when you want to sync a Case from Salesforce to Azure DevOps, or if you want to sync an issue (issue type, summary, description, comments, and attachments) from Jira to Salesforce.
The sync cannot be configured in this mode, so it works best if you want to give Exalate a try for the first time. But it does come with a Free Plan that supports up to 1,000 free syncs per month.
What makes Exalate stand out is the Script mode.
It has an intuitive Groovy-based scripting engine that allows you to control your sync from either end independently with the help of outgoing and incoming processors. That controls information coming in and going out of Salesforce or the other application. These processors can be configured with the help of Sync rules. We will see how it can be done.
Let’s first see how both these modes work.
The Basic Mode
Choose the Basic mode on the screen above and hit ‘Next’. You will be redirected to a screen asking you if you have admin access to the other side.
In case you do, depending on the destination application, you will be either prompted to choose a project (for instance, in Jira or Azure DevOps) or a repository in the case of GitHub or a connection will be established straight away.
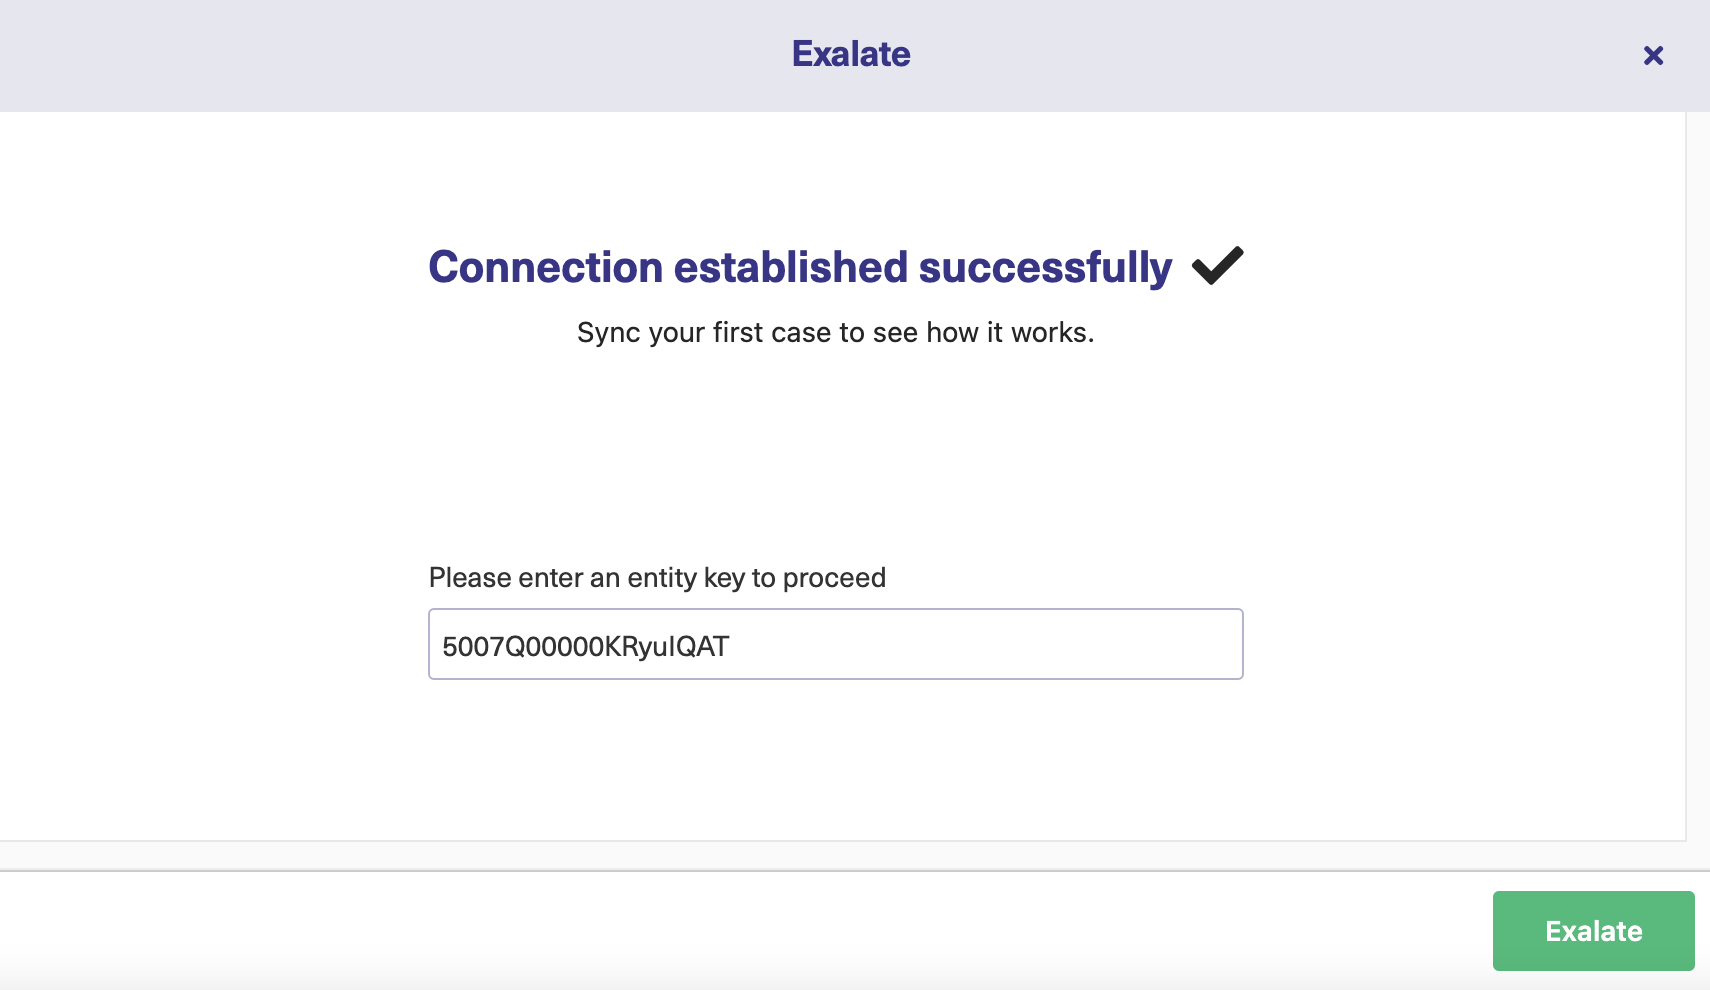
You can start by entering the Case key directly and get it synced over to the other side.
You can even navigate to the other side and enter the unique identifier of the entity you want to sync.
The Script Mode
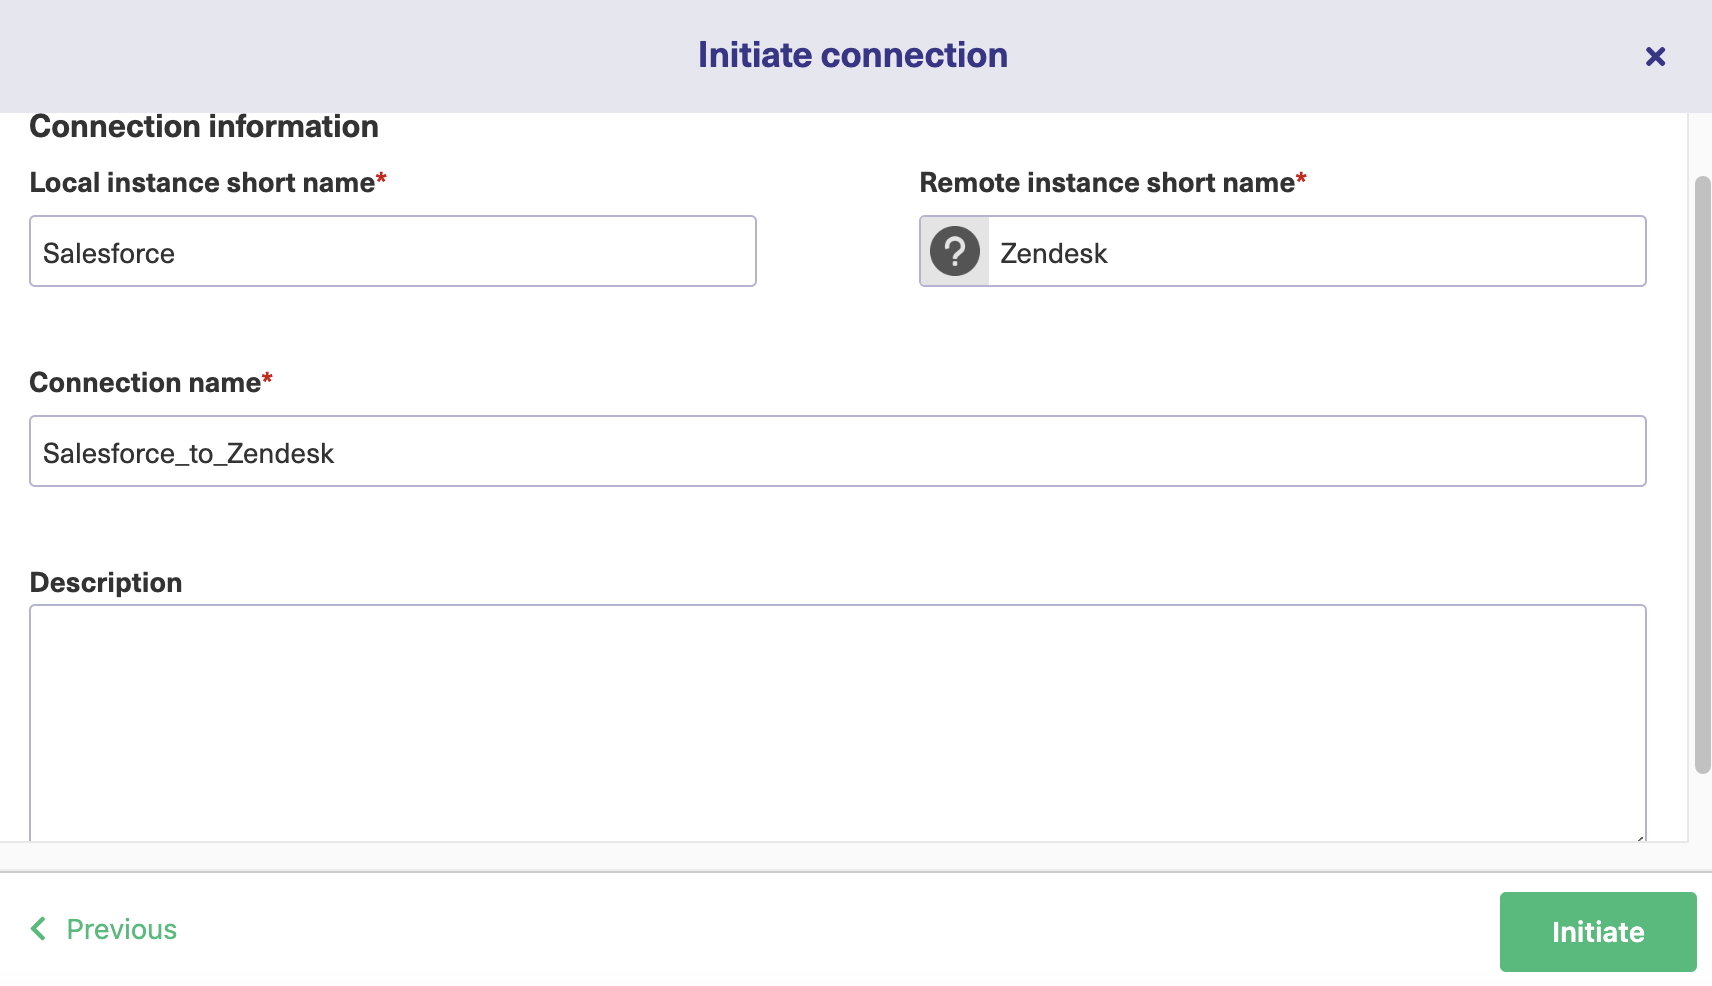
Let’s try out the full functionality of Exalate. So choose Script and click ‘Next’.
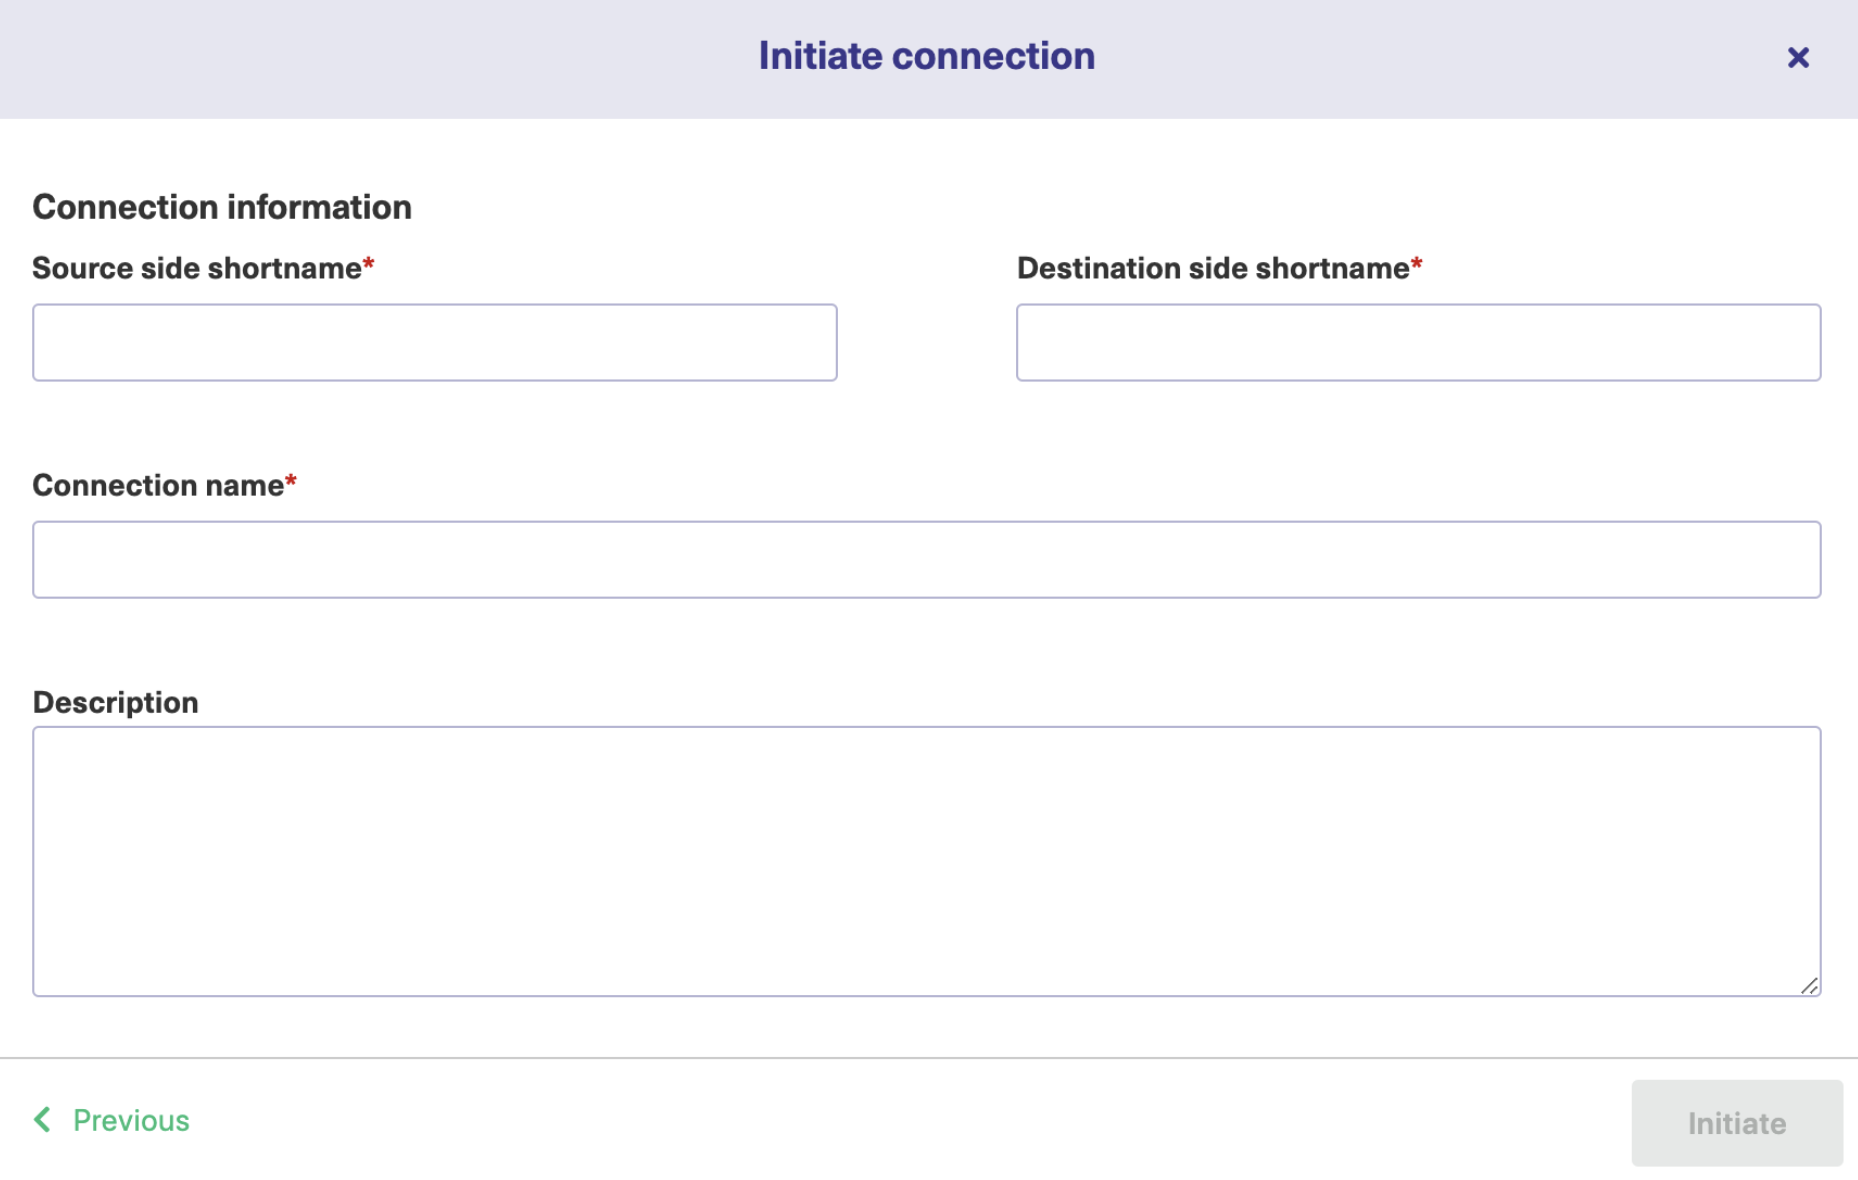
Enter the details for the remote and the local instance. You can change the connection name if you want. Enter a description too. Click ‘Initiate’.
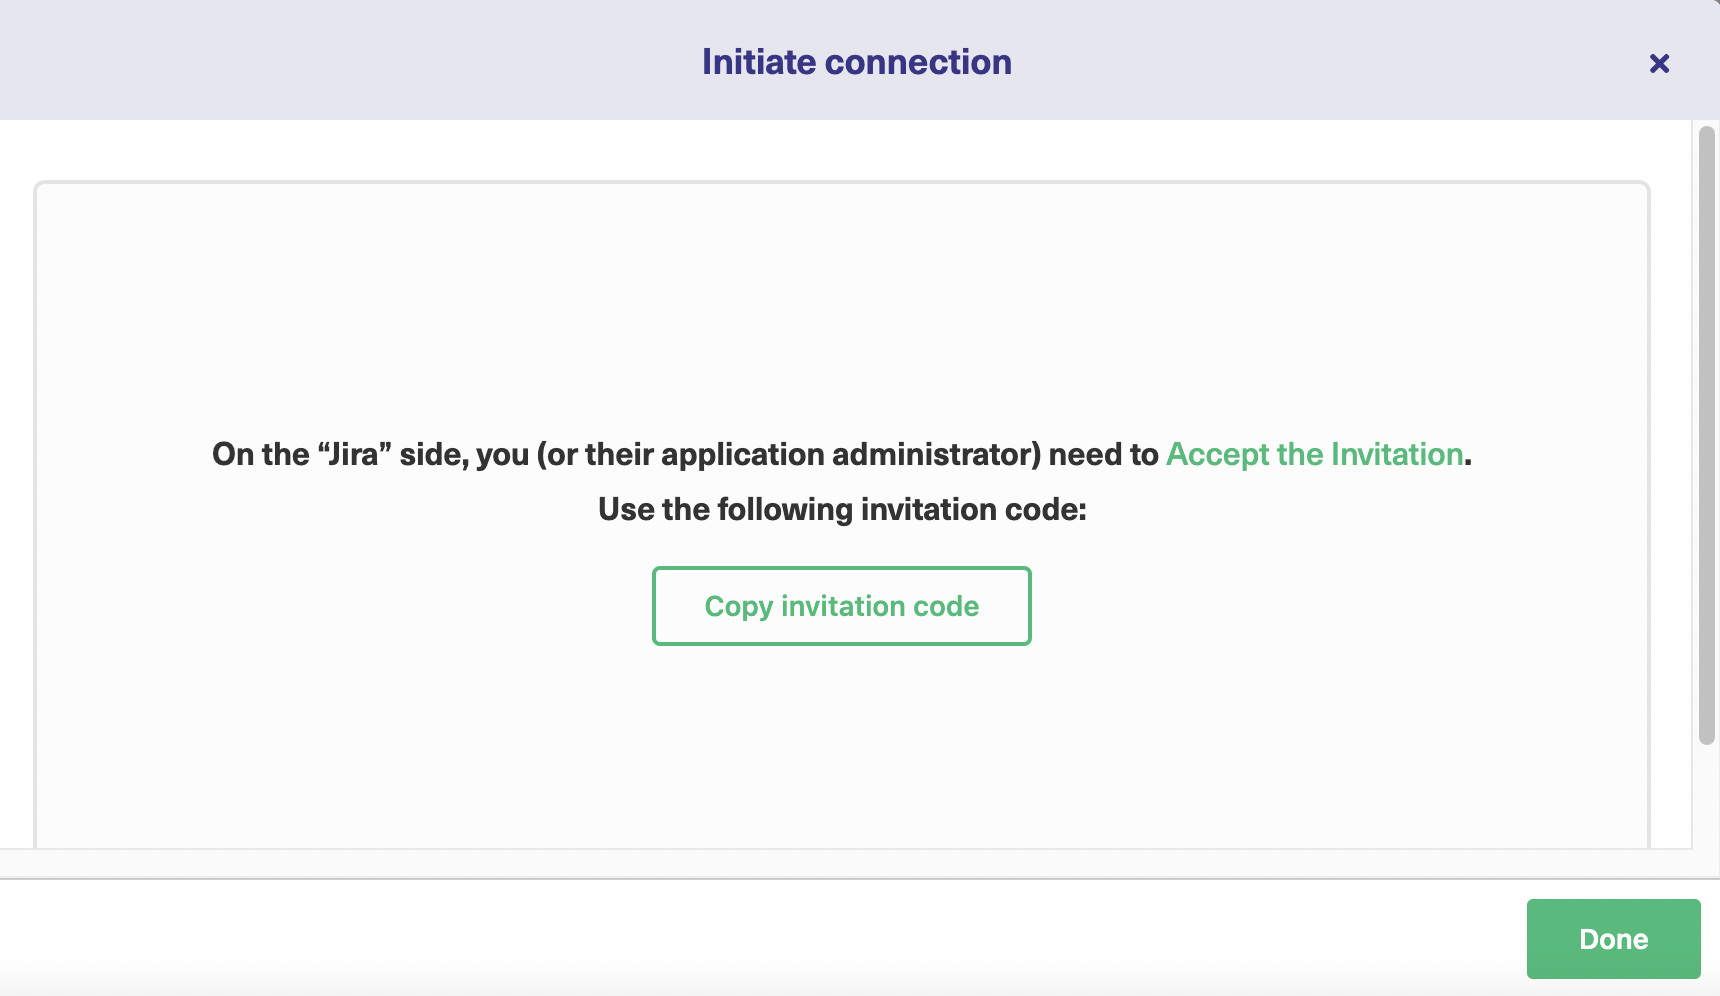
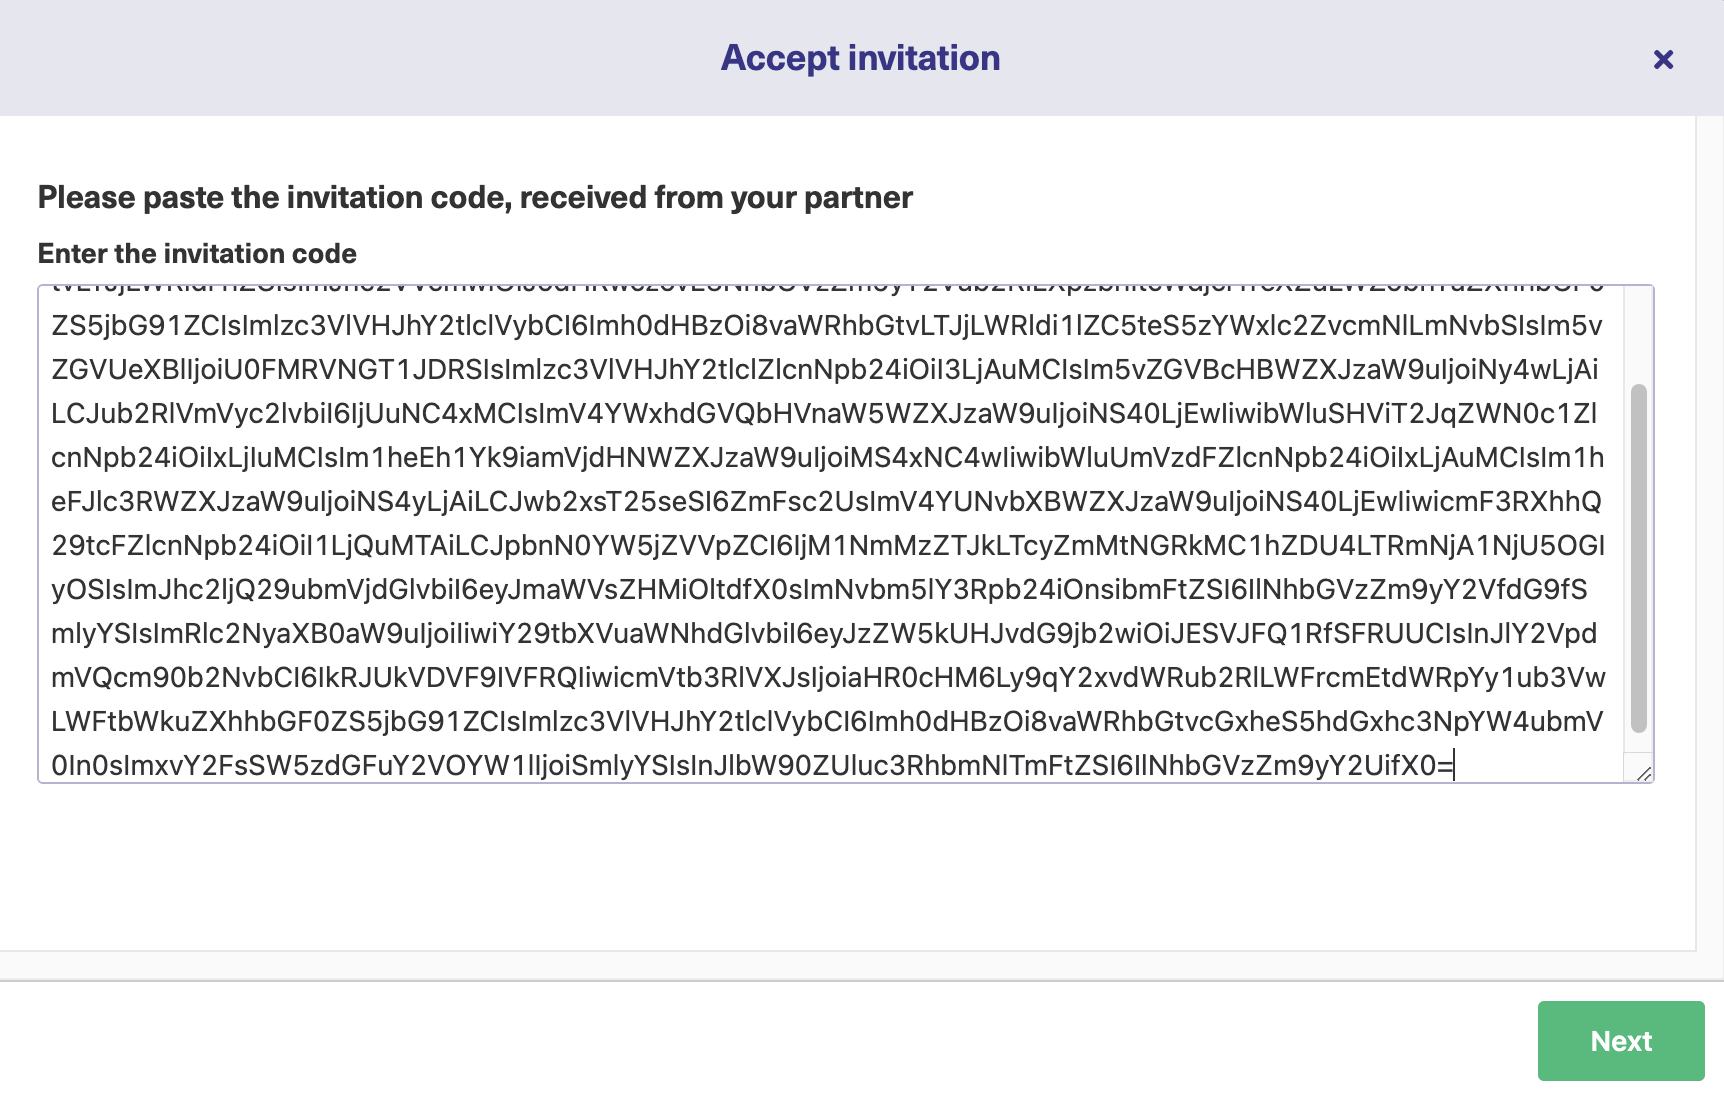
Next, an invitation code will be generated. This works like a shard secret that authenticates both integrating parties. Click on ‘Copy invitation code’.
Go to the other side, and now click ‘Accept Invitation’.
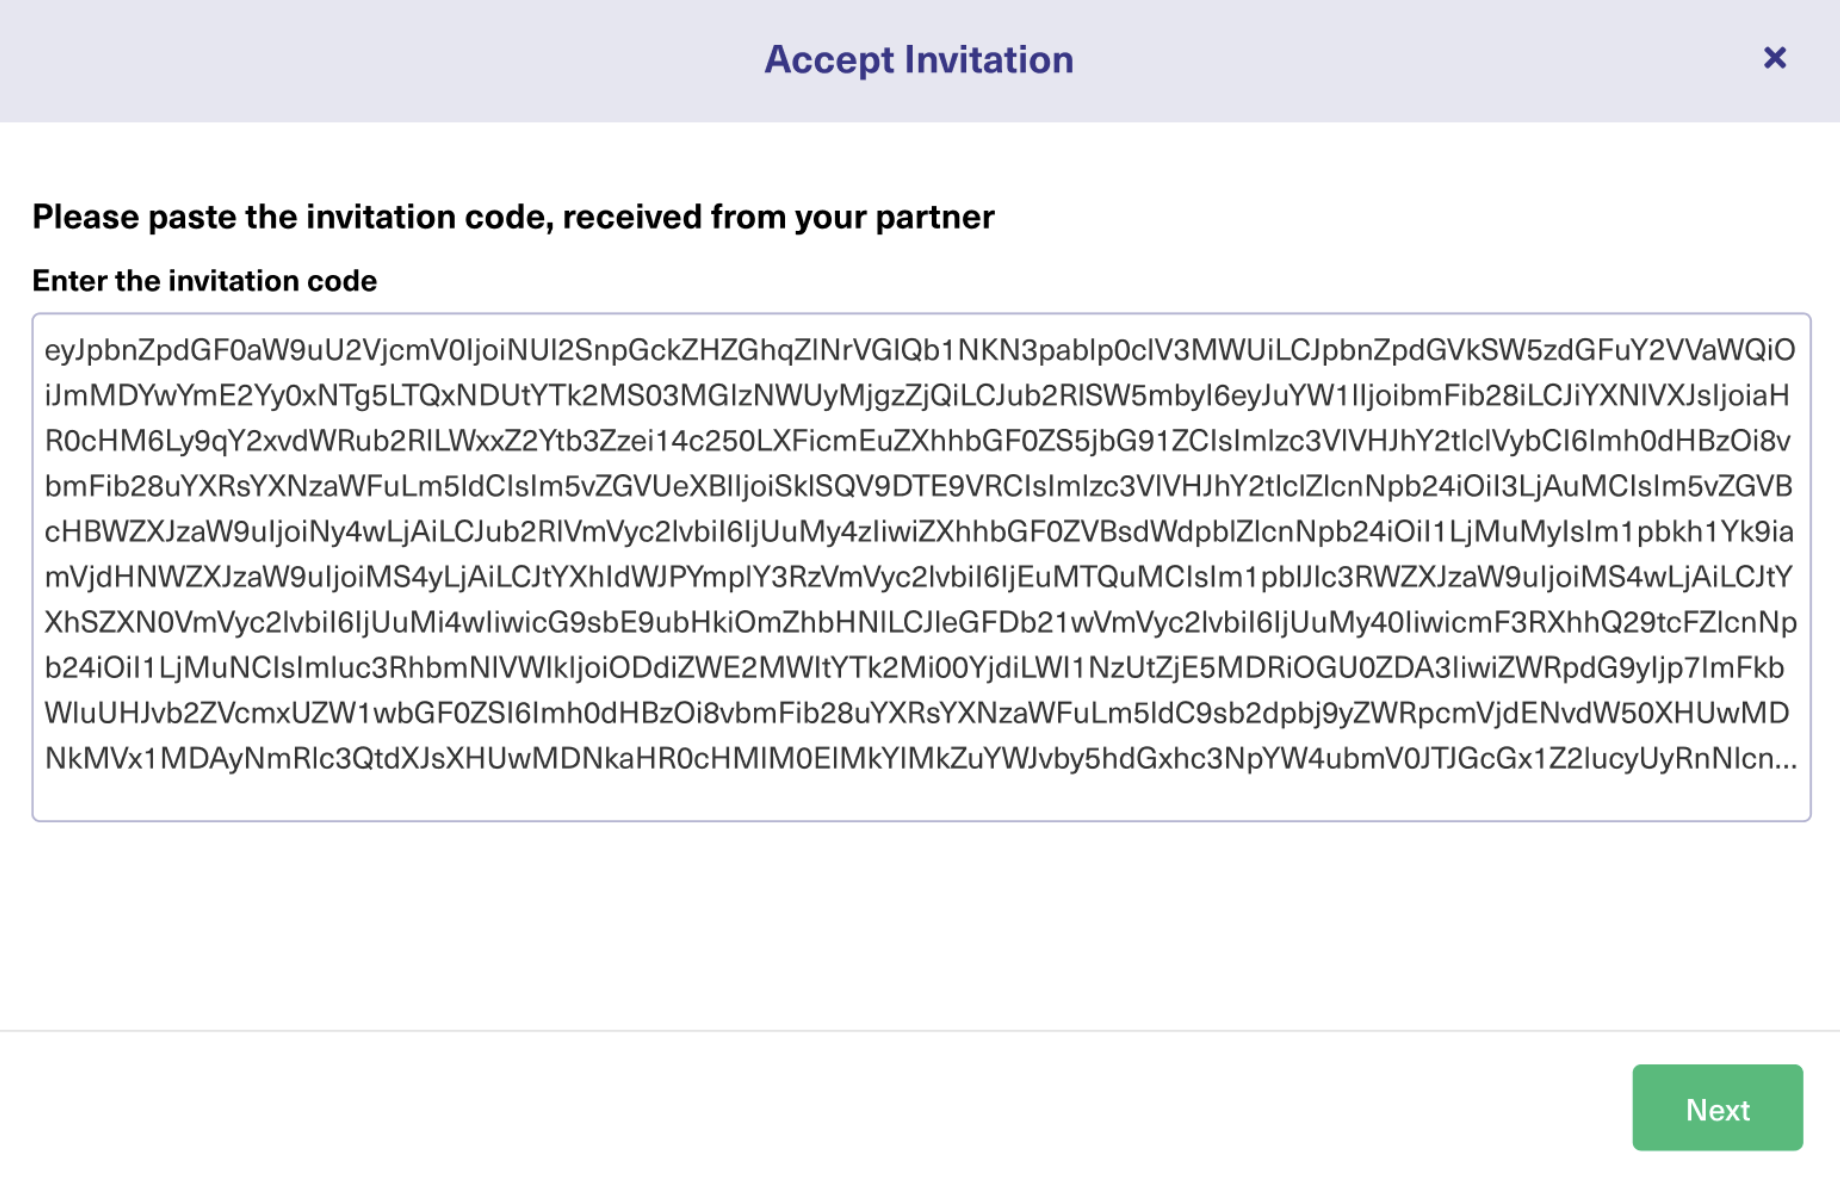
Paste the copied code in the text area and click ‘Next’.
Here again, depending on the other application you will be required to either choose a project or a repository like in the Basic mode.
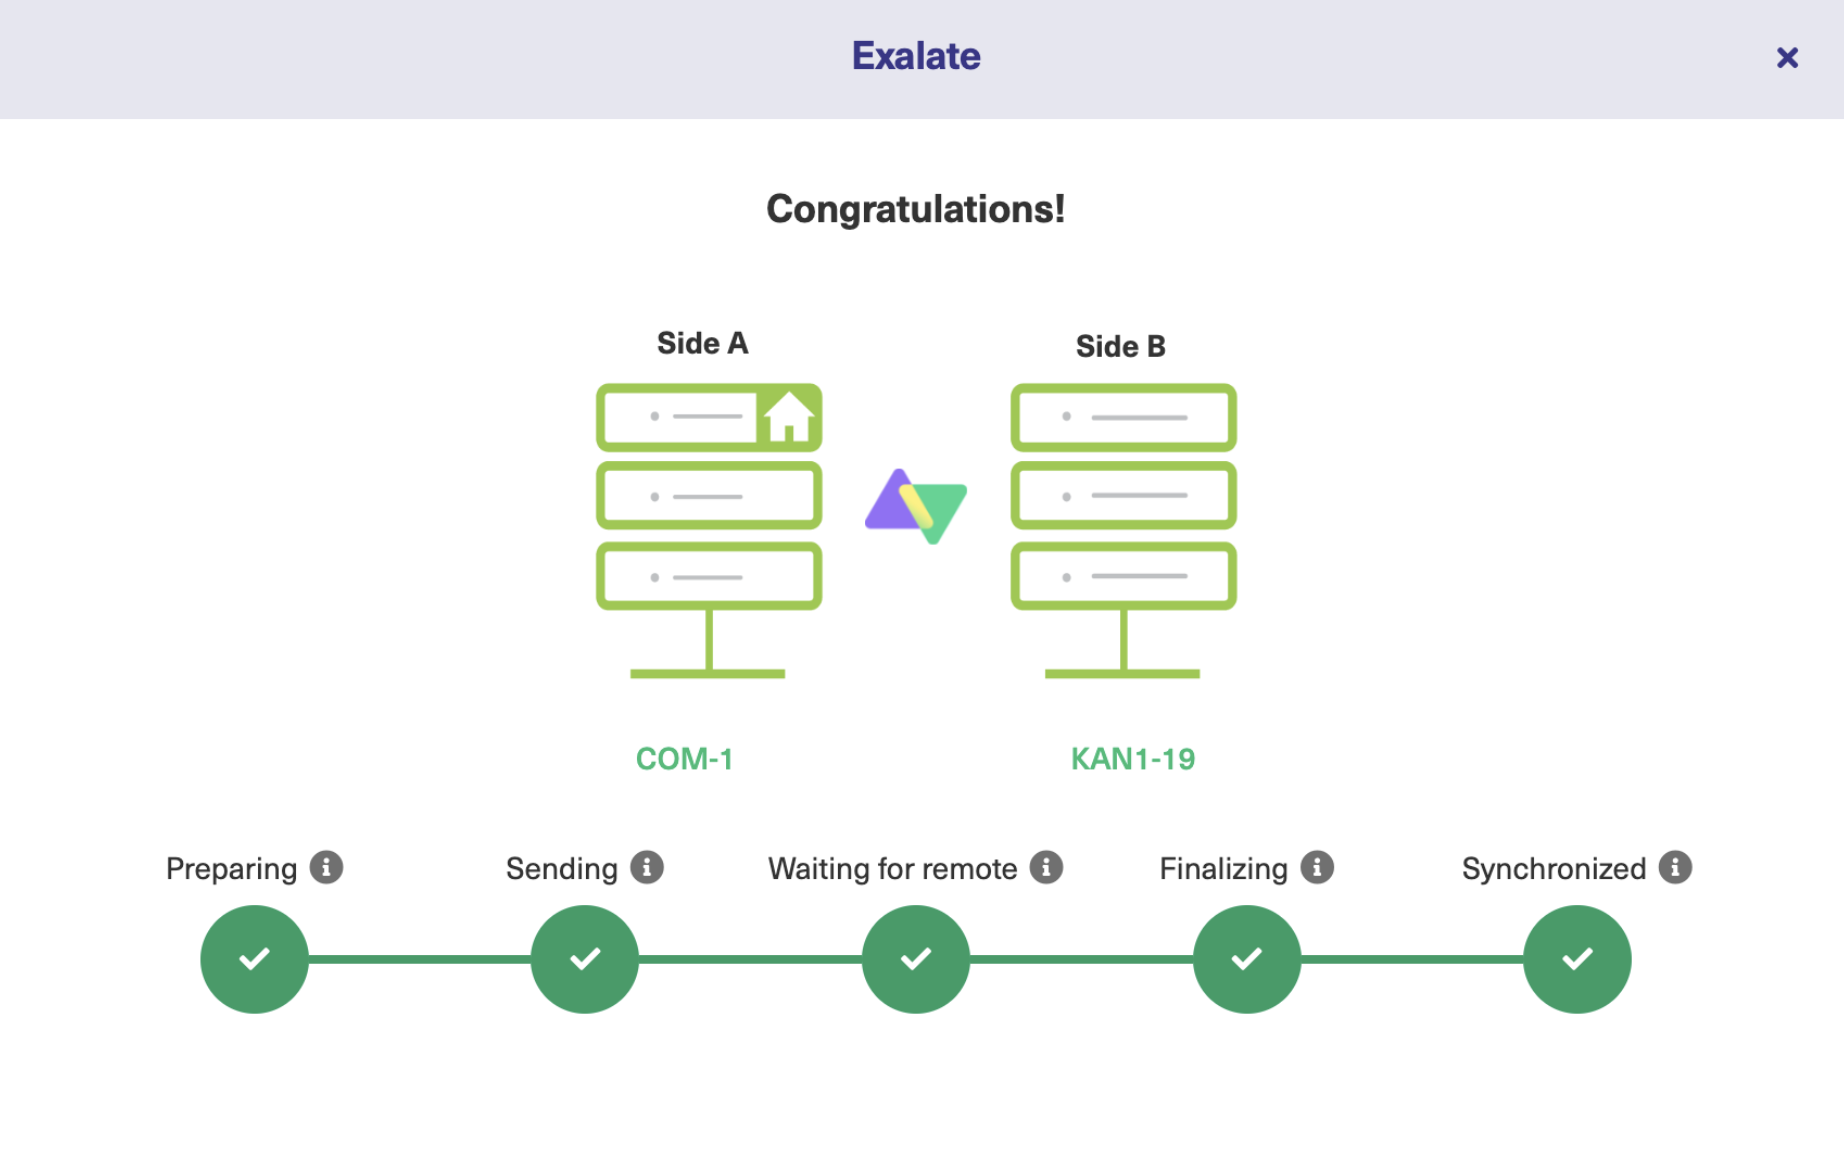
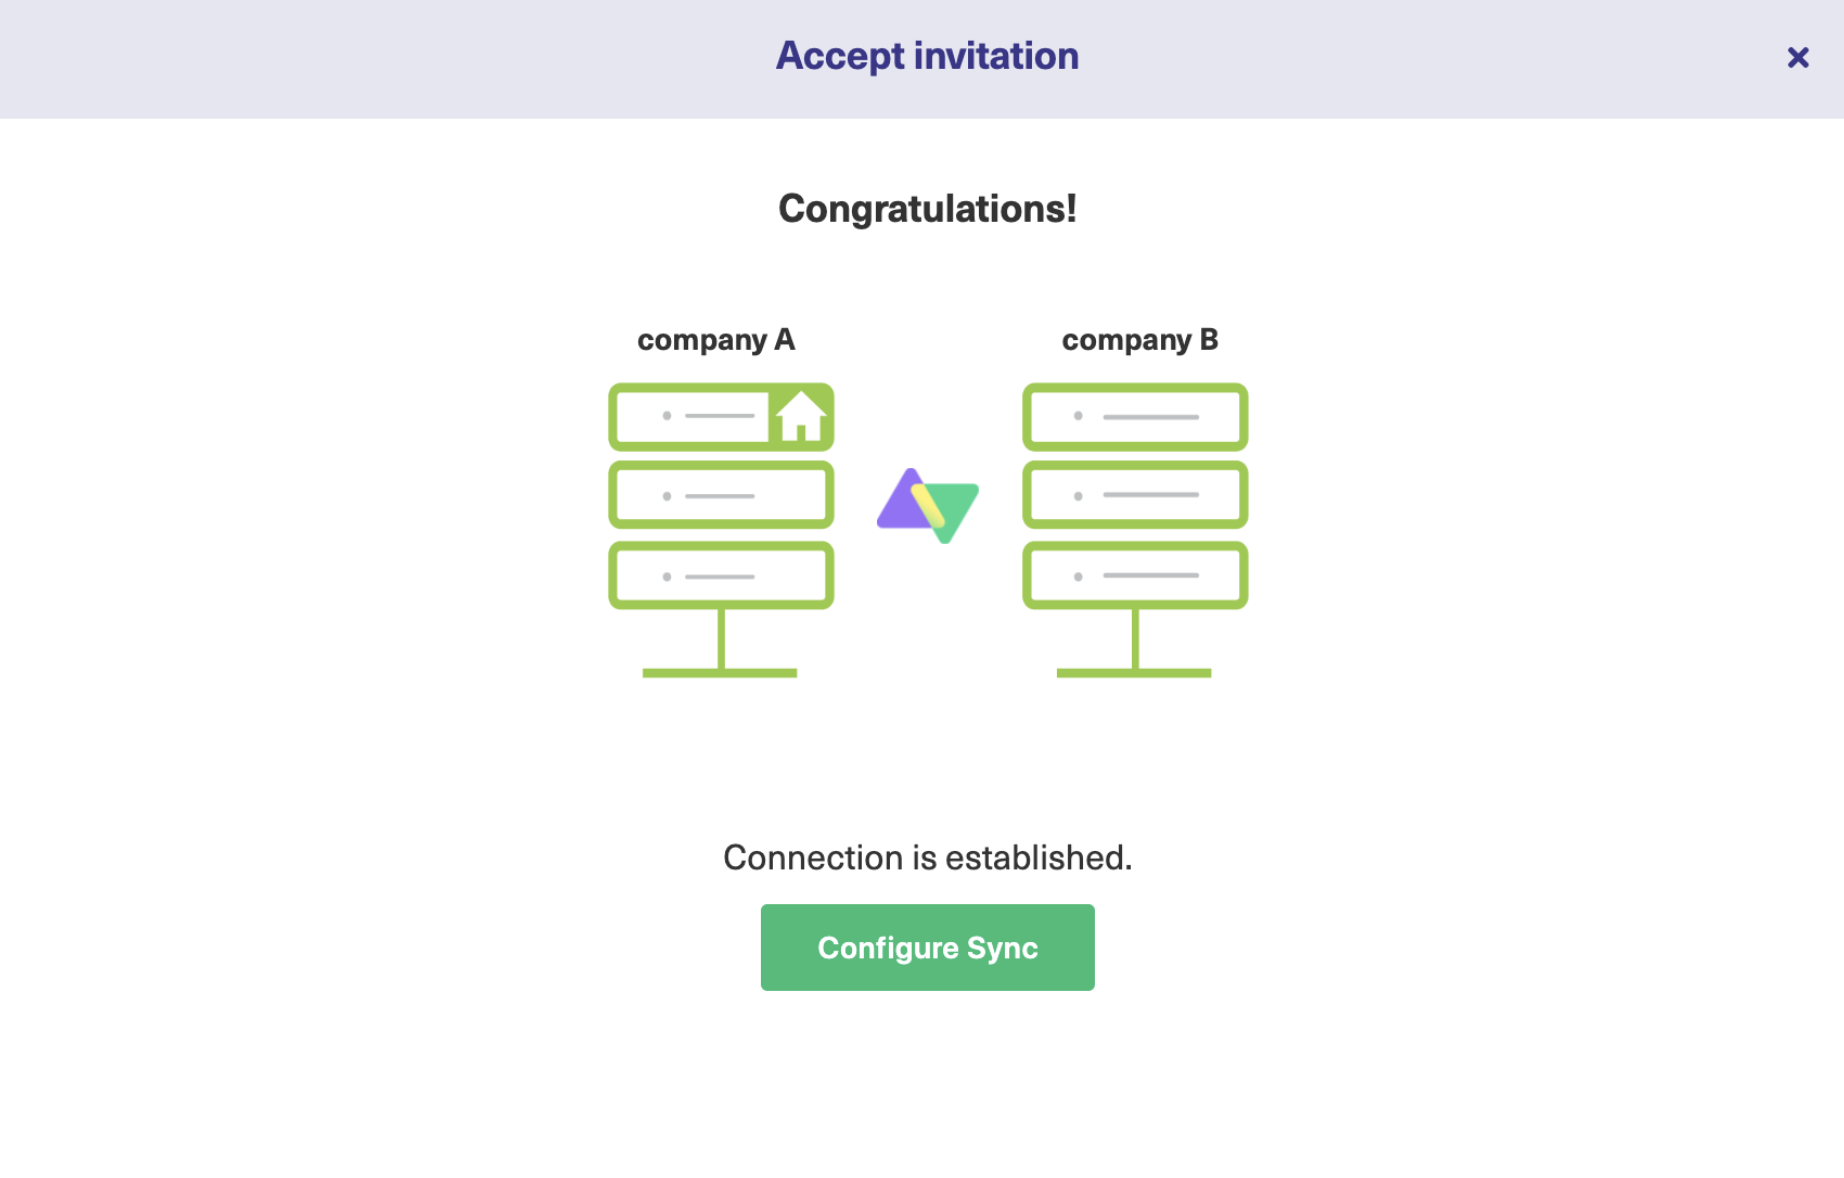
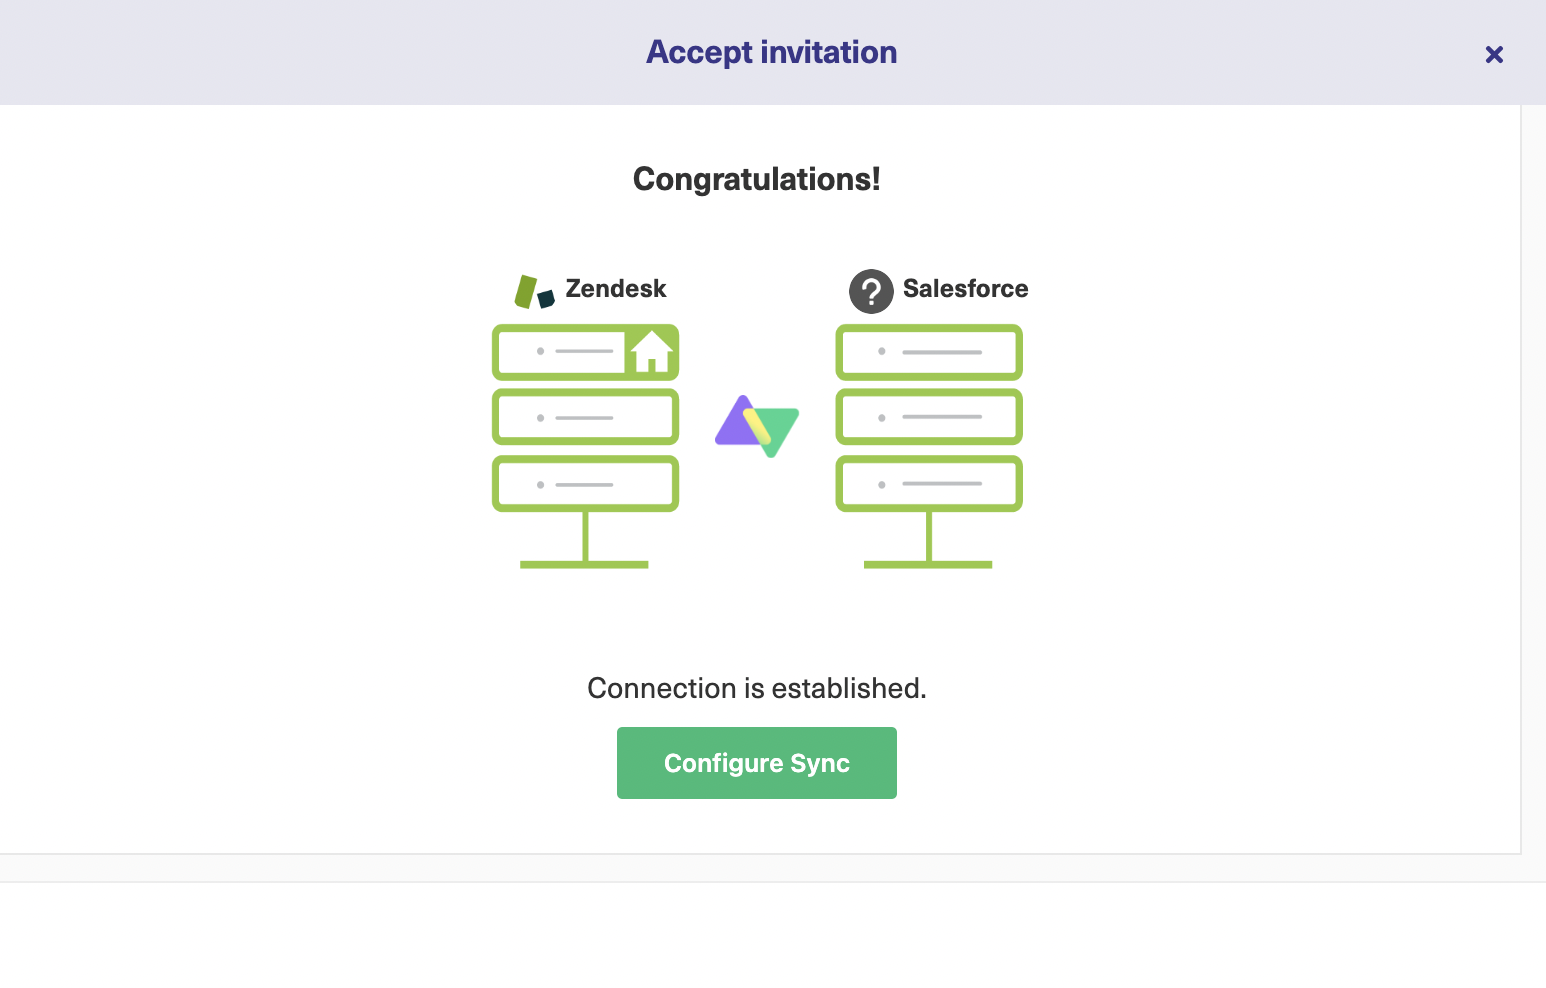
A connection then gets successfully established.
Move to the next step.
Step 3: Configure the Connection to Control Information Exchange
To configure the connection, click the ‘Configure Sync’ button. Or you can even go to the ‘Connections’ tab and click the edit connection icon in front of the connection name.
Both approaches will take you to a similar screen.
You can see 4 tabs: ‘Rules’, ‘Triggers’, ‘Statistics’, and ‘Info’.
We will explore the ‘Rules’ tab here and the ‘Triggers’ in the next section.
Statistics and Info simply provide more information about the connection.
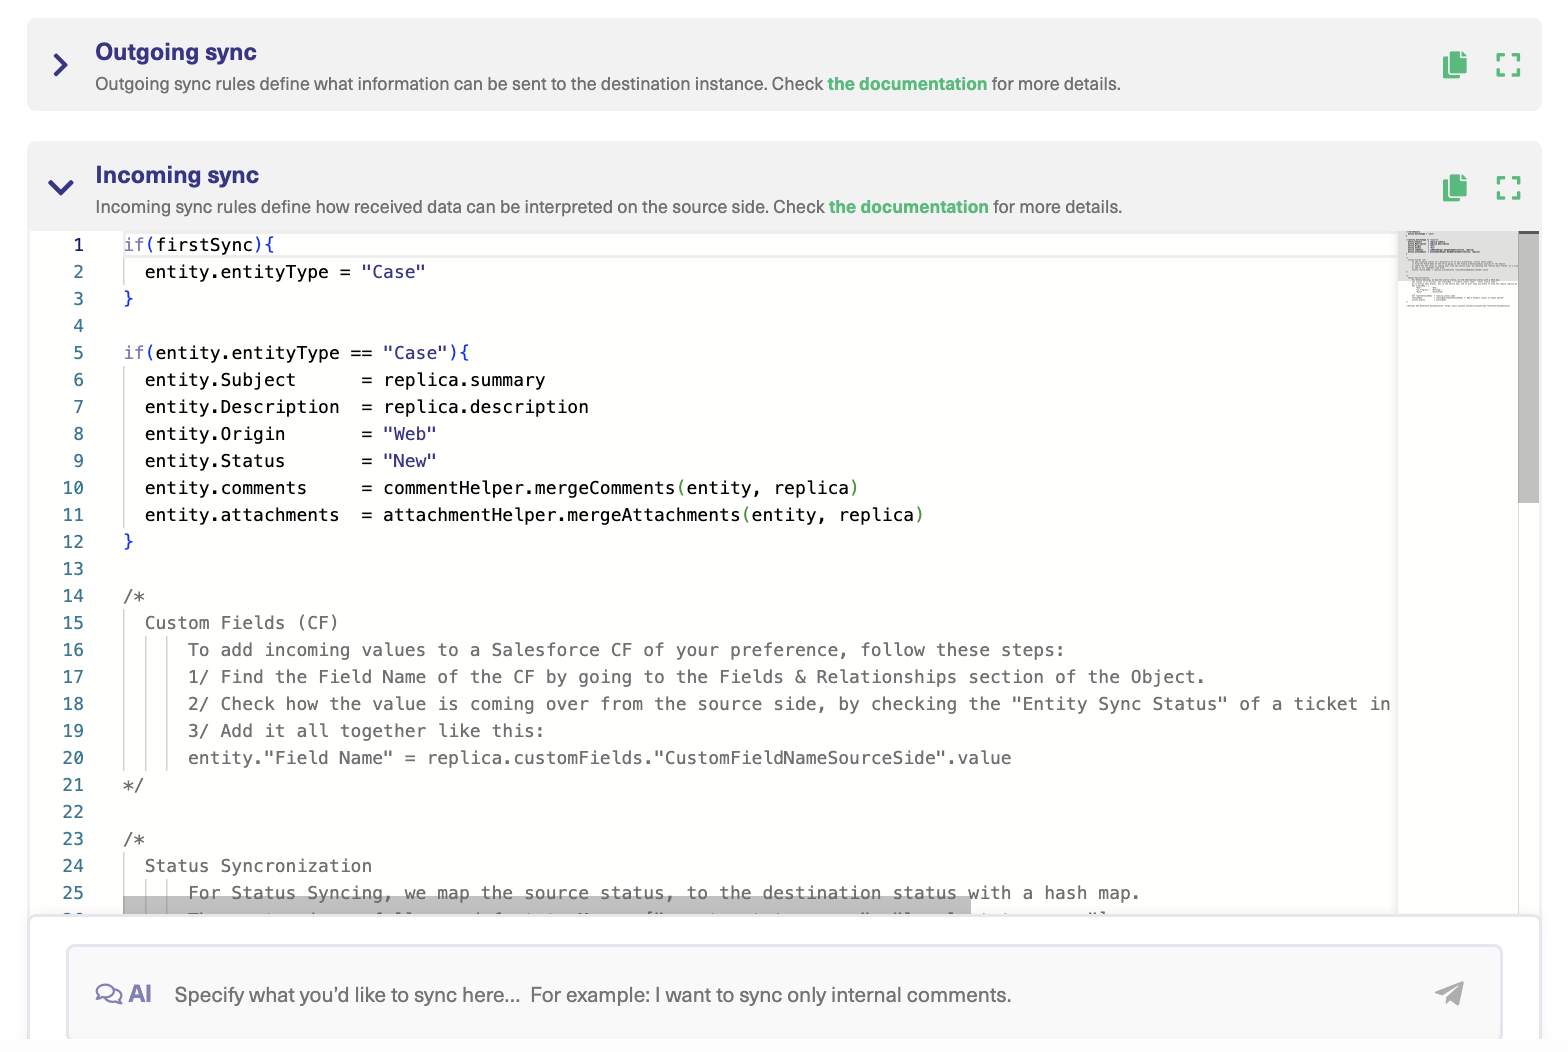
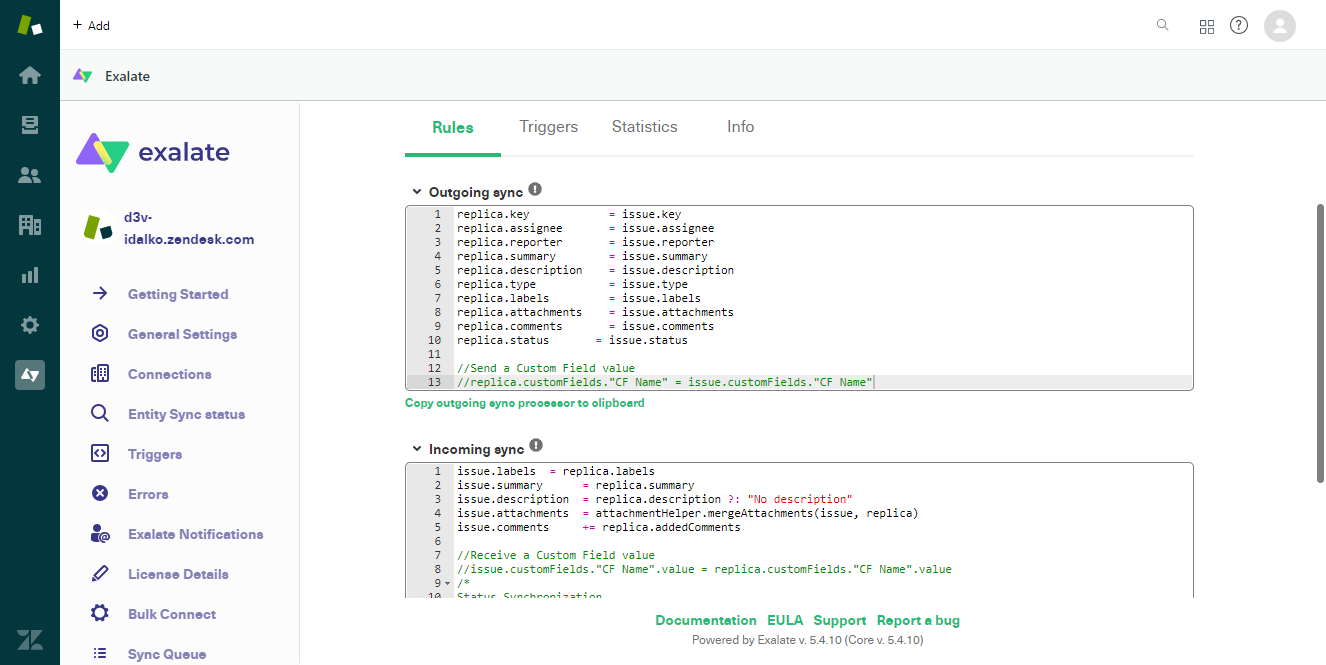
Rules are the Sync Rules we discussed a moment ago. They have both an ‘Incoming sync’ and ‘Outgoing sync’ to control information flow.
For instance, ‘Outgoing sync’ on Salesforce means what information must be sent out from Salesforce, and ‘Incoming sync’ means how information coming from the destination platform is interpreted. The same rules are present on the other side too.
This information is passed back and forth in something called ‘Replica’. It works like a message or payload between the integrating applications.
For instance, replica.summary=entity.Subjectin the ‘Outgoing Sync’ of Salesforce means that the subject of the entity (Case, Product, Account, Opportunity, Task, etc.) is copied into replica.summary.
This replica.summaryis copied into the summary on the other side, for instance, in Jira’s ‘Incoming Sync’ we will write issue.summary=replica.summary.
So if you want to send additional information, you can simply add it to the replica and send it over to the other side. There we extract the information from the replica and apply it locally in any way that makes sense.
If there is something you don’t want to send or receive, you can simply delete the line or comment it, so it will be ignored at the time of synchronization.
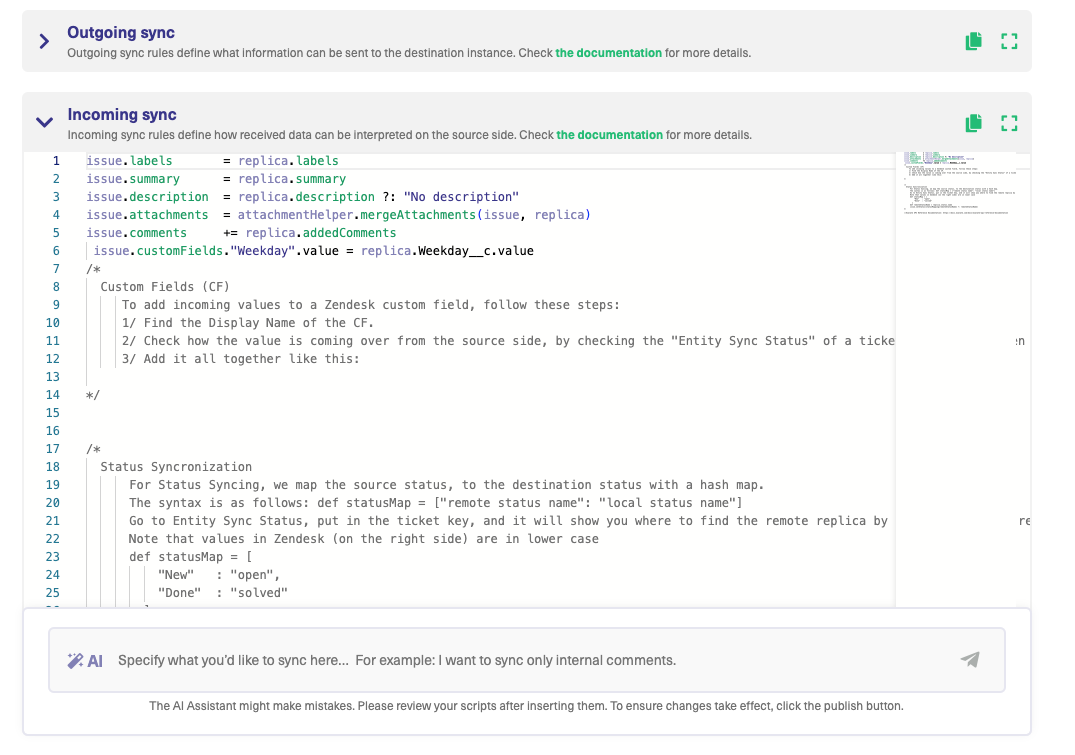
Use AI Assist with Script Mode
Exalate’s script mode now comes with AI Assist, which is available as a chat window in both the incoming and outgoing sync rules tabs.
These scripts generated by the AI-powered chatbot are created based on your input, existing configurations, and Exalate’s scripting API.
Remember, like any AI, AI Assist isn’t perfect and may occasionally make mistakes. So, be as clear and specific as possible with your prompts.
Here’s an example of how you can use it:
Let’s say you need to map case statuses between multiple Salesforce instances. You can type something like this in the AI chat:
For incoming sync: “Create a status mapping that sets New to Open, Working to In Progress, and Escalated to Done in the Jira incoming configuration.”
The AI will generate the script in a few moments.
Lines in red show what will be removed from the current script, while green lines represent the new additions. You can accept or reject the changes and, if needed, adjust your prompt. Once everything looks good, publish your changes.
Once you have decided what information must be sent and received, move to the next step where you decide when to send this information.
Step 4: Set up Automatic Synchronization Triggers
Triggers control when information exchange must happen. Say when a new Case is created i.e. Status = ‘New’, then send it over to the other side.
In short, when the condition set for the trigger is met, then send and receive information according to the ‘Sync rules’.
Remember that triggers are platform-specific, so on the other side, they will be either in JQL (Jira Query Language) for Jira or WIQL (Work Item Query Language) for Azure DevOps and so on.
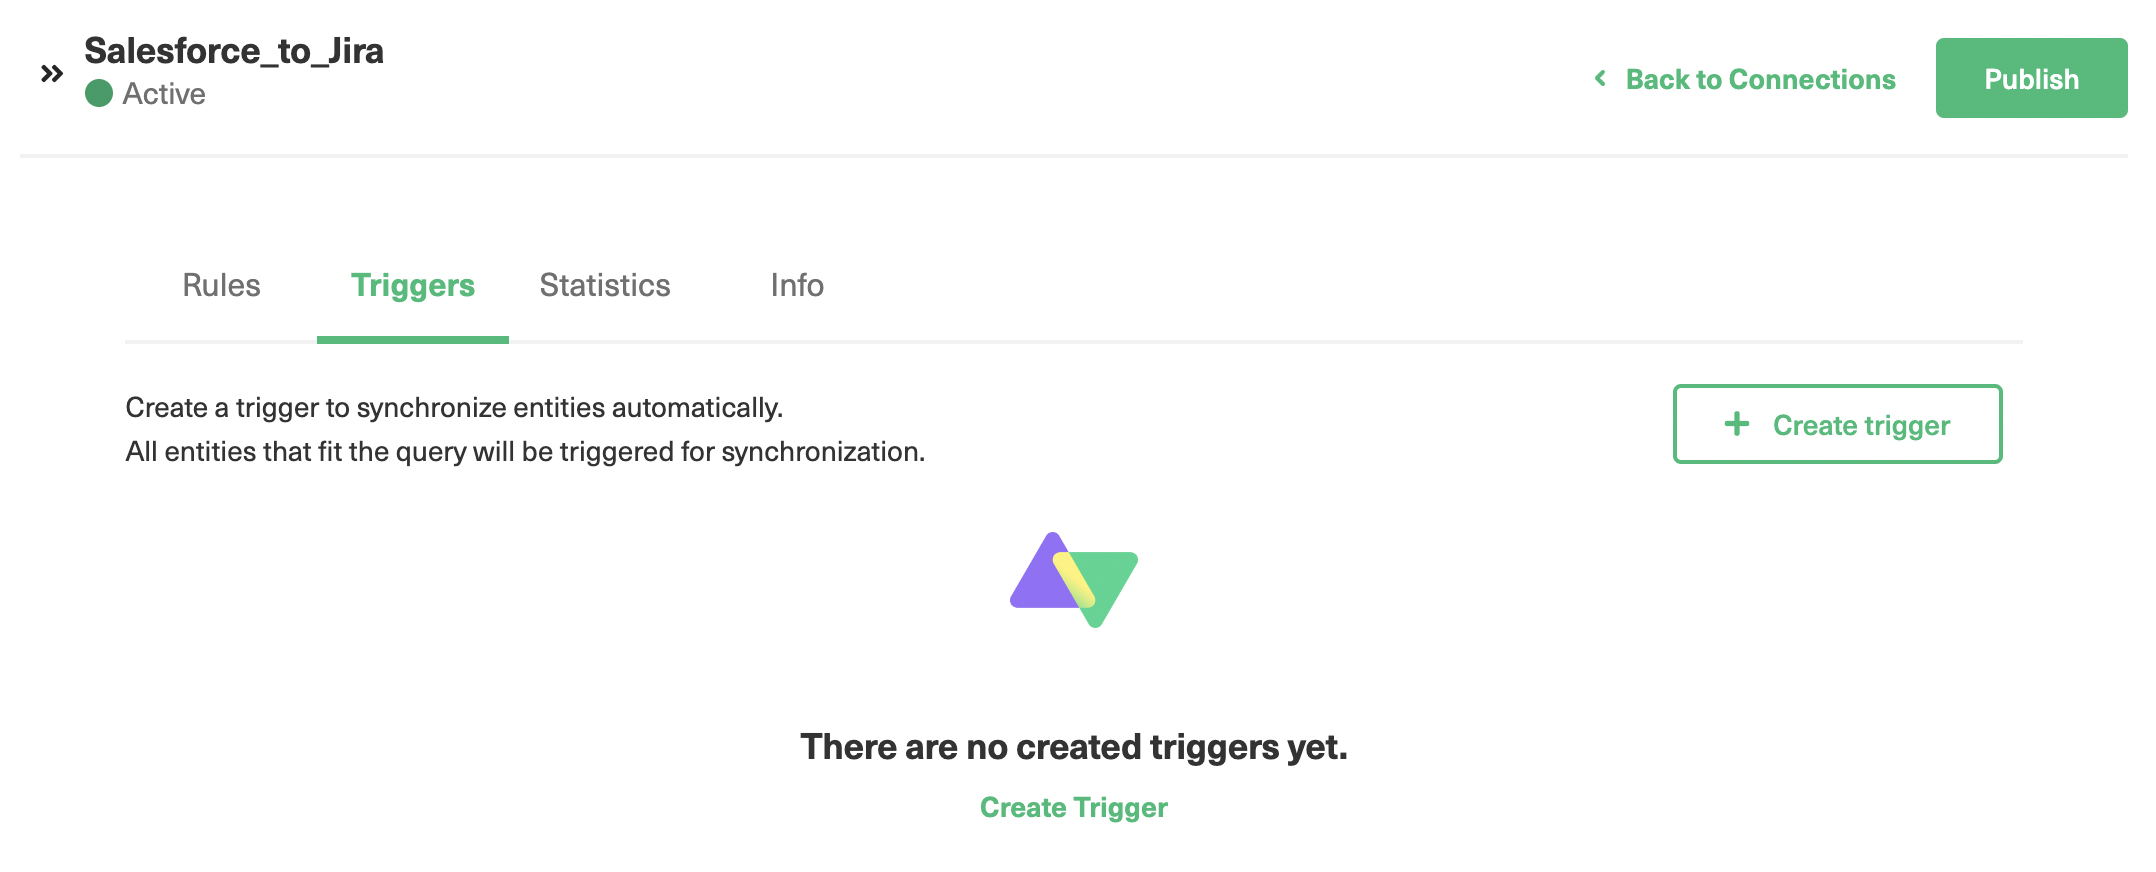
Click the ‘Triggers’ tab from the last screen we saw. There is also a ‘Triggers’ screen on the left-hand side of the Exalate console. This is a global screen to manage triggers. You can create one from here too, but you need to select the connection name while doing so.
Click the ‘Create Trigger’ button to open the ‘Add Trigger’ screen.
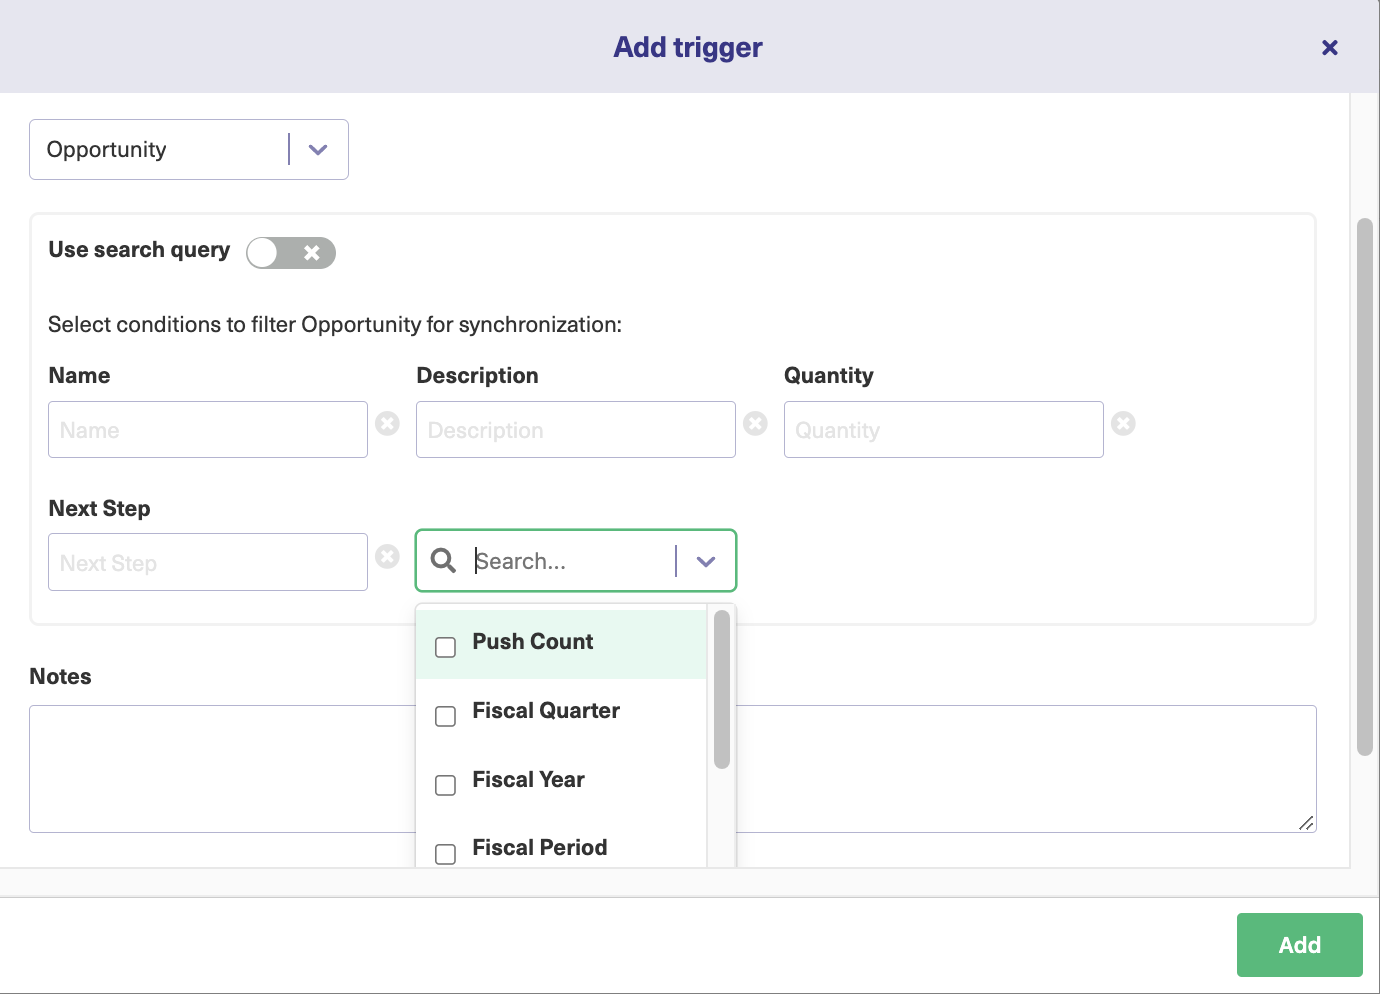
Under the first drop-down, select the Salesforce object to which the trigger applies. It can be a Case, Account, Opportunity, or Product.
You can directly enter some values in the text boxes provided to filter what conditions to set for the trigger.
Or you can simply toggle the ‘Use search query’ button. This will allow you to enter triggers in the SOQL (Salesforce Object Query Language).
For instance, if this is the query: Status = 'New' AND SuppliedCompany = 'Exalate',then it means that newly-created Cases having the Web Company = ‘Exalate’ need to be synced over to the other side.
Leave some notes for the trigger, activate it, and click ‘Add’.
You can view the newly created trigger on the previous screen. To delete or edit a trigger, click the 3 dots in front of the name and explore the options. You can also sync the existing entities that satisfy the trigger condition using the ‘Bulk Exalate’ option.
Don’t forget to ‘Publish’ the changes to the connection.
Step 5: Start Synchronization
There are multiple ways in which you can start synchronization.
For the Basic connection, directly enter the Case number.
Manually sync the Salesforce object through the Exalate panel under the object view. This option is also available for other platforms like Jira, Zendesk, etc. So just select the name of the connection you want to sync the particular object with.
Create automatic sync triggers like we just saw.
Use the ‘Bulk Exalate’ or ‘Bulk Connect’ option to sync objects that already exist in Salesforce or other applications.
Why Exalate is A Reliable Salesforce Integration
Exalate allows deeper integrations with the help of scripts and pre-made connectors.
It supports decentralized integration. As already discussed, this means that each integrating side has complete, independent control over incoming and outgoing information. Exalate achieves this with the help of an AI-powered scripting engine that has Sync rules that can be configured at either end. We will see how that’s done in a while.
This scripting engine offers flexible and deeper integrations with the help of advanced machine-learning algorithms. It also comes with a drag-and-drop interface for common integration scenarios, but even this can be configured for advanced use cases.
It uses a JWT-based token mechanism, HTTPS, and also provides role-based access control. All this can be explored in detail in its security and architecture whitepaper.
It supports integrations for many popular platforms like Jira, Zendesk, Azure DevOps, GitHub, HP ALM, etc. So you can simply set up a Jira Salesforce integration or you can also get the same platform integrations using Exalate like a Salesforce to Salesforce integration.
With the help of an integrated retry mechanism, changes or updates can be applied automatically in case of downtimes.
This also includes understanding what information must be sent and received and how it will impact security. The decentralized integration that Exalate provides needs to be further considered in the scope of information exchange.
Conclusion
In this blog post, we discussed what Salesforce integrations are and went over the benefits of integrating the Salesforce application with other applications like Jira, GitHub, Azure DevOps, Zendesk, or HP ALM by having a look at a few real-life use cases.
And then we looked at the native ways in which to achieve such integration. Of course, there are challenges there, but we addressed them by exploring a third-party integration solution called Exalate.
Then, we saw a step-by-step approach to our integration, which was to see how it can be set up using Exalate.
All said and done, Salesforce integrations can prove to be an effective decision for your business, and we saw that in our blog post.
Frequently Asked Questions
Why is the advantage of Salesforce integration?
Salesforce integration offers streamlined data flow, information consistency, and reduced manual data entry. Integration enhances productivity by automating processes and providing a unified view of customer data. It also improves the customer experience by delivering personalized interactions based on integrated data.
Does Exalate Have API Limits?
Exalate can access the Salesforce integrations API. Salesforce has its own guidelines for API Access add-ons. For instance, API access is provided by default in Enterprise accounts, while it is not the case with other accounts like Professional. This must be considered beforehand. Note: Visit this documentation page to learn about the different Salesforce editions Exalate supports.
What are Salesforce integrations?
Salesforce integrations refer to connecting Salesforce with external systems, applications, or services to automate data exchange and extend the core functionality. Such integrations can be achieved through APIs (Application Programming Interfaces), middleware platforms, or pre-built connectors provided by third-party plugins.
What applications integrate with Salesforce?
You can integrate Salesforce with various systems, such as ERP, marketing automation, customer support, or custom-built applications. For instance, you can use the best Salesforce integrations to connect Salesforce with Mailchimp, Jira, GitHub, Azure DevOps, Asana, Slack, etc.
How to choose the correct Salesforce integration solution?
There are a lot of tools that support Salesforce integration with multiple systems. Some factors to consider while choosing these tools are ease of use, flexibility to support advanced integration cases, scalability, maintainability, robustness of the integration, and cost. You can also create an assessment matrix and choose one that best suits your requirements.
What is REST API in Salesforce?
The REST API serves as a web interface allowing you to access Salesforce data externally. Through REST API access, you can interact with Salesforce by sending HTTP requests to specific endpoints. These requests enable you to create, modify, search, and retrieve various types of information.
Integrating Salesforce using REST APIs requires technical resources to implement it. Instead, an external integration vendor can ensure a hassle-free implementation.
Salesforce often involves multiple objects that have an association between them. For instance, an Opportunity can have an Account or Product association, or a Case can have a linked Account or Contact, or there can be a completely new custom object.
And then I have often come across requests where these related objects in Salesforce need to be synced over to Jira for better visibility to different teams.
This article is to help you understand how this can be achieved using a 3rd-party integration solution like Exalate.
Jump to:
The Use Case
Using a 3rd-party Integration Solution: Exalate
The Use Case
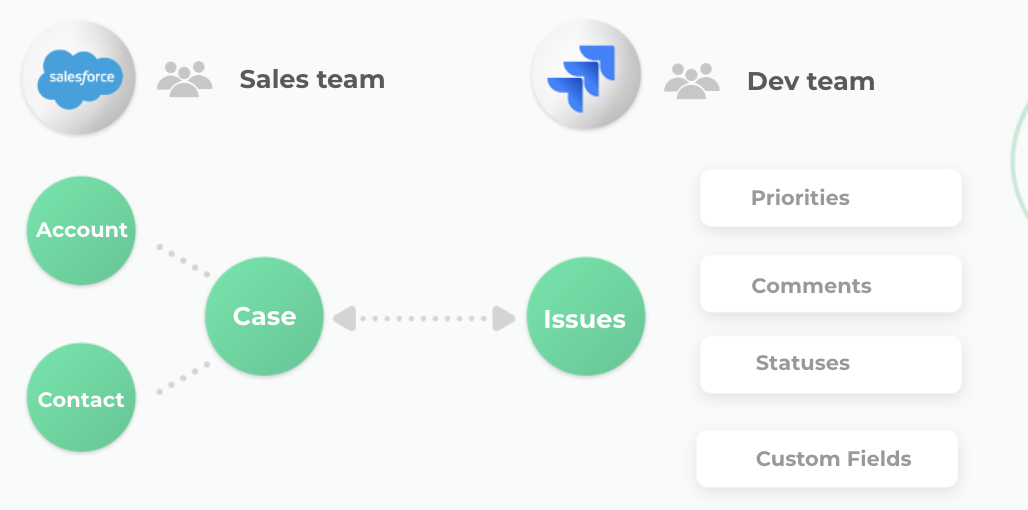
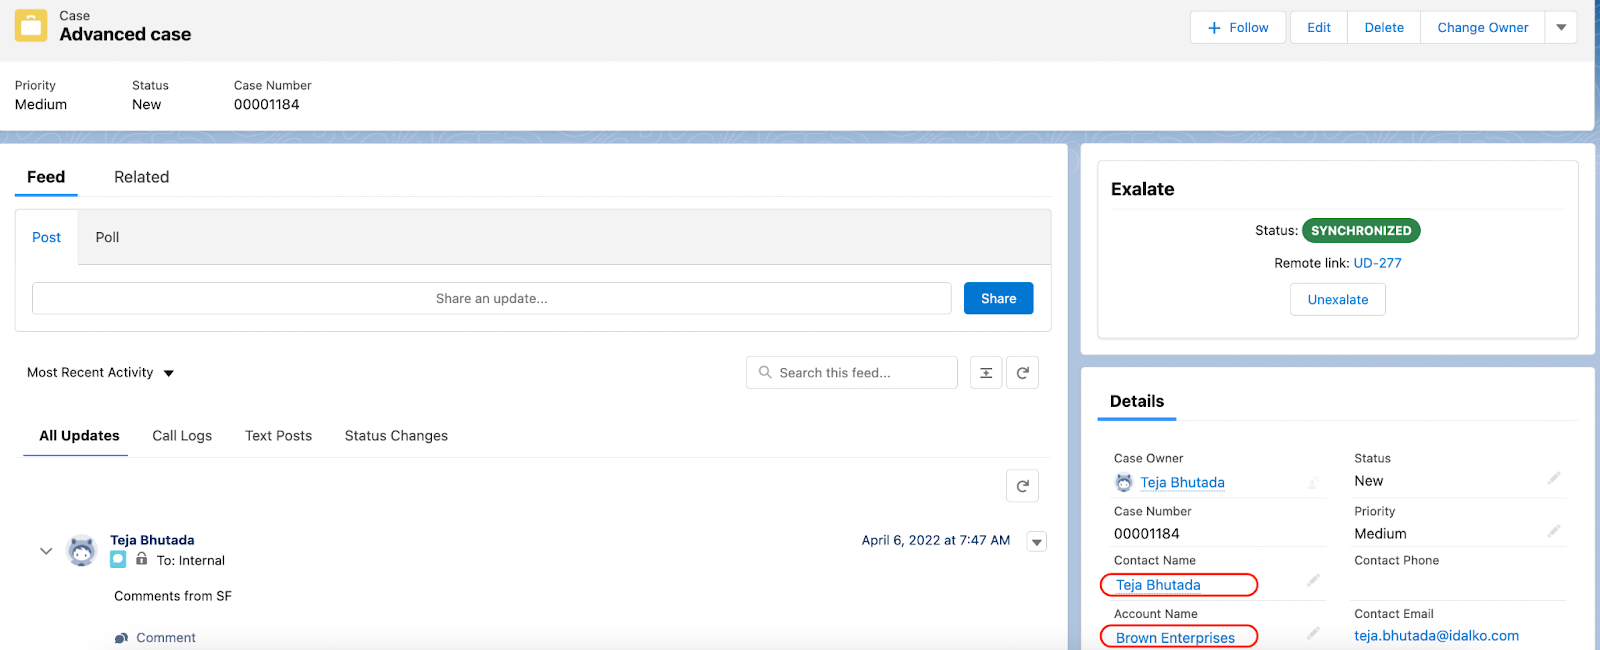
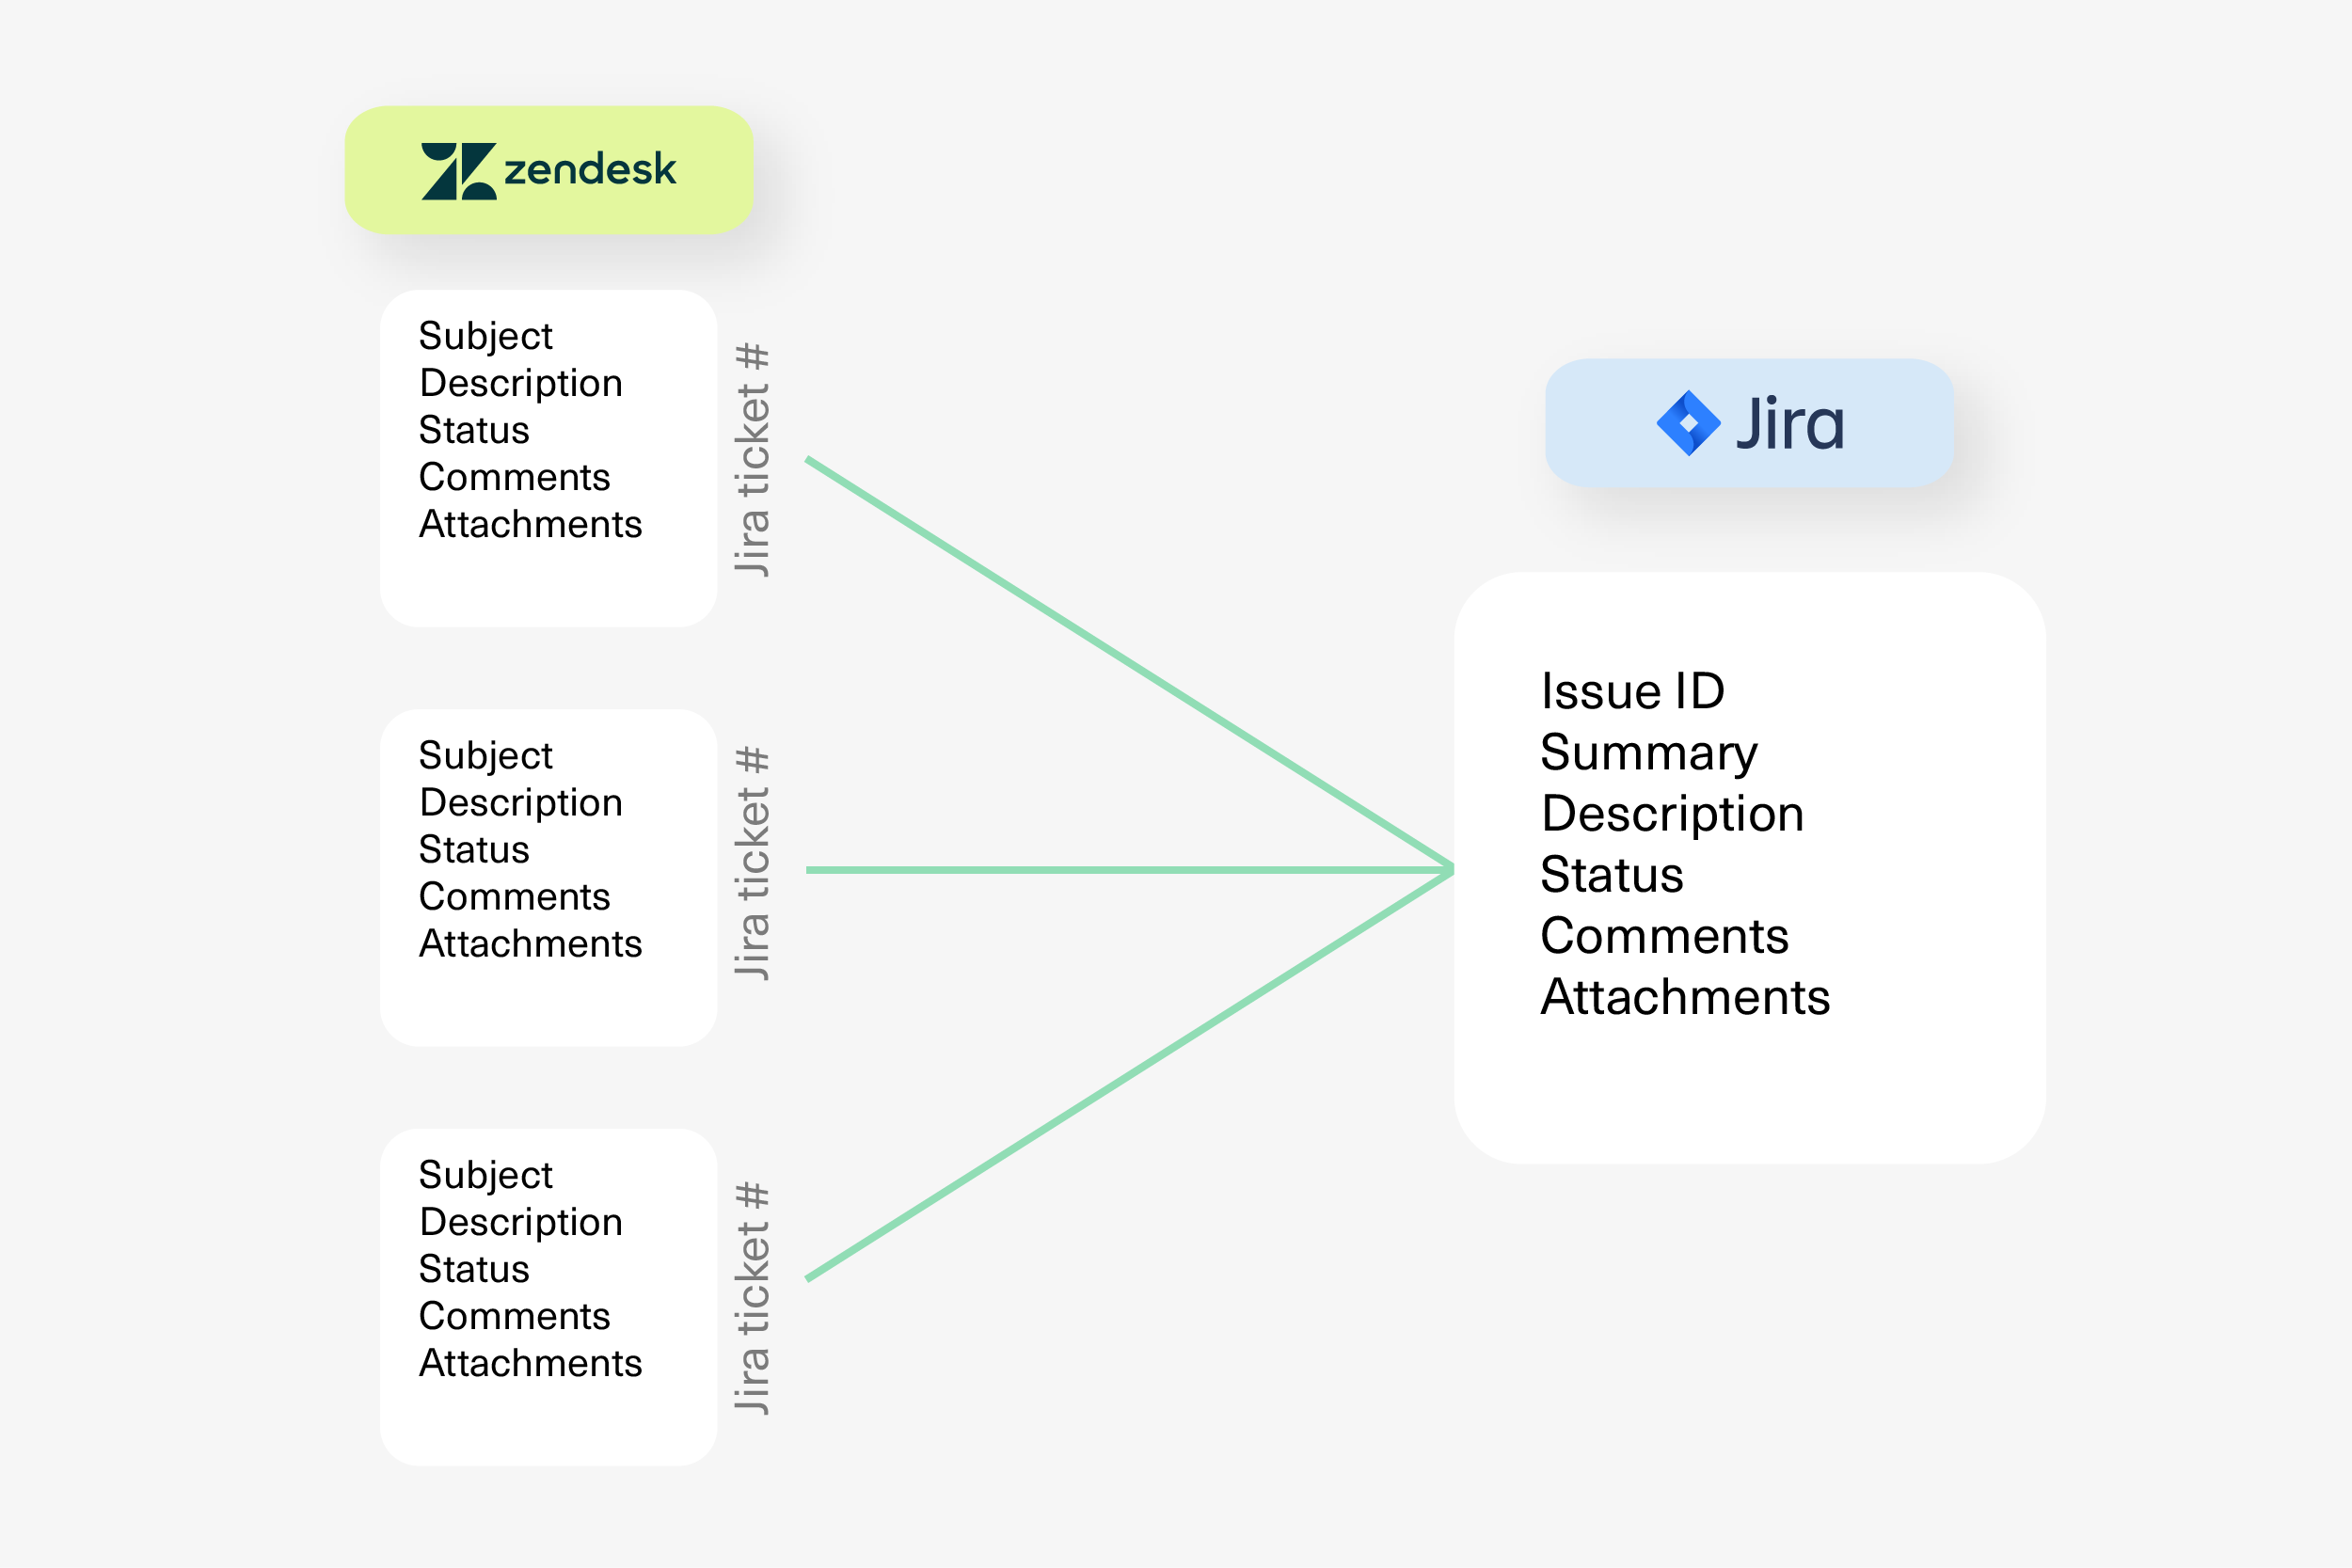
We have a Case object that has a Contact and Account linked to it and that needs to be presented on the Jira side.
The specifics:
Case information like subject, description, comments, status, and attachments needs to be synced bi-directionally between Jira and Salesforce.
On the Jira side there are 2 custom fields: ‘SF Contact’ and ‘SF Account’ to display the Account and Contact information related to the above Case.
Name, title, and email of the Contact to be displayed on the Jira side.
Name and description of the Account to be displayed on the Jira side.
Any changes or updates in the Account or Contact need to be reflected on the Jira side.
The Challenges:
Fetching information related to Case, Account and Contact individually from Salesforce to Jira can be simple. The real challenge lies in connecting the Account and Contact to the correct Jira issue that has been created while syncing the Case.
Changes in the Account or Contact should pass over correct updates to the synced Jira issue.
Using a 3rd-party Integration Solution: Exalate
Exalate is a bi-directional synchronization solution that integrates different platforms like Jira, Salesforce, Azure DevOps, ServiceNow, Zendesk, GitHub, and more. The above use case can be implemented using the Exalate API. With a built-in Groovy-based scripting engine, you have the necessary capabilities to implement almost any use case.
As an Exalate administrator, you can configure both the incoming and outgoing processors on each side independently. These processors on both Jira and Salesforce filter what information must be sent and received.
Implementation with Exalate
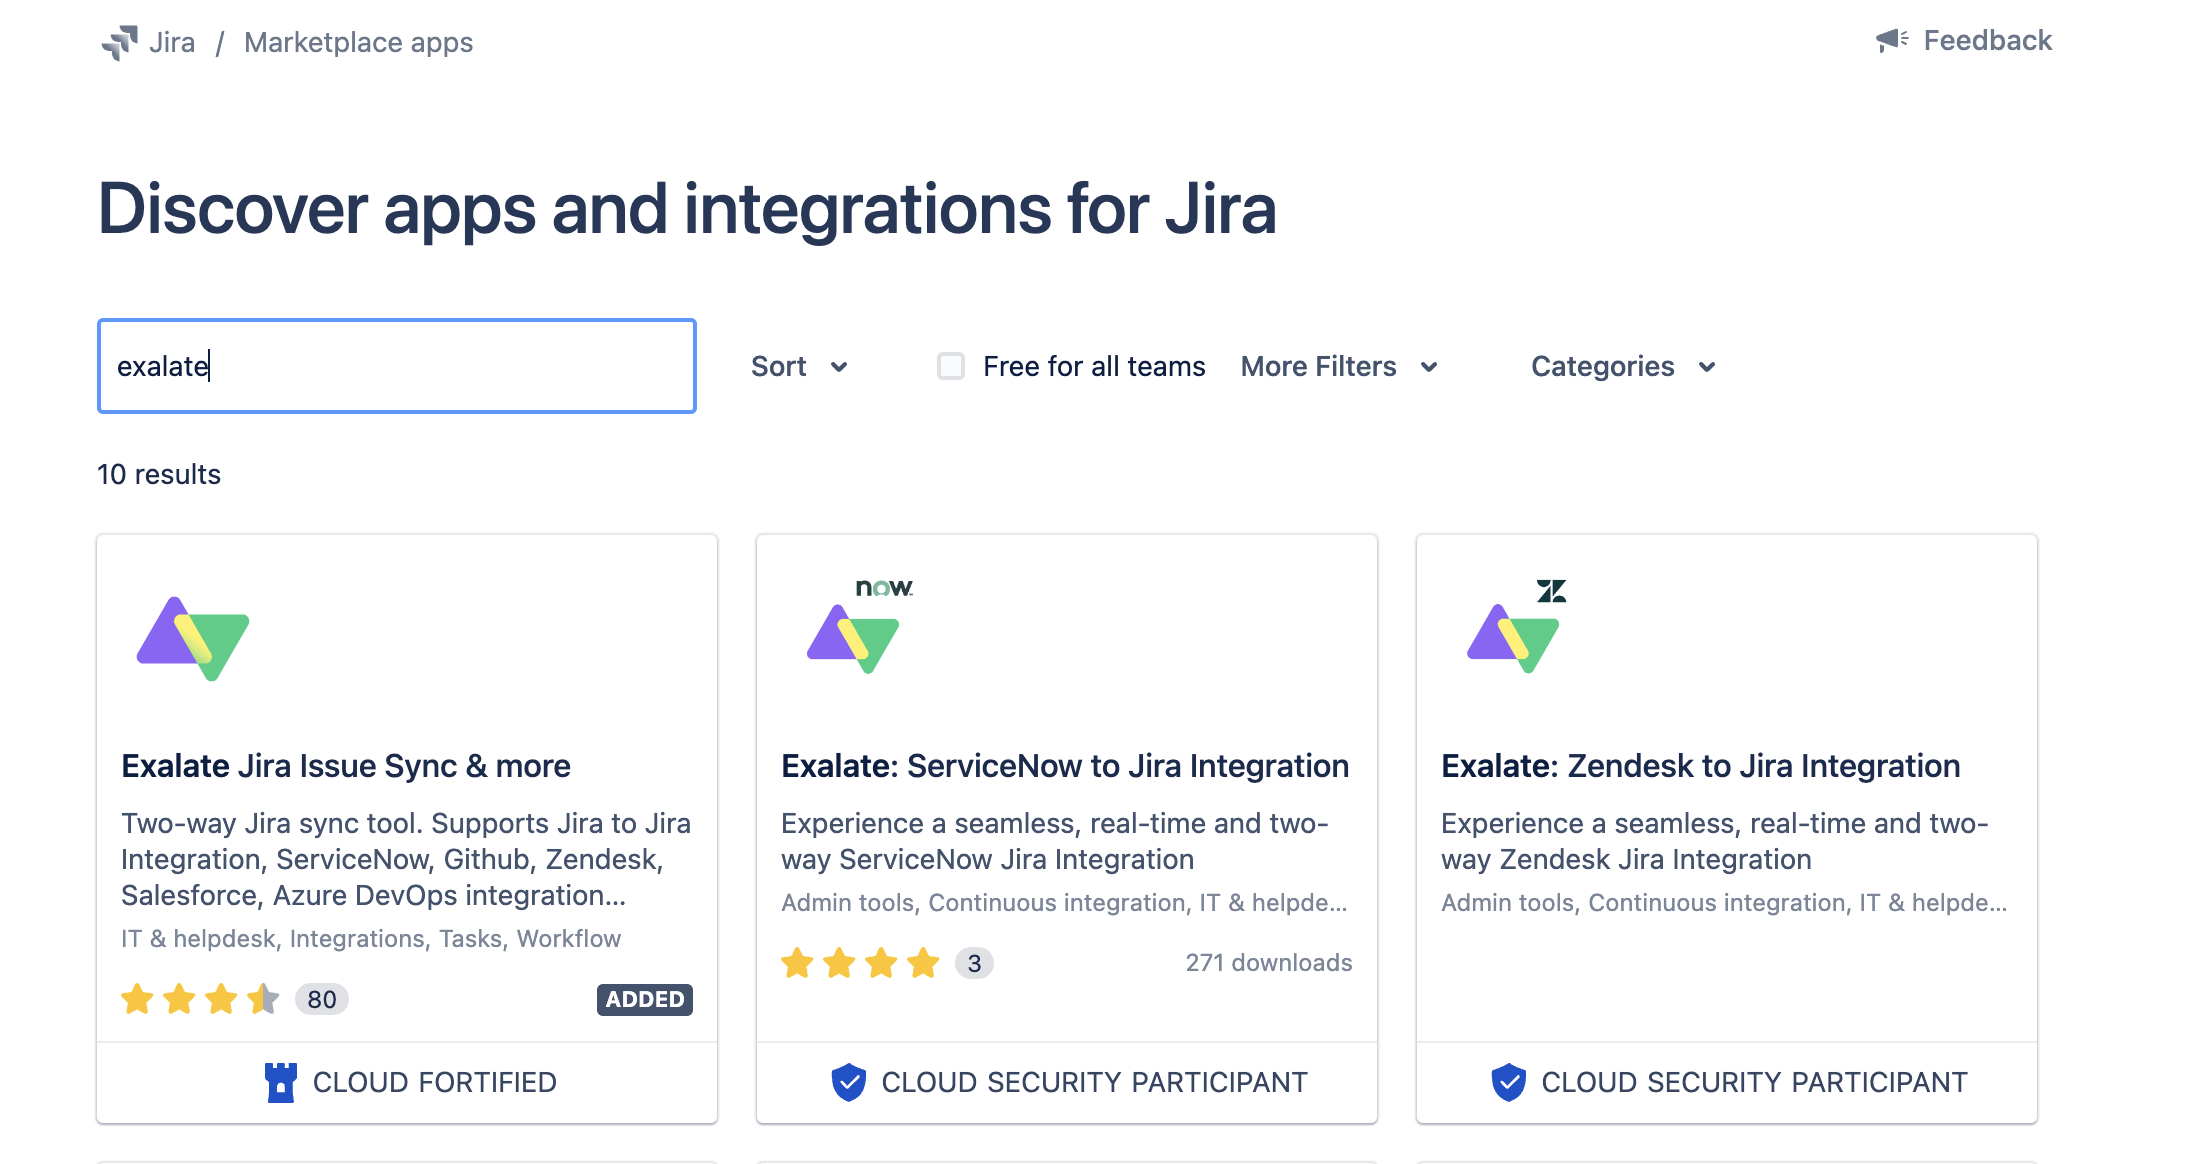
Before starting the implementation we need to install Exalate on both Jira and Salesforce. For Jira Cloud, you can do so from the Atlassian Marketplace. For Salesforce head over to AppExchange.
Note: You can also watch the Exalate installation videos of Jira and Salesforce if you prefer so.
Search for the Exalate app on both marketplaces and start following the installation wizard, which is pretty straightforward.
Note: To know about how it can be done on Jira on-premise, have a look at this doc.
Then a connection must be established between them. There are 2 types of connections that are supported: Basic mode and Script mode.
The Basic mode is for syncing basic entities like summary, description, comments, attachments, and issue types in Jira and Cases in Salesforce. As you can’t configure it, it is suitable for simple integration cases, but you can use it for free.
The Script mode connection provides independent control on each side. It consists of Groovy scripts that help configure the incoming and outgoing information. It can be done by editing the Sync rules.
Keeping in mind the advanced configuration of this use case, it is recommended we use the Script mode connection.
Configuring the Connection
Once the connection has been set up, we start configuring it. Both the incoming and outgoing scripts need to be configured at either end. ‘Outgoing sync’ at the Jira end decides what information goes out from Jira to Salesforce and ‘Incoming sync’ at Jira keeps track of how to receive information coming from Salesforce. These syncs are present at the Salesforce end too.
As seen in the script below, all the information (sent or received) is through something called ‘replica’. This ‘replica’ acts like a payload or message being sent as a part of a sync transaction. It can contain issues, Cases, or any other information that needs to be passed between the two platforms.
Let us have a look at the ‘Incoming’ and ‘Outgoing’ syncs that need to be configured at Jira and Salesforce by following the steps of this use case along the way.
Outgoing Sync: Jira
Since there is no additional information apart from the defaults that need to be sent from Jira to Salesforce, we keep it as it is.
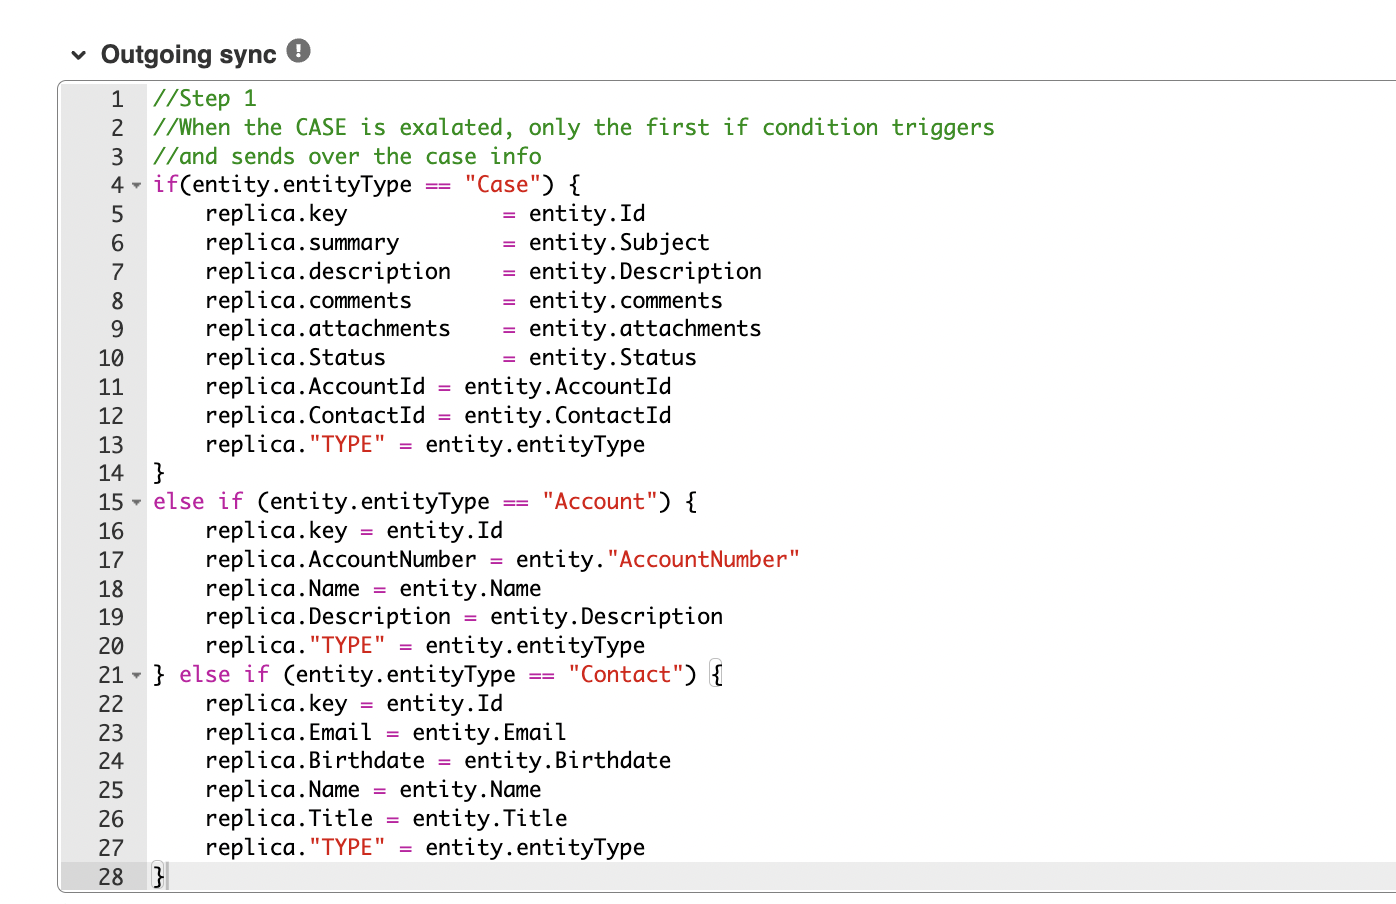
Step 1: Outgoing Sync, Salesforce
Line 4: Here, the first ‘If’ condition checks whether the entityType is ‘Case’.
If yes, then Subject, Description etc for the Case is copied into a replica to be sent over to Jira.
Line 13: replica.“Type” carries the type of the Salesforce record, for instance, Case, Account or Contact. This is used at the Jira end to recognize what type of entity is coming over.
Line 15 and Line 21: The next 2 if conditions are to send specific Account and Contact related information.
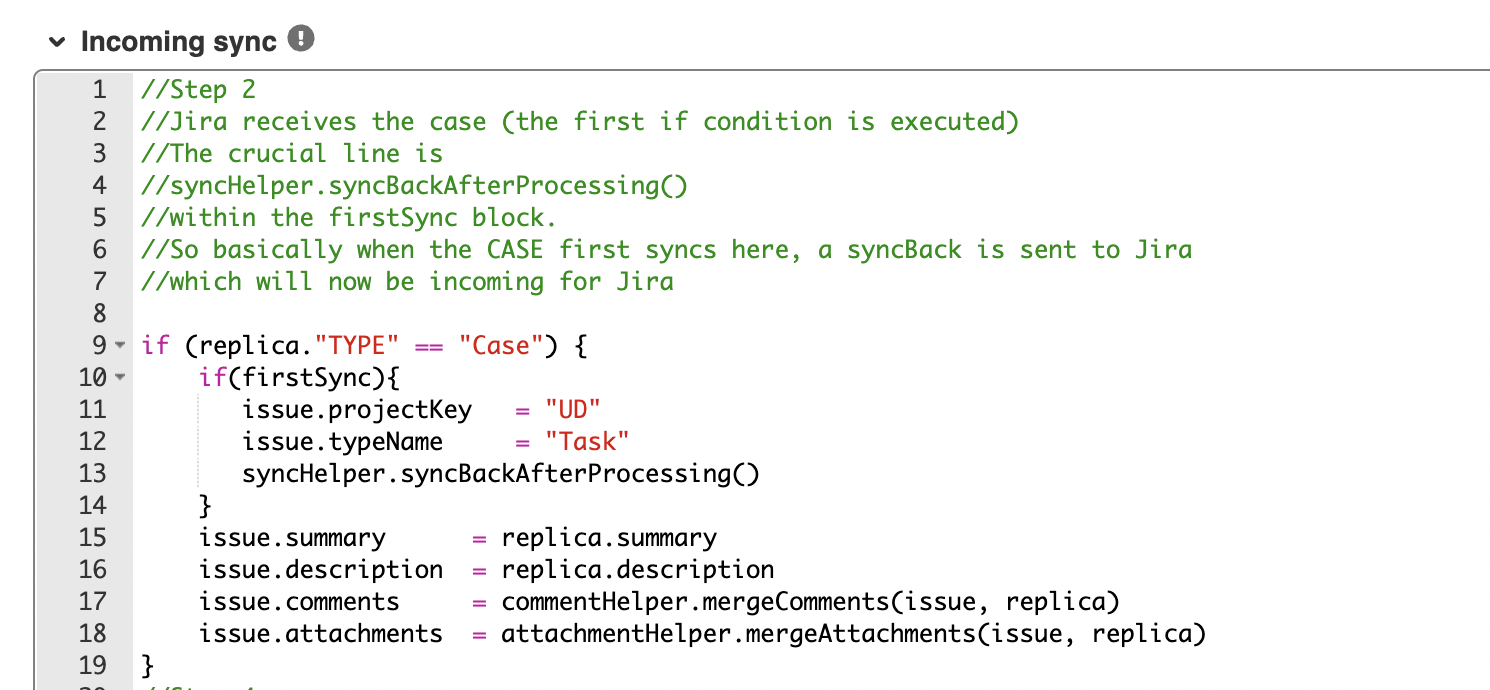
Here, you will check if the entity from the replica is ‘Case’, if it is and it’s the first sync, then you create a ‘Task’ in Jira.
And then we call: syncHelper.syncBackAfterProcessing().
This is a helper method the Exalate API provides. When it’s the first sync, this method syncs back to Jira, so there is an incoming sync for Jira to fetch the Contact and Account information from Salesforce.
Note: You can also have a look at the other helper methods provided by the Exalate API.
Right now let’s go to the other end (Salesforce incoming) to be in line with the steps of our use case. We will have a look at the remaining code in the ‘Incoming sync’ of Jira in step 4 again.
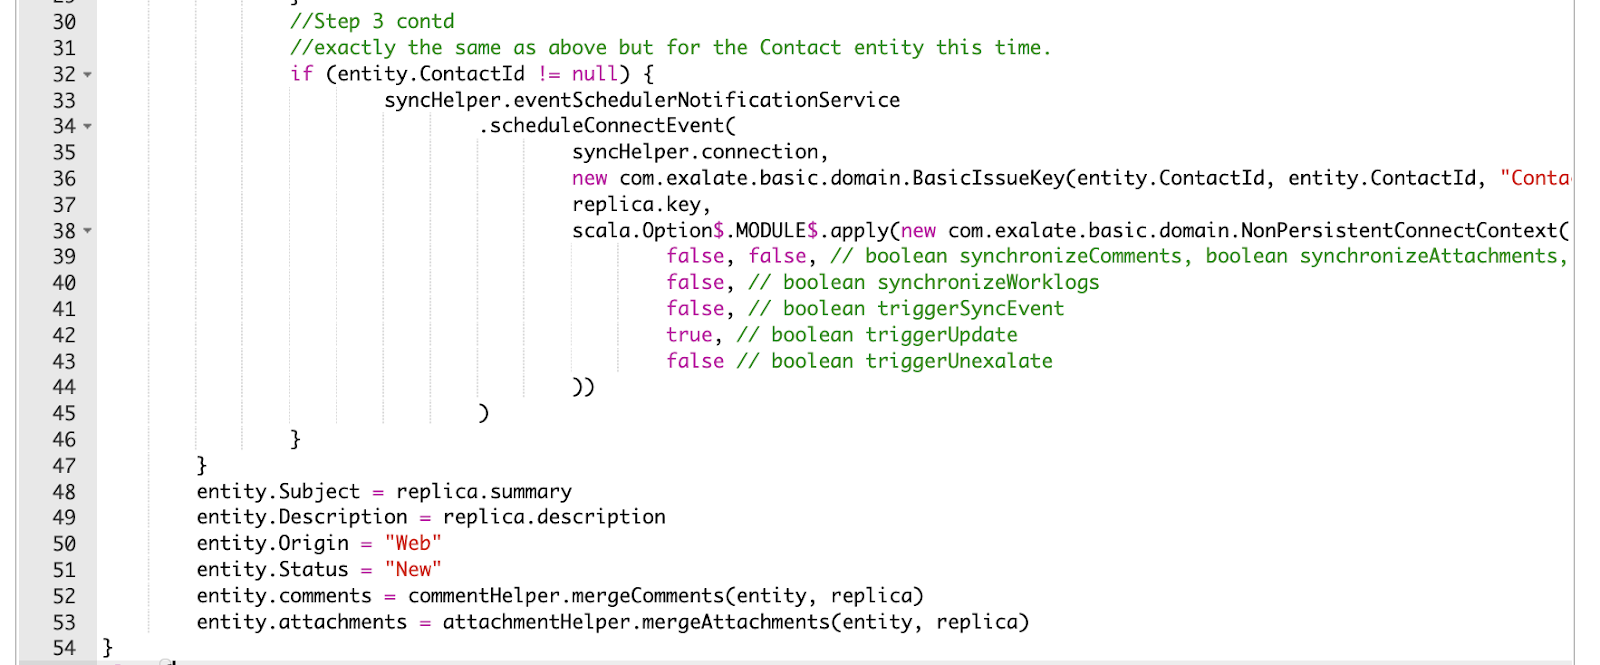
Step 3: Incoming Sync, Salesforce
In Salesforce, if it is the first sync then a Case is created. Do remember that this is completely customizable, you can create any other entity if you want.
Line 6: If the entity type is Case, then proceed with fetching the Account and Contact information
Line 10: The value of the syncRequest.remoteSyncEventNumber is checked to see if it’s equal to 1. If it is, then it ensures that the code that goes next is executed only once and not on every subsequent sync.
Line 12: Checks if there is some Account information to be fetched (i.e it’s not null).
Line 16: Executes the scheduleConnectEvent method which connects the linked Account from Salesforce with the Jira issue already synced with the Case, and doesn’t create a new one. It uses the replica.key from the Jira side to form this link. This key is already received in the syncBack transaction.
The same set of code applies to fetching the Contact details as well.
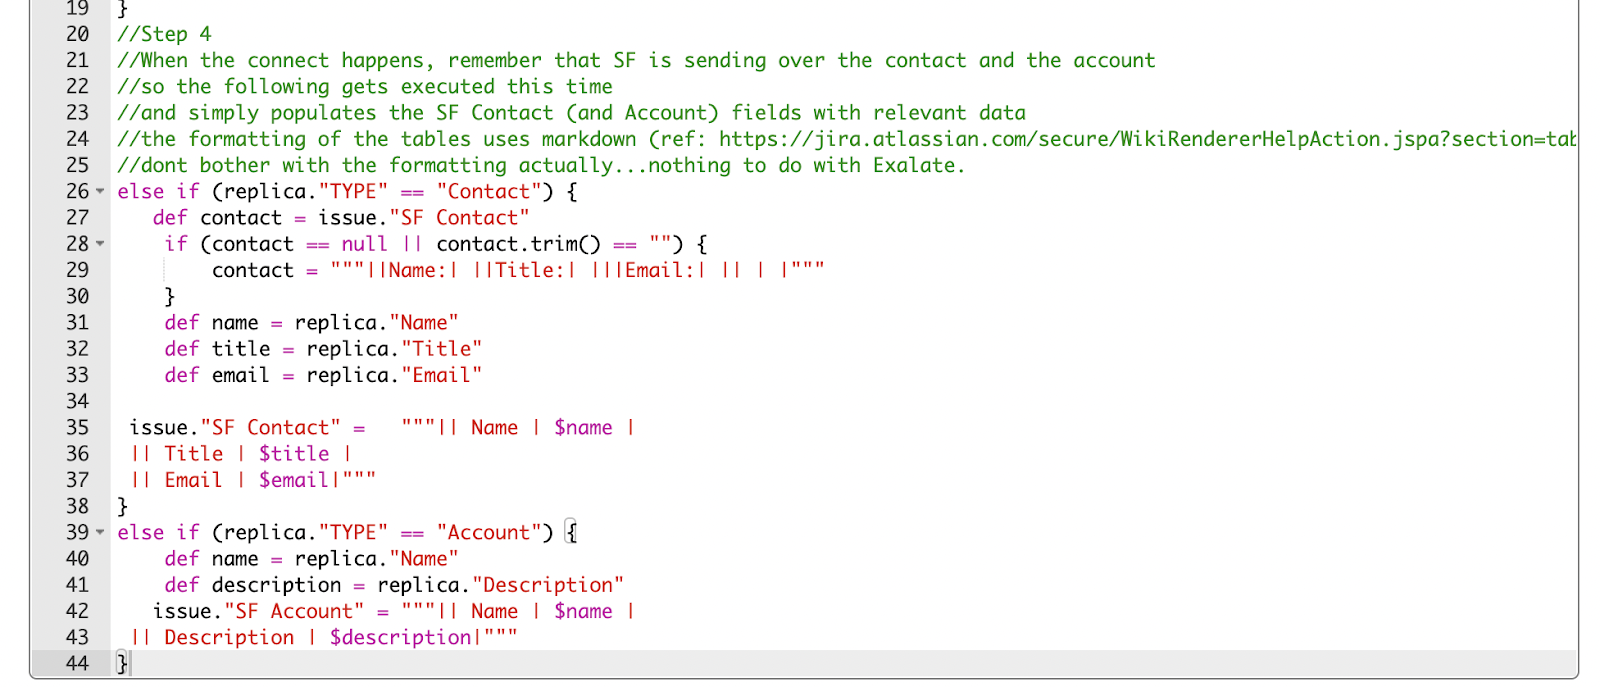
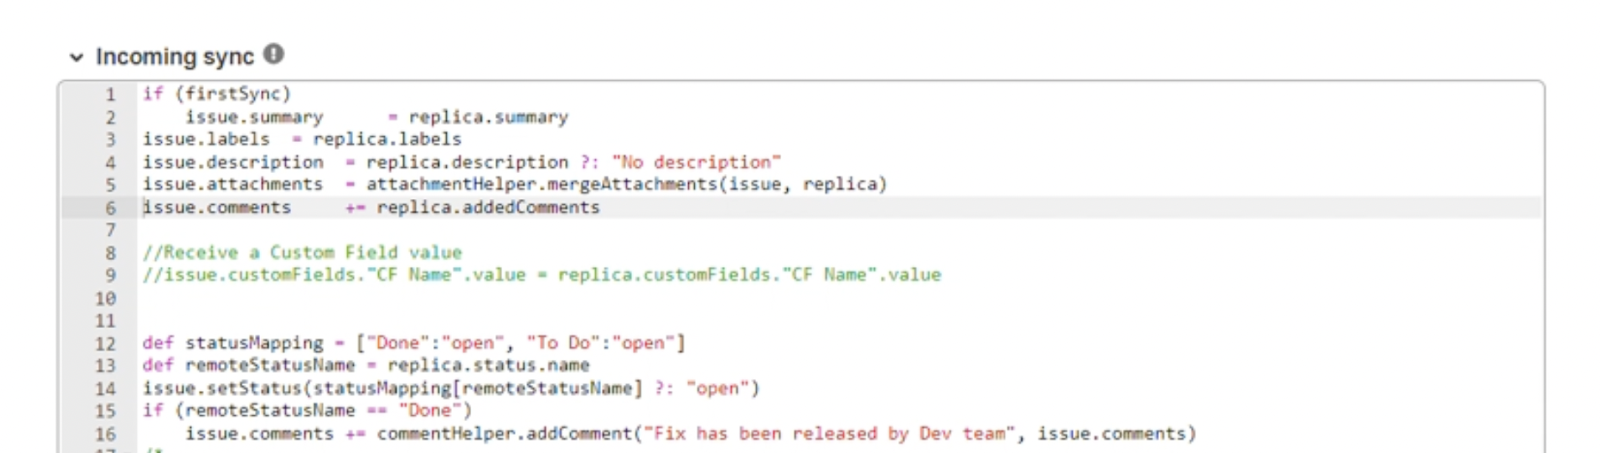
Step 4: Incoming Sync, Jira
Now coming back to the incoming sync on Jira, it’s time we display the fetched Account and Contact details.
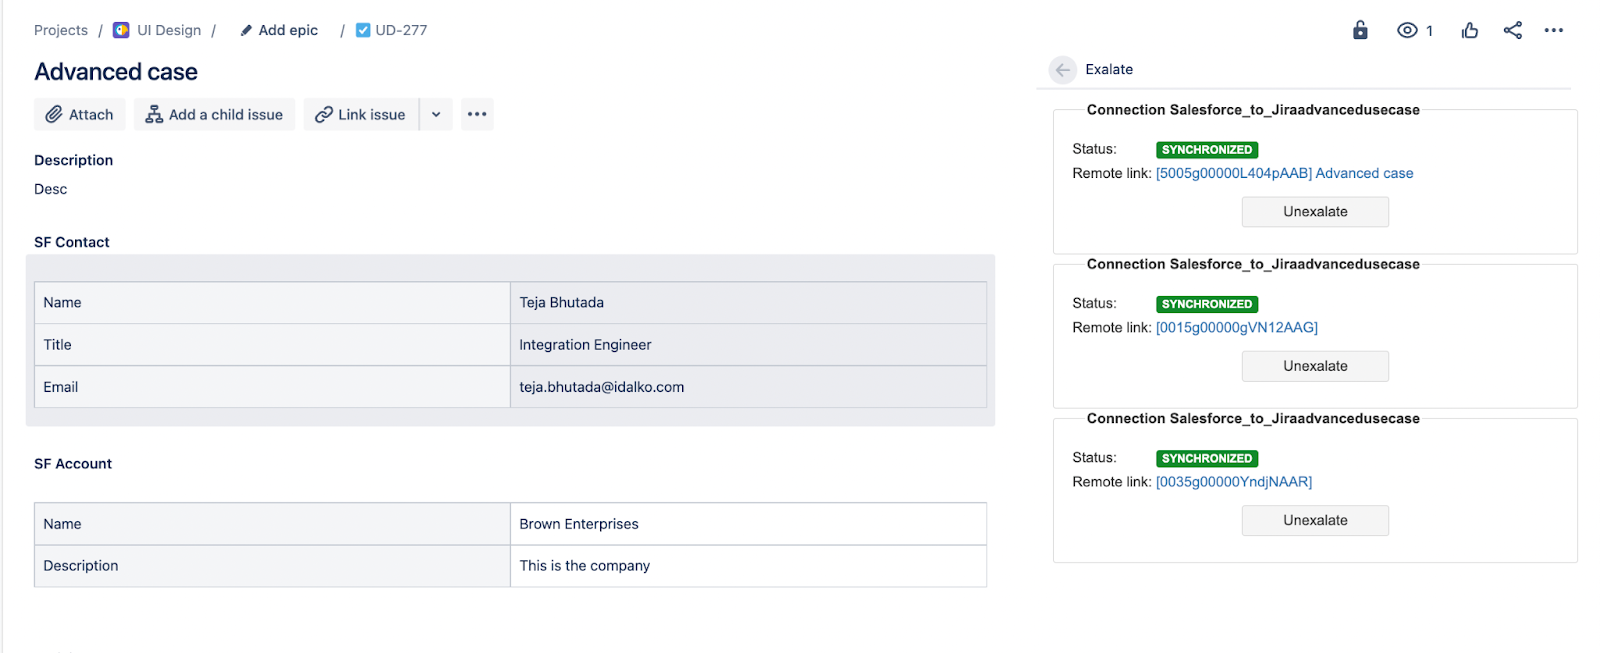
As seen, the details are displayed in custom fields called ‘SF Contact’ and ‘SF Account’.
Line 26, 39: Check if the type of entity received from Salesforce is Account or Contact, and depending on it, the details are displayed further.
Line 36, 37: Name, Title, and Email of the Contact are displayed.
Line 42,43: Name and Description of the Account are displayed.
Additional fields from both these Salesforce records or some other Salesforce record in itself can also be displayed this way.
Note the ‘|’ and ‘||’ used here are just to display the data in the form of tables. It has nothing to do with Exalate.
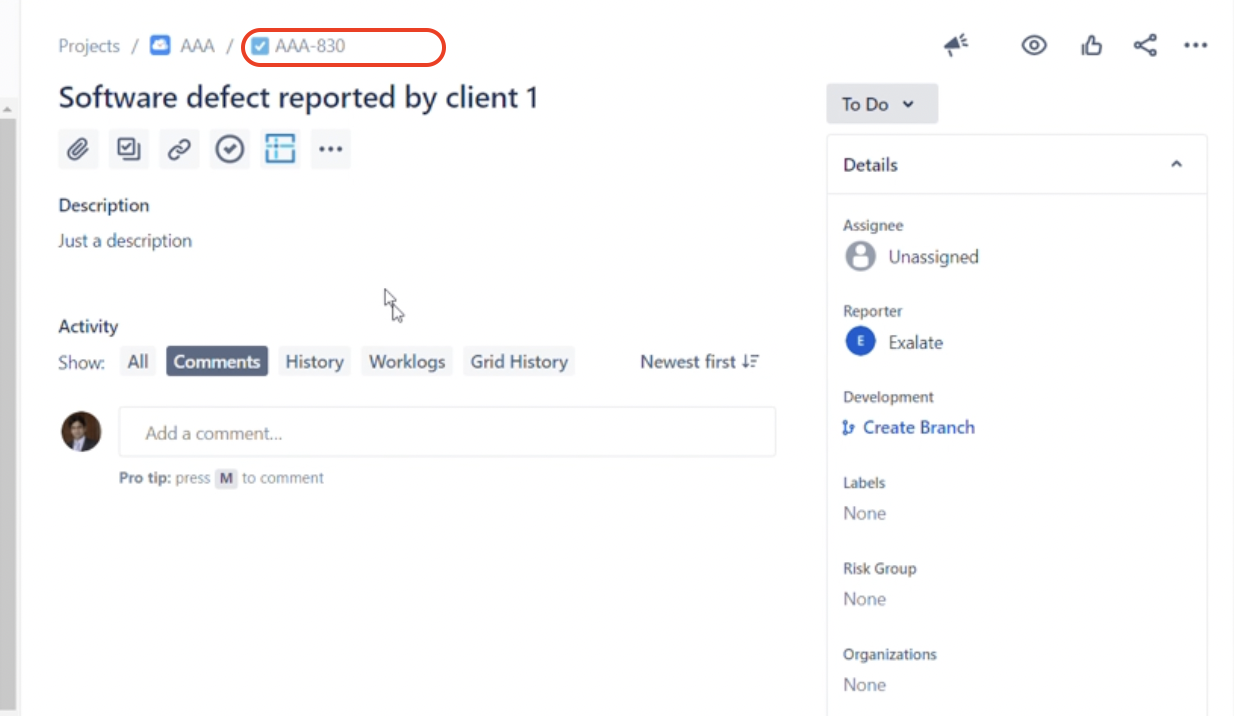
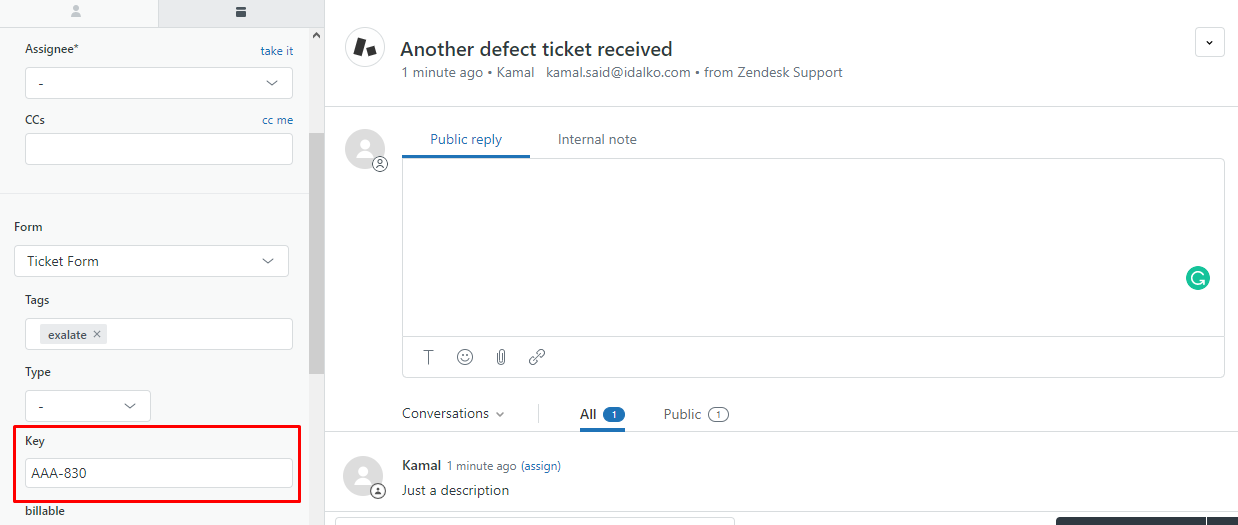
Output
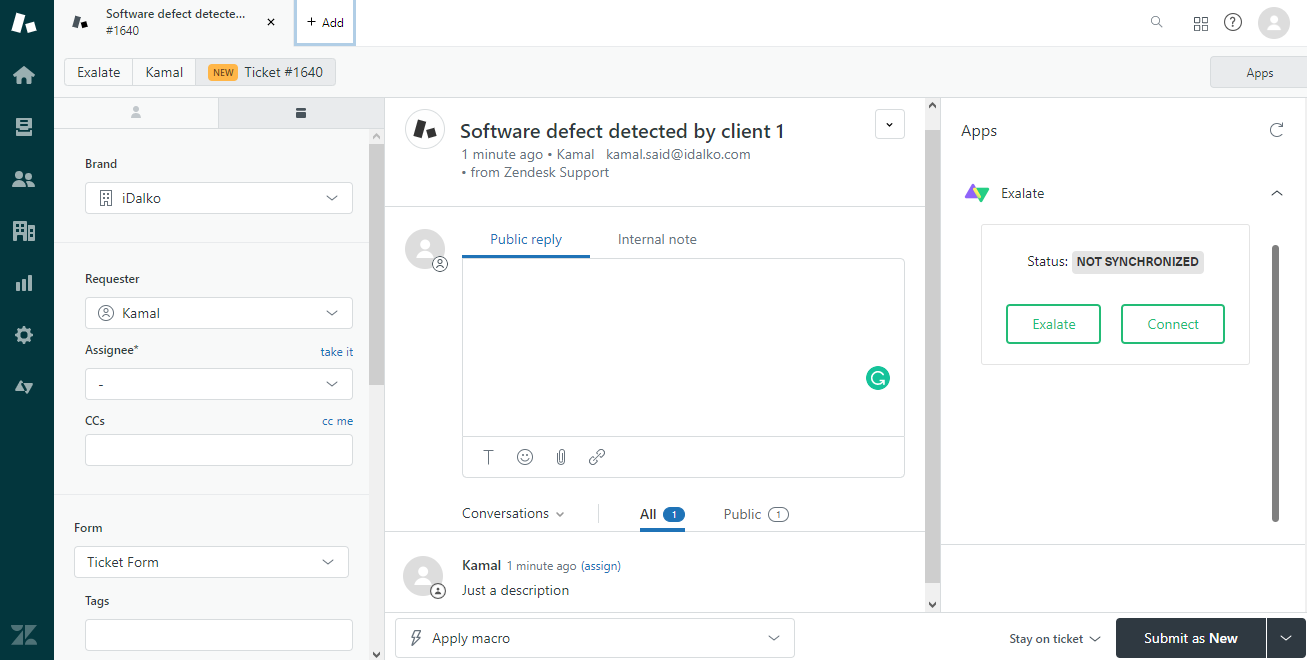
Let’s quickly see how all this looks in action.
We start by creating a Case in Salesforce and assign a Contact and Account to it.
Then sync it over to Jira (either manually or through triggers).
In a short while, under the issue created in Jira, you can see the Account and Contact related information being displayed under the 2 custom fields in Jira in the form of a table.
Open the Exalate panel on the issue view and you can see the Account, Case, and Contact sync status and also their respective remote links.
You can try making some changes to either the Account or the Contact in Salesforce and see those being reflected in Jira.
Wrap it up
We saw how multiple-related objects within Salesforce can be synced over to Jira or even some other platforms like Azure DevOps, ServiceNow, GitHub, or Zendesk. This was possible using an integration solution called Exalate which uses Groovy-based scripts to implement even the most advanced or complex use cases.
If you want to learn more about it or want to see how Exalate can be tailored to your specific use case, then book a demo with us. Or get in touch with our partners if you already use it and want to sync with an advanced use case like this.
We got this question from one of the users about how to automatically exalate all subtasks whenever an issue is being exalated.
Exalate is an issue sync solution allowing for integration between Jira, ServiceNow, Salesforce, Zendesk, and more (and yes – I’m part of the team building that add-on).
Therefore I thought to implement this requirement with ScriptRunner…
The article shows how the exalate classes can be instantiated to trigger an exalate operation.
The way it works
Whenever an exalate operation is finished, a ‘Exalate’ issueEvent is raised.
A ScriptRunner custom listener picks up the issue event.
The custom listener will trigger a new exalate event for each subtask on the issue.
Setting up the custom Listener
An image is worth 1000 words. The event the listener needs to listen to is ‘com.exalate.api.domain.trigger.EXALATED’
How does it work in detail? The whole script code can be found in this snippet.
event.issue contains the parent issue which has been exalated. The exalateNow function is called on every subtask.
The exalateNow function is a closure taking an issue object and a connection name.
On line 26 – the connection that needs to be used to exalate the subtask is looked up, an error is raised if the name is not found.
On line 33 – an exalate issue key is generated.
On line 36 – the outgoing sync processor is run on the subtask, creating a ‘hubIssue’ which is the object that will be sent over.
On line 39, the exalate operation is scheduled (internally, it’s called Pairing an issue).
The exalateNow code is using a couple of classes that need to be instantiated. This can be done using the code below:
Line 6,7 – get the exalate class loader from the PluginAccessor.
Line 9 – 13 are used to retrieve the classes from the class loader.
Line 9 – BasicIssueKey class is used to generate a unique identifier for the issue.
Line 10 – EventSchedulerService is the exalate service responsible to manage the sync events.
Line 11 – a twin is the couple of issues that are related to each other. The twin trace repository contains all the twins managed by this exalate. It is not used in the code but it can be useful in certain use cases.
Line 12 – a relation is another name for connection – the relation repository contains all the defined connections.
Line 13 – the node helper class is used to run the outgoing sync processor.
Line 15-18 are used to get access to the OSGiComponents.
Wrap up
This article is meant to give an example of how to instantiate the exalate classes and use these to perform a more advanced synchronization case.
Using the above logic it is possible to write a procedure to synchronize a complete issue structure (Project -> Epic -> Story) and all related subtasks.
Disclaimer
This example uses non-public APIs which will change between different versions of the add-on. Take this into account to implement production scripts whenever using the APIs.
This example is an example and there is no guarantee that it would work in your case. If in doubt – there are 130+ Exalate partners providing professional services to help out.
I have often come across companies that have their sales team working in Salesforce and their customer support team working in Zendesk.
But with such different applications, these teams often end up working in silos. For them to deliver a coherent customer experience, these silos need to be broken without leaving your favorite platforms.
So a Zendesk Salesforce integration is needed where information is exchanged automatically and bi-directionally in real-time. This will keep the teams up with information useful to each other.
With this in mind, I thought of putting together a post to help set up a step-by-step integration process between Zendesk and Salesforce.
Choose an Integration Solution
The tool I use for this tutorial is called Exalate. It is a bi-directional synchronization solution that integrates different platforms like Zendesk, Salesforce, Jira, ServiceNow, Azure DevOps, GitHub, and more. You can even implement the same tracker integrations using Exalate, such as integrating multiple Salesforce instances.
Exalate also offers an AI-powered Script Mode, which gives you access to the chat feature called AI Assist for generating custom sync configurations. Users of different technical capabilities can use this feature to generate code snippets and set up connections faster.
This app offers each side independent control over their configurations, so no worries about admins messing up each other’s sync. We will see how it is done in a while.
Let’s get to the implementation part first.
Implementation Using Exalate
The following are the basic steps:
Step 1: Install Exalate on Zendesk and Salesforce
First Exalate needs to be installed on both Zendesk and Salesforce. The installation is done via Zendesk marketplace and AppExchange from Salesforce and is pretty straightforward and easy to follow. So stick around while it’s done.
Step 2: Establish a Connection
Next, you need to create a connection between Zendesk and Salesforce. One side initiates the connection and the other side accepts the connection invitation.
So at either end, under the ‘Connections’ tab of the Exalate menu panel, click on ‘Initiate Connection’.
Suppose you start with Salesforce and enter the destination instance URL, i.e., the Zendesk URL.
You will now choose between the Script mode or the Basic mode.
The Basic mode is used for syncing simple tickets or Case information and you can’t configure it. So it is suitable for basic integration cases and is on the free plan.
The Script mode is based on a Groovy-based scripting engine. So, as an Exalate admin, you can control both the incoming and outgoing information independently. This is possible with the help of incoming and outgoing processors that filter information to be sent and received at both ends.
On the Exalate UI, they are configured using ‘Rules’ aka Sync Rules. This mode gives the necessary flexibility to support complex or advanced integration cases.
Proceed to give a local and remote name to your instances, and a connection name will be generated, which can also be changed.
An invitation code is generated. Copy it and then paste it on the destination, i.e Zendesk in our case.
And that’s all that is needed to create a connection.
Now that you have created the connection, let’s configure it.
Step 3: Configure the Connection to Control What Information to Share
Sync rules that we discussed above are used to control what information needs to be sent and received. When you edit the connection or click on ‘Configure sync’ above, you will see something like this.
I will throw light on ‘Rules’ in this section.
As seen, ‘Outgoing sync’ and ‘Incoming sync’ denote information flowing out of or into the 2 platforms.
The replica is an empty placeholder and acts as a message or payload to send the required fields from one side to the other.
You can save the information you want to send in the ‘Outgoing sync’ and then map it to the ‘Incoming sync’ of the receiving side.
If there is some additional information apart from the default scripts presented above, then you simply add it to the ‘Rules’ tab. For instance, if you want to send some custom fields from Zendesk to Salesforce, then you write in the Outgoing sync:
If there is certain information that you want to stop syncing, then simply comment or remove those lines from the code.
Once you have worked on configuring the ‘Rules’, it’s time we head towards creating triggers.
Use AI Assist to Generate Sync Rules
Exalate’s script mode includes AI Assist, accessible through a chat window in both the incoming and outgoing sync rules tabs. Simply enter your sync requirements into the chat, and AI Assist will generate the scripts for you.
The scripts are built based on your input, existing configurations, and Exalate’s scripting API.
However, like any AI, AI Assist isn’t flawless and can sometimes make mistakes. To get the best results, make sure your prompts are as clear and detailed as possible.
Here’s an example of how to use it:
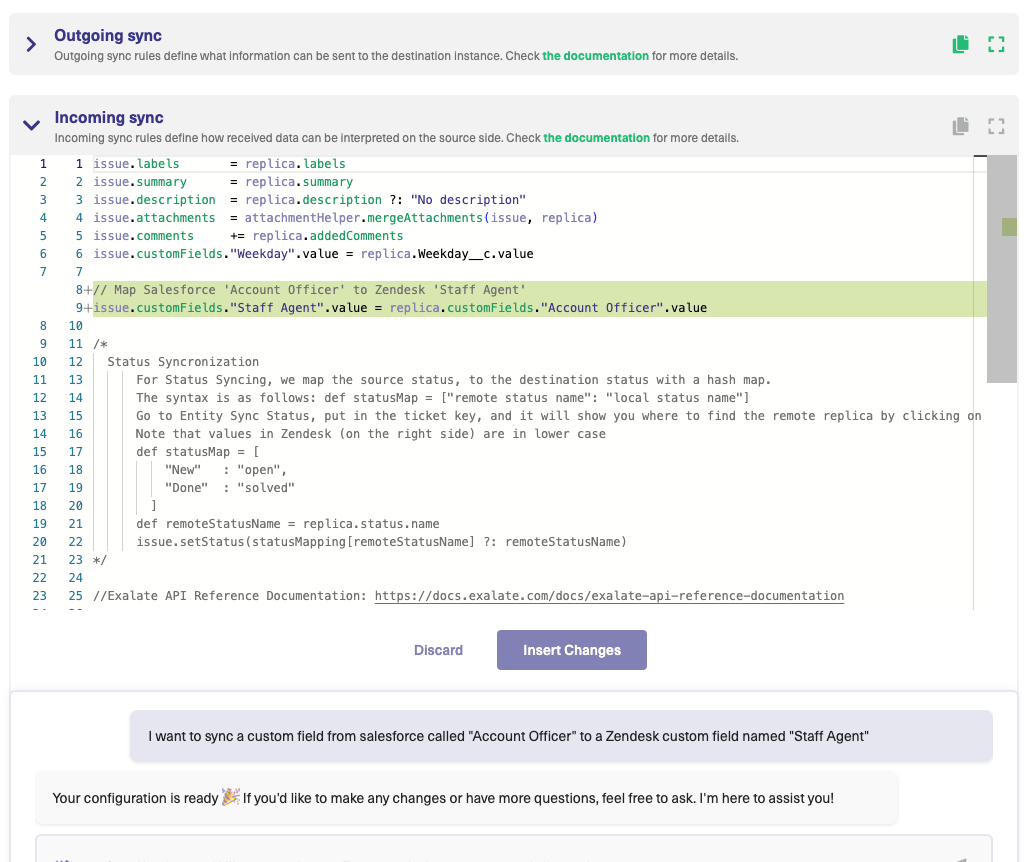
If you want to map custom fields between Zendesk and Salesforce, you could type something like this into the AI chat:
I want to sync a custom field from Salesforce called “Account Officer” to a Zendesk custom field named “Staff Agent”.
The AI will generate the script shortly.
Red lines indicate what will be removed from the existing script, while green lines represent new additions. You can accept or reject these changes and refine your prompt if needed. Once everything is correct, don’t forget to publish your changes.
Step 4: Configure Triggers
Triggers are used to start the automatic synchronization of information once the conditions you set are fulfilled. Start by clicking on the ‘Triggers’ tab to create them.
On the Zendesk instance, you will use the Zendesk search syntax for creating triggers, whereas on the Salesforce instance, you will use the SOQL (Salesforce Object Query Language).
First, select the entities to which the trigger applies from the drop-down list. Then in the ‘If’ section enter the trigger query. You can also choose the entities you want to create a trigger for using a drag-and-drop
option.
Activate the trigger and ‘Publish’ the changes.
You can also perform ‘Bulk Exalate’, a feature that allows you to synchronize all existing entities that meet the trigger condition.
Step 5: Synchronize Information
Once all the configuration is done and the trigger condition is met, then synchronization will start as per the ‘Rules’ you have set. So sit back and enjoy!
At some point in using software, we have all felt the pain of making different software communicate with each other. Exalate helps to ease that pain a little and we saw how. If you feel this tool can help with your use case, then feel free to book a demo and talk with one of our experts.
This blog post was written by Mariia Onyshchenko, the partner manager at Exalate.
Remote collaboration is now an essential part of doing business. Companies are connecting to bring to life a new project. Organizations merge to form new world-famous enterprises and also collaborate with services companies to ensure a smooth process. Departments of the same company organize to bring the best customer experience, etc. And to ensure frictionless communication between all of them, you need an integration solution.
And there are many integration solutions on the market which could help make your life easier.
Application integration is still a hot topic. With the help of Exalate, we have successfully helped various customers ranging from relatively simple to complex use cases.
If it is not your first time visiting the Exalate blog, then you might already know how Exalate is different.
But to be on the safe side, let me sum it up briefly:
Exalate is built upon a distributed architecture, which allows complete autonomy for each side.
You don’t have to worry about the admin from the other side messing up your sync. Once the integration is set up, you get to decide what information will be sent, received, and how you want to display it.
That’s why Exalate is so popular among customers in the fintech and banking industry, government organizations, tech and IT, telecom, and professional services. Basically, all those companies for whom security is of utmost importance.
Exalate is also the perfect choice for cross-company integration. But almost half of our customers use Exalate to connect different platforms internally.
With Exalate you can choose the platforms you’d like to sync.
You don’t have to purchase all of our connectors at once. You can add new integrations over time. Grow your Exalate network at the pace most suitable for you.
Exalate’s Configuration Modes
Visual Mode
The Basic mode is perfect for basic to medium complexity integration use-case. It does not require almost any technical knowledge.
Scripting Mode
The Script mode is suitable for medium to high complexity integration use-cases. It requires a learning curve if you have never worked with Groovy or any other object-oriented programming language, but once you get the hang of it, the possibilities are practically endless.
And you can start with the Exalate free version to see if works for your specific scenario.
So, why should one consider to become an Exalate Partner?
As a partner, you add one more solution to your services portfolio. So whenever an integration use case comes up, you will be able to offer various solutions to your clients and help them choose one that fits their use case best. So, first, you will have happier customers!
Second, the revenue! We provide our partners with up to 20% discount, but I should also add that normally most of our partners’ profit comes from professional services around Exalate (configuration, implementation, maintenance), and license management is a much smaller part of it.
By the way, note that Exalate is a subscription-based license.
Exalate is a networking product. So once a customer introduces Exalate to their organization with a simple use case, say a Jira Zendesk integration, they realize that they can actually connect their Salesforce, too.
Now the whole team is in sync: The support team (on Zendesk) can confirm the deal value or closing probability with the Sales (on Salesforce) and easily escalate the ticket to the Development team (on Jira) when necessary. That’s an intra-company sync.
Now, they start working with a company called ABC on a mutual project. ABC uses AzureDevOps. So they connect their Jira to ADO and start the development. And it’s already a cross-company use case. And it keeps on snowballing: you are going to have more and more Exalate customers.
The ultimate goal for both a solution vendor and a partner is to have happy customers. It makes sense, because why would one push a solution when it doesn’t fit? It will only bring more support, and more work for customer success, and will definitely hurt the partner’s credibility resulting in frustration for everyone.
It’s very important for us that customers trust Exalate partners. This way, the Exalate team is able to focus on the product development and pass the consultancy work to the partners.
What perks would I get as a partner?
The app helps me look like an absolute expert and with the easy setup, you can have an advanced setup up and running in less than an hour. For basic ones, less than 10 minutes.
Daniel Miks (Eficode)
We are keen to get you up to speed with a product. Free live and on-demand product and sales training, certifications, guides, community, and video tutorials are at your service.
We also provide you with a free partner license, which you can use both for testing and tinkering, and also for integrating with your current customers. Introduce them to the product and, who knows, maybe they ask you to link their instance with their other partner(s).
Without Exalate, we’d have a lot of administrative overhead in keeping track of everything going on.
JORDEN VAN BOGAERT (Brain2)
And, of course, here come the joint marketing opportunities.
We have noticed that those are very important, especially for the newly-joined partners, since they help “warm up” your target audience and gently introduce to a new solution in your portfolio. And, of course, generate a lead or two.
Once you feel comfortable with Exalate, you can get certified. Certification is a green light for our inside sales team: now you’re ready to receive qualified leads.
Is it necessary that we have an official agreement in place?
Yes. A partnership agreement protects both sides.
Another highly important part of the Partnership Agreement is an NDA. We share a lot of confidential information with our partners, especially during the lead handover process.
Also, having an NDA in place gives reassurance to all employees in the partner organization to share necessary information with our sales and marketing team. This helps close deals and build a strong relationship (even, I daresay, friendship).
What is expected from the partners?
We understand that:
a) integration use-cases are not coming up every day,
b) Exalate is a niche solution and will not work for any integration use case.
That’s why we always stress that our partners can onboard at their own comfortable pace. But please keep in mind that we are not able to allocate any leads to your organization unless there is at least one certified Exalate expert.
We suggest that you start the onboarding process as soon as you have joined the partner program. Understanding the product features will help you fish out all the relevant use-case and build an Exalate customer base.
I hope this article was helpful for you.
Are there any questions left? Check out our partner page.
Salesforce is perfect for teams working with customer data. Feature-rich and easy to use, it lets you control every aspect of the sales process without advanced technical know-how.
There are ways to get more from it, however. The data you store can be shared with teams using other tools like Jira, Zendesk, etc. That means your sales department can work with other departments more easily, with data filtered and shared automatically.
Why Integrate Salesforce Using a Third-Party Integration Solution
Though Salesforce includes a broad range of functionality, a third-party integration can take you beyond its default capabilities.
Specialized applications bring features that can help you connect to other platforms with little development effort. Here are some examples of how that could work.
Common Use Cases
Salesforce is typically used by sales teams, but you can use a third-party integration to connect to other platforms.
If you have sales teams in different locations, you can integrate their data and exchange tickets. Perhaps they sometimes acquire customers that are best handled by other teams. An integration can help your teams share their details automatically.
Developers using Jira can share progress on new items with the sales team via an integration. The sales team can make developers aware of customer requests for features, and developer feedback can be automatically sent back to the original ticket.
Project managers working in Azure DevOps can share targets with the sales team, and the sales team can have that data automatically synchronized with the other team’s system.
There are many other ways a third-party integration can contribute to your business. All it takes is a little imagination.
Choosing the Right Solution for a Salesforce Third-Party Integration
The integration solution we have chosen for this article is called Exalate. Exalate is an integration solution that enables two-way syncs between multiple tools like Salesforce, Jira, Zendesk, ServiceNow, HP ALM, GitHub, Azure DevOps, and more.
There are a few criteria that you need to take into consideration when choosing an integration solution for your specific use case.
Decentralized Integration
With a decentralized integration, neither side owns the connection. If different teams manage each platform, they retain their autonomy and have full control over what they share and how incoming data is mapped to their systems. Exalate gives each team an independent configuration screen, allowing them to choose what is shared.
Flexibility
Exalate is hugely customizable and suitable for many scenarios. Its scripting engine allows you to filter and map data using advanced logic.
With the Script Mode, users get access to the AI-powered assistant, AI Assist, which reduces the complex process of writing scripts into a simple 3-step process: prompt, edit, and accept.
Reliability
Exalate is designed with reliability in mind. If one side of the connection drops, it can recover gracefully. There’s no need for manual intervention. Once it is running, you can forget about it.
How to Integrate Salesforce with Other Tools through a Third-Party Solution
An advantage of using Exalate as a Salesforce third-party integration solution is that it uses a common interface on each platform.
In this example, we’ll connect it to Jira Cloud, but the process is the same for other platforms. You can integrate any of these with Salesforce or each other just as easily.
The process starts with installing Exalate on both platforms and then connecting them. Next are some optional configuration steps for controlling how data is shared and when data exchange happens.
We’ll discuss the process via AppExchange in this section.
Start by deciding where you want to install Salesforce: either “Install in This Org” or in a Sandbox org. I chose “Install in This Org” for my installation.
After selecting your installation destination, scroll down to the bottom of the screen and agree to the terms and conditions. Once you’ve done that, click on “Confirm and Install”.
Next, you need to specify the users for whom you want to install Salesforce. Remember that you can modify this later if necessary. For my installation, I opted to go with “Install for All Users” and clicked “Install”.
Now, you’ll be required to “Approve Third-party Access”. Click on “Continue” to proceed with the installation process. After the installation is complete, click on “Done” to finalize the setup.
Moving on, access your Salesforce instance and create a connected app. Make sure to save the “Consumer Secret” and “Consumer Key” that are generated during this process. Then, within your Salesforce instance, navigate to “Apps” and search for “Exalate”.
To request an Exalate node, provide the “Consumer Secret” and “Consumer Key” you saved earlier, and then click on “Request Node”.
To add new “Trusted URLs”, go to “Setup” and search for “Trusted URLs”
In the “Trusted URL information” section, enter the following details:
API name: free input string
URL: *.exalate.cloud
Now, check all the checkboxes under the “CSP Directives” section and click “Save”.
To grant access permissions to Exalate, click on “Allow”. Afterward, enter your personal details and click on “Agree and Submit”. Now, wait for an email from the Exalate License Manager.
Upon receiving the email, click on “Verify Exalate instance” to be redirected to the Exalate admin console.
From this point onward, you can proceed to install Exalate on Jira. If you ever find yourself logged out of your Salesforce instance, simply refer back to these steps to log in again.
Step 2: Install Exalate on Jira
Next, switch to Jira and install Exalate on Jira as well. You can do that via the Atlassian marketplace.
Note: We’re using Jira Cloud, but you can read about how to set up Jira on-premise here.
First, search for “Exalate” in the Atlassian Marketplace and install it via the “Try it free” button, followed by the “Start free trial” button.
After a brief install process, click “Get Started”.
You can start from either side of the connection. This guide uses Salesforce, so find the Exalate screen on your Salesforce installation, then click “Connections”. This screen shows any existing connections but will be empty the first time you use it.
To create your first connection, click the “Initiate connection” button. Next, you’ll see a “Destination instance URL” box. Enter your Jira instance’s address, so that Exalate can verify it is available.
Next, you should select the Basic mode or the Script mode.
The Basic mode uses automatic configuration, with simple visual tools. The Scripting mode uses programming logic to set complex rules that control how your data is shared.
Let’s cover them in turn.
Continue with the Basic Mode
The Basic mode takes you through a few simple dialogue screens. You can head straight to the other side of your connection by clicking a button.
Once there, choose a project and click “Confirm”. Your connection is now ready and you can test it by picking a test issue to synchronize.
If you don’t have admin access to the other side of the connection, use the Script Mode guide to complete the process.
Continue with the Script Mode
In the Script mode, you need to choose a name for your connection and can optionally add a description, both of which can help you make sense of things later on, especially if you have multiple connections.
After adding these details, click “Initiate”. You’ll see a “Copy invitation code” button. Click that, and then click the “Done” button.
On the Jira connection screen, click the “Accept invitation” button and paste the code into the space provided. The code should be on your clipboard. If not, go back and copy it again.
Click next, and Exalate will ask you a few questions, as in the Basic mode. When you’re done, the connection is created and you can move on to the next steps.
Step 4: Configure the Connection Rules
This allows you to control what is shared and how fields from each side of the connection are mapped onto each other.
To begin, find the newly created connection on the Exalate connections screen. Then click the “edit connection” button.
Multiple tabs appear on the screen, and “Rules” should be visible by default. Select it if not.
Here, you can see two sets of rules, one for incoming items and one for outgoing. These describe how each item is mapped to its equivalent on the other platform.
When you sync tickets, the data is copied between these fields, from the existing ticket to the new one.
By default, the mappings use identical, or similar fields. In the above screenshot, you can see thatreplica.description maps to entity.Description in the outgoing rules.
You can change, remove, or adjust any of these lines.
If you want to remove a line, delete it or comment it out. You could also add specific text. For example, you could change the description line to read: replica.description = “Synced from Salesforce”. That way all items in Jira that come from Salesforce will have that description.
You could match items to others if that suits you better. Perhaps you want to make the summary on one platform list the status on the other. In that case, you could change the summary line to replica.summary = entity.Status.
Use AI Assist with Script Mode
Exalate’s script mode now comes with AI Assist, which is available as a chat window in both the incoming and outgoing sync rules tabs. Just describe your sync requirements in the chat, and AI Assist will generate the necessary scripts for you.
These scripts are created based on your input, existing configurations, and Exalate’s scripting API.
Remember, like any AI, AI Assist isn’t perfect and may occasionally make mistakes. So, be as clear and specific as possible with your prompts.
Here’s an example of how you can use it:
Let’s say you need to map case statuses between multiple Salesforce instances. You can type something like this in the AI chat:
For incoming sync: “Create a status mapping that sets New to Open, Working to In Progress, and Escalated to Done in the Jira incoming configuration.”
The AI will generate the script in a few moments.
Lines in red show what will be removed from the current script, while green lines represent the new additions. You can accept or reject the changes and, if needed, adjust your prompt. Once everything looks good, publish your changes.
You can go further and use code to make decisions based on the values being exchanged. That’s beyond the scope of this article, but if you have any coding skills, you can probably think of a few ideas yourself.
Step 5: Set Up Triggers to Automate Data Exchange
In the previous step, you used sync rules to decide what maps to use. In this step, you’ll create a trigger that decides when items are exchanged. You can have as many triggers as you like, setting different conditions for sharing.
Perhaps you want to share high-priority items or items assigned to a particular person. You can create separate triggers for both of those things.
To get started, click the “Triggers” tab on the edit connection screen you accessed in the previous step. Then click the “Create trigger” button.
On the add trigger screen, there are several controls. Firstly, you can choose the type of entity the trigger synchronizes. There’s a notes section to describe the trigger and a checkbox to switch the trigger on and off.
There’s also a “Use search query” switch that gives you a choice of how to do things. If you don’t use a query, you can specify values for fields that will activate the trigger if met.
For more advanced decision-making, you can use a search query. That uses code for more advanced control. In Salesforce, you use SOQL (Salesforce Object Query Language), and JQL (Jira Query Language) in Jira.
As an example, you could use Name = 'demo opportunity' to select items with the specified name. You can use programming constructs like AND and OR to combine conditions.
When you’re done, click the “Add” button to create the trigger.
Step 6: Start Synchronizing Salesforce and Jira
Now the platforms are connected, you can start adding more triggers that match the data you want to share. The integration will automatically share this data between Salesforce and Jira. It’s a good idea to monitor what happens at first to make sure it matches your requirements.
Now that it’s working, you can make it do even more for you by creating advanced filters and sharing rules. Experimenting with the triggers and sync rules can give you new ideas on how you can use them, so try a few things out.
Conclusion
When you want to share data between platforms your choice of solution is key. Get it right and your teams will benefit.
Exalate, as a Salesforce third-party integration solution, is designed to deliver reliability and flexibility in a decentralized integration. It lets you integrate multiple platforms easily without leaving the tool(s) you are familiar with.
You can choose exactly how and when data is shared. Once set up, your integration does the hard work for you, leaving your teams free to get on with what they do best.
An interesting use case often requires elaboration. And we thought this use case was interesting enough to be detailed for others who have similar requirements.
So here it is!
The Use Case
A customer wanted to sync multiple Zendesk tickets (raised by their customers) to be reflected in a single Jira Cloud issue to be taken up by the Dev team.
Also, once the status on the Jira issue has been marked as “Done” from “In Progress”, the corresponding status on the Zendesk side would be changed to “Open” from “New”.
A custom field called “Jira ticket #” is used as an identifier for the issue on the Jira side.
Summary/Subject, description, labels/tags, attachments, and comments need to be synced bi-directionally between the 2 systems.
The challenges
Finding out the correct Jira issue ID so that the tickets are mapped correctly to it.
Mapping statuses such that the customer support team using Zendesk gets the correct status updates.
The Integration Solution: Exalate
Exalate is a bi-directional synchronization tool that integrates platforms like Jira, Zendesk, Azure DevOps, Salesforce, GitHub, and more. The above use case can be implemented using the Exalate Connect API. It supports Groovy-based scripting giving it the necessary flexibility.
It has a distributed architecture, so as an Exalate administrator, you can configure both the incoming and outgoing processors on each side independently. These processors on both Jira and Zendesk filter what information must be sent and received.
Implementation with Exalate
Before starting this implementation, Exalate must be installed on both Zendesk and Jira.
Then a connection must be established between them. There are 3 types of connections that are supported: Basic mode, Visual mode, and Script mode.
The Basic mode is for syncing basic entities like summary, description, comments, attachments, and issue types. But you cannot configure it, so it is suitable for simple integration cases.
The Visual mode connection allows for a drag-and-drop interface and is best suited for those with admin access for both Zendesk and Jira.
The Script mode connection provides independent control on each side. It consists of Groovy scripts that help configure the incoming and outgoing information. It can be done by editing the Sync rules.
Considering the advanced configuration of this use case, it is recommended we use the Script mode connection.
Configuration of the Sync Rules
As stated above, we need to configure both the incoming and outgoing information at either end using Sync rules.
Starting with:
Zendesk: Outgoing Configuration
The ticket information from Zendesk, like summary, description, labels, etc., to be sent to Jira are present in the “Outgoing Sync” by default.
To this, I added only the information from the custom field “Jira Ticket #” to be sent to Jira.
Zendesk: Incoming Configuration
Since I need to map the statuses between Jira and Zendesk, the mapping code needs to be added in the “Incoming sync” field on Zendesk. Remote and local statuses are mapped one-on-one.
Also, once the issue has been marked ‘Done’ in Jira, a comment is added on the Zendesk ticket stating that “Fix has been released by Dev team”. This is done using the commentHelper class of Exalate.
Jira: Outgoing Configuration
Nothing specific needs to be added to the “Outgoing sync” of Jira, so the default configuration remains.
Jira: Incoming Configuration
For this, when the ticket is synced over for the first time, it needs to create an issue in the specific project. In our case, “AAA” is the project that is selected.
Then depending on the remote issue, an issue type is set, default is Task if no issue type is found.
The Jira issue ID from the Zendesk custom field “Jira Ticket #” is saved in the remoteIssueUrn variable
Fetch the Jira issue detailsusing the httpClient.get()method in the localIssuevariable.
If the Jira issue is not found, then an “Issue not found” exception is raised.
However, if the Jira issue exists, then set the Jira issue ID to the localIssueID.
Summary, description, comments, attachments, and labels are synced as is.
After this, you can create triggers to start syncing information automatically. On the Jira side, you can use the Jira Query Language, and on the Zendesk side, use the Zendesk Search Syntax to create them.
Output
We create a ticket on the Zendesk side and sync it manually to the Jira side by clicking the Exalate button on the right panel of the ticket view. Though this can be done automatically with the help of Triggers.
The issue on the Jira side has the ID: AAA:830
Remember: this is the ID that needs to be entered on the Zendesk side.
So when a new ticket is created, the same ID is entered in the custom field “Jira ticket #”.
And when it is synchronized, it gets synced to the same Jira issue we have entered.
That’s all that is needed to achieve this use case with Exalate. If you are a visual person, this video will help you get started, or check out this Jira Zendesk integration article.
Conclusion
There are native integrations that can integrate Jira and Zendesk, but they are confined by their UI.
Exalate, on the other hand, has a scripting engine that makes it flexible enough to handle even the most advanced or complex integration requirements. If you are interested in knowing more about it, book a demo with an expert, and we can walk you through its functionality.
At first blush, it would appear there isn’t much that bonds these two together. After all, ServiceNow is a platform focused on delivering digital workflows to unlock productivity.
SIAM (service integration and management), on the other hand, is an approach to multi-service integration across several different service providers so organizations can maintain insight and control over their coordinated service delivery outcomes.
But look closely and some threads of commonality begin to appear.
For instance, ServiceNow allows employees, customers, and creators to route work effectively through an enterprise. Similarly, SIAM is a framework designed to create a unified customer experience by transparently integrating suppliers and third-party vendors in a well-managed, end-to-end service level performance model.
Combined together, both can create a symphony of harmony and operational efficiency.
This is because ServiceNow specializes in building powerful workflows and so it can facilitate seamless customer experience by managing service delivery via a SIAM architectural model.
Therefore, ServiceNow’s digital workflows can become a crucial part of an organization’s SIAM model, especially in a modern economy increasingly fuelled by online activities.
According to Forbes, ServiceNow started out as an IT service management company but has grown beyond ITSM to incorporate areas like customer service management and IT asset management.
Thus, ServiceNow is deeply rooted in ITSM, which we’ll explore from the perspective of building around a SIAM model.
So, in this article, we’ll examine SIAM and how it’s increasingly relevant today, and how ServiceNow can help organizations operationalize their SIAM models.
What is SIAM and How is it Relevant to Today’s Service Delivery?
SIAM (service integration and management) enables the collaboration of multiple service providers to deliver value to customers through an effective and efficient service mechanism.
SIAM provides control, governance, and integration of service management across different service providers that need to be coordinated in order to deliver service outcomes.
Ultimately, SIAM ensures organizations can maintain and improve on a range of consistent services even when the suppliers and/or technology underlying these services are changed.
SIAM is especially relevant in today’s complex business climate because it addresses or alleviates the following pain points:
Poor architectural integration
Lack of innovation
Juggling several costly change requests
Navigating contractual constraints that hinder agility
Finger-pointing and blame culture between multiple internal and external vendors
Lack of understanding or transparency of end-to-end service level performance
The quest for cost-reduction and simpler integration, especially when the same systems are used by vendors
How does SIAM Facilitate Key Service Operations of an Organization?
SIAM facilitates the successful operation of companies in a multi-supplier environment by providing a framework in which service providers can operate safely and effectively. Most organizations that benefit from SIAM are typically those with a significant number of suppliers with whom they have to interact with.
Ultimately, SIAM helps these organizations realize the full value of engaging with multiple service providers to deliver value.
How to Get the Best from SIAM?
To get the best of SIAM from an operational standpoint, an organization needs to do the following:
Set clearly defined requirements for both critical and non-critical services. For instance, requirements should delineate whether non-critical services should be supported in-house, or whether an integrated model option be preferred for mission-critical services.
Focus is shifted from a supplier’s commercial perspective to service integration arrangements based on service agreements, performance, and availability.
A huge emphasis and focus on interoperability to facilitate seamless workflow, service arrangement, and performance.
How does ServiceNow Work with SIAM and Facilitate ITSM?
ServiceNow is in the business of IT service delivery using digital workflows. Therefore, ServiceNow shares a kindred spirit with ITSM.
ITSM touches on the actual practice of managing IT operational services. This management of end-to-end delivery of IT services requires a set of workflows to handle incidents, service requests, problems, and changes. And these can be performed through ITSM platforms such as ServiceNow.
However, each organization has to consciously make strategic decisions on how it should set up, streamline, and embark upon its ITSM operations. This is where ITIL comes in.
ITIL provides a framework of best practices to guide how to set up ITSM in an organization. ITIL isn’t organization-specific but allows companies to establish a baseline from which they can implement value-laden processes and procedures to deliver IT services.
ServiceNow is an ITSM tool based on the ITIL v3.0 framework. In fact, ServiceNow is arguably the leading digital workflow platform for ITSM. Moreover, ServiceNow allows you to deliver ITSM on a single platform with the cloud.
In an earlier article, we discussed how the SIAM operational models work. ServiceNow helps organizations with the challenging task of operationalizing how SIAM works in IT delivery.
The essential role ServiceNow plays with SIAM revolves around its ability to provide a platform that enables streamlined integration of the main processes in ITIL; namely, to optimize change, problem, incident, and request management.
ServiceNow is compliant with and supports ITIL v3 processes out of the box. ServiceNow’s ITSM solution gives you the flexibility to scale your operations through the following features:
Incident Management
At the core of incident management is the ability to restore any disruption caused in the IT service. In that vein, ServiceNow’s incident management provides the ability to resolve issues and restore services promptly.
Features of ServiceNow’s Incident Management
Major incident management: ServiceNow provides tested practice workflows to detect, identify, and ultimately resolve very impactful incidents
Single-pane agent view: While ServiceNow provides an intuitive omnichannel experience, it enables agents to view everything in one place with a streamlined interface
AI-powered insight: Enables fast and quick resolution of incidents with AI recommendations
Omni-channel notifications: Users can submit incidents through various means, which enhances mean time to resolution (MTTR)
Incident response playbook: Restore services quickly by bringing together the right agents aided by a task-oriented view of incident resolution workflows
As a ticketing system, ServiceNow helps identify, analyze, and restore services quickly with intelligent routing and built-in collaboration.
Problem Management
Instead of solving recurring problems like incident management, problem management aims to provide a permanent root cause for a recurring incident. In addition to preventing problems from arising at all, ServiceNow’s problem management attempts to minimize the impact of unexpected service disruption by finding and fixing issues.
Features of ServiceNow’s Problem Management
Provides a single system of record: One place to discover and address the impact of issues and potential pain point failures.
Contextual knowledge and information: Accessible solutions and workarounds to problems, along with automated notifications to increase collaboration and transparency.
Reports and dashboards: Operational transparency with reports, along with built-in dashboards to minimize disruptions and proactively analyze service performance.
Remediation plans: Eliminate recurring incidents by integrating current problems with other ITSM processes to reduce future disruptions, thereby stopping them at the source.
Change Management
IT systems experience strategic, tactical, and operational changes throughout the lifecycle of their IT services. Change management is a process focused on allowing organizations to control and roll out change requests easily throughout their IT infrastructure.
ServiceNow helps you navigate complex change management processes with the aid of automation and built-in AI. This helps enterprises minimize risk, failure, and disruption of IT services while also simplifying the process and reducing costs.
Features of ServiceNow’s Change Management
Change success score: Uses a numeric score to allow you to evaluate the probability for success of a change request, and to automate approvals for low-level, low-risk changes.
Multimodal change: ServiceNow provides out-of-the-box templates, which allow managers to make every change lifecycle and activity to fit specific use cases.
Risk intelligence: Risk classification criteria provide data-driven predictions using machine learning algorithms. This accelerates dynamic change approval policies.
Display of concurrent change management: ServiceNow allows you to view planned changes, displaying maintenance schedules and blackouts, along with an interactive timeline character.
In addition, ServiceNow provides a single system of record to facilitate the tracking of changes, performance, and delivery.
Request Management
People often confuse change management and request management but the two aren’t similar. Change management involves the changes that alter or disrupt the current state of the IT infrastructure or business environment. While change management tends to be macro in nature, request management is much more limited.
Service request management allows IT teams to quickly and effectively fulfill customers’ requests. These are usually for day-to-day things users or customers need to do their jobs (passwords, group changes, permissions, and so on).
Features of ServiceNow’s Request Management
Chat embedded portals: Most requests for services occur because users don’t know how to obtain solutions. ServiceNow’s chatbots provide users with answers 24/7 through keyword search.
Service catalog and builder: ServiceNow provides a visually guided interface that makes products and services discoverable through self-service.
Mobile-friendly, single-pane view: Agents are provided with a one-stop place on the go to respond to users’ needs via the Service Catalog.
Increased productivity: ServiceNow provides automation and AI to resolve simpler, common issues, thereby allowing IT staff to focus on more complex requests.
In a nutshell, ServiceNow provides foundational service operations in which all involved parties can fully engage, to ensure process needs are met for all services.
How to implement next-level SIAM with ServiceNow
Before you can implement next-level SIAM in your organization with ServiceNow, you first need to define your SIAM model.
In the process of defining this SIAM model for your organization, you’ll need to identify where the overall ServiceNow capabilities support and fit in your model.
These are the key implementation steps to follow:
Preparation: At this stage, you need to set your goals for SIAM’s vision and outcomes. A lot of collaboration, brainstorming, and cross-pollination of ideas needs to occur at this point for successful outcomes at subsequent stages.
Design and build:
Here, the SIAM model is designed along with the strategy needed to execute it.
SIAM is operationalized with ServiceNow’s workflow.
Implement and expand:
The pilot phase is necessary for the organization to get its feet wet in the process and work out the kinks. This also involves earning support and buy-in for the case to fully implement SIAM.
The implementation phase involves rolling out the SIAM model and expanding it to all services in the organization
The design and build phase includes operationalizing SIAM with ServiceNow. ServiceNow recommends that SIAM be supported with the following product capabilities:
ServiceNow ITSM: With its suite of ITSM products, ServiceNow allows you to coordinate and consolidate some of the processes we highlighted earlier (incident, change request, and problem management). By consolidating data and processes together, ServiceNow ensures the following:
Consistent operations across the service provider environment
Simplified communications across service providers and groups
ServiceNow CMDB: This configuration database provides a data repository to store the IT assets in your environment. It then provides you with full visibility as a foundational system of record. With CMDB, you can conveniently coordinate and manage service operations across the provider environment.
Service portfolio management: This feature allows organizations to improve their IT operations and meet customers’ demands more effectively. In the process, they can use the service portfolio management to cultivate an in-depth understanding of the type of services to deliver and the dependencies required to do so across services. It consequently helps an organization to manage vendors by their value and not by their task or contract level.
ServiceNow User Types
Before you can successfully implement SIAM with ServiceNow, you need to understand its deal structure, especially with regard to user types and licensing models.
There are several users who use the ServiceNow instance. However, as a system to track and route service requests, we’ll be concentrating on two roles:
Requestors
A requester is someone who asks for work to be done. These are “free of cost” users who can submit requests to the Service portal but only have create and read access.
Fulfillers
On the other hand, a fulfiller is a person who does the work requested. As a result, they have read and write access, including the ability to approve or reject the proposal. These are paid users with access to the Standard UI of Servicenow, such as ITIL, ITIL admin, and Change Manager features.
In short, fulfillers can complete an IT service request.
ServiceNow Service provider Reference Architecture for SIAM
ServiceNow is designed so service providers can use its shared instances to effectively manage service delivery. Therefore, ServiceNow provides a service provider (SP) architecture that organizations can leverage to integrate services for a unified customer experience.
Its SP architecture draws inspiration from attributes of SIAM’s architecture. ServiceNow allows customers to access its service provider (SP) services through a portal. This portal is designed to help customers to access their SP domain-separated instance.
Here are the basic attributes of ServiceNow’s service provider reference architecture:
Provides customers access to their SP services through a dedicated or shared portal
This portal is designed for them to reach their SP domain-separated instance
ServiceNow allows you to share and leverage administration tools, which enables you to optimize licenses and eliminate overhead
Separate administrative and dedicated teams are required for dedicated instances
However, every dedicated instance is only permitted to have a finite number of fulfillers and requesters.
Hybrid architecture is optionally provided for customized solutions.
ServiceNow’s SP reference architecture has several components, but we’ll focus mainly on its SIAM (multi-vendor) facet:
Service Integration: SIAM provides a service integration layer to encourage an integrated customer experience. This can be facilitated using SP architecture, which is geared to offer multiple best-in-class service providers for individual services. However, it emphasizes that key operational data be shared across multiple service providers.
Multi-supplier governance: This ServiceNow SIAM model makes sure that all of the organization’s requirements are met across all service providers. This unified governance approach also requires service providers to cooperate on behalf of the customer.
Final Thoughts
There are several advantages of choosing ServiceNow to implement SIAM. It automatically injects ITIL best practices into your operational activities. ServiceNow also helps enterprise customers improve IT service quality while reducing ITSM long-term costs.
ServiceNow’s workflows and architecture provide ready-made templates for a SIAM model implementation. This is especially so if you are already using the platform to manage “internal suppliers”. Hence, there’ll be minimal effort to incorporate external suppliers and take advantage of ServiceNow’s immense powers and capabilities.