
The main reason why teams and organizations integrate Freshservice and ServiceNow is to create a smooth collaboration pipeline that allows the flow of information between both systems.
But it goes beyond just plugging those systems and expecting them to work seamlessly.
Every Freshservice ServiceNow integration involves figuring out the best solution to make sure the data flowing between the two systems is what both sides need, and also secure in transit and at rest.
This also involves mapping default and custom fields, entities, and text values by fetching them from APIs and running the conversions under the hood.
In this article, I’ll cover everything worth knowing about ServiceNow Freshservice integration using real-world use cases. You’ll also learn how to set up this integration using Exalate.
Key Takeaways
- Freshservice to ServiceNow integration connects two ITSM platforms for seamless data exchange and workflow coordination.
- It eliminates data silos while supporting complex scenarios like multi-location operations and MSP collaboration.
- This reduces duplicate data entry, speeds up resolution times, and delivers consistent information across platforms.
- You can connect both systems through native APIs, middleware platforms, specialized ITSM tools, ServiceNow’s Integration Hub, or webhooks.
- Some ServiceNow to Freshservice integration use cases with Exalate include MSP-client service delivery, automated ticket escalation, incident consolidation, asset management coordination, and merger support scenarios.
- Don’t forget to track sync success rates, data latency, ticket resolution times, manual work reduction, customer satisfaction, and overall ROI to measure integration impact.
- Prepare for common obstacles, including data mapping complexities, authentication issues, conflicting business logic, API limitations, sync conflicts, and user adoption.

What Is Freshservice to ServiceNow Integration?
Freshservice to ServiceNow integration synchronizes IT service management (ITSM) processes between both platforms to create unified workflows across distributed ITSM environments. This connection maintains consistent service delivery standards while leveraging the unique strengths of each system.
The integration eliminates data silos by automatically synchronizing tickets, assets, user records, and service catalogs between platforms. You can implement this through custom APIs, middleware solutions, or specialized integration platforms.
Freshservice provides a user-friendly service desk with built-in asset discovery and intuitive self-service portals. It’s designed for IT, support, DevOps, and engineering teams to manage customer requests and operational concerns.
ServiceNow offers comprehensive IT operations management tools, specialized solutions for development and QA teams, and goes beyond ITSM to handle HR, customer service, and security operations.
In large organizations, teams commonly use both platforms for different types of service and operations management. Teams also need to integrate with external MSPs, partners, suppliers, and clients to create a cohesive, collaborative environment across organizational boundaries.
How Does Freshservice to ServiceNow Integration Work?
When you connect Freshservice and ServiceNow with an integration connector, it starts by establishing data synchronization between both platforms.
Think of the connector as a mediator that speaks both languages. The connector handles all the heavy lifting without requiring complex middleware infrastructure.
Your Freshservice tickets, incident details, and service requests automatically make their way over to ServiceNow, while ServiceNow sends back its problem records, change requests, and incident updates. All formatting differences are handled in the background.
Let’s say someone reports a critical incident in Freshservice. The connector catches this right away and can automatically create an incident or problem in ServiceNow, so your team can dig into the root cause. Or when ServiceNow approves a change request, that status update instantly shows up in Freshservice.
Each system maintains its independence, so your teams can configure their workflows without disrupting operations on the other side.
The Freshservice to ServiceNow connector uses mapping rules and custom scripts to convert priority levels, status values, and custom fields so everything makes sense in both systems. You can set up filtering criteria as triggers, so that only the tickets that actually matter flow between platforms.
Everything stays synchronized in real-time because the connector continuously checks for changes in both systems. When someone updates a ticket or adds a comment, it immediately appears on both sides.
This keeps your teams aligned without overwhelming either platform with unnecessary bulk updates, which is especially valuable when you’re managing distributed IT services across multiple locations or business units.
Why Integrate ServiceNow With Freshservice ITSM?
- Reduce manual errors and data duplication by eliminating manual ticket updates between systems and integration partners.
- Ensure information consistency and accuracy across ServiceNow and Freshservice through automated syncs.
- Give teams involved in the integration a better view of projects, operations, ticket status, and pain points. Maintain the full picture of IT operations by tracking how incidents relate to problems on both platforms.
- Increase operational efficiency by enabling faster decision-making when teams can access complete information from their preferred system. Critical issues get escalated automatically between platforms, cutting response times from hours to minutes.
- Address user pain points faster to guarantee higher customer satisfaction scores. Customers get quicker resolutions because support teams have access to complete information regardless of which system they’re using.
- Reduce expenses on onboarding new systems and additional user licenses. Your team can continue working on their existing system while gaining the benefits of unified operations.

Calculate time and money savings from automated bidirectional sync.
What are the Options for Integrating Freshservice and ServiceNow?
When connecting Freshservice and ServiceNow, there is a library of options available online. So I’ve narrowed them down to the following categories:
- Native API integration: If you have a solid development team, you can connect Freshservice’s API with ServiceNow’s Table API, Attachment API, and Import Set API to create exactly what you need. However, even though you’ll have complete control over data mapping and sync logic, you will end up with significant development work and ongoing maintenance headaches.
- Middleware and iPaaS solutions: Integration platforms like MuleSoft, Dell Boomi, or Microsoft Azure Logic Apps come with pre-built connectors for both systems. These tools give you visual workflow builders and data transformation features without needing to code everything from scratch.
- Third-party integration apps: Specialized tools like Exalate or purpose-built ITSM connectors come loaded with features like bidirectional sync, field mapping templates, and AI-enabled scripting.
- ServiceNow Integration Hub: ServiceNow’s native IntegrationHub provides “spokes”, which are connectors dedicated to a particular application or record type. This keeps all your integration logic inside ServiceNow and helps to connect with Freshservice. The drawback here is that you’ll need a ServiceNow guru to get things working as expected.
- Custom webhook implementation: Both platforms support webhooks for real-time updates when specific things happen (a critical incident is logged). This works for simple scenarios, but fails for data transformations or bulk sync operations.
How to Choose the Right Integration Tool for Freshservice And ServiceNow?
- AI features: Modern integration tools are getting smarter with AI-powered automation that can help with script generation and field mapping suggestions. This is especially helpful when you’re dealing with complex ITSM workflows or trying to map custom fields that require deep API calls.
- Reliability: The best integration solutions can queue up data changes and process them automatically once everything’s back online. This way, you never lose important ticket updates even during downtimes.
- Scalability: Choose a tool that can handle increased ticket volumes, additional system connections, and changing business processes without requiring major reconfiguration.
- Customizability: Your integration tool needs to be flexible enough to handle unique workflows and processes, offering both ready-to-use templates and the ability to create custom field mappings and workflows.
- Security features: IT service data often contains sensitive information about infrastructure, users, and business operations, so make sure your integration platform meets compliance standards like ISO 27001 and industry-specific requirements.
One tool that fits this bill is Exalate. It offers the flexibility to adapt to your unique ITSM integration requirements through its Groovy-based scripting engine and provides an AI scripting feature for help with configuration.
Exalate integrates with Jira, GitHub, Zendesk, Azure DevOps (server as well), Freshdesk, Freshservice, Salesforce, and many others.
The platform is also ISO 27001 certified for security compliance. You can learn more about Exalate’s security features in their Trust Center or review their detailed security whitepaper.
Now, let’s explore how to set up a Freshservice ServiceNow integration.
A Step-by-Step Setup Guide For Freshservice to ServiceNow Integration With Exalate
Create a Workspace
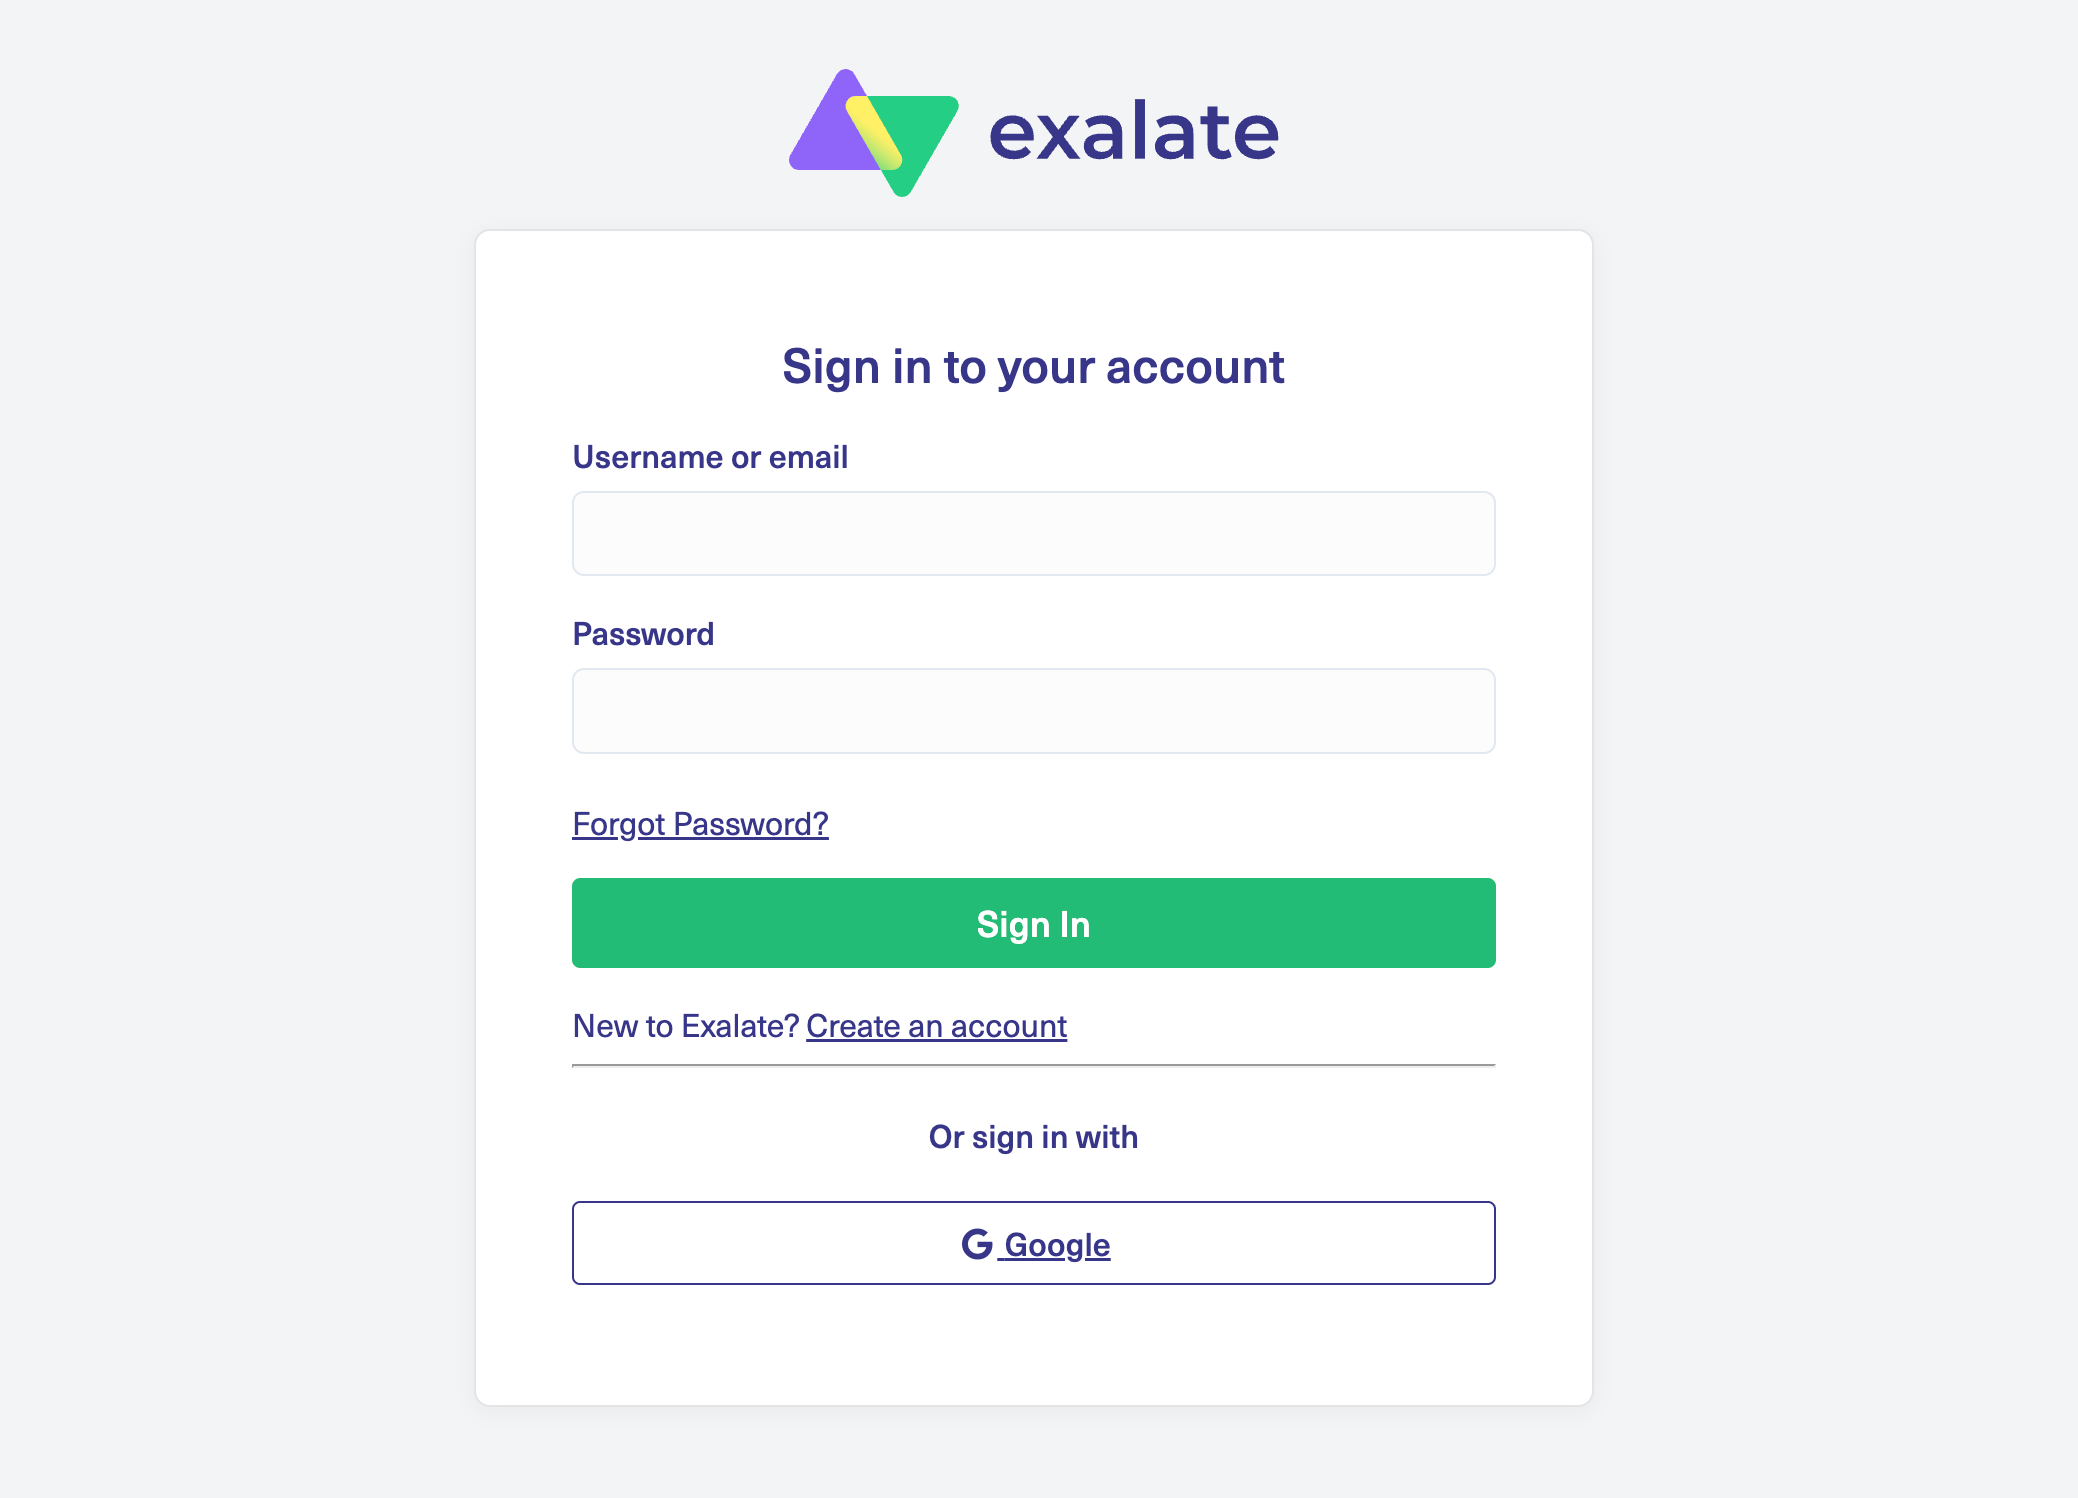
Visit the Exalate integrations page to get started. Create a new account by manually entering your email and verifying it, or sign up using Google.
If you already have an account, just log in to access the dashboard.
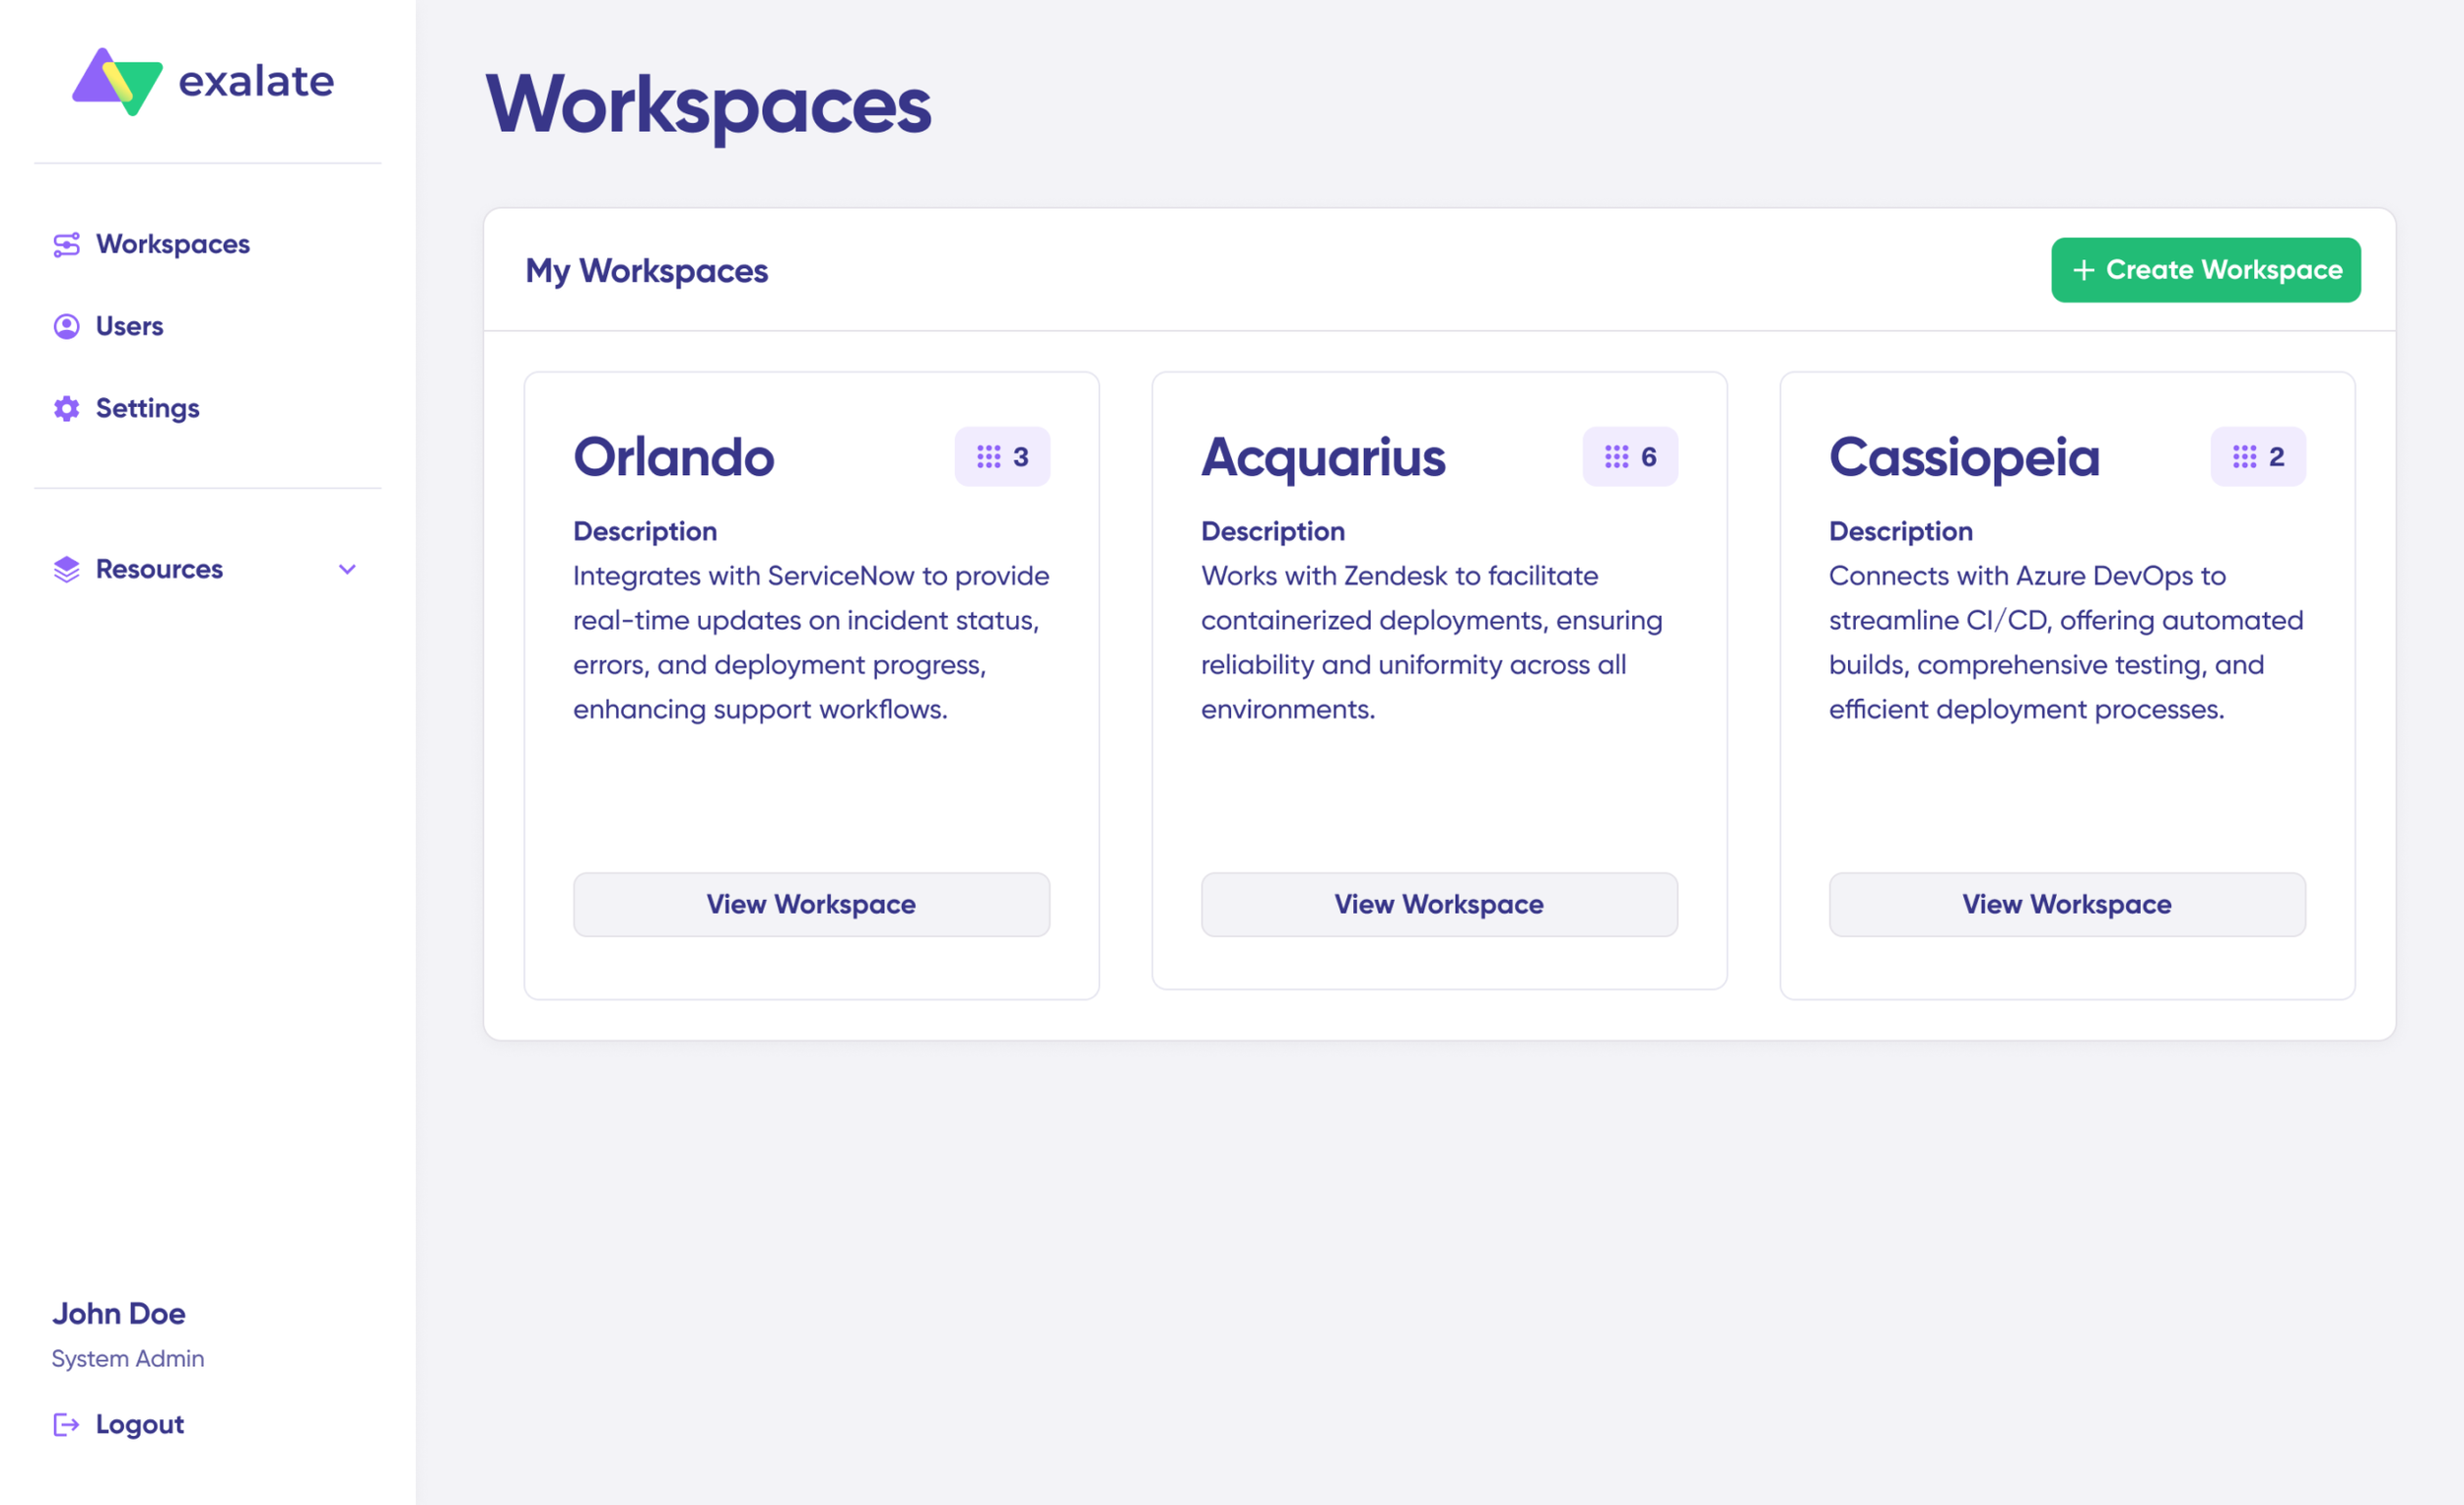
Create a workspace where you can manage your integrations and connections. All your existing workspaces are accessible from the “Workspaces” tab.
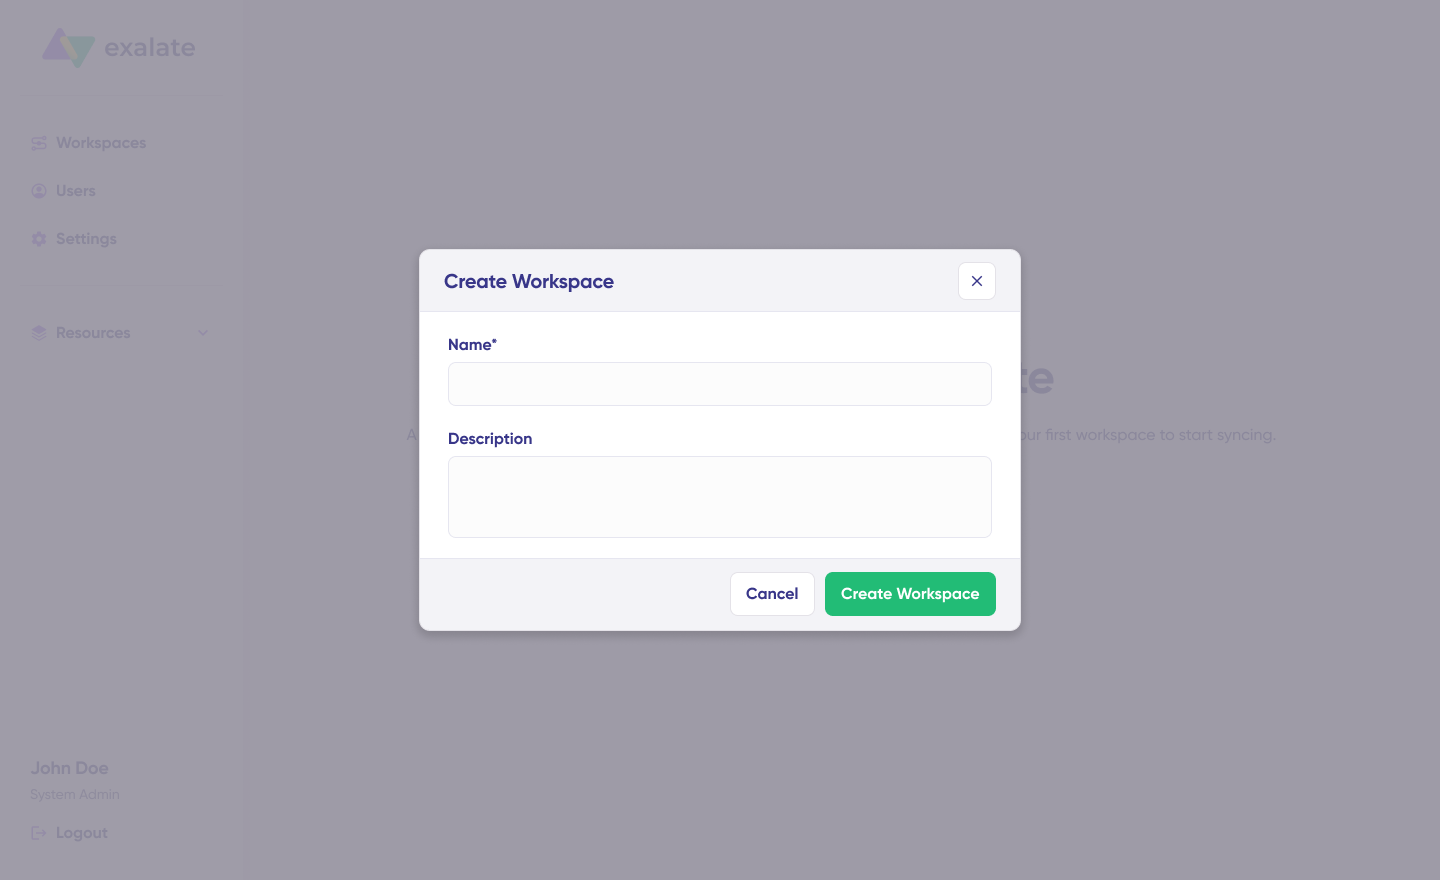
To create your own workspace, click the “+ Create Workspace” button. Enter a name and description for it, then click “Create workspace.“
Create a Connection
To create a connection, you’ll need an active Exalate account with at least one Workspace and the access credentials for both systems you want to connect (Freshservice and ServiceNow).
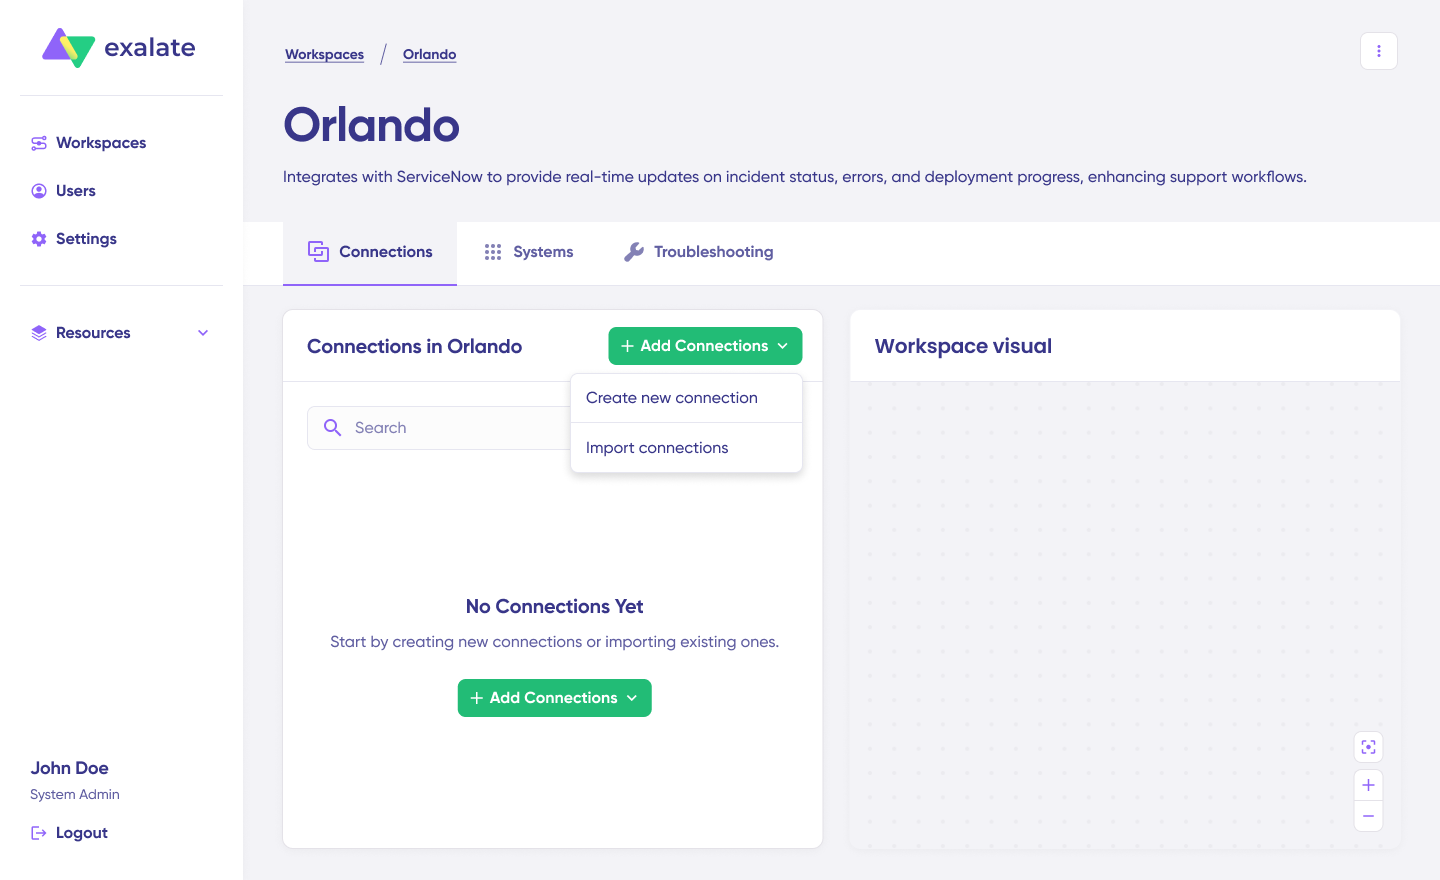
Click on “+ Add connections” > “Create new connection“. Enter the name for your first system. Enter the URL of your Freshservice instance.
Wait for checks and authentication to happen automatically under the hood. Systems from a different workspace will be newly registered for the current workspace.
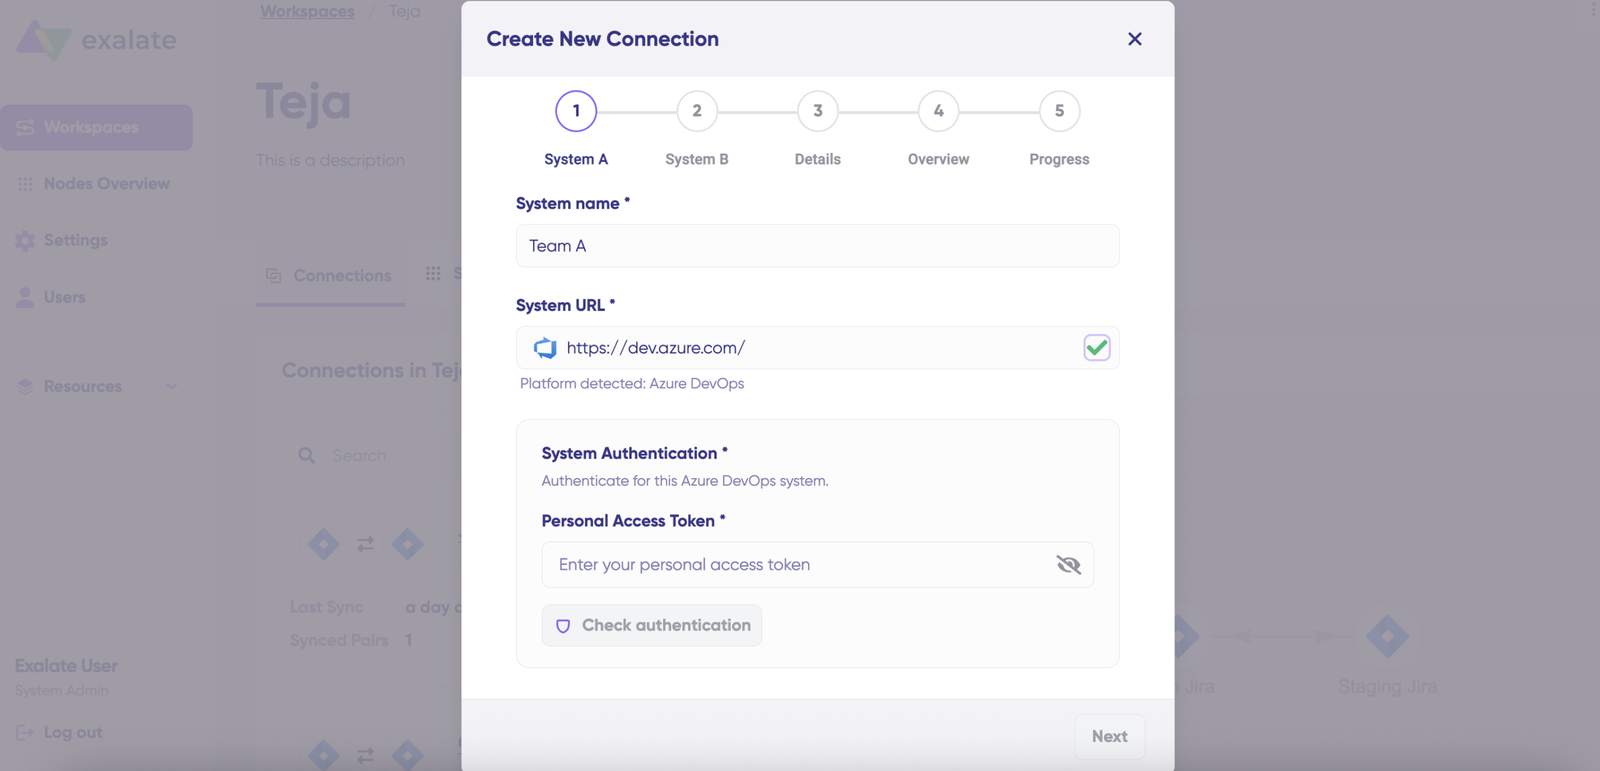
Enter the authentication details. For Freshservice, enter your API key (learn how to fetch your Freshservice API Key). Click on “Check Authentication“. If all is well, you’ll see “Successfully Authenticated“.
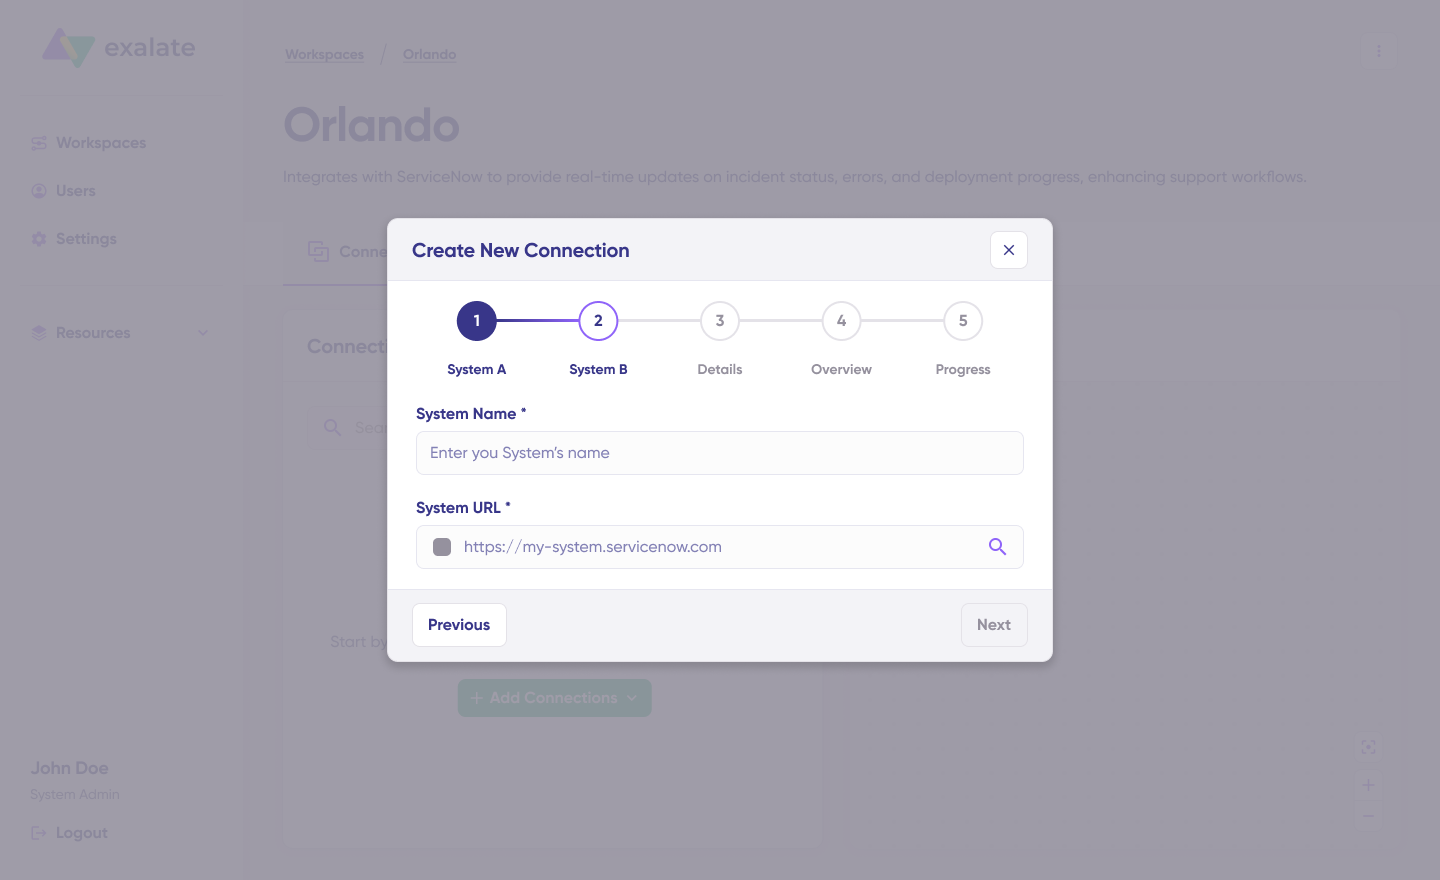
Click Next to configure System B (ServiceNow). Follow the same procedure as for your Freshservice instance. For ServiceNow, you’ll need to enter a Username and Password for Basic Auth.
Confirm the Connection Name and add a description (optional). Review the connection setup and click on “Create Connection“. Wait a few minutes so all the checks and setups will be configured in the background.
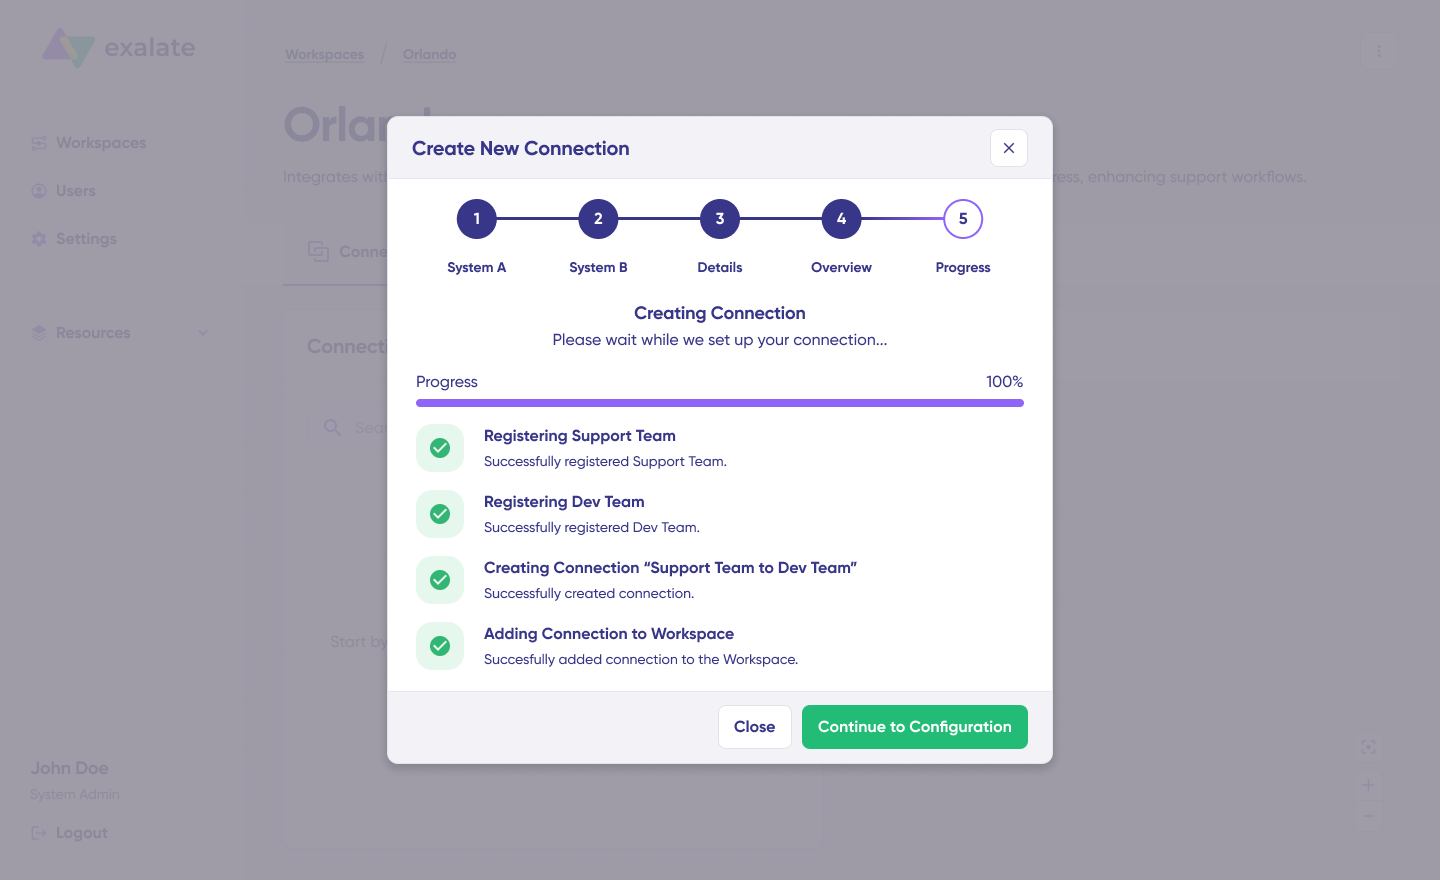
Once done, click “Continue to Configuration“. Your first connection has been successfully set up in your workspace.
Choose what you want to sync on both sides from the dropdown menu. For Freshservice, select tickets; for ServiceNow, select incidents. Click “Build and Continue“.
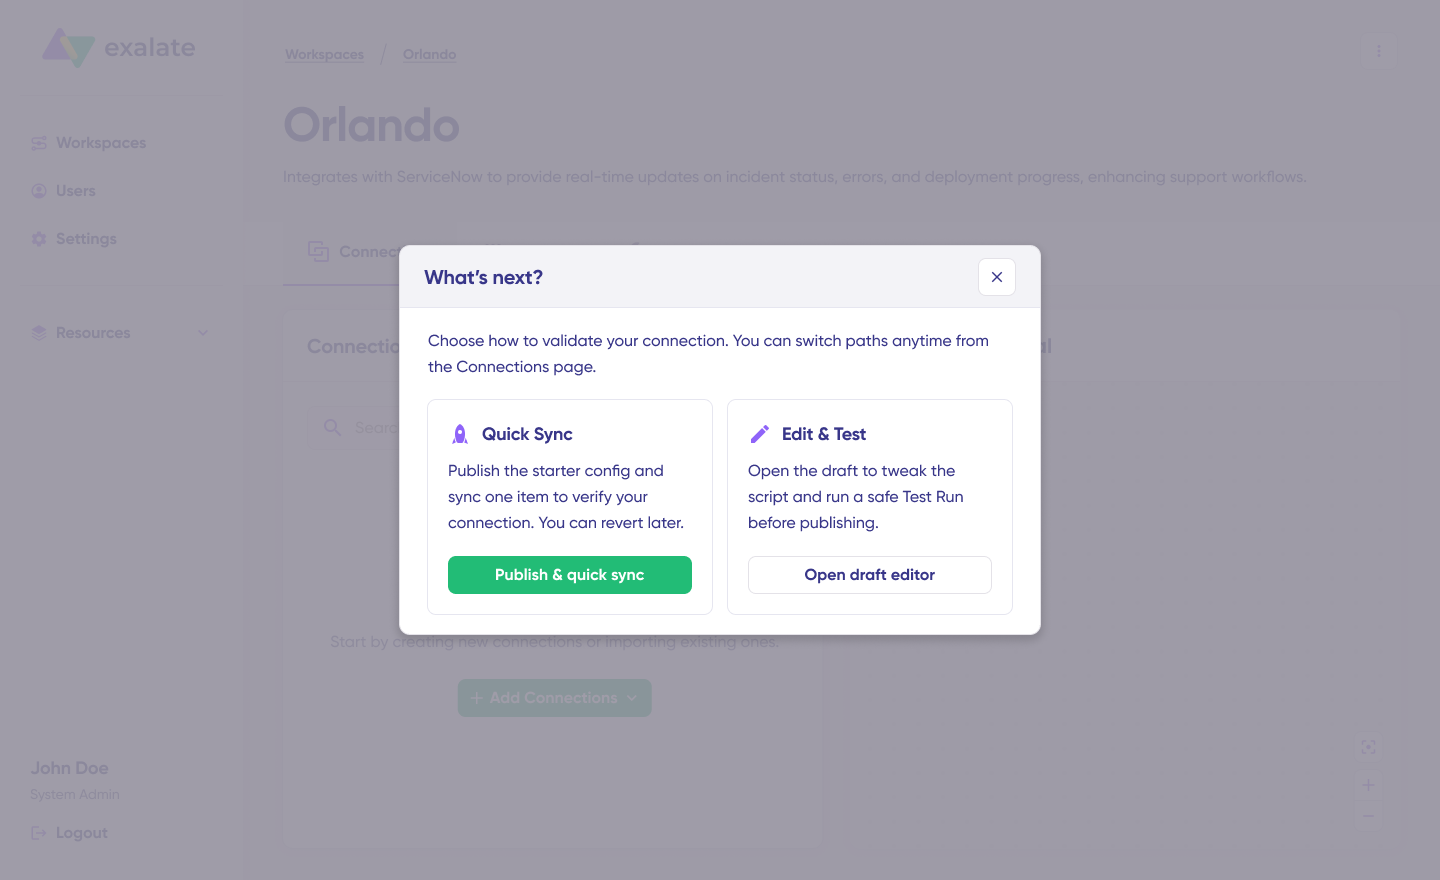
Now, you have 2 options: “Quick sync” and “Edit & Test“. Let’s go through them one by one.
Start Quick Sync
This option lets you sync one item between Freshservice and ServiceNow. Under the “Item sync monitor,” enter the ticket ID (for Freshservice) or incident number (for ServiceNow) and click on the “Sync Now” option.
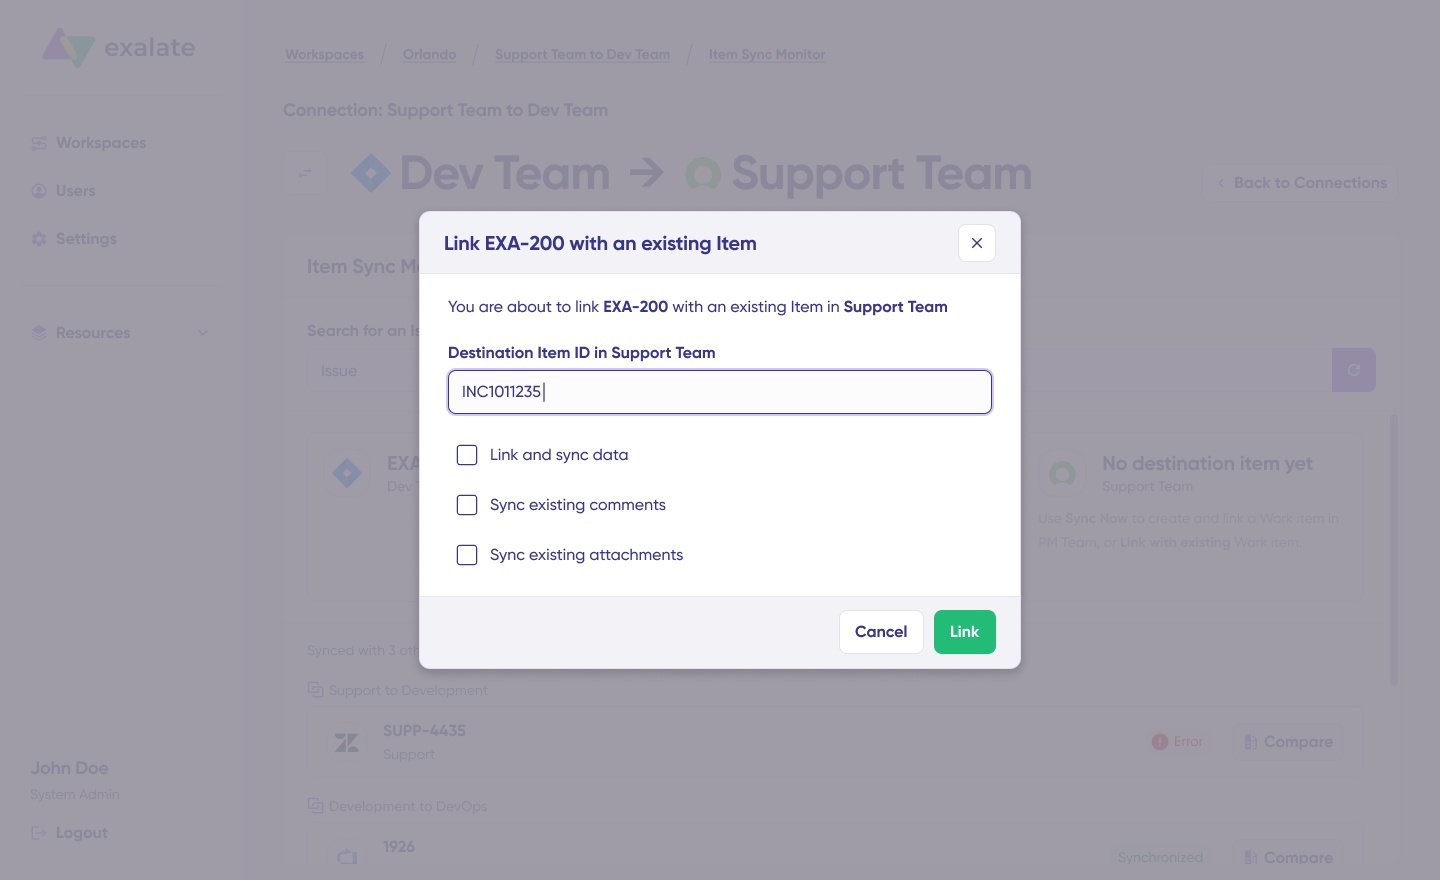
To link 2 existing items, click “Link with existing“. Once the sync is complete, you can view both the synced items in a new window. You can also choose to compare the changes.
Edit & Test
Open draft editor: This option allows changes when you click “Create a new version” or select the “Open latest draft“. This ensures you don’t modify the existing configuration accidentally.
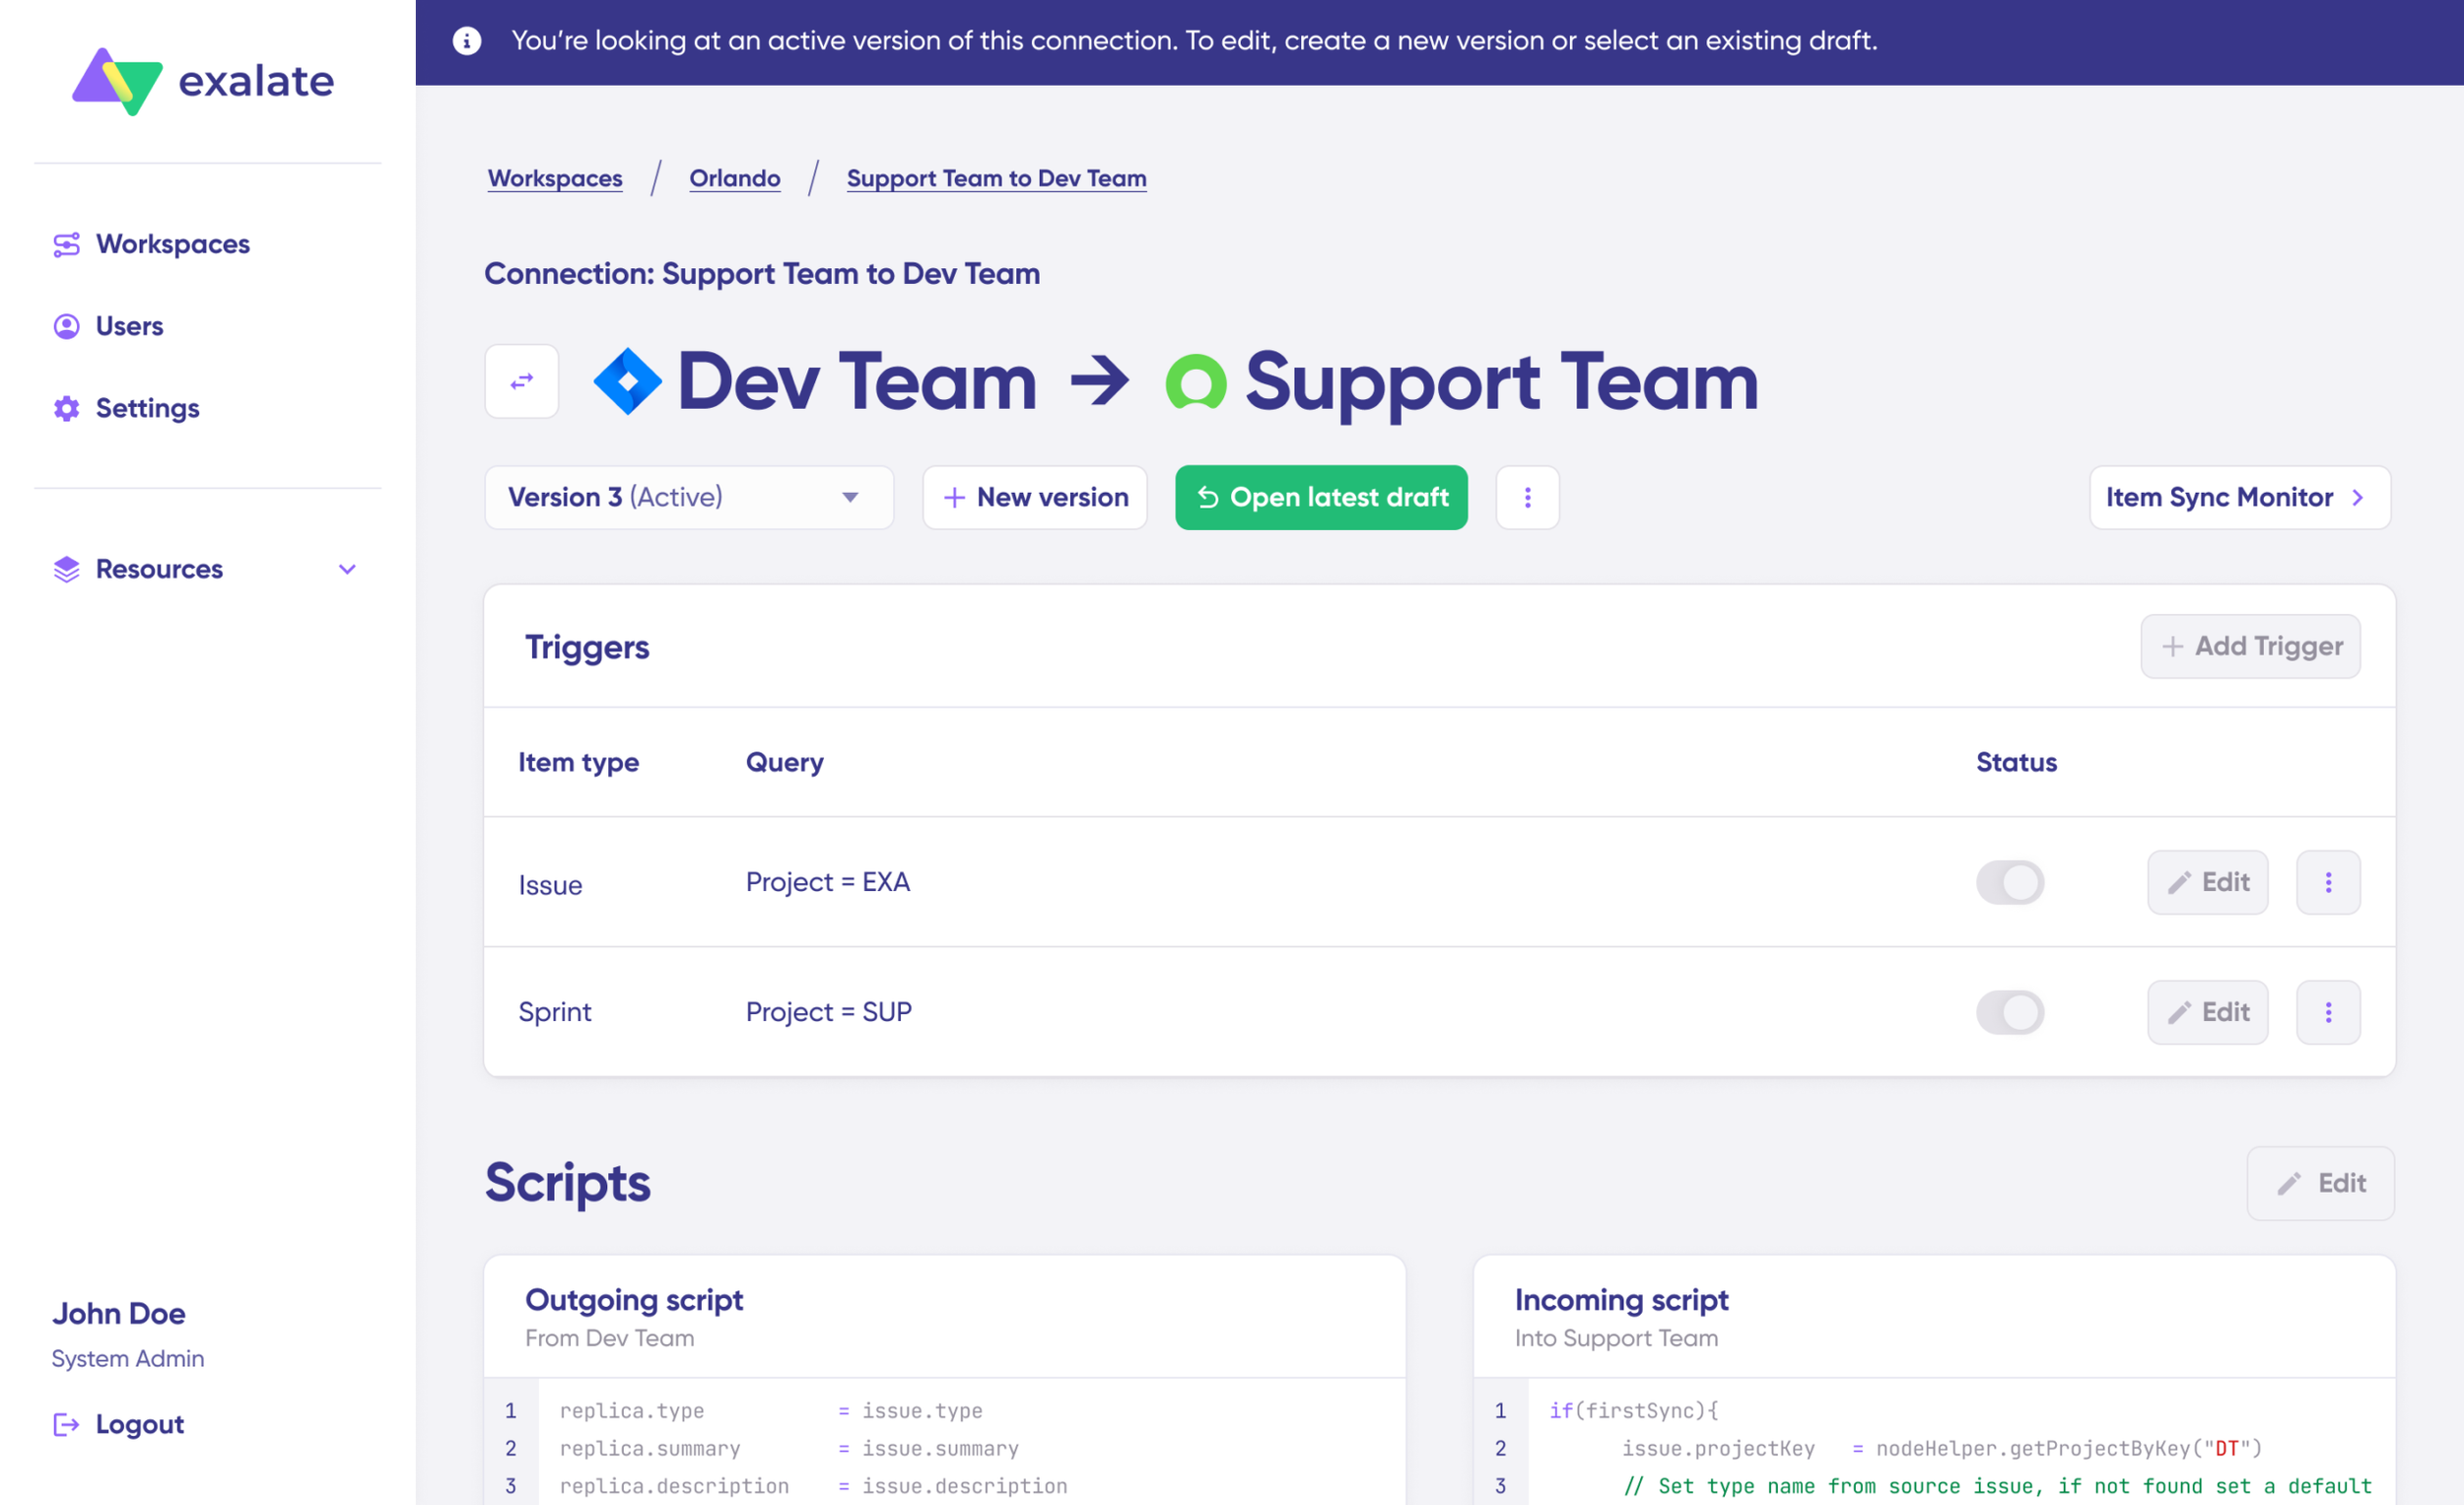
Once active, click the “Edit” button to open the editor and adjust the sync rules (Groovy-based scripts). These scripts let you add custom data logic and mapping for complex or advanced use cases or workflows.
Swap the sync direction by clicking the two arrows next to the connection name.
The outgoing script will hold the values passed from Freshservice to ServiceNow, and the incoming sync will define how the values coming from ServiceNow are mapped in Freshservice.
The Replica is a JSON file that carries the payload containing data being shared across entities on both platforms. You can adjust the sync scripts if you know the Groovy language. Otherwise, use Aida, our built-in AI assistant.
Use Aida to Generate Sync Scripts
Aida exists in both incoming and outgoing script sections, so choose the side accordingly.
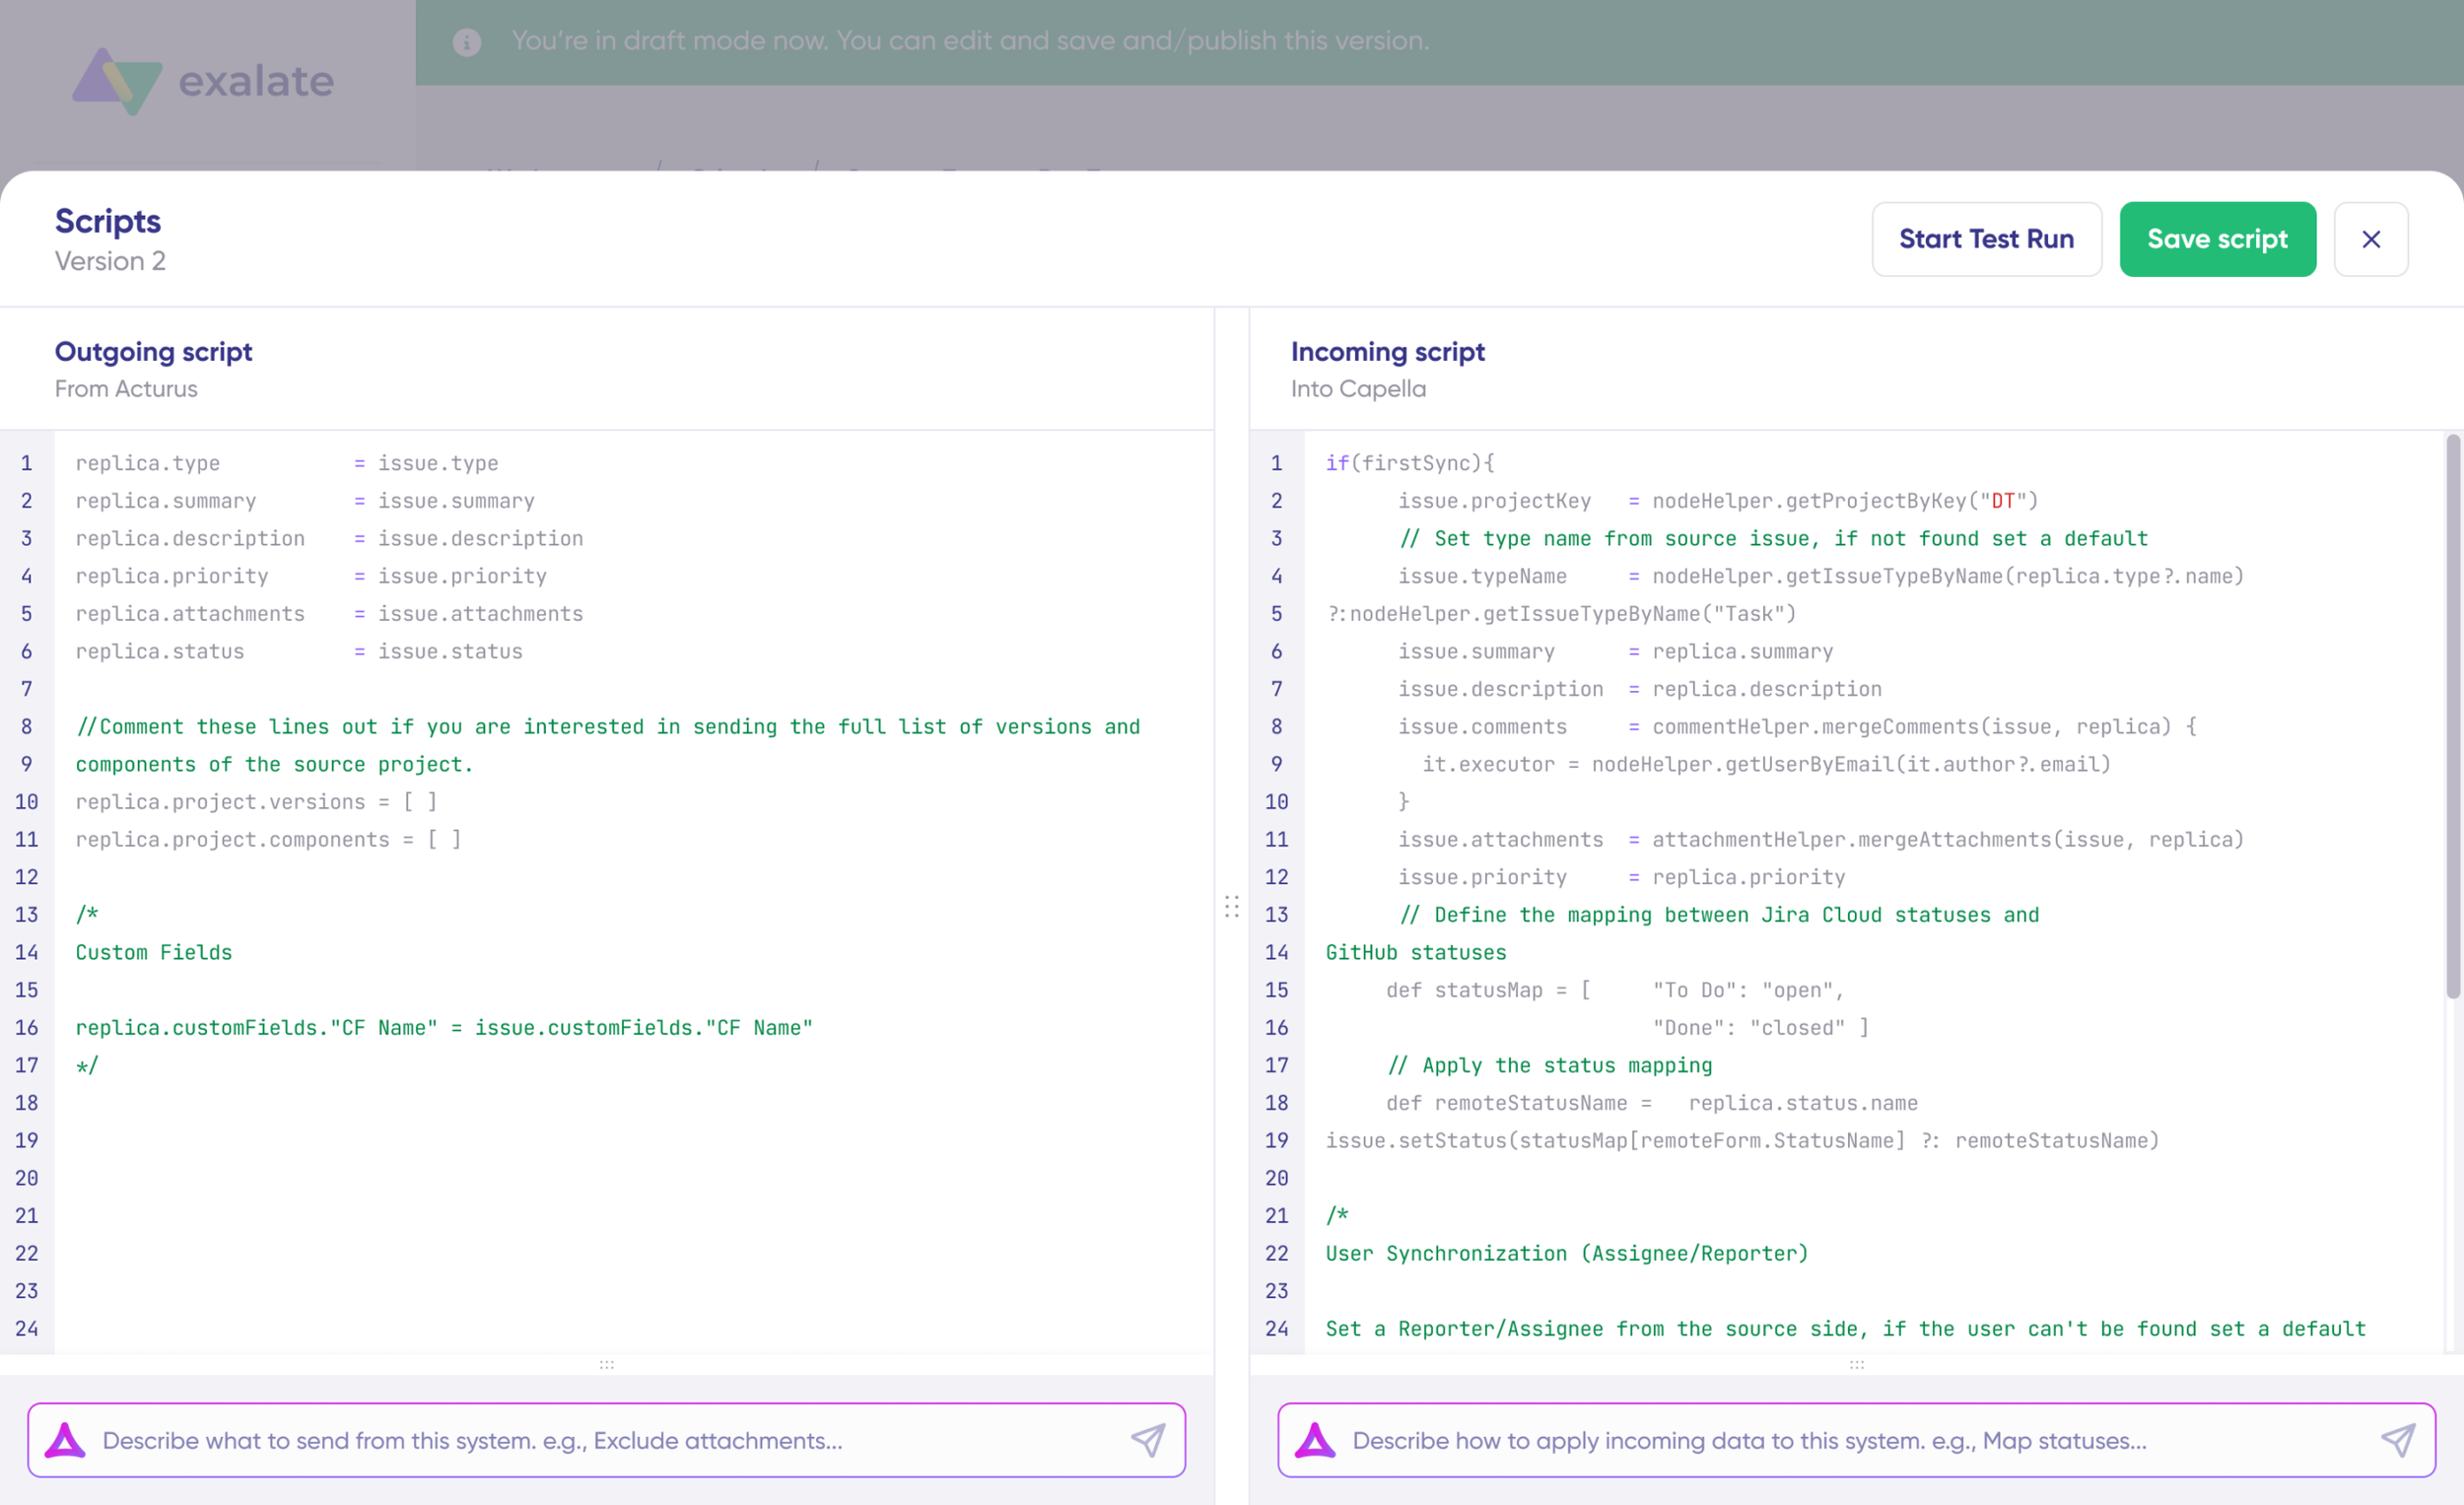
For Outgoing scripts: Describe what data should leave your system.
“Map ticket priority and status.”
For Incoming scripts: Describe how incoming data should be applied to your system.
“Map custom fields from ServiceNow incidents to Freshservice tickets.”
The scripts are generated based on Exalate’s scripting API and your existing scripts.
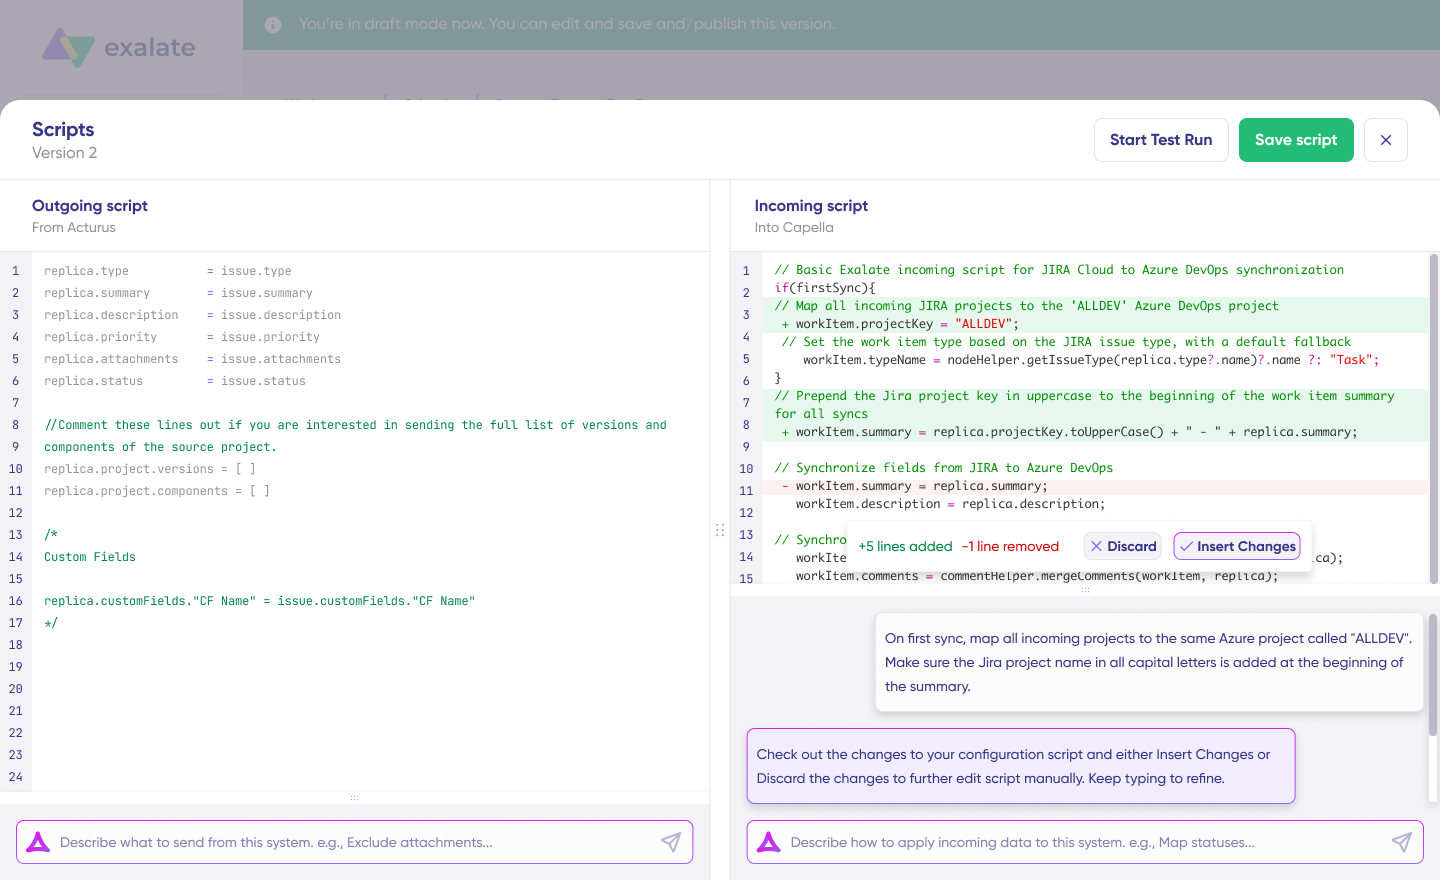
Review the output to validate the suggested changes. New lines are highlighted in green, while suggested removals are highlighted in red. Choose to “Insert” or “Discard” the suggestions.
Note: Just like with any other AI solution, review the generated code before applying it.
Once you have your sync scripts ready, you can choose to “Save script” or proceed to dry-run them before publishing.
Test Your Sync
Click “Start Test Run” and “Select items” to sync. You can select multiple tickets or incidents.

Wait a bit, and you’ll see the detailed results of the fields synced and the payload shared between both systems. If you’re satisfied with the results, click “Publish Version“.

You can view all versions from the “Version” dropdown. The versions can be either “Active“, in “Draft” (editable), or “Archived“.
Set Up Triggers
Set up triggers to automate your sync. These are conditions or filters you apply to specific items. For instance, sync all Freshservice tickets that have “priority = high” or all ServiceNow incidents where “category = software“.
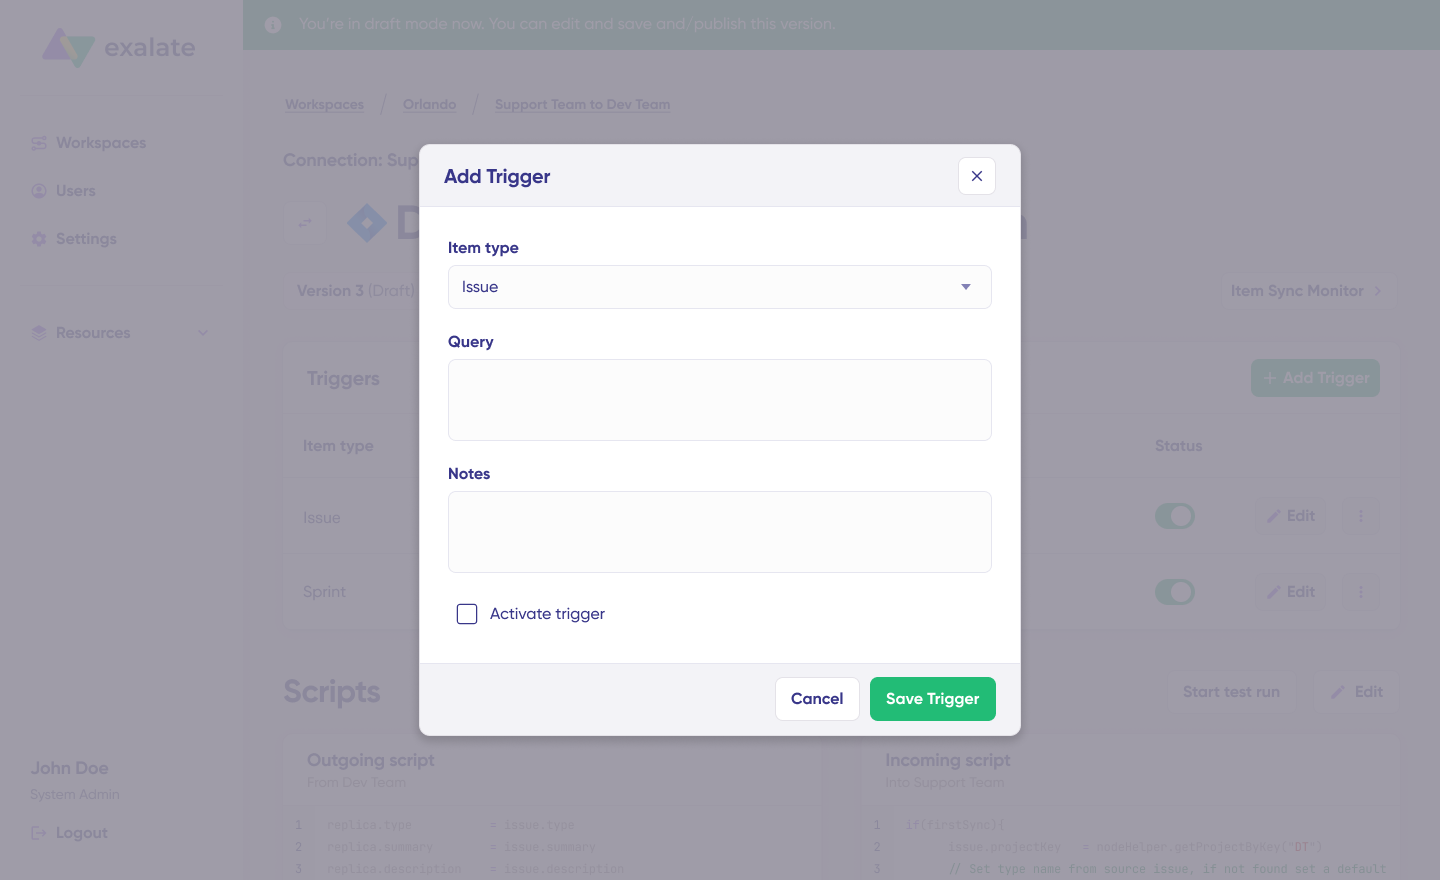
Click the “+Add trigger” button to start creating platform-specific triggers.
Choose the entity type (ticket for Freshservice, incident for ServiceNow). Apply your conditions—for example, “group_id = 123” for Freshservice or “assignment_group = IT Support” for ServiceNow. Then, save the trigger.
Troubleshoot with Aida

Troubleshoot your connection with Aida. If there’s an error, go to the “Troubleshooting” tab of your workspace. Hover over the error you want to diagnose and click on the Aida icon that appears next to the error.
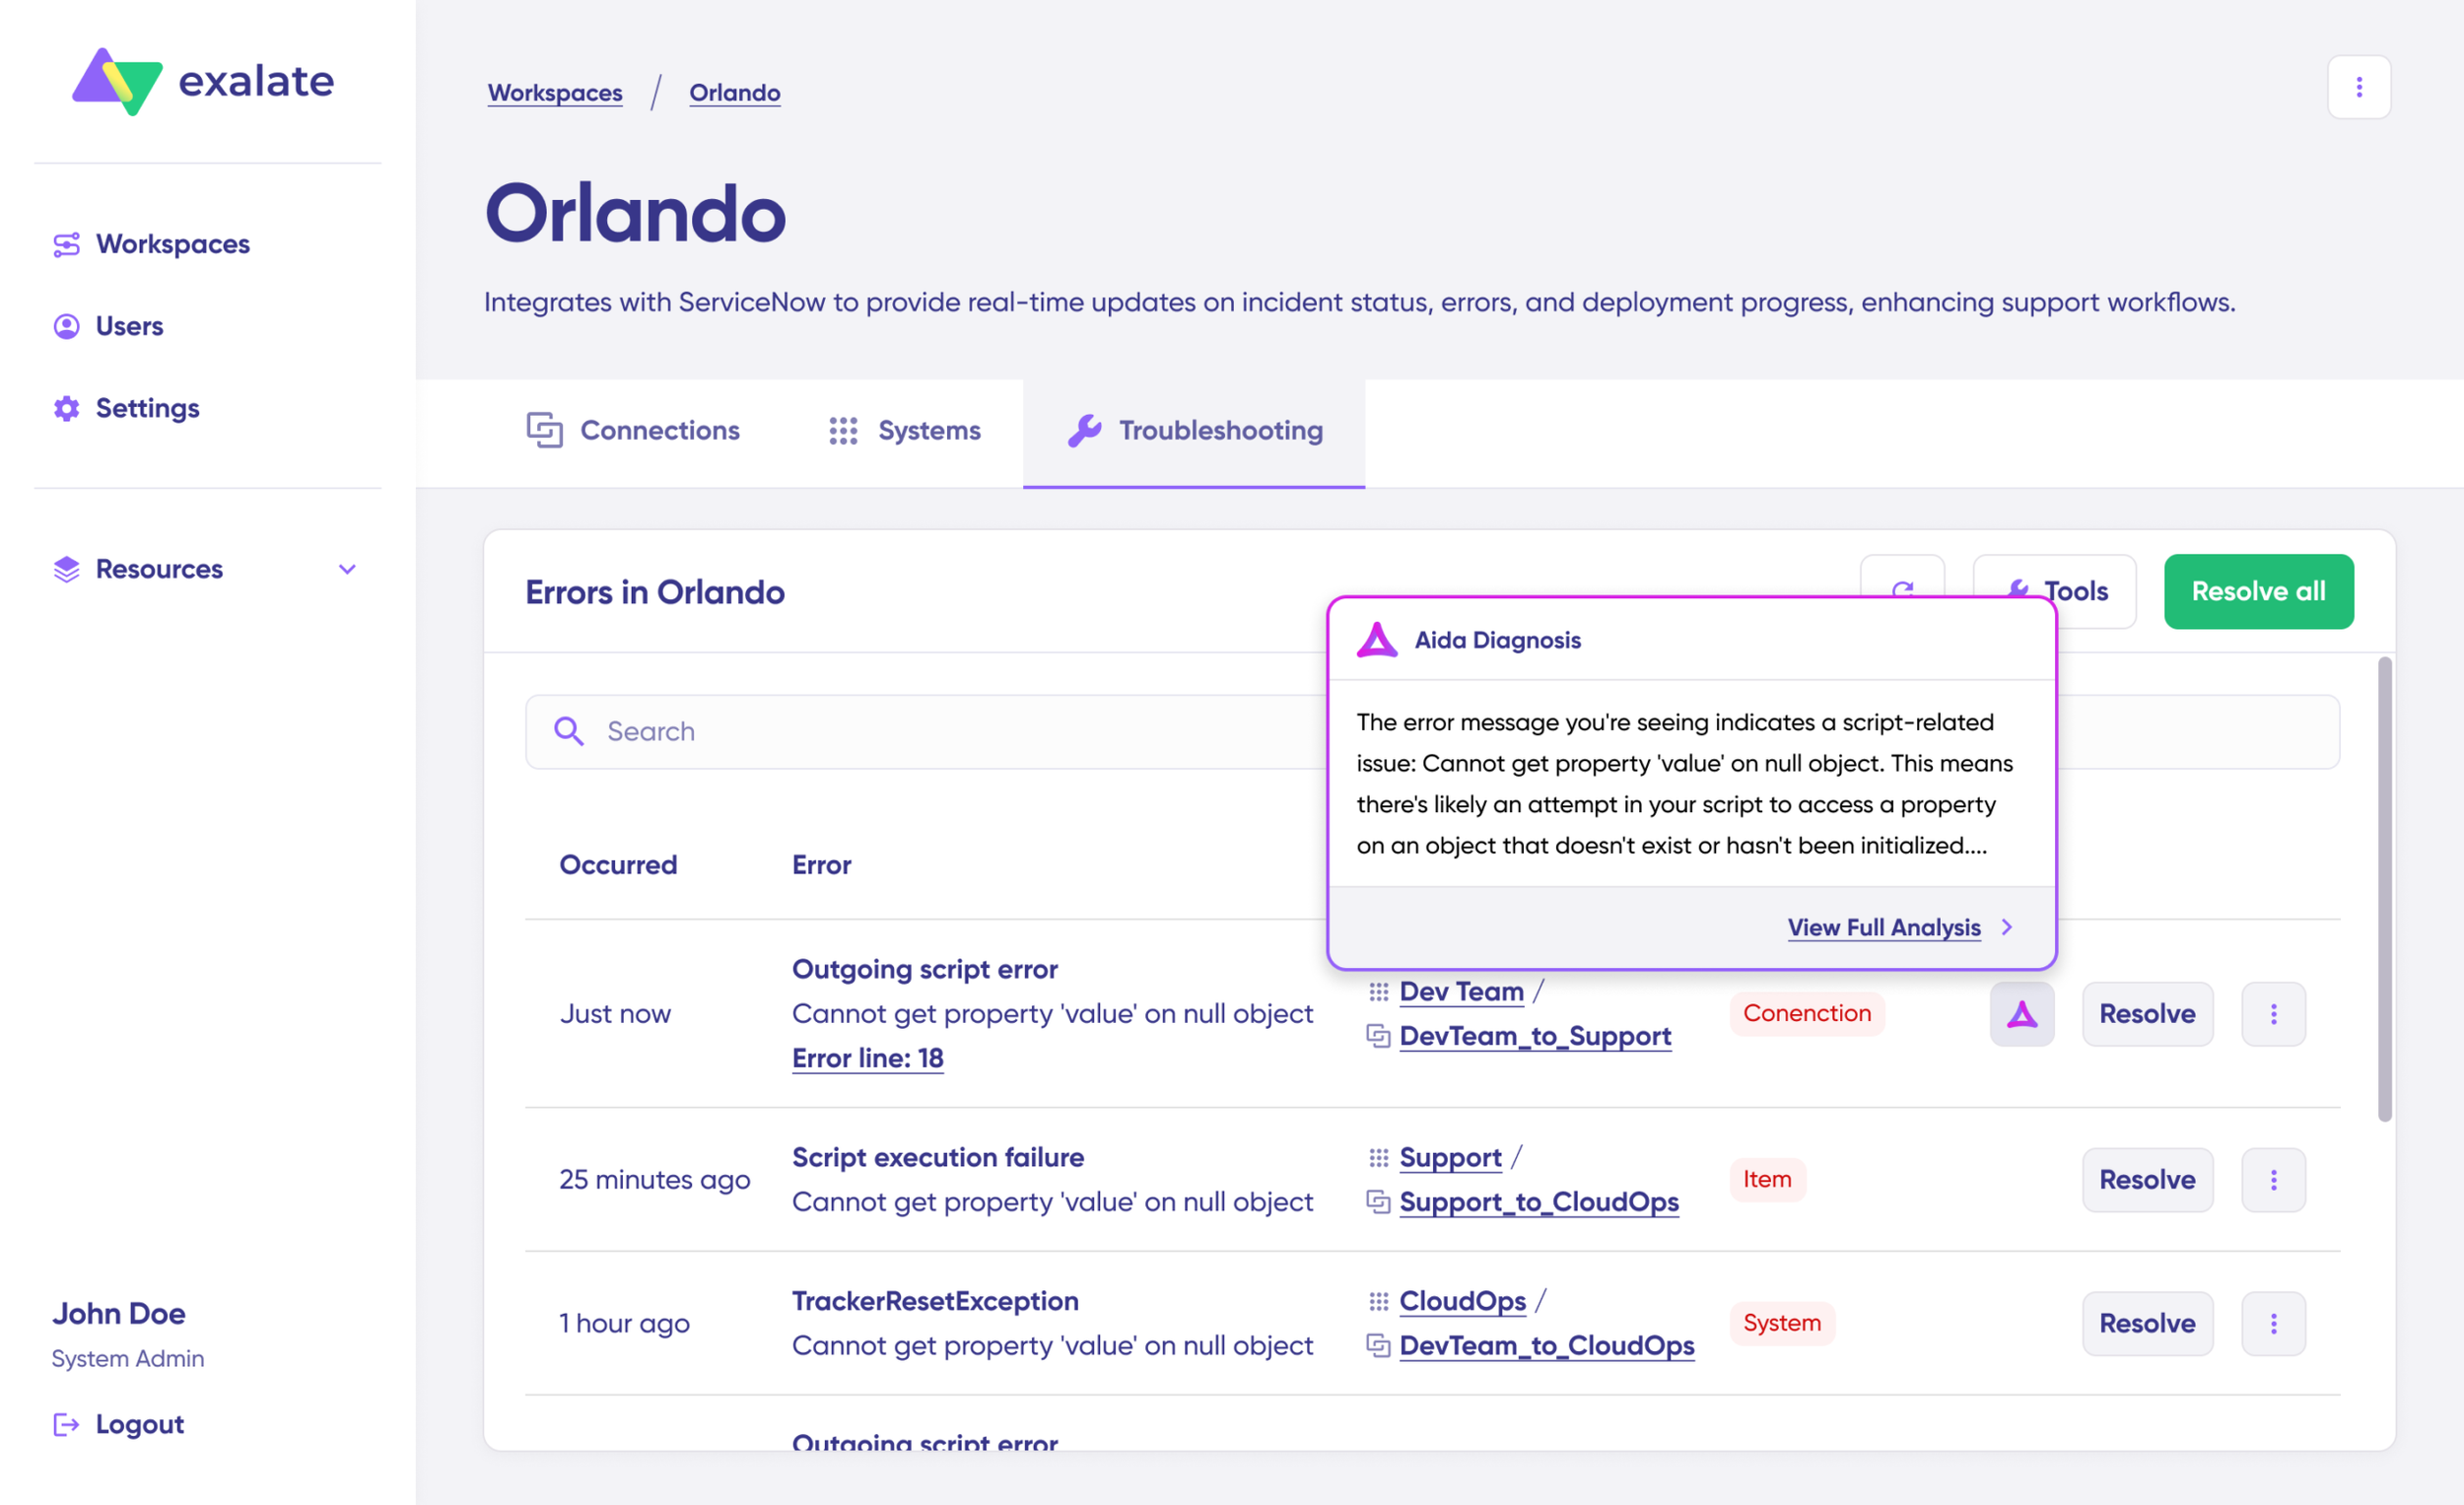
You will see all the affected systems, connections, and items. Aida will provide you with a brief analysis of the error message.
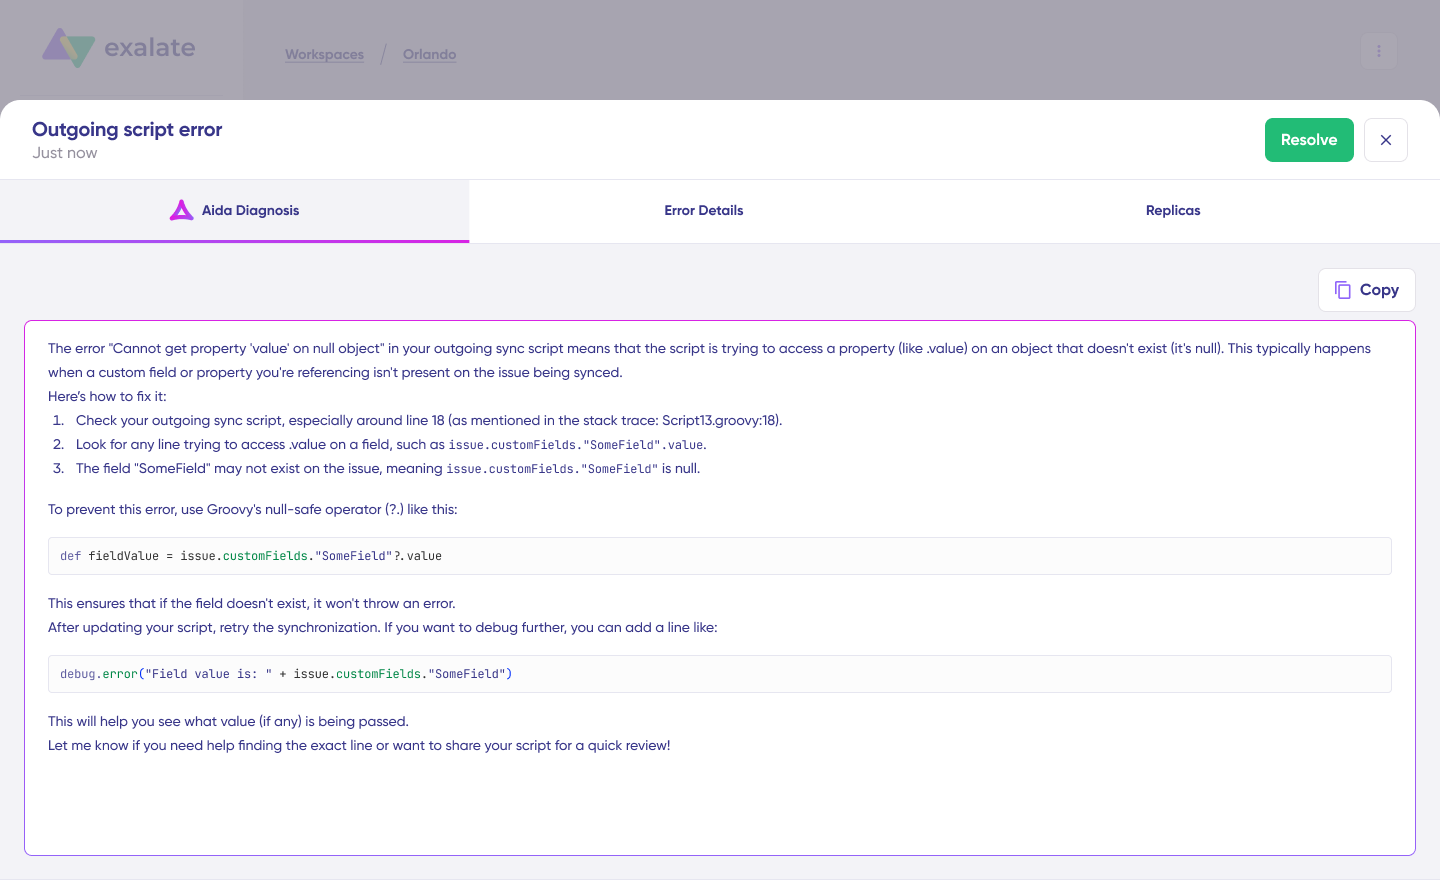
To get more information, click on Error Details. You’ll see the impact level, stack trace, error type, and date of occurrence. You can also “View Full Analysis” to get more context.
Fix the error and click on “Resolve“.
That’s it. Your first synchronization will start automatically based on the sync rules and triggers you have set. Happy syncing.
Real-World Use Cases For Freshservice to ServiceNow Integration
Case 1: Managed Service Provider (MSP) Operations
Challenge: An MSP manages 50+ clients, each using different ITSM tools. Some clients use Freshservice for day-to-day IT support, while the MSP uses ServiceNow as its central command center.
Solution: The MSP integrates each client’s Freshservice instance with their ServiceNow platform. When clients create tickets in Freshservice, they automatically sync to ServiceNow, where the MSP team can triage, assign, and track resolution.
Real-World Application: When a client’s Freshservice ticket is resolved, the status automatically updates in both systems. The MSP maintains visibility across all client tickets in ServiceNow while clients work in their familiar Freshservice environment. Attachments, comments, and updates flow bidirectionally based on configured access levels.
Case 2: Ticket Escalation Between Support Tiers
Challenge: A company’s L1 support team uses Freshservice to handle customer inquiries, but complex technical issues require escalation to the L2 DevOps team working in ServiceNow.
Solution: When support agents identify tickets requiring specialized expertise, they tag them with specific criteria (priority level, category, or custom fields). The integration automatically creates corresponding incidents in ServiceNow and assigns them to the appropriate DevOps team.
Real-World Application: A customer reports a critical application error through Freshservice. The support agent marks it as “High Priority” and categorizes it as “Application Error.” The integration creates a ServiceNow incident within seconds, including all customer details, error logs, and previous interaction history. As the DevOps team works on the issue, status updates flow back to Freshservice automatically, keeping the support team and customer informed.
Case 3: Multi-Brand Service Delivery
Challenge: A company acquired three smaller businesses, each with its own IT support structure using Freshservice. The parent company uses ServiceNow for enterprise IT operations and needs visibility across all brands.
Solution: Each subsidiary’s Freshservice instance integrates with the central ServiceNow platform. Tickets remain in Freshservice for local teams, while critical issues automatically sync to ServiceNow for enterprise oversight.
Real-World Application: When a security incident occurs at one subsidiary, it’s immediately visible in the parent company’s ServiceNow security operations dashboard. The security team can coordinate response across all brands while each subsidiary maintains its existing workflows. Monthly reporting consolidates metrics from all Freshservice instances into ServiceNow for executive dashboards.
Case 4: Vendor Collaboration
Challenge: An enterprise uses ServiceNow internally but works with external vendors who manage certain services through Freshservice. The vendors need to create and update tickets without direct access to the enterprise’s ServiceNow instance.
Solution: The integration creates a secure bridge between the vendor’s Freshservice and the enterprise’s ServiceNow. Vendors work in their Freshservice environment while their tickets automatically sync to ServiceNow incidents.
Real-World Application: A facilities management vendor receives a request for building maintenance through their Freshservice portal. The ticket automatically creates a ServiceNow incident visible to the enterprise’s facilities team. When the vendor completes the work and closes the Freshservice ticket, the ServiceNow incident closes automatically with completion notes and timestamps.
What are the Challenges in Freshservice ServiceNow Integration?
Data Mapping and Field Compatibility
One of the biggest headaches you’ll face when integrating ServiceNow and Freshservice is data transformation.
For instance, Freshservice might use “High,” “Medium,” “Low” for priorities, while ServiceNow uses numbers like “1, 2, 3”. Luckily, both platforms use HTML, so the conversions are minimal.
Another issue is business logic. Each platform has its own way of doing things, and forcing them to work together can create friction.
One platform might automatically assign tickets based on keywords, while ServiceNow uses complex assignment rules based on location, skill sets, and workload. When you sync a ticket from Freshservice to ServiceNow, you’ll need to decide which system’s business rules take precedence to avoid conflicts.
Authentication and Security Complexities
Managing secure connections between two enterprise platforms involves dealing with different authentication methods — API keys, OAuth tokens, etc.
Then there’s the challenge of maintaining these credentials, handling token renewals, and ensuring your integration doesn’t become a security vulnerability.
Each system has its own permission structures, so figuring out what level of access your integration needs without over-privileging can cause a few headaches.
API Rate Limits and Performance Issues
Both ServiceNow and Freshservice have limits on how many API calls you can make per hour (or within a specific period), and your team can quickly hit these ceilings during busy periods.
If you’re syncing hundreds of tickets during a major incident, you might get throttled just when you need the integration most.
User Adoption and Training Challenges
Getting teams comfortable with integrated workflows takes time and effort. Freshservice agents might resist having their tickets automatically escalated to ServiceNow, while ServiceNow users might not trust data coming from the “simpler” system.
You’ll face pushback about changed processes, concerns about data quality, and requests to “just keep doing things the old way.”
Troubleshooting Integration Issues
When something goes wrong, figuring out where the problem lies can be like detective work. Is the issue with your integration logic, a platform update, network connectivity, or user error?
In such cases, you will need detailed error logs with time stamps to help your system administrator diagnose problems effectively.
Scalability and Resource Planning
As your organization grows, your integration needs to handle increasing data volumes without degrading performance. What works fine for 100 tickets per day might collapse under the weight of 1,000 incidents. So you need to plan for peak loads, system maintenance windows, and geographic expansion.
Best Practices for Freshservice ServiceNow Integration
Follow these best practices to get the most out of your Freshservice and ServiceNow integration without the usual headaches:
Start with Clear Goals in Mind
Before diving into configurations, nail down exactly why you’re connecting these systems. Are you trying to speed up incident escalation from your help desk to enterprise IT? Do you want to give your ServiceNow team better visibility into customer-facing issues?
Maybe you’re dealing with an acquisition and need both platforms to work together temporarily. Having specific objectives like “reduce escalation time from 2 hours to 3 minutes” helps guide every decision you make during setup.
Get Everyone on the Same Page
Freshservice to ServiceNow integration should not be an IT-only project. Always involve your help desk managers, ServiceNow admins, and even end users from day one.
Your Freshservice agents know which fields they actually use, while your ServiceNow team understands their workflow requirements. So consult every stakeholder before setting up measurable KPIs together.
Document Every Step and Process
Record your field mappings, workflow decisions, and any custom scripts you create. Include screenshots of your configuration screens and notes about why you chose certain sync rules.
This information will come in handy when onboarding new team members, handing off tasks to a new team, or troubleshooting issues down the road.
Invest in Proper Training
Once your integration goes live, don’t just assume people will figure it out. Create practical training sessions that show real scenarios. Build quick reference guides and make sure both your Freshservice and ServiceNow teams understand how their actions affect the other platform.
Set Up Smart Monitoring and Alerts
If you want to catch problems before they become disasters, configure alerts for sync failures, unusual data volumes, or authentication issues.
For instance, if your integration typically processes 50 tickets per hour but suddenly drops to zero, you need to know immediately. This will help you spot issues early on.
Monitor and Optimize Performance
Keep an eye on how fast your data moves between systems. If tickets are taking 5 minutes to sync when they used to take 30 seconds, something needs attention.
Monitor your API usage to avoid hitting rate limits, and identify which data actually needs real-time sync versus what can be updated every few minutes. Sometimes, optimization means syncing fewer fields more frequently rather than syncing everything all the time.
Key Metrics to Track After Integrating ServiceNow and Freshservice
To know if your ServiceNow to Freshservice integration is a net benefit to your team, here are some metrics to track.
- Sync Success Rate: Track the percentage of successful data transfers and failed synchronizations to identify configuration issues. A healthy integration should maintain above 95% sync success rates while minimizing error frequency.
- Data Latency and System Performance: Measure how quickly changes in one system reflect in the other, aiming for under 30 seconds for most updates.
- Uptime (Downtime): Track integration system uptime, both planned and unplanned downtime, to ensure business continuity and reliability.
- Ticket Resolution Time: Compare average resolution times before and after integration to see how access to complete information from both systems impacts your team’s ability to resolve issues faster.
- Escalation Rates and Problem Resolution: Track how the ServiceNow and Freshservice integration reduces unnecessary escalations by providing complete context.
- Cost Reduction and ROI: Calculate savings from reduced manual processes, fewer licensing needs, and improved operational efficiency. Track the return on investment of your integration through reduced operational costs and improved resource allocation.
Frequently Asked Questions
What ServiceNow and Freshservice ticket fields can Exalate sync?
Exalate enables users to sync fields from Freshservice tickets (incidents and service requests), including summary, description, status, priority, urgency, attachments, notes, custom fields, custom keys, and more.
For ServiceNow, you can sync default and custom fields, plus any other field available via REST APIs. The most commonly synced entities are incidents, problems, change requests, RITMs, CMDB, and catalog tasks. If you don’t see the fields or entities that you need to sync, discuss your use case with us and explore all the possibilities.
Can I sync only specific tickets from Freshservice to ServiceNow?
Yes. Use conditional sync rules or triggers to filter which tickets sync. For example, sync only tickets with priority “High” or “Critical,” or tickets in specific categories.
Can I sync attachments and comments between platforms?
Yes, Exalate allows you to sync attachments and comments along with ticket fields. You can configure size limits for attachments and choose whether to sync internal notes or only public comments.
Can Exalate integrate multiple ServiceNow instances with Freshservice?
Yes, Exalate can integrate multiple ServiceNow instances with Freshservice. This setup works well for MSPs managing different client environments or enterprises with multiple ServiceNow instances across business units. Each team decides what data to share with Freshservice while maintaining privacy and control over their specific integration requirements.
Does the integration work with custom fields?
Yes, Exalate supports custom field mapping. You can map Freshservice custom fields to ServiceNow custom fields, or use scripts to transform custom field data.
Can Exalate integrate with other platforms beyond Freshservice and ServiceNow?
Yes, Exalate supports integrations with Jira Cloud, GitHub, Zendesk, Azure DevOps (Cloud and Server), Freshdesk, Salesforce, Service Desk Plus, and many other platforms, allowing you to create comprehensive integration ecosystems.
How does Exalate secure ServiceNow to Freshservice integrations?
Exalate protects the data flowing through your ServiceNow and Freshservice integration using security features such as JWT access tokens, role-based access controls, HTTP (HTTPS), TLS 1.2 and 1.3, and multi-factor authentication. It is also ISO27001:2022 certified. You can find out more about it in the Trust Center.
Recommended Reads


