Information continuously evolves and grows in organizations. This untapped information, if shared between teams using different applications like Azure DevOps and Salesforce, can increase business revenue and leave you with more satisfied customers. For this purpose, an Azure DevOps Salesforce integration is the best choice.
Such integration can automate information exchange between Azure DevOps and Salesforce. It can also ensure the exchange is bi-directional and in real-time, so data is consistently accessible and up-to-date.
This guide will introduce you to a step-by-step Azure DevOps Salesforce integration. It will also help you understand the benefits of such integration and present the key drivers for choosing the correct integration technology.
Key Takeaways
- Azure DevOps-Salesforce integration eliminates manual data entry between development and sales teams, reducing errors and saving time.
- Real-time bi-directional synchronization keeps customer-facing teams and developers aligned with automatic updates across both platforms.
- Choosing the right integration tool requires evaluating security certifications (ISO 27001), scripting flexibility, and multi-platform support.
- Common use cases include escalating Salesforce cases to Azure DevOps work items, providing progress updates to sales teams, and establishing smooth customer support pathways.
- AI-assisted configuration with tools like Exalate’s Aida feature enables both simple no-code setups and advanced custom integrations using Groovy scripts.

Why Integrate Azure DevOps and Salesforce?
Azure DevOps provides end-to-end DevOps toolchains for software development and deployment, with thousands of apps available through its marketplace.
Salesforce serves as the CRM backbone for sales, marketing, and service teams to strengthen customer relationships through AppExchange integrations.
Both platforms excel at breaking down silos, but when they operate in isolation, critical information gets trapped.
The Real Cost of Manual Data Exchange:
Without integration, teams waste hours on:
- Copy-pasting case details from Salesforce into Azure DevOps work items
- Chasing developers via Slack or email for bug fix status updates
- Manually updating Salesforce cases when work items change status
- Searching through email threads to understand customer context
- Re-entering the same information across multiple tools
This manual workflow creates:
- Data entry errors that confuse both teams
- Lost customer context when escalating work items
- Delayed responses to customer requests
- Scattered information across disconnected systems
- Frustrated teams switching between applications constantly
Features to Consider When Choosing an Azure DevOps Salesforce Integration
Choosing the right integration tool determines whether you eliminate manual work or simply shift it elsewhere. The wrong tool creates new bottlenecks, while the right one becomes invisible infrastructure that just works.
Here’s what matters most:
Security and Compliance
Security should be your top criterion since integration involves sensitive business data flowing between systems, often across company boundaries.
Look for:
- ISO certification
- Encryption in transit and at rest
- Role-based access control
- Secure transport protocols
Review detailed security measures in the Trust Center. You can also read more about how Exalate implements security measures by reading its security and architecture whitepaper.
Scripting and Operational Control
The best integration tools give both sides complete control over their data without requiring coordination with the other party.
This means:
- Independent sync rule configuration
- Flexible Groovy scripting engine
- No mutual dependencies
- Granular field-level control
Exalate achieves this through outgoing and incoming sync rules on both sides. Your development team in Azure DevOps controls what comes in. Your sales team in Salesforce controls what goes out. Both maintain full autonomy.
Reliability and Sync Integrity
Your integration must handle downtimes, system failures, and network issues gracefully without losing data or creating duplicates.
Exalate breaks synchronization into atomic steps, maintaining order even during Azure DevOps upgrades, firewall reconfigurations, or Salesforce maintenance windows.
Flexibility: From No-Code to Advanced Customization
Your integration needs will evolve. Simple syncs become complex. New requirements emerge. Your tool should adapt without requiring complete reconfiguration.
For simple use cases:
- Pre-configured sync rules work out-of-the-box
- No-code setup for standard field mappings
- Quick configuration that business users can understand
For advanced scenarios:
- Custom Groovy scripts for complex transformations
- AI-assisted configuration with Aida to generate sync rules from natural language
- Test Run feature validates changes before production deployment
- Quick Sync tests configurations in real-time
Exalate supports both ends of this spectrum. Start with no-code configuration, then add scripting as requirements grow more sophisticated.
Multi-Platform Integration Network
Your integration tool should support connections beyond just Azure DevOps and Salesforce. As partnerships expand and tool stacks evolve, you’ll need flexibility to connect additional platforms.
Exalate integrates with:
- Project management: Jira, Azure DevOps, Azure DevOps Server
- Service management: ServiceNow, Freshservice, Freshdesk, Zendesk
- Development: GitHub
- Collaboration: Asana
- CRM: Salesforce
- Custom connections: API-based connectors for proprietary systems
This multi-platform support means that when your partner uses Jira while you use Azure DevOps, or when you need to sync Freshservice tickets into Salesforce cases, you’re already covered.

Calculate time and money savings from automated bidirectional sync.
How to Set up an Azure DevOps Salesforce Integration with Exalate: Step-by-Step Guide
This tutorial demonstrates how to use Exalate to configure an Azure DevOps Salesforce integration.
Step 1: Create Your Exalate Account
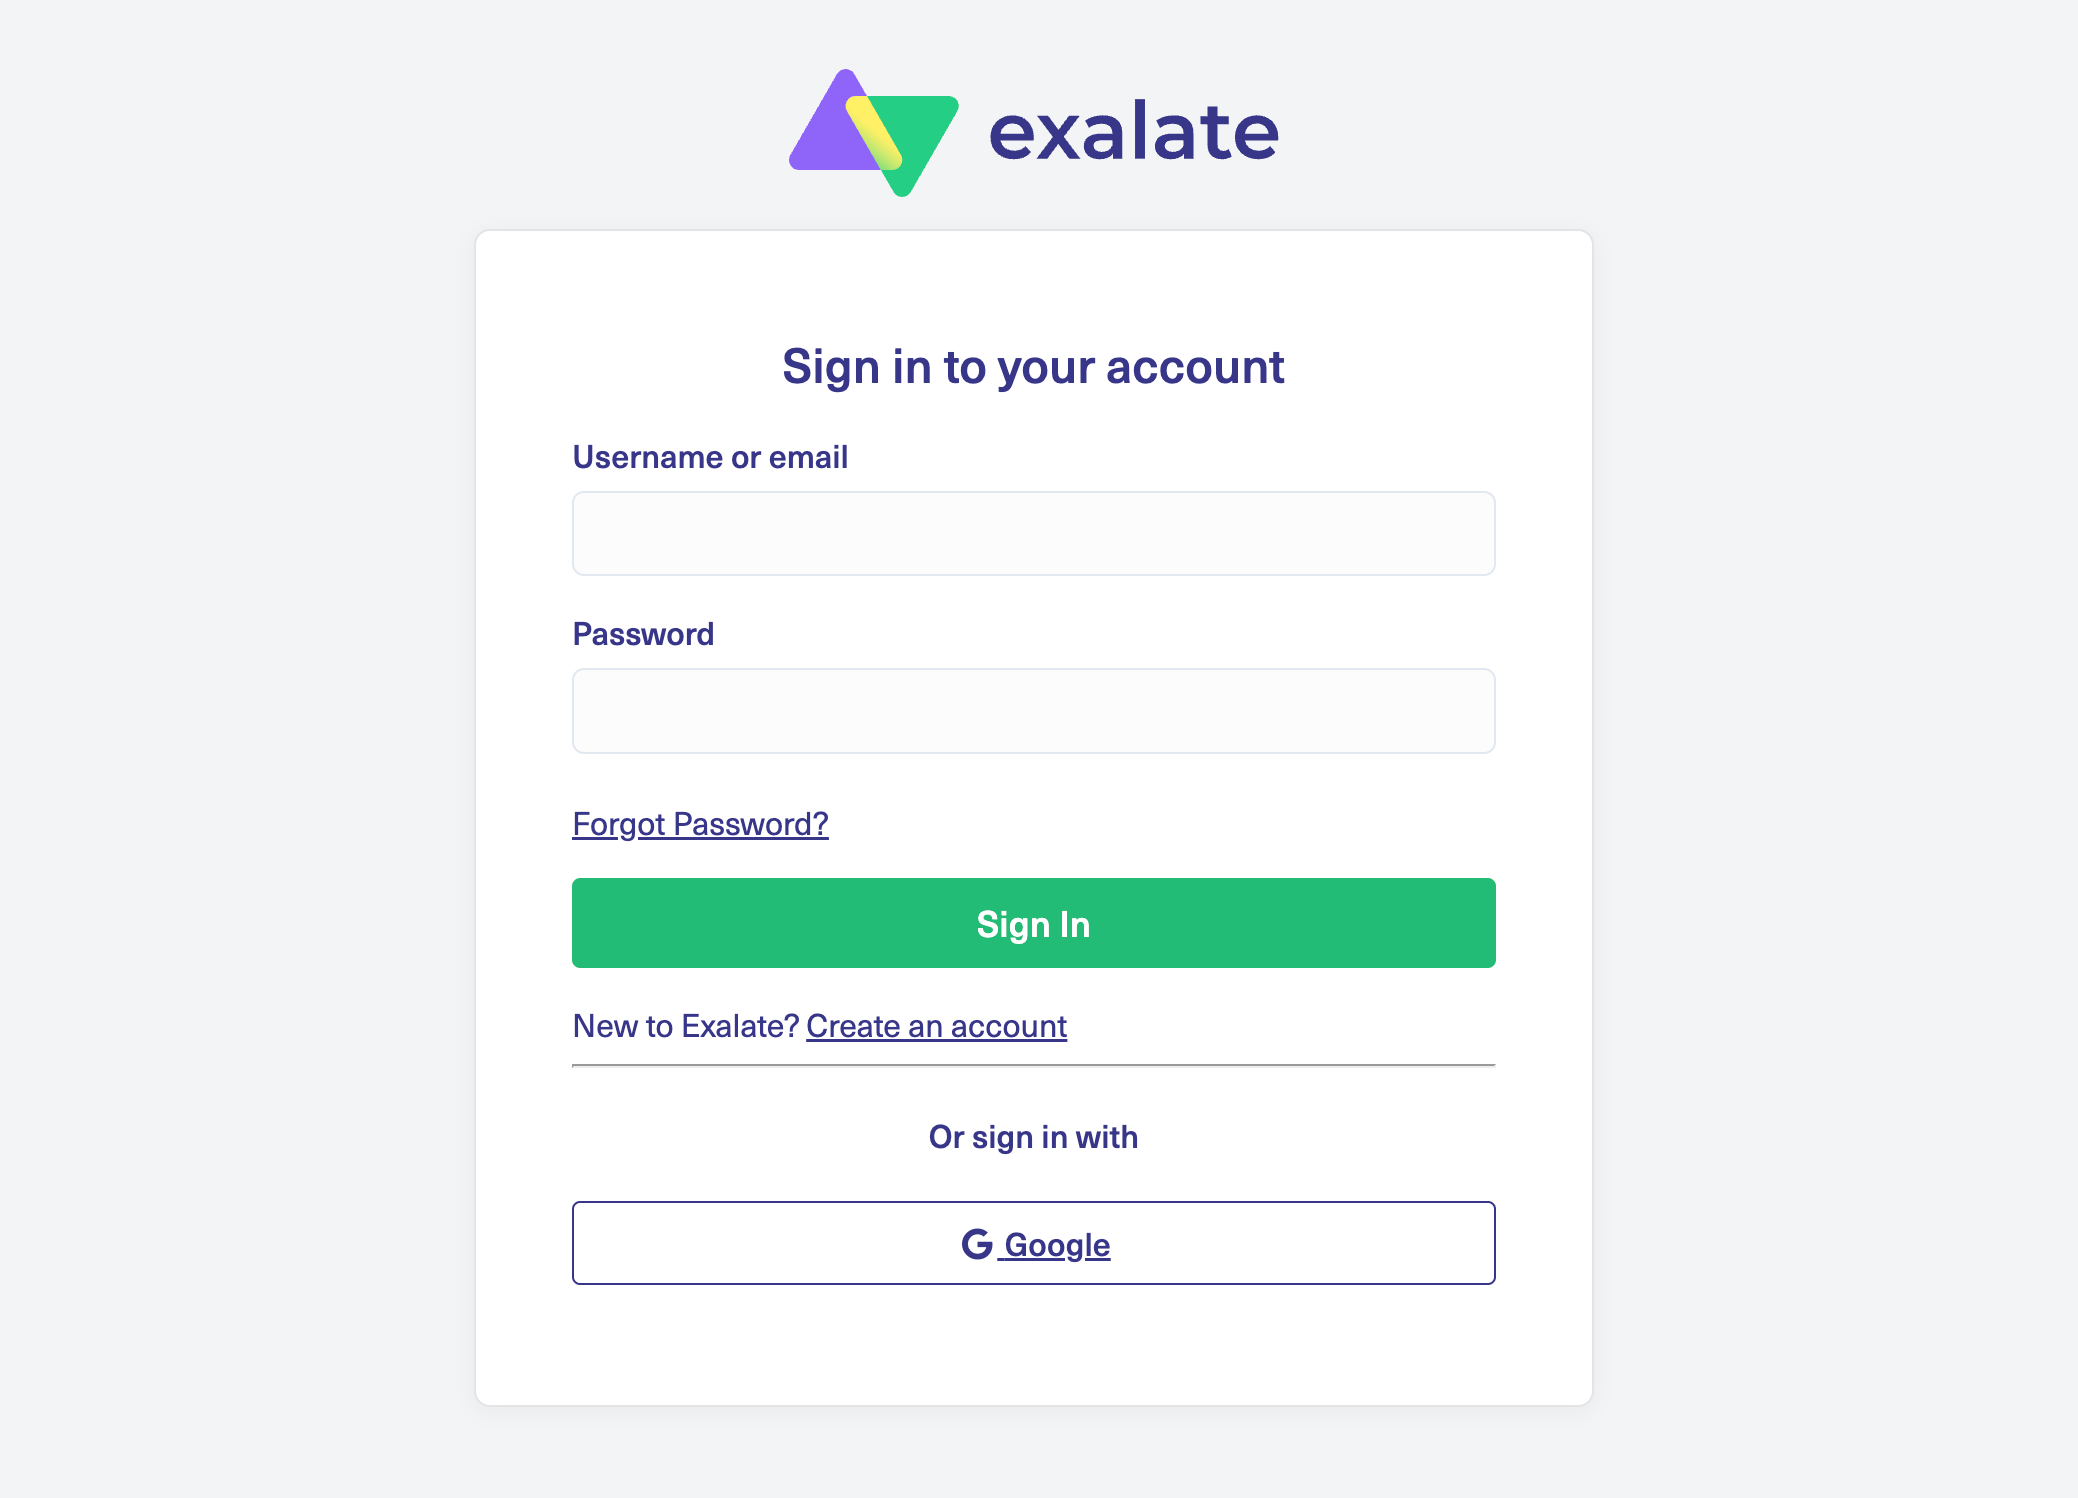
Visit the Exalate integrations page to get started. If you’re new to Exalate, create an account by entering your email and verifying it, or sign up using your Google account. Existing users can log in directly.
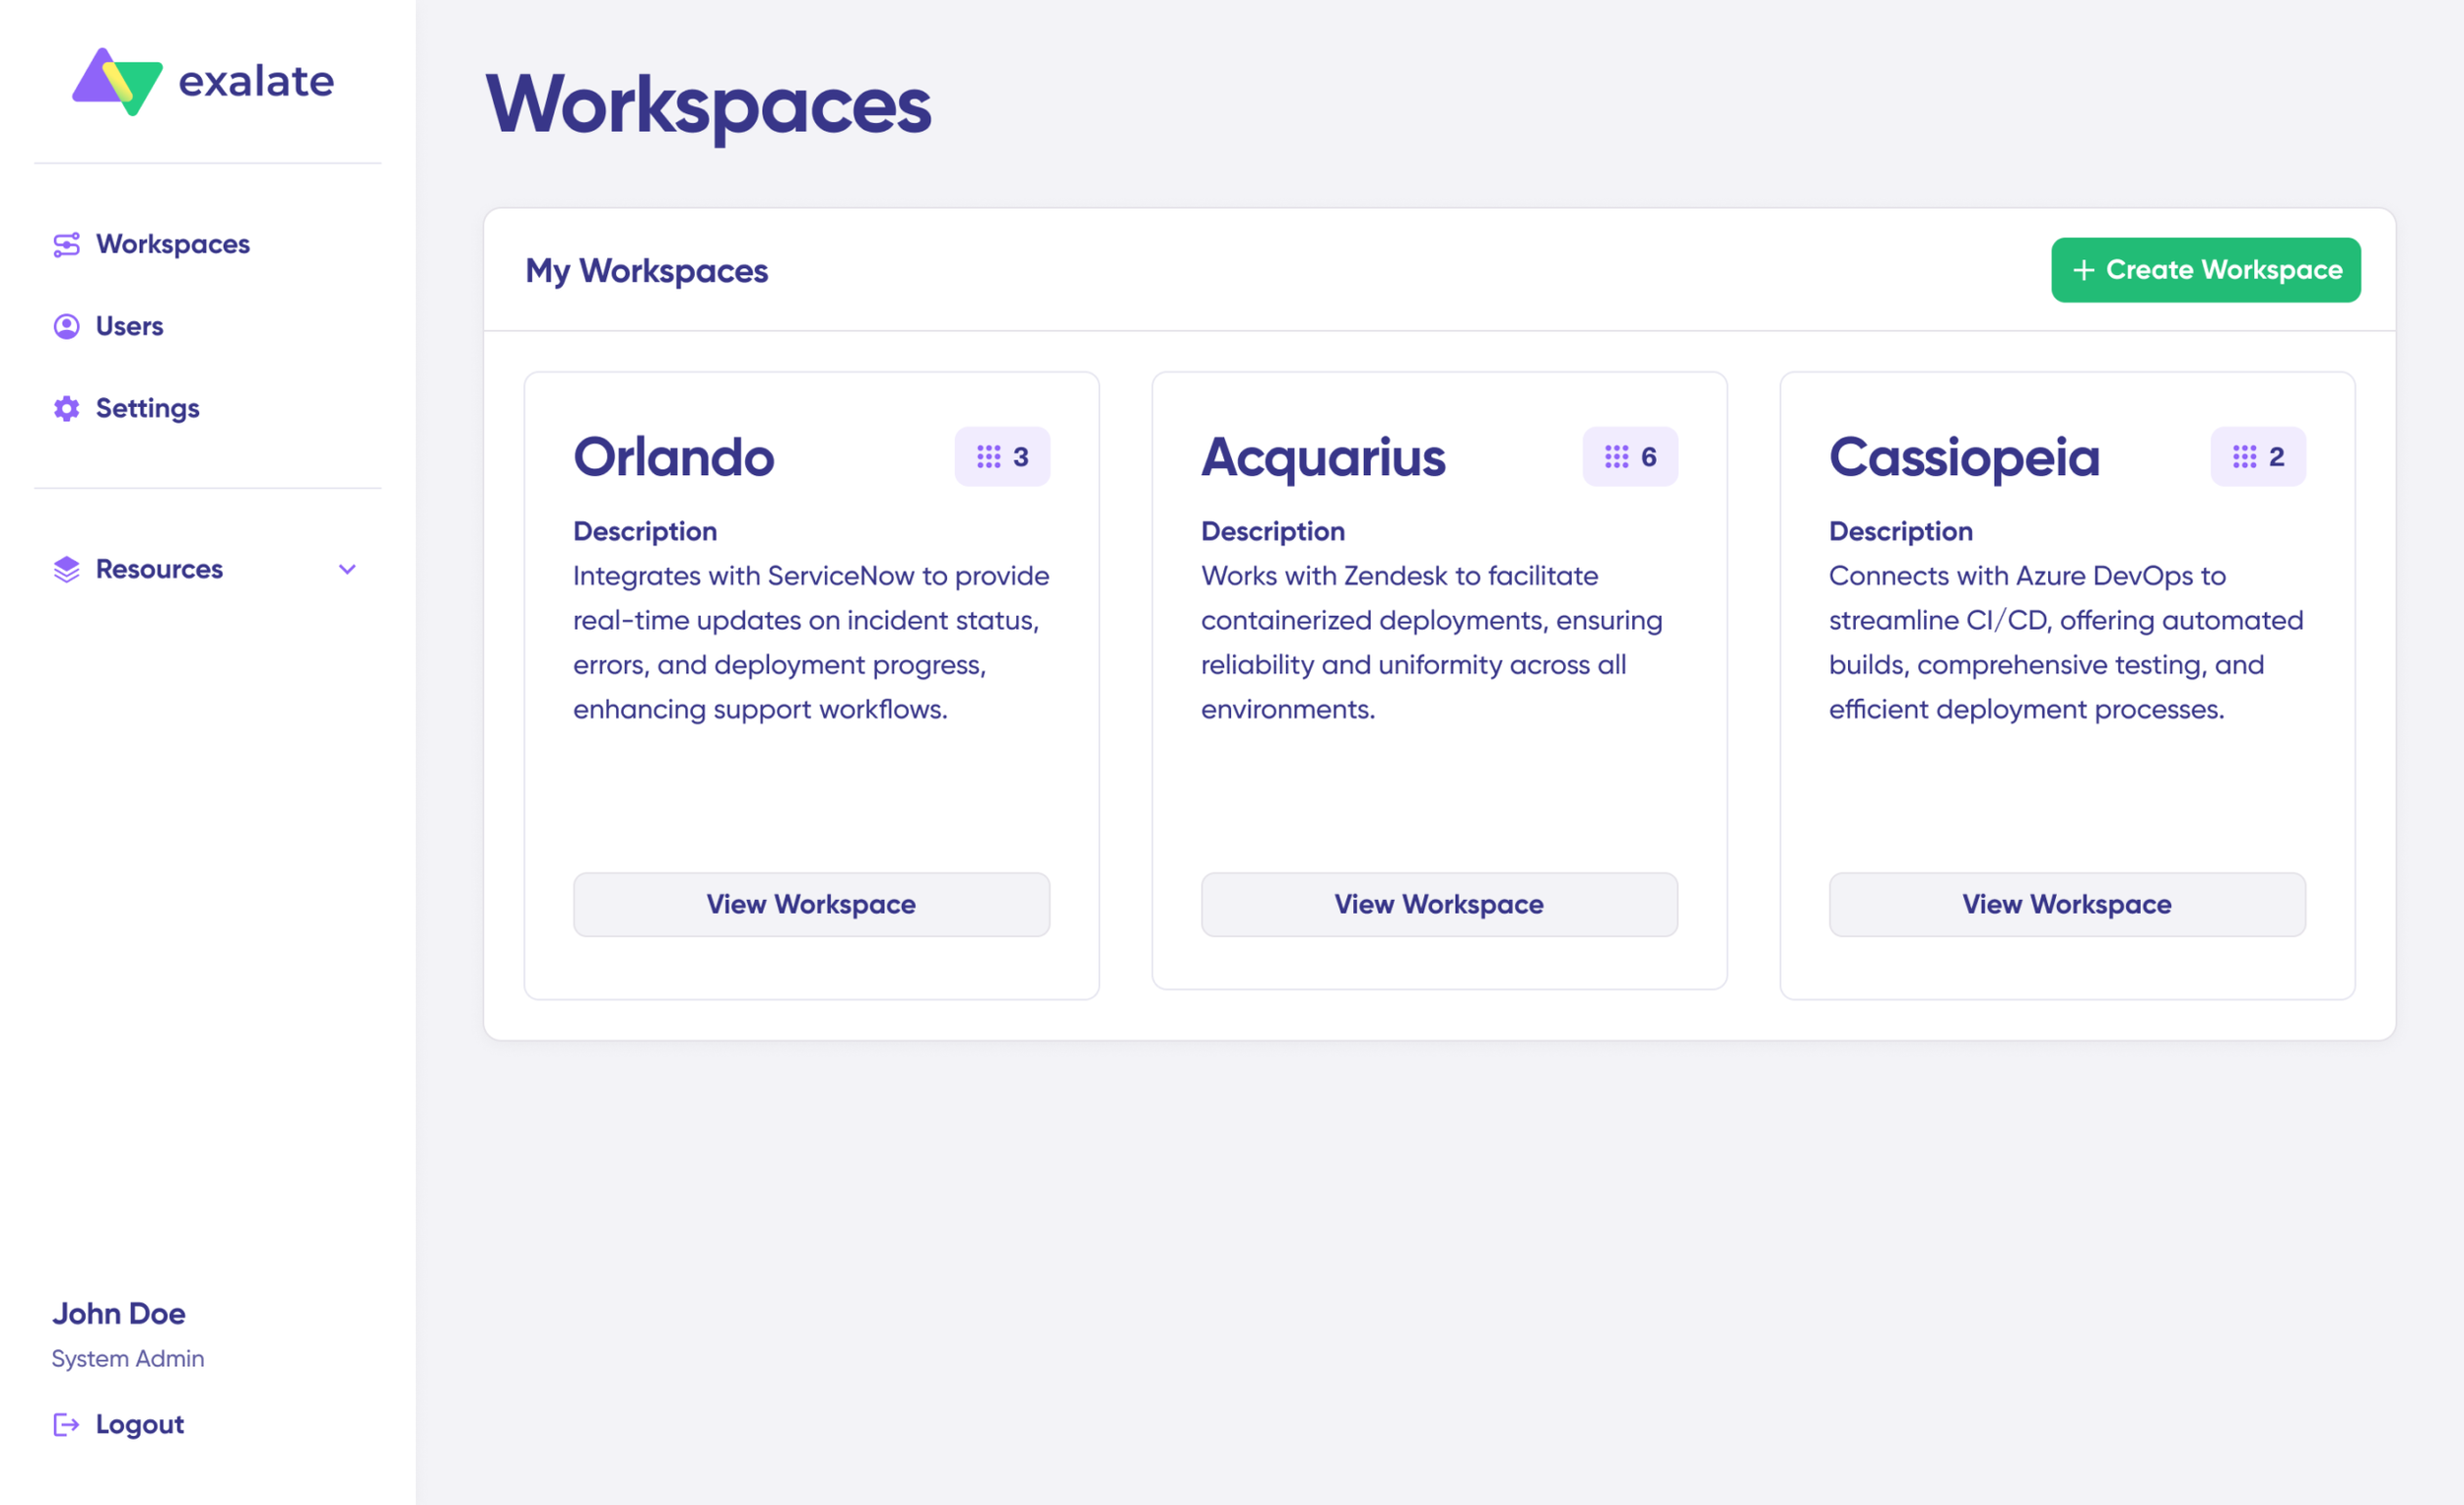
Workspaces serve as organizational hubs where you manage all your integrations and connections in one centralized location. Navigate to the “Workspaces” tab to view your existing workspaces. For first-time users, click the “+ Create Workspace” button.
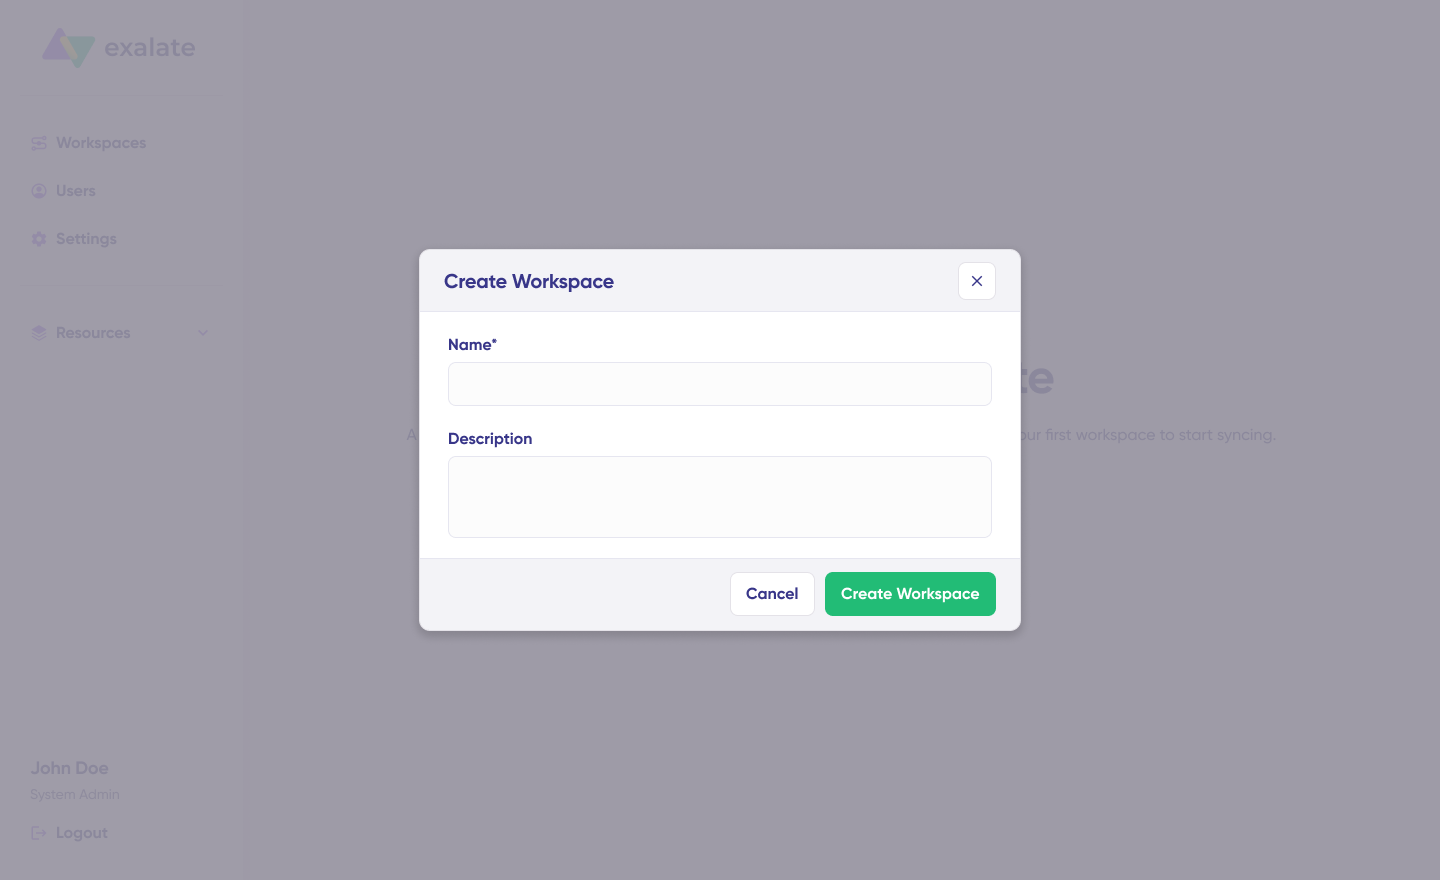
Provide a name and description for your workspace, then click “Create workspace” to proceed.
Step 2: Create Your Azure DevOps-Salesforce Connection
If you already have a workspace, all your connections appear under the “Connections” tab. From there, you can edit connections and view detailed connection information.
To create a connection, you need an active Exalate account with at least one workspace and valid authentication credentials for both Azure DevOps and Salesforce.
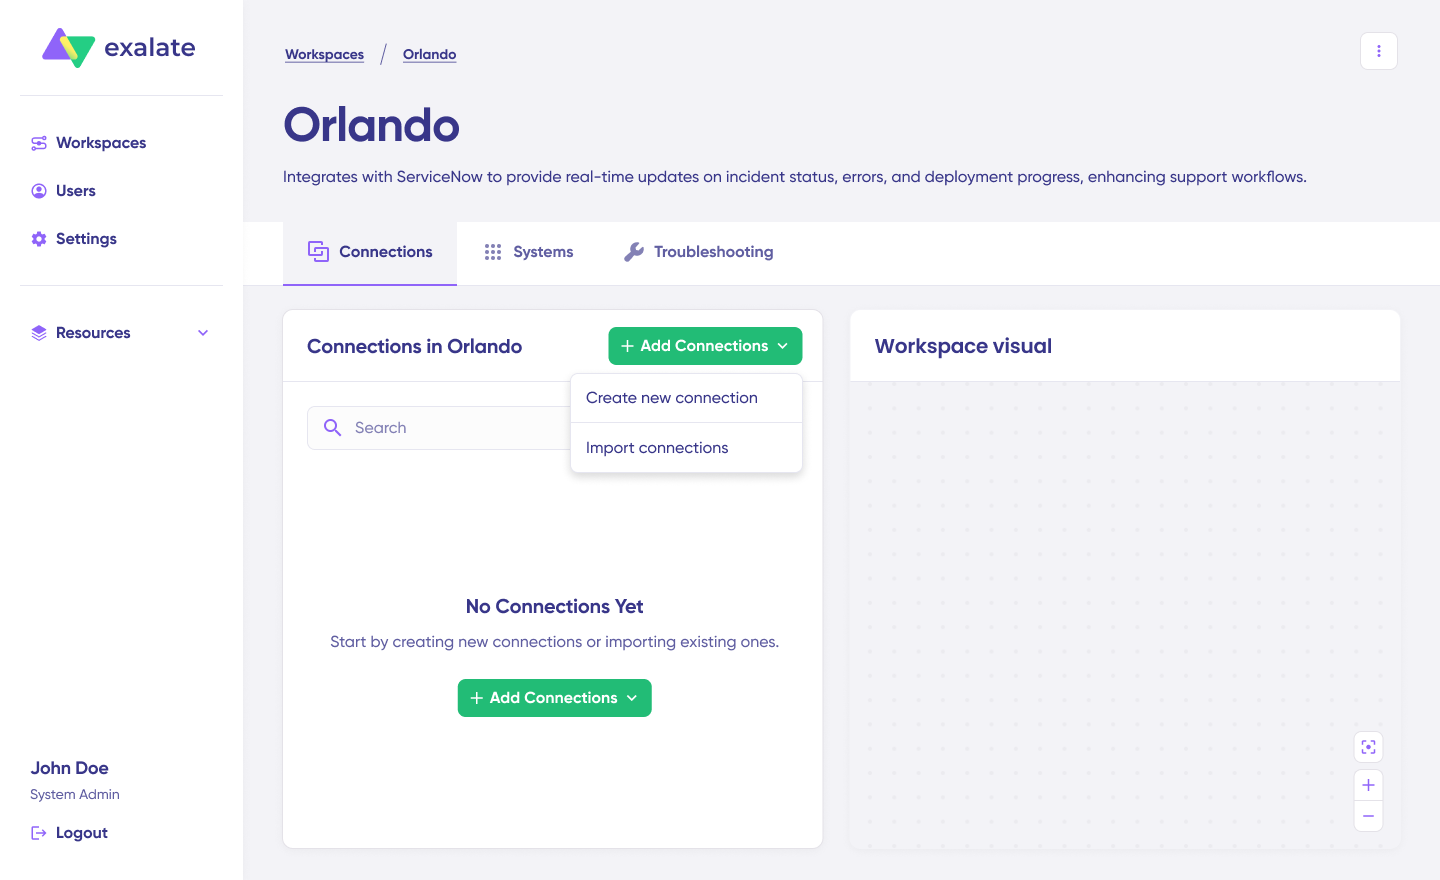
Click “+ Add connections” and select “Create new connection“. Name your first system—choose either Azure DevOps or Salesforce as System A (order doesn’t matter). Enter the URL of your chosen system. For example, if starting with Azure DevOps, enter your Azure DevOps organization URL.

If your system already exists in your current workspace, authentication happens automatically. For new systems, enter your authentication credentials. Both Azure DevOps and Salesforce support Basic authentication with username and password.
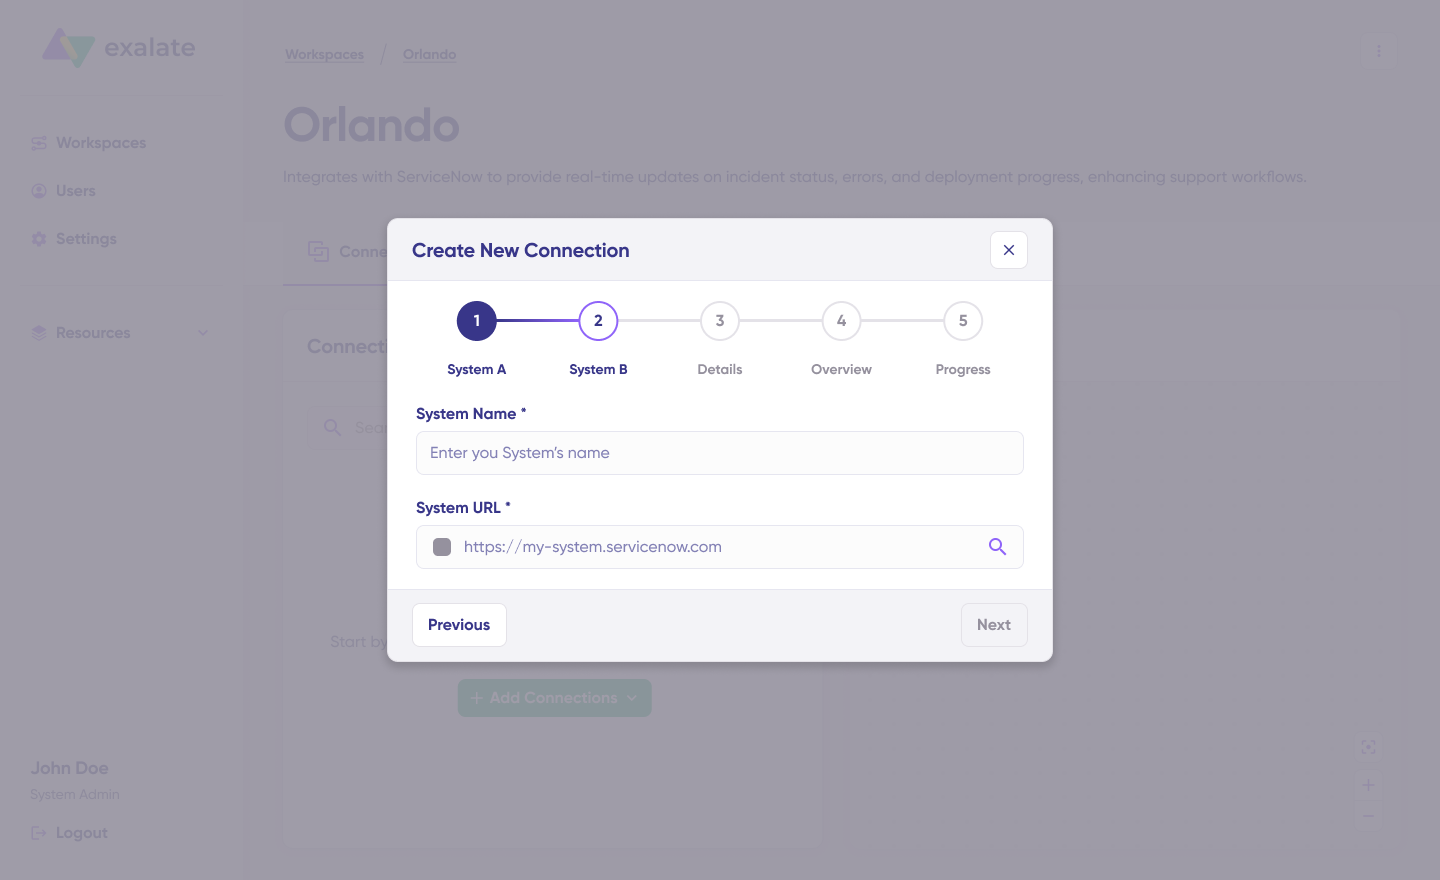
Complete the same setup process for your second system (Salesforce or Azure DevOps). Provide a name and description for your connection, then click “Next“. Review the connection details for accuracy and click “Create connection“.
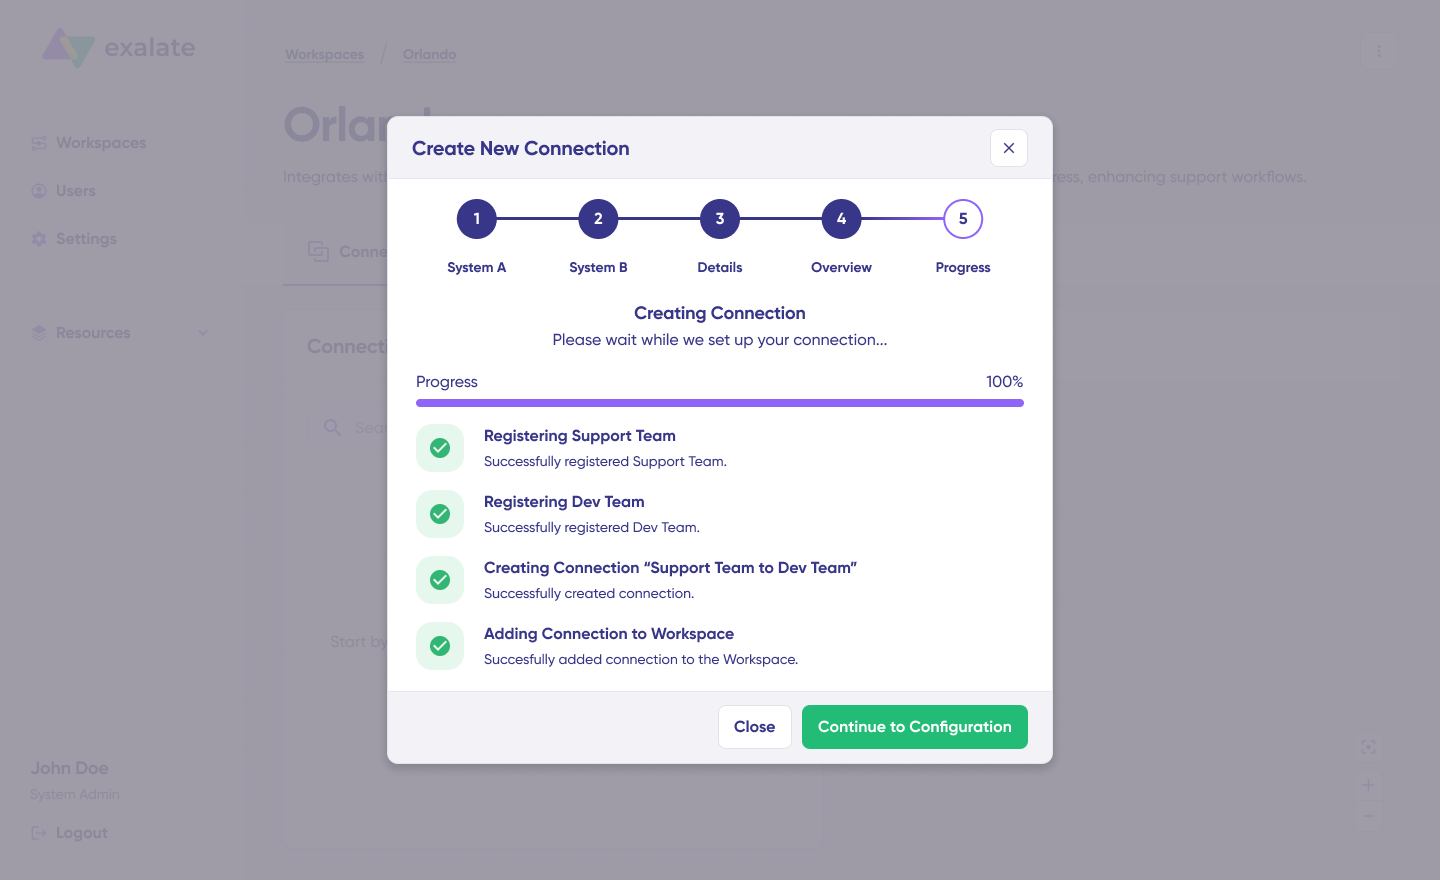
Once the process completes, select “Continue to configuration” and choose an Azure DevOps project for synchronization. Then click “Build & continue.”
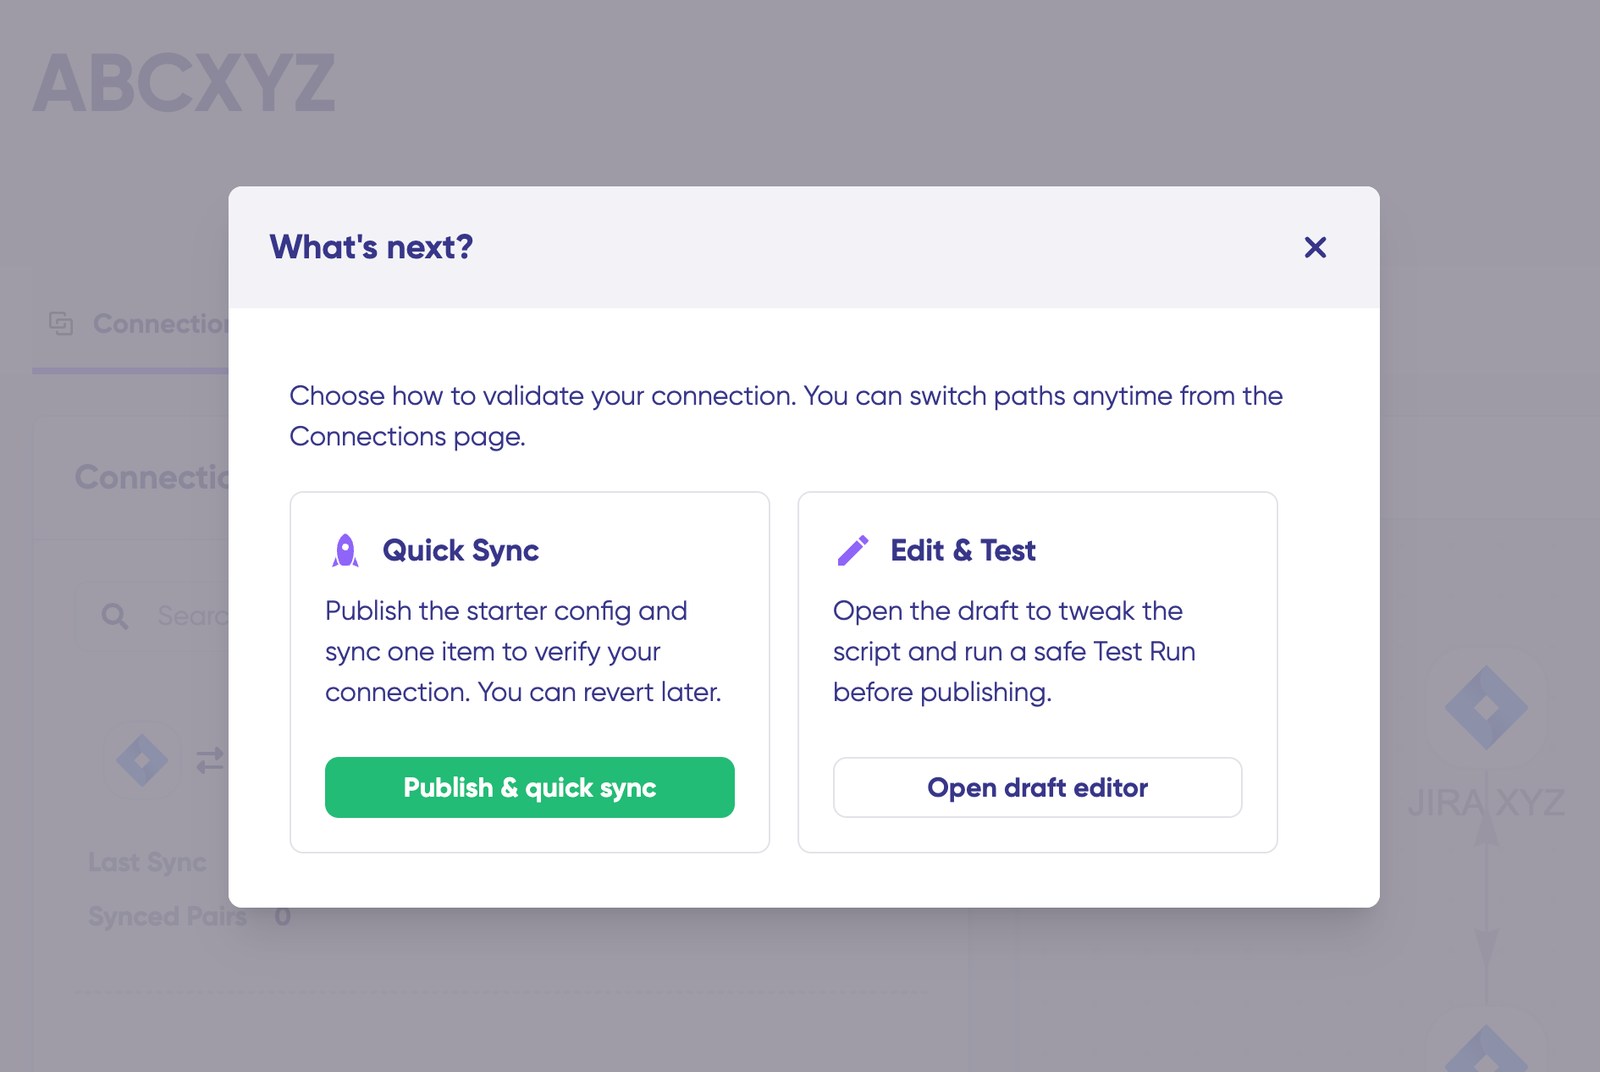
You now have two configuration options: “Quick Sync” and “Edit & Test.”
Step 3: Quick Sync – Verify Your Connection
Quick Sync lets you synchronize a single item between Azure DevOps and Salesforce to verify that your connection functions correctly. This is an optional but recommended step.
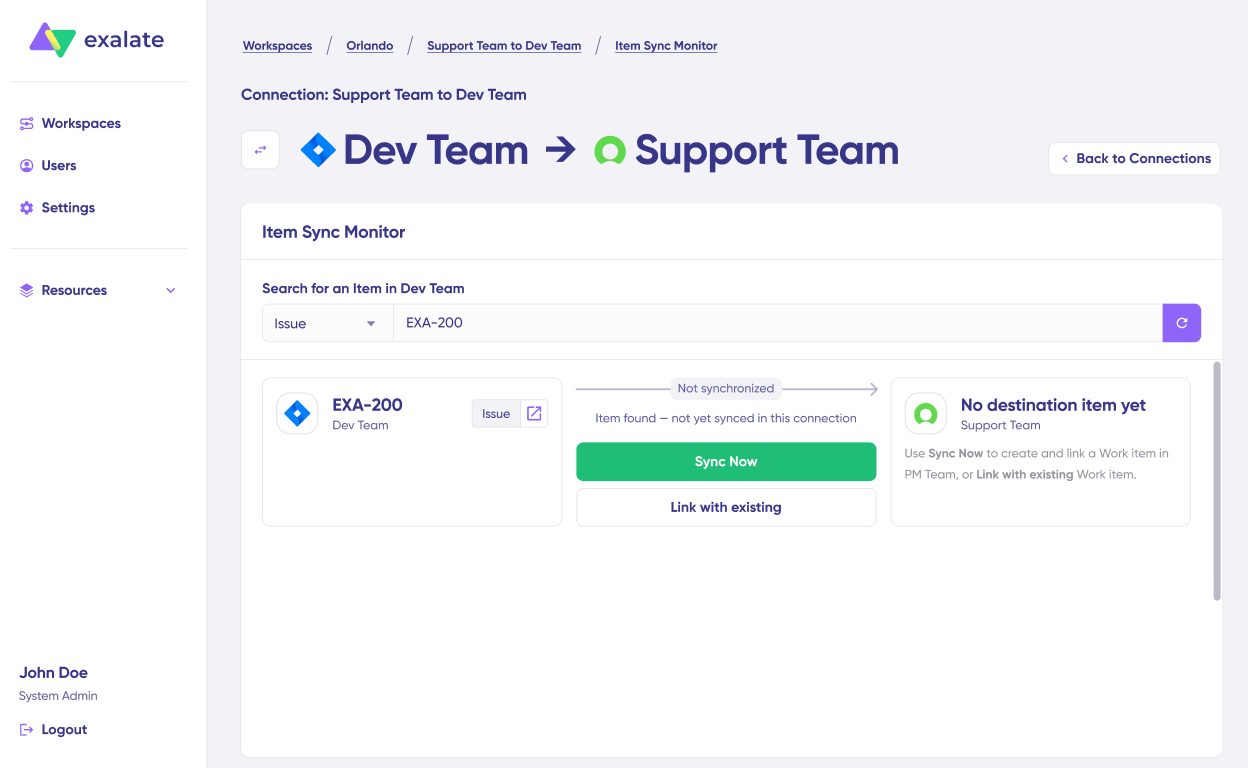
Under the “Item sync monitor,” enter the work item ID from Azure DevOps or the Case number from Salesforce. To sync your first item, click “Sync Now.” To link two existing items, click “Link with existing.“

During synchronization, you’ll receive real-time status updates. Once complete, open both synced items in new windows to verify the sync worked correctly. You can also compare how the synced items appear and preview how changes will be applied across both systems.
Step 4: Edit & Test – Configure Your Sync Rules
To begin customizing your integration, click “Create a new version” or select “Open latest draft.” This prevents accidental modifications to your active configuration. All draft changes save automatically.
Click the “Edit” button to open the sync rule editor. Sync rules use Groovy-based scripts that let you define custom data logic, field mappings, and conditional workflows. This flexibility supports both simple and complex integration scenarios.
Change the sync direction by clicking the bidirectional arrows next to the connection name. Scripts are divided into outgoing and incoming sections.
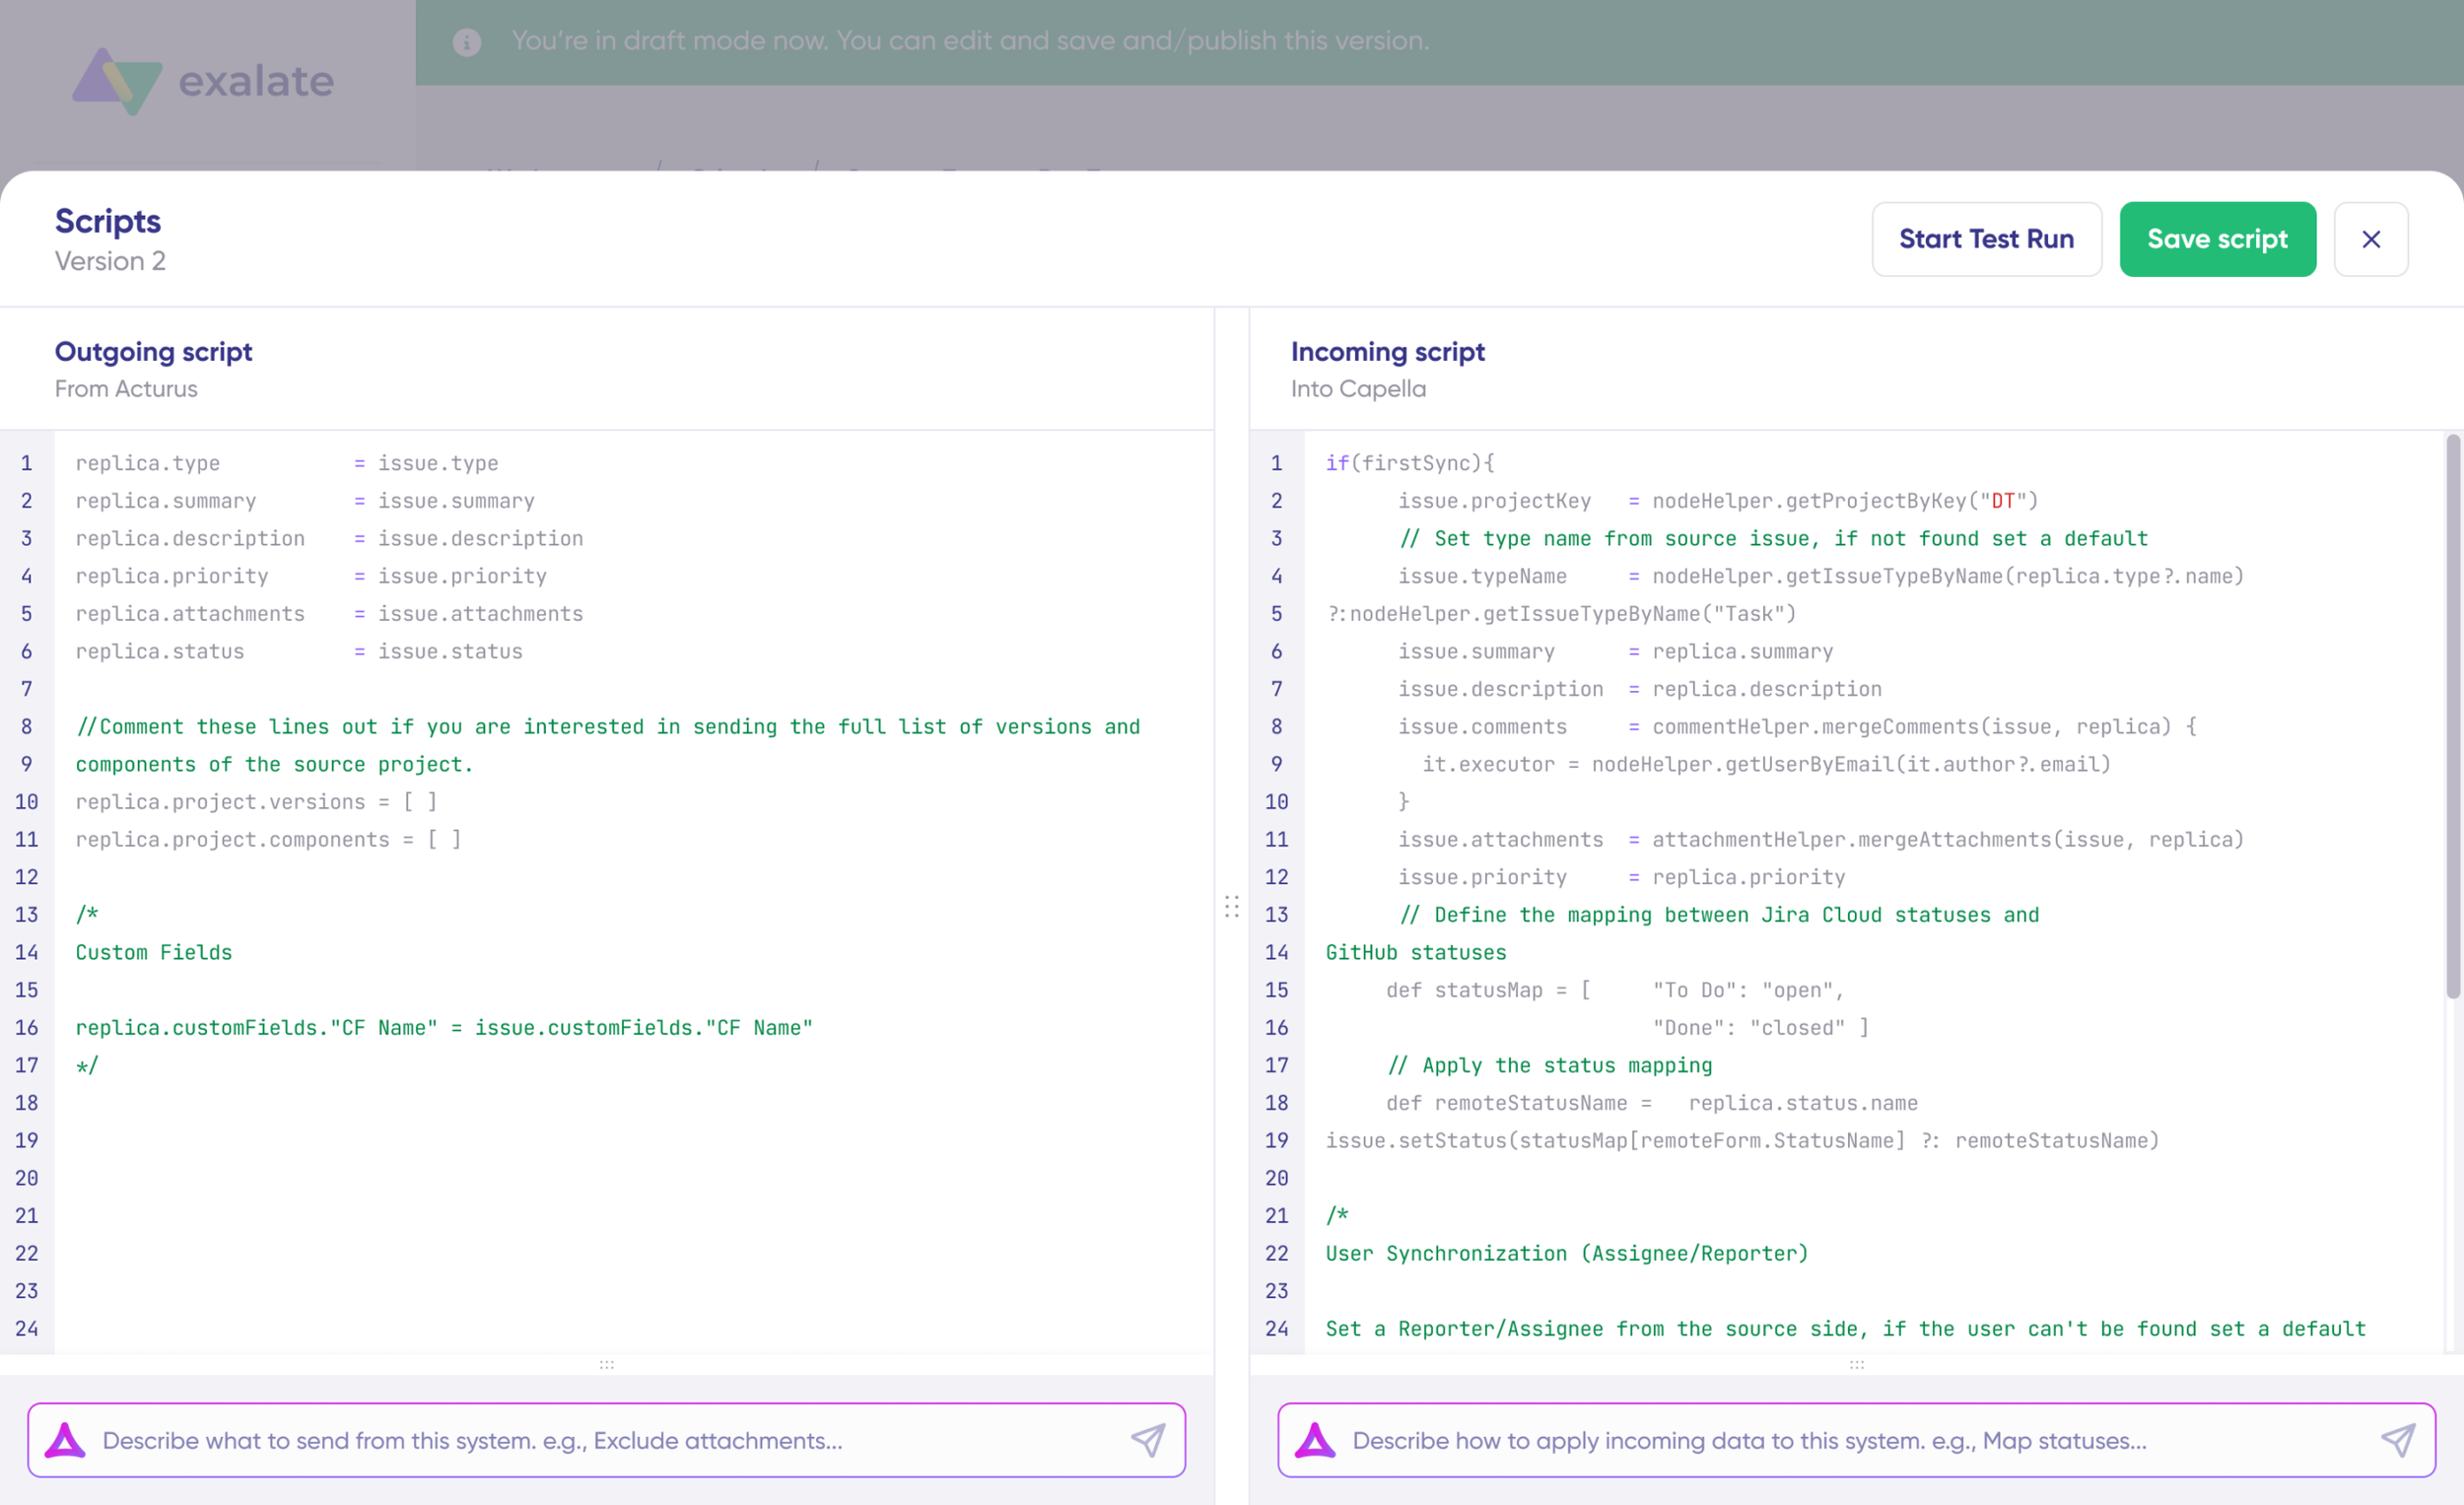
The outgoing script (from Azure DevOps to Salesforce) defines which data leaves Azure DevOps and how it’s packaged.
The incoming script (from Azure DevOps to Salesforce) defines how incoming data from Azure DevOps maps to Salesforce fields.
If you reverse the sync direction from Salesforce to Azure DevOps, the script roles reverse accordingly.
To sync new values, add them to your sync scripts directly (for technical users). To prevent specific data from syncing, remove that script line from the outgoing Azure DevOps script.
For example, when syncing from Azure DevOps to Salesforce, you might map Work Item Type to Case Type, State to Status, Title to Subject, Description to Description, Assigned To to Owner, Priority to Priority, Comments to Case Comments, and Attachments to Attachments.
Step 5: Use Aida for AI-Assisted Configuration
If you want to save time and avoid scripting complexity (especially useful for business users), use Exalate’s AI-assisted configuration feature called Aida to generate sync scripts automatically. Aida is available in both incoming and outgoing script sections.
Based on Exalate’s scripting API and your existing configuration, Aida generates working Groovy scripts with proper field mappings.
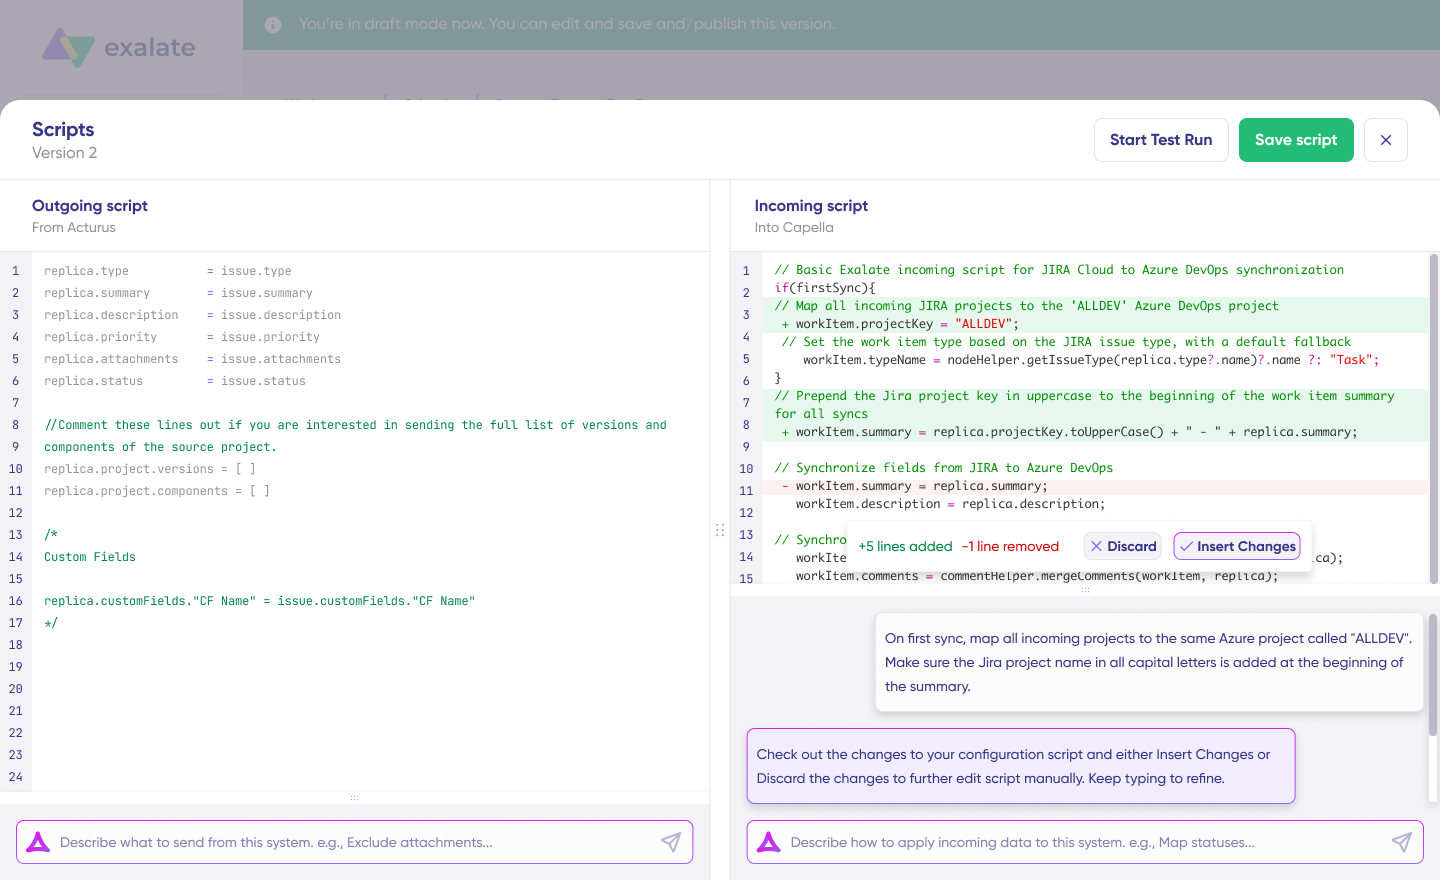
Once Aida finishes generating your script, review the proposed changes. Green highlights indicate new lines that will be added. Red highlights indicate lines that will be removed. Choose to “Insert” or “Discard” Aida’s suggestions.
Outgoing and incoming scripts work independently, as does Aida, so maintain separate context and direction for each prompt. While Aida is helpful, always review the generated code before applying it to your integration.
Example prompts might include:
- “Sync only Cases where Type equals ‘Bug’ to Azure DevOps as work item type ‘Bug'”,
- “Map Salesforce Priority values High, Medium, Low to Azure DevOps Priority 1, 2, 3”,
- “When Azure DevOps State is ‘Resolved’, update Salesforce Status to ‘Fixed'”.
Step 6: TestRun – Validate Before Production
Once your sync scripts are ready, save them using “Save script” or test them using the “Start Test Run” option.
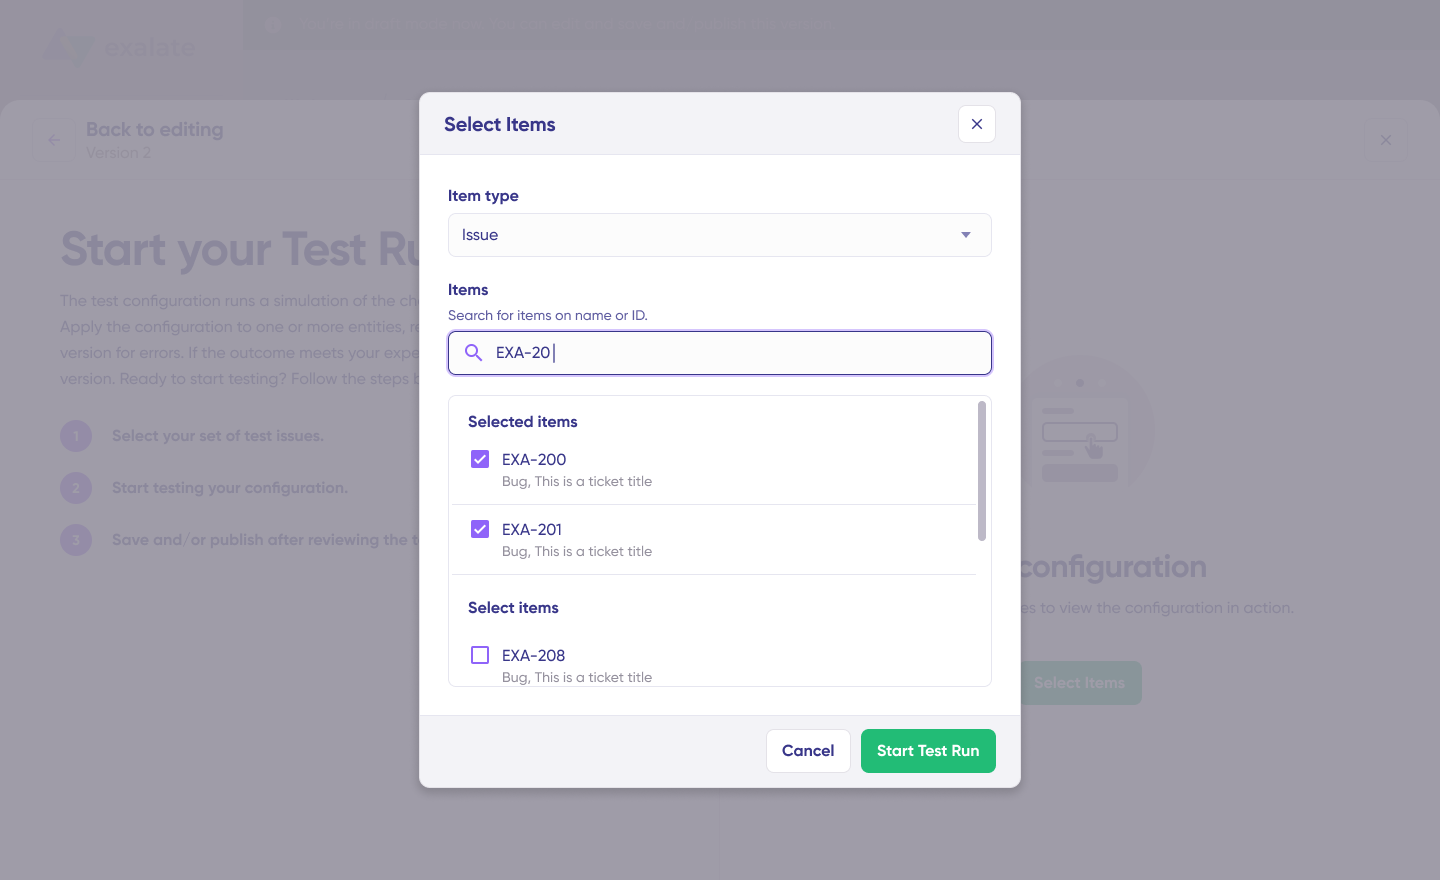
Click “Select Items” to choose work items or cases you want to test. You can select multiple items for comprehensive testing. Click “Start Test Run” to begin. View all incoming and outgoing replicas for each selected item in their respective tabs. Preview how the sync configuration will be applied to your items. Verify that field mappings look correct by examining the replica JSON.

If needed, go back to the editor, adjust your scripts, and test again. Deploy only when you’re confident the configuration works as expected. This safety net prevents errors from affecting your live production data.

Once everything meets your requirements, click “Publish Version” to apply the updated configuration to your live synchronization.
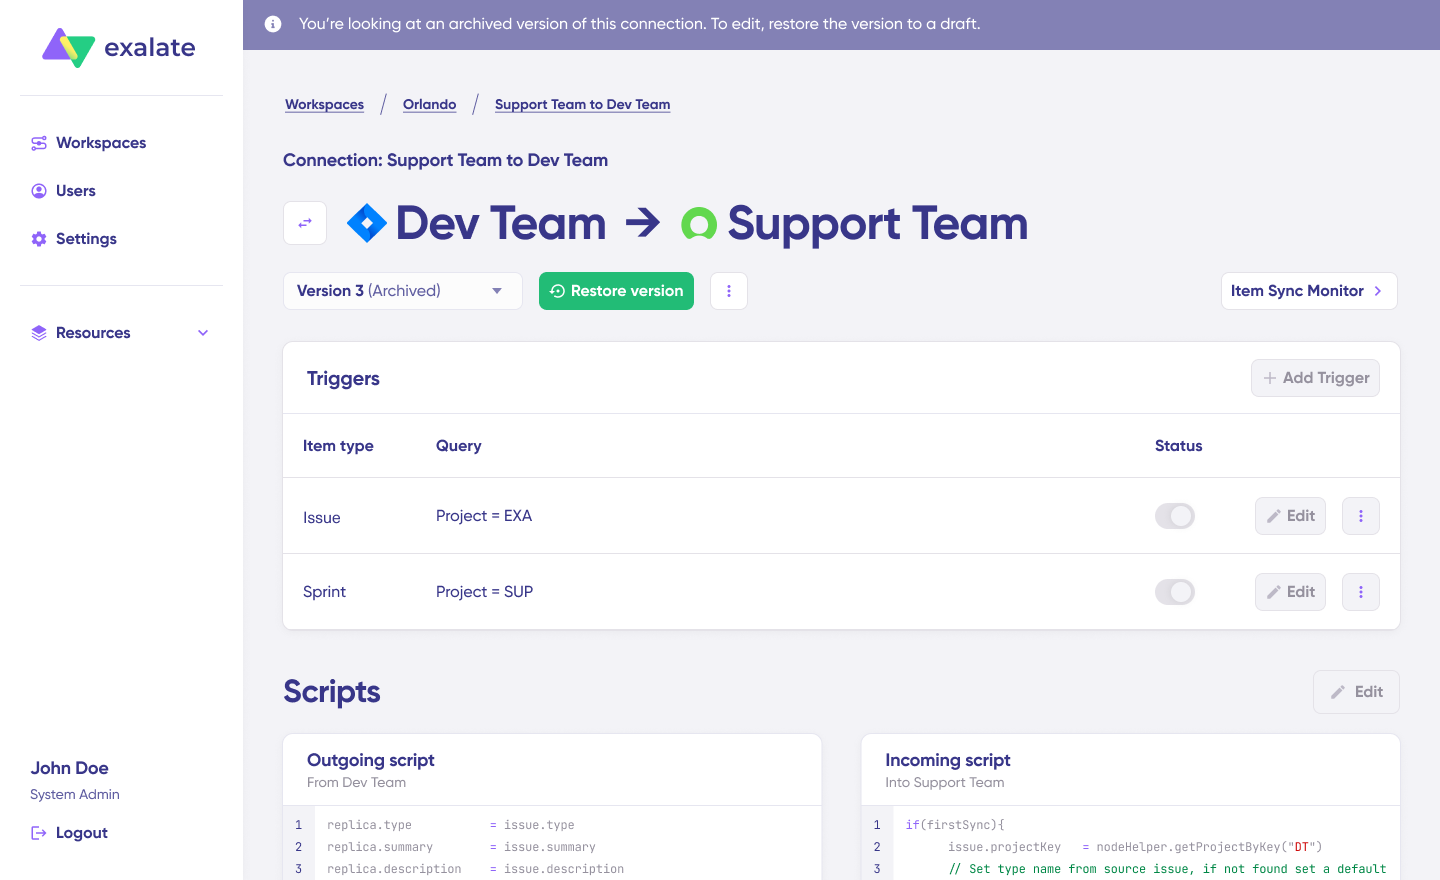
All versions for a connection are available in the “Version” dropdown. Versions can be Active (currently running in production), Draft (editable working version), or Archived (previous versions saved for reference).
Step 7: Add Triggers for Automatic Synchronization
To enable automatic synchronization, add “Triggers”—these are conditions or filters applied to specific items. For example, you might sync all Azure DevOps work items where Tags contain “customer-facing” or sync all Salesforce Cases where Account = "Enterprise Customer" and Status = "Escalated".
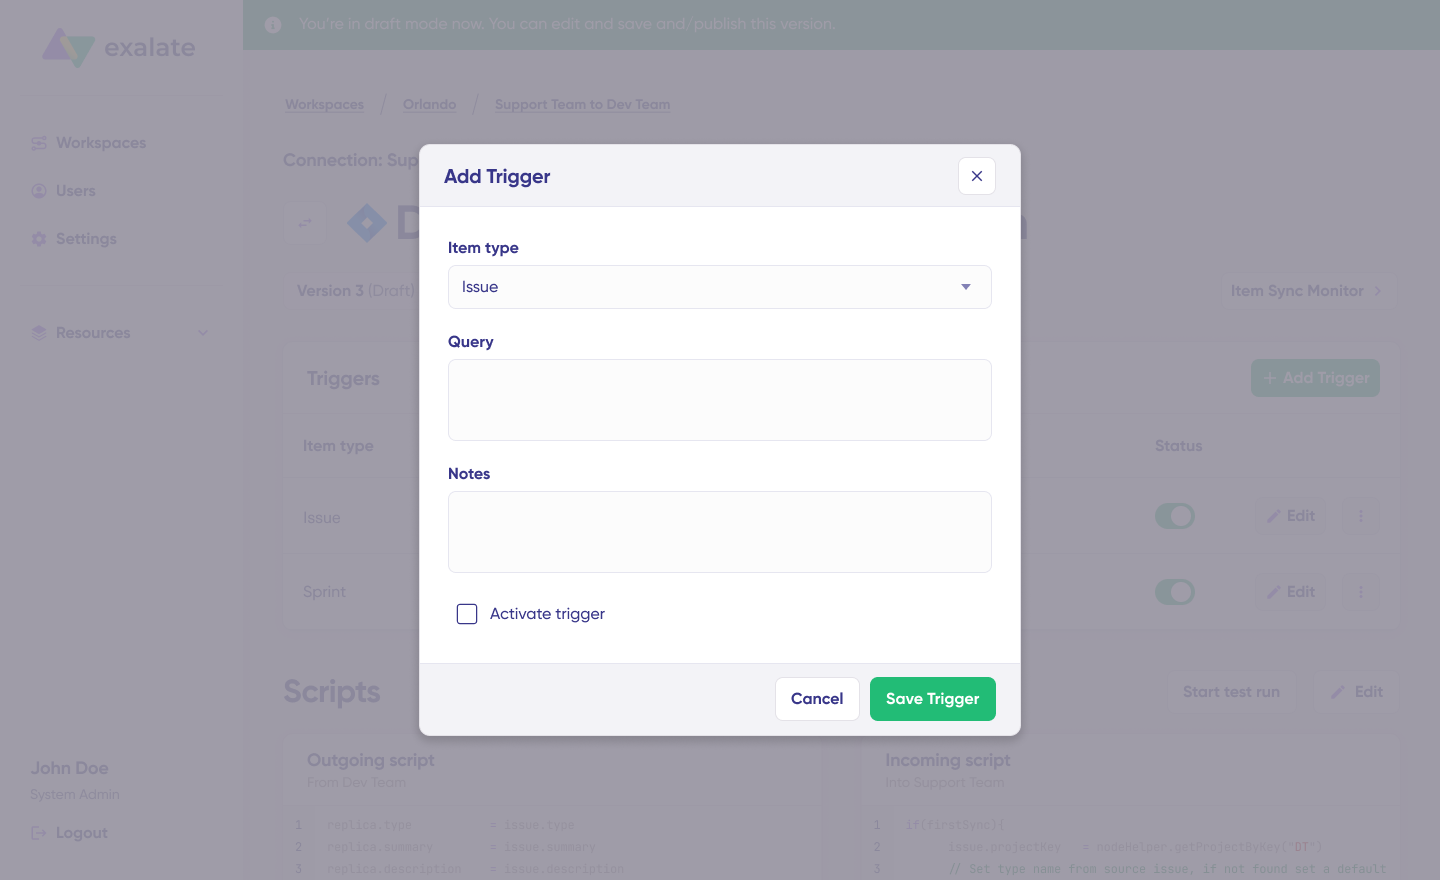
Click the “+ Add trigger” button to create triggers. These triggers are platform-specific.
For Azure DevOps, use Work Item Query Language (WIQL) to specify conditions for work items.
Examples:[System.Tags] CONTAINS 'salesforce-sync' or [System.WorkItemType] = 'Bug' AND [Microsoft.VSTS.Common.Priority] = 1.
For Salesforce, use Salesforce Object Query Language (SOQL) syntax to apply triggers to Cases, Opportunities, Accounts, or custom objects.
Examples: Type = 'Bug' AND Priority = 'High' or Account.Type = 'Customer' AND Status != 'Closed'.
Save your changes by publishing the trigger configuration.
Step 8: Troubleshoot with Aida
Aida AI accelerates troubleshooting by providing clear, context-aware suggestions to resolve errors exactly where you encounter them.

Navigate to the “Troubleshooting” tab in your workspace. Hover over the error you want to diagnose and click the Aida icon that appears next to the error. Review the AI-generated suggestion in the modal window, which includes a brief explanation of the error and a proposed solution.
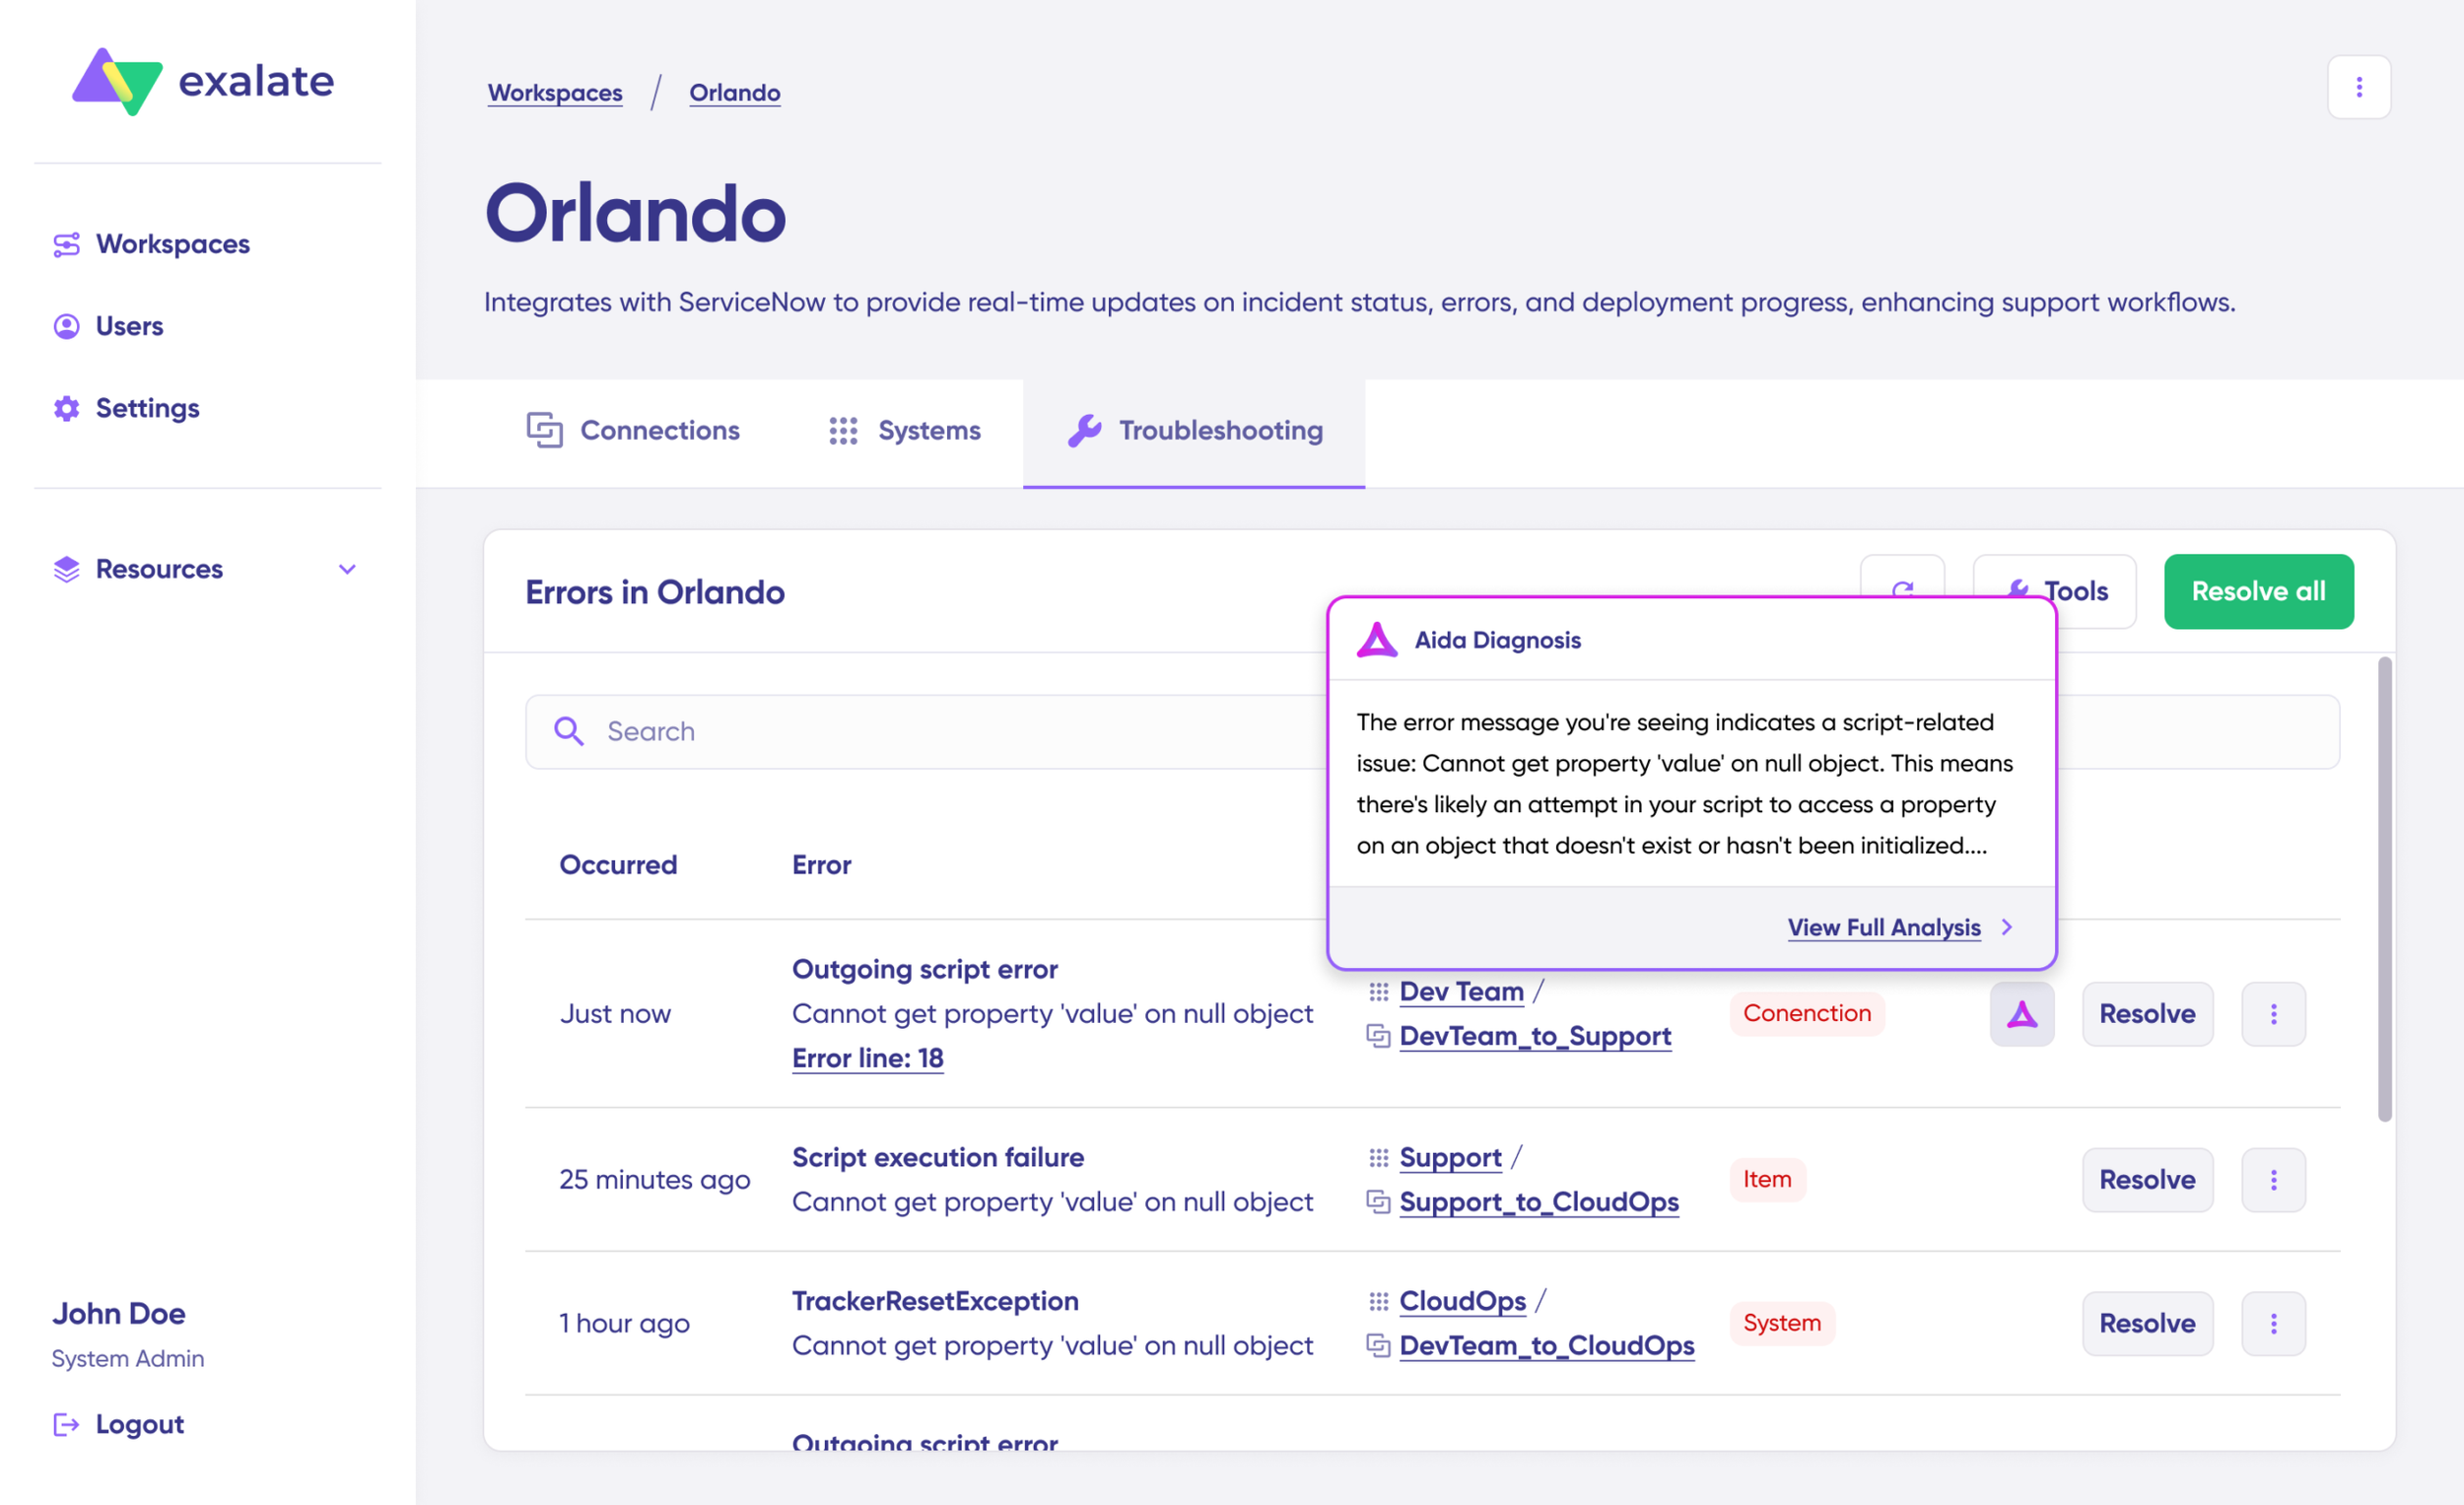
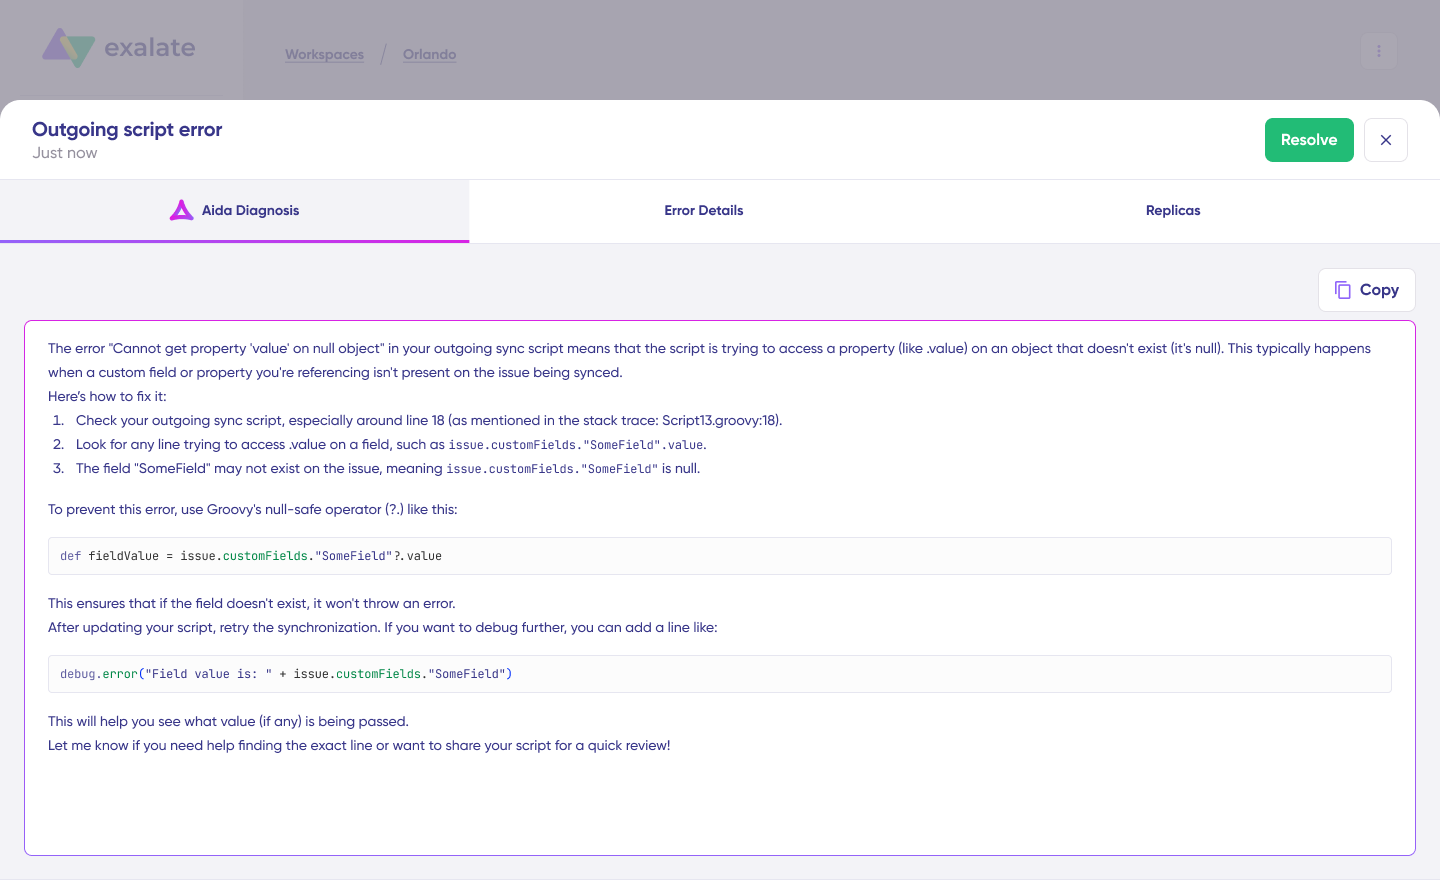
Click “View Full Analysis” for additional context. Access “Error details” to copy the stack trace if needed. Choose to “Resolve” and retry the failed synchronization.
Common error scenarios include:
- field mapping errors (when Azure DevOps fields don’t map correctly to Salesforce fields),
- user assignment errors (when a user in Azure DevOps doesn’t exist in Salesforce),
- status transition errors (when status values don’t align between systems),
- and attachment sync errors (when file size limits or permissions block attachment transfers).
With Aida’s assistance, you can identify root causes quickly and apply fixes without extensive debugging.
Common Use Cases For Azure DevOps to Salesforce Integration
Use Case 1: Bug Escalation from Salesforce Cases to Azure DevOps Work Items
Challenge: Customer support agents in Salesforce receive bug reports but lack visibility into development progress. They can’t provide accurate ETAs to customers, leading to repeated escalations and frustrated clients.
Solution: When support agents identify a case as a bug, they escalate it directly from Salesforce. The integration automatically creates an Azure DevOps work item with full context: customer account, reproduction steps, priority, and attachments. As developers update the work item status, comments sync back to the Salesforce case automatically.
Real-World Application: A SaaS company reduced average bug resolution communication time by 67%. Support agents no longer chase developers for updates. They see work item status, assigned developer, and progress notes directly in Salesforce. Customers receive proactive updates without agents leaving their CRM.
Use Case 2: Feature Request Management Across Teams
Challenge: Sales teams gather feature requests from prospects and customers, but these requests get lost in email threads or spreadsheets. Product and development teams lack visibility into which features would close the most deals.
Solution: Sales reps create Opportunities or Cases in Salesforce for feature requests, tagging them appropriately. These automatically sync to Azure DevOps as Epics or User Stories, complete with deal size, customer priority, and business justification. Product managers see the revenue impact, developers understand customer needs, and sales get automatic updates when features ship.
Real-World Application: An enterprise software company tied $4.2M in pipeline to specific feature requests. When development delivered those features, sales automatically received notifications in Salesforce, enabling them to re-engage prospects immediately. Win rates for deals with tracked feature requests increased by 43%.
Use Case 3: Customer Support Ticket Routing to Development
Challenge: Not every customer inquiry requires development resources, but when it does, the handoff creates delays. Support needs a way to quickly escalate technical work items without creating unnecessary work for simple questions.
Solution: Support agents triage incoming cases. For technical work requiring code changes, they click “Send to Dev” in Salesforce. The integration creates an Azure DevOps Bug or Task with customer details, support agent notes, and priority. Developers can ask clarifying questions through comments that sync back to the case, keeping support informed without context-switching.
Real-World Application: A B2B platform reduced average technical escalation time from 6 hours to 12 minutes. Support agents stopped writing detailed emails to development. Developers stopped asking “which customer is this for?” because all context arrived with the work item. First response times for escalated work items dropped 72%.
Use Case 4: Cross-Company Collaboration During Mergers
Challenge: When companies merge, development and sales teams use different tools. Migrating everything immediately disrupts operations, but teams need to collaborate right away.
Solution: Integration serves as middleware during the transition period. Company A’s Azure DevOps syncs with Company B’s Salesforce without requiring either team to migrate. Teams maintain their familiar workflows while sharing critical information. As systems eventually consolidate, the integration handles gradual data migration.
Real-World Application: During a merger, two companies maintained separate Azure DevOps and Salesforce instances for 18 months while integrating operations. The integration enabled joint customer support and product development without forcing either team to switch tools immediately. When they finally consolidated systems, historical data was already synchronized and normalized.
Use Case 5: Multi-System Customer Support Pathways
Challenge: Customers submit tickets through Zendesk. Support teams in Salesforce need visibility. Development teams in Azure DevOps need actionable work items. Manual handoffs between three systems create delays and lost context.
Solution: Three-way integration connects Zendesk → Salesforce → Azure DevOps. Customer tickets automatically create Salesforce cases. When support determines development is needed, cases become Azure DevOps work items. Developers add comments that filter back through Salesforce to Zendesk, reaching customers without manual copying.
Real-World Application: An enterprise SaaS provider supports customers across Zendesk, Freshservice, and Freshdesk (different acquisitions used different tools). All support cases flow into Salesforce for unified tracking, and technical work items automatically reach Azure DevOps. Average resolution time dropped from 8 days to 4 days.
Use Case 6: Partner and Vendor Collaboration
Challenge: Your development team uses Azure DevOps. Your implementation partner uses Salesforce. Sharing project status requires weekly calls, status reports, and manual updates, creating delays and misunderstandings.
Solution: Integration connects your Azure DevOps to your partner’s Salesforce (or vice versa). Each side controls what they share. You might sync specific work item types while keeping internal work private. Partners see real-time progress without accessing your Azure DevOps instance. You see their Salesforce cases without needing their CRM access.
Real-World Application: A software vendor working with 12 implementation partners reduced partner communication overhead by 76%. Partners see project status automatically in their Salesforce. The vendor’s development team sees partner-reported customer work items automatically in Azure DevOps. Weekly status calls became monthly strategic reviews because tactical updates happened automatically.
Common Field Mappings for Azure DevOps Salesforce Integration
Understanding how data maps between Salesforce and Azure DevOps helps you plan your integration configuration effectively.
Salesforce Case → Azure DevOps Work Item:
- Case Number → Work Item ID (reference field)
- Subject → Title
- Description → Description
- Status → State
- Priority → Priority
- Owner → Assigned To
- Account Name → Tags or Custom Field
- Comments → Discussion comments
- Attachments → Attachments
Azure DevOps Work Item → Salesforce Case:
- State → Status
- Assigned To → Owner
- Priority → Priority
- Iteration Path → Custom field
- Area Path → Custom field
- Comments → Case Comments
- Attachments → Attachments
Custom mappings:
- Azure DevOps Tags → Salesforce multi-select picklists
- Salesforce Account → Azure DevOps Area Path
- Salesforce Case Type → Azure DevOps Work Item Type
Use Exalate’s field mapping interface to configure these relationships visually or through Groovy scripts for complex transformations.
Conclusion
Integrating Azure DevOps and Salesforce eliminates the manual data entry, communication delays, and context loss that plague disconnected sales and development teams.
Real-time bidirectional synchronization means support agents see development progress automatically, developers receive customer context without switching tools, and everyone spends less time updating systems and more time serving customers.
The right integration tool provides security (ISO certification, encryption, RBAC), flexibility (no-code setup to advanced Groovy scripting), and control (independent sync rules, field-level transformations).
Tools like Exalate support growth from simple case-to-work-item syncs to complex multi-platform integration networks spanning Jira, ServiceNow, Freshservice, Freshdesk, Asana, and beyond.
Whether you’re escalating bugs, tracking feature requests, managing SLAs, or collaborating with partners, Azure DevOps to Salesforce integration transforms how customer-facing and technical teams work together.
Ready to see how integration eliminates manual work and keeps teams aligned? Book a demo with our engineers to discuss your specific use case.
Frequently Asked Questions
Why should I integrate Salesforce and Azure DevOps with Exalate?
Exalate eliminates manual data entry between customer-facing teams using Salesforce and development teams using Azure DevOps. With Exalate, cases automatically become work items with full context, status updates sync bidirectionally in real-time, and teams maintain complete autonomy over what they share. Unlike basic connectors, Exalate gives each side independent control through Groovy-based sync rules; your sales team controls what leaves Salesforce, your dev team controls what enters Azure DevOps.
What data can Exalate sync between Salesforce and Azure DevOps?
Exalate syncs any Salesforce object (Cases, Opportunities, Accounts, Tasks, custom objects) to any Azure DevOps work item type (Bugs, Tasks, User Stories, Epics, custom types). You can sync standard fields, custom fields, comments, attachments, and related objects. Exalate’s Groovy scripting engine handles complex transformations like mapping Salesforce picklists to Azure DevOps states, syncing multi-level hierarchies, or aggregating data from multiple related objects into single fields.
Can Exalate sync Azure DevOps work items back to Salesforce cases?
Yes, Exalate supports full bidirectional synchronization. When developers update work item status, add comments, attach files, or change priorities in Azure DevOps, those updates automatically sync back to linked Salesforce cases. You control exactly which fields sync in each direction using independent incoming and outgoing sync rules. Support and sales teams see real-time development progress without leaving Salesforce.
Does Exalate work with Azure DevOps Server (on-premises)?
Yes, Exalate supports both Azure DevOps cloud and Azure DevOps Server (on-premises). You can create connections between multiple on-premises instances, or build hybrid cloud-to-on-premises integrations. Exalate’s architecture doesn’t require opening inbound firewall ports, making it suitable for enterprise security policies.
How does Exalate handle security when integrating Salesforce and Azure DevOps?
Exalate maintains ISO 27001:2022 certification and implements enterprise-grade security controls. All data is encrypted in transit using TLS 1.2+ and at rest. Role-based access control limits who can configure sync rules and view synchronized data. Exalate’s Groovy scripting engine lets you filter sensitive fields before syncing, implement custom validation rules, and enforce data governance policies in code. Review complete security documentation at the Exalate Trust Center.
Can I use Groovy scripts with Exalate to customize Salesforce-Azure DevOps integration?
Yes, Exalate’s Groovy-based scripting engine provides complete customization flexibility. Write conditional logic to sync only specific cases (“sync only when Priority = High and Type = Bug"), transform data during sync (map Salesforce status values to Azure DevOps states), aggregate information from related objects, or implement complex business rules. Exalate’s Aida AI feature generates Groovy scripts from natural language descriptions, making advanced customization accessible to non-technical users.
What’s the difference between real-time and batch synchronization in Exalate?
Exalate uses real-time synchronization by default to show updates in seconds, not minutes or hours. When someone updates a Salesforce case, Exalate immediately processes the change and syncs it to the linked Azure DevOps work item. This real-time approach is critical for time-sensitive workflows like SLA management, customer escalations, and cross-team collaboration, where teams need immediate visibility into status changes.
Can Exalate sync specific Azure DevOps projects to specific Salesforce orgs?
Yes, you can sync specific Azure DevOps projects to specific Salesforce orgs, create separate connections for different teams, and maintain independent sync rules for each connection. This is essential for enterprises with multiple Azure DevOps instances, multiple Salesforce orgs, or complex partner relationships requiring selective data sharing. Each workspace maintains its own configuration without affecting other connections.
Can Exalate sync comments and attachments between Salesforce and Azure DevOps?
Yes, Exalate syncs comments and attachments bidirectionally, preserving complete context for both teams. Developers’ technical notes in Azure DevOps work item comments automatically appear in Salesforce case comments. Support agents’ customer interactions sync to Azure DevOps. File attachments sync in both directions, ensuring teams see all relevant documentation without switching platforms. You control which comments sync using filters in your Groovy script.
Can Exalate integrate Azure DevOps and Salesforce with other tools simultaneously?
Exalate supports multi-platform integration networks. You can connect Azure DevOps and Salesforce while simultaneously integrating with Jira, ServiceNow, Zendesk, Freshservice, Freshdesk, Asana, GitHub, and other platforms. Users can also build complex workflows like: Zendesk tickets → Salesforce cases → Azure DevOps work items, all with independent sync rules at each connection. Each integration maintains its own configuration, allowing you to create sophisticated multi-tool workflows that match your exact business processes across your entire tool stack.
Recommended Reads:
- How to set up a Jira Salesforce Integration
- Salesforce to Salesforce Integration: Sync Multiple Salesforce Instances Bidirectionally
- Jira Azure DevOps Integration
- GitHub Salesforce Integration: How to Set up a Sync in 6 Steps
- How to Set Up a Salesforce ServiceNow Integration
- Salesforce Zendesk Integration
- How to Set up a Zendesk Azure DevOps Integration
- How to Set Up an Azure DevOps ServiceNow Integration
- How to Set up an Azure DevOps GitHub Integration


