Teams within your organization usually use different platforms (let’s say Jira and ServiceNow) to handle business-critical or user-centered information. You might also want to share some data with other companies you do business with. To this end, you’ll need a Jira ServiceNow integration to connect internal and external teams.
With the integration in place, you’ll be able to boost your productivity and save yourself time if you understand how to set up a Jira ServiceNow integration with the least fuss possible.
So in this step-by-step guide, you’ll learn how to integrate Jira with ServiceNow.
Key Takeaways
Integrating Jira and ServiceNow lets you:
Automatically sync all your work between platforms, incidents in ServiceNow become trackable work in Jira without manual data entry
Keep teams aligned with real-time updates to comments, attachments, statuses, and priorities across both systems
Map ServiceNow urgency levels to Jira priorities (Critical → High, Moderate → Medium) so both teams see consistent prioritization
Escalate incidents from IT operations to development teams with complete context, including SLA timelines, work notes, and history intact
Enable cross-company collaboration where partners, suppliers, or MSPs can work in their preferred tool while staying synchronized
Reduce resolution time by eliminating context switching; developers work in Jira, operations in ServiceNow, and data flows automatically
Common use cases: Incident escalation, change request management, MSP client coordination, multi-team collaboration
Why Integrate Jira and ServiceNow
Teams using Jira and ServiceNow can benefit by collecting, organizing, and exchanging data between these platforms.
Use Case Example:
A customer logs an incident in Jira Service Management (JSM) (e.g., “System Outage”) with Summary, Description, Priority, and Attachments, with correct transformations applied (e.g., JSM’s “High” Priority maps to ServiceNow’s “Critical” Urgency, and so on). The support team needs to escalate this to IT operations in ServiceNow for resolution.
Without Integration: Manual copying of work item details from Jira to ServiceNow, which is time-consuming and error-prone.
With Integration:
An incident is automatically created in ServiceNow with all fields mapped correctly.
Any updates, such as a status change in JSM to “In Progress”, sync to ServiceNow as “Work in Progress.” Similarly, updates in ServiceNow sync back to JSM with proper field mappings.
Comments sync bidirectionally, but visibility rules ensure customer-facing comments in JSM remain internal work notes in ServiceNow.
If the incident is marked “Critical,” additional fields like Service Owner and Resolution SLA synchronize in real time.
Once the incident is resolved in JSM, the resolution code and resolution notes are automatically assigned to the incident based on the selection the agent makes.
This triggers the status change in the ServiceNow instance. The resolution code and resolution notes for the incident are automatically filled. The incident is now ‘Resolved’.
Both teams work in their preferred tool while maintaining complete visibility.
Key Benefits
Real-Time Visibility: Track synchronization progress and keep all the team members up-to-date
Reduced Manual Work: Automation eliminates duplicate data entry, saving hours per week
Better Collaboration: Development and IT teams stay aligned without constant context switching
Faster Resolution: Improve incident resolution time
But before that, let’s see a few practical use cases. If you don’t find what you’re looking for here, you can always set up a call with our integration engineers to discuss further.
What Does Jira ServiceNow Integration Do
A Jira ServiceNow integration creates a bidirectional data bridge between the two platforms, automatically synchronizing information without manual copying.
How It Works
When you integrate Jira and ServiceNow:
Automatic sync: ServiceNow incidents create corresponding Jira work items (or vice versa) based on triggers you define
Real-time updates: Comments added in ServiceNow appear in Jira within seconds. Attachments, status changes, and field updates flow automatically
Field mapping: ServiceNow “Priority 1 – Critical” automatically becomes Jira “High Priority” based on the transformation rules you configure
Context preservation: SLA timelines, work history, escalation notes, and other details transfer between systems without information loss
Workflow autonomy: IT operations continues using ServiceNow, development teams stay in Jira, but everyone sees synchronized data
What Data Is Typically Synced Between Jira and ServiceNow
Standard fields:
Entities: ServiceNow incidents, change requests, RITMs, problems, and other entities available in tables → Jira stories, bugs, tasks, epics → work items (previously called issues)
Comments and notes: Work notes, internal comments, customer-facing comments
Attachments: Files, images, documents (transferred or linked)
Status and workflow: Open → In Progress → Resolved → Closed (with custom mapping), any status transition based on your workflows
People: Assignee, reporter, watchers (with user mapping between systems)
Dates and times: Created date, due date, resolution date, SLA breach times
Priorities and urgency: ServiceNow urgency (1-5) → Jira priority (Highest to Lowest). Map according to your needs
Advanced synchronization:
Custom fields: Sync any custom field available via REST API between Jira and ServiceNow
SLA information: Breach times, SLA status
Related work items: Parent-child relationships, linked incidents, blocked by/blocks
Time tracking: Work logs, time spent, original estimates
CMDB data: Configuration items from the ServiceNow asset database
Any data available via REST APIs
Real-World Use Cases for Jira ServiceNow Integration
A Jira ServiceNow integration will ensure all the daily tasks are synced between different teams using these systems, increasing transparency and trust. It will also simplify reporting by keeping both teams aligned.
Let’s see a few practical use cases of integrating Jira and ServiceNow.
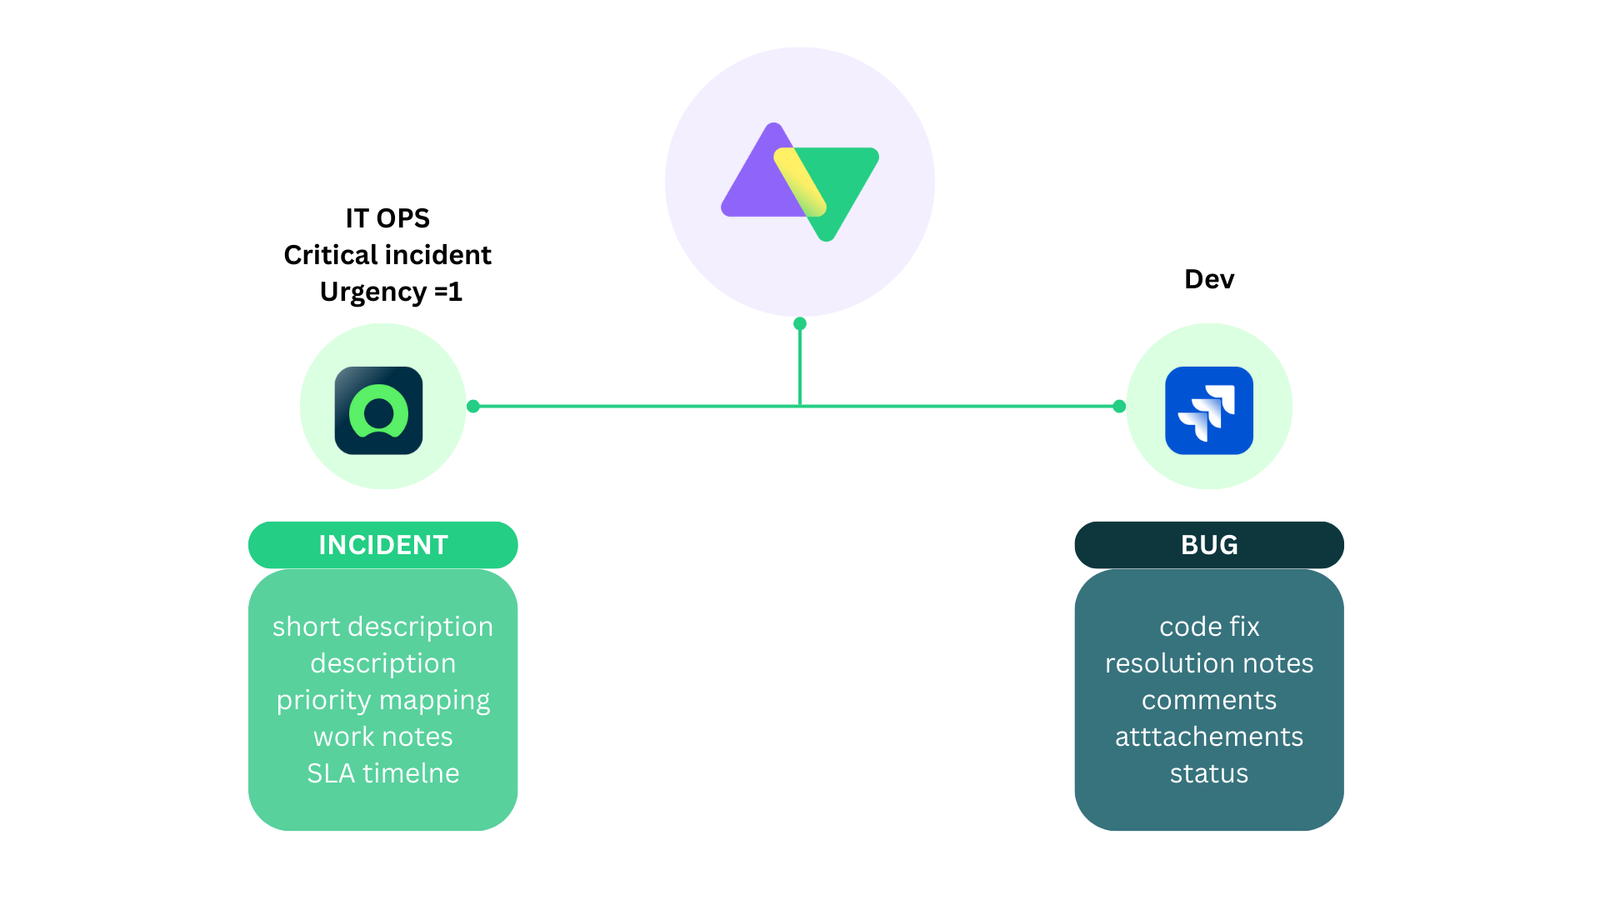
1. Customer Support to Development Incident Escalation with SLA Tracking
Scenario: A critical item (Urgency=1) occurs in your IT infrastructure.
Workflow:
Incident logged in ServiceNow with urgency, assignment group, and SLA details. Incident investigated by support
Root cause identified: requires code fix
Automatically creates a corresponding Jira work item with:
Complete incident history
SLA timeline information
Priority mapping (Critical → High, etc.)
Work notes transformed to Jira comments
The development team fixes the issue
Resolution notes sync back to ServiceNow
Incident closed with proper resolution code
The IT operations team handles incidents in ServiceNow
The development team tracks progress simultaneously in Jira
Status updates, comments, and attachments sync bidirectionally in real-time
SLA breach alerts notify both teams automatically
Outcome: Collaboration without context switching, complete visibility, faster resolution.
Jira ServiceNow Integration Use Cases: Learn how to implement some advanced technical use cases.
Challenge: Clients use Jira; MSP uses ServiceNow for centralized operations. Setting up a Jira ServiceNow integration for ITSM workflows will help solve this challenge.
Solution:
MSP connects its single ServiceNow instance to 5+ departmental Jira instances
Work items sync automatically when clients log requests
Comments, attachments flow bidirectionally
Integration visualization in a unified console shows all connections and how they connect
Different sync rules per department (connection) based on workflow needs
Clients work in their preferred tools without ServiceNow access
Security Features:
Role-based access control (RBAC) ensures proper permissions
Data encryption in transit (TLS 1.2/1.3) and at rest
The moment the ticket enters the help desk in ServiceNow, Exalate routes it to my team working in Jira. My team then provides feedback, which is immediately reflected in ServiceNow.
– Ms. TEO TEAM LEAD, LF LOGISTICS
Outcome: Transparency, simplified reporting, trust across organizations.
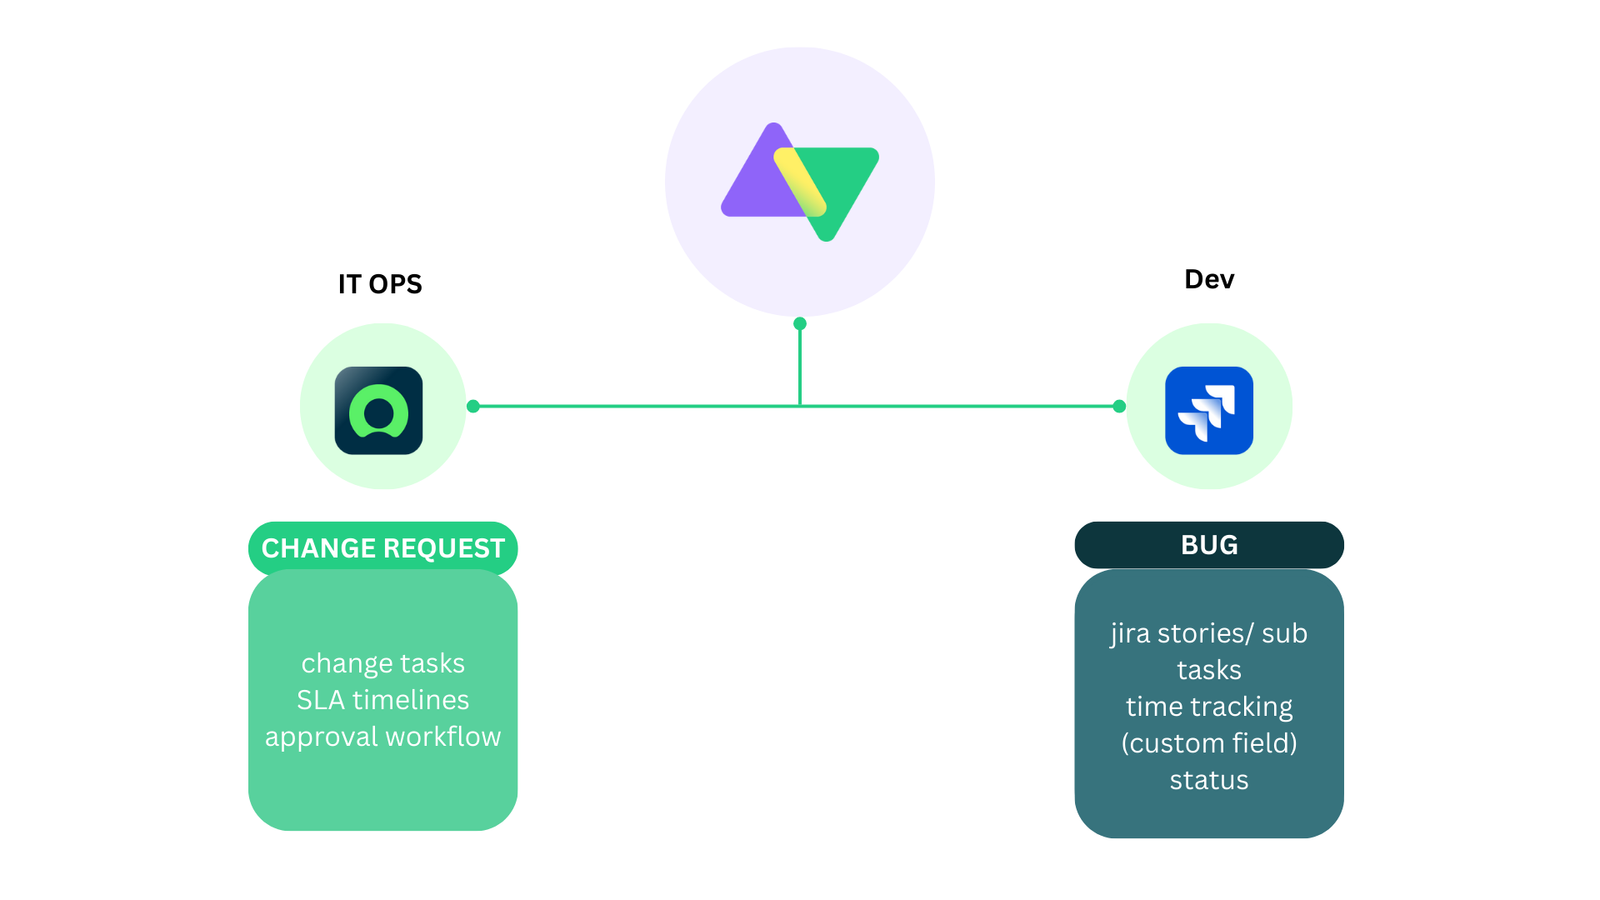
3. Change Request Management
Scenario: Your e-commerce platform requires upgrading.
Workflow:
Change request created in ServiceNow with approval workflow
Once approved, it automatically syncs to Jira as an Epic or a Story
Development team breaks down into tasks, tracks time
Progress updates flow back to ServiceNow in real-time
Completion triggers change request closure in ServiceNow
Advanced Mapping:
ServiceNow Change Request → Jira Epic
ServiceNow Change Tasks → Jira Stories/Sub-tasks
Time tracking aggregated from Jira stories returned to the ServiceNow custom field
What are the Best Ways to Connect Jira and ServiceNow?
Before you jump right into the integration, it’s important to understand the ways in which you can integrate Jira and ServiceNow.
ServiceNow IntegrationHub (Native Method)
ServiceNow’s IntegrationHub uses Jira Spoke for connectivity.
While native, it has limitations:
Limited bidirectional functionality
Longer onboarding journey
Additional package costs
ServiceNow-centric control (limited Jira-side autonomy)
Works for simple, unidirectional use cases
Best For: Basic, one-way data pushes when cost isn’t a constraint
Custom Code Development
I have often observed that ServiceNow users prefer to build their integration from scratch. Honestly, ServiceNow APIs do make the task easy, but this option isn’t always cost-effective. It also leads to significant maintenance costs and difficulty scaling your integration requirements.
Building with ServiceNow and Jira APIs gives complete control but requires ongoing investment:
Full customization capability
No licensing fees (initially)
High development costs (50-200+ hours)
Significant ongoing maintenance
Scaling difficulties as requirements grow
No built-in error handling, security, or monitoring. Has to be handled by the dev team
Best For: Organizations with dedicated integration teams and stable requirements
From my experience, I have observed that companies try to build their own solution initially, but then eventually switch to a third-party integration solution.
Also, when it comes to third-party solutions, you will see a lot of no-code, template-based tools to integrate Jira with ServiceNow. They may work for simple use cases, but cannot be used to implement advanced integration scenarios.
There are a lot of third-party Jira ServiceNow integration solutions available in the market with flexible license plans, various deployment models, extensive documentation, and other custom-made features. With such solutions, you can get your integration project up and running in no time.
However, it’s a good practice to consider some factors while choosing the solution.
What to Consider When Choosing an Integration Solution
Sharing data between Jira and ServiceNow sounds straightforward, but the approach you choose determines whether your integration becomes a productivity multiplier or a maintenance headache. The right solution keeps teams aligned, preserves data context during escalations, and scales as your organization grows.
When evaluating integration options, focus on these critical capabilities.
Security
Your integration handles sensitive operational data like incident details, customer information, SLA commitments, and internal work notes. Security isn’t optional.
What to look for:
Compliance certifications: ISO 27001, GDPR, compatibility
Data encryption: In transit (TLS 1.2/1.3) and at rest
Access control: Role-based permissions that separate integration management from system access
Authentication options: OAuth 2.0, API keys, Personal Access Tokens (no shared credentials)
Audit trails: Complete logs of configuration changes and data transfers for compliance
Why it matters: A security breach through your integration could expose customer data, violate compliance requirements, and damage trust. Choosing a certified platform reduces risk and satisfies audit requirements.
Look for platforms with public Trust Centers where you can review security documentation, penetration test results, and compliance certificates.
Real-Time Synchronization
Delays between systems create confusion. If a ServiceNow incident shows “In Progress” while Jira shows “Resolved,” which is correct? Real-time sync eliminates this ambiguity.
Why it matters: IT operations and development teams make decisions based on current data. Stale information leads to duplicate work, missed SLAs, and frustrated customers. Real-time sync means both teams always see the same truth.
Flexibility
Many companies look for integration solutions that can support complex or advanced use cases. Using predefined integration templates doesn’t always work. Look for solutions that offer support for complex integration use scenarios with minimum hassle. Adding conditional logic, advanced data mappings should be included as a default. The solution must also support historical data exchange or legacy system integration.
Why it matters: Your business processes have evolved over the years. Forcing them into rigid integration templates means either changing your workflows (expensive, disruptive) or accepting incomplete data sync (defeats the purpose).
AI-Assisted Configuration
Setting up integrations traditionally requires developers who understand both platforms’ APIs, data models, and scripting languages. AI changes this equation.
What to look for:
Natural language script generation: Describe what you want (“sync all high-priority incidents to Jira as bugs”), get working code
Context-aware suggestions: AI understands your existing configuration and recommends improvements
Error explanations: When sync fails, AI translates technical errors into plain language with fix suggestions
Learning from best practices: AI trained on thousands of successful integrations suggests optimal approaches
Why it matters: Reduces implementation time from days to hours. Non-developers can configure complex sync rules. Troubleshooting becomes faster when errors are explained clearly instead of cryptic API messages.
Scalability
You might start with one Jira project syncing to one ServiceNow assignment group. Six months later, you need five Jira instances connected to ServiceNow, plus Azure DevOps and Salesforce in the mix.
Why it matters: Starting with a solution that can’t scale means migration later: re-implementing integrations, retraining teams, and disrupting workflows. Choosing a scalable platform from the start avoids this pain.
Reliability
Downtimes are hard-hitting. It’s important to consider solutions that offer an integrated retry mechanism that doesn’t need manual intervention. Also, the two-way synchronization must resume from the point of interruption without having to worry about data being lost during system failures.
Rollback capability: If a configuration change breaks sync, revert to the previous working version
Uptime guarantees: SLA commitments for platform availability
Safe testing: Validate configuration changes before production deployment
Why it matters: A broken integration is worse than no integration; teams see outdated data, make decisions on false information, and lose trust in the system. Reliability features minimize downtime and provide safety nets.
Cost & Pricing Model
Integration pricing varies wildly. Some charge per user, some per transaction, some per connection. Understanding the model prevents budget surprises.
Pricing models explained:
Per-user licensing: You pay based on how many people have access to Jira or ServiceNow
Flat pricing: Charged a flat rate for the entire integration or per system
Per-transaction (usage-based): You pay per API call or sync event
Per-connection: You pay per integration pair (Jira ↔ ServiceNow)
Outcome-based (sync pairs): You pay for the number of work items actively synchronized at any given time
Cost per item decreases as scale increases: The more work items you sync, the lower the per-item cost. This aligns incentives; the platform wants you to get more value, not artificially limit your usage.
Look for transparency in pricing. You should be able to estimate costs before committing. An ROI calculator helps quantify benefits (time saved, errors reduced) against costs.
Note: You can also have a look at the complete comparison between IntegrationHub and Exalate if you prefer.
Why Use Exalate to Integrate Jira and ServiceNow
Exalate combines flexibility with operational simplicity through a unified management console:
Script-based engine: Groovy scripting for any custom Jira ServiceNow workflow
Side-by-side view: Manage all integrations and connections from one interface. Form 2-tier or multi-tier Jira ServiceNow integration networks.
TestRun functionality: Test your sync scripts before production deployment
Script versioning: Every script publish creates a new version. Full audit trail of who changed what and when, with rollback capability. This also allows you to work on drafts without affecting production data.
Real-time sync: Complete queue visibility and work item or incident history
Security-first: ISO 27001 certified, RBAC, encryption at rest and in transit. Visit Exalate Trust Center.
Supported Integrations: Jira, Jira Service Management, ServiceNow, Azure DevOps Cloud and Server, Salesforce, Zendesk, Freshservice, Freshdesk, Asana, GitHub, and more. View All Supported Connectors
Outcome-based pricing: Exalate uses sync-based (outcome-based) pricing, i.e., you pay for active work items in sync, not user seats, ensuring costs scale with actual usage, not team size. With every integration pair (Jira ServiceNow, in this case), you can create as many connections and users as you want. Also, the cost decreases as items under sync increase. View pricing details → | Exalate Plan Calculator
Now that you understand what makes an effective integration and why this guide uses Exalate, let’s walk through the actual setup process.
How to Integrate Jira and ServiceNow: A Step-by-Step Guide
This tutorial demonstrates how to integrate Jira and ServiceNow using Exalate.
Go to the Exalate app. If you already have an account, you can log in directly.
New users can create an account by manually entering their email and verifying it, or by signing up using Google.
If you’re a video person, we also have a step-by-step tutorial.
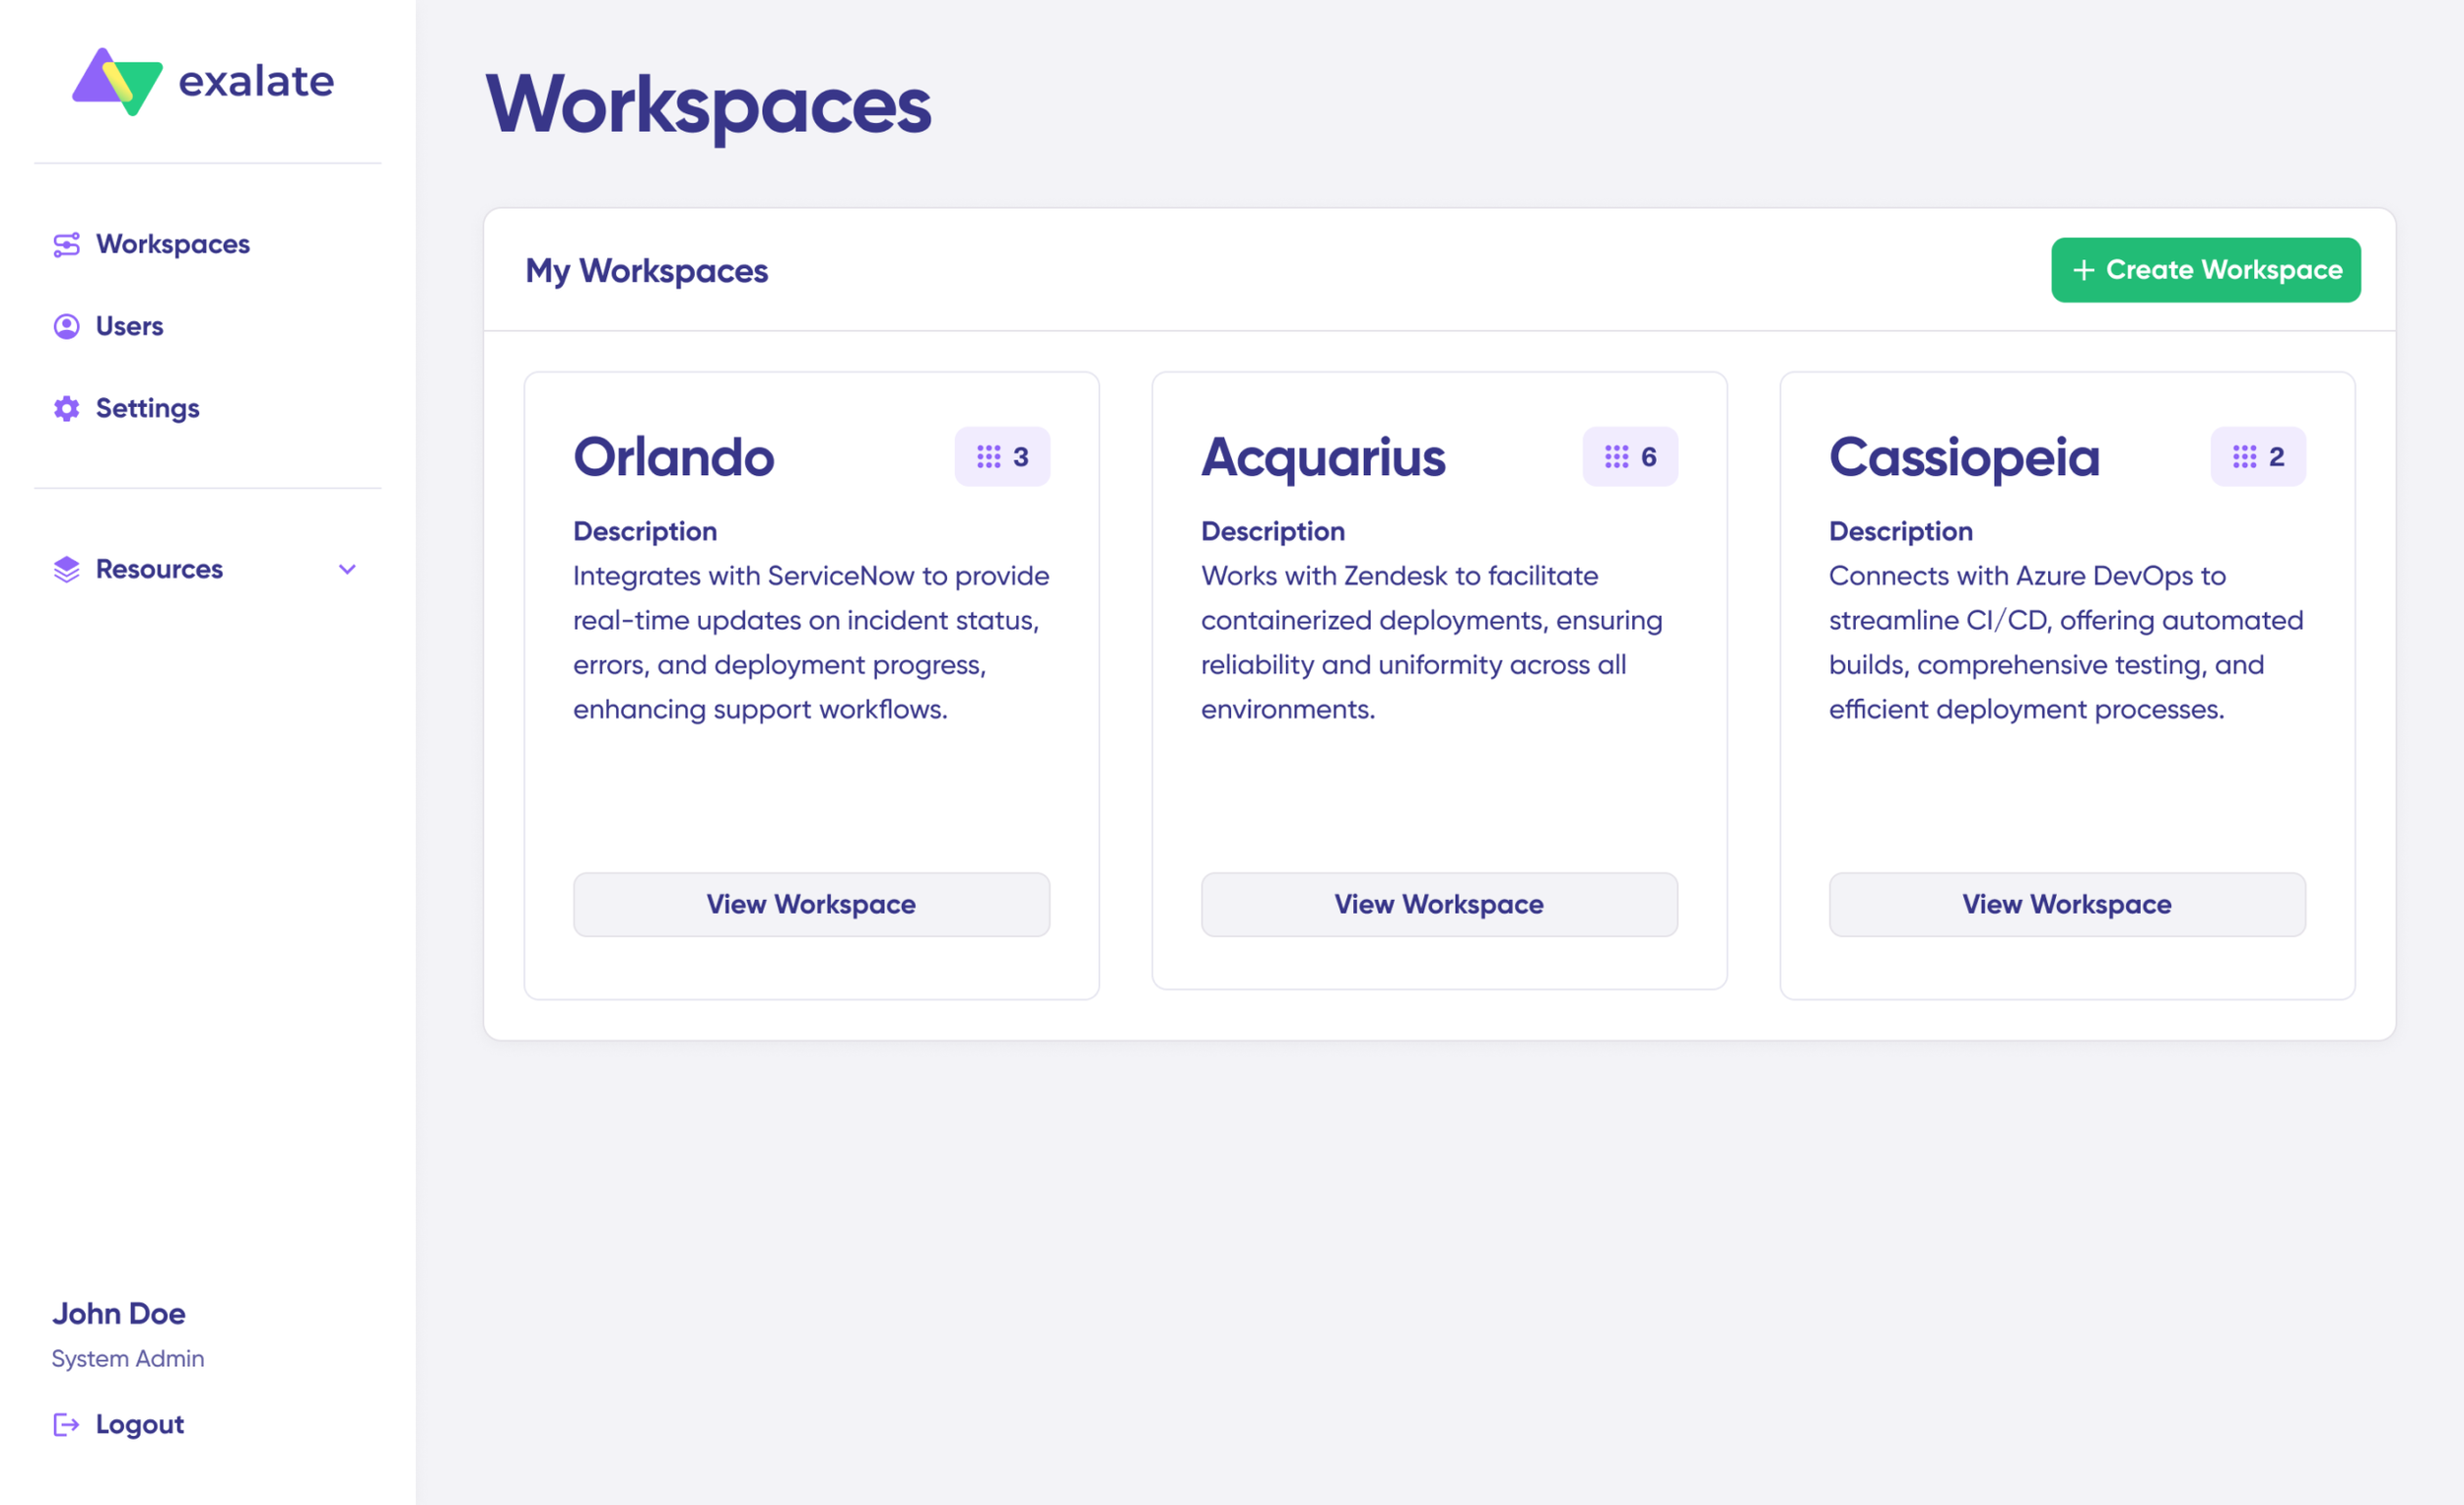
Creating a Workspace
Workspaces help you organize and manage your integrations and connections in a single place. You can find all your existing workspaces under the “Workspaces” tab.
To create your first workspace:
Click the “+ Create Workspace” button.
Enter a name and description for your workspace.
Click “Create workspace” to confirm.
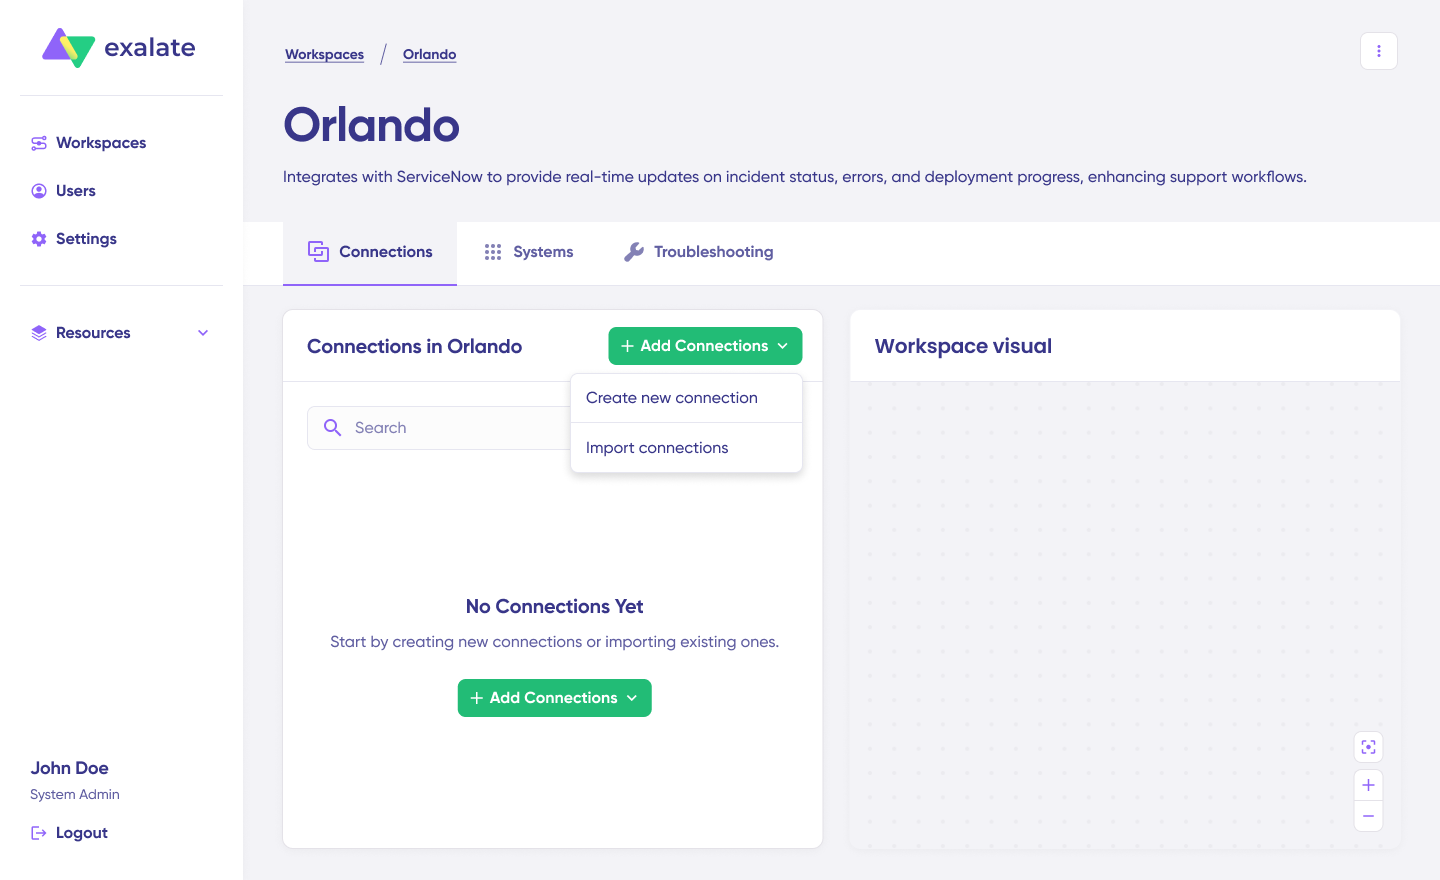
Creating Your First Connection
Once you have a workspace, you can start creating connections between Jira and ServiceNow. If you already have an existing workspace, you can view all your connections under the “Connections” tab, where you can edit connection settings and view other connection details.
Note: To create a connection, you’ll need an active Exalate account with at least one workspace and the access credentials for the systems you want to connect.
Jira ServiceNow Connection Setup Steps
Click “+ Add connections” > “Create new connection”.
Enter the name for your first system (System A). You can name either Jira or ServiceNow as System A—it doesn’t matter which one goes first.
Enter the URL of your system. For example, if you start with ServiceNow, enter your ServiceNow instance URL.
Once you enter the URL, a validation check occurs. If your system is already part of the existing workspace, authentication happens automatically. If the system is part of a different workspace, it will be imported into your current workspace.
For new systems, you’ll need to enter your authentication details. ServiceNow uses Basic authentication, and Jira uses OAuth.
Complete the same setup process for the Jira side.
Give your connection a name and description.
Click “Next”.
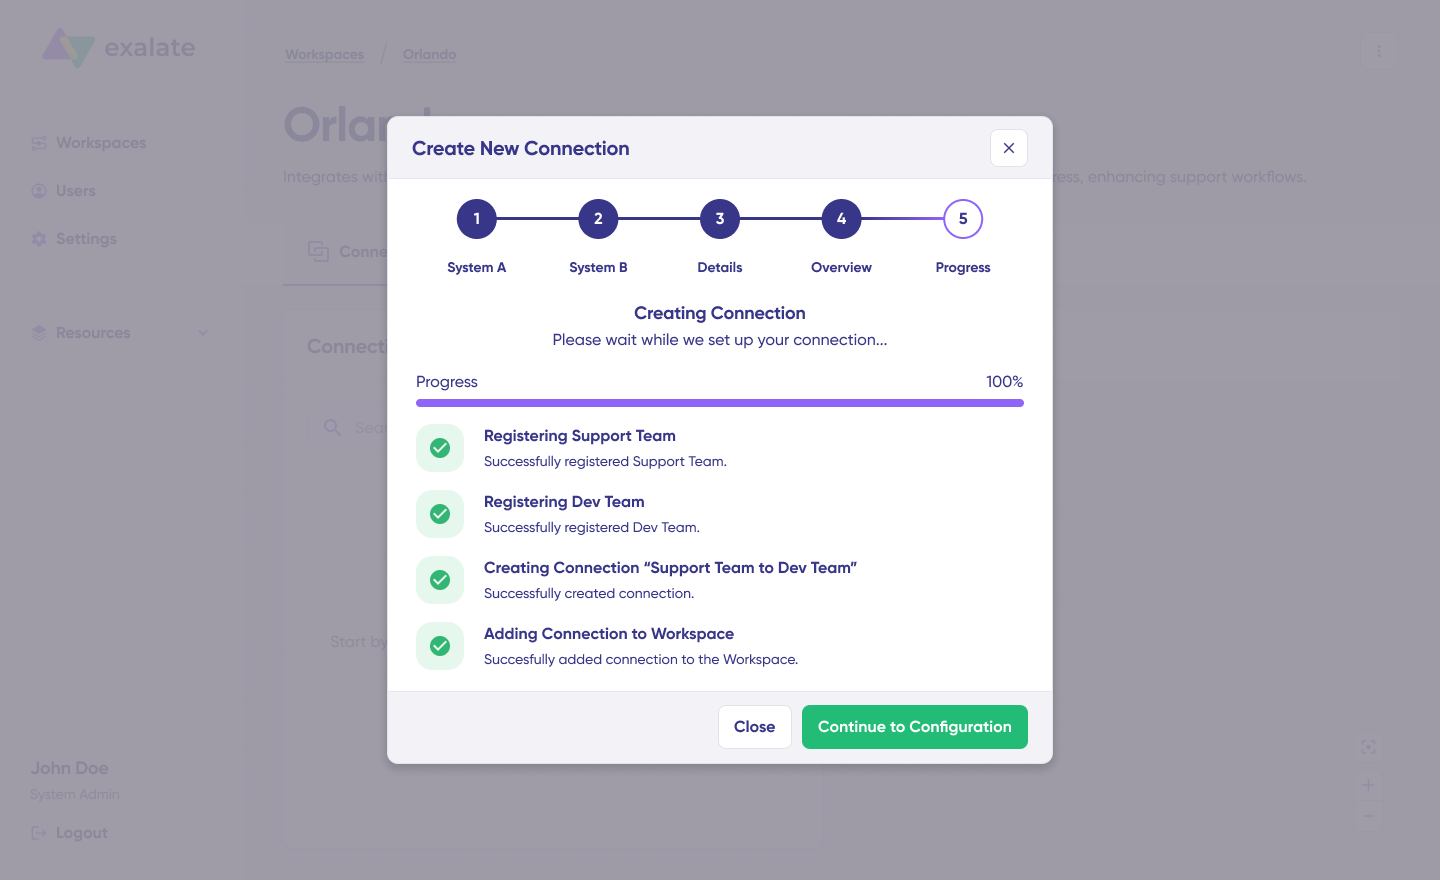
Review the details to ensure they are correct, then click “Create connection”.
When the process is complete, select “Continue to configuration” and choose a Jira project you want to use for synchronization.
Then click “Build & continue”.
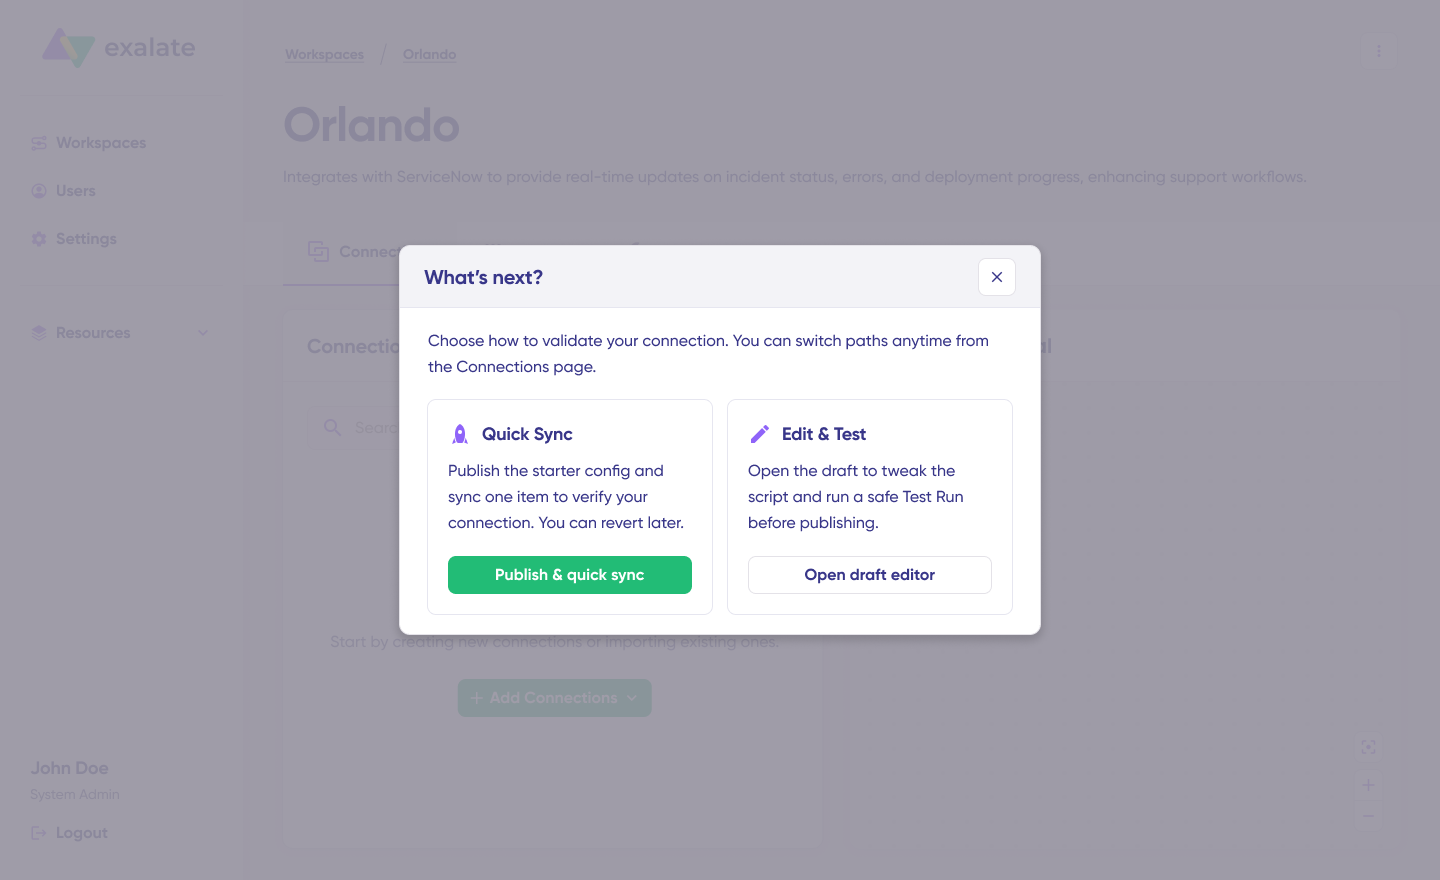
Jira ServiceNow Configuration Options
After creating your connection, you have two configuration options: “Quick Sync” and “Edit & Test”.
Let’s explore both.
Quick Sync: Publish & Quick Sync
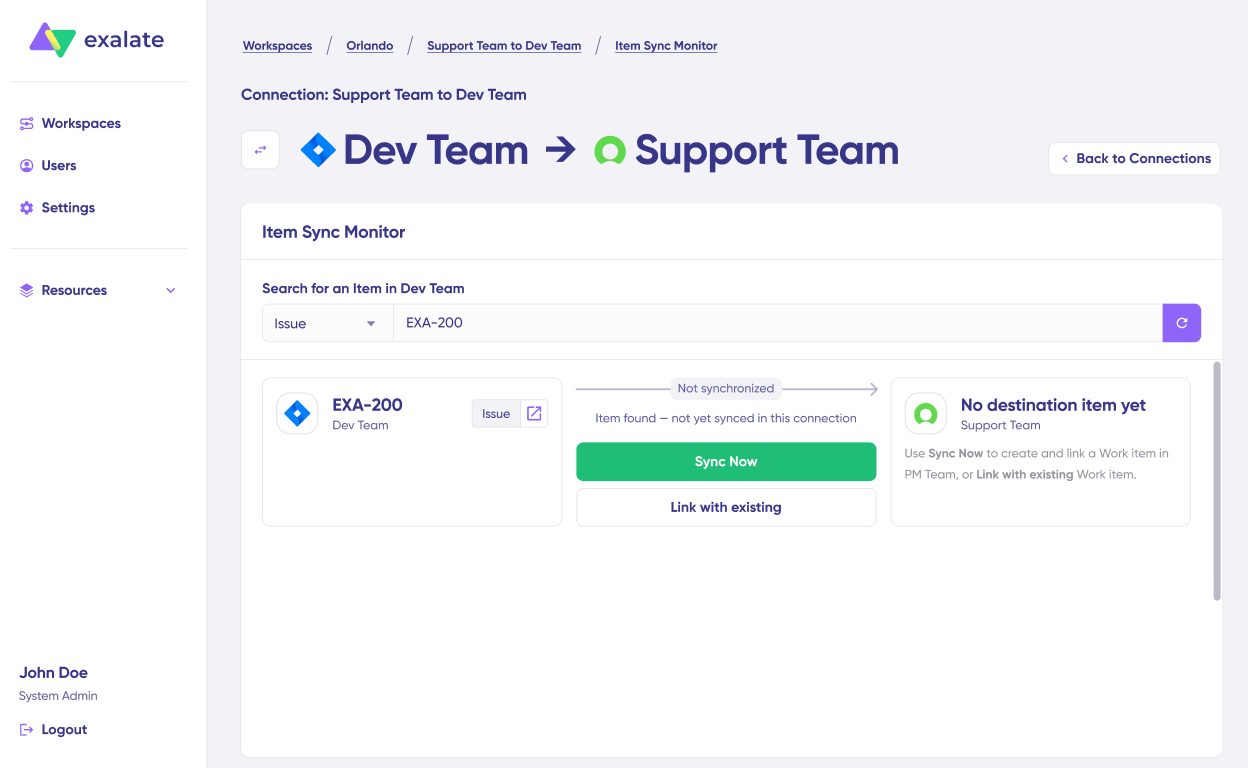
This option allows you to sync one item between Jira and ServiceNow to verify that your connection works properly. This is an optional step, but recommended for initial testing.
Under the “Item sync monitor,” enter the work item key in Jira or the incident number in ServiceNow.
To sync the first item, click “Sync Now”. To link two existing items, click “Link with existing”.
You’ll receive status updates while the items sync, and once the sync is complete, you can view both synced issues by opening them in a new window.
You can also compare how the synced items will look and how the changes will be applied.
Edit & Test: Open Draft Editor
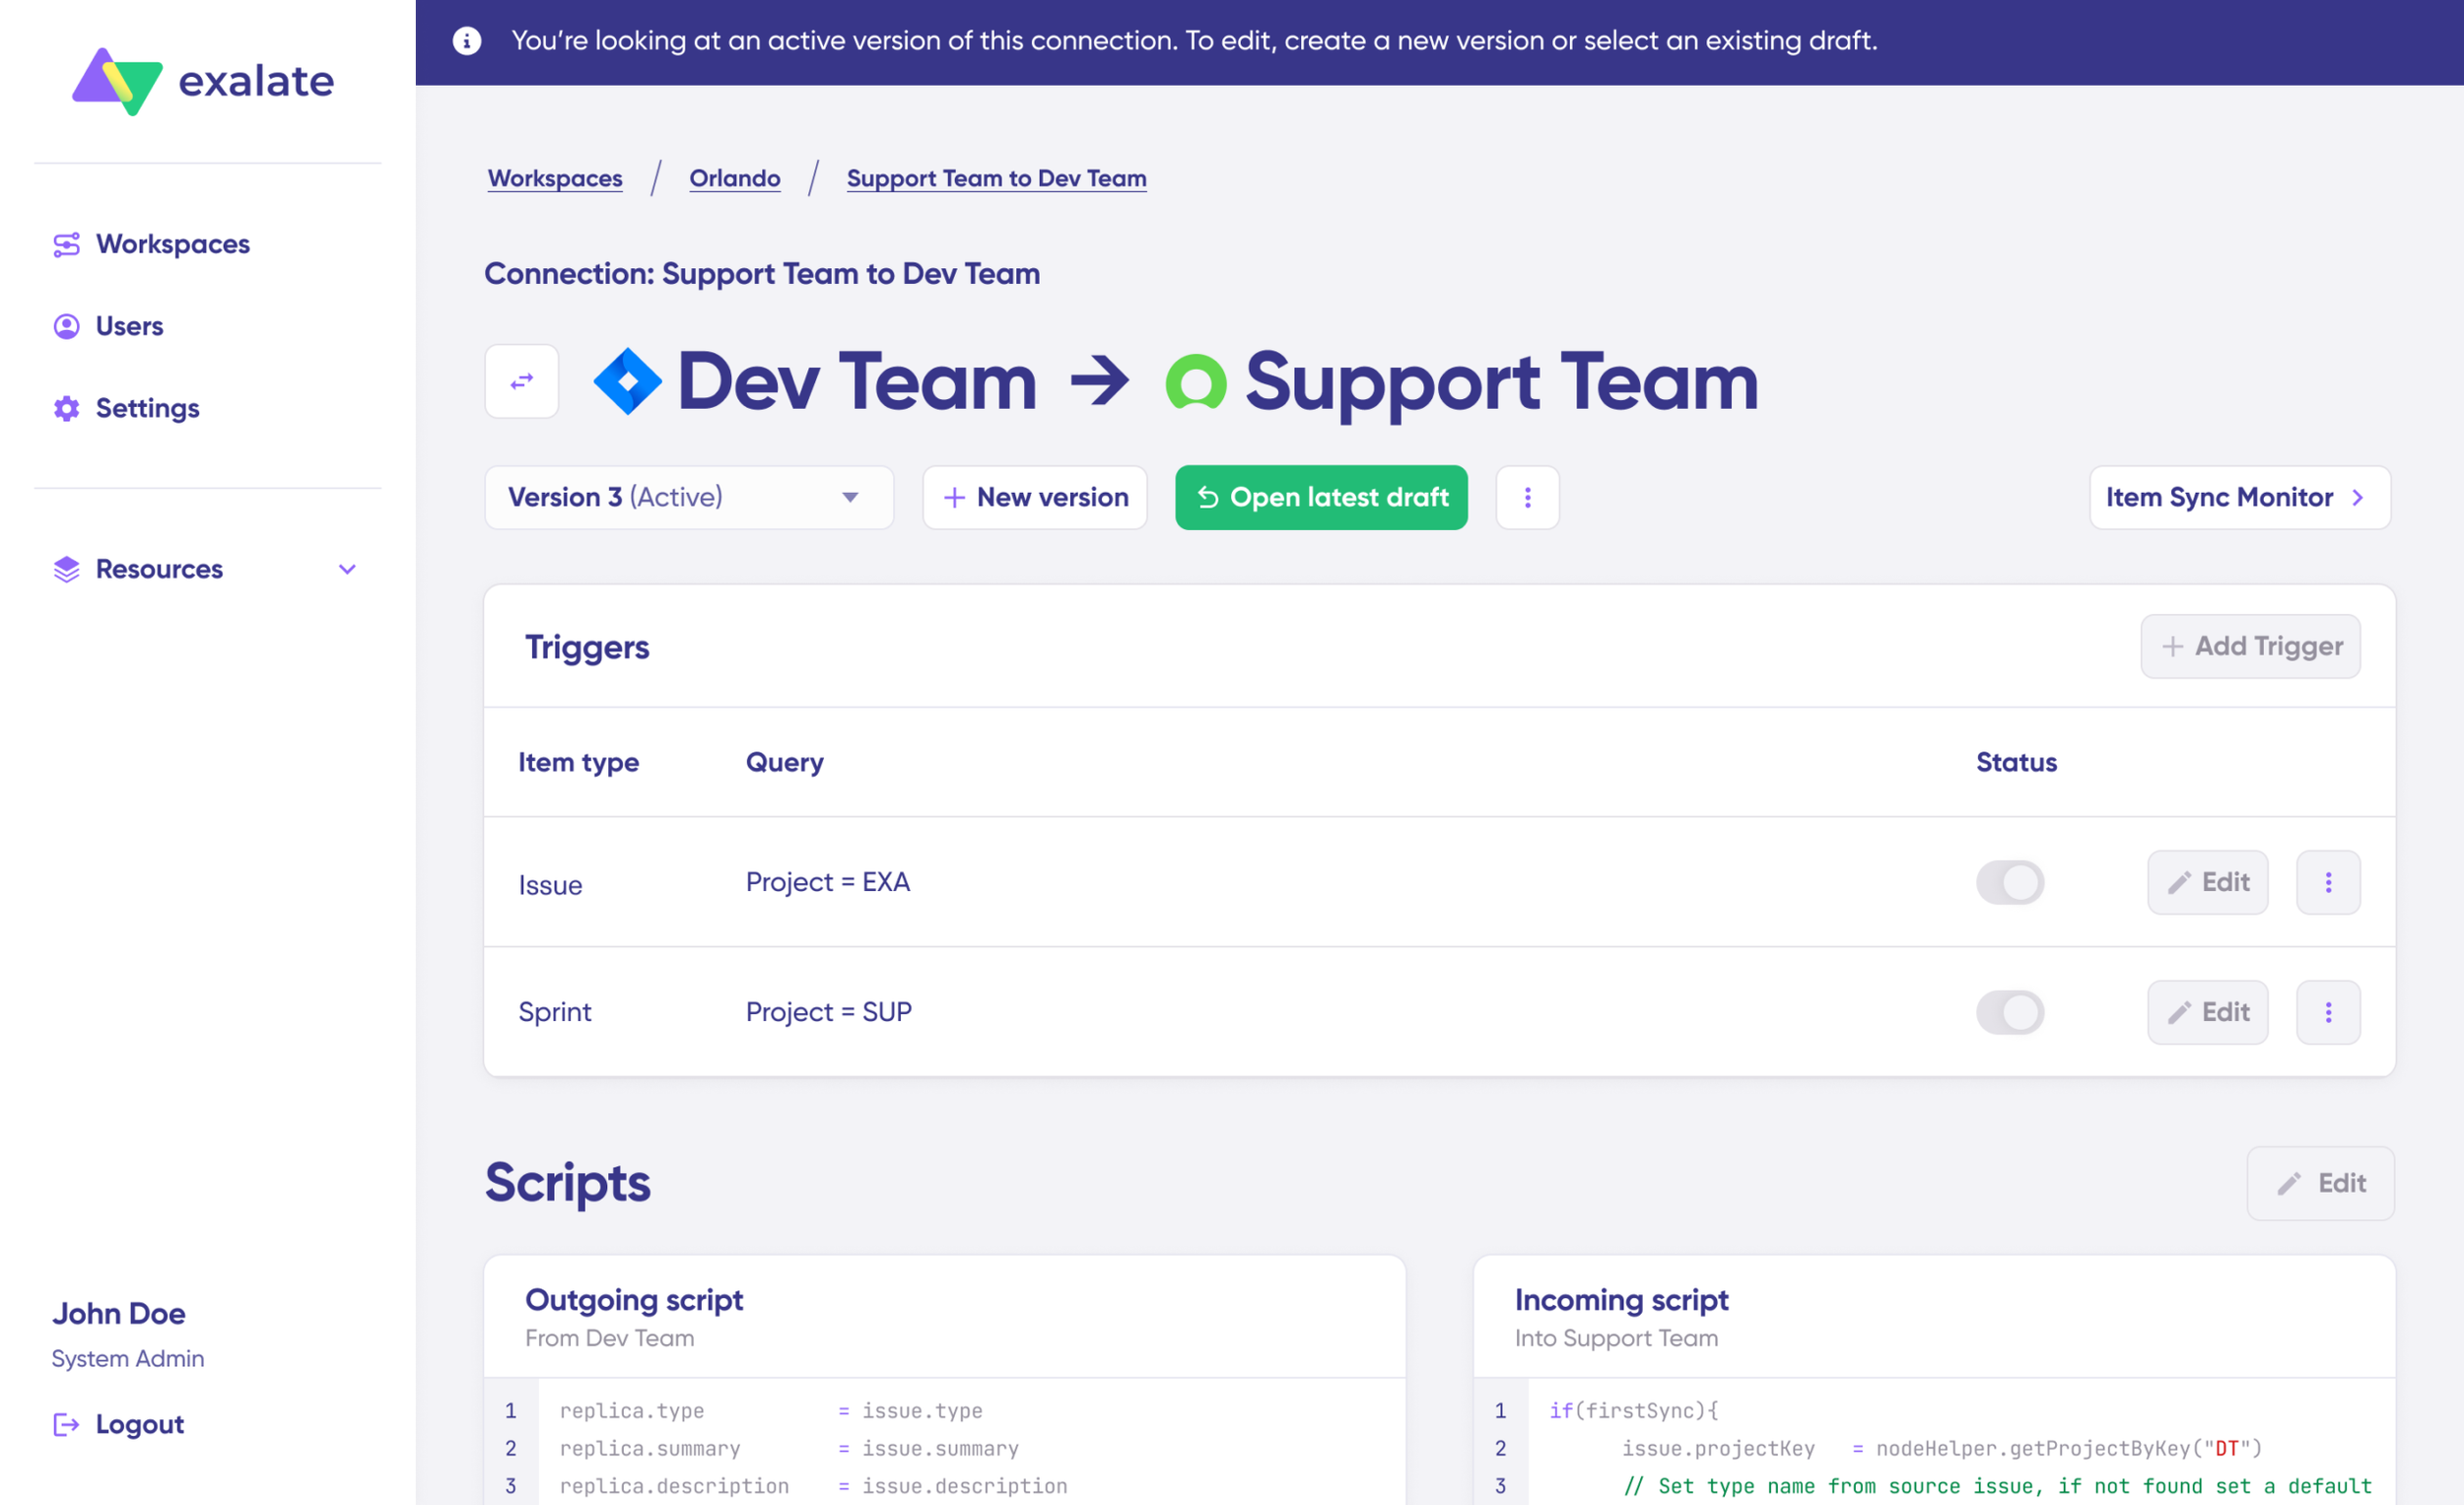
To start making changes to your sync configuration, click “Create a new version” or select “Open latest draft”.
This ensures you don’t accidentally modify the existing configuration. Changes in the draft are saved automatically.
Click the “Edit” button to open the editor and modify the sync rules.
Understanding Sync Rules
Sync rules are based on Groovy scripts. With these scripts, you can add custom data logic and mapping, along with conditional flows, allowing you to adapt for any complex or advanced use cases and workflows.
The direction of the sync can be changed by clicking the two arrows next to the connection name.
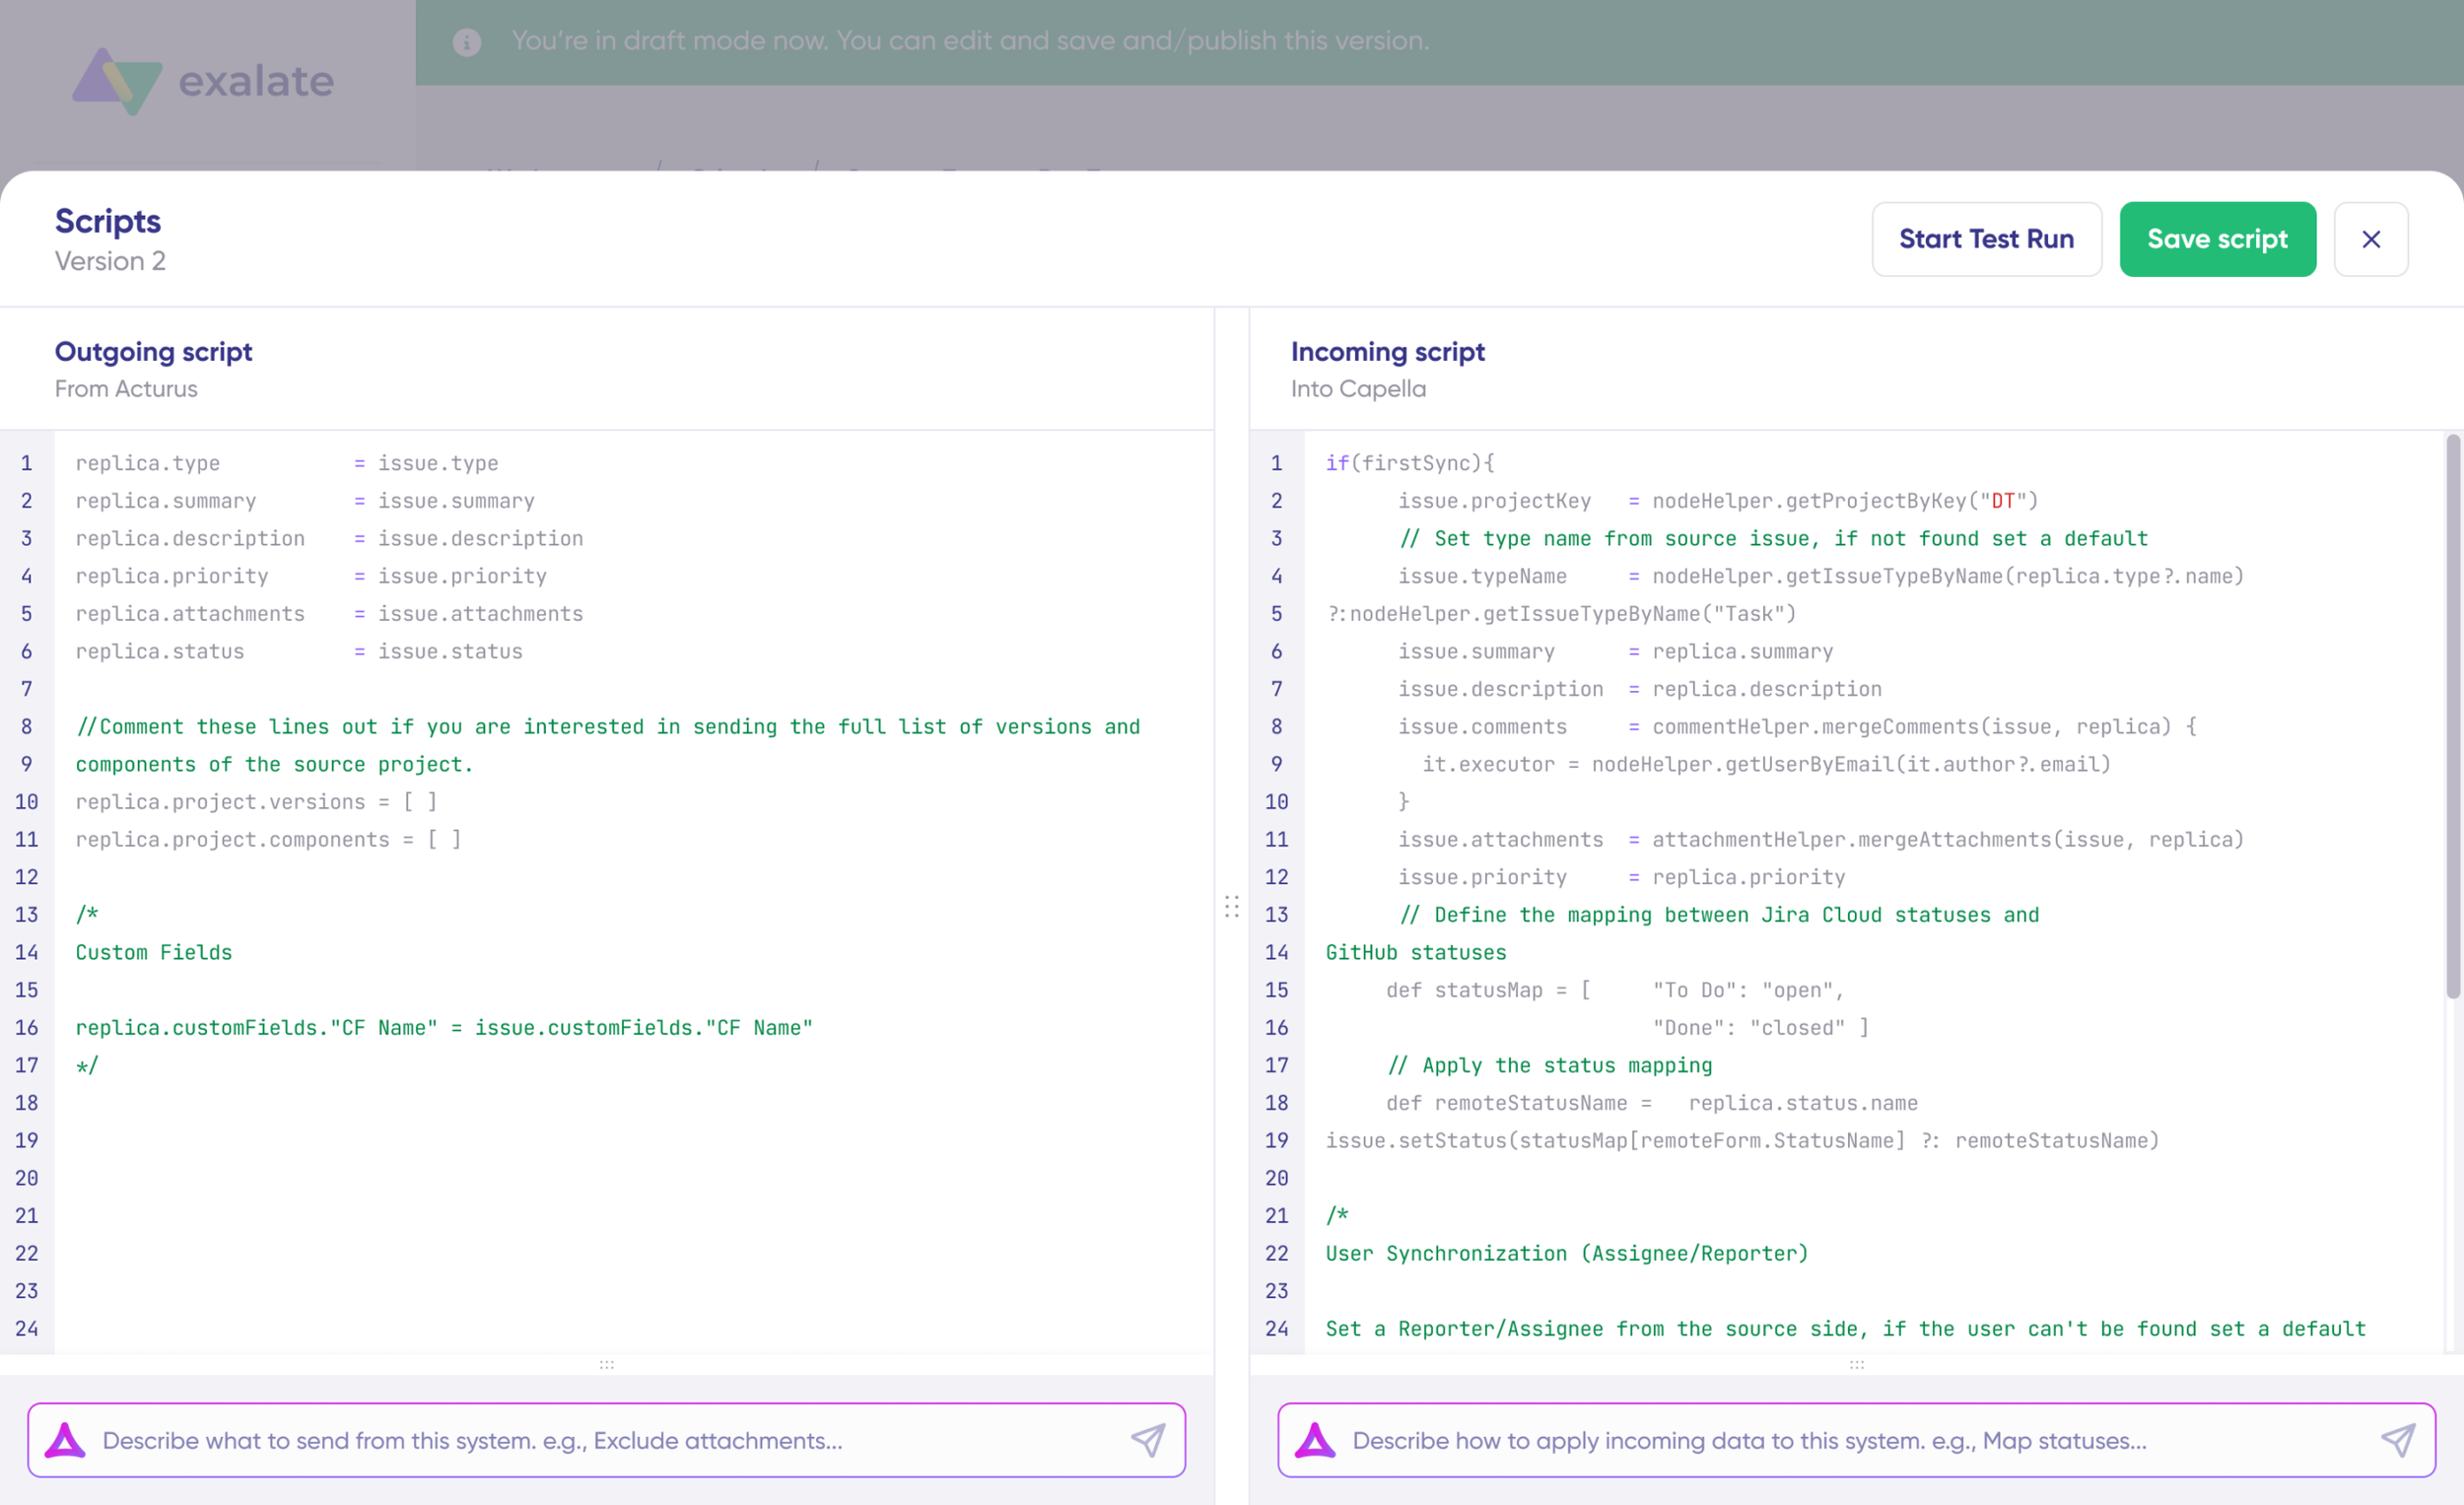
The scripts are divided into incoming and outgoing scripts:
Outgoing script: If the sync direction is from Jira to ServiceNow, the outgoing script will hold the values passed from Jira to ServiceNow.
Incoming script: The incoming script defines how the values coming from Jira are mapped in ServiceNow.
These scripts will be reversed if the direction changes.
Replica works like a message payload and holds the actual data passed between the synced entities. It exists in JSON format.
To sync new values, you can enter the sync script yourself if you are familiar with Groovy.
To stop something from syncing (for instance, attachments from Jira to ServiceNow), simply remove that script line from the corresponding script.
AI-Assisted Configuration
To save time and simplify the scripting process, you can use Exalate’s AI-assisted configuration feature called Aida to generate sync scripts.
Aida is available in both incoming and outgoing script sections, so choose the appropriate side accordingly.
Aida helps you in two ways:
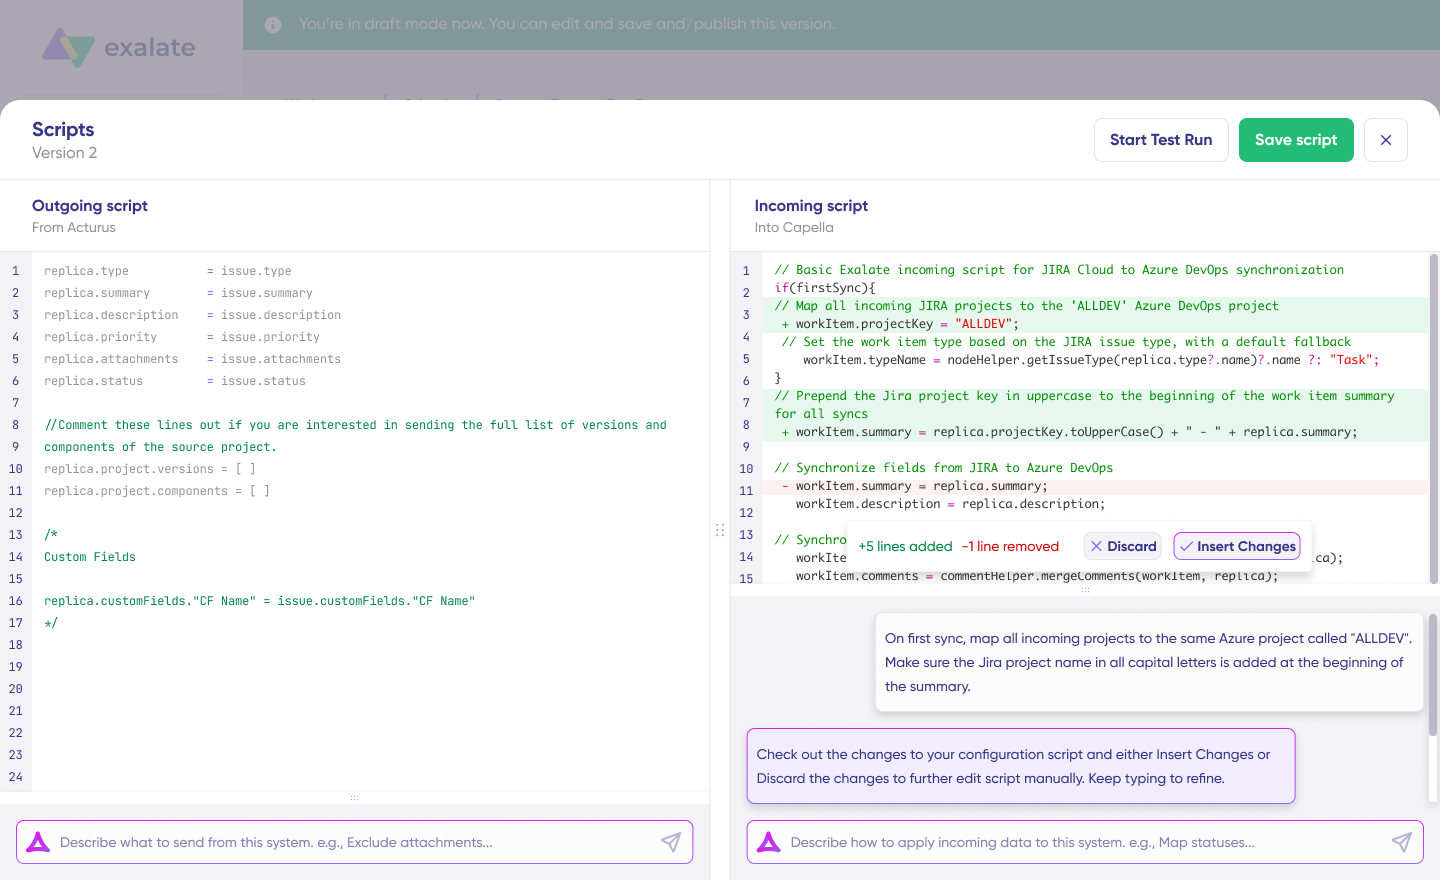
For Outgoing scripts: Describe what data should leave your system. For example, “Exclude attachments” or “Only sync high-priority issues.”
For Incoming scripts: Describe how incoming data should be applied to your system. For example, “Map statuses” or “Set a default assignee if the user can’t be found.”
Based on Exalate’s scripting API and your existing scripts, Aida generates working Groovy scripts with proper field mappings for you.
Once Aida finishes drafting your script, review the suggested changes. Green highlights indicate new lines that will be added, while red highlights show lines that will be removed from your script. You can choose to “Insert” or “Discard” Aida’s suggestions.
The outgoing and incoming scripts work independently, as does Aida, so maintain separate context and direction for each prompt.
Note: While Aida is helpful, like any AI tool, please review the generated code before applying it.
TestRun: Validate Before Production
Once your sync scripts are ready, you can choose to “Save script” or proceed to test them using the “Start Test Run” option.
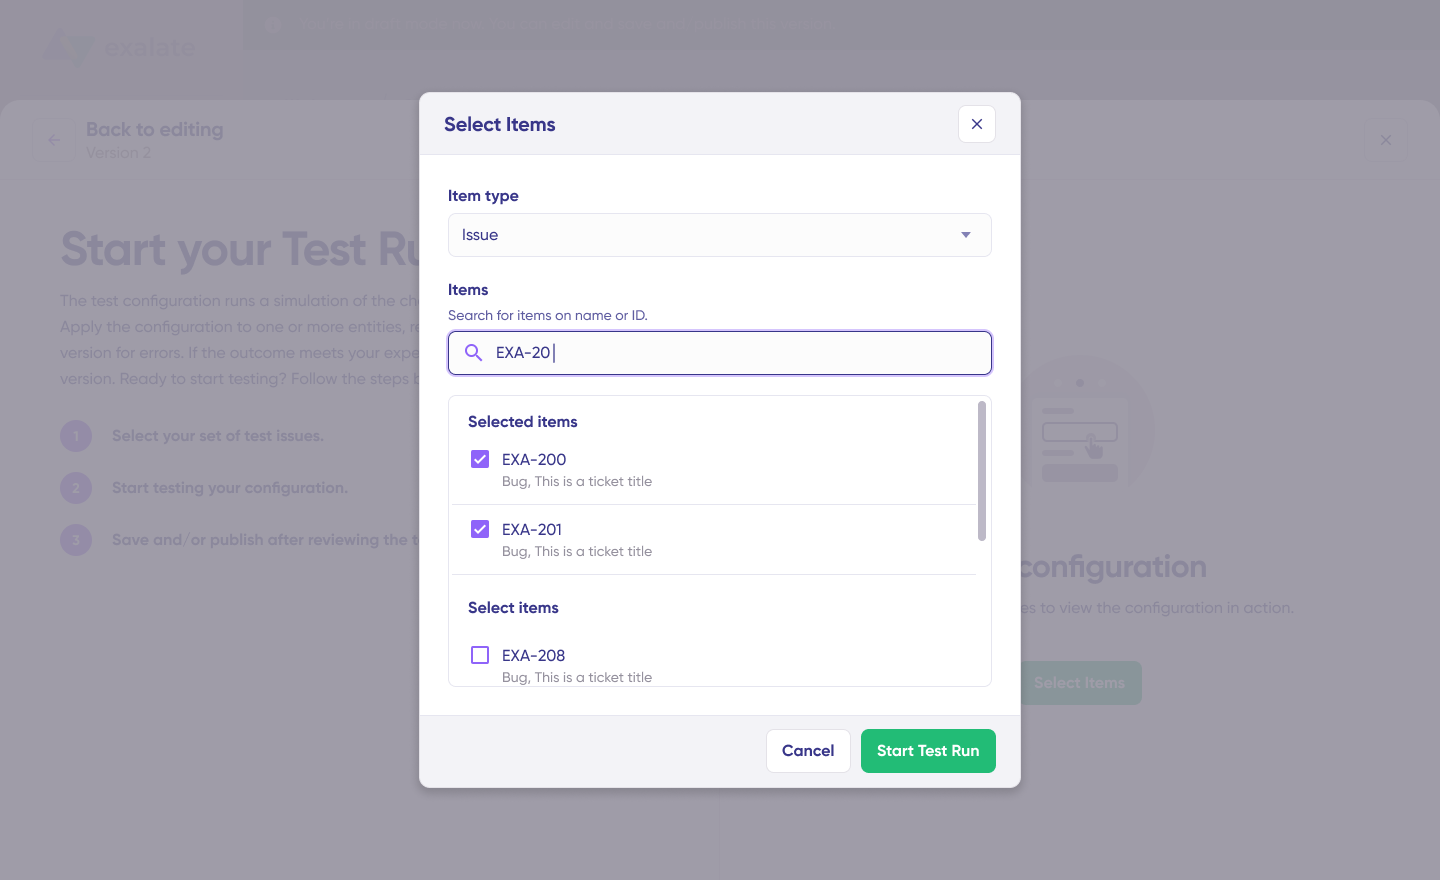
To test the configuration, select the items you want to apply the sync to. You can select multiple items. Once selected, click “Start Test Run”. You can now view all the incoming and outgoing replicas for each item you selected in their respective tabs.
Review how the sync configuration will be applied to your items, preview the replica, and verify that the field mappings look correct. If needed, go back, adjust the scripts, and test again. Deploy only when you’re confident everything works correctly.
This safety net prevents errors from affecting live data.
Once everything matches your needs, click “Publish Version” to apply the updated configuration to your live synchronization.
All versions for a connection are available in the “Version” dropdown. Versions can be either “Active”, in “Draft” (editable), or “Archived”.
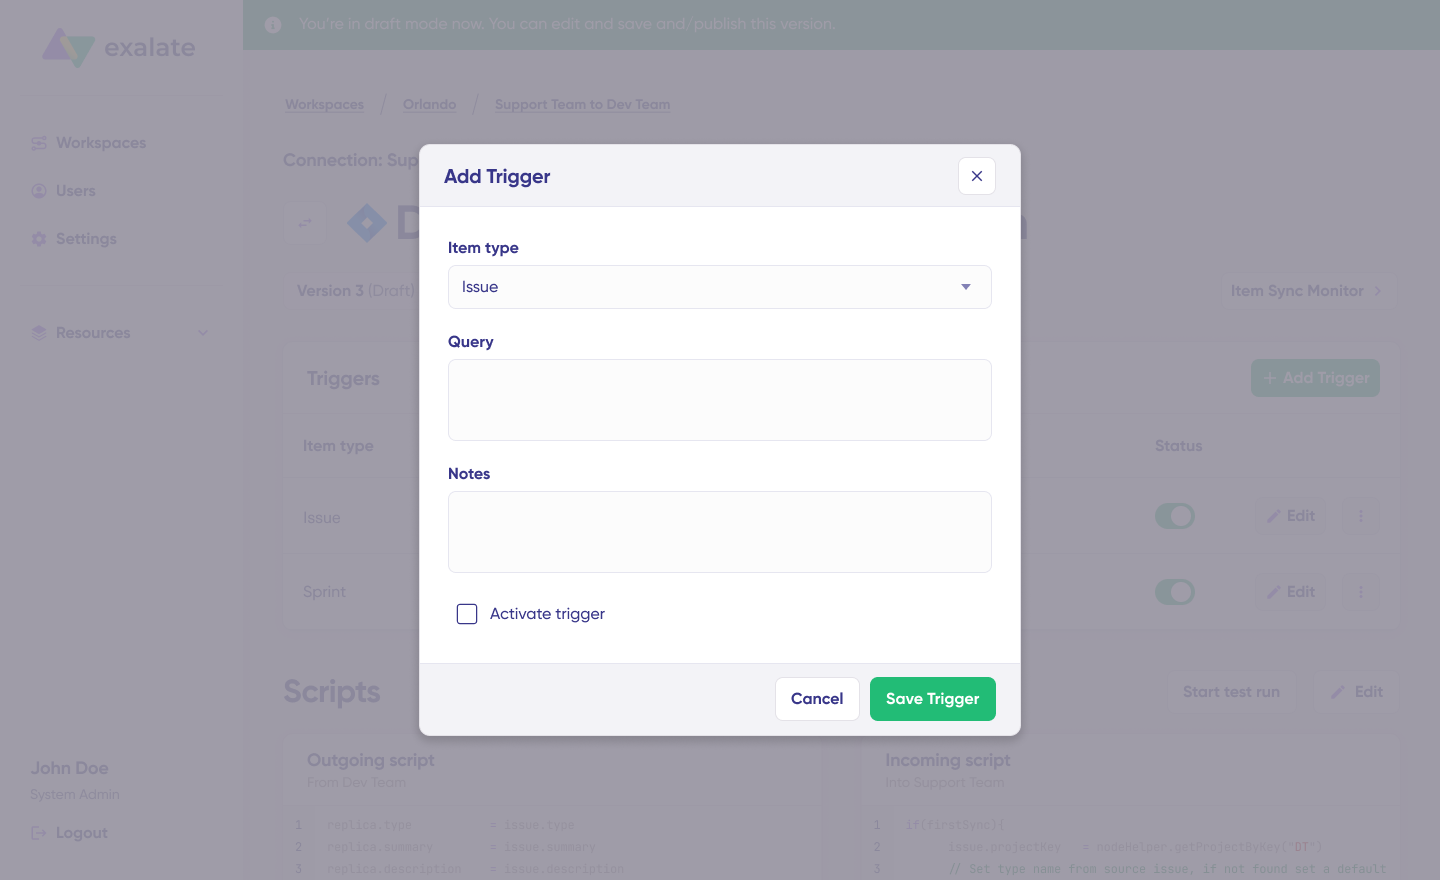
Adding Triggers
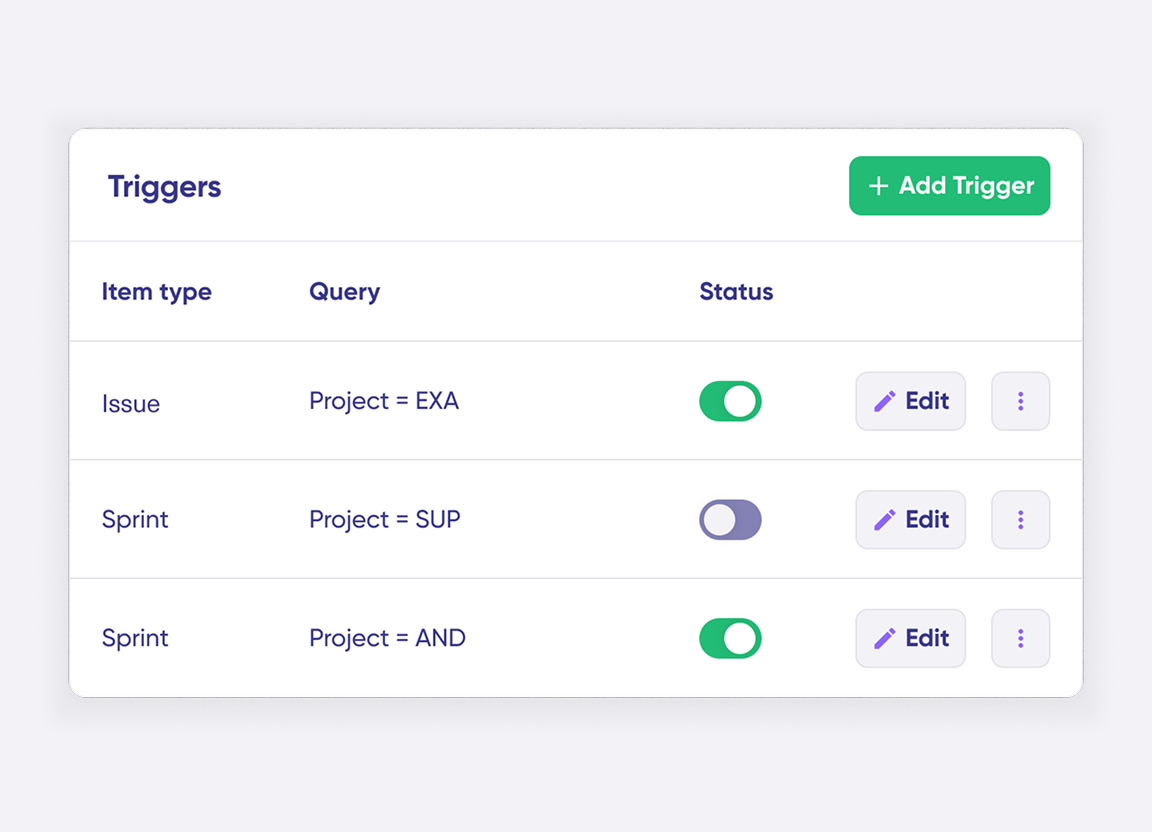
To start your sync automatically, it’s important to add triggers, which are conditions or filters you apply to specific items. For instance, you can sync all Jira work items that have a label “dev”, or sync all incidents in ServiceNow that belong to a specific assignment group.
Click the “+ Add trigger” button to start creating triggers. These triggers are platform-specific:
For Jira: You can use Jira Query Language (JQL) to specify conditions for work items or sprints.
For ServiceNow: You can use the advanced search syntax to apply the trigger to incidents, problems, change requests, etc.
Save your changes by publishing them.
Deploy and Monitor
That’s it! Your first synchronization will start automatically based on the sync rules and triggers you have set. Happy syncing!
Unfortunately, troubleshooting errors is a significant part of synchronization, especially in script-based tools like Exalate, which allow the flexibility of setting up complex workflows.
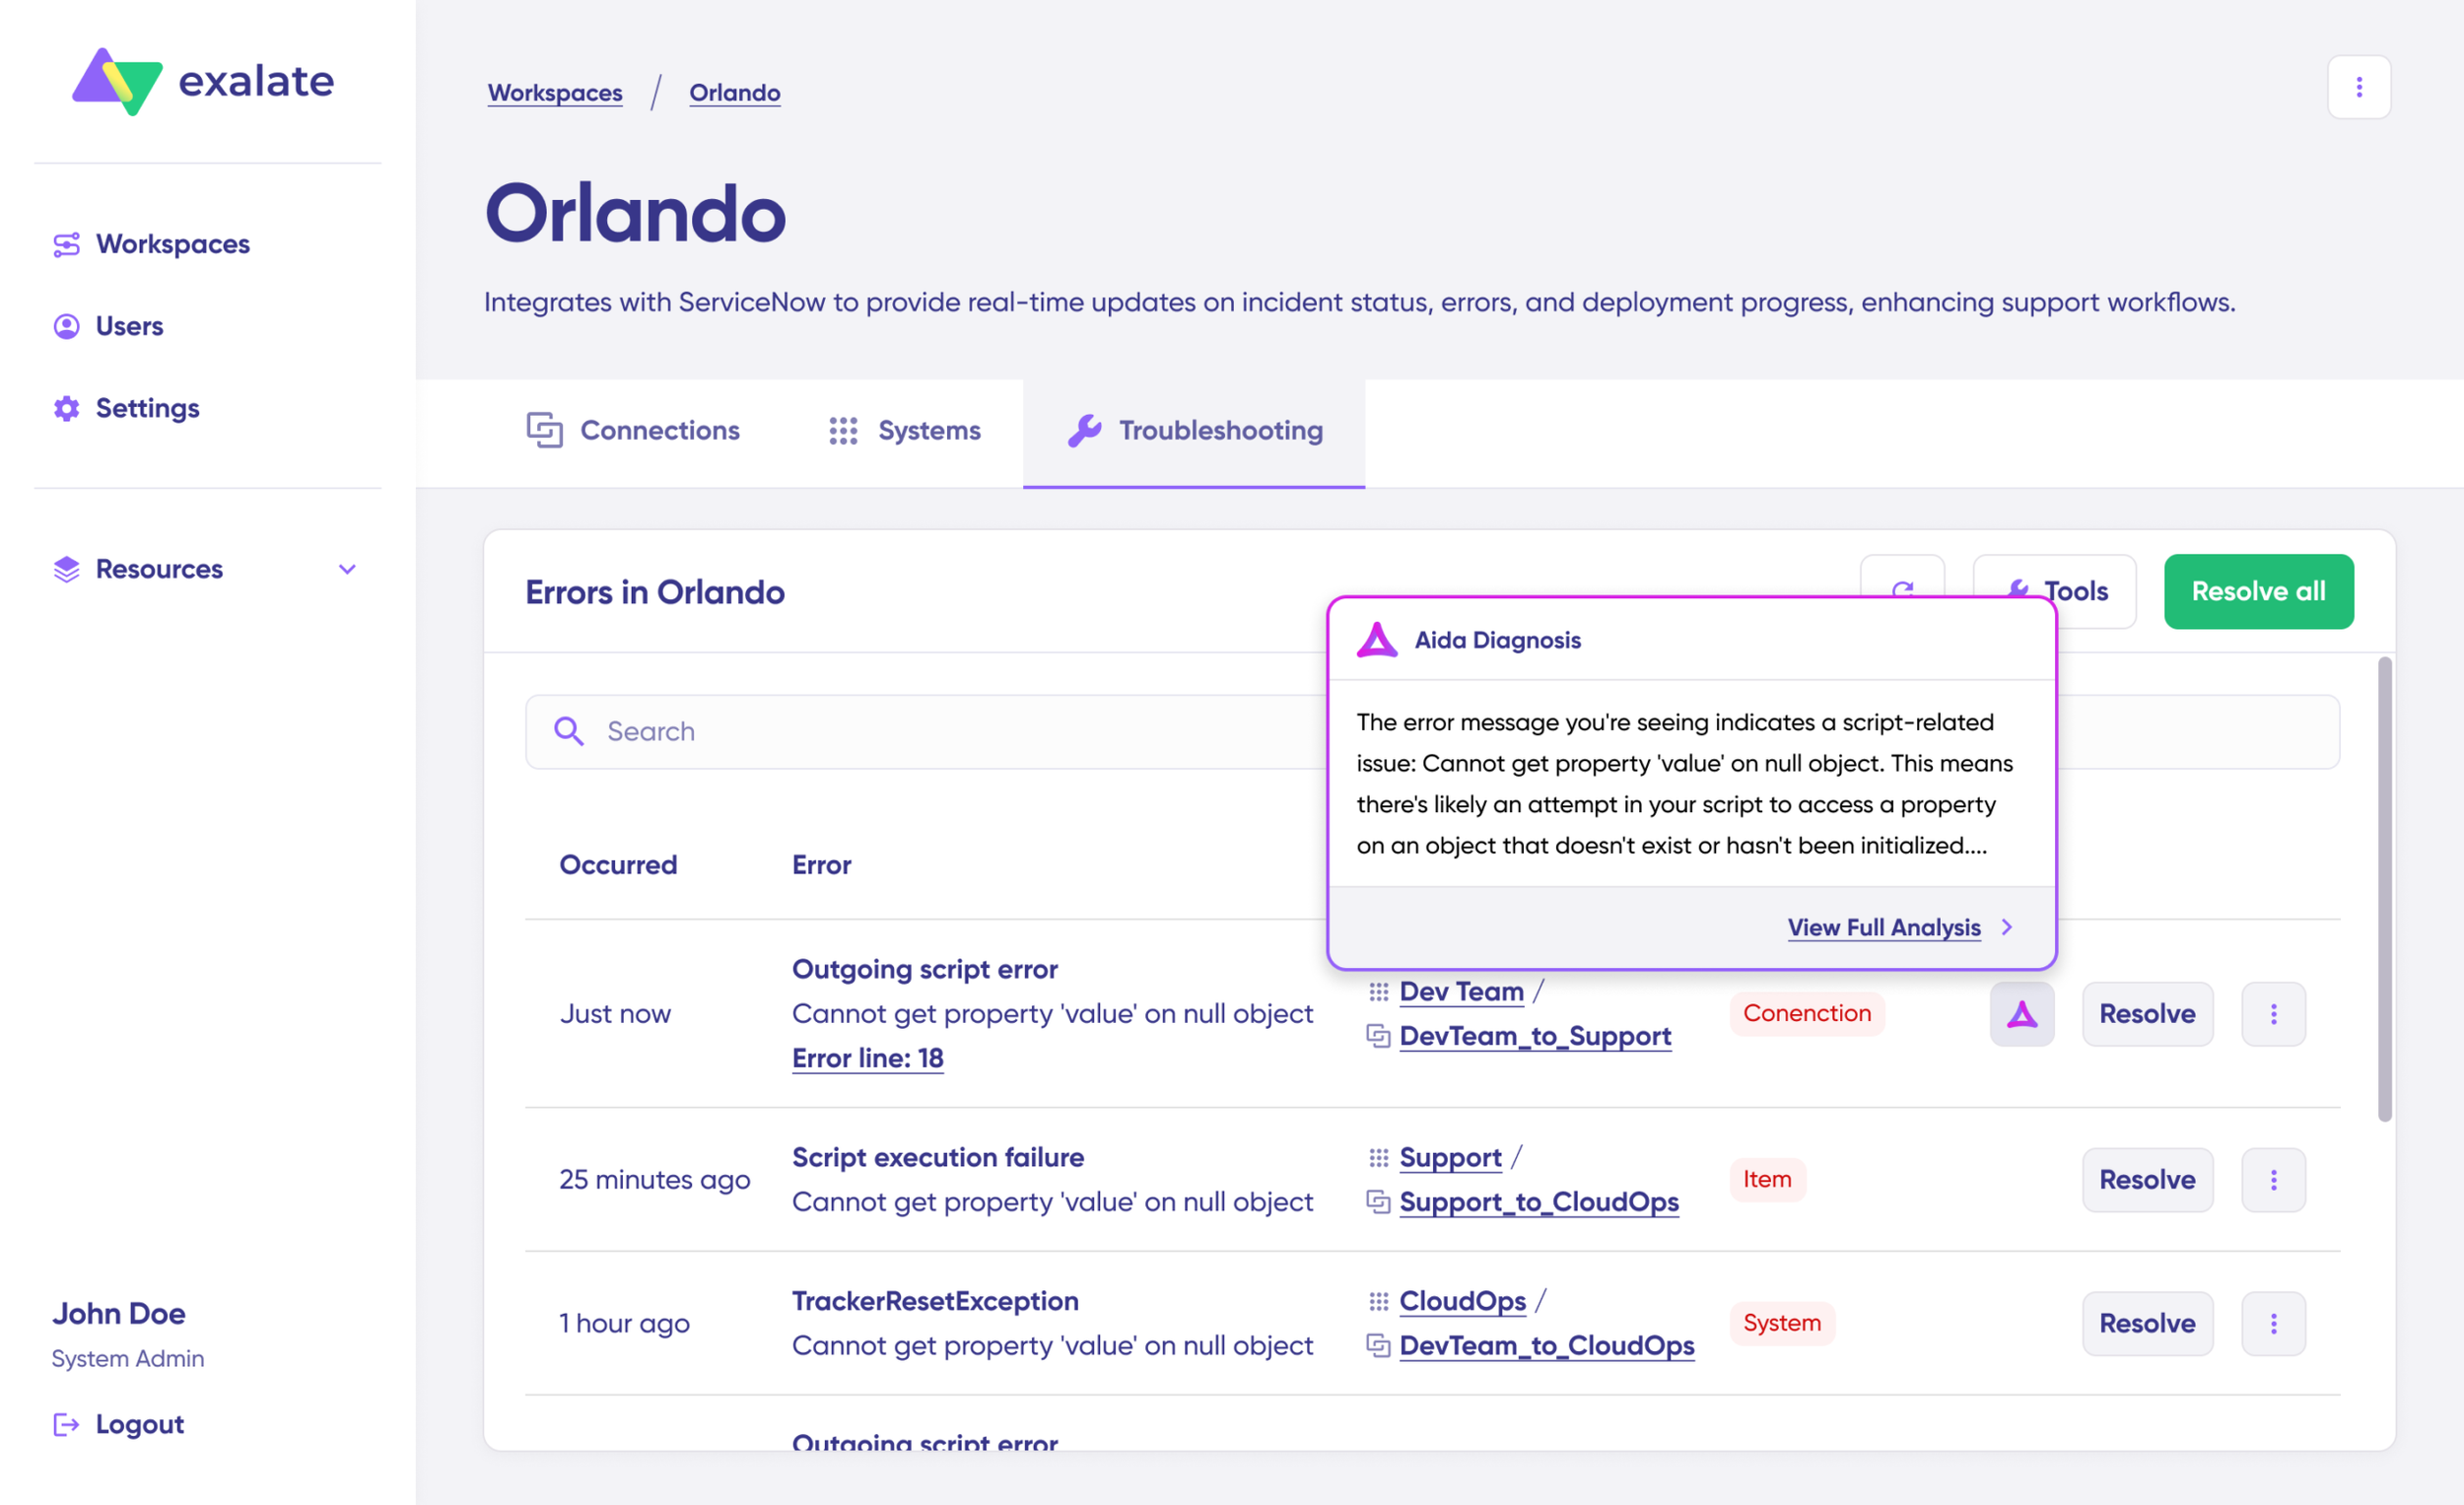
Troubleshooting with Aida
Aida AI helps you troubleshoot errors faster by offering clear and context-aware suggestions to resolve errors right where you see them.
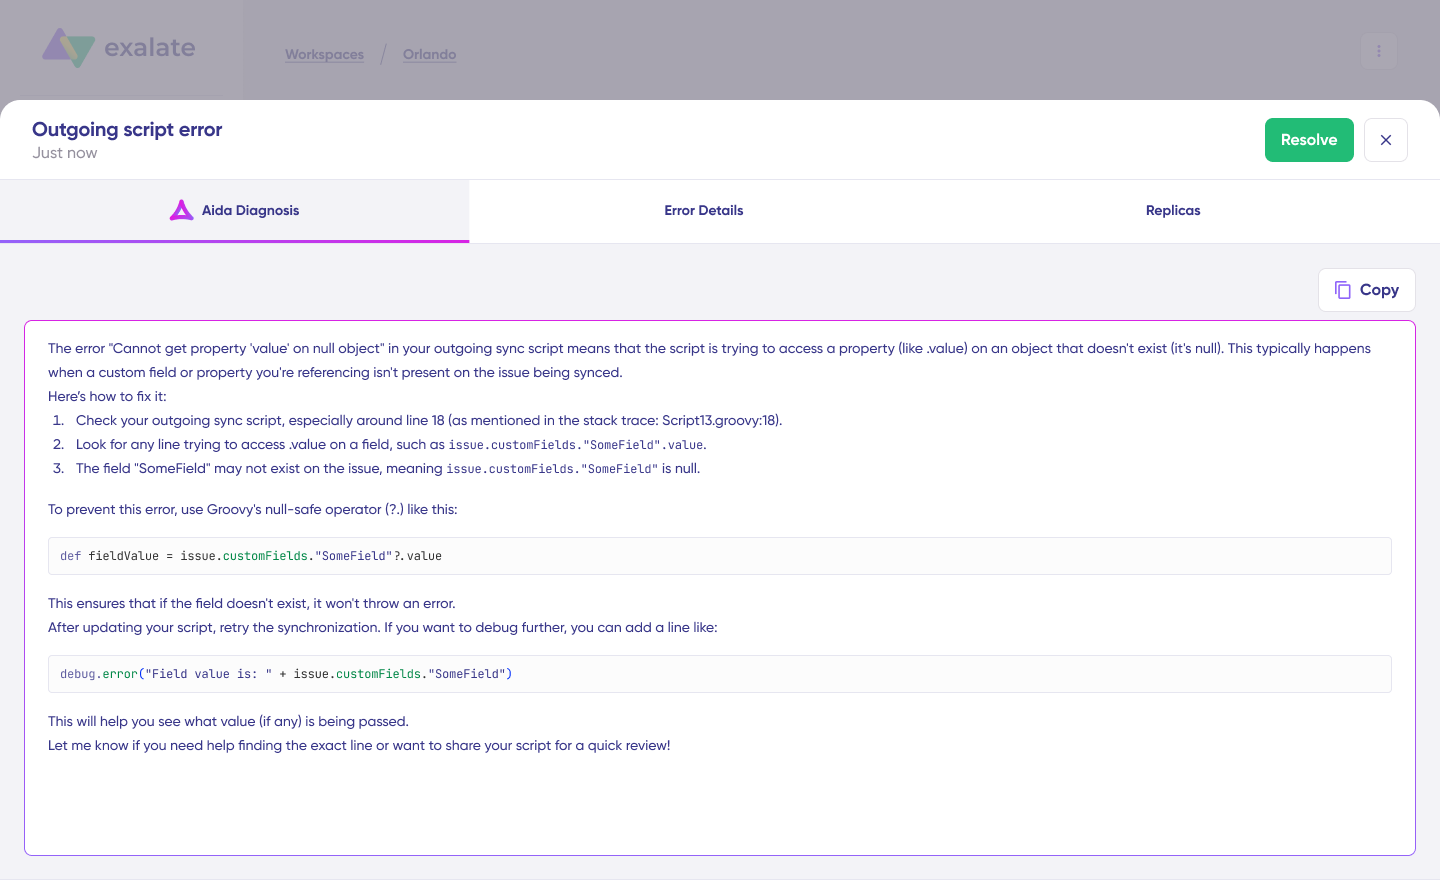
If there’s an error, go to the “Troubleshooting” tab of your workspace. Hover over the error you want to diagnose and click on the Aida icon that appears next to the error. You will see the AI-generated suggestion in the modal window. This includes a short explanation of the error and a proposed solution for it.
You can also “View Full Analysis” to get more context.
Additionally, you can view “Error details” to copy the stack trace and “Replicas” to view the JSON format, if required.
Choose to “Resolve” and retry errors as needed.
Advanced Jira ServiceNow Integration Options Using Exalate
Exalate gives you the flexibility to adapt and adjust your synchronization to handle different kinds of Jira ServiceNow integration use cases. We’ll discuss a few integration scenarios that are commonly implemented using Exalate.
Multi-Instance Connections
A hub-and-spoke architecture makes it possible to connect multiple Jira and ServiceNow instances simultaneously. For example, a central ServiceNow environment can integrate with several departmental Jira instances, or multiple vendor-managed ServiceNow instances can link into a single MSP Jira environment.
All of these connections are administered through a unified console, which provides a network-style visualization of every integration. Administrators can perform bulk operations, such as updating multiple connections at once, and apply consistent script templates across similar integrations to streamline maintenance and configuration.
Custom Field Mapping
The platform supports syncing virtually any field accessible through the REST API. In ServiceNow, this includes fields across tables such as Incident, Change Request, Problem, and others. In Jira, you can map standard fields, custom fields, and even multi-select fields.
For example, the ServiceNow Configuration Item value can be synchronized into a custom Jira field using a Groovy script such as:
This allows teams to maintain consistent contextual data across both systems, ensuring that critical attributes move seamlessly with the work items.
Correlation Fields
Correlation fields make it possible to define and preserve relationships between local and remote work items.
By storing identifiers from Jira inside ServiceNow, teams retain traceability even if titles or descriptions change over time.
A typical approach uses a script like:
// Store Jira work item key in ServiceNow correlation field entity.correlation_id = replica.key entity.u_issue_key = replica.key entity.correlation_display = issueUrl
This method allows users in either system to navigate quickly back to the originating item, creating a stable linkage that supports long-term auditing, reporting, and troubleshooting.
Epic and Story Time Tracking
ServiceNow incidents can be converted into Jira Epics while preserving detailed time-tracking information. A common pattern is to aggregate story-level estimates and time spent, then push those values back into ServiceNow for increased visibility. For example:
// ServiceNow → Jira Epic with time aggregation def ced = new CollectEpicData(issue.key) replica.customKeys.totalTimeSpent = ced.storyTotalTimeSpent replica.customKeys.totalOriginalEstimate = ced.storyTotalOriginalEstimate replica.customKeys.totalEstimate = ced.storyTotalRemainingEstimate
These aggregated values can then be returned to a ServiceNow custom field, ensuring teams on both platforms share a unified view of progress and effort across related stories.
Maintain Updates between SLA and the Attached Account
Imagine a priority 1 incident is raised, and the customer support agent identifies it as a dev work item to be passed to the dev team working in Jira. Along with the SLA and time-related information, if the incident status is also synced, the agents would always have visibility over it at all times, and the dev team would know the SLAs and time constraints they must adhere to beforehand.
So, when the work is marked resolved in Jira, the corresponding state is updated in ServiceNow with specific comments left as resolution notes.
Keep Internal Comms Private
Sometimes, internal teams working on specific problems or incidents must pass important information from ServiceNow to Jira, for instance, leaving notes for the dev team to help them with the work item.
In such a case, private comments must be kept private and synced between the two systems. It’s possible to do that with simple code. Share only ServiceNow work notes to Jira, such that the dev team has all the required information handy.
Sync Anything between Jira and ServiceNow
You can also sync different entities or work types between Jira and ServiceNow for better visibility and streamlined business operations.
For instance, sync a ServiceNow customer case to a Jira epic. You can also sync incidents, CMDB, change requests, problems, custom fields, and almost any field available via REST APIs.
Exalate also allows you to integrate ServiceNow’s Agile backlogs, defects, and incidents with Jira, allowing your teams to keep everything updated in real time. No more redundant data entry or siloed information.
With seamless bidirectional communication, support agents can focus on what really matters—providing support, without the headache of toggling between multiple systems.
Automate Incident Creation in ServiceNow from Jira Labels
With Exalate, you can automatically create ServiceNow incidents directly from Jira tickets using predefined labels. This ensures that your critical issues, required by contractual obligations, are created in ServiceNow without manual intervention, saving time and reducing errors.
Also, you can now automate change request workflows between ServiceNow and Jira with Exalate. Whether it’s syncing statuses, updating records, or auto-creating tasks, Exalate ensures a seamless flow of data, saving your team the pain of switching between platforms.
Exalate can also automatically send email notifications based on change completion, and even display the change details as a Jira ticket—keeping your team in the loop with minimal effort.
Case Study: Learn how Maersk uses Jira ServiceNow integration to streamline processes between their call center and support teams.
Integrating Jira and ServiceNow can help teams reduce information silos. It reduces manual errors like misplaced statuses, wrong escalations, etc. You can ensure data is exchanged automatically and is accessible to the right stakeholders when they need it. You can also control exactly how much data to share.
What’s the difference between Exalate and ServiceNow IntegrationHub?
IntegrationHub is ServiceNow’s native solution with limitations:
ServiceNow-centric control (limited autonomy for the Jira side)
Higher costs (additional package fees)
Limited bidirectional functionality
Best for simple, unidirectional use cases
Exalate provides:
Unified console with operational control for both sides
Full bidirectional sync with unlimited customization
AI-assisted configuration (Aida)
Outcome-based pricing (active sync pairs, not user seats)
Script versioning and TestRun for safe deployment
You can read the detailed comparison between Exalate and IntegrationHub here.
Can I connect multiple Jira and ServiceNow instances?
Jira: Jira Software, Service Management (Cloud, Data Center)
View the detailed documentation for fields supported here.
Can I sync work items bidirectionally in real-time?
Yes. Exalate provides real-time bidirectional synchronization. When a work item updates in Jira, it syncs to ServiceNow within seconds (and vice versa).
What if I only want certain work items or incidents to sync?
Use platform-native triggers for granular control:
Jira: JQL (Jira Query Language) Example: project = SUPPORT AND priority in (High, Highest)