This post has been published in the Atlassian community.
Jira and Azure DevOps integration is essential for teams that need to keep project data aligned across platforms. Both tools offer robust features, but when it comes to integrating data like custom fields, things can get tricky.
Custom fields capture unique data that goes beyond standard fields like summary or status. By syncing them, you ensure that all teams, regardless of the platform they use, have access to the same critical information. This leads to better collaboration, reduced errors, and a unified workflow.
In this post, we’ll walk through syncing three common custom field types between Jira and Azure DevOps using Exalate: Text, Dropdown, and Date. We’ll include code snippets so you can adapt them to your own setup.

Setting Up the Environment
To get started, go to the Exalate app and log in or create an account. New users can sign up using their email or Google account.
Creating a Jira and Azure DevOps Connection
Start by creating a workspace. They help you organize and view your connections in a single place.
Once you have a workspace, you can start creating connections between Jira and Azure DevOps.
You can find the detailed steps in the Jira Azure DevOps integration guide.
When the process is complete, select “Continue to configuration” and choose a Jira project you want to use for synchronization.
Configuration Options
After creating your connection, you have two configuration options: “Quick Sync” and “Edit & Test”.
For syncing custom fields, you’ll want to use “Edit & Test”, which opens the draft editor. Click “Create a new version” or select “Open latest draft” to start editing your sync rules safely without affecting production data.
Sync rules are based on Groovy scripts. With these scripts, you can add custom data logic and mapping, along with conditional flows.
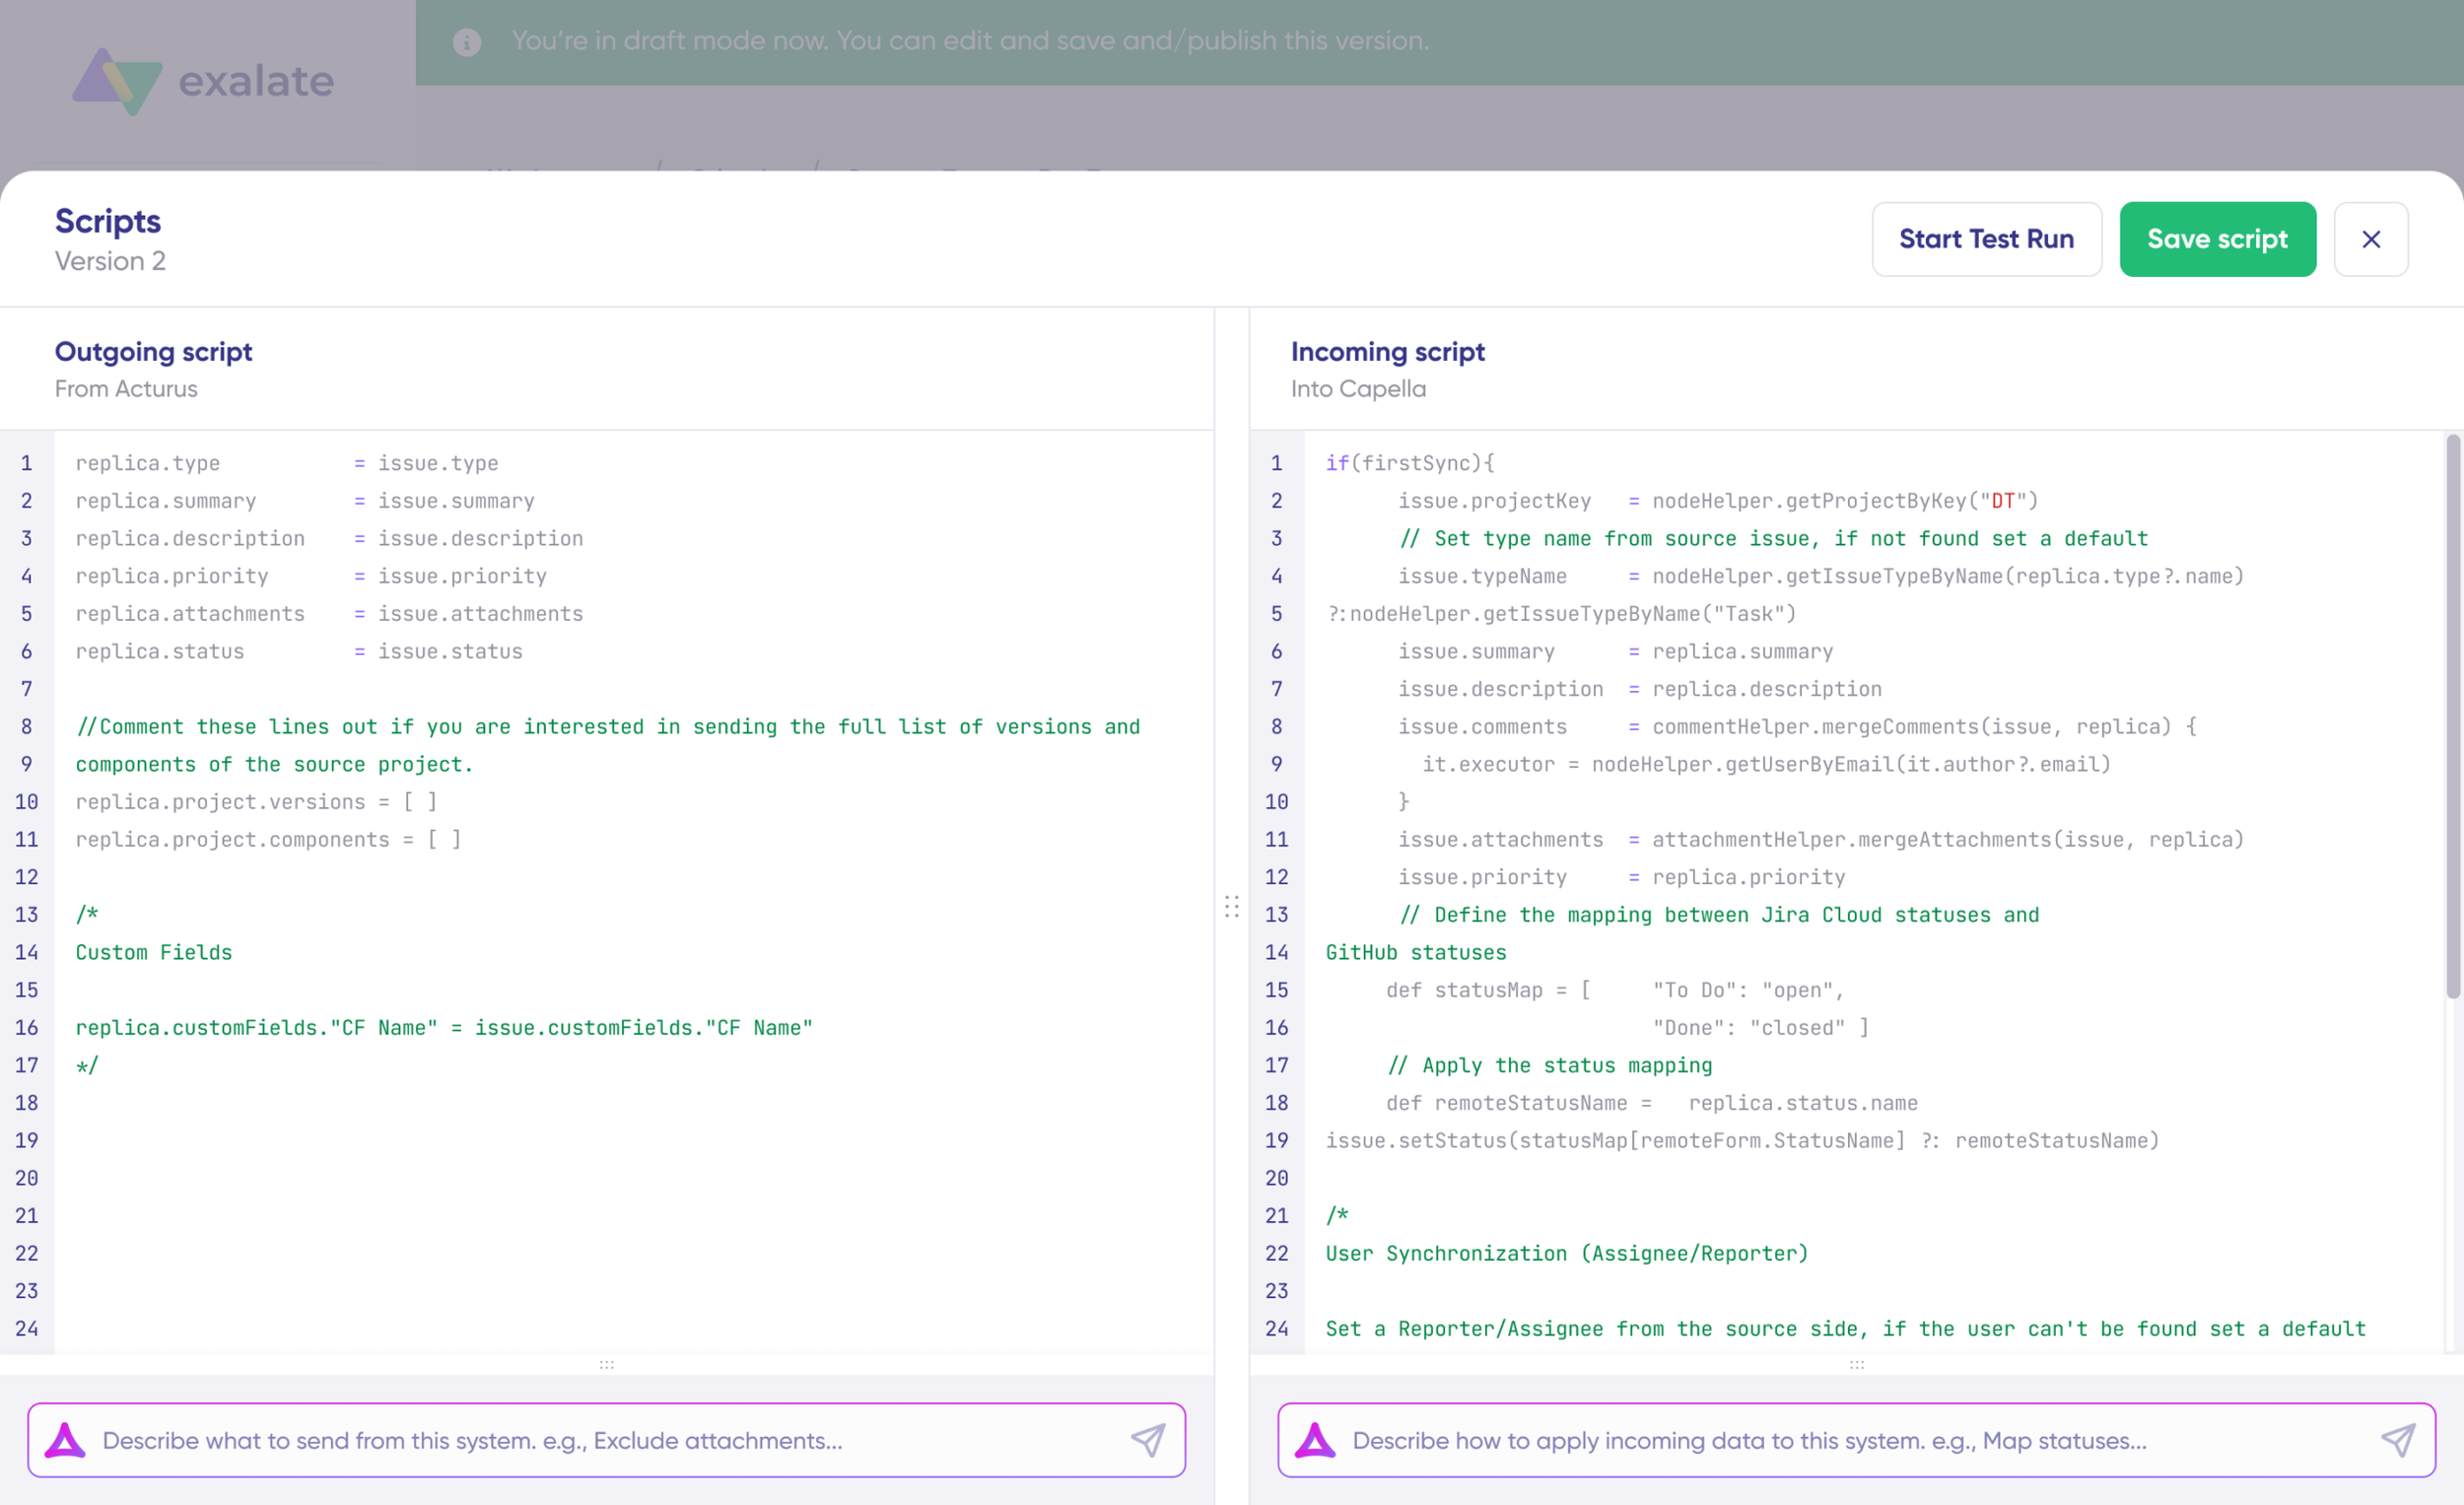
The scripts are divided into incoming and outgoing scripts:
- Outgoing script: Defines what data is sent from one system. For example, if the sync direction is from Jira to Azure DevOps, the outgoing script holds the values passed from Jira.
- Incoming script: Defines how the incoming values are mapped in the receiving system.
To sync custom field data from a Jira work item field to its corresponding Azure DevOps work item field, modify the outgoing sync rules on the Jira side. Then modify the incoming sync rules on the Azure DevOps side to receive the data. To do this the other way around, simply reverse the codes in the incoming and outgoing sync scripts.
You can also use Exalate’s AI-assisted configuration feature, Aida, to generate sync scripts. Simply describe your requirement in natural language, and Aida will generate the corresponding Groovy script for you.
Custom Fields Sync: A Deeper Look
1. Jira to Azure DevOps Text Field Sync
Text fields are commonly used to capture detailed information. Whether it’s a technical description or customer feedback, syncing text fields ensures that all teams have a consistent narrative.
//Jira outgoing sync
replica.customFields."CF Name" = issue.customFields."CF Name"Code language: JavaScript (javascript)//Azure DevOps incoming sync
workItem.customFields."CF Name".value = replica.customFields."CF Name".valueCode language: JavaScript (javascript)Here, you map the text field from Jira to Azure DevOps by sending the custom field value through the replica and assigning it on the other side.
2. Jira to Azure DevOps Dropdown (Select List) Field Sync
Dropdown or select list fields are useful for categorizing information, like selecting a priority level or feature type. Syncing these ensures categorizations stay consistent across platforms.
//Jira outgoing sync
replica.customFields."CF Name" = issue.customFields."CF Name"
//Azure DevOps incoming sync
workItem.customFields."CF Name".value = replica.customFields."CF Name".value.value
The code captures the dropdown object with its values in Jira and assigns the underlying value to the corresponding field in Azure DevOps. Note the extra .value on the incoming side to extract the selected option from the dropdown object.
3. Jira to Azure DevOps Date Field Sync
Date fields are essential for tracking deadlines, milestones, and other time-sensitive data. Keeping dates in sync prevents miscommunications and scheduling conflicts.
//Jira outgoing sync
replica.customFields."CF Name" = issue.customFields."CF Name"
//Azure DevOps incoming sync
import java.text.SimpleDateFormat

def sdf = new SimpleDateFormat("yyyy-MM-dd hh:mm:ss")

def targetDate = sdf.format(new Date())

workItem."Microsoft.VSTS.Scheduling.StartDate" = targetDateCode language: JavaScript (javascript)
This snippet ensures that date values are synchronized, keeping project timelines aligned across Jira and Azure DevOps.
Testing Your Scripts with Test Run
Before deploying your custom field sync to production, use Exalate’s Test Run feature to validate your scripts. Test Run lets you run your sync scripts against real data without affecting your live environment. This is especially helpful when mapping custom fields, as even small mismatches in field types or naming can cause unexpected results.
Once you’re satisfied with the results, click “Publish Version” to apply the configuration to your live synchronization.
Setting Up Triggers
After configuring your sync rules, add triggers to automate the sync. Triggers are conditions or filters you apply to specific work items. For instance, you can sync all Jira work items from a specific project or all Azure DevOps work items with a particular tag.
Jira uses JQL (Jira Query Language) for triggers, and Azure DevOps uses WIQL (Work Item Query Language) or tag-based filters.
Best Practices for Syncing Custom Fields Between Jira and Azure DevOps
- Consistent field types: Ensure that the custom fields in Jira and Azure DevOps have compatible types. A text field in Jira should map to a text field in Azure DevOps, and dropdown values should match on both sides.
- Field mapping: Carefully map the fields to avoid data loss or misinterpretation. Document your mappings for team reference.
- Use Test Run: Always test your sync setup using Exalate’s Test Run feature before deploying it in production. This prevents errors from reaching live data.
- Script versioning: Take advantage of script versioning to maintain an audit trail of changes. If a new mapping causes issues, you can quickly roll back to a previous version.
- Use Aida for complex mappings: For more advanced scenarios like conditional field mapping or value transformations, describe the requirement in natural language to Aida and get a working script as a starting point.
Conclusion
Synchronizing custom fields between Jira and Azure DevOps keeps your teams aligned and your project data consistent. Whether it’s text descriptions, dropdown categorizations, or date milestones, Exalate’s Groovy scripting engine gives you full control over what data flows between systems and how it gets mapped.
Ready to try it yourself? Start a free trial or book a demo to see how Exalate handles your specific integration needs.
Get Exalate on Atlassian Marketplace
Recommended Reading:
- How To Map and Sync Statuses and Correlation Details Between Azure DevOps and ServiceNow
- How to Synchronize a Zendesk Ticket to Multiple Jira Cloud Instances
- Advanced Integration Use Cases
- How to Use Exalate to Synchronize Insight Objects
- How to Synchronize a ServiceNow Customer Case to a Jira Epic
- How to Sync Tempo Worklogs Between Two Jira Cloud Instances
- How to Sync Custom List Fields Bi-Directionally Between Jira and Zendesk