Freshservice Jira integration eliminates the friction between ITSM and DevOps teams by synchronizing tickets, automating workflows, and creating unified visibility across platforms.
Organizations implementing this integration report faster bug resolution, reduced status meetings, and improved collaboration between traditionally siloed departments.
Understanding integration options and best practices ensures you select the solution that matches your operational complexity when managing internal teams or coordinating with external MSPs.
This guide explores native and third-party integration approaches, examines real-world implementation scenarios, and provides decision frameworks for choosing the right platform based on your team’s needs.
Note: Jira now refers to issues as work items throughout its platform. This guide uses “work items” to reflect Jira’s current terminology.
Key Takeaways
- Freshservice to Jira integration eliminates manual ticket updates between ITSM and development teams, reducing data duplication and human error by up to 60%.
- Organizations report faster incident resolution and higher customer satisfaction after implementing automated ITSM-DevOps workflows.
- Native integrations offer template-based simplicity for basic scenarios, while script-based platforms like Exalate handle complex multi-instance mapping and field transformations.
- Real-time bidirectional sync maintains alignment on ticket status, priority, comments, and attachments across both platforms without switching tools.
- Advanced integrations enable many-to-one ticket mapping, conditional escalation based on business rules, and secure external vendor collaboration.
- AI-assisted configuration tools (Aida) generate sync scripts from natural language descriptions, lowering the barrier for teams without Groovy experience.
- Enterprise-grade security, including ISO 27001 certification, role-based access control, and end-to-end encryption, protects sensitive data across integrations.

Why Integrate Jira With Freshservice ITSM?
Jira offers two primary solutions: Jira Service Management (JSM) for IT service delivery and Jira Software for development teams and QA specialists. Freshservice, part of the Freshworks ecosystem, serves IT, support, DevOps, and engineering teams handling customer requests and internal incidents.
It’s increasingly common to see organizations running both platforms simultaneously: Freshservice for customer-facing IT support and Jira for internal development workflows.
This dual-platform approach extends beyond company boundaries when teams need to integrate with external managed service providers (MSPs), development partners, offshore contractors, and enterprise clients.
Here’s what integration delivers:
- Bidirectional ticket synchronization eliminates manual data entry between systems, freeing IT staff from administrative overhead.
- Automated status updates reduce coordination meetings by 30-50%, allowing teams to focus on resolution rather than communication and updating tickets across systems.
- Real-time synchronization accelerates decision-making by giving stakeholders immediate visibility into development progress. It also leads to 40% improvement in Mean Time to Resolution (MTTR) for incidents requiring development.
- 35% reduction in repeat incidents as comprehensive root cause analysis prevents future problems, which helps teams operate efficiently within their preferred tools without needing duplicate software licenses.
- Eliminate 15-20 hours per week of manual ticket updates per team, which results in higher CSAT scores due to faster resolution and proactive communication.
- Automated synchronization eliminates costly mistakes from manual data entry. Unified visibility into ticket status across ITSM and development environments prevents duplicate work.
- DevOps deployment frequency increases when change management workflows coordinate seamlessly between platforms.
- Enterprise Service Management (ESM) extends ITSM practices beyond IT, connecting HR, facilities, legal, and other service teams with development workflows.
- MSPs managing multiple clients maintain centralized Freshservice oversight while connecting to individual client Jira instances with complete data isolation.
- Unified data across platforms enables comprehensive reporting on end-to-end service delivery—from initial customer report through development, testing, and final resolution.
What Freshservice Jira Integration Options Are Available?
Before choosing a native or third-party integration solution for Jira integration with Freshservice, let’s explore what each option entails.
Native Integrations
Freshservice, just like Freshdesk, supports native integrations out of the box, including e-commerce platforms, messengers, and work management apps.
The native option, Atlassian Jira Plus, enables users to connect multiple Jira accounts to Freshservice and vice versa. This is a good option if you want simple template connections without the hassle of tinkering around with the configuration.
But here’s the thing:
If you want to set up your own connections and configure scripts for specific use cases, you might need a customizable third-party integration.
Third-party Applications
Third-party integration apps allow you to connect Freshservice and Jira, as well as other applications. The integration app acts as a middleware application connecting both systems. Sometimes, it is embedded in the UI like a native app. Other times, you get a standalone application.
And the key benefit of third-party solutions is that they allow users to customize their sync rules and automate workflows using event-based triggers.
One third-party application that supports real-time, bidirectional Freshservice to Jira sync is Exalate.
As mentioned earlier, Exalate is an AI-powered integration tool that supports one-way and two-way custom connections between Jira and service desk platforms such as Freshservice, Freshdesk, Zendesk, and ServiceNow.
Exalate also supports integrations with systems like Salesforce, Azure DevOps, Azure DevOps Server, Asana, and GitHub.
Medium-sized companies and enterprises choose Exalate for Freshservice integration with Jira due to the following reasons:
- Exalate supports many-to-one and one-to-many connections, which are essential when connecting with multiple partners, vendors, managed service providers (MSPs), or suppliers.
- It provides complete script and operational control over your sync configuration, allowing you to customize exactly how data flows between systems.
- Security features include ISO 27001 certification, JWT-based authentication, role-based access controls, and encryption of data both in transit and at rest.
- It supports Groovy-based scripting for advanced integrations, powered by an AI-assisted configuration tool called Aida.
- Exalate uses automated triggers to streamline the replication of tickets and other desired actions on either side of the connection.
- You can delegate the mapping and configuration of your Jira to Freshservice sync to experienced engineers under the IaaS offering.
- It is highly scalable and adaptable to increasing ticket volumes without requiring additional upgrades.
- Exalate also includes a Chrome extension called Sync Panel that lets users check sync status, catch errors, run manual syncs, and unlink sync pairs directly from the browser, without console access.
Key Features to Consider When Choosing an Integration Solution
Selecting the right integration platform for Freshservice and Jira requires evaluating several factors beyond basic connectivity. Here’s what matters most:
Customization and Flexibility
Template-based integrations work for simple scenarios but break down when you need custom workflows. Script-based platforms like Exalate handle complex transformations—like routing tickets to different Jira projects based on Freshservice category and priority, while transforming custom fields along the way.
Bidirectional Sync Capabilities
Real-time, two-way synchronization ensures changes in either system immediately reflect on the other side. You control exactly what syncs in each direction.
For example:
You might sync all Freshservice updates to Jira, but only sync Jira status changes back to Freshservice—not comments.
Field Mapping and Transformation
The ability to sync any field—standard or custom—is crucial. This includes work summaries, descriptions, status, priority, assignee, custom fields, tags, labels, attachments, comments, and time tracking. Advanced platforms let you map Freshservice’s custom fields to Jira standard field, or handle missing fields by creating them on the fly.
Multi-Instance Support
For MSPs or organizations managing multiple clients, connecting one Freshservice instance to multiple Jira instances simultaneously is essential. The integration should route tickets to the appropriate instance based on custom rules like customer identifiers, project categorization, geographic region, or business unit.
Security and Compliance
Look for ISO certification, role-based access control (RBAC), and end-to-end encryption (both in transit and at rest).
Enterprises require these features to meet compliance standards and protect sensitive customer data. You can find out more about security from our Trust Center.
Scripting Engine and AI Assistance
A flexible scripting engine (like Groovy) provides unlimited customization potential. AI-assisted configuration tools (like Aida) make setup easier by generating scripts from natural language descriptions, reducing the barrier for teams without extensive coding experience.
Think of it this way:
Describe what you want to sync, and Aida creates the code. For teams without Groovy experience, this bridges the gap between business requirements and technical implementation.
Error Handling and Conflict Resolution
Failed syncs happen. Your integration should log errors, allow retries, and let you define how to handle conflicts when both systems update the same field simultaneously. Look for platforms with automatic retry logic, detailed error messages, manual intervention capabilities, alerting systems, and rollback options.
Scalability
As your ticket volumes grow, the integration should handle increased load without performance degradation or requiring infrastructure upgrades. This means handling hundreds or thousands of syncs per hour, managing integrations with dozens of synchronized fields, and supporting connections to many target systems.
Support and Documentation
Access to ready-made script templates, comprehensive documentation, and responsive support makes complex integrations manageable. Community-shared scripts accelerate implementation and provide proven solutions for common scenarios.
Common Challenges in ITSM-DevOps Integration and Solutions
Understanding obstacles that organizations encounter during integration helps you proactively address them rather than discovering problems mid-implementation.
Cultural Resistance and Organizational Silos
Challenge: IT operations and development teams traditionally operate as separate organizations with different priorities, vocabularies, and success metrics. IT focuses on stability and controlled change; development prioritizes speed and innovation.
Solution:
- Bring teams together in cross-functional workshops to map current pain points and design the future state collaboratively.
- Define shared metrics measuring joint success, like end-to-end resolution time, and start with a single use case to prove value.
- Publicly recognize improvements and team collaboration successes.
Process and Terminology Alignment
Challenge: ITSM frameworks like ITIL use specific terminology (incidents, problems, changes) that don’t map directly to DevOps vocabulary (bugs, stories, tasks). Status workflows differ between platforms—Freshservice might use “Open → In Progress → Resolved” while Jira uses “To Do → In Progress → Testing → Done.”
Solution:
- Document terminology equivalents and create bidirectional status mappings respecting each platform’s workflow while maintaining semantic accuracy.
- Use scripts to transform terminology during synchronization rather than forcing teams to change their native workflows.
Tool Selection and Integration Complexity
Challenge: Organizations face decision fatigue when evaluating dozens of integration platforms with overlapping capabilities. Without clear evaluation criteria, teams risk selecting tools that don’t integrate well with existing systems.
Solution:
- Define must-have versus nice-to-have capabilities before vendor evaluation. Test leading candidates with real data in sandbox environments.
- Include representatives from IT, development, and business teams in selection, speak with existing users in similar industries, and implement with a limited scope first.
Security and Compliance Concerns
Challenge: Integrations involve transmitting potentially sensitive data between systems. Security teams raise concerns about data exposure, unauthorized access, or compliance violations.
Solution:
- Involve InfoSec early in planning and verify the integration platform holds ISO and industry-specific certifications.
- Configure exactly which fields sync, excluding sensitive data, and confirm both transit and rest encryption meet standards.
- Ensure comprehensive logging supports compliance requirements, and include integration infrastructure in security assessments.
Data Quality and Consistency
Challenge: Integrations amplify data quality problems. Incomplete Freshservice tickets create invalid Jira work items. Inconsistent field values cause mapping failures.
Solution:
- Clean existing data before enabling integration. Implement validation rules preventing invalid data from syncing.
- Ensure source records contain all data needed for target creation, clearly document how each field maps, and what happens when source data is missing.
- Establish alerting for Freshservice Jira Integration.
How to Implement Freshservice Jira Integration Using Exalate
This guide walks you through connecting both systems, configuring sync rules, and automating your workflows.
Prerequisites
Before you begin, ensure you have:
- An active Exalate account (or create one during setup)
- Admin access to your Freshservice instance
- Admin access to your Jira Cloud instance
- API credentials for both systems
Step 1: Create Your Exalate Workspace
Visit the Exalate integrations page to get started. Create a new account by entering your email and verifying it, or sign up using Google.
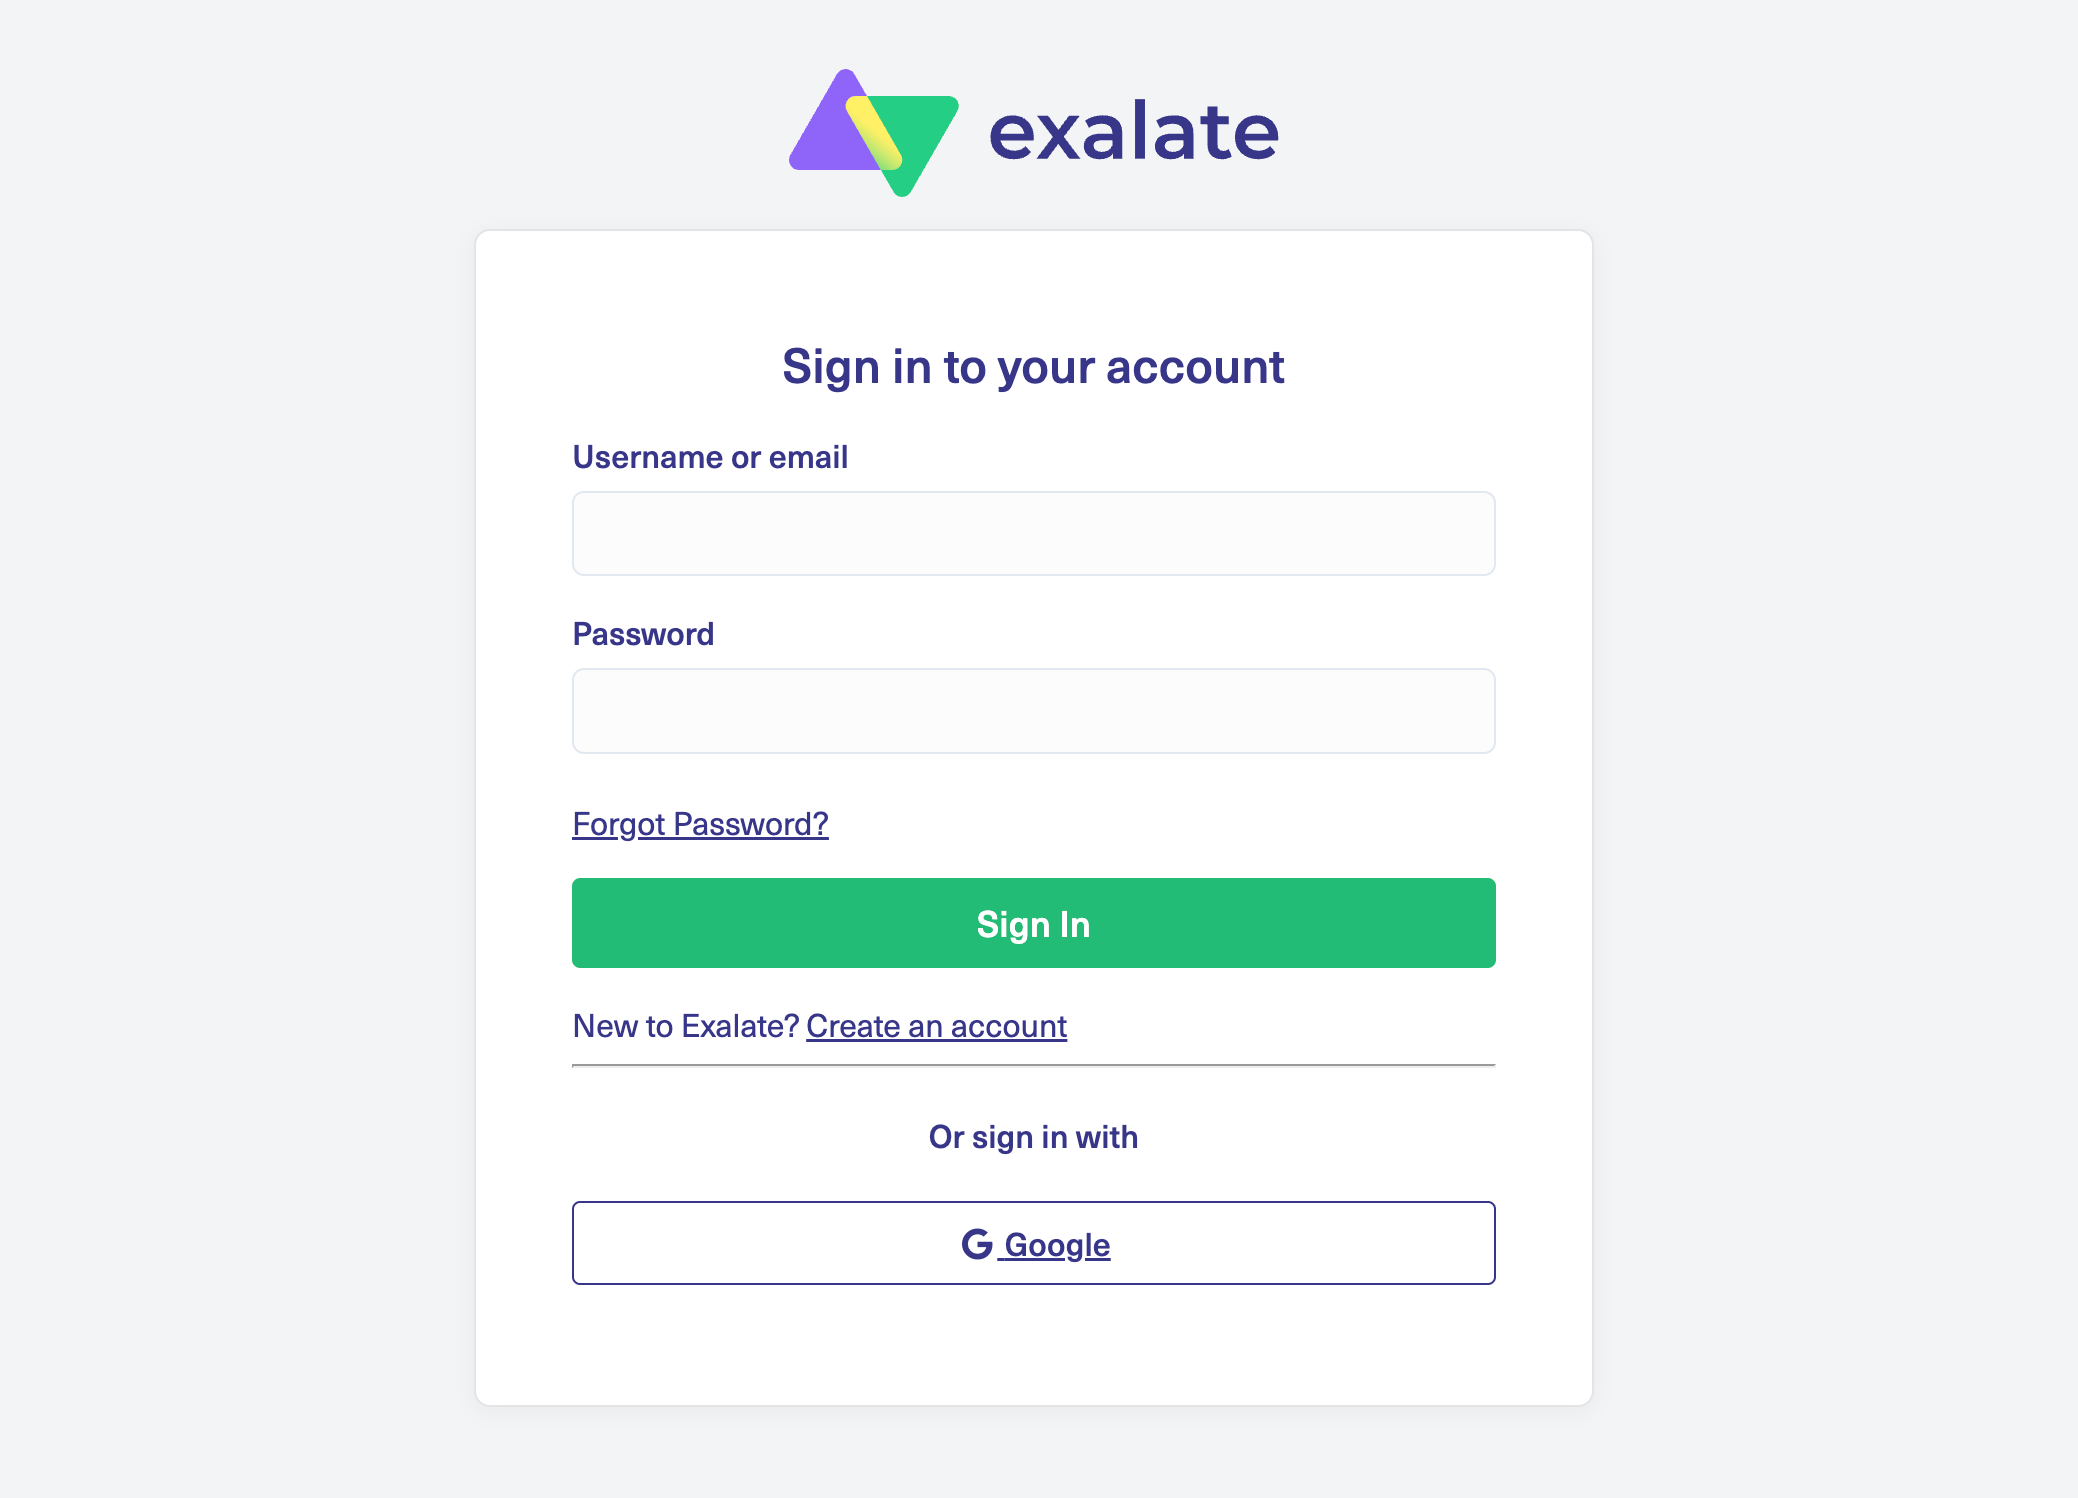
If you already have an account, log in to access the dashboard.
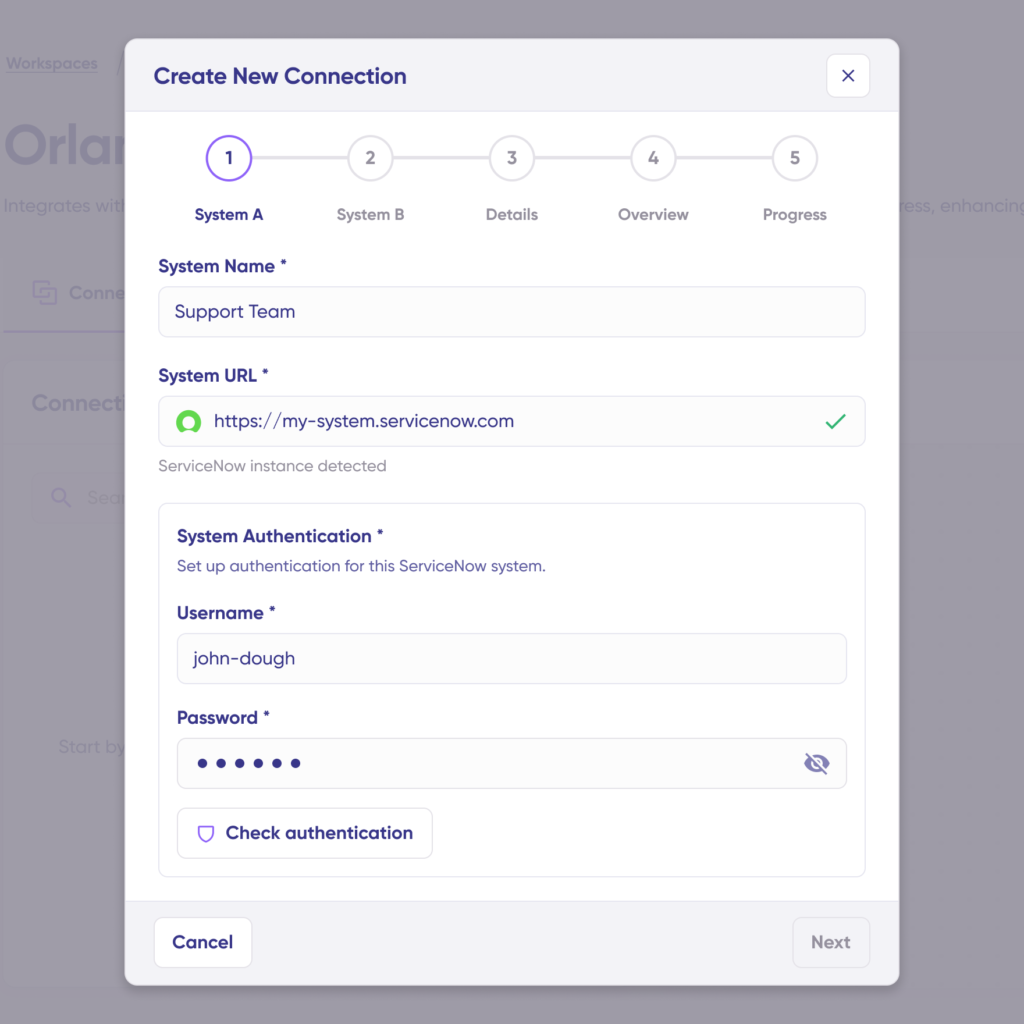
Step 2: Connect Freshservice (System A)
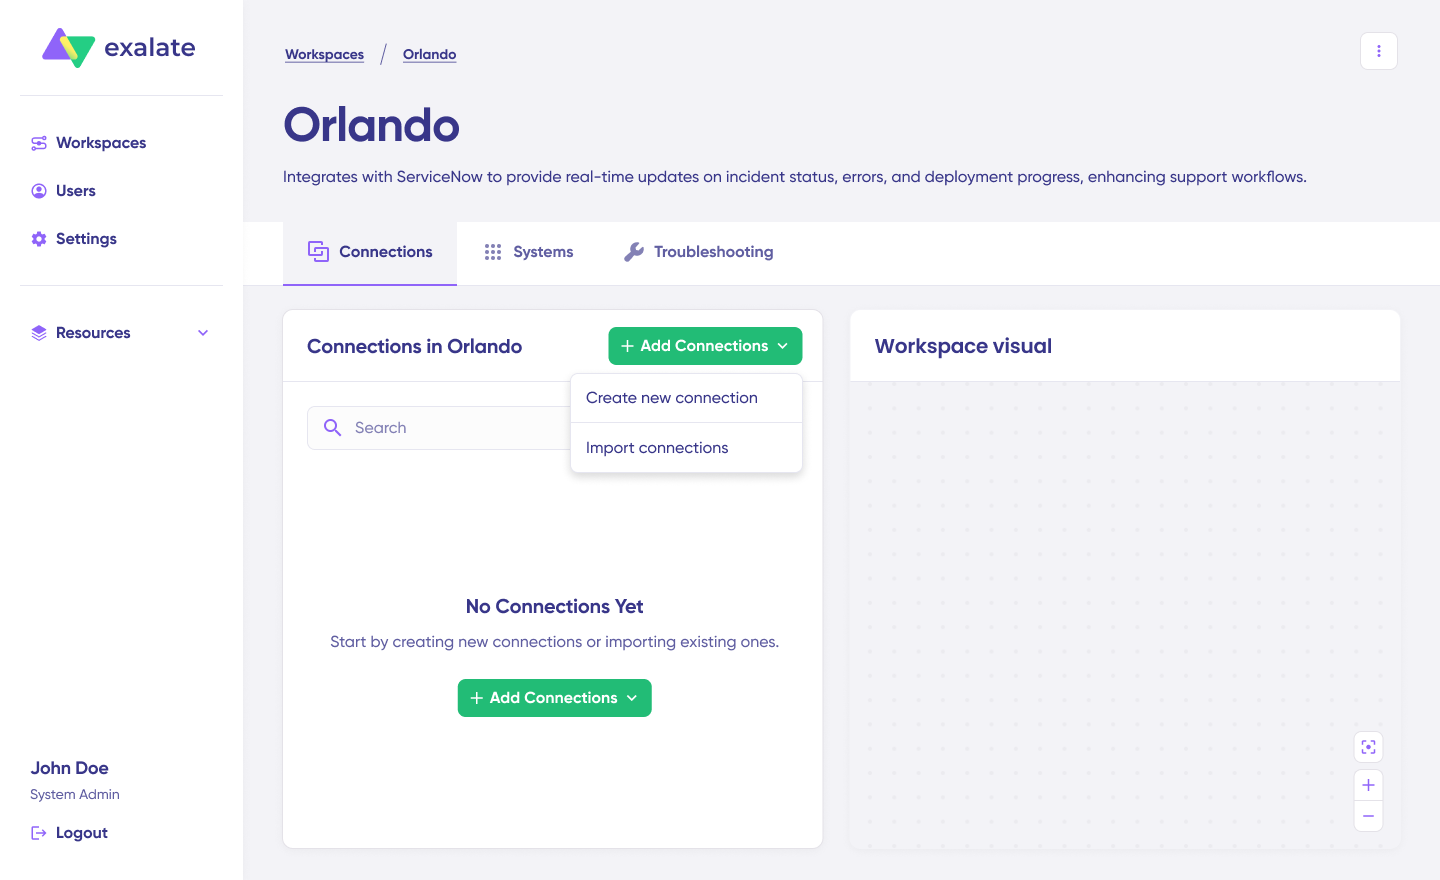
To create a connection, click on “+ Add connections” > “Create new connection“. Enter the name for your first system (Freshservice).
Enter the URL of your Freshservice instance (e.g., yourcompany.freshservice.com).
Wait for checks and authentication to happen automatically under the hood. Systems from a different workspace will be newly registered for the current workspace.
Enter your authentication details—for Jira, this includes your username and API key or Basic Auth. Click “Check Authentication” to verify the connection. If all is well, you’ll see “Successfully Authenticated“.
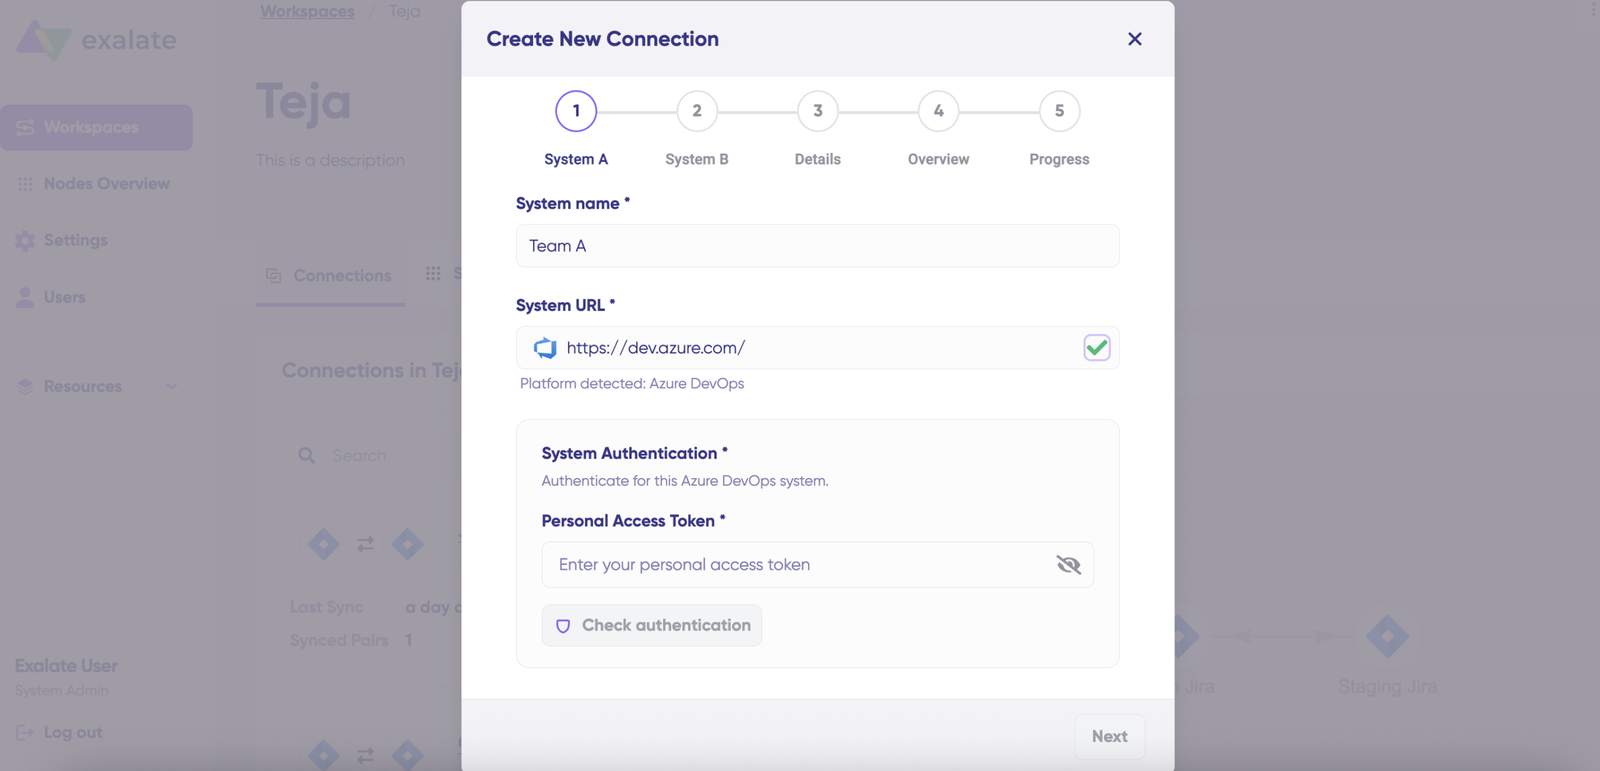
Step 3: Connect Jira (System B)
Click Next to configure System B (Jira). Follow the same procedure as for your Freshservice instance.
Enter the URL of your Jira instance (e.g., yourcompany.atlassian.net for Jira Cloud).
Click on “Check Authentication” to verify your credentials.
Step 4: Create the Connection
Confirm the Connection Name and add a description (optional). Review the connection setup and click on “Create Connection“.

Wait for a few minutes so all the checks and setups will be configured in the background.
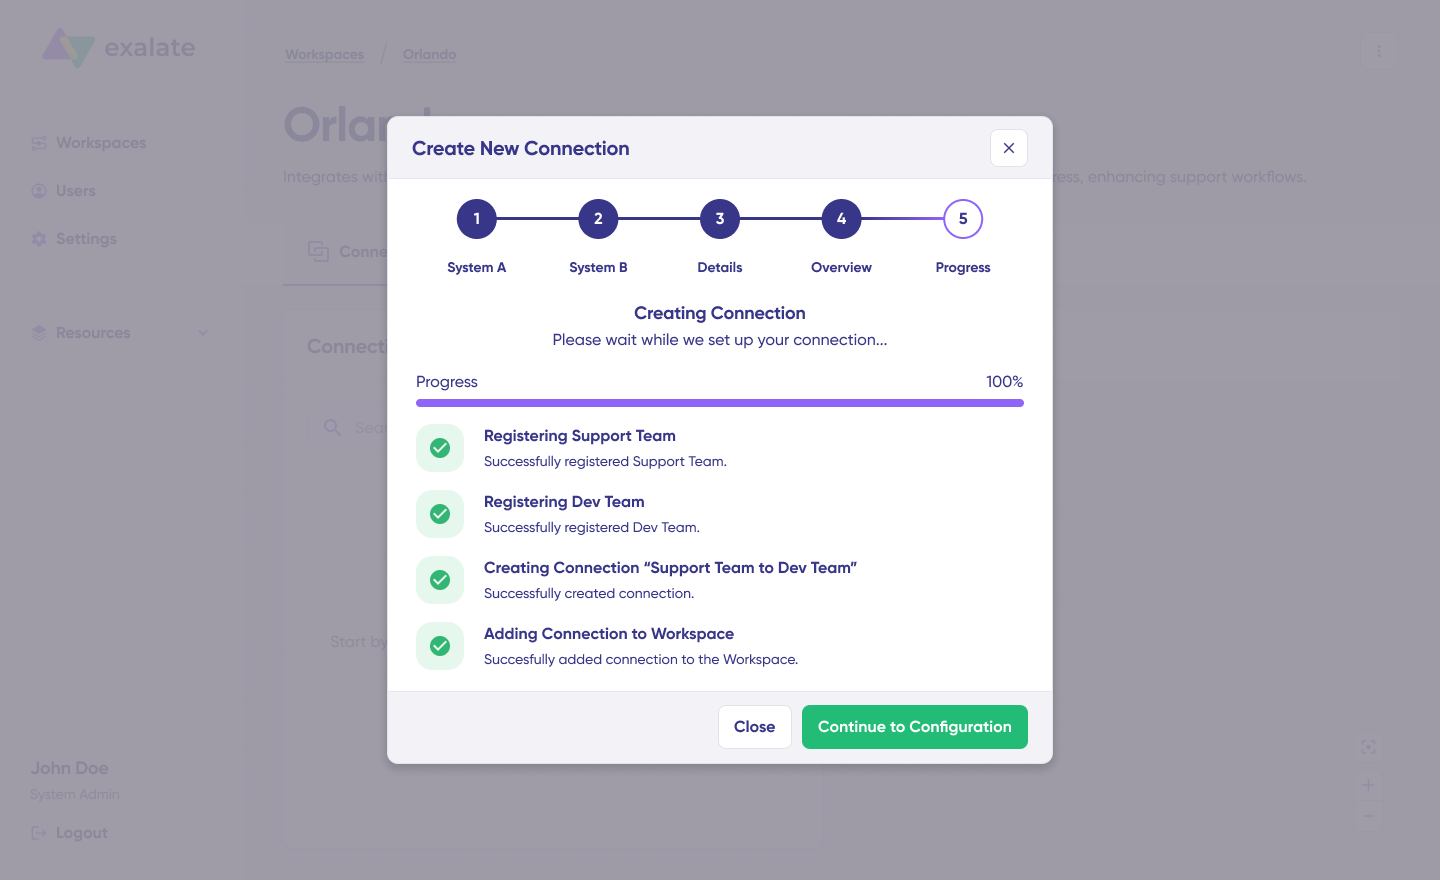
Once done, click “Continue to Configuration“. Your first connection has been successfully set up in your workspace.
If you’re using local connections in Jira, you can also sync work items across different Jira projects (or spaces) inside the same instance.
Example: your URL https://example.net/ might have 2 Jira projects (or spaces), project A with work item PROJA-11 and project B with work item PROJB-12. Local connections in Exalate let you sync both.
Step 5: Configure Your Sync
Choose what you want to sync on both sides. For Freshservice, select the ticket types (Incidents, Service Requests, Problems, Changes). For Jira, select the project from the dropdown menu.
Click “Build and Continue”.
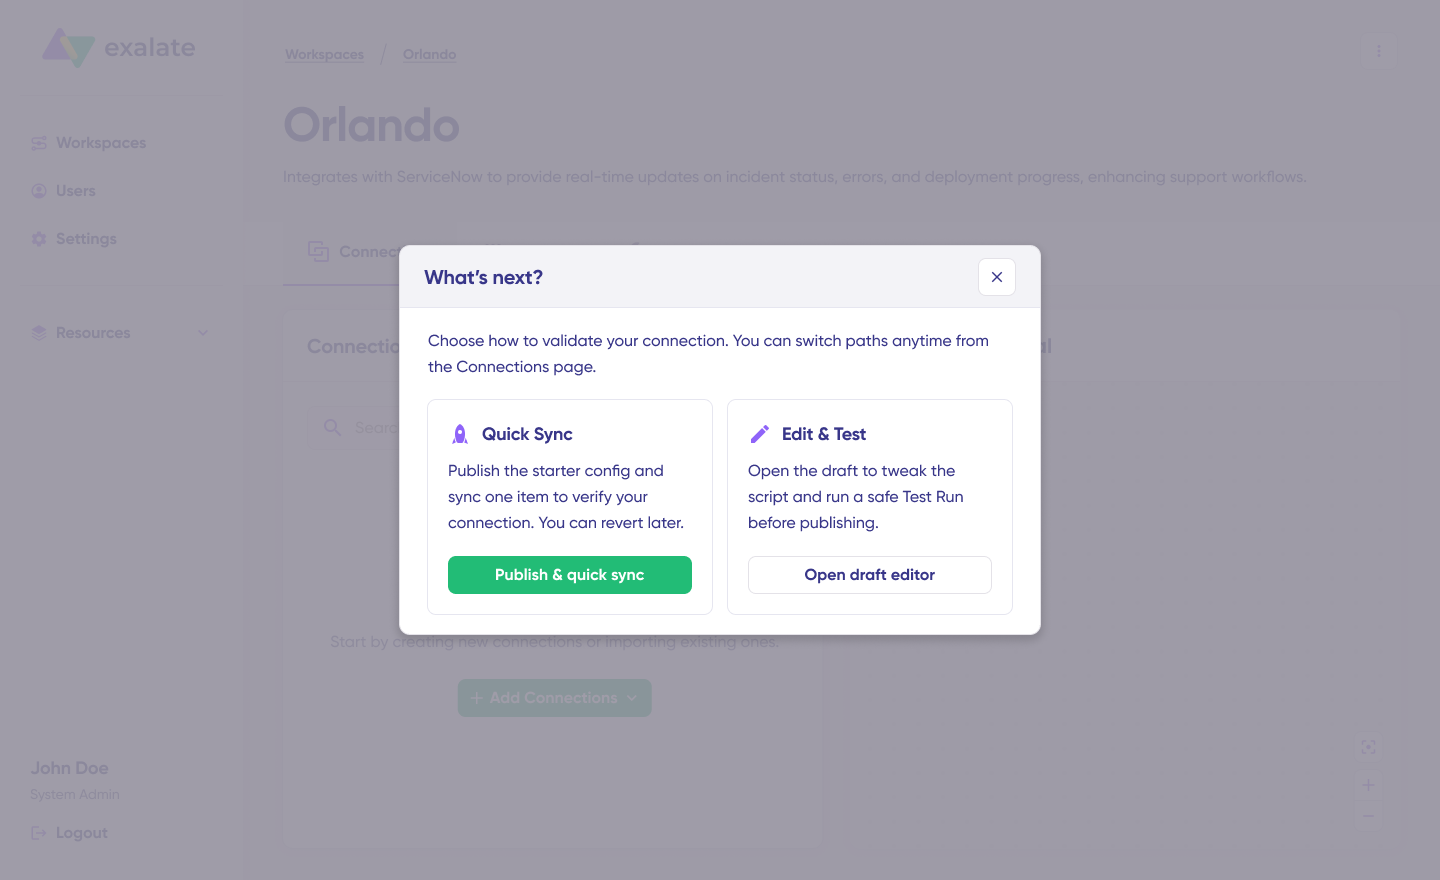
Now, you have 2 options: “Quick sync” and “Edit & Test“. Let’s proceed with them one by one.
Quick Sync: Test Your First Sync
This option allows you to sync one item between Freshservice and Jira.
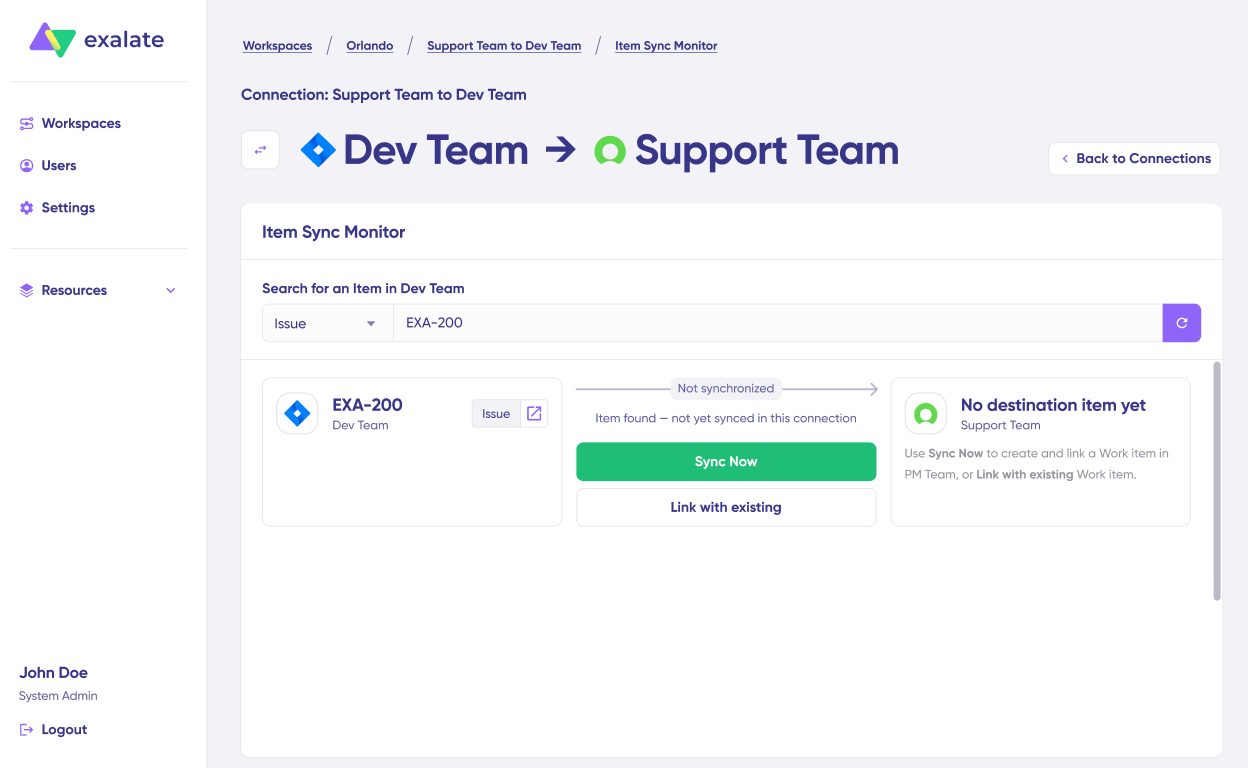
Under the “Item sync monitor,” enter the ticket ID (from Freshservice) or work item key (from Jira) and click on the “Sync Now” option.
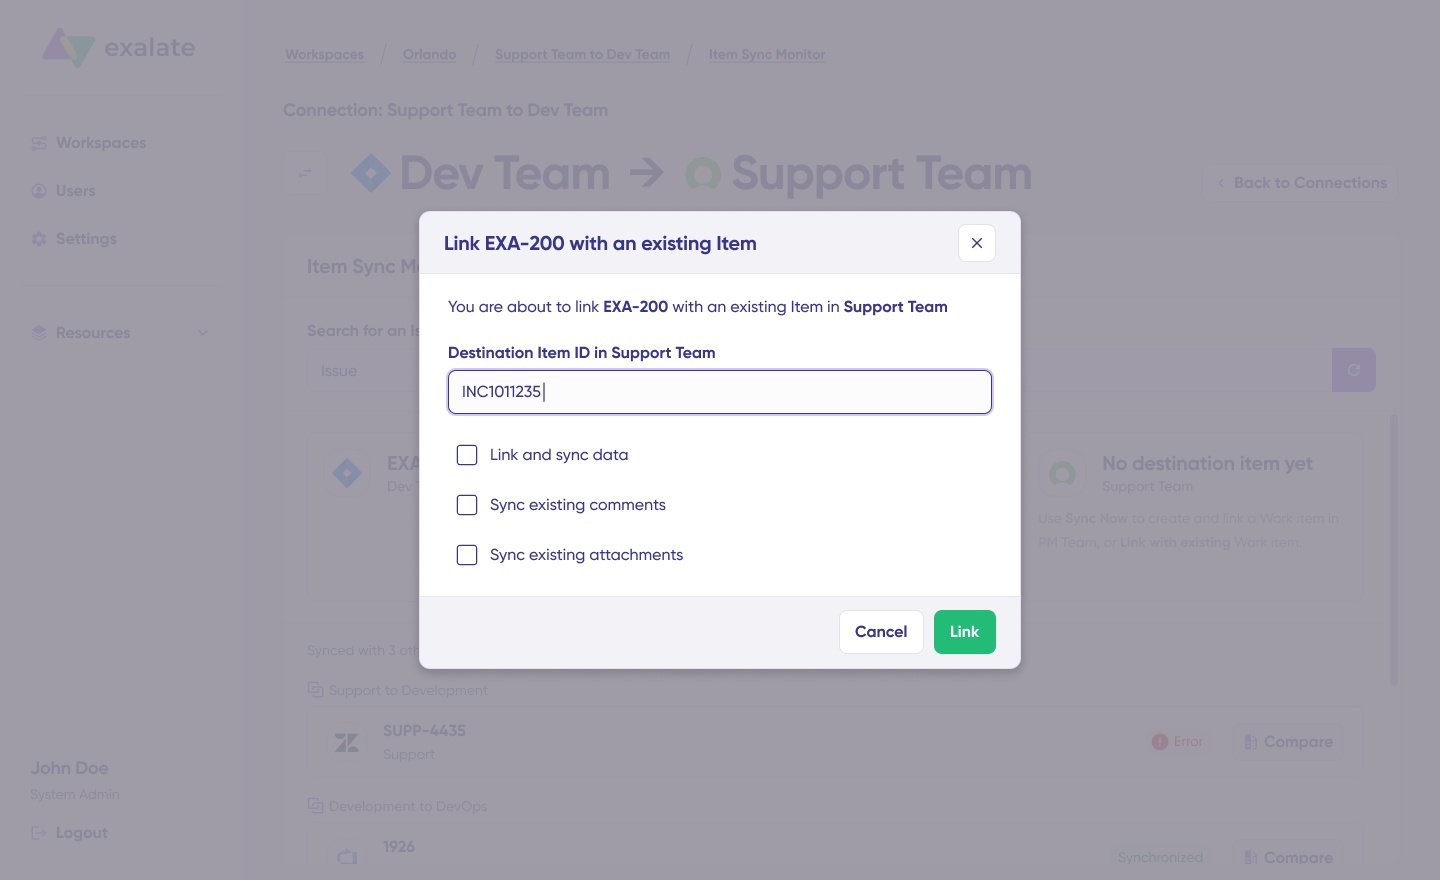
To link 2 existing items, click “Link with existing“. Once the sync is complete, you can view both the synced items in a new window. You can also choose to compare the changes.
Edit & Test: Customize Your Sync Rules
Open draft editor: This option allows changes when you click “Create a new version” or select the “Open latest draft“. This ensures you don’t modify the existing configuration accidentally.
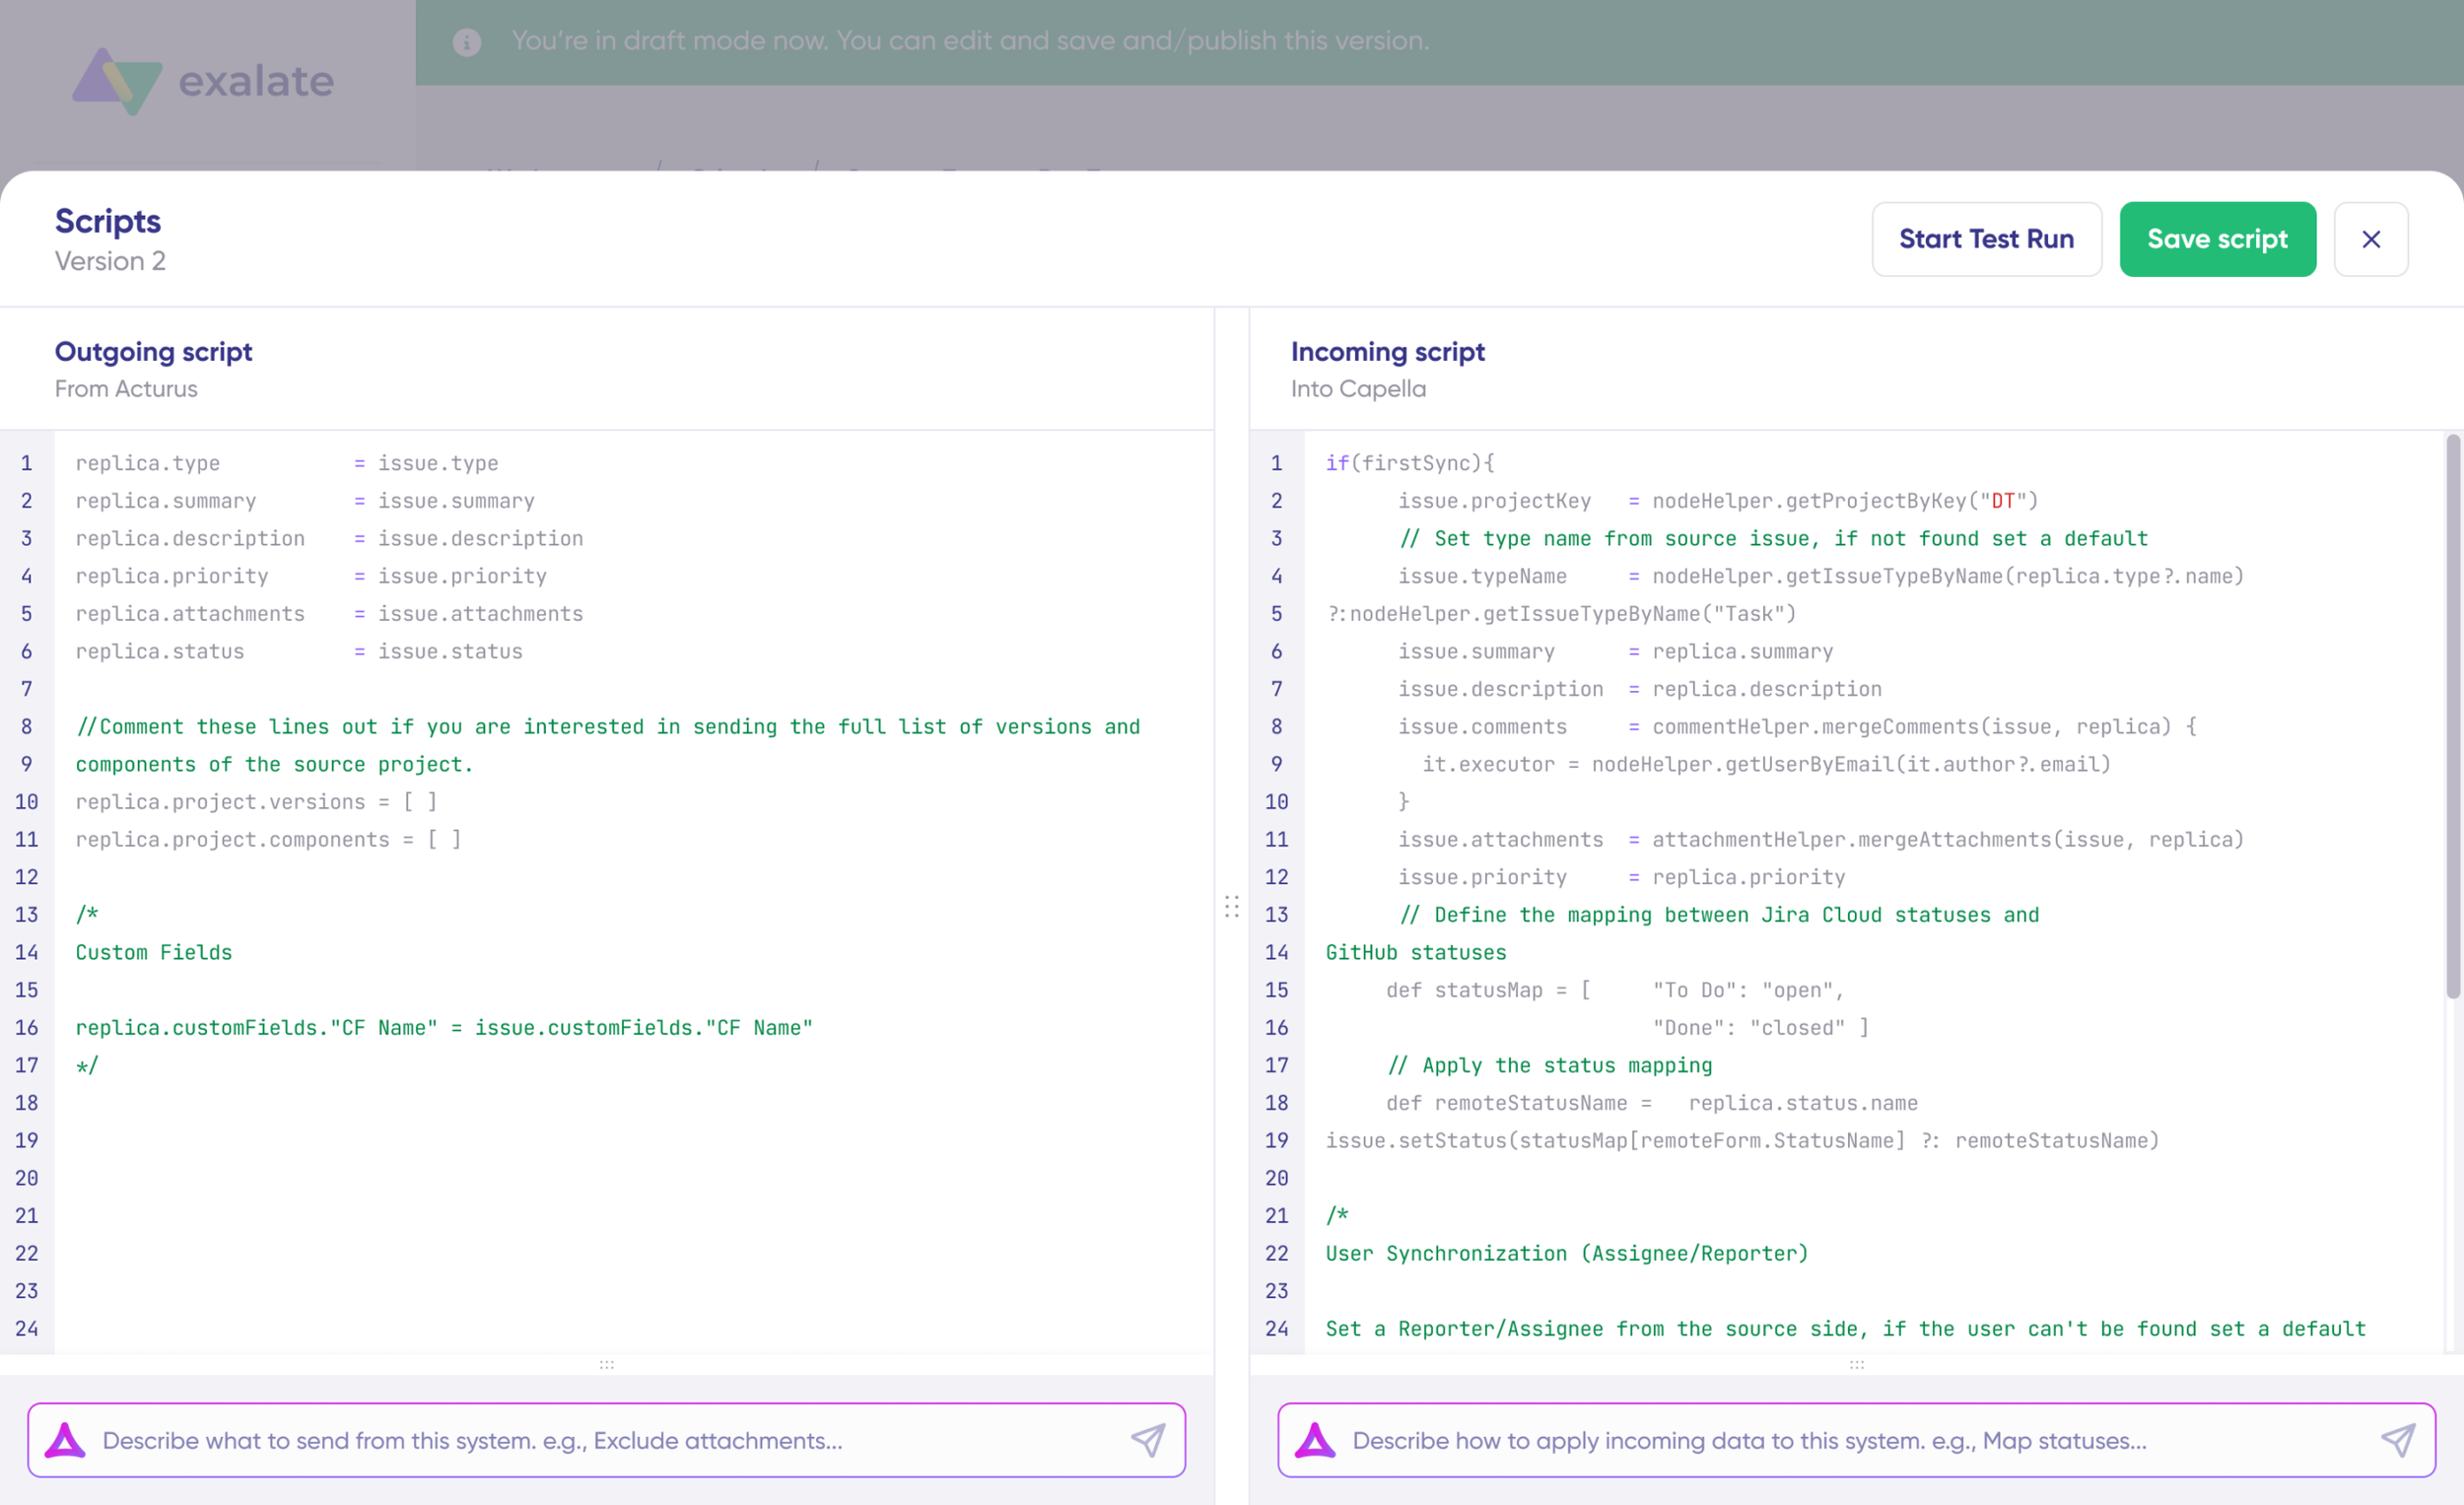
Once active, click the “Edit” button to open the editor and adjust the sync rules (Groovy-based scripts). These scripts enable users to add custom data logic and mapping for complex or advanced use cases or workflows.
Swap the sync direction by clicking the two arrows next to the connection name.
The outgoing script will hold the values passed from Freshservice to Jira, and the incoming sync will define how the values coming from Jira are mapped in Freshservice.
You can adjust the sync scripts if you know the Groovy language. Otherwise, use Aida, our built-in AI assistant.
Step 6: Use Aida for AI-Assisted Configuration
Aida exists in both incoming and outgoing script sections, so choose the side accordingly.
For Outgoing scripts: Describe what data should leave your system.
Examples:
- “Sync Freshservice urgent tickets as highest priority in Jira“
- “Exclude attachments larger than 10MB“
- “Only sync incidents with category ‘Software‘”
For Incoming scripts: Describe how incoming data should be applied to your system. Examples:
- “Map Jira ‘Done’ status to Freshservice ‘Resolved’“
- “Sync Jira comments to Freshservice notes”
- “Update Freshservice priority based on Jira priority“
The scripts are generated based on Exalate’s scripting API and your existing scripts.
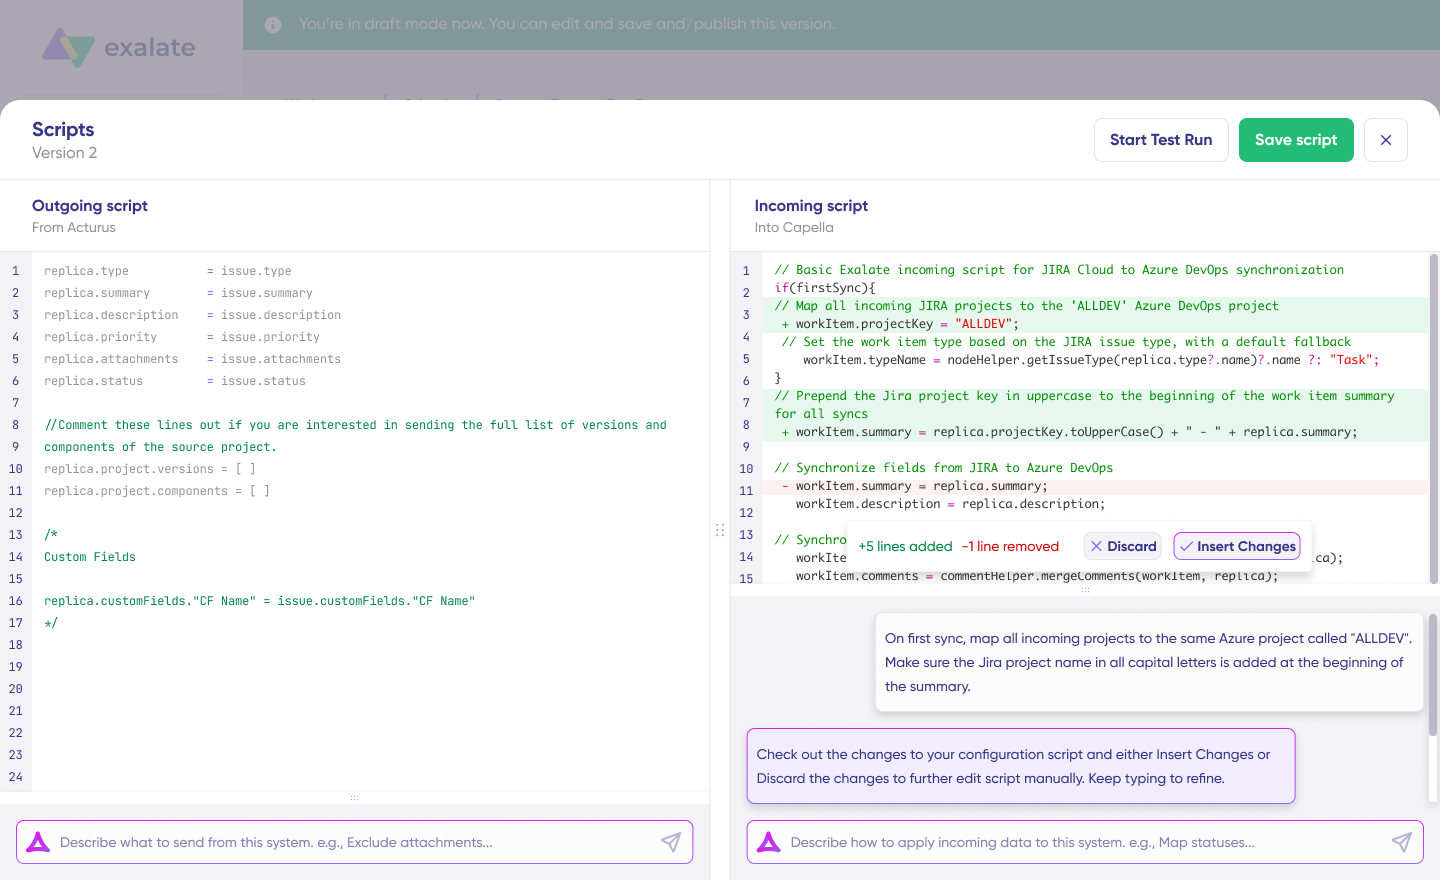
Review the output to validate the suggested changes. New lines are highlighted in green, while suggested removals are highlighted in red. Choose to “Insert” or “Discard” the suggestions.
Note: Just like with any other AI solution, please review the generated code before applying it.
Step 7: Test Your Configuration
Once you have your sync scripts ready, you can choose to “Save script” or proceed to dry-run them before publishing.

Click “Start Test Run” and “Select items” to sync. You can select multiple tickets or work items.

Wait for a bit, and you’ll see the detailed results of the fields synced and the payload shared between both systems. If you are satisfied with the results, click “Publish Version“.
You can view all versions from the “Version” dropdown. The versions can be either “Active“, in “Draft” (editable), or “Archived“.
Step 8: Set Up Triggers for Automation
Set up triggers to automate your sync. These are conditions or filters you apply to specific items.
Click the “+Add trigger” button to start creating platform-specific triggers.
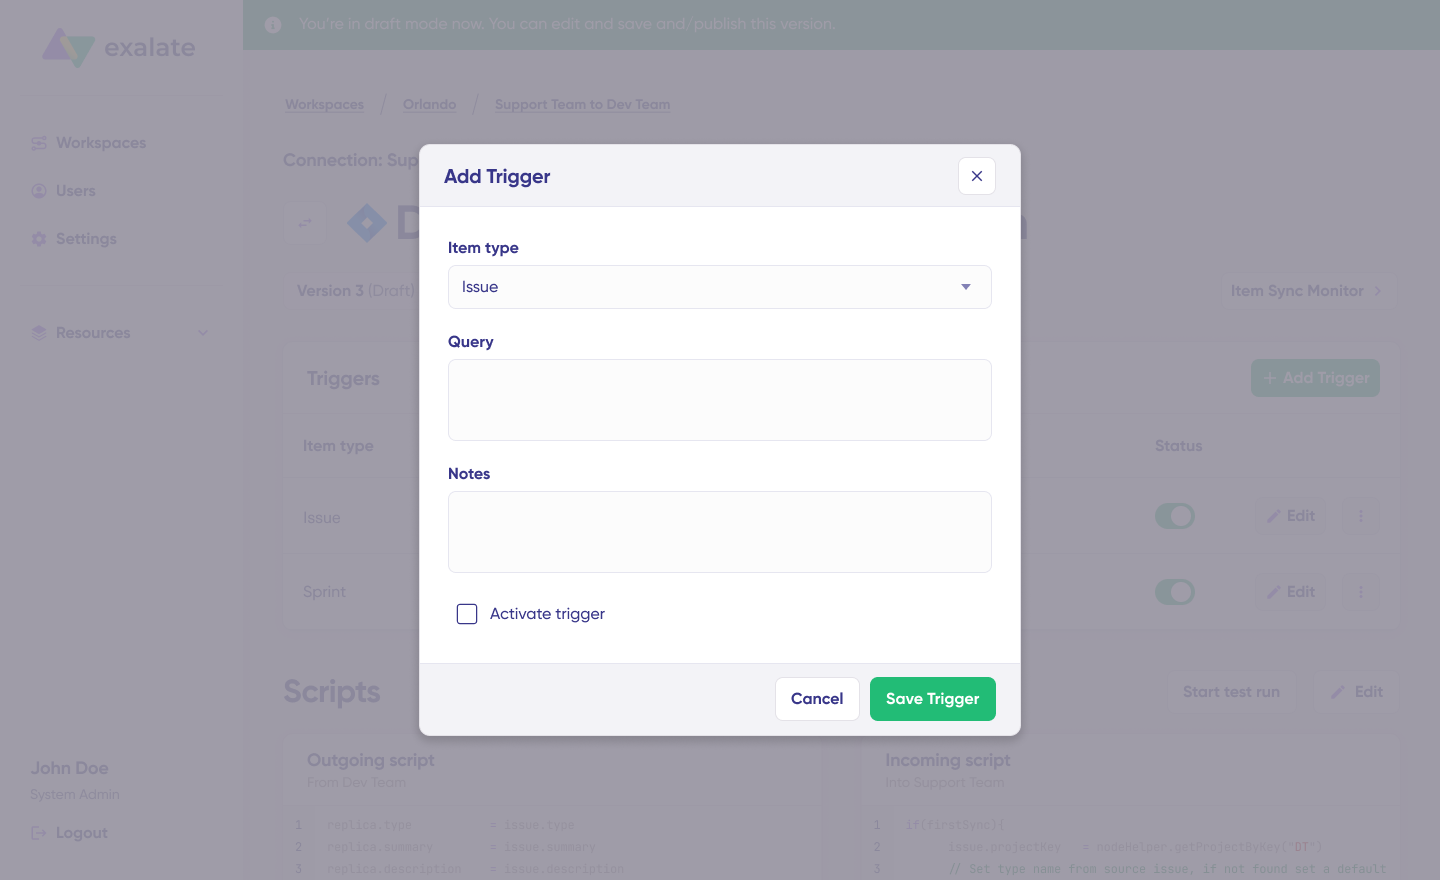
For Freshservice: Choose the entity type (Ticket, Problem, Change, Release). Specify conditions like:
- “
Category = Infrastructure AND Urgency = High“ - “
Type = Incident AND Status = Open“ - “
Requester = Internal Employee“
For Jira: Use Jira Query Language (JQL) to specify conditions for work items:
- “
Project = DEV AND Priority = Highest“ - “
Labels = 'customer-facing‘” "Status changed to 'In Progress'"
Then, save the trigger.
Step 9: Monitor and Troubleshoot
Troubleshoot your connection with Aida. If there’s an error, go to the “Troubleshooting” tab of your workspace. Hover over the error you want to diagnose and click on the Aida icon that appears next to the error.

You will see all the affected systems, connections, and items. Aida will provide you with a brief analysis of the error message.
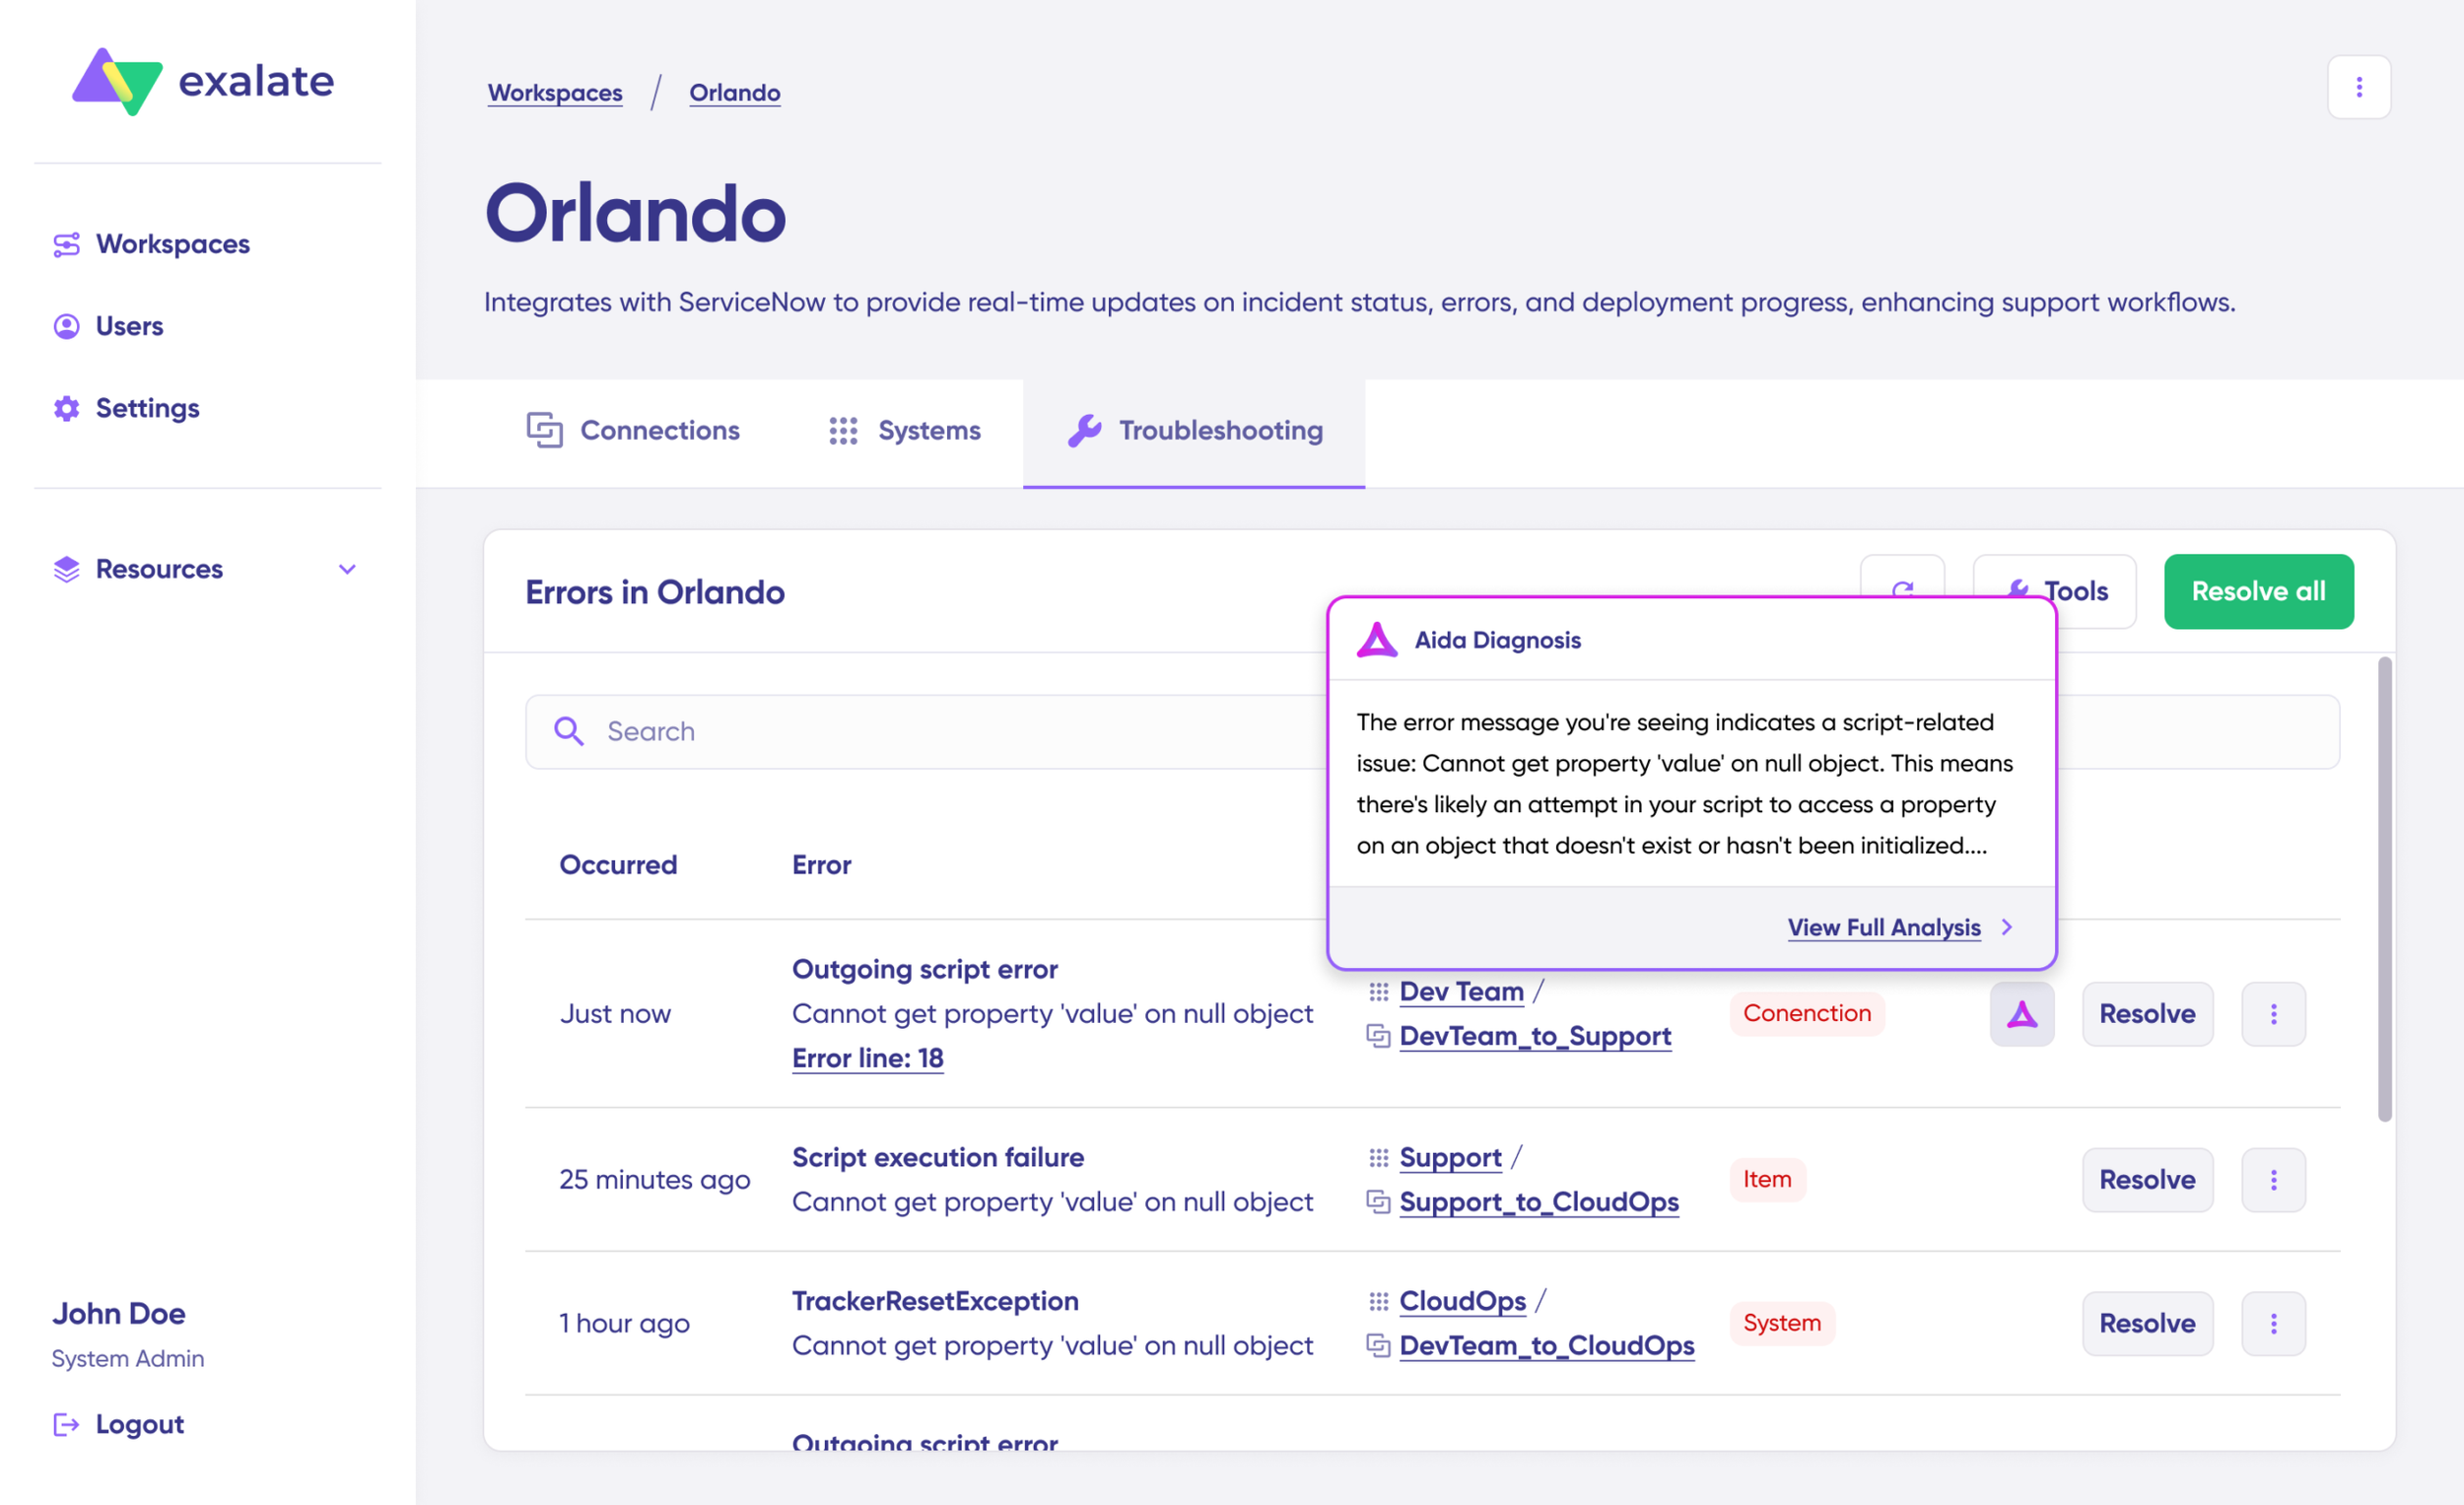
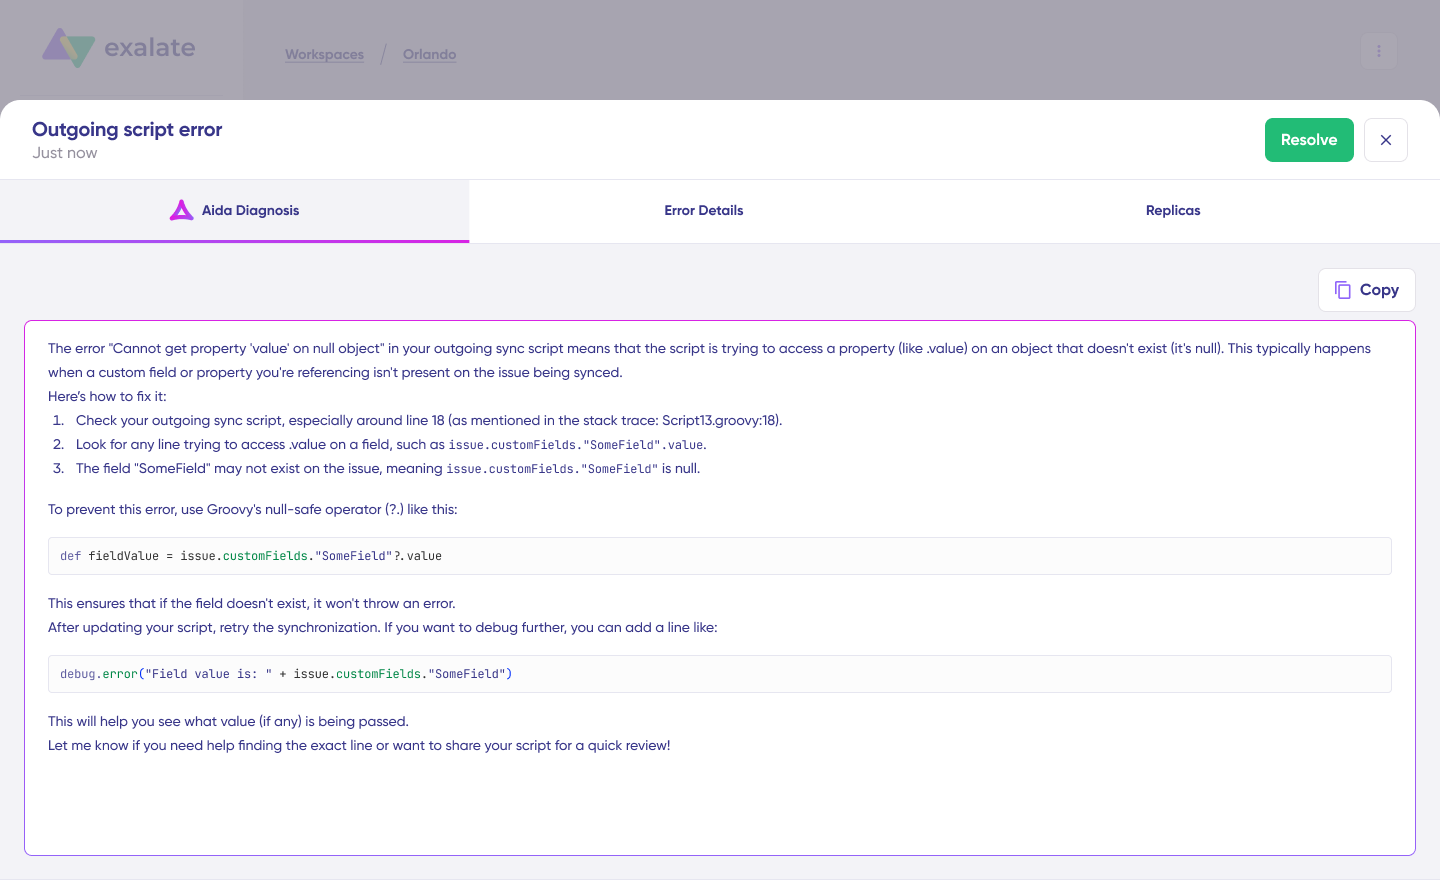
To get more information, click on Error Details. You will see the impact level, stack trace, error type, and date of occurrence. You can also “View Full Analysis” to get more context.
Fix the error and click on “Resolve“.
That’s it. Your synchronization will start automatically based on the sync rules and triggers you have set.
Freshservice tickets will flow to Jira, development updates will sync back to Freshservice, and your teams stay aligned without manual updates.
Need help setting up a specific use case? Book a discovery call with our integration engineers.
What Are the Use Cases for Freshservice Jira Integration?
Understanding proven implementation patterns helps you identify which scenarios apply to your organization and accelerate configuration by learning from real-world success stories.
Case 1: MSP Client Management with Secure Data Isolation
Challenge: Managed Service Providers (MSPs) handle support for dozens or hundreds of clients, each with separate Jira instances. Manual ticket management creates an administrative burden, risks data leakage between clients, and prevents scalable service delivery.
Solution: Configure Exalate to connect one centralized Freshservice instance to multiple client Jira environments with complete data isolation. Custom scripts route tickets based on client identifier fields, ensuring information flows only to the appropriate destination.
Real-World Application: A technology MSP supports 22 enterprise clients across healthcare, finance, and manufacturing. When a client-facing incident requires development work, the support agent tags it with the client identifier. Exalate detects this and creates a work item in that specific client’s Jira instance—never mixing client data. As the client’s dev team progresses work, status updates flow back to Freshservice automatically.
Case 2: Consolidate Multiple Incidents to a Single Root Cause
Challenge: When production issues affect multiple users, each submits a separate Freshservice ticket. Creating individual Jira work items fragments the development effort, duplicates investigation work, and complicates communication.
Solution: Use Exalate’s custom scripting to detect related incidents based on keywords, affected service, time window, or symptom patterns. Route all related Freshservice tickets to a single Jira work item representing the root cause investigation.
Real-World Application: A SaaS platform experiences database connection timeouts affecting 40 users within 30 minutes. As Freshservice tickets arrive, Exalate analyzes ticket descriptions and detects common keywords: “database,” “timeout,” “cannot connect.” The script routes all related tickets to one Jira work item titled “Database connection pool exhaustion – Production.”
Case 3: Automated IT-to-Development Escalation
Challenge: Level 1 IT support teams resolve standard requests but encounter issues requiring development intervention. Manual escalation involves sending emails, scheduling meetings, or posting in Slack. By the time development receives context, information loss during handoff requires developers to ask clarifying questions.
Solution: Map Freshservice statuses and priority levels to Jira equivalents. When a Freshservice incident moves to “Escalated to Engineering” status, Exalate automatically creates a linked JSM work item with appropriate priority and all context—description, attachments, affected users, and troubleshooting steps already attempted.
Real-World Application: Enterprise IT department receives a critical infrastructure incident: “Authentication service intermittently failing – 200 users affected.” L1 support investigates, confirms it’s not a known issue, and changes the status to “Escalated to Engineering.”
Within seconds, Exalate creates a JSM work item with Priority: Highest (mapped from Freshservice “Urgent”), Status: In Progress, full context from Freshservice including L1 troubleshooting steps, and relevant labels.
Case 4: Label-Based Intelligent Routing
Challenge: Development teams working in Jira discover operational issues while building features, but lack a streamlined way to route work to operations or service teams. Current processes require manually creating Freshservice tickets, duplicating information, and context-switching between tools.
Solution: Configure JQL triggers to monitor Jira labels. When developers add specific labels (“operations,” “service-desk,” “customer-facing”), Exalate automatically creates corresponding Freshservice incidents assigned to the appropriate team.
Real-World Application: While developing a new API feature, the development team notices production monitoring is reporting inaccurate metrics. The developer adds the label “operations” to the Jira work item with a note about the monitoring issue.
Exalate detects the label addition and creates a Freshservice incident assigned to the IT Operations Team with full context from Jira, including developer notes and relevant code references. The IT Ops team sees the incident appear in their Freshservice queue within seconds, investigates, discovers a misconfigured monitoring agent, fixes it, and marks the incident “Resolved.”
Case 5: Secure External Vendor Collaboration
Challenge: Organizations engage offshore development teams, specialized contractors, or third-party vendors, but need to share specific work without exposing entire ITSM or development environments. Security requirements prohibit granting vendors access to internal systems containing customer data.
Solution: Configure exactly which fields sync—share work item summaries, technical requirements, and status updates while excluding customer names, contact information, financial data, and internal notes.
Real-World Application: A healthcare organization contracts an external development team for EHR integration work. When Freshservice receives a feature request requiring vendor development, the integration syncs work summary and technical requirements to the vendor using Jira, but excludes patient information, hospital names, internal stakeholder details, budget and contract information, and compliance-related discussions.
Case 6: Post-Incident Review and Root Cause Analysis
Challenge: After major incidents, teams conduct retrospectives requiring complete context from both IT operations (customer impact, timeline, communication) and development (technical root cause, code changes, testing). Information scatters across multiple platforms, making a comprehensive review difficult.
Solution: Maintain bidirectional links to preserve the complete relationship between Freshservice incidents and related Jira work items throughout the lifecycle. All comments, attachments, time entries, status changes, and resolution details remain accessible from both sides.
Real-World Application: Payment processing fails for 2 hours, affecting 1,200 transactions. Freshservice captures initial customer reports, support team response timeline, customer communication sent during the outage, and business impact assessment. Jira captures technical root cause analysis, code changes deployed, testing performed, and post-deployment validation.
One week later, the SRE team conducts a post-mortem. They open the Freshservice incident and follow the link to the connected Jira work item. Both sides provide complete context for comprehensive retrospective documentation to prevent recurrence.

Calculate time and money savings from automated bidirectional sync.
Transform Your Operations with Reliable Freshservice to Jira Integration
Implementing Freshservice to Jira integration transforms how IT service management and development teams work together. Organizations report a significant decrease in time spent updating tickets, improvement in Mean Time to Resolution (MTTR), and an increase in customer satisfaction scores.
Beyond immediate efficiency gains, integration enables strategic capabilities like DevOps transformation, unified SLA tracking across the complete service lifecycle, and data-driven decision making with complete cross-platform visibility.
Exalate extends beyond Freshservice and Jira to connect your entire toolchain, from ITSM platforms (Freshservice, Freshdesk, ServiceNow, Zendesk) to development tools (Salesforce, Azure DevOps, Azure DevOps Server, GitHub, Asana) and project management platforms.
What’s Next?
Learn how Exalate works through comprehensive documentation and free trials.
Try Exalate for free and use it to set up a working sync without going through sales. Hook up both sides, write rules with Aida or a Groovy engineer, and watch records flow.
Ready to eliminate manual coordination and accelerate service delivery? Book a demo with integration engineers and explore managed services for turnkey solutions.
Frequently Asked Questions
What is the best way to integrate Freshservice with Jira?
The best approach depends on your complexity requirements. Native Freshservice-Jira apps work for basic ticket-to-work item linking with standard field mapping. For organizations needing custom workflows, conditional routing, multi-instance support, or advanced data transformations, script-based platforms like Exalate provide unlimited flexibility. Exalate uses Groovy scripting to sync any field, transform data during synchronization, and implement complex business logic matching your exact processes.
Is it possible to sync Freshservice tickets with multiple Jira instances simultaneously?
Absolutely. Exalate’s architecture enables connecting one Freshservice instance to numerous Jira environments concurrently. This is essential for MSPs managing multiple clients, enterprises with separate Jira instances per business unit, or organizations with both cloud and on-premise deployments. Custom routing logic determines which Freshservice tickets sync to which Jira instances based on customer identifiers, categories, priorities, or any other ticket attribute.
What fields can I sync between Freshservice and Jira?
Exalate syncs any standard or custom field type. This includes work summaries and descriptions, status, priority, assignee, custom fields (dropdowns, checkboxes, text fields, date pickers), tags, labels, attachments, comments (with rich text formatting), time tracking entries, and SLA data. You can map Freshservice custom fields to Jira default fields, convert priority scales between systems, or handle missing fields by mapping them to alternatives.
How does bidirectional sync work between Freshservice and Jira?
Exalate provides real-time, two-way synchronization where changes in either system are reflected in the other within seconds. You control exactly what syncs in each direction through Groovy scripts. For example, sync all Freshservice updates (status, comments, attachments) to Jira, but only sync Jira status changes and customer-facing comments back to Freshservice while keeping internal technical discussions private.
Can I sync Freshservice tickets to different Jira projects based on specific criteria?
Definitely, Exalate’s scripting engine routes tickets to different projects using any logic you define. Common routing patterns include department-based routing (HR requests to HR project, IT requests to IT Operations), priority-based (critical incidents go to Production Support, standard work to Development backlog), category-based (infrastructure tickets to Ops project, application bugs to Dev project), customer-based (enterprise clients to dedicated projects, standard customers to shared projects), or combined criteria routing based on multiple factors.
How does Exalate compare to template-based integrations?
Template-based tools offer pre-configured field mappings suitable for basic scenarios but encounter limitations quickly with inflexibility, complex logic challenges, multi-instance constraints, limited data transformation ability, and basic error handling without sophisticated logic.
Exalate’s script-based approach makes it possible to route tickets to different projects based on multiple criteria, enforce approval workflows, aggregate related tickets, and implement organization-specific business logic.
Can this integration work for MSPs managing multiple clients?
Yes. MSPs commonly use Exalate to connect centralized Freshservice instances to multiple client Jira environments. Routing logic based on client identifiers, custom fields, or tags ensures tickets flow to the correct destinations. Each client connection operates independently with complete data isolation, preventing cross-client information leakage. MSPs maintain unified visibility across all clients within Freshservice while clients work exclusively in their Jira instances.
Recommended Reads
- Freshdesk ServiceNow Integration: Bring Your Support and IT Teams Together
- Freshdesk Jira Integration in the Age of Customer Satisfaction
- How To Use Freshdesk Salesforce Integration For Better Sales
- Understanding Workflow Orchestration for Complex Business Processes
- ITSM Integration: Simplify Your IT Services