
Using Salesforce to handle your company’s data gives you access to multiple tools and integrations to harness this data. At the same time, Salesforce data integration with a third-party application can endanger your company’s sensitive data if you don’t follow the appropriate precautions.
Since your business’s success and growth depend heavily on data, you need to nail every stage of the integration process.
This article covers the best practices for smooth Salesforce data integration. I’ll also cover common use cases, the benefits and challenges you’ll face, and how to set up a successful Salesforce third-party integration using solutions like Exalate.
Key Takeaways
- Salesforce data integration assembles and arranges data from all Salesforce tools and third-party apps to obtain a unified view of customer interactions.
- Common use cases include constant record updates, automated lead scoring and routing, inventory management, and cross-platform activity tracking.
- Native Salesforce integration tools like Apex, MuleSoft Composer, and Platform Events have limitations, including governor limits and limited security controls.
- Third-party tools like Exalate offer advanced capabilities, including AI-assisted configuration, full scripting control, and enterprise-grade security.
- Best practices include tidying your data before integration, specifying scope, creating an integration plan, implementing layered security, and monitoring your network.
- When choosing an integration solution, evaluate bidirectional sync capabilities, security certifications, customization options, and platform compatibility.

What is Salesforce Data Integration?
Salesforce data integration involves assembling and arranging all the existing data from all Salesforce tools, as well as from other third-party apps, to obtain a unified view.
Data integration in Salesforce is straightforward because you only need to monitor the incoming and outgoing data. Some integrations use automated no-code triggers to sync your data without manual entries.
Salesforce data integration usually involves one or all of the following:
- Importing and storing customer contact information
- Importing, storing, and updating payment details
- Importing and saving support service data
- Updating and accessing Salesforce data records
- Exchanging data between Salesforce and other tools
The ability of any data-driven company to successfully implement these tasks depends on the integration plan as well as the software solution facilitating the exchange.
Salesforce Data Integration Use Cases
The use cases for data integration are limitless since you can map Salesforce orgs together as well as Salesforce with other systems.
Constant Record Updates
Challenge: When an Account record changes in one Salesforce org, related Account records in connected systems become outdated. Teams work with stale data, leading to miscommunication and duplicate efforts.
Solution: Configure bidirectional sync rules that automatically propagate Account record changes across all connected Salesforce orgs in real-time.
Real-World Application: A global enterprise with regional Salesforce instances uses Exalate to sync customer account updates. When the EMEA team updates a customer’s contract status, the North America team sees the change within minutes, eliminating the “Which version is correct?” confusion during cross-regional handoffs.
Automated Lead Scoring and Routing
Challenge: Manual lead scoring is slow, subjective, and inconsistent. High-value leads sit in queues while sales teams waste time on low-priority prospects.
Solution: Admins can configure Account records to update depending on the potential or actual value of the lead. Assign specific scores to leads automatically based on SLAs, engagement data, and demographic factors.
Real-World Application: A B2B SaaS company integrates Salesforce with their marketing automation platform. Leads from target industries who download pricing guides automatically receive high scores and are routed directly to senior account executives—reducing response time from 48 hours to under 2 hours.
Lead Routing Based on Triggers
Challenge: Leads get assigned to the wrong teams or fall through the cracks. Manual assignment creates bottlenecks and delays in follow-up.
Solution: Salesforce admins can set up triggers to make sure the Salesforce Account is routed to the direct segment or user pool in order to increase accuracy.
Real-World Application: A financial services firm routes leads based on asset level and geographic location. High-net-worth prospects from specific regions automatically land with wealth advisors who specialize in their area, while smaller accounts route to the digital advisory team.
Inventory Management
Challenge: E-commerce operations struggle with stockouts and overstock situations because sales data doesn’t sync with inventory systems in real-time.
Solution: E-commerce stores can configure their Salesforce inventory to detect spikes in demand or diminishing stocks of goods. Automated alerts trigger reorder processes before stockouts occur.
Real-World Application: An online retailer integrates Salesforce Commerce Cloud with their warehouse management system. When inventory drops below threshold levels, purchase orders are generated automatically, and sales teams receive notifications to adjust customer expectations on delivery timelines.
Cross-Platform Activity Tracking
Challenge: Support conversations, development updates, and sales activities that happen across disconnected systems. Teams can’t see the full picture of customer interactions.
Solution: Authorized users can sync comment threads and user mentions to make their communication visible across systems and organizations.
Real-World Application: A software company syncs Salesforce Cases with Jira work items using Exalate. When developers add technical notes in Jira, support agents see updates reflected in Salesforce—allowing them to provide accurate status updates without chasing down engineering teams.
Customer 360 View for Service Teams
Challenge: Service agents lack context about customer history, purchases, and previous interactions. Every call starts from scratch.
Solution: Integrate Salesforce Service Cloud with e-commerce platforms, support ticketing systems, and communication tools to create a unified customer profile.
Real-World Application: A telecommunications company integrates Salesforce with their billing system, network monitoring tools, and call center platform. When a customer calls about service issues, agents immediately see billing history, recent network outages in their area, and previous support interactions—resolving issues 40% faster.

Calculate time and money savings from automated bidirectional sync.
Features to Consider When Choosing an Integration Solution
Not all integration tools are created equal. Here’s what to evaluate when selecting a Salesforce data integration solution.
Sync Direction and Flexibility
- Bidirectional vs. Unidirectional Sync: Can you configure one-way data flow (source → destination only) or two-way synchronization where changes flow in both directions? One-way sync suits reporting scenarios; bidirectional sync enables true collaboration.
- Field-Level Control: Do you choose which specific fields synchronize, or is it all-or-nothing? Granular control matters for security and compliance. You might share account names and status but exclude financial fields, internal notes, or proprietary data.
Security and Compliance
Look for solutions that prioritize data protection:
- ISO 27001 Certification: Demonstrates adherence to international security standards
- Role-Based Access Control: Ensures team members only access data relevant to their role
- Encryption: Data should be encrypted both in transit and at rest
- Independent Configuration: Each side of the integration should control their own sync rules without exposing configuration details to partners
Exalate maintains ISO 27001 certification and encrypts all synchronized data. For detailed compliance documentation, visit the Exalate Trust Center.
Customization Capabilities
- Scripting Control: Can you write custom logic for complex sync scenarios? Look for solutions that offer full scripting capabilities for data transformations, conditional routing, and field mapping.
- AI-Assisted Configuration: Tools like Aida (Exalate’s AI-assisted configuration) let you describe sync requirements in natural language and generate working configurations automatically, ideal for getting started quickly while maintaining the option for manual customization.
Platform Compatibility
Evaluate which platforms the solution supports natively:
- ITSM Platforms: ServiceNow, Zendesk, Freshservice, Freshdesk
- Development Tools: Jira, Azure DevOps, Azure DevOps Server, GitHub
- CRM and Business Tools: Salesforce (including multiple orgs), Asana
- Custom Systems: REST API-based custom connectors for proprietary platforms
Operational Control
- Sync Rules and Triggers: Can you define exactly when and how data syncs? Look for support for automated triggers, scheduled syncs, and manual sync options.
- Error Handling: What happens when a sync fails? Robust solutions maintain transactional queues that preserve data integrity and retry automatically when connectivity is restored.
- Monitoring: Can you track sync status, identify bottlenecks, and troubleshoot issues without relying on vendor support?
Salesforce Data Integration Tools
Salesforce allows multiple methods of natively syncing, sharing, and integrating data with external systems. These data exchange methods allow Salesforce users to integrate their data with the CRM platform without needing third-party tools.
Native Salesforce Integration Options
Some native Salesforce data integration tools include:
- Apex Actions: Custom code for complex business logic
- Change Data Capture: Event-based notifications for record changes
- Custom Apex (REST and SOAP Web Services): Build custom API endpoints
- External Services: Connect to external APIs declaratively
- Platform Events: Publish and subscribe to event streams
- Salesforce Connect/External Objects: Display external data within Salesforce
- MuleSoft Composer: No-code integration builder
- MuleSoft Anypoint: Enterprise integration platform
- Heroku Connect: Sync data between Salesforce and Heroku Postgres
However, these data transfer protocols come with several drawbacks that could affect the quality and completion of the data transfer.
For instance, Apex is bound by governor limits, which hampers its integration capabilities. Besides, these native tools offer limited security controls, necessitating the addition of third-party integrations for better data integration security and reliability.
Third-Party Salesforce Integration Tools
Salesforce seamlessly integrates data with third-party apps, using inbound and outbound messages. This process follows the ETL (Extract, Transform, Load) protocol in AppExchange tools.
Here are the main categories of third-party integration tools:
iPaaS (Integration Platform as a Service)
Cloud-native platforms that handle everything from basic data sync to complex transformations. They typically offer pre-built connectors, visual workflow builders, and automated monitoring.
- MuleSoft Anypoint: Enterprise-grade API-led integration (Salesforce-owned)
- Workato: Recipe-based automation with AI-powered suggestions
- Tray.ai: Serverless architecture with low-code builder
- Celigo: Pre-built integration flows for common scenarios
ETL/ELT Tools
Built for heavy-duty data movement and transformation between Salesforce and data warehouses.
- Fivetran: Zero-maintenance automated pipelines
- Matillion: Cloud-native data transformation
- Talend: Open-source ETL with data quality management
- Skyvia: Cloud data platform for backup, integration, and management
- Informatica: Enterprise data quality and metadata-driven integration
Low-Code Automation Platforms
Designed for business users who need integrations without deep technical expertise.
- Zapier: Simple trigger-action workflows with 7,000+ app connections
- Make (formerly Integromat): Visual automation builder
- Microsoft Power Automate: Native Microsoft ecosystem integration
Deep Integration Platforms
Purpose-built for complex, bidirectional sync scenarios requiring full customization.
- Exalate: AI-assisted configuration with full scripting control, supporting Salesforce, Jira, ServiceNow, Azure DevOps, Zendesk, GitHub, Freshservice, Freshdesk, Asana, and custom connectors
- Jitterbit: Hybrid cloud and legacy system integration
- SnapLogic: AI-assisted pipeline development for data-intensive enterprises
Why Consider Exalate for Salesforce Integration?
Exalate stands out for scenarios requiring deep, bidirectional integration with full customization:
- AI-Assisted Configuration (Aida): Describe your sync requirements in natural language and generate working configurations automatically
- Full Scripting Control: Groovy-based scripting allows for basic to advanced integration scenarios. For example, you can sync comment threads and user mentions between Jira and Salesforce
- Independent Configuration: Each side of the integration maintains complete autonomy. Partners can’t see your sync scripts, and configuration changes don’t require approval from the other side
- One-way or Two-way Sync: Set up synchronization with granular control at both integrating sides
- Any Object, Any Field: Sync any objects along with their fields (including custom fields) from the Salesforce database
- Multiple Object Dependencies: Maintain relationships between Salesforce objects and external platform entities
- httpClient Integration: Sync any data available via REST APIs
- Enterprise Security: ISO 27001 certified with role-based access control and encryption of data both in transit and at rest
How to Integrate Jira and Salesforce with Exalate: Step-by-Step Guide
This section walks through setting up a Jira Salesforce integration using Exalate.
Prerequisites
Before starting, ensure you have:
- An active Exalate account (or sign up for a 30-day free trial)
- Admin access to both Jira and Salesforce instances
- System credentials for Jira (OAuth) and Salesforce (API token)
- Clear understanding of what data you want to sync (Cases → work items, Opportunities → Epics, etc.)
Step 1: Create an Exalate Account
Start by registering an Exalate account if you haven’t already. Navigate to the Exalate Console and complete the signup process.
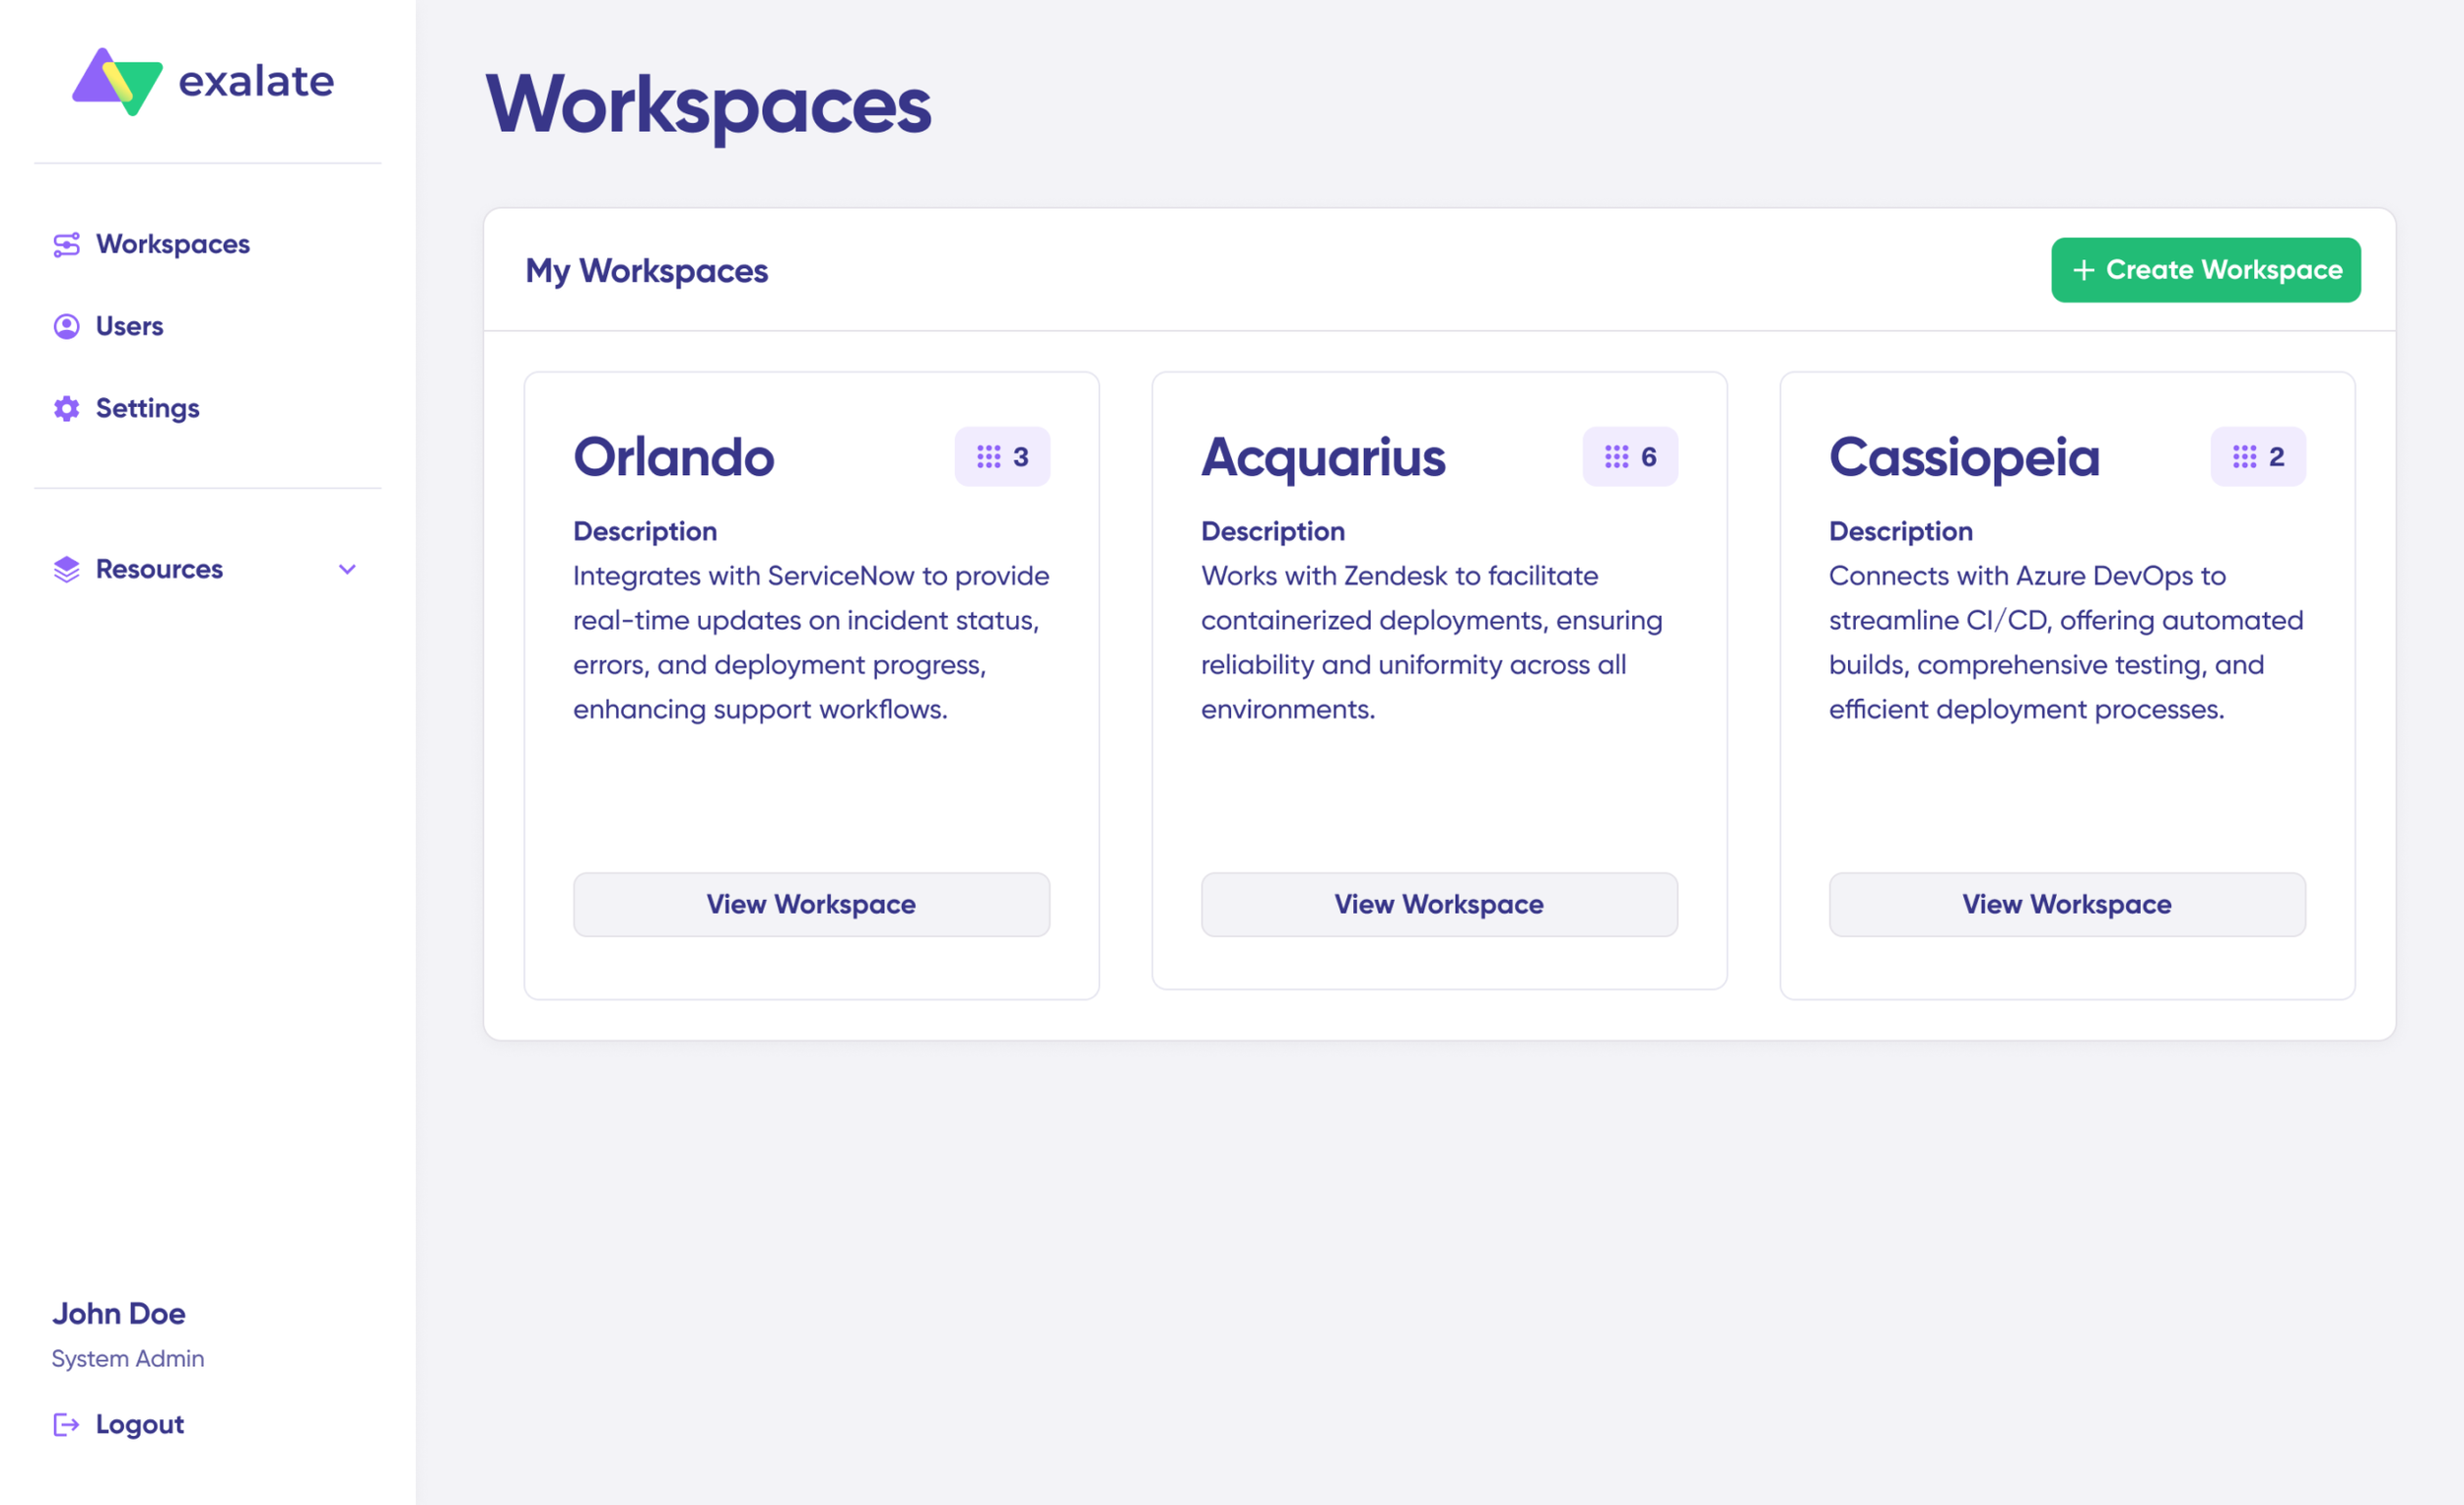
Once logged in, you’ll land in your Workspace. The Workspace organizes your Connections, sync rules, and troubleshooting tools in one place.
From here, you can manage multiple integrations across different platforms. For instance, you might connect Salesforce Cases with Jira work items for your engineering team while simultaneously syncing Opportunities with ServiceNow requests for your service desk.
Step 2: Create Your First Workspace
Workspaces organize and manage your integrations and connections in a single location.
- After logging in, click “+ Create Workspace”
- Enter a descriptive name (e.g., “Sales-Dev Integration”)
- Add an optional description explaining the workspace purpose
- Click “Create workspace” to confirm
You’ll see your new workspace in the Workspaces tab. All subsequent connections will be organized under this workspace.
Step 3: Create Your First Connection
A connection defines the link between your Jira and Salesforce instances.
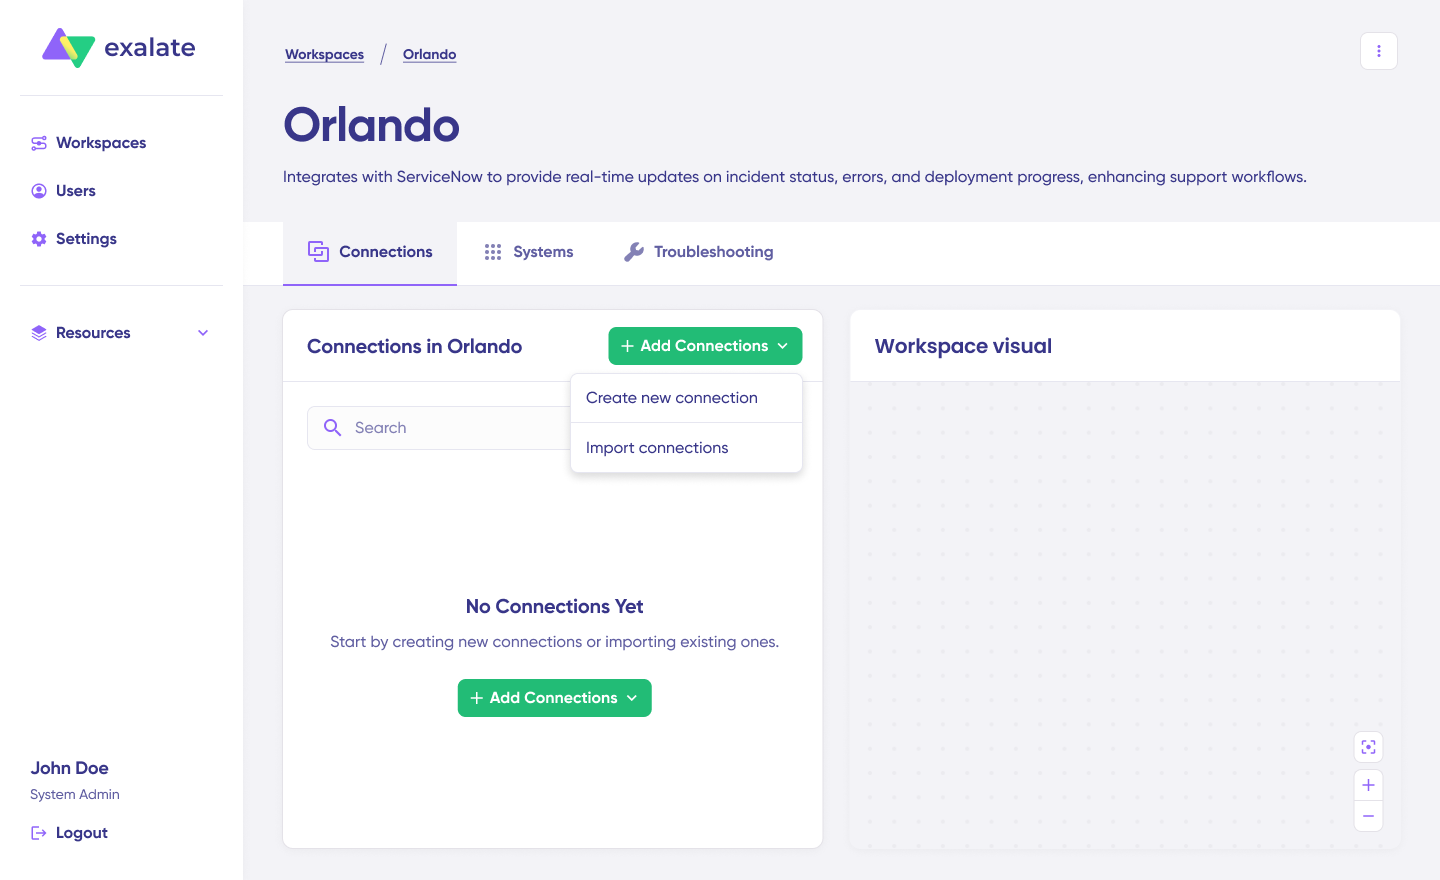
- Navigate to your workspace
- Click “+ Add connections” > “Create new connection”
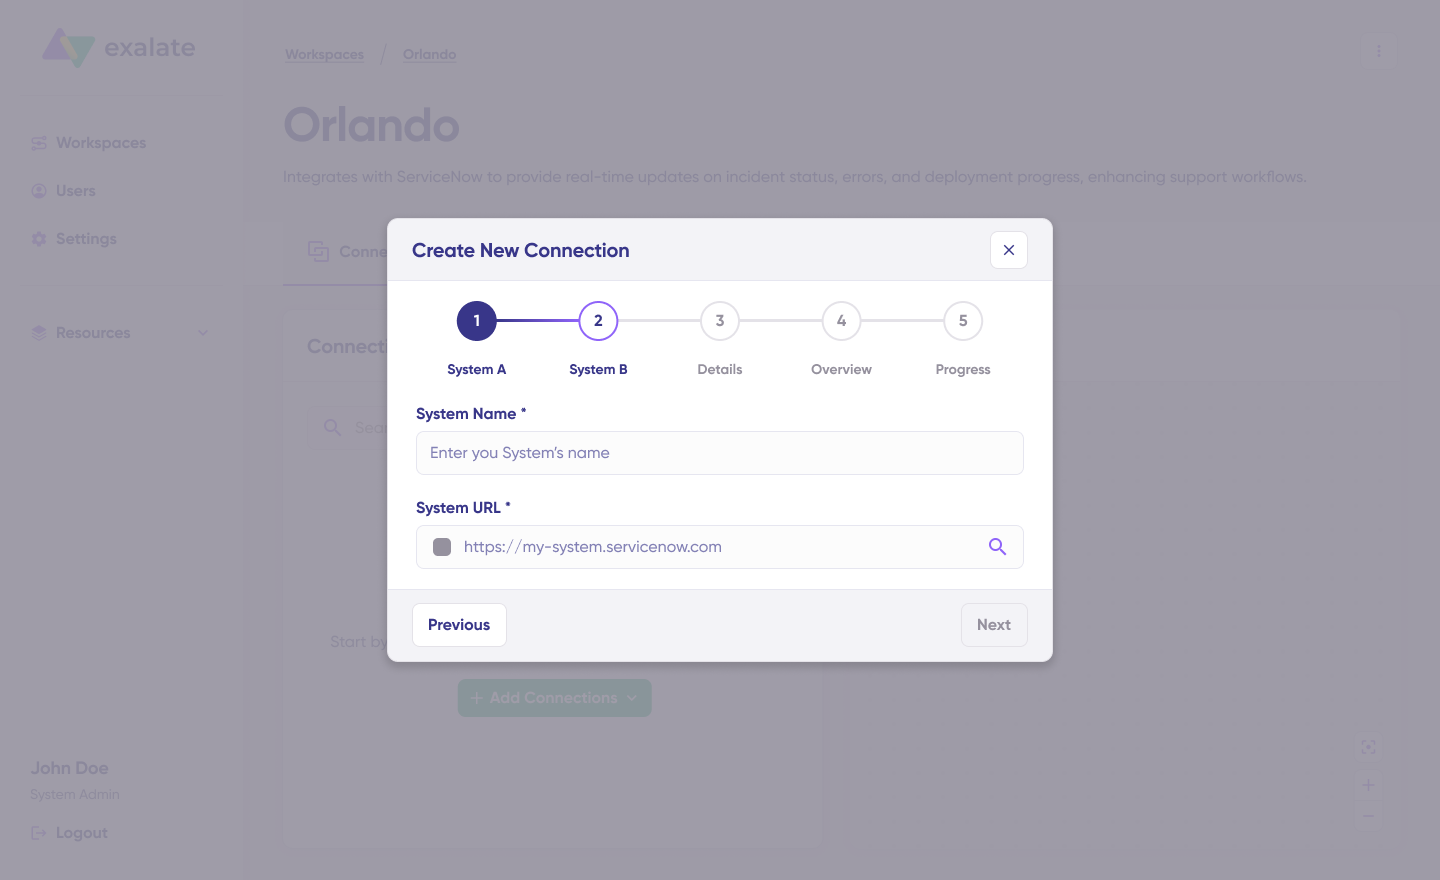
- Configure System A (you can start with either Jira or Salesforce):
- Enter a descriptive system name (e.g., “Salesforce Production”)
- Enter the system URL
- Authentication:
- For Salesforce: Enter the API token.
- For Jira: Authorize via OAuth by following the on-screen prompts
- Repeat the process for System B (the other platform)
- Name Your Connection:
- Enter a clear connection name (e.g., “Support Cases to Dev Team”)
- Add an optional description explaining the connection purpose
- Click “Next”
- Review Details.
- Click “Create connection.“
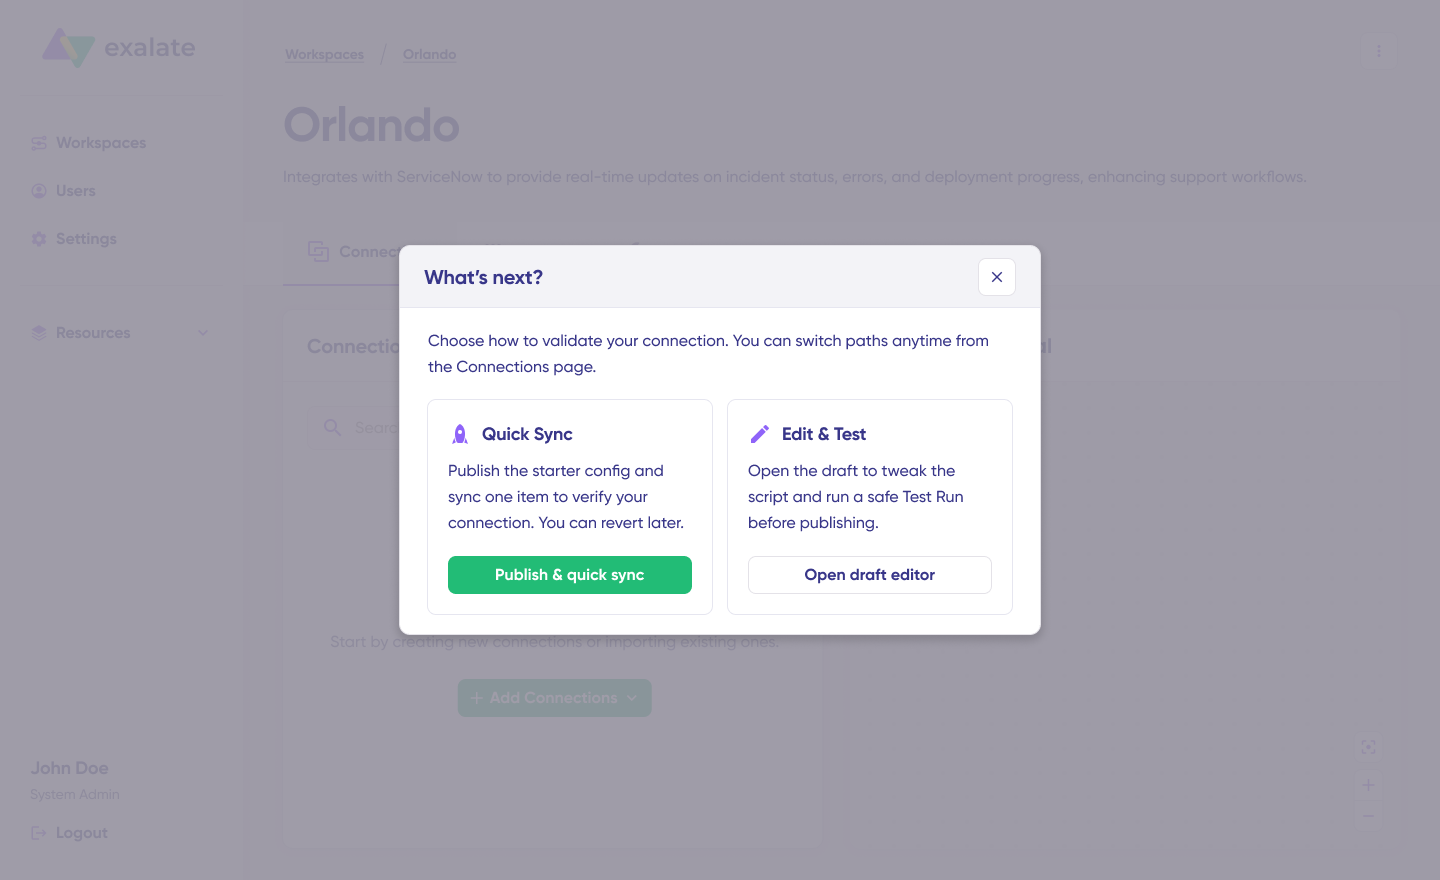
The system establishes the connection and shows a success message. You’ll then see two configuration options: “Quick Sync” and “Edit & Test”.
Step 4: Choose Configuration Approach
Option A: Quick Sync (Recommended for Testing)
Quick Sync allows you to sync one item between Jira and Salesforce to verify your connection works properly.
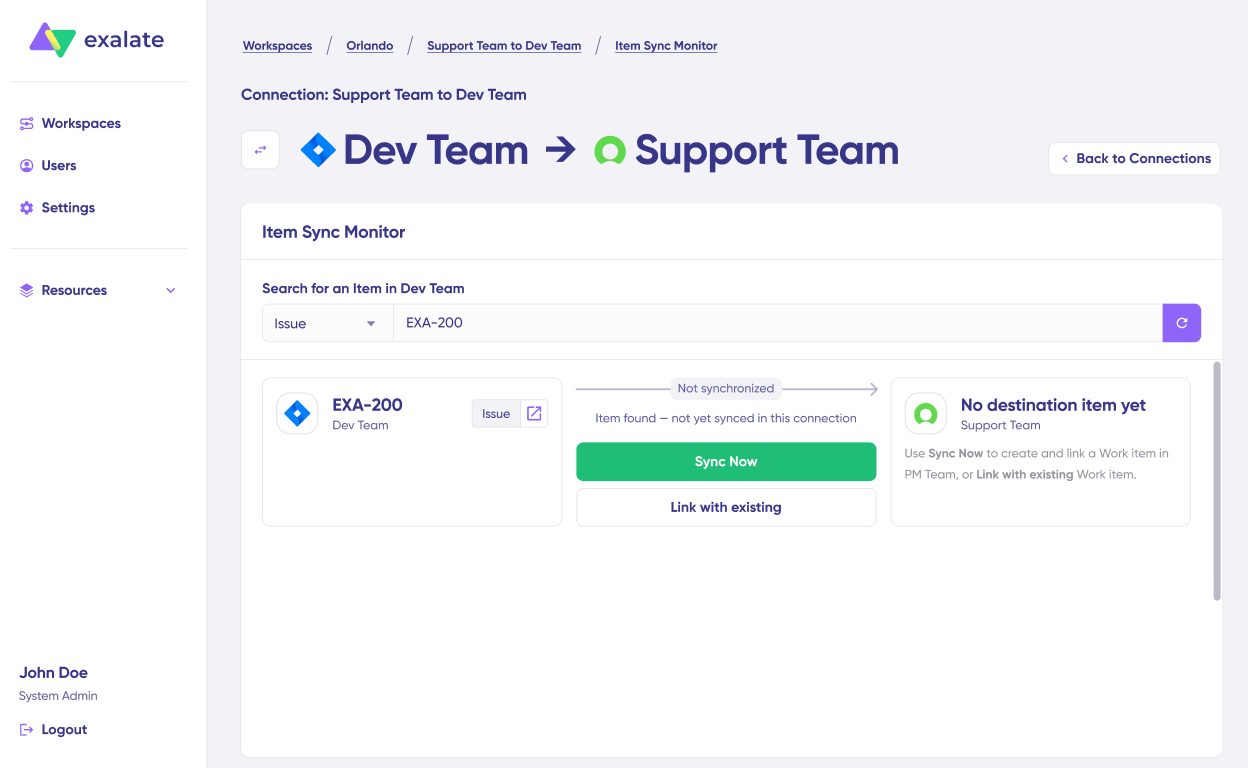
- Under “Item sync monitor,” enter:
- Jira work item key (e.g., “SUP-123”), OR
- Salesforce Case number
- Choose sync method:
- “Sync Now”: Creates the corresponding item on the other side
- “Link with Existing”: Links two already-existing items
- Click your chosen action
- Monitor sync status in real-time
- Once complete, click “Compare” to see how the synced items appear on both sides

This validates your connection before configuring comprehensive sync rules.
Option B: Edit & Test (For Production Setup)

For production deployment, configure detailed sync rules and triggers.
- Click “Open draft editor” or “Create a new version”
This ensures you don’t accidentally modify any existing configuration. Changes in draft mode save automatically.
- Click “Edit” to open the script editor
Step 5: Understanding and Configuring Sync Rules
Sync rules define what data flows between systems and how it transforms during transit.
Sync Direction
Change sync direction by clicking the arrows between system names at the top of the configuration screen.
Example: If direction is Jira → Salesforce:
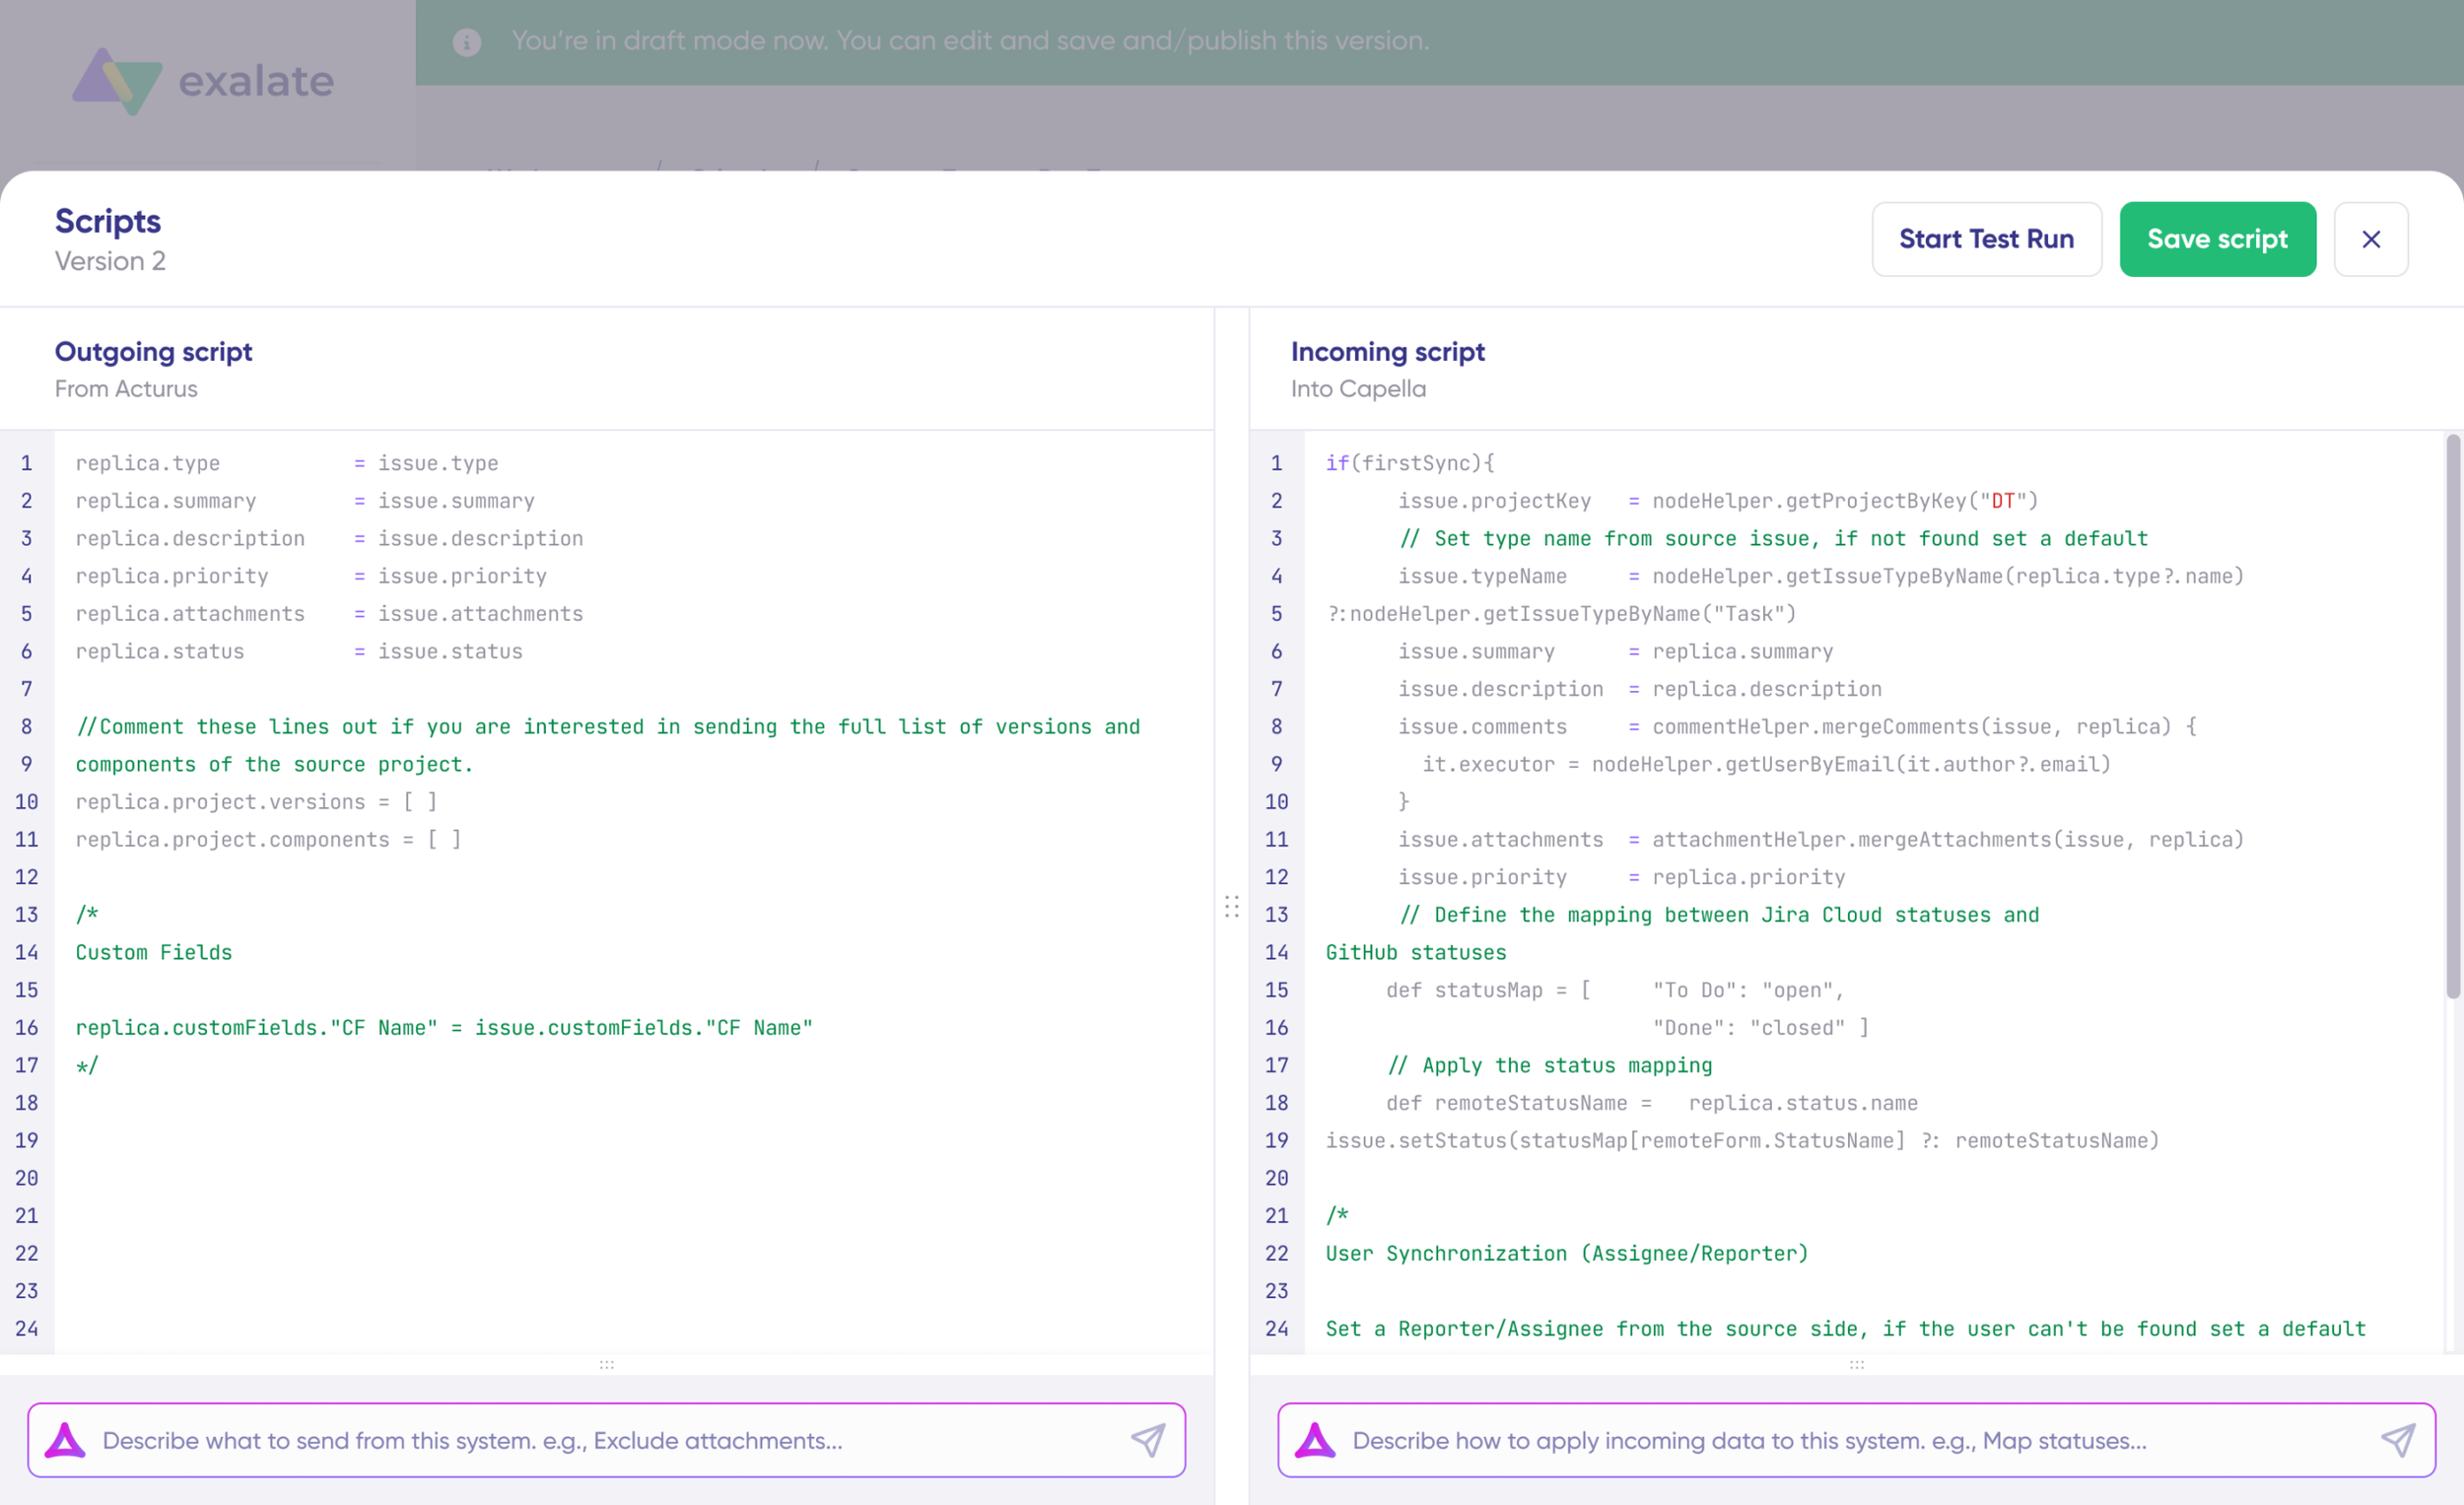
- Outgoing script (Jira side): Defines what data leaves Jira
- Incoming script (Salesforce side): Defines how Jira data maps to Salesforce fields
If you reverse the direction to Salesforce → Jira, the scripts swap roles.
Outgoing Sync Rules: Define what Salesforce data gets sent to the destination platform. For example, sending Case details to Jira:
replica.summary = entity.Subject

replica.description = entity.Description

replica.priority = entity.Priority

replica.status = entity.Status

replica.comments = entity.CaseComments

replica.attachments = entity.Attachments

replica.customFields."Case Origin" = entity.Origin

replica.customFields."Account Name" = entity.Account?.NameCode language: JavaScript (javascript)
Incoming Sync Rules: Specify how data arriving from the connected platform applies to Salesforce objects. For instance, receiving updates from Jira:
entity.Subject = replica.summary

entity.Description = replica.description

entity.Status = replica.status

entity.Priority = replica.priority
Exalate’s Groovy-based scripting engine gives you complete control over data transformation.
Understanding Replica
The replica object is the message payload carrying data between systems. It exists in JSON format and holds values passed between synced entities.
To sync new values, you can enter the sync script yourself if you are familiar with Groovy.
To stop something from syncing (for instance, attachments from Jira to ServiceNow), simply remove that script line from the corresponding script.
Step 6: Using AI-Assisted Configuration with Aida
Rather than writing Groovy scripts manually, use Aida to generate sync rules from natural language prompts.
Aida appears in both the Outgoing script and Incoming script sections as a chat interface at the bottom of the editor.
You can prompt something like this to Aida:
- “Exclude attachments from sync”
- “Only sync high-priority work items”
- “Send summary, description, priority, and status”
After Aida generates code:
- Green highlights: New lines that will be added
- Red highlights: Lines that will be removed
- Review the suggestions carefully (AI can make mistakes)
- Choose “Insert” to accept or “Discard” to reject
- Refine your prompt if needed and regenerate
Important Notes:
- Outgoing and incoming scripts work independently
- Maintain a separate context for each prompt
- Always review generated code before deployment
- Test in a safe environment first (see Step 7)
Step 7: Test Run – Validate Before Production
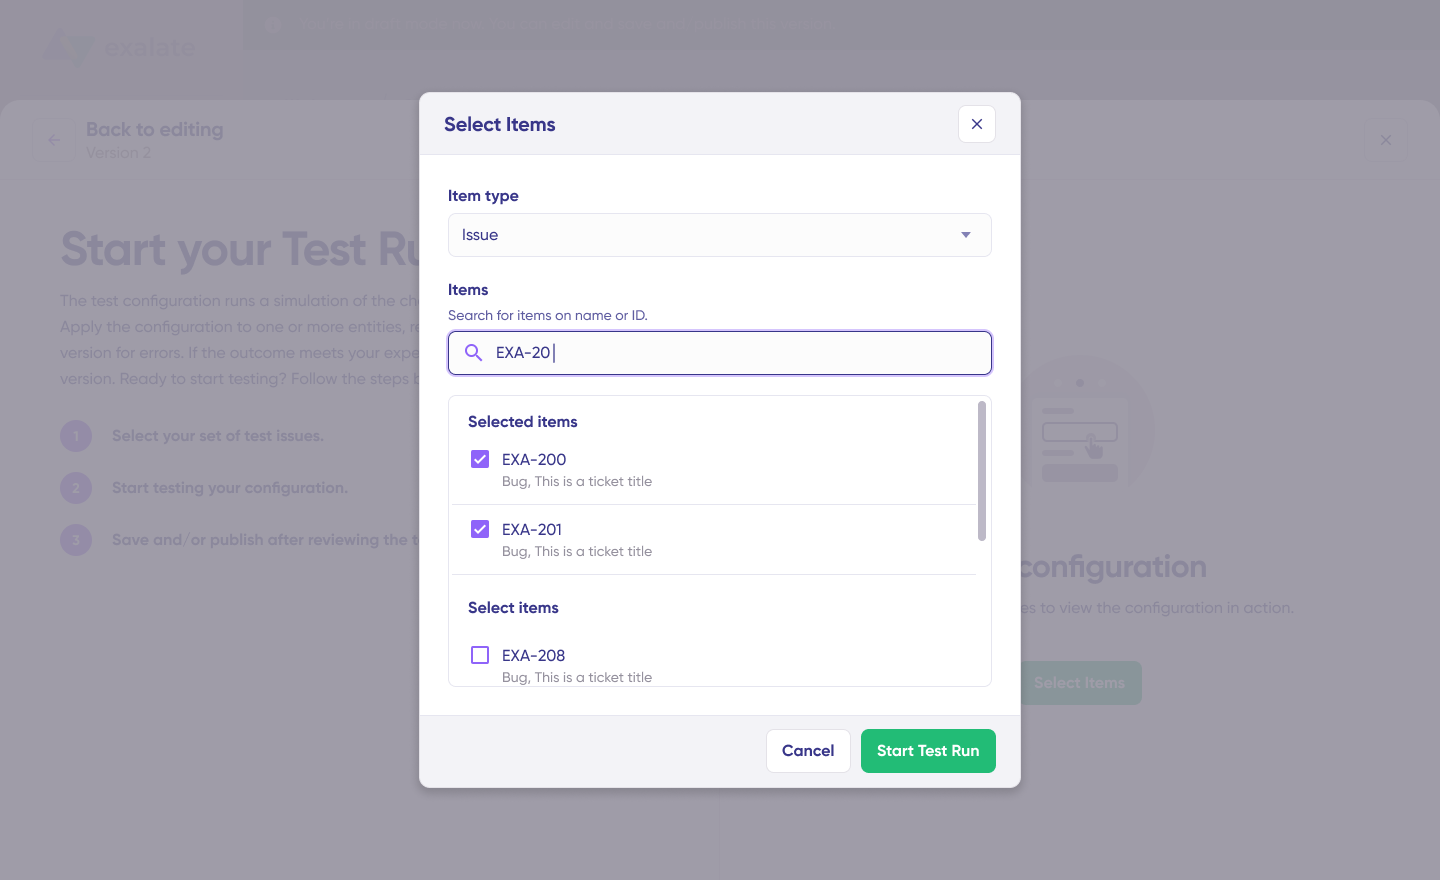
Test Run allows you to test sync configuration without affecting live data.

- After configuring scripts, click “Start Test Run” (do not click “Save script” yet)
- Select Test Items:
- Choose one or more existing work items from Jira or Cases from Salesforce
- Select items that represent realistic scenarios
- Click “Start Test Run”
- Review Results:
- View outgoing replicas (what data is being sent)
- View incoming replicas (how data will be received)
- Check field mappings are correct
- Verify transformations work as expected

- Iterate if Needed:
- If mappings are incorrect, go back to scripts
- Adjust code or refine Aida prompts
- Run Test Run again
- Deploy Only When Confident:
- Test Run prevents errors from affecting live data
- Only publish when all field mappings validate correctly
Step 8: Adding Triggers
Triggers define when items synchronize automatically. Without triggers, you must manually initiate sync for each item.
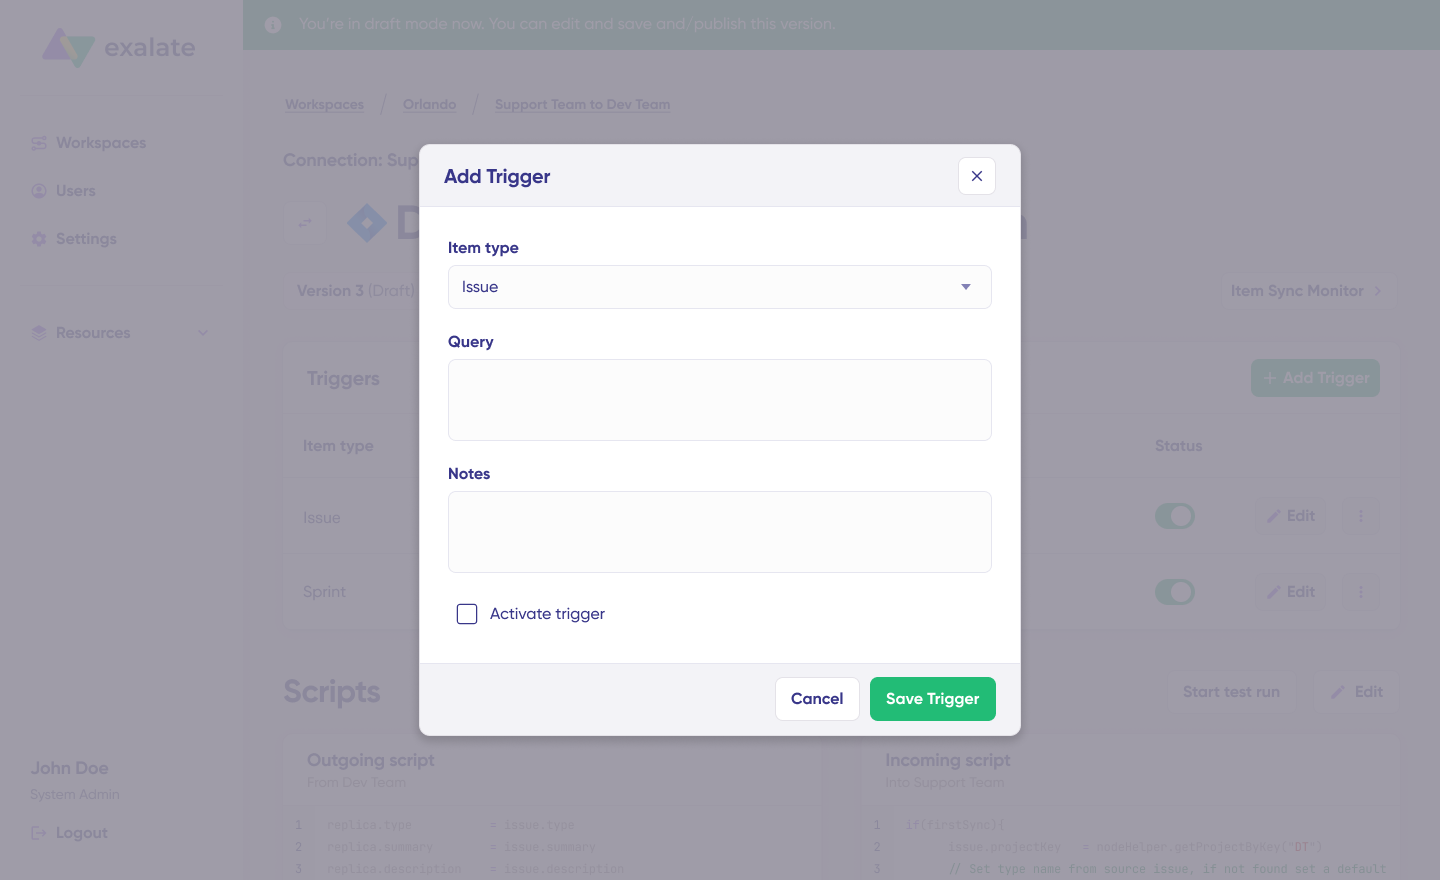
- Navigate to the “Triggers” tab in your connection editor
- Click “+ Add Trigger”
- Configure Trigger Parameters:
For Jira (using JQL):
- Item type: Select work item type (Work item, Epic, Sprint, etc.)
- Query: Enter JQL to filter which items trigger sync
Example JQL triggers:
project = SUPPORT AND priority in (High, Highest)project = ENGINEERING AND labels = "customer-facing"Code language: JavaScript (javascript)type = Bug AND status = "To Do"Code language: JavaScript (javascript)For Salesforce (using SOQL):
- Item type: Select object type (Case, Opportunity, etc.)
- Query: Enter SOQL to filter which items trigger sync
Example SOQL triggers:
Priority = '1' AND Status = 'New'Code language: JavaScript (javascript)Type = 'Problem' AND AccountId != nullCode language: JavaScript (javascript)Stage = 'Closed Won' AND Amount > 10000Code language: JavaScript (javascript)- Optional: Add notes explaining the trigger purpose
- Activate Trigger: Toggle the status to “Active”
- Click “Save Trigger”
You can create multiple triggers per connection. For example:
- Trigger 1: High-priority Cases → Bugs
- Trigger 2: Medium-priority Cases → Tasks
- Trigger 3: Feature Requests → Stories
Step 9: Script Versioning and Publishing
Every time you publish changes, Exalate creates a new script version.
Benefits of Versioning:
- Complete audit trail (who changed what and when)
- Rollback capability if new version causes problems
- Work on drafts without affecting production
- Compare versions to see what changed
To Publish Your Configuration:
- Review your scripts and triggers one final time
- Click “Publish Version”
- The new version becomes active immediately
- Previous versions remain available in the version dropdown
Version Management:
- Active: Currently running in production
- Draft: Editable, not yet published
- Archived: Previous versions available for rollback
Step 10: Deploy and Monitor
After publishing, your integration runs automatically based on configured triggers.
Benefits of Salesforce Data Integration
Merging your data with Salesforce comes with the following benefits for your business:
- Comprehensive Data Sync: Salesforce data integration rules allow you to sync all forms of data, including fields, attachments, descriptions, comments, and custom fields. This helps your business fill knowledge gaps and improve customer experience.
- Data Control and Visibility: Your business gains control over all incoming, outgoing, and in-processing data. You can manage and visualize your data directly from the Salesforce CRM.
- Enhanced Security: Salesforce provides strict admin controls, which offer maximum security when sharing data between systems. The exchange portal also has fail-safe mechanisms to protect your data if the integration is unsuccessful.
- Eliminate Data Silos: Businesses can use data integration tools for Salesforce to connect an unlimited number of instances from multiple sources. This helps dismantle silos and form a unified data platform to improve decision-making and serve as a single source of truth (SSOT).
- Real-Time Analytics: Real-time data integration with Salesforce makes it easier to visualize your company’s data on a single interface using tools like Tableau CRM and Einstein Discovery.
- Fast Change Propagation: Salesforce reflects changes quickly, which benefits businesses that rely on real-time, fast-paced data processing to maximize sales and boost customer satisfaction.
Challenges of Salesforce Data Integration
Common challenges encountered before, during, and after Salesforce data integration include:
Data Quality and Consistency
Your organization can only deem the data integration effort successful if the data quality is consistent across multiple iterations and systems. You also need to avoid duplication, disorganization, and inaccuracies, which affect the insights and reports generated as well as the decisions.
Mitigation: Implement data validation rules before sync, deduplicate records regularly, and use integration tools that offer data quality controls.
System Compatibility and API Limitations
If you integrate Salesforce with other systems, you must ensure compatibility. This involves filtering and transforming data formats and licensing. When writing custom code, you must consider all these issues.
Pay attention to API limits and other hurdles. For example, Salesforce enforces several hard and soft limits on the number of requests available within a specific duration. Other systems also have similar limits.
Mitigation: Choose integration tools that handle API limits intelligently with automatic retry logic and rate limiting. Exalate’s transactional queues ensure sync events are processed in order, even during rate limit throttling.
Continuous Maintenance
For custom Salesforce data integration, your team needs to conduct regular maintenance checks to ensure the solution is meeting requirements. This often takes time and extra resources that could be channeled to pressing business needs. Unfortunately, ignoring maintenance and updates will only create compliance issues down the road.
Mitigation: Use managed integration platforms that handle infrastructure maintenance, or consider managed services for turnkey implementations.
Security and Compliance
Cross-organization integrations require careful attention to data protection. Sharing sensitive customer information with partners or external systems introduces risk.
Mitigation: Choose integration solutions with strong security foundations—ISO 27001 certification, encryption of data in transit and at rest, and role-based access controls. Ensure each organization maintains independent configuration control so partners can’t access your sync scripts or internal data mappings.
Salesforce Data Integration Best Practices
Merging your data in Salesforce can lead to permanent data loss or misplacement, which will harm business decisions. To protect your business and customers’ data, here are the best practices for Salesforce data integration.
Tidy Your Data
Before you start any integration, you need to arrange your data. By doing so, your information will remain intact when it enters the Salesforce environment or vice versa. Otherwise, you will end up with jumbled-up data that will be of no use to your users.
Action items:
- Remove duplicate records
- Standardize field formats (dates, phone numbers, addresses)
- Fill in the missing required fields
- Archive or delete outdated records
Specify the Scope of the Integration
You have to determine if you want to integrate your entire data pool or if you only want to sync a subset of the existing data with Salesforce.
Since data integration takes a lot of time and effort, Salesforce data integration options ensure you stay within your budget, and your team members won’t waste their time and effort.
Focus on improving data visibility and transparency across all projects and interdependent teams in order to facilitate a free flow of information. This will give your business a 360-degree customer view.
Create an Integration Plan
The integration plan should detail how your company wants to organize the data, who is in charge of validating specific data sets, and the preferred storage environment.
You should also decide if you want to store your data on-site or in the cloud. Salesforce offers cloud tools for data storage, but you can also adopt a hybrid strategy to be on the safe side during synchronization.
Your plan should include:
- Data mapping documentation
- Sync frequency and direction
- Error handling procedures
- Rollback strategies
- Testing protocols
Implement Layered Security
The only path to success for any Salesforce data integration is to invest in data security. You need to shore up all potential leaks when handling sensitive customer or business information.
This involves the use of secure architecture, proper field configuration, tokenization, encryption, authorization, and edge protection. Choose solutions that offer role-based access control so team members only access data relevant to their responsibilities.
Monitor Your Network
You need to establish a mechanism for monitoring the network to detect issues or potential vulnerabilities early. Pay attention to indicators and metrics such as latency, uptime, server response time, etc., to guarantee that Salesforce data integration is working as intended.
Set up automated alerts for sync failures, unusual data volumes, or performance degradation.
Conclusion
Salesforce data integration often goes smoothly when you have a clear scope, a foolproof integration plan, and a robust backup strategy. When it goes right, you can move all your data from platforms like Jira to the Salesforce CRM to obtain a 360 customer view.
Always sync your data using only trusted third-party applications to keep your sensitive information safe. For complex integration scenarios requiring bidirectional sync, cross-company collaboration, or advanced customization, solutions like Exalate provide the flexibility and security enterprise teams need.
Ultimately, if you follow the best practices for Salesforce data integration, everything will go smoothly, and your business will make better data-driven decisions.
Frequently Asked Questions
What is Salesforce data integration?
Salesforce data integration is the process of connecting Salesforce with other systems to synchronize, share, and manage data across platforms. It enables businesses to maintain consistent customer information, automate workflows, and create a unified view of operations without manual data entry.
What are the different types of Salesforce integrations?
Salesforce integrations fall into several categories: native integrations (built by Salesforce), AppExchange apps (third-party applications from Salesforce’s marketplace), custom API integrations (built specifically for your needs), and iPaaS solutions (integration platforms that connect multiple systems). Each type suits different complexity levels and use cases.
How do I choose between native and third-party integration tools?
Native Salesforce tools work well for simple use cases within the Salesforce ecosystem. Choose third-party tools when you need bidirectional sync with external platforms, advanced customization, cross-company collaboration, or enterprise security controls. For complex scenarios involving Jira, ServiceNow, Azure DevOps, or other platforms, purpose-built integration tools like Exalate provide deeper functionality.
What security considerations matter for Salesforce data integration?
Key security considerations include encryption of data in transit and at rest, role-based access control, compliance certifications (ISO 27001, SOC 2), and independent configuration control, where each party manages their own sync rules. For cross-company integrations, ensure partners can’t access your internal scripts or modify your configuration.
How does Exalate handle Salesforce integration?
Exalate provides bidirectional sync between Salesforce and platforms, including Jira, ServiceNow, Azure DevOps, Zendesk, GitHub, Freshservice, Freshdesk, and Asana. It offers AI-assisted configuration (Aida) for quick setup and full Groovy scripting for advanced scenarios. Each side maintains independent control over their sync configuration, and all data is encrypted with ISO 27001-certified security.
Can I integrate multiple Salesforce orgs together?
Yes. Multi-org Salesforce integration is common for enterprises with regional instances, acquired companies, or partner ecosystems. Tools like Exalate support Salesforce-to-Salesforce sync with independent configuration on each side, making it ideal for scenarios where each org needs autonomy over their data and sync rules.
How do API limits affect Salesforce integration?
Salesforce enforces limits on API calls per 24-hour period based on your edition and license count. Integration tools handle this differently; some pause syncs when limits approach, others distribute requests over time, and some use optimized bulk operations to reduce API consumption. Choose tools that manage limits intelligently to avoid sync interruptions.
What’s the difference between one-way and two-way sync?
One-way sync moves data in a single direction (source to destination). Two-way (bidirectional) sync allows changes on either side to propagate to the other. One-way works for reporting and data warehousing; two-way enables true collaboration where both teams can update records and see changes reflected across systems.
Recommended Reads:
- Salesforce Integrations: Integrate Salesforce and other Tools
- Advanced Integration Use Cases
- Salesforce Third-Party Integration: Set up a Bidirectional Sync between Salesforce and Other Tools
- Jira Salesforce Integration: How to Set up a Two-Way Sync between Different Teams
- Salesforce to Salesforce Integration: Sync Multiple Salesforce Instances Bidirectionally
- How to Set up an Azure DevOps Salesforce Integration
- How to Guides for Setting Up Bidirectional Integrations
- How to Set up a Salesforce ServiceNow Integration


