This article was originally published on the Atlassian Community.
Companies often need to set up advanced or customized integrations between Jira and Azure DevOps. These integrations streamline communication between teams using different platforms and ensure work item relationships stay intact across both systems.
This article explains how to maintain work item links and their relationship types between Jira and Azure DevOps. We also cover a secondary requirement: syncing the parent-child hierarchy of work items and sub-tasks.
We use Exalate to implement this use case.

The Use Case
The following are the use case requirements:
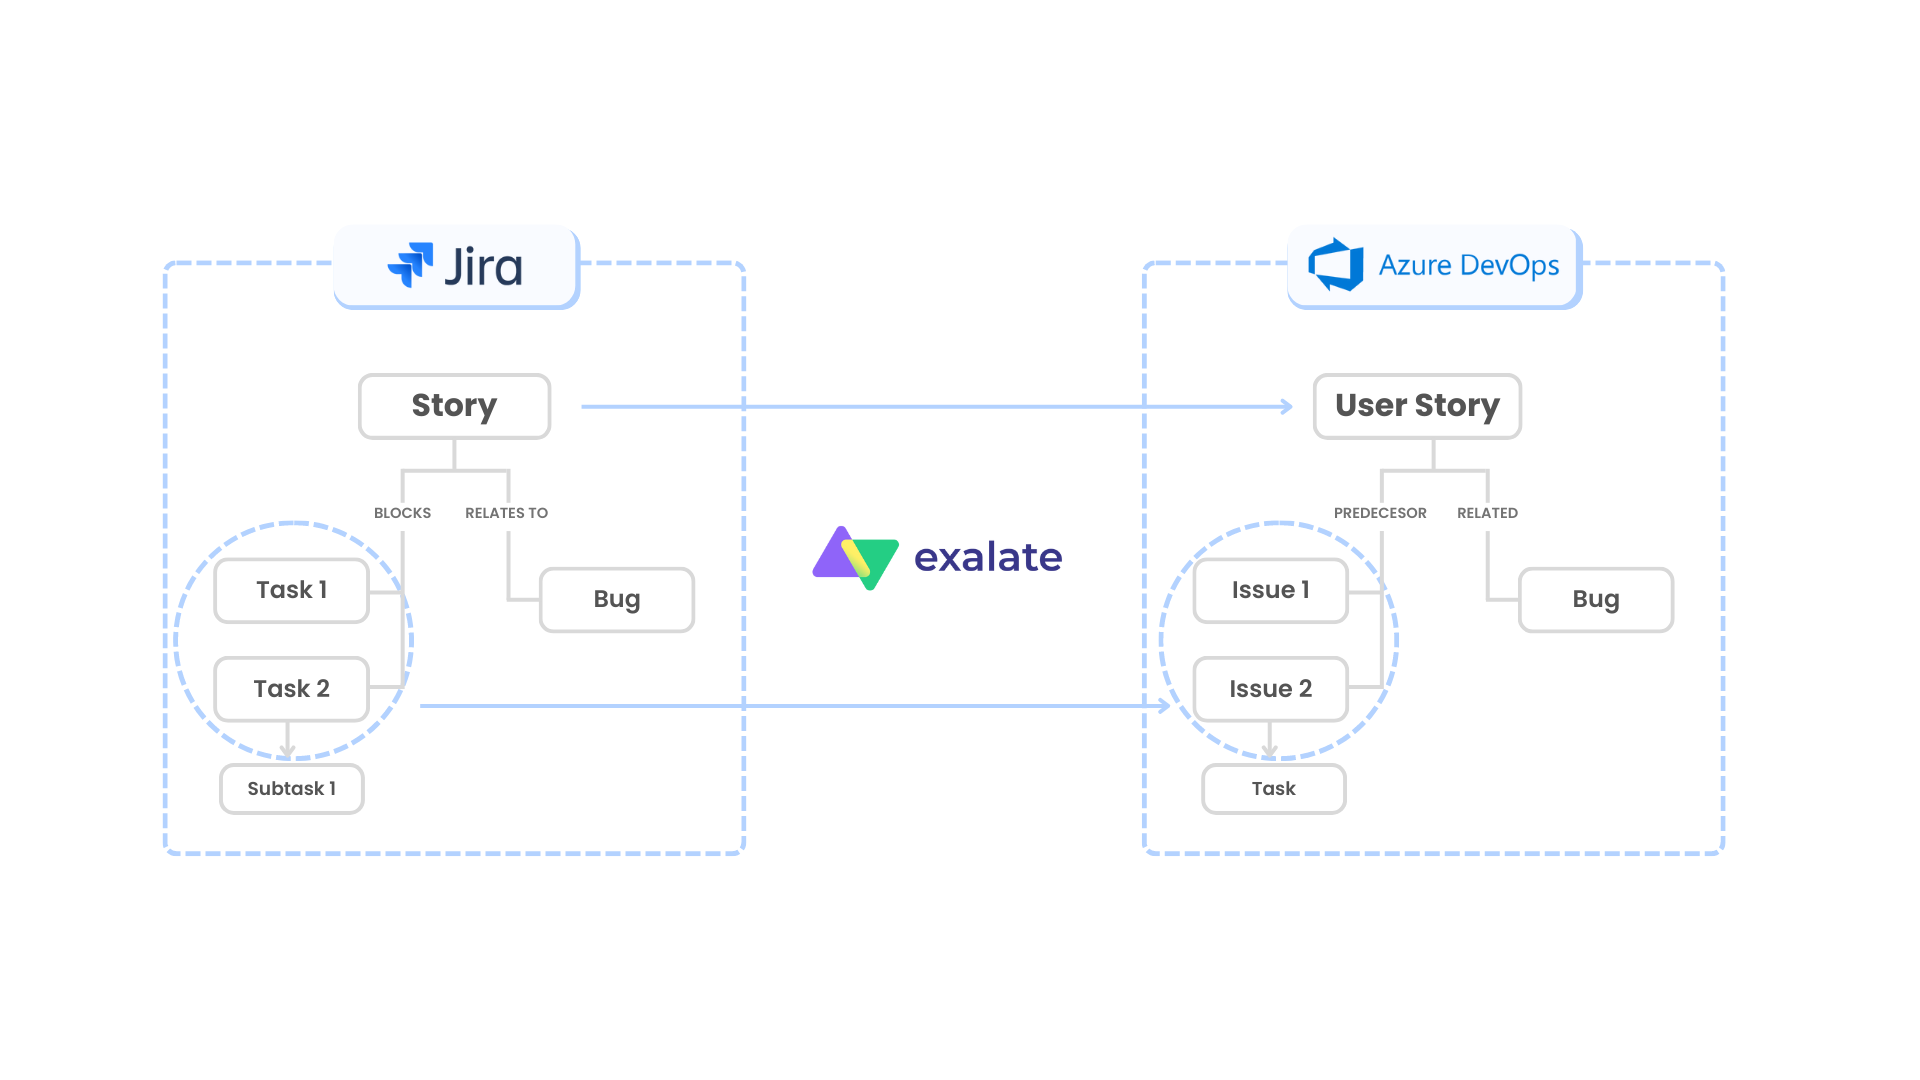
- Stories in Jira should arrive as User Stories (work item) in Azure DevOps.
- Stories have linked work items: Tasks and Bugs. These need to be reflected in Azure DevOps under the corresponding User Story.
- Tasks have a “blocks” relationship type with the Story. They must be synced over with a “predecessor” relation to the User Story in Azure DevOps.
- Bugs in Jira have a “relates to” relationship with the Story. They should be reflected as Bug work item types with a “related” relation to the User Story in Azure DevOps.
- Sub-tasks of Tasks in Jira are to be mapped to Tasks (as a child relationship) under the corresponding work items in Azure DevOps.
A visual depiction of the use case will make things clearer.
Potential Challenges
The requirements are unique and advanced. Here are the challenges we need to address:
Syncing a Story in Jira to a User Story in Azure DevOps requires understanding how both platforms handle work item types. Tasks in Jira fly as work items in Azure DevOps, while Bugs are kept as Bugs. Maintaining these mappings is critical for traceability.
Mapping the parent-child relationship between sub-tasks and Tasks in Jira to Tasks and work items in Azure DevOps requires careful script configuration. Each platform handles hierarchies differently.
Customizing the relationship types fully means you can define and map them as needed. For instance, the “blocks” relationship type is mapped to “predecessor” in Azure DevOps. Or the “relates to” relationship type is mapped as “related” in Azure DevOps. The actual mappings depend on your synchronization requirements.
After noting these challenges, it’s time to implement the use case.
But first, let’s understand why we chose Exalate.
Why Exalate for Jira Azure DevOps Integration
Exalate is a synchronization solution that supports integrations for various work management systems, including Jira, Jira Service Management, ServiceNow, Azure DevOps Cloud, Azure DevOps Server, Salesforce, Zendesk, Freshservice, Freshdesk, Asana, GitHub, and custom connectors.
We chose Exalate to implement this advanced integration use case for the following reasons:
Groovy Scripting Engine
Exalate has Groovy-based scripts that help set up complex logical mappings between the entities to be synced. You get granular control over what data crosses system boundaries and how it transforms during sync.
Advanced Automatic Sync Triggers
It supports triggers that can be fine-grained to advanced levels and enable automatic synchronization of data. These are native to the systems under sync. For instance, you can create triggers in JQL if you use Jira and in WIQL if you use Azure DevOps.
Operational Control
Since the use case we want to implement needs complex mappings in both Jira and Azure DevOps, we need control of the information to be sent and received. This ensures that changes on one side don’t affect the other side’s synchronization rules. Exalate provides a unified console to manage all connections while maintaining this separation.
Bulk Synchronization
Sometimes there is a need to sync entities in bulk if a particular condition is satisfied. Exalate handles bulk operations efficiently with complete queue visibility.
AI-Assisted Configuration
Aida (Exalate’s AI) helps generate and troubleshoot sync scripts. You can describe what you want in natural language and get working Groovy code. This reduces implementation time significantly.
Test Run Functionality
Test your sync scripts against real data before production deployment. Preview and compare the replica to verify field mappings work correctly without affecting live data.
How to Sync Work Item Links, Relations, and Sub-task Mappings Between Jira and Azure DevOps Using Exalate
Here’s a step-by-step guide to setting up this integration.
Step 1: Access Exalate and Create a Workspace
Go to exalate.app. If you already have an account, log in directly. New users can create an account by entering their email and verifying it, or by signing up using Google.
Workspaces help you organize and manage your integrations and connections in a single place. You can find all your existing workspaces under the “Workspaces” tab. Create a new workspace or select an existing one.
Step 2: Create a Connection Between Jira and Azure DevOps
Click “+ Add connections” then “Create new connection”.
Enter the name for your first system (System A). You can name either Jira or Azure DevOps as System A since it doesn’t matter which one goes first.
Once you enter the URL, a validation check occurs. If your system is already part of the existing workspace, authentication happens automatically. If the system is part of a different workspace, it will be imported into your current workspace.
For new systems, you’ll need to enter your authentication details. Jira uses OAuth authentication, while Azure DevOps uses API tokens.
Complete the same setup process for the other system. Give your connection a name and description, then click “Next”.
Review the details to ensure they are correct, then click “Create connection”.
When the process is complete, select “Continue to Configuration” and choose a Jira project and Azure DevOps project for synchronization.
Step 3: Configure Sync Rules
After creating your connection, you have two configuration options: “Quick Sync” and “Edit & Test”.
For this advanced use case, select “Edit & Test” to access the Groovy-based sync rules.
The sync rules have “Outgoing Sync” and “Incoming Sync” sections for both Jira and Azure DevOps.
Outgoing sync defines what information is sent from the source to the destination.
Incoming sync defines how information must be received from the source.
The Scripts
Let’s look at the actual scripts required to implement this use case.
Outgoing Sync: Jira
The only information that must move out of Jira are the work item links and the parent ID for the sub-tasks.
The following code does it:
replica.linkedIssues = issue.issueLinks
replica.parentId = issue.parentId
The main mapping logic is on the Azure DevOps side.
Incoming Sync: Azure DevOps
You must add a parent-child relationship corresponding to the task-subtask relation in Jira.
Use the following code:
workItem.parentId = null
if (replica.parentId) {
  def localParent = syncHelper.getLocalIssueKeyFromRemoteId(replica.parentId.toLong())
  if (localParent)
     workItem.parentId = localParent.id
}Code language: JavaScript (javascript)
Next, we must cover the relationship type requirement, i.e., mapping the links and creating them in Azure DevOps.
To do that, we create a mapping and then call an endpoint to get the relevant links created in Azure DevOps.
Refer to the following code:
def res = httpClient.get("/Majids%20Development/_apis/wit/workItems/${workItem.id}/revisions", true)
def await = { f -> scala.concurrent.Await$.MODULE$.result(f, scala.concurrent.duration.Duration.apply(1, java.util.concurrent.TimeUnit.MINUTES)) }
def creds = await(httpClient.azureClient.getCredentials())
def token = creds.accessToken()
def baseUrl = creds.issueTrackerUrl()
def project = workItem.projectKey
def localUrl = baseUrl + '/_apis/wit/workItems/' + workItem.id

int x = 0

res.value.relations.each{
    revision ->
        def createIterationBody1 = [
            [
                op: "test",
                path: "/rev",
                value: (int) res.value.size()

            ],
            [
                op:"remove",
                path:"/relations/${++x}"
            ]
        ]
}

def linkTypeMapping = [
    "blocks": "System.LinkTypes.Dependency-Reverse",
    "relates to": "System.LinkTypes.Related"
]

def linkedIssues = replica.linkedIssues
if (linkedIssues) {
    replica.linkedIssues.each{
        def localParent = syncHelper.getLocalIssueKeyFromRemoteId(it.otherIssueId.toLong())
        if (!localParent?.id) { return; }
        localUrl = baseUrl + '/_apis/wit/workItems/' + localParent.id
        def createIterationBody = [
            [
                op: "test",
                path: "/rev",
                value: (int) res.value.size()
            ],
            [
                op:"add",
                path:"/relations/-",
                value: [
                    rel:linkTypeMapping[it.linkName],
                    url:localUrl,
                    attributes: [
                        comment:""
                    ]
                ]
            ]
        ]

        def createIterationBodyStr = groovy.json.JsonOutput.toJson(createIterationBody)
        converter = scala.collection.JavaConverters;
        arrForScala = [new scala.Tuple2("Content-Type","application/json-patch+json")]
        scalaSeq = converter.asScalaIteratorConverter(arrForScala.iterator()).asScala().toSeq();

        createIterationBodyStr = groovy.json.JsonOutput.toJson(createIterationBody)

        def result = await(httpClient.azureClient.ws
            .url(baseUrl+"/${project}/_apis/wit/workitems/${workItem.id}?api-version=6.0")
            .addHttpHeaders(scalaSeq)
            .withAuth(token, token, play.api.libs.ws.WSAuthScheme$BASIC$.MODULE$)
            .withBody(play.api.libs.json.Json.parse(createIterationBodyStr), play.api.libs.ws.JsonBodyWritables$.MODULE$.writeableOf_JsValue)
            .withMethod("PATCH")
            .execute())
    }
}Code language: JavaScript (javascript)
Step 4: Test with Test Run
Before publishing your configuration, use the Test Run feature to validate your sync scripts. Enter a work item key from Jira and preview how it would sync to Azure DevOps. Review the replica to verify that link mappings and parent-child relationships are correctly configured.
If needed, adjust the scripts and test again. Deploy only when you’re confident everything works correctly.
Step 5: Add Triggers
To start your sync automatically, add triggers. Triggers are conditions or filters you apply to specific work items. For instance, you can sync all Jira work items that have a label “sync-to-ado”, or sync all Stories in a specific project.
In Jira, use JQL: project = "YourProject" AND issuetype = Story
In Azure DevOps, use WIQL to filter which work items should sync back.
Output
You can set up automatic sync triggers to start the sync whenever a Story is created in Jira.
In Jira
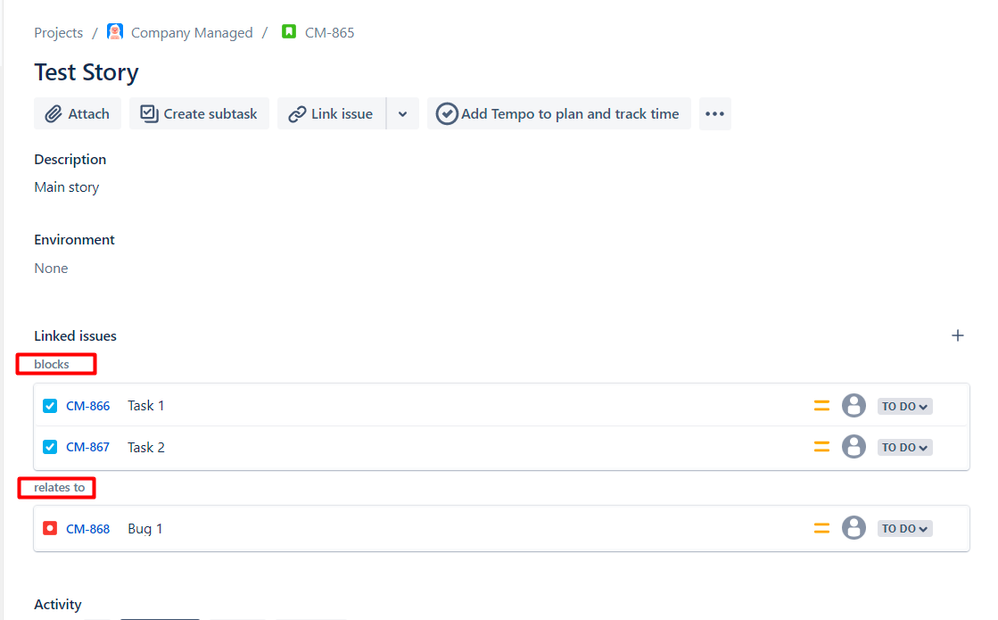
Create a Story in Jira. Create the linked work items: 2 Tasks (Task 1 and Task 2) with the required relationship types. Create a Bug with the required relationship type.
In Azure DevOps
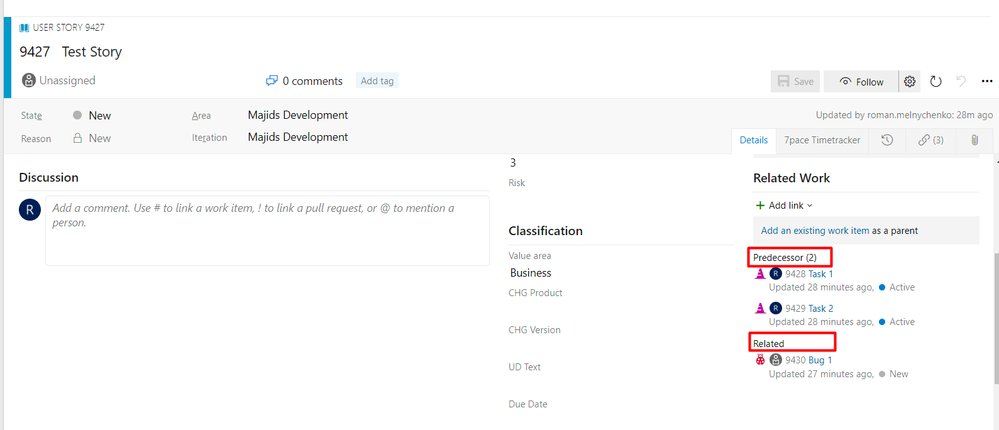
Work items and the relations are synced, and the parent-child hierarchy is maintained.
Common Relationship Type Mappings
Here are some common relationship type mappings between Jira and Azure DevOps:
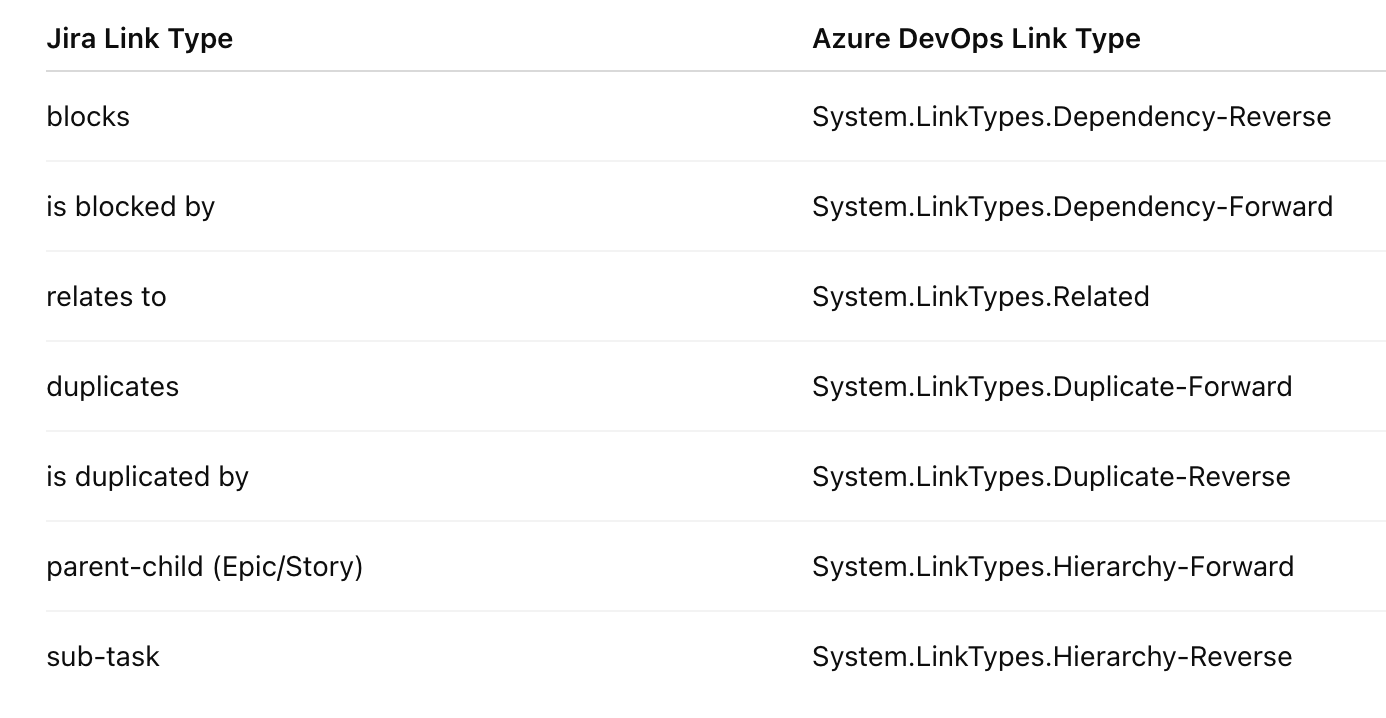
You can customize these mappings in the linkTypeMapping variable based on your specific needs.
Conclusion
Integrating Jira and Azure DevOps brings significant benefits. It reduces manual efforts, increases the visibility of important information, and keeps development teams aligned regardless of which platform they use. Maintaining work item links and hierarchies across both systems ensures complete traceability throughout your development lifecycle. Book a demo or start a free trial with Exalate to see how it works for your specific scenario.
With Exalate, you get:
- Unified console: Manage all integrations from one place
- Groovy scripting: Full flexibility for complex mappings
- AI-assisted setup: Aida generates scripts from natural language
- Test Run: Validate before production deployment
- Script versioning: Full audit trail with rollback capability
- Real-time sync: Complete queue visibility
- Enterprise security: ISO 27001 certified, RBAC, encryption at rest and in transit
Recommended Reading:
- How to Append the Jira Issue Key to a Private Comment in Zendesk When the Issue is Closed
- How to Synchronize Epics between 2 Jira Instances
- Advanced Integration Use Cases
- How to Sync SLA Records and Maintain State Updates From ServiceNow Incident to Jira Issue
- HubSpot Jira Integration: Manage your HubSpot Data in Jira Like a Pro


