Sales teams and customer support staff can stay in lockstep regarding customers when both teams have access to relevant, real-time data.
This helps them sync information from default and custom fields between Salesforce cases and Freshdesk tickets in real time.
To get this to work smoothly, you’ll need a Freshdesk Salesforce integration solution that gives you full control over what syncs and how.
In this article, I’ll discuss the core principles of integrating Salesforce with Freshdesk, explore practical use cases across different industries, and help you choose the right integration approach for your team.
Key Takeaways
- Freshdesk Salesforce integration eliminates data silos between support and sales teams.
- Real-time bidirectional sync keeps customer context visible across both platforms. Proper implementation improves response times, customer satisfaction, and cross-team collaboration.
- Advanced integrations support custom field mapping, status synchronization, and multi-entity relationships.
- Choose integration tools based on customization flexibility, security standards, and operational control.

Why Integrate Salesforce With Freshdesk?
The benefits of integrating a Freshdesk instance with Salesforce vary depending on your specific business or technical use case. Here’s what you gain:
- Unified team collaboration: Unify the efforts of both teams within the same organization through cross-platform integration.
- Enhanced visibility: Teams on both sides get a better view of ongoing operations, open tickets, and trending customer concerns. They also gain a complete view of the customer journey from first contact to closed sale.
- Improved service quality: Better visibility directly improves the quality of services delivered to customers and their overall satisfaction levels
- Eliminated information silos: Tools like Exalate break down information silos, creating clear communication paths between support and sales.
- Cross-company collaboration: Enable cross-company collaborations for teams in different organizations without affecting internal company culture.
- Cost savings: Both teams stay within their own instance without needing to onboard new members to separate platforms to acquire the required information.
- Automated workflows: Eliminate manual data entry and reduce human error to help support agents see sales context and resolve issues as soon as possible.
3 Ways to Integrate Salesforce and Freshdesk
All integration options for Salesforce and Freshdesk can be grouped into the following categories:
Native Integrations
Freshdesk comes with out-of-the-box native integration for different apps. You can integrate e-commerce platforms like Stripe and Shopify or work management systems such as Salesforce, Jira, and Zendesk.
Salesforce has an array of native integration options, like Mulesoft, which is a hybrid between a native and third-party solution.
Mulesoft allows you to connect your Salesforce org with your Freshdesk account. But the major drawback is that you’re limited only to template connections, which you cannot use for complex integration scenarios.
Pros:
- Quick setup
- No additional costs beyond platform licenses
- Basic functionality works out of the box
Cons:
- Limited customization options
- Template-based configurations don’t fit unique workflows
- Difficult to modify without vendor support
- Often lacks advanced features like conditional sync.
You’d need a Salesforce connector that gives you more flexibility and customization options.
Custom Integrations
If you want to extend the scope of applicability for your Freshdesk to Salesforce integration, a custom solution is another option to explore.
A custom integration solution could be a middleware application developed in-house from scratch to interact with the API of both platforms. It could also be a script that performs specific functions and fetches data based on code.
Pros:
- Complete control over functionality
- Tailored exactly to your requirements
- No vendor lock-in
Cons:
- High development costs (often $50,000-$200,000+)
- Ongoing maintenance burden
- Requires dedicated development resources
- Limited to the platforms for which it was developed
- Breaks when platform APIs change
- Difficult to scale or modify.
The problem with custom integration is that it requires significant resources to build and maintain.
Third-Party Integration Platforms
To avoid the development and maintenance costs associated with custom integration development, the alternative is to opt for a third-party integration platform.
Unlike native integrations, third-party apps allow bidirectional data exchange between CRMs, ERPs, and cloud solutions.
Third-party integrations support connections with multiple platforms simultaneously, making it possible to scale with your system workload.
Pros:
- Faster deployment than custom solutions
- Lower cost than building in-house
- More flexibility than native integrations
- Vendor handles maintenance and updates
- Multi-platform support
Cons:
- Subscription costs
- Some platforms limit customization
- Dependency on vendor roadmap

Use the calculator to determine the cost of building or buying your integration solution.
Exalate As The Perfect Freshdesk to Salesforce Integration Tool
Exalate is an AI-powered integration tool that supports one-way and two-way custom connections between Salesforce and service desk platforms such as Freshdesk, Freshservice, Zendesk, and ServiceNow.
It also supports integrations with work management systems such as Azure DevOps, Azure DevOps Server, Jira, Asana, and GitHub.
Key differentiators for Exalate:
- AI-assisted configuration: Aida, the embedded AI assistant, automates sync rule generation and helps configure complex scenarios without deep technical knowledge
- Full scripting control: Groovy-based scripting mode improves flexibility by allowing engineers to implement advanced sync scenarios with complete operational control over your sync
- Automated triggers: Streamline the replication of tickets and desired actions using native conditional logic to control how connections behave when events occur (like ticket priority changes)
- Enterprise security: ISO 27001 certified with role-based access control, encryption of data both in transit and at rest, and comprehensive security protocols available at our Trust Center.
- Scalability: Scales according to ticket volume or number of entities without needing additional maintenance or upgrades
- IaaS offering: Integration as a Service for companies connecting with multiple partners, vendors, MSPs, customers, or suppliers
- Multi-platform ecosystem: Single platform for all your integration needs across service desk, CRM, and work management tools
Features to Consider When Choosing a Freshdesk Salesforce Integration Tool
Selecting the right integration platform determines how well your teams can collaborate and how much control you have over your data flow. Here are the critical features to evaluate.
1. Customization and Flexibility
What to look for:
- Custom field mapping beyond standard fields
- Conditional sync rules based on ticket priority, account type, or custom criteria
- Support for complex workflows involving multiple entities
- Ability to modify sync behavior without vendor assistance
Why it matters: Every business has unique processes. Cookie-cutter integrations force you to change your workflows instead of adapting to them.
Exalate approach: AI-assisted configuration (Aida) allows you to define exactly what syncs and under what conditions. You maintain full operational control over your sync with custom scripting capabilities using Groovy.
2. Security and Compliance
What to look for:
- ISO 27001 certification
- Role-based access control (RBAC)
- Encryption of data both in transit and at rest
- Data residency options for compliance with regulations
Why it matters: Customer data moves between systems continuously. Any security gap puts your entire organization at risk.
Exalate approach: Exalate meets enterprise security standards with ISO 27001 certification, comprehensive encryption, and granular role-based access controls.
Sync Panel
Exalate also comes with a Chrome extension called Sync Panel that lets users check sync status, spot errors, trigger manual syncs, and unlink sync pairs straight from the browser, without opening the console.
It’s useful for two groups: admins who want to keep an eye on sync status without switching tabs and end users who want to confirm that the remote side received their update.
You can access this feature via the browser. But if you want to check the sync queue status or configure your sync, you still need to log into the Exalate console.
3. Bidirectional vs. Unidirectional Sync
What to look for:
- True bidirectional synchronization (changes flow in both directions)
- Conflict resolution strategies when simultaneous updates occur
- Option to configure one-way sync for specific fields or scenarios
Why it matters: Unidirectional sync creates information gaps. Bidirectional sync keeps both teams working with the same current data.
Exalate approach: Supports both bidirectional and unidirectional sync with granular control over which fields sync in which direction.
4. Real-Time vs. Scheduled Sync
What to look for:
- Near-instant synchronization for time-sensitive updates
- Configurable sync intervals for less urgent data
- Manual sync triggers for specific scenarios
Why it matters: Delayed updates mean teams work with stale information, leading to duplicate effort and customer frustration.
Exalate approach: Real-time sync with configurable intervals based on your performance requirements and system load.
5. Multi-Platform Support
What to look for:
- Support for additional platforms beyond Freshdesk and Salesforce
- Consistent integration experience across different tools
- Ability to create three-way or multi-way integrations
Why it matters: Your tech stack will evolve. Choose a platform that grows with you.
Exalate approach: Connects Salesforce and Freshdesk with multiple platforms, including Jira, ServiceNow, Azure DevOps, Azure DevOps Server, GitHub, Zendesk, Freshservice, Asana, and custom connectors for proprietary systems.
6. Error Handling and Monitoring
What to look for:
- Clear error messages when sync fails
- Automatic retry mechanisms for transient failures
- Alerting when manual intervention is required
- Unified view of sync status and health
Why it matters: Integration problems shouldn’t be invisible until they cause major issues.
Exalate approach: Comprehensive error reporting with detailed logs and proactive notifications when sync issues occur.
7. Scalability
What to look for:
- Performance with high ticket/case volumes
- No hard limits on the number of synced entities
- Consistent performance as data grows
Why it matters: Integration bottlenecks slow down your entire operation during peak times.
Exalate approach: Scales according to ticket volume without requiring additional maintenance or upgrades.
8. Deployment and Maintenance
What to look for:
- Straightforward setup process
- Clear documentation and support resources
- Minimal ongoing maintenance requirements
- Vendor support for troubleshooting
Why it matters: Complex deployments delay ROI and require dedicated resources.
Exalate approach: Streamlined installation with AI-assisted configuration reduces setup time. Ongoing maintenance is minimal due to platform stability.
A Step-by-Step Setup Guide For Freshdesk to Salesforce Integration With Exalate
Get Started and Set Up Your Account
Visit the Exalate integrations page to begin your journey. You can create a new account by manually entering your email and verifying it, or you can simply sign up using your Google credentials.
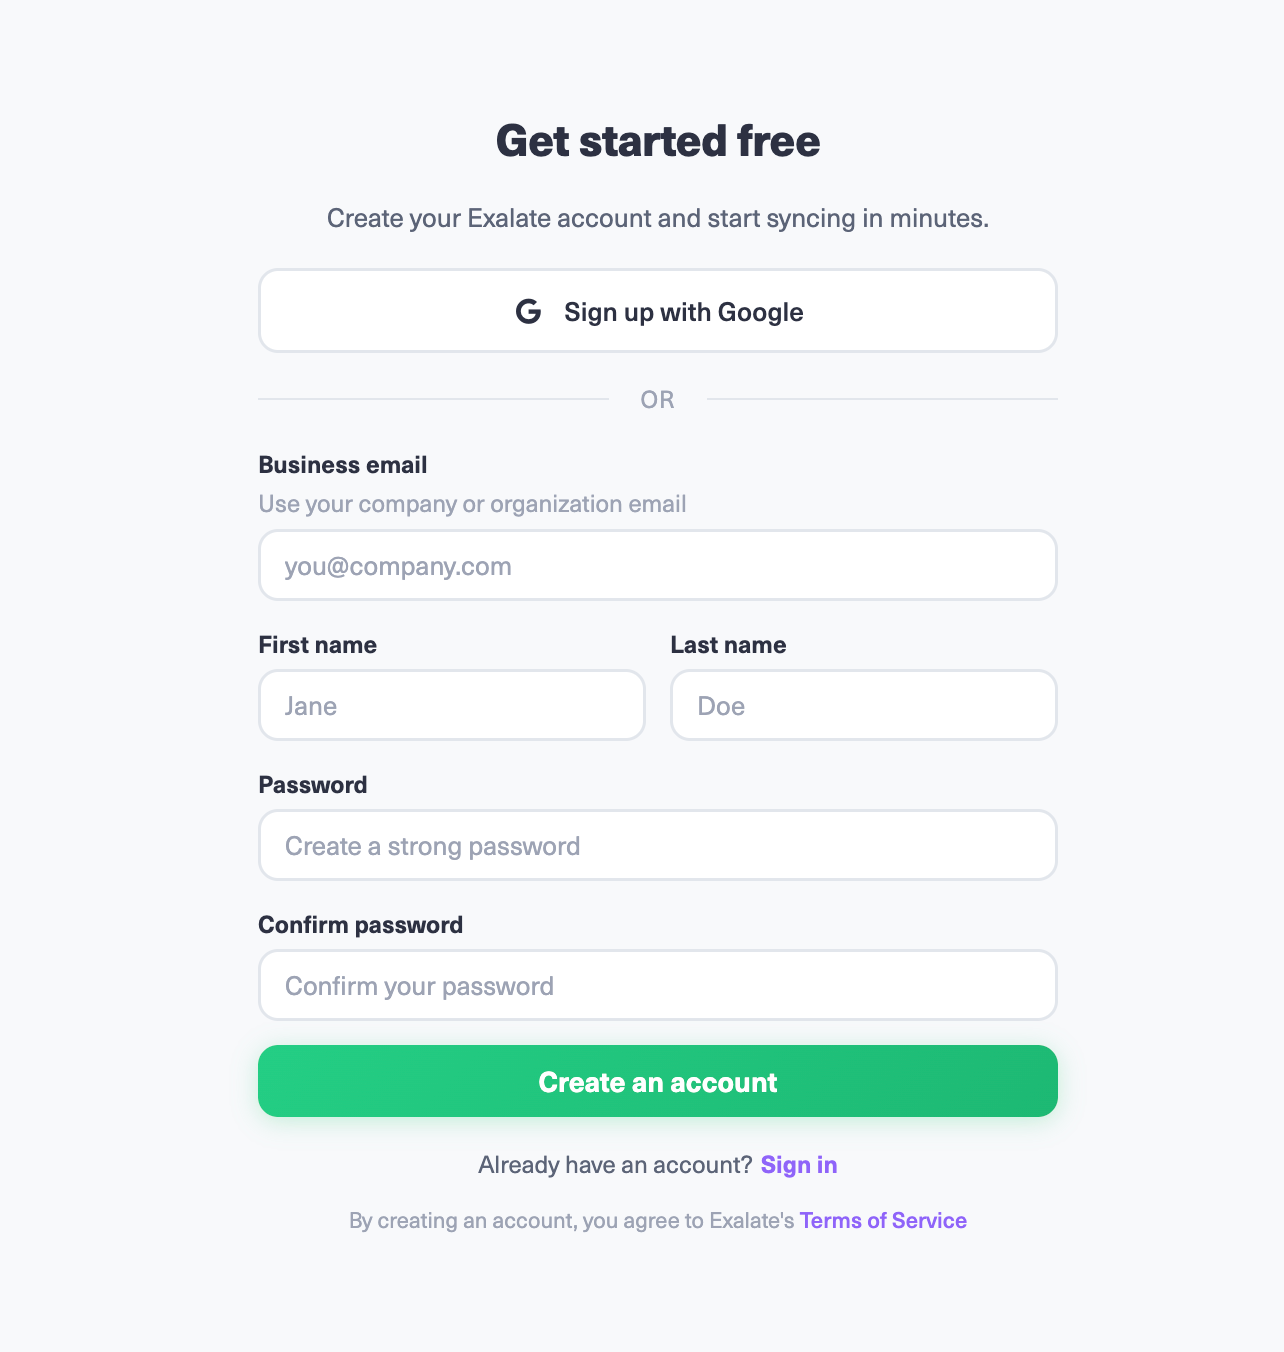
If you already have an account, log in directly to access the dashboard.
Initiate a Connection
To connect Freshdesk and Salesforce, you need an active Exalate account and access credentials for the systems you want to connect.
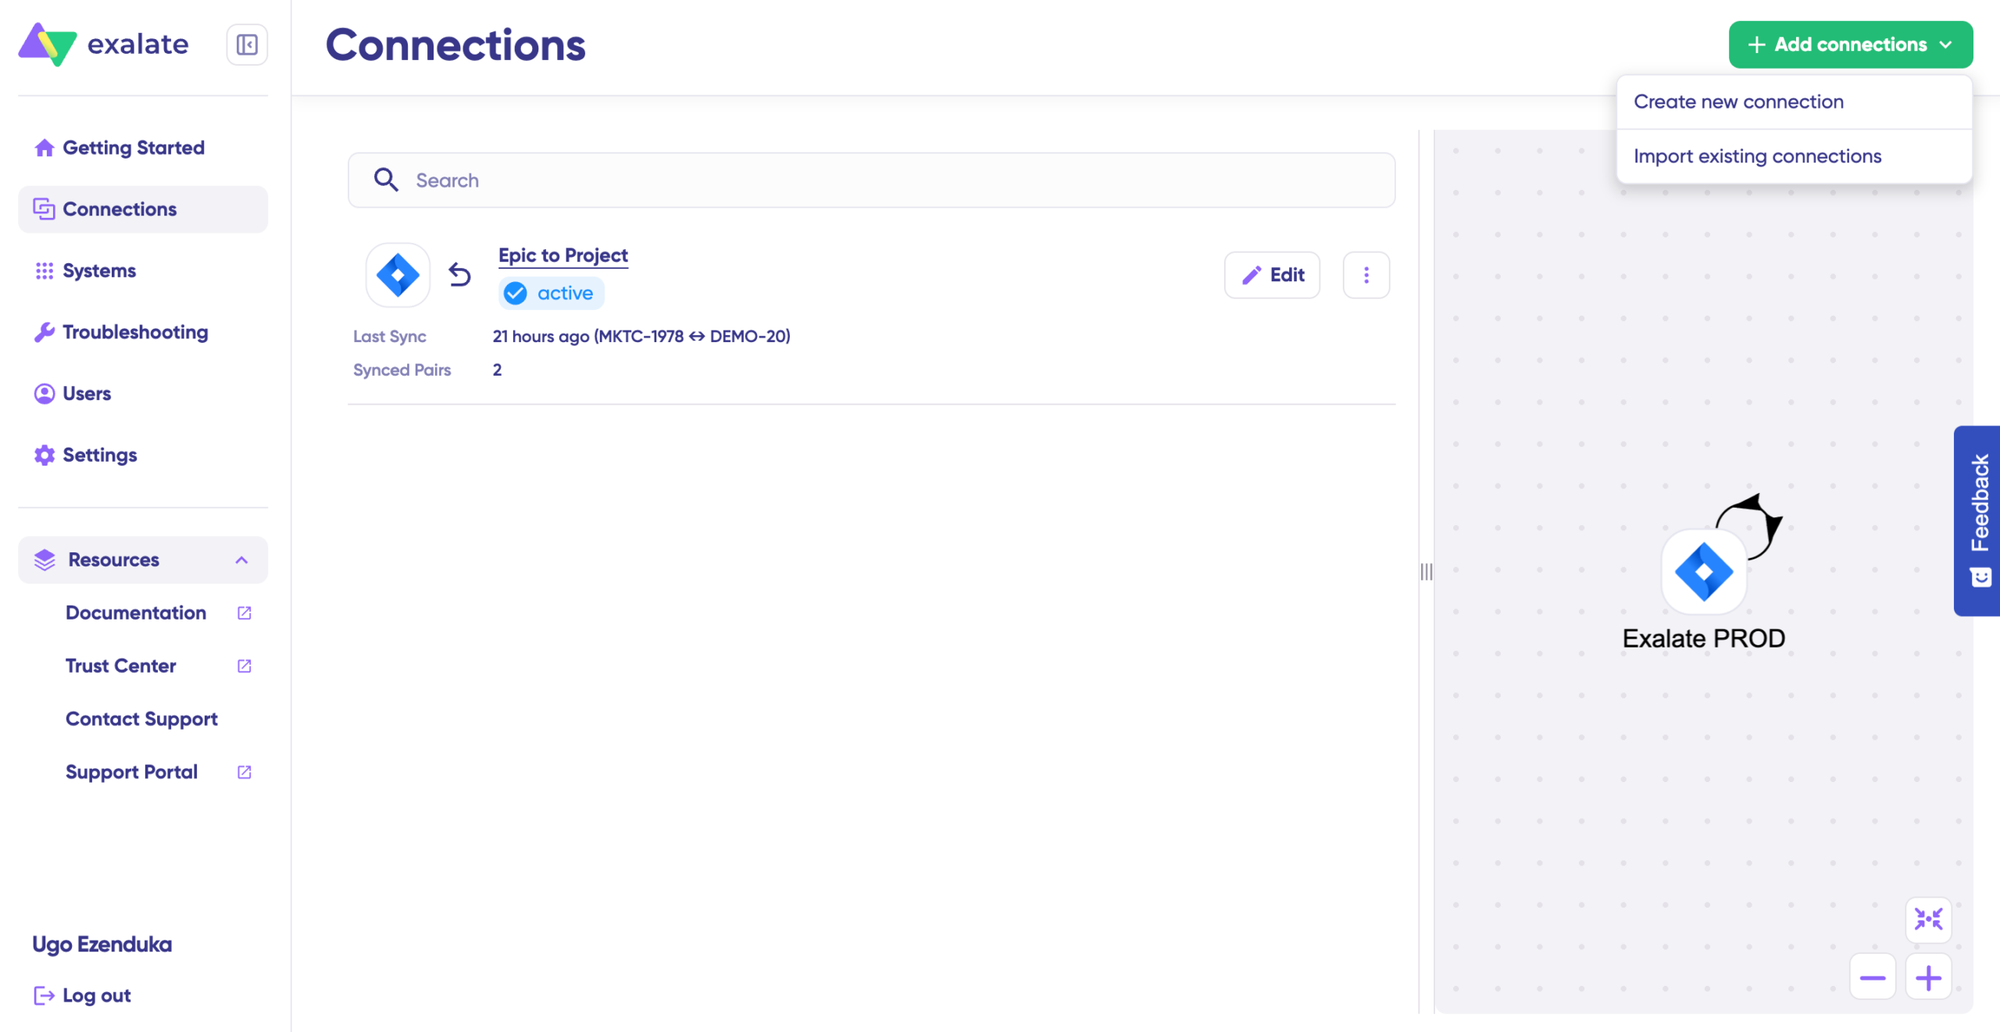
Click on “+ Add connections” and select “Create new connection“. Enter the name for your first system (e.g., Salesforce) and input the instance URL.
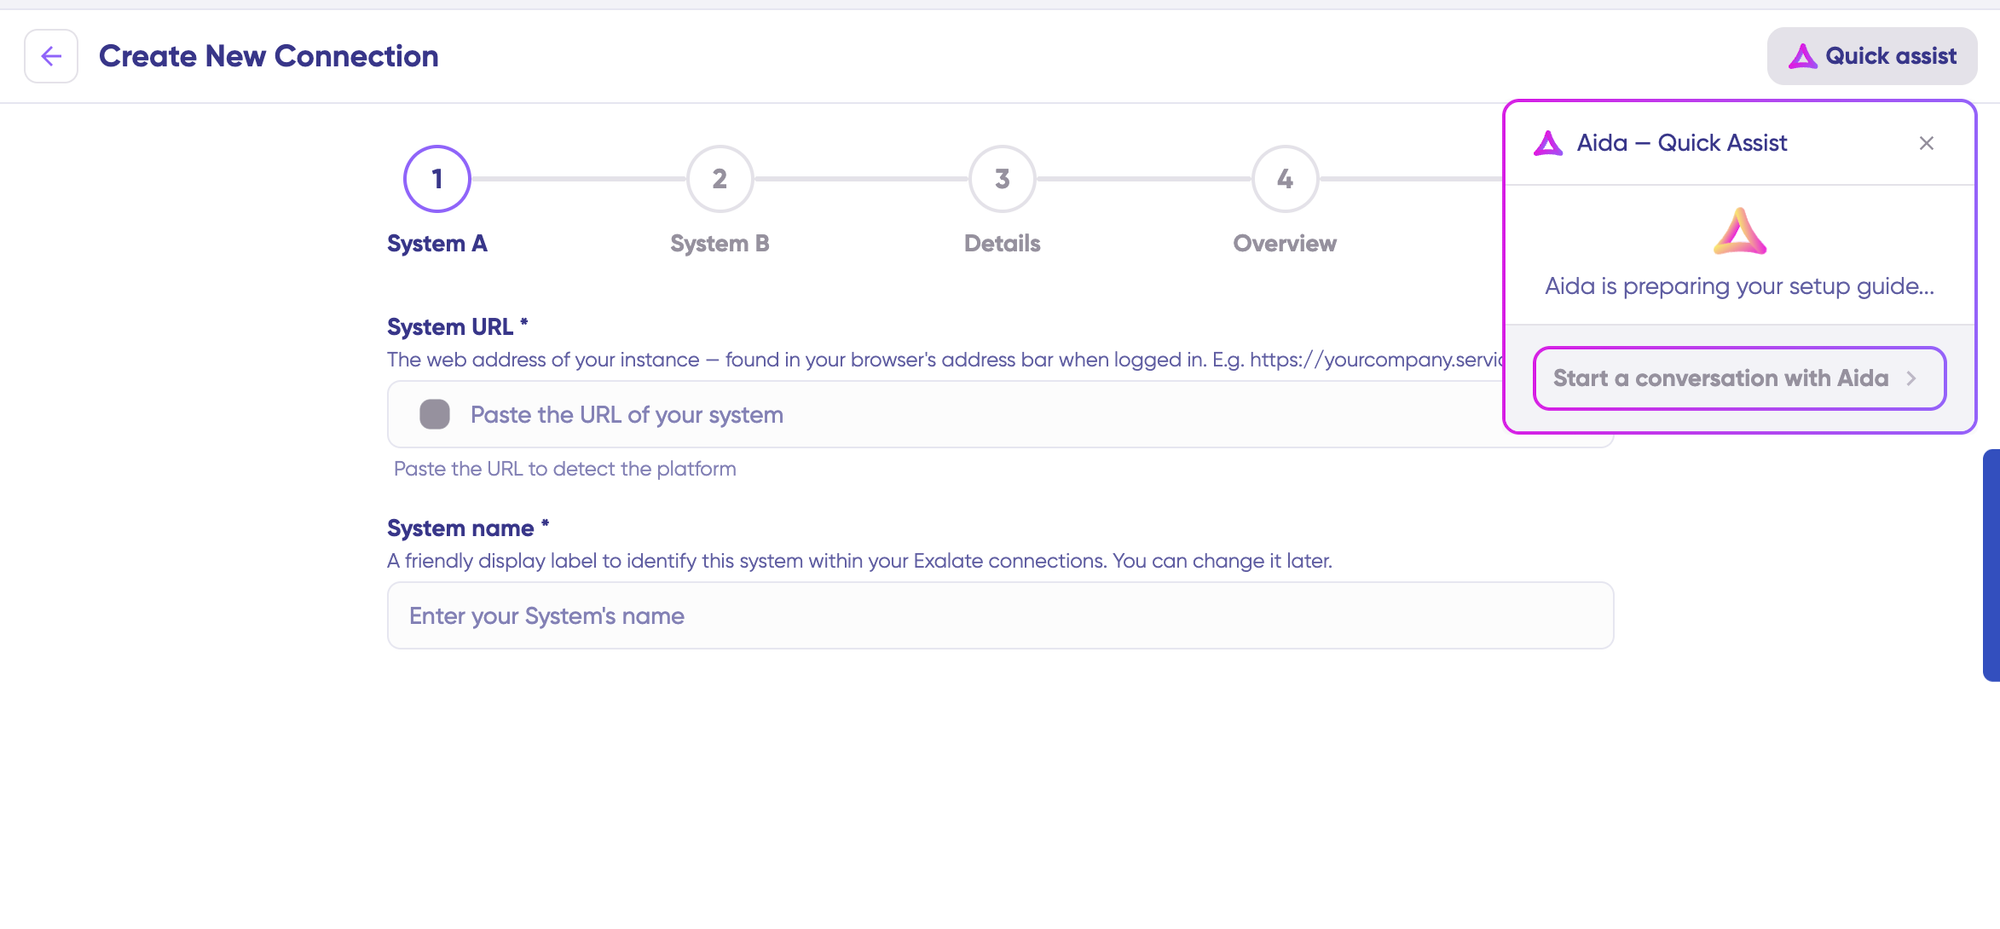
You can also speed up the process by using Aida – Quick Assist at the top right of the dashboard. Wait for the automatic checks and authentication processes to complete in the background.
Authenticate Your Systems
Enter the specific authentication details for your platforms. For Salesforce, use the client ID and secret. For Freshdesk, enter the username and API key or Password, depending on the specific platform requirements.
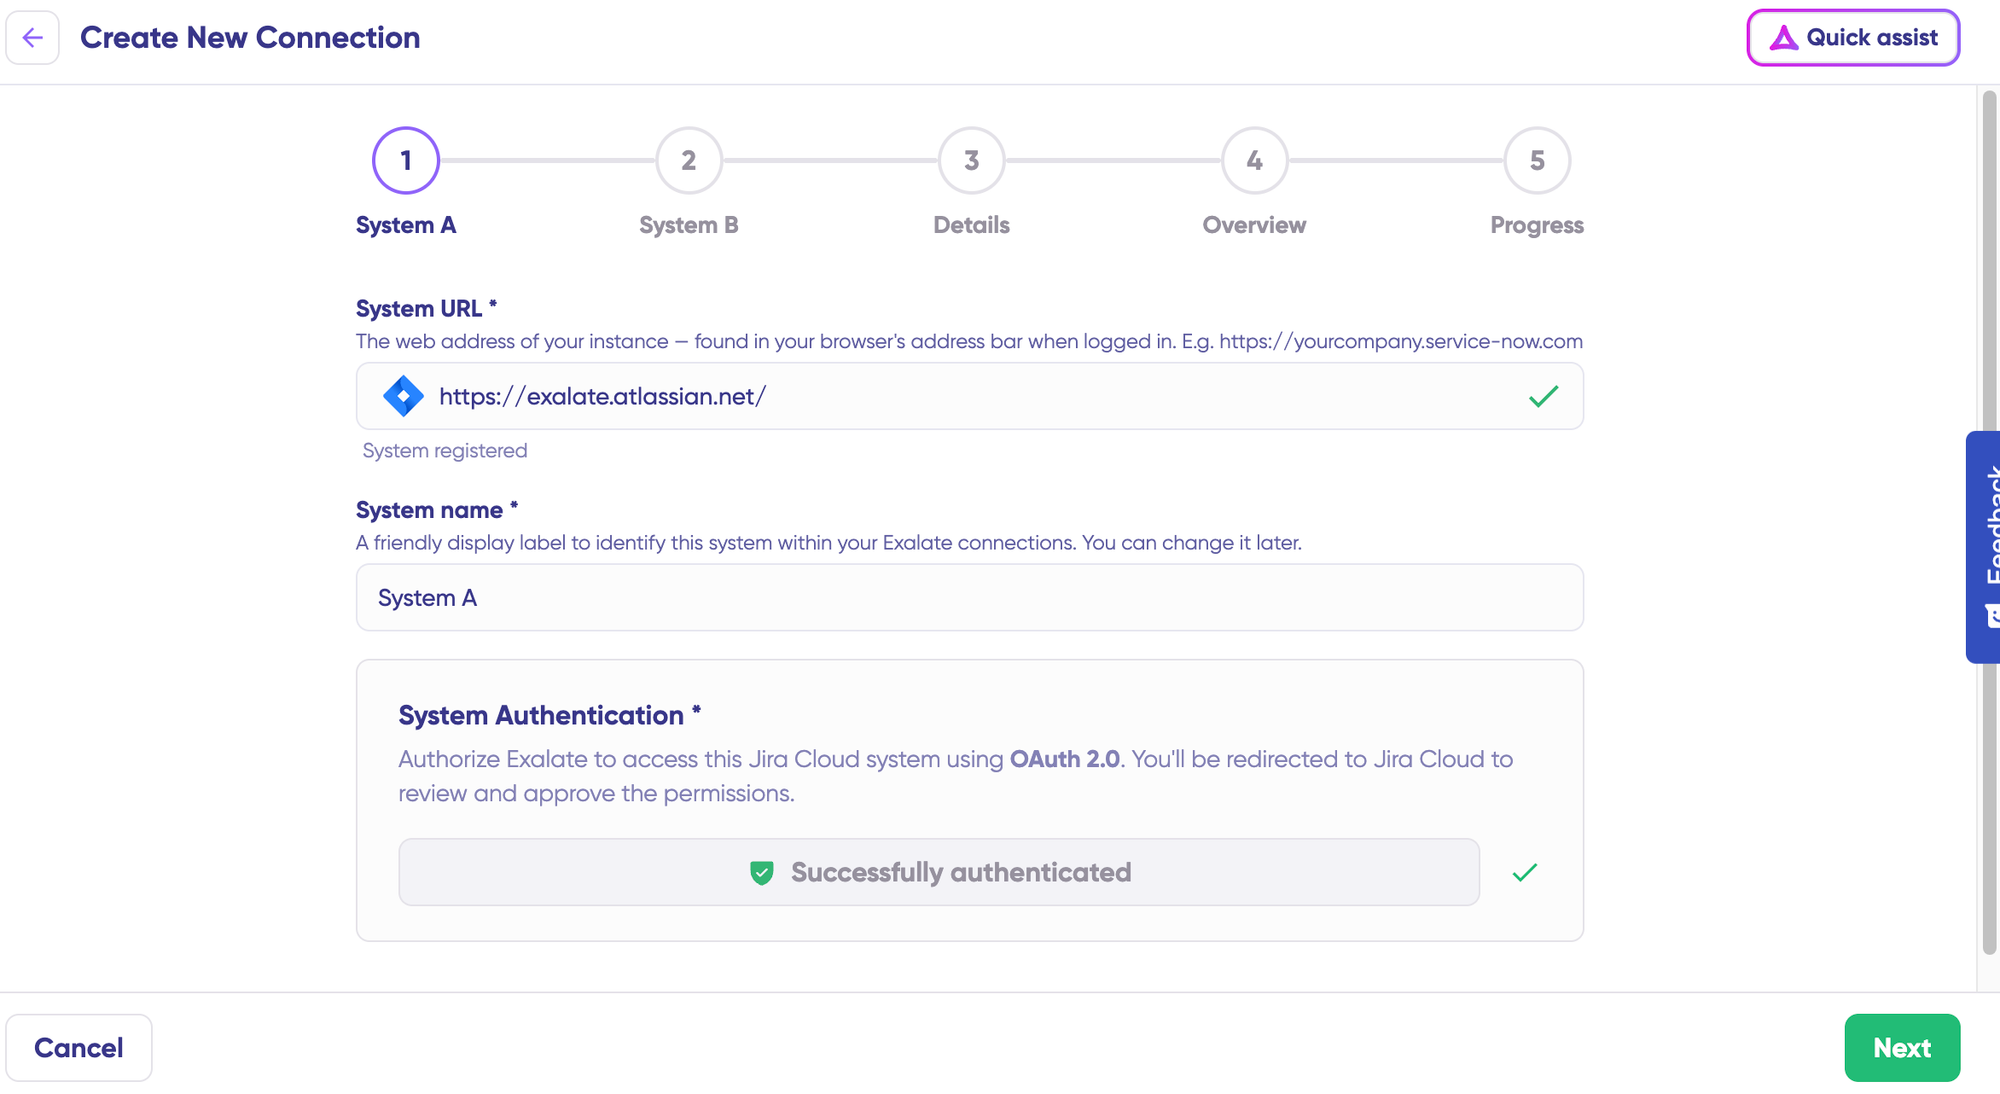
Click on “Check Authentication“. Once verified, you will see a “Successfully Authenticated” message. Click Next and repeat this procedure for System B (Freshdesk).
Finalize the Connection Setup
Confirm your Connection Name and add an optional description. Review the setup details and click “Create Connection“.
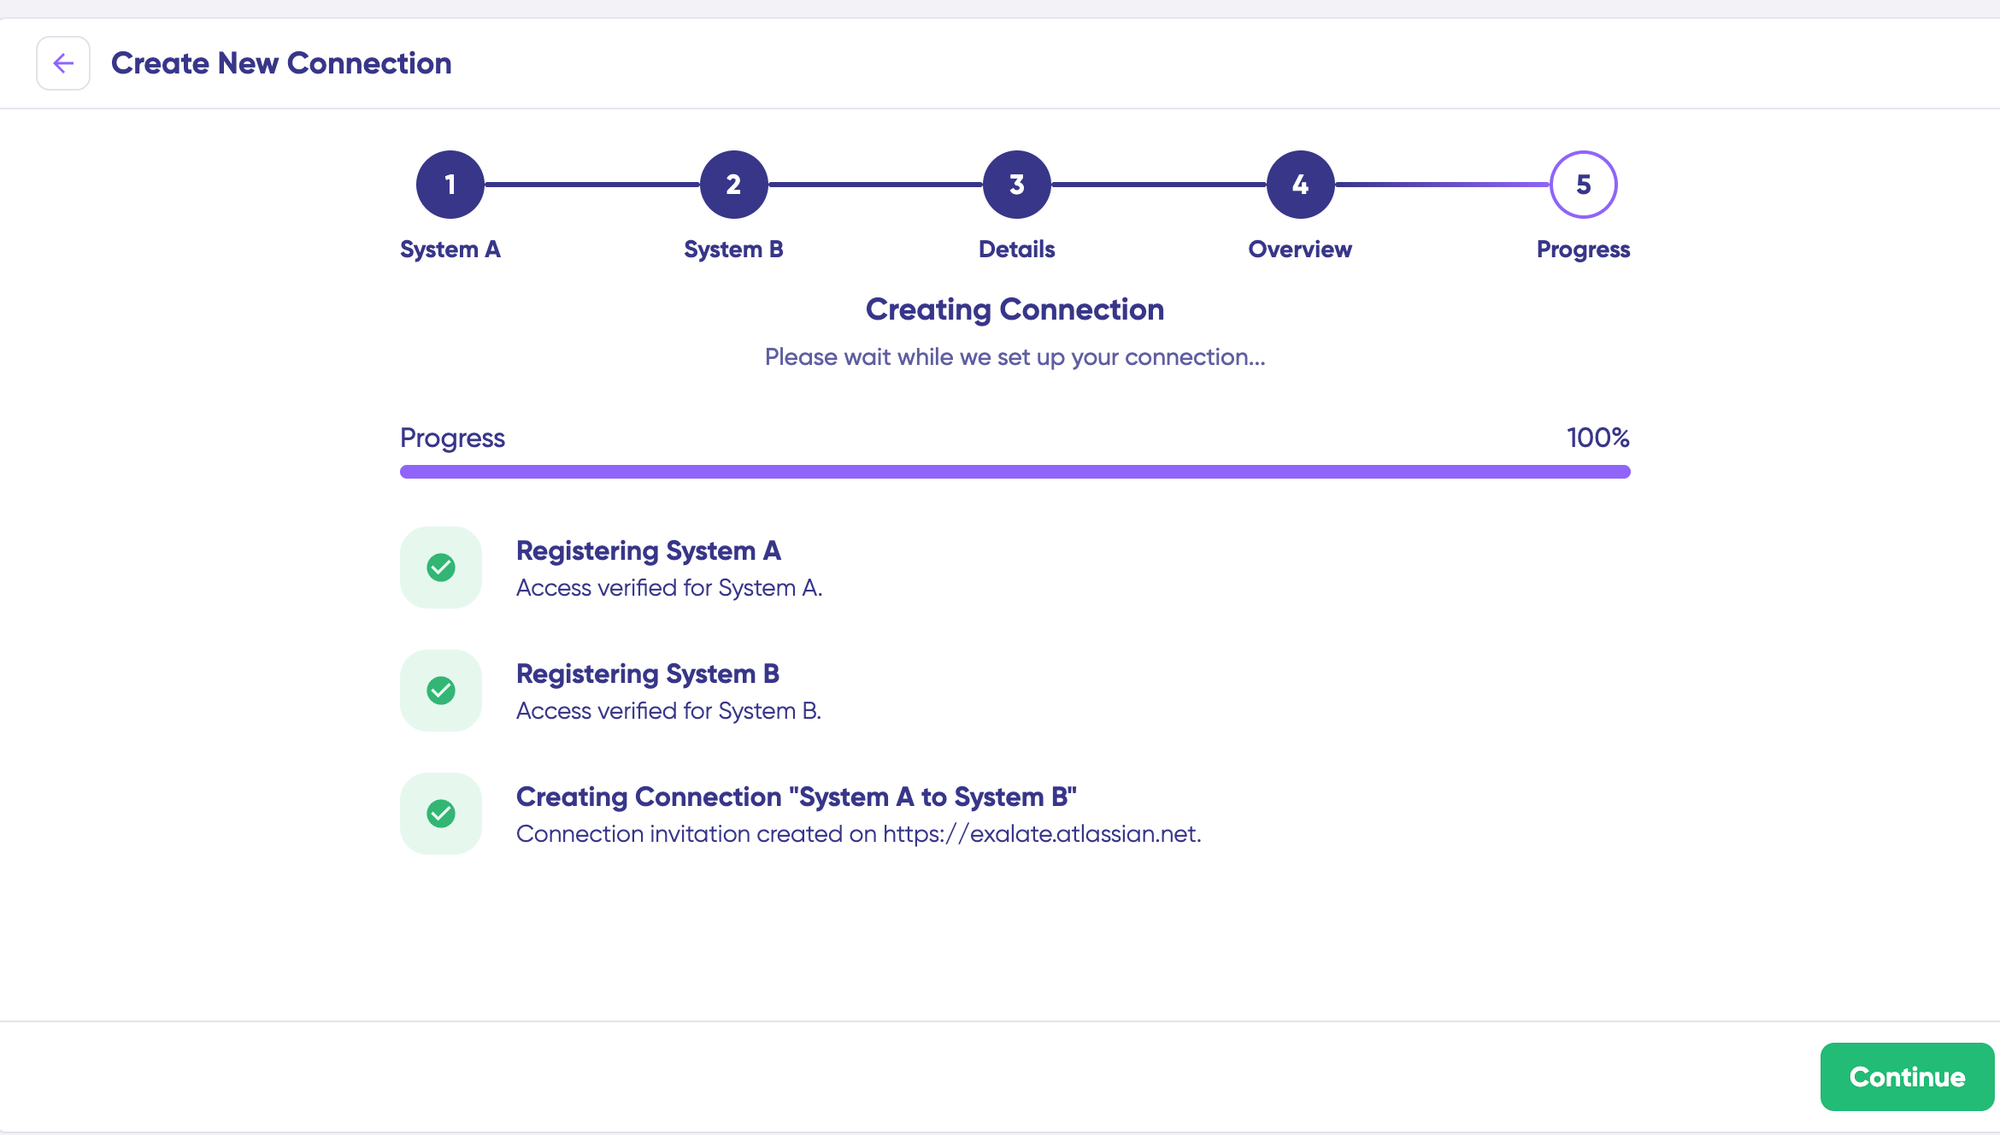
Allow a few minutes for the system to configure the necessary checks and setups in the background. Once the process is complete, click “Continue to Configuration“.
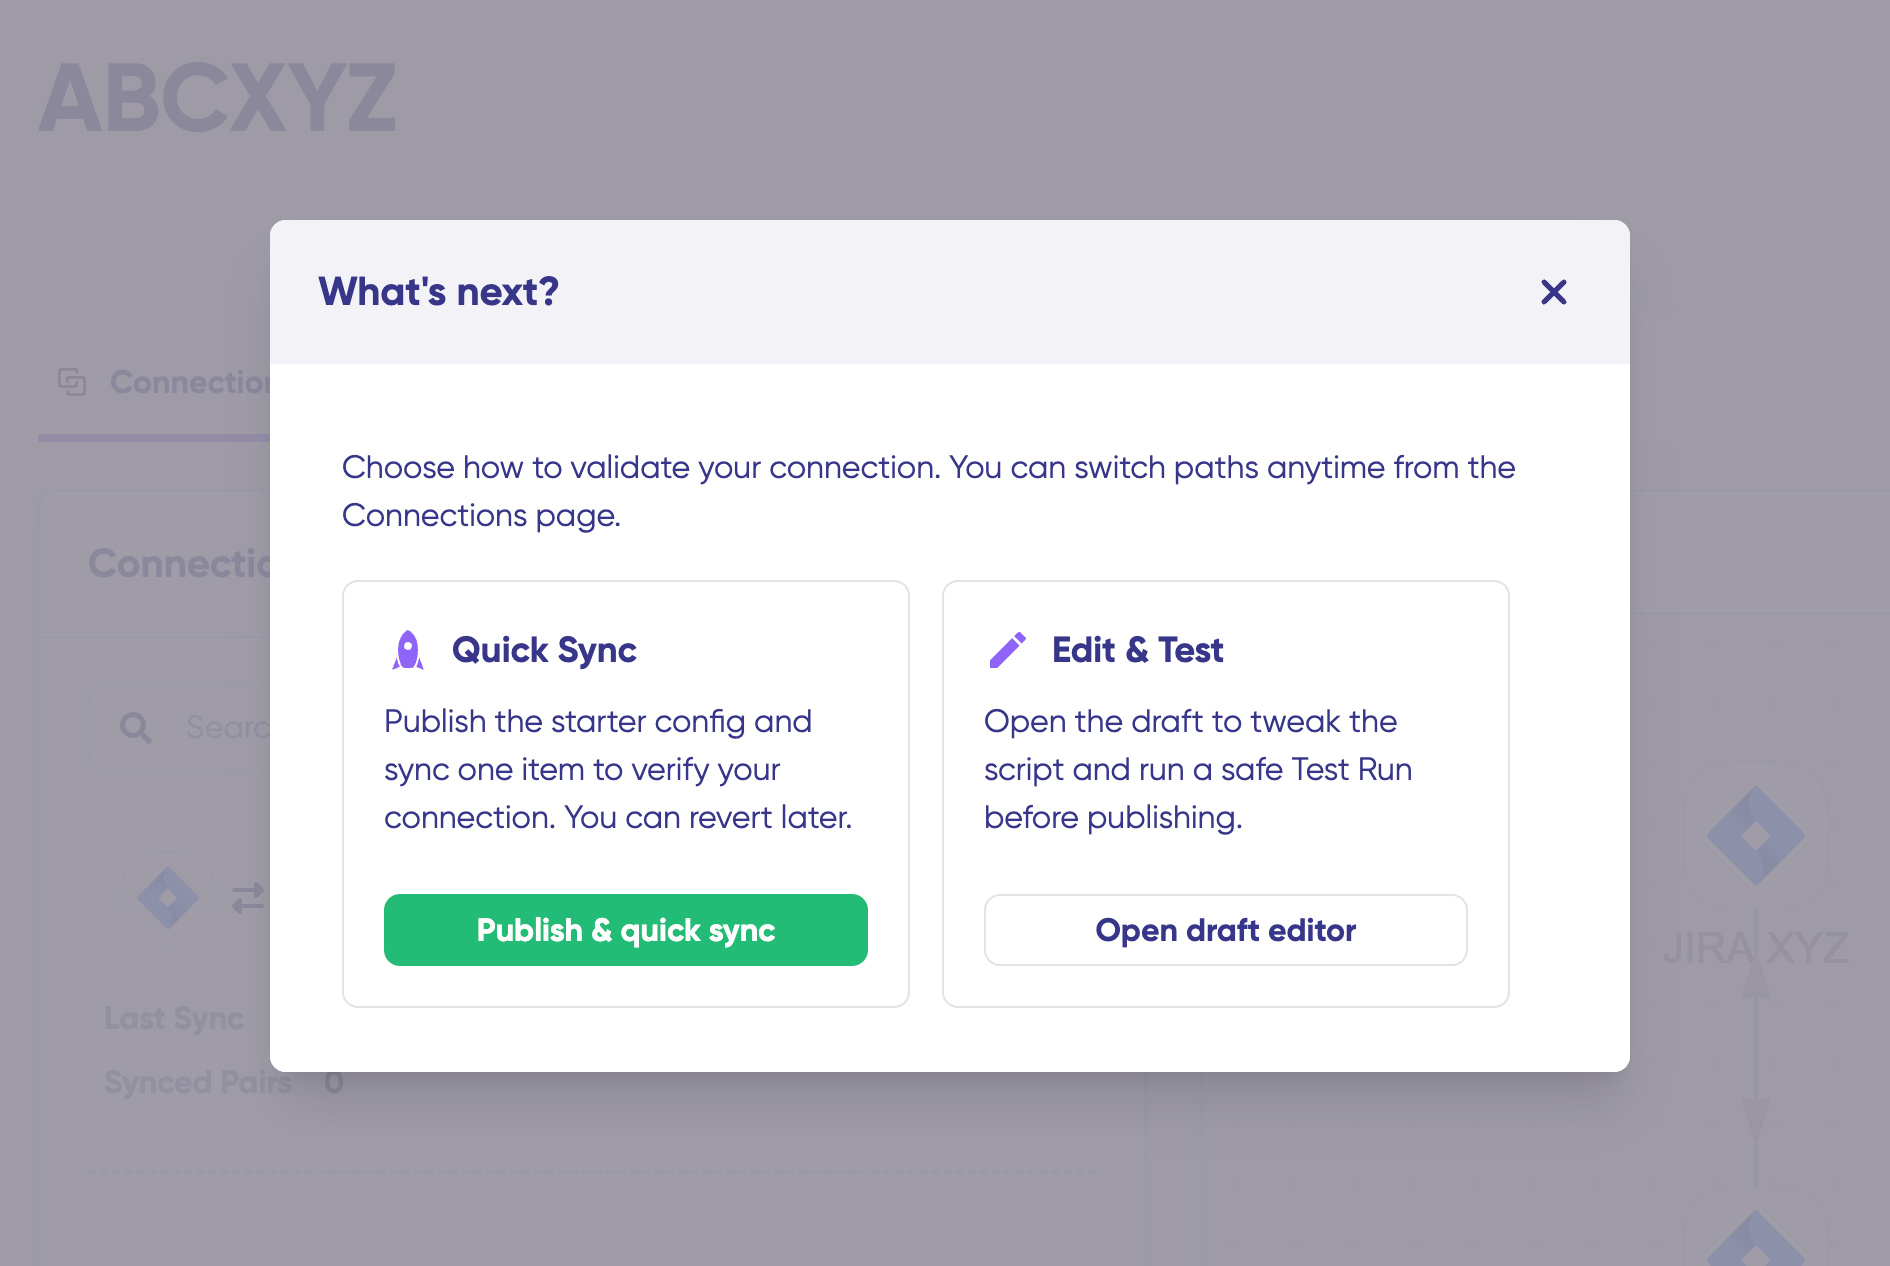
Choose Your Sync Mode
You now have two options to proceed. The Quick Sync option is ideal for immediate testing as it allows you to sync one item instantly.
Under the “Item sync monitor“, enter a specific Key or ID and click “Sync Now“.
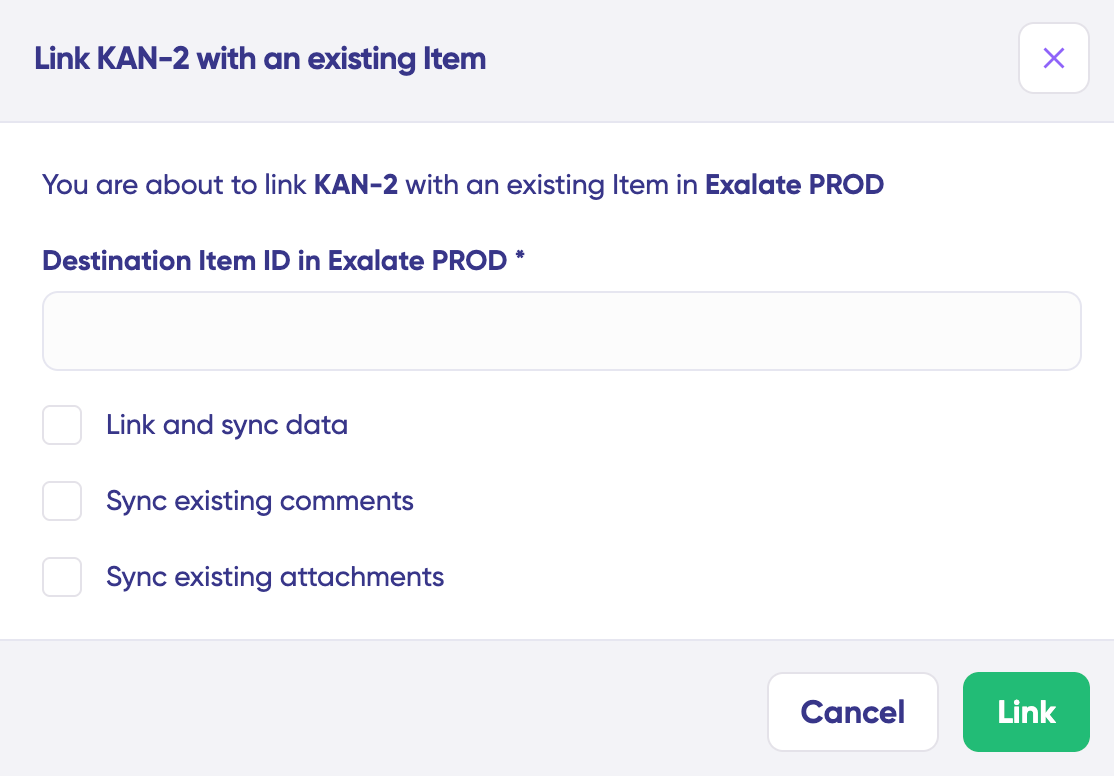
To connect items that already exist on both sides, use “Link with existing“.
Alternatively, use the Open Draft Editor option. Select “Open latest draft” or “+ New version” to enter the configuration mode.
This safely opens a draft environment so you do not accidentally modify a live configuration.
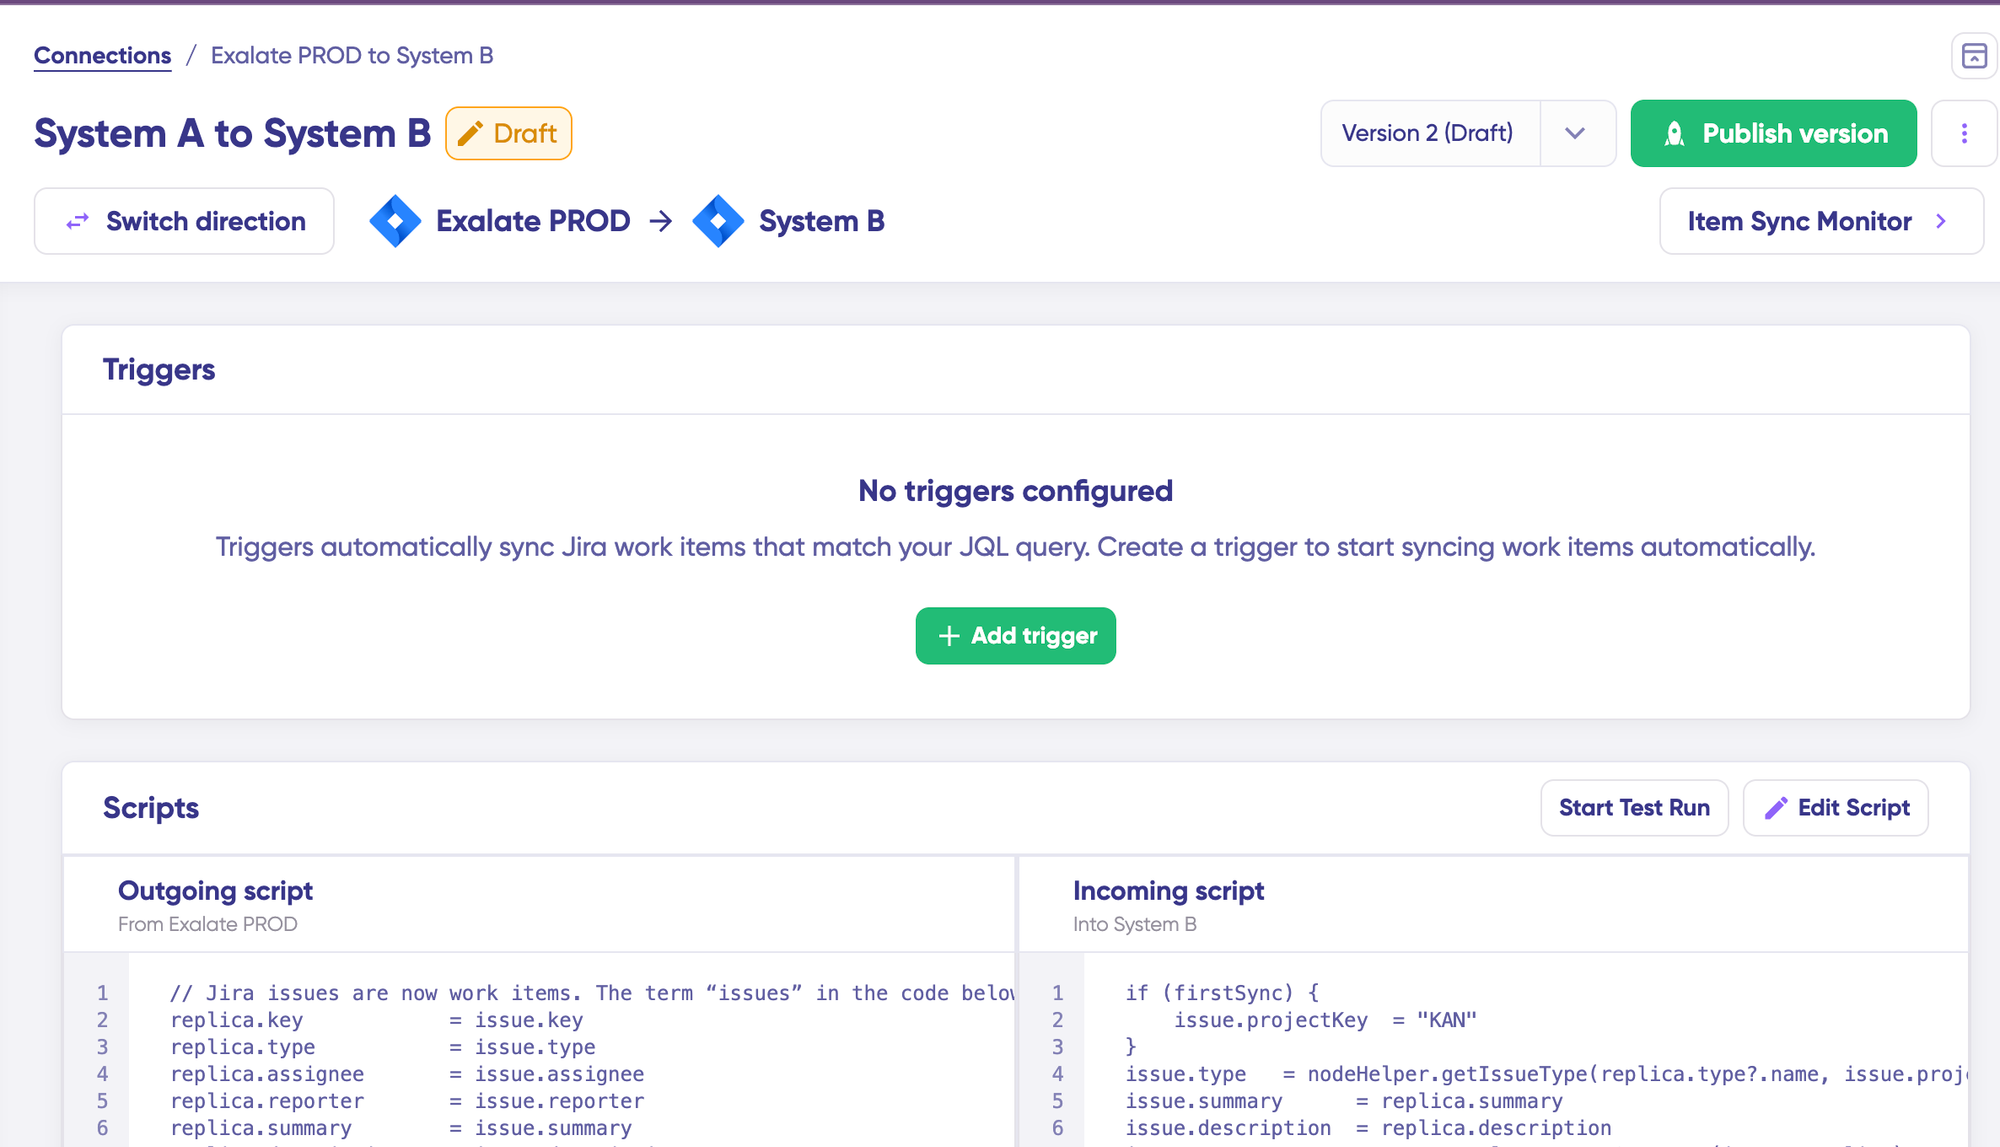
Configure Sync Scripts
Click the “Edit Script” button to open the script editor. Here, you define your sync rules using Groovy-based scripts.
The Outgoing Script defines what data leaves the source system, while the Incoming Script defines how data arriving from the remote system is mapped locally. The Replica is the JSON file carrying the payload of data shared between the entities.
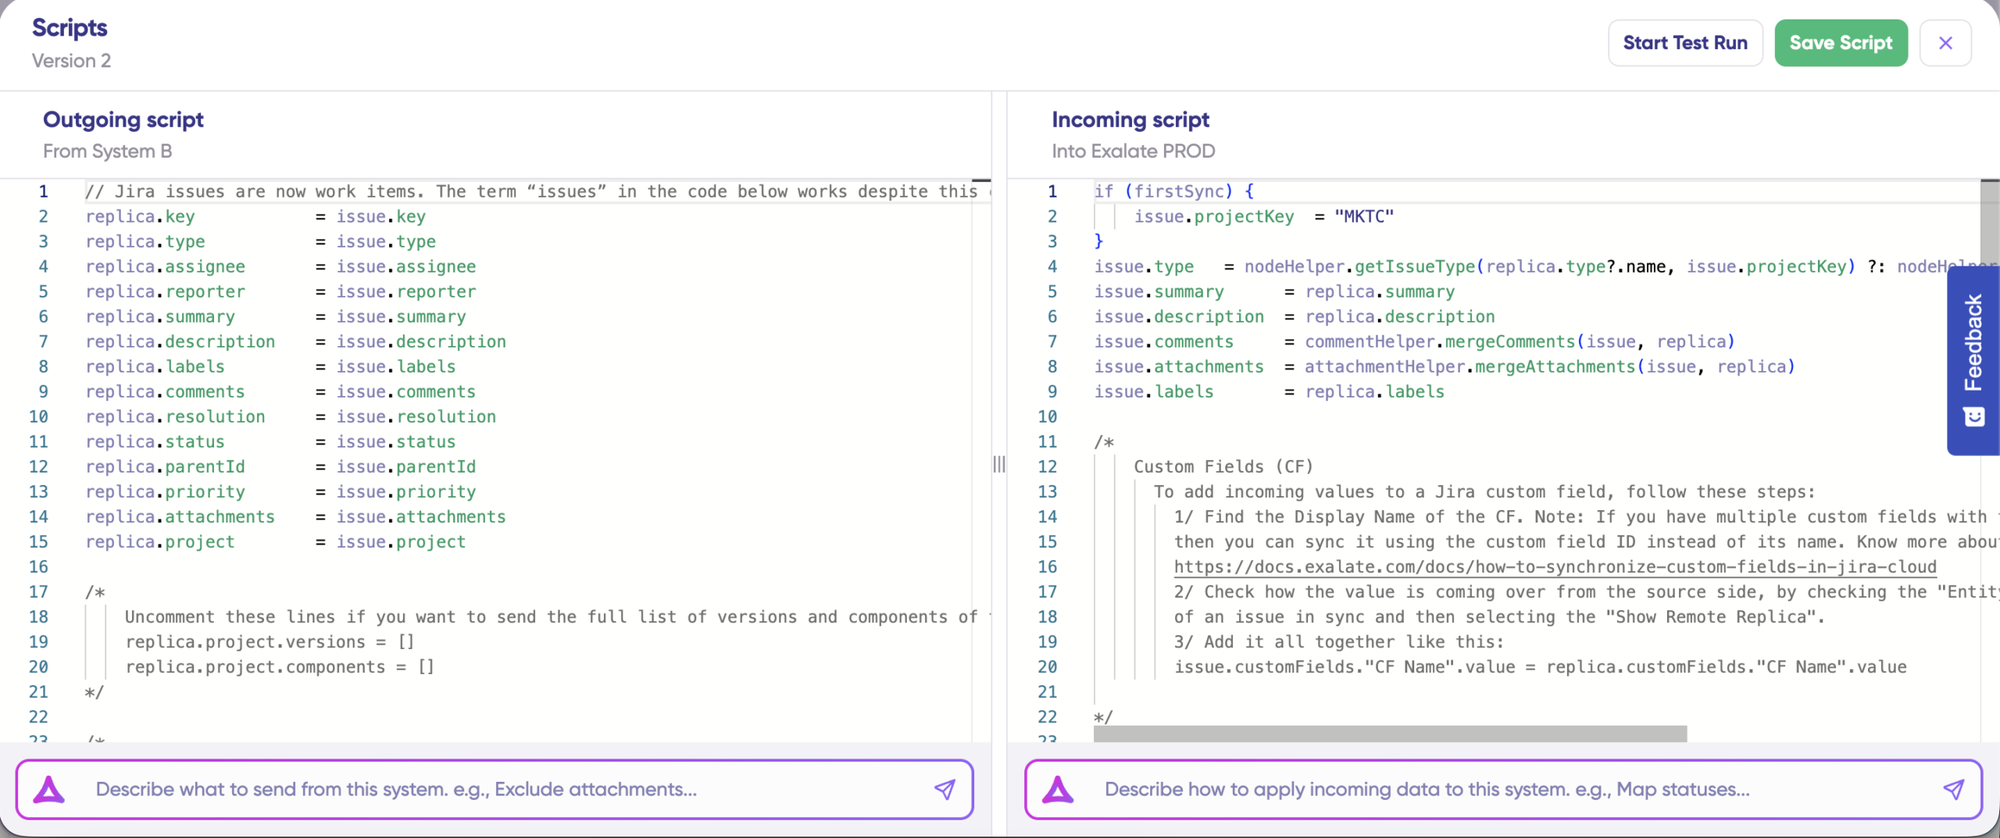
Use Aida for AI-Assisted Scripting
If you are not familiar with Groovy, use Aida, our built-in AI assistant, located in both the incoming and outgoing script sections.

Prompt Aida by describing your need, such as “Map ‘Closed’ status to ‘Resolved’.” Aida generates the code based on Exalate’s scripting API, highlighting additions in green and removals in red.
Review the code and click “Insert” to apply it or “Discard” to try again.
Test with a Dry Run
Before going live, save your script and perform a test. Click “Start Test Run” and “Select items” to choose specific tickets or cases.

Wait for the simulation to finish to see detailed results of the fields synced and the payload shared.
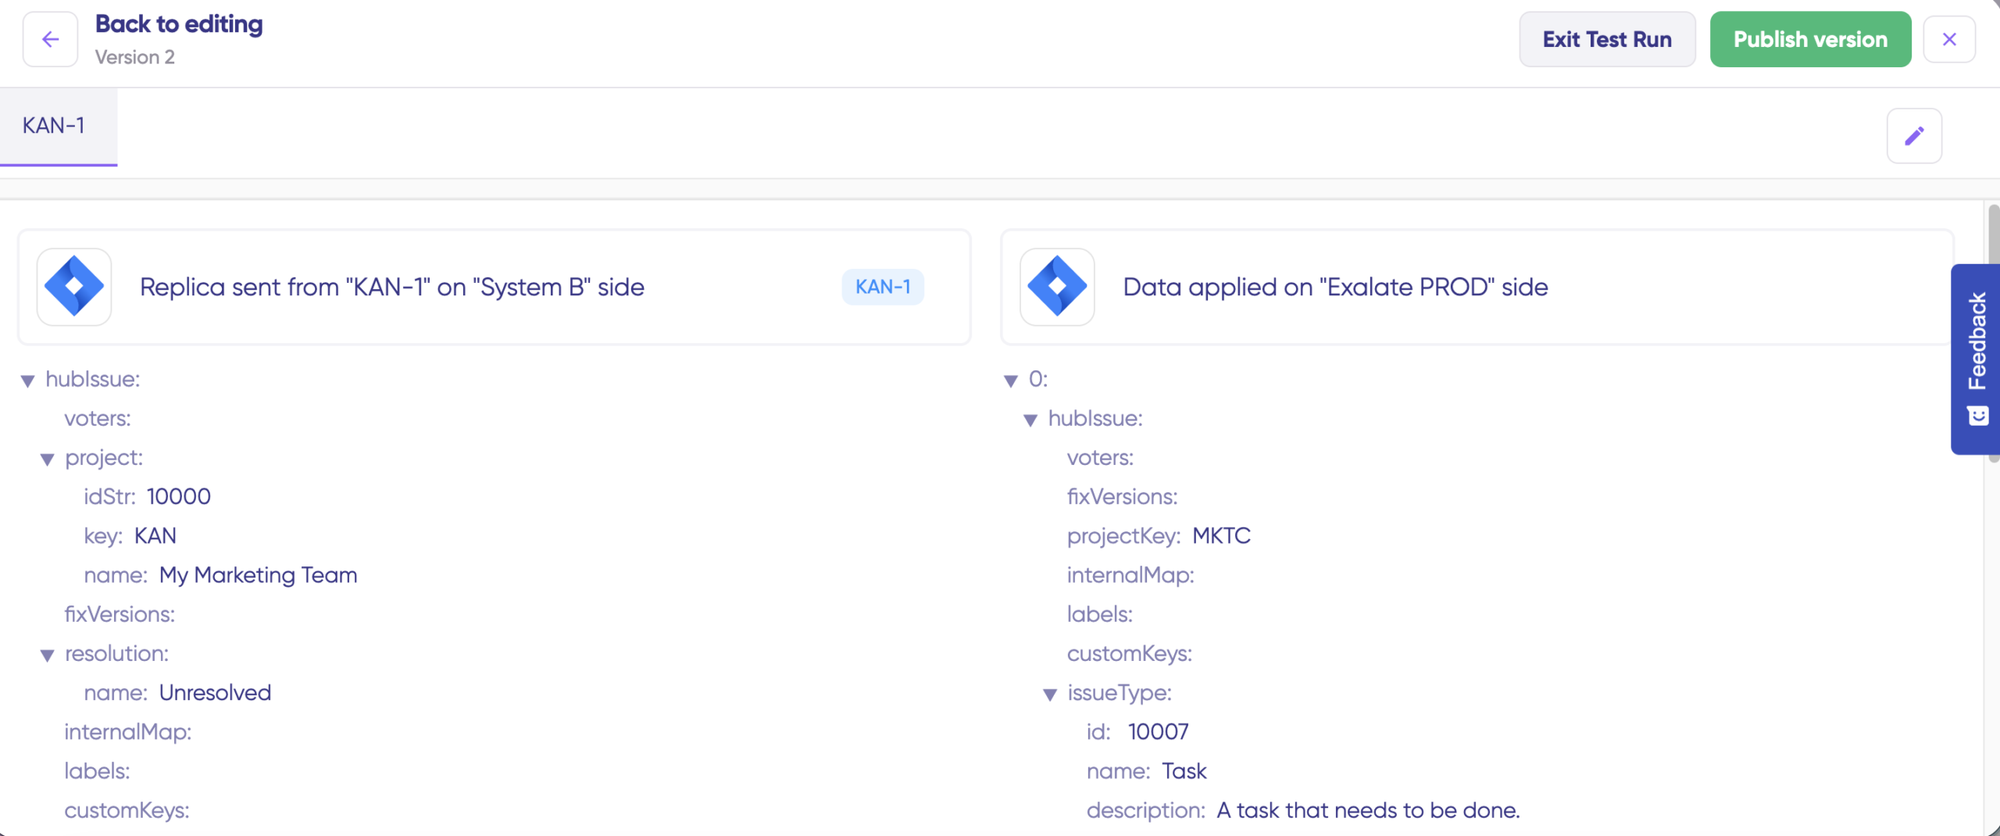
If satisfied, click “Publish Version“. You can manage these snapshots via the “Version” dropdown, switching between “Active“, “Draft“, or “Archived“.
Automate with Triggers
Set up Triggers to automate the sync based on specific conditions. Click “+Add trigger” and choose the entity type.
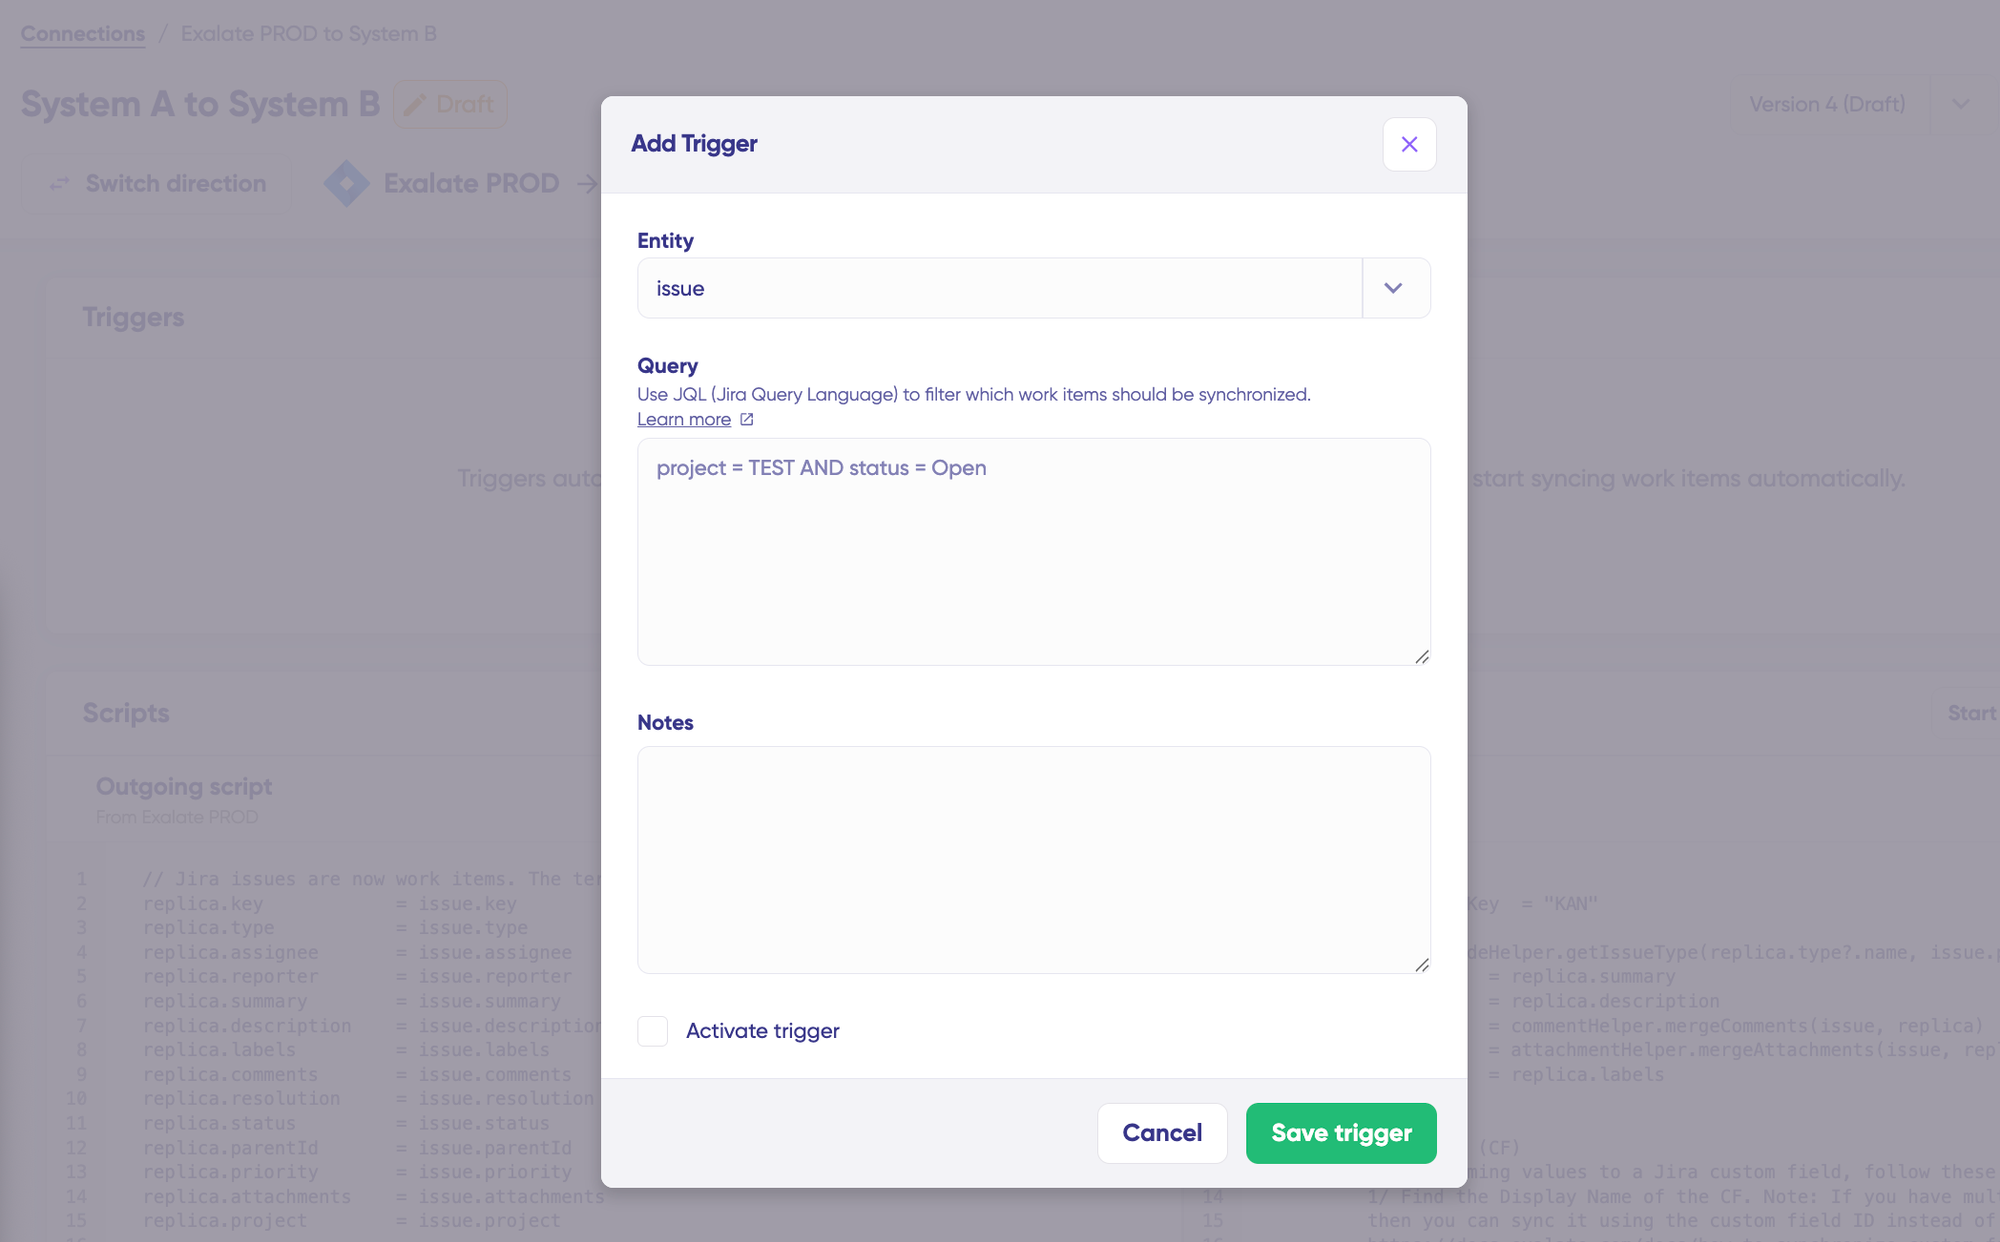
Define your condition using the platform’s specific query language (e.g., status equals Open) and save the trigger to ensure items meeting these criteria sync automatically.
For Freshdesk, use the search syntax to define conditions for ticket escalation: “filter = new_and_my_open” syncs only new and open tickets.
For Salesforce, you have to use Salesforce Object Query Language to specify the filter query. When you choose the entity type as “Opportunity” and the query contains “StageName= 'Prospecting‘, then all Opportunities in the Prospecting stage will be synced.
Troubleshoot with Aida
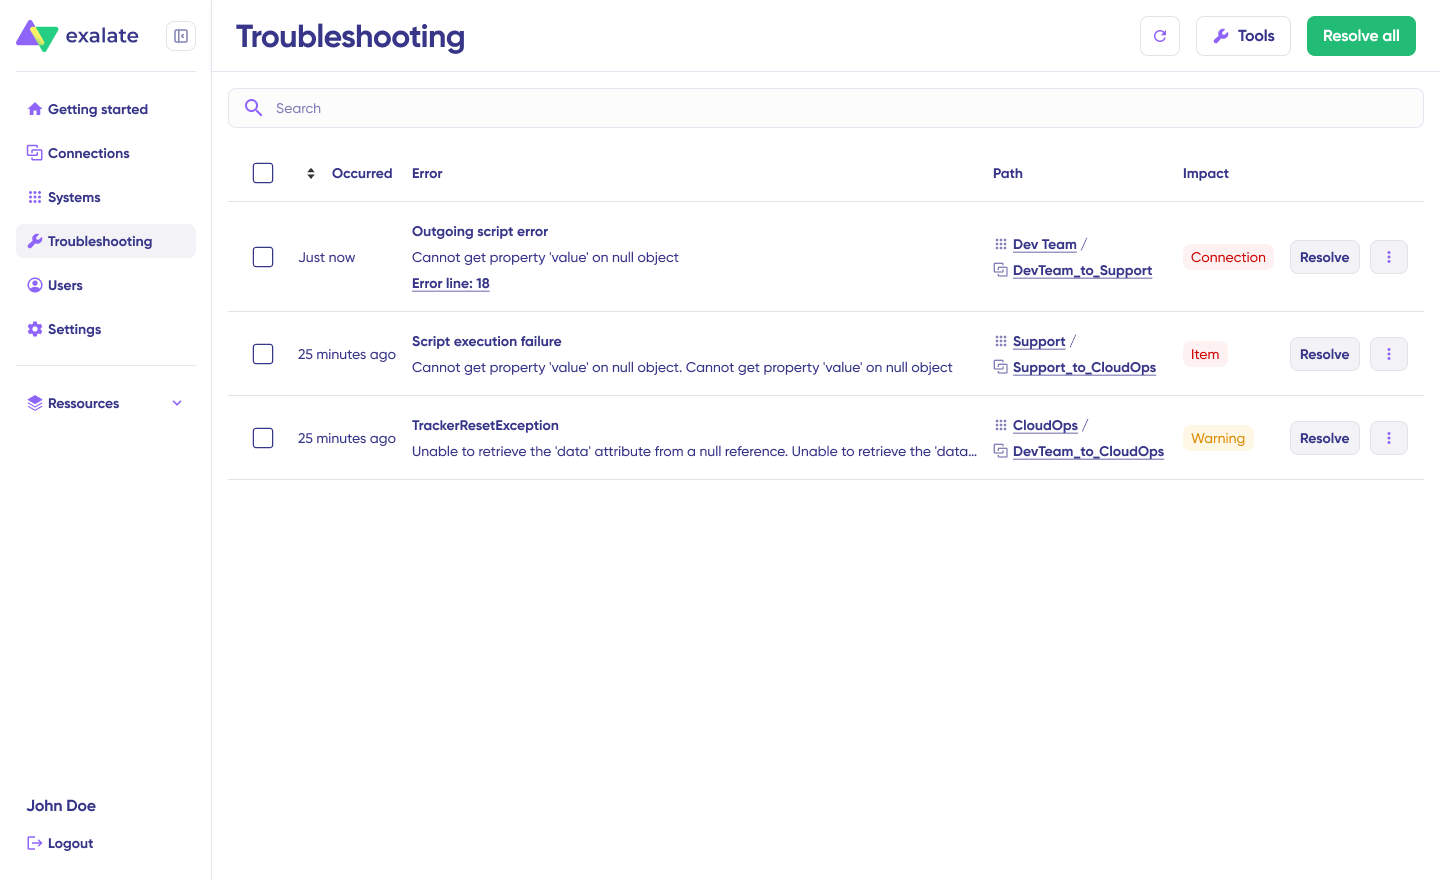
If you encounter errors, navigate to the “Troubleshooting” tab. Hover over the error and click the Aida icon next to it. Aida provides a brief analysis of the problem.
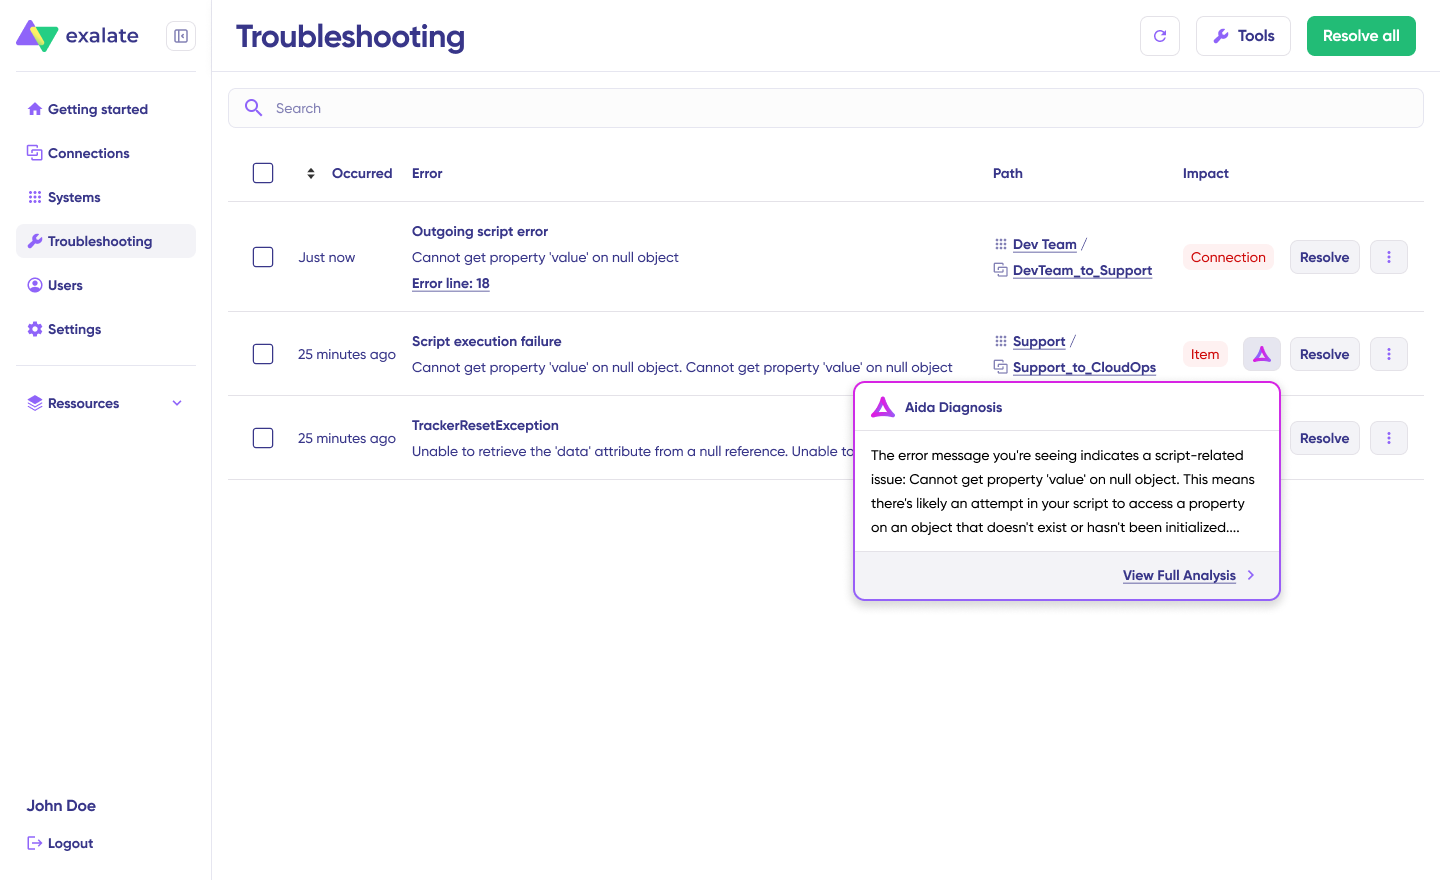
Click “Error Details” to see the stack trace and “View Full Analysis” for deep context. Once fixed, click “Resolve“.
What Are the Use Cases for Freshdesk Salesforce Integration?
Here are practical applications of Freshdesk to Salesforce integration across different industries and team structures:
Case 1: Escalate Salesforce Cases as Freshdesk Tickets
Scenario: A customer creates a case in Salesforce requesting a product upgrade. The sales team needs technical support to evaluate feasibility.
Solution: When a customer creates a case, the contents are escalated to Freshdesk to create a new ticket or update an existing one. This keeps each side in their own environment and provides timely updates.
With a solution like Exalate, you can control specific mapping conditions using AI-assisted configuration and custom sync rules.
Real-world application: An enterprise software company uses this workflow to route technical questions from high-value accounts directly to senior support engineers, reducing response time from hours to minutes.
The standard fields and entities supported for integration between Freshdesk and Salesforce include comments, attachments, descriptions, account information, and more.
On Freshdesk, you can sync read-only entities like reporter, source, responder ID, and company ID. You can also sync case source, milestone status, custom fields, and all contact information from Salesforce CRM.
Case 2: Sync Freshdesk Ticket Status and Priority with Salesforce Case Status
Scenario: Multiple teams are working on related issues for the same customer across platforms. Status changes need to be reflected immediately.
Solution: Freshdesk cannot share status updates directly with Salesforce because they are incompatible. Status mapping solves this by translating platform-specific statuses into equivalent values.
When teams on either side are working on a similar concern raised by the same customer, they stay updated about progress with automated status mapping.
Assuming a Freshdesk ticket is marked as “Open” and the priority is “Urgent”, the case status will reflect in Salesforce as “New” with “High” priority.
Real-world application: A financial services company uses status mapping to keep compliance teams informed when high-priority security tickets are opened, automatically triggering review workflows in Salesforce. This helps managers delegate and allocate resources to address issues in a timely manner, automating support workflows end-to-end.
Case 3: Map Multiple Salesforce Cases to A Single Freshdesk Ticket
Scenario: Multiple customers report the same product bug or service issue. Support needs to consolidate these into a single tracking ticket.
Solution: Multiple related customers could create change requests, incidents, or problems on a Freshdesk instance, and these could be synchronized to a single Salesforce Case to consolidate everything.
In the same way, multiple related Salesforce cases can be mapped to a corresponding Freshdesk entity (problem or incident), so it can be escalated to the right support team.
Real-world application: A SaaS company experiencing a widespread outage receives 50+ cases in Salesforce. These automatically link to a single Freshdesk incident ticket, where engineers coordinate the fix and updates flow back to all affected cases simultaneously.
Case 4: Sync Customer Contact Information Across Platforms
Scenario: A customer updates their email or phone number in Salesforce. Support agents in Freshdesk need this updated information immediately.
Solution: Bidirectional contact sync ensures that account information, contact details, and company data stay consistent across both platforms.
Real-world application: An e-commerce business syncs customer shipping addresses and contact preferences between Salesforce and Freshdesk, reducing delivery issues and support inquiries related to outdated information.
Case 5: Cross-Organization Collaboration for MSPs
Scenario: Managed service providers need to collaborate with client teams without exposing internal processes or requiring access to each other’s systems.
Solution: Cross-company integration allows MSPs to sync relevant customer tickets with client Salesforce instances while maintaining security boundaries.
Real-world application: An IT services firm shares ticket status with clients in real-time, improving transparency and trust while keeping internal troubleshooting notes private.
Case 6: Escalate VIP Customer Issues Automatically
Scenario: High-value accounts require faster response times and dedicated support resources.
Solution: Rules-based automation identifies cases from premium accounts in Salesforce and creates high-priority tickets in Freshdesk with automatic assignment to specialized support teams.
Real-world application: A managed services provider (MSP) guarantees 15-minute response times for enterprise clients by automatically routing their cases to dedicated support queues with real-time notifications.
Case 7: Automate Follow-Up Tasks Based on Ticket Resolution
Scenario: When support resolves a technical issue, sales needs to follow up with the customer to ensure satisfaction and identify upsell opportunities.
Solution: Configure integration rules that automatically create follow-up tasks in Salesforce when Freshdesk tickets are marked as resolved, assigning them to the appropriate account manager.
Real-world application: A telecommunications company uses automated follow-ups to contact customers after service restoration, converting 15% of these interactions into upgrade opportunities.
Case 8: Sync Product Information for Contextual Support
Scenario: Support agents need to know which products or subscriptions a customer has purchased to provide relevant assistance.
Solution: Sync product and subscription data from Salesforce opportunities to Freshdesk tickets, giving agents complete context without switching platforms.
Real-world application: A software company automatically populates Freshdesk tickets with the customer’s license tier, purchased modules, and renewal date, reducing time spent gathering information by 40%.
Case 9: Track Customer Health Scores Across Departments
Scenario: Customer success teams maintain health scores in Salesforce, but support interactions should influence these scores.
Solution: Bidirectional sync allows support ticket data (volume, resolution time, satisfaction ratings) to feed into Salesforce health score calculations, while health scores inform support prioritization.
Real-world application: An enterprise SaaS provider identifies at-risk accounts earlier by incorporating support metrics into their customer health algorithm, reducing churn by 12%.
Common Challenges in Freshdesk Salesforce Integration (And How to Solve Them)
Challenge 1: Status Mismatch Between Platforms
Problem: Freshdesk and Salesforce use different status values. A “Resolved” ticket in Freshdesk doesn’t directly map to Salesforce case statuses.
Solution: Implement status mapping rules that translate platform-specific values into equivalent statuses. For example:
- Freshdesk “Open” → Salesforce “New”
- Freshdesk “Pending” → Salesforce “Waiting on Customer”
- Freshdesk “Resolved” → Salesforce “Closed”
Best practice: Document your status mapping logic and communicate it to both teams so everyone understands how statuses translate.
Challenge 2: Duplicate Records
Problem: The same customer creates tickets in Freshdesk and cases in Salesforce, leading to duplicate work.
Solution: Use matching rules based on customer email, account ID, or ticket description to link related entities instead of creating duplicates.
Challenge 3: Custom Field Compatibility
Problem: Your organization uses custom fields unique to each platform, which don’t automatically map between systems.
Solution: Create explicit custom field mappings during integration setup. Exalate allows you to map any custom field from Freshdesk to any custom field in Salesforce with data transformation if needed.
Challenge 4: Permission and Access Control
Problem: Not all team members should see all synced data. Support agents shouldn’t access sensitive sales information and vice versa.
Solution: Implement role-based access control at the integration level. Configure which fields sync based on user roles and apply filtering rules to limit visibility.
Challenge 5: Performance with High Volumes
Problem: Large enterprises process thousands of tickets and cases daily. Poor integration performance creates backlogs.
Solution: Choose integration platforms designed for scale. Look for features like batch processing, intelligent queueing, and optimized API usage.
Challenge 8: Data Format Inconsistencies
Problem: Date formats, currency symbols, or text encoding differ between platforms, causing sync errors.
Solution: Use integration platforms that handle data transformation automatically, converting formats between systems while preserving meaning.
Get Started with Your Freshdesk Salesforce Integration
Salesforce and Freshdesk integration helps your organization provide better support and improve customer satisfaction. Before choosing any integration solution, consider how it fits into your organization’s budget and objectives.
Exalate provides one-way and two-way connectivity with partners, clients, MSPs, and internal teams with full operational control over your sync.
Next steps:
- Evaluate which fields need to be in sync, what workflows you want to automate, and what security standards you must meet.
- Choose between native, custom, or third-party based on your complexity and resources.
- Identify how statuses, priorities, and custom fields should translate between platforms.
- Configure security settings: Set up role-based access control and encryption standards.
- Start with a small team or specific use case before rolling out organization-wide.
- Track sync performance and user adoption, adjusting rules as needed.
Want to learn more about Exalate? Find out how it works or book a call with an integration expert.
Frequently Asked Questions (FAQs)
What is Freshdesk Salesforce integration?
Freshdesk Salesforce integration connects your customer support platform (Freshdesk) with your CRM (Salesforce) to sync data automatically between systems. This keeps support and sales teams aligned with real-time customer information.
Can I sync custom fields between Freshdesk and Salesforce?
Yes, advanced integration platforms like Exalate support custom field mapping, allowing you to sync organization-specific fields between Freshdesk and Salesforce with data transformation capabilities if needed.
How do I handle status differences between Freshdesk and Salesforce?
Use status mapping rules to translate platform-specific statuses into equivalent values. For example, a “Resolved” Freshdesk ticket might map to a “Closed” Salesforce case. Most integration platforms include status mapping functionality.
Can multiple Salesforce cases link to a single Freshdesk ticket?
Yes. This is useful when multiple related customer reports should be tracked under one incident or problem ticket. Advanced integrations support many-to-one and one-to-many relationships between entities.
What security standards should my integration platform meet?
Look for ISO 27001 certification, role-based access control, encryption of data both in transit and at rest, and compliance with relevant regulations. Enterprises and large organizations should also verify data residency options. For detailed information about security measures, data handling practices, and compliance certifications, visit our Trust Center.
Can I integrate Freshdesk and Salesforce with other platforms simultaneously?
Yes, Exalate supports multi-platform integrations, allowing you to connect Freshdesk and Salesforce with tools like Jira, ServiceNow, Azure DevOps, Azure DevOps Server, GitHub, Zendesk, Freshservice, Asana, and others in a unified ecosystem.
What happens if sync fails?
Modern integration platforms include error-handling mechanisms like automatic retries for transient failures, detailed error logs, and alerting when manual intervention is required. Look for platforms with comprehensive monitoring and unified views of sync health.
What’s the difference between one-way and two-way sync?
One-way sync sends data in a single direction (e.g., Freshdesk to Salesforce only). Two-way bidirectional sync allows changes to flow in both directions, keeping both systems updated regardless of where changes occur. Two-way sync is more powerful but requires conflict resolution strategies.
Recommended Reads
- Freshdesk Jira Integration in the Age of Customer Satisfaction
- Freshdesk Azure DevOps Integration: A Recipe For Happy Users
- The Best Salesforce Integration Apps For Business Productivity
- Simplify Your Business Processes with Salesforce Integration Tools
- How to Sync Comment Threads & User Mentions – Jira & Salesforce
- Sync Statuses and Custom Fields Between GitHub and Salesforce


