When your development team works in one Jira instance while your support team operates in another, information gets siloed. Manual updates become routine, work items fall through the cracks, status changes require email notifications, and context gets lost in transit.
Jira to Jira sync solves this by creating real-time, bidirectional data flow between separate Jira instances. Your teams stay in their familiar environments while critical information flows automatically where it’s needed—no duplicate entry, no version conflicts, no communication delays.
The right integration maintains team autonomy while eliminating silos. Each side controls what they share and how incoming data appears in their instance. Security stays intact, workflows remain independent, and collaboration becomes frictionless.
Note: Jira now refers to issues as work items. Throughout this guide, you’ll see references to work items, which represent individual tasks, bugs, stories, or any trackable unit of work in Jira.
Key Takeaways
- Jira to Jira sync enables seamless real-time collaboration between separate Jira instances without manual updates or duplicate data entry.
- Exalate provides flexible, secure synchronization with full control over what data flows between instances and independent configuration on each side.
- Organizations can sync any work item field, custom field, sprints, and epics using AI-assisted or script-based configuration tailored to specific workflows.
- Security features to look out for when choosing a multi-Jira sync tool include ISO 27001 certification, role-based access control, and encryption of data both in transit and at rest.
- Common use cases for Jira to Jira sync include cross-team collaboration, external partner coordination, multi-region operations, and hybrid cloud-to-data-center scenarios.

Get the Jira to Jira Sync Guide
Learn how to achieve a seamless integration between multiple Jira instances, step-by-step.
Why Connect Multiple Jira Instances?
- Eliminate Information Silos – Different teams tracking work in separate instances creates isolation that blocks collaboration. Jira-to-Jira synchronization enables real-time, automated data flow, so when a developer marks a work item “In Progress,” the corresponding work item updates immediately in the project manager’s instance. No delays. No manual intervention.
- Stop Manual Work – Copying work items between instances, forwarding updates via email, and maintaining duplicate records wastes time and introduces errors. These redundant tasks become even more tedious as projects grow more complex and teams become more distributed. Automated sync eliminates this overhead entirely.
- Maintain Team Autonomy – Each team controls its configuration independently without affecting the other side. Your internal team manages what they share outbound. Your partner configures what they accept inbound. Neither side’s changes break the other’s setup.
- Protect Sensitive Data – Selective sync means you share only what’s needed while keeping confidential information protected. Sync public work item details with external partners while internal comments, attachments, and custom fields stay private. No shared credentials or admin access required between instances.
- Enable Unified Visibility – Stakeholders gain accurate project status without switching contexts or requesting updates. Leadership sees progress across all teams. Product managers track features spanning multiple groups. Everyone works from the same current information.
- Scale Across Organizations – The same technology that syncs two project teams supports multinational organizations coordinating across continents. The architecture handles 2-person teams and 10,000+ user enterprises with complex field mappings and conditional sync rules.
Note: We’ve covered more use cases on Jira work synchronization in the following article on Making The Case For Synchronization Of Work Trackers

What Are Some Practical Use Cases For Jira to Jira Sync?
Use Case 1: Development and QA Team Coordination
Challenge: Your internal dev team builds features while an external QA agency tests them in separate Jira instances. Creating duplicate work items means double entry, which leads to conflicts when both sides update simultaneously.
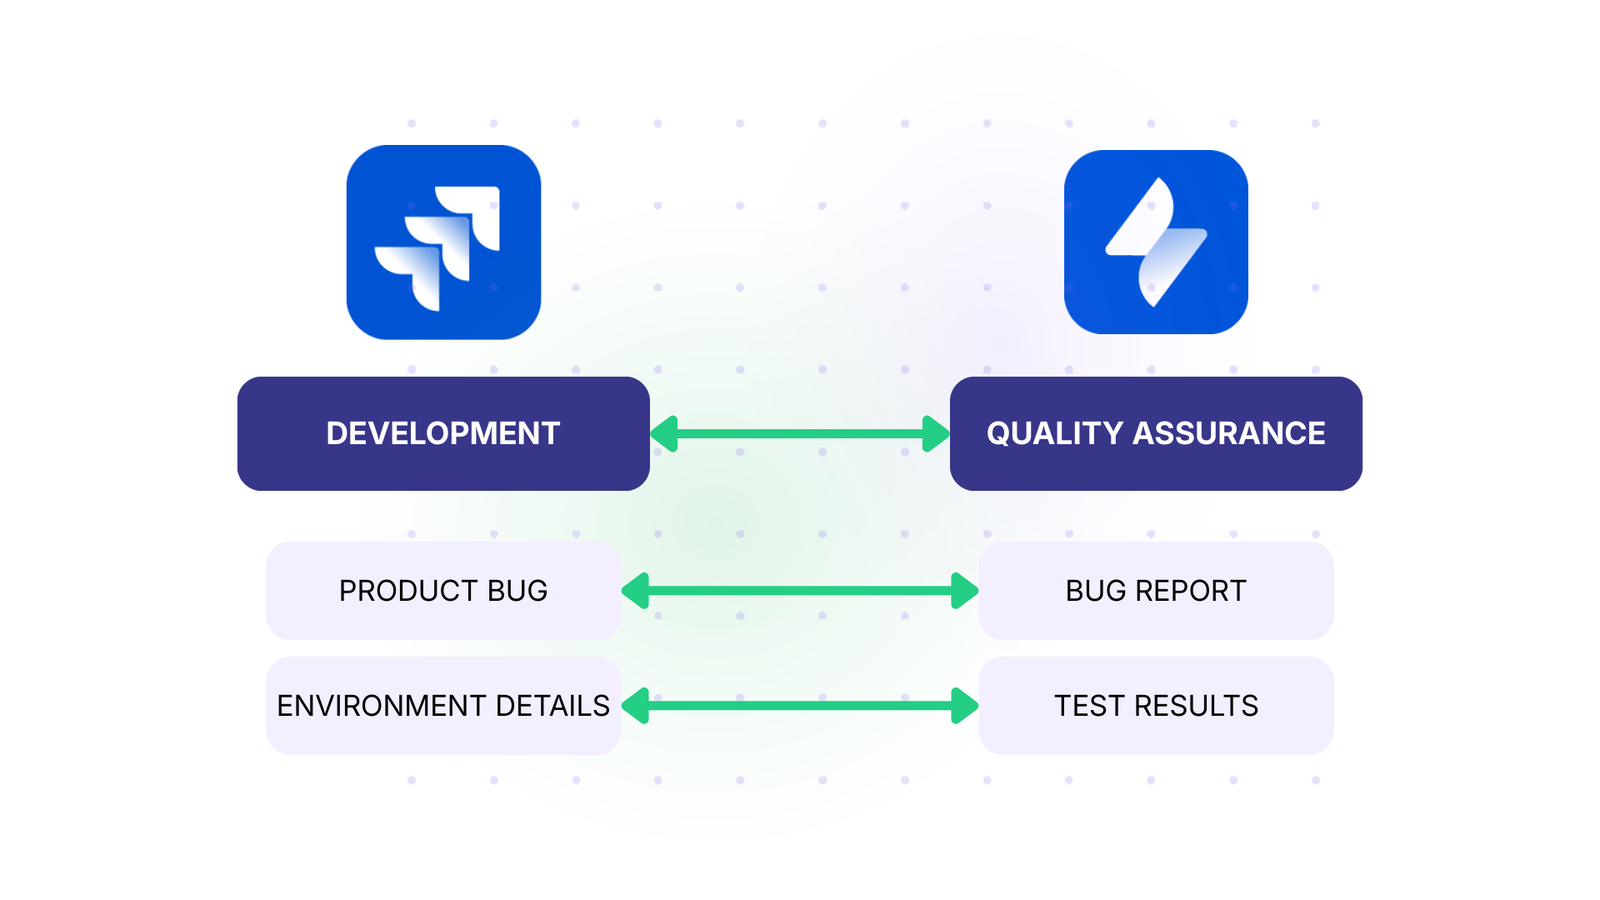
Solution: Set up bidirectional sync with triggers. When a developer moves a work item to “Ready for Testing,” it automatically appears in QA’s backlog with acceptance criteria and environment details. QA’s test results and bug reports flow back instantly. Field-level sync rules share public information while keeping internal notes, time estimates, and sprint planning private.
Real-World Application: A gaming studio with 50 developers and 30 QA testers reduced bug-tracking overhead by 60%. New builds trigger automatic work item creation in QA’s instance with all required context. Both teams work in familiar environments while maintaining perfect synchronization.
Use Case 2: IT Support to Development Escalation
Challenge: Support logs work items in Jira Service Management. Critical bugs need escalation to the dev team’s Jira Software instance, but the current process involves manual copying and email forwarding. Information gets lost. Resolution times suffer.
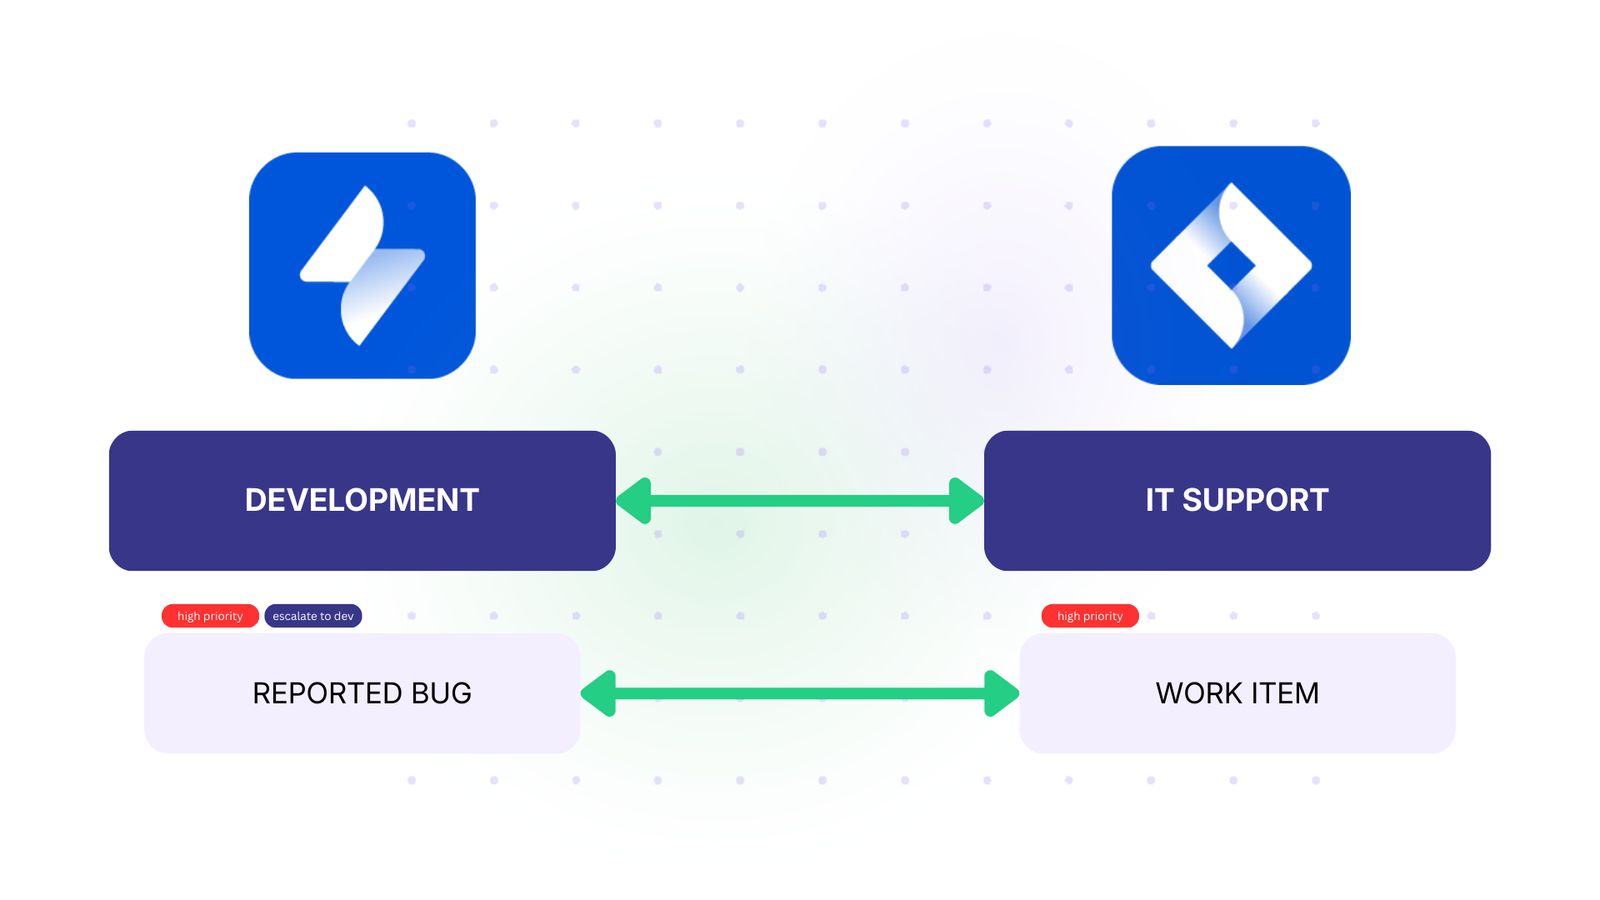
Solution: Configure trigger-based sync that automatically creates dev work items when tickets meet escalation criteria—”priority = High AND issueType = Bug AND labels = ‘escalate-to-dev’“. The sync pulls customer impact, reproduction steps, and environment details. When developers mark the work item “Resolved,” the support ticket updates automatically.
Real-World Application: A SaaS company processing 500+ monthly support tickets reduced escalation time from 4 hours to 15 minutes. Support agents simply add an “escalate” label—no manual work item creation required. Customer satisfaction improved as resolution times dropped.
Use Case 3: Partner and Vendor Collaboration
Challenge: You’re building with an external partner who needs project requirements and status updates, but your internal Jira contains confidential roadmap features, competitive analysis, and financial projections. Full access violates security policies and duplicated projects create maintenance overhead.
Solution: Implement selective field synchronization. Sync summaries, descriptions, and status while keeping attachments, internal comments, and custom fields like “Revenue Impact” private. Configure comment filtering so external-facing comments sync bidirectionally while internal discussions stay private.
Real-World Application: A fintech company collaborates with three offshore partners across different Jira instances. Each partner sees only their assigned work items. Internal fields tracking compliance requirements and revenue projections remain private. Admins can use Groovy scripts to filter comments by author group for granular control.
Use Case 4: Acquisition and Merger Integration
Challenge: You acquired an organization with completely different Jira workflows, custom fields, and project structures. Leadership demands unified visibility immediately, but an overnight migration would disrupt both teams. Neither side wants to abandon their setup.

Solution: Implement gradual integration, connecting specific projects without wholesale migration. Start with high-priority shared initiatives. Use AI-assisted configuration to map mismatched fields—their “Severity” to your “Priority.” Expand sync scope incrementally as teams acclimate and workflows stabilize.
Real-World Application: After acquiring a 200-person competitor, a software company integrated operations over six months.
- Month one: sync executive-level epics.
- Month two: add cross-company initiatives.
- Month three: integrate customer-facing requests.
By month six, teams had naturally aligned, making eventual consolidation straightforward.
Use Case 5: Sprint and Epic Synchronization Across Teams
Challenge: Your platform team plans epics spanning multiple specialized teams—mobile, backend, infrastructure—each with separate Jira instances and sprint cadences. Epic owners manually check each team’s Jira and update spreadsheets. By the time reports reach stakeholders, information is outdated.
Solution: Sync epics and associated work items bidirectionally across team instances. When the platform team breaks down an epic, relevant stories appear automatically in each specialist team’s backlog. Sprint progress rolls up automatically—mobile team closes stories, epic completion updates; backend hits a blocker, epic reflects the risk.
Real-World Application: A product organization with eight engineering teams reduced planning overhead by 40%. Epic owners get real-time dashboards showing progress across all teams. Cross-team initiatives that required weekly sync meetings now use an automated status roll-up. The organization ships complex features faster with less coordination overhead.

Calculate time and money savings from automated bidirectional sync.
Types of Jira-to-Jira Integration Tools
- Atlassian Marketplace apps install directly into Jira and are embedded within its interface. They benefit from Atlassian’s security review and integrate with Jira’s authentication. Organizations wanting solutions vetted by Atlassian with deep native integration typically choose this approach.
- Enterprise Service Bus (ESB) solutions like MuleSoft or Dell Boomi route Jira data through central integration layers. Large enterprises with complex IT landscapes integrating multiple applications beyond just Jira use these platforms for unified monitoring and governance.
- Custom Script-Based Solutions – Development teams build custom integrations using Jira’s REST API. This approach offers complete control and zero licensing costs but requires ongoing maintenance as Jira evolves. Specialized platforms like Exalate focus exclusively on multi-instance synchronization. They understand Jira’s data model deeply, handle complex field mappings, manage bidirectional updates with conflict resolution, and provide granular control.
- Jira Automation Rules – Jira’s built-in automation triggers webhooks or API calls to other instances for simple one-way scenarios. This native approach works without additional tools but lacks sophisticated sync capabilities like bidirectional updates or complex field mapping.
- Middleware and iPaaS Solutions – Integration Platform as a Service (iPaaS) offerings provide cloud-based connectivity through pre-built connectors. Organizations preferring cloud-managed integrations and needing integration with multiple applications beyond Jira use these platforms.
Features to Consider When Choosing an Integration Solution
- Bidirectional vs. Unidirectional Sync – The ability to configure one-way data flow (source → destination only) or two-way synchronization where changes flow in both directions is fundamental. One-way sync suits reporting scenarios; bidirectional sync enables true collaboration.
- Field-Level Control – Granular control over which specific fields synchronize matters for security and compliance. You might share summaries and statuses but exclude financial fields, time estimates, or internal comments.
- Custom Field Support – Integration solutions should handle Jira’s specialized field types—select lists, cascading fields, checkboxes, multi-user pickers, date ranges—plus custom fields from third-party plugins like Tempo Worklogs, ScriptRunner calculated fields, or Insight asset data.
- Entity-Level Sync – Comprehensive solutions synchronize more than just work items—they handle sprints with their dates and goals, epics with progress tracking, components, versions, and attachments. This reduces the need for manual coordination.
- No-Code Configuration – User-friendly configuration reduces dependency on developers and speeds up implementation for straightforward use cases. AI assistants such as Aida generate sync scripts from natural language descriptions—non-technical teams describe requirements, and Aida produces a working configuration.
- Script-Based Customization – Technical teams need support for conditional mappings, data transformations, field concatenation, and custom validation rules for advanced scenarios. Exalate uses Groovy-based scripts for advanced conditional logic, data transformations, and API integrations.
- Cloud Support – Solutions should work with Jira Cloud instances to accommodate different organizational infrastructure preferences.
- Scalability – Performance should remain consistent from small team deployments to enterprise-scale implementations with thousands of users as workload increases. Exalate scales from small teams to 10,000+ user enterprises with consistent performance.
- Multi-Platform Integration – Organizations rarely use Jira in isolation, so broader platform support for non-Jira systems like ServiceNow, Azure DevOps, or Salesforce enables comprehensive integration strategies.
- Security and Data Encryption – End-to-end encryption protects sensitive information throughout the sync process, both in transit and at rest. Granular permissions control who configures sync rules, triggers changes, or views sync logs to prevent unauthorized configuration changes. Also, third-party certifications like ISO 27001 indicate that security practices meet established standards.
- Sync Panel: Exalate also includes a Chrome extension called Sync Panel, allowing users to check sync status, find errors, run manual syncs, and unlink sync pairs from the browser without ever touching the console.
How Exalate Enables Secure, Flexible Jira-to-Jira Sync
What Jira Fields and Entities Can Be Synced With Exalate?
- Default work item fields: Summary, description, status, priority, assignee, reporter, due date, resolution, affects versions, fix versions, etc.
- Custom fields: Select lists, cascading selects, checkboxes, radio buttons, date pickers, text fields, number fields, URL fields, user pickers, multi-user pickers
- Work item relationships: Parent-child links, blockers, dependencies, duplicates, related work items
- Work item types, components, labels, and versions with automatic or custom mapping between instances
- Comments with user mention preservation, formatting retention, and optional filtering by author or content
- Attachments and inline images (embedded) with file size limits and type restrictions as needed
- Sprints with start/end dates, goals, state (active/future/closed), and board association
- Epics with progress tracking, color coding, and hierarchical work item relationships.
Exalate Tools Available for Security and Control
- ISO 27001 certified infrastructure with annual third-party audits verifying security practices
- Role-based access control for configuration management—restrict who can create connections, modify sync rules, or view sync logs
- Encryption of data using TLS 1.2+ for all data traveling between instances
- Full script and operational control over your integration
- No requirement to share credentials or admin access between instances. Each side authenticates independently
- Selective field sync with granular control. You get to share only the necessary fields and keep sensitive data private.
- Comment filtering to sync external communication while keeping internal discussions confidential
- Attachment control to exclude specific file types or sizes from synchronization
- Sync panel Chrome extension.
Visit the Trust Center for detailed security documentation, compliance certifications, and security questionnaire responses.
Platform Supported By Exalate
- Jira Cloud (all versions currently supported by Atlassian)
- Jira Software for development teams tracking features, bugs, and technical work
- Jira Service Management for support teams managing incidents, requests, and customer issues
- Jira Work Management for business teams coordinating projects and operations
- Integration with other platforms: ServiceNow, Azure DevOps, Azure DevOps Server, Salesforce, Asana, Freshservice, Freshdesk, Zendesk, GitHub, and more.
- Custom connectors available for proprietary systems, legacy platforms, or specialized industry software
A Step-by-Step Setup Guide For Jira to Jira Sync With Exalate
Find the step-by-step process to sync two Jira instances in this video, or go through the guide here.
- Go to the Exalate integrations page to get started. Create a new account by manually entering your email and verifying it, or sign up using Google.
If you already have an account, you can log in to access the dashboard.
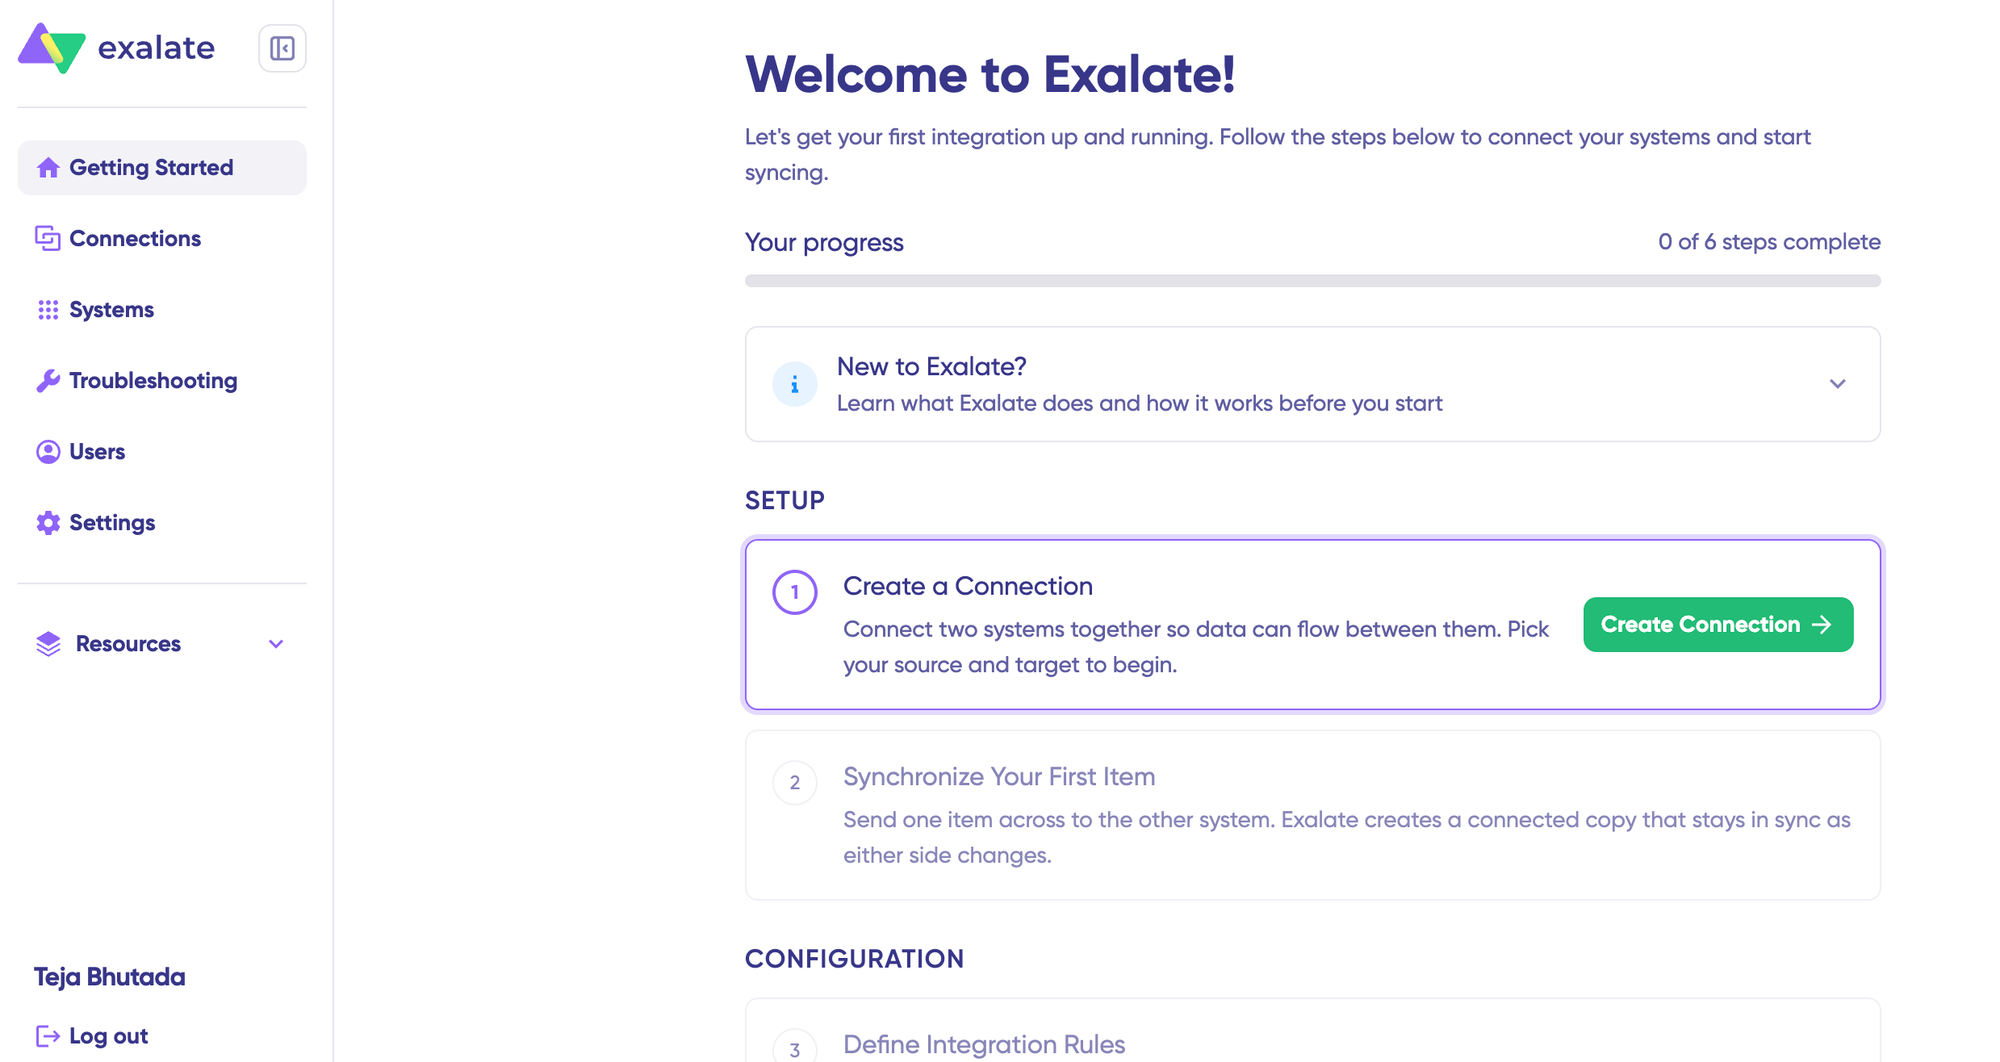
- To create a connection, you’ll need an active Exalate account and the access credentials for the systems you want to connect (System A and System B).
- Click on “+ Add connections” > “Create new connection”. Enter the name for your first system. Enter the URL of your system (Jira).
Wait for checks and authentication to happen automatically under the hood.
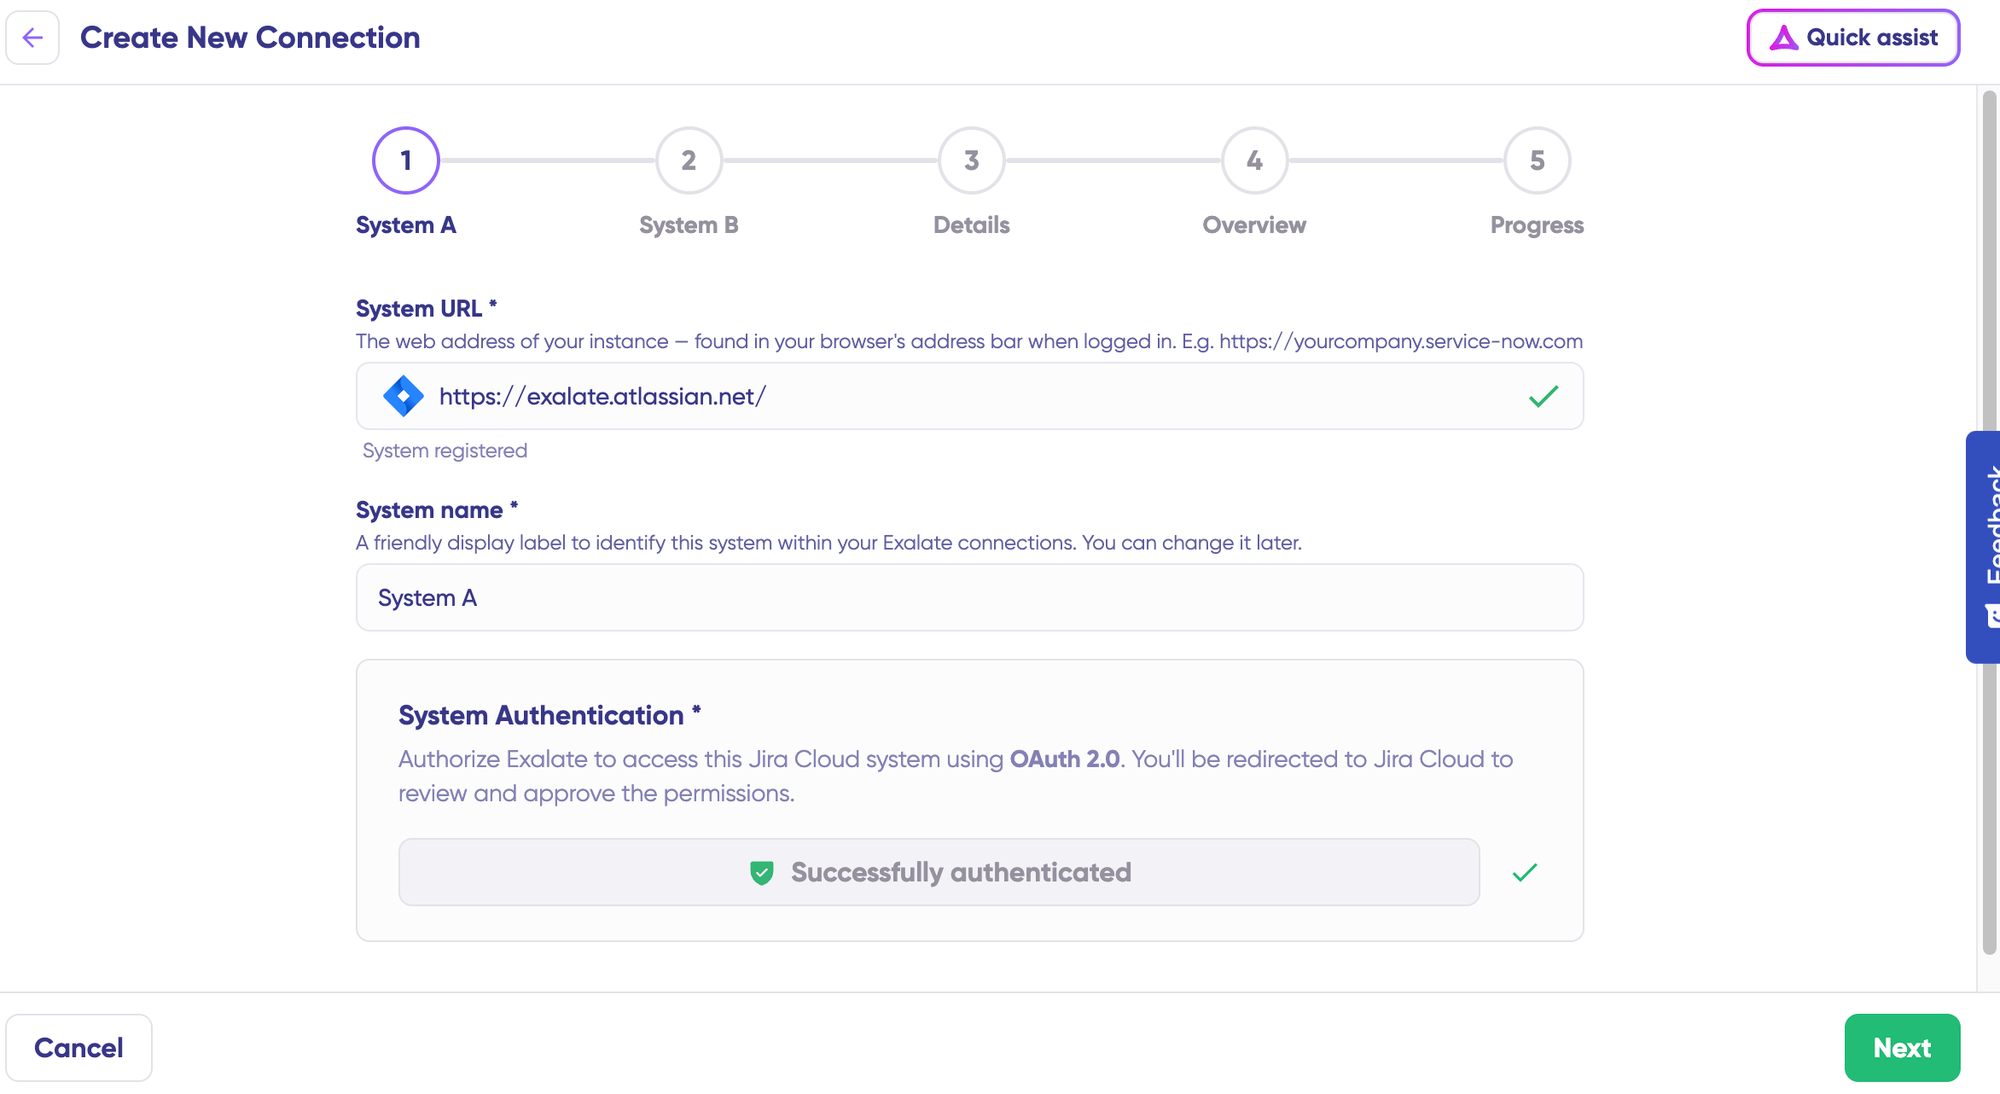
Enter the authentication details. For Jira, you need OAuth. Click on “Check Authentication”. If all is well, you’ll see “Successfully Authenticated”.
Click Next to configure System B (Jira). Follow the same procedure as for your System A (Jira) instance.
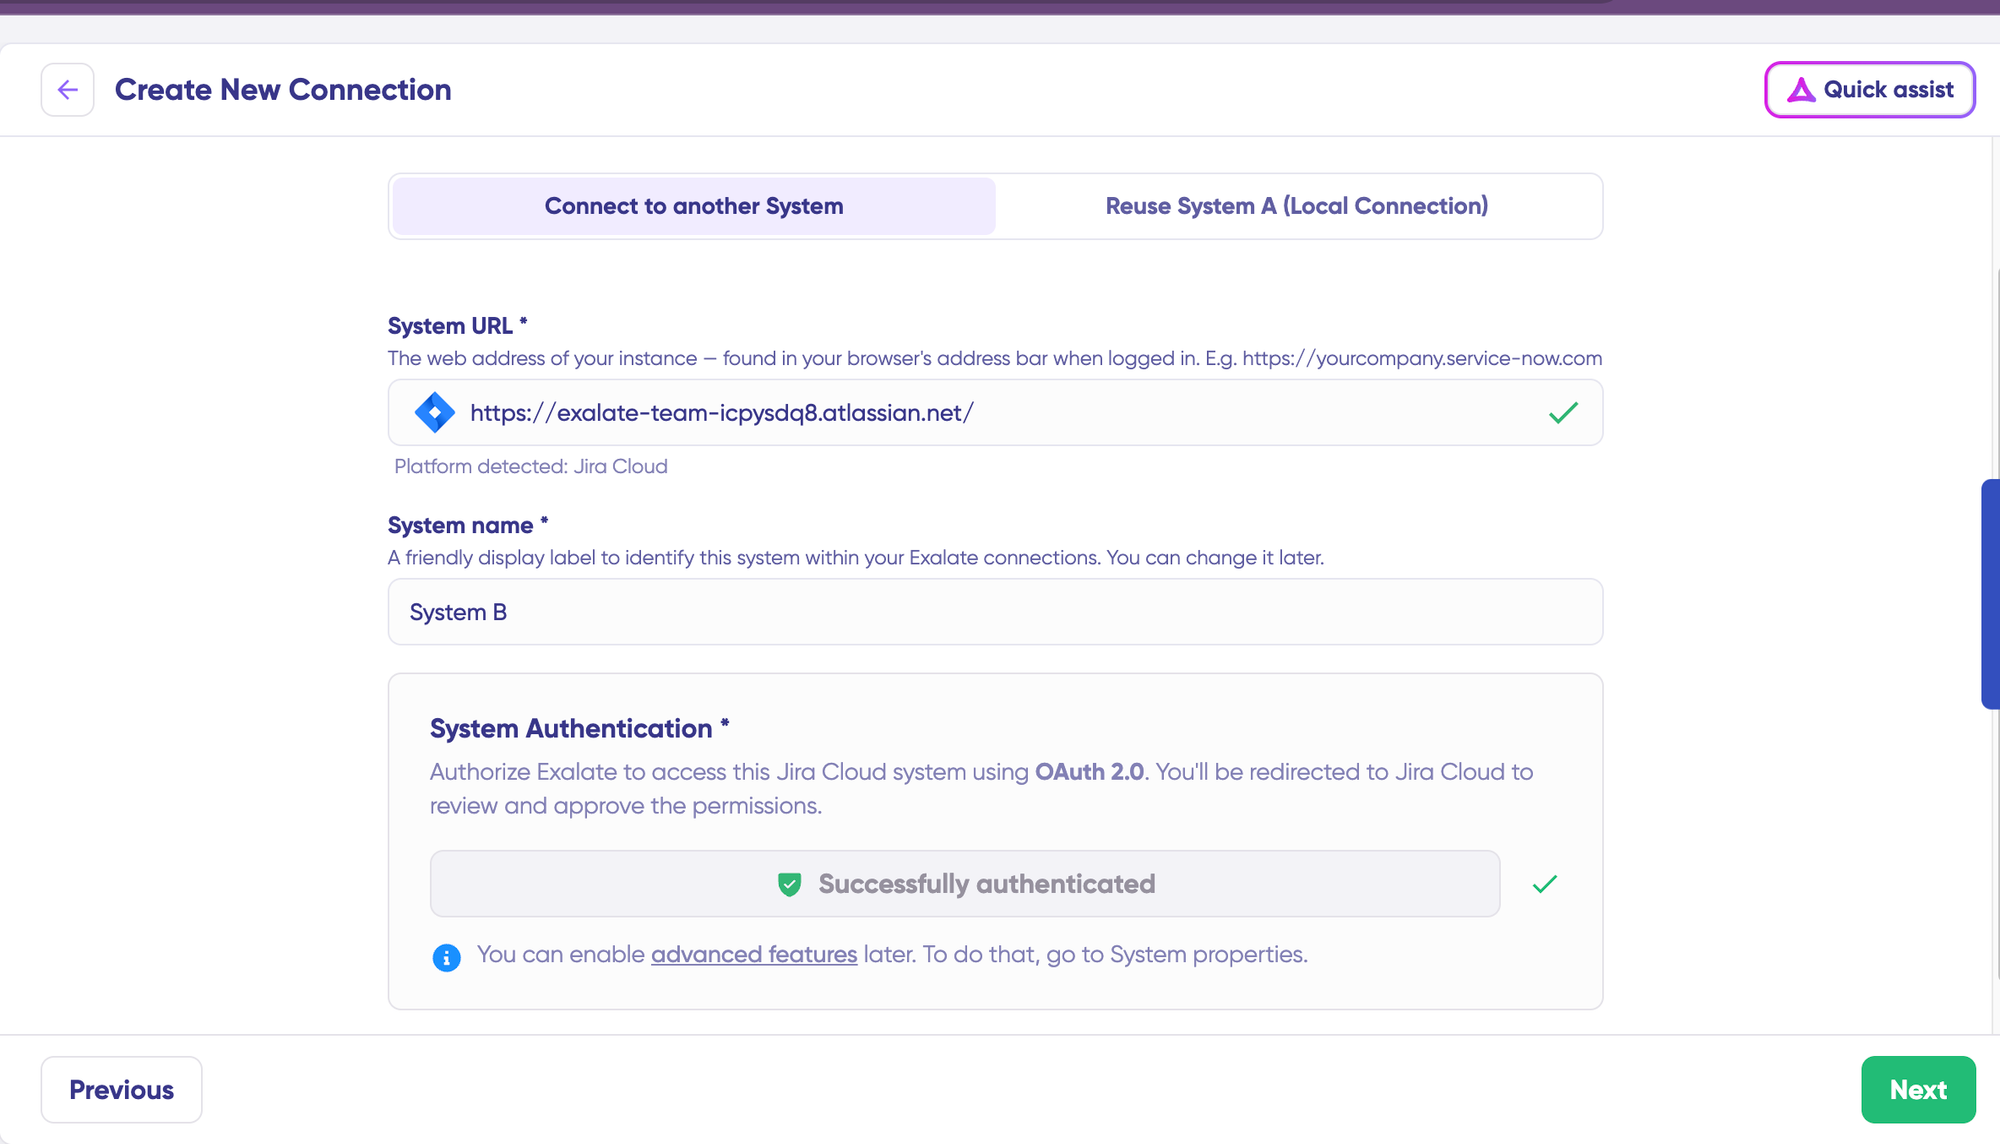
Click Next after authentication to proceed. Confirm the Connection Name and add a description (optional). Review the connection setup and click on “Create Connection”. Wait for a few minutes, so all the checks and setups will be configured in the background.
Local connections in Jira give you the option to sync work items between different Jira projects (or spaces) that share an instance.
Example: if a URL like https://example.net/ holds 2 Jira projects (or spaces)—project A with work item PROJA-11 and project B with work item PROJB-12—both items can sync via local connections in Exalate.
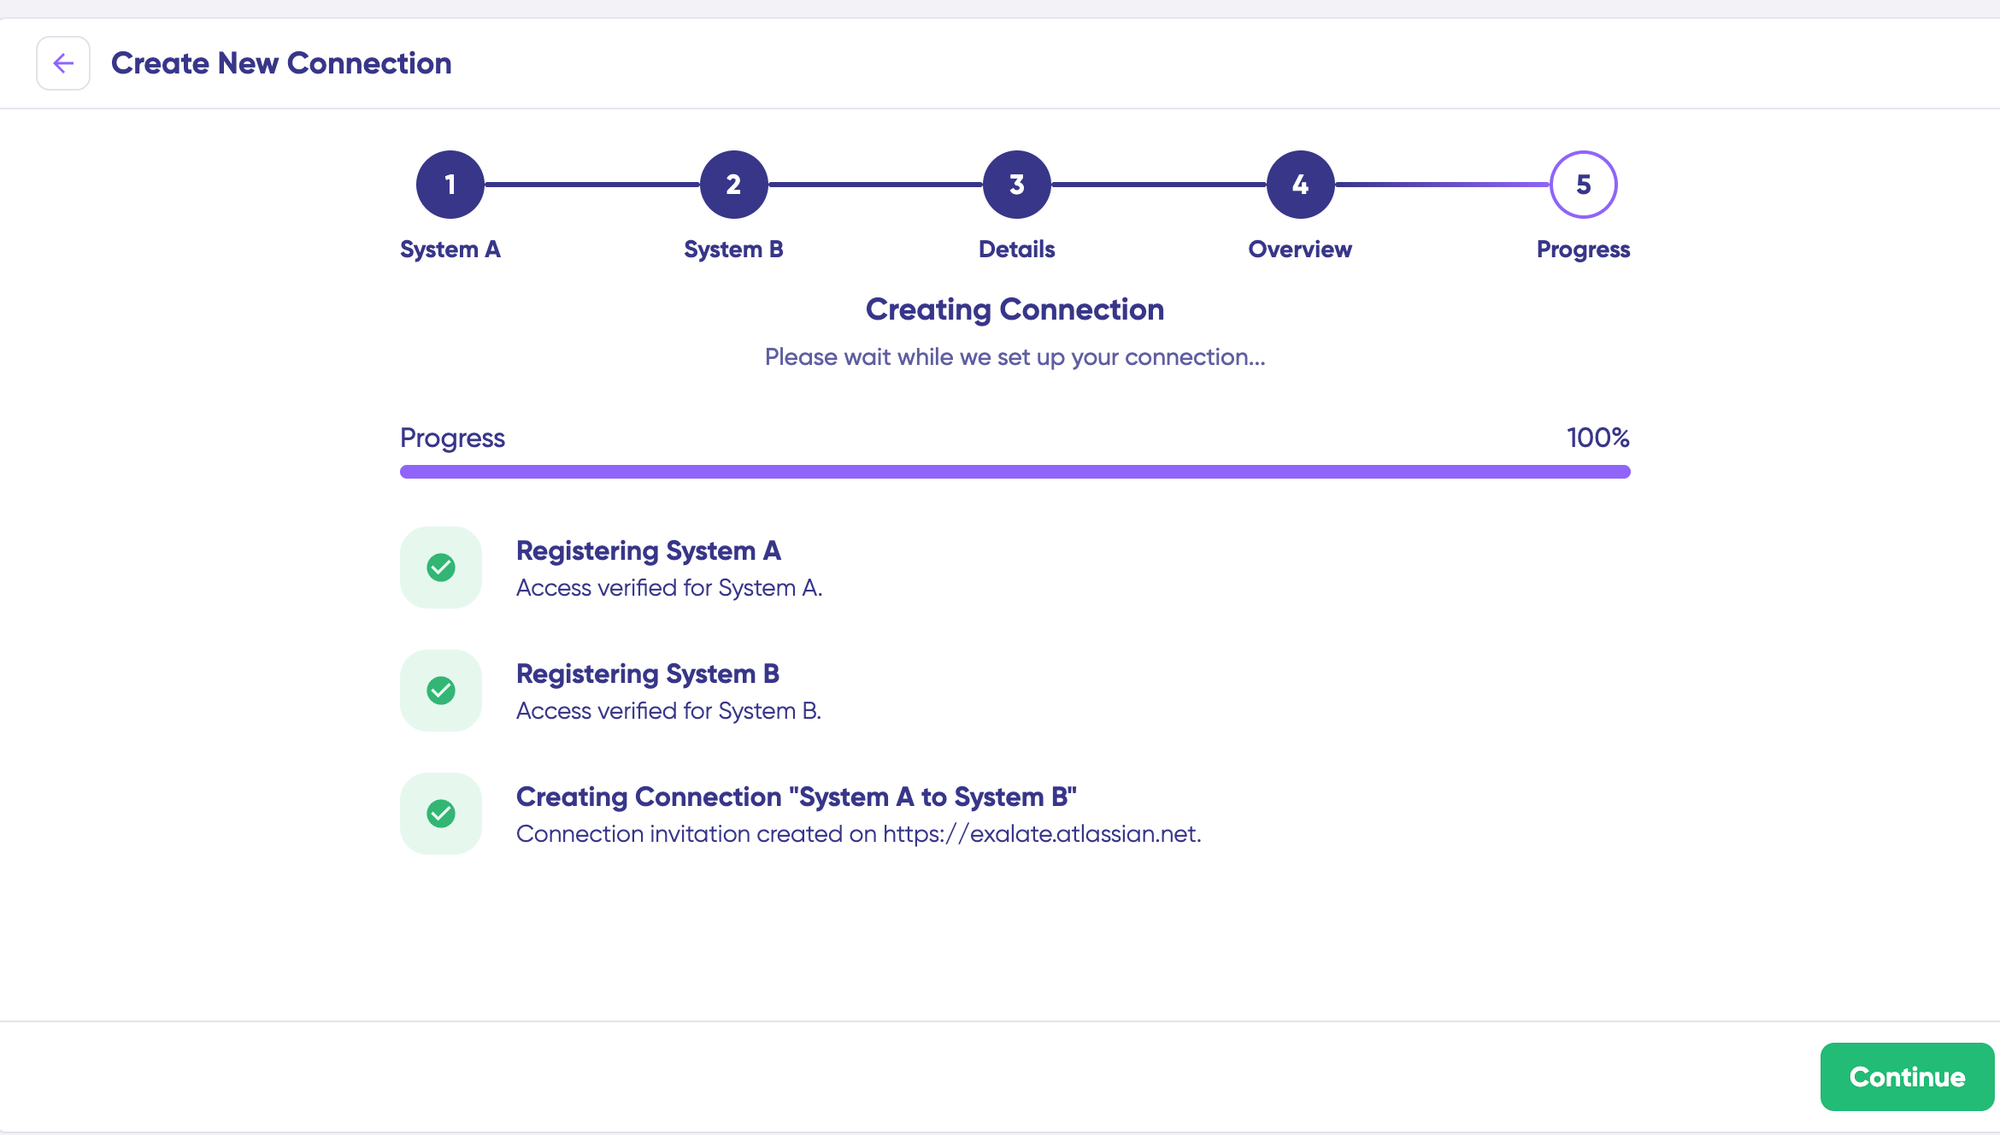
Once done, click “Continue“, then “Continue to Configuration” to complete the setup. Voila! Your first connection has been successfully set up.
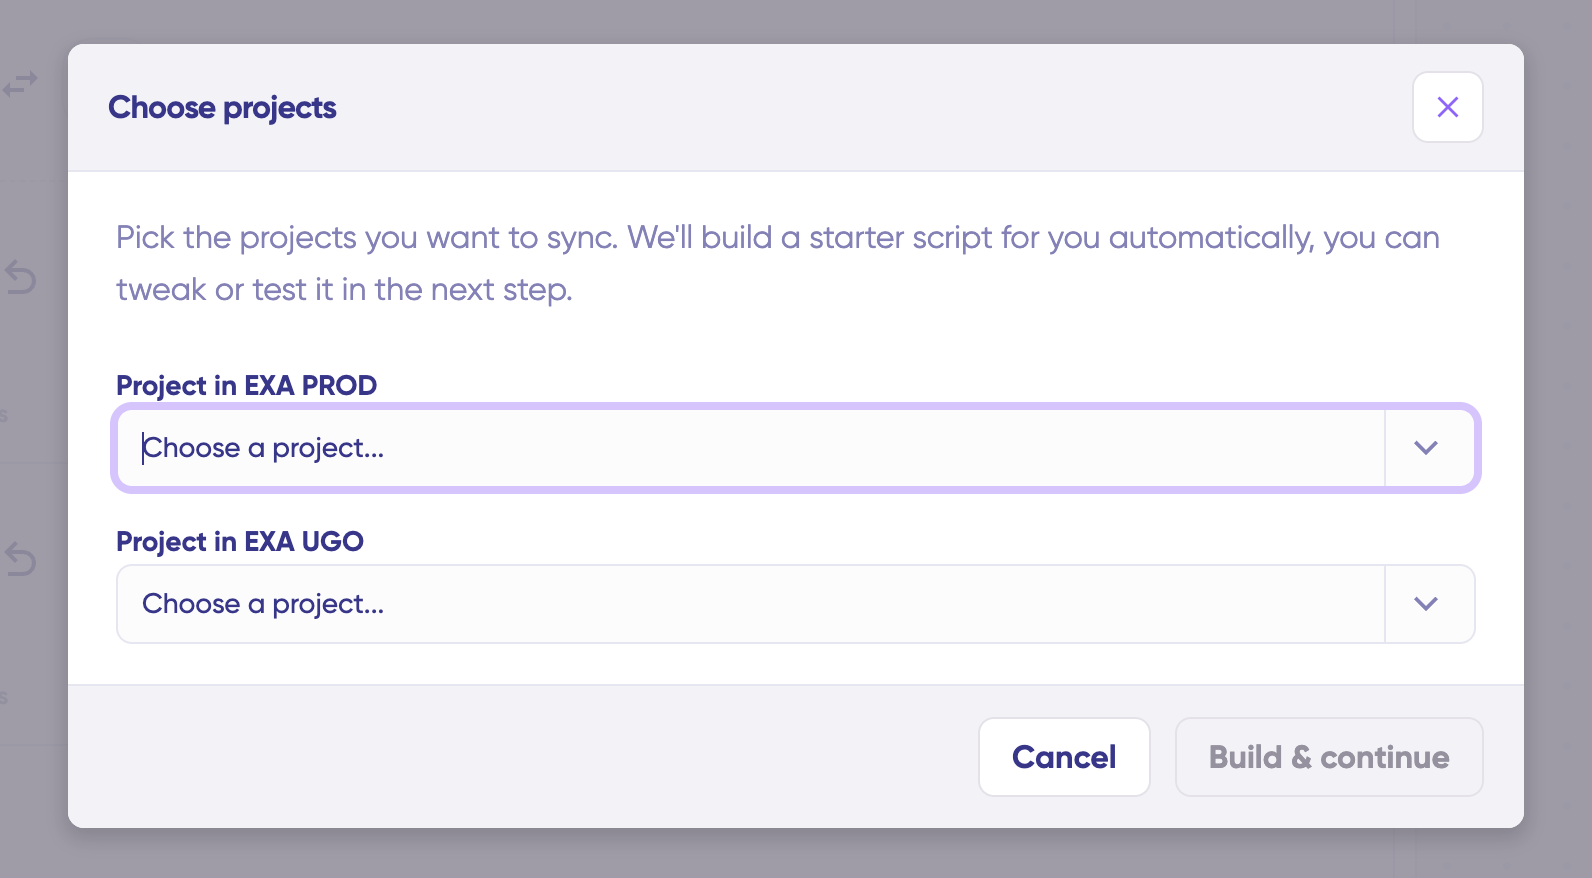
Choose a project you want to sync on both sides from the dropdown menu. Click “Build and Continue”.
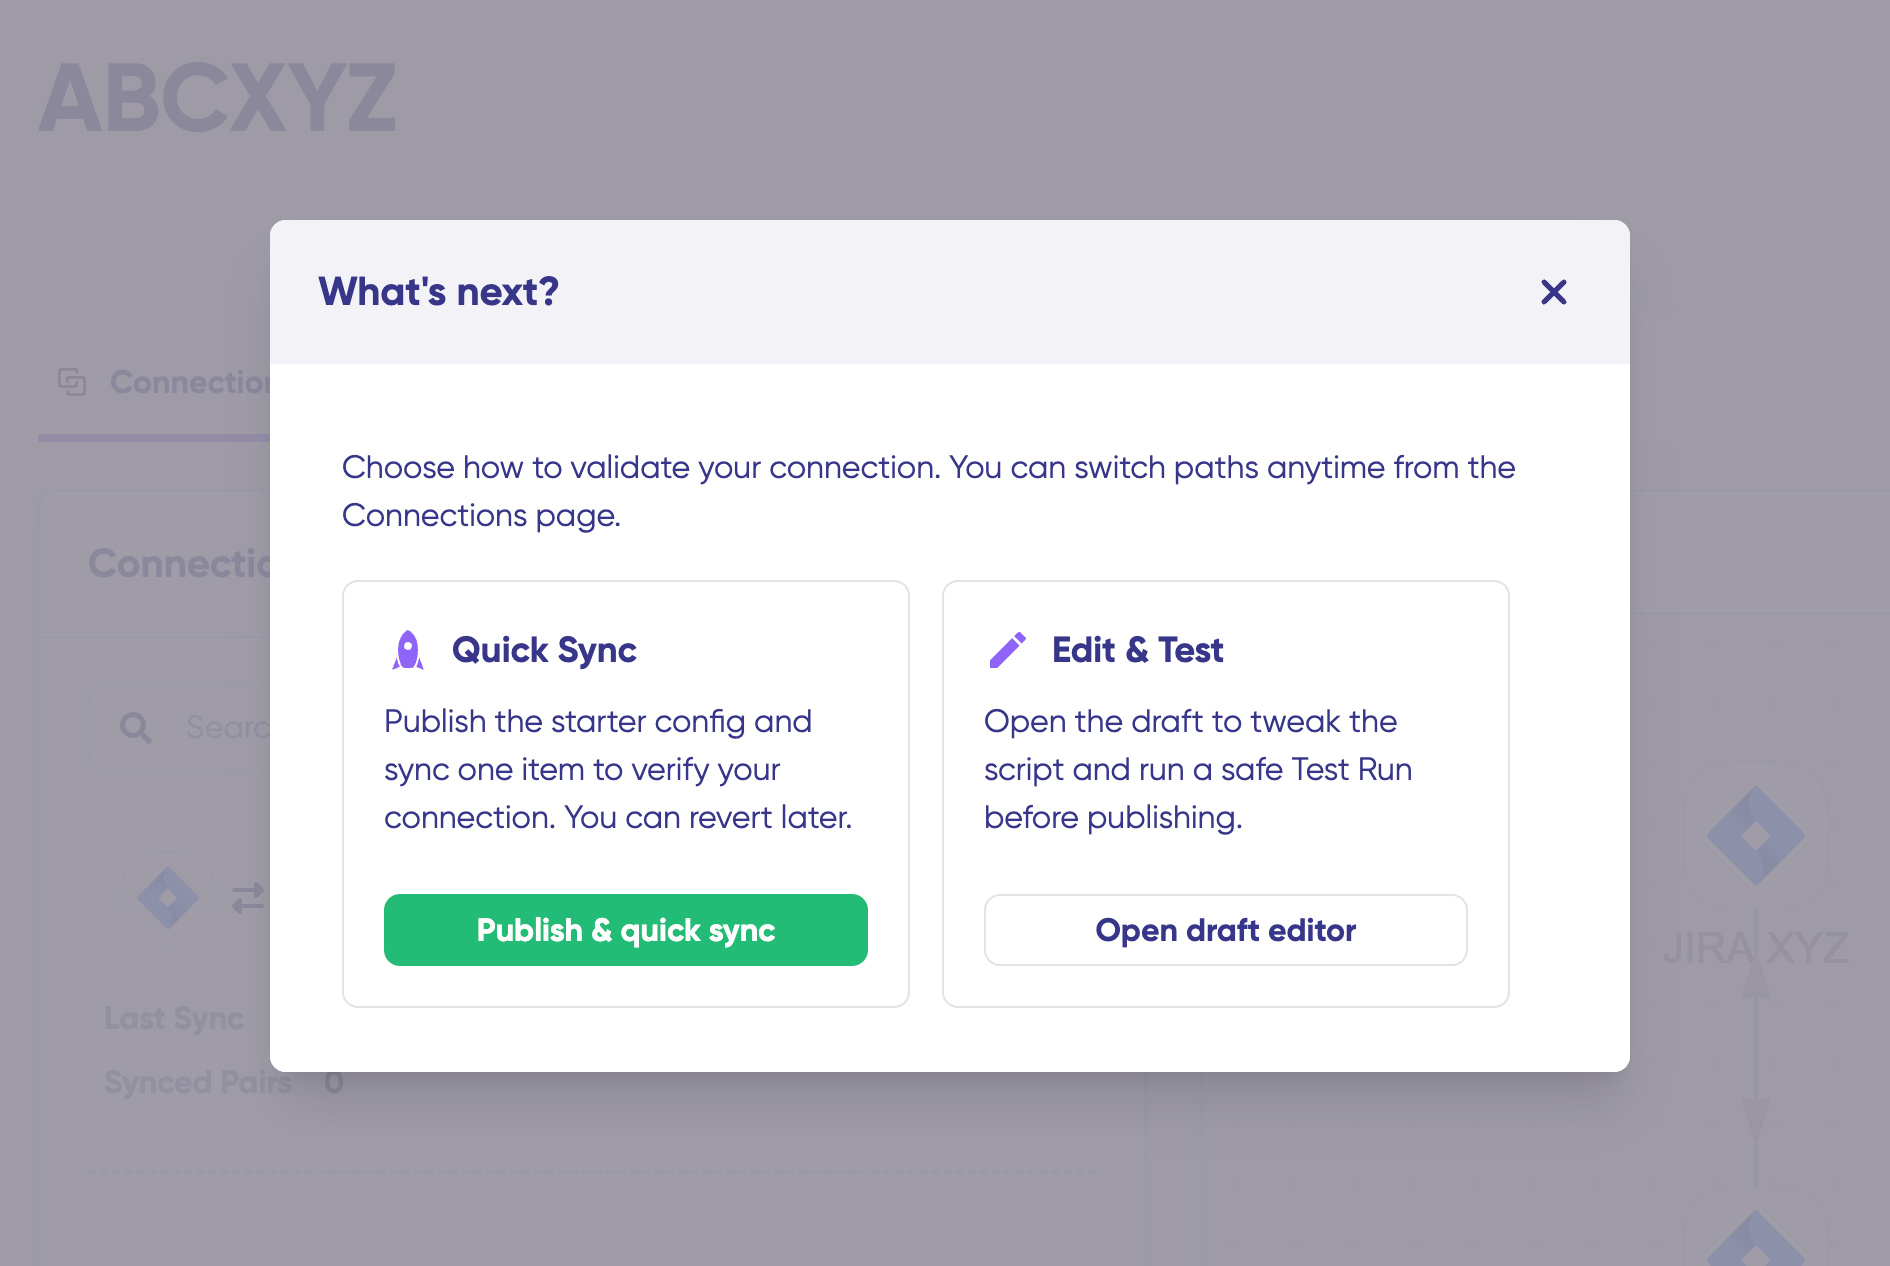
Now, you have 2 options: “Quick sync” and “Edit & Test”. Let’s proceed with them one by one.
- Quick Sync: This option allows you to sync one item between Jira instances.
Under the “Item sync monitor,” enter the work item key and click on the “Sync Now” option.
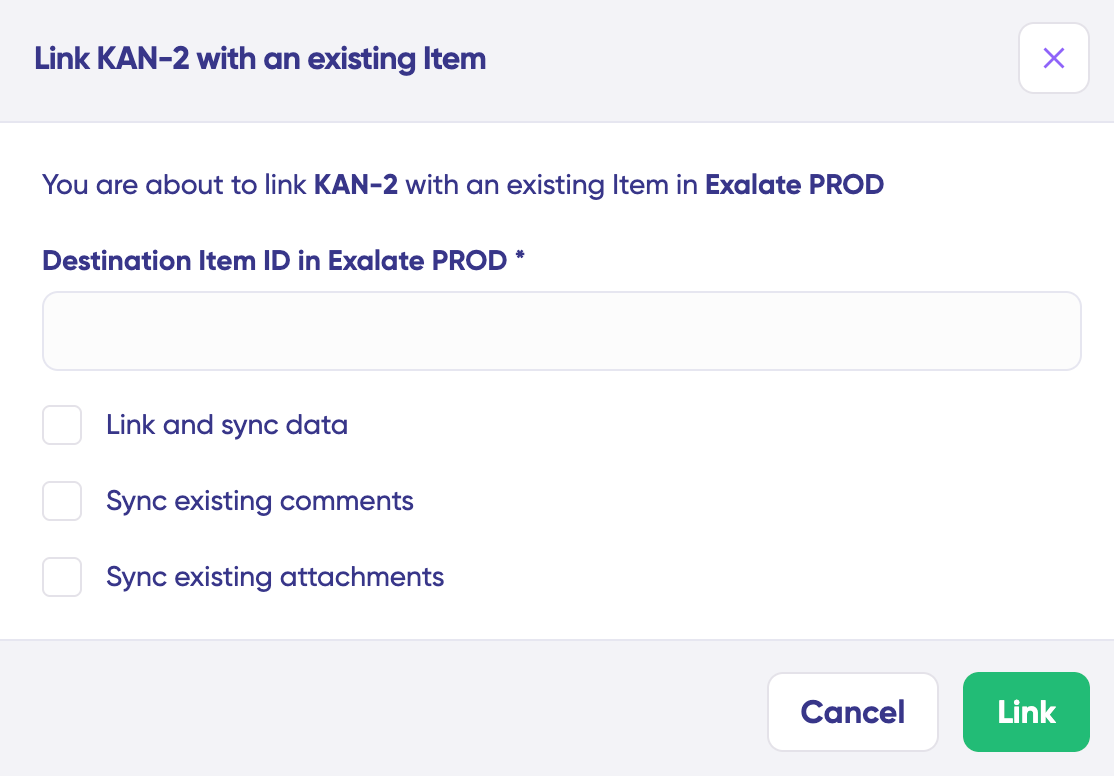
To link 2 existing items, click “Link with existing”. Once the sync is complete, you can view the synced issues in a new window. You can also choose to compare the changes.
- Open draft editor: This option allows changes when you click “+ New version” or select “Open latest draft”. This ensures you don’t modify the existing configuration accidentally.
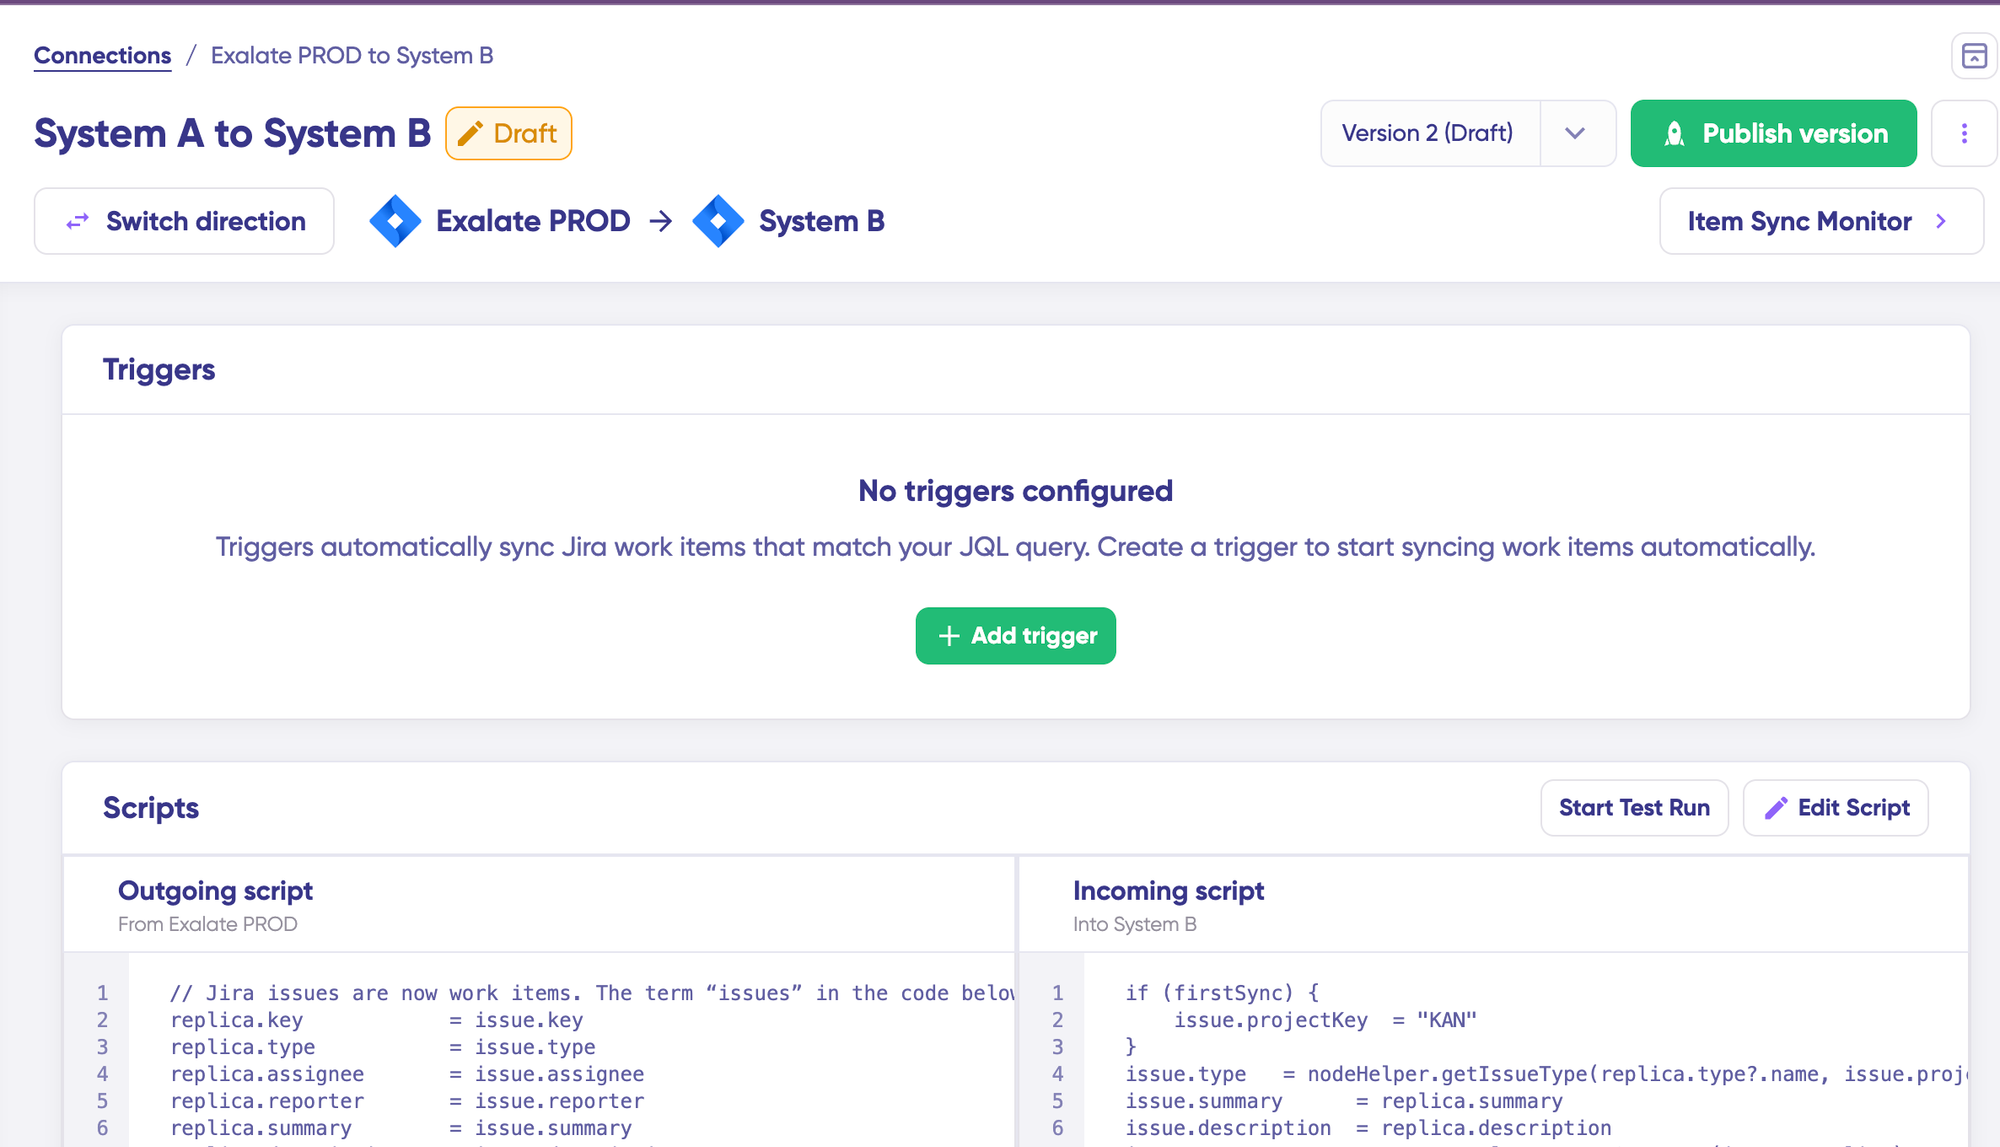
Once active, click the “Edit Script” button to open the editor and adjust the sync rules (Groovy-based scripts). These scripts enable users to add custom data logic and mapping for complex or advanced use cases or workflows.
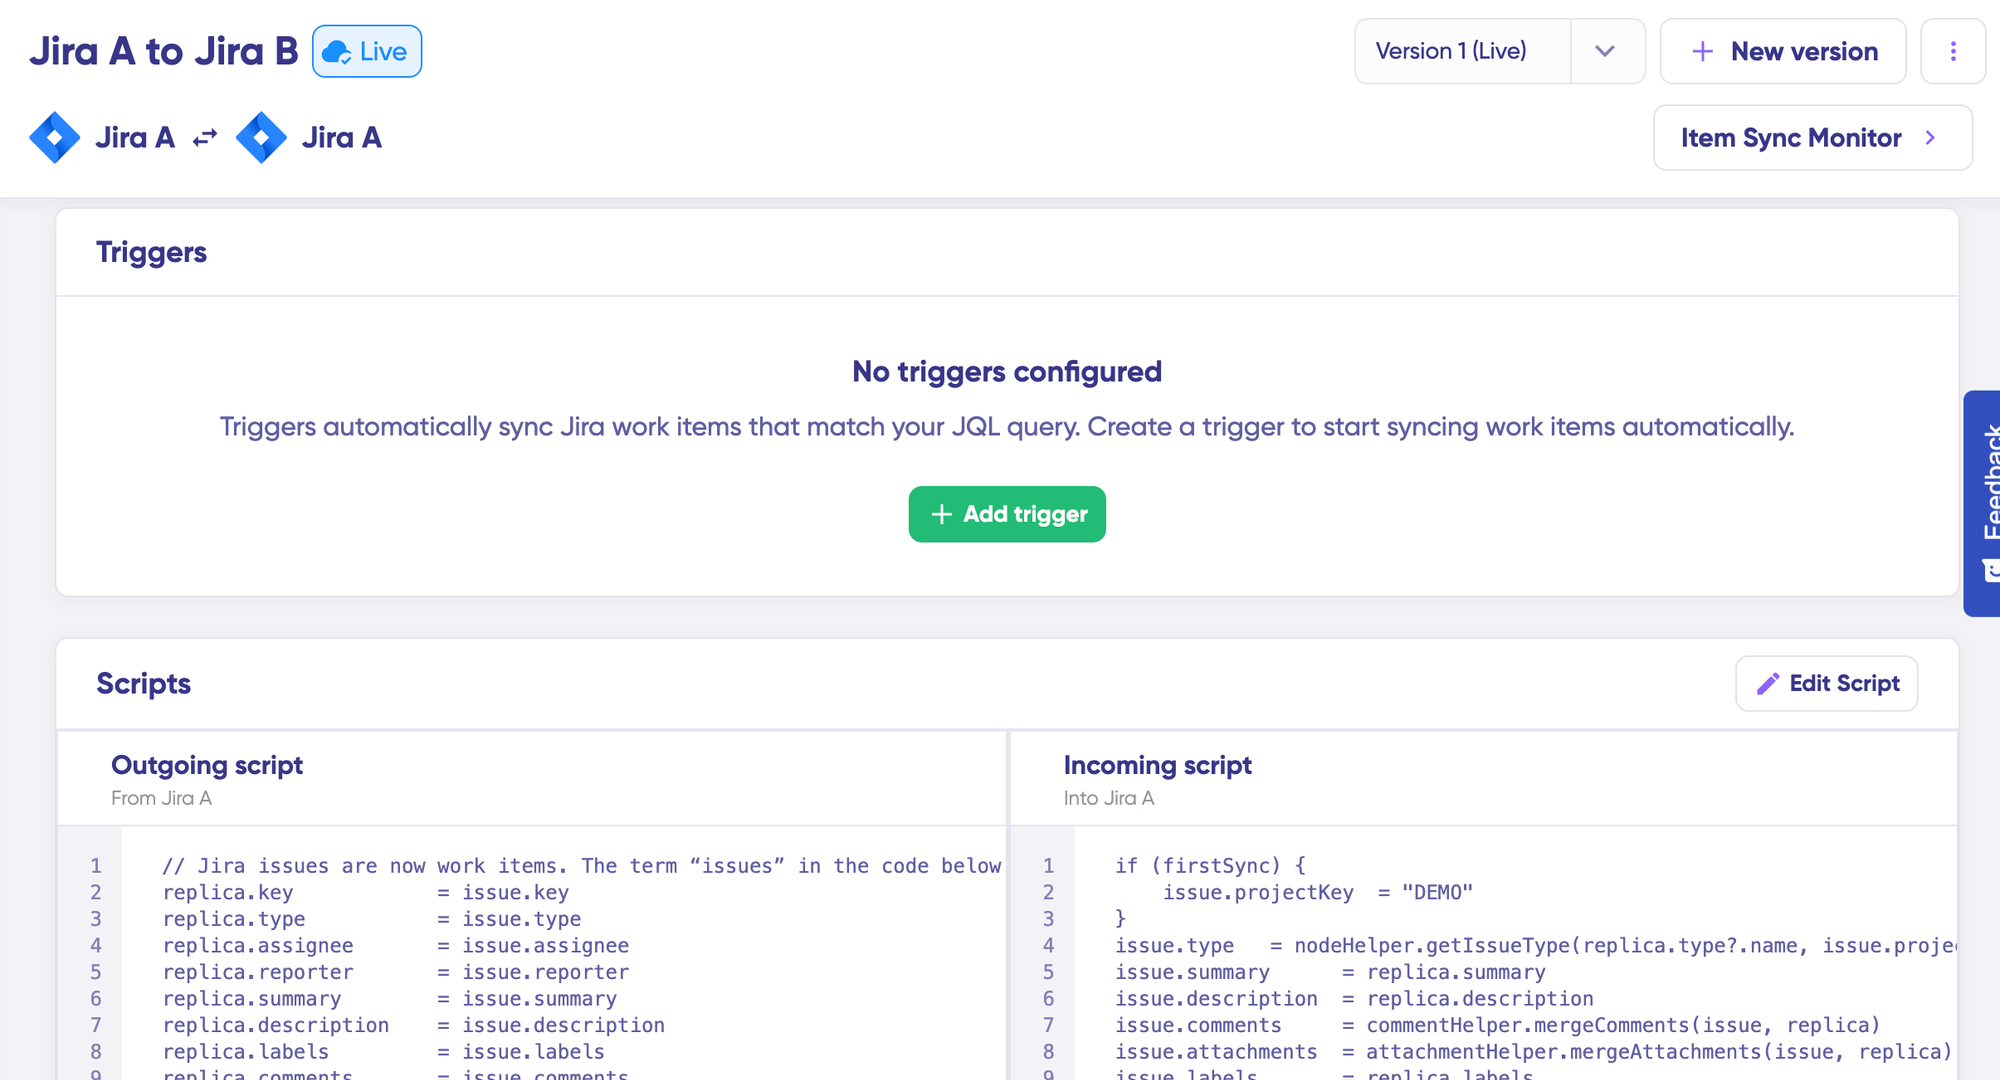
Click on the “Switch Direction” button to swap the sync direction by clicking the two arrows next to the connection name.
The outgoing script will hold the values passed from Jira A to Jira B, and the incoming sync will define how the values coming from Jira B are mapped in Jira A.
The Replica is a JSON file that carries the payload containing data being shared across entities on both Jira instances. You can adjust the sync scripts if you know the Groovy language. Otherwise, use Aida, our built-in AI assistant.
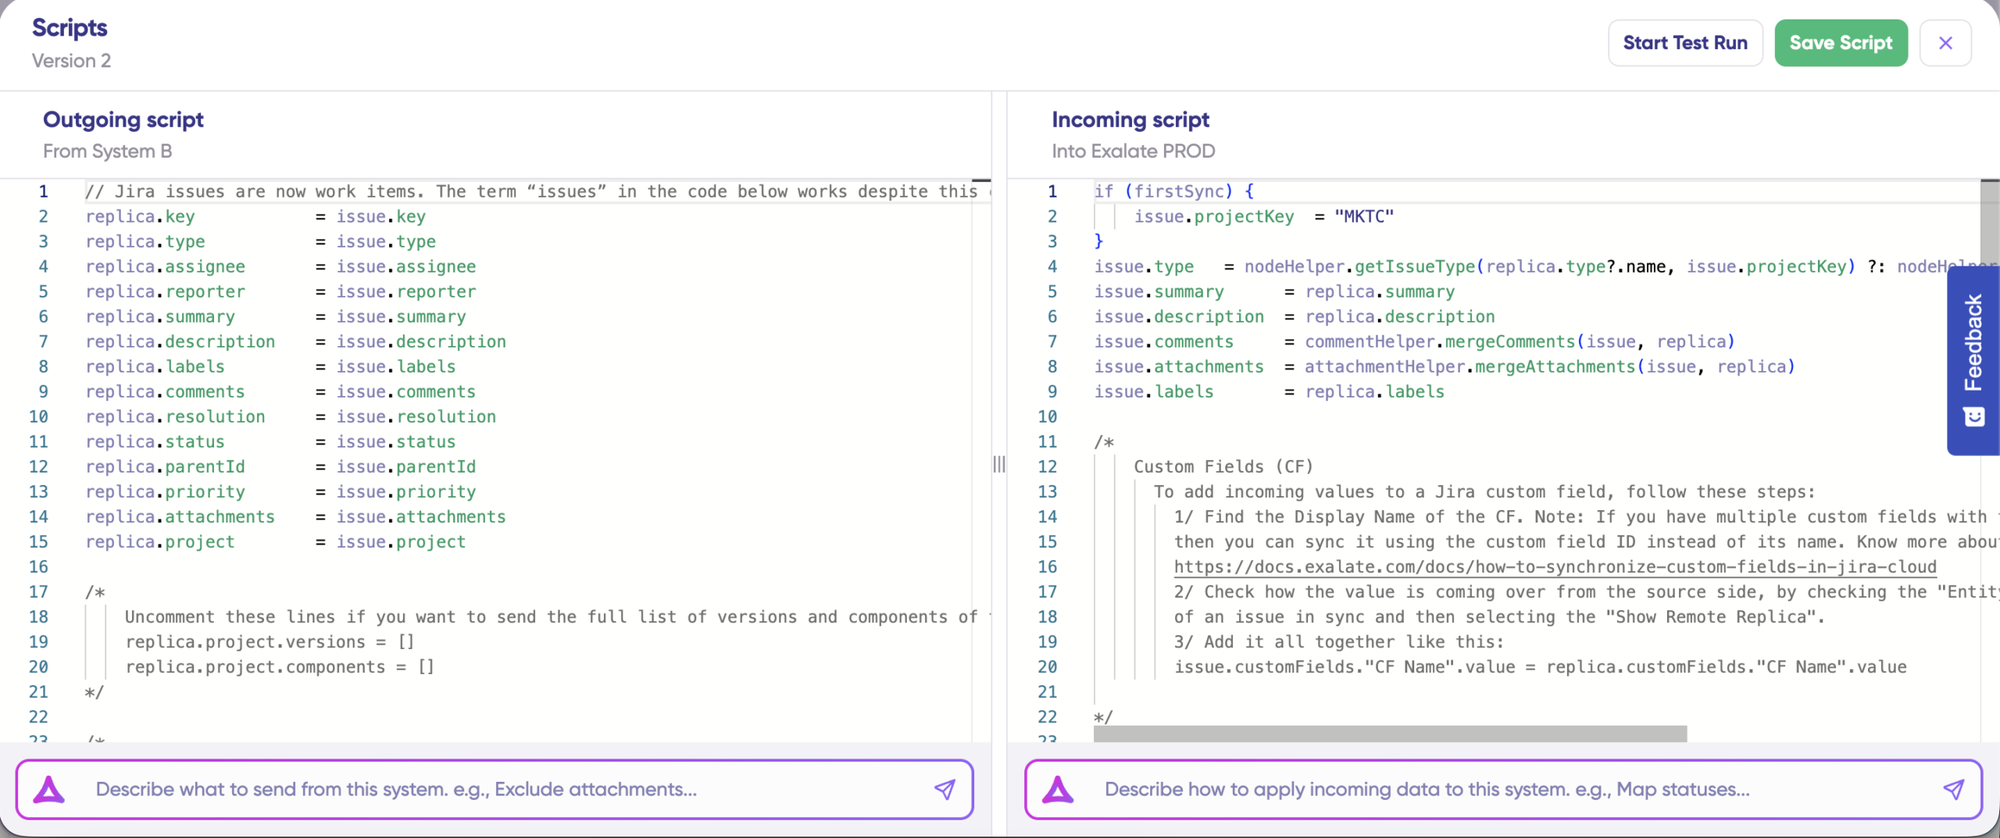
- Use Aida to generate sync scripts. Aida exists in both incoming and outgoing script sections, so choose the side accordingly.
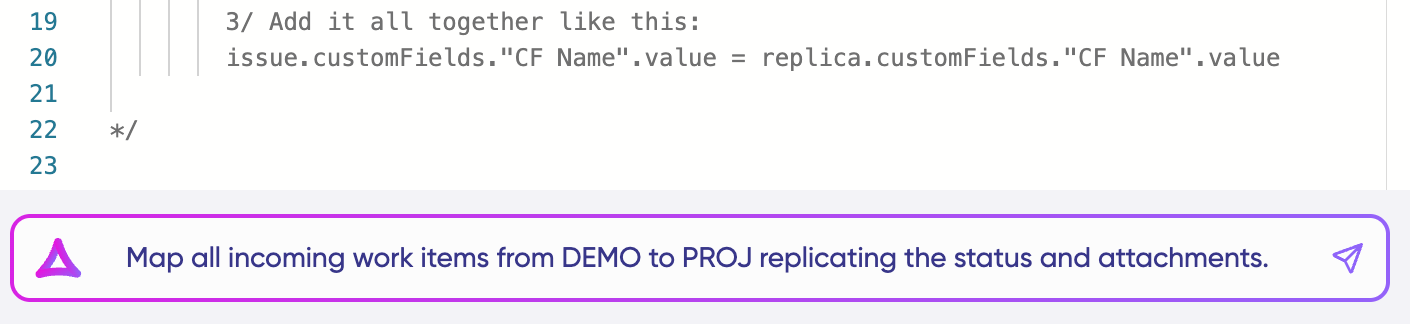
For Outgoing scripts: Describe what data should leave your system. Eg, “Exclude attachments” or “Only sync high-priority issues.”
For Incoming scripts: Describe how incoming data should be applied to your system. Eg, “Map statuses between tasks“.
The scripts are generated based on Exalate’s scripting API and your existing scripts.
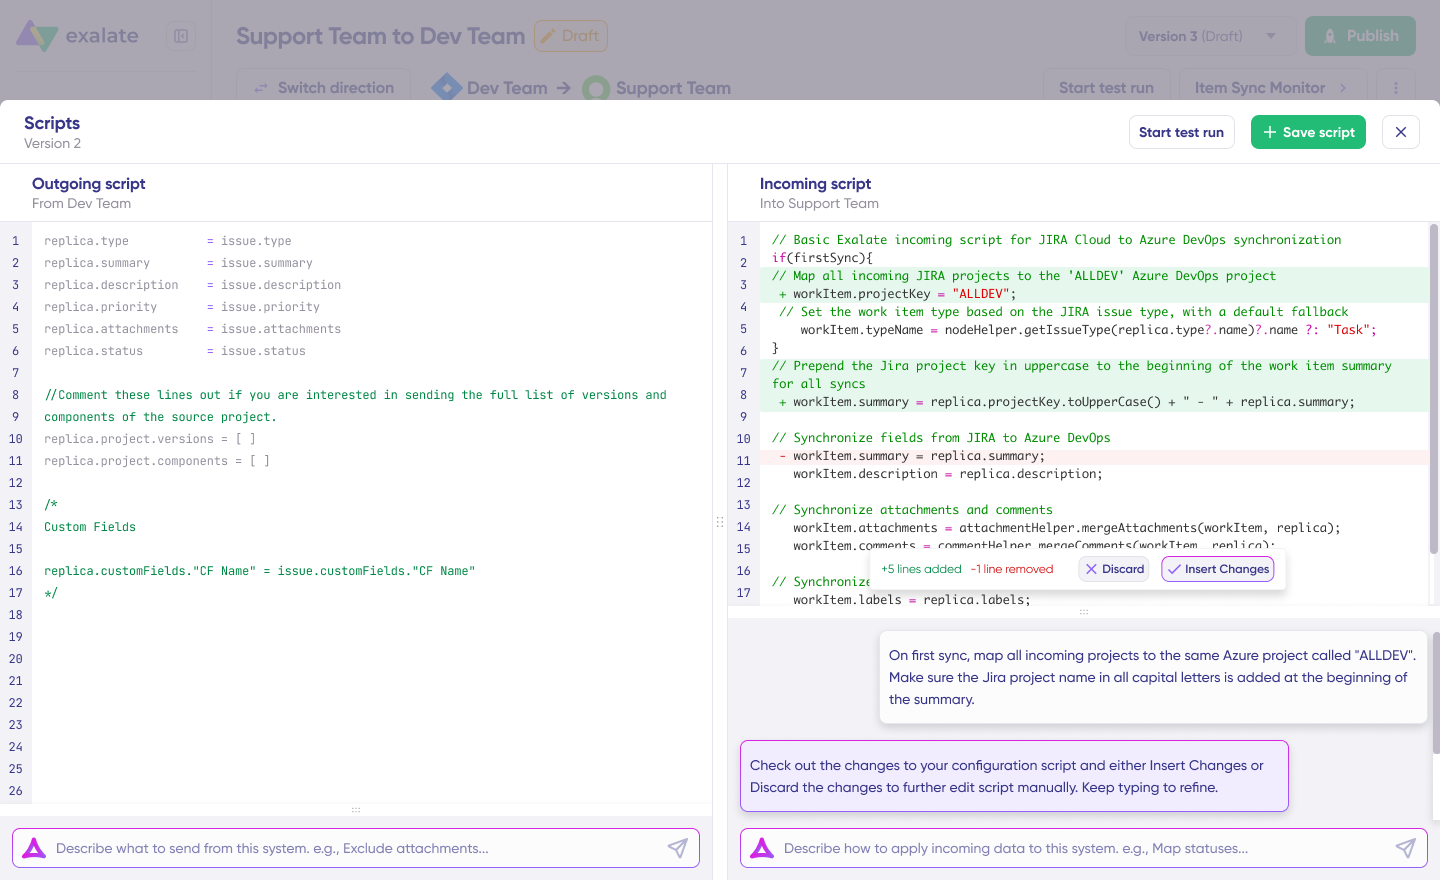
Review the output to validate the suggested changes. New lines are highlighted in green, while suggested removals are highlighted in red. Choose to “Insert” or “Discard” the suggestions.
Note: Just like with any other AI solution, please review the generated code before applying it.
Once you have your sync scripts ready, you can choose to “Save script” or proceed to dry-run them before publishing.

- Click “Start Test Run” and “Select items” to sync. You can select multiple work items. Wait for a bit, and you’ll see the detailed results of the fields synced and the payload shared between both instances or systems. If you are satisfied with the results, click “Publish Version”.
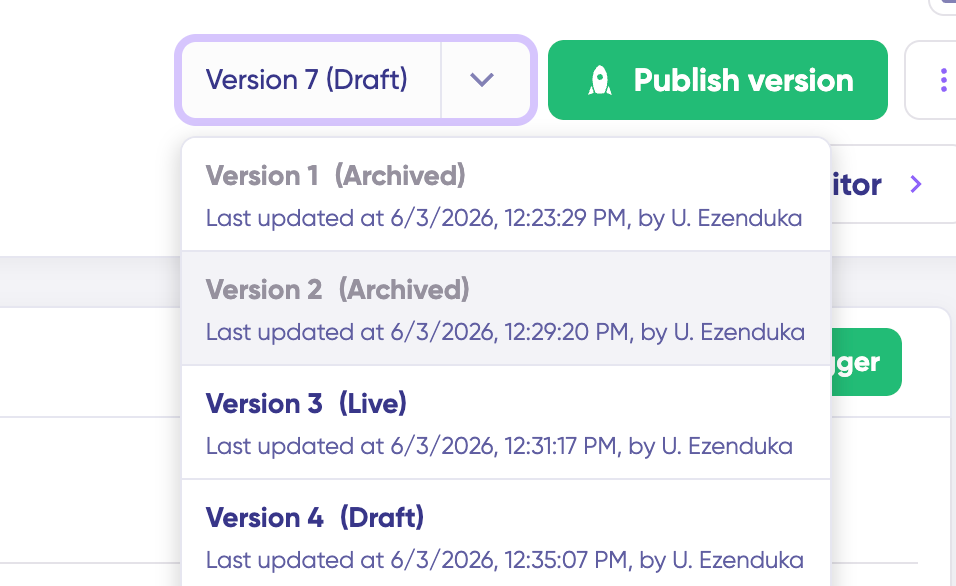
You can view all versions from the “Version” dropdown. The versions can be “Active”, “Draft” (editable), or “Archived”.
- Set up triggers to automate your sync. These are conditions or filters you apply to specific items. For instance, sync all Jira work items that have “
label = dev”.
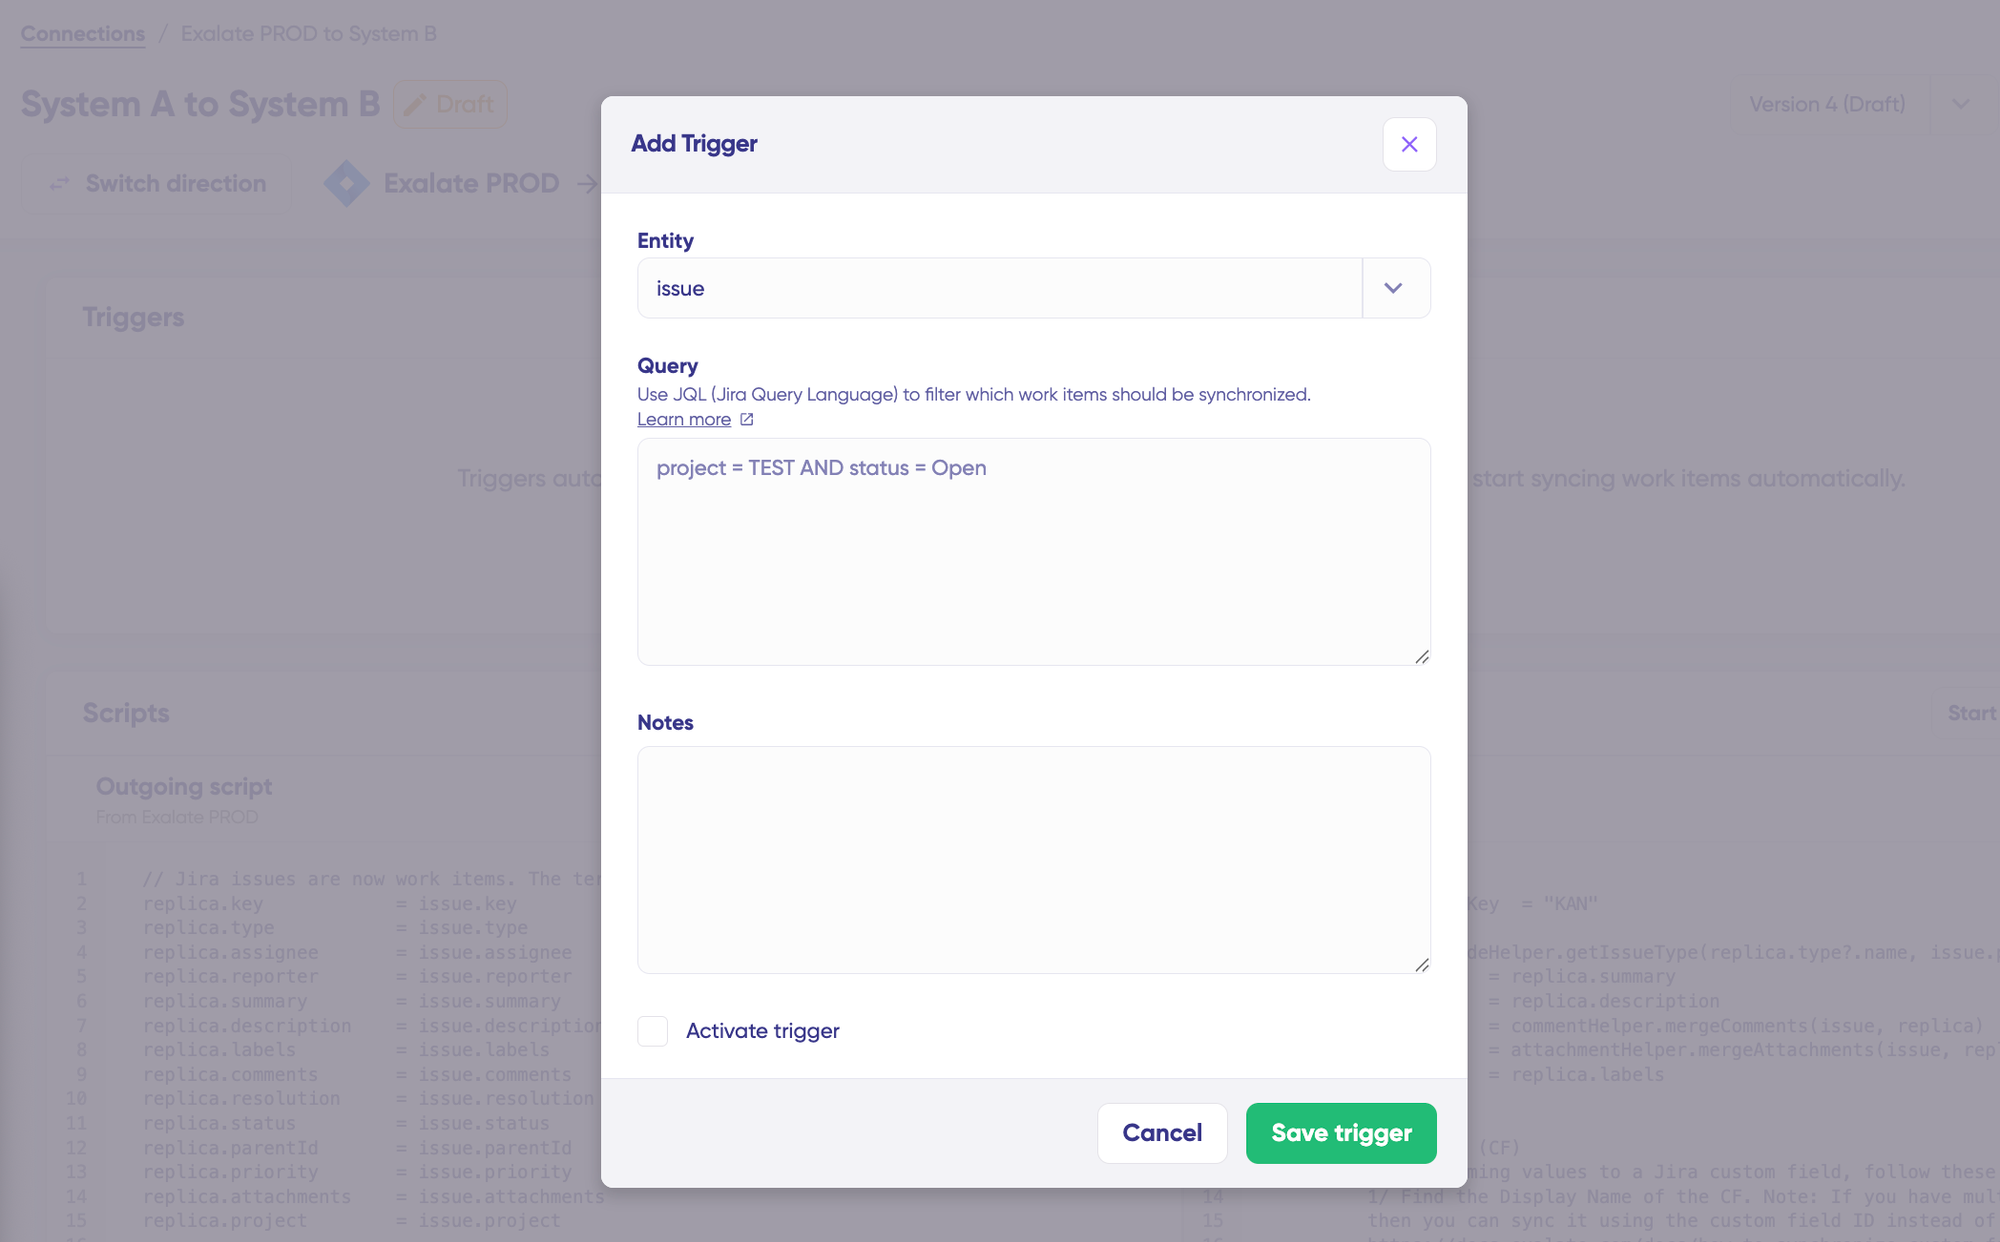
Click the “+Add trigger” button to start creating platform-specific triggers.
Choose the entity type (issue or sprint). For Jira, you can use Jira Query Language (JQL) to specify conditions for work items or sprints: “Project = EXA” will only sync when the item is in the EXA project. Then, save the trigger.
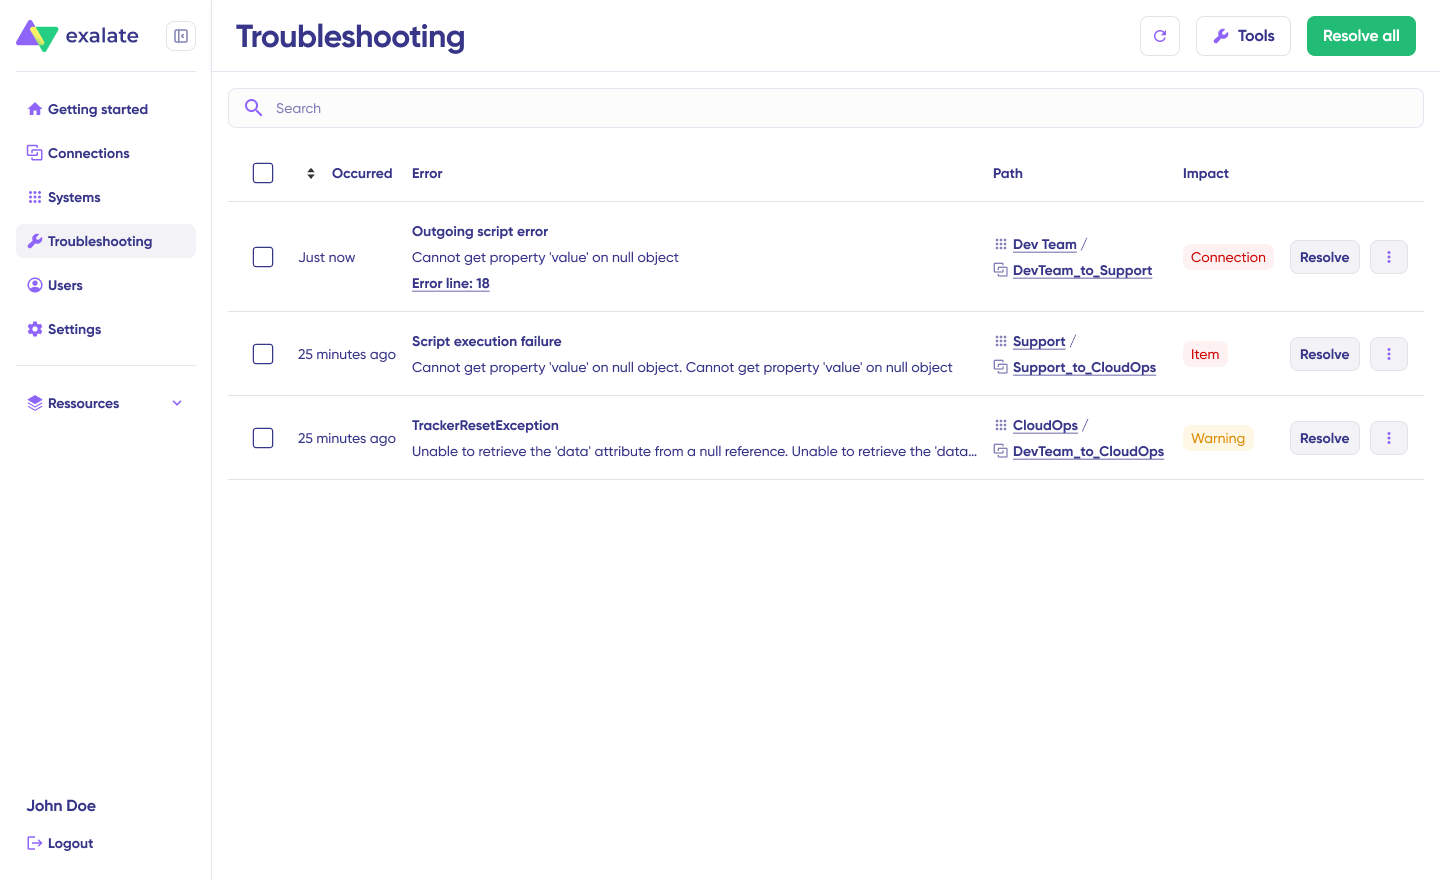
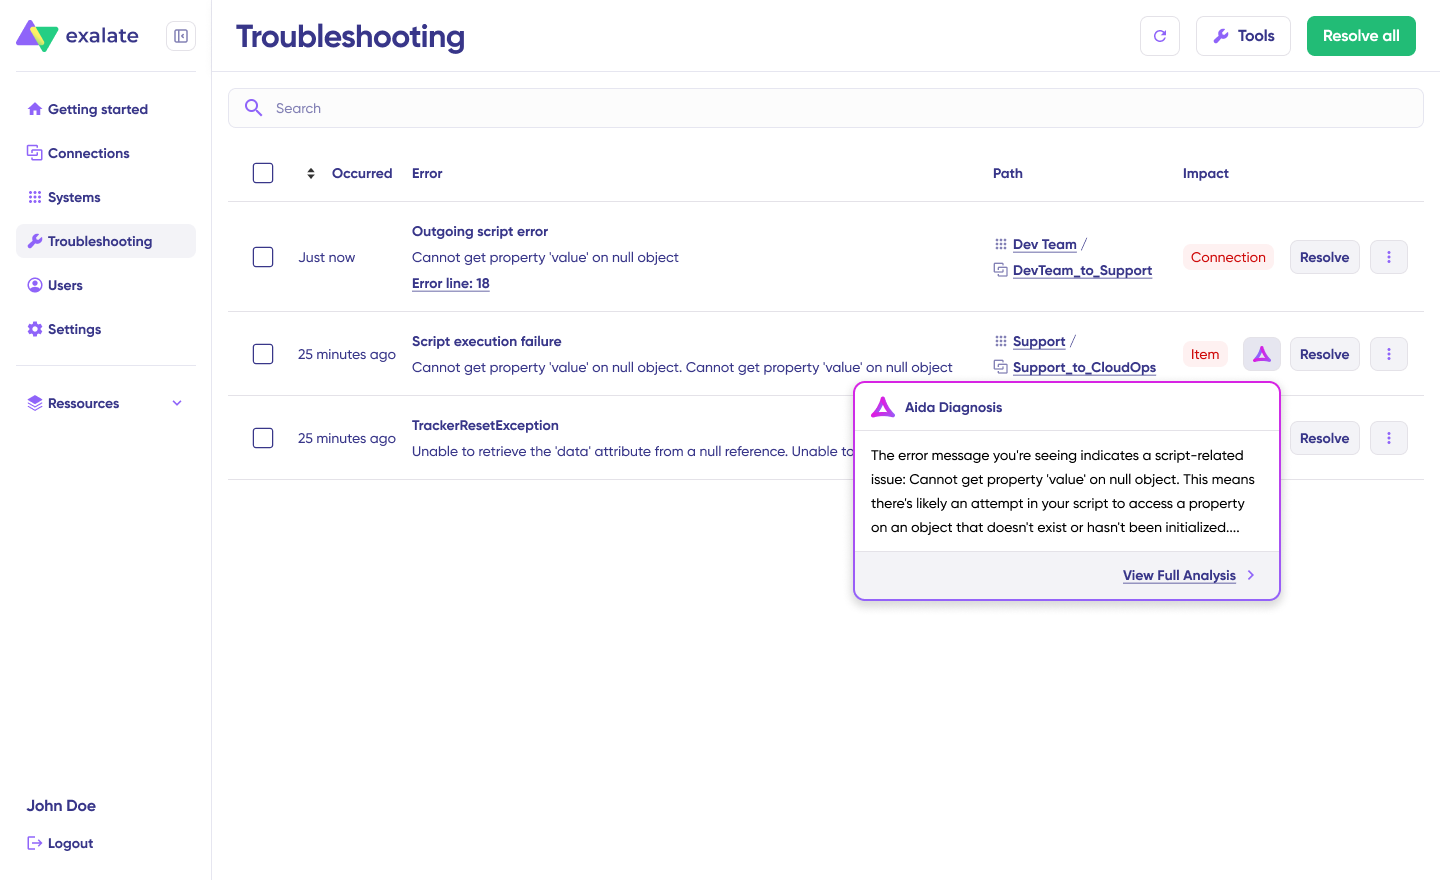
- Troubleshoot your connection with Aida. If there’s an error, go to the “Troubleshooting” tab. Hover over the error you want to diagnose and click on the Aida icon that appears next to the error.
You will see all the affected systems, connections, and items. Aida will provide you with a brief analysis of the error message.
- To get more information, click on Error Details. You will see the impact level, stack trace, error type, and date of occurrence. You can also “View Full Analysis” to get more context.
Fix the error and click on “Resolve”.
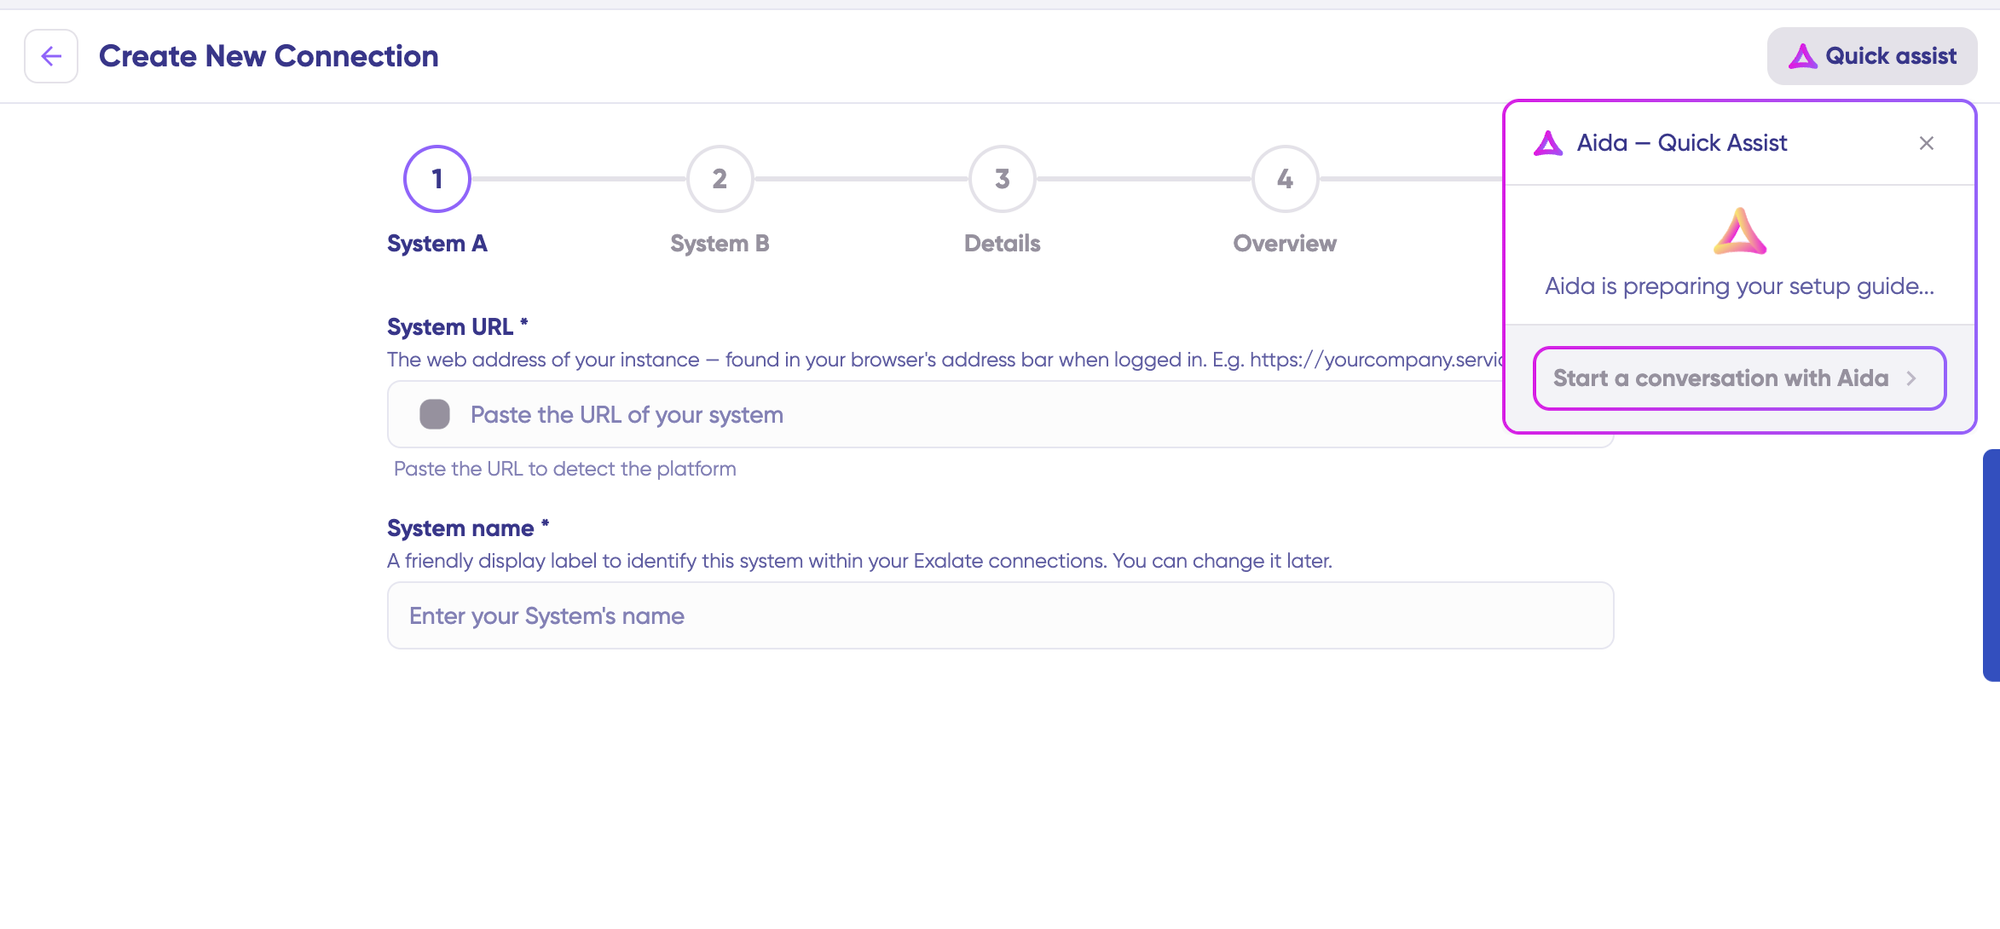
You can also speed up the process by using Aida – Quick Assist at the top right of the dashboard.
That’s it. Your first synchronization will start automatically based on the sync rules and triggers you have set. Happy syncing.
What’s Next?
Jira to Jira synchronization transforms how distributed teams collaborate. When your development, support, operations, and partner teams work in separate Jira instances, Exalate creates the real-time data flow that eliminates silos without forcing everyone into a single system.
The right integration preserves team autonomy while enabling seamless collaboration. Your developers keep their workflows. Your support team keeps theirs. Your partners work in their own environment. Critical information flows automatically where it’s needed. Security stays intact. Each side maintains control.
From two-person startups coordinating with an external QA agency to multinational enterprises managing thousands of users across five continents, Exalate scales to match your requirements. Start with simple field mappings using AI-assisted configuration. Grow into complex multi-instance architectures with conditional logic and custom transformations.
Secure, flexible, and built for real-world complexity, Exalate lets your teams work the way they want while staying synchronized on what matters.
Begin a free trial on Exalate’s free tier and set up a working sync without going through sales. Connect both ends, configure rules with Aida or a Groovy engineer, and watch records flow.
Want a live walk-through on your specific case first? Book a demo and the Exalate team handles the integration patterns on a call.
Frequently Asked Questions
How do I prevent confidential data from syncing to external partners?
Configure field-level sync rules that specify exactly which fields cross the boundary. In your outgoing sync script, explicitly map only the fields you want to share. Fields not mentioned in your outgoing sync configuration don’t transmit to the remote side, regardless of what their incoming sync requests.
For example, your outgoing sync might include:
replica.summary = issue.summary
replica.description = issue.description
replica.status = issue.status
This configuration shares only summary, description, and status. Attachments, comments, custom fields, time tracking, and all other fields remain private because they’re not included in the replica object sent to the remote side.
For comments, implement filtering logic that syncs only comments from users in specific groups or containing specific tags. Internal comments marked with “[INTERNAL]” can be excluded, while external communications sync bidirectionally.
Does Exalate slow down Jira performance?
No, Exalate operates asynchronously without blocking Jira operations. When you update a work item that has an active sync, Jira processes your update normally and immediately returns control to you. Sync processing happens in background queues and doesn’t impact the user interface’s responsiveness.
How does Exalate handle custom field mapping between different Jira configurations?
Aida suggests field mappings based on field names, types, and context. When setting up a new connection, Aida analyzes custom fields on both sides and proposes mappings for fields with similar names or purposes. You review suggestions and accept, modify, or reject them.
Advanced scenarios use Groovy scripts for complex transformations. If one side uses a single-select “Priority” field with values [Low, Medium, High] and the other uses a number field “Priority Score” with values [1, 2, 3].You write transformation logic converting between them.
// Outgoing sync (convert number to text)
replica.customFields."Priority Text" =
issue.customFields."Priority Score".value == 1 ? "Low" :
issue.customFields."Priority Score".value == 2 ? "Medium" : "High"Code language: JavaScript (javascript)
// Incoming sync (convert text to number)
issue.customFields."Priority Score".value =
replica.customFields."Priority Text" == "Low" ? 1 :
replica.customFields."Priority Text" == "Medium" ? 2 : 3Code language: JavaScript (javascript)
Can I sync sprints and epics, not just individual work items?
Yes, Exalate syncs sprints with their complete metadata: start date, end date, goal, state (active/future/closed), and the board they’re associated with. When you create a sprint on one side and add work items to it, the sprint appears on the remote side with the same dates and goals. Work items join the corresponding sprint automatically.
Epics sync bidirectionally with progress tracking. When you create an epic on one side and add child work items across multiple instances, the epic maintains relationships with all its children regardless of where they physically reside.
This enables true cross-instance initiative tracking. Your platform team plans an epic in their instance. Mobile, backend, and infrastructure teams create implementation work items in their own instances.
What security certifications does Exalate maintain?
Exalate is ISO 27001 certified, demonstrating adherence to internationally recognized information security management practices. The certification covers infrastructure, development practices, data handling, access controls, and incident response procedures.
Additional security features include:
- Role-based access control for configuration management
- Encryption in transit (TLS 1.2+) for all data traveling between instances
- Encryption at rest for temporarily stored data in sync queues
- Regular third-party penetration testing
- Security monitoring and incident response procedures
- Compliance documentation for common security questionnaires
Visit the Trust Center for detailed security documentation, compliance certifications, security white papers, and responses to standard security questionnaires.
Can non-technical teams set up basic syncs without scripting?
Yes, Aida provides an AI-assisted configuration where you describe sync needs in plain language. “Sync all high-priority bugs from Project Alpha to Project Beta, sharing summary, description, and status fields” generates an appropriate configuration automatically.
Aida handles common scenarios without requiring scripting knowledge:
- Field mapping between standard Jira fields
- Basic filtering by project, work item type, or priority
- Status mapping between different workflows
- Comment synchronization with or without filtering
For more complex requirements—conditional logic based on custom fields, data transformations, or integration with external systems via API—technical teams can customize the generated scripts using Groovy.
What other platforms can Exalate integrate with Jira?
Beyond Jira-to-Jira synchronization, Exalate connects Jira with ServiceNow, Zendesk, Freshservice, Freshdesk, Azure DevOps, Azure DevOps Server, GitHub, Salesforce, and Asana. Each platform connector is purpose-built rather than a generic REST adapter.
This means field mappings understand platform-specific concepts—ServiceNow’s incident fields, Azure DevOps’ work item types, Salesforce’s object relationships—and provide appropriate transformation logic.
Custom connector frameworks enable integration with internal tools, legacy platforms, or specialized industry software. If you have a proprietary system with a REST API, Exalate can integrate it with Jira using custom connector development.
Can I use Exalate with Jira Service Management?
Yes, Exalate fully supports Jira Service Management, including service-specific fields like request types, organizations, SLAs, and customer portal settings. You can sync service desk tickets with other Jira instances or with external ITSM platforms like ServiceNow.
It allows you to:
- Connect service desks with external partners who report issues via their own service management tools
- Sync support tickets to the development Jira when bugs need engineering escalation
- Integrate the customer-facing service desk with the internal IT operations
- Synchronize service requests across regional service desks for multinational support operations
Field mappings handle Service Management-specific concepts, and configuration can filter based on request types, organizations, or SLA status to ensure only appropriate tickets synchronize.
Recommended Reading:
- Jira Integrations: Integrate Jira and Other Systems Bidirectionally
- How to Set Up a Jira Salesforce Integration: The Comprehensive Guide
- Jira Azure DevOps Integration: The Complete Step-by-Step Guide
- Jira ServiceNow Integration: How to Set up an Integration in 6 Steps
- The Step-by-Step Guide to Setting up a Jira Zendesk Integration