
This article was originally published on the Salesforce Community.
How to Sync a Salesforce Account from a Jira Custom Field Using Exalate
You can integrate Jira and Salesforce using trusted third-party tools. The main goal of such integrations is to sync updates from Jira work items or projects to your Salesforce account, preferably without any manual effort.
Let’s walk through a practical use case. For this integration, I have used Exalate.
Custom Field Update: Jira to Salesforce Use Case
A drop-down custom field in Jira lets you select an account name that is then synced to the Salesforce side as an account entity. Any changes to the account name in Jira will also reflect on the Salesforce side automatically.
Here are the requirements and challenges:
Primary Requirements
When a user updates a ticket description or custom field in a Jira work item, the changes should appear on the Salesforce side without copying them manually.
You need to set up sync rules for the incoming and outgoing data in custom fields.
You can also set up triggers to automatically update the field on the Salesforce side.
Potential Challenges
Accuracy, network timeouts, failing triggers, and mistakes in sync rules can cause issues. Mapping fields between Jira and Salesforce can be tricky, especially when you need to find the correct API name for scripting. Getting data transformations right for picklists and drop-down values also requires careful attention.
Solution to the Problem: Exalate
Exalate is a two-way integration solution that works with Jira, Salesforce, ServiceNow, Zendesk, Azure DevOps, Freshservice, Freshdesk, Asana, GitHub, and more.
Why Exalate?
You can use it to sync Salesforce and Jira custom fields with full control over what data goes in and out. Its Groovy scripting engine handles complex use cases like mapping drop-down values to account entities.
Beyond custom fields, Exalate supports syncing standard and custom Salesforce objects (Cases, Opportunities, Accounts, Contacts) with Jira work items, including comments, attachments, statuses, and priorities.
Key features that make this work:
- Unified console: Manage all your Jira and Salesforce connections from a single interface.
- Aida (AI-assisted configuration): Get help generating and troubleshooting sync scripts.
- Test Run: Test your sync scripts against real data before deploying to production.
- Script versioning: Full audit trail of every change with rollback capability.
- Real-time sync: Complete queue visibility so you always know the sync status.
- Side-by-side view: See both sides of the connection on one screen.
Security: ISO 27001 certified, role-based access control (RBAC), encryption in transit (TLS 1.2/1.3) and at rest, plus decoupled access control. Visit the Exalate Trust Center for more details.
Get Exalate on the Atlassian Marketplace
How to Set Up the Jira to Salesforce Connection
To get started, go to the Exalate app at exalate.app. If you already have an account, log in directly. New users can create an account by entering their email and verifying it, or by signing up with Google.
Creating a Workspace
Workspaces help you organize and manage your integrations and connections in one place. You can find all your existing workspaces under the “Workspaces” tab.
To create your first workspace, click the “+ Create Workspace” button, enter a name and description, and click “Create workspace” to confirm.
Creating Your First Connection
Once you have a workspace, you can start creating connections between Jira and Salesforce.
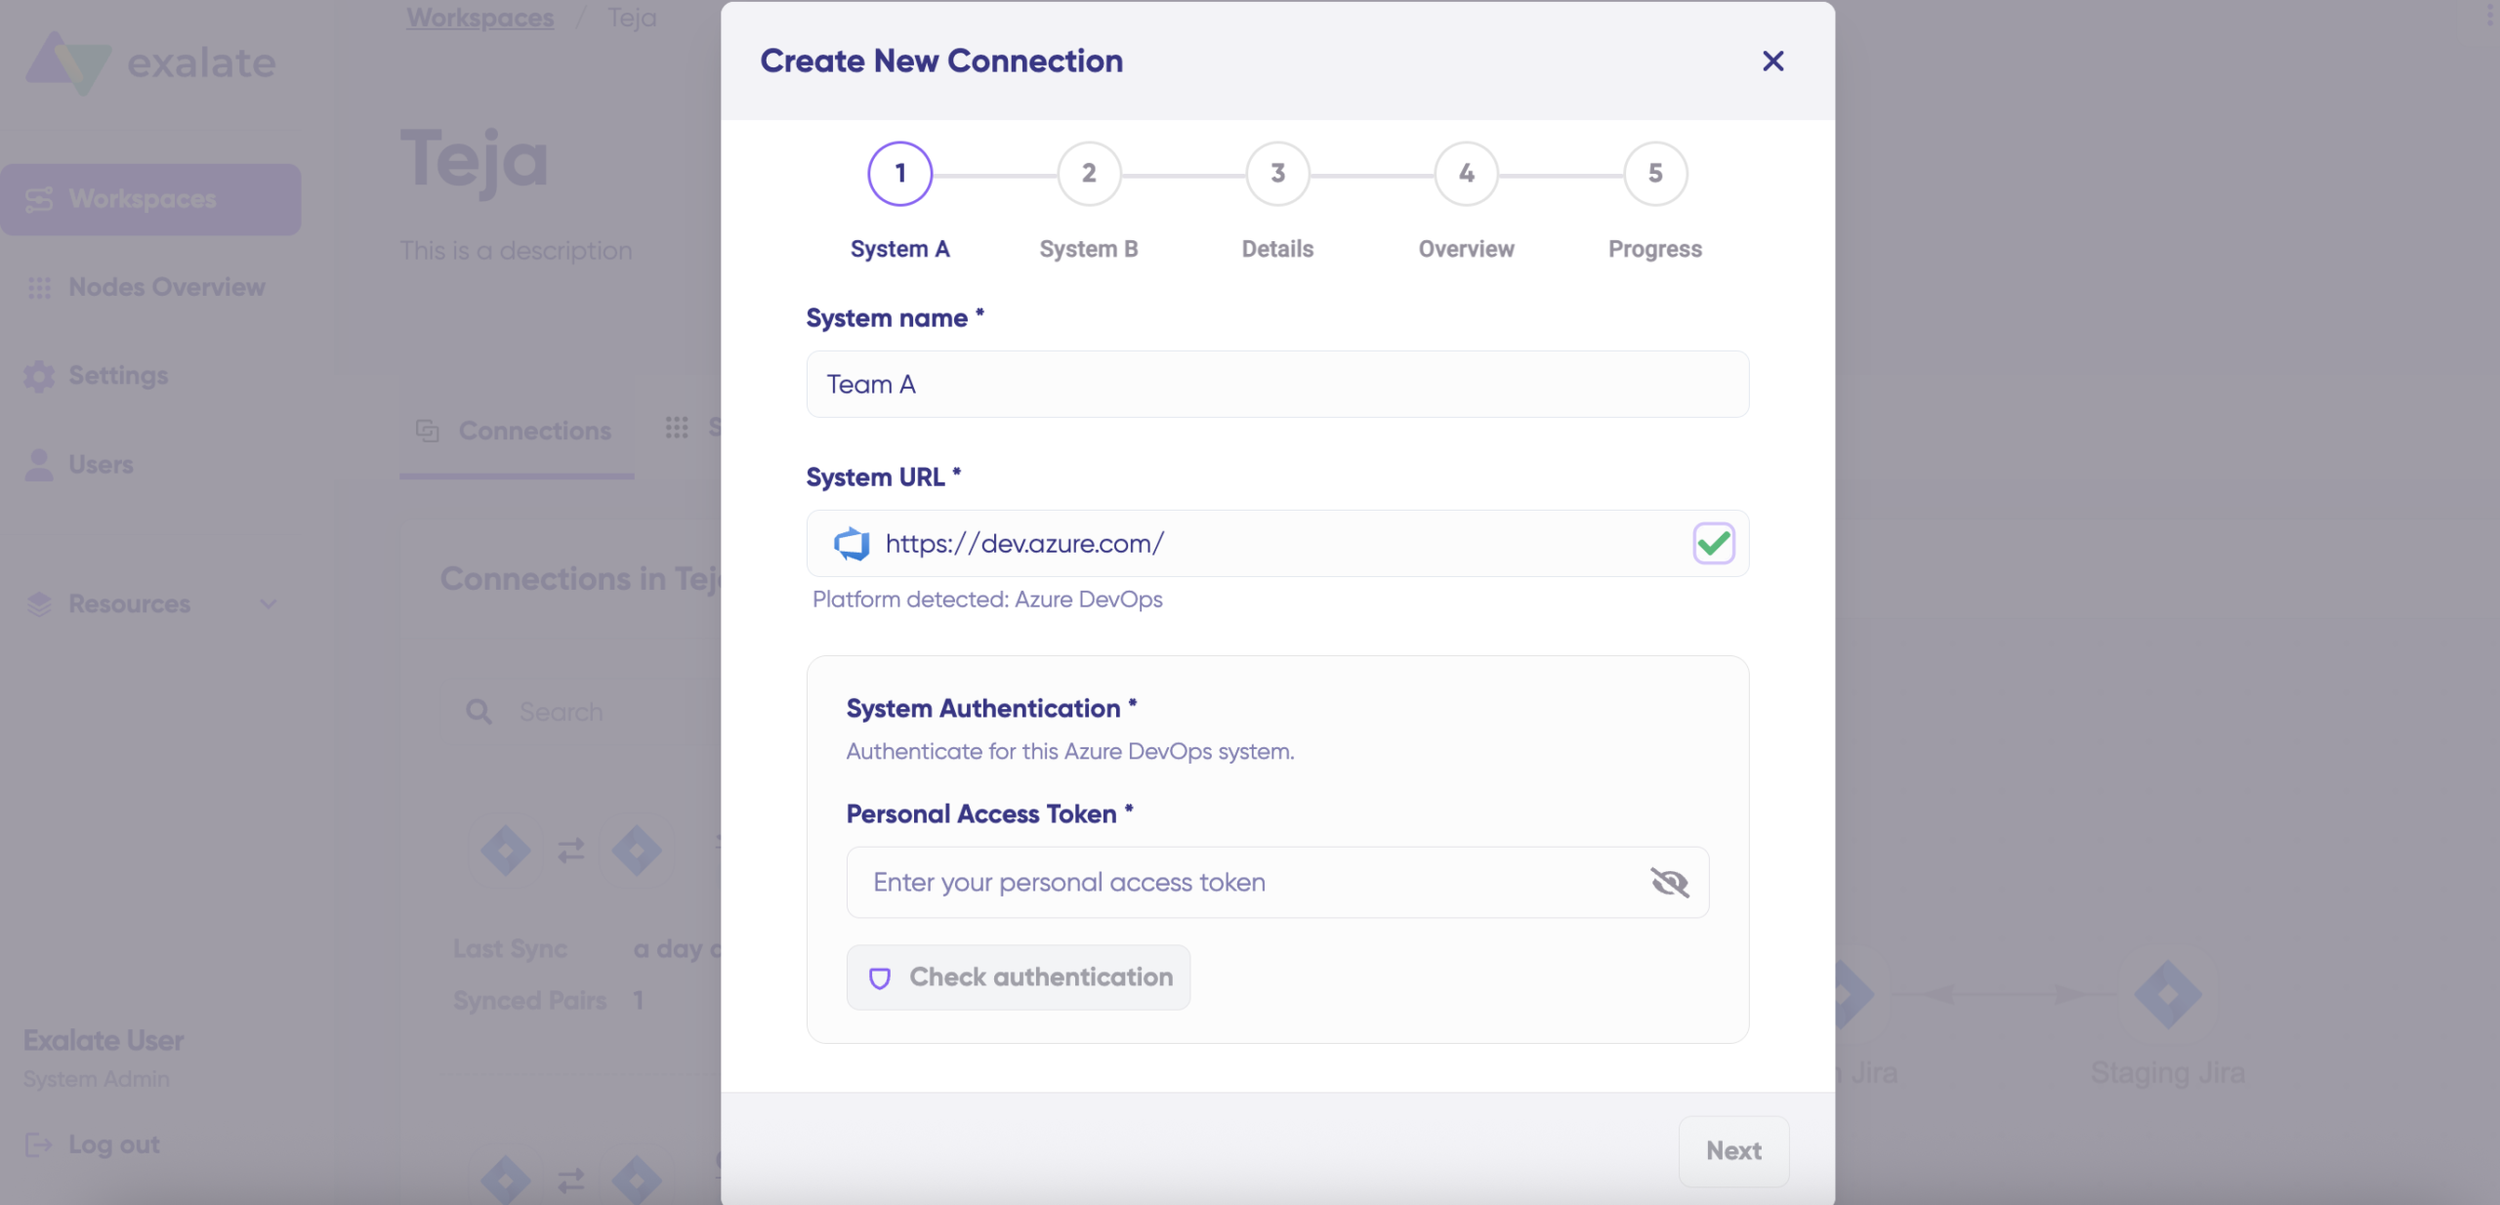
- Click “+ Add connections” > “Create new connection”.
- Enter the name for your first system (System A). You can name either Jira or Salesforce as System A. It doesn’t matter which one goes first.
- Enter the URL of your system. For example, if you start with Salesforce, enter your Salesforce instance URL.
- Once you enter the URL, a validation check runs. If your system is already part of the existing workspace, authentication happens automatically.
- For new systems, you’ll need to enter your authentication details. Jira uses OAuth, and Salesforce uses API tokens.
- Complete the same setup process for the other side.
- Give your connection a name and description.
- Click “Next”.
- Review the details to ensure they are correct, then click “Create connection”.
When the process is complete, select “Continue to configuration” and choose a Jira project you want to use for synchronization.
Then click “Build & continue”.
Configuration Options
After creating your connection, you have two configuration options: “Quick Sync” and “Edit & Test”.
Quick Sync lets you sync one item between Jira and Salesforce to verify that your connection works properly. Enter the work item key in Jira or the case number in Salesforce, then click “Sync Now”.
Edit & Test is where you configure the actual sync rules. Click “Create a new version” or “Open latest draft” to start making changes. Changes in the draft are saved automatically.
Configure Sync Rules for Custom Fields
Go to the connection you want to edit and open the script editor. Sync rules are based on Groovy scripts. You have two sides:
- Outgoing script (on the Jira side): Defines the data to be sent over to the Salesforce side.
- Incoming script (on the Salesforce side): Defines how the data received from Jira is applied.
Under the “Rules” tab, enter the following code snippet into the “Outgoing sync” text area:
replica.customFields."SF Account" = issue.customFields."SF Account"
Note: The issue.customFields function points to the custom field name within the Jira work item. The replica works as a payload or a message. It contains information you want to pass between the two systems.
Once done, click “Publish” to save the changes.
On the Salesforce side, enter the code in the “Incoming sync” text area:
if(!firstSync){
    def response = httpClient.get("/services/data/v54.0/query/?q=SELECT+id+from+Account+where+name=%27${replica.customFields.'SF Account'.value}%27")
    if(response){
        def accId = response.records.Id[0]
        httpClient.patch("/services/data/v54.0/sobjects/Case/${entity.Id}", """
        {
            "AccountId" : "${accId}"
        }""")
    }
}Code language: PHP (php)
This uses the httpClient method to fetch (GET and PATCH) the correct account name selected in Jira and save it in a response variable. Then the case in Salesforce is updated with the particular account information.
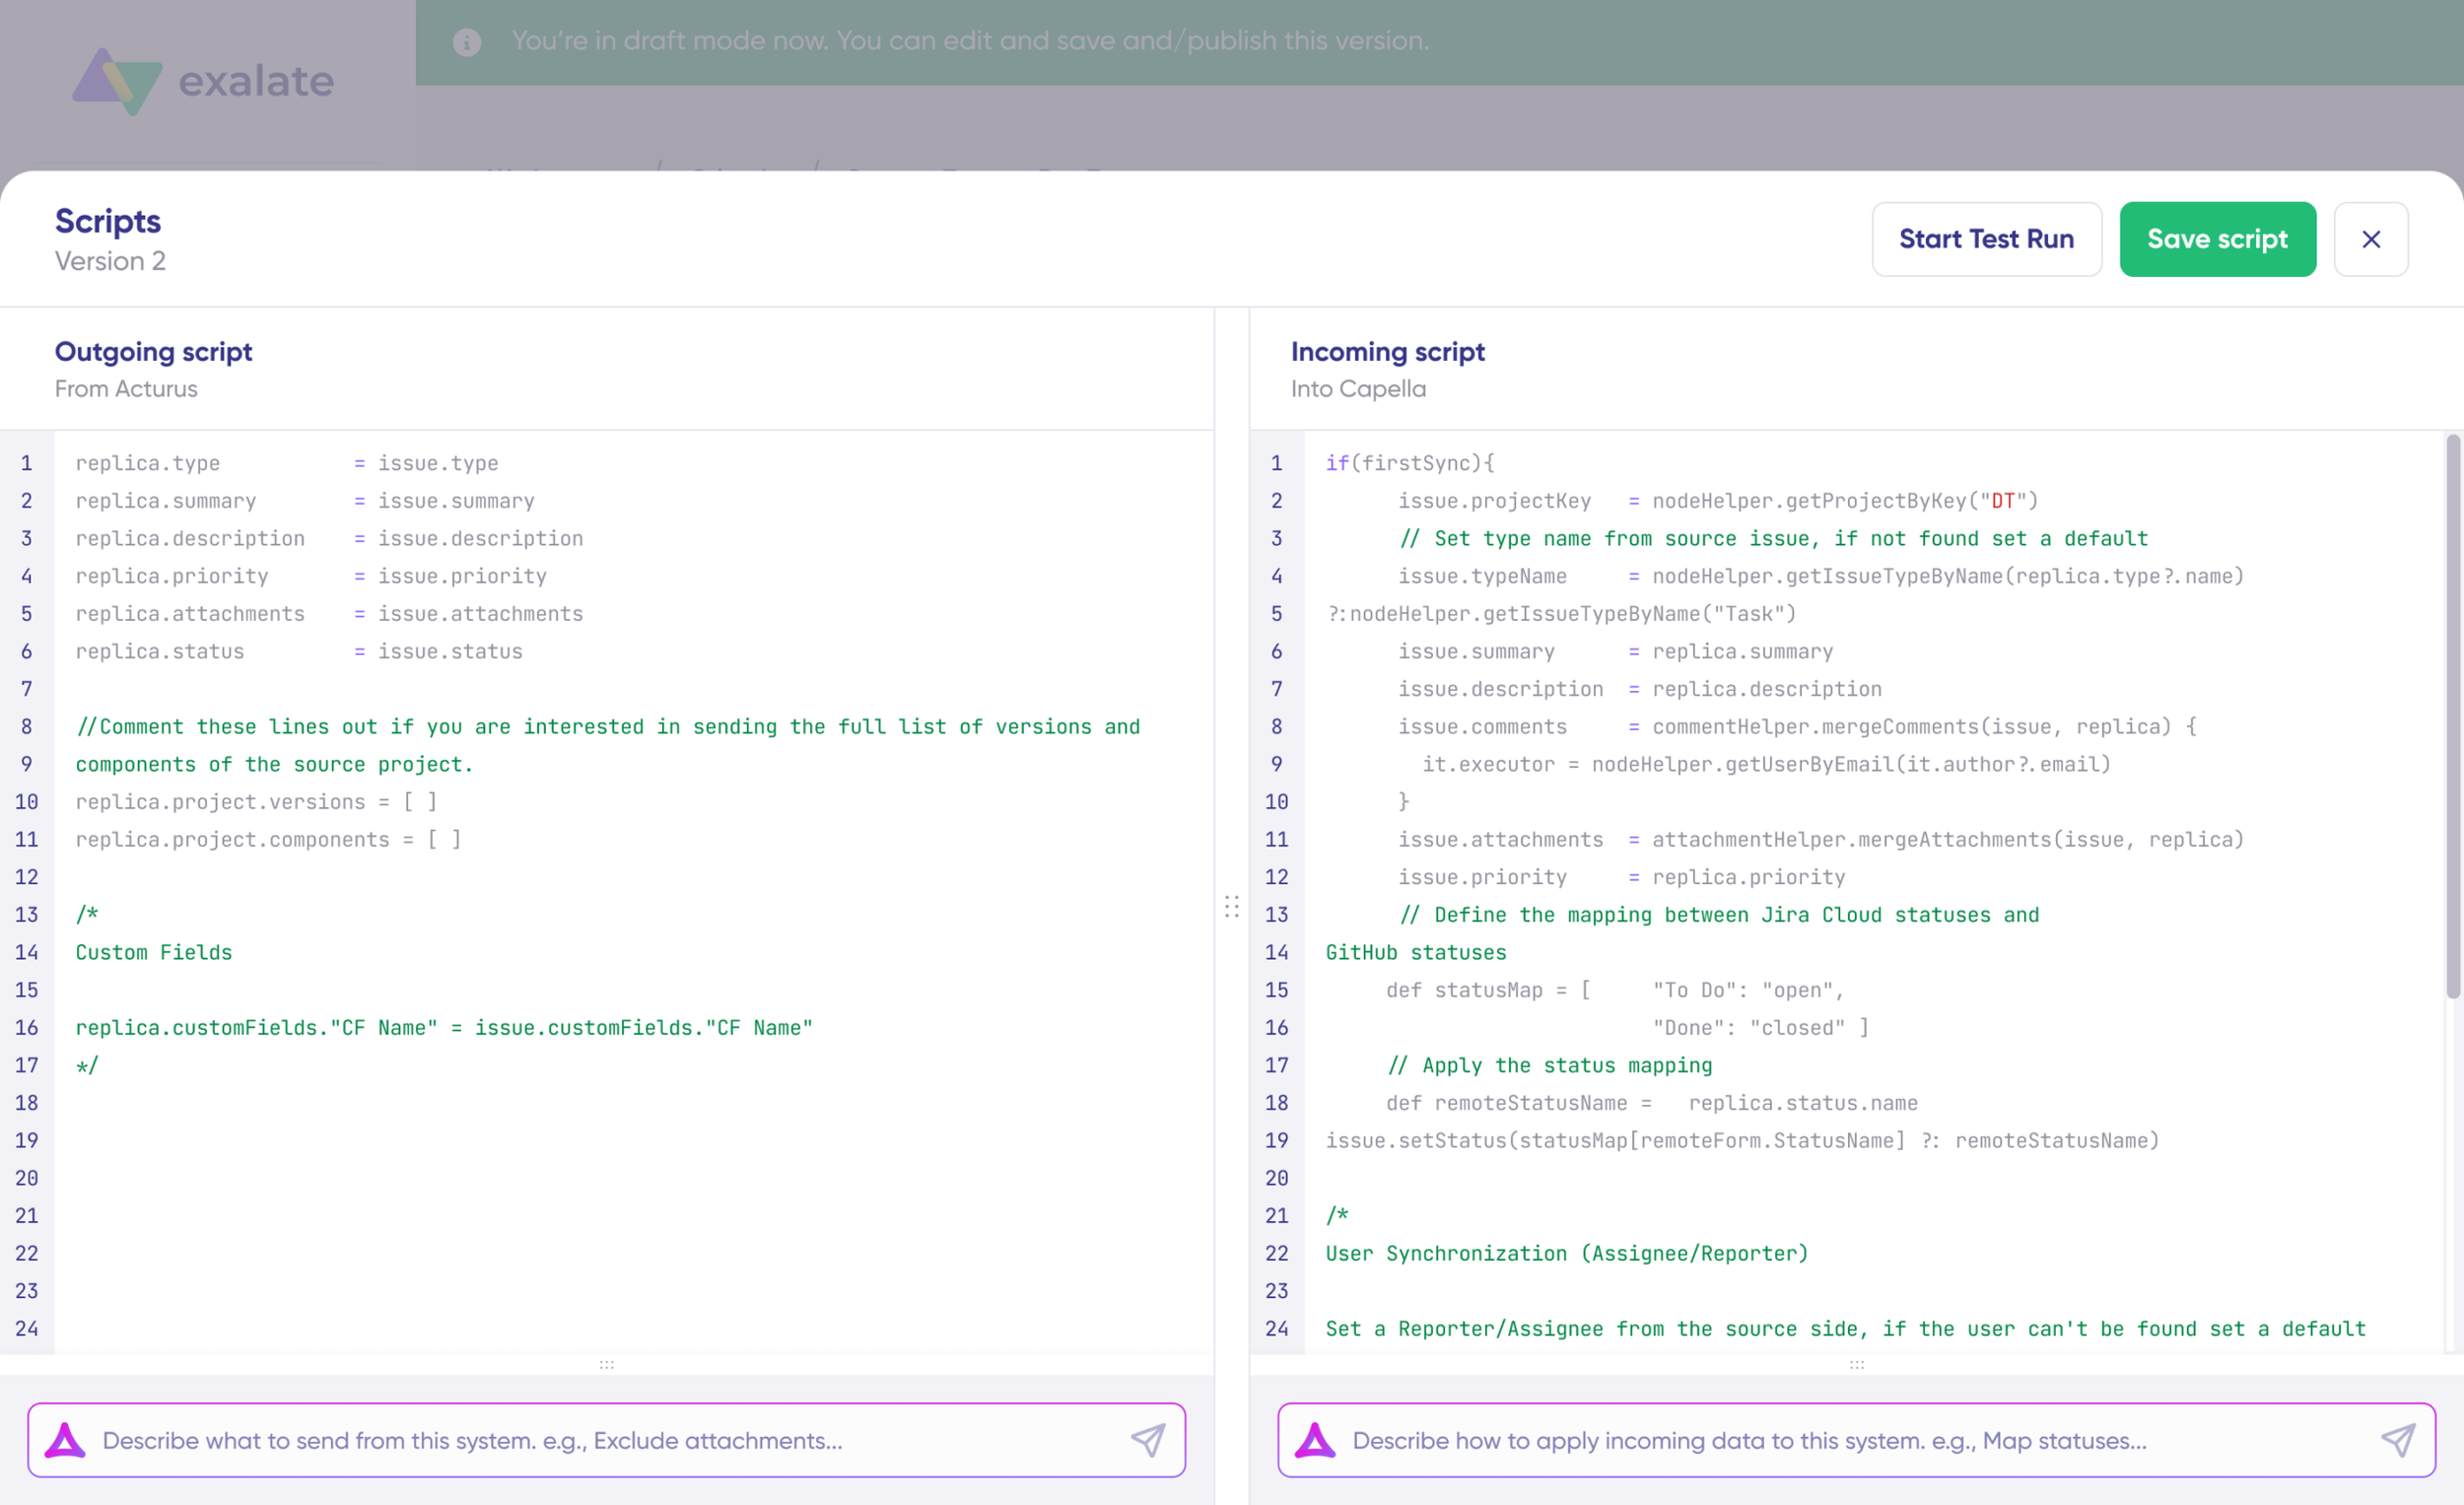
Once done, click “Publish” to save the changes.
Before going live, use the Test Run feature to validate your sync scripts. Select the work items you want to test, click “Start Test Run”, and review the incoming and outgoing replicas. Deploy only when you’re confident everything works correctly.
Now go back to the Jira work item and change the SF Account to one of the options.
Back on Salesforce, you will see the Account Name appear automatically.
You have now set rules and triggers to help you update and sync custom Jira fields to Salesforce.

Conclusion
Exalate lets you sync your Jira custom fields with your Salesforce account using flexible Groovy scripts. You can create specific rules and triggers to tailor the process to each use case, and the unified console gives you visibility into all your connections from one place.
If you still have questions or want to see how Exalate fits your specific use case, book a demo with one of our experts.
Recommended Reading:


