
This article was originally published on the Atlassian Community.
You can integrate custom data between Jira and Azure DevOps with the help of secure third-party tools. Such custom integrations are necessary to maintain the hierarchy of data when moving between both sides of the integration.
For better clarity, we’ll explore a sample use case using Exalate, an integration solution built for complex, bidirectional synchronization.
Custom Integration: Azure DevOps to Jira Use Case
Any work item (Epic, Task, or Feature) created on Azure DevOps is reflected as a ticket (Story, Task, or Bug) on the Jira side. Making any adjustments to the ticket name or description is reflected automatically on the other side.
You will also see a link between work items or tickets based on the established hierarchical structure.
Let’s go through the requirements and challenges:
Primary Requirements
When a user creates a task, epic, or feature on the Azure DevOps side, it should be mapped to a story, task, or bug on the Jira side. You also need to create a 3-level hierarchy between all 3 work items.
In addition, you need to establish sync rules for the incoming and outgoing data on both sides.
Potential Challenges
Common issues that arise during hierarchy synchronization include inaccurate mapping of fields, network failures, triggers with errors, and poorly written rules. Testing your configuration before production deployment helps catch these issues early.

The Solution: Exalate
Exalate is an integration solution that enables bidirectional synchronization with work and service management platforms such as Jira, Azure DevOps Cloud, Azure DevOps Server, ServiceNow, Zendesk, Salesforce, Freshservice, Freshdesk, Asana, GitHub, and more.
Why Use Exalate?
Exalate provides a powerful set of features for complex integrations like hierarchy synchronization:
- Unified console: Manage all your connections and integrations from a single interface, eliminating the need to switch between multiple systems.
- Groovy scripting engine: Configure your use cases with full scripting flexibility. If you can write it in Groovy, Exalate can sync it.
- Custom triggers: Set triggers using platform-native query languages (JQL for Jira, filter queries for Azure DevOps) for automatic syncs.
- Bulk operations: Save time when you have multiple syncs to complete using bulk connect and update capabilities.
- Test Run: Test your sync scripts against real data before production deployment to validate your configuration works correctly.
- Aida (AI-assisted configuration): Get help generating and troubleshooting sync scripts using natural language prompts.
- Script versioning: Every script publish creates a new version with full audit trail, rollback capability, and draft mode so you can work on changes without affecting production data.
How to Integrate Jira and Azure DevOps with Exalate
This tutorial demonstrates how to set up a Jira and Azure DevOps integration using Exalate’s unified console.
Step 1: Access the Exalate App
Go to exalate.app and log in. If you’re a new user, create an account by entering your email and verifying it, or sign up using Google.
Step 2: Create a Workspace
Workspaces help you organize and manage your integrations and connections in a single place. To create your first workspace, click the “+ Create Workspace” button, enter a name and description, then click “Create workspace” to confirm.
Step 3: Create Your Connection
Once you have a workspace, you can start creating connections between Jira and Azure DevOps.
- Click “+ Add connections” > “Create new connection”
- Enter the URL for your first system (System A). You can name either Jira or Azure DevOps as System A
- Once you enter the URL, a validation check occurs. If your system is already part of the existing workspace, authentication happens automatically
- For new systems, you’ll need to enter your authentication details. Jira uses OAuth, and Azure DevOps uses API tokens
- Complete the same setup process for the other system
- Give your connection a name and description
- Click “Next” and review the details, then click “Create connection”
When the process is complete, select “Continue to configuration” and choose a Jira project you want to use for synchronization.
Step 4: Configure Sync Rules
For this hierarchy use case, you’ll need to use the script-based configuration. After creating your connection, select “Edit & Test” to access the full scripting capabilities.
Outgoing Sync (Azure DevOps side)
Under the sync rules, enter the following code snippet into the “Outgoing sync” text area to send parent relationship data:
replica.parentId = workItem.parentId

def res = httpClient.get("/_apis/wit/workitems/${workItem.key}?\$expand=relations&api-version=6.0", false)

if (res.relations != null) {

    replica."relation" = res.relations[0].attributes.name

    replica."relationid" = (res.relations[0].url).tokenize('/')[7]

}Code language: JavaScript (javascript)
This code snippet uses httpClient to call the API for the work item using the GET method. It picks up information about the relationships for work item attributes such as name and description.
Once done, click “Publish” to save the changes.
Incoming Sync (Jira side)
import com.atlassian.jira.issue.link.IssueLinkManager
import com.atlassian.jira.component.ComponentAccessor
import com.atlassian.jira.security.JiraAuthenticationContext
import com.atlassian.jira.issue.link.IssueLinkTypeManager
import com.atlassian.jira.issue.link.IssueLinkType
import org.slf4j.Logger

class LogIn {
    static logIn(u) {
        def authCtx = com.atlassian.jira.component.ComponentAccessor.getJiraAuthenticationContext()
        try {
            //Jira 7

            authCtx.setLoggedInUser(u)
        } catch (Exception ignore) {

            // Jira 6

            //noinspection GroovyAssignabilityCheck
            authCtx.setLoggedInUser(u.getDirectoryUser())
        }
    }

    static <R> R tryLogInFinallyLogOut(Closure<R> fn) {
        def authCtx = com.atlassian.jira.component.ComponentAccessor.getJiraAuthenticationContext()
        def proxyAppUser = getProxyUser()
        def loggedInUser = authCtx.getLoggedInUser()
        try {
            logIn(proxyAppUser)
            fn()
        } finally {
            logIn(loggedInUser)
        }
    }
    static getProxyUser() { ... } // Note: Bottom of script 3 is cut off in image
}

On the Jira side, configure the incoming sync to map work item types and relationships:

def issueMap = [
    "Epic": "Story",
    "Feature": "Task",
    "Task": "Bug"
]

issue.typeName = issueMap[replica.type?.name]

def linkTypeMap = [
    "Parent": "Relates",
    "Duplicate": "Duplicate"
]Code language: JavaScript (javascript)
The issueMap fragment specifies how work items should be mapped to Jira elements (Epic-Story, Feature-Task, Task-Bug). The linkTypeMap object specifies how the relationships between work items should be mapped between Azure DevOps and Jira.
Step 5: Test Your Configuration
Before deploying to production, use Test Run to validate your sync scripts against real data. This safety net prevents errors from affecting live data. Review how the sync configuration will be applied to your items, preview the replica, and verify that the field mappings look correct.
Once done, click “Publish” to save the changes.
Step 6: Add Triggers
To start your sync automatically, add triggers that filter which work items should sync. For example, you can sync all Azure DevOps work items that have a specific tag, or sync all Jira work items that belong to a particular project.
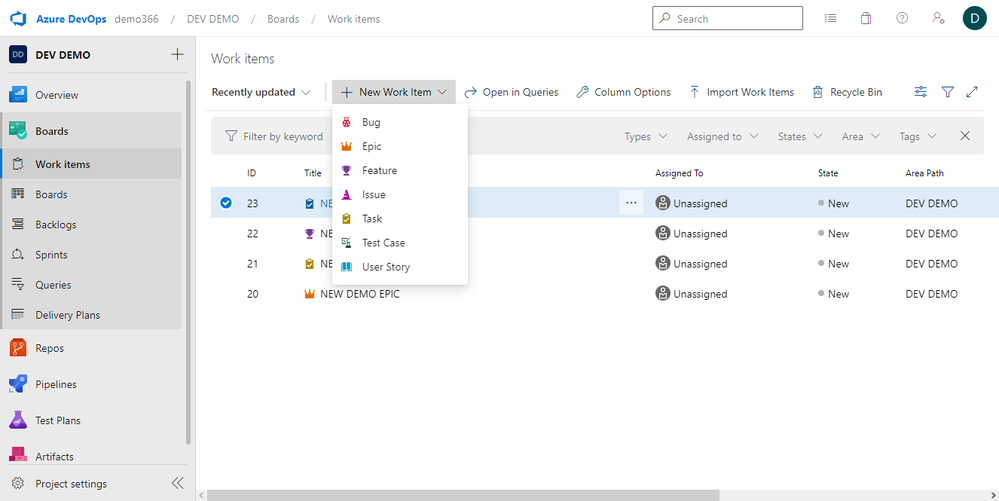
Go to your Azure DevOps dashboard and create a new work item to test the connection. Click on “New Work Item” on your selected board and select “Epic” from the dropdown menu.
Change the name and click “Save” to effect the changes. Afterward, you can scroll down to the bottom of the Epic to see that the connection has started syncing automatically.
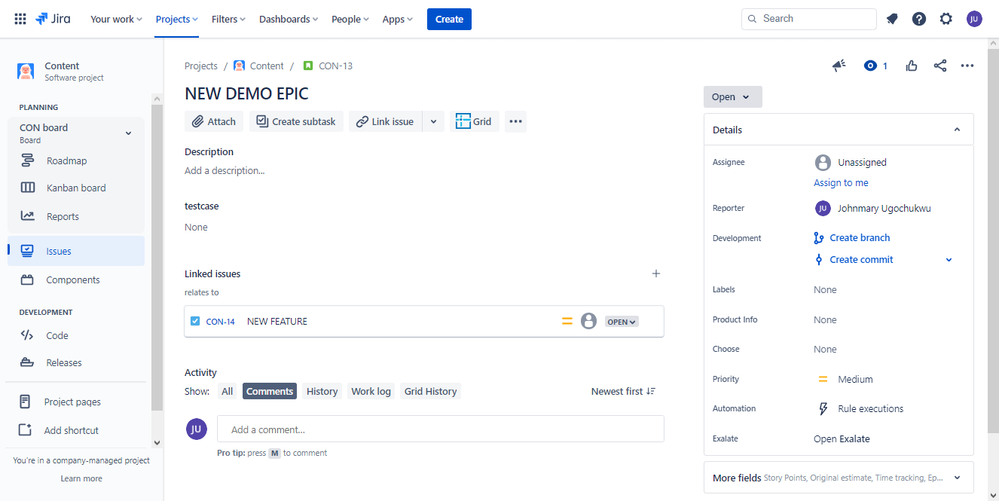
When this is complete, you can click on the link to view the corresponding work item on the Jira side.
Follow the same steps to create a Task and a Feature, establishing the parent-child relationships to build your hierarchy.
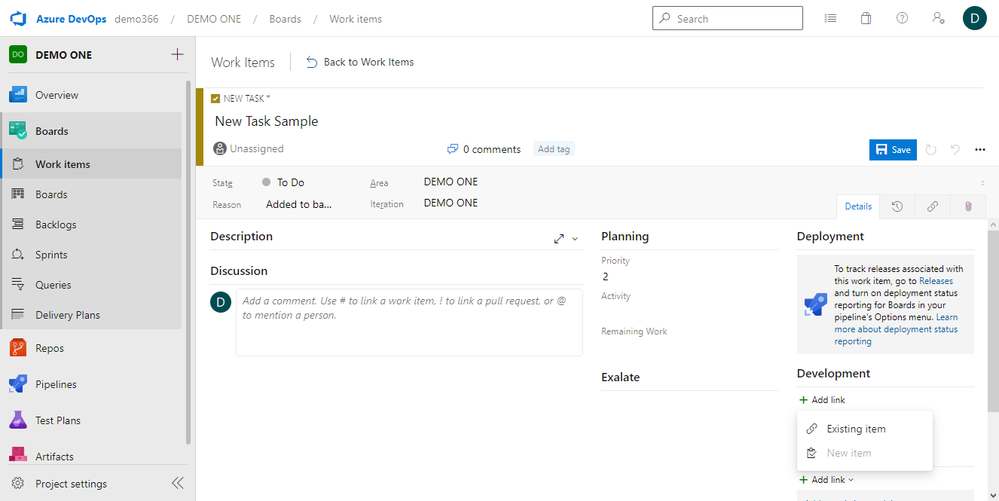
With the Feature tab open, add a name and description. Then, go to the “Related Work” section on the right and click on “Add link” then select “Existing Item”.
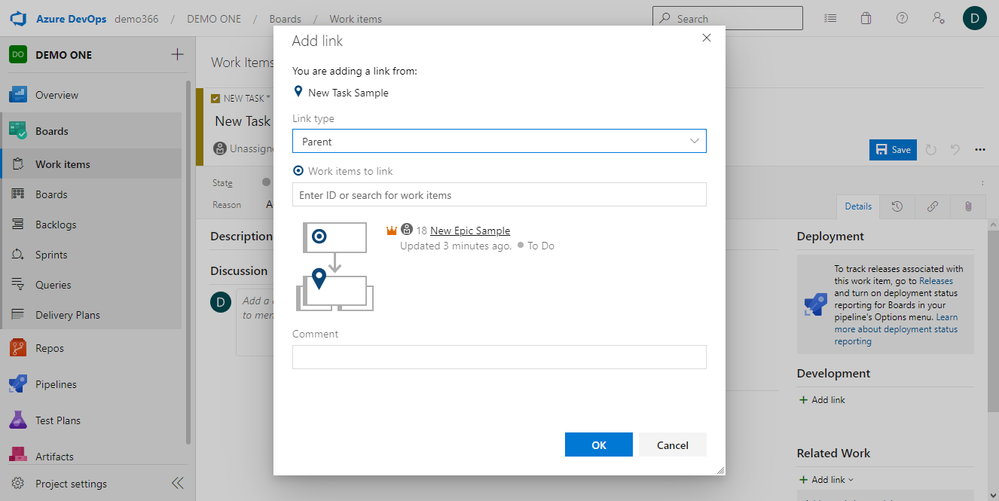
You will see a pop-up modal. Select “Parent” as the link type and make the Epic you created earlier the parent. Click on “OK” to complete the process and save the changes.
Next, create a Task and make the Feature its parent. Afterwards, you can view them on Jira to see the established hierarchy.
Conclusion
Exalate enables you to sync custom Azure DevOps work items with Jira work items while maintaining complex hierarchical relationships. With features like Test Run, script versioning, and Aida for AI-assisted configuration, you can confidently build and deploy integrations that match your specific workflow requirements.
Ready to try it yourself? Start a free 30-day trial with full functionality. If you still have questions or want to see how Exalate is tailored to your specific use case, book a demo with one of our experts.
Recommended Reading:


