This post has been published on the Atlassian and the Zendesk community.
To sync statuses between Jira and Zendesk, you need a third-party integration solution that supports bidirectional synchronization and custom field mapping. This guide shows you how to implement this use case with Exalate.
Jira Zendesk Integration Use Case: Work Item Status Sync
Changing the status of your Jira work item automatically updates the status of the corresponding Zendesk ticket. This keeps both teams aligned without manual updates.
Primary Requirements
Every time a user changes the status of a Jira work item, the linked Zendesk ticket reflects the status change. For this to work, you need to establish sync rules that control incoming and outgoing data and map the correct status values between each system.
You can also set triggers to automatically sync status updates for all tickets linked to the connection, bidirectionally.
Potential Challenges
- Mapping the right statuses using the correct field names in both systems
- Writing the correct sync rules for your specific workflow
- Setting up triggers to control which work items enter the synchronization
How Exalate Can Solve the Problem
Exalate is a bidirectional integration solution that works with Zendesk, Jira, Azure DevOps, ServiceNow, Salesforce, Freshservice, Freshdesk, Asana, GitHub, and more.
With Exalate, you can:
- Sync Zendesk and Jira custom fields, statuses, comments, attachments, and other entities
- Use the Bulk Exalate feature to sync existing work items via triggers
- Configure complex use cases using Exalate’s Groovy scripting engine
- Use Aida (AI-assisted configuration) to generate sync scripts from natural language prompts
- Test your configuration with Test Run before affecting production data
How to Set Up Jira Zendesk Status Sync with Exalate
Setting up Exalate involves creating an account, connecting your systems, and configuring sync rules.
Step 1: Access the Exalate App
Go to exalate.app and log in. New users can create an account by entering their email or signing up with Google.
Step 2: Create a New Connection
Click “+ Add connections” and select “Create new connection”. Enter the URL for your first system (either Jira or Zendesk). A validation check occurs automatically.
For authentication:
- Jira uses OAuth
- Zendesk uses API tokens
Complete the same process for the second system, then give your connection a name and description. Review the details and click “Create connection”.
Step 3: Map Statuses on the Zendesk Side
On the Zendesk incoming script, add the following code to map Jira statuses to Zendesk:
def statusMap = [
    "To Do":"pending",
    "New":"open",
    "Done":"solved"
]

def remoteStatusName = replica.status.name
issue.setStatus(statusMap[remoteStatusName] ?: remoteStatusName)Code language: JavaScript (javascript)
The statusMap variable establishes the relationship between statuses. When a work item has a “To Do” status in Jira, it appears as “pending” in Zendesk.
Step 4: Map Statuses on the Jira Side
On the Jira incoming script, add:
def statusMap = [
    "pending":"To Do",
    "open":"In Progress",
    "solved":"Done"
]
def remoteStatusName = replica.status.name
issue.setStatus(statusMap[remoteStatusName] ?: remoteStatusName)Code language: JavaScript (javascript)
When a ticket has an “open” status in Zendesk, it appears as “In Progress” in Jira.
Using Aida for Script Generation
Instead of writing scripts manually, you can use Aida (Exalate’s AI-assisted configuration) to generate sync scripts from natural language prompts.
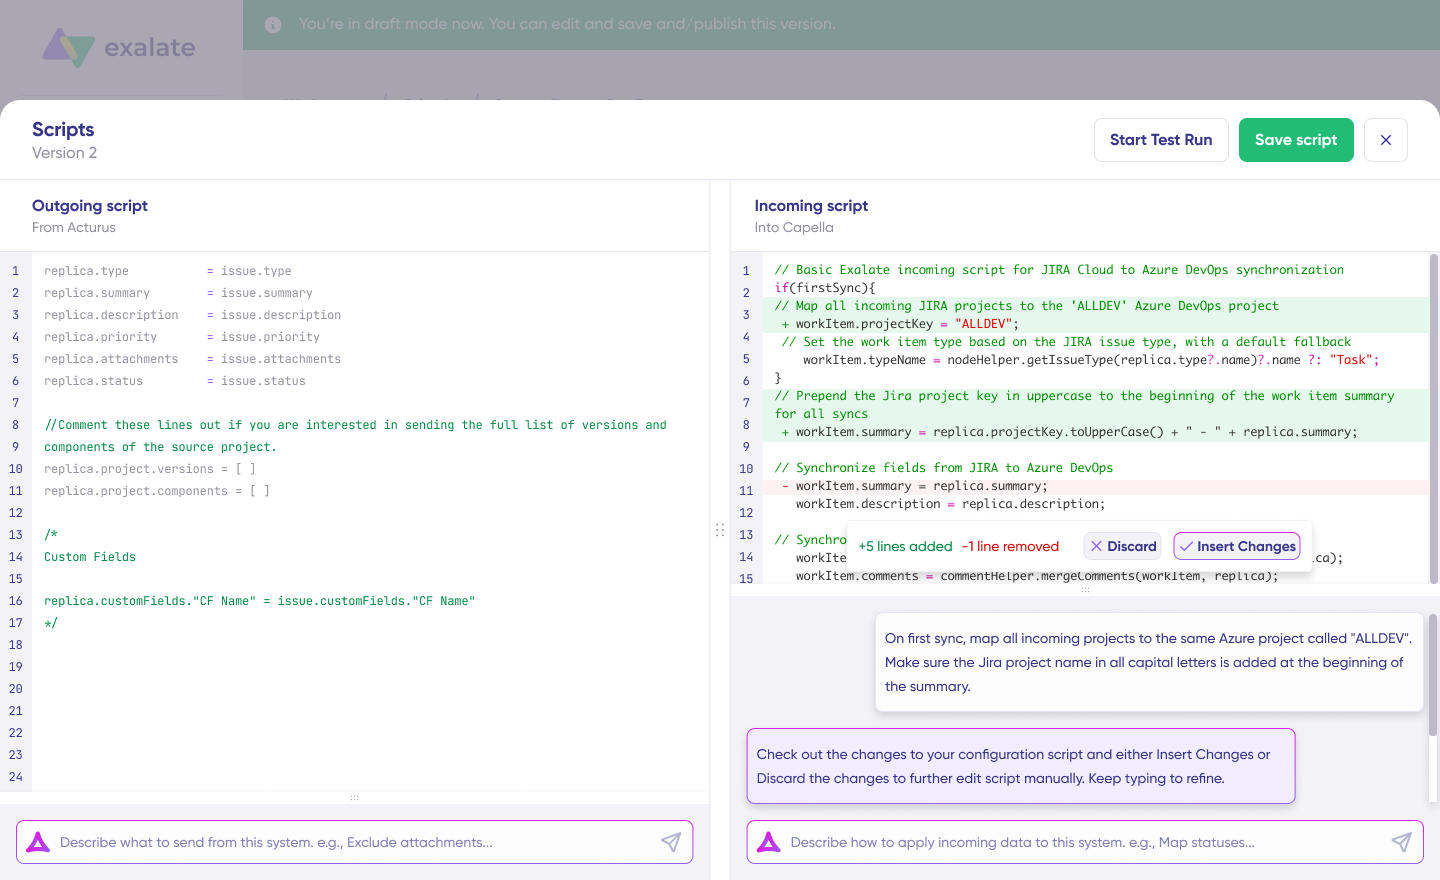
For example, type: “Map statuses between Jira and Zendesk as ‘To Do’ to ‘pending’, ‘In Progress’ to ‘open’, and ‘Done’ to ‘solved’.”
Aida generates working Groovy scripts with proper field mappings. Review the suggested changes before applying them.
Output
Now, create a ticket in Zendesk and set the status to “Open”.

Back on Jira, you will see the status appear as “In Progress” automatically.

Congratulations!

Next Steps
You have now configured rules to sync Jira work item statuses with Zendesk tickets bidirectionally.
Start a free trial | Book a demo with our integration experts to discuss your specific use case.
Recommended Reading:
- How to Synchronize a Zendesk Ticket to Multiple Jira Cloud Instances
- How to Append the Jira Issue Key to a Private Comment in Zendesk When the Issue is Closed
- Advanced Integration Use Cases
- How to Sync Multiple Zendesk Tickets to a Single Jira Issue
- How to Use Exalate to Synchronize Insight Objects
- How to Synchronize a ServiceNow Customer Case to a Jira Epic
- How to Sync Custom List Fields Bi-Directionally Between Jira and Zendesk


