When your IT service desk operates in Freshservice while your sales and customer data live in Salesforce, you’re running two critical systems in complete isolation. This leads to a lack of visibility into how IT incidents affect customer relationships.
That’s where Freshservice Salesforce integration transforms the dynamic.
Instead of forcing teams to juggle multiple platforms, you create a unified ecosystem where service tickets automatically inherit customer context from your Salesforce CRM, and support interactions feed directly back into your sales pipeline.
Key Takeaways
- Freshservice-Salesforce integration connects IT service management with CRM systems to enable automatic data sharing and contextual ticket handling.
- Real-time bidirectional syncing eliminates manual data entry, reduces errors, and ensures both teams work with consistent, up-to-date information.
- Exalate provides AI-assisted configuration, advanced field mapping, and scripting capabilities for complex enterprise integration scenarios.
- Priority-based routing automatically escalates high-value customer tickets based on synced account data and contract information.
- Multiple use cases exist, including customer escalation workflows, onboarding automation, lead qualification through support interactions, and cross-team collaboration.
- Essential features to evaluate include sync flexibility, security compliance, field mapping capabilities, and real-time vs. scheduled sync options.
- Proper integration improves customer retention, accelerates issue resolution, and provides complete visibility across sales and support operations.

What is Freshservice Salesforce Integration?
Freshservice to Salesforce integration connects your IT help desk with your customer relationship management system so they can communicate and share information automatically.
When someone submits a support ticket in Freshservice, the integration pulls up their customer details from Salesforce—purchase history, account status, contract value, or case priority. This gives your support team complete context about the customer.
When your support team resolves tickets or updates information in Freshservice, that data flows back into Salesforce so your sales team stays informed without switching systems.
Examples of synced data:
- Customer contact details and account information
- Support ticket status and resolution notes
- Service history and interaction logs
- Priority levels based on customer value
- Custom fields relevant to both teams
- Attachments and images
The integration handles the behind-the-scenes synchronization automatically, creating a bridge between your IT support and customer management teams. This proves helpful when juggling IT support across different offices, regions, or business divisions.
Why Tool Sprawl Makes Integration Essential
Modern organizations don’t run on single platforms—they run on ecosystems. Marketing works in Salesforce. IT operates in Freshservice. Development teams use Jira or Azure DevOps. Customer success lives in Zendesk or ServiceNow.
Without integration, each tool becomes an information silo. Support tickets lack sales context. Sales teams can’t see support patterns. Customer success misses critical incidents because nobody has complete visibility.
This fragmentation causes:
- Duplicated work: Teams manually copy data between systems, wasting 5-15 hours per week on administrative tasks instead of customer-facing work.
- Missed SLAs: Support can’t prioritize tickets properly without knowing which customers are at risk, have large contracts, or are in active sales cycles.
- Poor customer experience: Customers repeat information to different departments because teams don’t share context across tools.
- Alignment gaps: Sales promises capabilities that support hasn’t been briefed on. Support escalates issues sales already resolved. Nobody knows who owns what.
- Reporting blind spots: Leadership can’t get accurate metrics when data lives in disconnected systems with conflicting information.
Integration solves this by creating data highways between tools. Teams keep working in their preferred systems while information flows automatically to whoever needs it, whenever they need it.
Why Organizations Integrate Salesforce With Freshservice
- Support agents get the complete customer context. Instead of treating every ticket generically, they can see if someone’s a priority customer, their contract status, or where they are in the sales pipeline.
- Customer retention improves significantly. When support escalates properly based on customer value and sales teams proactively address service concerns, you build stronger relationships instead of just fixing problems.
- Manual data entry disappears. Your teams stop wasting time copying information between systems or hunting down customer details across platforms. No more typos, missed updates, or conflicting records.
- Information stays consistent and accurate. Automated syncs ensure customer details, ticket statuses, and interaction histories match perfectly across both platforms.
- Teams gain complete operational visibility. Everyone sees the full picture of customer relationships, service histories, and ongoing incidents from their preferred workspace.
- Critical incidents get escalated instantly. High-priority customers automatically trigger faster response protocols, cutting resolution times from hours to minutes as data moves between Salesforce and Freshservice.
- Decision-making accelerates. When teams have complete customer and service context at their fingertips, they act quickly instead of hunting for information.
- You reduce tool and license costs. Teams keep working in familiar systems while gaining all the benefits of unified customer and service operations without buying multiple licenses for new platforms.
- Cross-functional collaboration improves dramatically. Sales, support, customer success, and IT teams align on customer issues, resolution status, and action items without endless status meetings or email chains.

Calculate time and money savings from automated bidirectional sync.
Integration Approaches for Freshservice and Salesforce
Native Integration Options
- Freshservice’s built-in Salesforce integration: Enables basic connectivity where agents can view CRM details for requesters when tickets arrive from Salesforce. Supports only Salesforce Enterprise edition and above. Limited to importing contact, lead, and account fields with minimal customization options.
- Salesforce Flow automation: Allows creation of automated workflows that trigger actions in external systems. Requires technical knowledge to configure properly and maintain as systems evolve.
- Email-to-case functionality: Creates Salesforce cases from Freshservice email notifications. Simple to set up but lacks field mapping, bidirectional sync, and real-time updates.
Advanced Integration Platforms
- Purpose-built integration tools: Platforms like Exalate provide deep, bidirectional syncing between business systems with advanced field mapping, AI-assisted configuration, and real-time synchronization capabilities. Built specifically for complex enterprise scenarios.
- Custom API development: Building your own integration using Freshservice REST APIs and Salesforce APIs gives total control over data flow and transformation logic. Requires significant development resources, ongoing maintenance, and dedicated technical staff.
- iPaaS (Integration Platform as a Service): Enterprise integration platforms like MuleSoft or Boomi handle complex data transformations, orchestration, and business logic across multiple systems. Come with enterprise-grade price tags and require specialized technical expertise.
- ETL/data pipeline tools and middleware solutions: Custom-built integration layers that sit between systems and handle data transformation, cleansing, and routing. Better suited for batch processing, data warehousing, or analytics use cases than real-time operational syncing.
- Webhook-based solutions: Both platforms support webhooks that trigger real-time updates when specific events occur (incident created, case priority changed, status updated). Requires development work to implement proper authentication, error handling, and retry logic.
Essential Features to Consider When Choosing an Integration Solution
Sync Capabilities and Flexibility
- Data volume handling: Evaluate how much data you need to sync. Some integrations handle basic contact info, while others sync complex custom fields, attachments, and detailed interaction histories. Choose tools that scale with increasing ticket volumes, additional system connections, and evolving business processes.
- Sync timing requirements: Determine whether you need instant updates when tickets change or if syncing every few hours works for your workflows. Real-time syncing suits customer-facing operations, while scheduled syncs work for reporting and analytics.
- Directional sync options: Look for integrations supporting both unidirectional and bidirectional sync. Bidirectional sync pushes data both ways, while unidirectional sync flows data in one direction only—useful when one system acts as the source of truth.
Configuration and Customization
- Field mapping flexibility: Evaluate how easily you can map custom fields between systems. Advanced solutions offer visual mapping interfaces, field transformation capabilities, and support for complex data types.
- AI-assisted configuration: Modern integration platforms provide AI-powered suggestions for complex mappings and can generate configuration scripts automatically, reducing setup time from days to hours.
- Scripting and operational control: For complex scenarios, you need full scripting capabilities to transform data, apply business logic, and handle edge cases. Groovy-based or JavaScript-based scripting gives complete control over sync behavior.
- Trigger and automation options: Configure what events trigger synchronization—new tickets, status changes, field updates, or custom conditions. Flexible trigger configuration ensures only relevant data syncs.
Technical Requirements
- Error handling and reliability: Choose solutions that queue changes and retry automatically rather than losing data during downtimes. Built-in error logging and notification systems alert you to sync failures immediately.
- Performance and API efficiency: Track processing times and API usage to avoid hitting rate limits. Efficient integrations, batch updates, and optimized API calls to stay within platform limits.
Security and Compliance
- Data protection standards: Ensure the integration meets requirements like ISO 27001 or GDPR compliance, especially when handling sensitive customer and infrastructure data.
- Encryption and access controls: Data should be encrypted both in transit and at rest. Role-based access control (RBAC) ensures only authorized team members can modify sync rules or access sensitive data.
Learn more about security standards and compliance in the Trust Center.
Cost Structure and Scalability
- Pricing models: Understand whether you pay per sync, per record, per user, or a flat fee. Calculate how costs scale with your data volume growth and user adoption.
- Trial and proof of concept: Start with free trials to validate the integration works with your specific use cases before committing to annual contracts.
- Total cost of ownership: Factor in setup time, training requirements, ongoing maintenance, and support costs beyond the base subscription price.
Calculate time and money savings from automated bidirectional sync.
Vendor Support and Ecosystem
- Support responsiveness: Prioritize vendors with responsive support teams, comprehensive documentation, and active user communities.
- Integration ecosystem: Verify the solution integrates with your other tools like Jira, ServiceNow, Zendesk, Azure DevOps, Asana, Freshdesk, or custom systems without creating conflicts.
- Future-proofing: Choose vendors actively developing their platform, releasing regular updates, and supporting new features in Salesforce and Freshservice.
Exalate: Advanced Freshservice Salesforce Integration
Exalate handles complex integration requirements through AI-assisted configuration and scripting capabilities. It connects Freshservice tickets (incidents and service requests) with Salesforce fields and objects (cases, tasks, accounts, products, opportunities).
Key differentiators:
- Full scripting and operational control: Each team maintains complete control over what data they share and receive. Your Freshservice and Salesforce teams can manage their own sync rules independently without stepping on each other’s toes.
- AI-assisted integration (Aida): The built-in AI assistant helps generate scripts and suggest field mappings automatically, converting natural language prompts into actual configuration code.
- Multi-platform connectivity: Beyond Freshservice and Salesforce, Exalate connects with Jira Cloud, GitHub, Zendesk, Azure DevOps (Cloud and Server), Freshdesk, ServiceNow, Asana, and custom connectors for proprietary systems.
- Enterprise security standards: ISO 27001 certified with role-based access control (RBAC), encryption of data in transit and at rest, and comprehensive compliance documentation.
- Real-time synchronization: Changes sync instantly between platforms, ensuring teams always work with current information.
A Comprehensive Setup Guide for Freshservice to Salesforce Integration
Begin by navigating to the Freshservice integrations page to initiate the process. You can either create a new account by entering and verifying your email or you can sign up through Google.
If you’re an existing user, simply log in to access your dashboard.
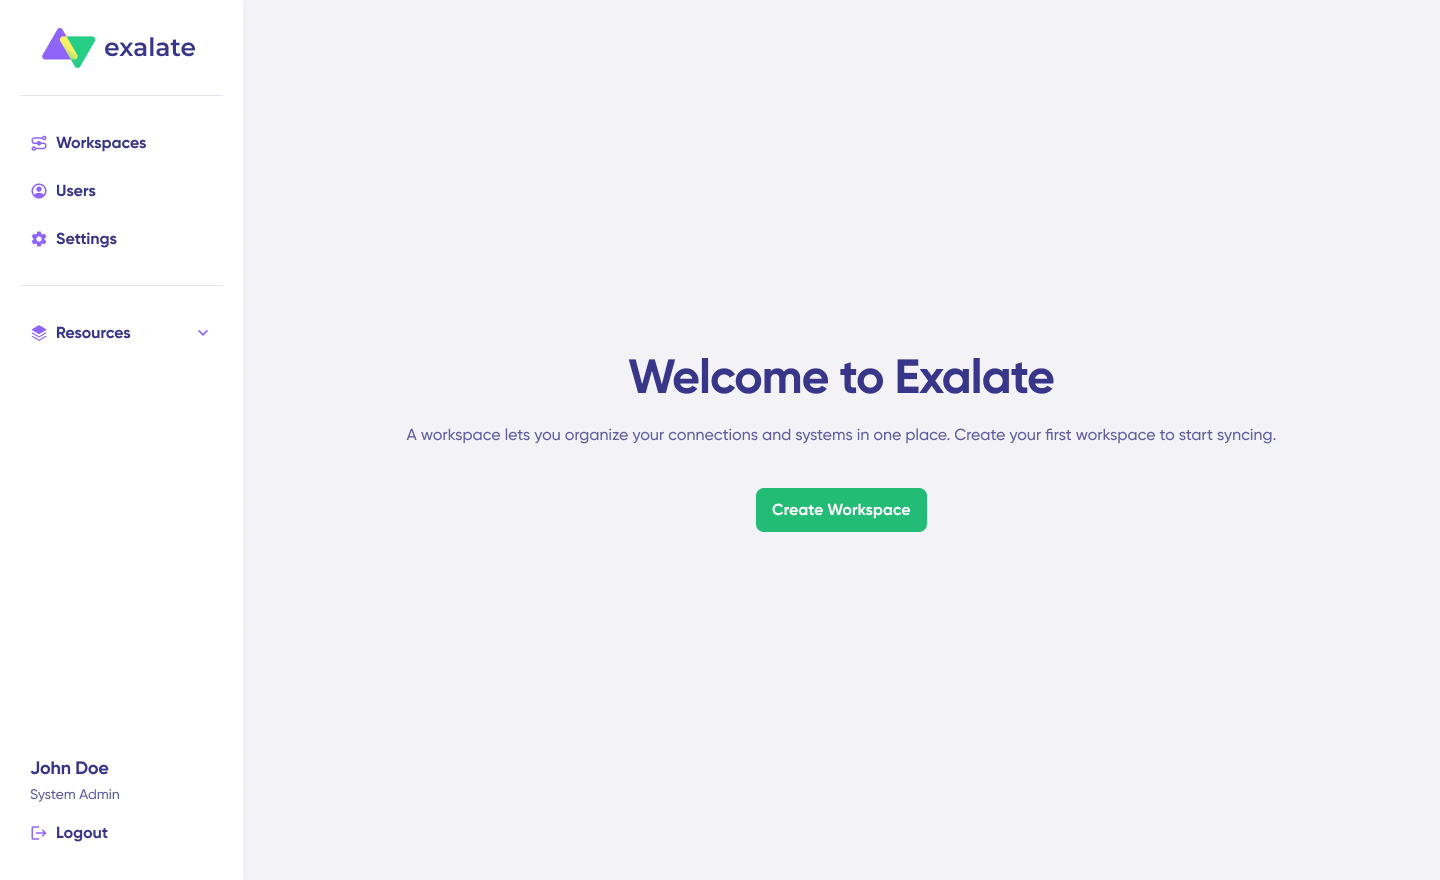
Create a workspace where all your integrations and connections will be managed. All your workspaces can be accessed from the “Workspaces” tab.
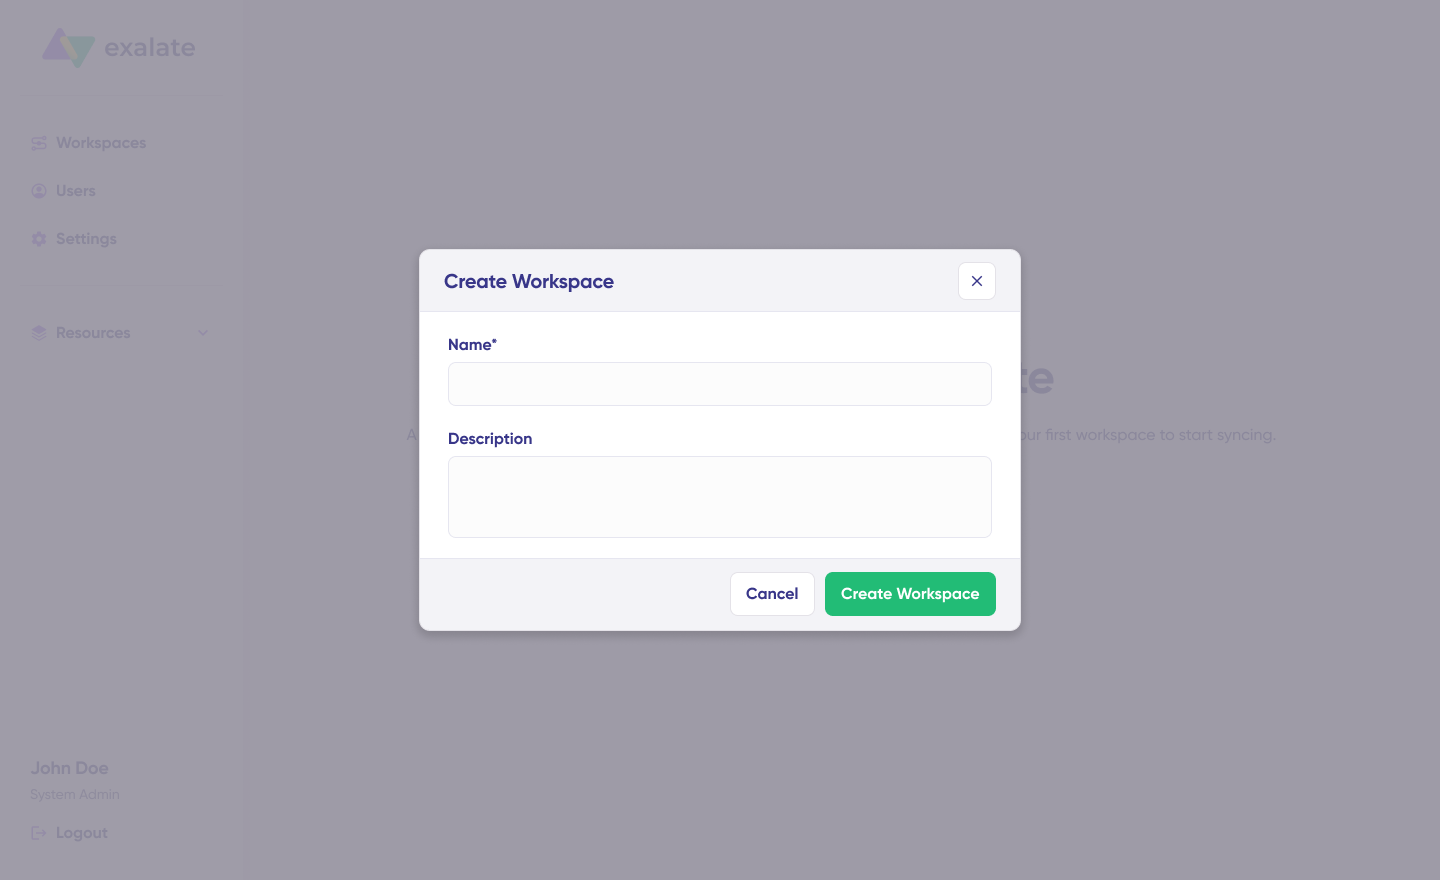
To establish a new workspace, click on the “+ Create Workspace” button. Provide a name and a brief description, then click “Create Workspace.”
To set up a new connection, ensure you have an active Freshservice account with at least one workspace and the necessary access credentials for the systems you plan to link (System A and System B).
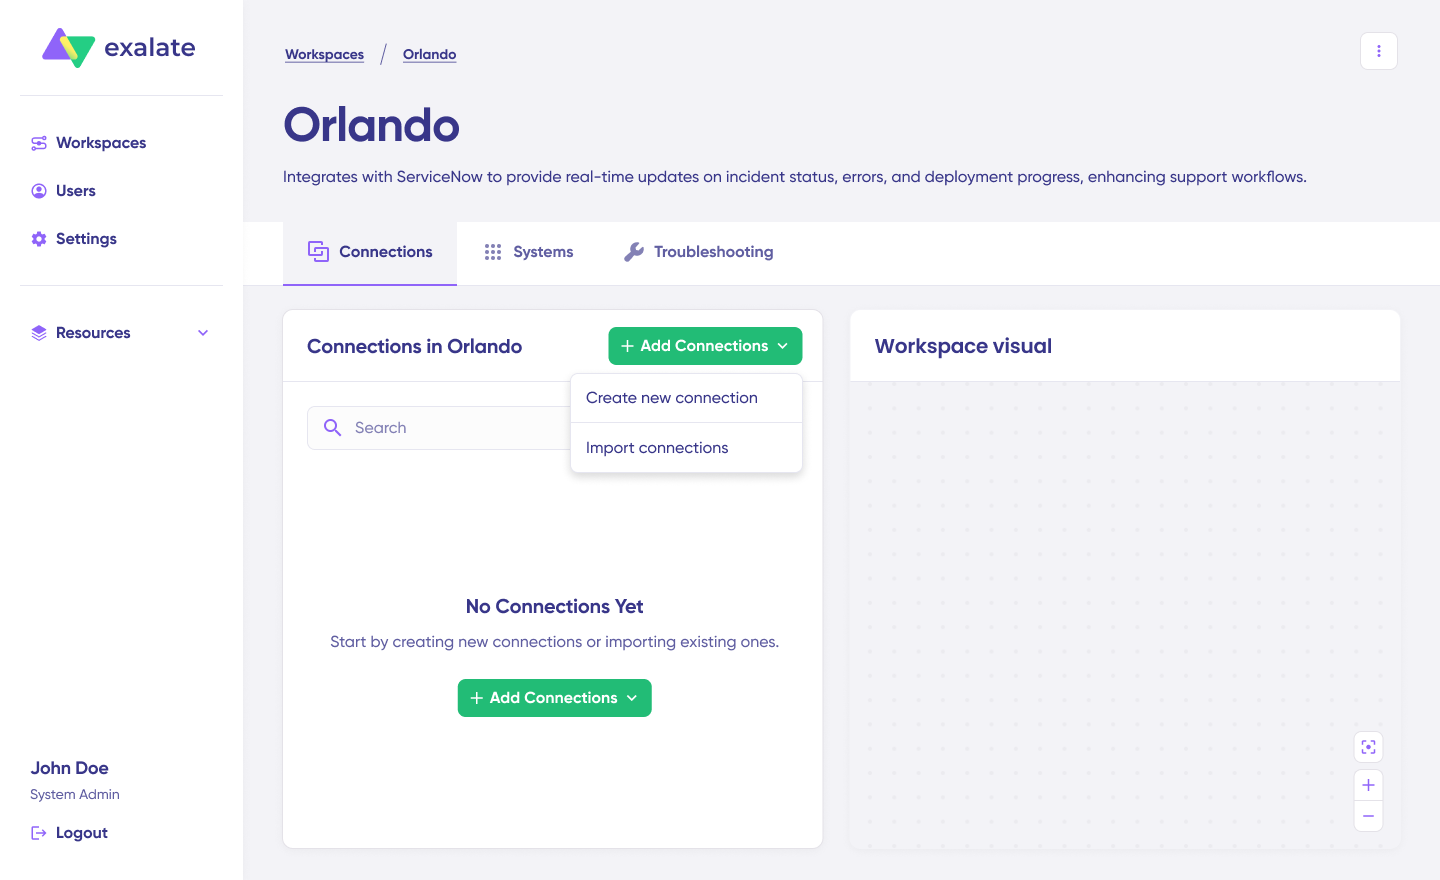
Click on “+ Add Connections” > “Create New Connection.” Enter the name of your first system, then provide the URL for the system (Freshservice or Salesforce).
Allow the system to perform automatic checks and authentication in the background. Systems from other workspaces will be newly registered for the current workspace.
Input the required authentication details. For Freshservice to Salesforce, you will need to enter your credentials, such as your API key.
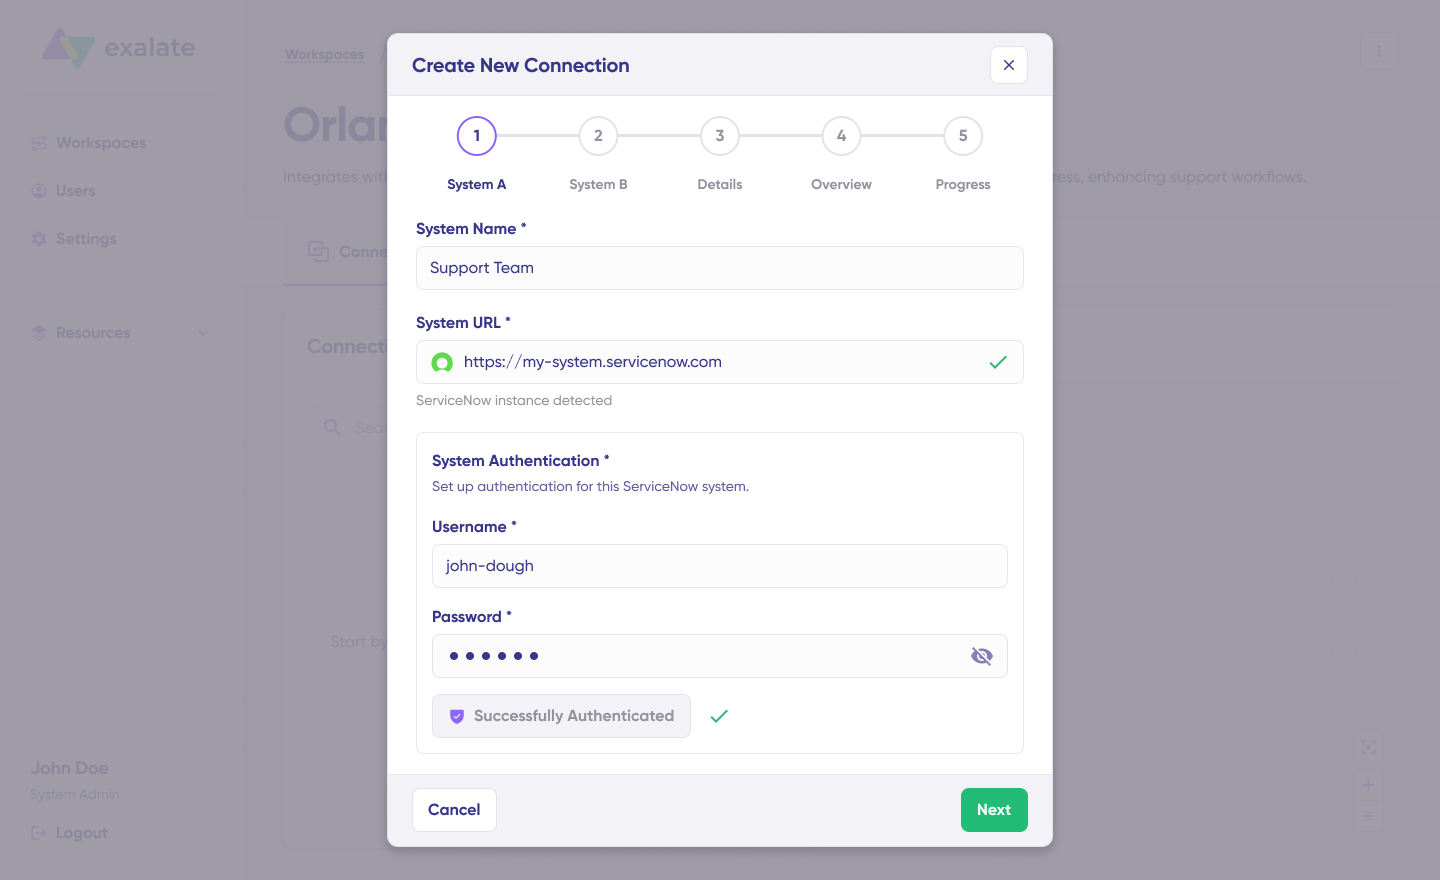
Basic Auth might also be required, including a username and password. After filling this out, click on “Check Authentication.” If everything is correct, you should see “Successfully Authenticated.”
Click Next to configure the second system (Salesforce), and follow the same process for authentication.

Confirm the connection name and add a description (optional). Review your connection setup and click on “Create Connection.” Allow a few minutes for the system to complete all necessary checks and configurations in the background.
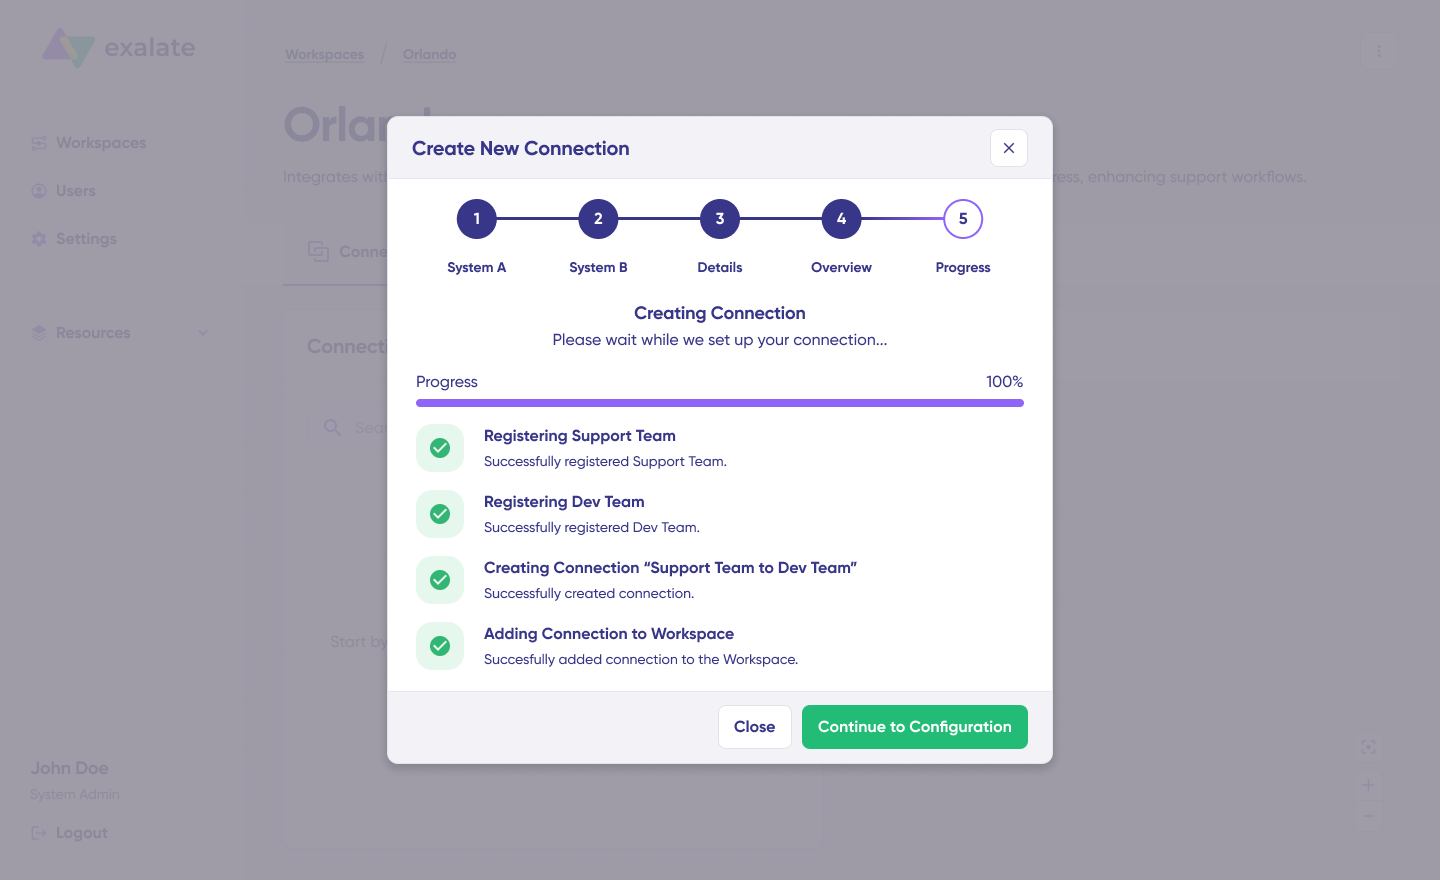
Once everything is set up, click “Continue to Configuration.” Congratulations, your first connection has been successfully established in your workspace.
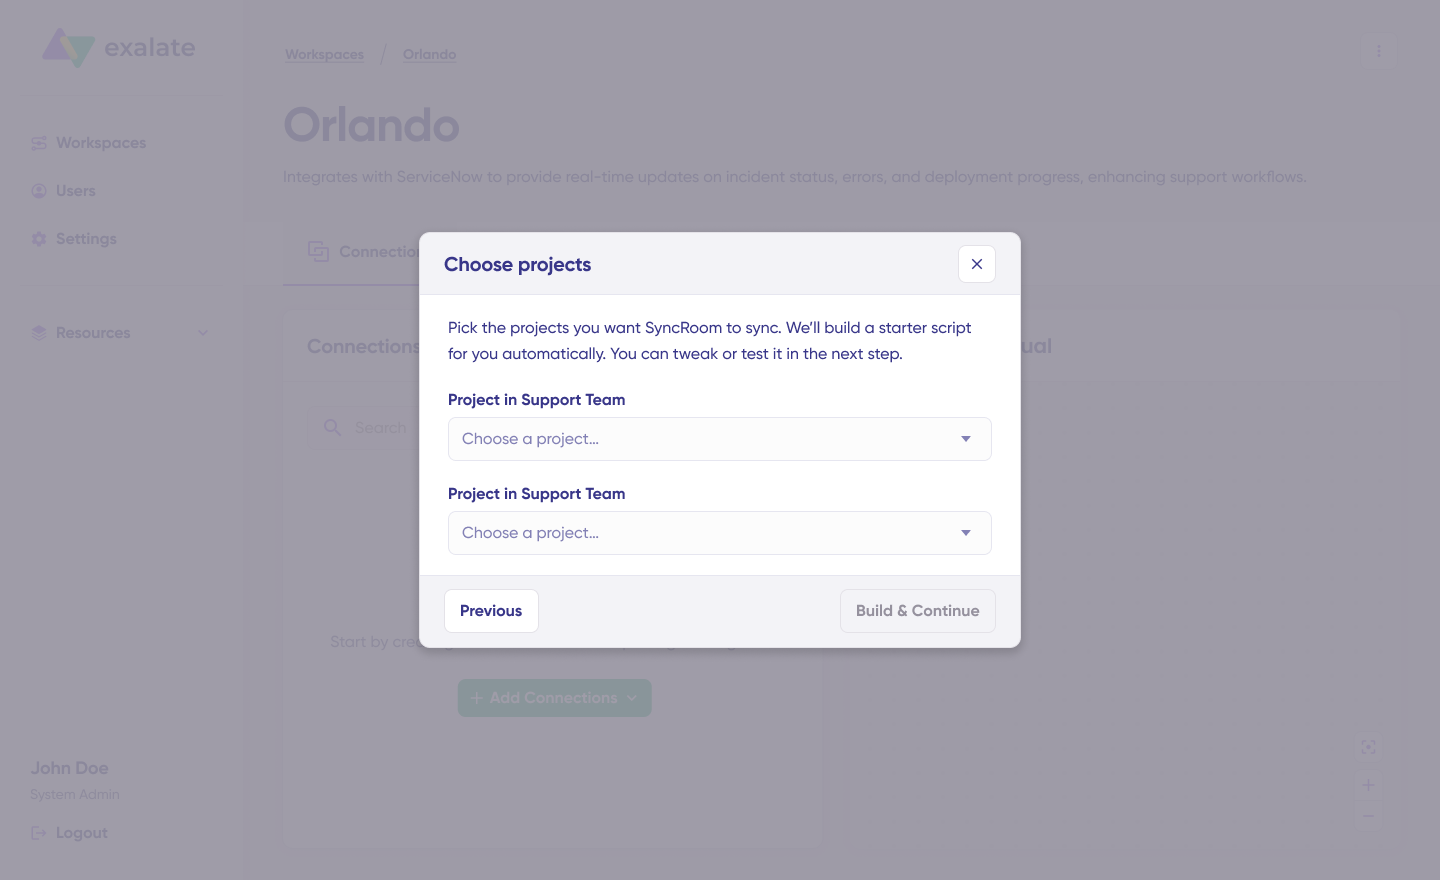
Select a project or entity you wish to sync on both systems from the dropdown menu, and click “Build and Continue.”
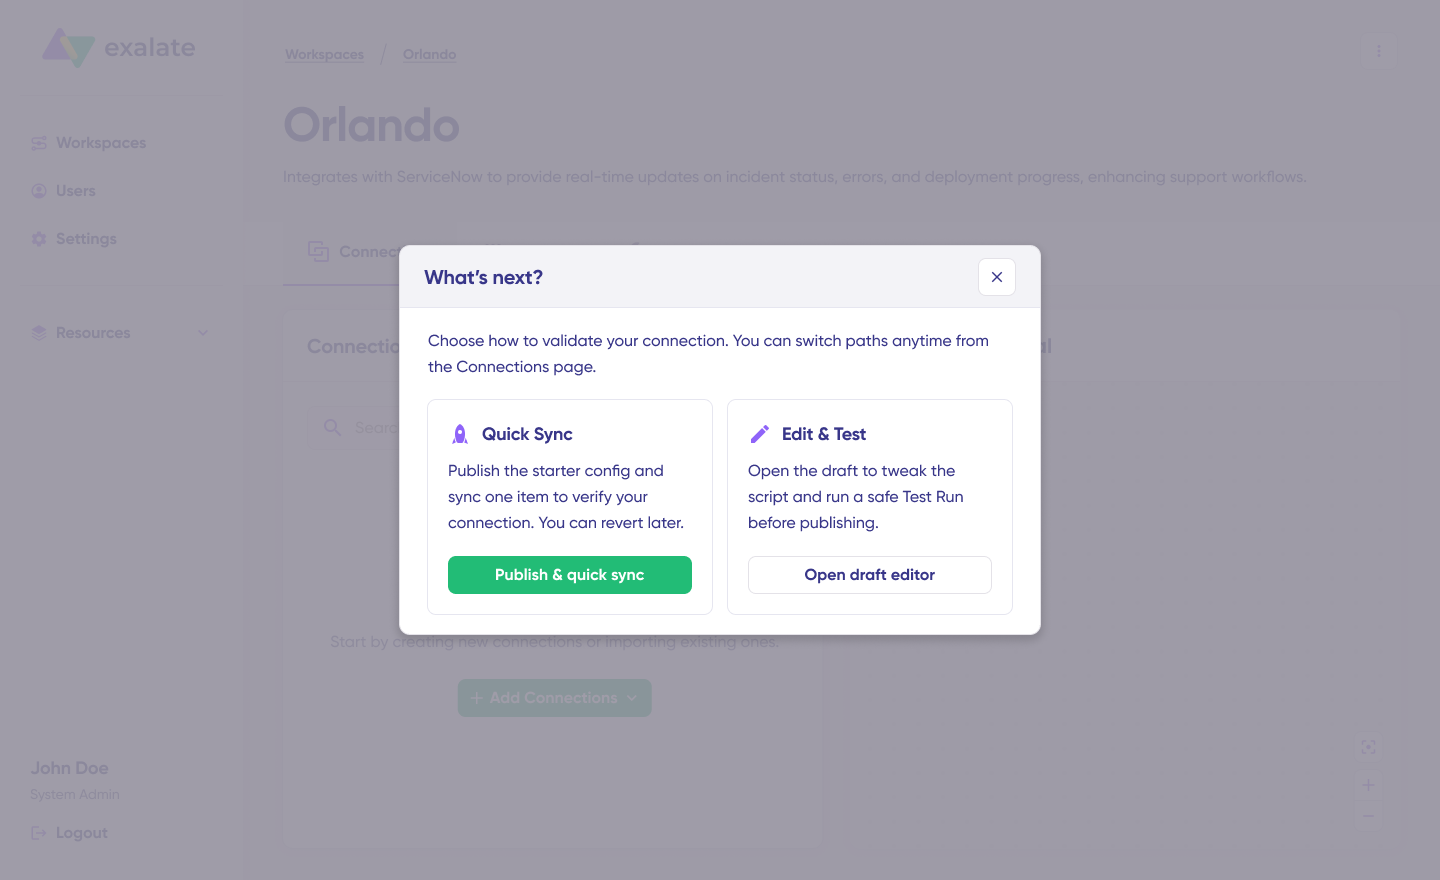
Now, you’ll have two options: “Quick Sync” and “Edit & Test.” Let’s explore both options.
Quick Sync: This option lets you sync one item between Freshservice and Salesforce.
Under the “Item Sync Monitor,” input the work item key and click the “Sync Now” button.
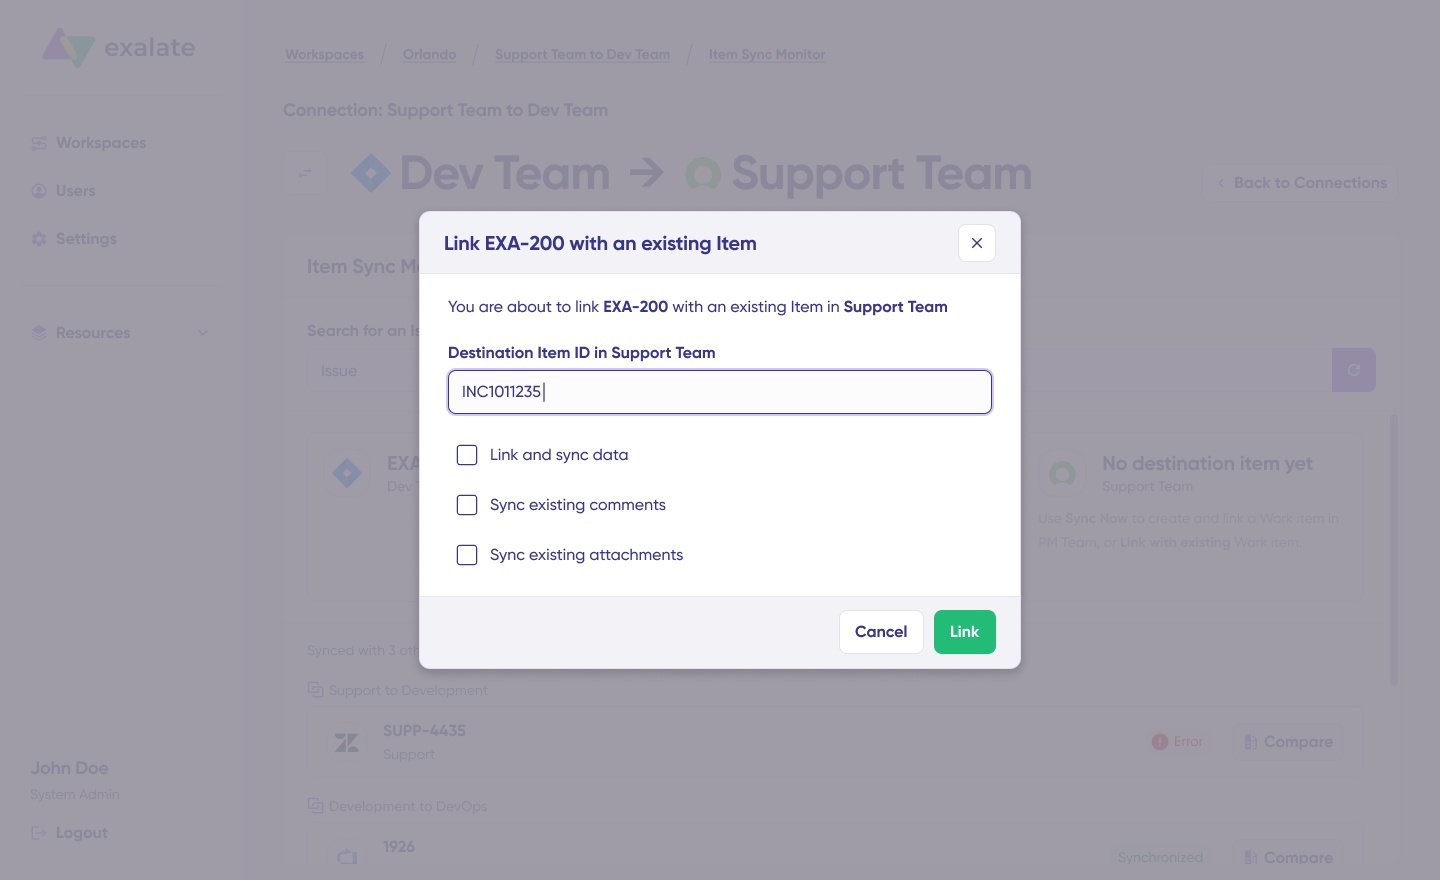
To link existing items, choose “Link with Existing.” After synchronization, both synced items will appear in a new window. You can also compare changes made during the sync.
Open Draft Editor: This option lets you make adjustments by clicking “Create a New Version” or selecting “Open Latest Draft.” This ensures that you don’t accidentally modify the existing configuration.

Once active, click the “Edit” button to open the editor and adjust sync rules (using Groovy-based scripts). These scripts enable users to apply custom data logic and mappings for more advanced workflows or use cases.
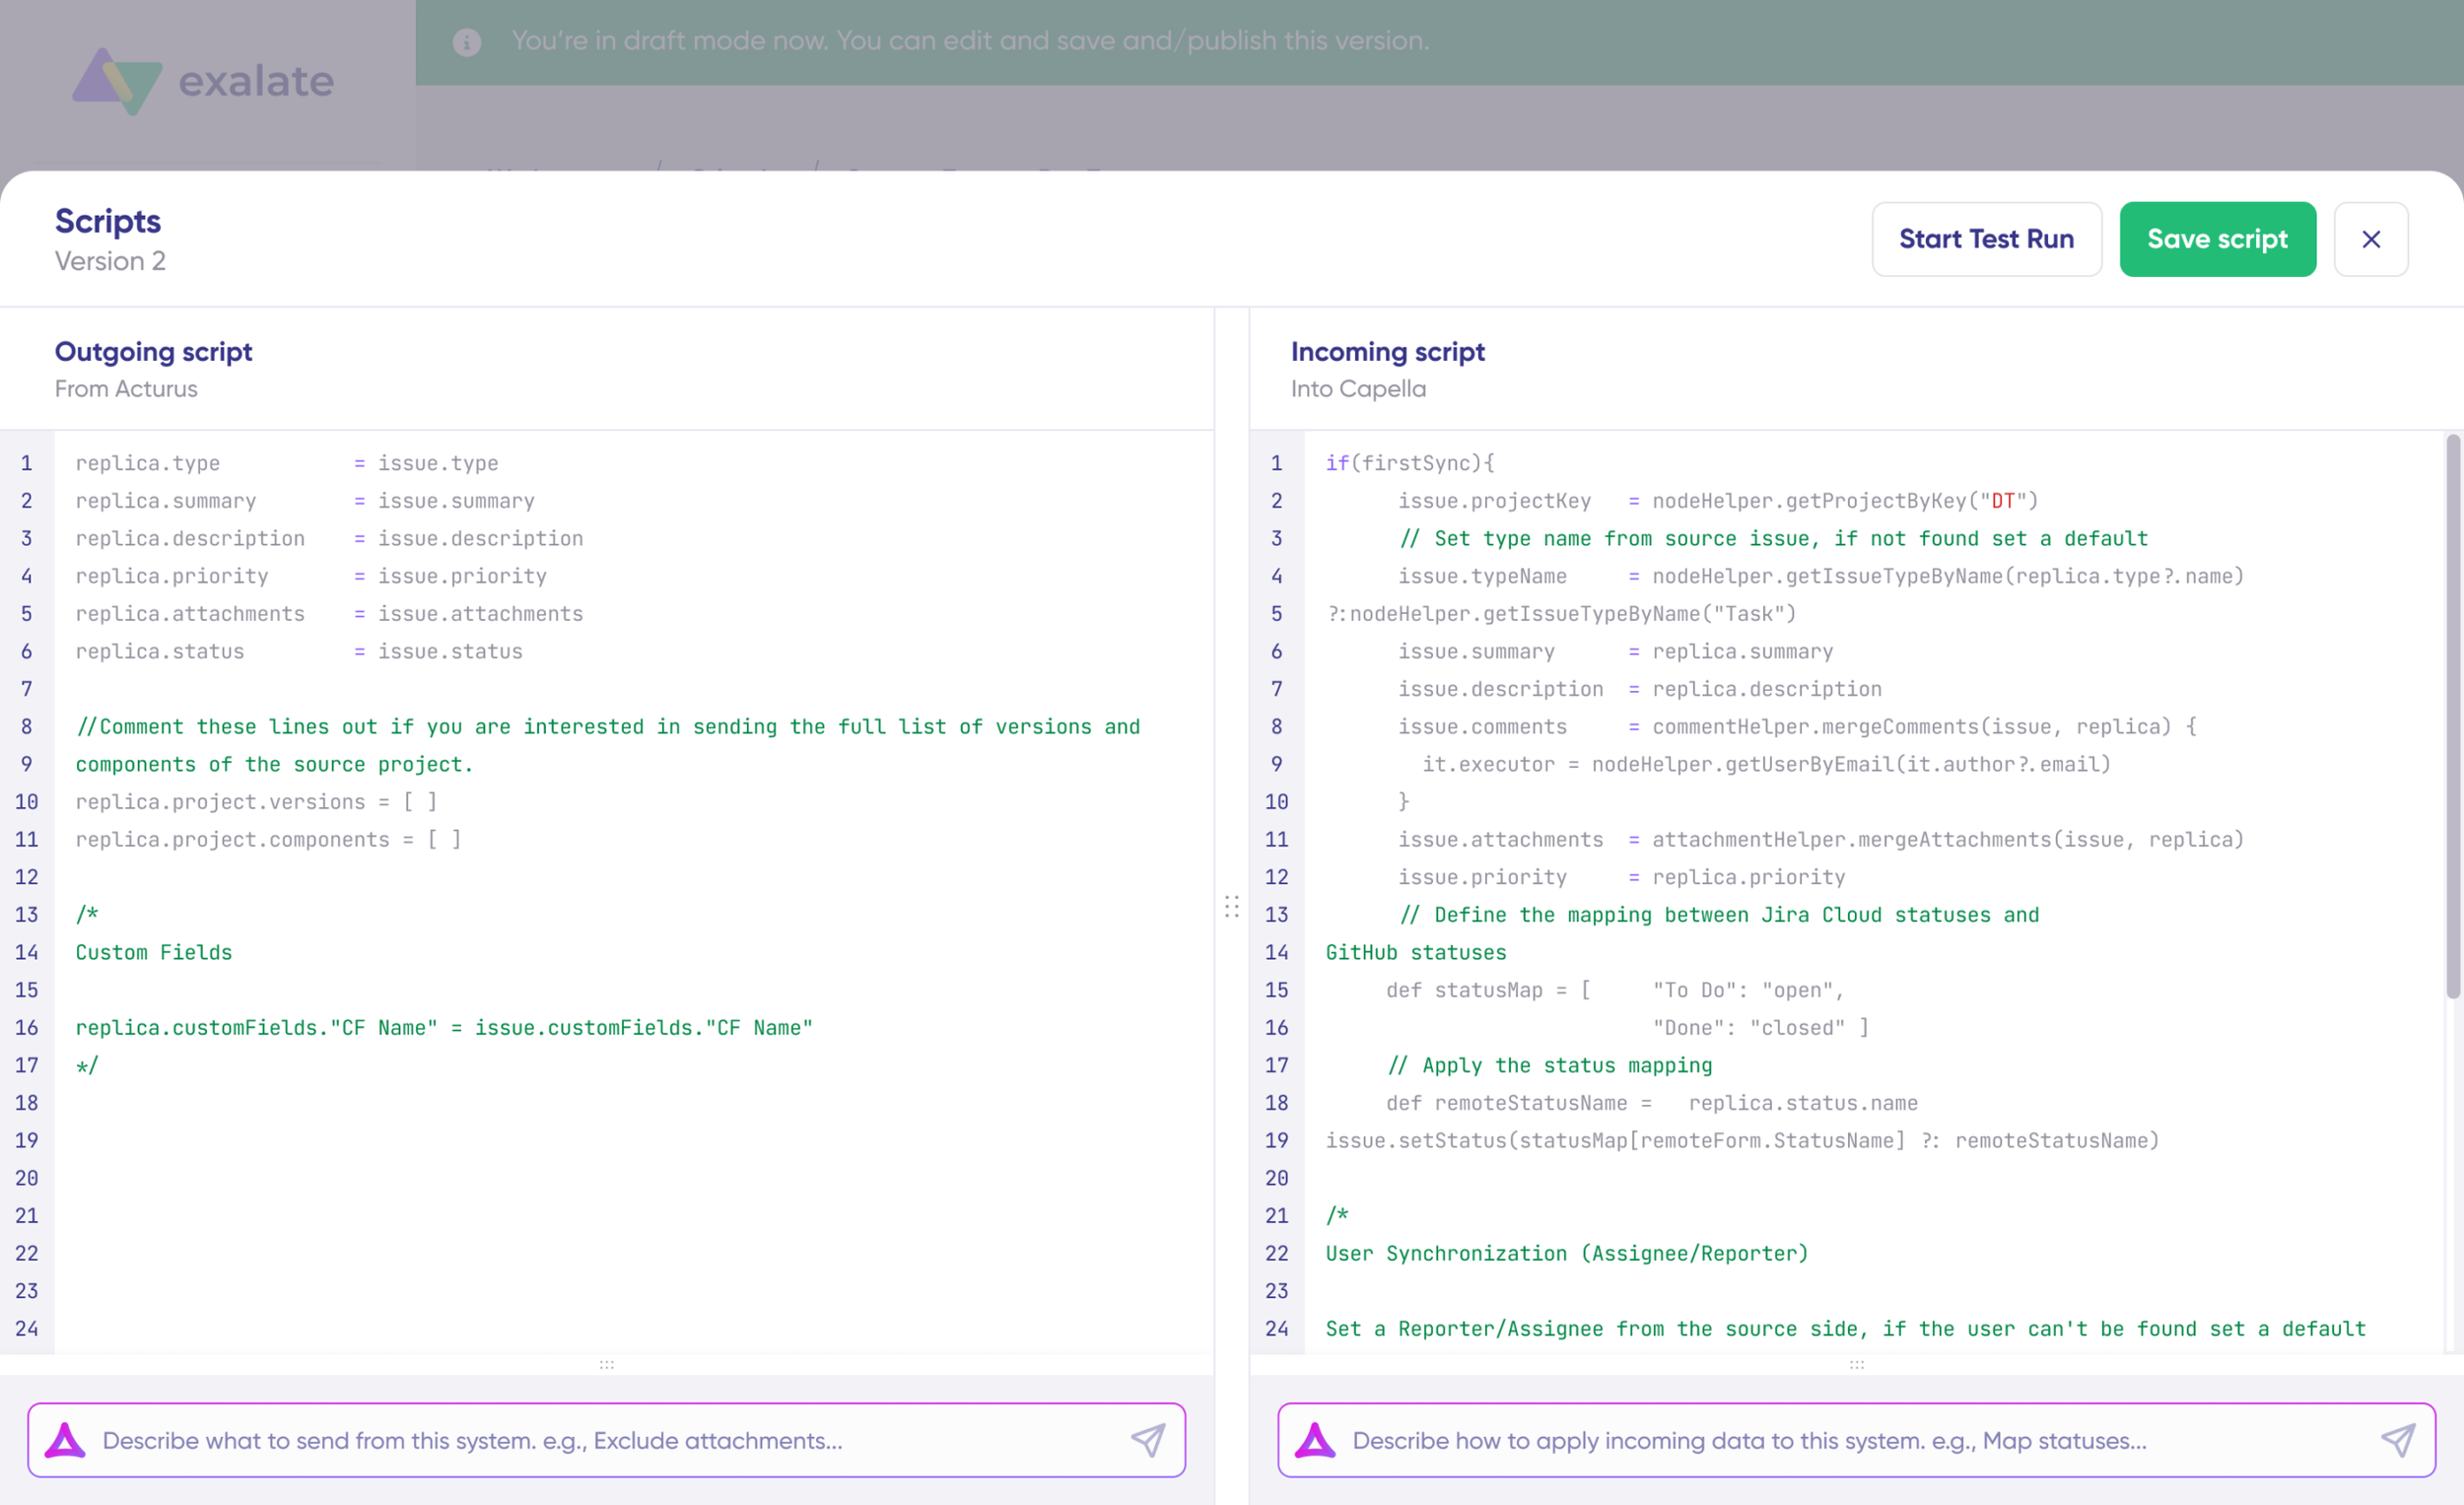
You can reverse the sync direction by clicking the two arrows next to the connection name.
The outgoing script will define how data is passed from Freshservice to Salesforce, while the incoming sync determines how data from Salesforce is mapped to Freshservice.
The Replica is a JSON file containing the data payload shared across both Freshservice and Salesforce. If you’re comfortable with Groovy, you can modify the sync scripts. Otherwise, utilize Aida, our built-in AI assistant.
Use Aida to generate sync scripts. Aida is available for both outgoing and incoming scripts, so select the appropriate side for your configuration.
For Outgoing Scripts, describe what data should leave your system, for example, “Only sync high-priority incidents.”
For Incoming Scripts, specify how incoming data should be applied to your system, such as “Map all incoming cases to a specific ticket.”
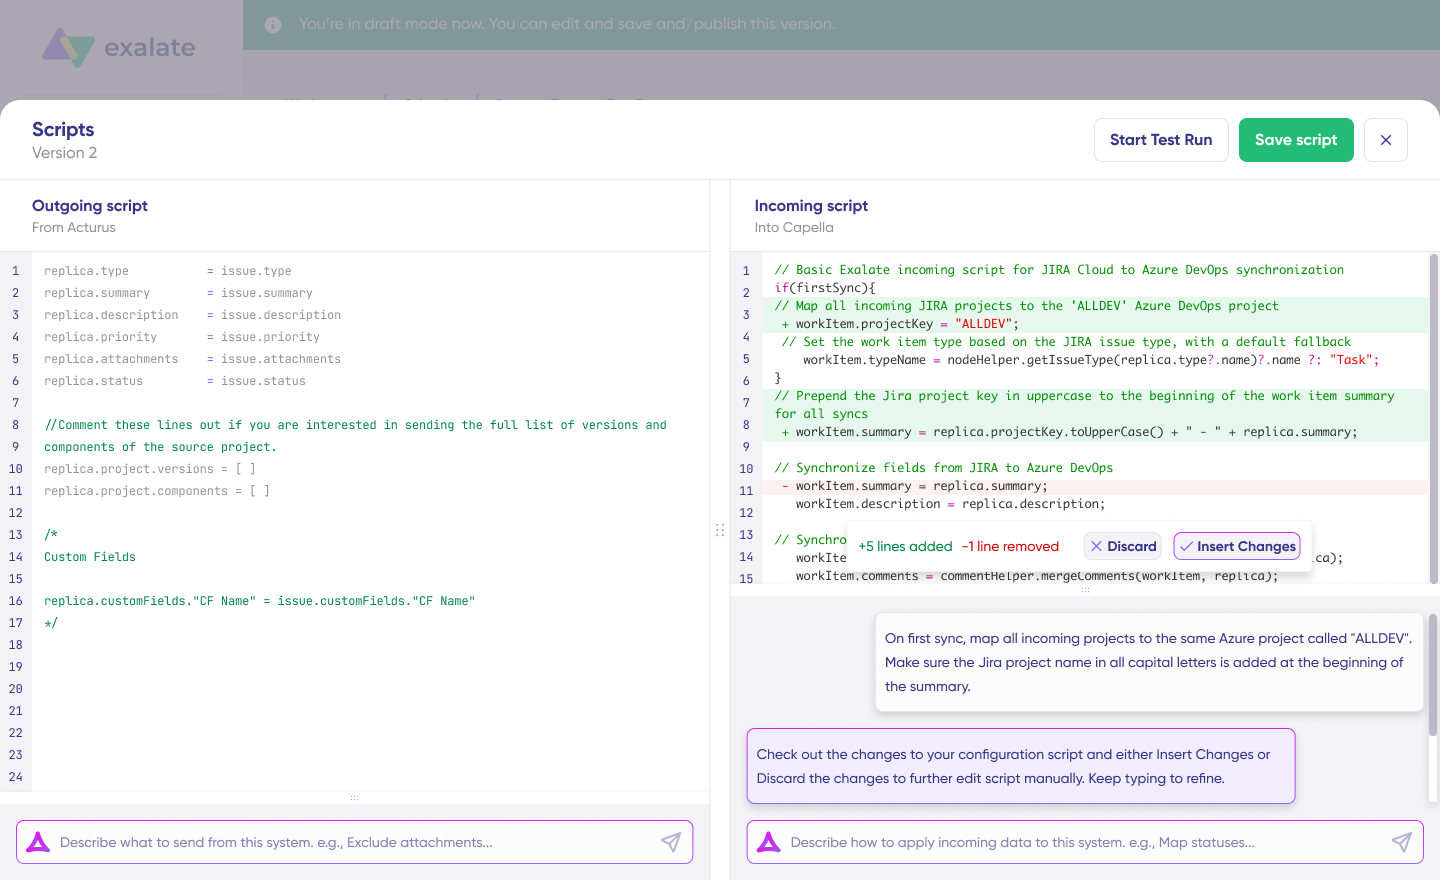
Aida will generate scripts based on Exalate’s scripting API and any existing scripts you’ve created.
Review the output to validate the changes. Newly added lines are highlighted in green, while suggested removals are marked in red. You can either “Insert” or “Discard” these suggestions.
Important Note: As with any AI-generated solution, it’s crucial to review the generated code before applying it.
Once you’ve finalized your sync scripts, you can choose to “Save Script” or test them before publishing.

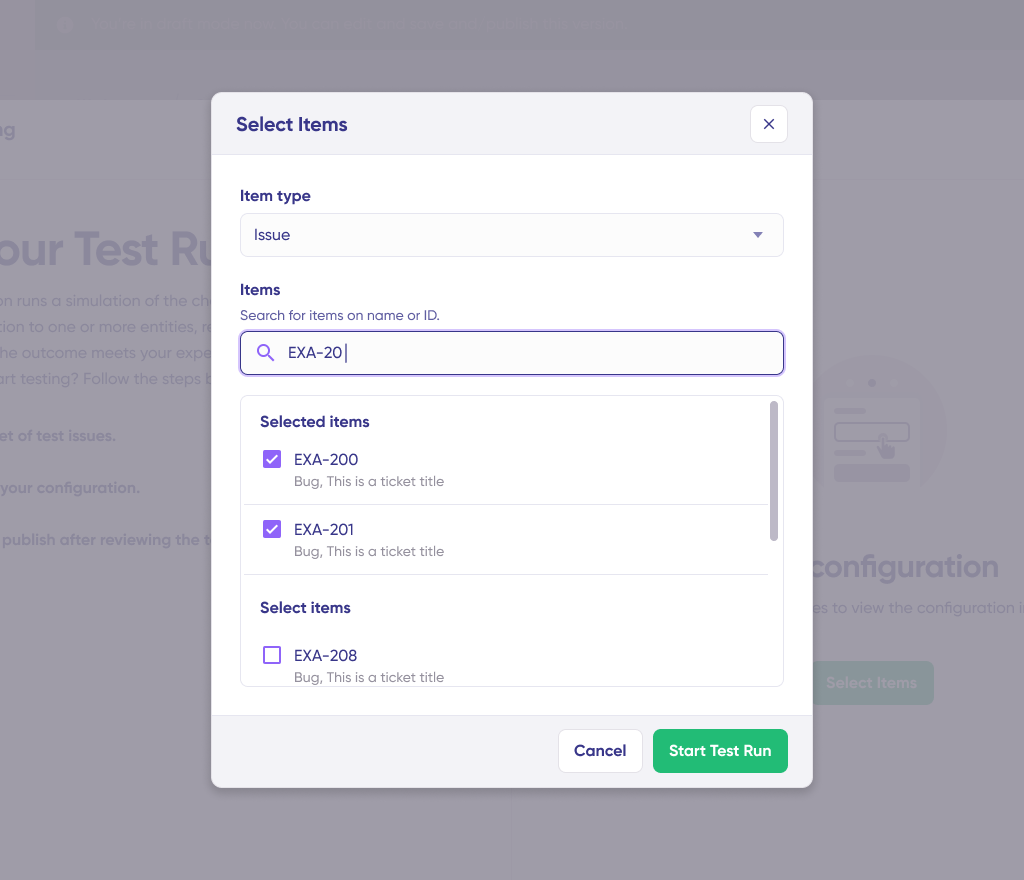
Click “Start Test Run” and select the items you want to sync. You can choose multiple work items to test. After a brief wait, you’ll see the detailed results of the synced fields and the data payload exchanged between both systems. If you’re satisfied with the results, click “Publish Version.”
You can access all versions from the “Version” dropdown. Versions can be “Active,” “Draft” (editable), or “Archived.”
Set up triggers to automate your sync. These triggers are conditions or filters that apply to specific items. For example, sync all work items with a “label = csupport” in Freshservice.
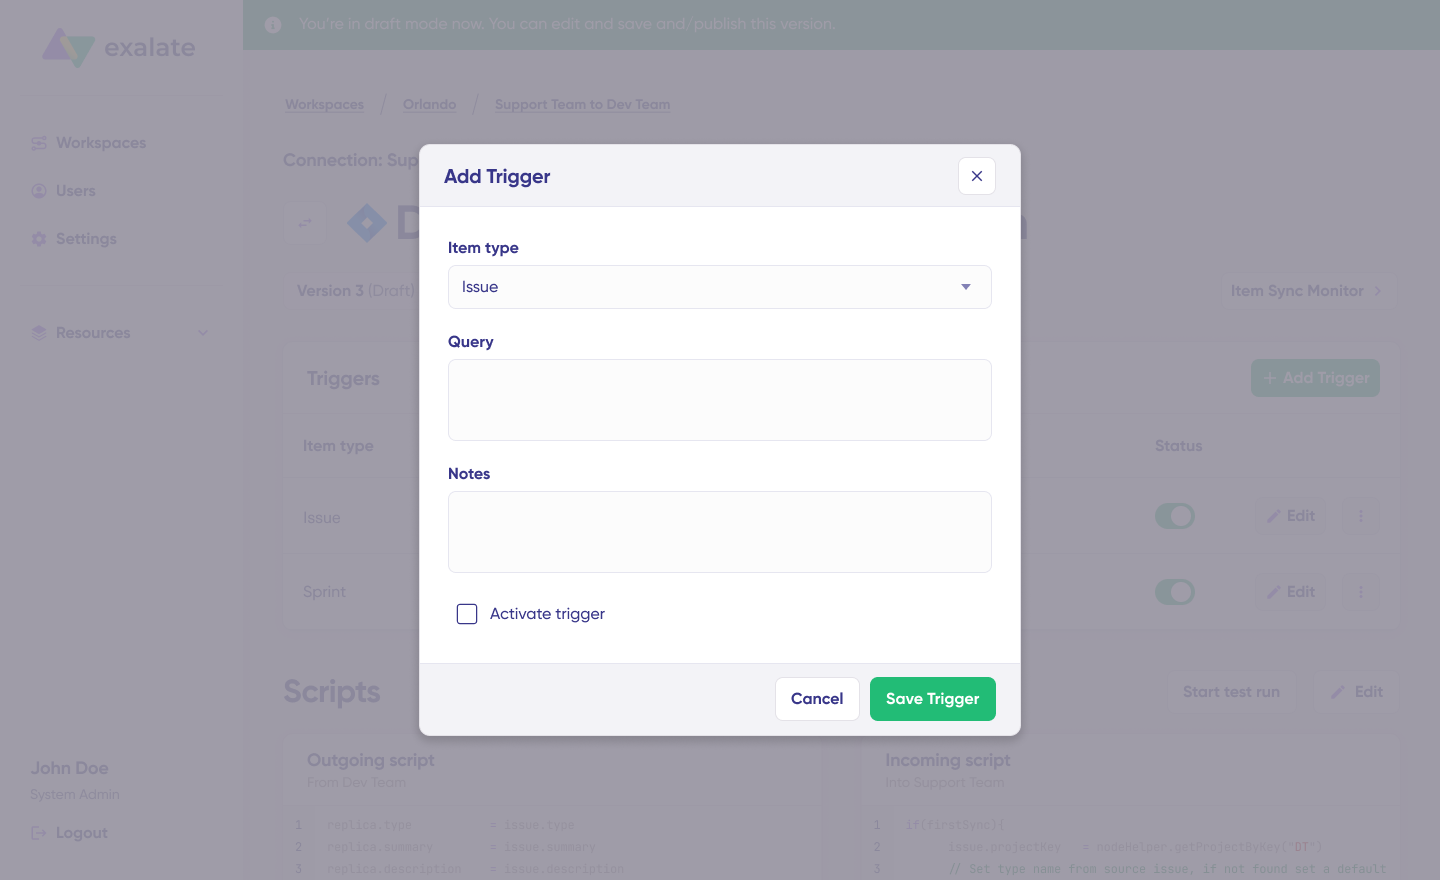
Click the “+Add Trigger” button to start creating platform-specific triggers.
Choose the entity type (incident or case). For Freshservice, you can use query language to specify conditions like “priority: 1 AND status: 2,” ensuring the sync only happens for high-priority incidents with a corresponding status value of “2”. Save the trigger once set.
For Salesforce, you have to use Salesforce Object Query Language to specify the filter query. When you choose the entity type as “Opportunity” and the query contains “StageName= 'Prospecting’”, then all Opportunities in the Prospecting stage will be synced.
Troubleshoot Connection Issues with Aida: If an error arises, navigate to the “Troubleshooting” tab of your workspace. Hover over the error you want to diagnose and click the Aida icon next to the error.

Aida will display all affected systems, connections, and items. It will also provide a brief analysis of the error message.
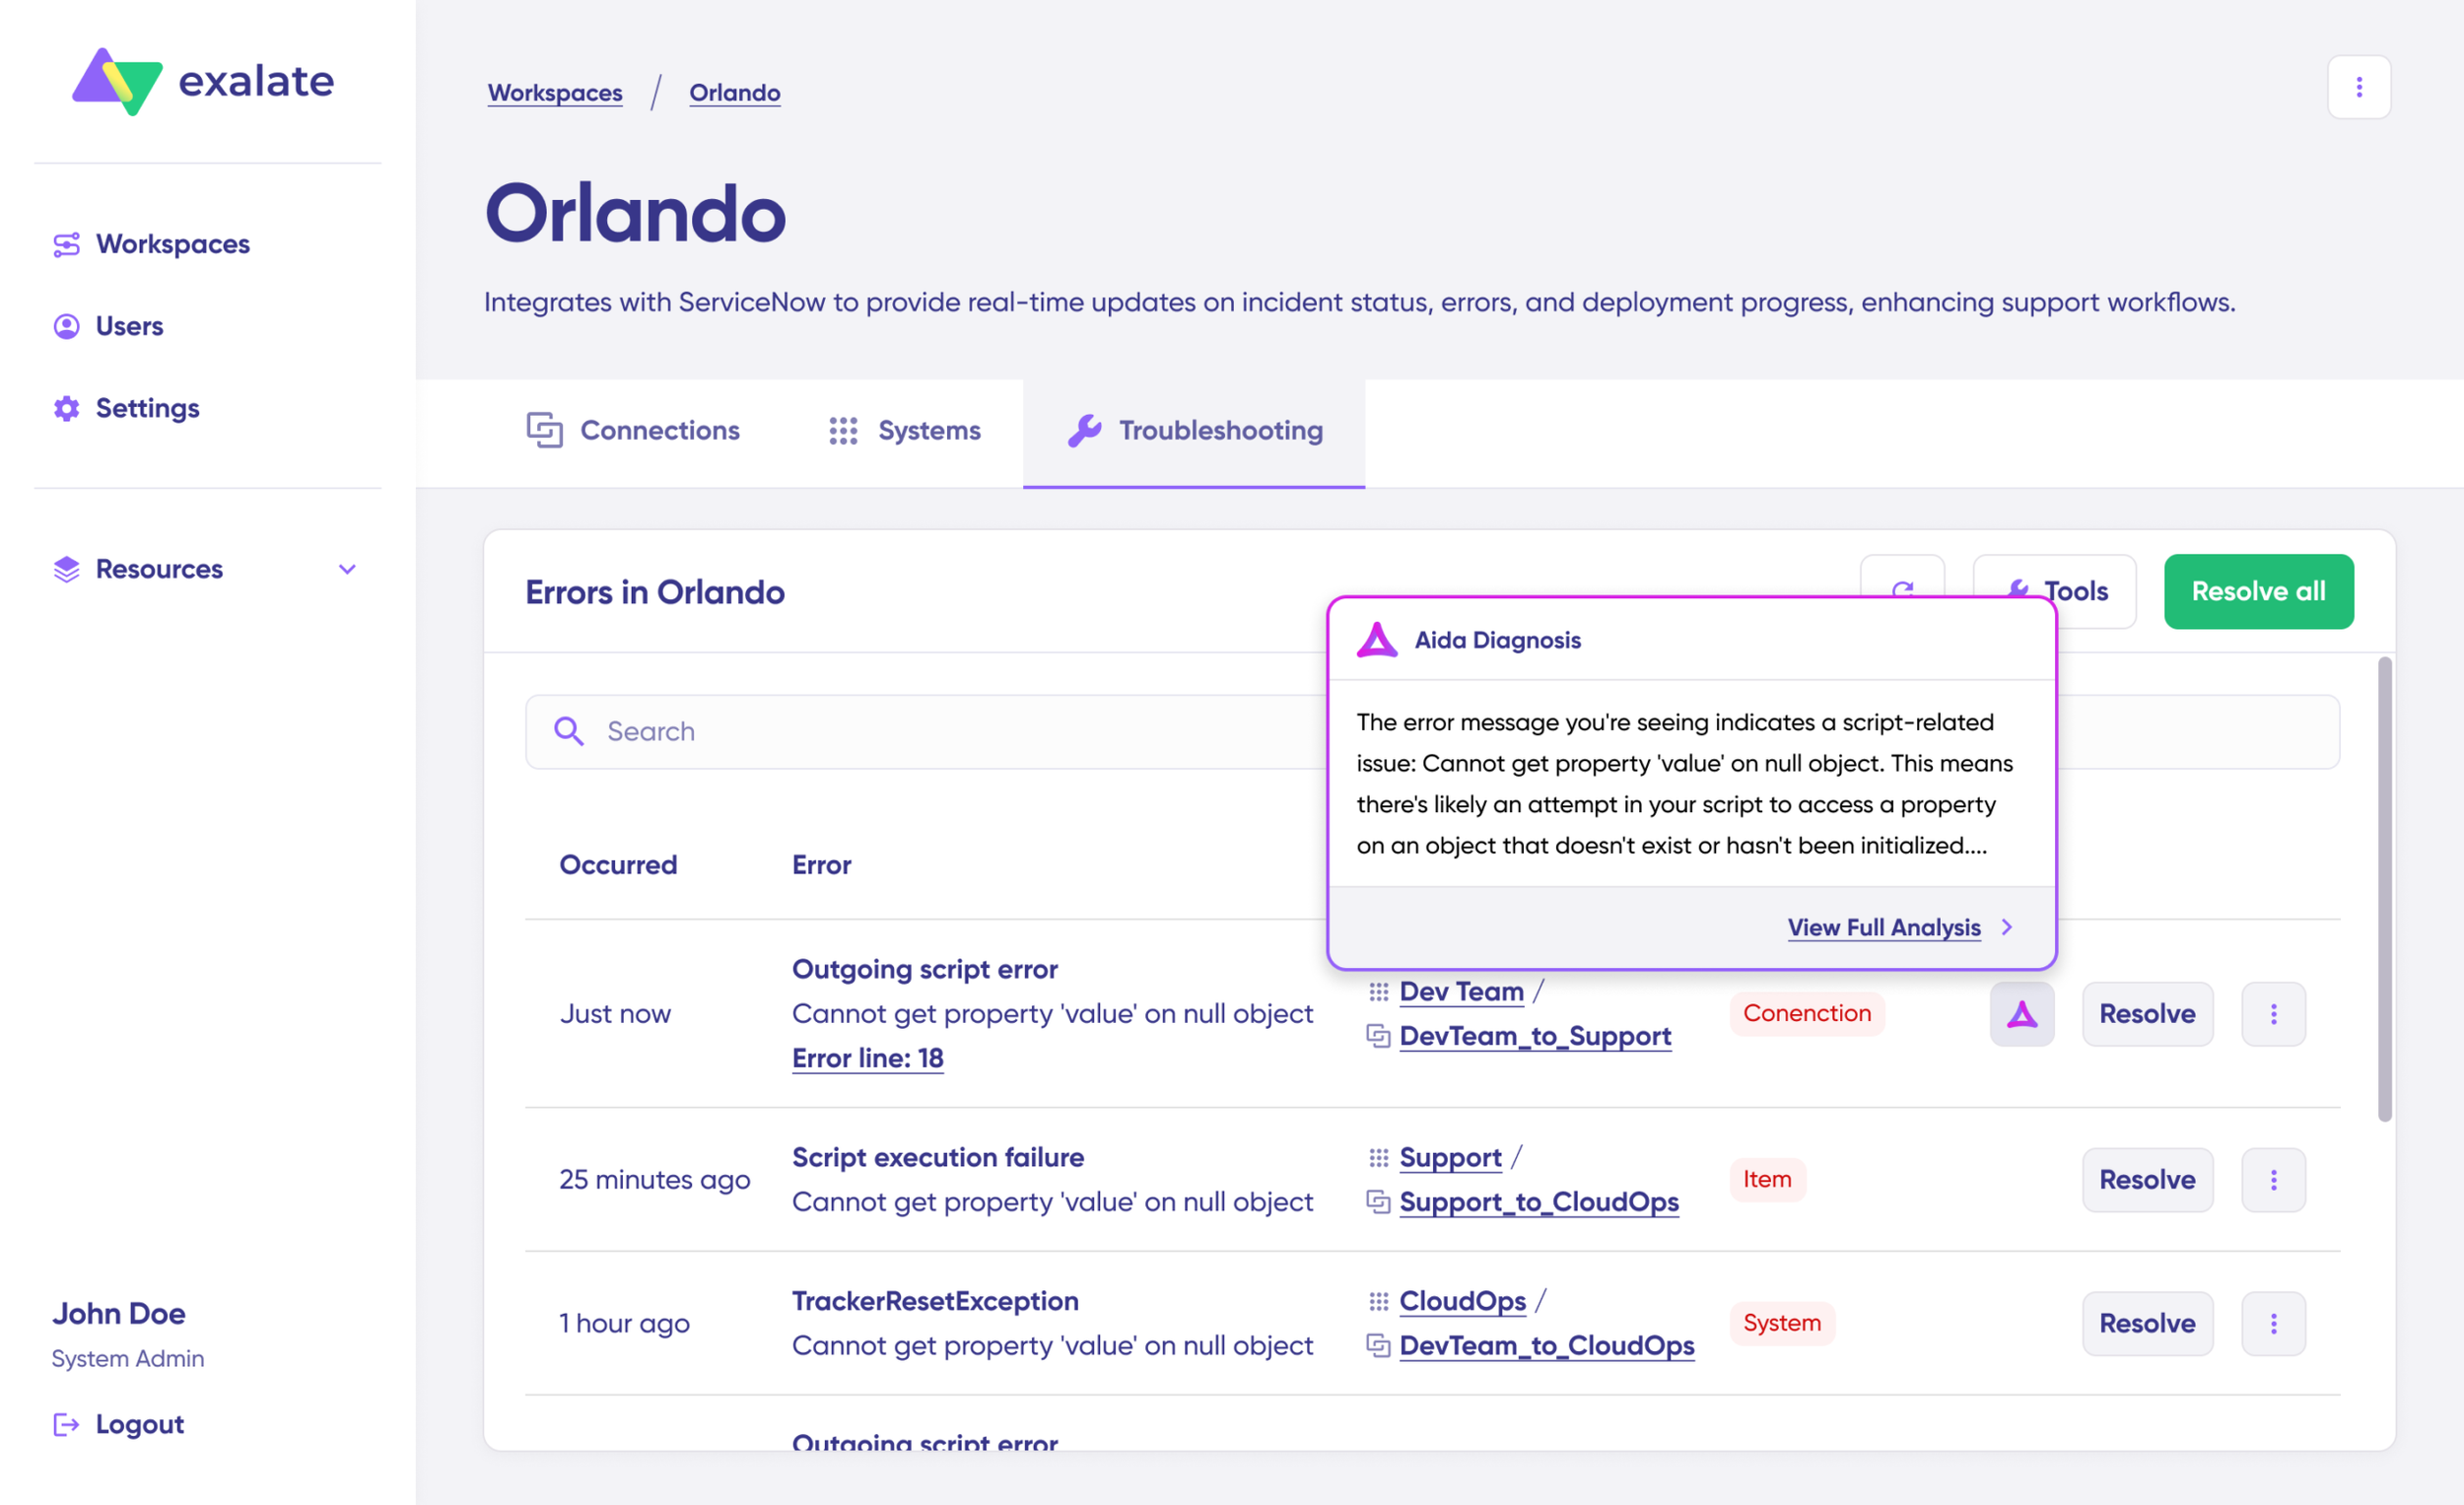
For further details, click on “Error Details.” You’ll find information such as impact level, stack trace, error type, and the date the issue occurred. You can also “View Full Analysis” for more context.
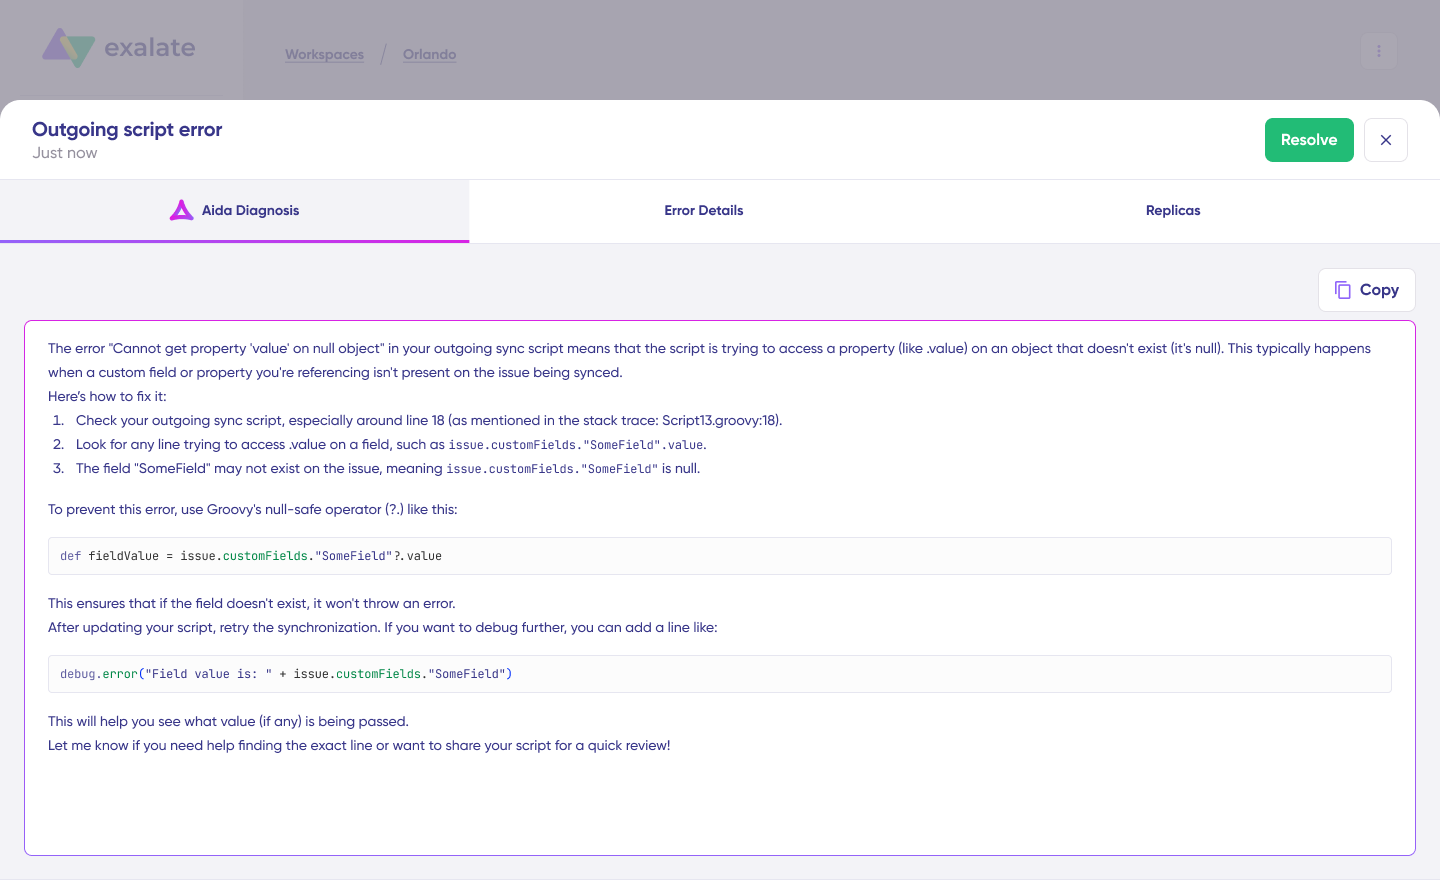
Resolve the error and click on “Resolve” to fix it.
And that’s it! Your first synchronization will begin automatically based on the sync rules and triggers you’ve configured. Enjoy the seamless integration!
Real-World Use Cases with Practical Applications
Use Case 1: Customer-Initiated Ticket Escalation
Scenario: A high-value enterprise client submits a ticket about API connectivity issues affecting their production environment.
Solution with Exalate:
- Ticket automatically created in Freshservice with full customer context
- Integration syncs Salesforce account tier, contract value, and renewal risk status
- Custom fields populate with account manager information and SLA requirements
- Priority automatically escalates based on customer value
- VIP workflow triggers, reducing response time from hours to minutes
Real-world application: MSPs managing Fortune 500 clients use this workflow to maintain strict SLAs. When a critical client reports issues, the support team immediately sees contract details, knows which account manager to loop in, and can escalate to senior engineers if needed—all without leaving Freshservice.
Measurable impact: Response times drop from 2-4 hours to under 15 minutes for enterprise clients, improving retention rates and customer satisfaction scores.
Use Case 2: Sales-Initiated Support Requests
Scenario: An account manager logs a Salesforce case about data migration concerns during a client expansion.
Solution with Exalate:
- Case automatically creates a Freshservice ticket with complete context
- Ticket inherits Salesforce priority, account value, and attached documentation
- Support team sees sales opportunity stage and expansion timeline
- Real-time status updates flow back to Salesforce
- Account manager tracks progress without switching systems
Real-world application: During enterprise sales cycles, technical concerns often arise. Sales teams document these in Salesforce as cases. The integration creates corresponding Freshservice tickets, enabling IT teams to address technical blockers while sales teams monitor resolution progress in their CRM.
Measurable impact: Sales cycles accelerate by 20-30% as technical concerns get resolved faster with proper visibility across teams.
Use Case 3: Priority Mapping Based on Customer Lifecycle
Scenario: Customers at different lifecycle stages require different support priority levels.
Solution with Exalate:
- Integration syncs Salesforce opportunity stage, contract status, and customer health scores
- Freshservice tickets automatically inherit appropriate priority levels
- Renewal-risk accounts get elevated priority
- New customers receive enhanced onboarding support
- Expansion opportunities trigger proactive support engagement
Real-world application: SaaS companies use this to align support with revenue objectives. Accounts in renewal windows get faster response times. Customers evaluating expansion receive white-glove support. Churning customers trigger retention workflows automatically.
Measurable impact: Customer churn reduces by 15-25% through proactive support intervention during critical lifecycle moments.
Use Case 4: Multi-Case Incident Consolidation
Scenario: Multiple customers log separate Salesforce cases about the same underlying infrastructure issue—API timeouts, login failures, and data sync errors.
Solution with Exalate:
- All related cases map to a single Freshservice incident
- Filtering criteria based on urgency, priority, impact, or keywords
- IT teams identify patterns and address root causes through coordinated problem management
- Updates sync back to all related Salesforce cases simultaneously
- Customers receive consistent communication about the issue
Real-world application: Cloud service providers use this during service disruptions. Instead of treating 50 related tickets as separate incidents, they consolidate them into one problem ticket, resolve the root cause, and automatically update all affected customers through their individual Salesforce cases.
Measurable impact: Problem resolution time decreases by 40-60% through better incident correlation and root cause analysis.
Use Case 5: Automated IT Onboarding Workflows
Scenario: HR hires a new sales engineer in Salesforce.
Solution with Exalate:
- New hire data triggers automated Freshservice tasks
- IT provisions laptops, software licenses, and CRM access
- Freshservice project tickets track each onboarding step
- Task completion updates sync to Salesforce
- HR monitors onboarding progress through Salesforce dashboards
- Account manager receives notification when a new team member is fully provisioned.
Real-world application: Growing organizations use this to eliminate manual coordination between HR, IT, and department managers. When HR marks an employee as “Hired” in Salesforce, the entire IT provisioning workflow triggers automatically in Freshservice with proper scheduling, dependencies, and stakeholder notifications.
Measurable impact: New hire productivity increases as time-to-productivity drops from 5-7 days to 2-3 days with automated provisioning.
Use Case 6: Lead Qualification Through Technical Support
Scenario: Prospects submit technical requests through Freshservice during evaluation.
Solution with Exalate:
- Technical support tickets automatically create Salesforce leads
- Product interest, technical complexity level, and engagement scores are populated from ticket data
- Support conversations sync to lead activity history
- Sales reps access the complete context for the first call
- Technical product fit indicators help prioritize high-potential leads
Real-world application: Enterprise software companies use this to identify high-intent prospects. When a prospect asks sophisticated technical questions or requests specific feature implementations, those signals automatically flow to sales teams with full conversation context.
Measurable impact: Lead conversion rates improve by 25-35% as sales teams engage prospects with complete technical context and demonstrated product interest.
Use Case 7: Cross-Organizational Collaboration
Scenario: MSPs using Freshservice need to collaborate with enterprise clients using Salesforce.
Solution with Exalate:
- Tickets flow automatically between MSP and client organizations
- Each organization controls what data it shares
- External vendors can participate in multi-party workflows
- Sensitive information stays protected through field-level security
- Status updates sync bidirectionally across organizational boundaries
Real-world application: Managed service providers supporting Fortune 500 clients maintain their own Freshservice instance while clients track service requests in Salesforce. The integration enables seamless collaboration without forcing either party to adopt the other’s platform.
Measurable impact: Client satisfaction improves by 30-40% through better transparency and faster issue resolution across organizational boundaries.
Use Case 8: Customer Health Monitoring
Scenario: Support teams need early warning signs of customer churn risks.
Solution with Exalate:
- Freshservice ticket volumes, resolution times, and satisfaction scores sync to Salesforce
- Customer success managers see support metrics in account records
- Automated alerts trigger for accounts with declining satisfaction
- Support patterns inform renewal conversations
- Product usage issues get escalated before contracts come up for renewal
Real-world application: B2B SaaS companies combine support metrics with product usage data in Salesforce to create comprehensive customer health scores. Accounts showing support tickets about feature limitations get targeted for product training or upgrade conversations before they churn.
Measurable impact: Proactive intervention based on support patterns reduces churn by 20-30% annually.
Implementation Best Practices
- Define clear integration objectives like “reduce escalation time from 2 hours to 30 minutes” or “provide sales teams with daily support updates” before configuring any sync rules.
- Include all stakeholders in planning. Support agents, sales reps, Salesforce admins, and IT operations need input since they know which fields and workflows actually matter. Focus on syncing data that drives decisions rather than everything available.
- Set up proper security controls. Ensure only authorized team members can modify sync rules or access sensitive customer data flowing between platforms. Implement role-based access control (RBAC) and field-level security where needed.
- Document everything thoroughly. Record field mappings, workflow logic, custom scripts, and include screenshots with explanations so future admins can understand and troubleshoot your setup.
- Clean your data first. Remove duplicate contacts, standardize field formats, and merge overlapping records before enabling integration to prevent propagating data quality issues.
- Start with a pilot program. Begin with one team or customer segment, test thoroughly, then expand gradually to catch problems before they affect your entire operation.
- Train your teams properly. Create practical training sessions showing real scenarios and build quick reference guides so teams understand how their actions in one system affect the other platform.
- Establish data quality standards before syncing begins. Define required fields, validation rules, and data formats to maintain consistency across both systems.
- Implement smart monitoring. Configure notifications for sync failures, unusual data volumes, or performance drops so you can spot problems before users complain.
- Optimize for performance. Track processing times and API usage. Identify which data needs real-time sync versus what can update every few minutes to avoid hitting rate limits.
- Budget for ongoing maintenance. Plan time and resources for keeping your integration working as both platforms evolve with new features and API changes.
Integration Metrics That Matter
Track these metrics to evaluate your Freshservice Salesforce integration effectiveness:
Sync reliability metrics:
- Sync success rate and failure frequency
- Data processing speed and latency
- Error recovery time
- API usage and rate limit consumption
Data quality metrics:
- Data accuracy and consistency scores
- Duplicate record rate
- Field mapping error rate
- Data validation failure rate
Business impact metrics:
- Average ticket resolution time
- Customer satisfaction (CSAT) scores
- Lead conversion rates from support interactions
- Customer retention improvement
- Time saved on manual data entry
Operational metrics:
- Integration uptime and availability
- Cost per transaction
- Support ticket volume trends
- User adoption rates across teams
Frequently Asked Questions
Can I integrate Freshservice if I’m using Salesforce Classic instead of Lightning?
You can integrate Freshservice with both Salesforce Classic and Lightning interfaces. While Classic has more limited widget functionality compared to Lightning’s modern integration features, the core data synchronization works across both versions.
What Salesforce and Freshservice ticket fields can Exalate sync?
Exalate enables users to sync fields from Freshservice tickets (incidents and service requests), including summary, description, status, priority, urgency, attachments, notes, custom fields, custom keys, and more.
For Salesforce, you can sync default and custom fields, plus any other field available via REST APIs. The most commonly synced entities are accounts, cases, opportunities, contacts, leads, custom objects, etc. If you don’t see the fields or entities that you need to sync, discuss your use case with us and explore all the possibilities.
Does Exalate support real-time bidirectional syncing?
Yes, Exalate monitors changes in both systems and triggers automatic updates in real-time. You can configure either unidirectional or bidirectional synchronization based on your requirements. Ticket modifications, status changes, and comments synchronize instantly, ensuring teams always work with current information.
Can I sync custom fields between Freshservice and Salesforce?
Yes, Exalate enables syncing both default and custom fields between platforms. Administrators control what data is shared or kept private in your Freshservice-Salesforce sync, ensuring the integration meets specific needs. The AI-assisted configuration helps map complex custom fields automatically.
Can I integrate multiple Salesforce orgs with one Freshservice instance?
Yes, Exalate can integrate multiple Salesforce orgs with a single Freshservice instance. This setup works well for MSPs managing different client environments or enterprises with multiple Salesforce orgs across business units. Each team or organization decides what data to share with Freshservice while maintaining privacy and control over their specific integration requirements.
How does Exalate secure Freshservice-Salesforce integrations?
Exalate protects data flowing through your integration using:
- Encryption of data both in transit and at rest (TLS 1.2 and 1.3)
- Role-based access controls (RBAC)
- JWT and personal access tokens for authentication
- Basic Auth and OAuth authentication
- Multi-factor authentication support
- ISO 27001:2022 certification
Learn more in the Trust Center.
Do both teams need to coordinate configuration changes?
No, Exalate’s architecture means both teams maintain full control over their side of the integration. You can modify sync rules, update field mappings, and change business logic independently without coordinating changes with the other platform’s team. Each side controls exactly what data it shares and how incoming data gets processed.
Can Exalate integrate with other platforms beyond Freshservice and Salesforce?
Yes, Exalate supports integrations with Jira Cloud, GitHub, Zendesk, Azure DevOps (Cloud and Server), Freshdesk, ServiceNow, Asana, Service Desk Plus, and custom connectors for proprietary systems. This allows you to create comprehensive integration ecosystems connecting multiple platforms.
Does Exalate require coding knowledge to configure?
While Exalate provides full scripting capabilities for complex scenarios, the AI-assisted configuration (Aida) allows non-technical users to set up integrations using natural language prompts. For advanced customization and business logic, basic scripting knowledge helps but isn’t required for standard integration scenarios.
Can I filter which tickets sync between systems?
Yes, you can configure triggers and filtering conditions to control exactly which tickets sync. Filter based on priority, status, customer type, custom field values, ticket type, or any other criteria. This ensures only relevant data flows between systems and prevents overwhelming either platform with unnecessary information.


