An Asana Zendesk integration connects customer support workflows with project execution. Zendesk tickets become actionable Asana tasks. Status updates flow back without anyone switching tools or copying data manually.
But the native integration has limits. The built-in Asana sidebar app in Zendesk lets agents create or link tasks, but it doesn’t offer true bidirectional sync. Status changes in Asana don’t automatically update Zendesk tickets. Custom fields don’t map. And if you need cross-company collaboration, conditional sync, or advanced data transformations, you’ll need a different approach entirely.
This guide breaks down every integration method available, walks through practical use cases, shows you how to set up a connection using Exalate, and covers the pitfalls teams run into when connecting these platforms.
Key Takeaways
- Teams need this integration to eliminate manual handoffs between support and project execution workflows.
- Script-based platforms like Exalate provide full control over what syncs, how data transforms, and what triggers the synchronization.
- Practical use cases range from SLA-driven ticket escalation to vendor coordination and customer feedback loops feeding product roadmaps.
- Choosing the right approach depends on sync direction, field complexity, cross-company needs, and whether you need conditional logic.
- Security, resilience, and independent control on each side of the integration are critical for enterprise deployments.

Why Do Teams Need Asana Zendesk Integration?
The gap between support and project management is where work disappears. Here’s why organizations connect these two platforms.
Close the Loop Between Customer Issues and Internal Action
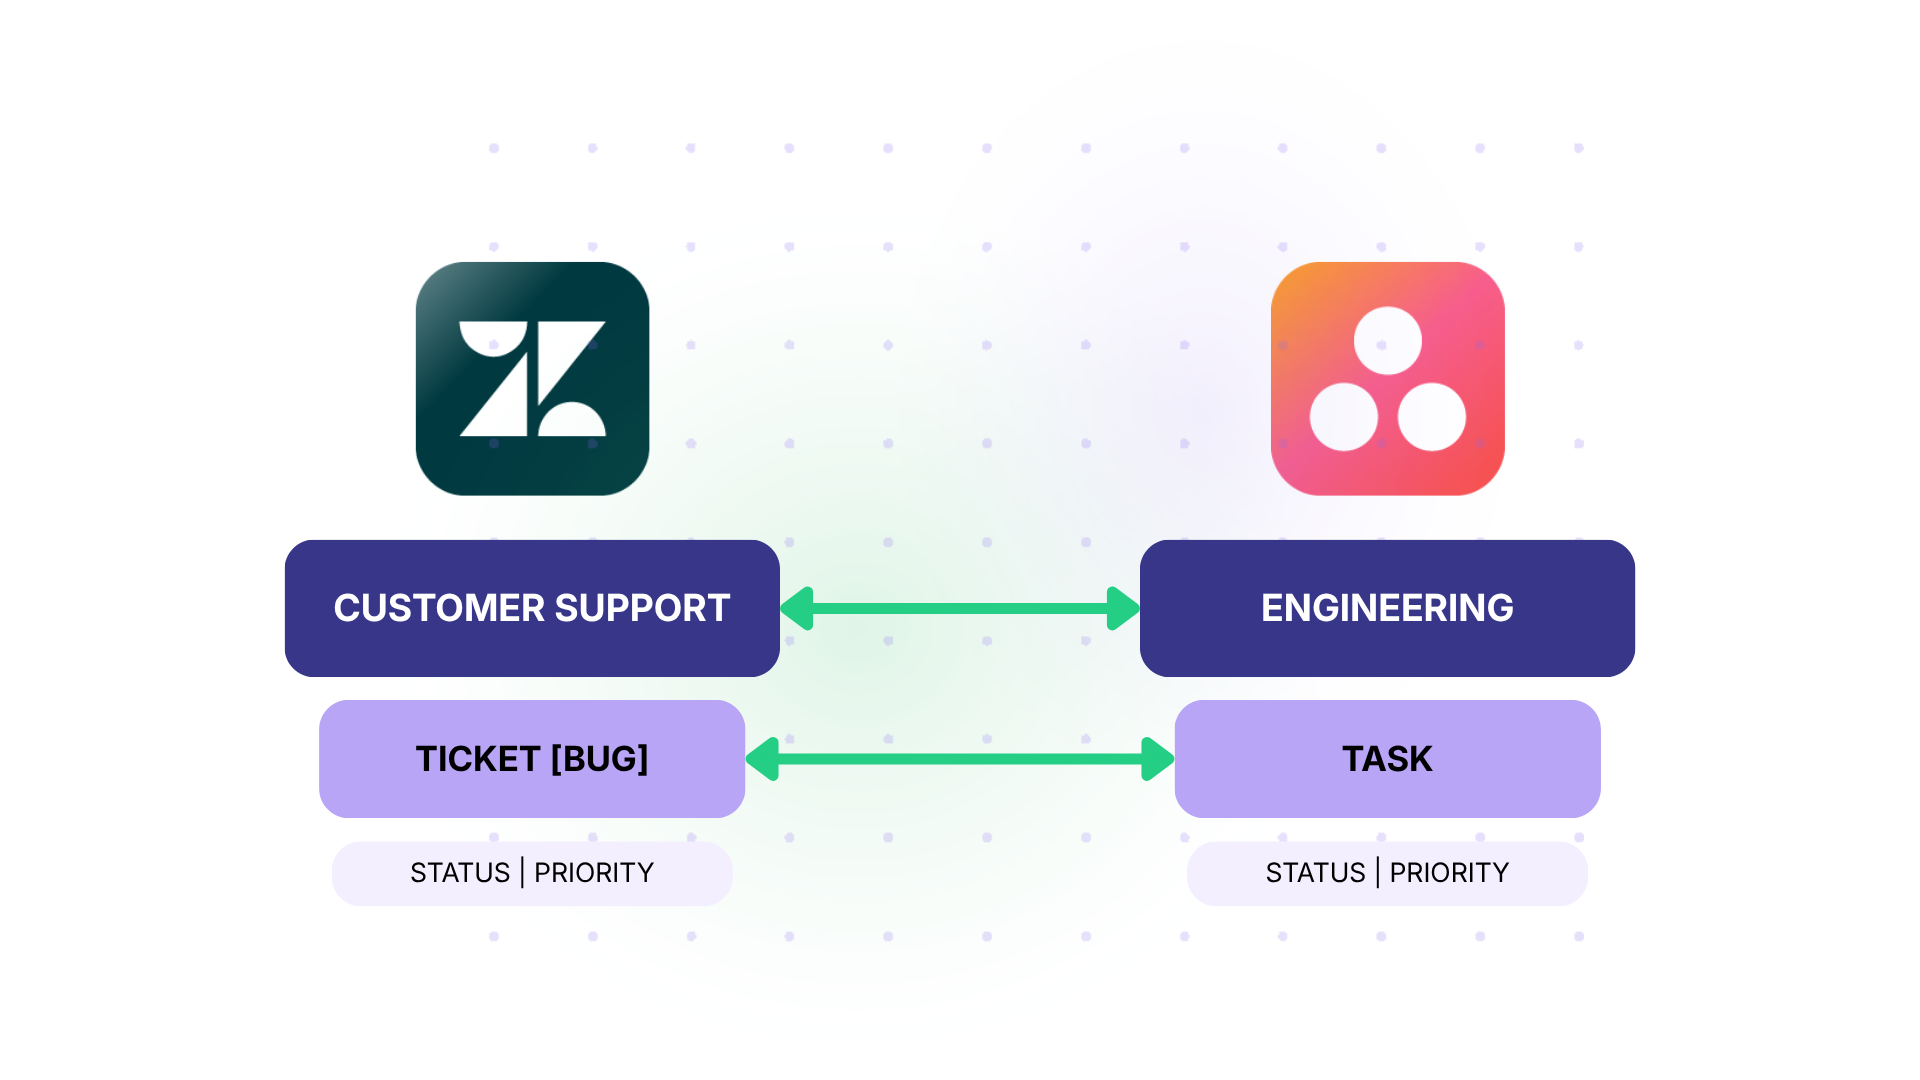
When a customer reports a bug or requests a feature through Zendesk, someone on the support team has to notify the right internal team. Without integration, that means manually creating tasks, sending messages, or updating spreadsheets. By the time the task reaches the product or engineering team in Asana, key details from the original ticket are often missing.
With an integrated setup, the Zendesk ticket generates an Asana task automatically. The task carries over the ticket subject, description, priority, requester information, and any custom fields you configure. When the Asana task is completed, the Zendesk ticket updates to reflect the resolution.
Eliminate Duplicate Data Entry
Support agents waste time re-entering ticket information into project management tools. Project managers waste time asking support for context that already exists in Zendesk. Integration removes that overhead by syncing data in real time. Updates happen once and propagate to both sides.
Maintain Visibility Without Switching Tools
Support agents shouldn’t need Asana access to know the status of an escalated issue. Project managers shouldn’t need Zendesk access to understand the customer impact of a task. A well-configured integration surfaces the right information in each tool, so both teams have the context they need without leaving their workspace.
Scale Cross-Functional Workflows
As ticket volume grows, manual handoffs become a bottleneck. A team handling 50 tickets per week might manage with copy-paste. A team handling 500 can’t. Integration scales the handoff process without adding headcount or administrative overhead.
Support Cross-Company Collaboration
If you outsource support to a third party using Zendesk, or if a partner handles certain ticket categories, integration lets each organization maintain control over its own tool while sharing the data needed for collaboration. Each side decides what to share and what stays private.
What Data Can You Sync Between Asana and Zendesk?
Before choosing a tool, it helps to know what’s actually possible. Here’s what you can sync between Asana and Zendesk depending on the integration method you use.
| Asana Field | Zendesk Field | Native App | Automation Tools | Script-Based (Exalate) |
| Task name | Ticket subject | Yes | Yes | Yes |
| Task description | Ticket description | Yes | Yes | Yes |
| Assignee | Assignee | No | Limited | Yes |
| Due date | Due date | Yes | Yes | Yes |
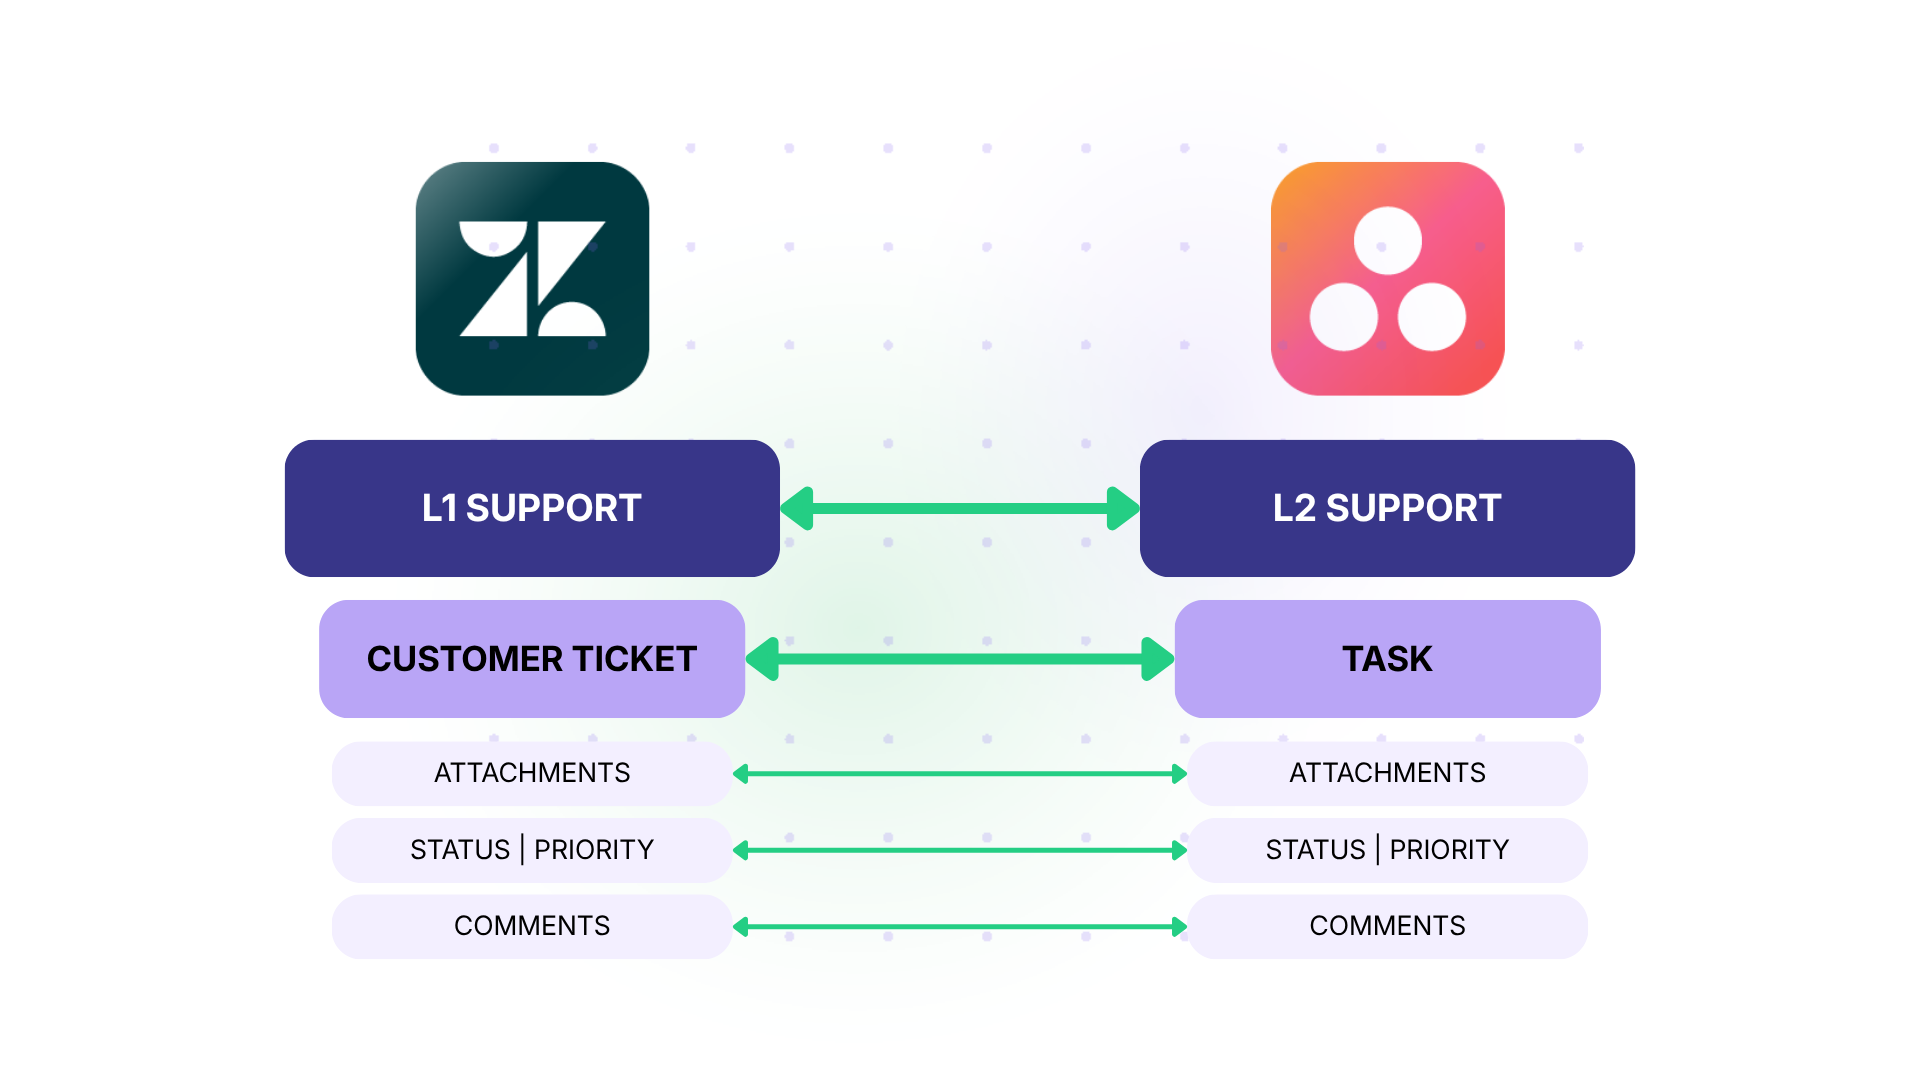
| Task status/completion | Ticket status | Partial (completion only) | Limited | Yes (full mapping) |
| Comments | Comments/Public replies | No | Limited | Yes (bidirectional) |
| Attachments | Attachments | Yes (from Zendesk to Asana) | No | Yes (bidirectional) |
| Custom fields | Custom fields | No | Very limited | Yes (all types) |
| Tags | Tags | No | Yes | Yes |
| Priority | Priority | No | Yes | Yes (with mapping) |
| Project assignment | Group/Organization | No | No | Yes |
| Subtasks | N/A | No | No | Yes (as linked items) |
Learn more about all the Asana and Zendesk fields supported by Exalate.
The native app handles the basics: creating tasks from tickets and linking existing tasks. For anything beyond that, including syncing comments, mapping custom fields, or enabling bidirectional status updates, you’ll need a third-party tool.
Integration Approaches: Native, Automation, and Dedicated Platforms
Native Asana-Zendesk Integration
Asana offers a sidebar app that installs directly in Zendesk. Once enabled, agents can create new Asana tasks or link existing ones to the ticket they’re working on.
Ticket details like subject and description carry over. There’s also a widget in Asana that shows linked Zendesk ticket information, including owner, status, and last update time.
You can combine this with Asana Rules to automate actions. For example, a Rule can post a comment back to the Zendesk ticket when the linked Asana task is updated.
Where it works well: Small teams with straightforward escalation workflows where agents manually decide which tickets need Asana tasks.
Where it falls short: The native app doesn’t sync custom fields, doesn’t offer true bidirectional status mapping, and can’t automate task creation based on ticket conditions (like priority or tag). It also doesn’t support cross-company setups where each organization manages its own instance.
Automation Platforms (Zapier, Make, Appy Pie)
Automation tools connect Asana and Zendesk through trigger-action workflows. For example: “When a new ticket is created in Zendesk with tag ‘escalate,’ create a task in Asana project X.”
These platforms handle one-way automations well. Zapier supports multi-step Zaps that can map fields, add conditions, and route tasks to specific projects. Make (formerly Integromat) offers more complex branching logic.
Strengths: Fast to set up, no coding required, good for simple one-directional flows, and cost-effective for low-volume scenarios.
Limitations: Bidirectional sync is difficult to implement reliably. You need separate workflows for each direction, with custom logic to prevent infinite loops. Custom field mapping is limited. Error handling is basic. And if one step fails, the entire workflow breaks without clear recovery mechanisms.
Script-Based Integration Platforms (Exalate)
Exalate connects Asana and Zendesk with a scripting engine that gives you full control over what syncs, when it syncs, and how data transforms between platforms. Each side of the integration is configured independently, meaning the Asana admin controls what comes in and goes out of Asana, while the Zendesk admin does the same on their side.
Capabilities include:
- bidirectional sync of tasks, tickets, comments, attachments, and custom fields.
- Conditional sync logic (only sync tickets matching certain criteria).
- Data transformation (map Zendesk priority values to Asana custom field options, for instance).
- AI-assisted script generation via Aida, Exalate’s AI configuration assistant. And resilience features like automatic retry and change queuing during outages.
Where it fits: Teams that need advanced field mapping, conditional logic, cross-company integration, or high-volume sync with audit trails and security controls.
Trade-off: More setup effort than native or automation tools. But the scripting model, combined with AI assistance from Aida, reduces the technical barrier significantly.
Custom API Integration
Both Asana and Zendesk offer REST APIs. Organizations with development resources can build custom integrations from scratch.
This gives complete control but requires significant investment. You need to handle authentication (OAuth for Asana, API tokens, or OAuth for Zendesk), webhook management, rate limiting, error recovery, conflict resolution, and ongoing maintenance as both APIs evolve.
For most teams, the total cost of building and maintaining a custom integration exceeds the cost of a dedicated platform.
Asana Zendesk Integration Use Cases
SLA-Driven Ticket Escalation to Product Teams
Case: A SaaS company’s support team receives bug reports in Zendesk. Tickets tagged “bug” with priority “High” or “Urgent” need to reach the product engineering team in Asana within the SLA window. The support team tracks SLA compliance, but the engineering team plans work in Asana sprints.
Solution: Configure Exalate to automatically sync Zendesk tickets matching specific conditions (tag = “bug,” priority = “High” or “Urgent”) to a designated Asana task. Map the ticket subject to the task name, the full description, and the initial customer message to the task description, and the priority field to a custom field in Asana. When the engineering team updates the task status in Asana (e.g., moves it to “In Progress” or “Fixed”), the corresponding Zendesk ticket status updates automatically, and an internal note is added with the latest update.
Real-World Application: A project management software company handles 200+ bug reports per month. Before integration, a support lead spent roughly 6 hours per week manually creating Asana tasks and chasing engineers for status updates. After setting up the automated escalation, the manual effort dropped to near zero, and SLA compliance for high-priority bugs improved because the engineering team received consistently formatted, context-rich tasks immediately.
Customer Feedback Loop for Product Roadmap
Case: A product team uses Asana to manage its roadmap. Customer feature requests come in through Zendesk as tickets. The product manager needs to see aggregated customer demand for specific features without digging through Zendesk.
Solution: Sync Zendesk tickets tagged “feature-request” to an Asana project called “Customer Feature Requests.” Map the ticket requester’s organization to a custom field in Asana so the product team can see which accounts are requesting what. Use Exalate’s scripting engine to append the customer’s company name and plan tier to the Asana task description. When the product team links the request to a roadmap item and marks it as “Planned,” the Zendesk ticket updates with a public reply template notifying the customer.
Real-World Application: A B2B analytics platform receives 80+ feature requests per month across 15 enterprise accounts. The product manager uses the synced Asana project to identify that 6 of the top 10 accounts are requesting the same reporting feature. This data directly influences the next quarter’s roadmap prioritization, and customers receive proactive updates without the support team manually checking roadmap status.
Vendor Coordination for Outsourced Support
Case: A mid-size company outsources Tier 1 support to a BPO vendor that operates its own Zendesk instance. Internal Tier 2 and Tier 3 teams use Asana to track escalated issues. The vendor needs visibility into escalation progress, but the company doesn’t want to grant the vendor access to its internal Asana workspace.
Solution: Set up a cross-company integration using Exalate. The vendor’s Zendesk instance syncs escalated tickets to the company’s Asana project. Each side controls its own sync rules independently. The vendor sees ticket status updates in Zendesk as the internal team progresses through the investigation in Asana. Sensitive internal notes and discussion threads in Asana stay private. Only the fields designated for sharing (status, resolution summary, expected timeline) sync back to the vendor’s Zendesk.
Real-World Application: An e-commerce company with a 15-person outsourced support team handles 2,000+ tickets per month. Roughly 300 get escalated monthly. Before integration, escalation tracking involved a shared Google Sheet that was perpetually out of date. After connecting the vendor’s Zendesk to the internal Asana workspace, the average escalation resolution time dropped by 22% because both sides had real-time visibility without relying on manual updates.
IT Operations and Service Request Fulfillment
Case: An internal IT team uses Zendesk for employee service requests (hardware, software access, onboarding). Project-based IT work (system migrations, infrastructure upgrades) lives in Asana. Some service requests evolve into project tasks, like when a software access request reveals the need for a new procurement workflow.
Solution: Create triggers in Exalate that sync Zendesk tickets from the “IT Internal” group to an Asana triage project when they meet certain conditions (e.g., custom field “Requires Project Work” is set to “Yes”). The IT project manager reviews the synced tasks in Asana, assigns them to the right project and team member, and updates the status. The requesting employee sees progress updates in Zendesk without needing to track down the IT project manager.
Real-World Application: A 500-person company processes 150+ internal IT requests per month. About 20% turn into project tasks. Before integration, these fell into a black hole between the service desk and project boards. With the sync in place, the IT project manager catches every request that needs project-level attention, and employees get status updates without follow-up emails.
Multi-Platform Integration Hub
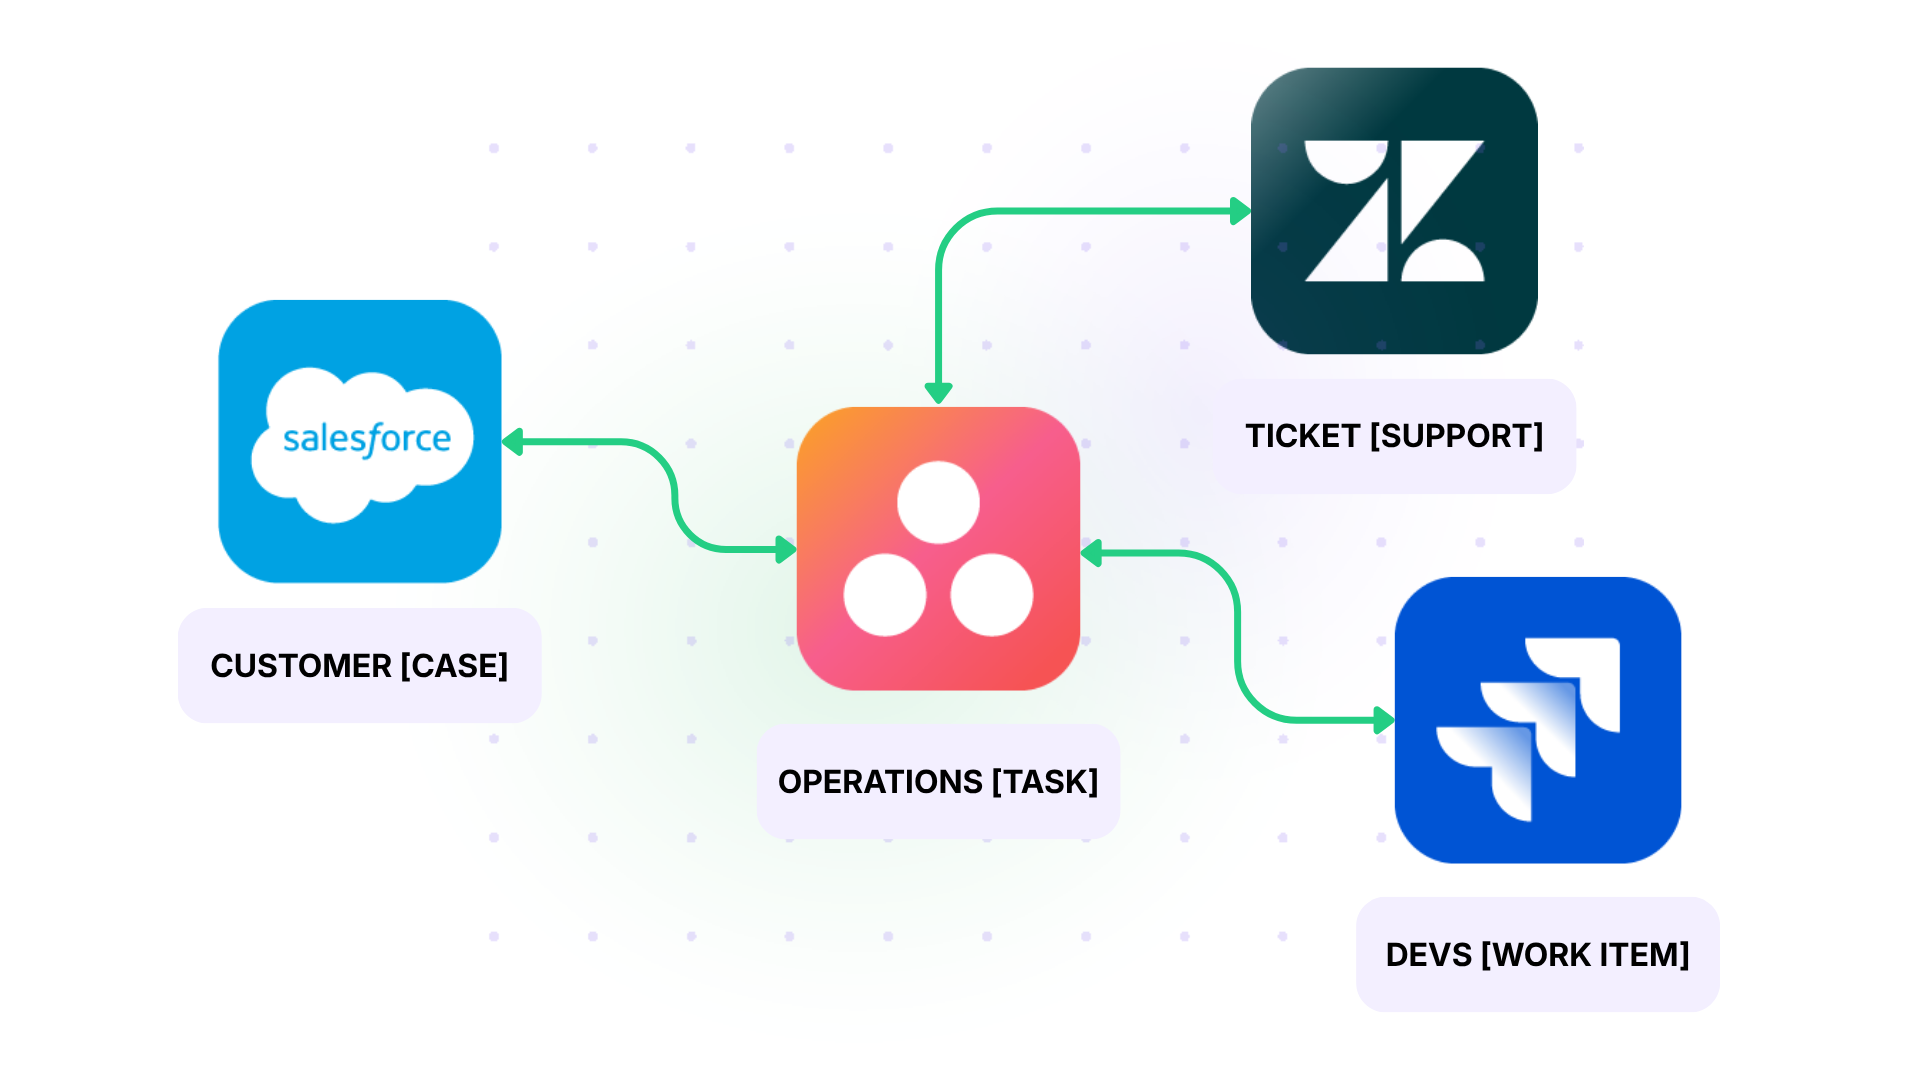
Case: A large organization uses Zendesk for customer support, Asana for operations and marketing, Jira for engineering, and Salesforce for customer data. Customer issues sometimes need to flow through multiple systems, depending on the resolution path.
Solution: Exalate acts as a connector between both platforms. A Zendesk ticket syncs to Asana for operations triage. If the issue requires engineering, the Asana task syncs to Jira. Customer account context from Salesforce enriches the Asana task. Each connection is configured independently with its own rules, field mappings, and sync direction.
Real-World Application: An enterprise software company uses this hub model to route critical customer issues. A P1 support ticket in Zendesk creates an Asana task in the “Critical Issues” project. The operations lead assigns it and, if engineering is needed, the task syncs to a Jira work item. Meanwhile, the Salesforce account record updates with the issue status. When engineering resolves the Jira work item, the status propagates back through Asana to Zendesk, and the support agent closes the ticket with full context.
Features to Look for in an Asana Zendesk Integration Tool
Independent Configuration Per Side
Each team should control its own sync rules without depending on the other side. The Asana admin decides what data comes in and goes out of Asana. The Zendesk admin does the same for Zendesk. This is critical for cross-company setups where each organization has its own data governance policies.
Flexibility and Scalability
What starts as a simple ticket-to-task sync might grow into a multi-project setup with conditional routing, custom workflows, and connections to additional platforms. The tool you pick should support that evolution without forcing a full rebuild.
Look for the ability to adjust sync rules on the fly, add new field mappings as workflows mature, and connect additional platform instances without disrupting existing configurations.
Pricing Structure
If you have a large support team but only sync a handful of tickets, per-item pricing works in your favor. If you sync high volumes but only a few people configure the integration, per-user pricing might be cheaper. Watch for hidden costs like charges for premium field types, additional connections, or priority support tiers.
Exalate prices based on the number of items in active sync, not the number of users. Each connection is billed separately. This keeps costs predictable as your team grows. Check the Exalate pricing page for more information.
Bidirectional Sync with Conflict Handling
One-way sync covers simple escalation. But real collaboration requires two-way data flow. When the engineering team updates a task status in Asana, the support team needs to see it in Zendesk without refreshing or checking manually. The integration tool should handle conflicts (both sides update the same field simultaneously) without losing data.
Custom Field Mapping and Data Transformation
Zendesk and Asana structure data differently. Zendesk uses ticket fields (dropdowns, text, and checkboxes). Asana uses custom fields on tasks. A good integration tool lets you map these flexibly: Zendesk dropdown values to Asana custom field options, Zendesk tags to Asana sections, or Zendesk requester organization to an Asana custom text field.
Conditional Sync Triggers
Not every Zendesk ticket should create an Asana task. The integration should support conditions: only sync tickets from a specific group, with a certain priority, or tagged with a particular label. This keeps the Asana workspace clean and reduces noise.
Resilience and Error Recovery
Outages happen. The integration tool should queue changes during downtime and apply them in the correct order when systems come back online. It should also provide monitoring, alerts, and detailed logs for troubleshooting sync failures.
Security and Compliance
Data flows between support (which handles customer PII) and project management. The integration tool should encrypt data in transit and at rest, support role-based access controls, and provide audit trails. For regulated industries, certifications like ISO 27001 matter.
Exalate meets these requirements with ISO 27001 certification, TLS 1.2/1.3 encryption, JWT-based authentication, and granular role-based access. For full details, visit the Exalate Trust Center.
Sync Panel
Exalate also comes with a Chrome extension called Sync Panel that lets users check sync status, spot errors, trigger manual syncs, and unlink sync pairs straight from the browser, without opening the console.
It’s useful for two groups: admins who want to keep an eye on sync status without switching tabs and end users who want to confirm that the remote side received their update.
You can access this feature via the browser. But if you want to check the sync queue status or configure your sync, you still need to log into the Exalate console.
How to Set Up Asana Zendesk Integration With Exalate
Here’s a walkthrough for connecting Zendesk and Asana using Exalate.
Visit the Exalate integrations page to get started and create a new account. If you already have an account, you can log in.
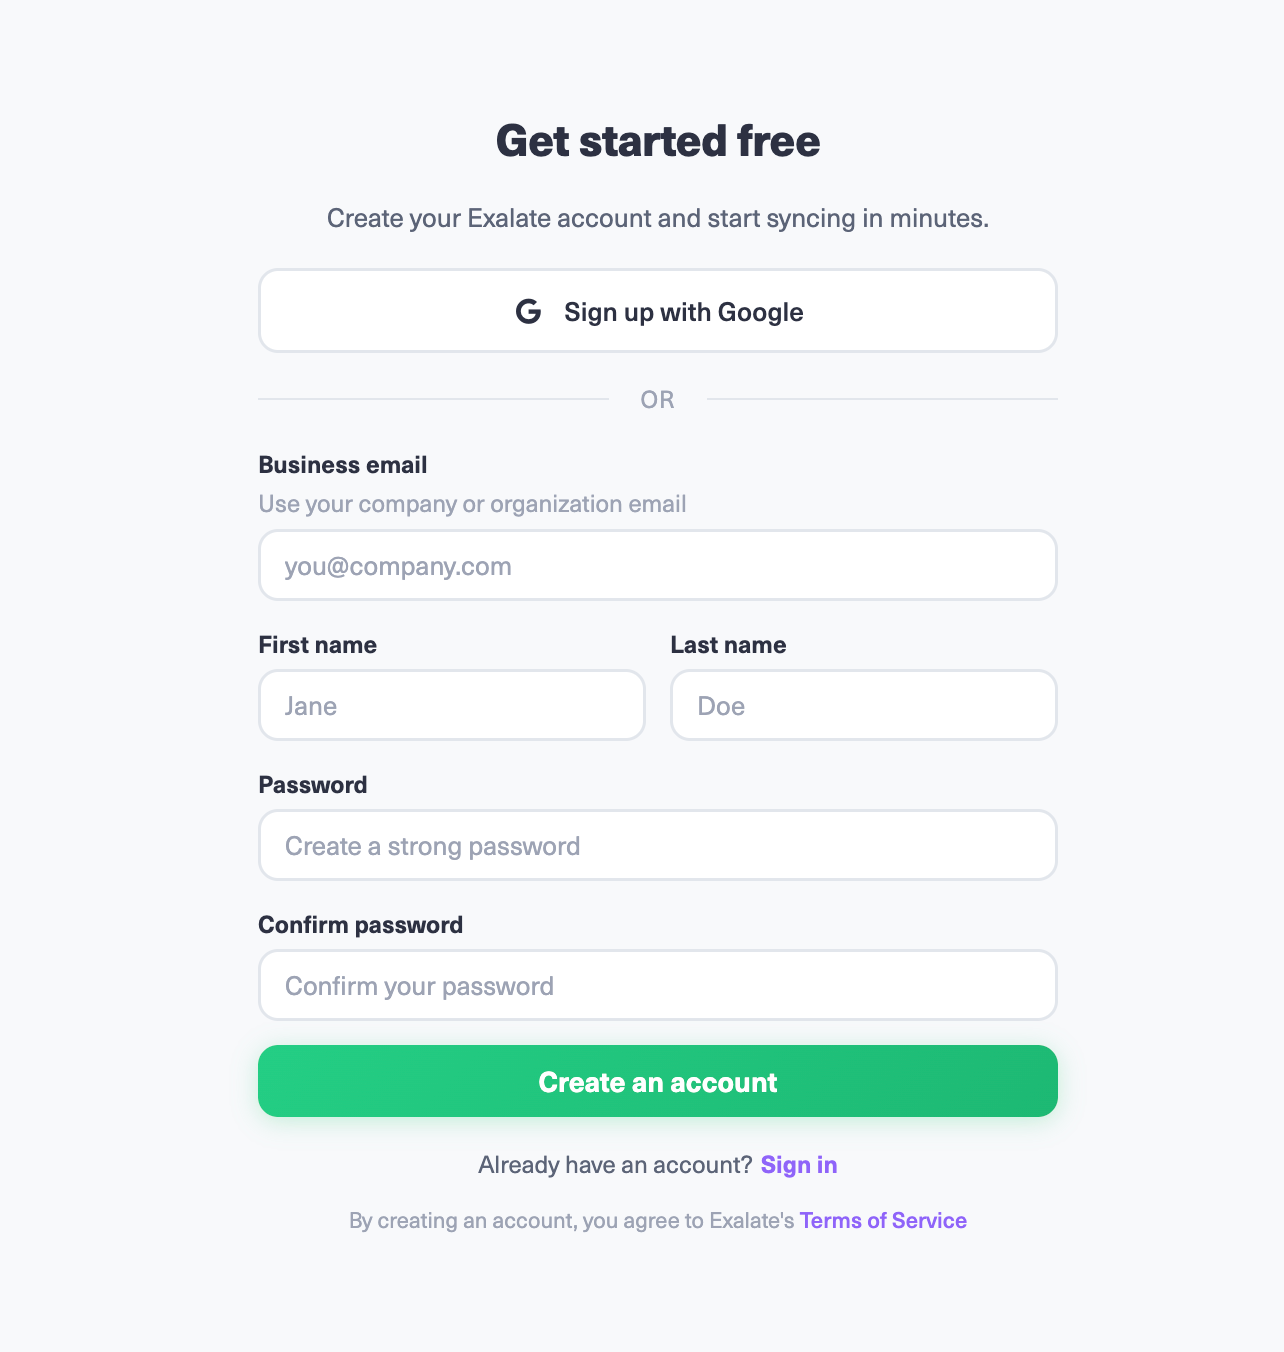
You can create your account by manually entering your business email and verifying it, or sign up using Google.
You can view all your connections under the “Connections” tab. You can choose to edit the connection from here and view other connection details.
Note: To create a connection, you’ll need an active Exalate account with access credentials for the systems you want to connect.
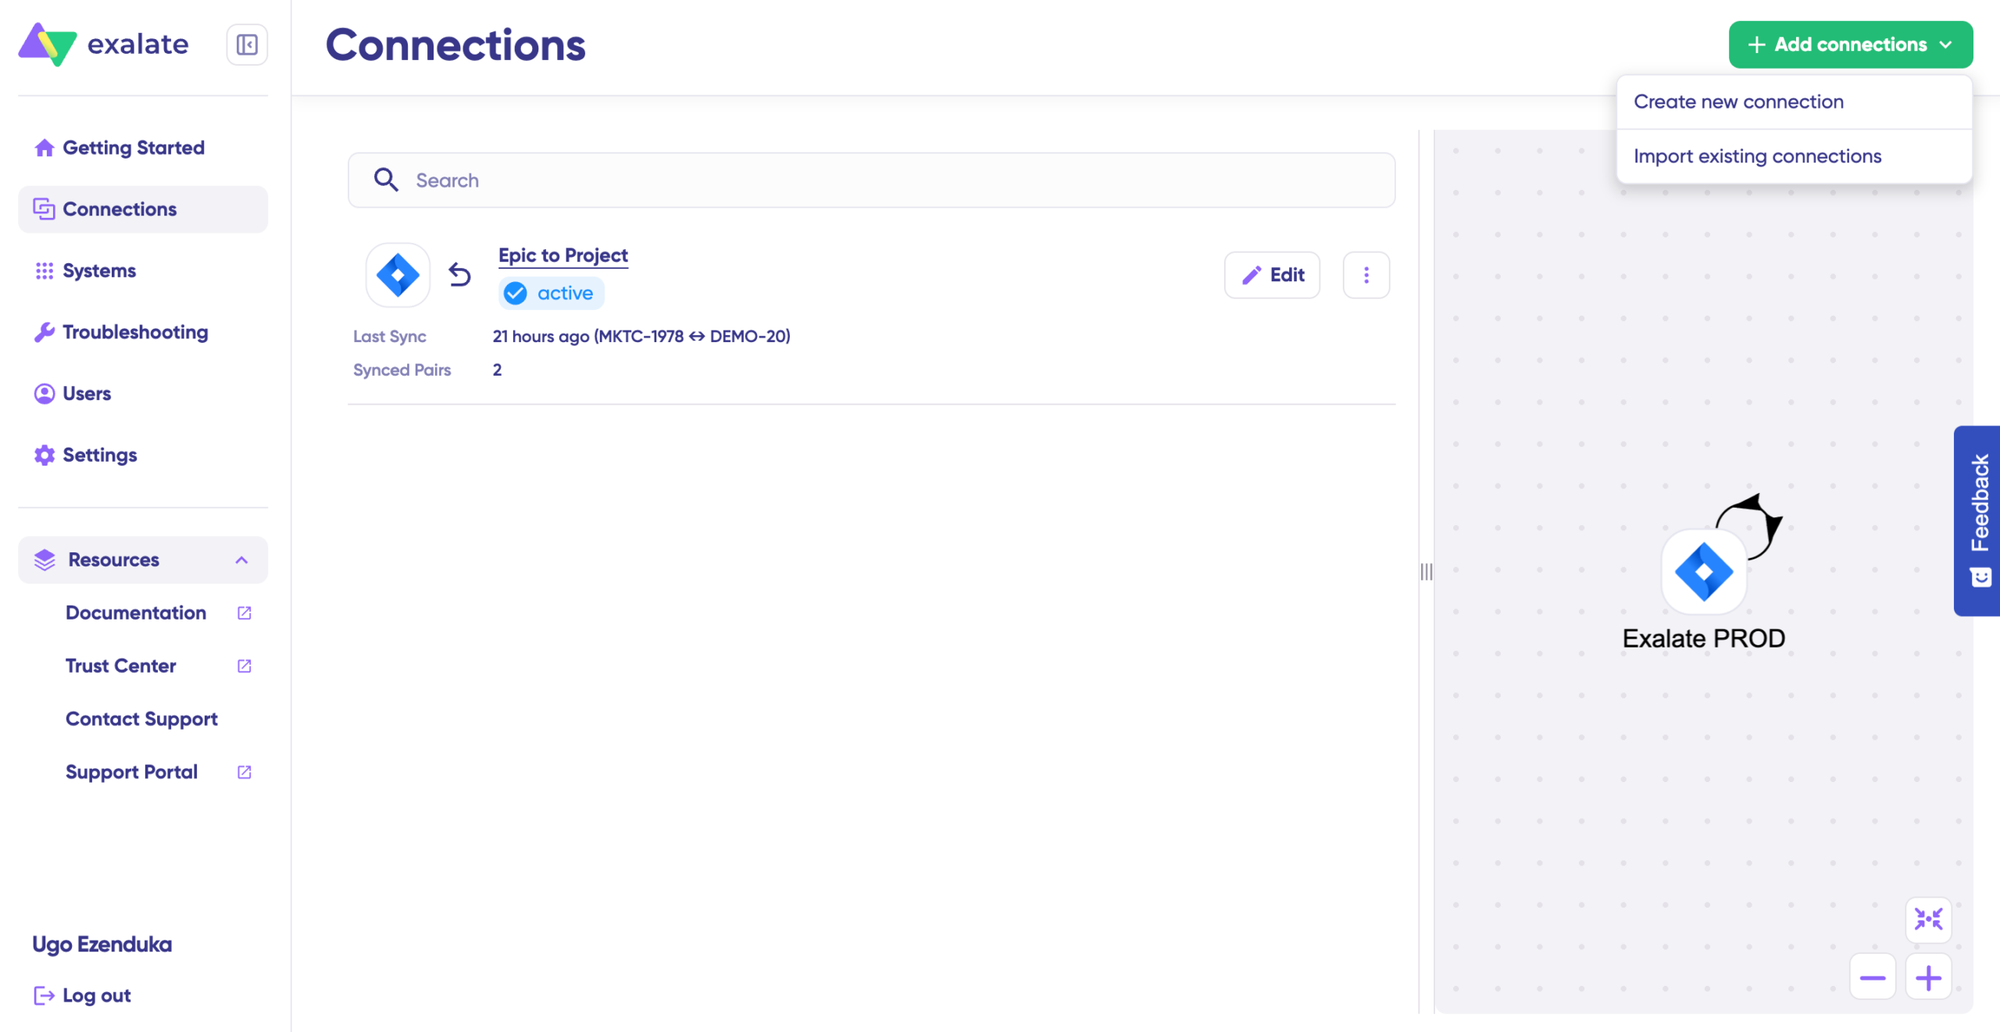
Click on “+ Add connections” > “Create new connection”.
Enter the name for your first system. Name either Asana or Zendesk as your System A. It doesn’t matter which one goes first. Enter the URL of your system. Let’s say we start from Asana, then enter your Asana instance URL.
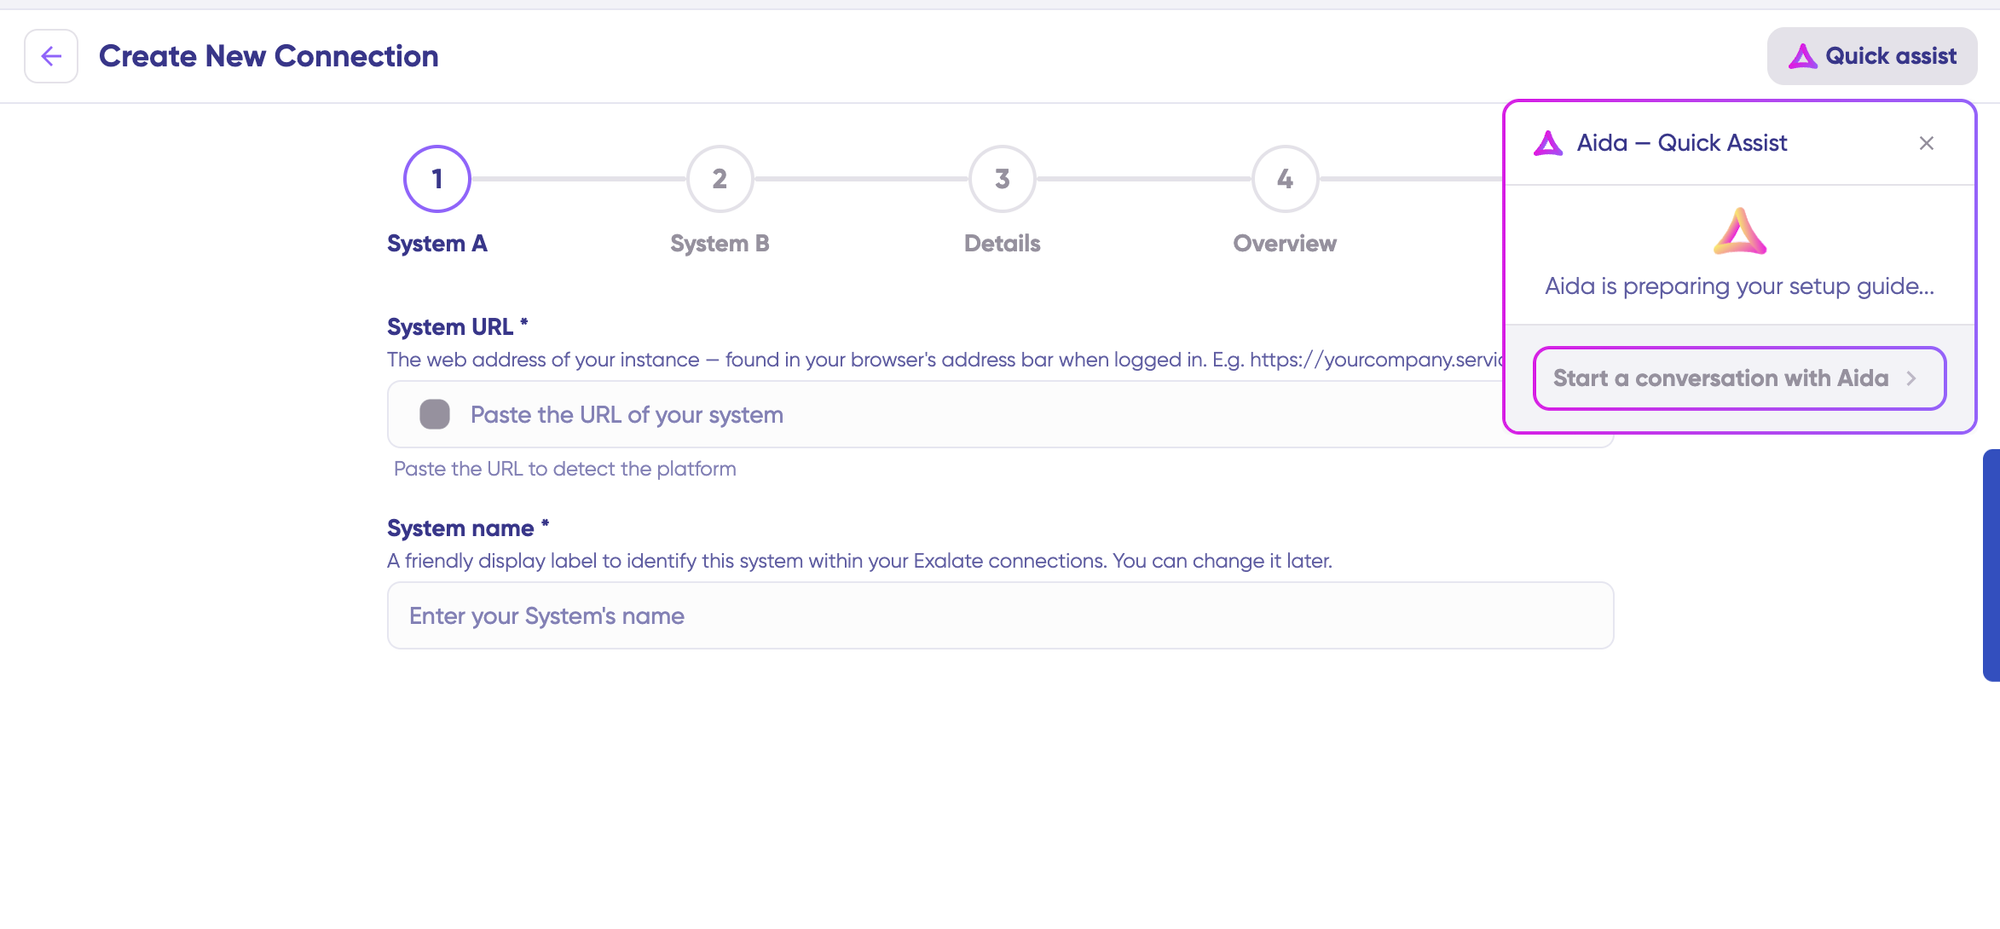
You can also speed up the process by using Aida – Quick Assist at the top right of the dashboard.
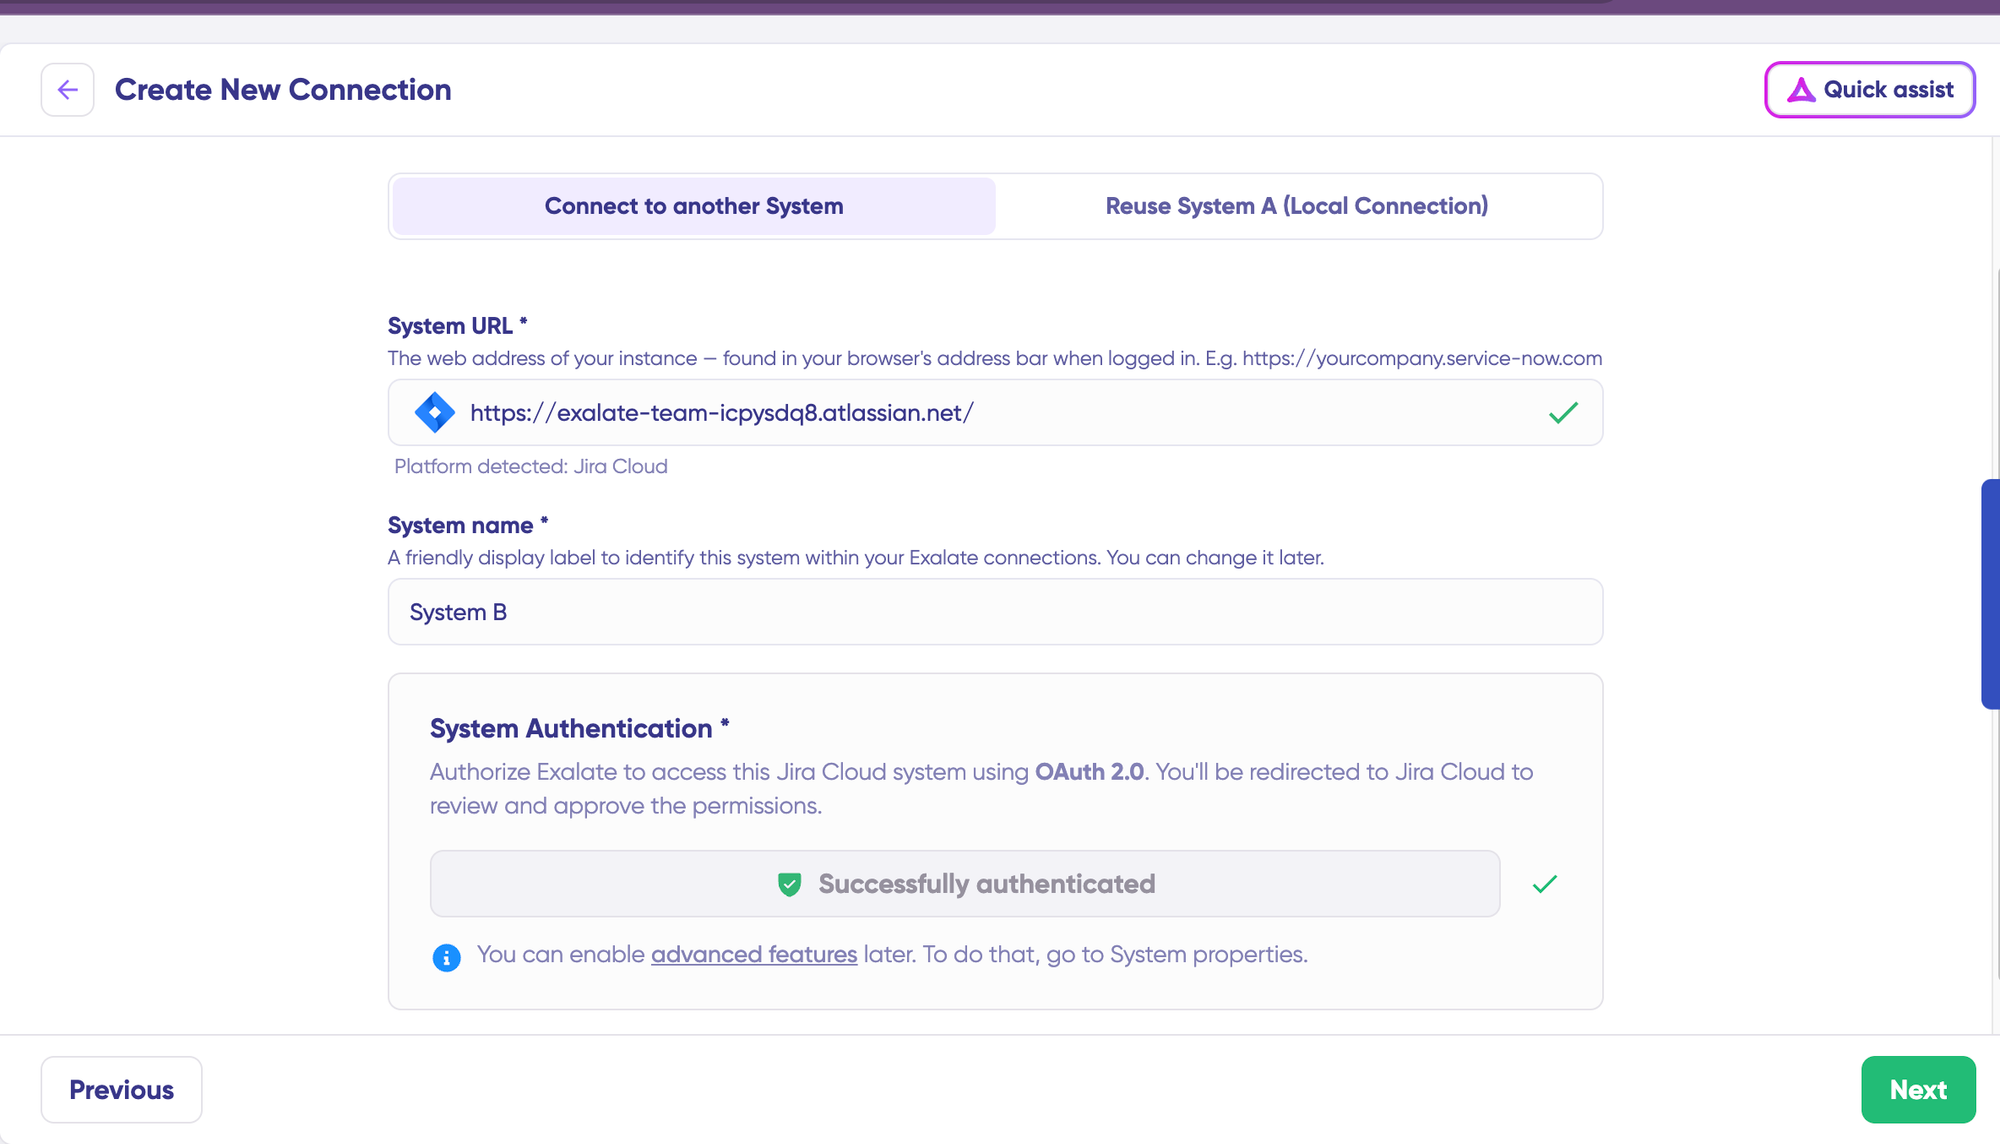
Once you enter the URL, a small check happens behind the scenes.
For a new system, you need to enter your authentication details. For Asana and Zendesk, you can log in with API tokens.
Finish this setup for the Zendesk side as well. The same rules apply as they did for your Asana instance.
Give a name and description for your connection. Click “Next.”
Review if the details are correct and click “Create connection”. That’s all!
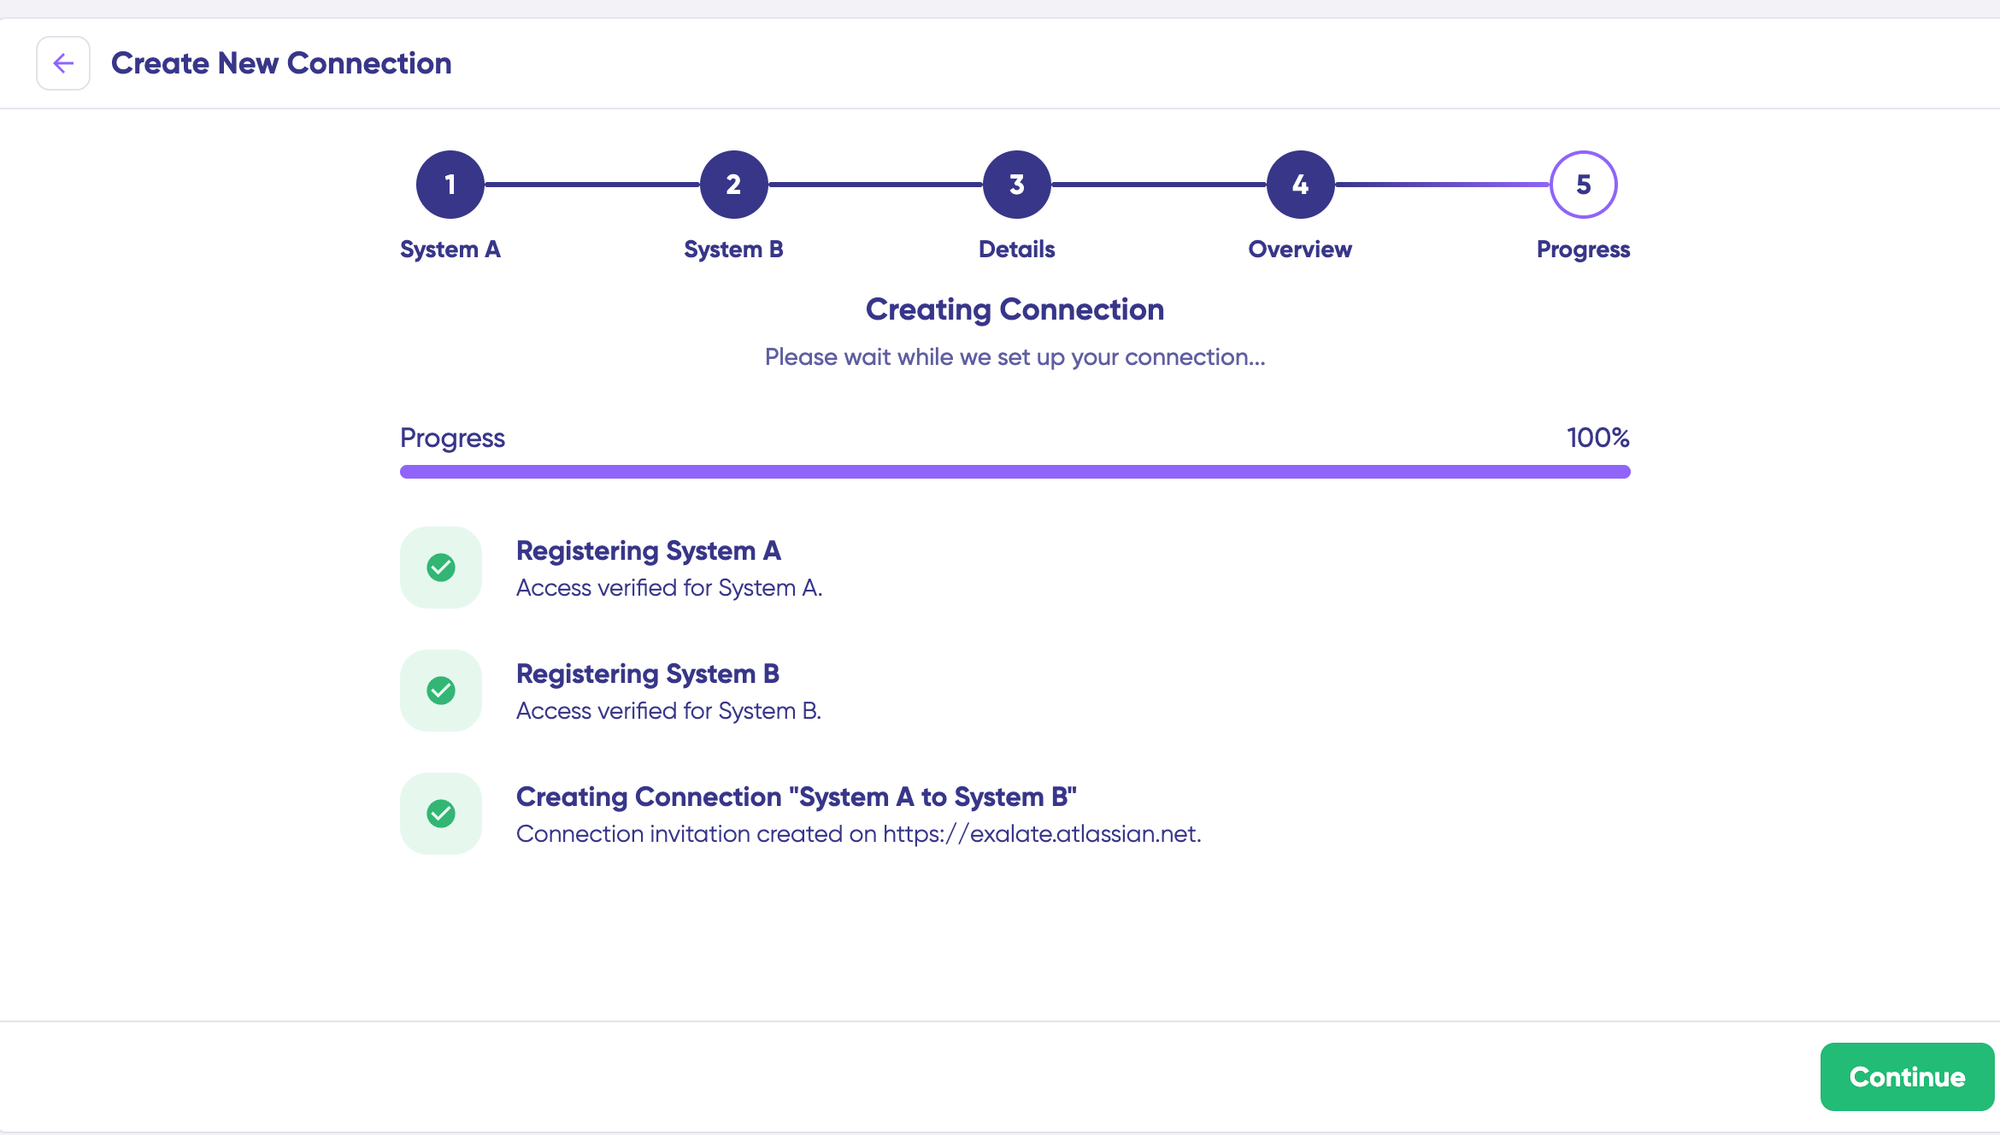
When the process is complete, you’d need to select “Continue to configuration” and choose an Asana project you want to use for synchronization. Then click “Build & continue”.
Now, you have 2 options: “Quick sync” and “Edit & Test”. Let’s proceed with them one by one.
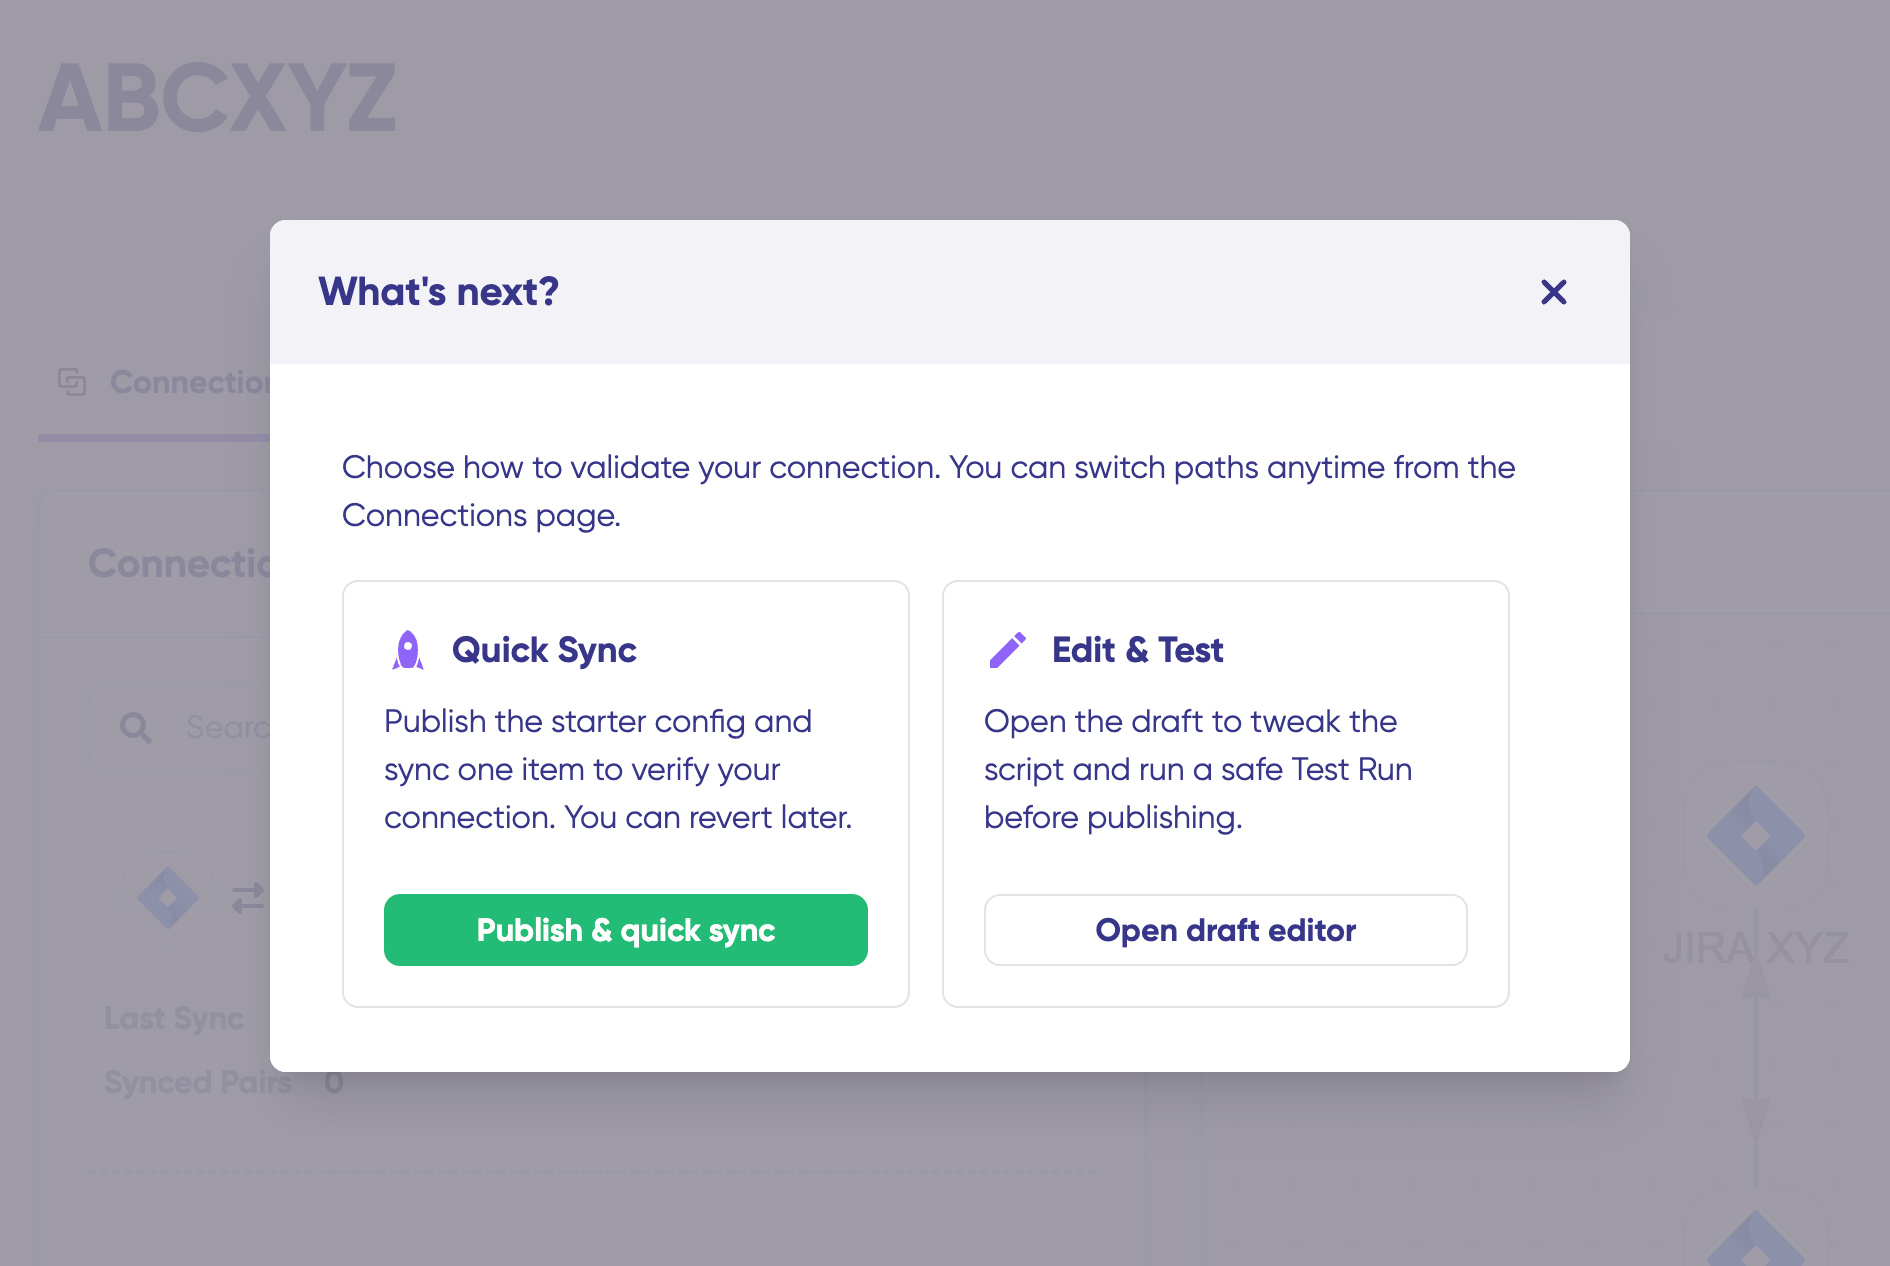
Quick Sync: Publish & Quick Sync
Using this choice, you can sync one item between Asana and Zendesk to verify if your connection works properly. This is an optional step.
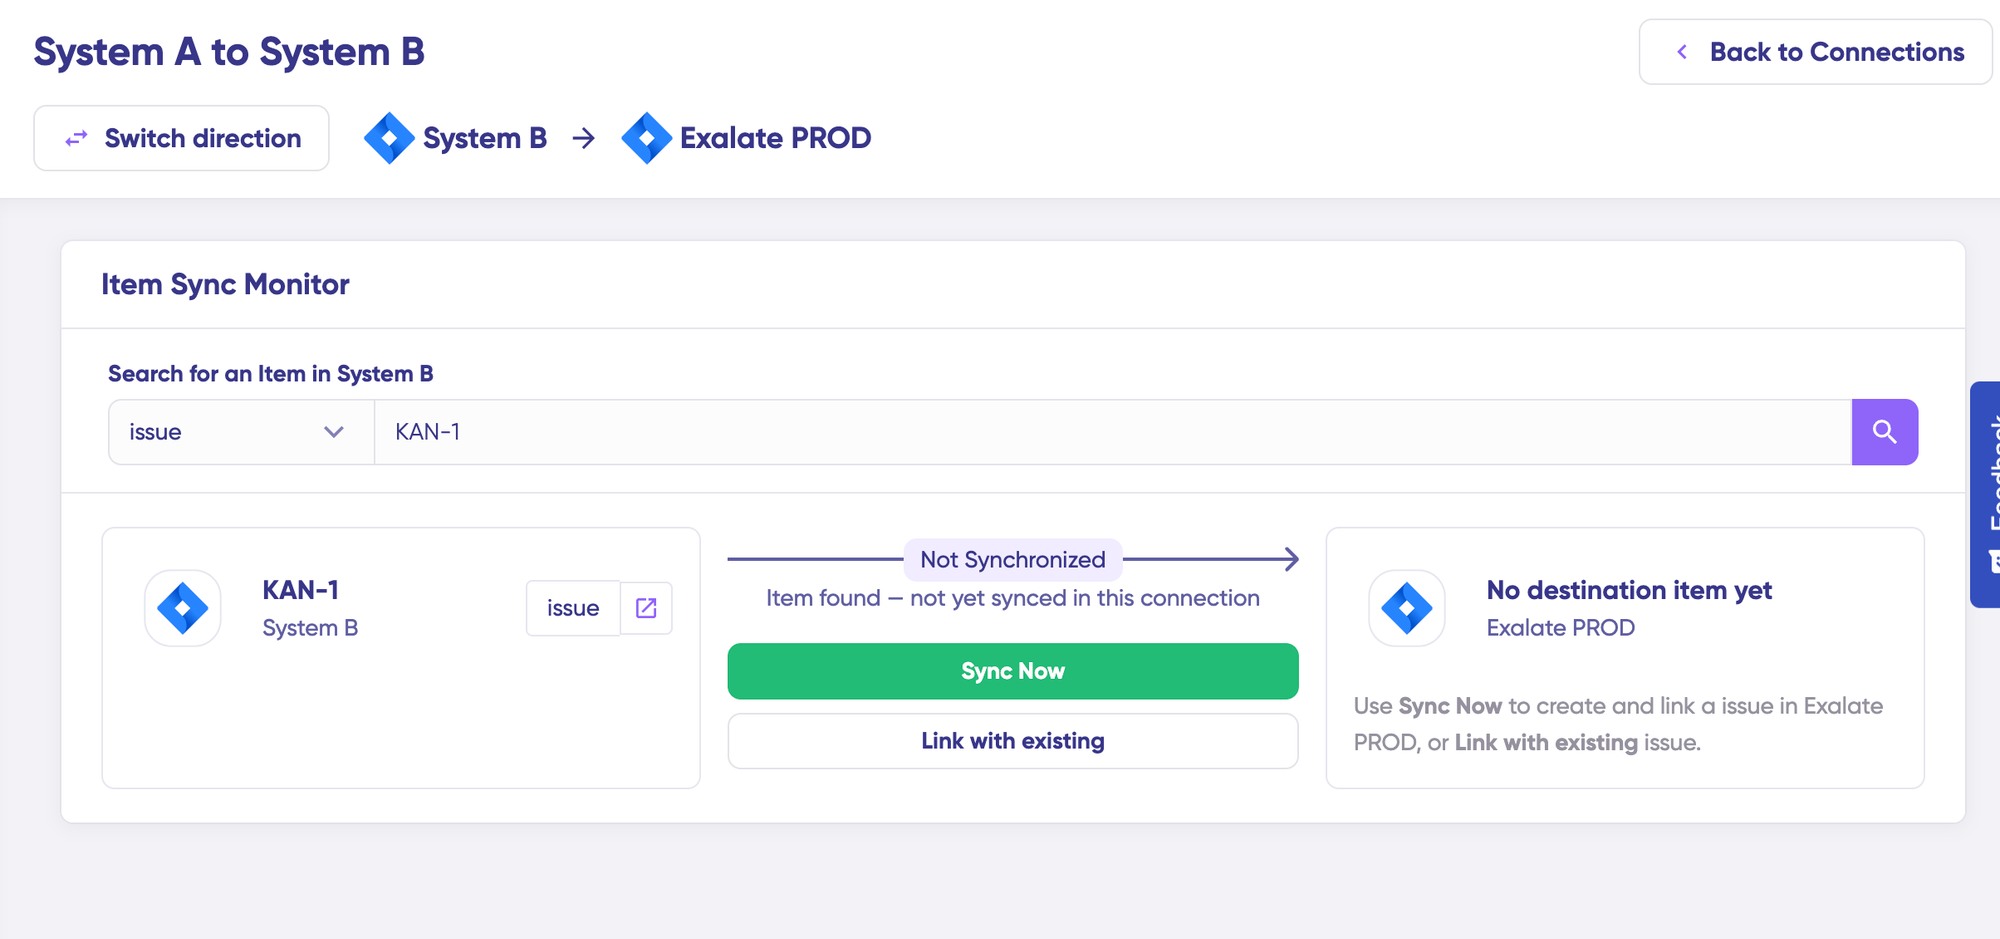
Under the “Item sync monitor,” enter the task ID in Asana, or the ticket number in Zendesk. To sync the first item, click on the “Sync Now” option. To link 2 existing items, click “Link with existing”. While the items sync, you’d get status updates. Once the sync is complete, you can view both the synced issues by opening them in a new window.
You can also choose to compare how the sync items would look and how the changes would be applied.
Edit & Test: Open draft editor
To start making changes, click “New version” or select the “Open latest draft”. This ensures you don’t modify the existing configuration accidentally. Changes in the draft are saved automatically.
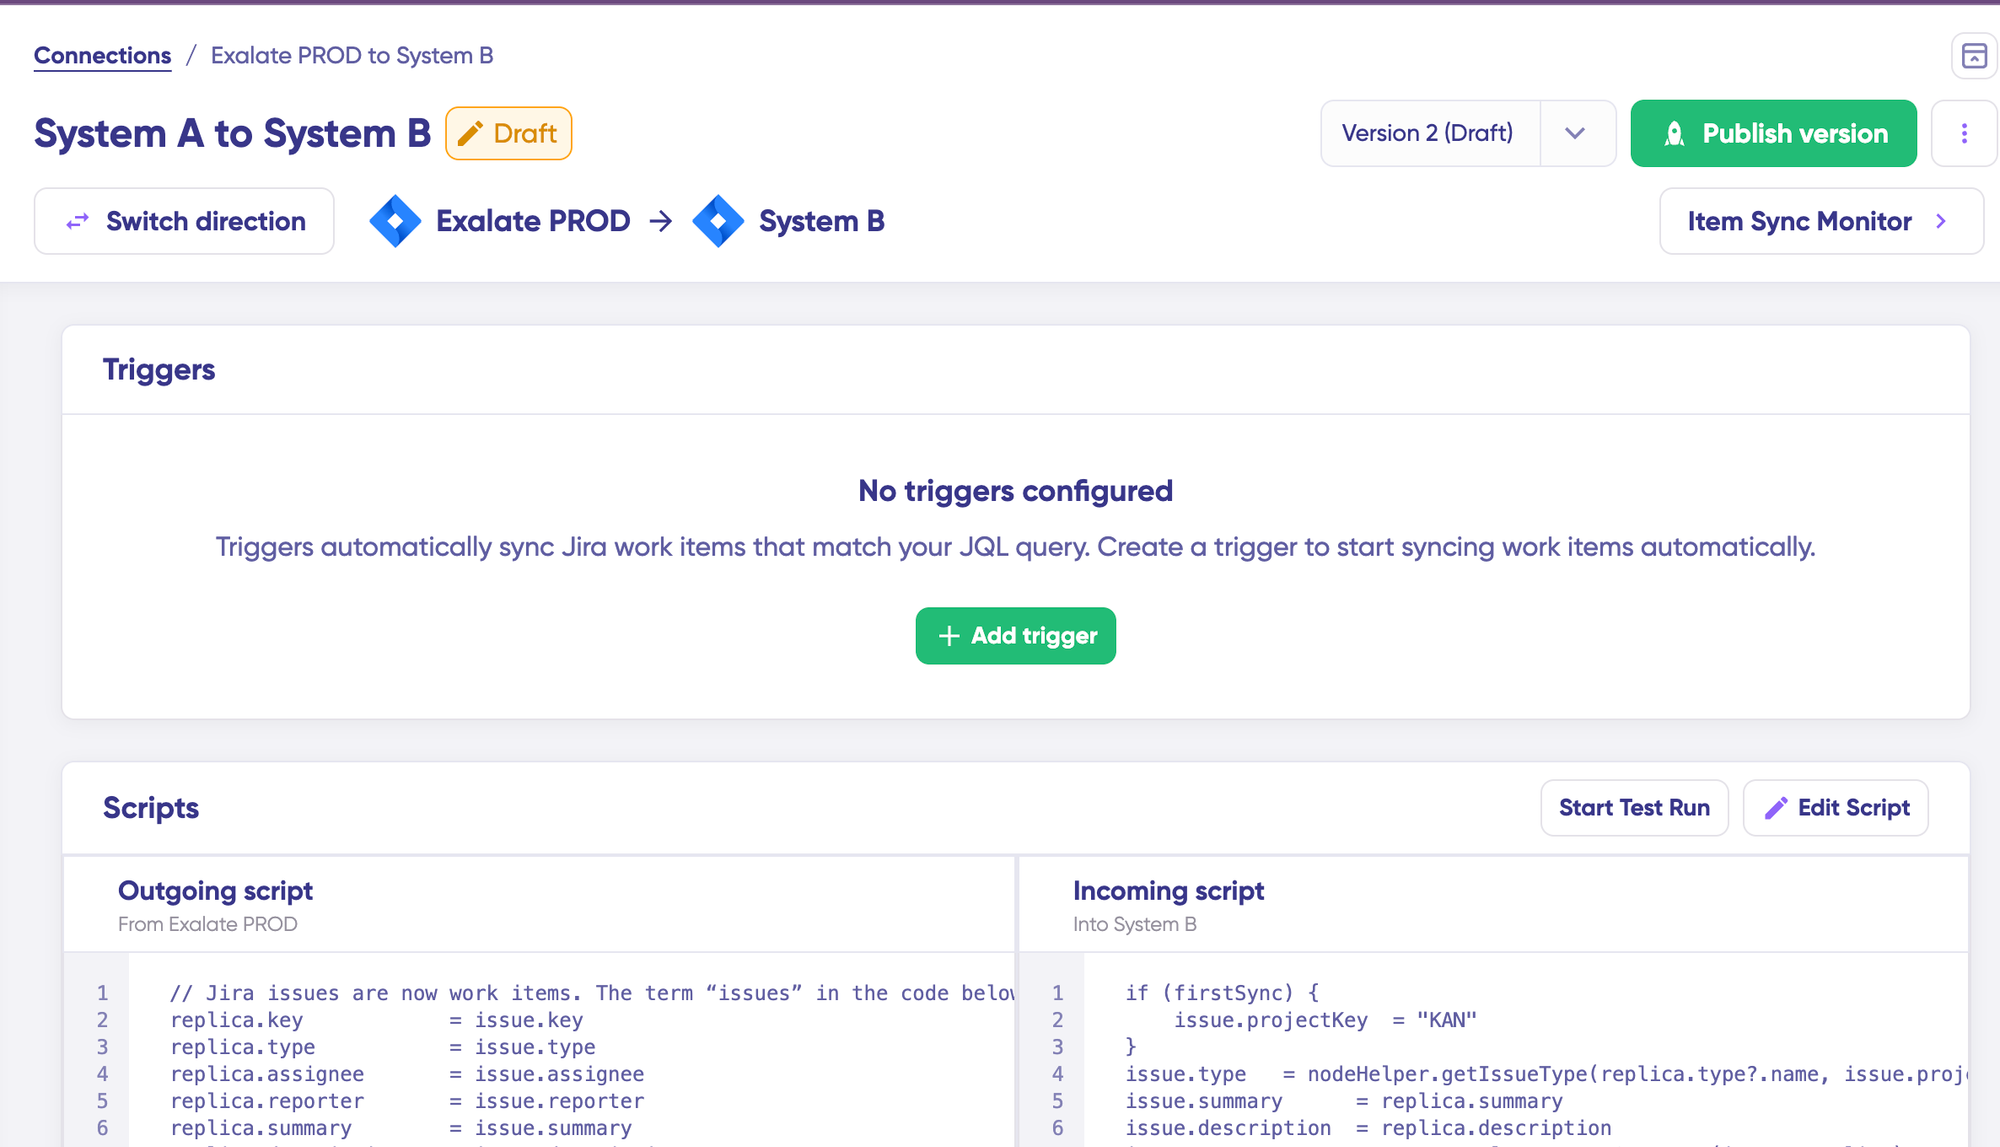
Click the “Edit Script” button to open the editor and edit the sync rules.
Sync rules are based on Groovy-based scripts. With these scripts, you can choose to add custom data logic and mapping, along with conditional flows, basically allowing you to adapt for any complex or advanced use cases or workflows.
Click “Switch direction” to change the direction of data flow.
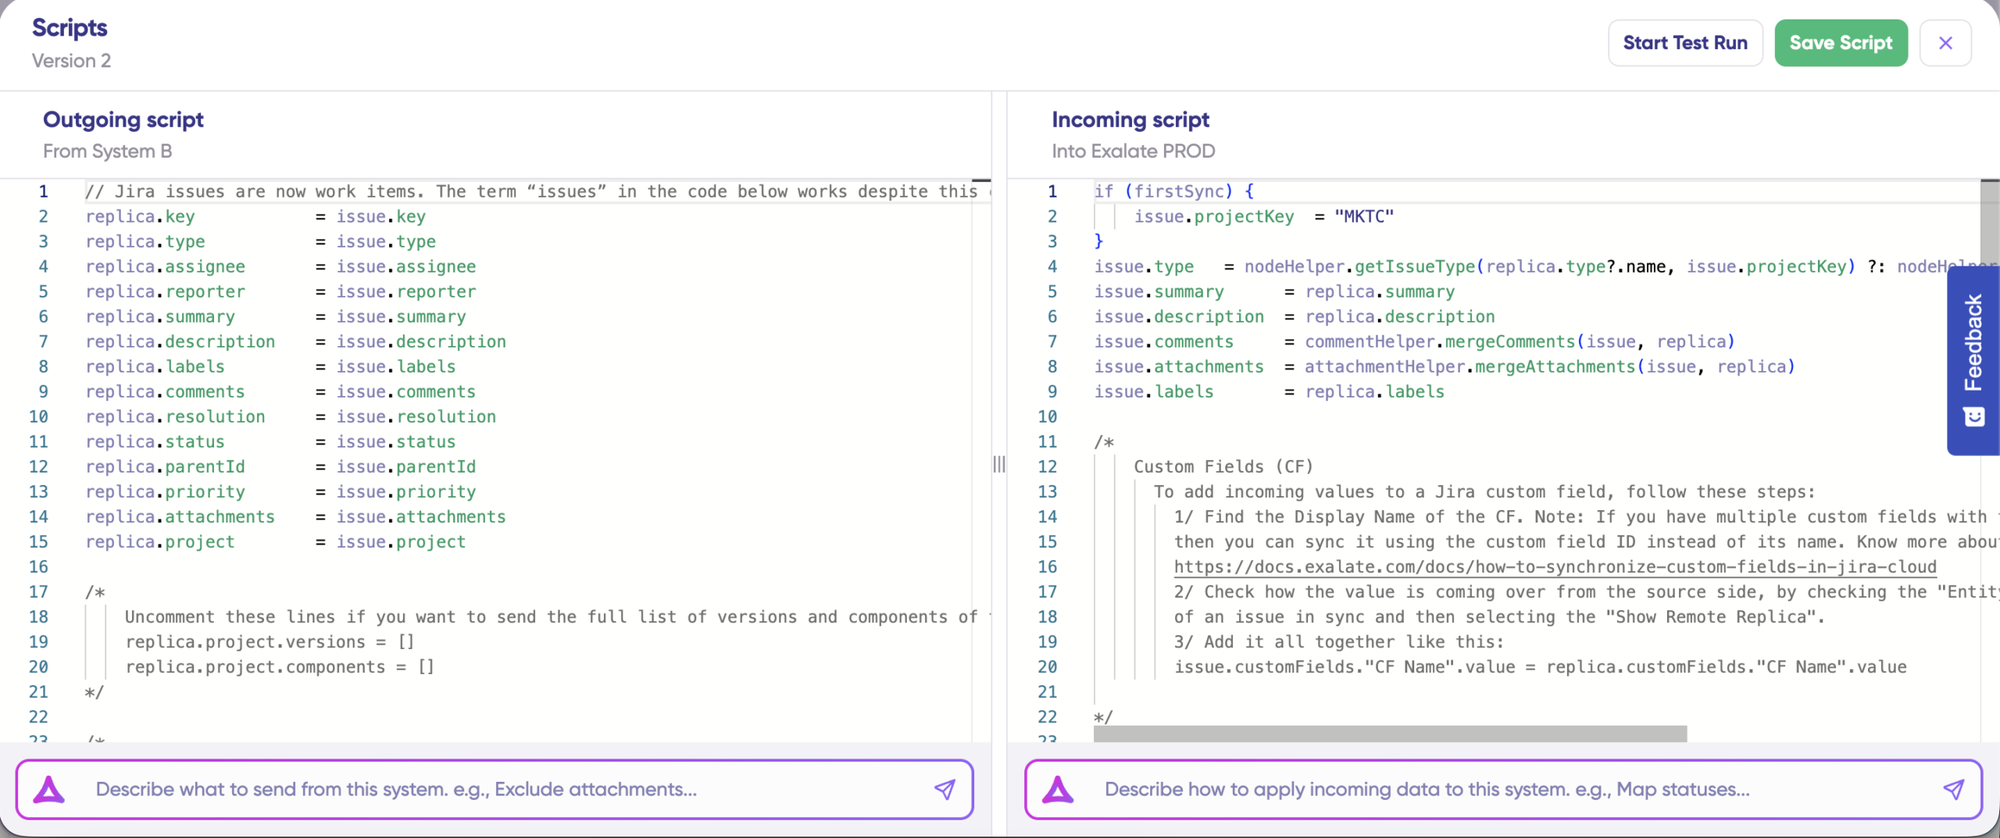
If the sync direction is from Asana to Zendesk, then the outgoing script will hold the values passed from Asana to Zendesk, and the incoming sync will define how the values coming from Asana are mapped in Zendesk. These scripts will be reversed if the direction changes.
Replica works like a message payload and holds the actual data passed between the synced entities. It exists in the JSON format. To sync new values, you can simply enter the sync script yourself (if you are tech-savvy).
If you want to stop something from syncing, for instance, no attachments from Asana to Zendesk, remove that script line from the outgoing Asana script.
If you want to save time and scripting hassles (aka if you are a business person), you can use Exalate’s AI-assisted configuration feature called Aida to generate the sync scripts. Aida exists in both incoming and outgoing script sections, so choose the side accordingly.
Aida helps you in two ways:
- For Outgoing scripts: Describe what data should leave your system. For example, “Exclude attachments” or “Only sync high-priority issues.”
- For Incoming scripts: Describe how incoming data should be applied to your system. For example, “Map statuses” or “Set a default assignee if the user can’t be found.”
Based on Exalate’s scripting API and your existing scripts, Aida generates the working Groovy script with proper field mappings for you.
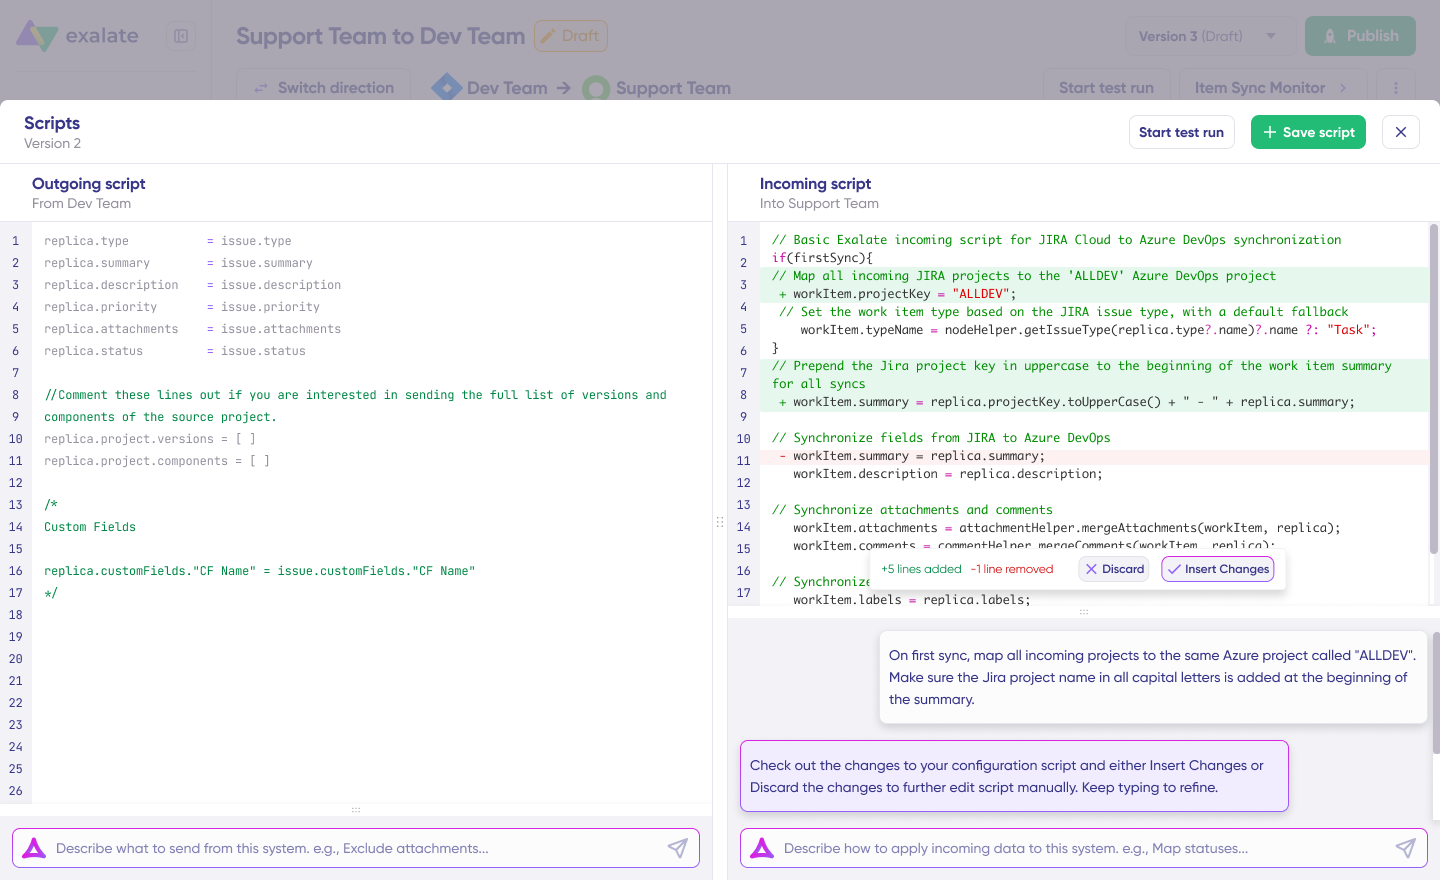
Once Aida finishes drafting your script, review the changes suggested. Green highlights the new lines that will be added. Red highlights lines that would be removed from your script. You can choose to “Insert” or “Discard” Aida’s suggestions.
The outgoing and incoming scripts work independently, so does Aida, so they maintain separate context and direction for each prompt.
Note: Aida is helpful, but just like with any other AI, please review the generated code before applying it.
Test Run: Validate before production
Once you have your sync scripts ready, you can choose to “Save script” or proceed to dry run them using the “Start Test Run” option.
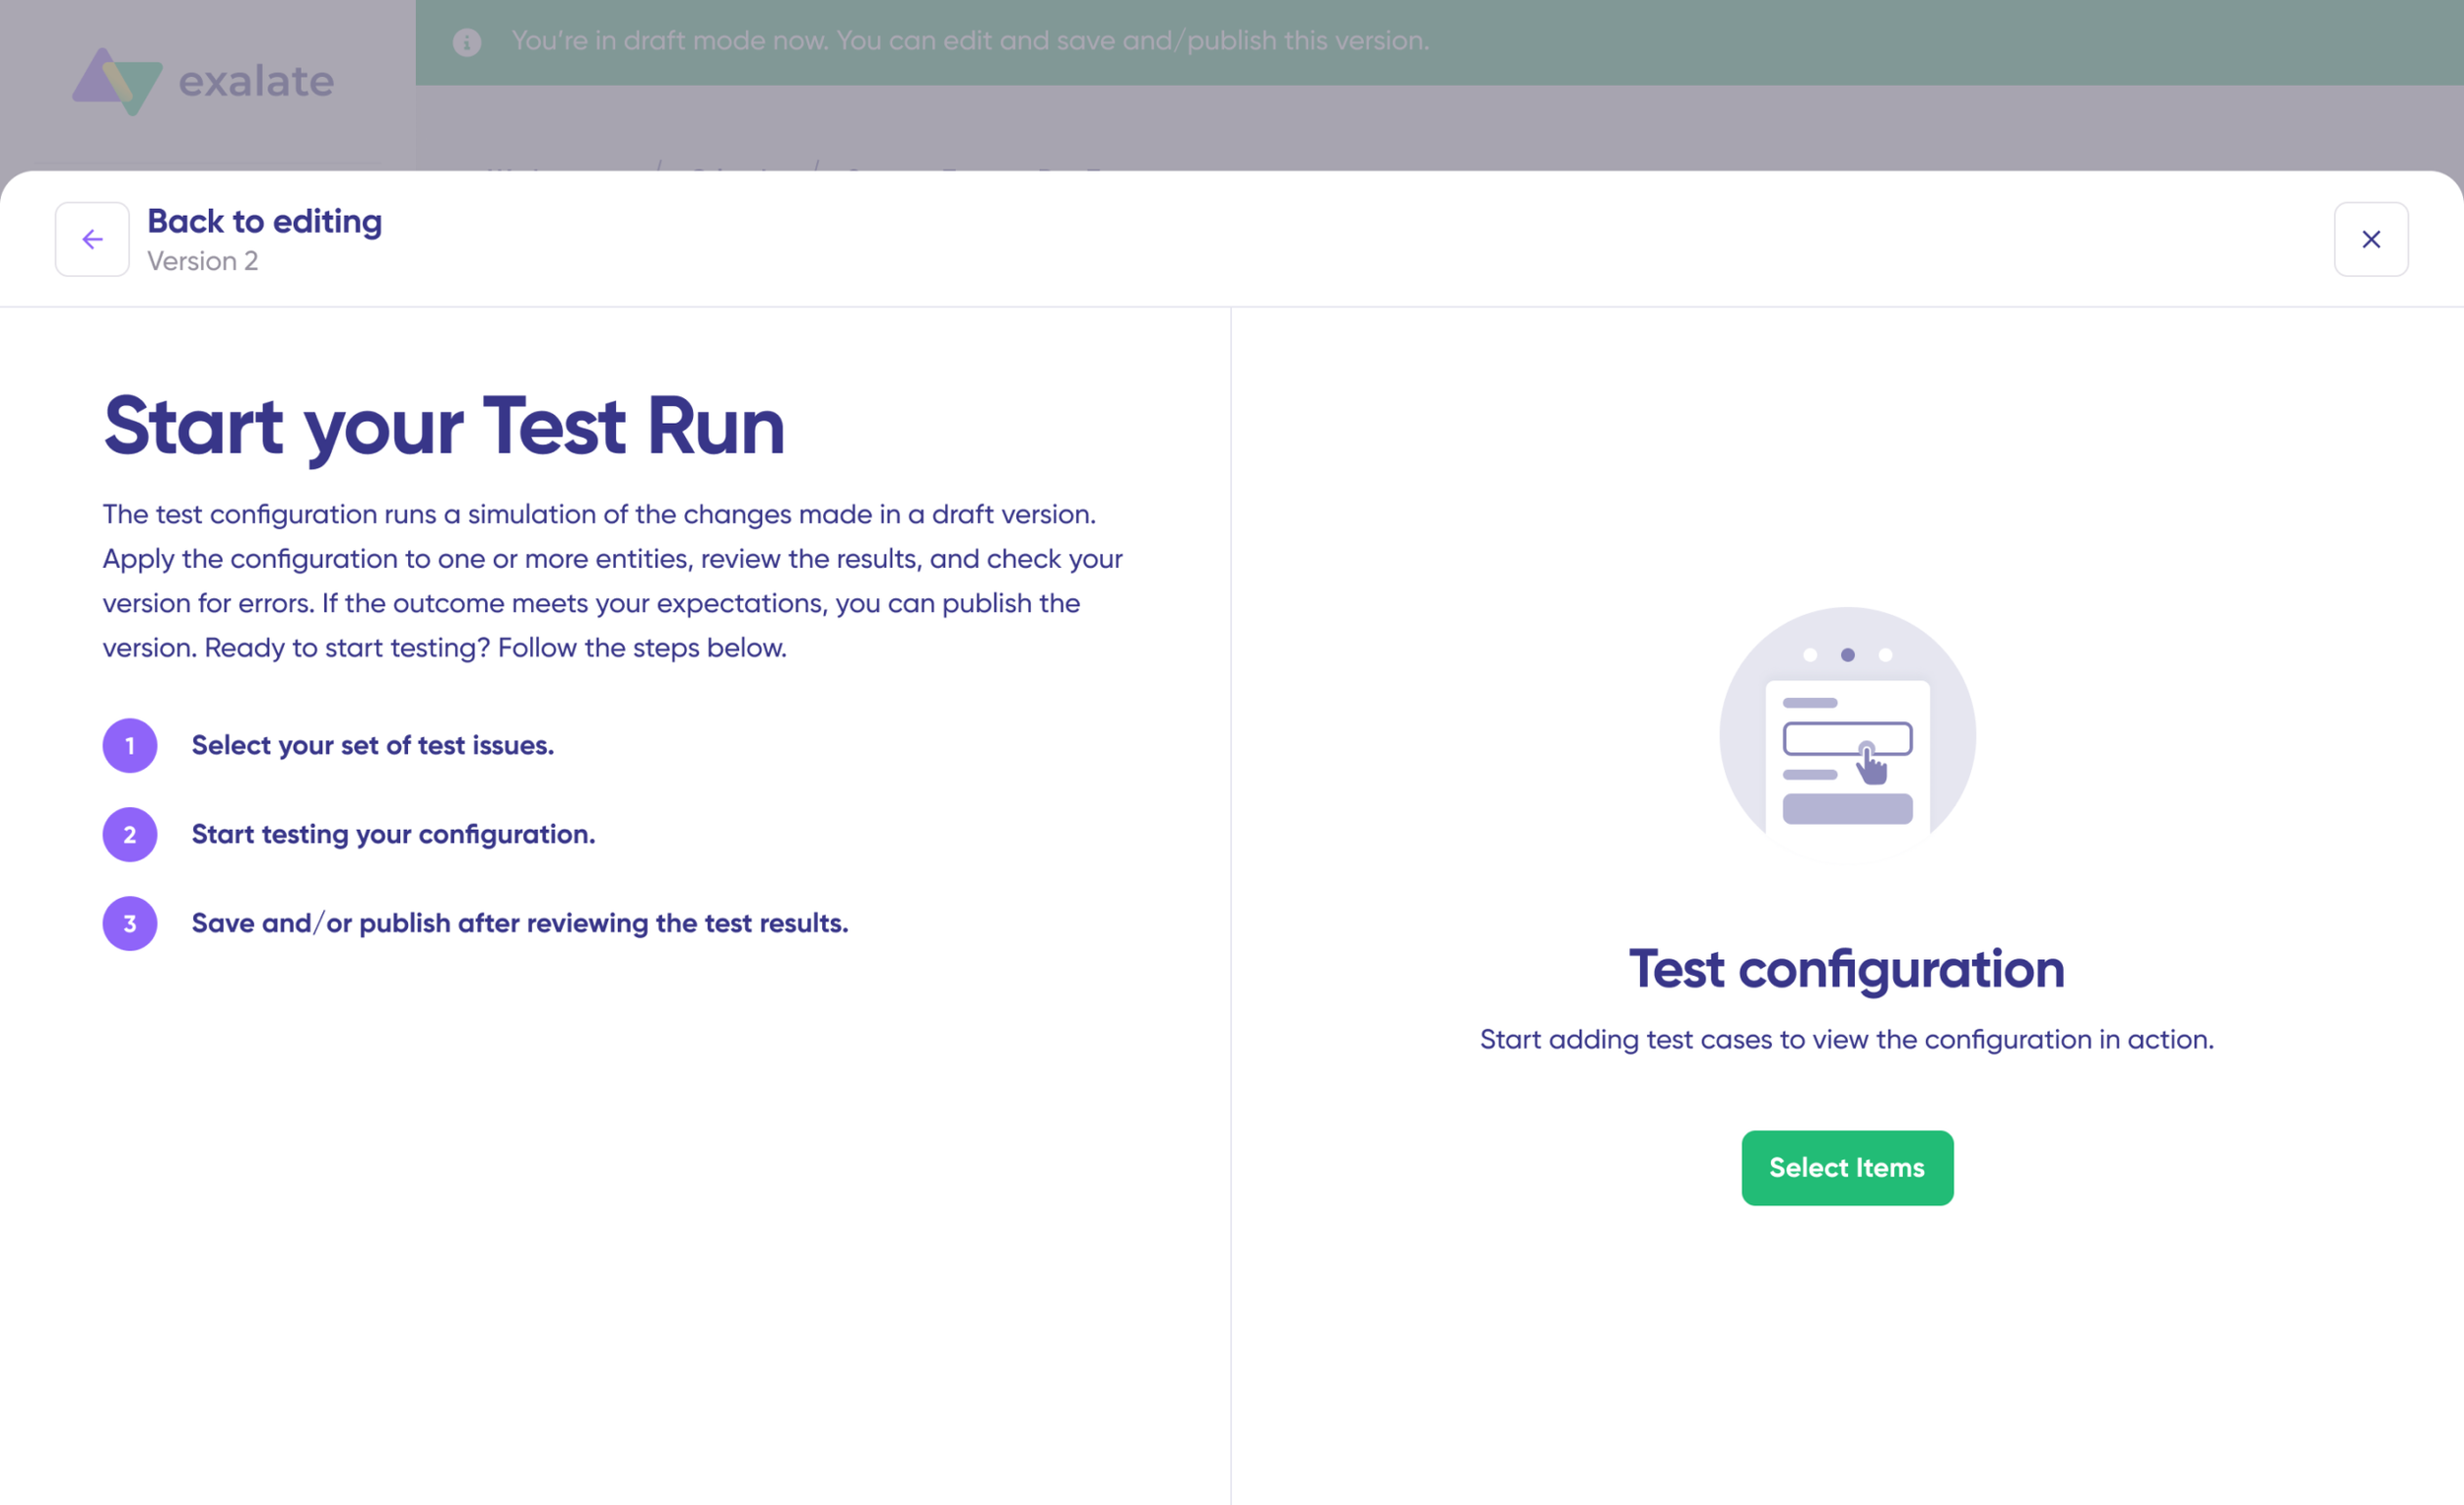
To test the configuration, “Select Items” you want to apply the sync to. You can select multiple items. Once you do that, click “Start Test Run”. You can now see all the incoming and outgoing replicas for each item you selected. You can view all of them in the respective tabs.
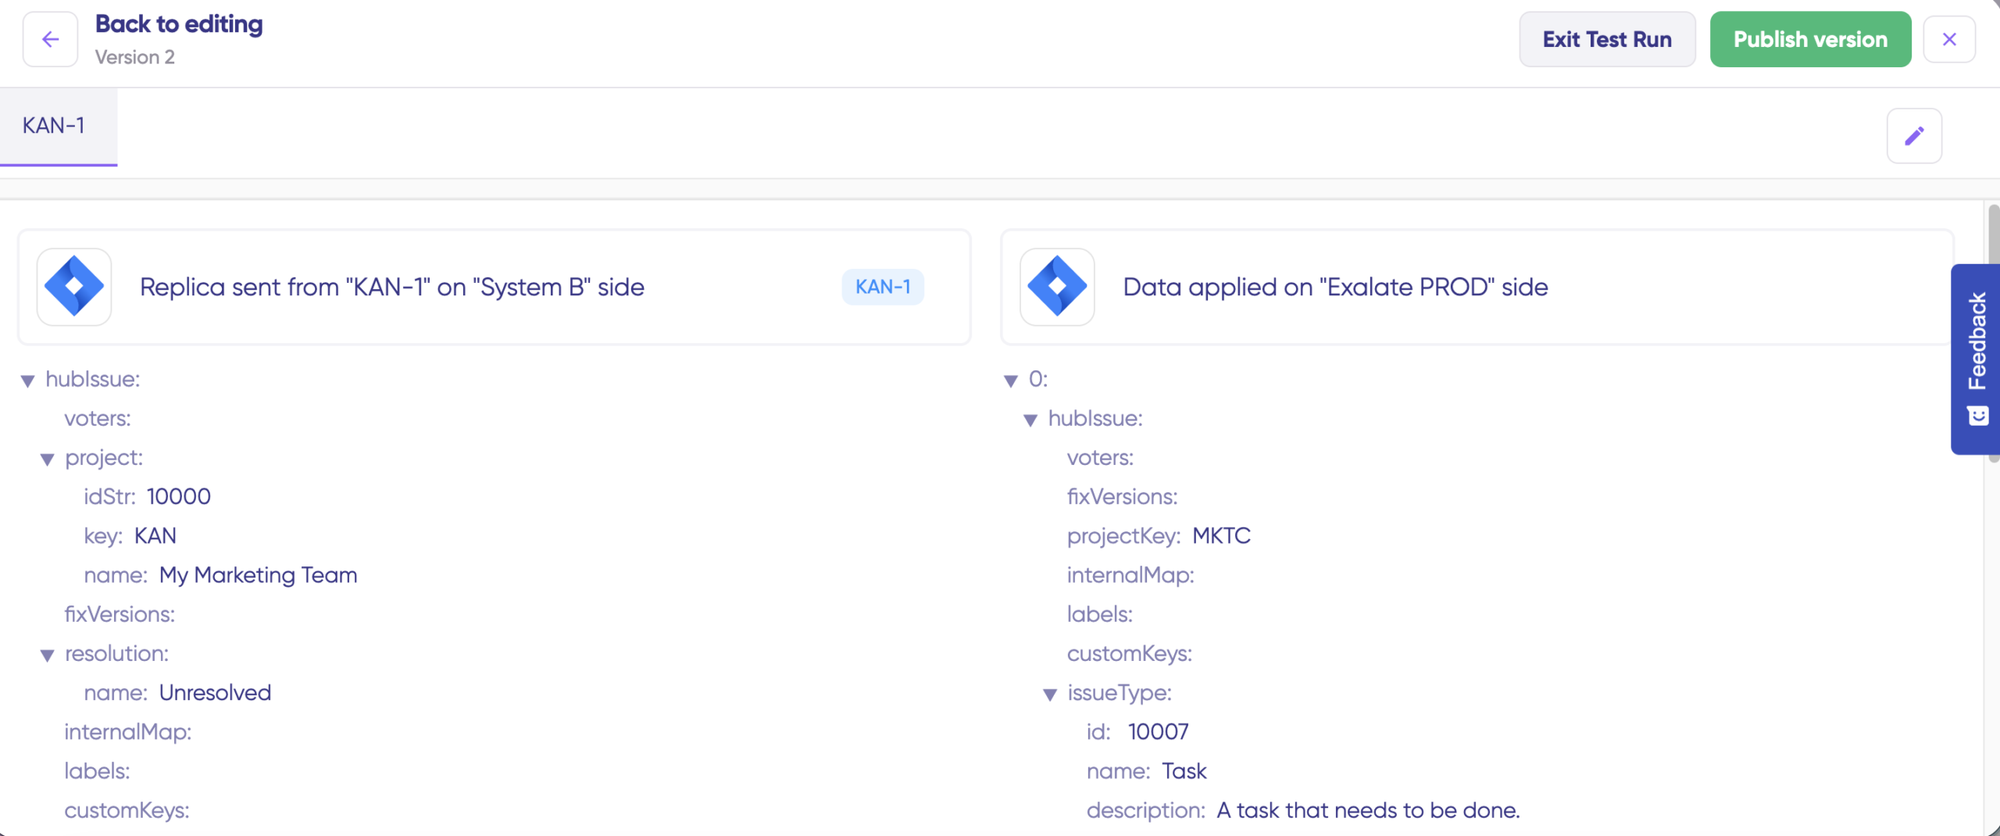
View how the sync configuration will be applied to your items, preview the replica, and verify if the field mappings look correct.
If required, go back, adjust the scripts, and test again. Deploy only when you’re confident it works.
Once everything matches your needs, click “Publish Version” to apply the updated configuration to your live synchronization. All versions for a connection are available in the “Version” dropdown. Versions can be either “Active”, in “Draft” (editable), or “Archived”.
To start your sync automatically, it’s important to add “Triggers”, which are conditions or filters you apply to specific items.
For instance, sync all Asana tasks that have a label = “dev”, or sync all tickets in Zendesk that belong to a specific assignment group. Click the “+Add trigger” button to start creating triggers.
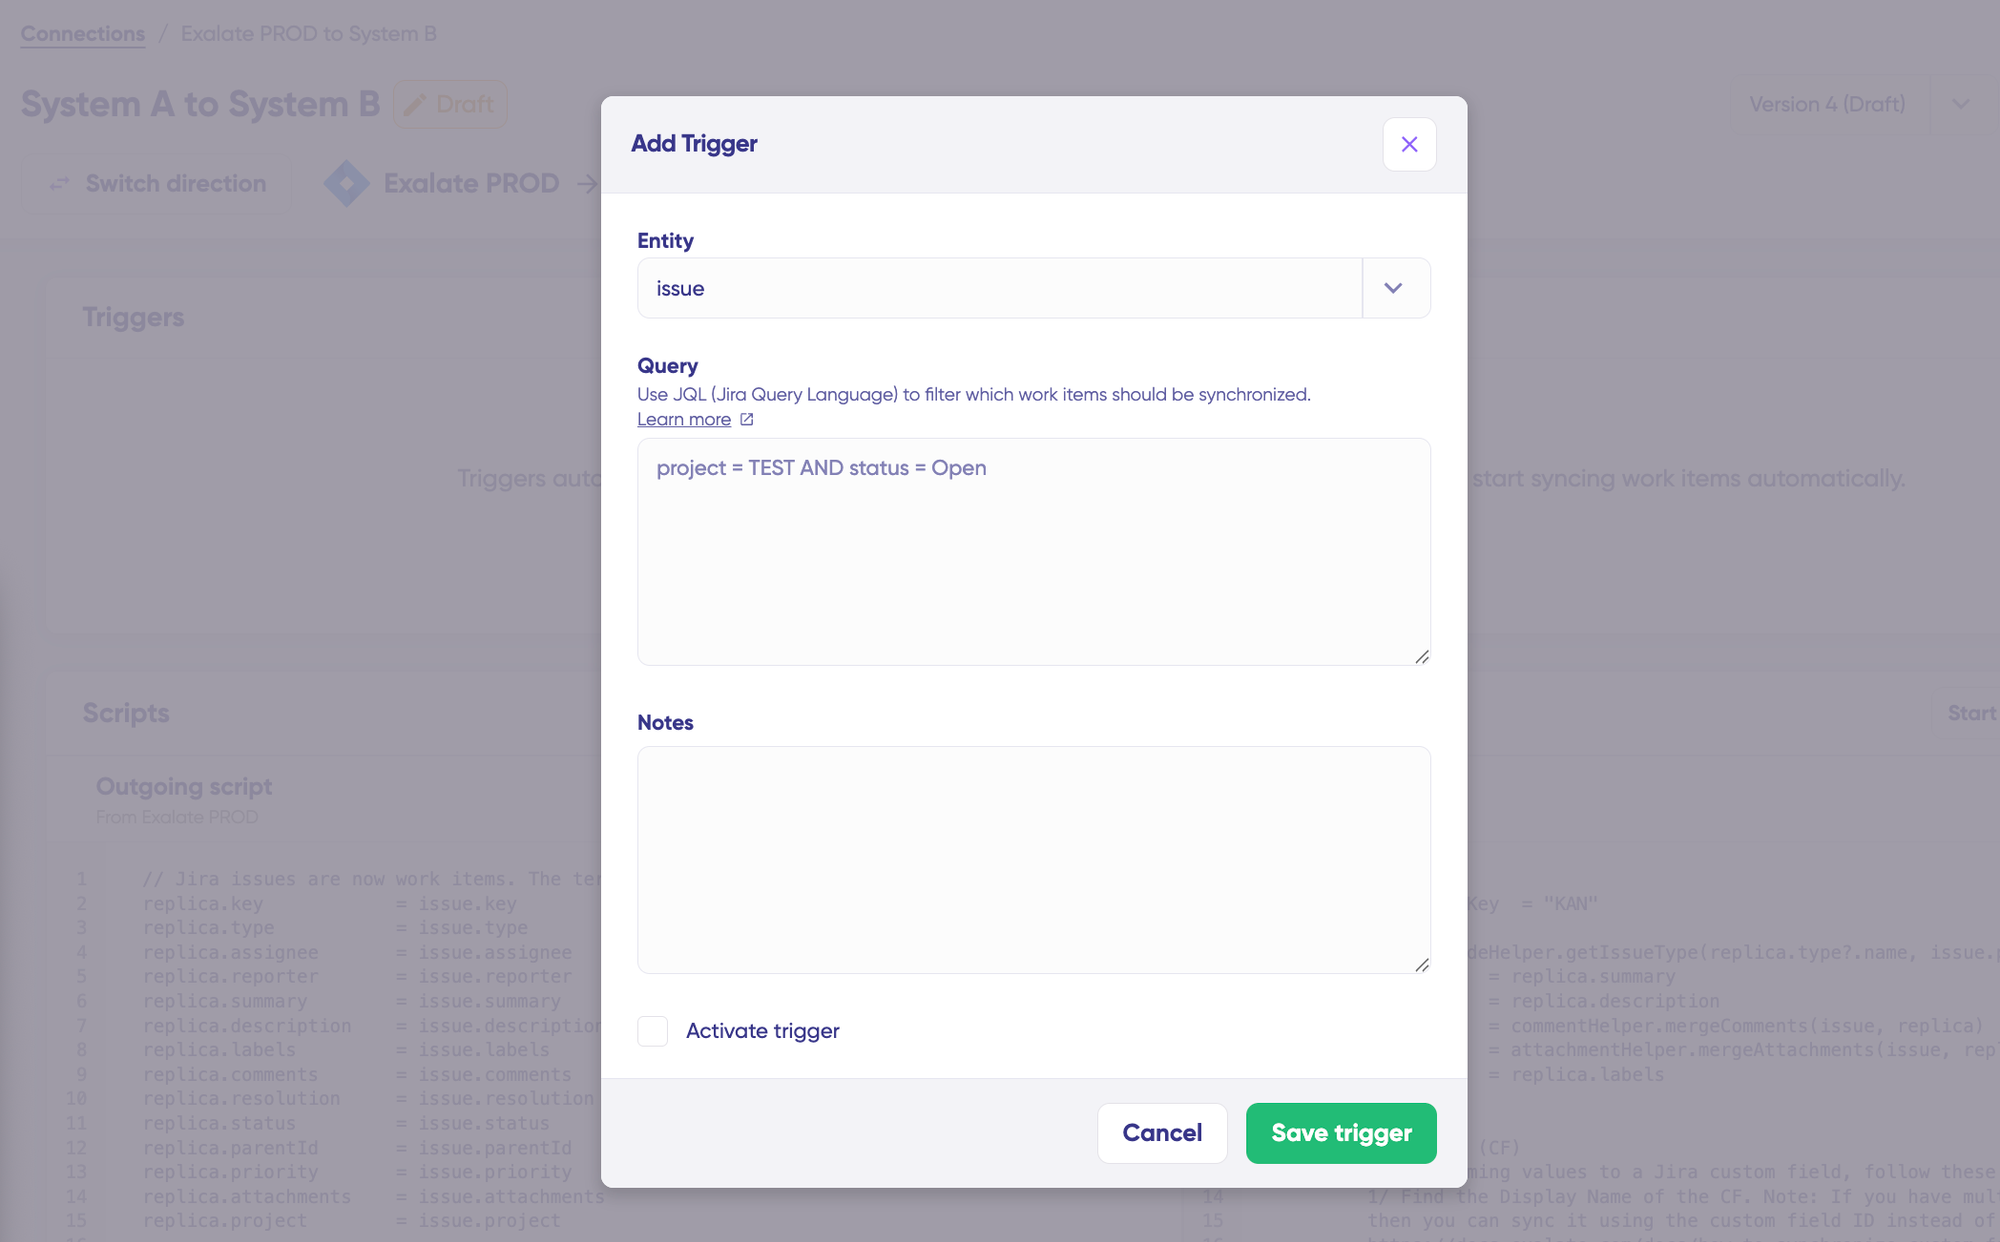
These triggers are platform-specific. For Asana, you can use search syntax to specify conditions for work items or sprints. For Zendesk, you can use the advanced search syntax to apply the trigger to tickets. Save your changes by publishing them.
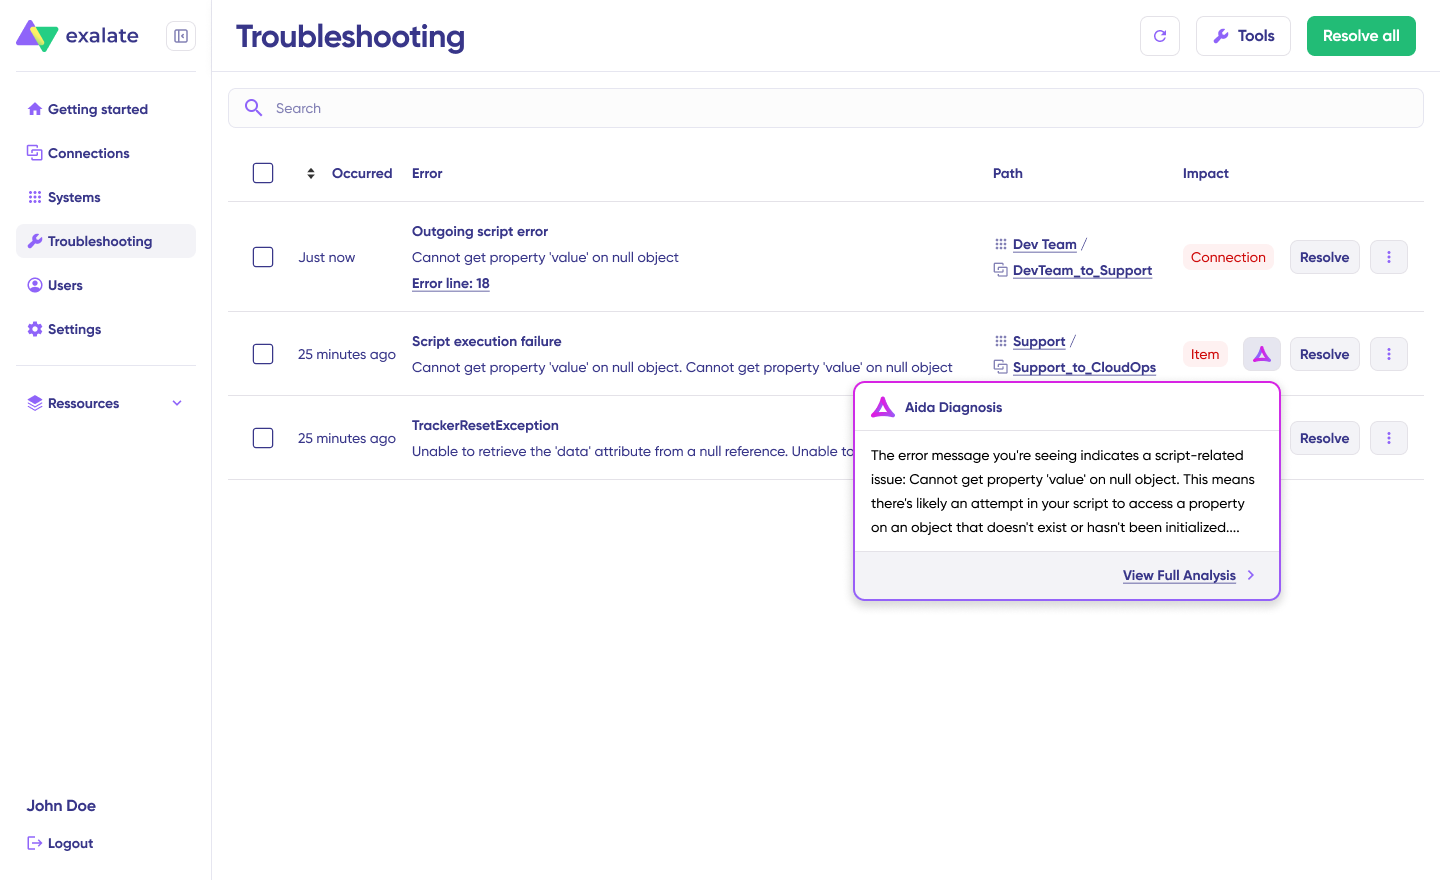
Troubleshooting with Aida. Aida AI helps you troubleshoot errors faster. It offers clear and context-aware suggestions to resolve errors, right where you see them.
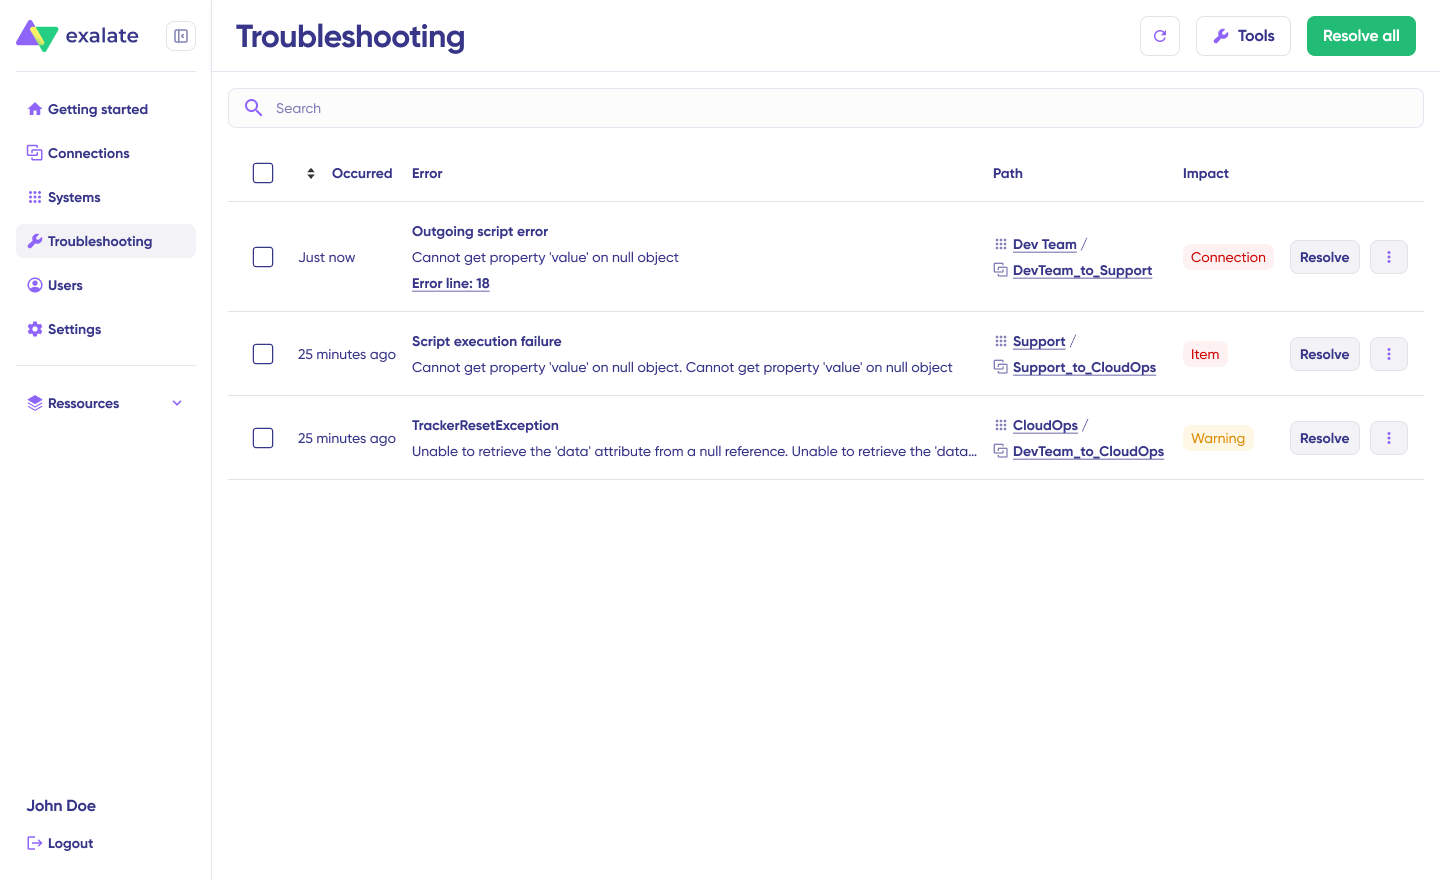
If there’s an error, go to the “Troubleshooting” tab. Hover over the error you want to diagnose and click on the Aida icon that appears next to the error. You will see the AI-generated suggestion in the modal window.
This includes a short explanation of the error and a proposed solution for it. You can also “View Full Analysis” to get more context.
You can also view “Error details” to copy the stack trace and “Replicas” to view the JSON format, if required. Choose to “Resolve” and retry errors.
Best Practices for Asana Zendesk Integration
- Start with a narrow scope. Don’t sync everything on day one. Begin with one ticket type or one Zendesk group flowing to one Asana project. Validate the field mappings and workflow before expanding.
- Map statuses deliberately. Zendesk and Asana handle status differently. Zendesk tickets have predefined statuses (New, Open, Pending, Solved, Closed). Asana tasks use sections, custom fields, or completion states. Decide how each Zendesk status maps to an Asana equivalent before configuring the sync.
- Use tags or custom fields as sync triggers. Triggering sync on every new Zendesk ticket floods Asana with noise. Use specific tags (like “escalate” or “product-feedback”) or custom field values to control which tickets create tasks.
- Keep comments clean. Bidirectional comment sync is powerful, but it can create clutter if internal Zendesk notes sync to Asana or vice versa. Configure the sync to distinguish between public replies and internal notes, and only share what’s relevant.
- Document your field mappings. As the integration evolves, it’s easy to lose track of what maps where. Maintain a simple reference document that lists each Zendesk field, its corresponding Asana field, the transformation logic, and the sync direction.
- Test with production-like data. Test tickets with one-word subjects won’t reveal issues with long descriptions, special characters in custom fields, or attachments that exceed size limits. Use realistic data for testing.
Conclusion
Connecting Asana and Zendesk removes the friction between customer support and internal project execution. Whether it’s routing bug reports to engineering, feeding feature requests into a product roadmap, or coordinating with an outsourced support vendor, the right integration keeps both sides in sync without manual overhead.
The native sidebar app covers basic task creation from tickets. Automation tools like Zapier handle simple one-way triggers. For anything more, including bidirectional sync, custom field mapping, conditional logic, cross-company collaboration, or multi-platform routing, a dedicated integration platform gives you the control and reliability to handle it.
Start by defining what needs to sync, in which direction, and between which teams. Then choose the tool that matches those requirements without limiting your ability to scale later.
Get started with your Asana to Zendesk integration setup. Reach out to our engineering team to get things rolling.
Frequently Asked Questions (FAQs)
Can Exalate sync Zendesk tickets to Asana tasks bidirectionally?
Yes. Exalate supports full real-time, bidirectional sync between Zendesk tickets and Asana tasks. This includes task/ticket fields, comments, attachments, status, and custom fields. Each side controls its own sync configuration independently.
Does the native Asana-Zendesk integration support bidirectional sync?
Not fully. The native integration lets you create Asana tasks from Zendesk tickets and view linked ticket information in Asana. Some updates (like task completion) can reflect back in Zendesk via Rules. But custom fields, comments, and granular status mapping don’t sync natively in both directions.
Can I sync only specific Zendesk tickets to Asana?
Yes. Exalate uses triggers and conditions to control which tickets enter the sync. You can filter by tag, priority, group, requester, custom field values, or any combination of conditions.
Does Exalate handle custom fields between Asana and Zendesk?
Yes. Exalate’s scripting engine supports mapping between any custom field types on both platforms. You can transform values during sync, such as converting a Zendesk dropdown selection to a corresponding Asana custom field option.
What happens if Zendesk or Asana goes down during a sync?
Exalate queues all pending changes during an outage. When the system comes back online, queued changes are applied in the correct chronological order. No data is lost.
Can I integrate multiple Zendesk instances with one Asana workspace?
Yes. Each Exalate connection is independent. You can connect multiple Zendesk instances (for example, one per region or one per outsourced vendor) to the same Asana workspace with separate sync rules for each.
Does Exalate support cross-company integration for Asana and Zendesk?
Yes. This is one of Exalate’s core capabilities. Each organization installs Exalate on its own instance and controls what data is shared. This is ideal for outsourced support teams, vendor partnerships, and multi-organization workflows.
Can I use Aida to generate sync scripts without coding?
Yes. Aida, Exalate’s AI assistant, generates Groovy sync scripts from natural language descriptions. You describe what you want to sync, and Aida produces the script. You can also paste error messages into Aida for troubleshooting guidance.
What security certifications does Exalate hold?
Exalate is ISO 27001 certified and encrypts data both in transit (TLS 1.2/1.3) and at rest. It supports JWT authentication, role-based access controls, and provides full audit trails. Visit the Exalate Trust Center for detailed documentation.
How does Exalate pricing work for Asana Zendesk integration?
Exalate pricing is based on the number of items in active sync, not the number of users. Each integration connection is billed separately. Go to the Exalate pricing page to find out more. You can estimate costs using the pricing calculator, and there’s a 30-day free trial so you can test things before committing.
Can I sync Zendesk ticket comments to Asana task comments?
Yes. Exalate syncs comments bidirectionally. You can configure whether to sync all comments, only public replies, or only internal notes. The scripting engine lets you add prefixes or formatting to distinguish synced comments from native ones.
Is it possible to connect Asana and Zendesk alongside other platforms like Jira or Salesforce?
Yes. Exalate supports integrations across Jira, Salesforce, ServiceNow, Azure DevOps, GitHub, Freshdesk, Freshservice, and more. You can build a multi-platform integration hub where data flows between Zendesk, Asana, and other tools as needed.
How long does it take to set up Exalate for Asana Zendesk integration?
A basic connection with Quick Sync takes about 15 minutes. A fully customized integration with conditional triggers, custom field mapping, and bidirectional comment sync typically takes a few hours, depending on the complexity of your workflow requirements.


