Platforms like Zendesk and ServiceNow can manage entire areas of your organization and help you with various tasks.
Zendesk can serve as a ticket management system for the support team, while ServiceNow can be the central solution for the IT and operations teams.
Since both teams often collaborate internally or even across companies, the best course of action is to align them with a Zendesk ServiceNow integration.
If you prefer staying in your own environment while sharing data bidirectionally with another team on another platform, then this article is just for you.
I’ll explain the reasons for needing Zendesk ServiceNow integration, the use cases, and how to configure your instance for cross-platform synchronization.
Key Takeaways
- Zendesk-ServiceNow integration eliminates manual data sharing between support and IT teams, reducing errors and response times.
- Exalate provides autonomous synchronization with workspace-based setup, giving both teams control over their data.
- Security features include ISO certification, encryption in transit and at rest, and role-based access control.
- Aida (AI-assisted configuration) accelerates integration deployment and reduces setup complexity.
- Custom field mapping and bidirectional sync ensure contextual accuracy across platforms.
- Real-time monitoring through unified dashboards provides visibility into sync status and performance.
- Integration scales seamlessly from small team collaborations to enterprise-wide deployments.

Why Do You Need Zendesk ServiceNow Integration?
Zendesk is a customer relationship management platform offering comprehensive helpdesk and customer support tools. Beyond ticketing, it provides communication channels, automation, and reporting features.
ServiceNow is a cloud platform for IT service and workflow management. With revenues exceeding $3 billion annually and thousands of customers, it offers extensive features and enterprise-grade capabilities.
Here’s why integrating them matters:
- Teams working across Zendesk and ServiceNow need seamless access to overlapping data without platform switching. When support teams log customer issues in Zendesk while IT tracks incidents in ServiceNow, integration ensures both sides see complete, updated information.
- Manual data sharing introduces errors and delays. Integration solutions handle data transformation between APIs automatically, ensuring standardized, contextually accurate formatting across platforms.
- Process efficiency improves dramatically when support and IT workflows connect. Team members eliminate spreadsheet exports, manual updates, and messaging requests for information—saving hours weekly.
- Scalability becomes simpler when integration bridges platform gaps. As your organization grows, both teams can expand operations independently without worrying about breaking connections or losing data synchronization.
- Zendesk to ServiceNow integrations create the transparency and accountability needed for effective inter-team and inter-company collaboration.
- Cost optimization happens when teams stay in their native platforms. Zendesk users avoid ServiceNow licensing fees and vice versa, while maintaining full collaboration capabilities.
Features to Consider When Choosing a Zendesk-ServiceNow Integration
Selecting the right integration solution requires evaluating several critical factors:
- Autonomous operation ensures both teams maintain control over their data and configurations. Solutions that don’t rely on centralized middleware give each side the ability to make changes without disrupting the other team’s workflow.
- Security and compliance are non-negotiable for enterprise environments. Look for ISO certification, encryption of data both in transit and at rest, role-based access control, and comprehensive audit capabilities.
- Customization flexibility determines whether the integration adapts to your workflows or forces you to adapt to it. The ability to sync custom fields, transform data based on business rules, and configure field mappings ensures the solution fits your specific requirements.
- Scalability matters as your organization grows. Integration solutions should handle increasing data volumes, support multiple connections, and maintain performance under load.
- AI-assisted configuration reduces setup time and technical complexity. Modern solutions use AI to generate synchronization rules, suggest field mappings, and provide documentation assistance.
- Real-time vs. batch synchronization impacts how quickly updates appear across platforms. Real-time sync ensures immediate visibility, while batch processing may introduce delays but reduce API call volume.
- Error handling and retry mechanisms determine reliability. Automatic retries, detailed error logging, and recovery procedures minimize data loss and downtime.
- Support for multiple platforms provides flexibility beyond Zendesk-ServiceNow. Solutions supporting Jira, Azure DevOps, Freshservice, Freshdesk, Asana, and other platforms enable broader collaboration scenarios.
- Pricing transparency helps budget planning. Subscription-based models with clear pricing structures prevent unexpected costs as your integration needs evolve.

Calculate time and money savings from automated bidirectional sync.
The integration solution used in this guide is called Exalate. It was built with these core concepts in mind, allowing both teams to control their own side of the connection while collaborating flexibly with one another.
Exalate also speeds up script generation for connections by using Aida, an AI-powered scripting assistant. It also provides a documentation assistant to help with technical configurations.
How to Set Up Zendesk ServiceNow Integration with Exalate: Step-by-Step Guide
This tutorial walks you through creating a Zendesk ServiceNow integration using Exalate’s workspace-based setup.
Key Zendesk Fields Available for Synchronization:
- Ticket number, subject, description
- Status, priority, type
- Requester, assignee, tags
- Comments and attachments
- Custom fields
- Due dates and SLA information
Key ServiceNow Entities and Fields Available for Synchronization:
- Incidents, change requests, problems, customer cases, RITMs
- Number, short description, description
- State, priority, urgency, impact
- Assignment group, assigned to
- Work notes, comments, attachments
- Custom fields and tables
- SLA and escalation data.
Step 1: Create Your Exalate Account
Visit the Exalate integrations page and create a new account. If you’re already registered, log in directly.
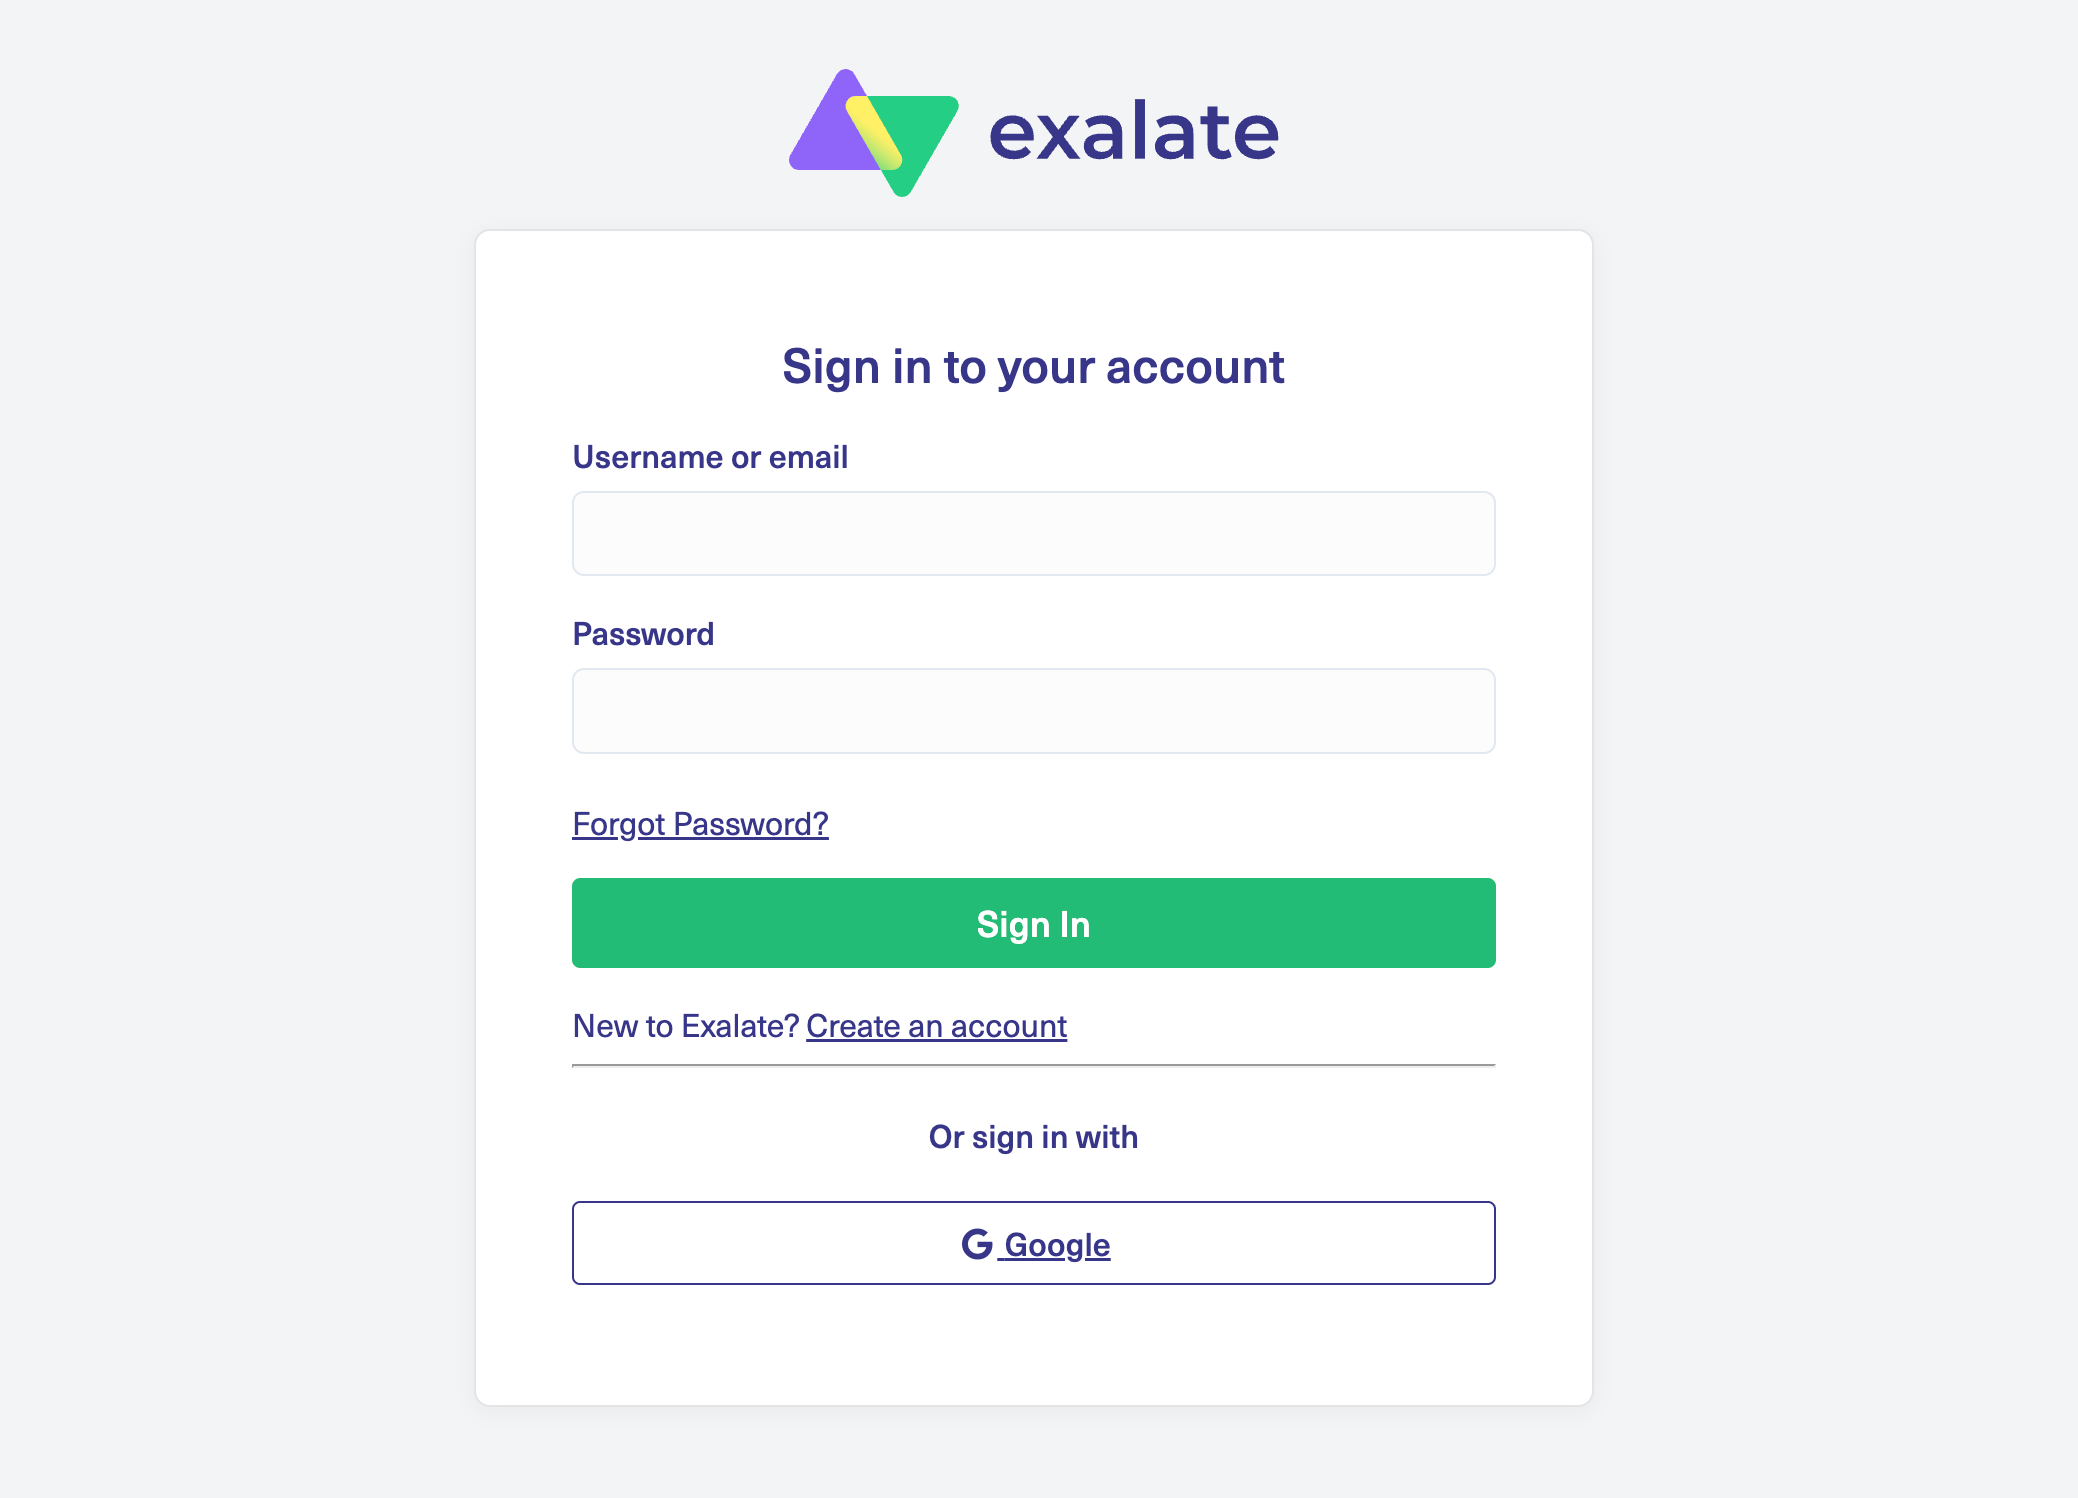
You can sign up manually by entering your email and verifying it, or use Google authentication for faster access.
Step 2: Set Up Your Workspace
Workspaces provide a centralized location for organizing and managing all your integrations and connections.
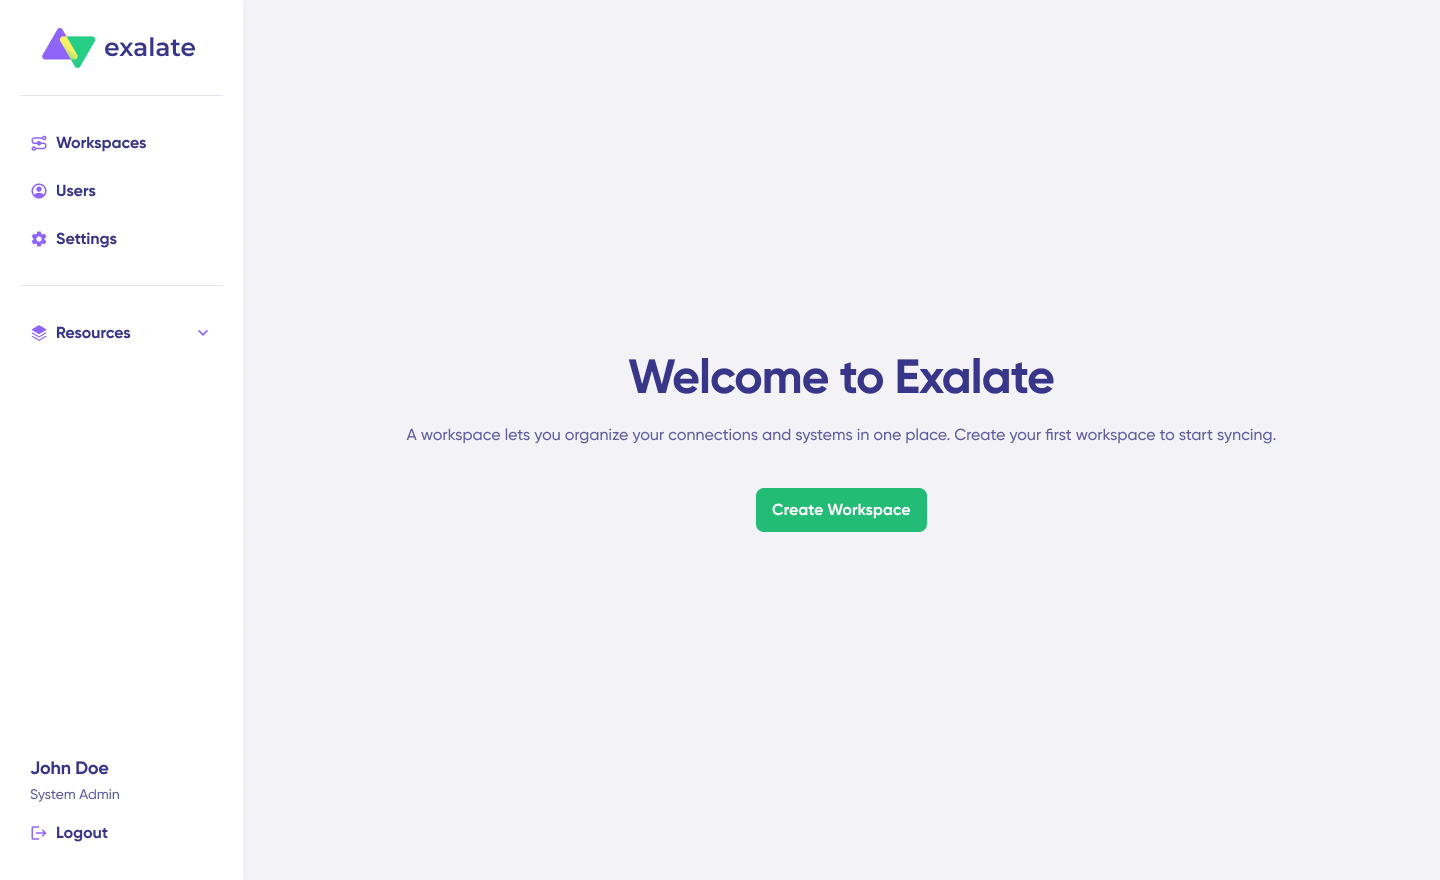
Navigate to the “Workspaces” tab to view existing workspaces. For first-time users, click the “+ Create Workspace” button.
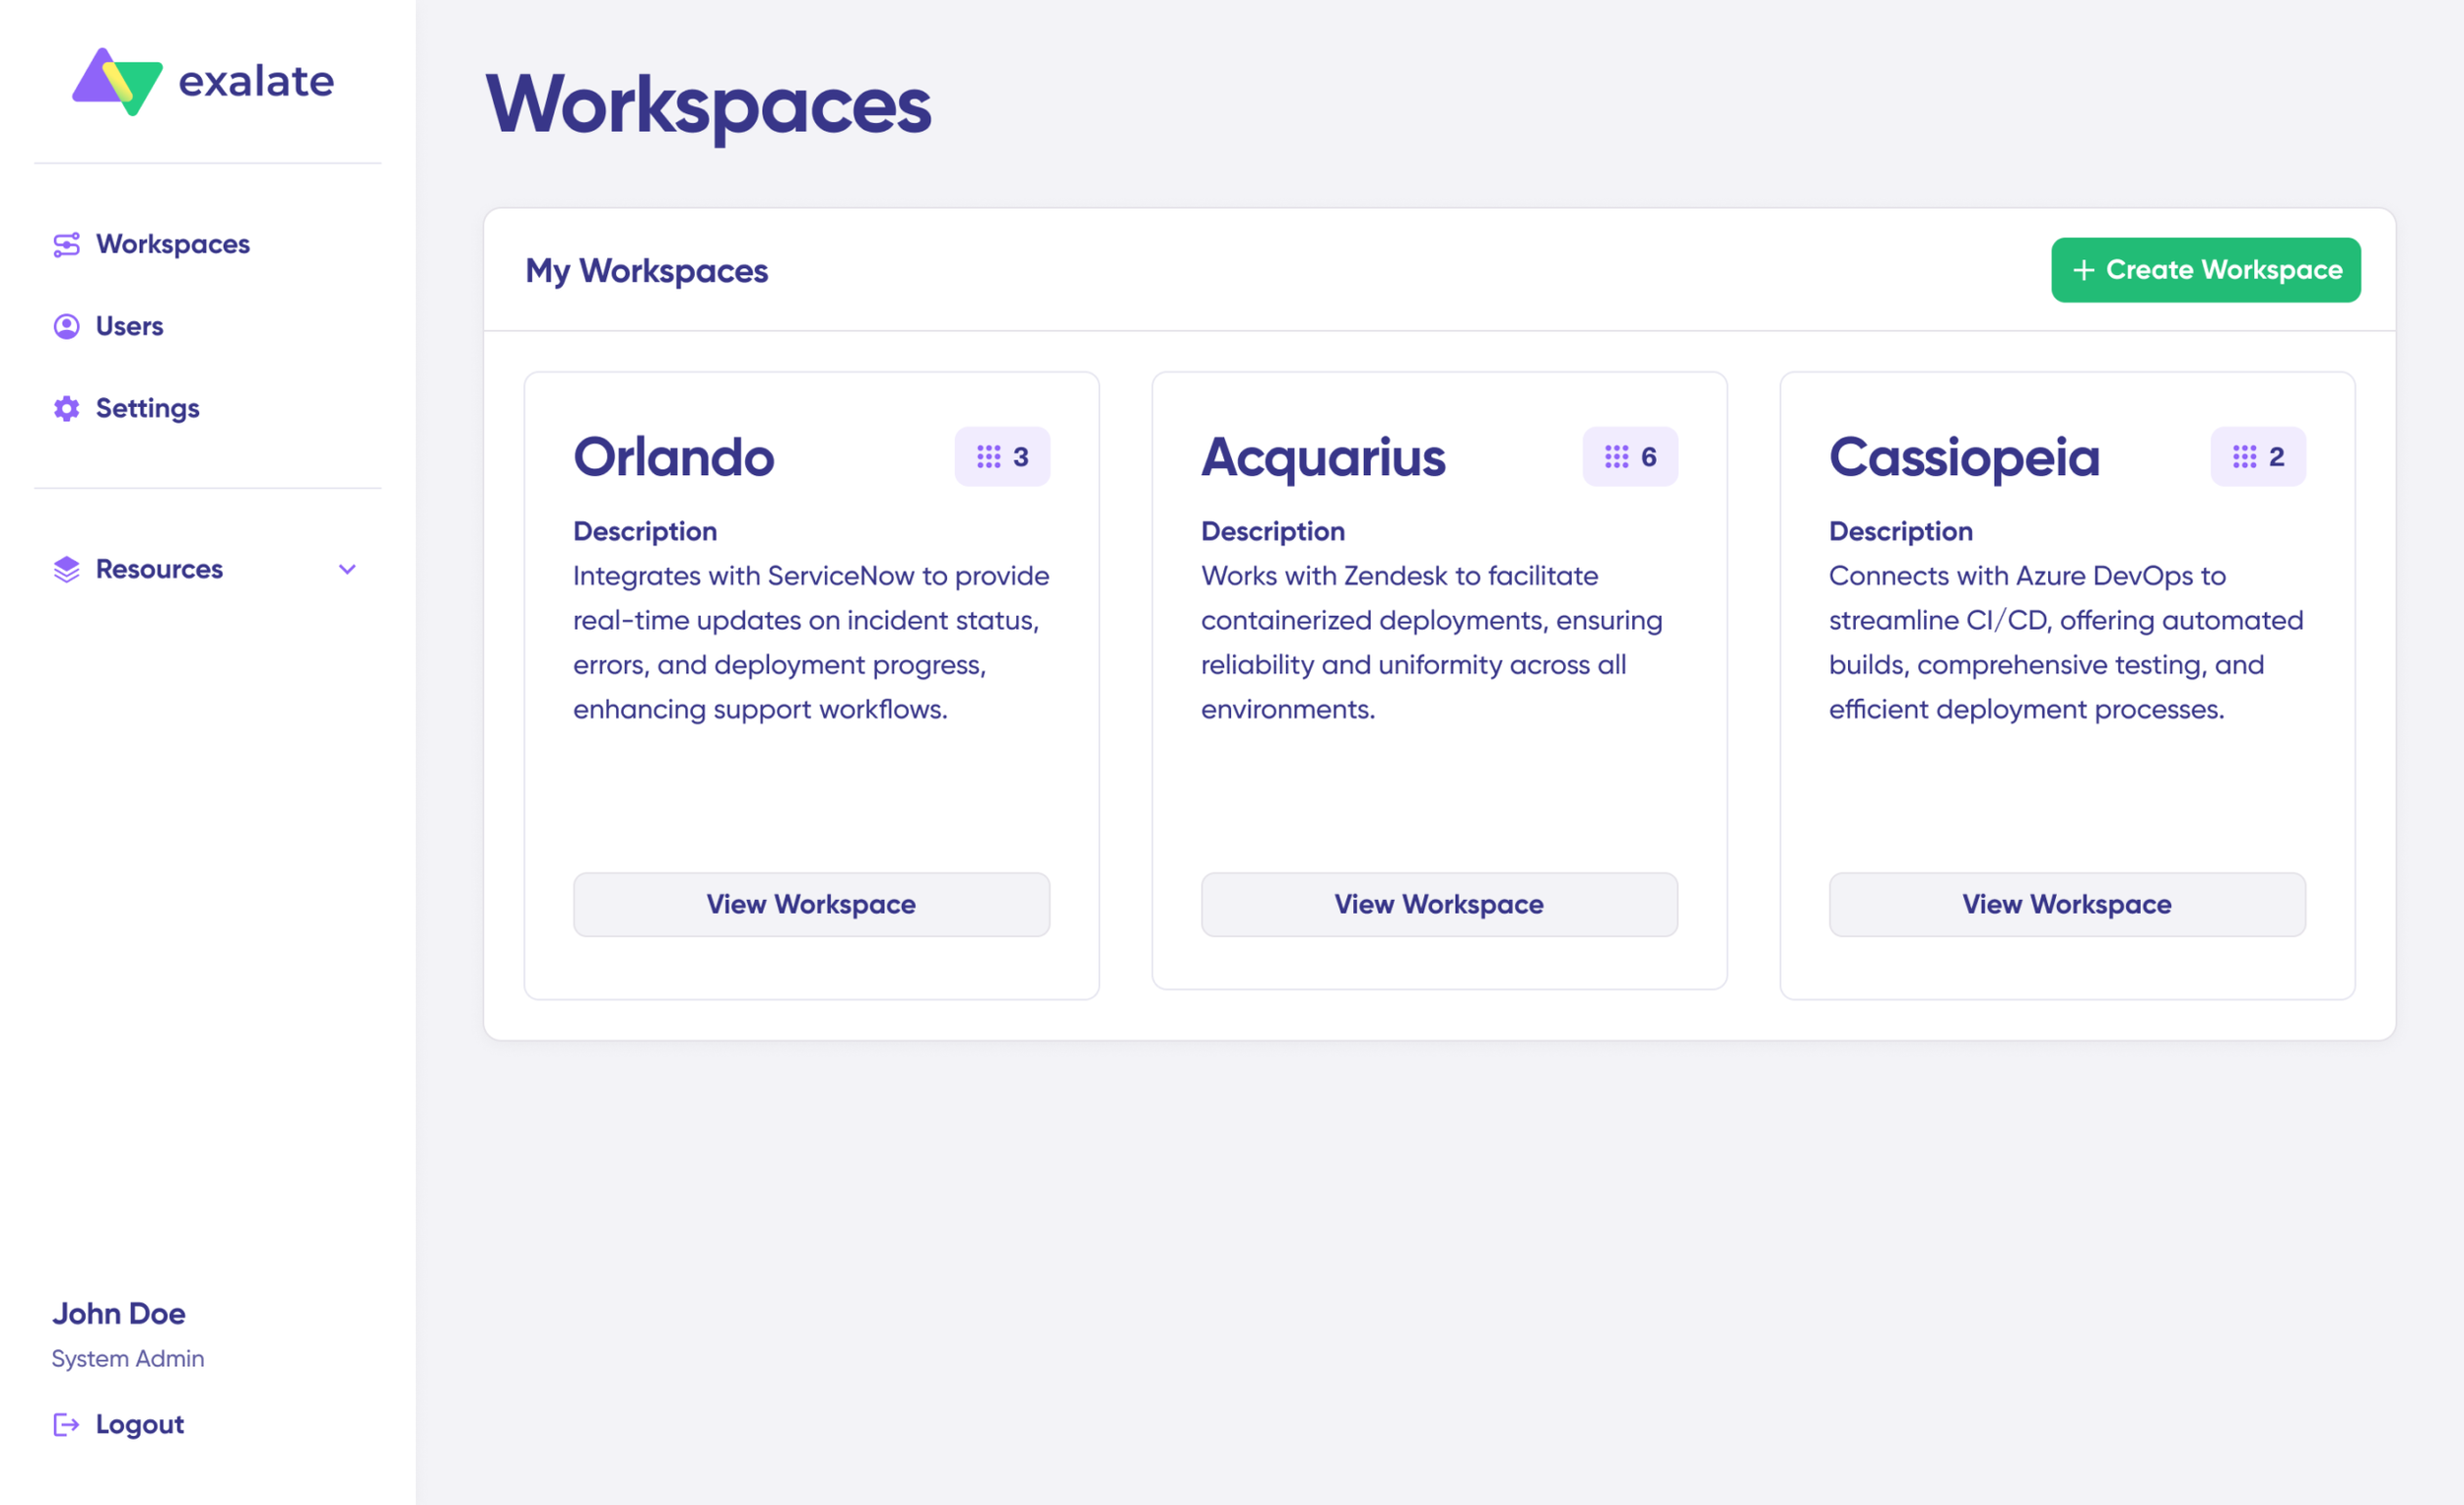
Provide a name and description for your workspace, then click “Create workspace” to complete the setup.
Step 3: Configure Your Zendesk to ServiceNow Connection
If you have an existing workspace, find all your connections under the “Connections” tab. From here, you can edit connections and view detailed connection information.
Note: Creating a connection requires an active Exalate account with at least one workspace and access credentials for both systems you’re connecting.
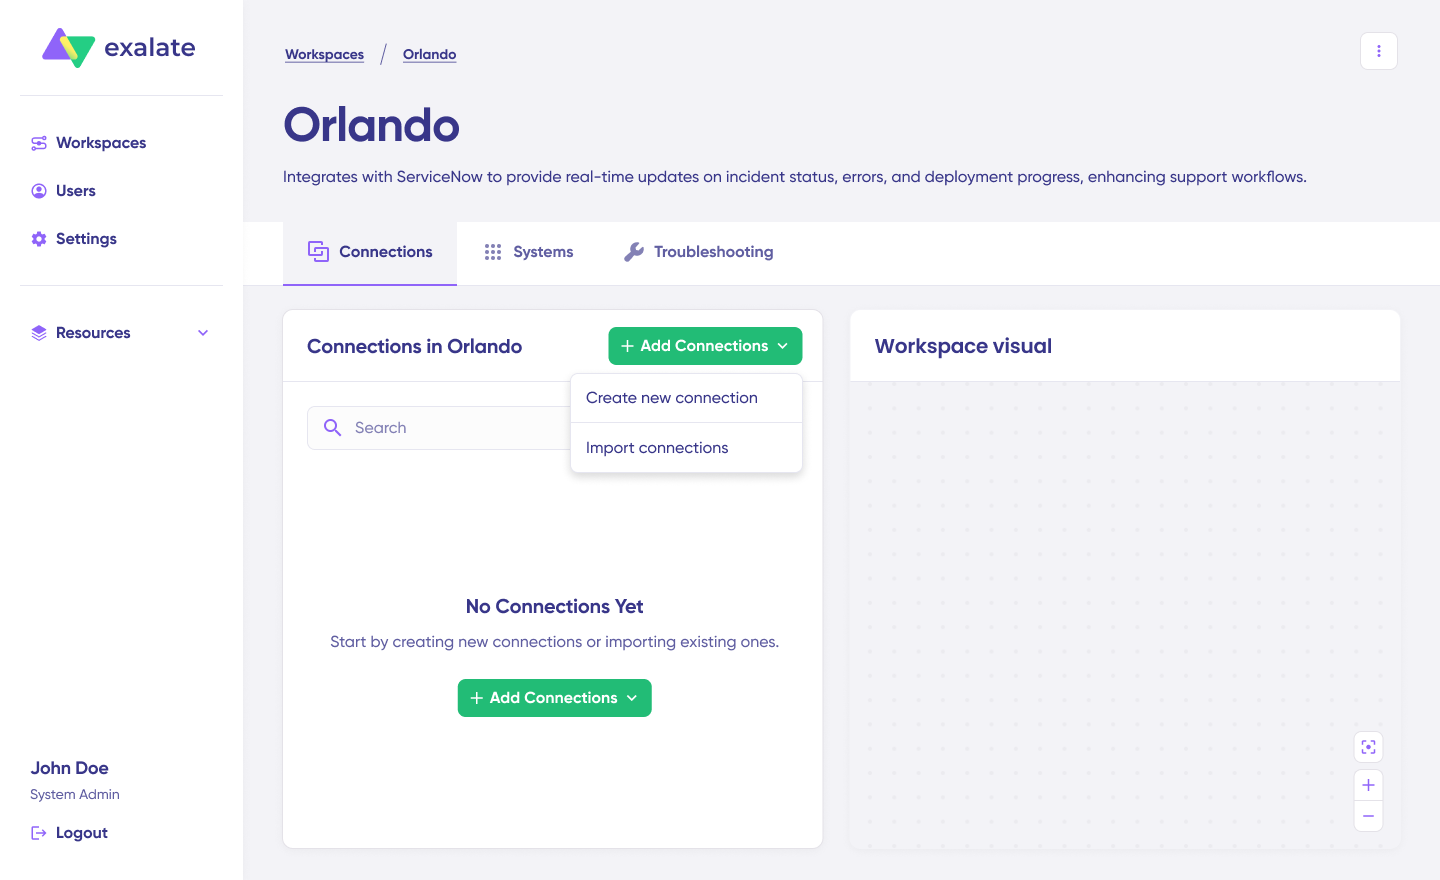
To create your connection:
Click “+ Add connections” > “Create new connection“. Then name your first system—either Zendesk or ServiceNow as System A (the order doesn’t matter).
Enter the URL for your chosen system. For example, if starting with Zendesk, provide your Zendesk instance URL.
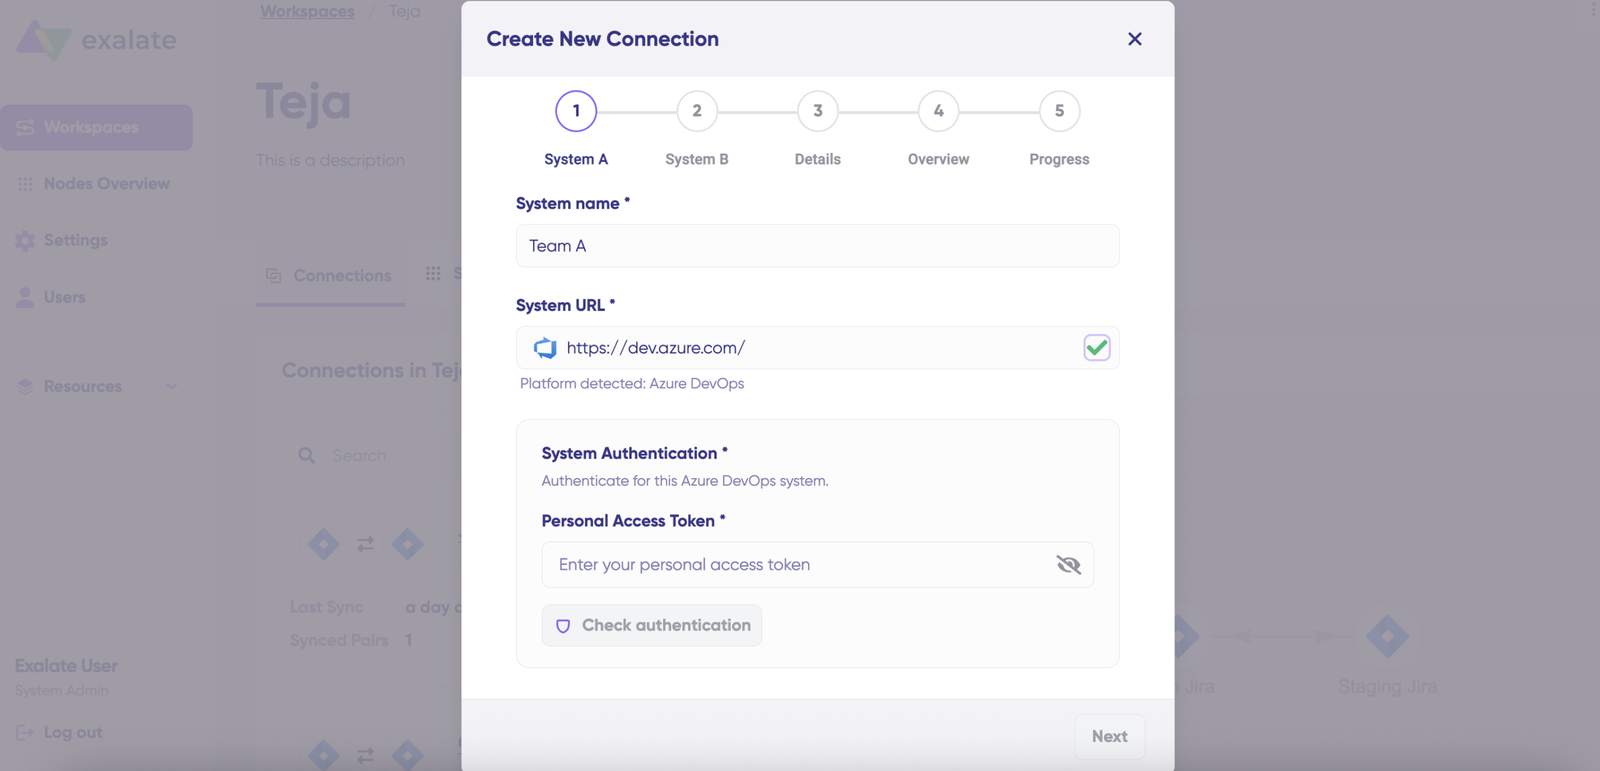
Behind the scenes, Exalate verifies your system. If it already exists in your current workspace, authentication happens automatically. If the system belongs to a different workspace, it registers anew for your current workspace
For new systems, provide authentication credentials. Both Zendesk and ServiceNow support Basic Auth using username and password
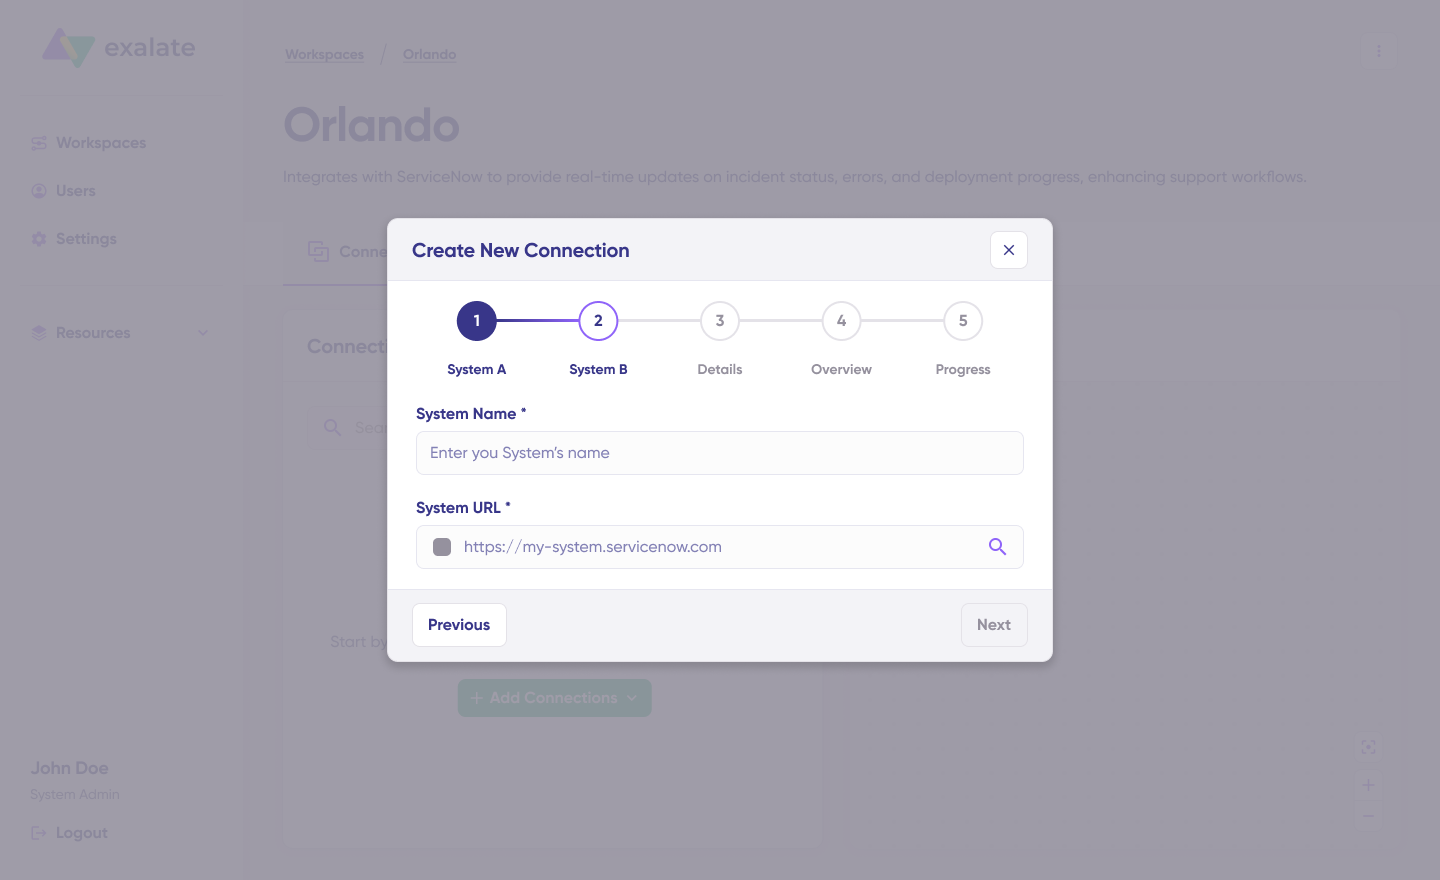
Complete the same setup process for the second system, following identical authentication rules
Provide a name and description for your connection, then click “Next.”
Step 4: Review and Create Connection
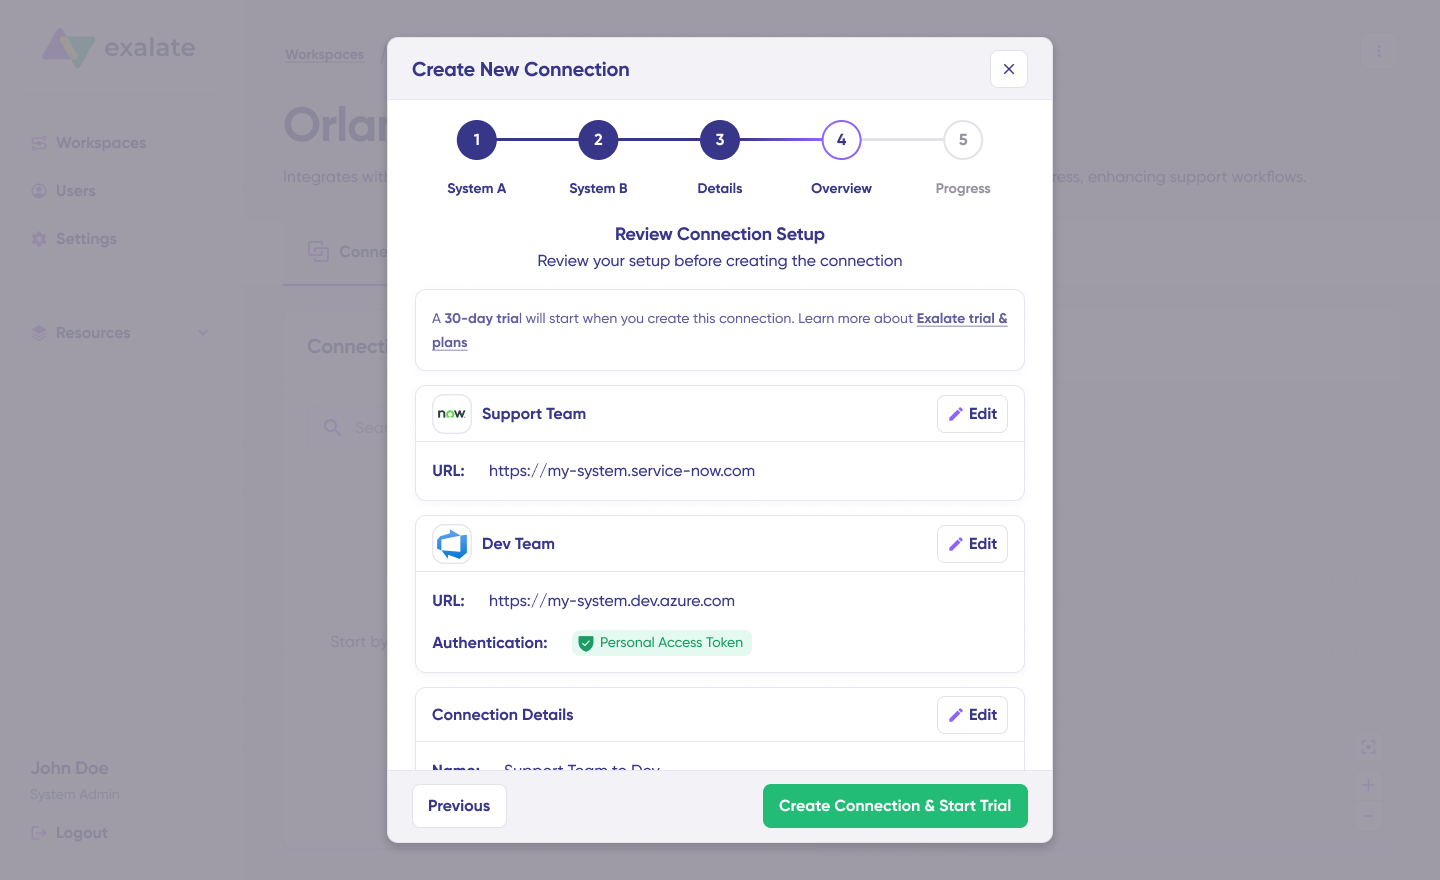
Review all connection details for accuracy and click “Create connection & Start Trial.” That’s it!
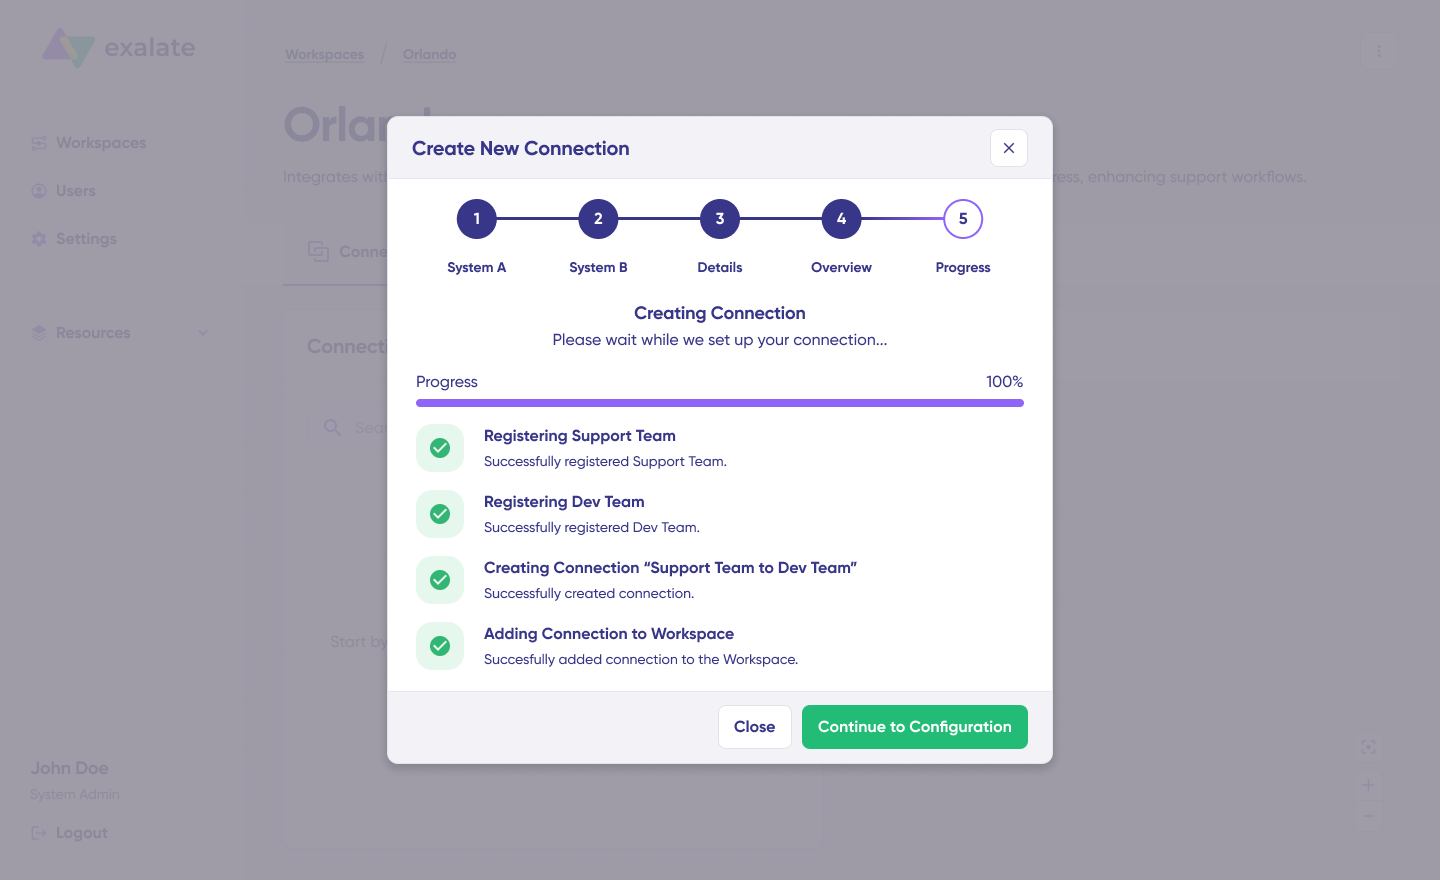
When the process completes, select “Continue to configuration” and choose which Zendesk ticket types or ServiceNow entities you want to synchronize. Then click “Build & continue.“
You now have two configuration paths: “Quick sync” and “Edit & Test.”
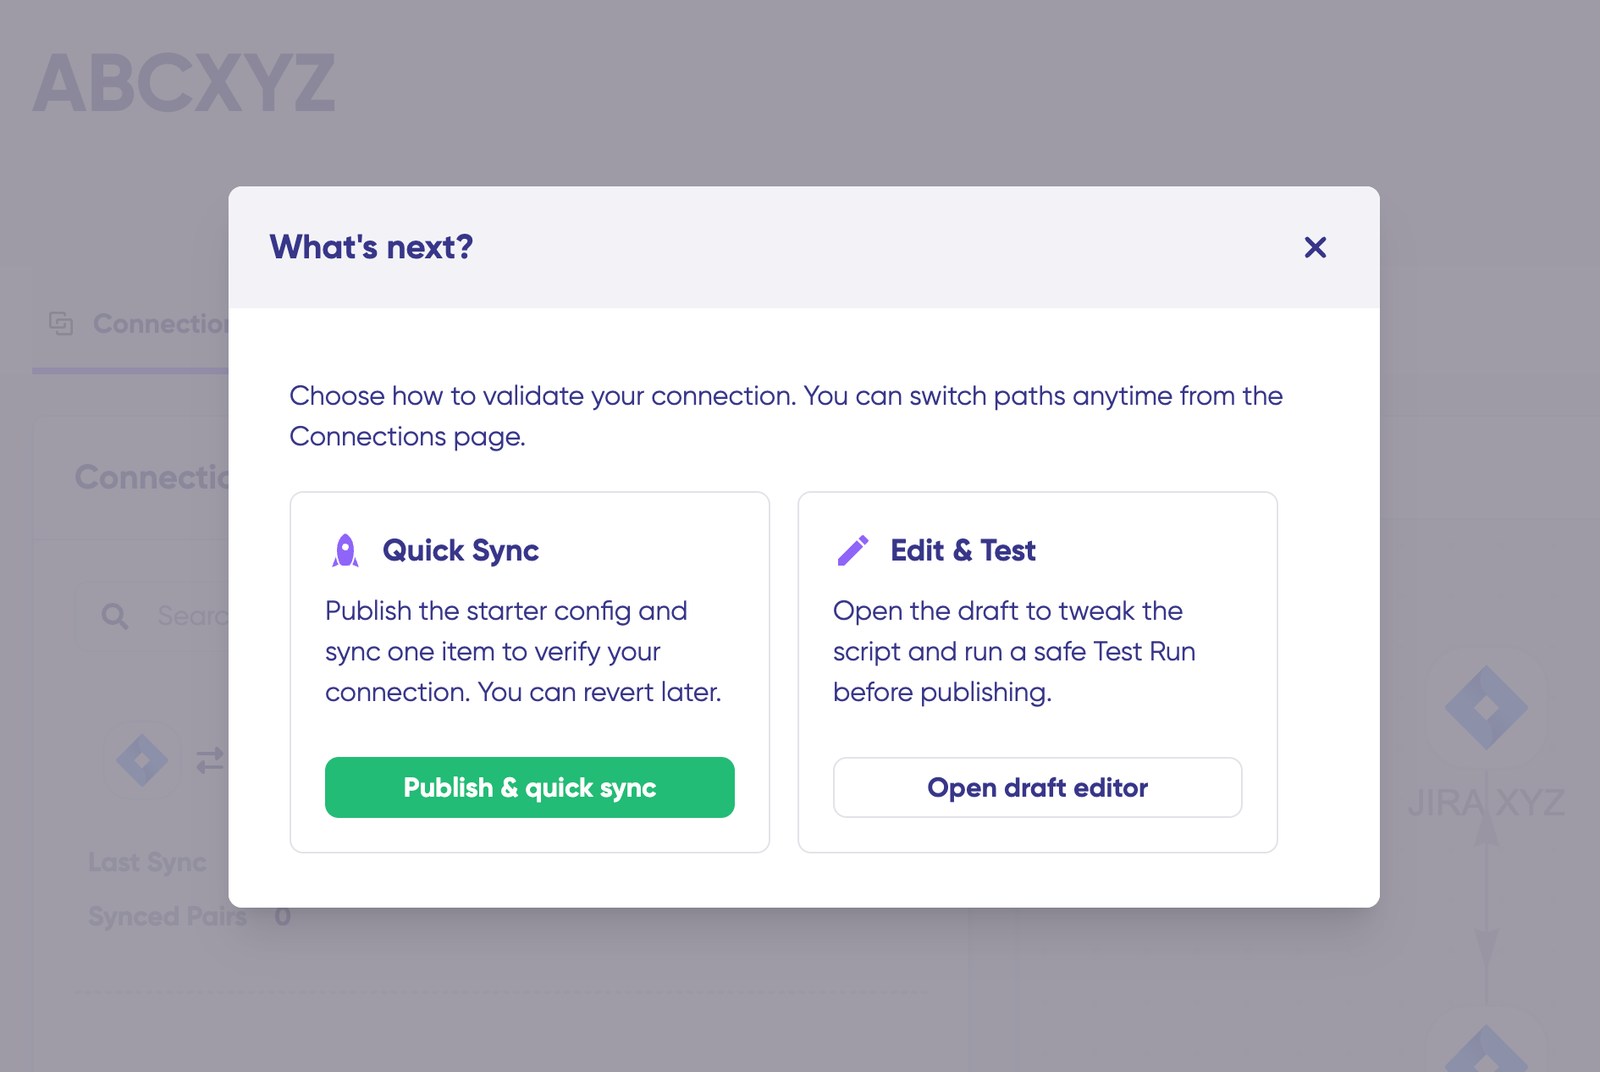
Step 5: Quick Sync – Verify Your Connection Works
Quick Sync lets you synchronize a single item between Zendesk and ServiceNow to verify that your connection functions properly. This optional validation step provides immediate feedback.
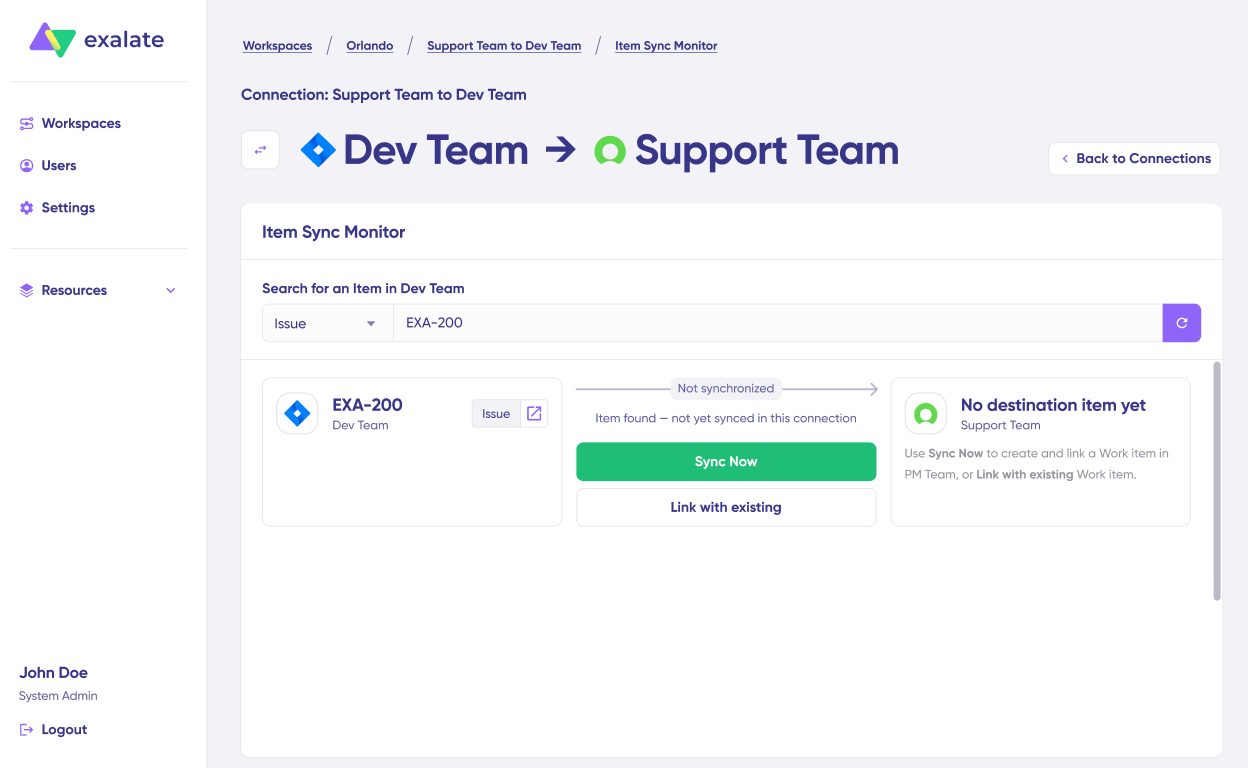
Under the “Item sync monitor,” enter the ticket number from Zendesk or the incident number from ServiceNow. Click “Sync Now” to synchronize the first item, or select “Link with existing” to connect two already-existing items.

During synchronization, you’ll receive status updates. Once complete, view both synced items by opening them in separate windows. You can also compare how the synced items appear and preview how changes will be applied.
Step 6: Edit & Test – Configure Sync Rules
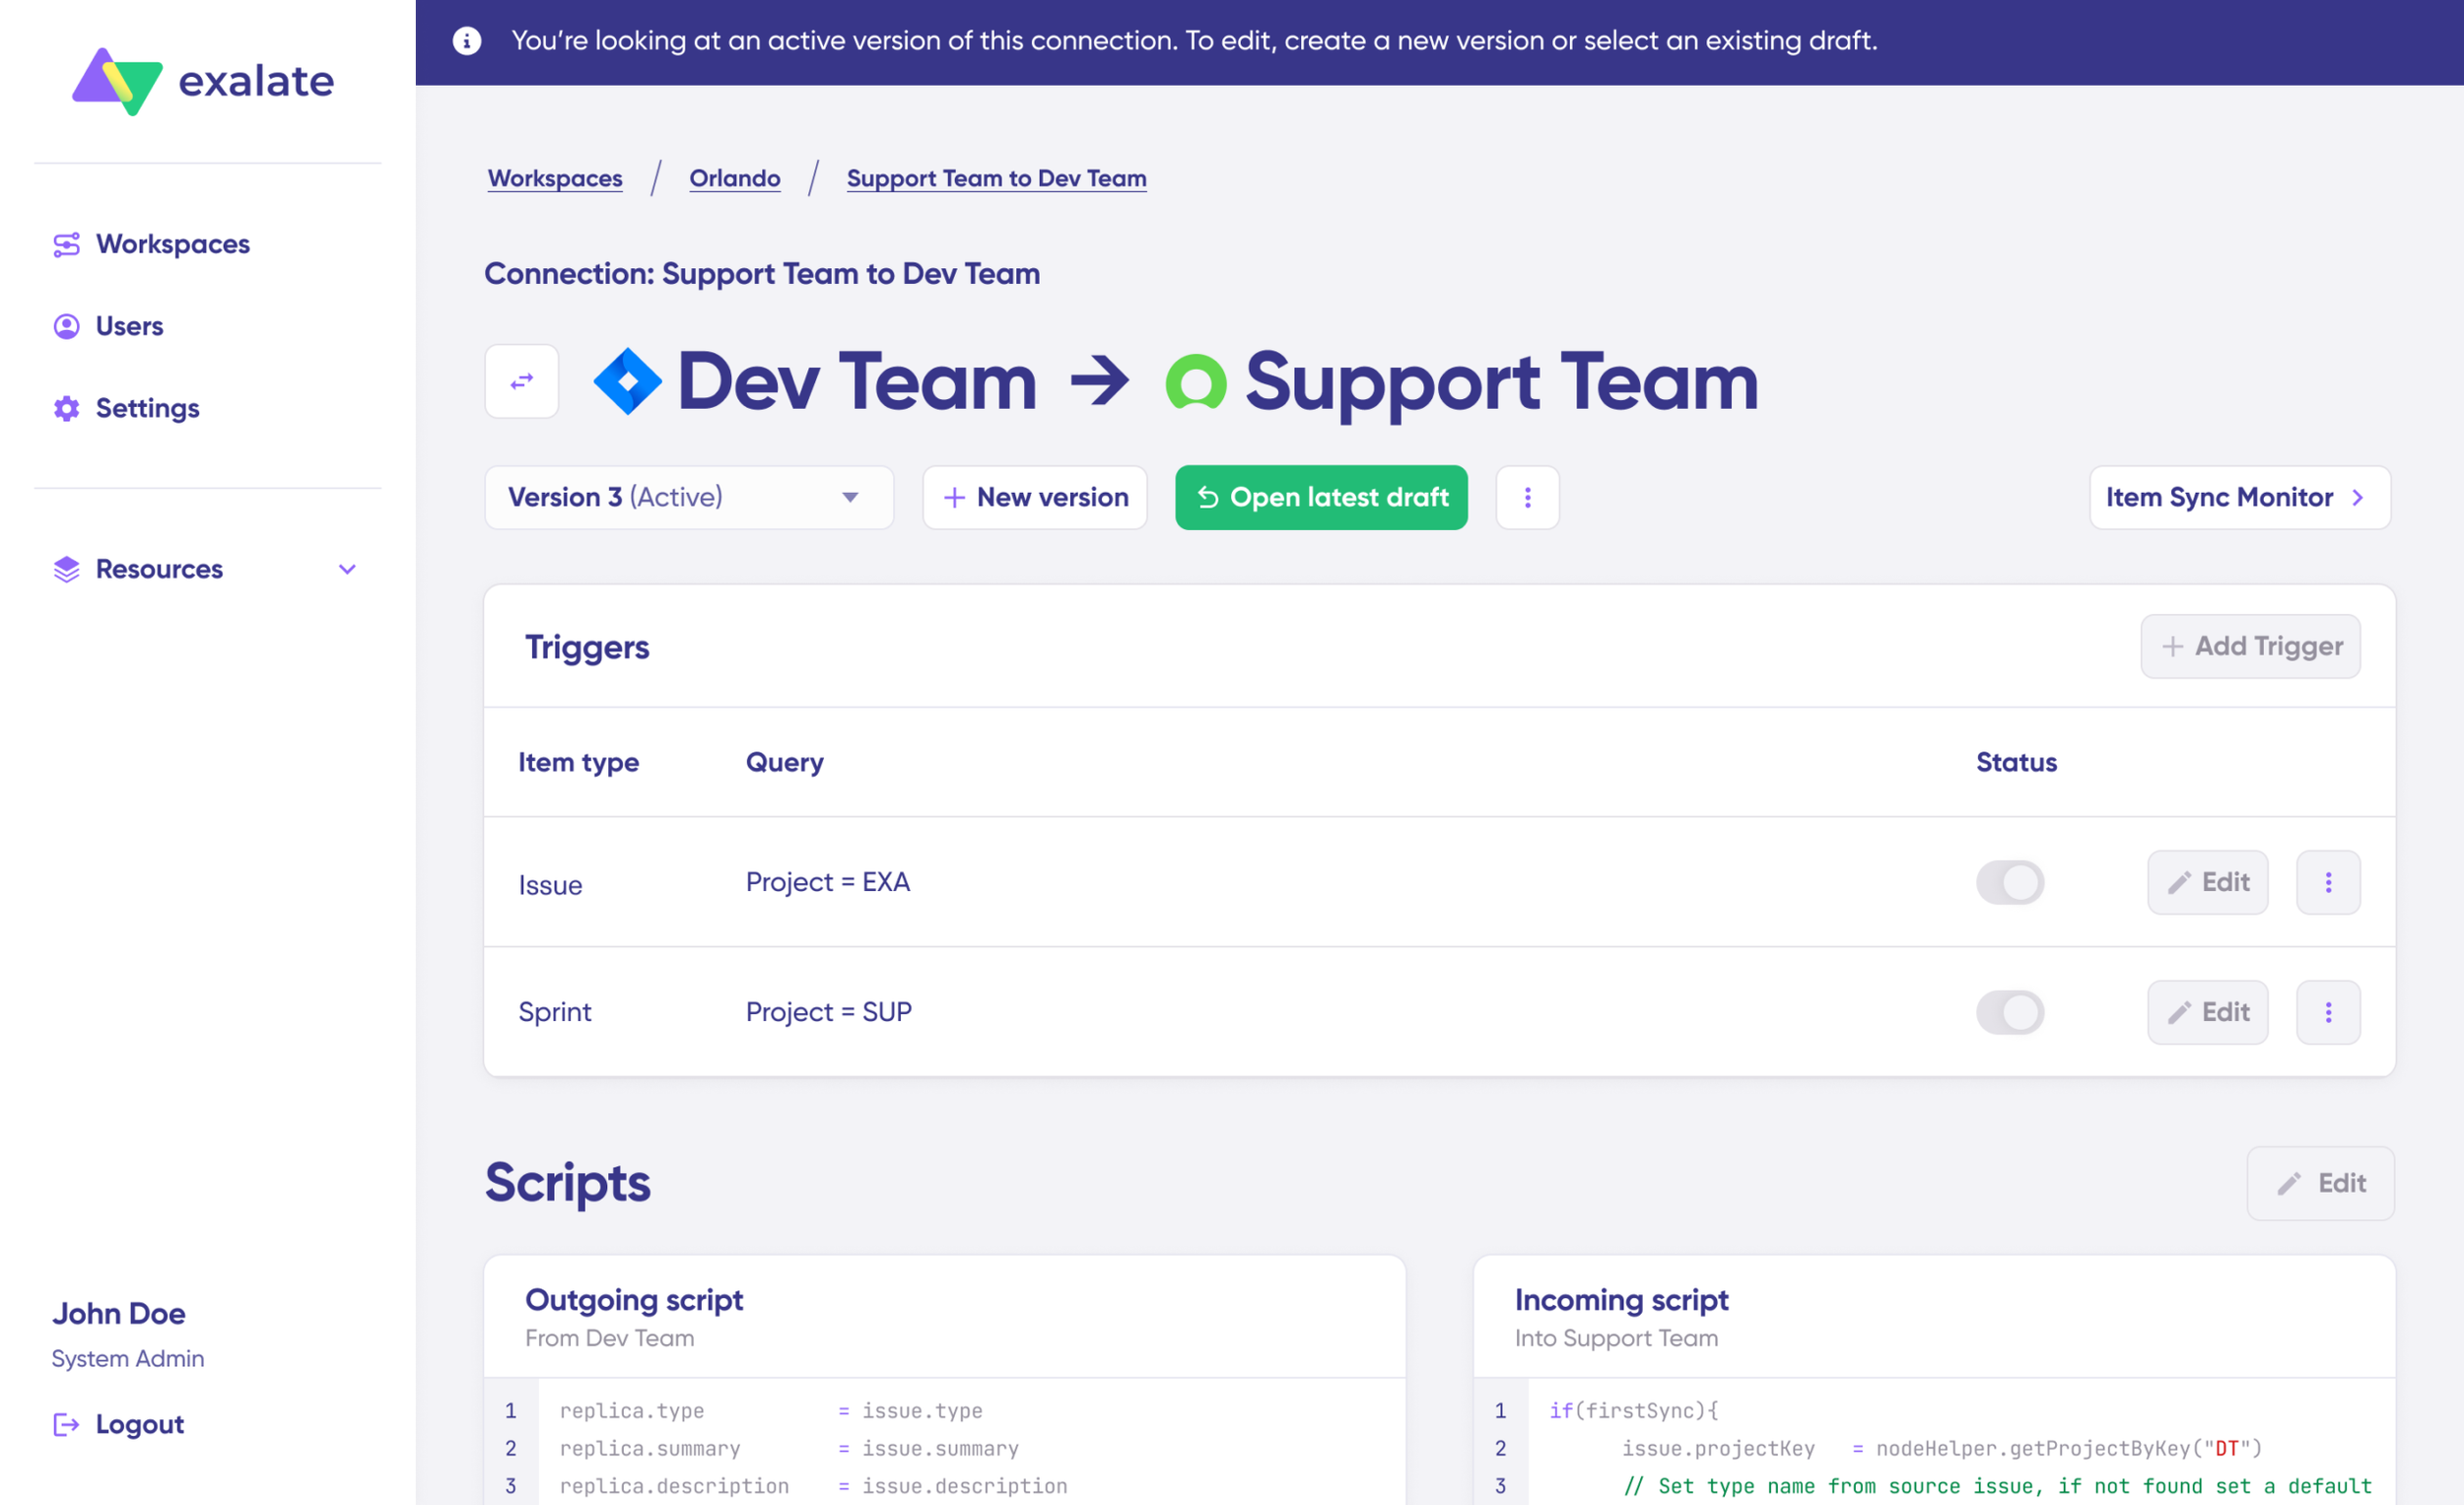
To customize your integration, click “Create a new version” or select “Open latest draft.” This prevents accidental modifications to your active configuration. The draft auto-saves your changes automatically.
Click the “Edit” button to access the editor and modify sync rules.
Sync rules use Groovy-based scripts that enable custom data logic, field mapping, and conditional workflows—adapting to any complex use case or workflow requirement.
Change sync direction by clicking the bidirectional arrows next to the connection name. Scripts are organized into incoming and outgoing sections.
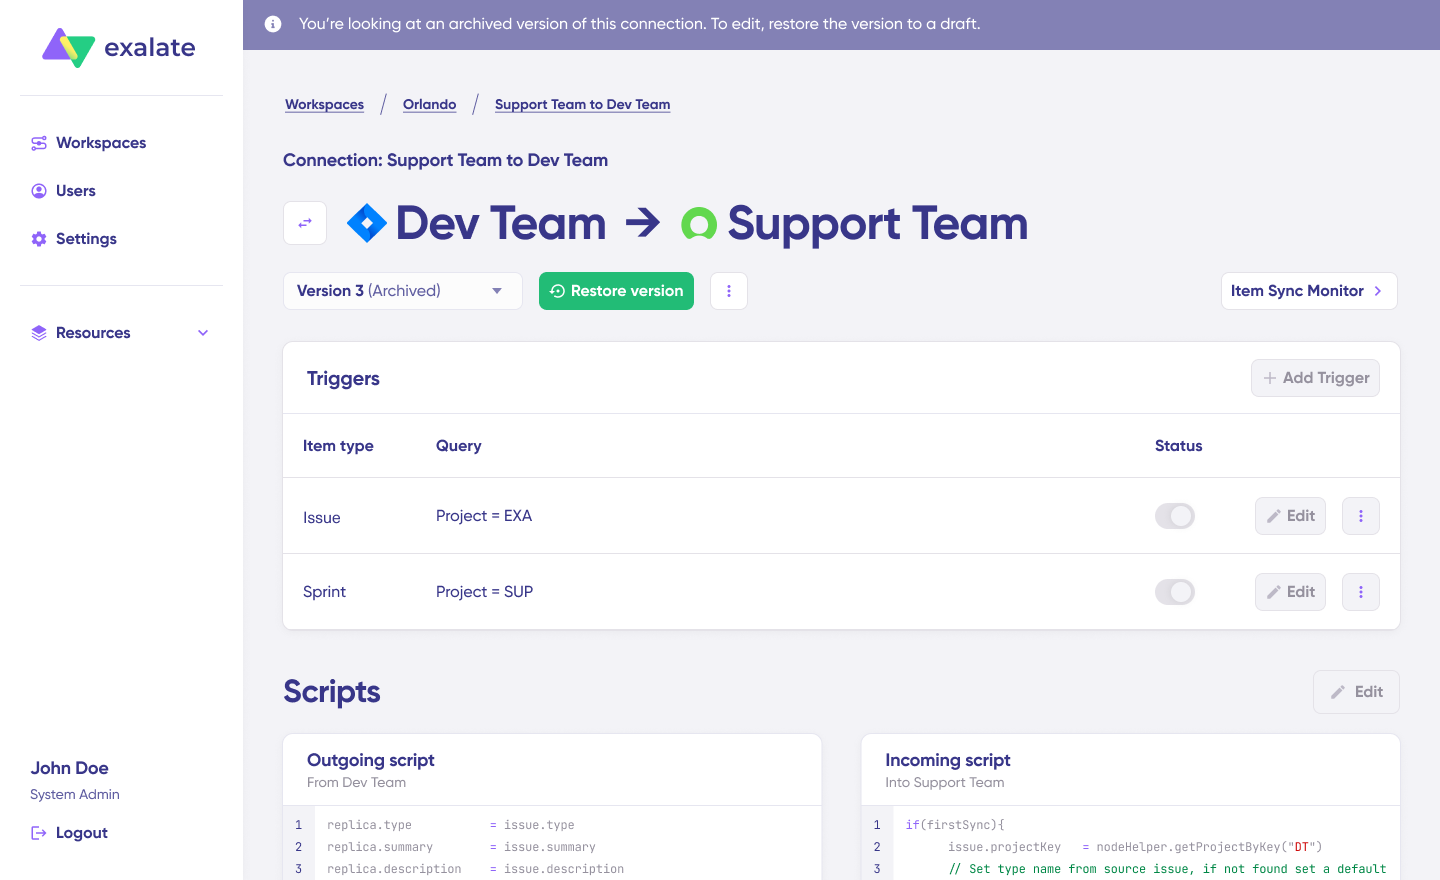
Understanding sync direction:
If syncing from Zendesk to ServiceNow, the outgoing script defines values passed from Zendesk to ServiceNow, while the incoming script determines how Zendesk values map to ServiceNow fields. These scripts reverse when the direction changes.
The replica functions as a message payload, holding actual data passed between synced entities in JSON format. To sync new values, write the sync script directly if you’re technically comfortable. To prevent something from syncing, delete that script line from the console.
Step 7: Use Aida for AI-Assisted Configuration
Save time and eliminate scripting complexity using Exalate’s AI-assisted configuration feature called Aida. Aida generates sync scripts automatically and appears in both incoming and outgoing script sections, so select the appropriate side for your needs.
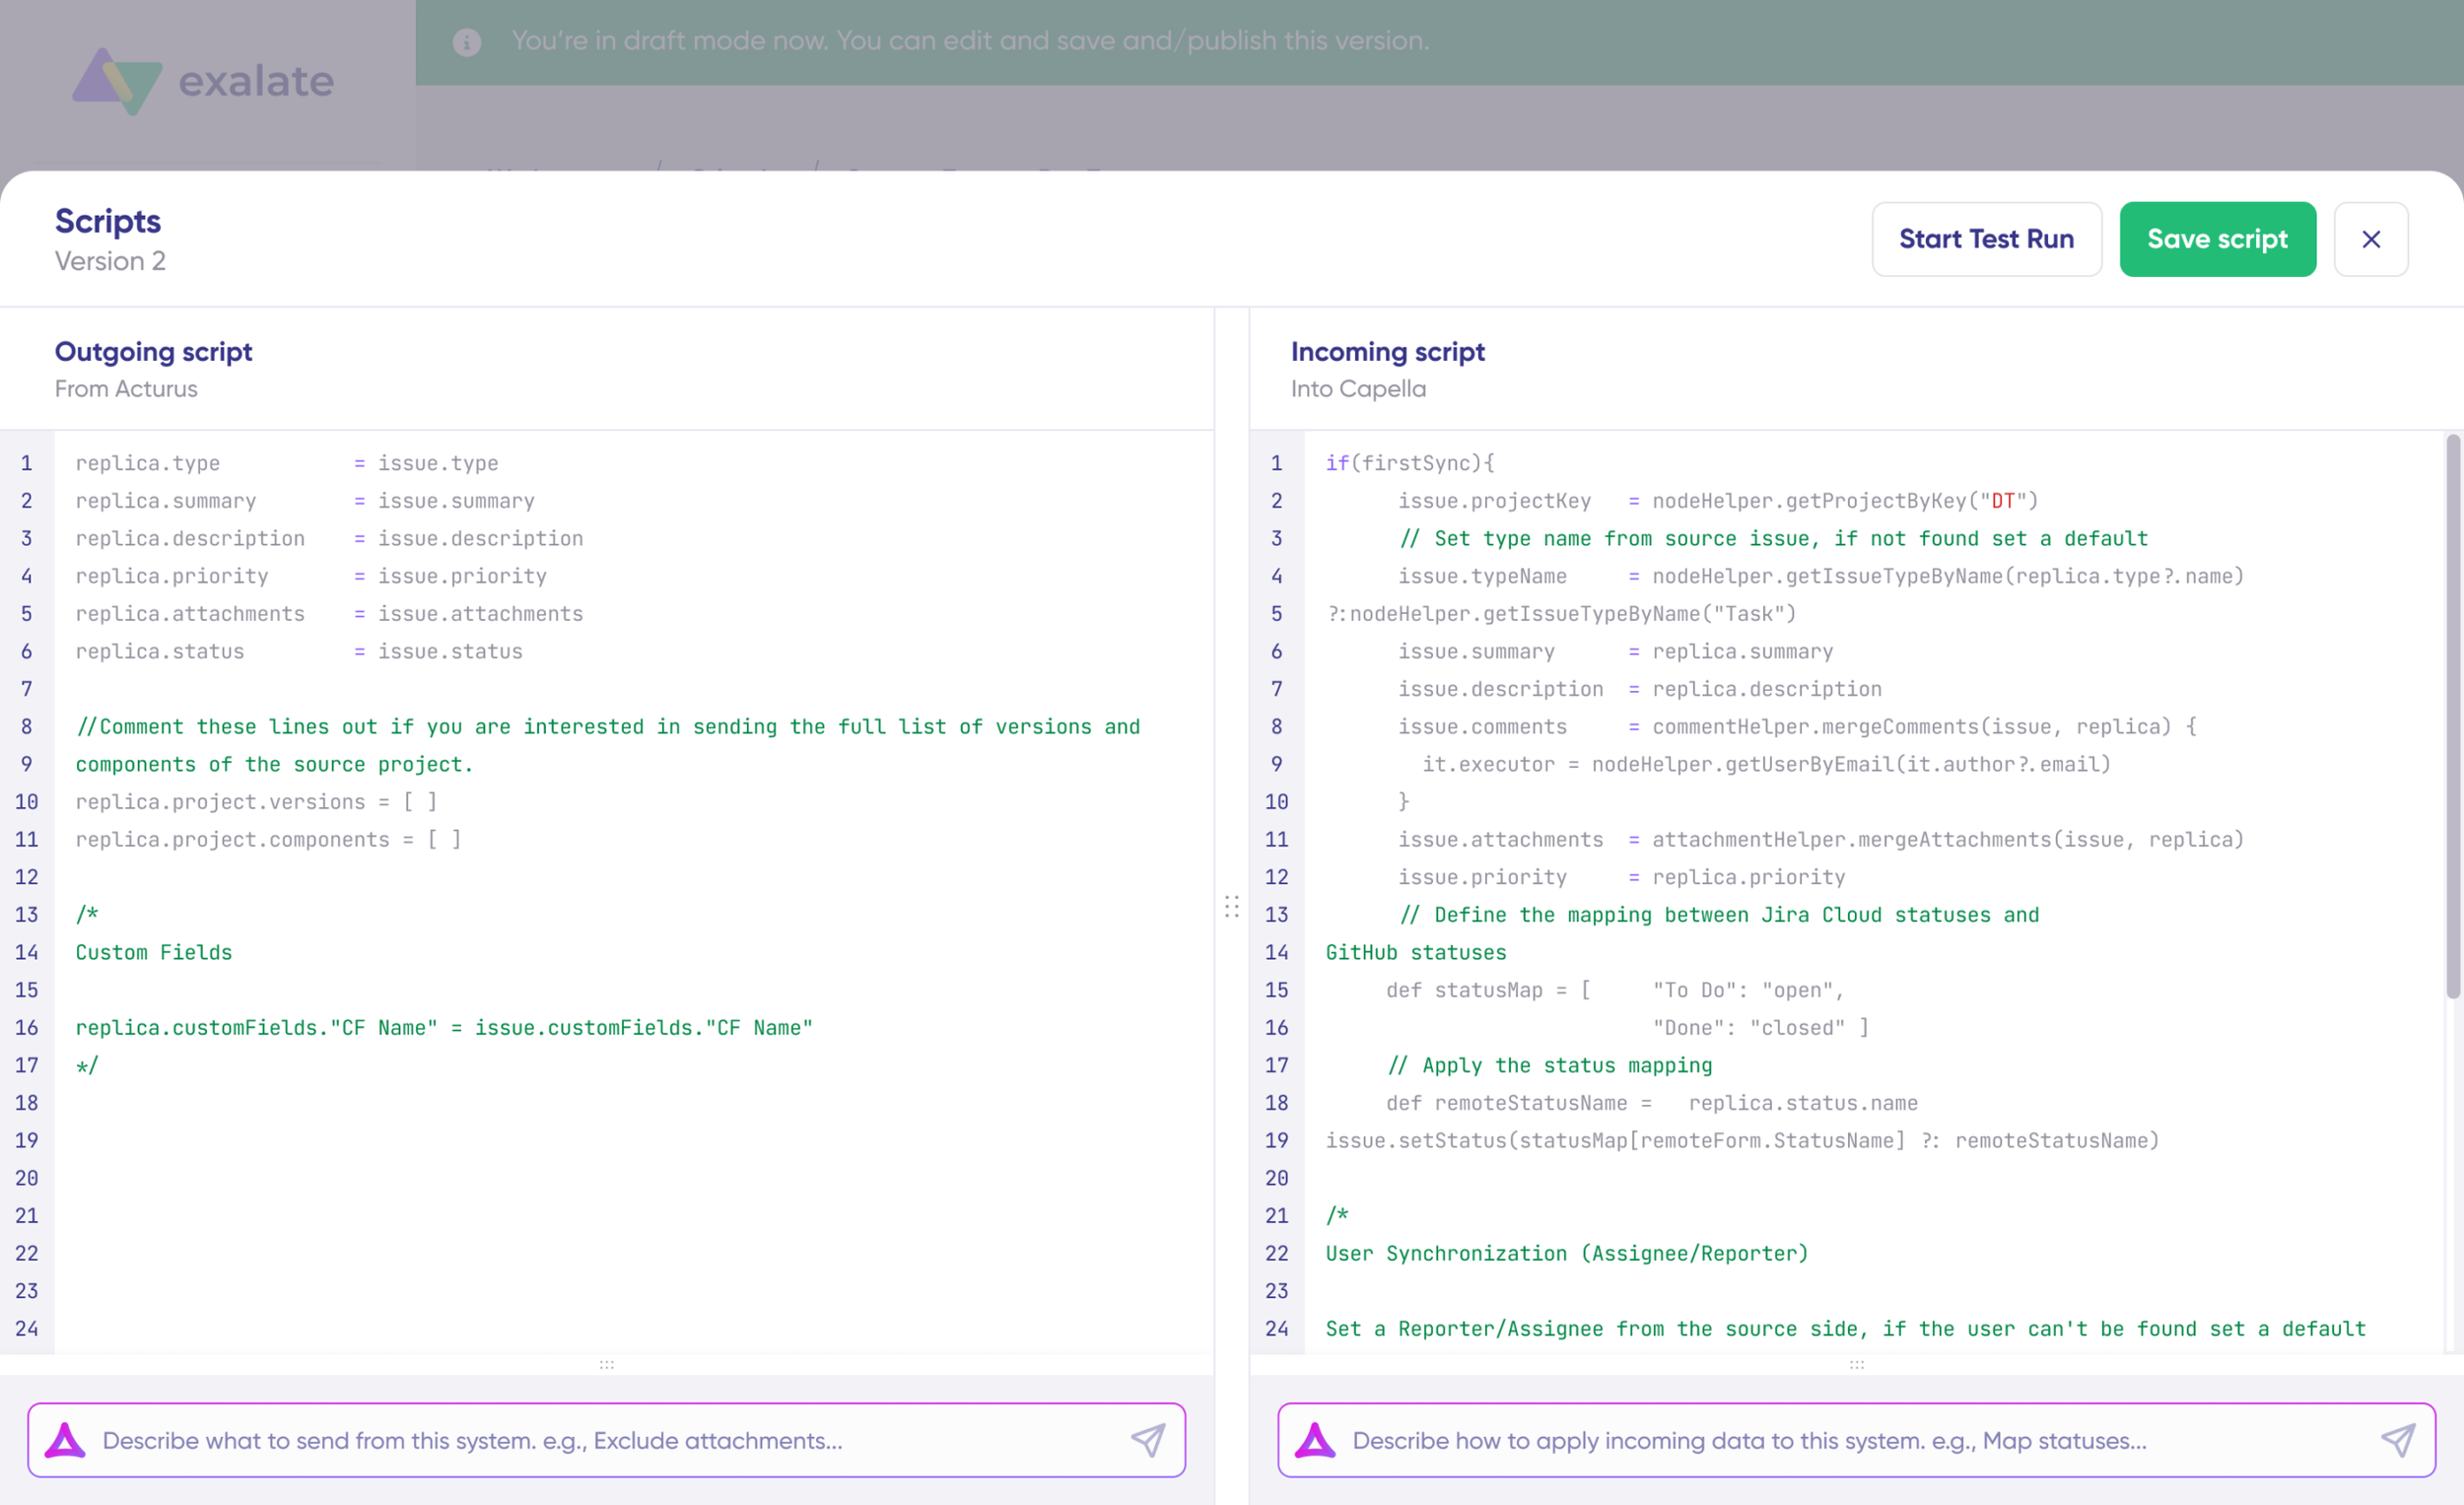
Aida assists in two ways:
For Outgoing scripts: Describe what data should leave your system. Example: “Only sync urgent tickets.”
For Incoming scripts: Describe how incoming data should be applied to your system. Example: “Map ticket status to incident state.”
Based on Exalate’s scripting API and your existing configuration, Aida generates working Groovy scripts with proper field mappings.
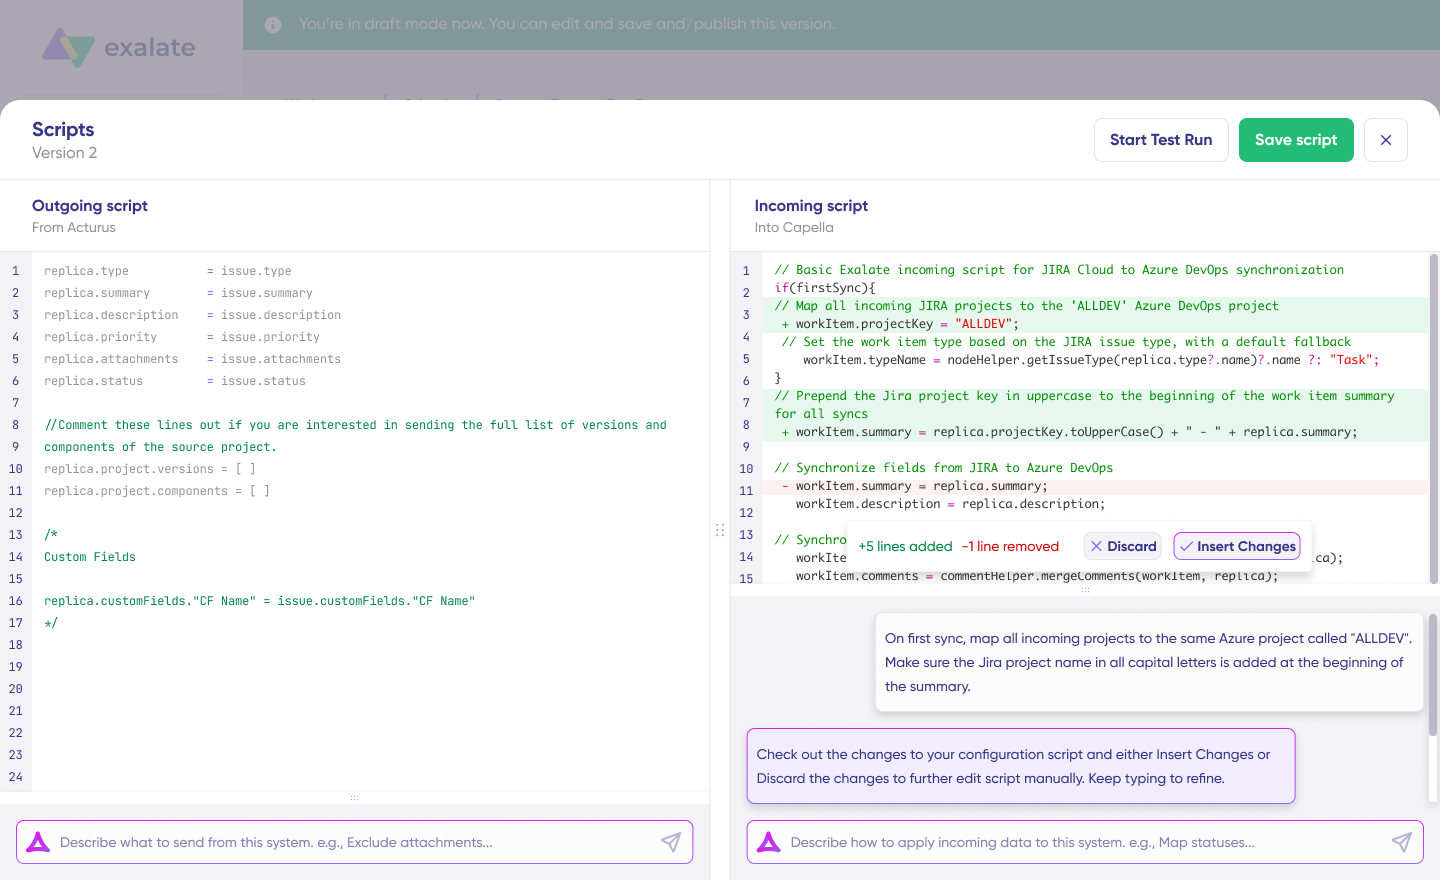
After Aida drafts your script, review the suggested changes. Green highlights indicate new lines being added, while red highlights show lines being removed. Choose to “Insert Changes” or “Discard” Aida’s suggestions.
Outgoing and incoming scripts operate independently, as does Aida, so maintain separate context and direction for each prompt.
Note: Aida is helpful, but like any AI tool, always review generated code before applying it to your integration.
Step 8: TestRun – Validate Before Production
Once your sync scripts are ready, choose “Save script” or test them using the “Start Test Run” option.
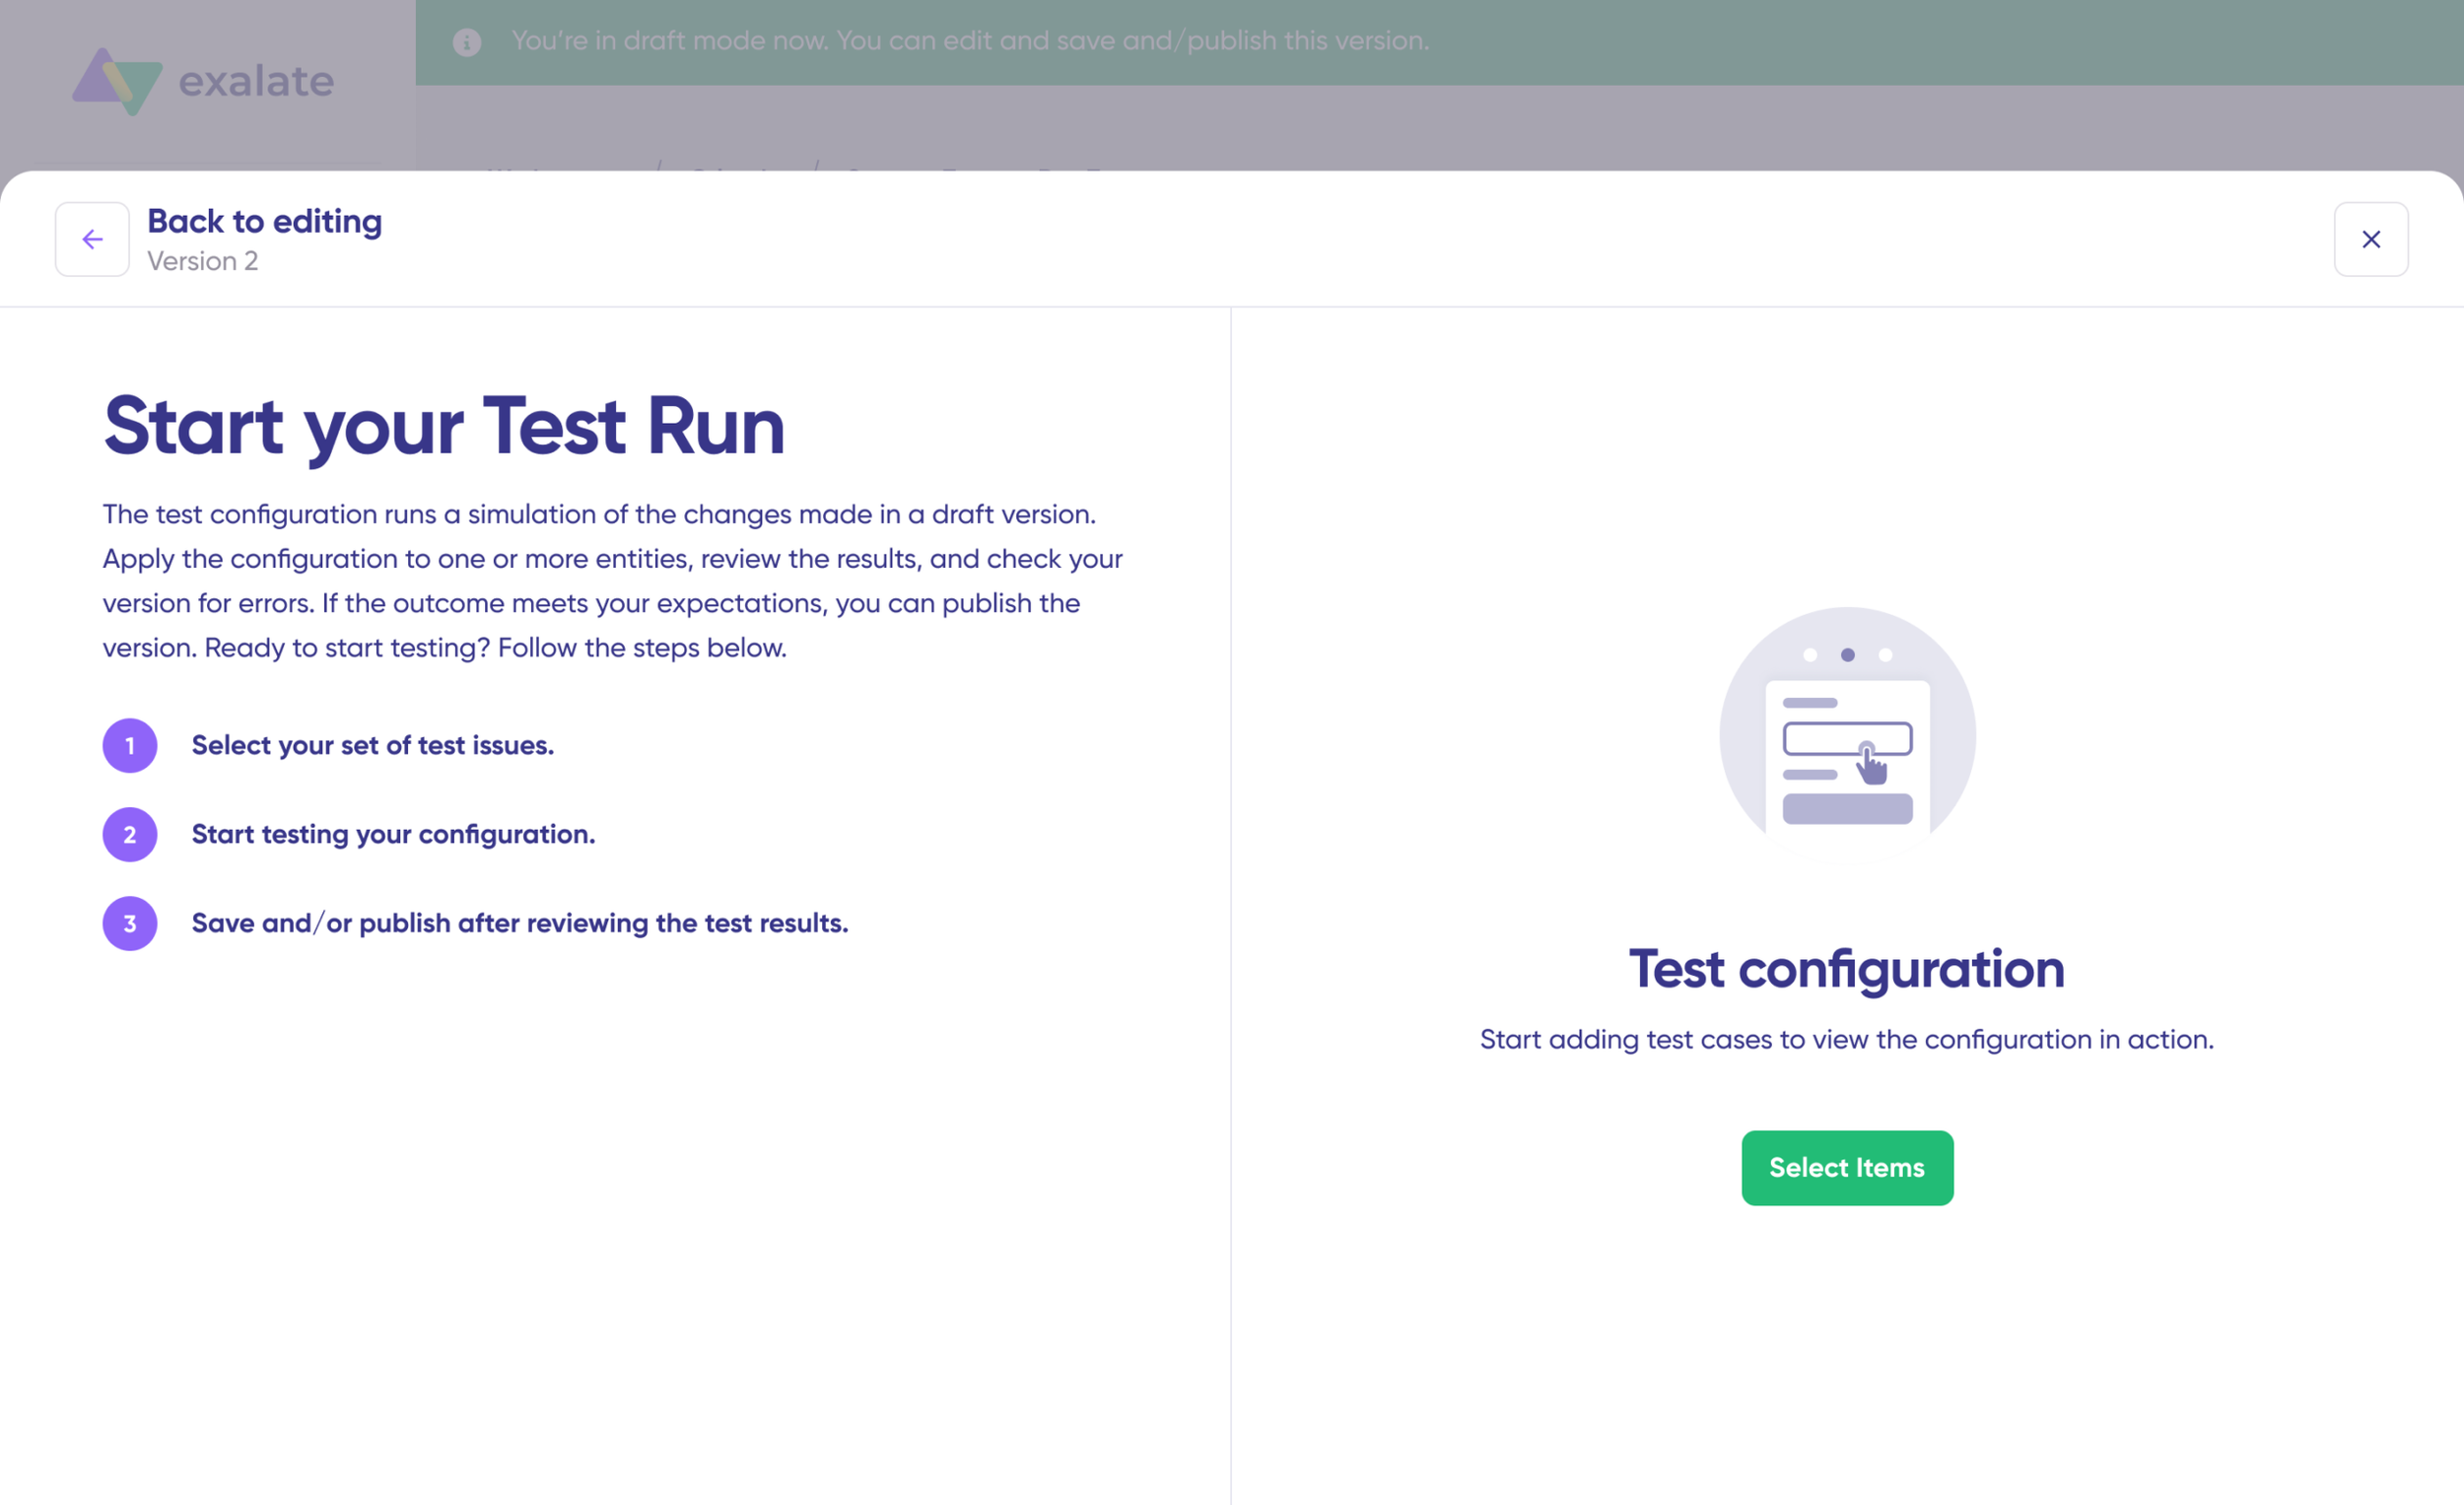
To test your configuration, “Select Items” you want to apply the sync to—multiple items can be selected simultaneously.
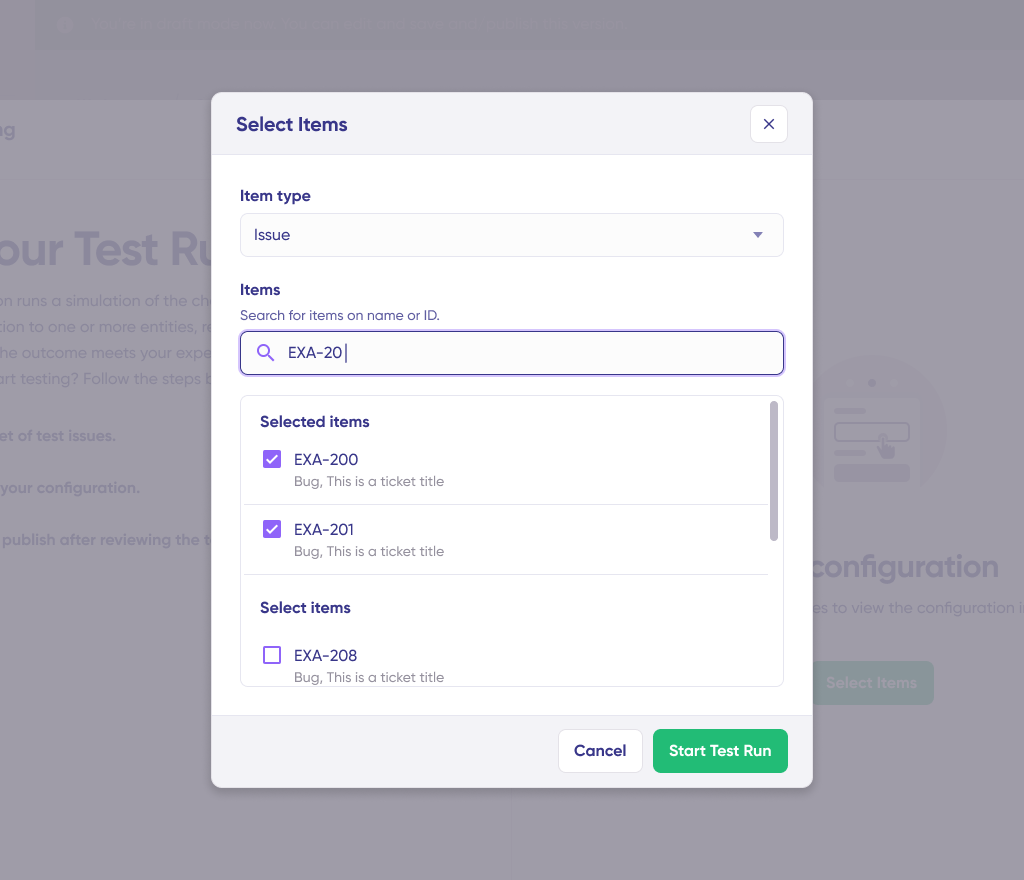
Click “Start Test Run” to proceed. View all incoming and outgoing replicas for each selected item in their respective tabs.
Preview how the sync configuration applies to your items, examine the replica, and verify that field mappings appear correct.

If adjustments are needed, return to the editor, modify scripts, and test again. Deploy only when you’re confident everything works as expected. This safety mechanism prevents errors from affecting production data.
Step 9: Publish Your Configuration
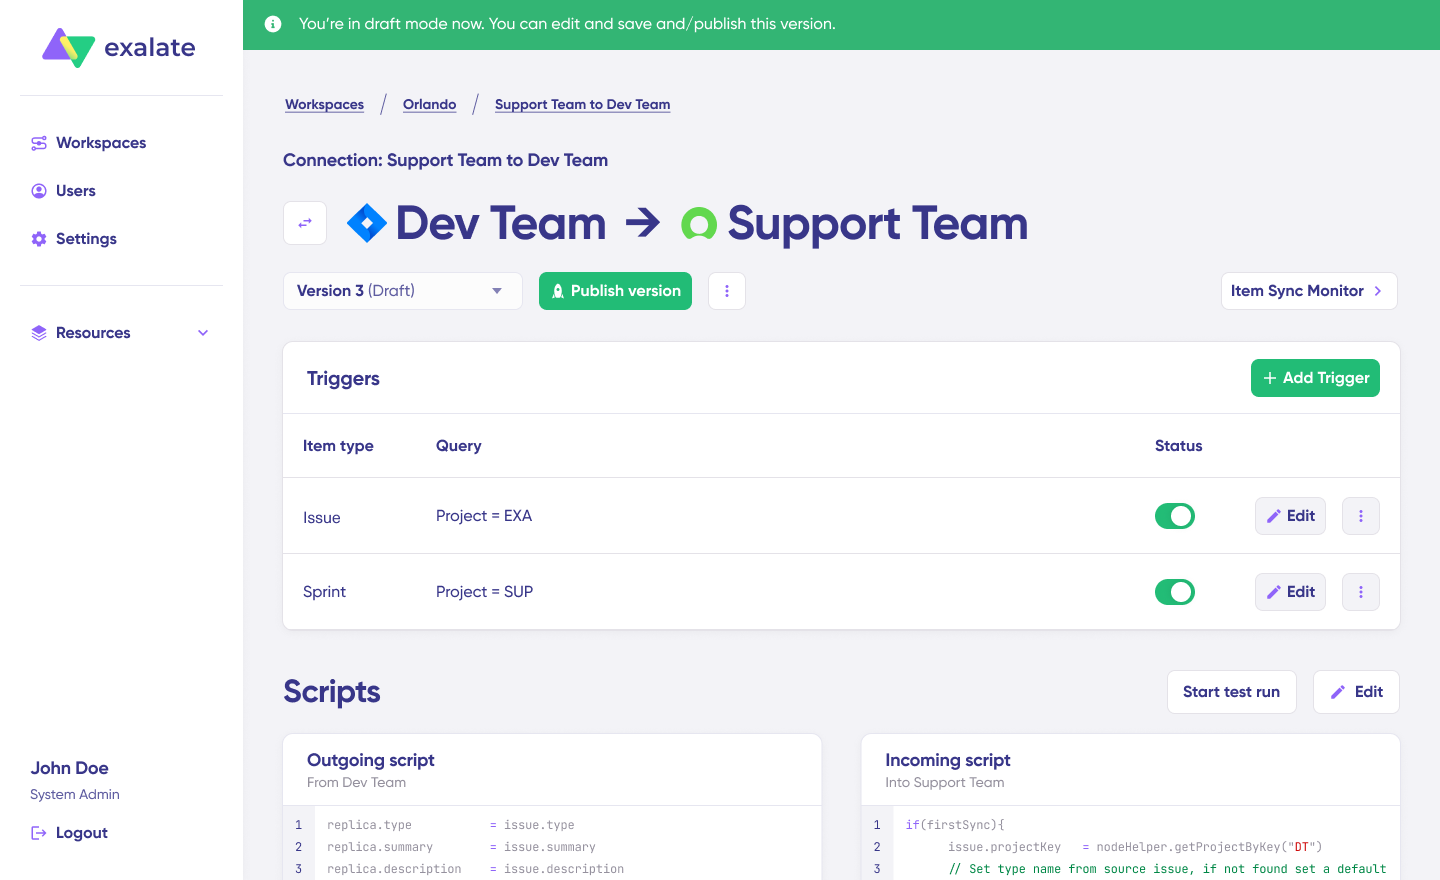
When everything meets your requirements, click “Publish Version” to apply your updated configuration to live synchronization. All versions for a connection are accessible in the “Version” dropdown, showing statuses as either “Active,” “Draft” (editable), or “Archived.”
Step 10: Configure Triggers for Automatic Sync
To enable automatic synchronization, add “Triggers“—conditions or filters applied to specific items. Examples include syncing all Zendesk tickets with a specific tag or all ServiceNow incidents belonging to a particular assignment group.
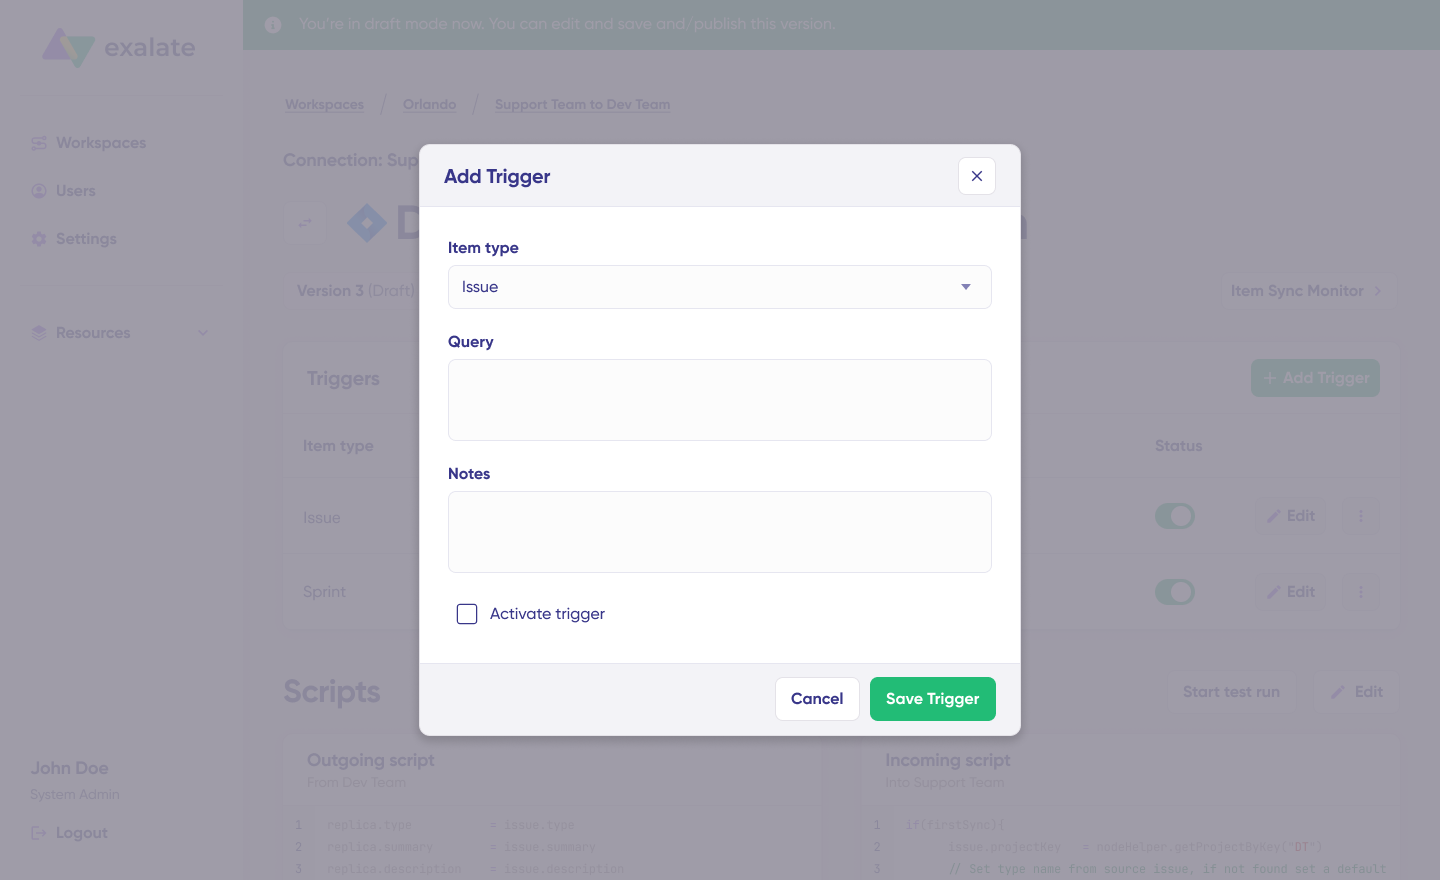
Click the “+ Add trigger” button to create triggers. These triggers are platform-specific:
- For Zendesk: Use Zendesk’s search syntax to specify conditions for tickets based on priority, status, tags, or custom fields.
type:ticket status:open
This code snippet will only sync open tickets.
- For ServiceNow: Use advanced search syntax to apply triggers to incidents, problems, change requests, or other entities based on assignment group, priority, or custom criteria.
urgency=1
This code snippet will only sync incidents and entities with the highest urgency value.
Save your changes by publishing them. This will automatically activate the trigger.
Step 11: Troubleshooting with Aida
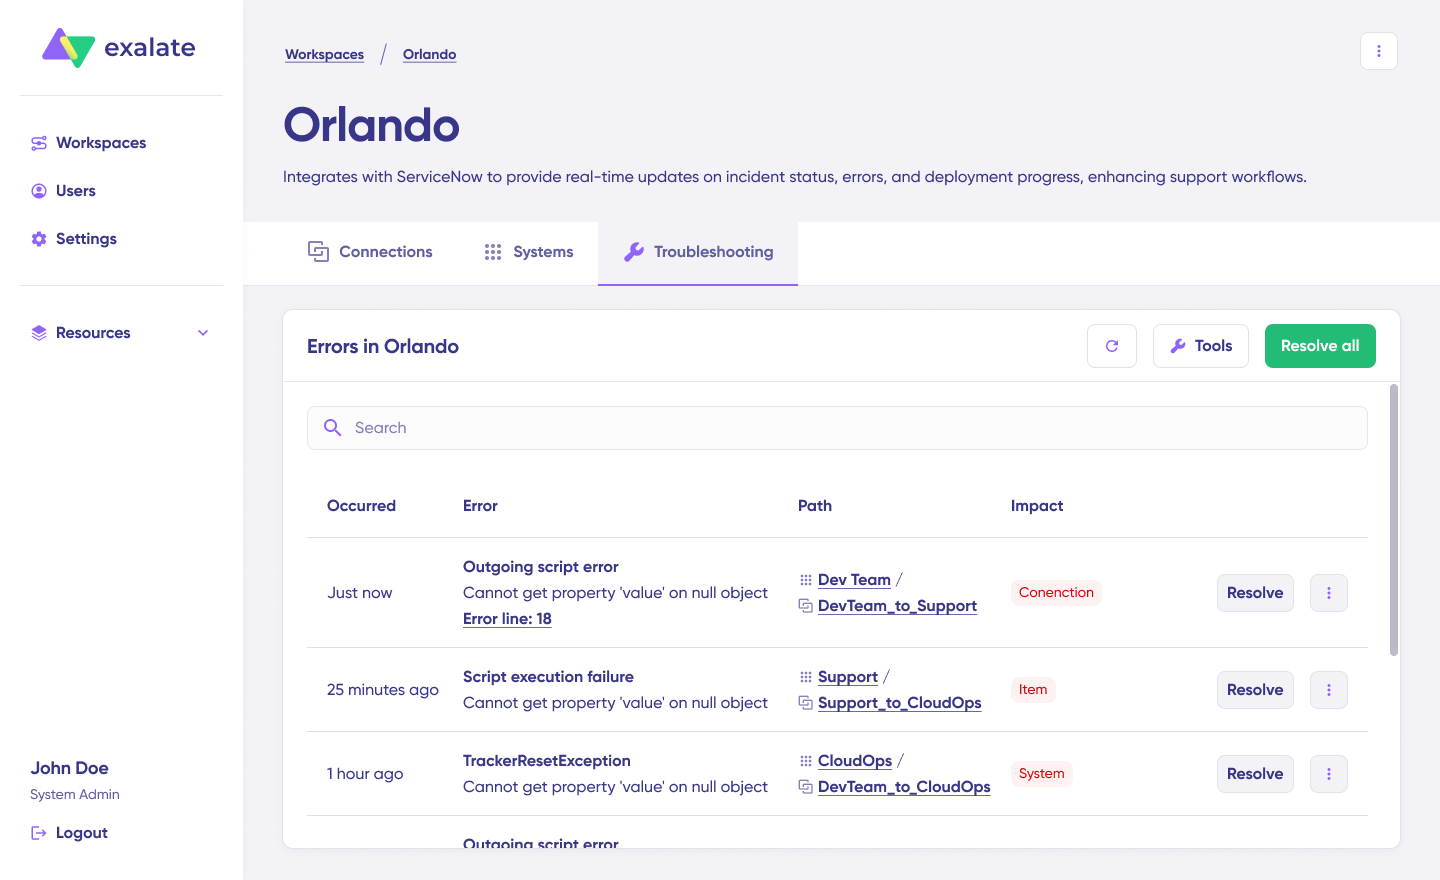
Aida accelerates error troubleshooting by offering clear, context-aware suggestions directly where errors appear.
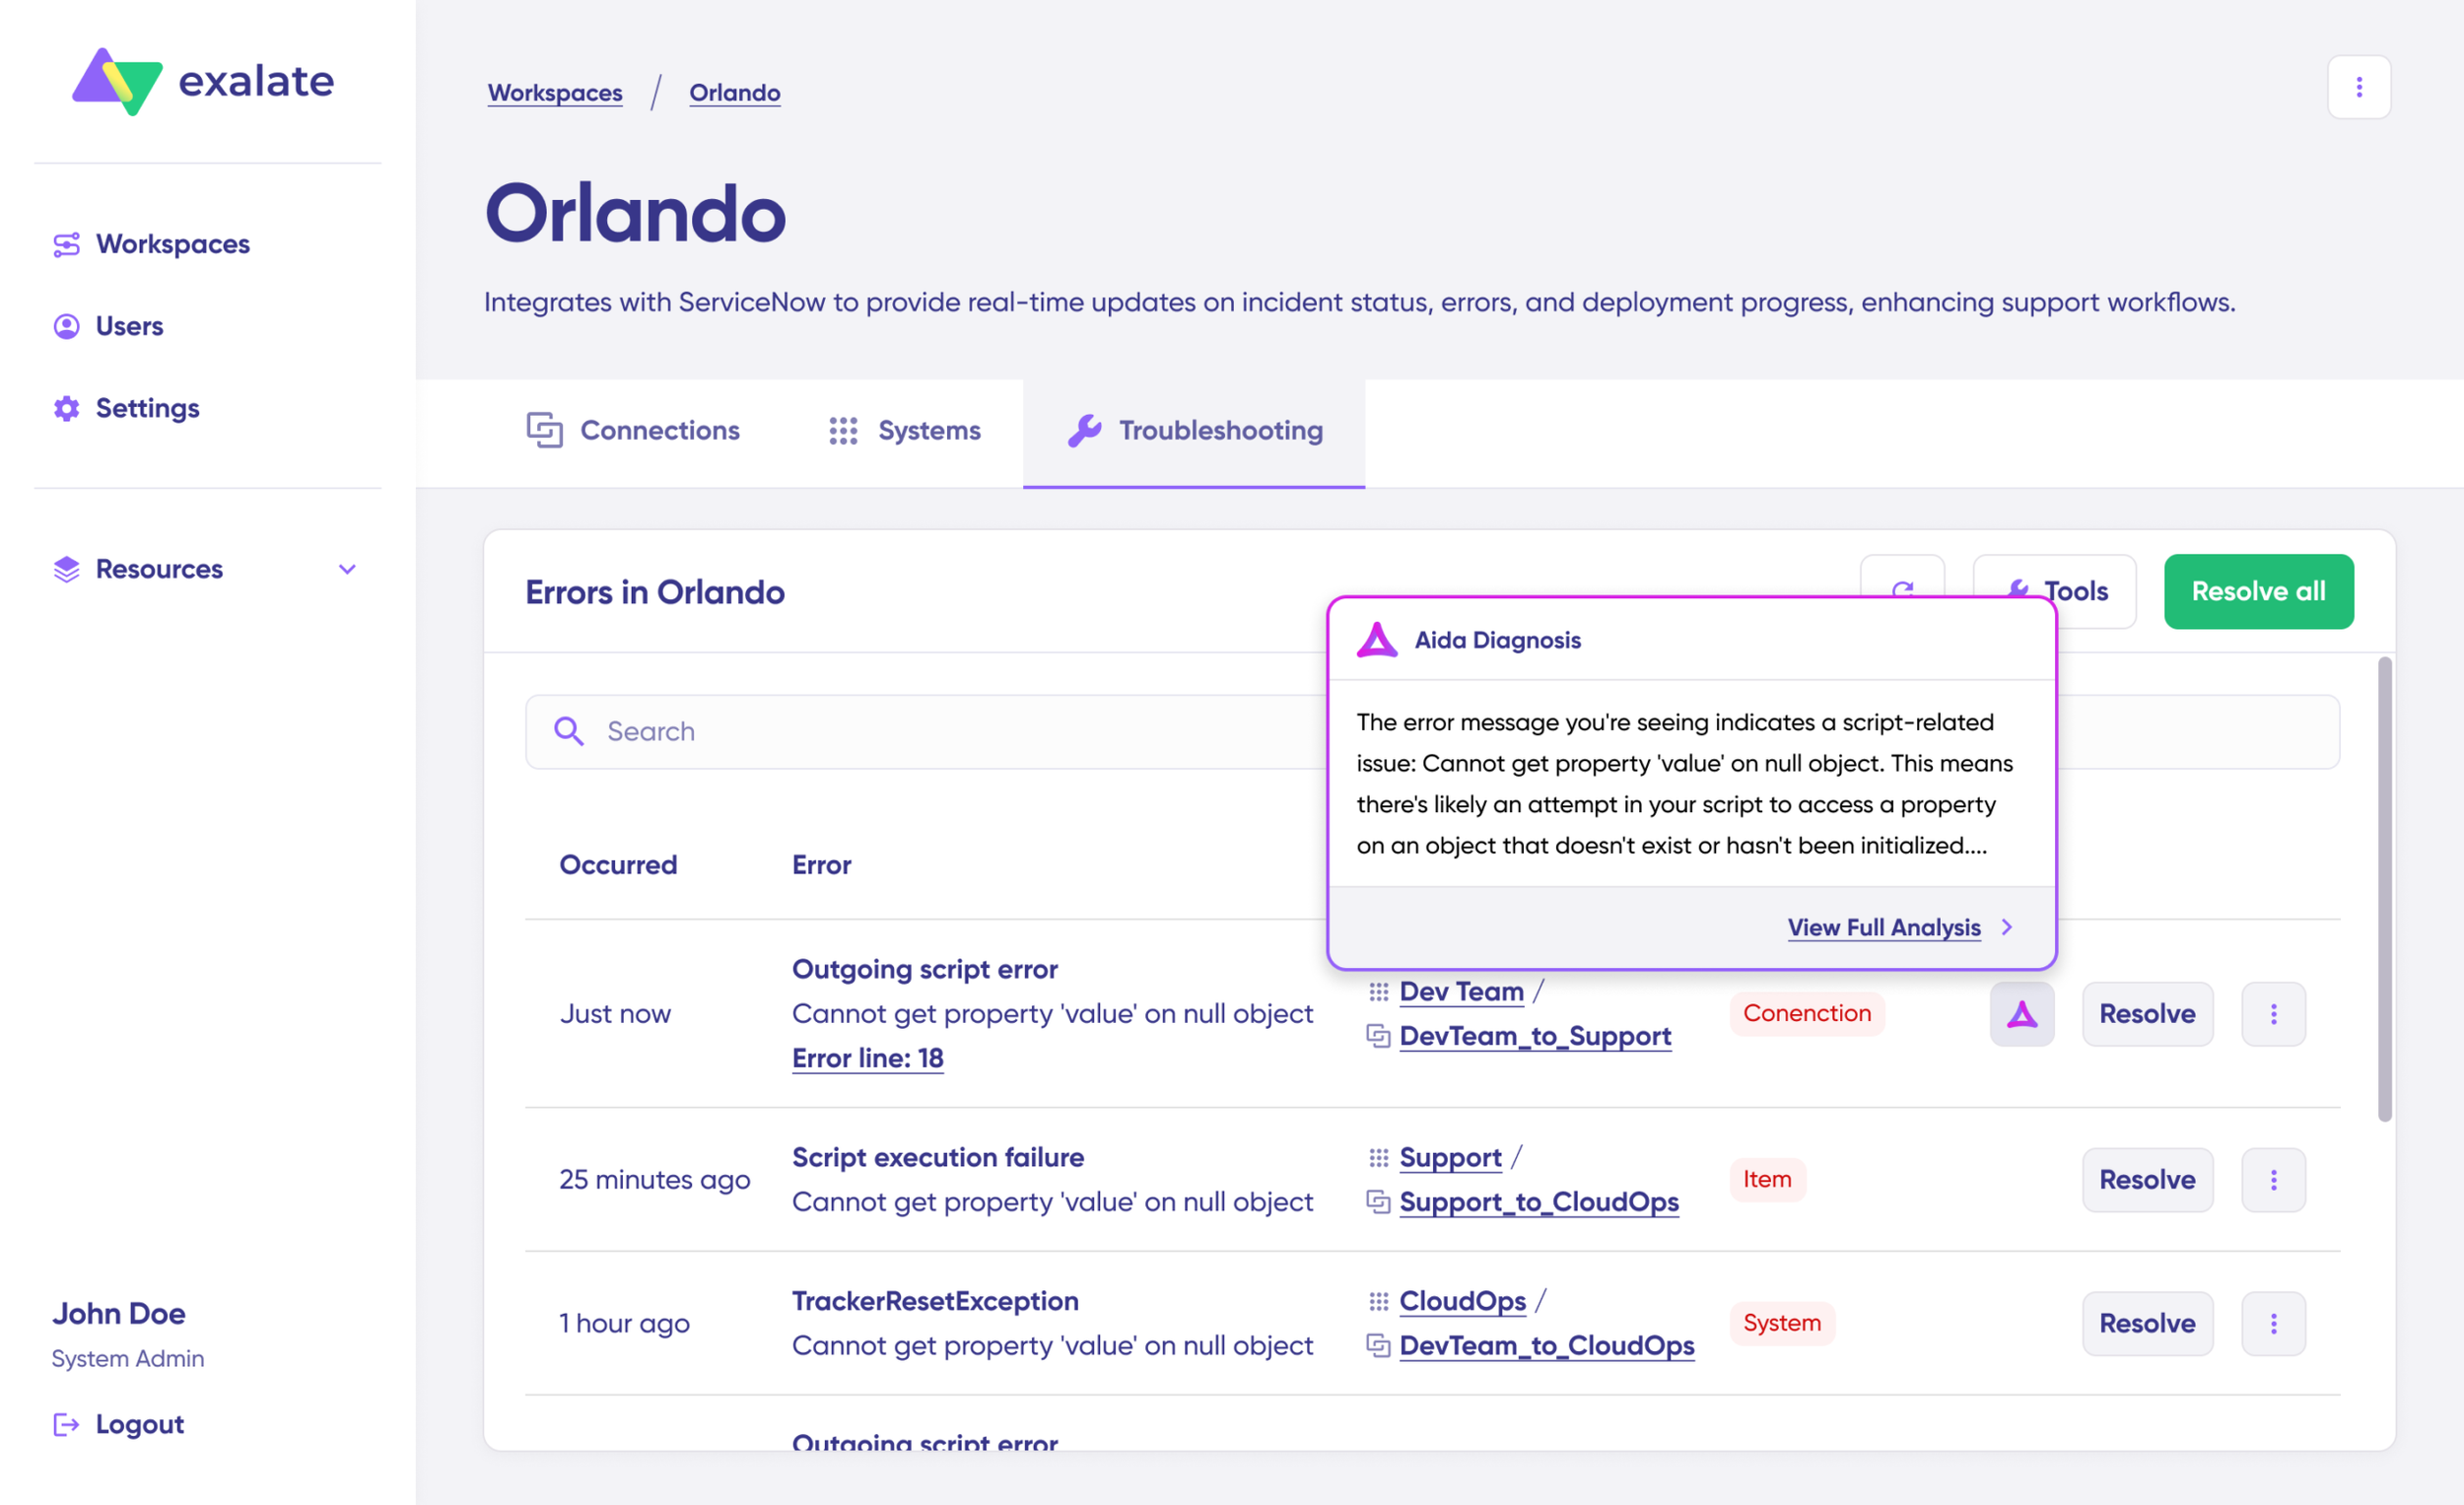
When errors occur, navigate to the “Troubleshooting” tab in your workspace. Hover over the error you want to diagnose and click the Aida icon that appears beside it. The AI-generated suggestion displays in a modal window, including a concise error explanation and proposed solution.
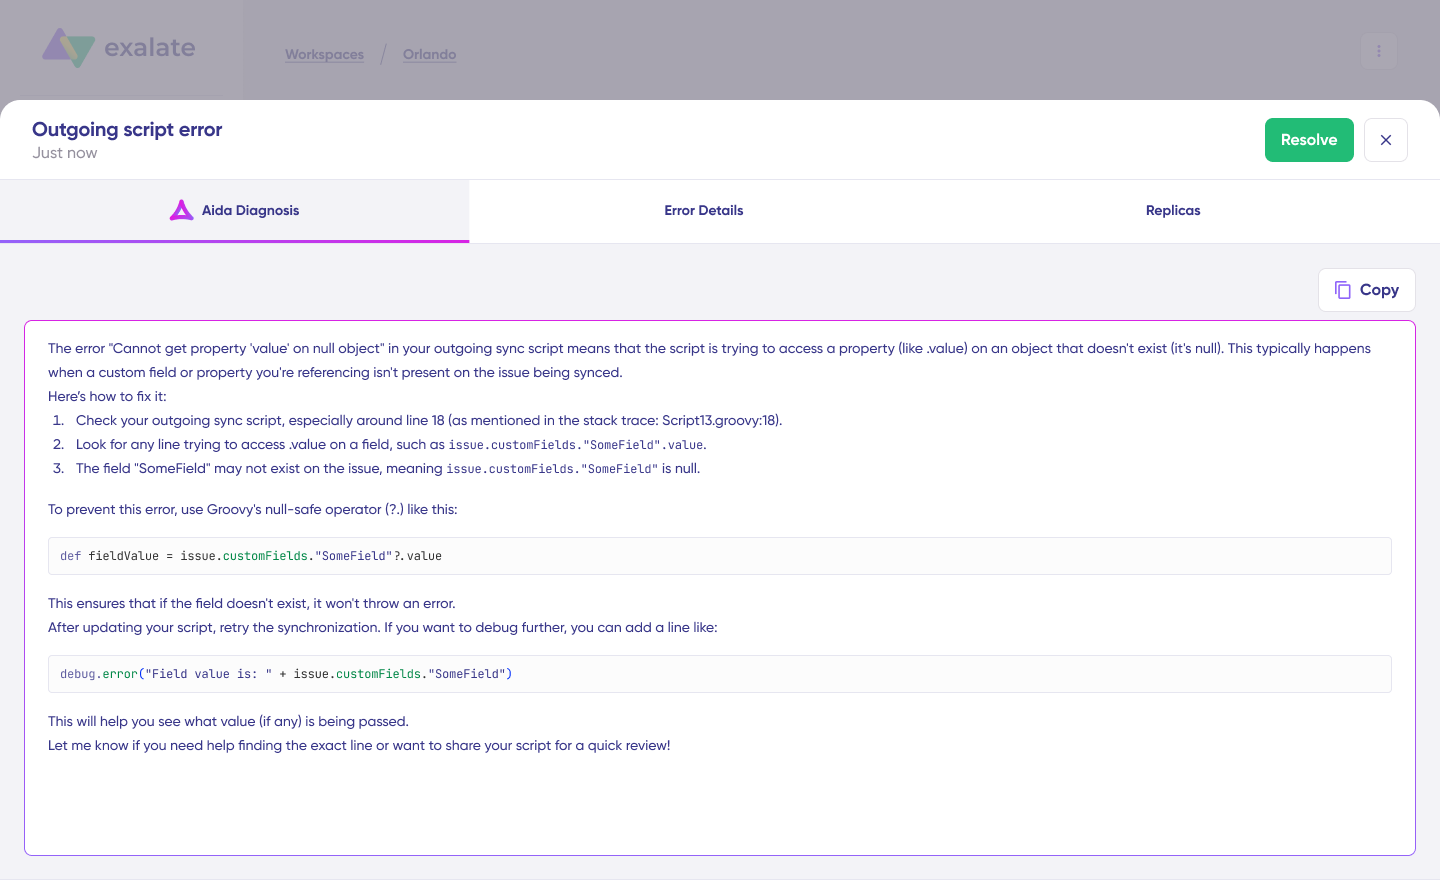
Select “View Full Analysis” for additional context. Access “Error details” to copy the stack trace or view “Replicas” in JSON format if needed. Choose “Resolve” to apply fixes and retry failed synchronizations.

Zendesk to ServiceNow Use Cases: How Organizations Leverage Integration
Case 1: Maintain Priority Across Platforms
Challenge: When tickets move between Zendesk and ServiceNow, priority levels must convey the same urgency to both teams. Misaligned priorities lead to delayed responses and frustrated customers.
Solution: Exalate maps priority fields bidirectionally, ensuring a high-priority ServiceNow change request automatically reflects as high priority in Zendesk. Triggers on the Zendesk side can escalate and sort tickets automatically based on synchronized priority levels.
Real-World Application: A financial services company routes critical customer issues from Zendesk to ServiceNow for backend system changes. High-priority tickets trigger immediate notifications to on-call engineers, reducing response time from hours to minutes.
Case 2: Relay Progress Updates in Real Time
Challenge: Support teams in Zendesk need visibility into ServiceNow incident progress without manually requesting updates. IT teams need to know when support marks tickets as resolved.
Solution: Status and state synchronization keep both teams informed. When ServiceNow changes an incident state to “In Progress,” the corresponding Zendesk ticket status updates automatically. Comments added on either side appear in both systems.
Real-World Application: A SaaS company’s support team creates Zendesk tickets for reported outages. As the ServiceNow incident moves through investigation, diagnosis, and resolution states, support representatives see real-time updates and can proactively communicate with customers.
Case 3: Create Multi-Platform Connectivity Networks
Challenge: Complex workflows span multiple teams and platforms. A customer issue might require support, development, and QA involvement across Zendesk, ServiceNow, Jira, and Azure DevOps.
Solution: Exalate connects multiple platforms simultaneously, creating workflows that span organizational boundaries. Support receives customer reports in Zendesk, creates ServiceNow change requests for IT, escalates to development in Jira, and routes QA tasks to Azure DevOps, all automatically.
Real-World Application: A telecommunications provider handles network outage reports through this workflow: Customer → Zendesk ticket → ServiceNow incident → Jira work item for engineering → Azure DevOps task for testing. Each team sees only relevant information, reducing clutter while maintaining end-to-end visibility.
Case 4: Synchronize Custom Fields for Complete Context
Challenge: Standard field mapping (summary to description, status to state) doesn’t capture specialized information like customer sentiment scores, SLA tier, or custom categorization.
Solution: Custom field synchronization enables organizations to map Zendesk custom fields to ServiceNow custom fields. This ensures complete context transfer, including metadata that drives prioritization and routing decisions.
Real-World Application: An e-commerce company tracks customer lifetime value (CLV) in Zendesk custom fields. When syncing to ServiceNow, CLV data routes high-value customer issues to senior engineers automatically, improving retention rates.
Case 5: Track Product Launches and Release Issues
Challenge: New product launches generate ServiceNow incidents, change requests, and problems alongside increased Zendesk ticket volume. Teams need unified visibility into customer reception and technical issues.
Solution: Connected systems aggregate data across platforms, enabling stakeholders to track overall customer sentiment, identify release-related issues faster, and accelerate resolution timelines.
Real-World Application: A software company launching a mobile app update monitors Zendesk tickets for user complaints while tracking ServiceNow incidents for backend errors. Integration reveals that login issues stem from API changes, enabling rapid fixes before customer churn increases.
Case 6: Manage Multi-Company Collaborations
Challenge: Mergers, acquisitions, and partnerships require sharing data between organizations using different platforms. Security, data governance, and workflow differences complicate collaboration.
Solution: Exalate’s workspace-based approach gives each organization autonomous control over what data they share and how they transform it. One company uses Zendesk while their partner uses ServiceNow, but both maintain data security and compliance requirements.
Real-World Application: A healthcare provider partnering with a medical device manufacturer shares patient incident reports from Zendesk to the manufacturer’s ServiceNow system for product safety analysis—while filtering out protected health information (PHI) through custom scripts.
Case 7: Automate Asset and Configuration Management
Challenge: ServiceNow’s CMDB (Configuration Management Database) contains authoritative asset information, but support teams in Zendesk need this context when troubleshooting customer issues.
Solution: Integrate ServiceNow CMDB data with Zendesk tickets, automatically attaching relevant asset information, warranty status, and configuration details to support requests.
Real-World Application: An IT services company syncs hardware asset data from ServiceNow CMDB to Zendesk. When customers report laptop issues, support representatives immediately see warranty status, hardware specifications, and previous incident history.
Case 8: Handle Customer Escalations Systematically
Challenge: High-severity customer complaints require immediate IT attention, but manual escalation processes introduce delays and inconsistencies.
Solution: Automated escalation rules create ServiceNow incidents when Zendesk tickets meet specific criteria—priority level, customer tier, keyword detection, or sentiment analysis scores.
Real-World Application: A cloud hosting provider automatically escalates any Zendesk ticket containing “data loss” or “security breach” to ServiceNow’s security incident response team, ensuring immediate investigation regardless of time zone or staff availability.
Case 9: Coordinate Change Management Processes
Challenge: IT changes managed in ServiceNow impact the services customers use, requiring coordinated communication through Zendesk support channels.
Solution: Sync ServiceNow change requests with Zendesk to notify support teams of planned maintenance, outages, or service modifications. Support can proactively communicate with affected customers.
Real-World Application: A financial institution syncs ServiceNow change requests for banking system updates to Zendesk, automatically creating internal tickets that prompt support to notify business customers about upcoming maintenance windows.
Security Considerations for Zendesk-ServiceNow Integration
Enterprise integrations require robust security measures to protect sensitive customer and operational data.
Exalate provides comprehensive security features:
- ISO 27001 certification demonstrates Exalate’s commitment to information security management best practices. Independent audits verify security controls meet international standards.
- Encryption of data in transit and at rest protects information throughout the synchronization process. TLS encryption secures API communications between Zendesk and ServiceNow, while encrypted storage protects data at rest.
- Role-based access control (RBAC) limits who can configure integrations, view synchronization logs, and modify data transformation rules. Granular permissions ensure only authorized personnel have access to sensitive integration settings.
- Full scripting and operational control give your team complete authority over synchronization logic. Custom scripts enable data filtering, field transformation, and business rule enforcement without exposing sensitive information to third parties.
- Compliance support helps organizations meet regulatory requirements, including GDPR, HIPAA, and SOC 2. Data residency options and audit logging facilitate compliance reporting.
For detailed security documentation, whitepapers, and compliance certifications, visit the Exalate Trust Center.
Exalate offers subscription-based plans tailored to your integration complexity, data volume, and number of connected platforms.

Calculate time and money savings from automated bidirectional sync.
Best Practices for Zendesk-ServiceNow Integration Success
Based on implementations across hundreds of organizations, these practices ensure reliable, secure integrations:
- Security first: Implement authentication protocols, enable role-based access controls, and monitor user activity. Regular security audits verify compliance with organizational policies.
- Collaborative planning: Work with both Zendesk and ServiceNow teams to develop field mapping strategies, approve transaction flows, and confirm which entities participate in synchronization. Cross-team alignment prevents configuration conflicts and ensures maximum impact.
- Choose appropriate sync directions: One-way syncs work for straightforward scenarios like fetching incident numbers from ServiceNow. Bidirectional syncs enable both teams to track priority levels, status updates, and resolution progress. Base decisions on compliance requirements and service-level agreements.
- Test thoroughly: Run integration tests in sandbox environments before production deployment. Testing identifies potential issues, validates field mappings, and confirms business rules execute correctly—especially important for cross-company collaborations.
- Enable your teams: Conduct training sessions explaining integration fundamentals, configuration procedures, and troubleshooting techniques. Well-trained teams make effective changes without external support.
- Monitor and optimize: Log errors and performance metrics continuously. Regular report analysis identifies optimization opportunities, capacity planning needs, and potential reliability improvements.
- Document everything: Maintain documentation of field mappings, business rules, and transformation logic. Documentation accelerates troubleshooting and knowledge transfer when team members change.
- Start small, scale gradually: Begin with a single use case or team before expanding integration scope. Incremental rollouts build confidence, refine configurations, and demonstrate value before organization-wide deployment.
Conclusion
Zendesk ServiceNow integration eliminates manual data sharing between support and IT teams, enabling seamless collaboration while each team works in their preferred platform. Exalate provides the autonomous, secure synchronization needed for both small team workflows and enterprise-scale deployments.
Your teams can now share information automatically, maintain control over what data they expose, and scale operations independently. Security features, including ISO certification, encryption, and role-based access control, protect sensitive information throughout the synchronization process.
Whether you’re connecting teams within a single organization or collaborating across company boundaries, Exalate’s workspace-based approach gives each side autonomy while maintaining data integrity and compliance.

Frequently Asked Questions
Does Zendesk integrate with ServiceNow?
Yes, Zendesk integrates with ServiceNow through third-party integration solutions available in both platforms’ marketplaces. Exalate provides autonomous synchronization with workspace-based setup, giving teams control over field mappings and data transformations.
What can I integrate between ServiceNow and Zendesk?
Exalate supports synchronization of any ServiceNow entity, including incidents, change requests, CMDB items, problems, customer cases, RITMs, and custom tables. On the Zendesk side, you can sync tickets along with any default or custom fields, attachments, and comments.
What security features does Exalate provide for Zendesk-ServiceNow integration?
Exalate provides ISO 27001 certification, encryption of data both in transit and at rest, role-based access control, and full scripting control over synchronization logic. For comprehensive security documentation, visit the Trust Center.
How does Exalate handle data transformation between Zendesk and ServiceNow?
Exalate uses configurable scripts and field mappings to transform data between Zendesk and ServiceNow schemas. Teams can define custom transformation rules, filter sensitive information, and apply business logic during synchronization.
Can I sync custom fields between Zendesk and ServiceNow?
Yes, Exalate supports custom field synchronization between Zendesk and ServiceNow. You can map custom fields on both platforms and apply transformation logic to ensure data appears in the correct format on each side.
How long does it take to set up Zendesk-ServiceNow integration with Exalate?
Setup time varies based on integration complexity. Simple configurations synchronizing standard fields can be operational within hours. Complex integrations involving custom fields, business rules, and multi-platform workflows may require several days for planning, configuration, and testing.
Does Exalate support real-time synchronization?
Yes, Exalate supports real-time synchronization between Zendesk and ServiceNow. Changes made on either platform trigger immediate synchronization, ensuring both teams see updated information within seconds.
Can I integrate multiple Zendesk instances with ServiceNow?
Yes, Exalate supports multi-instance integrations. You can connect multiple Zendesk instances to a single ServiceNow environment or establish complex many-to-many configurations based on your organizational structure.
How does Aida (AI-assisted configuration) help with setup?
Aida accelerates integration setup by generating synchronization scripts based on natural language descriptions of your requirements. It suggests field mappings, provides configuration documentation, and helps troubleshoot common setup issues.
What other platforms can I connect alongside Zendesk and ServiceNow?
Exalate supports Jira, Azure DevOps, Freshservice, Freshdesk, Asana, Salesforce, GitHub, and more. You can create multi-platform workflows connecting customer support, IT operations, development, and project management systems.
Recommended Reading:
- ServiceNow to ServiceNow Integration: The Step-by-Step Guide to Setting up a Two-Way Sync
- ServiceNow Integrations: Integrate ServiceNow and Other Systems Bidirectionally
- The Complete Guide to Azure DevOps to ServiceNow Integration
- Zendesk Integrations: Streamline Teams Working in Zendesk and Other Tools


