Developers and customer service agents must be in perfect sync to address user concerns promptly and correctly.
But here’s the thing: platforms like Azure DevOps and Freshdesk can’t exchange data by default. If one side needs data urgently, they’d have to put in a manual request to get it.
It doesn’t have to be this way. The alternative to manual data requests is automation and integration. This allows you to fetch vital information from specific fields in real-time.
All you need is a Freshdesk Azure DevOps integration that can interact with the APIs of both platforms. This tool handles data transformation and keeps the information secure.
This guide walks you through the real-life implementation of Freshdesk Azure DevOps integration using practical use cases, security considerations, and selection criteria.
Key Takeaways
- Freshdesk Azure DevOps integration automates data flow between customer support and development platforms, eliminating manual ticket transfers and status update requests.
- Integration solutions range from native plugins with basic sync to third-party tools like Exalate that offer bidirectional synchronization with full scripting control.
- Exalate provides AI-assisted configuration (Aida) for quick setup, plus Groovy-based scripting for complex sync scenarios, including multi-tenant MSP environments.
- Consider flexibility, scalability, affordability, and security when evaluating integration options for enterprise environments.

What is Freshdesk Azure DevOps Integration?
Freshdesk Azure DevOps integration is the process of using native tools, custom scripts, or third-party apps to connect instances of both platforms.
Freshdesk is commonly used by customer support staff. Azure DevOps is where developers manage code, builds, and work items. Getting them on the same wavelength ensures both sides share the data they need without manual intervention.
A proper integration:
- Connects to the APIs of both platforms
- Transforms data between different field types and structures
- Maintains security and compliance throughout the data flow
- Operates bidirectionally or unidirectionally based on your requirements.
Why Integrate Azure DevOps and Freshdesk?
Syncing Freshdesk and Azure DevOps boils down to getting both platforms to communicate and bridge the compatibility gap.
- Eliminate context-switching. Teams working on both Azure DevOps and Freshdesk stay in their own ecosystem while still accessing all the data they need. This applies to intra-company workflows and cross-company collaborations.
- Reduce platform licensing costs. When data flows automatically, you may reduce the need for full access to both platforms for certain team members.
- Access deeper analytics. Freshdesk’s omnichannel support funnels customer data to advanced analytics dashboards. Combined with Azure DevOps reporting, you get end-to-end visibility from customer complaint to code fix.
- Increase resolution speed. Integrating a help desk with a DevOps platform decreases time-to-resolution for pressing customer concerns. Support agents see development progress; developers see customer impact.
- Improve tracking and monitoring. Freshdesk to Azure DevOps integration provides timely updates and progress reports on demand. Managers track work items and tickets across the entire pipeline from a unified view.
What Should You Consider When Choosing a Freshdesk Azure DevOps Integration?
Before settling on a solution for connecting Freshdesk and Azure DevOps, make sure it ticks these boxes.
Flexibility and Scalability
Look for integration apps that offer flexibility to add extra projects, systems, and partners. This also extends to current volume and future expectations.
Pay attention to tools that adapt to increasing requirements and ticket loads. This becomes critical after major releases or security incidents when ticket volumes spike.
Affordability
Choose a solution that offers a favorable pricing model for your use case. Start with free offerings, then evaluate those with subscription-based pricing.
The trick is finding a solution that handles your use case at the lowest possible price point while offering all the features you need. Exalate offers subscription-based plans calculated by usage volume.
Visit the pricing page for details.
Security and Privacy
Security when handling data is non-negotiable. It should form the core of your choice because most partners won’t compromise on security.
Check these security features:
- Encryption: Data protection in transit and at rest
- Certifications: ISO 27001 compliance
- Access control: Role-based permissions for configuration changes
- Operational control: Full scripting control over what data syncs and how
Exalate addresses security concerns through multiple layers of protection. Learn more from the Exalate Trust Center.
Type of Integration Solution
You can choose native, custom, or third-party integrations depending on technical requirements and budget.
- Native integrations are hosted by Freshdesk or the Azure DevOps marketplaces. They provide basic synchronization options like creating work items from tickets or linking existing items. These work for simple use cases but offer limited customization.
- Custom solutions are produced and maintained in-house for specific use cases. However, the cost of internally managed solutions can skyrocket as integration requirements expand.
- Third-party applications allow bidirectional data exchange between platforms. This option balances default syncs with custom configuration. The third party manages the solution and offers the iPaaS option to customers. Exalate falls into this category.
Bidirectional Synchronization
One-way sync only tells half the story. Look for tools that support true bidirectional synchronization, where changes on either side automatically reflect on the other. When a developer updates a work item status in Azure DevOps, the corresponding Freshdesk ticket should update, and vice versa.
Custom Field Mapping
Standard fields (title, description, priority) aren’t enough. Enterprise environments rely heavily on custom fields. Your integration tool should map any field accessible via API, including custom fields specific to your Freshdesk or Azure DevOps configuration.
Automated Triggers
Triggers specify conditions for automatic ticket or work item escalation. Instead of syncing everything, you define rules: sync only high-priority tickets, sync only bugs (not features), or sync based on specific custom field values.
AI-Assisted Configuration
Manual configuration is time-consuming. Tools like Exalate offer Aida (AI-assisted configuration) to generate sync rules from plain-language descriptions. Describe what you want to sync, and Aida produces the configuration. Refine as needed.
Scripting Control
AI-assisted setup handles common scenarios, while complex requirements need scripting. Look for tools that offer full scripting control; Exalate uses Groovy-based scripts that let you transform data, apply conditional logic, and integrate with external systems.
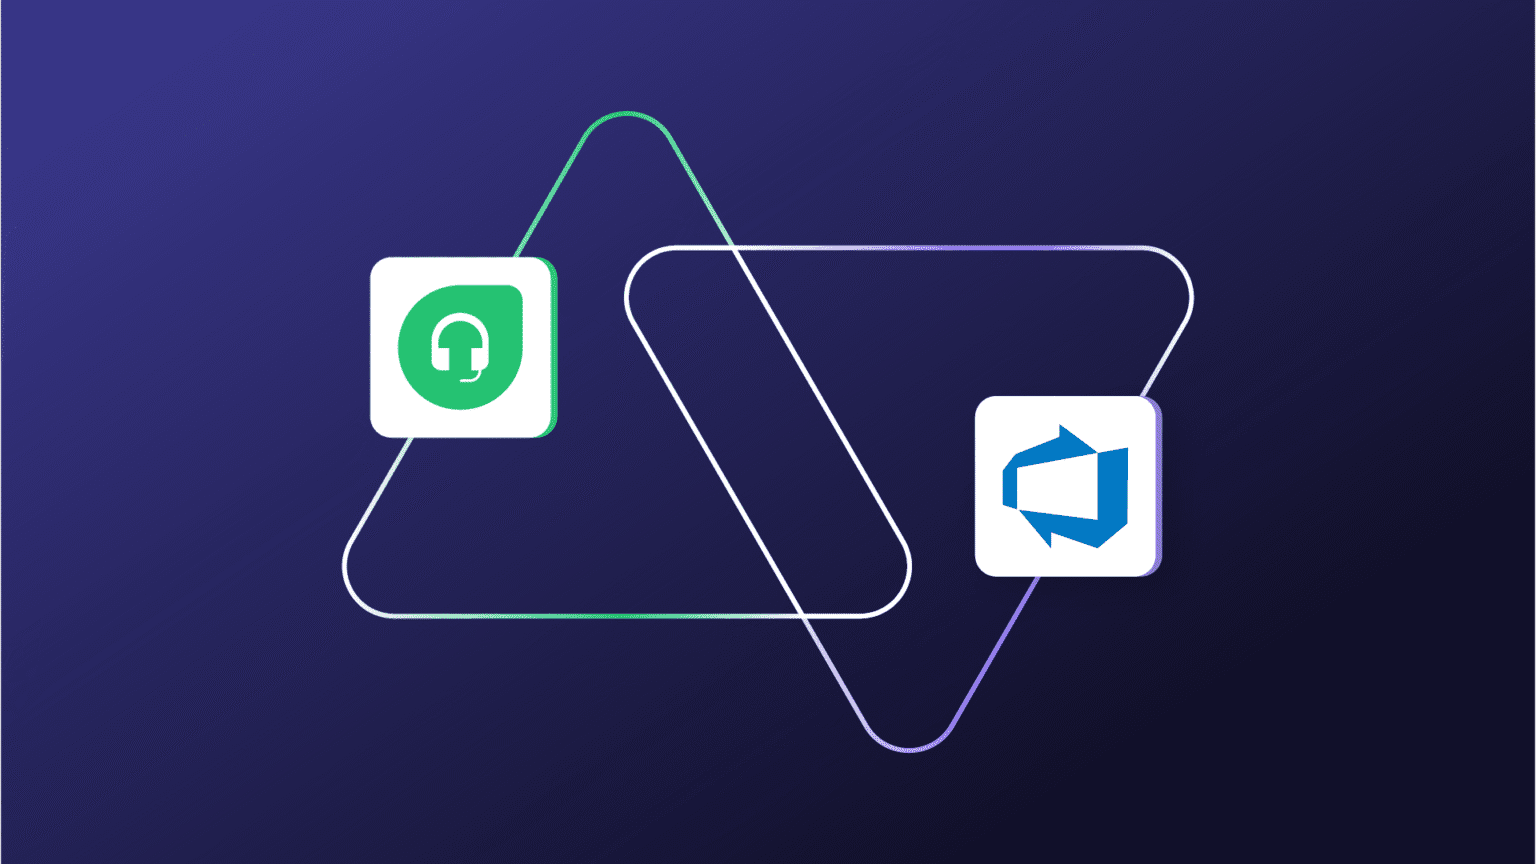
Why Use Exalate for Freshdesk Azure DevOps Integration?
Exalate is an AI-powered integration tool that supports one-way and two-way custom connections between Freshdesk and Azure DevOps.
Beyond these two platforms, Exalate connects with:
- ITSM platforms: ServiceNow, Zendesk, Freshservice
- Development platforms: Jira, GitHub, Azure DevOps Server
- CRM and business tools: Salesforce, Asana
- Custom systems: REST API-based custom connectors
Exalate stands out for these reasons:
- AI-assisted configuration with Aida. Describe your sync requirements in plain language. Aida generates the appropriate configuration, which you can refine or extend with scripting.
- Groovy-based scripting. Advanced integration scenarios get full scripting support. Transform data, apply conditional logic, and customize behavior without limitations.
- Automated triggers. Use automated triggers to specify conditions for automatic ticket or work item escalation.
- Managed services option. The IaaS option lets you offload integration configuration to experienced engineers who handle setup and maintenance.
- Scales automatically. Exalate scales according to ticket volume or the number of work items without requiring additional maintenance or upgrades.

Calculate time and money savings from automated bidirectional sync.
How to Integrate Freshdesk and Azure DevOps with Exalate: Step-by-Step Guide
This tutorial walks you through setting up a Freshdesk Azure DevOps integration using Exalate.
Step 1: Create Your Exalate Account
Head over to the Exalate integrations page to get started. If you’re new, create an account by entering your email and verifying it, or sign up directly through Google. Already have an account? Just log in to start setting up connections.
Step 2: Set Up a Workspace
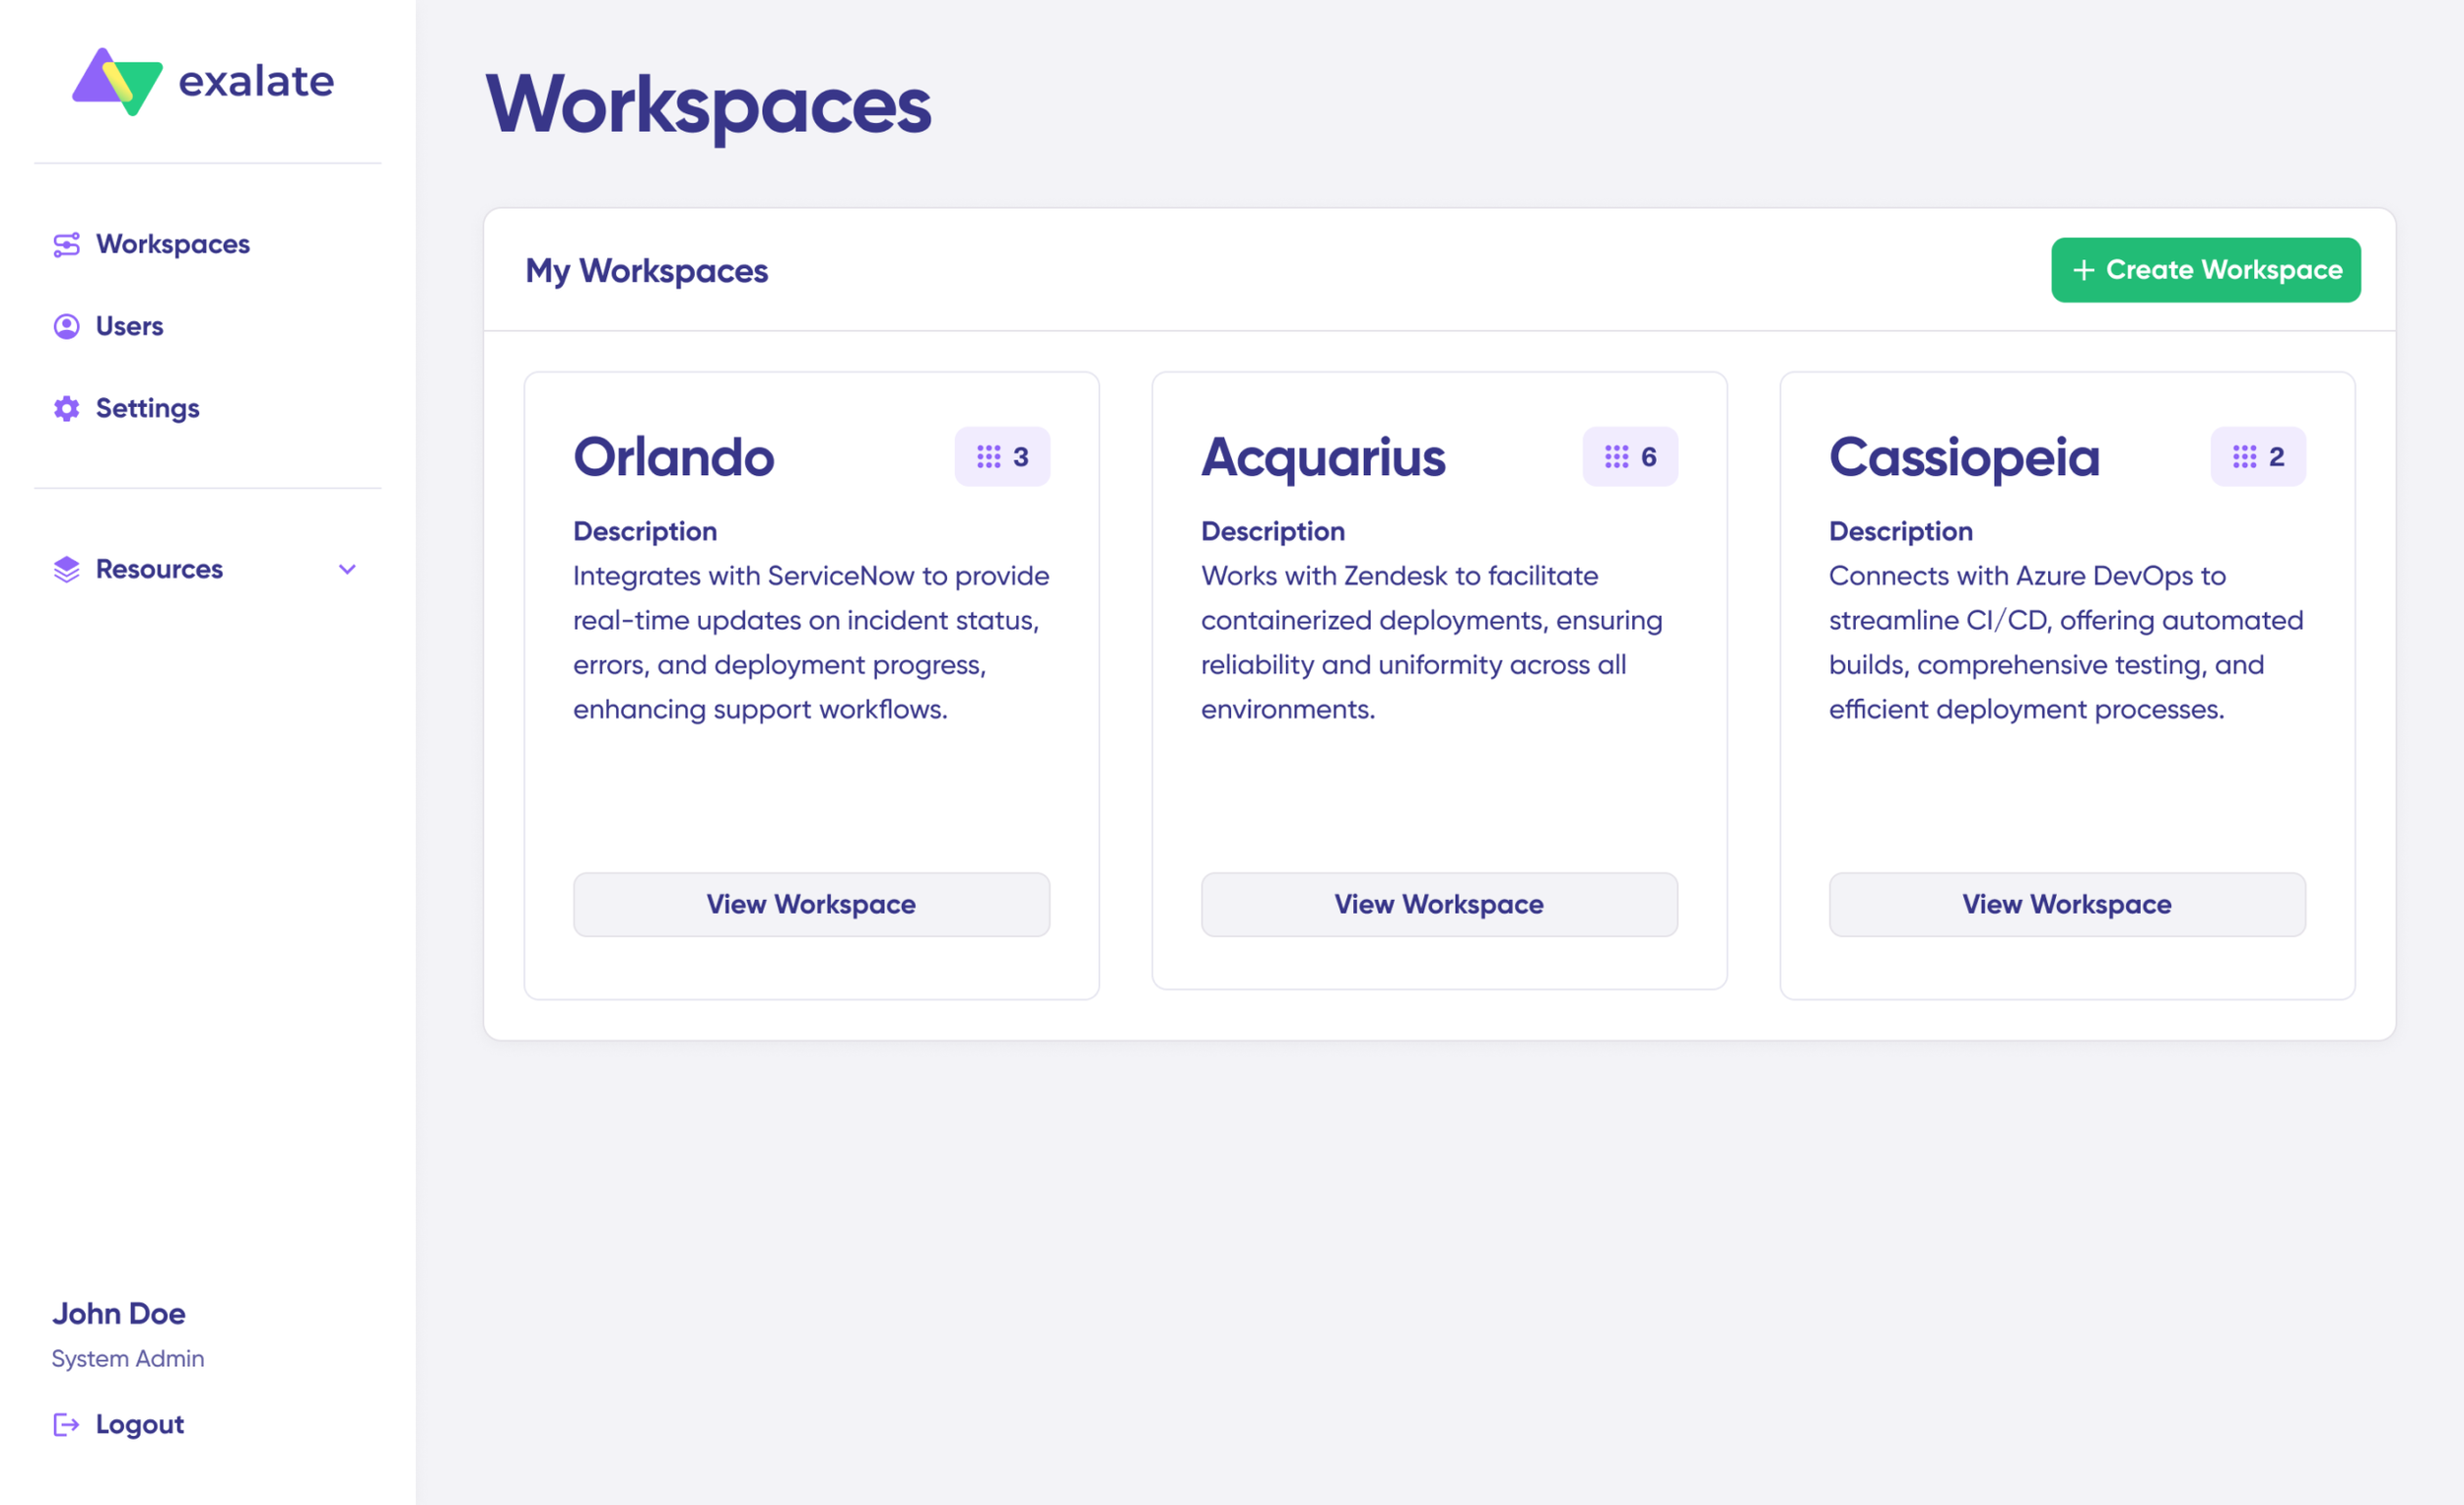
Workspaces let you organize and manage all your integrations and connections from a single location. Check the “Workspaces” tab to see any existing workspaces you have access to.
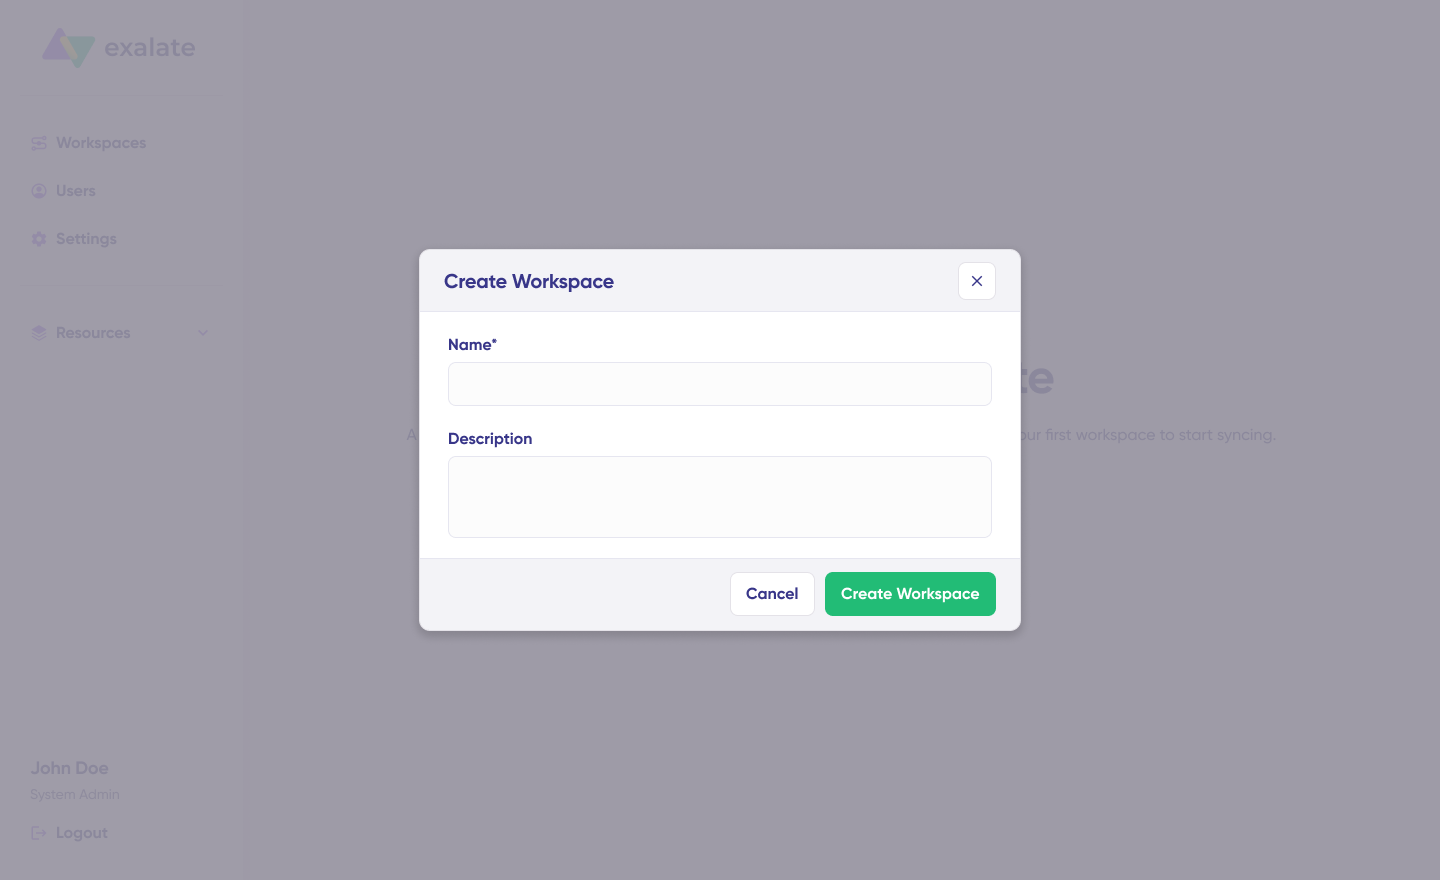
For first-time users, click the “+ Create Workspace” button. Provide a name and description for your workspace, then click “Create workspace.”
Step 3: Create Your Freshdesk Azure DevOps Connection
With your workspace ready, you can now establish a connection between Freshdesk and Azure DevOps. Navigate to the “Connections” tab to view and manage existing connections or create new ones.
Note: You’ll need an active Exalate account with at least one workspace, plus access credentials for both Freshdesk and Azure DevOps.
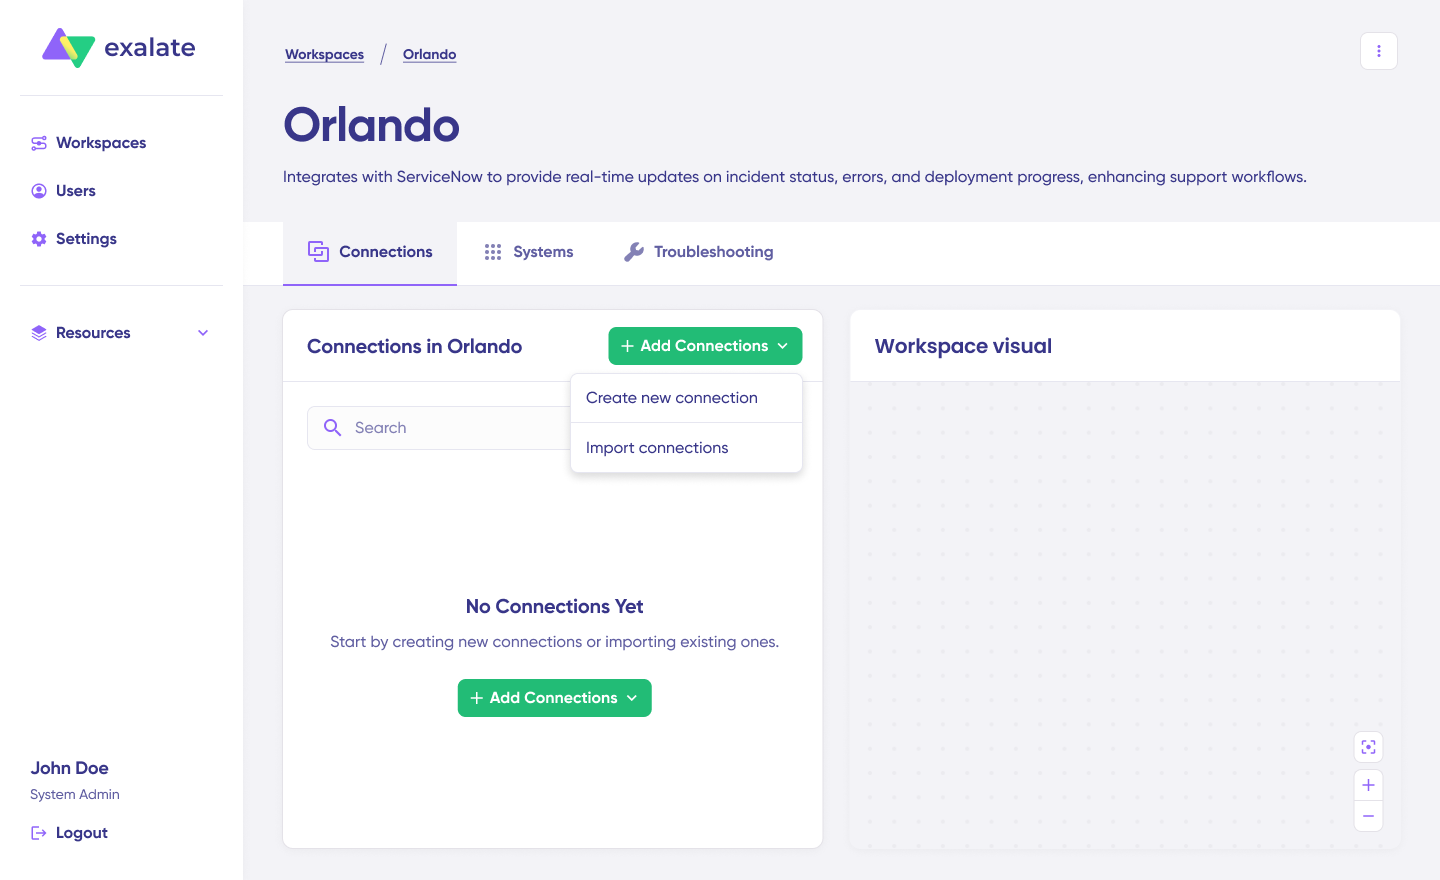
Add Your First System:
Click “+ Add connections” > “Create new connection”
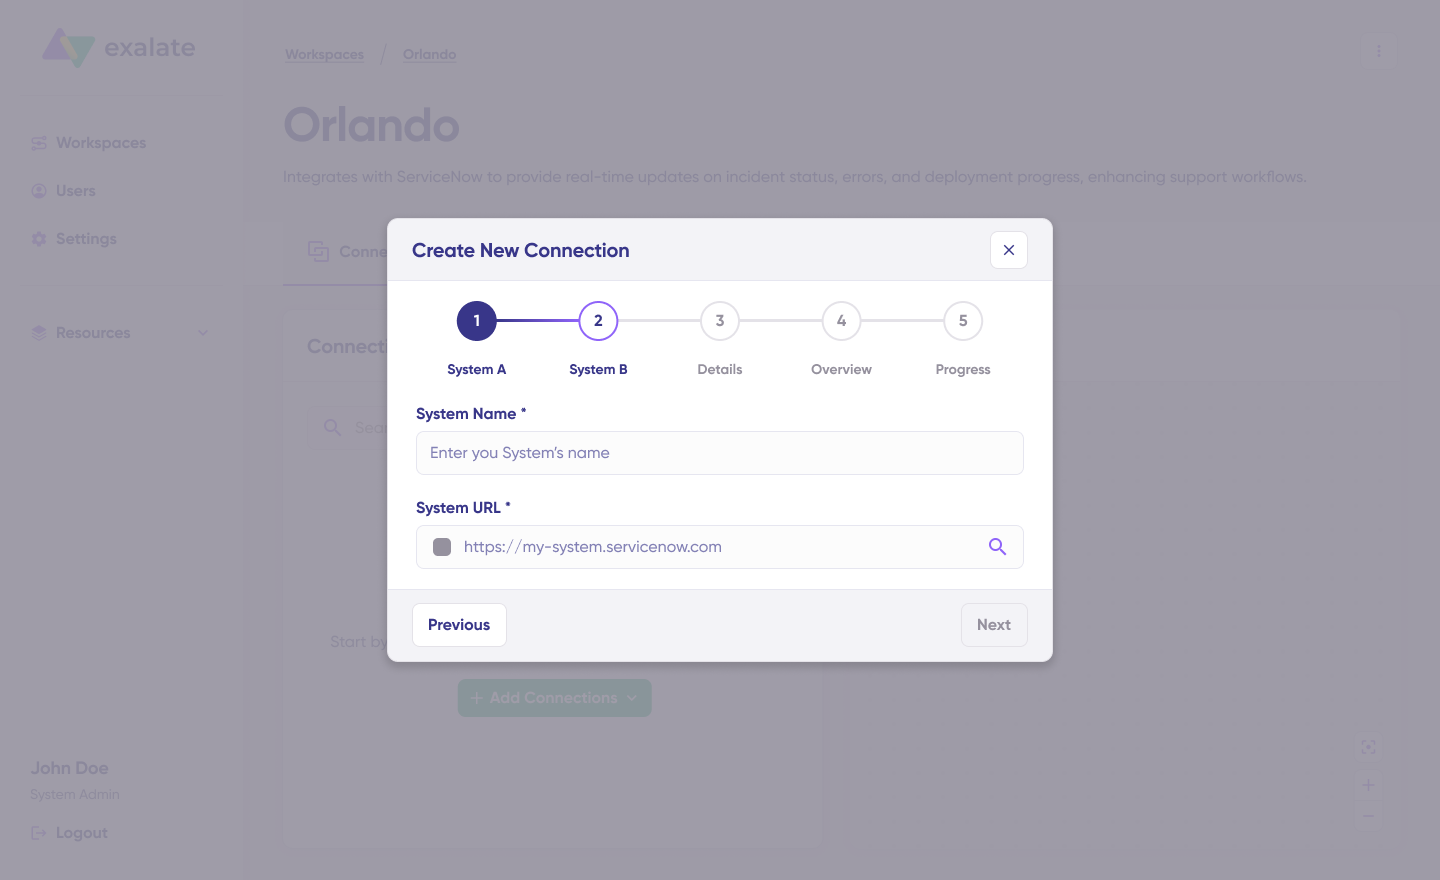
Name your first system, either Freshdesk or Azure DevOps. The order doesn’t matter. Let’s start with Freshdesk

Enter your Freshdesk instance URL (e.g., yourcompany.freshdesk.com)
A quick verification runs in the background. If your system already belongs to this workspace, authentication happens automatically. If it’s part of a different workspace, the system gets registered to your current workspace. For new systems, you’ll need to provide authentication details.
For Freshdesk, authenticate using your API key (found in Profile Settings > Your API Key). For Azure DevOps, use a Personal Access Token (PAT) with appropriate scopes for work item read/write access.
Add Your Second System: Repeat the process for Azure DevOps. Enter your Azure DevOps organization URL (e.g., dev.azure.com/yourorganization or yourorganization.visualstudio.com).
Finalize Connection Setup: Assign a name and description to your connection. Click “Next”, then review the configuration details and click “Create connection”.
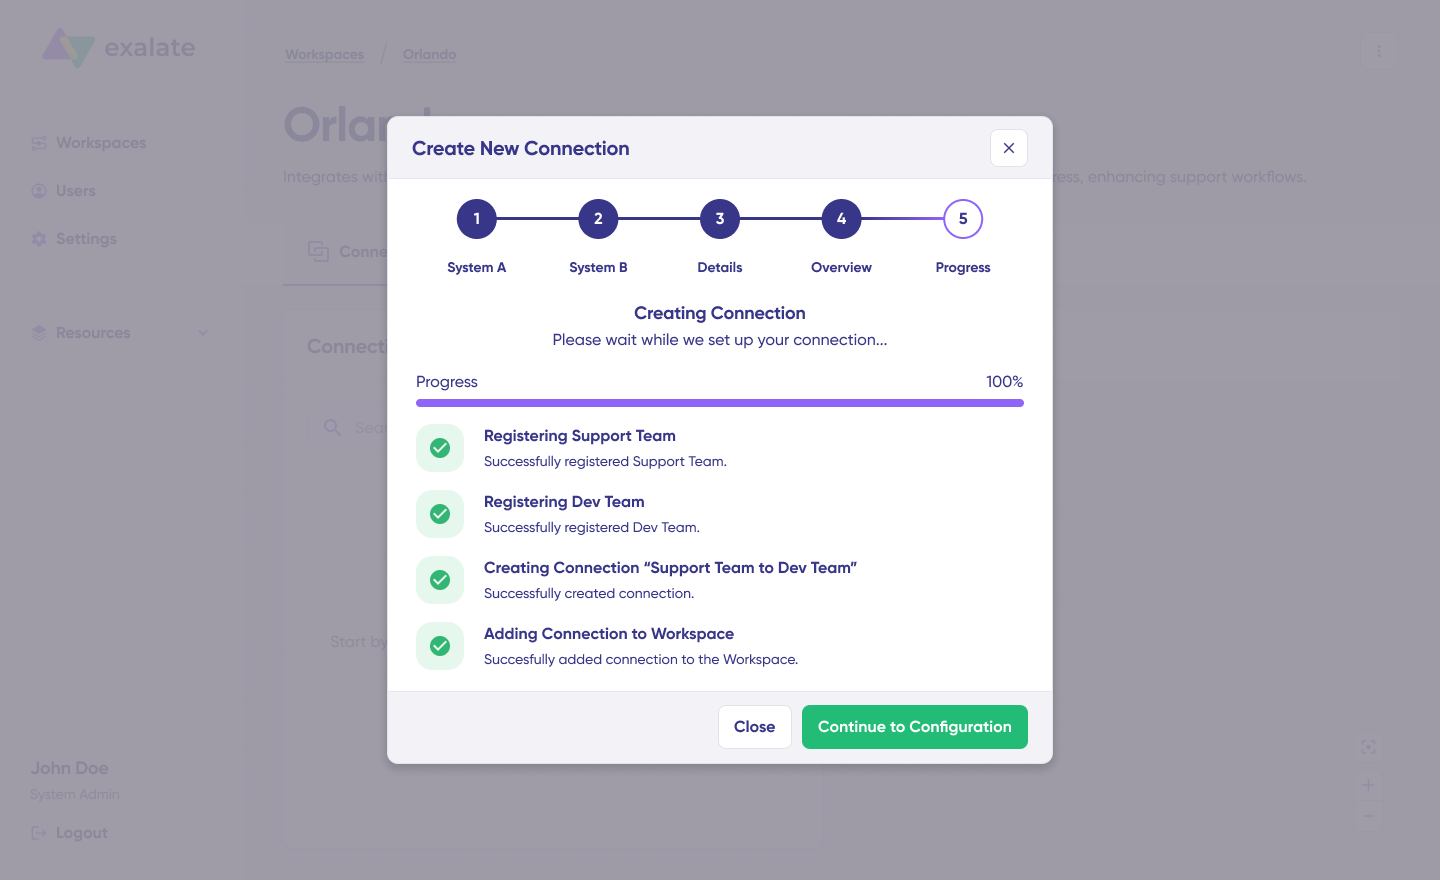
Once complete, select “Continue to configuration” and choose the Freshdesk group and Azure DevOps project you want to synchronize. Click “Build & continue.”
You now have two options: “Quick sync” and “Edit & Test.”
Step 4: Quick Sync – Verify Your Connection
This optional step lets you sync a single item between Freshdesk and Azure DevOps to confirm everything works.
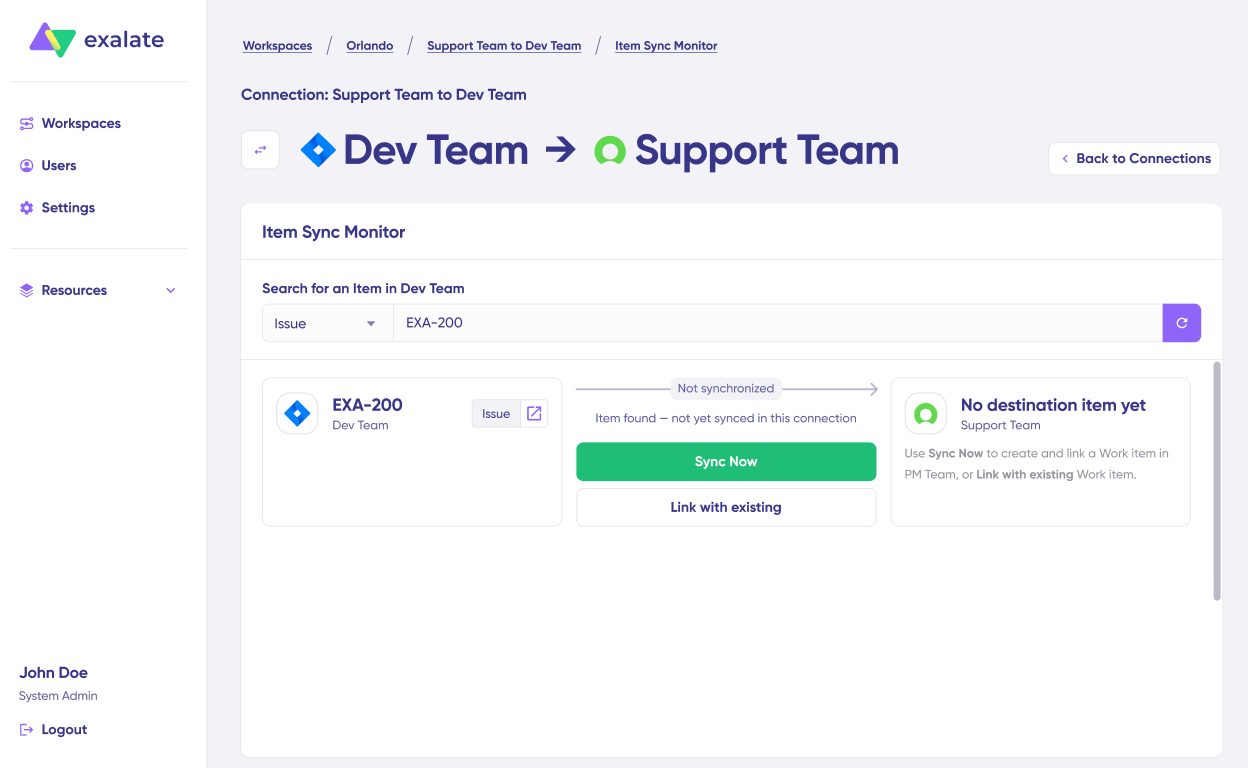
Under the “Item sync monitor,” enter either:
- A Freshdesk ticket ID, or
- An Azure DevOps work item ID
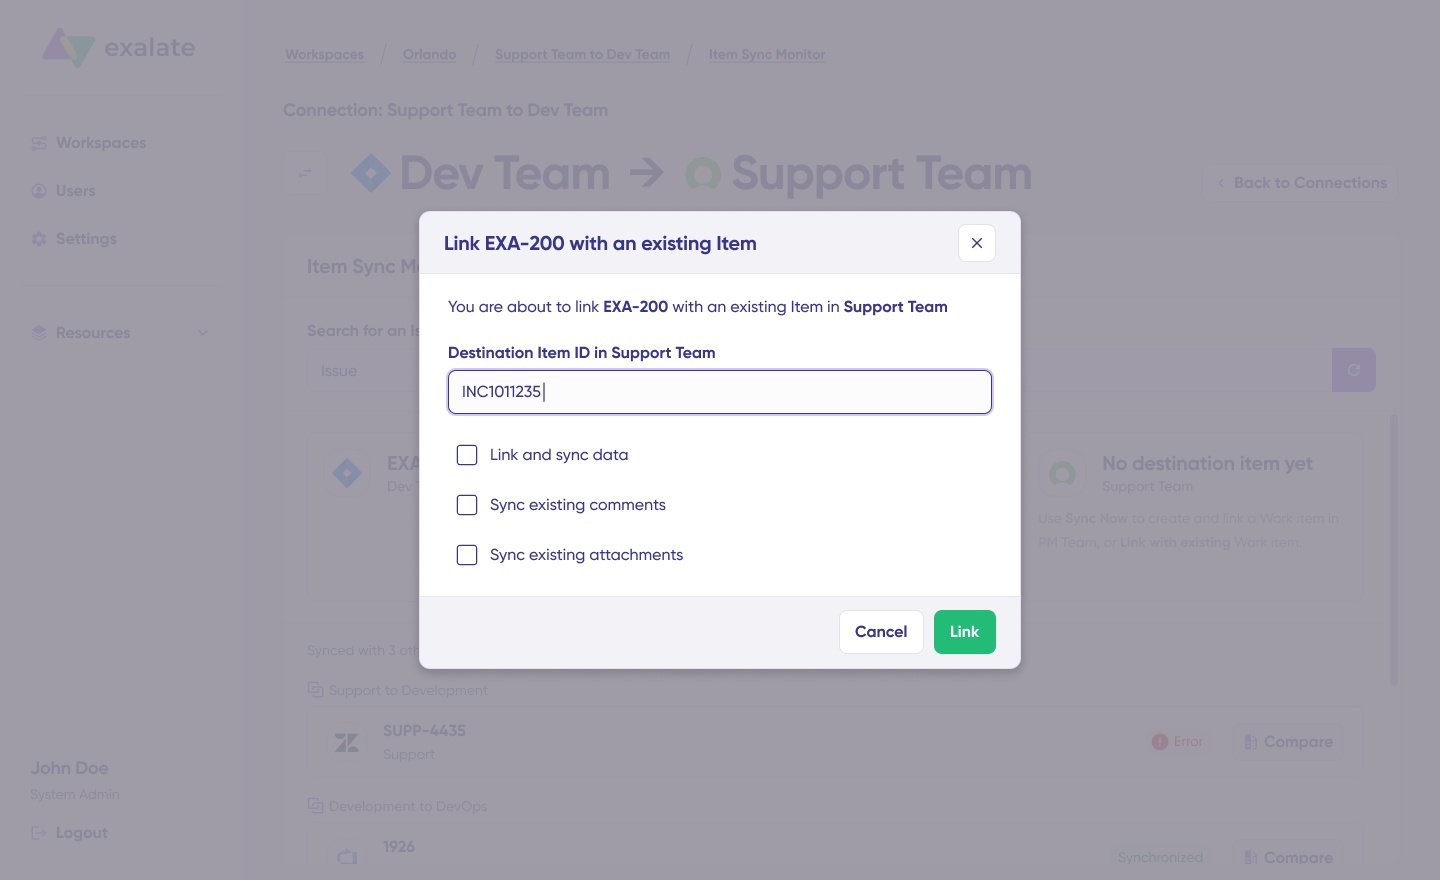
Click “Sync Now” to synchronize a new item, or “Link with existing” to connect two items that already exist in both systems.
Watch the status updates as synchronization progresses. Once complete, open both the synced ticket and work item in new windows to verify the data transferred correctly.

You can also compare how synced items appear and preview how changes will be applied before they go live.
Step 5: Edit & Test – Configure Your Sync Rules
To customize your synchronization, click “Create a new version” or select “Open latest draft.” This protects your existing configuration from accidental changes. All edits save automatically.
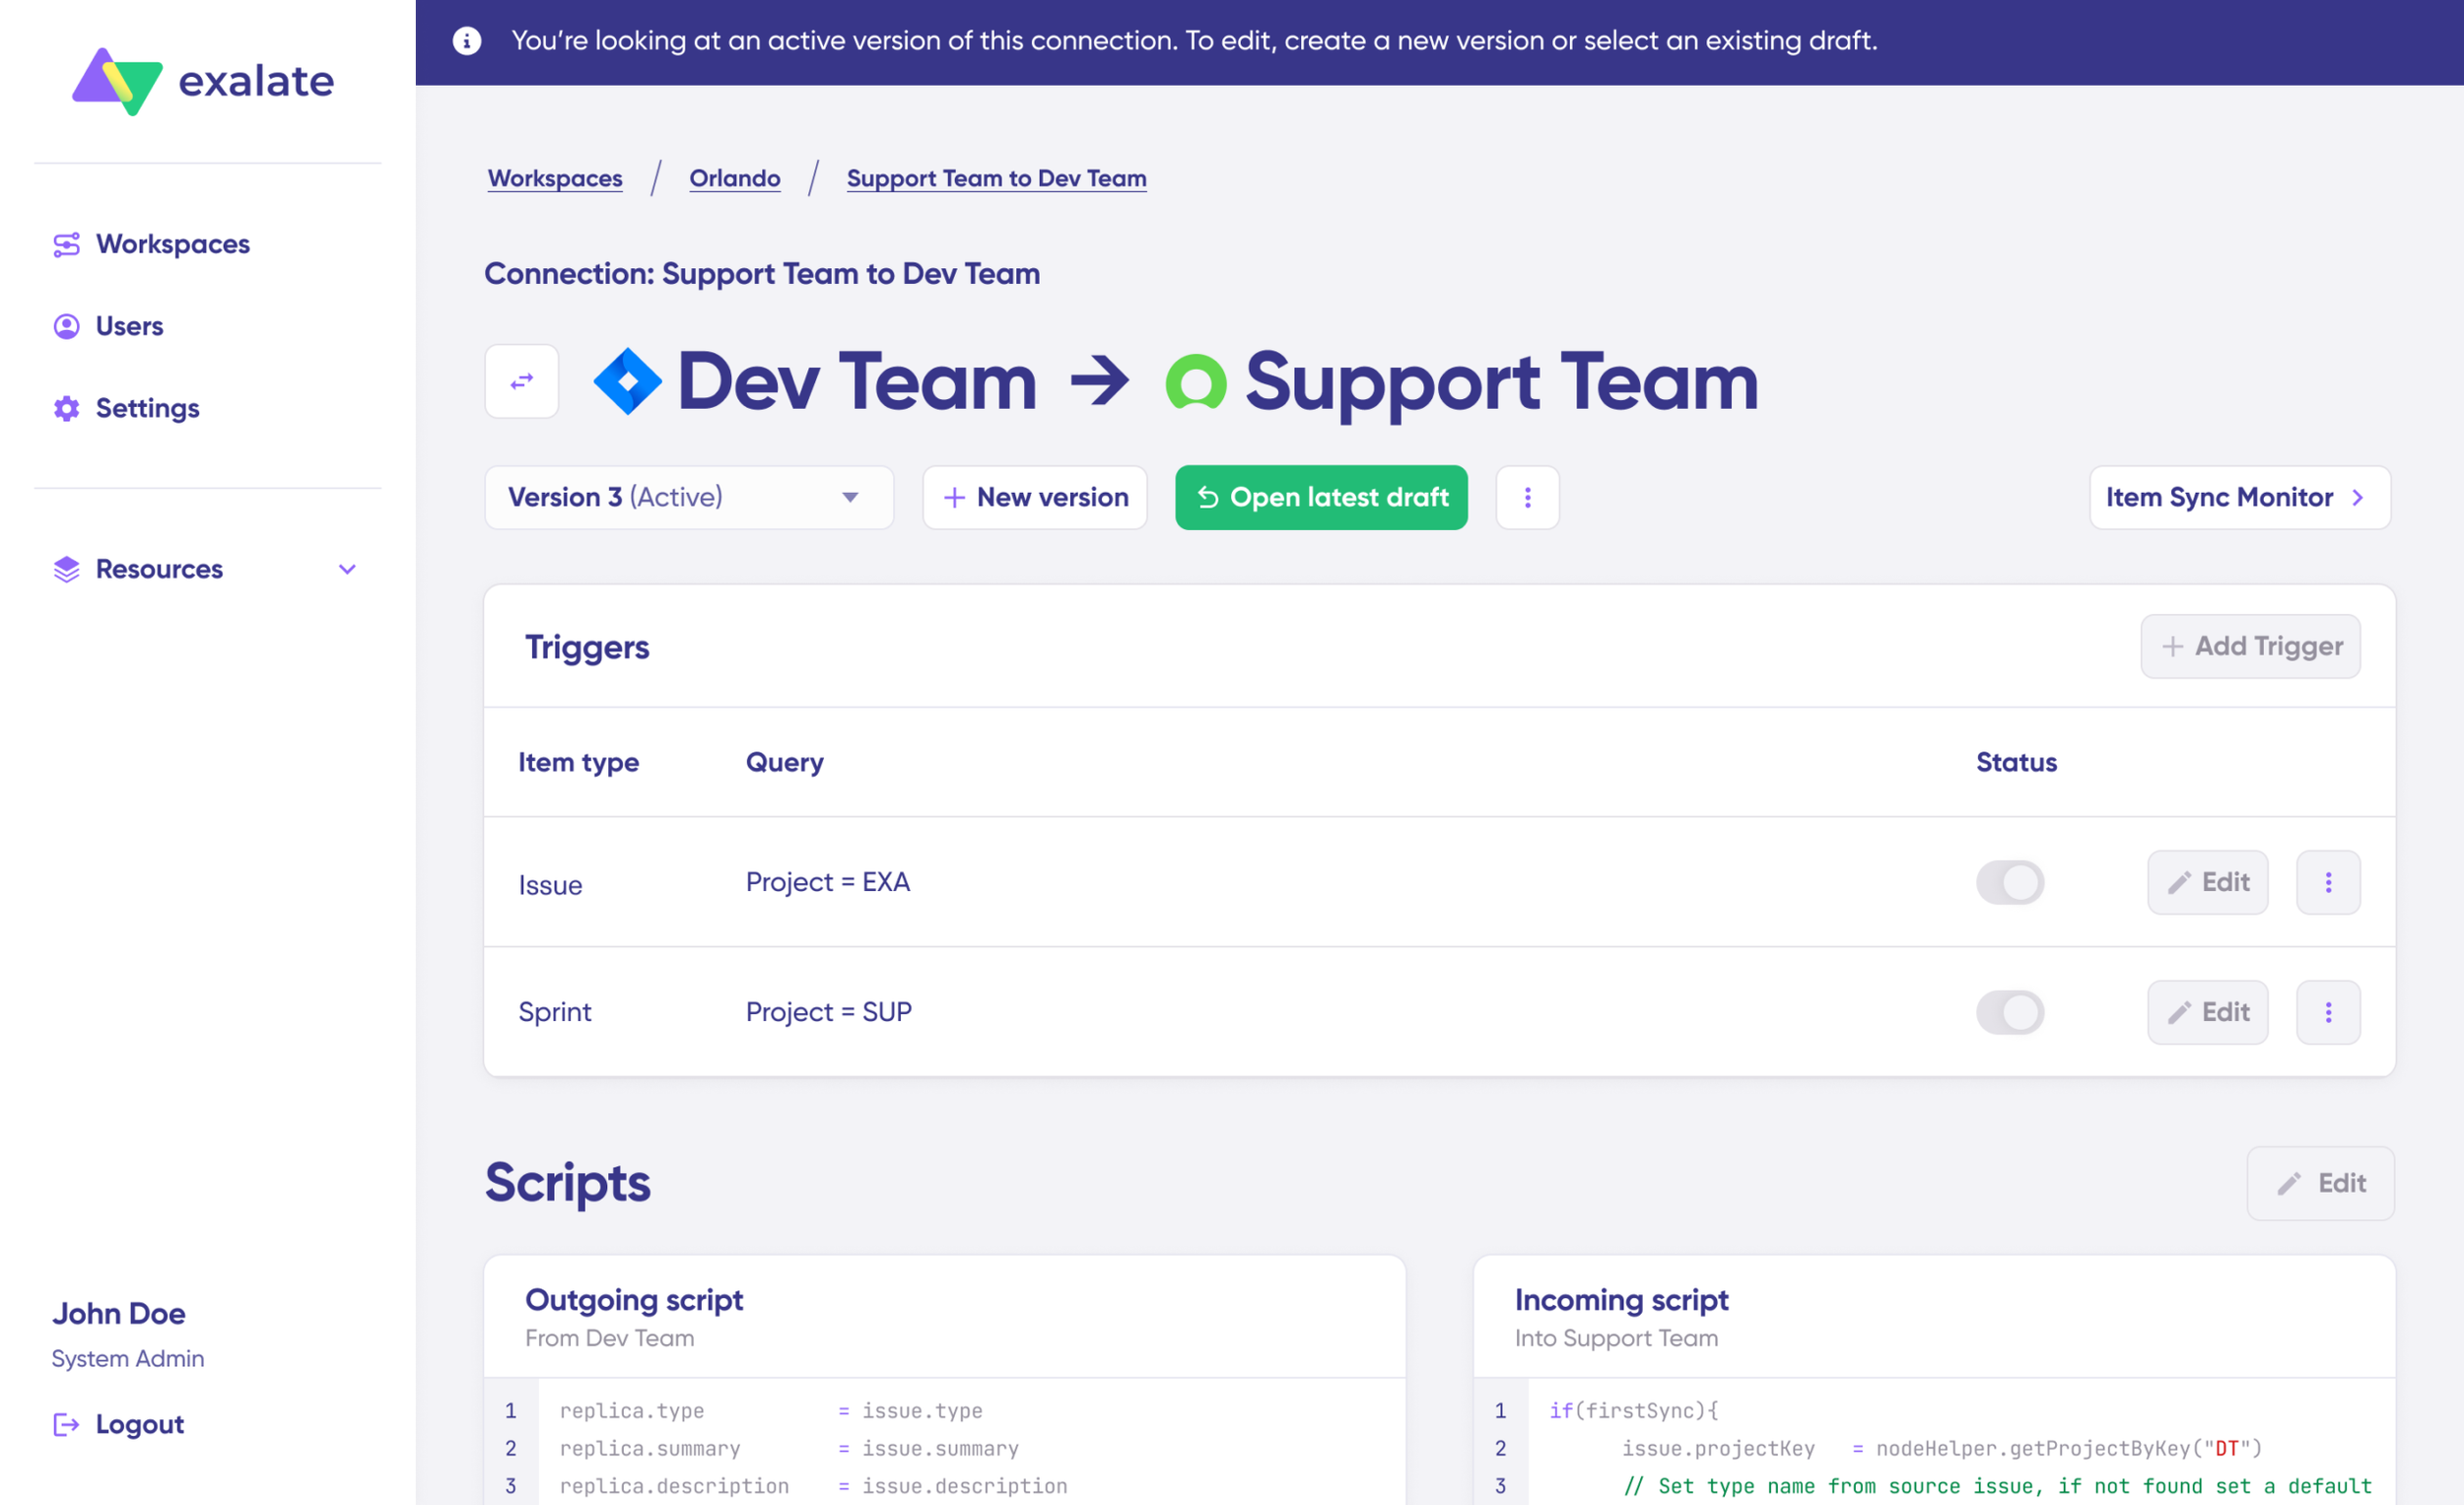
Click the “Edit” button to access the script editor and modify your sync rules.
Understanding Sync Rules:
Sync rules use Groovy-based scripts that give you complete control over data logic, field mapping, and conditional flows. This flexibility handles everything from simple ticket-to-work-item syncs to complex multi-tenant MSP scenarios.
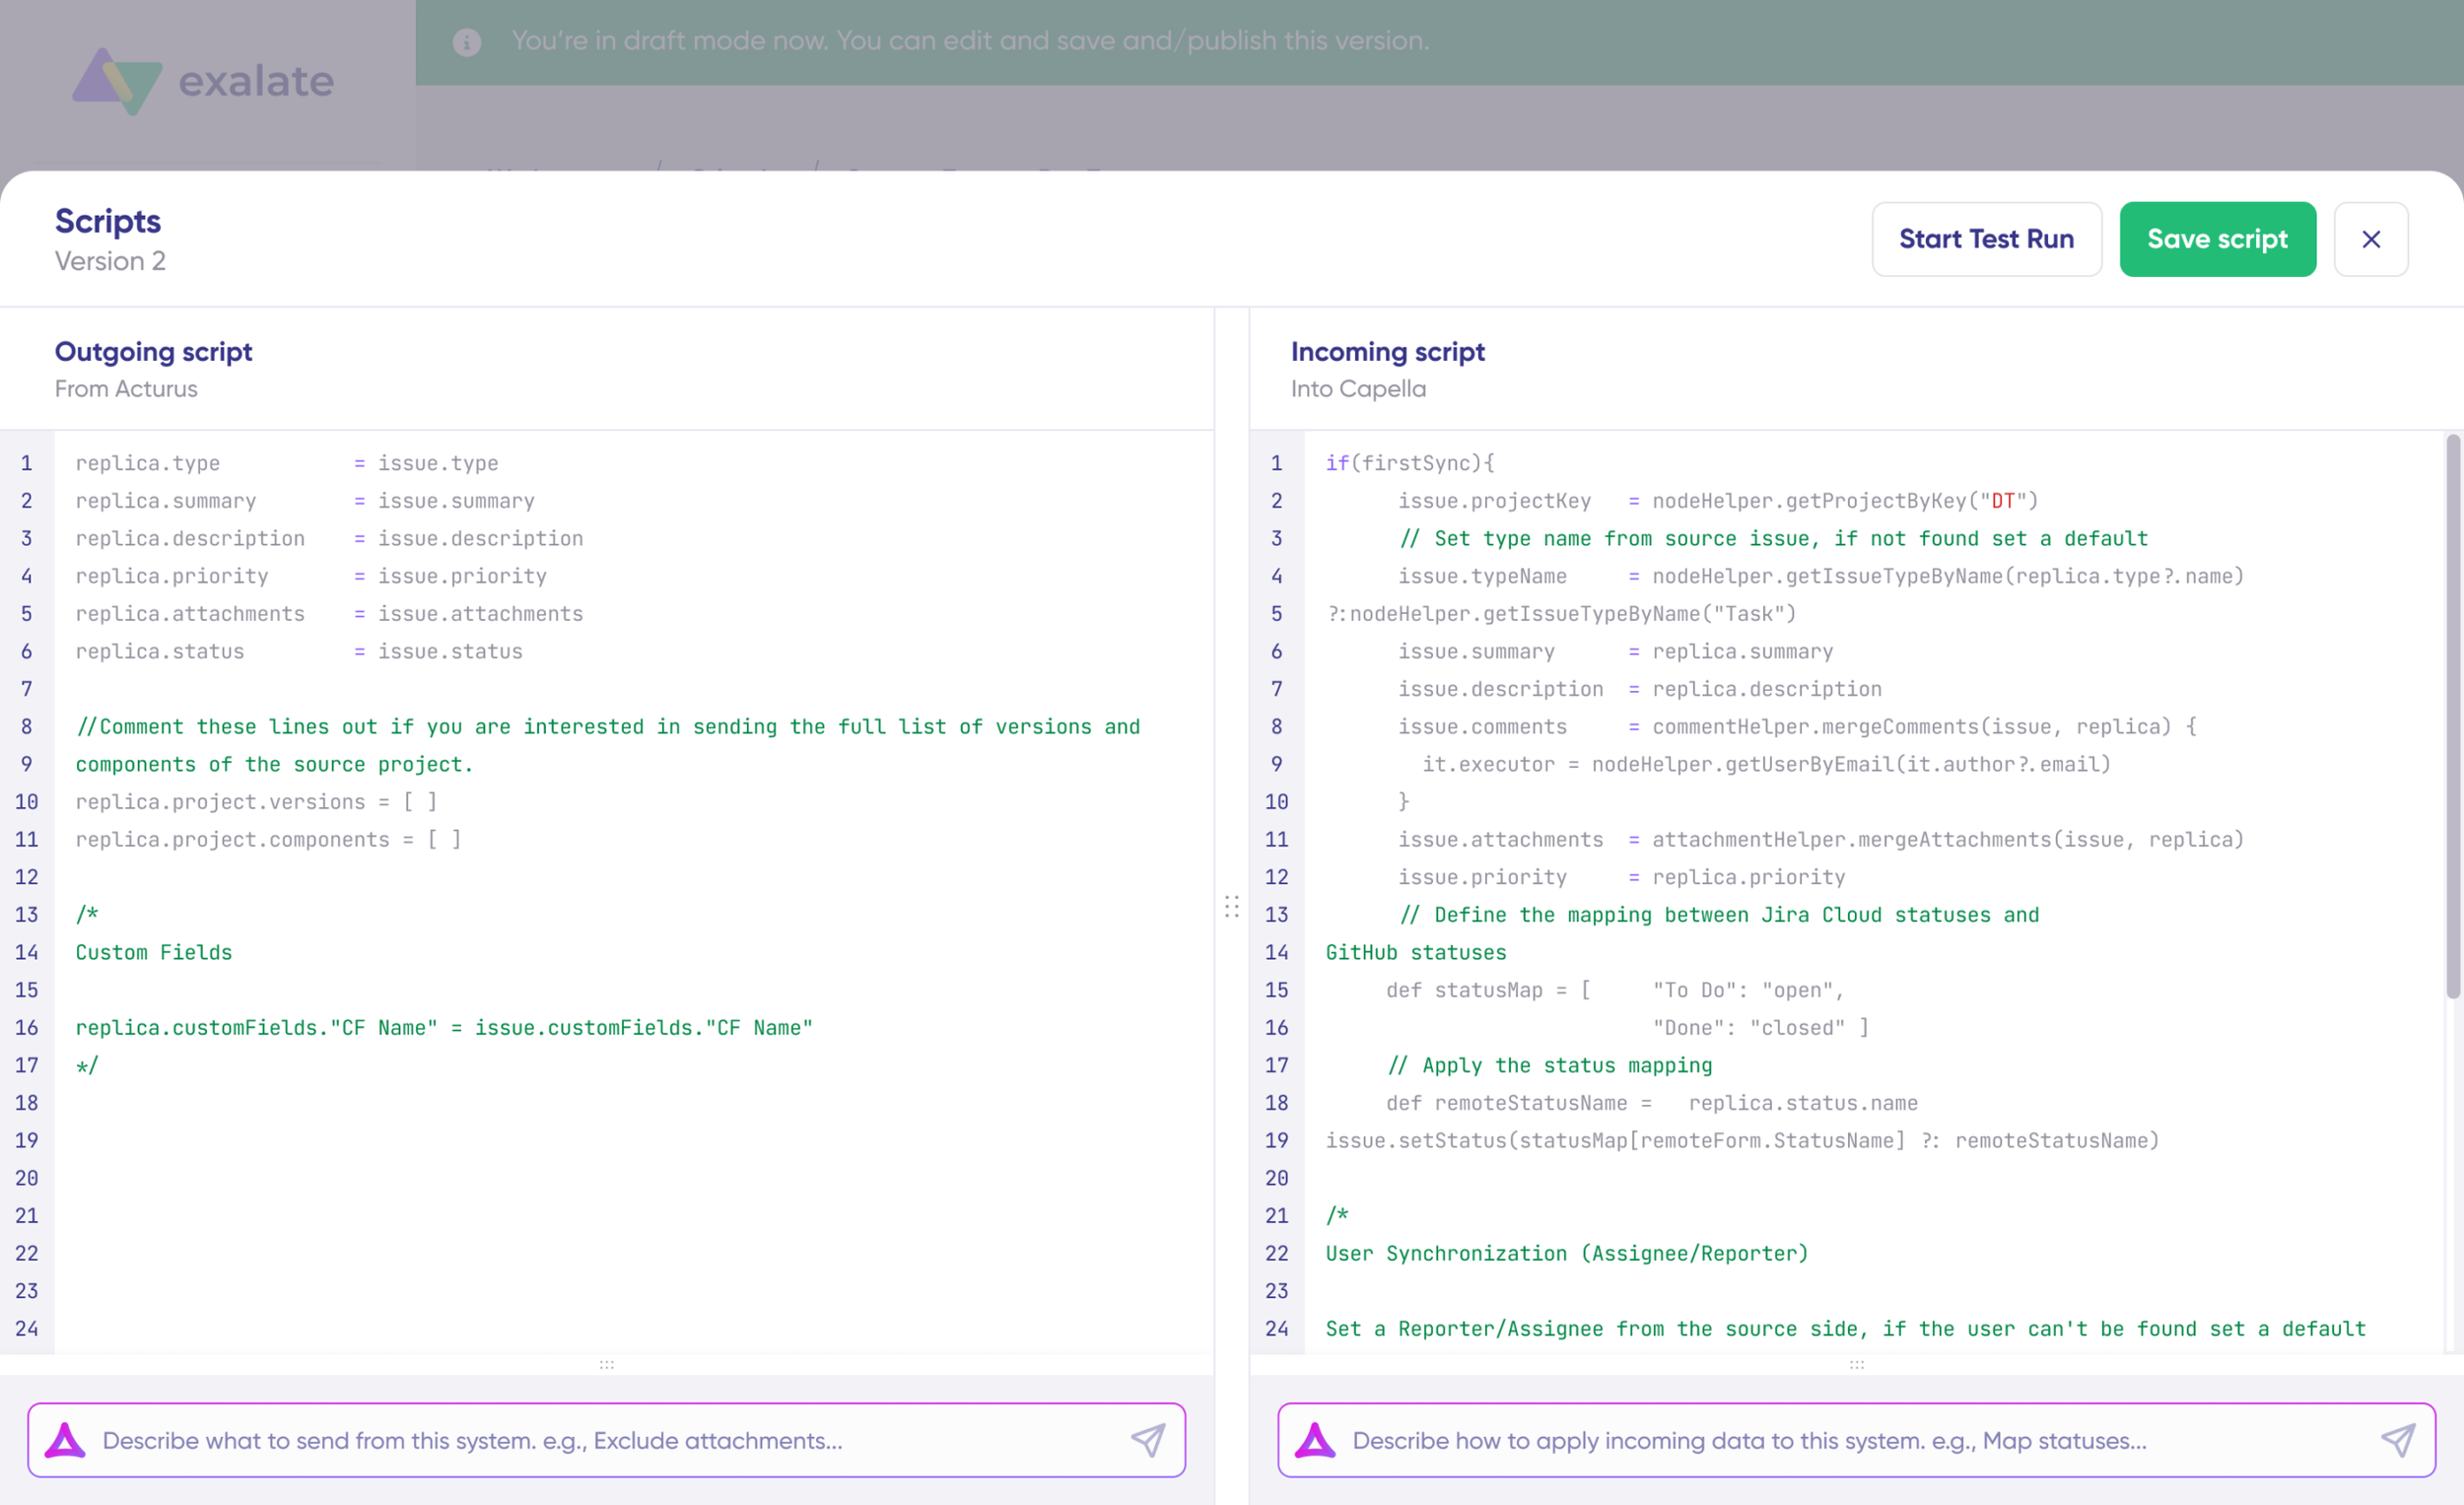
Toggle the sync direction by clicking the arrows next to the connection name. Scripts are divided into:
- Outgoing scripts: Define what data leaves your system
- Incoming scripts: Define how incoming data maps to your system
For a Freshdesk → Azure DevOps sync:
- The outgoing Freshdesk script determines which ticket fields (subject, description, priority, status, requester, custom fields) get sent.
- The incoming Azure DevOps script determines how those values map to work item fields (Title, Description, Priority, State, Assigned To, custom fields).
The Replica acts as a message payload carrying data between synced entities in JSON format. To sync additional fields, add them to your script. To exclude data—say, prevent attachments from syncing—remove that line from the outgoing script.
Common Field Mappings:
| Freshdesk Field | Azure DevOps Field |
| Subject | Title |
| Description | Description |
| Priority (Low/Medium/High/Urgent) | Priority (1-4) |
| Status (Open/Pending/Resolved/Closed) | State (New/Active/Resolved/Closed) |
| Requester | Created By / Custom field |
| Agent | Assigned To |
| Tags | Tags |
| Attachments | Attachments |
| Comments (public/private) | Discussion / Work Item Comments |
| Custom fields | Custom fields |
Step 6: Use AI-Assisted Configuration with Aida
If you’d rather skip manual scripting, use Exalate’s AI-assisted configuration feature called Aida to generate sync scripts automatically. Aida appears in both incoming and outgoing script sections.
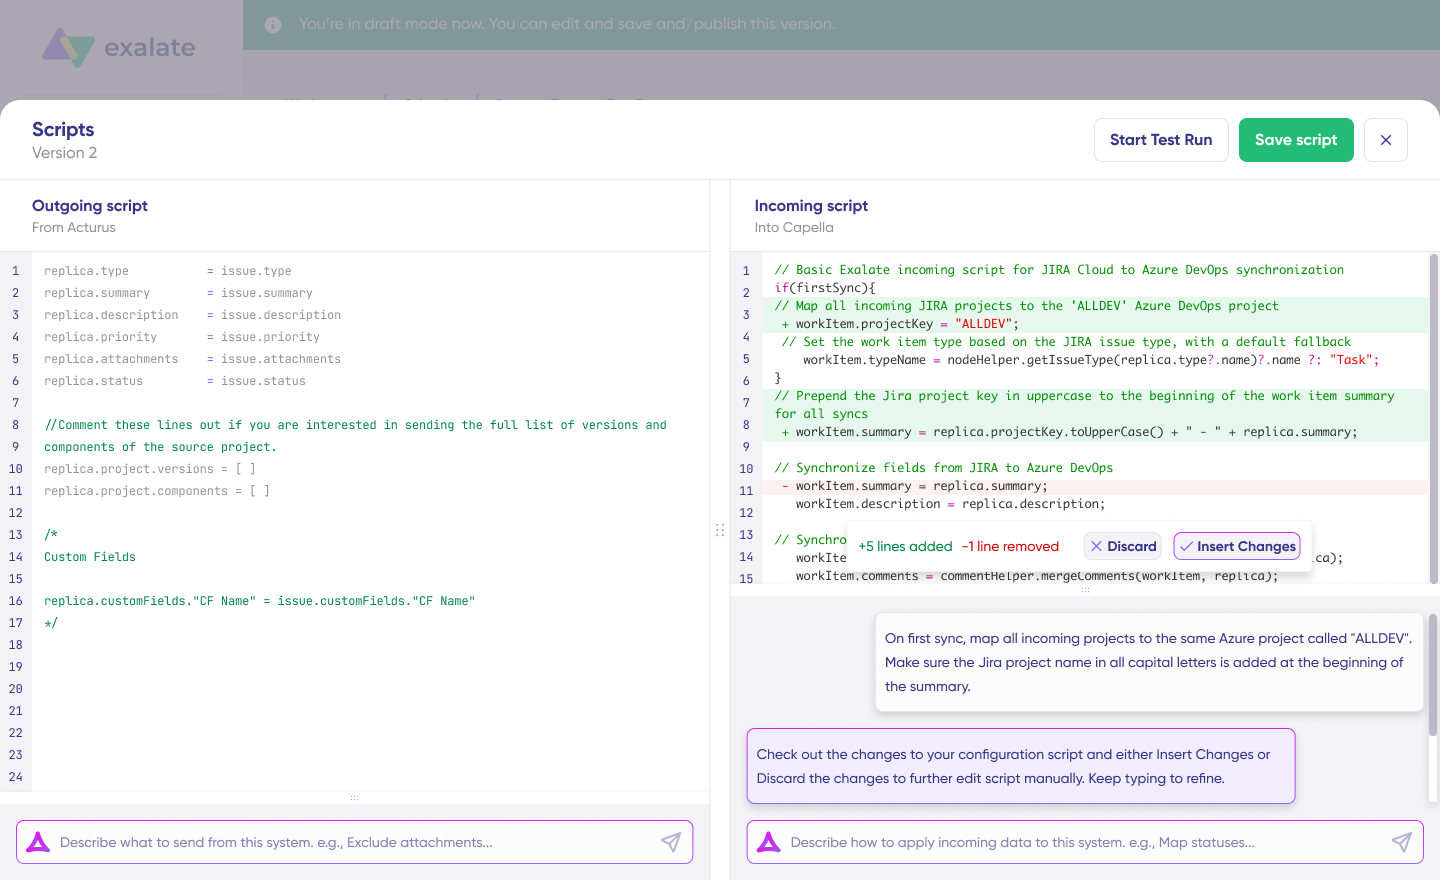
How Aida Works:
For Outgoing scripts, describe what data should leave your system:
- “Sync ticket subject, description, priority, and all public comments”
For Incoming scripts, describe how data should map to your system:
- “Set work item type to Bug for tickets tagged ‘defect’, otherwise create Tasks”
Aida generates working Groovy scripts with proper field mappings based on Exalate’s scripting API and your existing configuration.
Review Aida’s Suggestions:
- Green highlights show new lines being added
- Red highlights show lines being removed
Click “Insert” to accept or “Discard” to reject suggestions
Since outgoing and incoming scripts operate independently, maintain separate contexts when prompting Aida for each side.
Note: Aida accelerates configuration, but like any AI tool, review the generated code before applying it to production.
Step 7: TestRun – Validate Before Going Live
With your sync scripts ready, you can either “Save script” or validate them using “Start Test Run.”

Click “Select Items” and choose tickets or work items to test. Select multiple items for comprehensive testing. Click “Start Test Run”
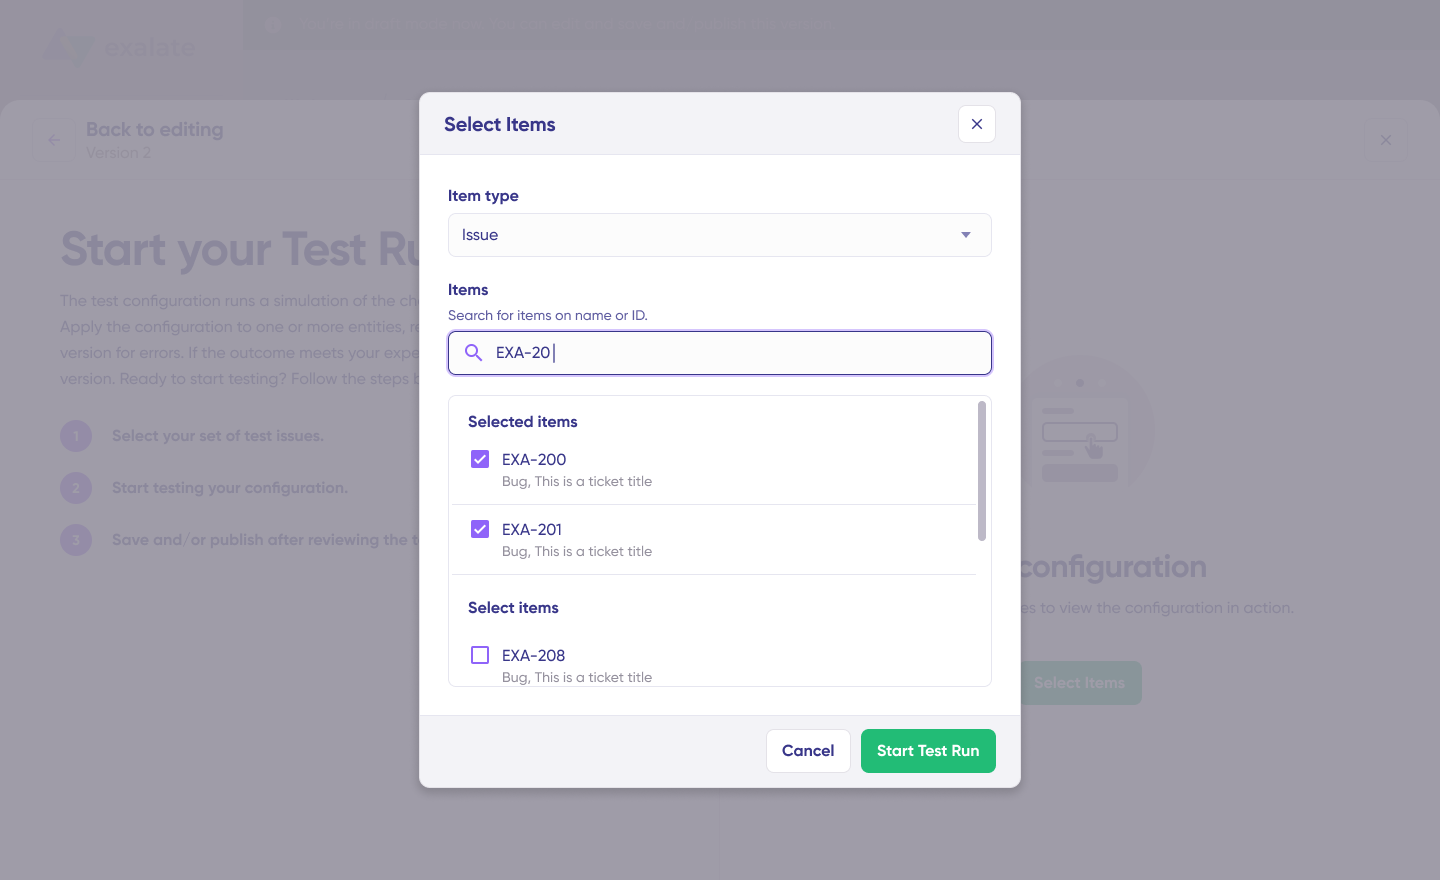
View incoming and outgoing replicas for each selected item in their respective tabs. Preview how the sync configuration will apply, examine the replica data, and verify that field mappings look correct.

If something’s off, go back, adjust your scripts, and test again. Deploy only when you’re confident everything works as expected.
This safety net prevents configuration errors from affecting live data.

Once everything matches your requirements, click “Publish Version” to apply your configuration to live synchronization.
All connection versions appear in the “Version” dropdown with three possible states:
- Active: Currently running in production
- Draft: Editable, not yet deployed
- Archived: Previous versions stored for reference
Step 8: Set Up Triggers for Automatic Sync
Triggers define conditions that automatically start synchronization for specific items. Without triggers, you’d need to sync items manually.
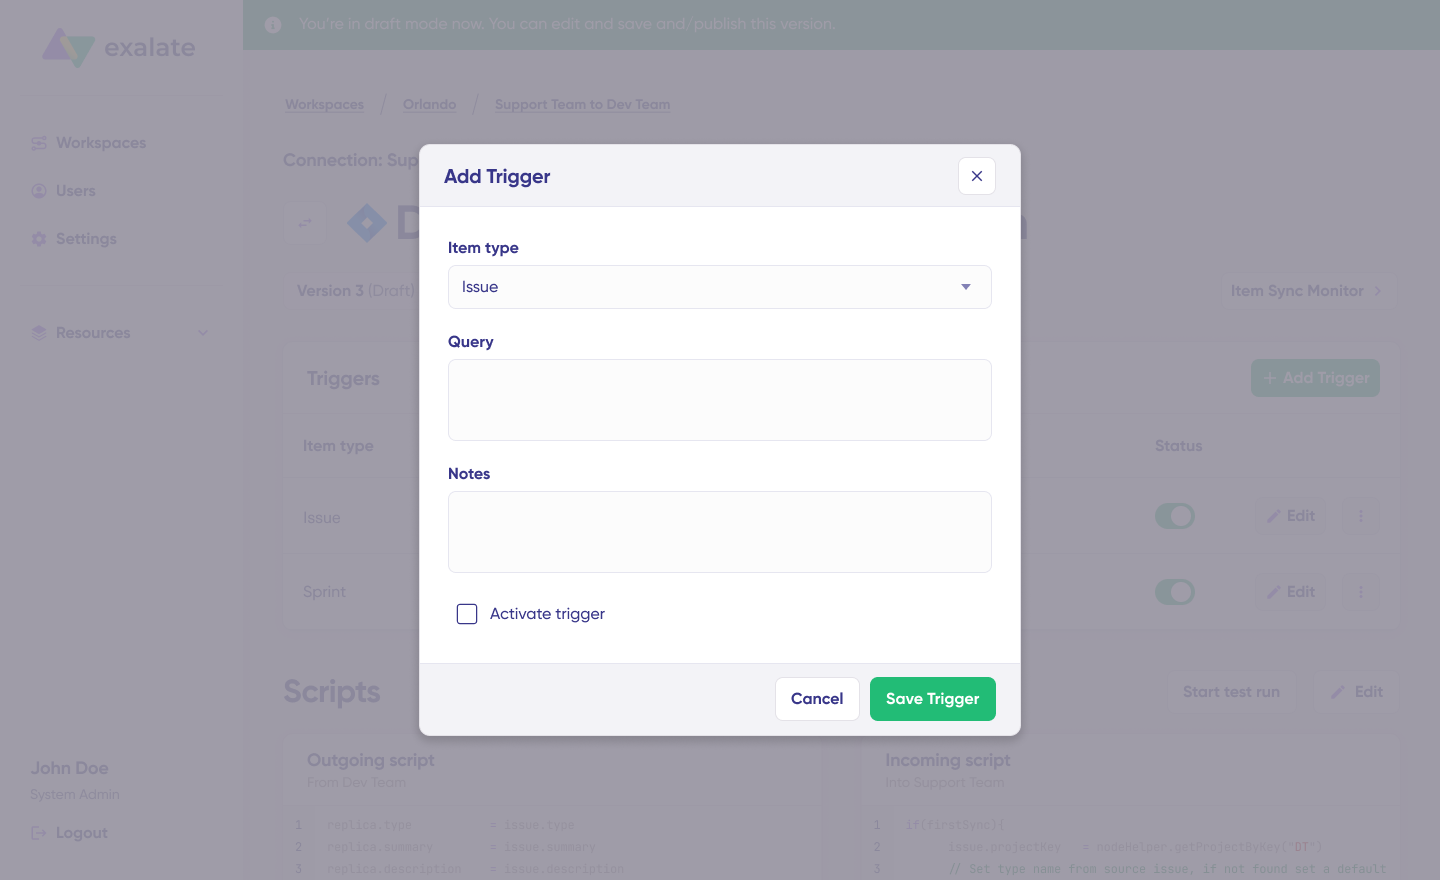
Click “+Add trigger” to create triggers. These are platform-specific:
Freshdesk Triggers: Use Freshdesk’s filter syntax to specify which tickets sync automatically:
- Sync tickets with
priority = "Urgent" - Sync tickets tagged with “
escalate-to-dev“
Azure DevOps Triggers: Use Azure DevOps query syntax (WIQL) to specify which work items sync:
- Sync all work items in a specific Area Path
- Sync items where
State = "Active" AND Priority = 2
Save your triggers by publishing the changes.
Step 9: Troubleshooting with Aida
Aida also helps you diagnose and resolve sync errors faster with context-aware suggestions.
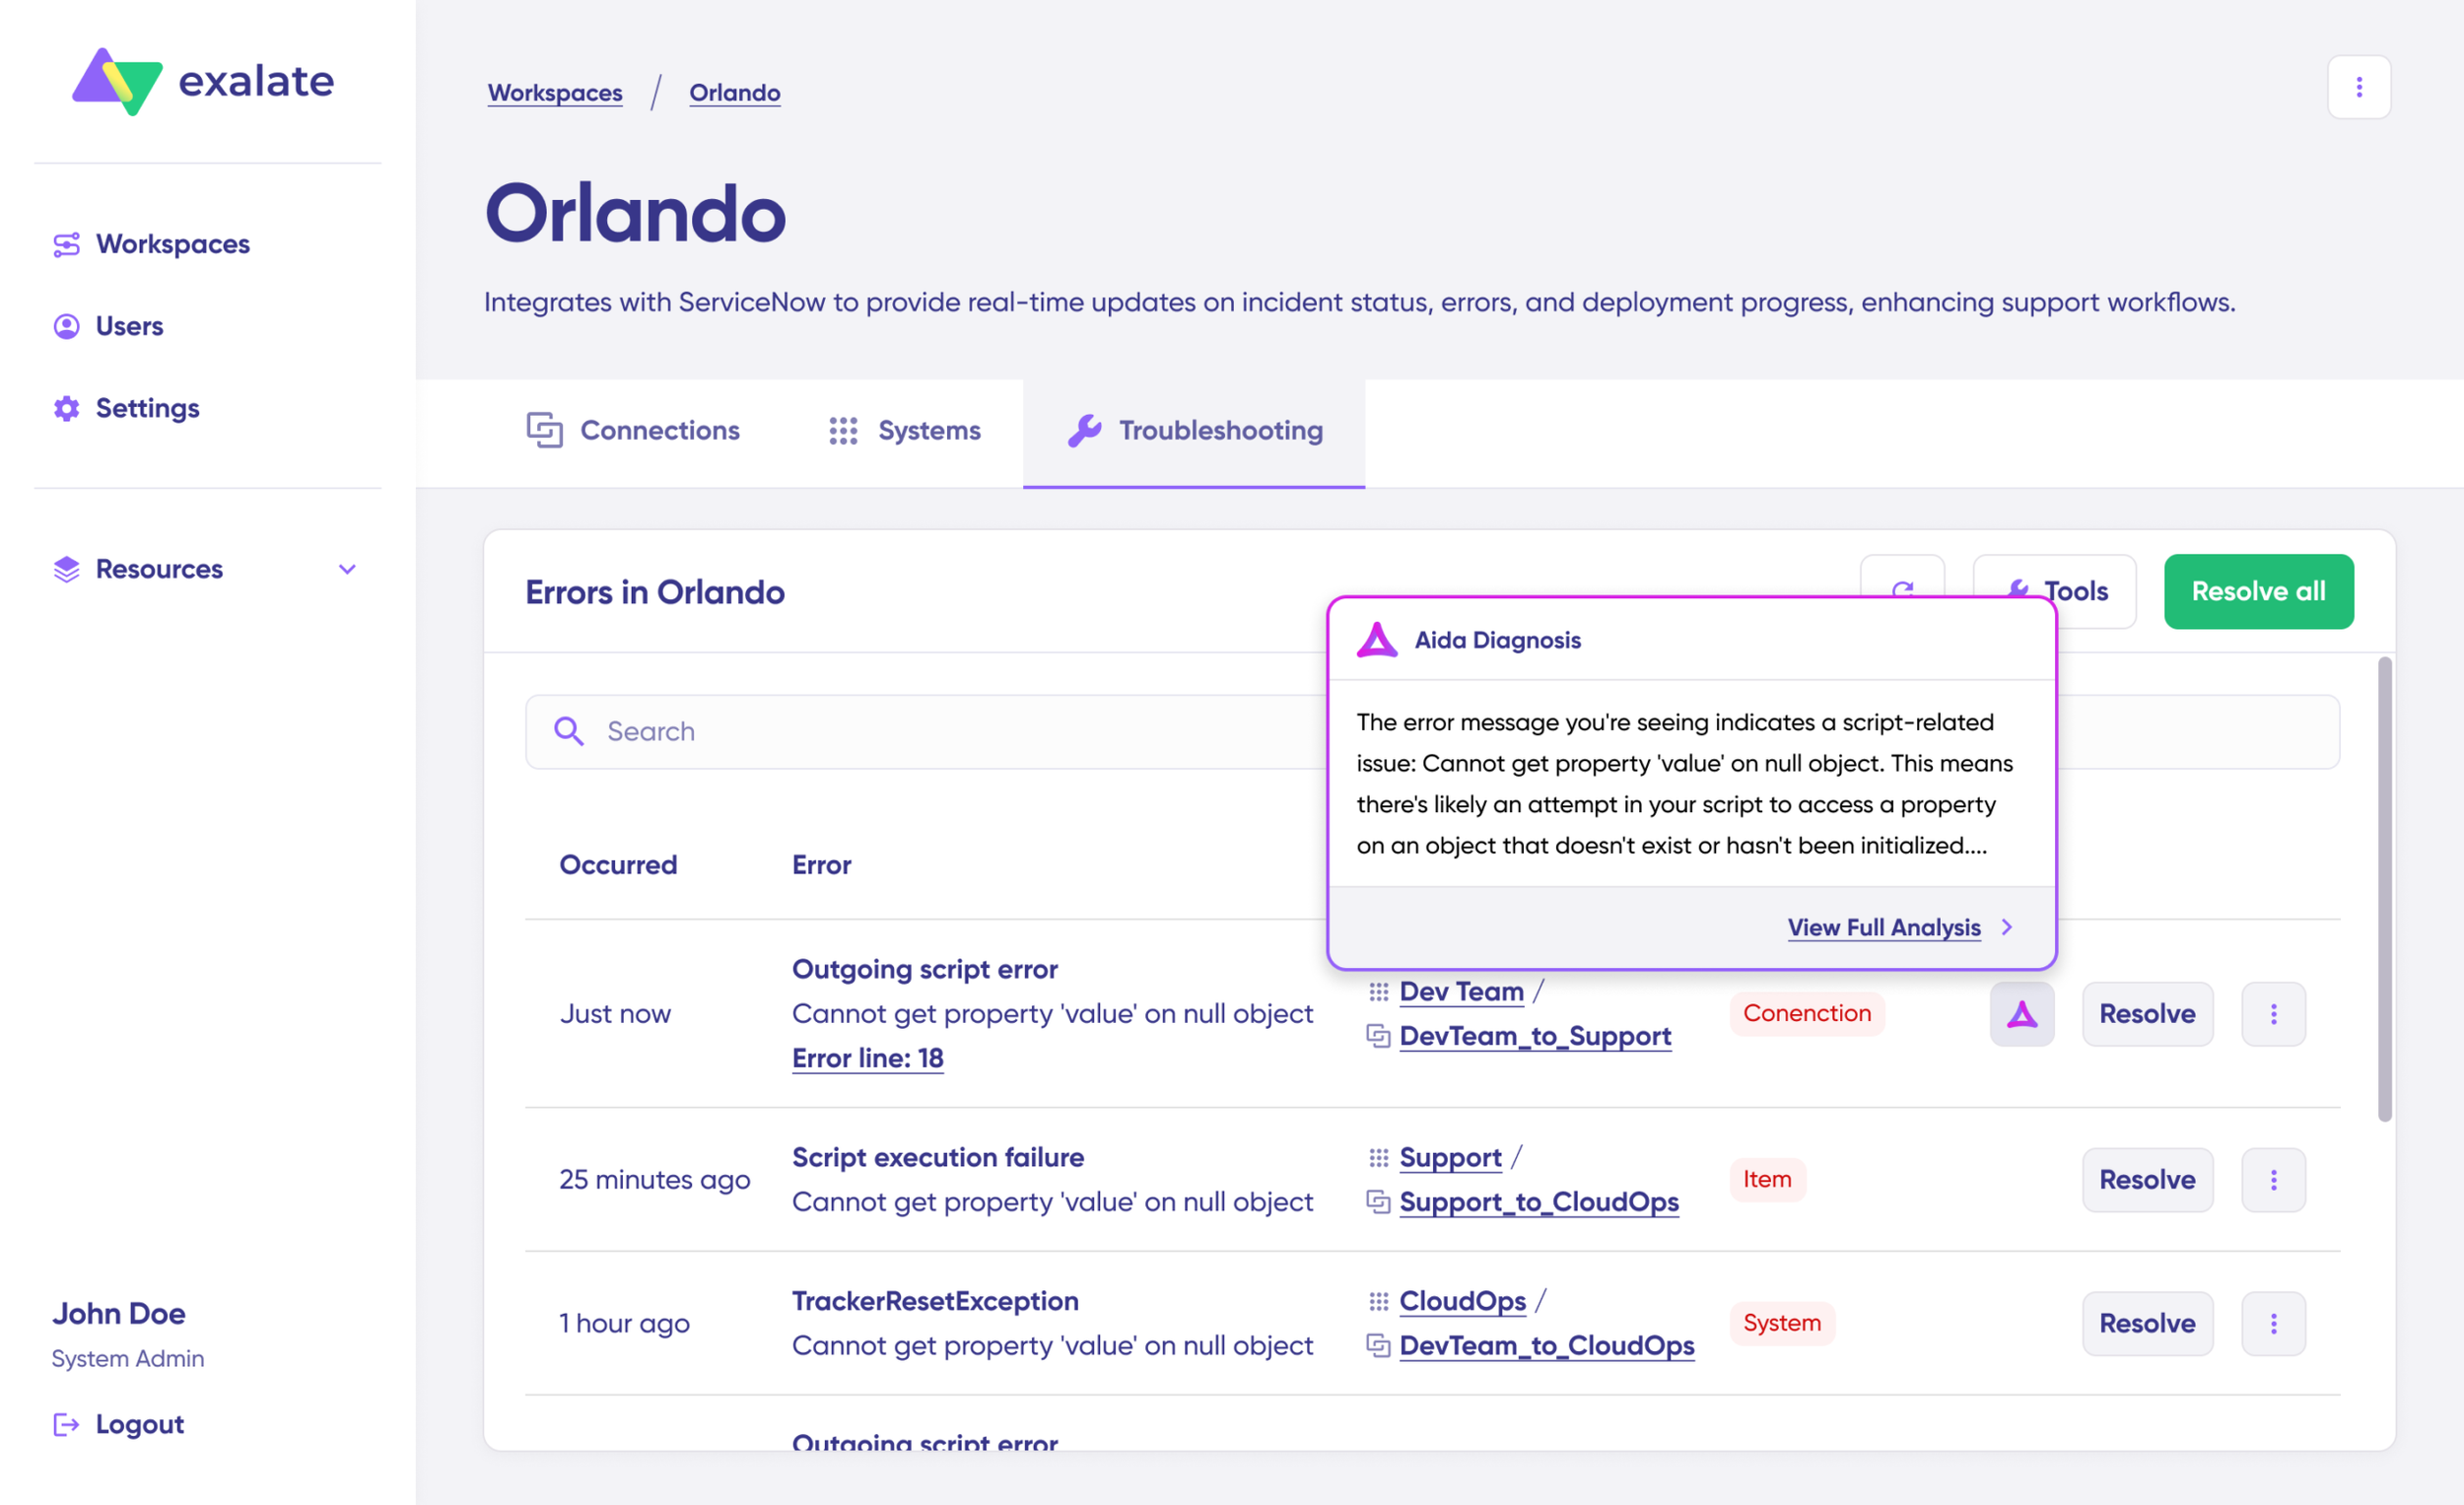
To troubleshoot an error:
Navigate to the “Troubleshooting” tab in your workspace. Hover over the error you want to investigate. Click the Aida icon that appears.
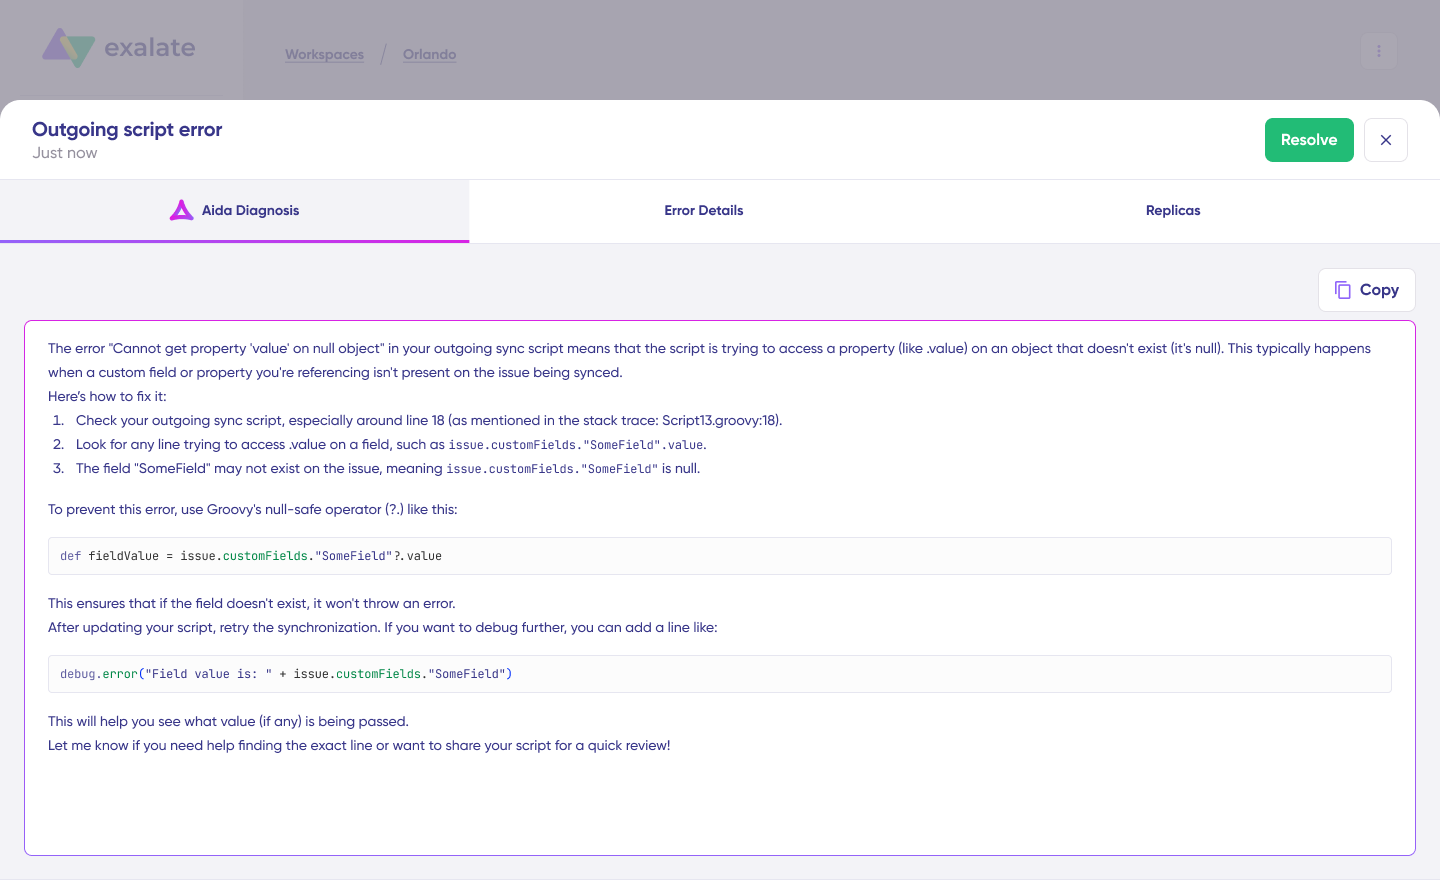
Aida displays a modal with:
- A brief explanation of what went wrong
- A proposed solution to fix it
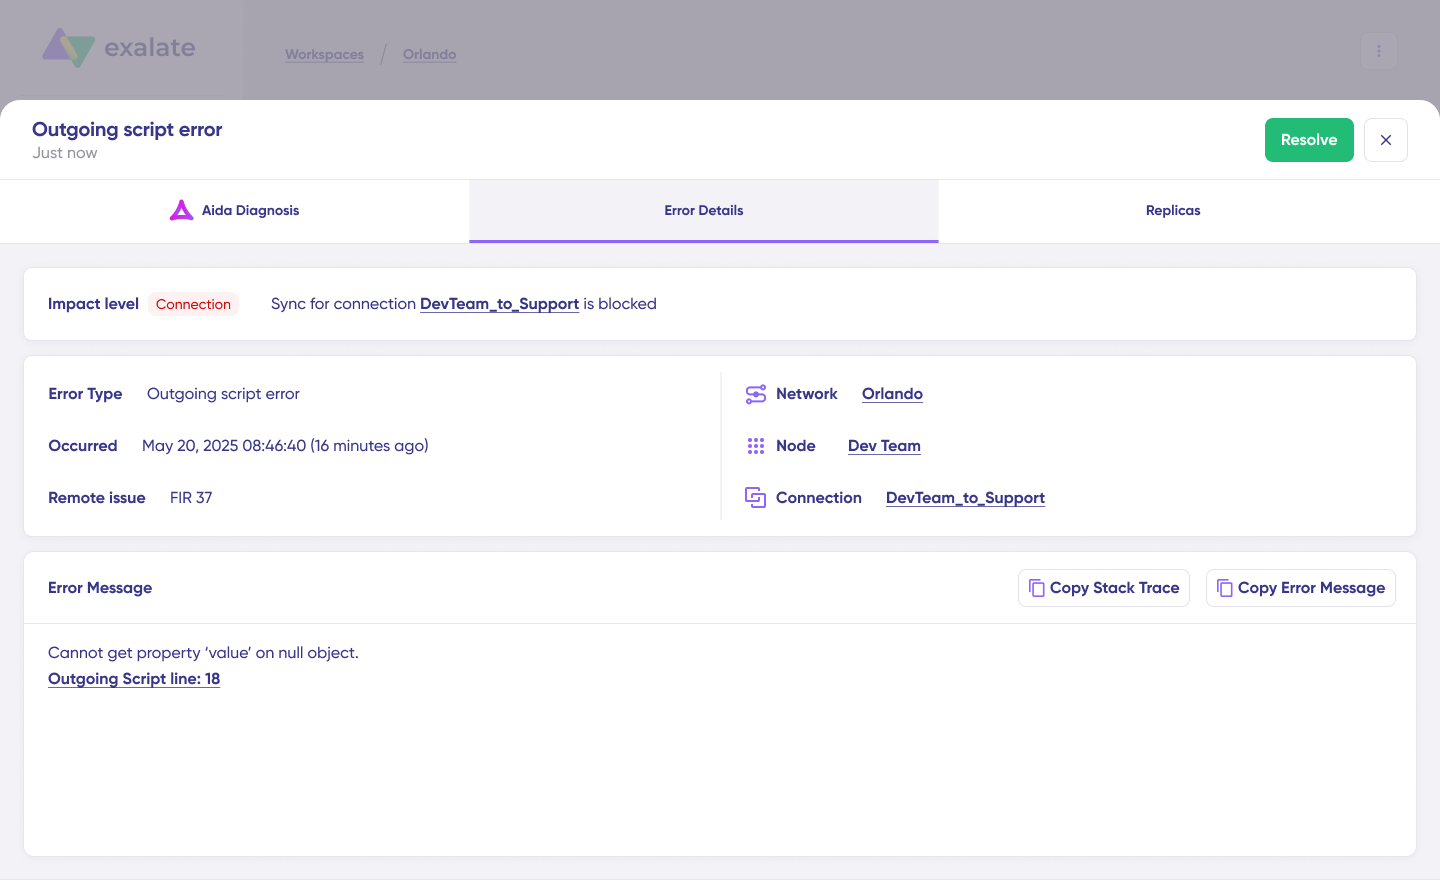
Click “View Full Analysis” for deeper context. You can also access “Error details” to copy the stack trace or view “Replicas” to examine the JSON payload.
Choose “Resolve” to apply fixes and retry the failed synchronization.
Use Cases for Freshdesk Azure DevOps Integration
Here are practical applications of Freshdesk to Azure DevOps integration for organizations.
Use Case 1: Escalate Support Tickets to the Development Team
Challenge: Support teams receive bug reports and feature requests in Freshdesk. Developers work in Azure DevOps. Manual escalation creates delays and information gaps.
Solution: Configure automatic escalation from Freshdesk to Azure DevOps. When a ticket meets certain criteria (e.g., type = bug, priority = high), a corresponding work item is created in Azure DevOps with all relevant details.
Real-World Application: A SaaS company routes all Freshdesk tickets tagged “bug” directly to their Azure DevOps backlog. Comments and attachments sync bidirectionally, so developers see customer screenshots and support agents see developer notes.
Use Case 2: Map Multiple Freshdesk Tickets to a Single Azure DevOps Work Item
Challenge: When multiple customers report the same issue, you end up with duplicate work items in development and fragmented customer communication.
Solution: Configure n-to-1 mapping where multiple Freshdesk tickets link to a single Azure DevOps work item (task or bug). All related tickets consolidate into one truth source.
Real-World Application: An e-commerce platform experienced an influx of tickets about a faulty payment gateway. All tickets related to this issue have been escalated to Azure DevOps as a single bug. Developers accessed consolidated information from all affected customers. Once fixed, all linked Freshdesk tickets received automatic resolution updates.
Use Case 3: Share Instant Updates Between Freshdesk and Azure DevOps
Challenge: Support agents spend time chasing developers for status updates. Developers get interrupted with status requests instead of coding.
Solution: Configure bidirectional status sync. When a developer moves a work item from “In Progress” to “Code Review,” the corresponding Freshdesk ticket reflects this change automatically.
Real-World Application: Map status between Freshdesk and Azure DevOps using Aida. Prompt: “Map incoming Freshdesk statuses to Azure DevOps statuses: ‘Open’ maps to ‘To Do’, ‘Pending’ maps to ‘In Progress’, ‘Closed’ maps to ‘Done’.” Refine the resulting script for your specific workflow.
Use Case 4: MSP Multi-Tenant Support
Challenge: Managed Service Providers handle Freshdesk instances for multiple clients. Each client may have their own Azure DevOps projects. Routing tickets to the correct development project is complex.
Solution: Configure multi-tenant sync rules using Exalate’s scripting capabilities. Based on ticket properties (organization, custom fields), route to the appropriate Azure DevOps project.
Real-World Application: An MSP manages Freshdesk for 15 clients. When tickets require development escalation, Exalate routes them to the correct Azure DevOps project based on the “Organization” field. Each client’s development team sees only their relevant tickets while the MSP maintains a unified view across all accounts.
Use Case 5: Cross-Company Vendor Collaboration
Challenge: Your company uses Freshdesk for customer support. A vendor partner uses Azure DevOps for development. Sharing information across company boundaries requires secure, controlled data exchange.
Solution: Exalate enables cross-company integration where each party maintains full operational control. You decide what data leaves your Freshdesk instance. The vendor decides what enters their Azure DevOps.
Real-World Application: A software company integrates their Freshdesk support portal with a third-party development agency’s Azure DevOps. Bug reports escalate securely, but internal notes and customer information remain in Freshdesk. The agency sees only sanitized information needed for fixing the bug.
Challenges and Limitations of Freshdesk Azure DevOps Integration
Setting up a sync between Azure DevOps and Freshdesk comes with technical considerations.
Security Configuration
Sensitive customer information flows between both platforms. You need encryption protocols, secure API authentication, and proper firewall rules. Verify that the user account used for API tokens has appropriate permissions to create and edit tickets and work items, but not broader access than necessary.
Field Mapping Complexity
Most solutions support only standard fields (title, description, priority) out of the box. Custom fields require additional configuration. If you want to add a custom field, expect manual configuration and testing. Solutions with scripting capabilities (like Exalate) provide more flexibility here.
Error Handling Requirements
When a sync fails, you need clear visibility into what went wrong. Some tools lack sufficient troubleshooting capabilities to identify if the correct path has been referenced or if the right values are being fetched. Look for solutions with detailed logging and error notifications.
Ongoing Maintenance
Integrations aren’t set-and-forget. Field additions, workflow changes, and API updates require configuration adjustments. Factor in maintenance overhead when evaluating solutions, or consider managed services to offload this work.
Get Started with Your Freshdesk Azure DevOps Integration
Azure DevOps and Freshdesk integration can improve your team’s quality of support, which directly enhances customer satisfaction.
Before choosing any integration solution, make sure it fits your company’s technical use case. Features like security certifications, custom field support, and automated event triggers should top the checklist. Factor in your organization’s budget and scalability requirements.
A tool like Exalate provides seamless one-way or two-way connectivity with partners, clients, MSPs, and internal teams.
Frequently Asked Questions
Does Freshdesk have a native integration with Azure DevOps?
Freshdesk offers marketplace apps that provide basic connectivity with Azure DevOps. These native integrations support creating work items from tickets and linking existing items. For advanced scenarios like bidirectional sync, custom field mapping, or automated triggers, third-party tools like Exalate provide more flexibility.
Can I sync custom fields between Freshdesk and Azure DevOps?
Yes, if you use an integration tool that supports custom field mapping. Exalate syncs any field accessible via API, including custom fields specific to your Freshdesk or Azure DevOps configuration. Use Groovy-based scripts to transform data between different field types.
How does Exalate handle Freshdesk Azure DevOps integration differently from native plugins?
Exalate provides bidirectional synchronization, meaning changes on either side automatically reflect on the other. Native plugins typically offer one-way creation (Freshdesk → Azure DevOps) with limited field support. Exalate adds AI-assisted configuration, Groovy scripting, automated triggers, and enterprise security features.
What security features should I look for in an integration tool?
Prioritize tools with ISO 27001 certification, data encryption in transit and at rest, role-based access control, and operational control over sync rules. Verify compliance with your industry requirements (GDPR, etc.). Check the vendor’s trust center for current certification status.
Can I integrate multiple Freshdesk accounts with Azure DevOps?
Yes. Exalate supports multi-instance configurations where multiple Freshdesk accounts sync with different Azure DevOps projects or organizations. This is particularly useful for MSPs managing multiple clients or enterprises with separate business units.
How does Aida (AI-assisted configuration) work?
Aida lets you describe your sync requirements in plain language. For example: “Sync all high-priority bug tickets from Freshdesk to Azure DevOps, including comments and attachments.” Aida generates the appropriate configuration code, which you can then refine or extend with scripting if needed.
Can I control what data syncs between Freshdesk and Azure DevOps?
Yes. With Exalate, you have full operational control over your sync side. Define triggers that specify which tickets sync (e.g., only bugs, only high priority). Use outgoing sync rules to control what data leaves your instance and incoming sync rules to control what data enters.
Does Exalate support Azure DevOps Server (on-premises)?
Yes. Exalate supports both Azure DevOps Services (cloud) and Azure DevOps Server (on-premises). The same synchronization capabilities apply regardless of deployment model.
What other platforms can Exalate integrate with Freshdesk?
Beyond Azure DevOps, Exalate connects Freshdesk with Jira, ServiceNow, Zendesk, Freshservice, GitHub, Salesforce, and Asana. Custom connectors enable integration with proprietary systems that have REST APIs.
Is there a free trial available?
Yes. Exalate offers a free trial with full access to features so you can evaluate the platform with your actual use case before making a purchase decision.
Can non-technical teams configure Freshdesk Azure DevOps integration?
Aida makes basic configuration accessible without scripting knowledge. Describe what you want to sync, and Aida generates the configuration. For complex requirements involving conditional logic or data transformations, technical teams can extend configurations using Groovy scripts.
What’s the difference between one-way and two-way sync?
One-way sync pushes data in a single direction (e.g., Freshdesk → Azure DevOps). Two-way (bidirectional) sync pushes data in both directions; changes in Freshdesk reflect in Azure DevOps, and changes in Azure DevOps reflect back in Freshdesk.
Can I sync attachments and comments between Freshdesk and Azure DevOps?
Yes. Exalate syncs attachments (screenshots, logs, documents) and comments bidirectionally. Configure whether public comments, private notes, or both should sync based on your requirements.
Recommended Reads
- Freshdesk Jira Integration in the Age of Customer Satisfaction
- How To Map and Sync Statuses and Correlation Details
- How to Sync Date and Time Formats between Azure DevOps and Jira Cloud
- How to Sync Side Conversations between Zendesk and Jira
- Why Cross-Platform Integration is the New Wave for Organizations