
When the support desk uses Jira Service Management while developers track work in Azure DevOps, information gets trapped.
In organizations where service teams and development teams often find themselves working in silos, manual ticket copying, delayed updates, and miscommunication slow everything down.
Integrating Jira Service Management with Azure DevOps helps escalate tickets and automatically create work items with full context. Status updates flow bidirectionally in real-time, and both teams stay in their preferred tools while collaborating seamlessly.
For that to happen, you need an integration solution that can connect both JSM and Azure DevOps in order to enable real-time, unidirectional, or bidirectional syncs.
Note: Jira now refers to issues as work items. This guide uses the updated terminology throughout.
Key Takeaways
- Jira Service Management and Azure DevOps integration automatically synchronizes service requests, incidents, bugs, and work items between both platforms.
- Use cases include incident escalation, bug tracking, multi-team collaboration, centralized service desk routing, MSP client management, post-merger integration, and cross-company vendor collaboration.
- JSM to Azure DevOps integration enables routing different ticket types to specific Azure DevOps projects automatically based on priority, labels, or custom fields for streamlined workflow management.
- Essential features to consider include bidirectional sync, flexible field mapping, conflict resolution, security controls, scalability, selective sync filtering, audit trails, and customization options.
- Organizations benefit from faster incident resolution, improved accountability, reduced response times, broken-down organizational silos, and higher customer satisfaction.

Why You Need Jira Service Management and Azure DevOps Integration
Here’s what Jira Service Management to Azure DevOps integration does for your teams:
Eliminates Manual Ticket Copying
Integrating both Azure DevOps and Jira eliminates the need for copy-pasting ticket details between platforms. Manual data entry inevitably leads to mistakes: wrong priority levels, missing attachments, mismatched fields, and incomplete descriptions.
For instance, when a JSM ticket needs dev attention, it automatically creates a work item in Azure DevOps with all the relevant context. Updates flow back automatically, so your support team always knows the status without switching tools.
Keeps Everyone in Sync in Real-Time
When a developer changes a work item status in Azure DevOps, that update appears instantly in the corresponding Jira Service Management ticket.
The same goes for comments, priority changes, and attachments. Both teams see the same information at the same time, no matter which tool they’re using.
Speeds Up Incident Resolution
Critical bugs reported through Jira can be escalated to your dev team immediately. The integration routes high-priority incidents and epics to the right Azure DevOps project, triggers notifications, and maintains the urgency level across both systems.
Your developers start working on the problem faster because they get the complete context right away.
Improves Accountability and Transparency
When everything syncs automatically, both teams maintain complete visibility into ticket status, progress, and ownership. You can track when a ticket was escalated, who’s working on it, and what progress they’ve made. This transparency matters for SLAs, customer communication, and incident post-mortems.
Reduces Response Time and Resolution Cycles
Integration cuts out the delays that happen when teams wait for email responses or status updates. A ticket that would usually require an agent to escalate it manually can now move to the dev team in seconds. Faster handoffs mean faster fixes, which translates directly to better customer satisfaction scores.
Scales for MSPs and Multi-Team Organizations
If you’re a managed service provider handling multiple clients, you can connect your central JSM instance with each client’s Azure DevOps environment. Or if you’re a large organization with separate dev teams (web, mobile, infrastructure), you can route different request types to the appropriate Azure DevOps project automatically.
Breaks Down Organizational Silos
When service and development teams can’t easily share information, they start working in isolation. Integrating Jira and Azure DevOps forces cross-functional product managers to see real customer pain points from both ends. This shared context leads to better prioritization and more informed decisions.
Improves Customer Satisfaction
Customers don’t care about your internal workflows; they just want their work items resolved quickly. When your teams are integrated, resolution times drop, and communication improves. This will help support agents to provide accurate status updates to customers because they have real-time visibility into dev progress.
Saves Money on Licensing and Training
Your service desk doesn’t need to learn Azure DevOps, and your developers don’t need to log into Jira Service Management every day. Each team stays productive in the environment they know best while still collaborating effectively.
Instead of buying JSM licenses for your entire dev team or Microsoft Azure DevOps licenses for your support staff, each team uses what they already have. You also skip the cost and time of cross-training teams on unfamiliar platforms.

Calculate time and money savings from automated bidirectional sync.
Jira Service Management and Azure DevOps Integration Use Cases
Here are real-world scenarios where connecting Jira Service Management with Azure DevOps makes a tangible difference:
Case 1: Automating Incident Escalation from Service Desk to Dev Team
Challenge: A customer reports they can’t log into your application. Your JSM support agent discovers it’s an authentication service failure affecting multiple customers. Without integration, the agent must manually copy ticket details, email the dev team, and repeatedly check for updates to relay to customers.
Solution: When the agent escalates the JSM incident, Exalate automatically creates a high-priority bug in Azure DevOps with all diagnostic information: attachments, error logs, and affected user details. As developers update the work item with progress, those updates sync back to JSM in real-time.
Real-World Application: A SaaS company using this integration cut their average incident resolution time by 40%. Support agents provide accurate status updates to customers without interrupting developers, and critical bugs reach the right team within seconds instead of hours.
Case 2: Feature Request Management
Challenge: Customers submit feature requests through the Jira Service Management portal. Your team reviews and approves them, but manually creating work items in Azure DevOps takes time, and context gets lost in translation.
Solution: Once approved, requests automatically flow to Azure DevOps as product backlog items with customer context, use case descriptions, and business impact. When developers complete the feature, the original Jira request closes automatically and triggers a notification back to the customer.
Real-World Application: A B2B software company increased customer satisfaction scores by 15% after implementing this workflow. Customers receive proactive updates when requested features ship, and product teams maintain a direct line to customer needs.
Case 3: Change Request Management
Challenge: Change requests require approval workflows in JSM before implementation can begin. Implementation teams work in Azure DevOps, creating a disconnect between approval status and actual work progress.
Solution: When a change request gets approved through JSM’s approval workflows, it automatically creates corresponding work items in Azure DevOps for the teams responsible for implementation. As developers and engineers complete tasks and update statuses, that progress syncs back to the change request in JSM.
Real-World Application: A healthcare technology company achieved compliance by demonstrating complete traceability between change requests and their implementation. Managers have complete visibility into progress, risk assessments, and rollback plans without requiring technical teams to work outside Azure DevOps.
Case 4: MSP Collaboration Across Projects
Challenge: Your organization has separate dev teams for web, mobile, and infrastructure, each using its own Azure DevOps project. A central Jira receives all incoming support requests in one place, but routing them to the right team requires manual intervention.
Solution: When you integrate both systems, requests automatically route based on categories, labels, or custom fields. Each team works in its own environment while the service desk maintains a unified view in Jira.
Real-World Application: An MSP supporting multiple enterprise clients keeps each client’s data completely isolated while managing all support from a central JSM instance. Client-specific sync rules ensure sensitive information never crosses organizational boundaries.
Case 5: Unified Service Desk Routing to Multiple DevOps Boards
Challenge: Your centralized service desk receives tickets across multiple product lines, customer segments, and work item categories. Manually routing each ticket to the correct Azure DevOps board wastes time and introduces errors.
Solution: Integrating Jira Service Management with multiple Azure DevOps instances creates a centralized ecosystem for managing customer tickets. Tickets route to separate Azure DevOps boards based on customer type, work item category, or custom fields. Updates from dev teams sync back to original JSM tickets for unified SLA tracking.
Real-World Application: A multi-product software company reduced ticket routing time from 15 minutes to zero by automating the handoff. Support managers now have centralized reporting across all products while each dev team works independently.
Case 6: Agile Board Synchronization
Challenge: Your product team plans work in Jira Service Management using roadmaps and backlogs, while your development team executes sprints in Azure DevOps. Without integration, product managers lack visibility into development progress, and developers lack context on product priorities.
Solution: Integrating both systems syncs epics, user stories, and tasks so product managers can track development progress without accessing Azure DevOps. Developers see the product context behind their work items, improving prioritization decisions.
Real-World Application: A product-led growth company aligned their quarterly planning with sprint execution by syncing roadmap items between JSM and Azure DevOps. Product managers stopped attending daily standups because they could see progress in real-time.
Case 7: Customer Feedback Loop to Product Development
Challenge: Customer success teams collect feature feedback and enhancement requests through JSM. Product teams plan development in Azure DevOps. Without integration, valuable customer insights get lost or delayed in reaching developers.
Solution: Approved feedback items in JSM automatically create user stories in Azure DevOps with customer context, use case descriptions, and business impact. When features ship, JSM tickets update automatically, enabling customer success to close the loop with customers.
Real-World Application: A B2B software company increased NPS scores after implementing this feedback loop; customers received proactive updates when requested features were released, and product teams had direct visibility into customer priorities.
What are the Key Features to Consider in a Jira Service Management Azure DevOps Integration Tool
Your choice of an integration solution for Jira to Azure DevOps connections depends on several features:
- Flexibility or customizability: Simple one-way syncs work fine with webhooks. Complex bidirectional scenarios with conditional logic need scripting capabilities or dedicated integration tools.
- Technical resources: If you don’t have developers available, template-based tools or managed integration services make more sense than custom scripts.
- Scalability: Handling hundreds of tickets monthly requires a more robust solution with architectural resilience. Look for tools with reliable performance, error handling, and retry mechanisms, and scalability to add more apps to the existing integration to create different networks like mesh, star, or hub and spoke.
- Security and access control: Look for ISO certification, encryption in transit and at rest, JWT or OAuth authentication, and role-based access controls. For MSP scenarios, ensure the tool supports data isolation between different client environments. Exalate’s Trust Center provides detailed security and architecture information.
- Full scripting and operational control: Enterprise integrations often require custom logic beyond simple field mapping. Groovy-based scripting engines let you implement conditional sync rules, data transformations, and business logic while maintaining full control over what data enters your system.
- Bidirectional, real-time sync: Your integration should handle updates flowing in both directions automatically. When a developer changes a work item status in Azure DevOps, that update should appear in the JSM ticket instantly, and vice versa.
- Selective sync and filtering: Look for tools that let you define sync rules based on priority, labels, custom fields, or JQL queries. For example, only sync high-priority bugs or tickets tagged “escalate” to avoid cluttering your Azure DevOps boards with routine requests.
- AI-powered capabilities: Look for features like AI-powered script generation that converts natural language prompts into integration code. AI assistants can suggest optimal sync configurations based on your requirements and help troubleshoot issues faster.
- Affordable pricing: Evaluate the total cost of ownership, including per-user costs, connector licensing, transaction limits, and overage charges. Factor in implementation costs, training expenses, and ongoing maintenance requirements. Exalate offers subscription-based plans—visit the pricing page for current options.
For most organizations, dedicated integration tools or enterprise iPaaS solutions provide the best balance of flexibility, reliability, and maintainability.
Read technical use cases and practical applications of Exalate for cross-platform integration
A Step-by-Step Setup Guide For Jira-Azure DevOps Integration With Exalate
Before connecting Jira and Azure DevOps, ensure you have:
For Jira:
- Admin access to your Jira instance
- Appropriate project permissions
For Azure DevOps:
- Admin access to your Azure DevOps organization (Services or Server)
- A Personal Access Token (PAT) with read/write permissions for work items
- Organization or collection-level permissions
1. Create Your Exalate Account
Visit the Exalate integrations or the app and create an account using your business email or Google sign-in. If you already have an account, simply log in to access the dashboard.

Once logged in, create all the connections you need.
2. Connect Jira and Azure DevOps
To create a connection, you’ll need authentication credentials for both systems.
Click “+ Add connections” > “Create new connection“.
Enter the name and URL for your first system [Jira (System A)]. Exalate automatically performs authentication checks in the background.
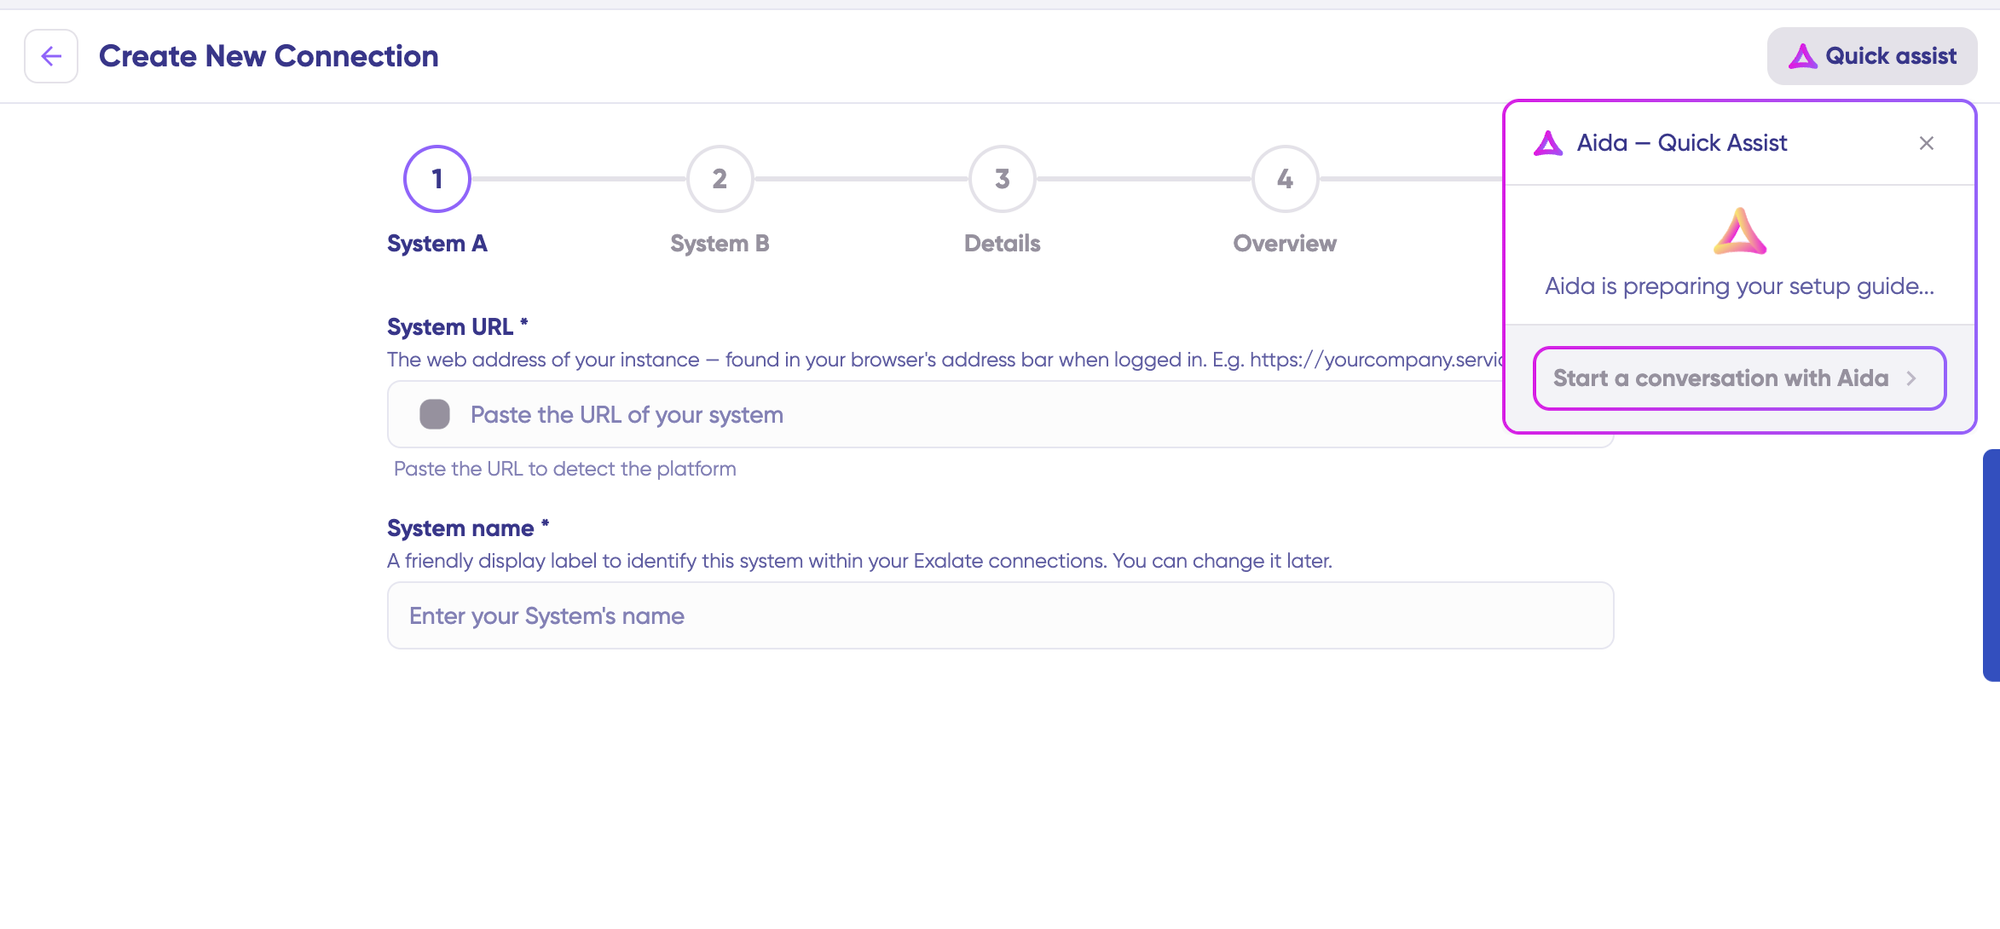
You can also speed up the process by using Aida – Quick Assist at the top right of the dashboard.
Enter the authentication details. For Jira, you need OAuth. Click on “Check Authentication”. If all is well, you’ll see “Successfully Authenticated”.
Repeat the same processes for Azure DevOps as System B (Azure DevOps).
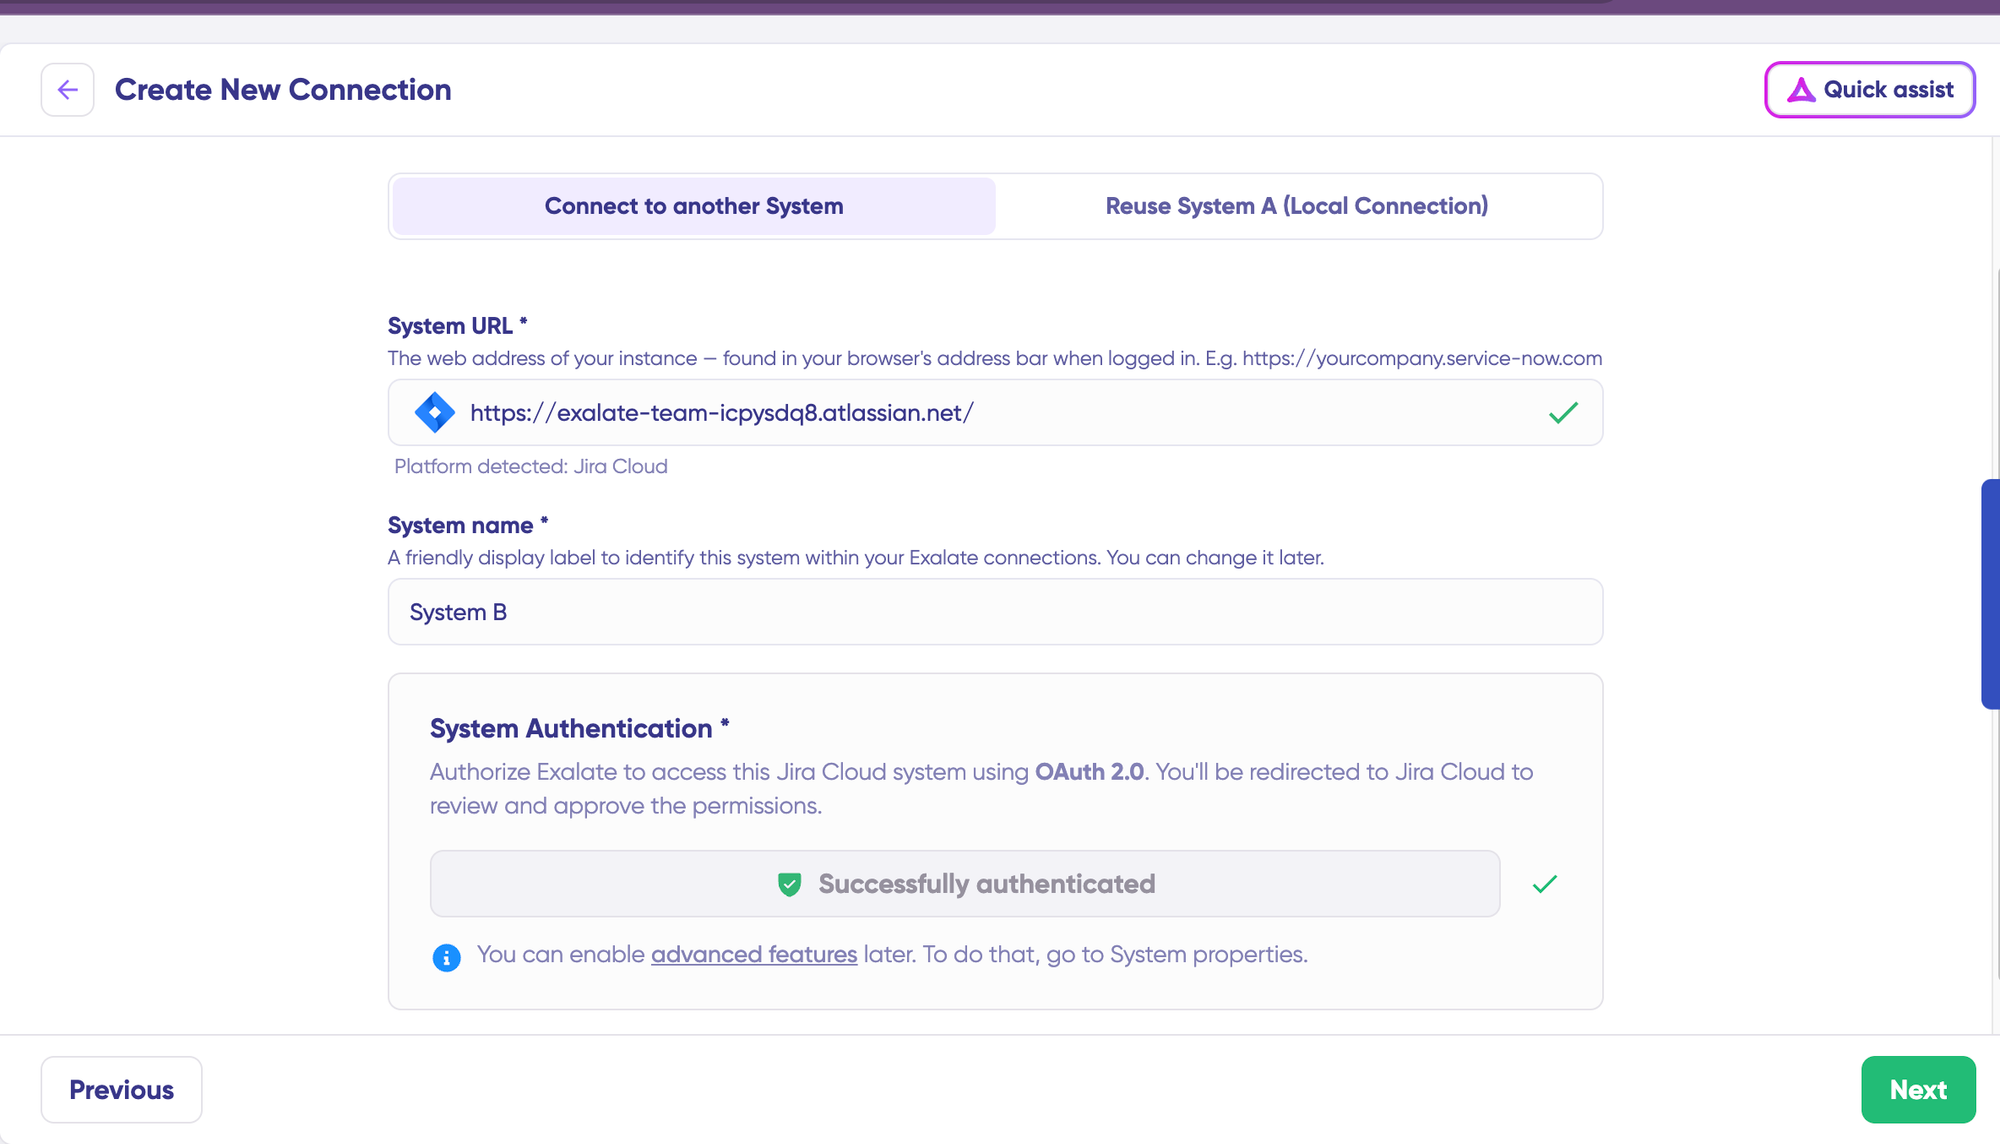
Once both systems are authenticated, confirm the connection name, add an optional description, and click “Create Connection“. Wait a few minutes for background configuration to complete, then click “Continue to Configuration“.
3. Configure Your Syncs
Choose the projects you want to sync from the dropdown menus on both sides, then click “Build and Continue“.
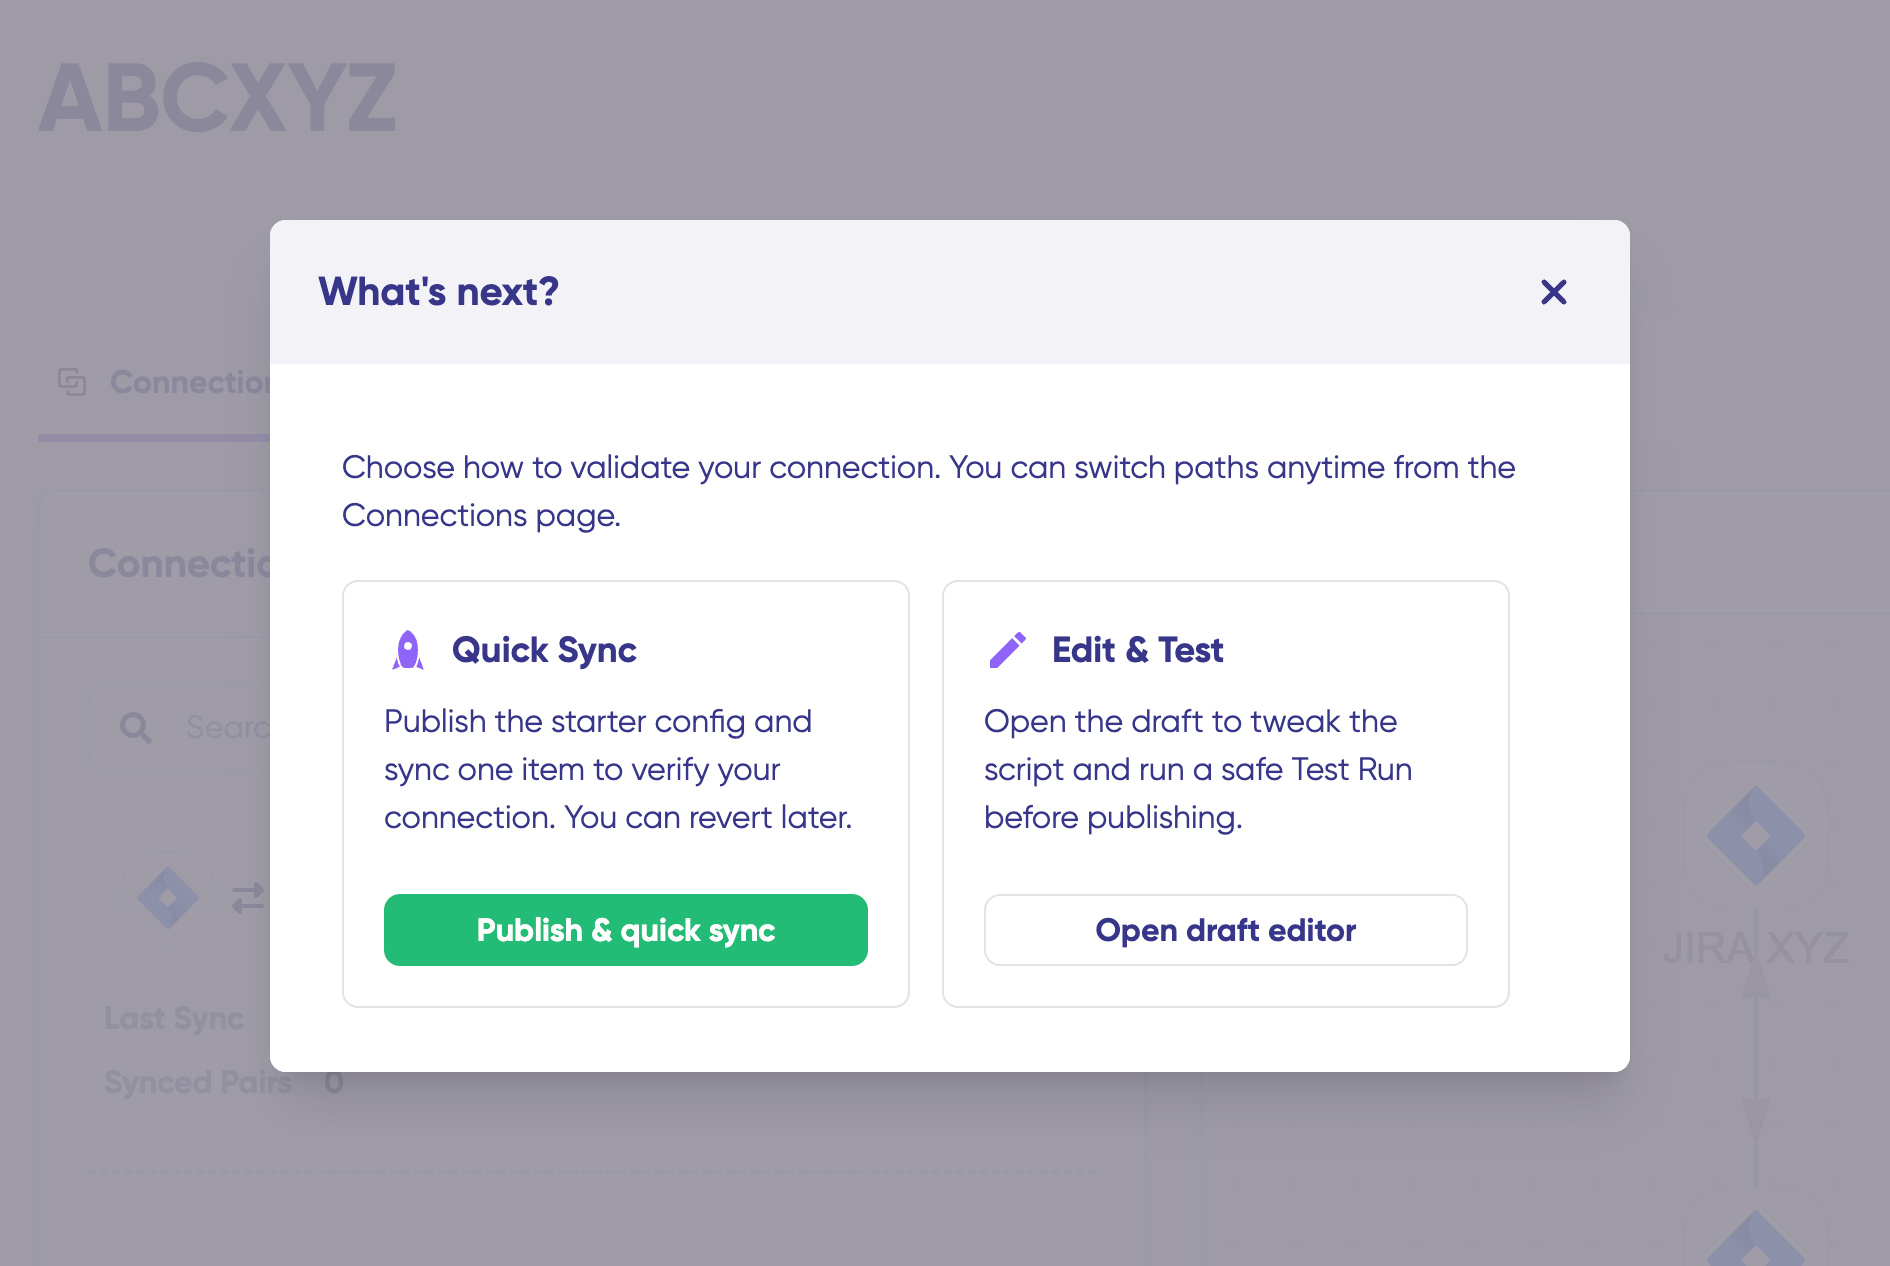
You’ll have two configuration options: Quick Sync and Edit & Test.
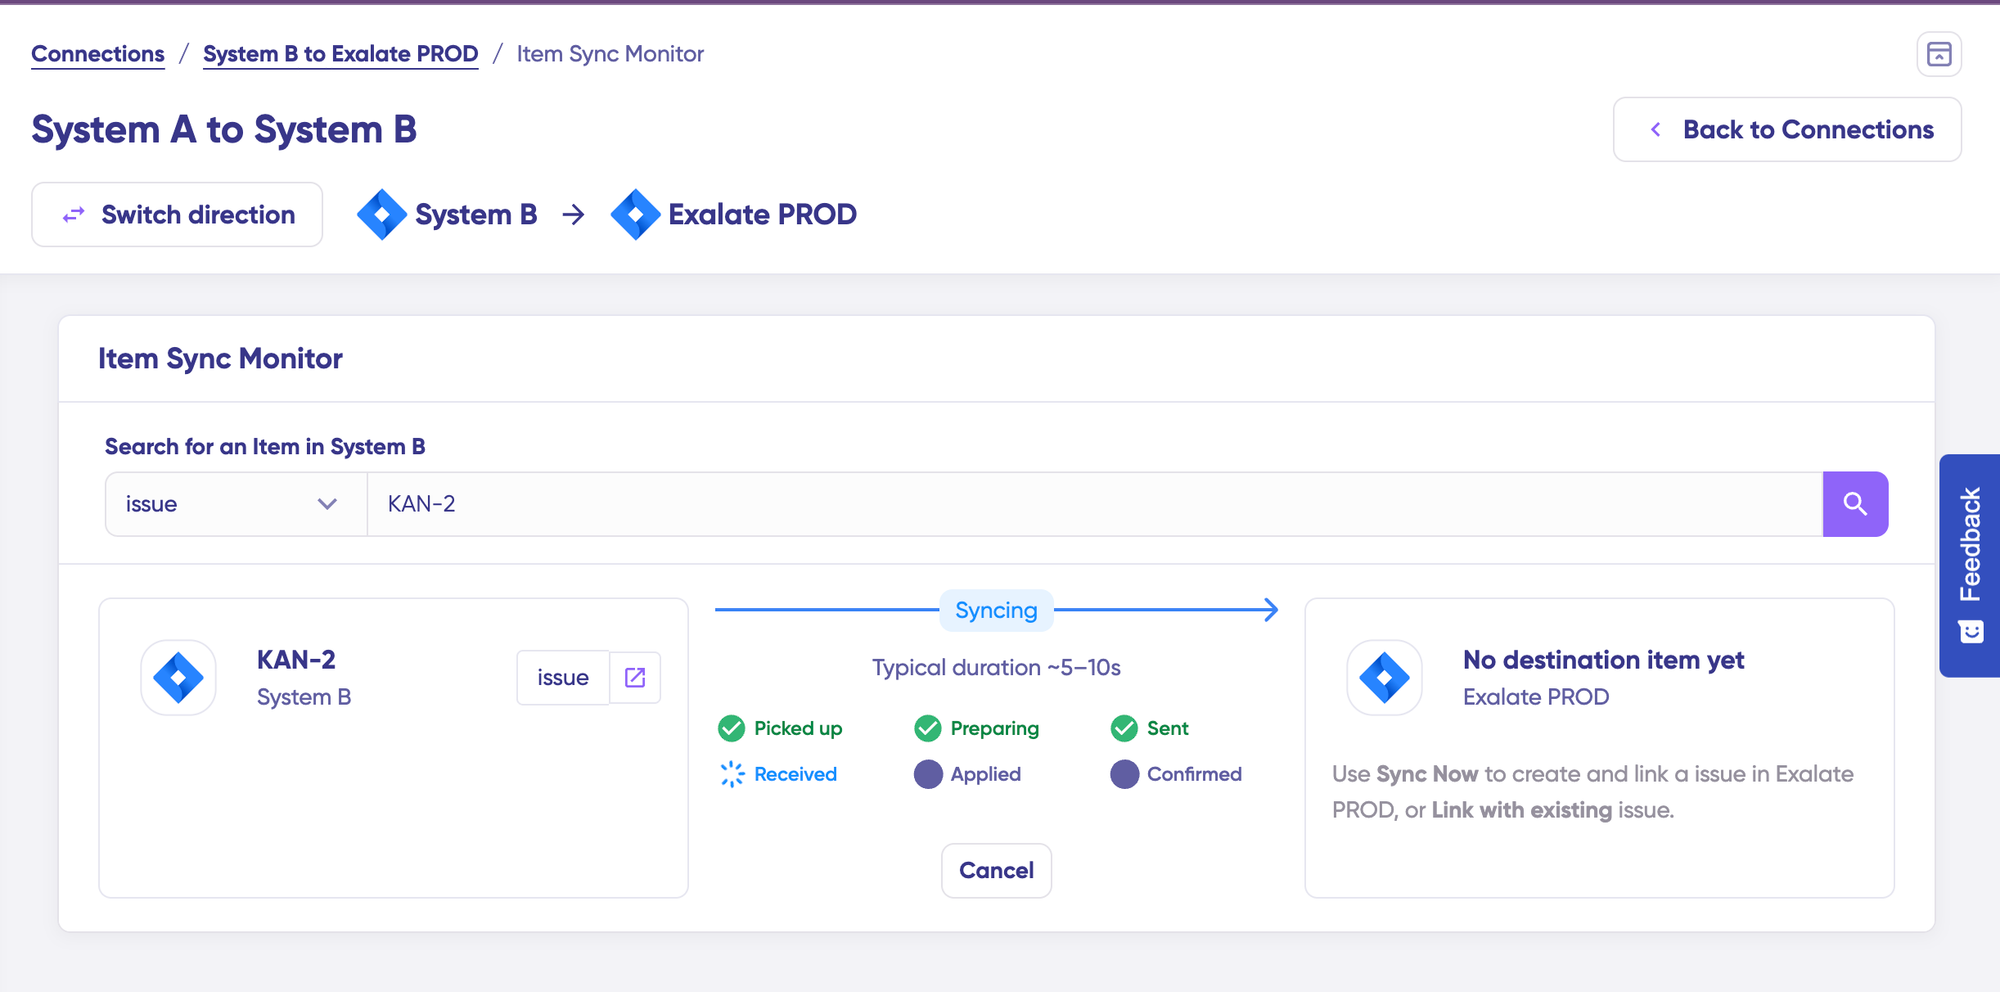
Quick Sync: Test synchronization with a single work item. Enter a work item key under “Item sync monitor” and click “Sync Now“. You can also link existing work items between systems. Once complete, view both synced items and compare changes.
Edit & Test: Customize sync rules using the draft editor. Click “+ New version” or “Open latest draft” to modify the configuration without affecting active syncs. Use the editor to adjust Groovy-based scripts that define custom data logic and field mappings for complex workflows.
4. Use Aida for AI-Assisted Configuration
Instead of writing scripts manually, use Aida, Exalate’s built-in AI assistant, to generate Groovy-based sync rules using natural language.
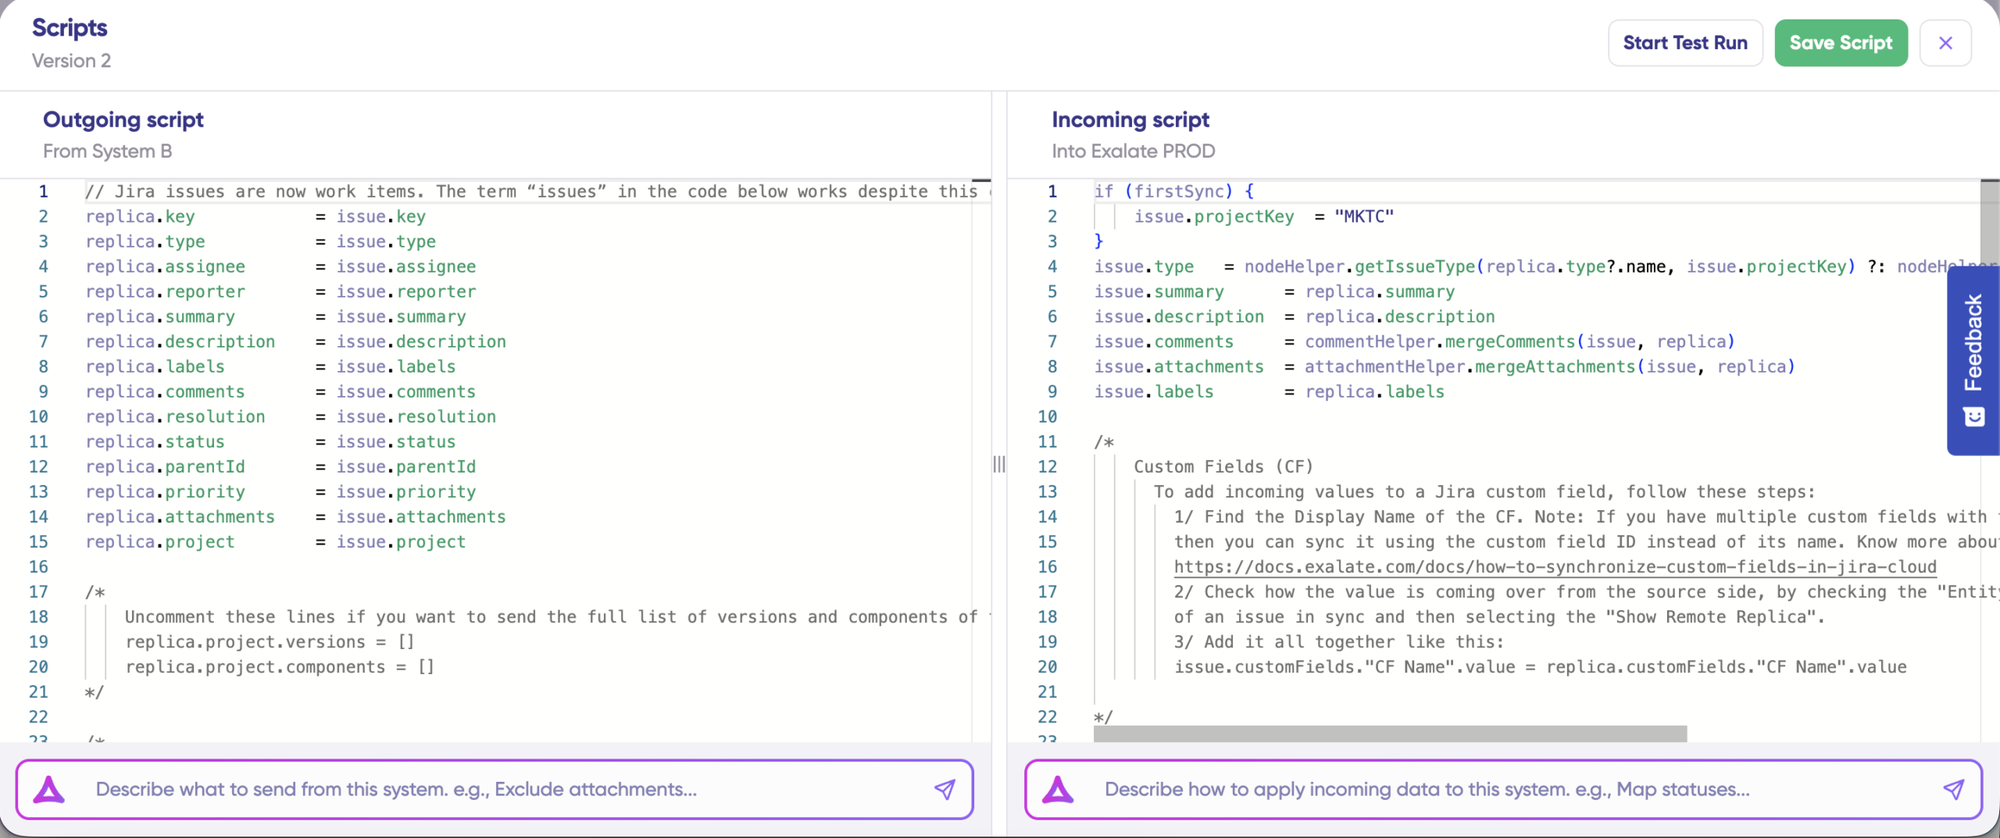
To make changes, click “Edit Script”. Aida appears in both outgoing and incoming script sections:
For Outgoing scripts: Describe what data should leave your system. Example: “Sync only high-priority work items.”
For Incoming scripts: Describe how incoming data should be applied. Example: “Map Jira statuses to Azure DevOps states.”
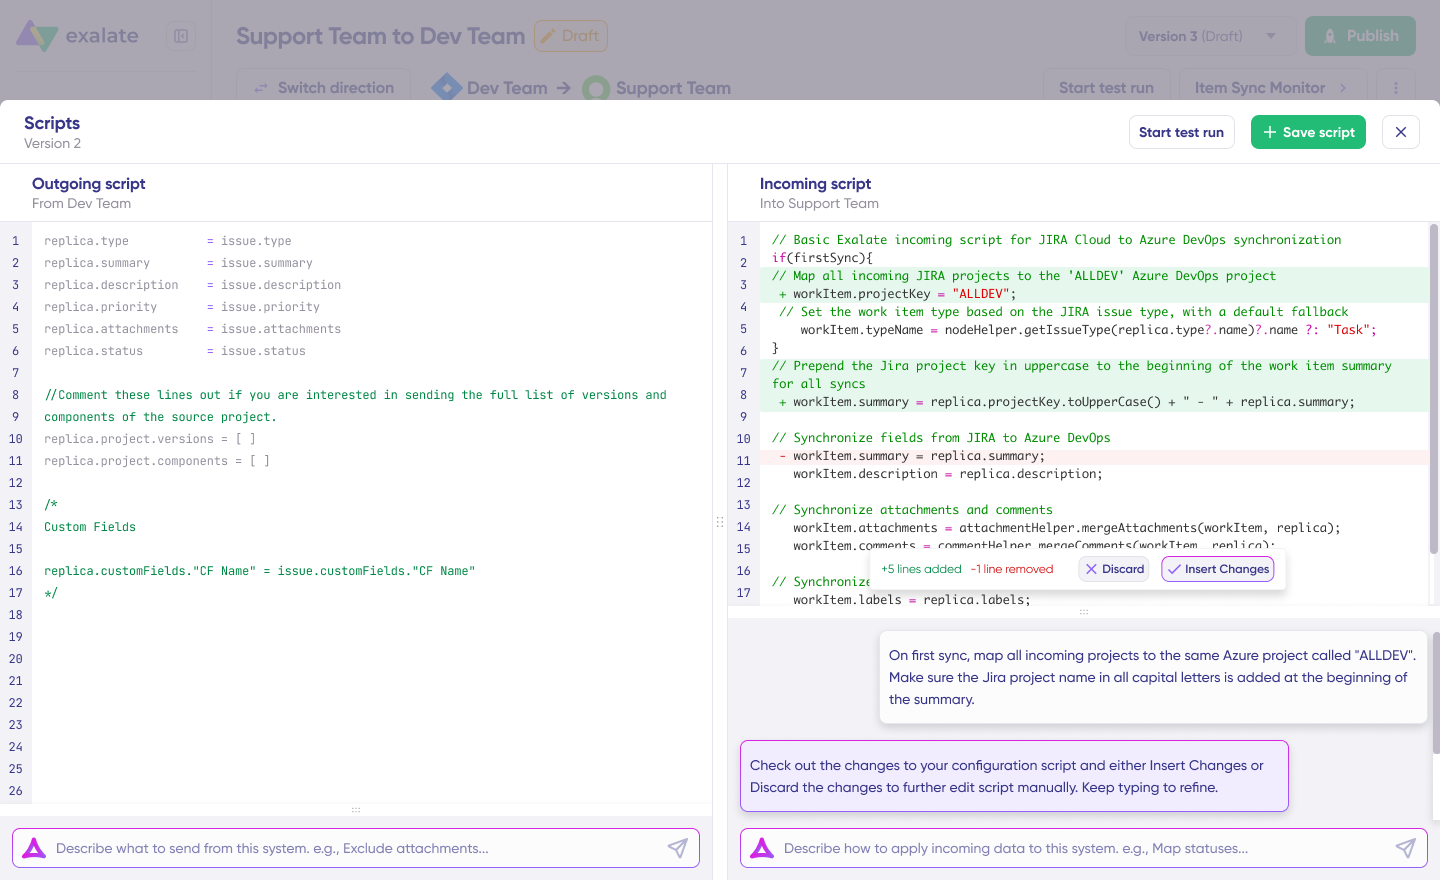
Aida generates scripts based on Exalate’s API and your existing configuration. Review the suggested changes; new lines appear in green, suggested removals in red. Choose to “Insert” or “Discard” suggestions. Always review AI-generated code before applying it.
5. Test and Publish Your Configuration
Before going live, test your sync rules with a dry run. Click “Start Test Run” and “Select items” to sync (you can choose multiple work items).

Review detailed results showing which fields synced and the payload shared between systems. If satisfied, click “Publish Version“.
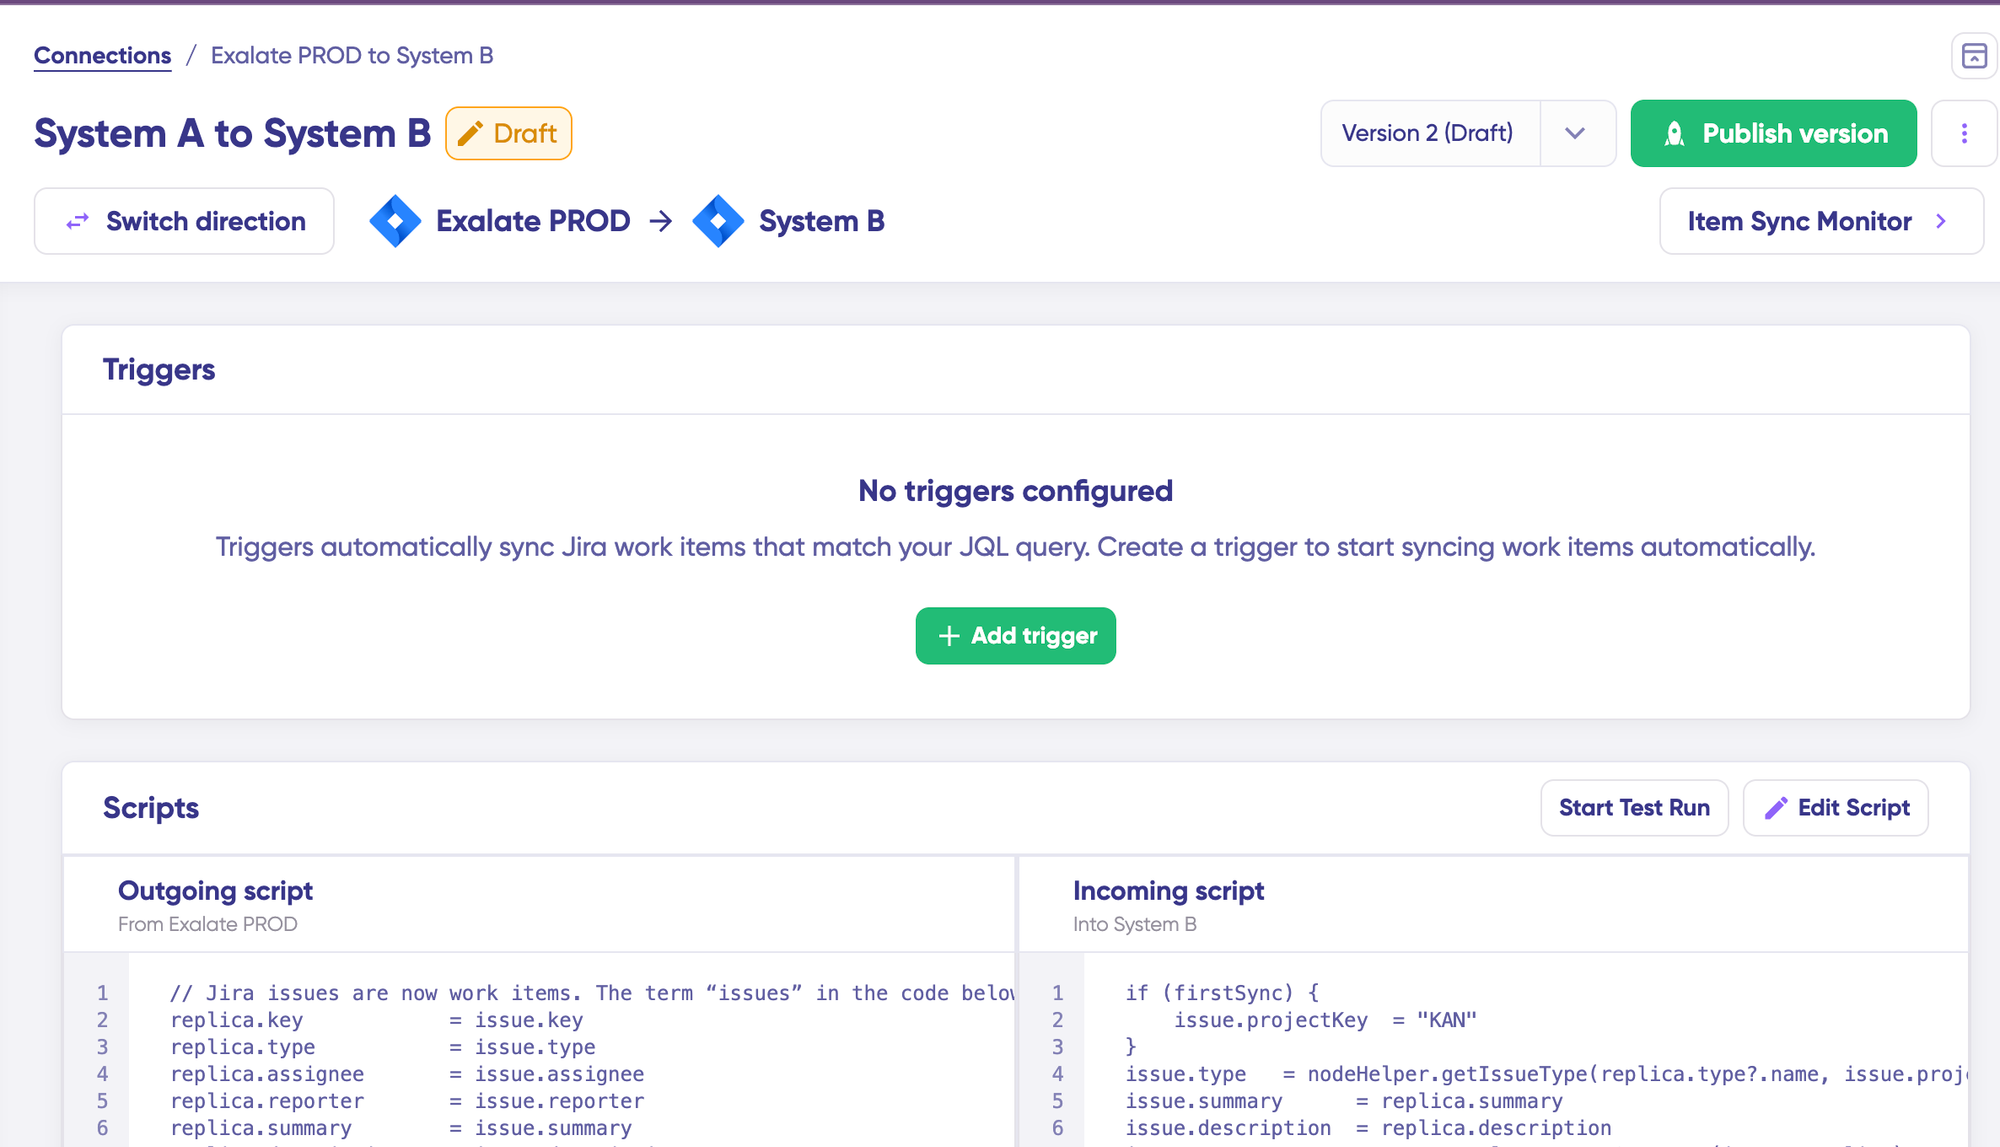
All configuration versions are accessible from the “Version” dropdown, labeled as “Active,” “Draft” (editable), or “Archived.”
6. Set Up Automated Triggers
Define conditions that automatically trigger synchronization. For example, sync all Jira work items with “label = dev” or all Azure DevOps work items in a specific area path.
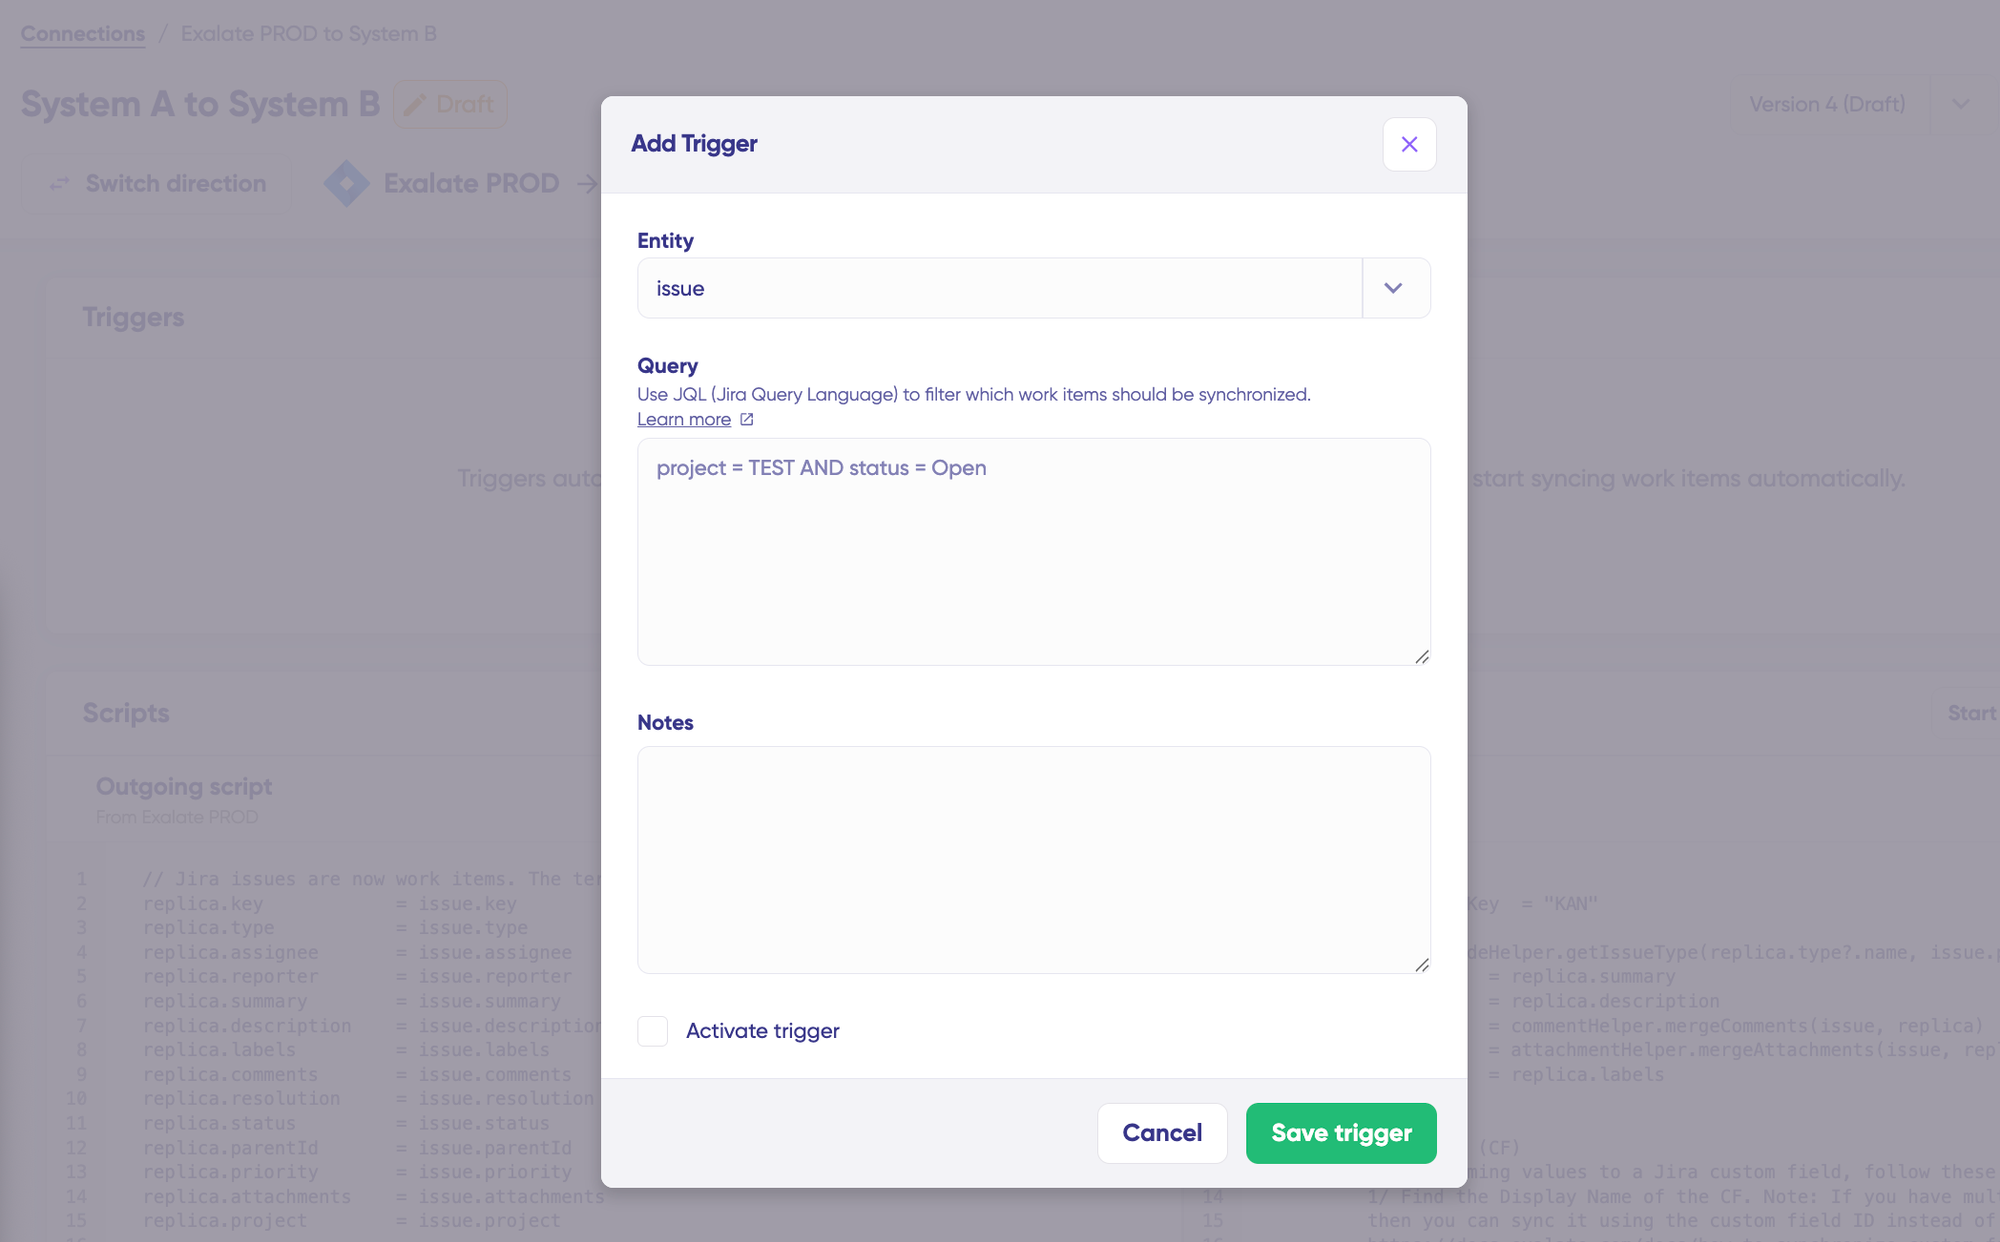
Click “+ Add trigger” to create platform-specific triggers. Choose the entity type (work item or sprint), then use platform-native query languages:
- For Jira: Use JQL (Jira Query Language). Example: “
Project = EXA”syncs only items in the EXA project. - For Azure DevOps: Use WIQL (Work Item Query Language) to specify conditions.
Save your trigger, and synchronization will run automatically based on these rules.
7. Troubleshoot with Aida
If connection errors occur, navigate to the “Troubleshooting” tab. Hover over any error and click the Aida icon for immediate analysis. Aida shows affected systems, connections, and work items, plus a brief explanation of the error.
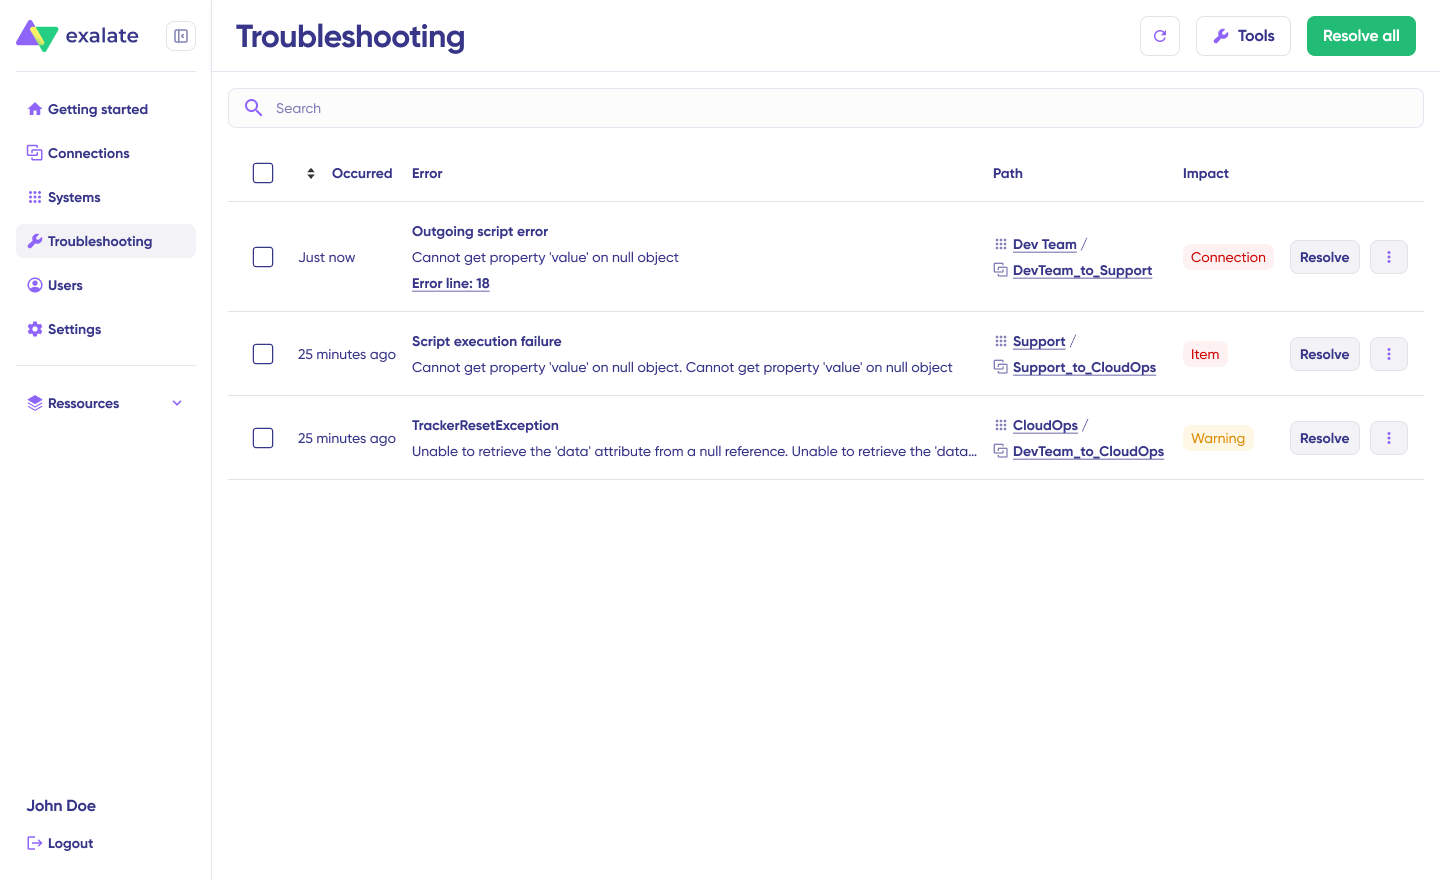
For deeper investigation, click “Error Details” to view the impact level, stack trace, error type, and occurrence date.
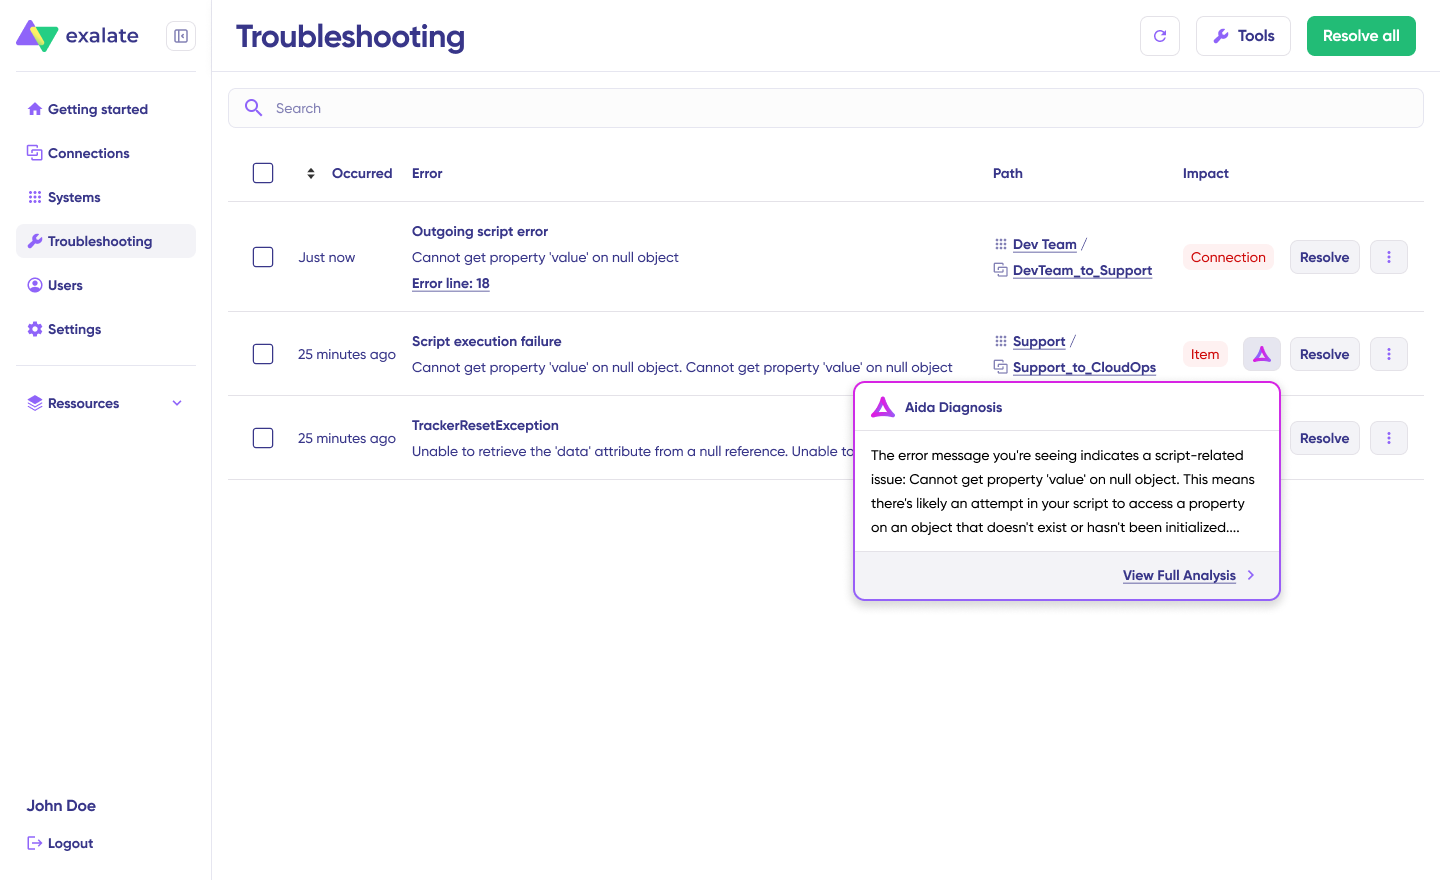
Use “View Full Analysis” for complete context. Once you’ve resolved the issue, click “Resolve” to clear the error.
Your integration is now active. Synchronization runs automatically based on your configured sync rules and triggers.
10 Best Tools for Azure DevOps to Jira Work Item Sync
1. Exalate
Exalate supports real-time, bidirectional sync between Jira Service Management and Azure DevOps with complex field mappings and business logic. Its Groovy-based scripting engine enables unlimited customization for enterprise requirements.
Exalate also supports integration with Jira Cloud, Azure DevOps Server (on-premises), GitHub, Salesforce, Zendesk, ServiceNow, Freshdesk, Freshservice, Asana, and custom connectors.
Exalate Pros:
- Unlimited customization through Groovy scripting
- Aida (AI-assisted configuration) simplifies setup from simple to advanced use cases
- Handles complex workflows with conditional logic and data transformations
- Strong data isolation for MSPs and cross-company integrations
- Full operational control over your sync side
- ISO 27001 certified with encryption in transit and at rest
- Role-based access control for enterprise governance
- Integration dashboards for monitoring sync health
- Sync panel Chrome extension for easy access.
Exalate Cons:
- Advanced customization requires Groovy scripting knowledge, though Aida now generates scripts from natural language prompts
- Best suited for complex enterprise-grade integrations; simpler use cases may not need its full feature set
2. Zapier
Zapier provides pre-built templates or “Zaps” for connecting JSM with Azure DevOps. It’s user-friendly and requires no coding, making it accessible for non-technical teams. You can trigger work item creation in Azure DevOps when JSM tickets are created and vice versa.
Zapier Pros:
- Easy to set up
- No coding required
- Quick implementation
- Affordable for small teams
- Intuitive interface
Zapier Cons:
- Limited to simple one-way workflows
- Struggles with complex field transformations
- No real bidirectional sync
- Lacks conflict resolution
- Can get expensive at scale
3. Microsoft Power Automate
Power Automate is Microsoft’s automation platform that supports native Azure DevOps integration. It allows users to create flows that sync Jira Service Management tickets with Azure DevOps work items using built-in connectors. Since it’s part of the Microsoft ecosystem, it integrates naturally with Azure DevOps.
Power Automate Pros:
- Native Azure DevOps integration
- Affordable for Microsoft 365 users
- Familiar interface for Microsoft customers
- Suitable for simple automations
Power Automate Cons:
- Limited connector capabilities
- Challenging for bidirectional scenarios
- Restricted customization options
- Flow complexity can spiral quickly
4. Workato
Workato is an enterprise iPaaS platform that connects systems through pre-built “recipes.” It handles complex workflows, data transformations, and error handling better than simpler tools. Workato scales well for high-volume integrations and provides strong monitoring capabilities.
Workato Pros:
- Enterprise-grade reliability
- Handles complex transformations
- Excellent monitoring and logging
- Scales well with strong error handling
Workato Cons:
- Enterprise pricing model
- Requires significant technical expertise to configure
- Overkill for simple use cases
- Steep learning curve
5. Azure Logic Apps
Azure Logic Apps is Microsoft’s cloud-based integration service that enables users to build workflows connecting Azure DevOps with JSM using built-in or custom connectors.
It provides more flexibility than Power Automate for complex scenarios and scales well for enterprise needs.
Logic Apps Pros:
- Deep Azure ecosystem integration
- Consumption-based pricing
- Scales automatically
- More flexible than Power Automate
- Good monitoring tools
Logic Apps Cons:
- Requires Azure expertise
- JSM connector limitations
- Can be complex to debug
- Costs can be unpredictable with high volumes
6. Unito
Unito focuses on two-way sync between work management tools, including Jira and Azure DevOps. It offers a visual interface for mapping fields and configuring sync rules without coding. Unito handles bidirectional updates and can sync based on filters or labels.
Unito Pros:
- True bidirectional sync
- Visual interface
- No coding required
- Better than Zapier for two-way scenarios
- Reasonable pricing
Unito Cons:
- Less flexible than script-based tools
- Limited complex transformation support
- Occasional sync delays
- Can’t handle very complex business logic
7. MuleSoft Anypoint Platform
MuleSoft is an enterprise-grade iPaaS solution with robust connectors for disparate systems. It excels at complex integrations with multiple systems and handles high transaction volumes reliably.
MuleSoft Anypoint Platform Pros:
- Enterprise-grade reliability
- Handles massive ticket volumes
- Comprehensive API management
- Excellent governance features
- Supports complex multi-system integrations
- Provides comprehensive monitoring
MuleSoft Anypoint Platform Cons:
- Expensive enterprise licensing
- Requires specialized MuleSoft skills
- Long implementation time
- Overkill for simple integrations
8. Tasktop Integration Hub
Tasktop specializes in integrating software development and service delivery tools, which makes it a suitable option for JSM to Azure DevOps with a focus on value stream management. Tasktop maintains data integrity across systems and provides visibility into work flowing between teams.
Tasktop Pros:
- Purpose-built for DevOps integrations
- Strong data integrity focus
- Ensures value stream visibility
- Handles artifacts and traceability well
Tasktop Cons:
- Enterprise pricing
- Focused on specific use cases
- Requires rigorous training
- Less flexible for non-DevOps scenarios
9. ZigiOps
ZigiOps is a no-code integration platform explicitly built for ITSM and DevOps tool integration. It offers pre-built templates for platform sync with drag-and-drop field mapping. ZigiOps handles bidirectional sync and provides real-time updates.
ZigiOps Pros:
- No-code interface
- Quick setup with templates
- ITSM-focused features
- Bidirectional support
- Easier to use than custom scripts
ZigiOps Cons:
- Less flexible than scripting tools
- Limited advanced customization
- Smaller user community
- May not handle very complex scenarios
10. Custom API Integration
Building your own integration using JSM and Azure DevOps REST APIs gives you complete control. You can write scripts in Python, JavaScript/TypeScript, Groovy, or other languages to handle your requirements exactly.
This approach works well for organizations with specific needs that off-the-shelf tools can’t address.
Pros:
- Provides complete control and customization
- No licensing costs for the tool itself
- Can implement any logic you need
- Provides full transparency
Cons:
- High development time and cost
- Requires ongoing maintenance
- Needs infrastructure to host
- Must handle error cases yourself
- Takes resources away from core business functions
What Next?
Start a free trial on Exalate’s free tier and set up a functional sync without a sales call. Connect both ends, configure your rules with Aida or a Groovy engineer, and records flow.
If you’d prefer to watch it run on your use case first, book a demo and the Exalate team will walk through the integration patterns on a live call.
FAQs
Can I sync custom fields between JSM and Azure DevOps with Exalate?
Yes. Standard fields like descriptions, comments, attachments, assignees, and dates sync with minimal configuration. Custom fields sync through Exalate’s Groovy scripting engine, which handles data transformations between different field structures. Aida can generate these scripts from natural language descriptions of what you need.
Does Exalate support Azure DevOps Server (on-premises)?
Yes. Exalate supports both Azure DevOps Services (cloud) and Azure DevOps Server (on-premises). This flexibility matters for organizations with strict data residency requirements or air-gapped environments.
How does Exalate handle security for JSM Azure DevOps integration?
Exalate is ISO 27001 certified and encrypts data both in transit (HTTPS/TLS) and at rest. It supports JWT-based authentication and role-based access controls. Each integration side maintains full operational control over what data enters their system—you decide what goes out and what comes in. For detailed security information, visit the Exalate Trust Center.
Can Exalate handle MSP scenarios with multiple clients?
Yes. Exalate’s architecture supports connecting your central JSM or Azure DevOps instance with multiple client environments while maintaining complete data isolation. Each client connection has its own sync rules, field mappings, and security controls, ensuring sensitive data never crosses organizational boundaries.
What’s the difference between Exalate and native Azure DevOps for Jira integration?
The native Atlassian integration provides basic connectivity focused on CI/CD pipeline visibility; developers push deployment data from Azure DevOps to Jira. Exalate provides true bidirectional sync with custom field mapping, conditional logic, and full control over what syncs and when. Exalate handles complex enterprise scenarios like MSP multi-tenancy, cross-company collaboration, and advanced workflow automation.
Can I control which tickets sync based on priority or labels?
Yes. Exalate lets you define sync triggers using JQL queries (Jira) and WIQL (Azure DevOps). Sync only high-priority work items, tickets with specific labels, or items matching any custom criteria. This selective sync prevents clutter and ensures only relevant data moves between systems.
Does Exalate support AI-assisted configuration?
Yes, Aida, Exalate’s AI-powered assistant, generates Groovy scripts from natural language prompts. Describe what you want to sync in plain English, and Aida creates the script code with suggestions highlighted. This makes complex configurations accessible without deep scripting expertise.
How quickly does Exalate sync data between JSM and Azure DevOps?
Exalate provides near real-time synchronization, typically within seconds. The event-based architecture detects changes immediately and processes them through the sync queue efficiently. Exact timing depends on sync volume and your trigger configuration.
Can I sync attachments and comments between systems?
Yes, Exalate syncs attachments and comments bidirectionally. Configure which comments sync using scripts—for example, only public-facing comments, comments from specific user groups, or comments containing certain keywords. Set attachment sync conditions based on file types or sizes. Find out all the entities available for sync in Jira and Azure DevOps.
Do I need developers to set up Exalate?
It depends on complexity. Simple scenarios work with Exalate’s visual configuration. Complex use cases leverage Groovy scripting, but Aida generates scripts from natural language descriptions, making advanced configuration accessible to non-developers.
Can I integrate other platforms besides JSM and Azure DevOps?
Yes, Exalate supports Jira Cloud, Azure DevOps Services, Azure DevOps Server, GitHub, Salesforce, ServiceNow, Zendesk, Freshservice, Freshdesk, Asana, and custom connectors. You can build integration networks connecting multiple platforms in mesh, star, or hub-and-spoke topologies.
Recommended Reads
- How to Set Up an Azure DevOps ServiceNow Integration: The Step-by-Step Guide
- How to Set Up a Bidirectional Jira Service Management Integration with Jira Software
- How to Automate Your Integration For Smarter Business Workflows
- Jira to Jira Sync: How to Synchronize Multiple Jira Instances in 8 Steps
- Why Cross-Platform Integration is the New Wave for Organizations


