From time to time, we at Exalate receive customer requests for advanced integration cases. One such request was to synchronize Customer Cases in ServiceNow as Epics in Jira, while preserving parent-child relationships and keeping comments private.
This post walks through the use case, the configuration logic, and how to implement it with Exalate.
The Use Case
The requirements looked like this:
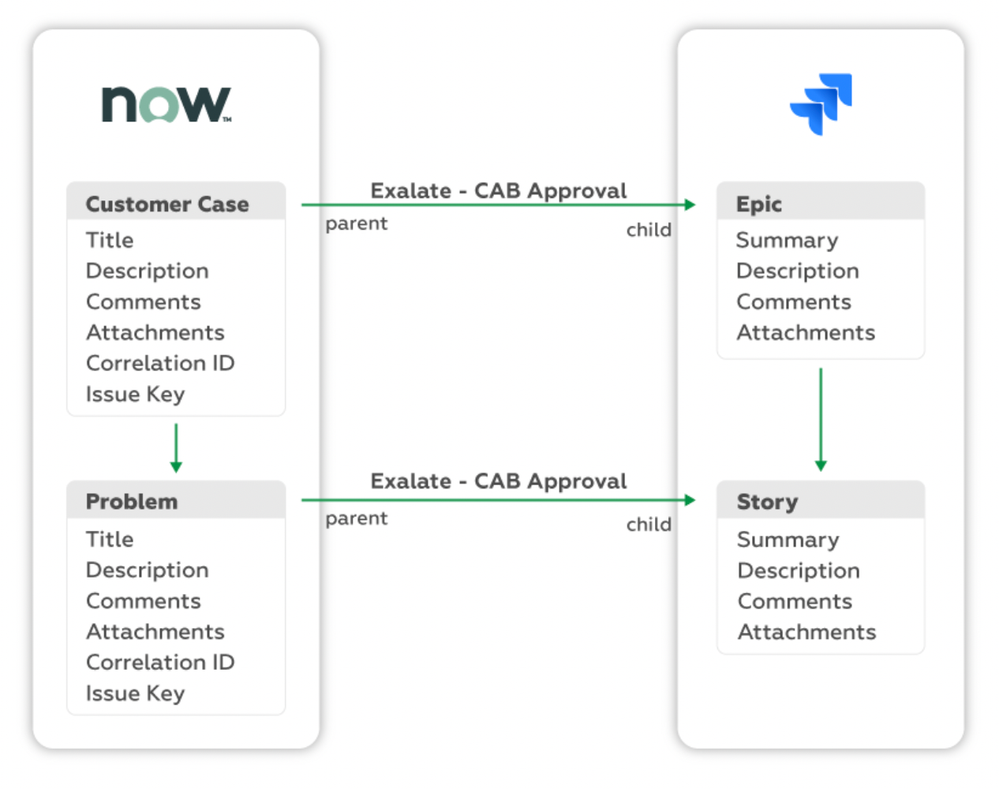
When a Case is assigned to the “CAB Approval” assignment group in ServiceNow, an Epic on the Jira side must be created automatically through triggers. The Epic name, which is a mandatory Jira field, must be set to the Case identifier.
On the ServiceNow side, the Correlation ID field for the Case must include the Jira work item key, and a custom field called “Issue Key” must provide a direct link to the Jira work item.
When a Problem is created under that specific Case, it must be automatically synced under the corresponding Epic in Jira as a Story. Correlation ID and the “Issue Key” field must also be set for Problems.
Comments and attachments need to sync between both platforms, but Jira comments on the ServiceNow side must reflect as “Work Notes” and remain invisible to customers.

The Integration Solution: Exalate
Exalate handles this use case through its Groovy-based scripting engine, giving you the flexibility to map any data, transform entity types, and control comment visibility across both systems.
With Exalate’s unified management console, you configure both the incoming and outgoing sync scripts for each side independently. These scripts on both Jira and ServiceNow control what information is sent and received.
The steps for implementing this use case are:
- Setting up your Exalate account and creating a workspace
- Creating a connection between Jira and ServiceNow
- Configuring sync scripts (incoming and outgoing for both sides)
- Setting up triggers for automatic synchronization
- Testing and deploying
Implementation with Exalate
Getting Started
To begin, go to the Exalate app and log in or create a new account. New users can sign up with their email or Google account.
Once logged in, create a workspace to organize your integrations. Workspaces let you manage all your connections in a single place.
Creating a Connection
Inside your workspace, click “+ Add connections” > “Create new connection” to set up your Jira and ServiceNow connection.
Enter a name for your first system (System A) and its URL. You can name either Jira or ServiceNow as System A. Once the URL is entered, Exalate validates the system and prompts for authentication. ServiceNow uses Basic authentication, while Jira uses OAuth.
Complete the same setup for the second system, give the connection a name, review the details, and click “Create connection.”
After the connection is created, select “Continue to configuration” and choose the Jira project you want to use for synchronization.
Configuration Options
After creating your connection, you have two paths:
Quick Sync lets you publish the default configuration and sync one item to verify the connection works. Under the “Item sync monitor,” enter a work item key from Jira or an incident number from ServiceNow to test.
Edit & Test opens the draft editor, where you can customize sync scripts. Click “Create a new version” or “Open latest draft” to begin editing without affecting the active configuration.
Configuring Sync Scripts
Sync rules in Exalate are based on Groovy scripts. Each connection has outgoing scripts (what data leaves a system) and incoming scripts (how data is applied on the receiving side).
Exalate uses a Replica, which works like a message payload in JSON format and holds the actual data passed between synced entities.
ServiceNow: Outgoing Script
The outgoing script on the ServiceNow side uses entityType to determine whether the entity is a Case or a Problem. Depending on this, information is packaged differently.
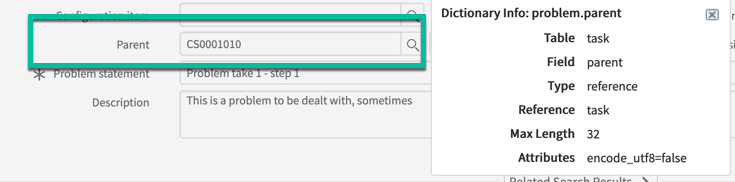
If the type is “customerCase,” then the short description, description, comments, attachments, and status are sent. If it is “problem,” in addition to the above, “problem.parent” is also sent.
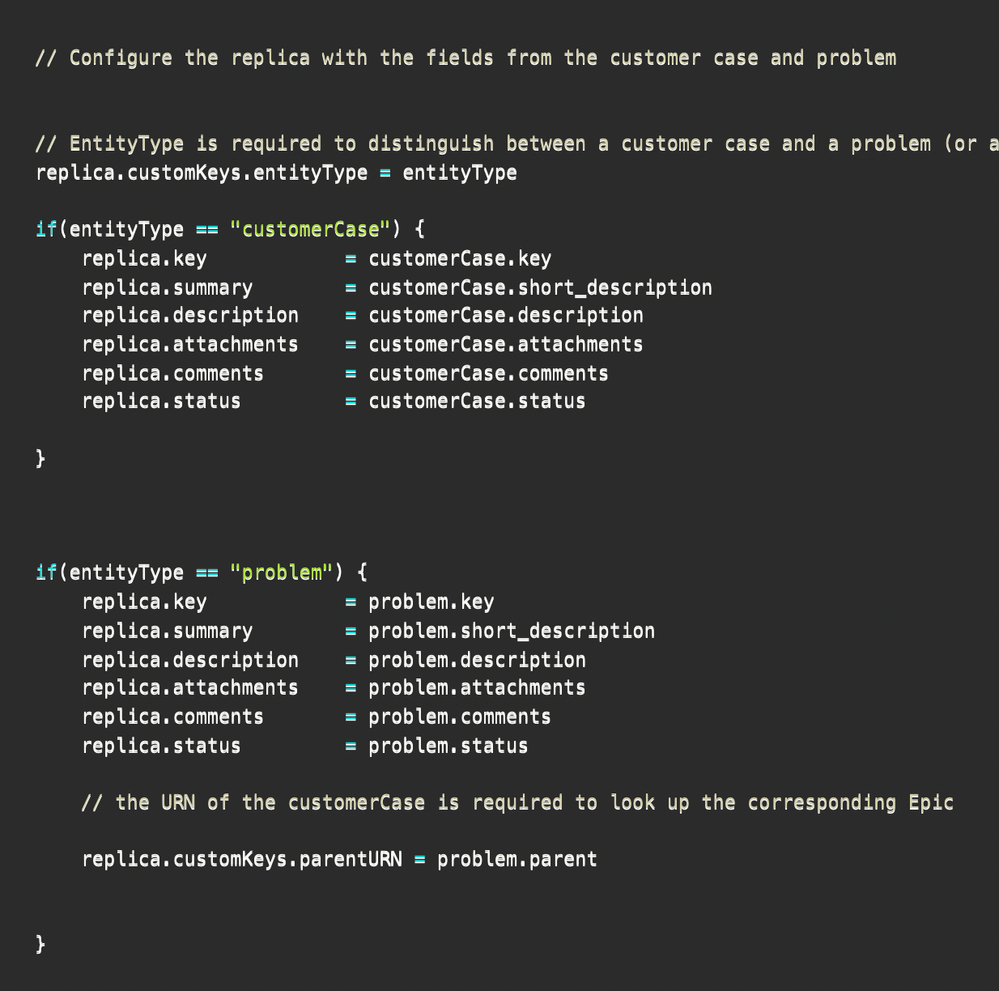
This parent reference is the Case number used to locate the corresponding Epic on the Jira side.
ServiceNow: Incoming Script
The default incoming configuration syncs summary, description, comments, and attachments. To keep Jira comments private on the ServiceNow side, the following code is used:
customerCase.comments += replica.addedComments.each { it.internal = true }
Additional Groovy scripts fetch the work item key and URL from the Jira side, so the ServiceNow record displays a direct link back to the corresponding Jira work item.
if(entityType == "customerCase") {

customerCase.short_description = replica.summary customerCase.description = replica.description customerCase.attachments += replica.addedAttachments customerCase.comments += replica.addedComments.each { it.internal = true }

}Code language: JavaScript (javascript)
Jira: Outgoing Script
No changes to the default configuration are needed on the Jira outgoing side.
Jira: Incoming Script
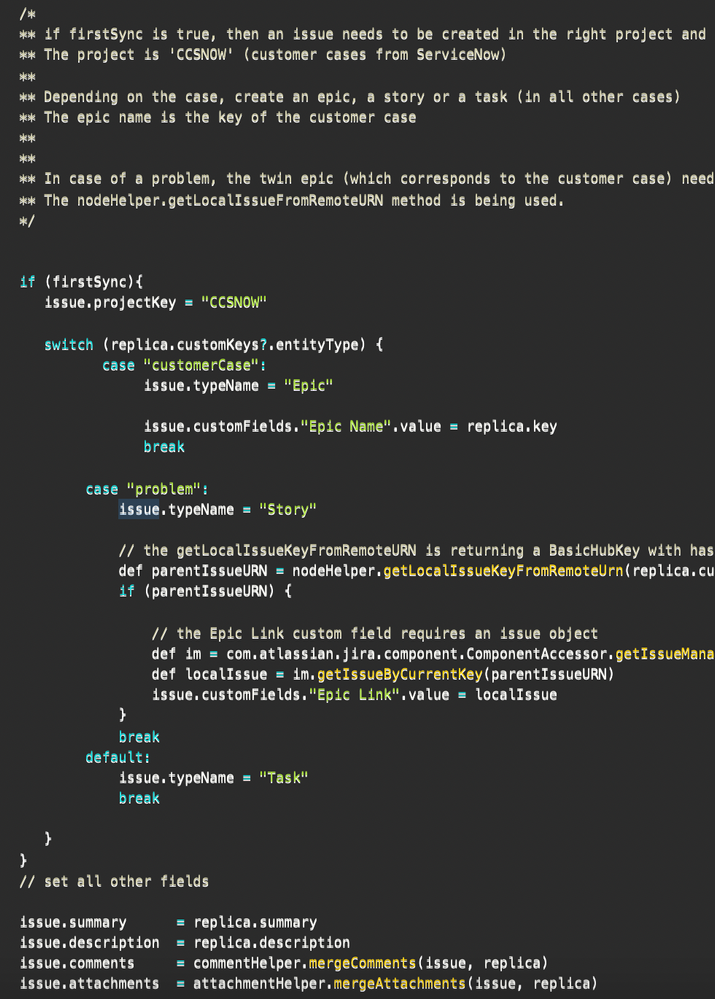
The incoming script on Jira handles the entity type mapping:
A firstSync variable determines what happens when an entity from ServiceNow syncs for the first time. Based on the entityType from ServiceNow, the script creates the appropriate Jira work item type: Case becomes an Epic, Problem becomes a Story, and anything else becomes a Task. A switch case handles the logic and applies the correct field mappings for each type.
Using Aida for Script Generation
To simplify scripting, you can use Aida, Exalate’s AI-assisted configuration feature, to generate sync scripts. Aida is available in both incoming and outgoing script sections.
For outgoing scripts, describe what data should leave your system (e.g., “Send short description, comments, and attachments for customer cases”). For incoming scripts, describe how data should be applied (e.g., “Map customer cases to Epics and problems to Stories”).
Aida generates working Groovy scripts with proper field mappings based on your existing configuration. Review the suggested changes (green for additions, red for removals) and choose to insert or discard them.
Testing with Test Run
Before publishing your configuration, use TestRun to validate your sync scripts against real data without affecting production. Select the items you want to test, click “Start Test Run,” and review the incoming and outgoing replicas. Check the field mappings and adjust scripts if needed.
Once everything looks correct, click “Publish Version” to apply the configuration to your live synchronization. All versions are accessible in the Version dropdown, with statuses of Active, Draft, or Archived.
Setting the Triggers
Once the sync scripts are configured, set up triggers to automate synchronization.
Click “+ Add trigger” to create a trigger condition. Triggers are platform-specific: for Jira, use JQL (Jira Query Language); for ServiceNow, use filter queries.
For this use case, create a trigger so that whenever a Problem or a Case is assigned to the “CAB Approval” assignment group, it syncs automatically to Jira.
Syncing Information
That is all that is needed. Create a Customer Case and assign it to the CAB Approval Group. The Sync Queue in Exalate shows the different stages the sync goes through, and you can check the status of all sync requests there.
After the sync completes, the work item key and Correlation ID appear in ServiceNow. On the Jira side, an Epic is created with a name matching the Case in ServiceNow.
When a Problem is created under the same Case and assigned to “CAB Approval,” it appears in Jira as a Story with the correct Epic link, maintaining the parent-child relationship across both systems.
Troubleshooting with Aida
If sync errors occur, navigate to the “Troubleshooting” tab in your workspace. Hover over the error and click the Aida icon for an AI-generated diagnosis. Aida provides a short explanation of the error and a proposed solution, with the option to view a full analysis, error details, or replicas in JSON format.
Conclusion
This walkthrough showed how an advanced integration use case like Case-to-Epic synchronization can be handled flexibly with Exalate. The Groovy scripting engine lets you map any entity type, maintain parent-child relationships, and control comment visibility, while features like Aida, TestRun, and script versioning keep your configuration safe and manageable. If you want to learn more, you can book a demo with our integration experts or start your free trial.
Recommended Reading:
- How to Synchronize User Mentions in Comments Between Jira Cloud and Jira On-premise
- How to Sync Multiple Related Salesforce Objects (Contact & Account Linked to a Case) to Jira
- How to Synchronize a ServiceNow Customer Case to a Jira Epic
- Advanced Integration Use Cases
- How to Sync Custom List Fields Bi-Directionally Between Jira and Zendesk


