
This article was originally published on the Atlassian Community and the Salesforce Community.
Salesforce often involves multiple objects that have an association between them. For instance, an Opportunity can have an Account or Product association, or a Case can have a linked Account or Contact, or there can be a completely new custom object.
Teams frequently need these related objects in Salesforce synced over to Jira for better visibility across departments. This post walks you through how to achieve that using Exalate, a bidirectional integration solution that connects platforms like Jira, Salesforce, ServiceNow, Azure DevOps Cloud, Azure DevOps Server, Zendesk, Freshservice, Freshdesk, Asana, GitHub, and more.
The Use Case
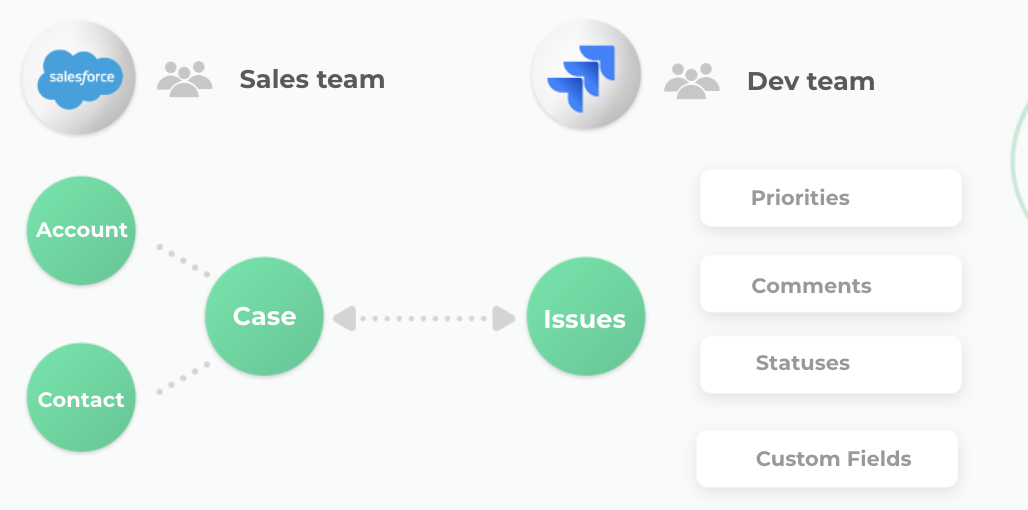
We have a Case object in Salesforce that has a Contact and Account linked to it. This information needs to be presented on the Jira side.
The specifics:
- Case information like subject, description, comments, status, and attachments needs to be synced bidirectionally between Jira and Salesforce.
- On the Jira side, two custom fields (‘SF Contact’ and ‘SF Account’) display the Account and Contact information related to the Case.
- Name, title, and email of the Contact are displayed on the Jira side.
- Name and description of the Account are displayed on the Jira side.
- Any changes or updates in the Account or Contact need to be reflected on the Jira side.

The Challenges
Fetching information related to Case, Account, and Contact individually from Salesforce to Jira can be straightforward. The real challenge lies in connecting the Account and Contact to the correct Jira work item that was created while syncing the Case. Changes in the Account or Contact should pass correct updates to the synced Jira work item.
Why Use Exalate for Multi-Entity Sync
Exalate is a bidirectional synchronization solution with a built-in Groovy-based scripting engine, giving you the capabilities to implement almost any use case, including syncing multiple related objects.
Key features that make this possible:
- Groovy scripting engine for custom logic, field mapping, and data transformations
- Aida (AI-assisted configuration) to help generate and troubleshoot sync scripts
- Test Run to test your sync scripts against real data without affecting production
- Script versioning with full audit trail, rollback capability, and draft mode
- Unified management console to oversee all your connections from a single interface
- Real-time sync with complete queue visibility
Exalate also supports syncing any Salesforce object accessible via the REST API, including Cases, Opportunities, Accounts, Contacts, Leads, Tasks, Products, and custom objects.
How to Set Up a Jira Salesforce Connection
Before diving into the multi-entity configuration, you need to set up a connection between Jira and Salesforce. Here is a quick overview of the process.
Step 1: Log in to Exalate
Go to exalate.app and log in. New users can create an account by entering their email or signing up using Google.
Step 2: Create a Workspace
Workspaces help you organize and manage your integrations in a single place. Click “+ Create Workspace,” enter a name and description, and confirm.
Step 3: Create a Connection
Click “+ Add connections” then “Create new connection.” Enter a name for your first system (either Jira or Salesforce). Then enter the URL of your system. A validation check occurs automatically. For new systems, you will need to enter your authentication details. Jira uses OAuth, and Salesforce uses API tokens. Complete the same setup process for the other side, give your connection a name and description, review the details, and click “Create connection.”
Step 4: Configure Sync Rules
After creating the connection, you have two options:
- Quick Sync: Publish the starter configuration and sync one item to verify the connection works. This is optional but recommended for initial testing.
- Edit & Test: Open the draft editor to customize sync rules before going live.
Click “Create a new version” or “Open latest draft” to start editing. The scripts are divided into incoming and outgoing scripts. For a Jira to Salesforce direction, the outgoing script defines what data leaves Jira, and the incoming script defines how Salesforce processes that data.
You can write Groovy scripts yourself, or use Aida to generate scripts from natural language prompts. Aida appears in both the outgoing and incoming script sections.
Step 5: Test with Test Run
Once your sync scripts are ready, use the “Start Test Run” option to validate the configuration against real data without affecting production. Select the items you want to test, review how the sync will be applied, and verify the field mappings look correct. Deploy only when you are confident everything works.
Step 6: Add Triggers and Publish
Add triggers to start syncing automatically. For Jira, use JQL (Jira Query Language). For Salesforce, use SOQL (Salesforce Object Query Language). Save your changes by publishing the version.
Implementation: Multi-Entity Sync Configuration
Now let’s look at the specific scripts for syncing Case, Account, and Contact objects together.
As an Exalate administrator, you can choose to configure both the incoming and outgoing scripts on each side independently. All information is passed through the “replica,” which acts like a message payload carrying data between the two platforms in JSON format.
Outgoing Sync: Jira
Since there is no additional information apart from the defaults that need to be sent from Jira to Salesforce, we keep it as is.
Outgoing Sync: Salesforce
The outgoing Salesforce script handles the logic for sending Case, Account, and Contact data.
1 //Step 1

 2 //When the CASE is exalated, only the first if condition triggers

 3 //and sends over the case info

 4 if(entity.entityType == "Case") {

 5     replica.key            = entity.Id

 6     replica.summary        = entity.Subject

 7     replica.description    = entity.Description

 8     replica.comments       = entity.comments

 9     replica.attachments    = entity.attachments

10     replica.Status         = entity.Status

11     replica.AccountId      = entity.AccountId

12     replica.ContactId      = entity.ContactId

13     replica. "TYPE"        = entity.entityType

14 }

15 else if (entity.entityType == "Account") {

16     replica.key           = entity.Id

17     replica.AccountNumber = entity."AccountNumber"

18     replica.Name          = entity.Name

19     replica.Description   = entity.Description

20     replica. "TYPE"       = entity.entityType

21 } else if (entity.entityType == "Contact") {

22     replica.key       = entity.Id

23     replica.Email     = entity.Email

24     replica.Birthdate = entity.Birthdate

25     replica.Name      = entity.Name

26     replica.Title     = entity.Title

27     replica."TYPE"    = entity.entityType

28 }Code language: JavaScript (javascript)
Key points in the script:
- Line 4: The first ‘If’ condition checks whether the entityType is ‘Case’. If yes, Subject, Description, and other Case fields are copied into the replica to be sent to Jira.
- Line 13: replica.”Type” carries the type of the Salesforce record (Case, Account, or Contact). This is used at the Jira end to recognize what type of entity is coming over.
- Lines 15 and 21: The next two ‘If’ conditions send specific Account and Contact-related information.
Incoming Sync: Jira (Part 1)
Here, you check if the entity from the replica is ‘Case.’ If it is, and it is the first sync, then you create a ‘Task’ in Jira.
//Jira receives the case (the first if condition is executed)

//The crucial line is

//syncHelper.syncBackAfterProcessing()

//within the firstSync block.

//So basically when the CASE first syncs here, a syncBack is sent to Jira //which will now be incoming for Jira

if (replica."TYPE" == "Case")

{ if(firstSync)

{

issue.projectKey = "UD"

issue.typeName = "Task"

syncHelper.syncBackAfterProcessing()

}

issue.summary = replica.summary

issue.description = replica.description

 issue.comments = commentHelper.mergeComments(issue, replica)

issue.attachments = attachmentHelper.mergeAttachments(issue, replica)

}Code language: PHP (php)
Then the script calls syncHelper.syncBackAfterProcessing(). This is a helper method from the Exalate API. When it is the first sync, this method syncs back to Jira so there is an incoming sync for Jira to fetch the Contact and Account information from Salesforce.
Note: You can also look at the other helper methods provided by the Exalate API.
Incoming Sync: Salesforce
In Salesforce, if it is the first sync, a Case is created. This is completely customizable, so you can create any other entity if needed.
1  if (firstSync) {

2      entity.entityType = "Case"

3  }

4  //Step 3

5  //This part now gets executed

6  if (entity.entityType == "Case") {

7      //Step 3 contd

8      //We check if the remoteSyncEventNumber==1 to ensure that the following code

9      //is executed only once and only when Jira send back the syncBack (and not on subsequent syncs)

10     if (syncRequest.remoteSyncEventNumber == 1) {

11         //Step 3 cont checks if the Account is populated and if it is we continue

12         if (entity.AccountId != null) {

13             //if account is found on the case, we trigger a connect event i.e. scheduleConnectEvent

14             //this connect helps to connect the linked account with the Jira issue created already

15             //this link can be formed using the replica.key (which has already been received using in the syncBack

16             syncHelper.eventSchedulerNotificationService

17                 .scheduleConnectEvent(

18                     syncHelper.connection,

19                     new com.exalate.basic.domain.BasicIssueKey(entity.AccountId, entity.AccountId, "Account"),

20                     replica.key,

21                     scala.Option$.MODULE$.apply(new com.exalate.basic.domain.NonPersistentConnectContext(

22                         false, false, // boolean synchronizeComments, boolean synchronizeAttachments,

23                         false, // boolean synchronizeWorklogs

24                         false, // boolean triggerSyncEvent

25                         true, // boolean triggerUpdate

26                         false // boolean triggerUnexalate

27                     ))

28                 )

29         }

30     }

31 }Code language: JavaScript (javascript)
Key logic in the script:
- Line 6: If the entity type is Case, proceed with fetching the Account and Contact information.
- Line 10: The value of syncRequest.remoteSyncEventNumber is checked to see if it equals 1. This ensures the following code runs only once and not on every subsequent sync.
- Line 12: Checks if there is Account information to be fetched (not null).
- Line 16: Executes the scheduleConnectEvent method, which connects the linked Account from Salesforce with the Jira work item already synced with the Case, without creating a new one. It uses the replica.key from the Jira side to form this link, which is already received in the syncBack transaction.
The same set of code applies to fetching the Contact details as well.
Incoming Sync: Jira (Part 2)
Now it is time to display the fetched Account and Contact details.
//Step 4
//When the connect happens, remember that SF is sending over the contact and the account
//so the following gets executed this time
//and simply populates the SF Contact (and Account) fields with relevant data
//the formatting of the tables uses markdown (ref: )
//dont bother with the formatting actually...nothing to do with Exalate.
else if (replica."TYPE" == "Contact") {
def contact = issue."SF Contact"
if (contact == null || contact.trim() == "") {
contact = """||Name:| ||Title:| ||Email:| || | """
}
def name = replica."Name"
def title = replica."Title"
def email = replica."Email"
|| Title | $title |
|| Email | $email |"""
}
else if (replica."TYPE" == "Account") {
def name = replica."Name"
def description = replica."Description"
issue."SF Account" = """|| Name | $name |
|| Description | $description |"""
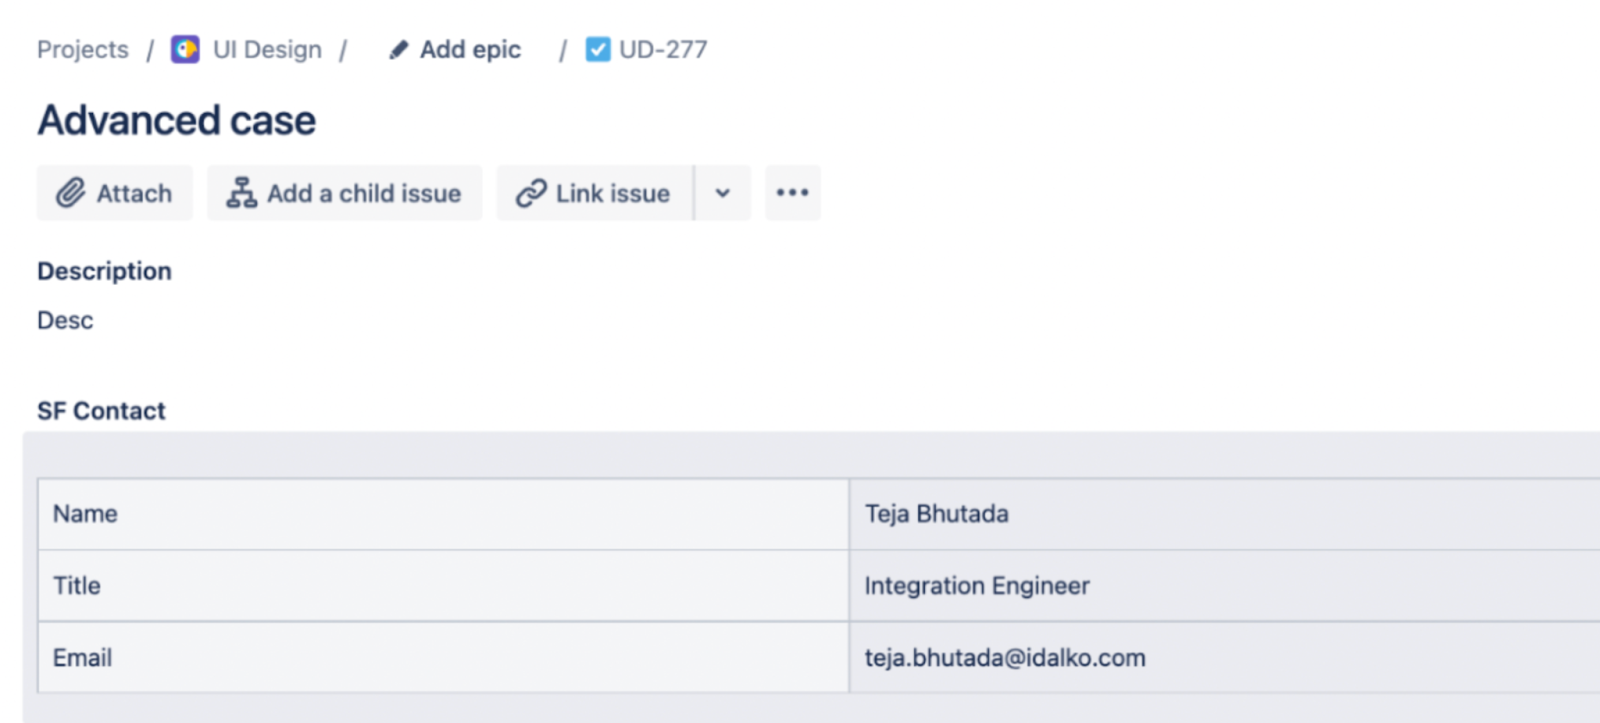
}Code language: PHP (php)The details are displayed in custom fields called ‘SF Contact’ and ‘SF Account.’
Key script logic:
- Check if the type of entity received from Salesforce is Account or Contact, and depending on the type, the details are displayed accordingly.
- Name, Title, and Email of the Contact are displayed.
- Name and Description of the Account are displayed.
Additional fields from both these Salesforce records (or other Salesforce records entirely) can also be displayed this way.
Note: The ‘|’ and ‘||’ used in the script are just for displaying the data in the form of tables. They have nothing to do with Exalate.
Output
Here is what the sync looks like in action:
- Create a Case in Salesforce and assign a Contact and Account to it.
- Sync it over to Jira (either manually or through triggers).
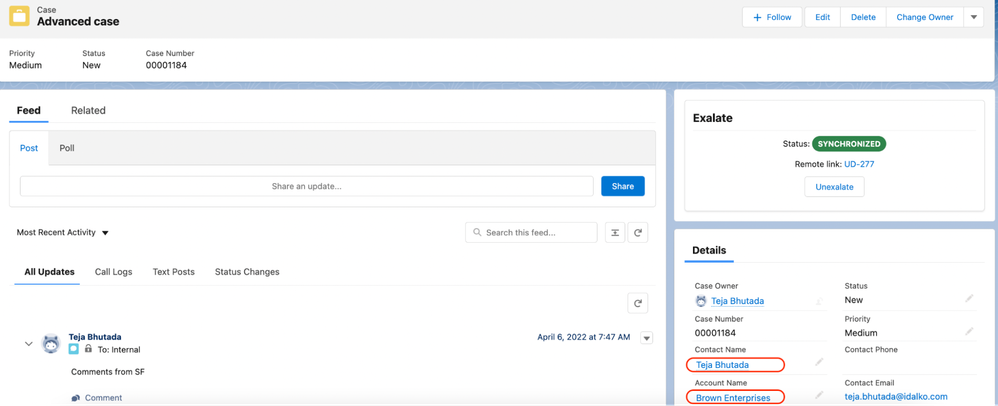
- In a short while, the work item created in Jira will display the Account and Contact related information under the two custom fields in the form of a table.
You can make changes to either the Account or the Contact in Salesforce and see those reflected in Jira.
Other Multi-Entity Use Cases
Beyond syncing Contacts and Accounts linked to Cases, you can apply similar patterns to:
- Opportunities with Products: Sync Opportunity details along with related Products to Jira for product teams to track feature requests tied to sales deals.
- Custom objects: If your Salesforce org uses custom objects with lookup relationships, the same approach works. Just adapt the outgoing script to include the custom object fields and handle them in the incoming sync.
- Multi-platform networks: This approach also works when syncing Salesforce objects to other platforms supported by Exalate, including ServiceNow, Azure DevOps, Zendesk, Freshservice, Freshdesk, Asana, and GitHub.
Conclusion
We saw how multiple related objects within Salesforce can be synced over to Jira using Exalate’s Groovy-based scripting engine. The same approach works for syncing to other platforms like Azure DevOps, ServiceNow, Zendesk, and more.
If you want to explore this further, book a demo with us. Or get in touch with our partners if you already use Exalate and want to implement an advanced use case like this.
Recommended Reading:


