
Jira admins and Salesforce users configure both platforms to share data with a reliable, secure integration solution. This is called a Salesforce Jira connector.
But why use a dedicated connector?
A Jira to Salesforce connector allows users to sync data without having to leave their environments. Every data exchange and interaction has to pass the configuration and security smell test before it goes through.
In this guide, you’ll learn about Salesforce Jira connectors in detail, including benefits, practical use cases, integration tool options, features to evaluate when choosing a solution, and best practices for implementation.
Note: Jira now refers to issues as work items. Throughout this guide, you’ll see “work items” instead of the older “issues” terminology.
Key Takeaways
- A Salesforce Jira connector bridges CRM and work management platforms to enable bidirectional data exchange without manual copying or constant context-switching.
- Integration benefits include reduced manual workload, automated near-real-time exchanges, unified visibility across sales and development, and improved customer experience through faster resolution times.
- Use cases span bug escalation, customer feedback loops, opportunity-to-development handoffs, SLA tracking, and cross-team reporting.
- Exalate offers AI-assisted configuration (Aida) for quick setup plus Groovy scripting for complex multi-platform scenarios across Jira, Salesforce, ServiceNow, Azure DevOps, Zendesk, Freshdesk, Freshservice, and more.

What is a Salesforce Jira Connector?
A Salesforce Jira connector is a solution that allows you to share data and map fields, objects, and entities between Salesforce and Jira.
The connector, whether a custom solution, native integration, or third-party tool, acts as a bridge between both platforms. It handles authentication and transformation to ensure the accuracy and consistency of every data exchange.
Without a connector, teams rely on manual processes: copying data between systems, sending emails requesting status updates, or scheduling meetings just to stay aligned. A connector eliminates this friction by automating the data flow.
Why Use a Salesforce Jira Connector?
Using an app to connect Salesforce and Jira comes with several technical and business benefits.
- Reduced manual workload. Teams no longer need to request data from other departments or external partners manually. Information flows automatically based on predefined rules.
- Near-real-time information exchange. Salesforce Jira connectors speed up information exchange between both platforms by automating transactions to occur in near-real time, often within seconds of a change.
- Unified visibility. Since both platforms are in sync, decision-makers have a unified view of projects and customers from both CRM and work management perspectives. Sales can see development progress; engineering can see customer context.
- Cost optimization. A Salesforce and Jira connector can reduce costs by eliminating the need for users to maintain licenses on both platforms just to check status updates. Teams work where they’re most productive.
- Transparent collaboration. Both sides have access to the necessary information whenever needed, reducing miscommunication and enabling faster decision-making.
- Improved customer experience. With both systems in sync, support tickets escalate to development faster, bugs get resolved sooner, and customers receive more informed updates throughout the process.
Businesses can enjoy other granular benefits depending on the specific use case and scope of integration.
Practical Use Cases for a Salesforce Jira Connector
Here are practical scenarios where a Salesforce Jira connector delivers measurable value.
Bug Escalation from CRM to Development
Challenge: A customer reports a critical bug through your support channel. The support agent creates a Salesforce Case, but the development team works in Jira. Without integration, the agent manually copies bug details, loses context, and spends time following up on status.
Solution: With a connector, the Salesforce Case automatically creates a corresponding Jira work item with all relevant details—customer information, bug description, attachments, and priority. When developers update the work item status, those changes sync back to Salesforce.
Real-world application: You can keep the customer and case owner updated about the status of the bug reported through a Jira Service Management portal. Support agents see resolution progress without leaving Salesforce, and customers get faster, more accurate updates.
Syncing Attachments and Comments for Complete Context
Challenge: Bug reports require detailed descriptions, screenshots, and conversation history. When this context doesn’t transfer between systems, developers waste time requesting additional information.
Solution: A Jira Salesforce connector allows you to sync attachments and comments from multiple Salesforce objects between both systems to ensure the bug comes with detailed descriptions and context.
Real-world application: Transfer the contents of a Salesforce entity (Account, Case, Opportunity) to the corresponding Jira work item, including picklists, checkboxes, and custom fields. Developers get everything they need on day one.
Account Updates from Jira Custom Fields
Challenge: Customer account details need updating based on information gathered during development interactions. Without integration, this requires manual data entry in both systems.
Solution: Update the customer’s account records from the designated Jira custom field automatically.
Real-world application: Sync details like account ID, date/time, user mentions, and comments. When engineering notes customer-specific requirements in Jira, that information appears in the Salesforce account record for sales and support visibility.
Service Quality Analytics
Challenge: Admins need to measure the efficiency and quality of customer service efforts, but lack visibility into both systems simultaneously.
Solution: Use data synced from Jira to understand service metrics and identify improvement opportunities. Track resolution times, bug fix velocity, and customer impact.
Real-world application: Admins can move the Salesforce entity to a resolution by changing its status and priority from the Jira work item. This creates an audit trail that supports data-driven service improvements.
Opportunity-to-Development Handoff
Challenge: Sales closes a deal with custom requirements, but those requirements get lost in translation when handed off to the development team.
Solution: When a Salesforce Opportunity reaches a specific stage, automatically create a Jira Epic or work item with all customer requirements, expected delivery dates, and revenue impact.
Real-world application: Development teams see the business context behind feature requests. Sales gets visibility into delivery progress without interrupting engineering workflows.
MSP and Multi-Client Environments
Challenge: Managed service providers need to sync data between their internal Jira instance and multiple client Salesforce orgs without exposing client data to each other.
Solution: Create separate connections for each client with independent sync rules. Each connection operates autonomously with its own field mappings and filters.
Real-world application: An MSP can manage 50 client integrations from a single Jira instance, with each client’s data remaining isolated while still flowing automatically.
Features to Consider When Choosing a Salesforce Jira Connector
Not all connectors are created equal. Here’s what to evaluate when selecting a solution.
Bidirectional Synchronization
One-way sync works for simple use cases, but most organizations need data flowing in both directions. When a developer updates a work item in Jira, the corresponding Salesforce Case should reflect that change, and vice versa.
Look for connectors that support true bidirectional sync with conflict resolution, ensuring that simultaneous updates on both sides don’t result in data loss.
Custom Field Mapping
Standard field mapping covers basic use cases, but enterprise environments rely heavily on custom fields. Your connector should support mapping Salesforce custom fields (including formula fields and picklists) to Jira custom fields.
Exalate allows you to reference custom fields using their API names in your sync scripts—Custom_Field__c in Salesforce—and map custom to standard fields, custom to custom, or transform them however needed.
Real-Time vs. Scheduled Sync
Different use cases demand different sync frequencies. Critical bug escalations need near-real-time sync (within seconds), while batch reporting updates might work fine on hourly schedules.
Look for connectors that offer webhook-based triggers for immediate sync alongside scheduled polling for batch operations.
Scripting and Operational Control
Template-based configurations work for simple scenarios, but complex integrations require scripting flexibility. The ability to write custom logic for data transformation, conditional routing, and advanced filtering separates enterprise-grade connectors from basic tools.
Exalate provides full Groovy scripting capabilities, giving you operational control over exactly what data leaves your system and how it transforms before reaching the destination.
Security and Compliance
Integration solutions handle sensitive customer data, so security isn’t optional. Evaluate connectors based on certifications and compliance with industry standards.
Key security features to look for include ISO 27001 certification, role-based access control (RBAC), encryption of data both in transit and at rest, and independent authentication (no shared credentials between systems).
For comprehensive security documentation, visit the Exalate Trust Center.
Cross-Platform Support
If your organization uses platforms beyond Jira and Salesforce—like ServiceNow for ITSM, Azure DevOps for development, or Zendesk for support—choose a connector that supports your entire tech stack.
Exalate integrates with Jira, Salesforce, ServiceNow, Azure DevOps, Azure DevOps Server, GitHub, Zendesk, Freshdesk, Freshservice, Asana, and other platforms via custom connectors.
Error Handling and Monitoring
Integrations fail. Networks go down, APIs time out, and data validation errors occur. Your connector should provide clear error logging, retry mechanisms, and alerting to ensure you catch issues before they impact business operations.
Look for connectors with dedicated error consoles, sync status visibility, and notification capabilities.
AI-Assisted Configuration
Modern connectors leverage AI to simplify setup and suggest mapping rules. Instead of writing scripts from scratch, AI assistants can generate initial configurations based on your described use case.
Exalate’s Aida uses AI to suggest sync rules and scripts, reducing configuration time while maintaining full customization capabilities for complex scenarios.
Types of Salesforce Jira Connectors
Every connector for Jira and Salesforce varies in terms of architecture, functionality, and configuration. Here’s how they break down.
Native Integrations
This refers to built-in integration options provided by Salesforce or Atlassian. For example, Salesforce provides MuleSoft as its default integration solution.
You can use MuleSoft Composer or Anypoint Platform to integrate your Jira work items with a Salesforce CRM. Atlassian also offers Jira Service Management integration with Salesforce Service Cloud for basic case routing.
Pros:
- No additional vendor relationship required
- Tight platform integration
Cons:
- Limited to default features and supported fields
- Less flexibility for custom workflows
- Often restricted to specific product combinations (e.g., Service Cloud + JSM only)
Third-Party Connectors
Exalate
- Bidirectional integration platform supporting Jira, Salesforce, ServiceNow, Azure DevOps, GitHub, Zendesk, Freshdesk, Freshservice, Asana, and custom platforms.
- Offers AI-assisted configuration (Aida) for quick setup plus full Groovy scripting for complex scenarios.
- ISO 27001 certified with role-based access control and encryption.
- Best for organizations needing flexible, scalable cross-platform integration with full operational control.
- Sync Panel Chrome extension for monitoring and controlling syncs via a browser.
Appfire Connector for Salesforce & Jira
- Marketplace connector focused on Salesforce-Jira integration.
- Generates Jira work items from Salesforce records with custom field mapping.
- Good for teams wanting a dedicated Salesforce-Jira solution without scripting requirements.
Peeklogic Connector
- Offers bidirectional synchronization with direct integration architecture (no middleware).
- Includes Flow-based automation and native reporting capabilities.
- Focuses on keeping Jira data visible within Salesforce records.
zAgile Align
- Emphasizes data visibility and security for enterprise use.
- Provides deep reporting across both platforms.
Zapier
- General-purpose integration platforms supporting Salesforce and Jira alongside hundreds of other apps.
- Best for simple automation workflows.
- Less suited for true bidirectional synchronization.
How to Integrate Jira and Salesforce with Exalate: Step-by-Step Guide
This section walks through setting up a Jira Salesforce integration using Exalate.
Prerequisites
Before starting, ensure you have:
- An active Exalate account (or sign up for a 30-day free trial)
- Admin access to both Jira and Salesforce instances
- System credentials for Jira (OAuth) and Salesforce (API token)
- Clear understanding of what data you want to sync (Cases → work items, Opportunities → Epics, etc.)
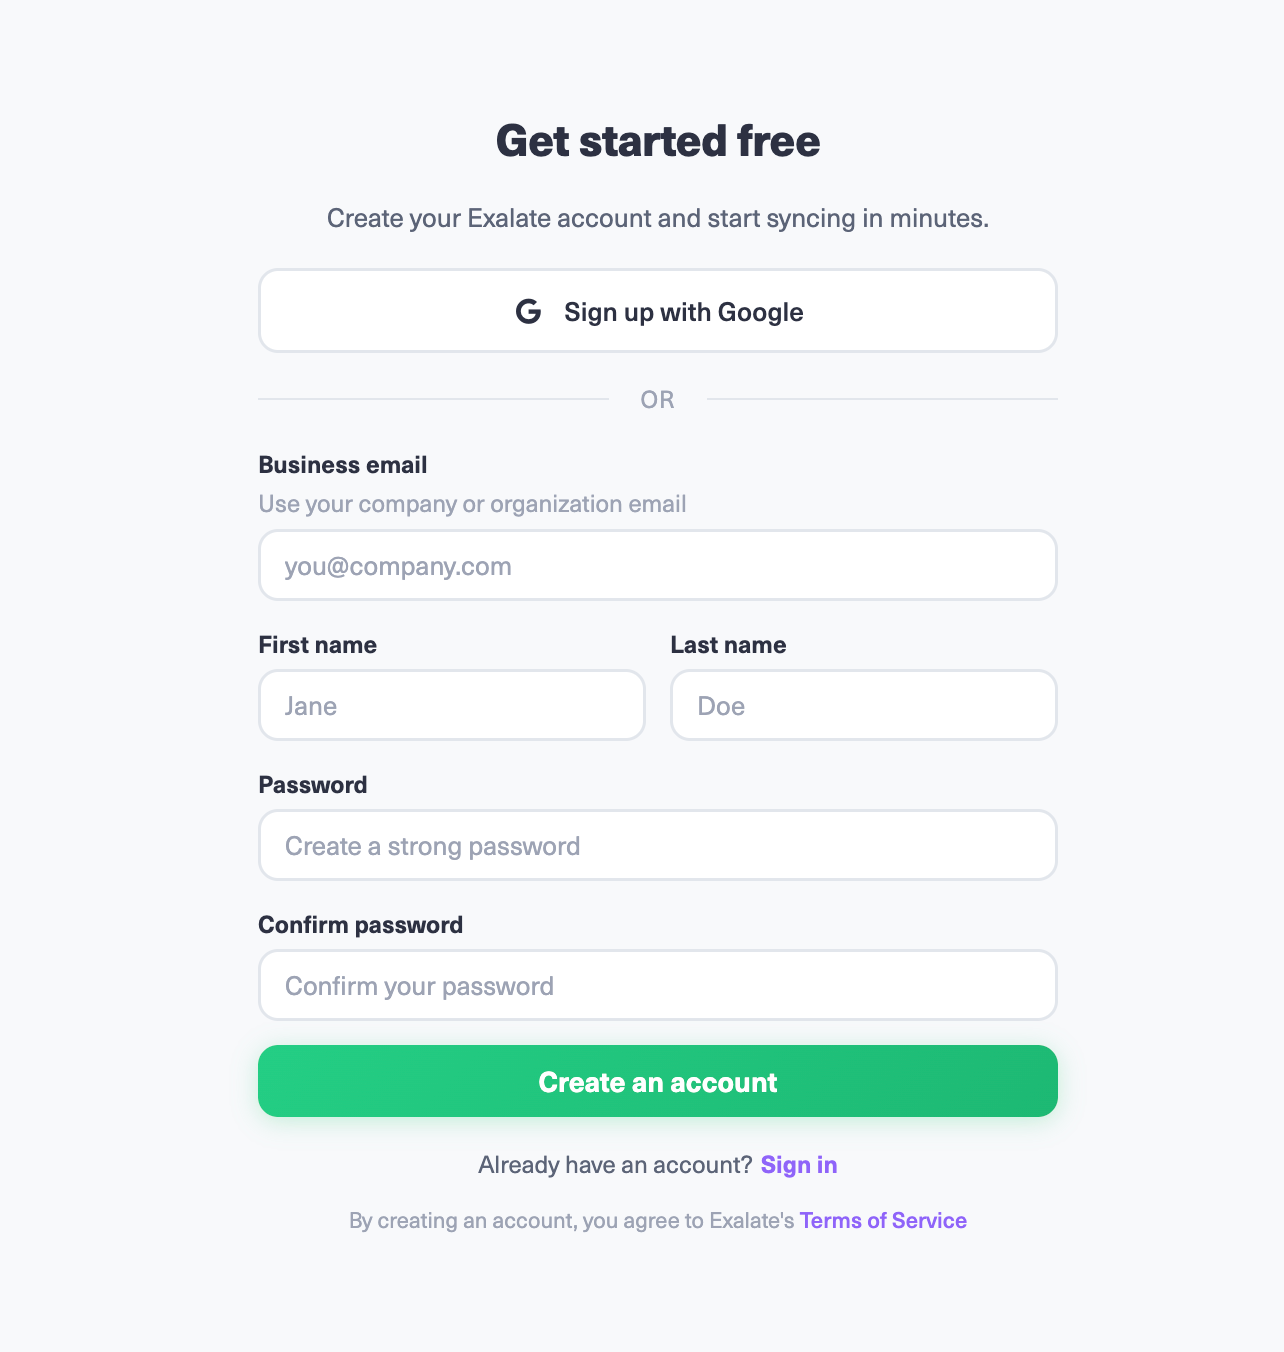
Step 1: Create an Exalate Account
Navigate to the Exalate app.
For new users:
- Click “Sign Up”
- Register using a business email (with verification) or sign up with Google
- Complete account creation
For existing users: Log in directly with your credentials.
Step 2: Create Your First Connection
A connection defines the link between your Jira and Salesforce instances.
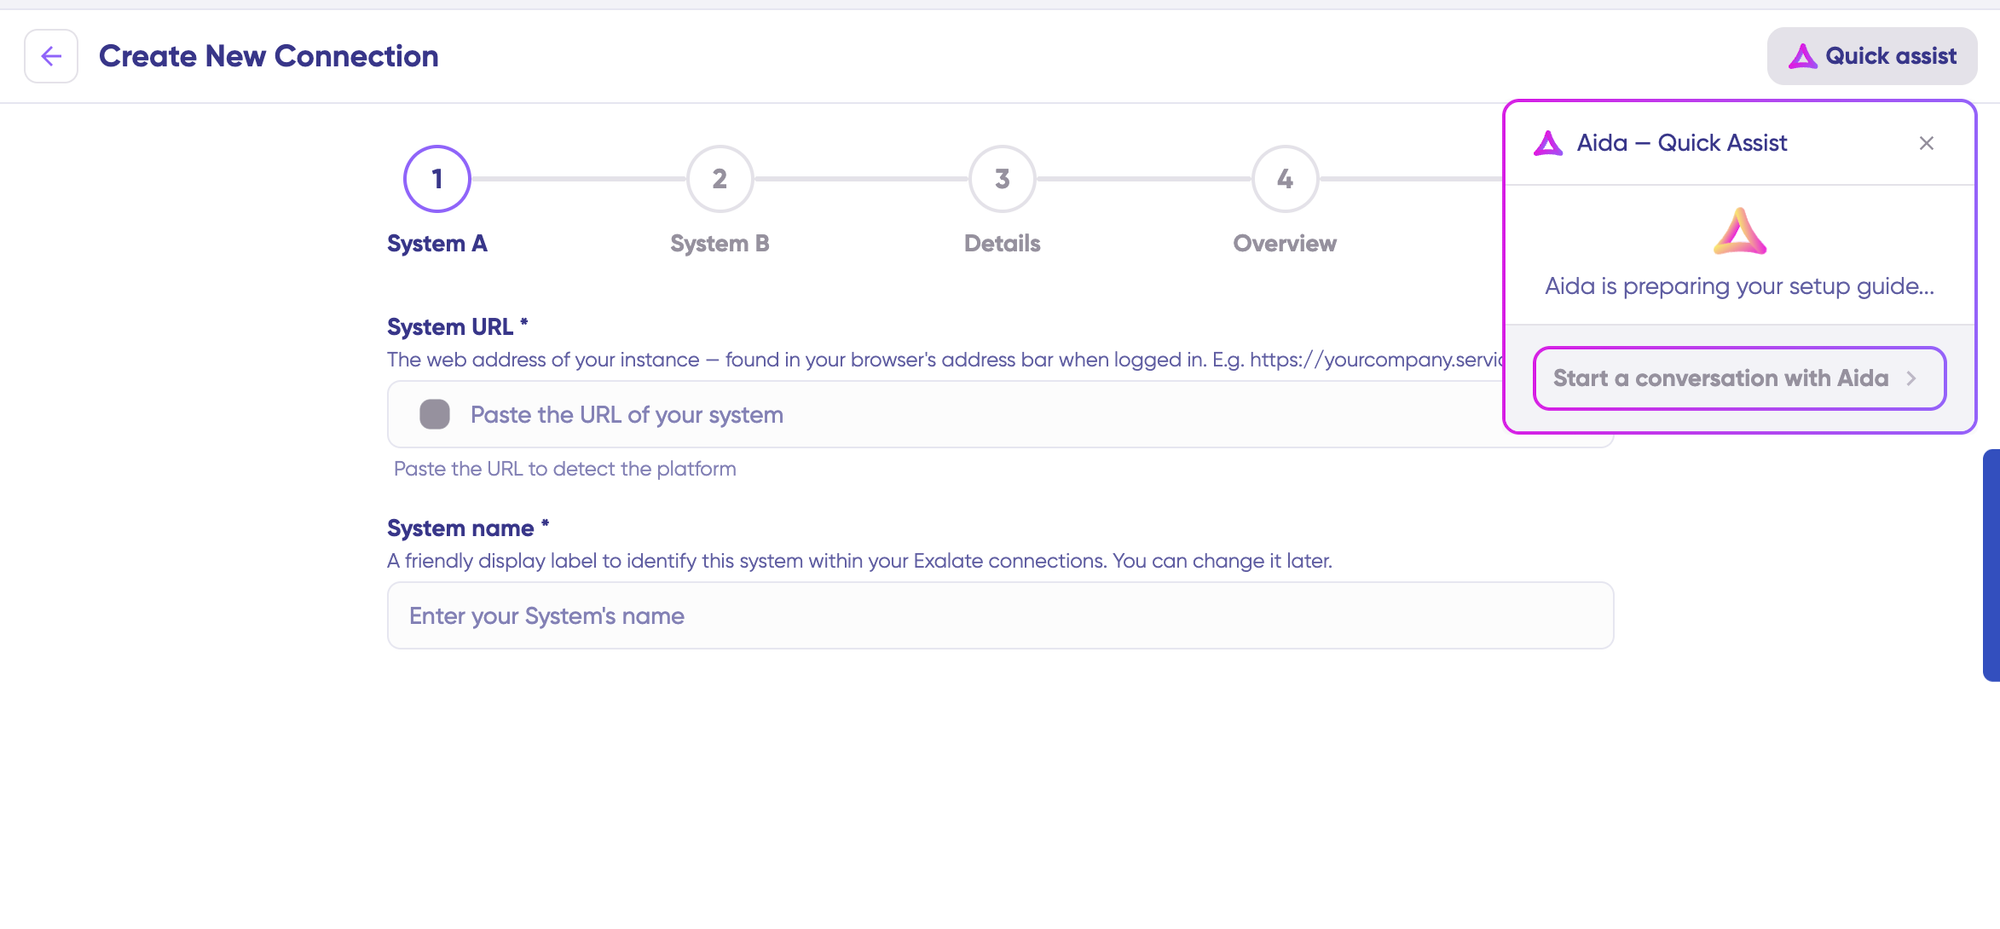
- Navigate to your system.
- Click “+ Add connections” > “Create new connection”
- Configure System A (you can start with either Jira or Salesforce):
- Enter a descriptive system name (e.g., “Salesforce Production”)
- Enter the system URL
- Authentication:
- For Salesforce: Enter the API token.
- For Jira: Authorize via OAuth by following the on-screen prompts
- Repeat the process for System B (the other platform)
- Name Your Connection:
- Enter a clear connection name (e.g., “Support Cases to Dev Team”)
- Add an optional description explaining the connection purpose
- Click “Next”
- Review Details.
- Click “Create connection“
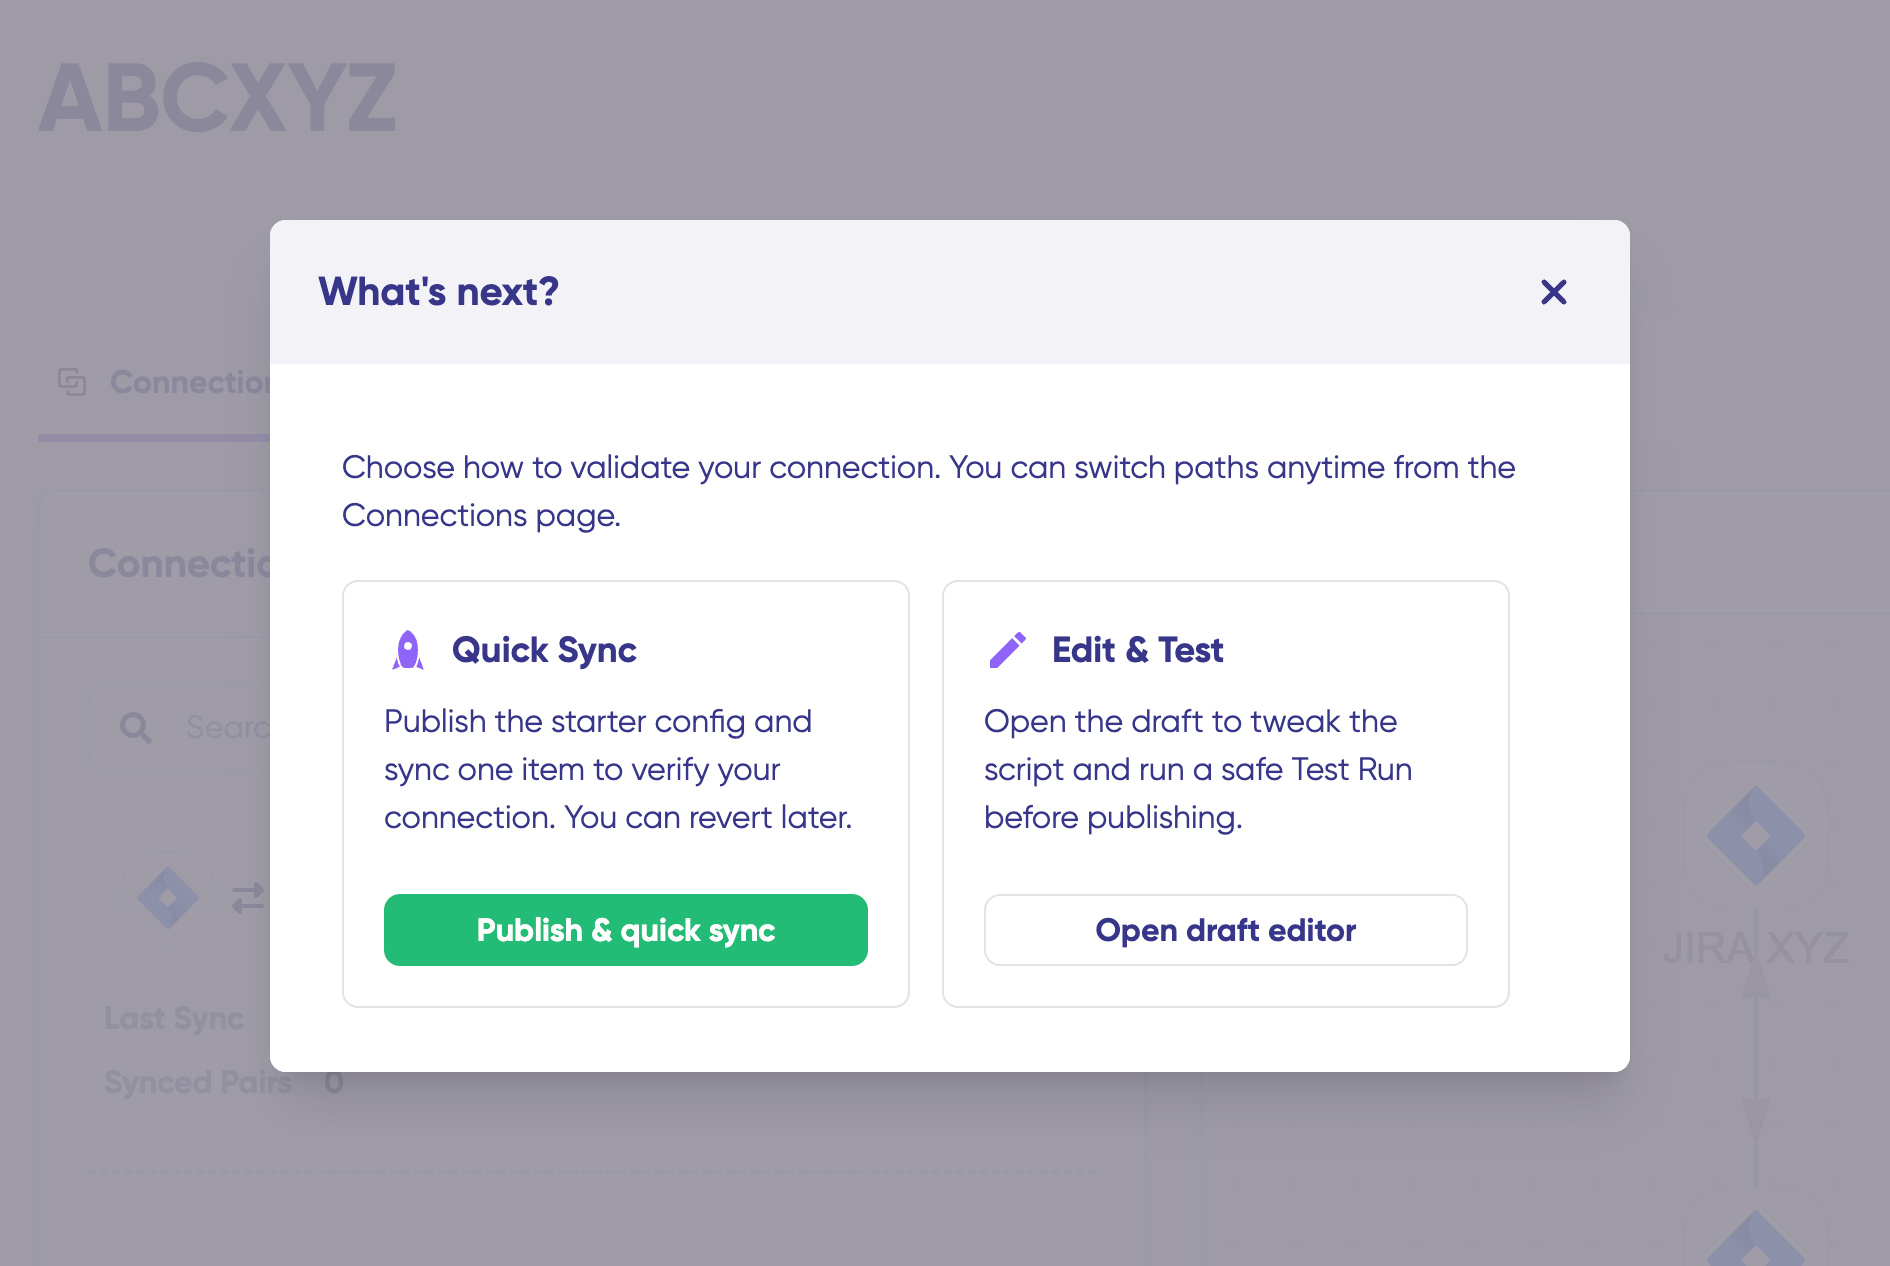
The system establishes the connection and shows a success message. You’ll then see two configuration options: “Quick Sync” and “Edit & Test”.
Step 3: Choose Configuration Approach
Option A: Quick Sync (Recommended for Testing)
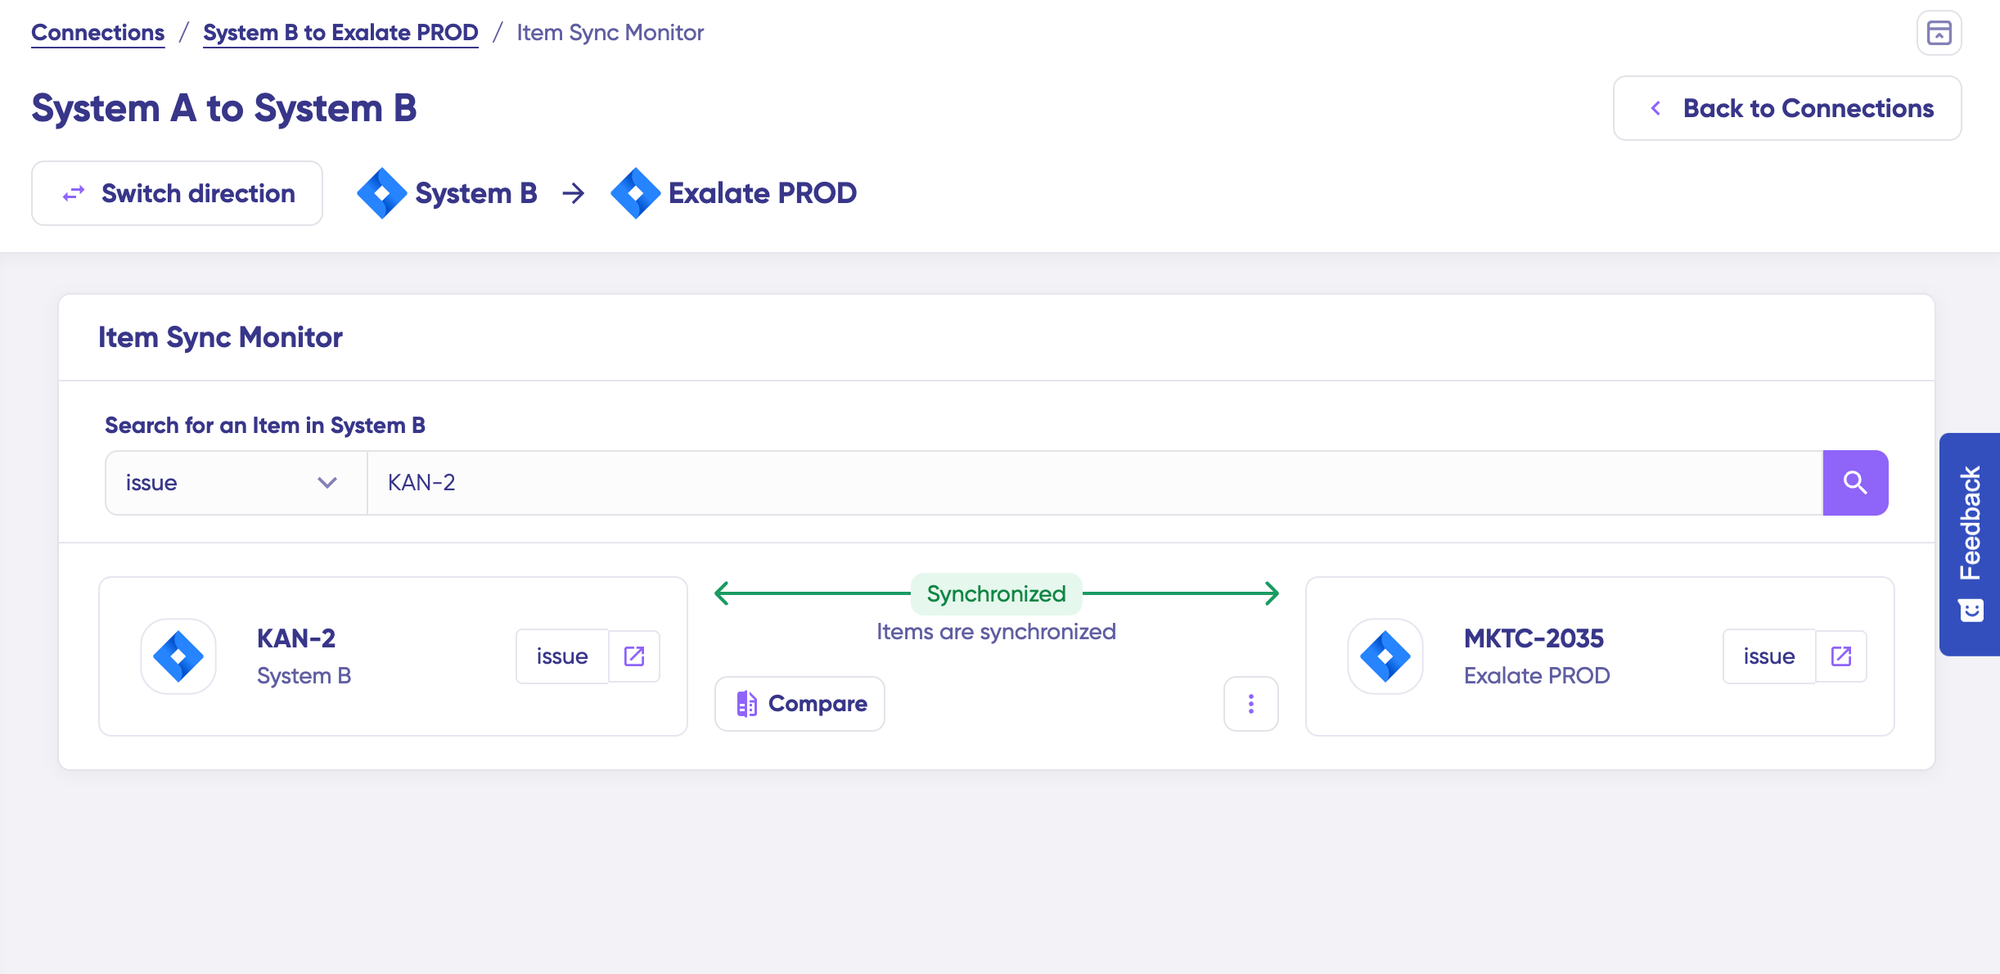
Quick Sync allows you to sync one item between Jira and Salesforce to verify your connection works properly.
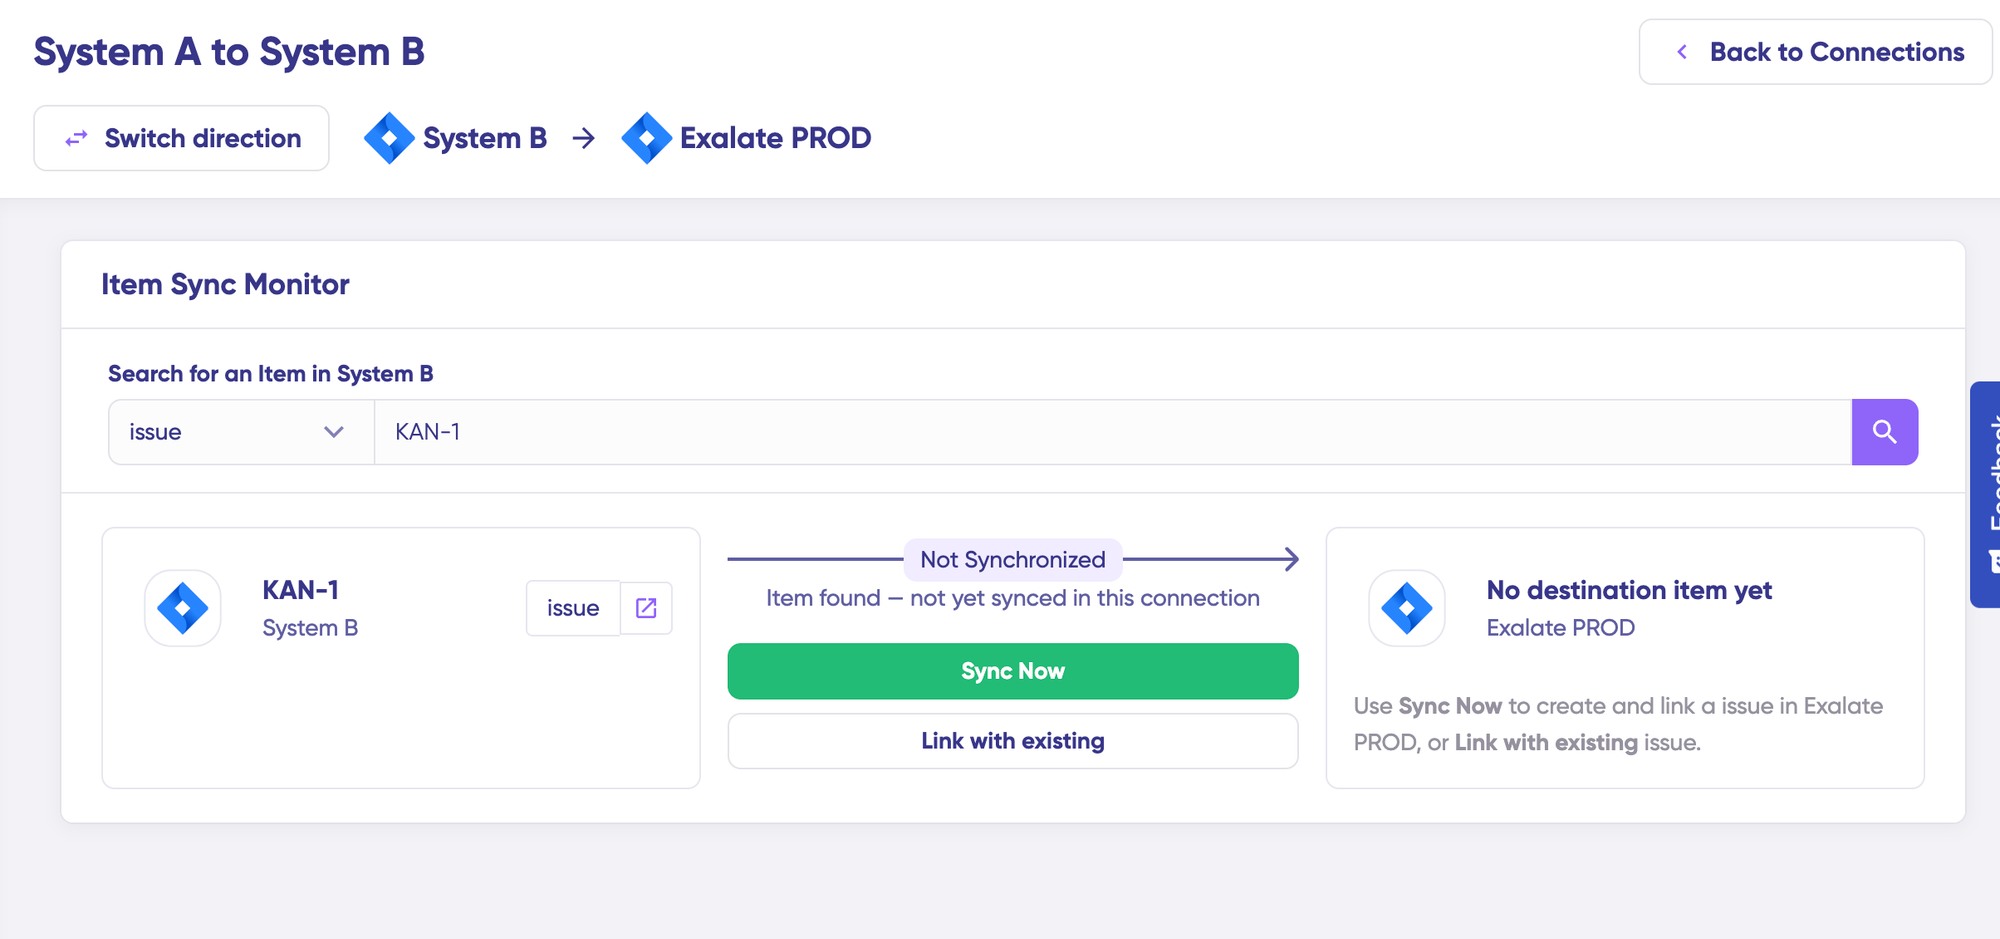
- Under “Item sync monitor,” enter:
- Jira work item key (e.g., “SUP-123”), OR
- Salesforce Case number
- Choose sync method:
- “Sync Now”: Creates the corresponding item on the other side
- “Link with Existing”: Links two already-existing items
- Click your chosen action
- Monitor sync status in real-time
- Once complete, click “Compare” to see how the synced items appear on both sides
This validates your connection before configuring comprehensive sync rules.
Option B: Edit & Test (For Production Setup)
For production deployment, configure detailed sync rules and triggers.
- Click “Open draft editor” or “+ New version”
This ensures you don’t accidentally modify any existing configuration. Changes in draft mode save automatically.
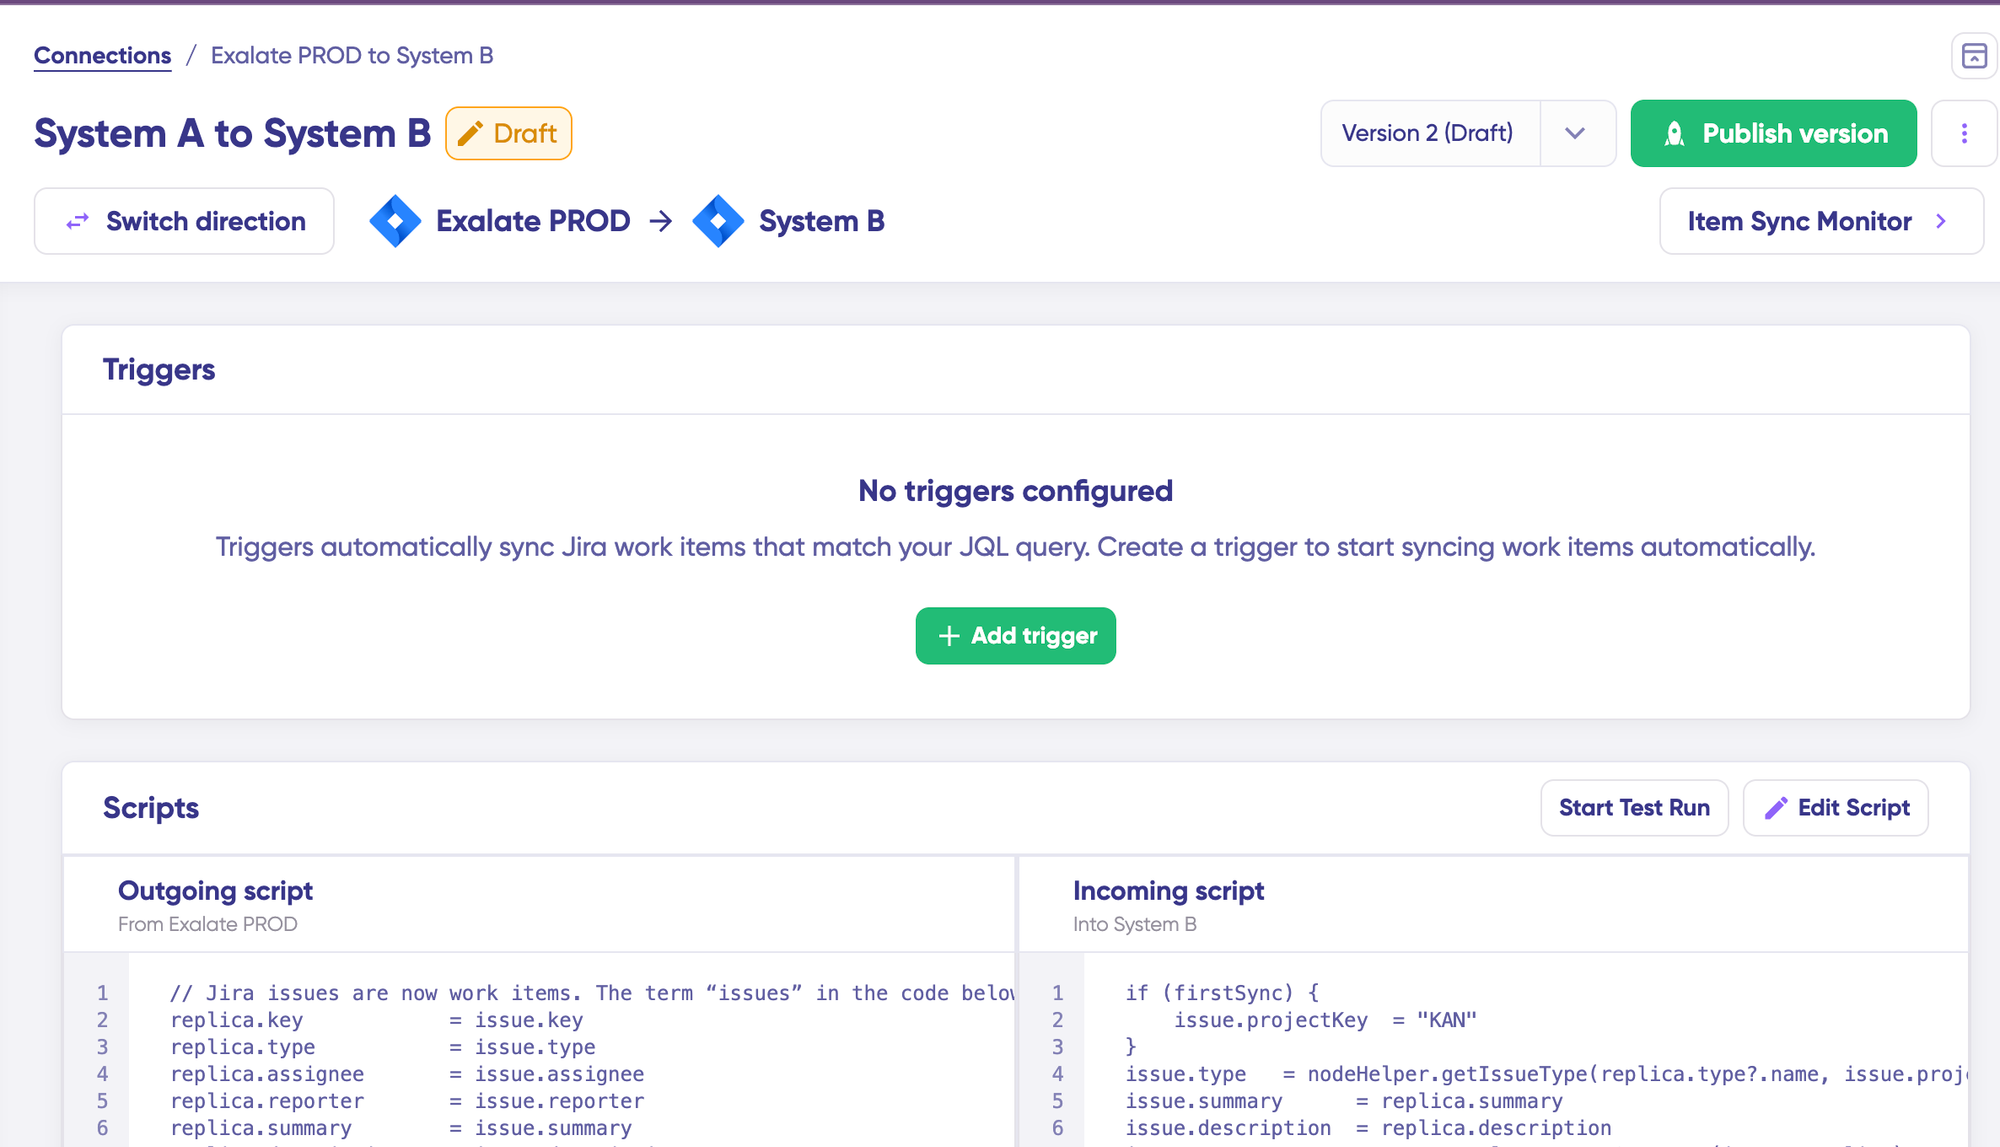
- Click “Edit Script” to open the script editor
Step 4: Understanding and Configuring Sync Rules
Sync rules define what data flows between systems and how it transforms during transit.
Sync Direction
Change sync direction by clicking the arrows between system names at the top of the configuration screen.
Example: If direction is Jira → Salesforce:
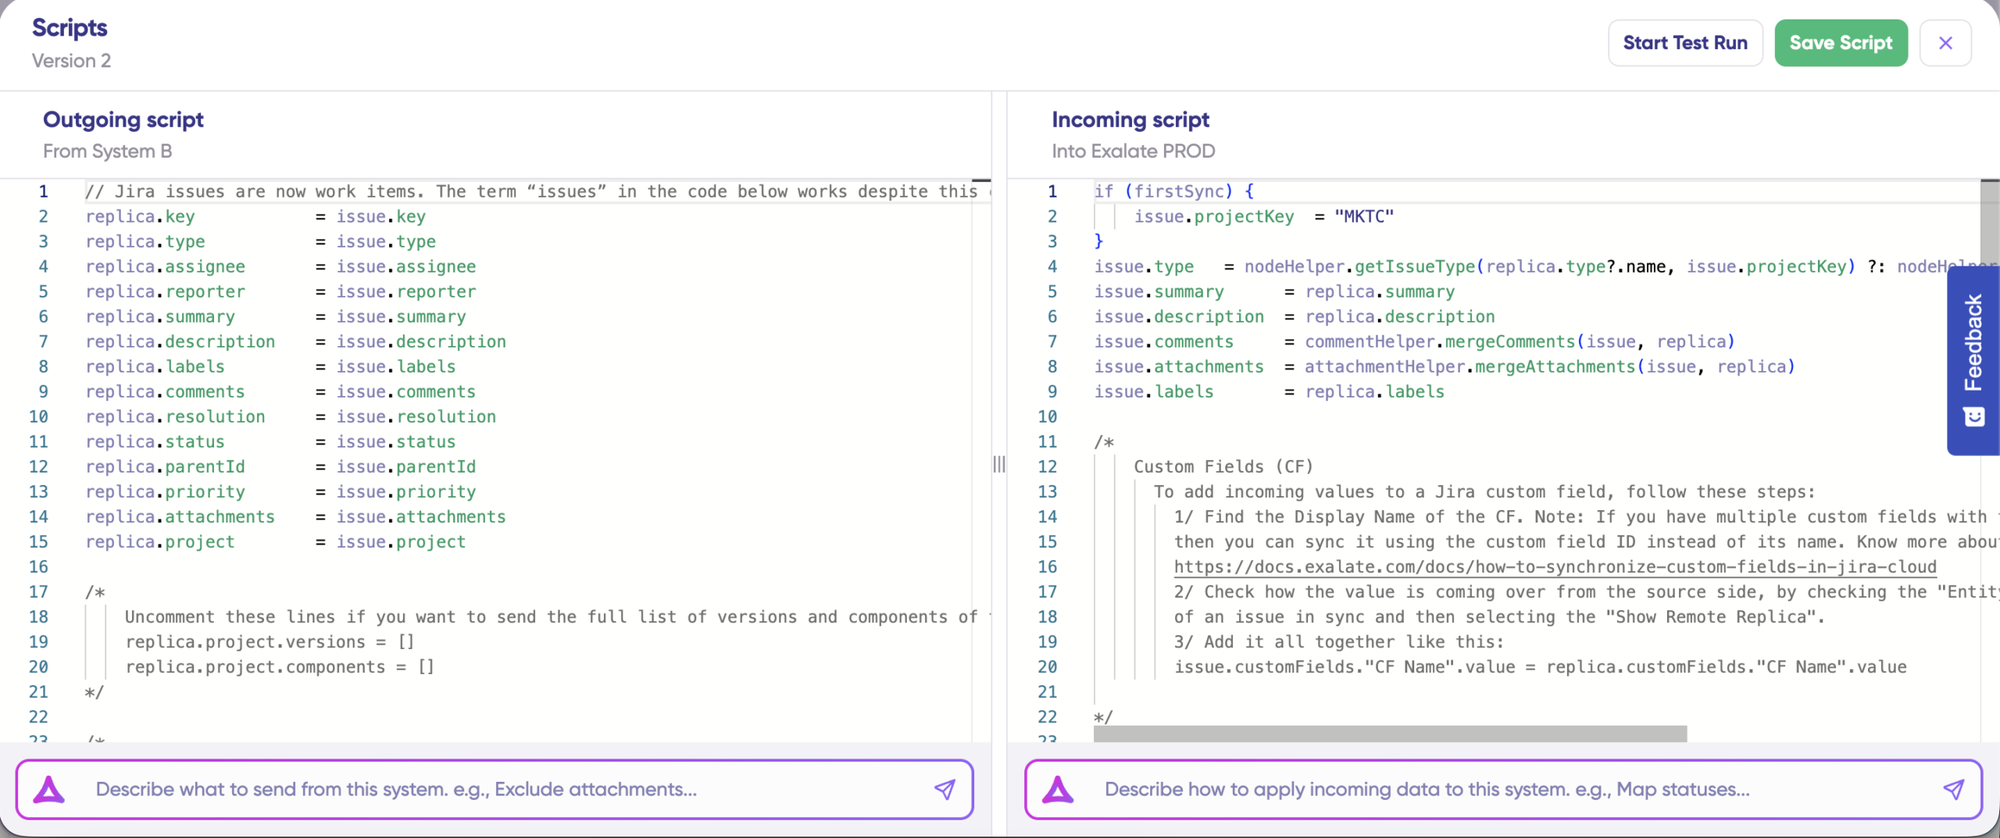
- Outgoing script (Jira side): Defines what data leaves Jira
- Incoming script (Salesforce side): Defines how Jira data maps to Salesforce fields
If you reverse the direction to Salesforce → Jira, the scripts swap roles.
Understanding Replica
The replica object is the message payload carrying data between systems. It exists in JSON format and holds values passed between synced entities.
To sync new values, you can enter the sync script yourself if you are familiar with Groovy.
To stop something from syncing (for instance, attachments from Jira to ServiceNow), simply remove that script line from the corresponding script.
Step 5: Using AI-Assisted Configuration with Aida
Rather than writing Groovy scripts manually, use Aida to generate sync rules from natural language prompts.
Aida appears in both the Outgoing script and Incoming script sections as a chat interface at the bottom of the editor.
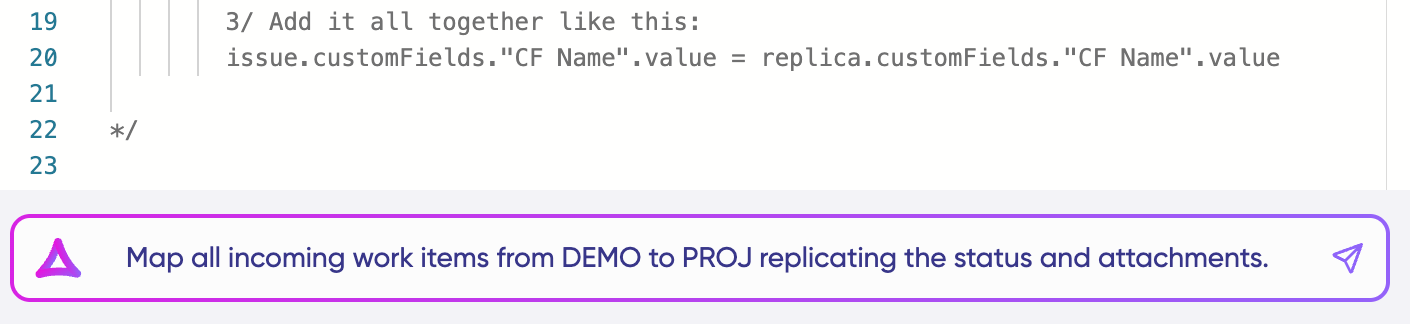
You can prompt something like this to Aida:
- “Exclude attachments from sync”
- “Only sync high-priority work items”
- “Send summary, description, priority, and status”
After Aida generates code:
- Green highlights: New lines that will be added
- Red highlights: Lines that will be removed
- Review the suggestions carefully (AI can make mistakes)
- Choose “Insert” to accept or “Discard” to reject
- Refine your prompt if needed and regenerate
Important Notes:
- Outgoing and incoming scripts work independently
- Maintain a separate context for each prompt
- Always review generated code before deployment
- Test in a safe environment first (see Step 7)
Step 6: Test Run – Validate Before Production
Test Run allows you to test the sync configuration without affecting live data.

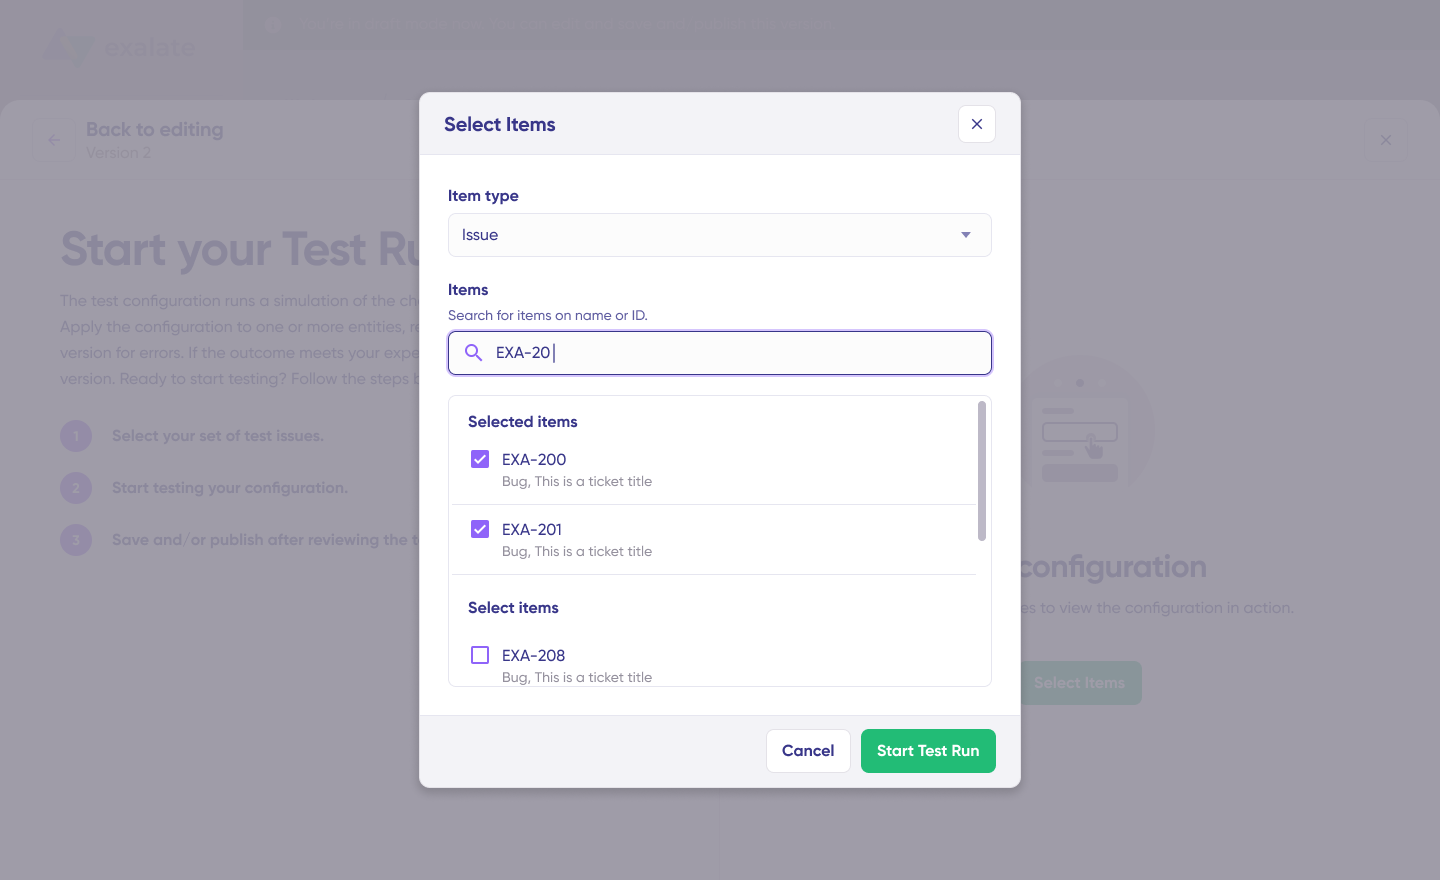
- After configuring scripts, click “Start Test Run” (do not click “Save script” yet)
- Select Test Items:
- Choose one or more existing work items from Jira or Cases from Salesforce
- Select items that represent realistic scenarios
- Click “Start Test Run”
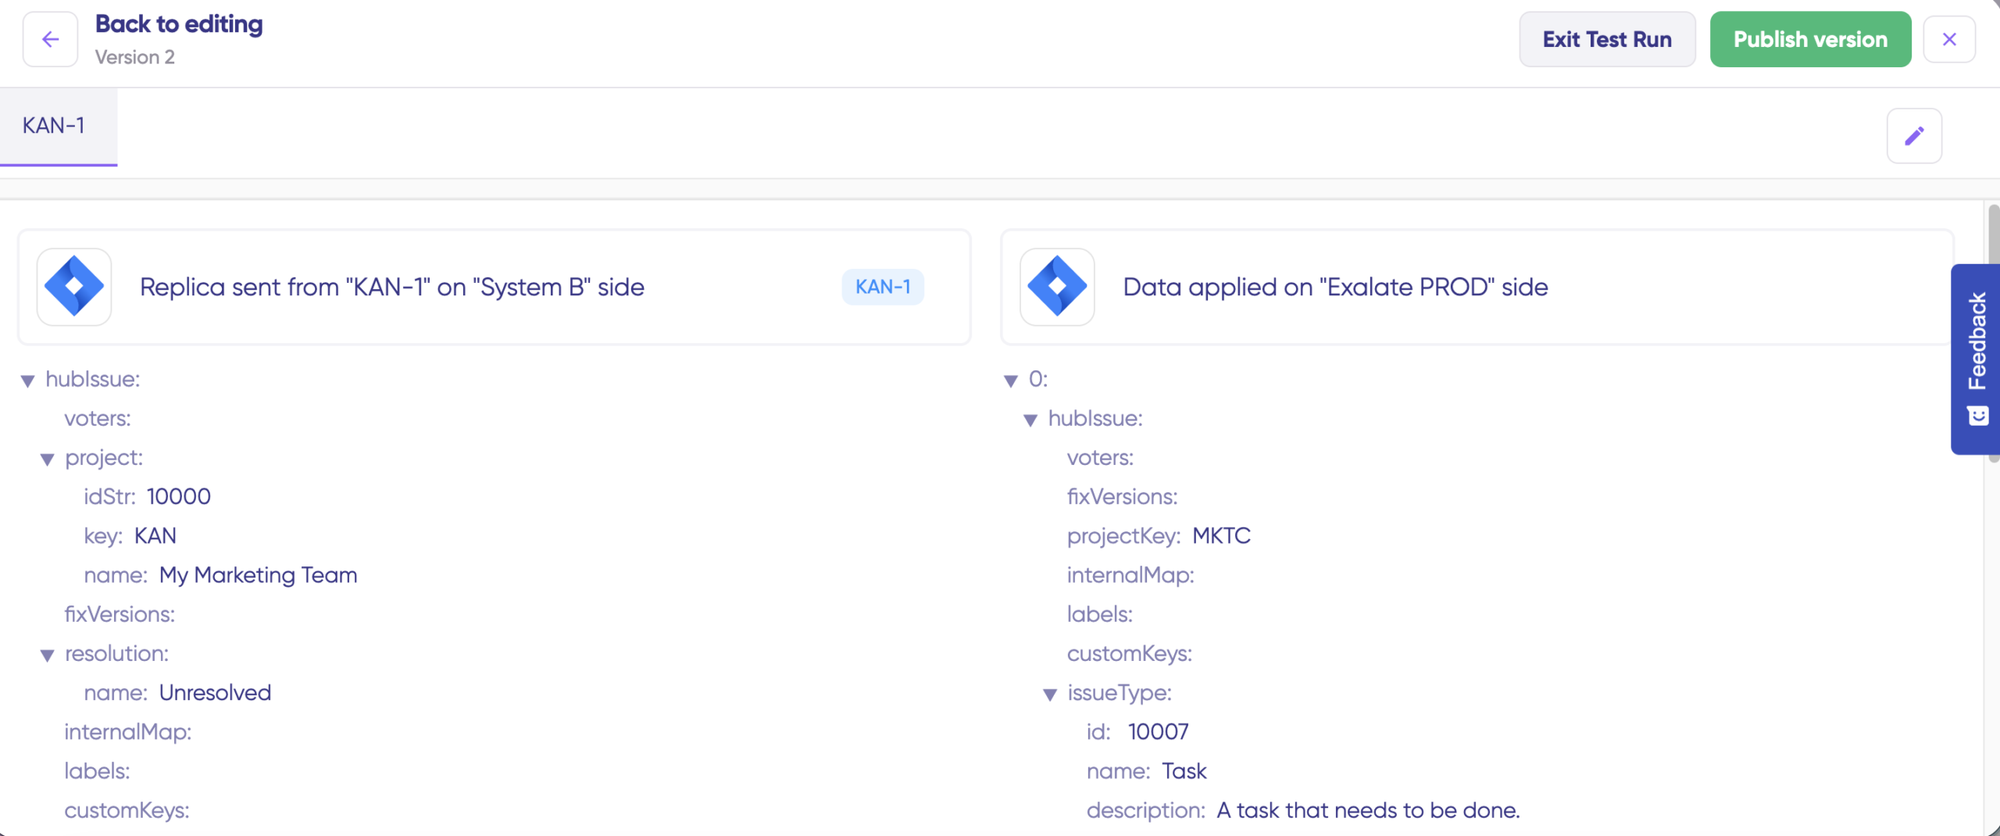
- Review Results:
- View outgoing replicas (what data is being sent)
- View incoming replicas (how data will be received)
- Check that the field mappings are correct
- Verify transformations work as expected
- Iterate if Needed:
- If mappings are incorrect, go back to the scripts
- Adjust code or refine Aida prompts
- Run Test Run again
- Deploy Only When Confident:
- Test Run prevents errors from affecting live data
- Only publish when all field mappings validate correctly
Step 7: Adding Triggers
Triggers define when items synchronize automatically. Without triggers, you must manually initiate sync for each item.
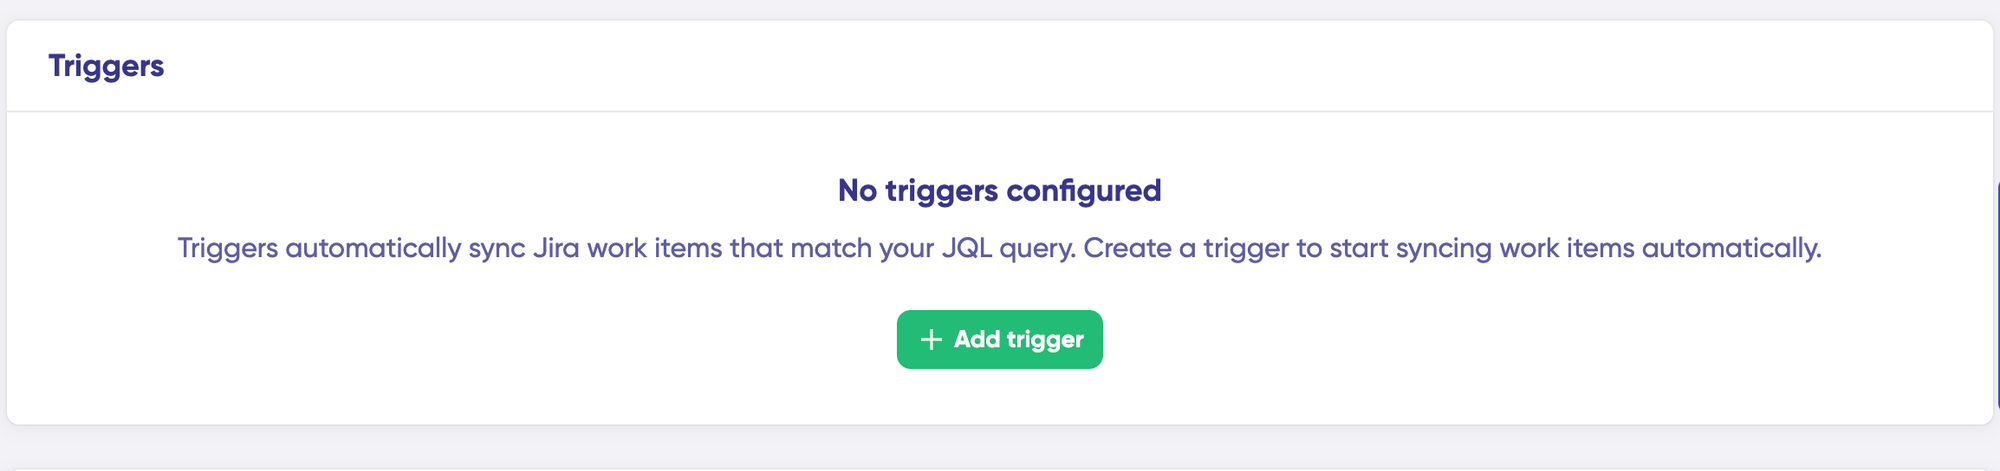
- Navigate to the “Triggers” tab in your connection editor.
- Click “+ Add Trigger”
- Configure Trigger Parameters:
For Jira (using JQL):
- Item type: Select work item type (Work item, Epic, Sprint, etc.)
- Query: Enter JQL to filter which items trigger sync
Example JQL triggers:
project = SUPPORT AND priority in (High, Highest)project = ENGINEERING AND labels = "customer-facing"Code language: JavaScript (javascript)type = Bug AND status = "To Do"Code language: JavaScript (javascript)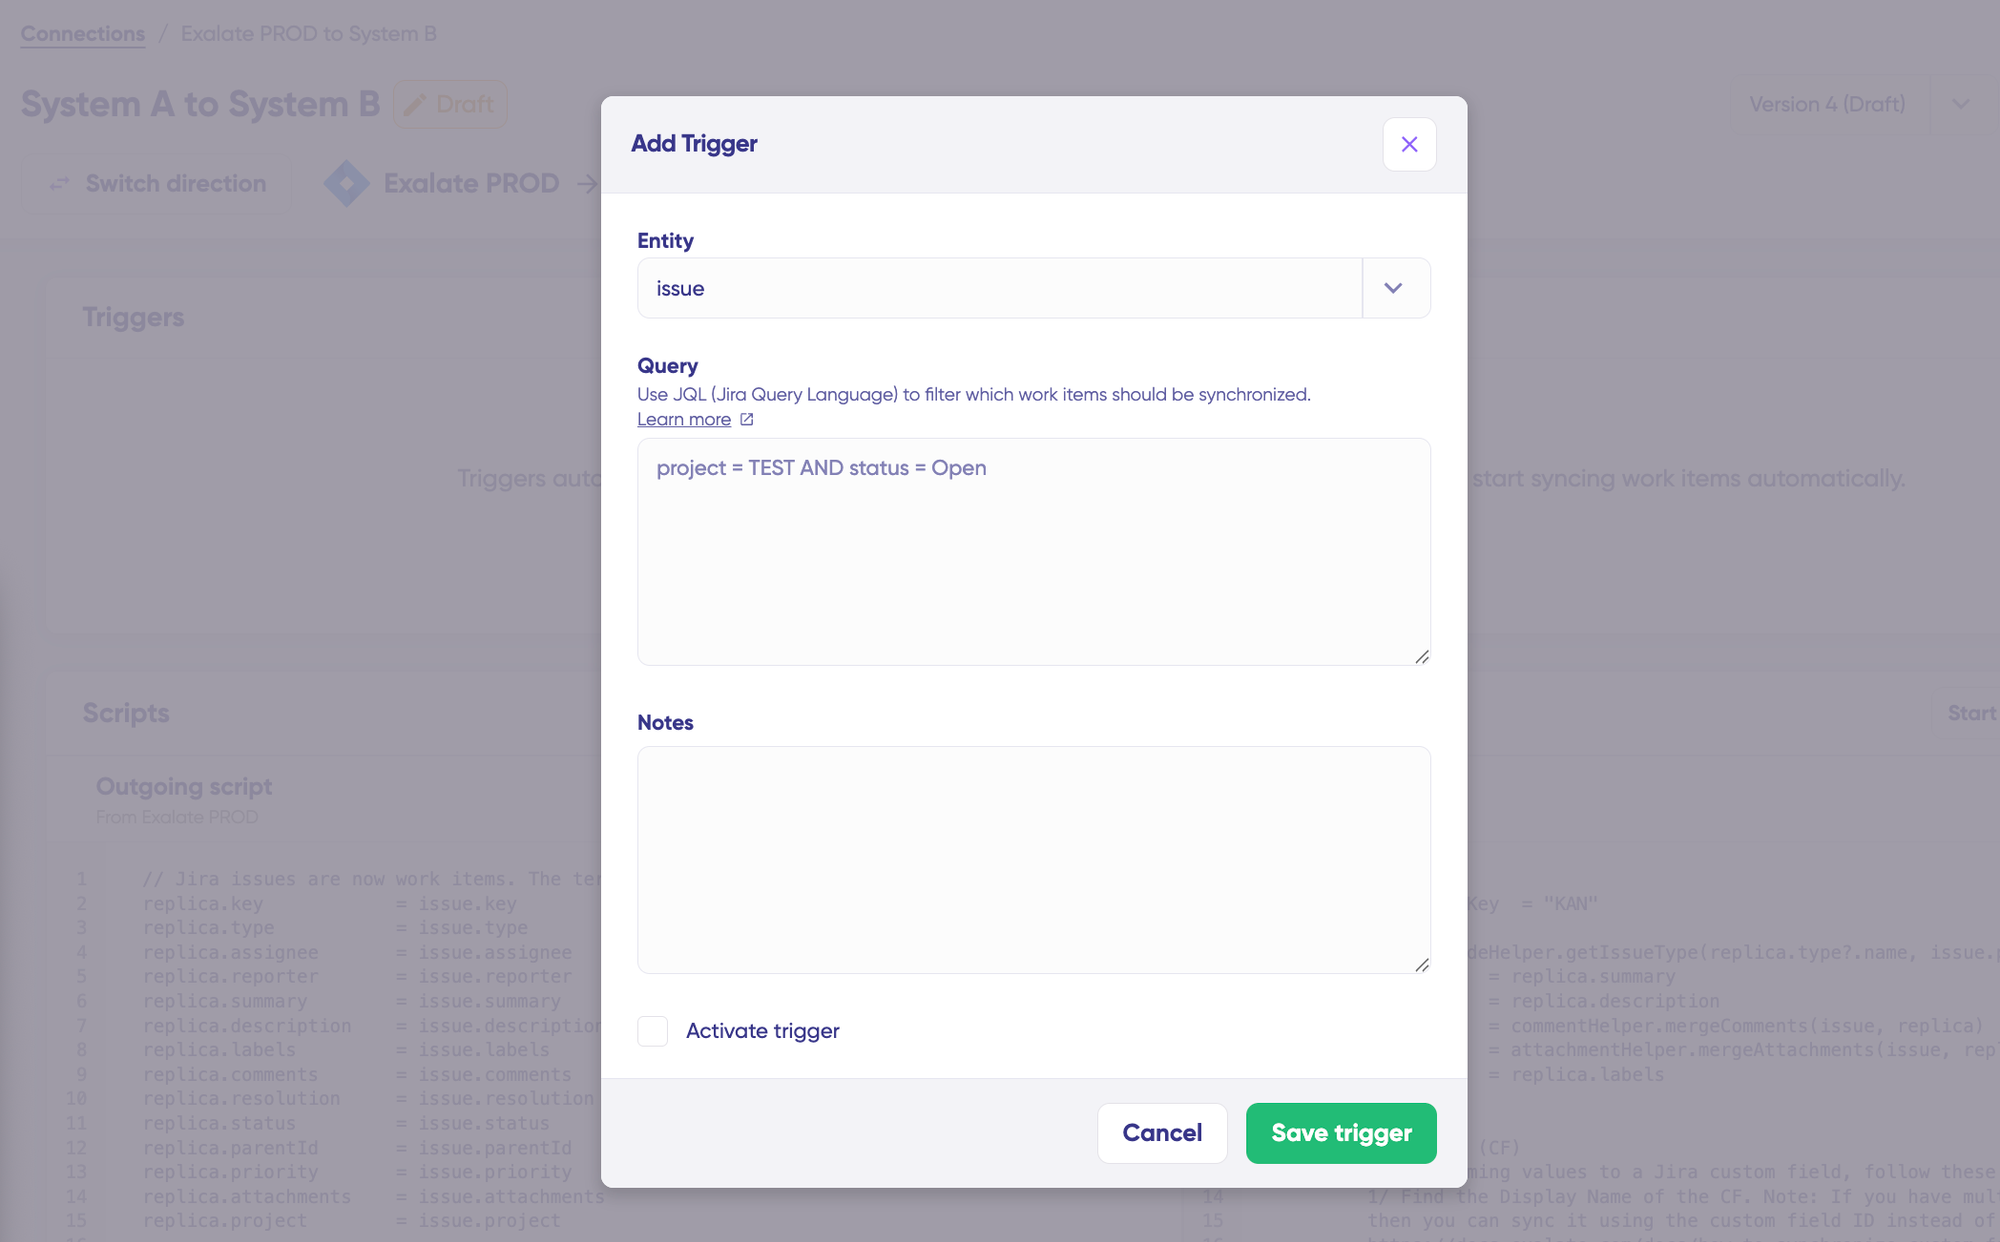
For Salesforce (using SOQL):
- Item type: Select object type (Case, Opportunity, etc.)
- Query: Enter SOQL to filter which items trigger sync
Example SOQL triggers:
Priority = '1' AND Status = 'New'Code language: JavaScript (javascript)Type = 'Problem' AND AccountId != nullCode language: JavaScript (javascript)Stage = 'Closed Won' AND Amount > 10000Code language: JavaScript (javascript)- Optional: Add notes explaining the trigger purpose
- Activate Trigger: Toggle the status to “Active”
- Click “Save Trigger”
You can create multiple triggers per connection. For example:
- Trigger 1: High-priority Cases → Bugs
- Trigger 2: Medium-priority Cases → Tasks
- Trigger 3: Feature Requests → Stories
Step 8: Script Versioning and Publishing
Every time you publish changes, Exalate creates a new script version.
Benefits of Versioning:
- Complete audit trail (who changed what and when)
- Rollback capability if new version causes problems
- Work on drafts without affecting production
- Compare versions to see what changed
To Publish Your Configuration:
- Review your scripts and triggers one final time
- Click “Publish Version”
- The new version becomes active immediately
- Previous versions remain available in the version dropdown
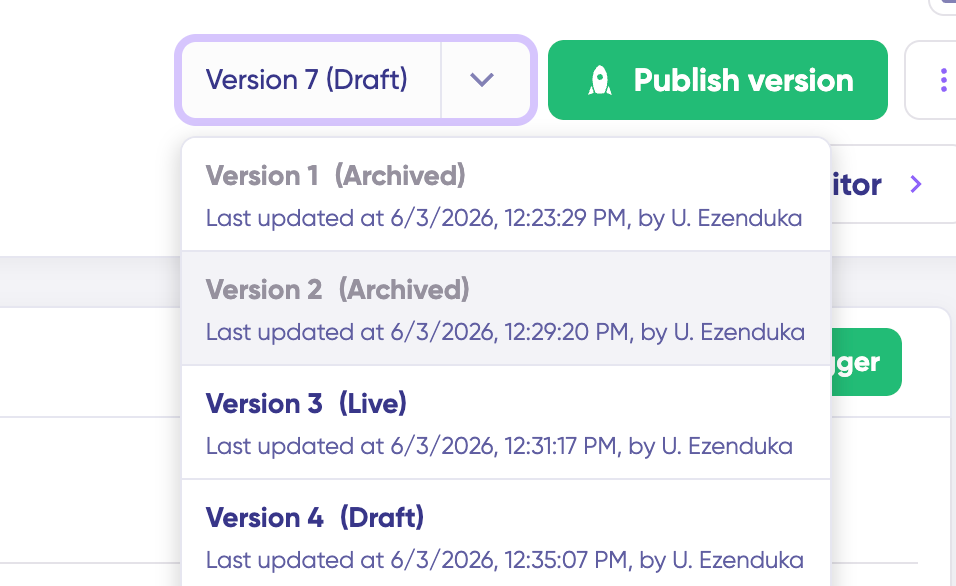
Version Management:
- Active: Currently running in production
- Draft: Editable, not yet published
- Archived: Previous versions available for rollback
Step 9: Deploy and Monitor
After publishing, your integration runs automatically based on configured triggers.
Through local connections in Jira, you also have the option to sync work items between different Jira projects (or spaces) within a single instance.
Example: take a URL like https://example.net/ hosting 2 Jira projects (or spaces). Project X has work item PRX-1; Project Y has work item PRY-2. Local connections in Exalate handle the sync between the two.
Challenges of Implementing Salesforce Jira Connectors
Here are common challenges that can hinder implementation.
API Limits
Most APIs enforce governance and usage limits, restricting the number of requests within specific time frames. For businesses scaling operations or syncing high volumes of data, these limits can constrain integration performance.
Choose connectors that handle rate limiting gracefully with queueing and retry mechanisms.
Data Conflicts
Without proper data transformation, you’ll end up with jumbled data that doesn’t provide business value. Mapping conflicts, inconsistencies, and scripting mistakes affects connector performance.
Example: If you mistakenly map “name” and “account ID” fields from a Salesforce Case to a single “user” field in a Jira work item, the conflicting data will override values after every exchange.
Security and Privacy
The Salesforce and Jira connector introduces potential areas of vulnerability; if a malicious actor gains access to the solution, they could obtain sensitive information.
That’s why compliance and privacy regulations, as well as security best practices, are necessary considerations. Look for ISO 27001 certification, encryption of data both in transit and at rest, and role-based access control.
Documentation Gaps
Some integration vendors neglect documentation, creating a nightmare for users trying to make simple configurations.
For instance, you should be able to consult the connector documentation to learn how to implement custom field mappings without waiting for professional assistance. If the documentation lacks structure and substance, fixing simple errors becomes time-consuming.
How to Set Up a Salesforce Jira Connector
Best Practices for Using a Salesforce Jira Connector
Here are expert tips for successful implementation.
- Outline integration goals aligned with business objectives. Define what success looks like before configuring anything. For instance, the connector could help you fetch SLA records for specific users or reduce average bug resolution time by 30%.
- Choose a connector that supports your specific use case. For example, select a solution that supports custom field mapping instead of generic syncing of default fields only.
- Ensure platform prerequisites are met. Both platforms should meet the minimum requirements for the connector before beginning implementation.
- Anticipate scale. Opt for a scalable and reliable connector that can handle increasing workloads and requests as your organization grows.
- Implement role-based access control. Specify access and permissions for users based on their roles. Enforce authorization protocols for every system admin.
- Train your team. Increase efficiency by ensuring administrators understand how to configure and troubleshoot the integration.
- Back up data on both sides. In case the connector fails during high-priority data exchange, backups will bail you out if something goes wrong with the exchange or configuration.
- Use alerts and notifications. Track connector performance and fix configuration and network issues promptly.
Next Steps
Exalate is a reliable Salesforce Jira connector because it supports custom, bidirectional syncs between both platforms, as well as other ITSM and work management systems like Zendesk, GitHub, ServiceNow, Azure DevOps, Azure DevOps Server, Freshdesk, Freshservice, and Asana.
Users can set up advanced integrations with Exalate’s Groovy scripting engine. Multiple fields, objects, and entities are available for mapping on both ends, and AI-assisted configuration via Aida accelerates initial setup.
Exalate is ISO 27001 certified, with role-based access control and encryption of data both in transit and at rest. Admins get full script and operational control to configure their syncs exactly as needed without affecting the other side’s instance. Each organization maintains autonomy over its own configuration.
Get a free trial on Exalate’s free tier, and you can set up a working sync without a sales conversation. Connect both ends, configure your rules with Aida or a Groovy engineer, and let records flow.
Want to learn more about the Exalate Jira to Salesforce connector? Book a demo with an integration engineer and discuss your use case in detail.

Calculate time and money savings from automated bidirectional sync.
Frequently Asked Questions
What is a Salesforce Jira connector?
A Salesforce Jira connector is an integration solution that syncs data between Salesforce CRM and Jira work management platforms. It handles authentication, data transformation, and field mapping to ensure accurate, consistent exchanges without manual intervention.
How does Exalate sync data between Salesforce and Jira?
Exalate uses bidirectional sync with customizable scripts. When a record changes, the outgoing script defines what data gets sent, and the incoming script on the receiving side processes it. You control field mapping, transformations, and conditional logic at every step. Sync happens near real-time via triggers and webhooks, typically within seconds of a change.
Do I need coding knowledge to use Exalate?
Not necessarily. Aida can generate sync rules for you, and there are plenty of script examples in the documentation. Basic configurations are manageable for Salesforce or Jira admins. That said, advanced customizations benefit from knowing Groovy, though the syntax is approachable if you’ve worked with any programming language.
Can I sync specific Salesforce objects with Jira work items?
Exalate allows you to sync any standard or custom Salesforce object—Cases, Leads, Opportunities, custom objects—to any Jira work item type. You can set up multiple configurations for different object-to-work-item-type combinations. Use trigger conditions to filter which specific records sync, like only Cases with Priority = 'High' or Opportunities in certain stages.
Is the sync real-time or scheduled?
Exalate uses triggers in Salesforce and webhooks in Jira to detect changes immediately, processing them within 5-10 seconds. You can also configure polling intervals for scheduled batch processing if you prefer bulk syncs at specific times rather than continuous updates.
Can I sync attachments and comments?
Yes, you can sync both attachments and comments bidirectionally. You control whether they sync automatically or under certain conditions—like only attachments from specific users or comments that meet size requirements. You can filter which comments sync based on content or author, transform formatting between systems, and add prefixes to indicate source.
What security features does Exalate provide?
Exalate is ISO 27001 certified and provides role-based access control, encryption of data both in transit and at rest, and independent authentication (no shared credentials between organizations). Each side maintains complete autonomy over configuration; partners can’t see your sync scripts, and changes on one side don’t require approval from the other.
For comprehensive security documentation, visit the Exalate Trust Center.
Can I integrate Salesforce and Jira with other platforms simultaneously?
Yes. Exalate supports integrations across Jira, Salesforce, ServiceNow, Azure DevOps, Azure DevOps Server, GitHub, Zendesk, Freshdesk, Freshservice, Asana, and other platforms via custom connectors. You can create multiple connections from a single platform instance.
How is Exalate different from Zapier or MuleSoft?
Exalate is purpose-built for bidirectional synchronization between work management and service platforms. Unlike Zapier (which focuses on trigger-action automation without true two-way sync) or MuleSoft (which is a broader integration platform), Exalate specializes in keeping records synchronized across systems with full scripting control and operational autonomy for both parties.
Can MSPs use Exalate for multi-client environments?
Yes. MSPs can create separate connections for each client with independent sync rules, maintaining data isolation while managing all integrations from a single instance. Each connection operates autonomously with its own field mappings and filters.
What Salesforce objects can I sync with Jira?
Exalate supports syncing from Salesforce Opportunities, Cases, Accounts, Tasks, Products, Leads, Contacts, and custom objects. Supported fields include external ID, account name, expected revenue, email, call duration, case number, and any custom fields accessible via the REST API.
What Jira fields can I sync with Salesforce?
Exalate supports syncing Jira assignees, statuses, reporters, attachments, parent IDs, security levels, priority, work item types, custom fields, comments, and more. Any field available via the Jira REST API can be included in your sync configuration.
Recommended Reads:
- ServiceNow Connectors: How To Keep Systems and Companies Connected
- How a Salesforce Connector Can Extend Your CRM Functionality
- How to Integration Guides for Two-way Sync Between Multiple Systems
- Advanced Integration Use Cases
- The Best Salesforce Integration Apps For Business Productivity
- How a ServiceNow Jira Connector Can Improve Workflows
- How to Connect Multiple Jira Instances For Efficient Collaborations
- How to Set up an End-to-End ServiceDesk Plus Jira Integration


