Freshdesk and ServiceNow both provide powerful tools for service delivery, but teams often face challenges when data sits in silos. A Freshdesk ServiceNow integration solves this by enabling seamless data sharing across platforms while maintaining security and control.
This guide covers why integration matters, practical use cases, what features to look for in an integration tool, and how Exalate delivers reliable, flexible connections between Freshdesk and ServiceNow.
Key Takeaways
- Critical security features include role-based access control, ISO 27001 certification, and independent data governance for each side.
- Freshdesk ServiceNow integration eliminates manual data entry and keeps support and IT teams aligned with real-time synchronization.
- Effective integrations require bidirectional sync, field-level mapping control, and enterprise-grade security features.
- Exalate provides AI-assisted configuration, full scripting control, and encryption for secure data exchange.
- Use cases range from automated ticket escalation to MSP workflows and CMDB asset sharing.

Why You Need a Freshdesk ServiceNow Integration
Instead of working in silos with duplicate data entry and communication gaps, integration creates a unified workflow that benefits both platforms.
Eliminate Manual Data Entry
Without integration, teams waste hours copying information between systems. A support agent closes a Freshdesk ticket, then manually updates the corresponding ServiceNow incident. An IT engineer adds diagnostic notes in ServiceNow, then emails the information to support. This duplication introduces errors, delays responses, and frustrates both teams.
Integrating both ServiceNow and Freshdesk automates this data exchange. Updates in one system immediately reflect in the other, eliminating redundant work and ensuring accuracy.
Maintain Team Autonomy
Different teams need different tools. Support teams thrive in Freshdesk’s customer-centric interface, while IT teams depend on ServiceNow’s comprehensive ITSM capabilities.
Integrating these two systems lets each team use their preferred platform without sacrificing visibility or collaboration. Each side retains complete control over its data.
Freshdesk administrators decide what information to share with ServiceNow, while ServiceNow administrators control what data enters their system.
This autonomy is critical for organizations working with partners, vendors, or clients who need to maintain data sovereignty.
Accelerate Issue Resolution
When support agents have immediate access to IT asset information from ServiceNow’s CMDB, they troubleshoot faster.
When IT teams receive complete context from Freshdesk tickets—including customer communications, attachments, and status history—they resolve problems more efficiently.
Integrating ServiceNow and Freshdesk reduces the back-and-forth communication that slows resolution. All relevant information flows automatically to whoever needs it, when they need it.
Enable Multi-Instance Visibility
Organizations with multiple Freshdesk or ServiceNow instances struggle to compare performance across teams, regions, or clients.
Freshdesk integration with ServiceNow lets you consolidate data from multiple sources into a single platform for analysis.
You can pull metrics from regional Freshdesk instances into ServiceNow for unified reporting. Managers can also track SLA performance across all clients as well as identify patterns and best practices by comparing teams. This visibility improves decision-making and service quality.
Support MSP and Multi-Organization Workflows
Managed service providers (MSPs) need to monitor clients across different platforms without forcing everyone onto a single system. Connecting data from both systems creates a unified view while respecting each organization’s platform choice.
MSPs can manage 50+ clients, each using different tools, through a single ServiceNow dashboard. Clients continue using familiar platforms, and data flows securely between systems without requiring everyone to switch tools or share admin access.
Improve Customer Experience
Customers don’t care about internal system boundaries. They expect fast, informed responses regardless of which team handles their issue.
Freshdesk and ServiceNow synchronization ensures support agents always have current information when communicating with customers.
When IT makes progress on a backend issue, support sees those updates immediately and can proactively inform customers. This transparency builds trust and improves satisfaction.
Scale Service Operations
As organizations grow, managing integrations becomes critical infrastructure. A well-designed integration scales with your operation—handling increasing ticket volumes, adding new instances, or connecting additional platforms without requiring major reconfiguration.
Integration platforms like Exalate support complex topologies: connect multiple Freshdesk instances to one ServiceNow hub, or build mesh networks linking Freshdesk, ServiceNow, Jira, Azure DevOps, and other platforms. This flexibility supports growth without forcing teams to abandon tools that work for them.
Reduce Total Cost of Ownership
Manual processes cost more than integration subscriptions. Consider the hours spent copying data, the errors that result from duplicate entry, the delayed resolutions that impact customer satisfaction, and the productivity lost to context switching between systems.
System integration automates these processes, reducing labor costs while improving service quality. Teams spend time solving problems instead of managing data transfer.

Calculate time and money savings from automated bidirectional sync.
Ensure Data Consistency
When teams work from different data sources, inconsistencies multiply. A ticket status in Freshdesk doesn’t match the incident state in ServiceNow. Comments added in one system never reach the other. Attachments get lost in email forwarding.
Bidirectional integration maintains data consistency automatically. Every update, comment, and attachment syncs between systems. Both teams always work from the same current information, eliminating confusion and miscommunication.
Strengthen Security and Compliance
Integration done right improves security rather than compromising it. Look for solutions offering encryption in transit and at rest, ISO 27001 certification, role-based access controls, and independent data governance.
Exalate implements enterprise-grade security measures, ensuring your Freshdesk ServiceNow integration meets compliance requirements while maintaining data protection.
Features to Consider When Choosing an Integration Tool
Selecting the proper integration platform determines whether your Freshdesk ServiceNow connection delivers value or creates new problems. Here are the critical features to evaluate:
Bidirectional Sync Capabilities
Data should flow both ways. Changes in Freshdesk must reflect in ServiceNow and vice versa, without manual intervention. True bidirectional sync maintains data consistency across both platforms in real-time.
What to look for:
- Real-time or near-real-time synchronization (sub-minute latency)
- Field-level control over what syncs in each direction
- Conflict resolution mechanisms when both sides update simultaneously
- Support for both uni-directional and bi-directional configurations per field.
Advanced Mapping and Customization
Pre-built integrations offer convenience but often lack the flexibility for complex use cases. You need fine-grained control over how data maps between platforms.
What to look for:
- Custom field mapping beyond standard fields
- Conditional sync rules (sync only when specific criteria are met)
- Data transformation to match target system requirements
- Scripting support for advanced logic
Exalate provides complete scripting control using a Groovy-based engine, enabling custom mapping logic for any use case. The platform also offers AI-assisted configuration (Aida) that generates sync scripts based on natural language descriptions.
Enterprise-Grade Security
Security can’t be an afterthought when connecting platforms that handle customer data, internal operations, and potentially sensitive information.
What to look for:
- Data encryption in transit (TLS 1.2/1.3) and at rest
- ISO 27001 certification
- Role-based access control (RBAC)
- Multi-factor authentication support
- JWT or OAuth authentication
- Regular security audits and compliance updates
Exalate maintains ISO 27001 certification and implements comprehensive security measures detailed in our Trust Center. Data remains encrypted throughout transmission, and role-based access ensures only authorized users can configure integrations.
Reliability and Performance
Freshdesk and ServiceNow integration shouldn’t become a bottleneck. The platform must handle your data volume without degrading performance.
What to look for:
- Proven uptime SLAs
- Automatic recovery from network failures or system outages
- Performance under load (can it handle your ticket volume?)
- Support for connection types (cloud-to-cloud, on-premise, hybrid)
Scalability and Platform Support
Your needs will evolve. The integration should grow with your organization.
What to look for:
- Support for multiple concurrent connections
- Ability to connect more than two platforms (mesh, hub-and-spoke topologies)
- Pre-built connectors for platforms you use or might use
- Regular updates to support new platform versions and features
Exalate supports connections between Freshdesk, ServiceNow, Freshservice, Jira, Azure DevOps, Azure DevOps Server, Zendesk, Salesforce, Asana, GitHub, and other platforms. You can connect multiple instances in any topology that fits your workflow.
Implementation and Support
Even powerful tools need good support to deliver value.
What to look for:
- Documentation quality and depth
- Availability of training resources
- Support response times and channels
- Professional services for complex implementations
- Community forums or user groups
- Regular product updates and feature releases
A Step-by-Step Setup Guide For Freshdesk to ServiceNow Integration With Exalate
Head over to the Exalate integrations page to begin. Sign up by entering your email address and completing verification, or use your Google account for faster access.
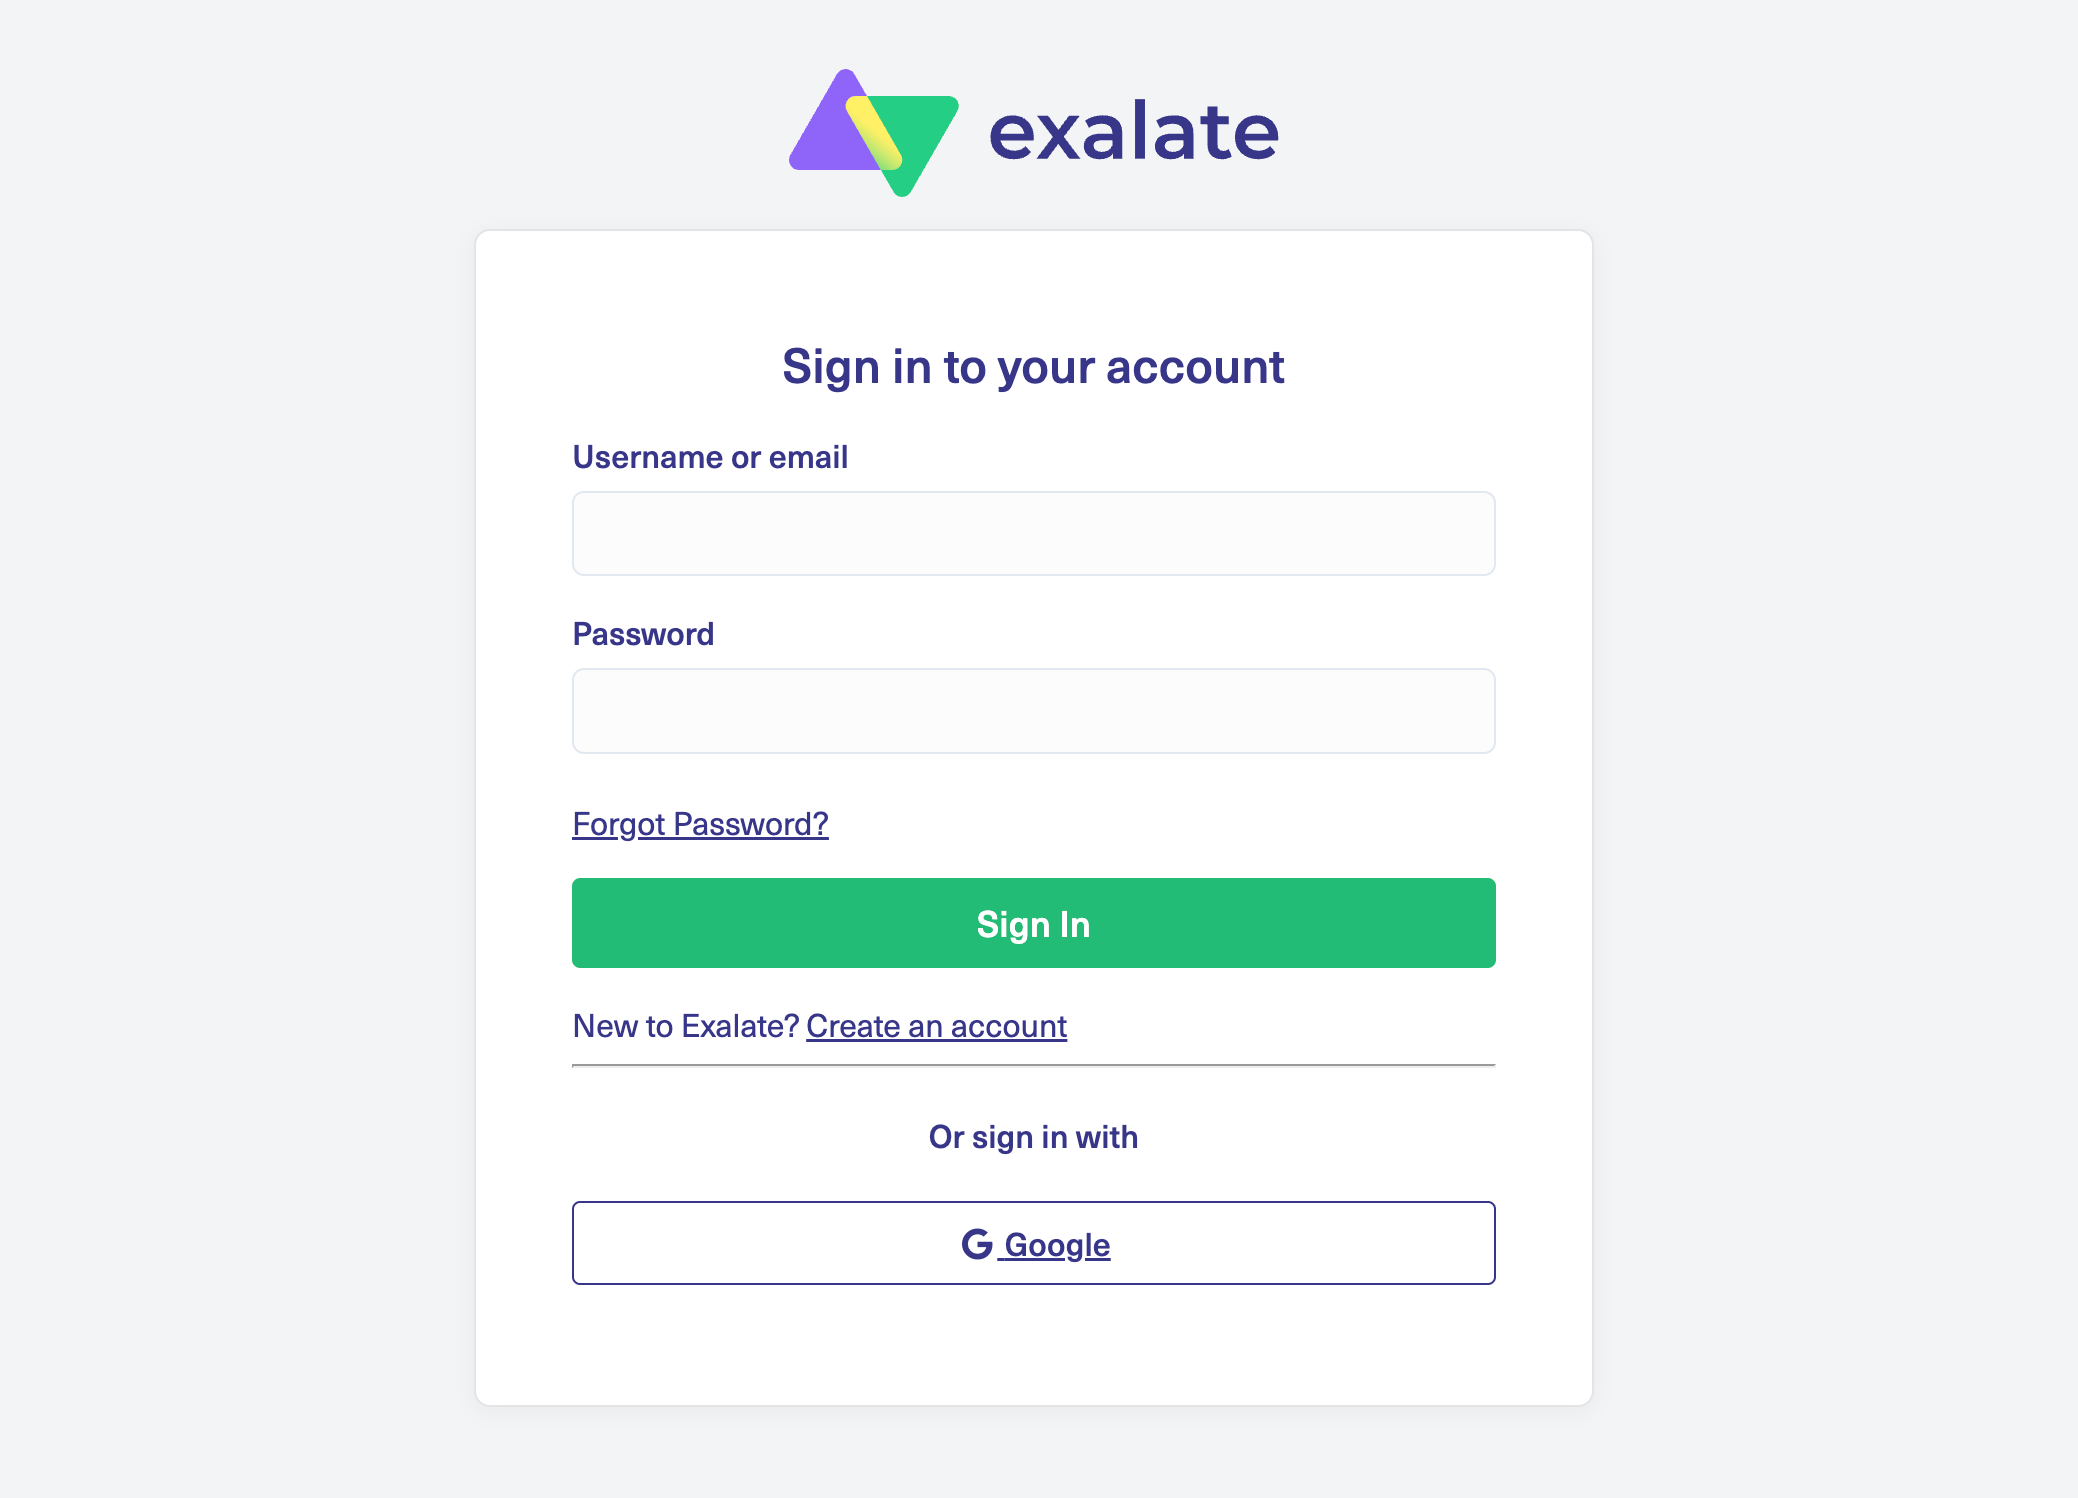
Already registered? Simply log in to reach your dashboard.
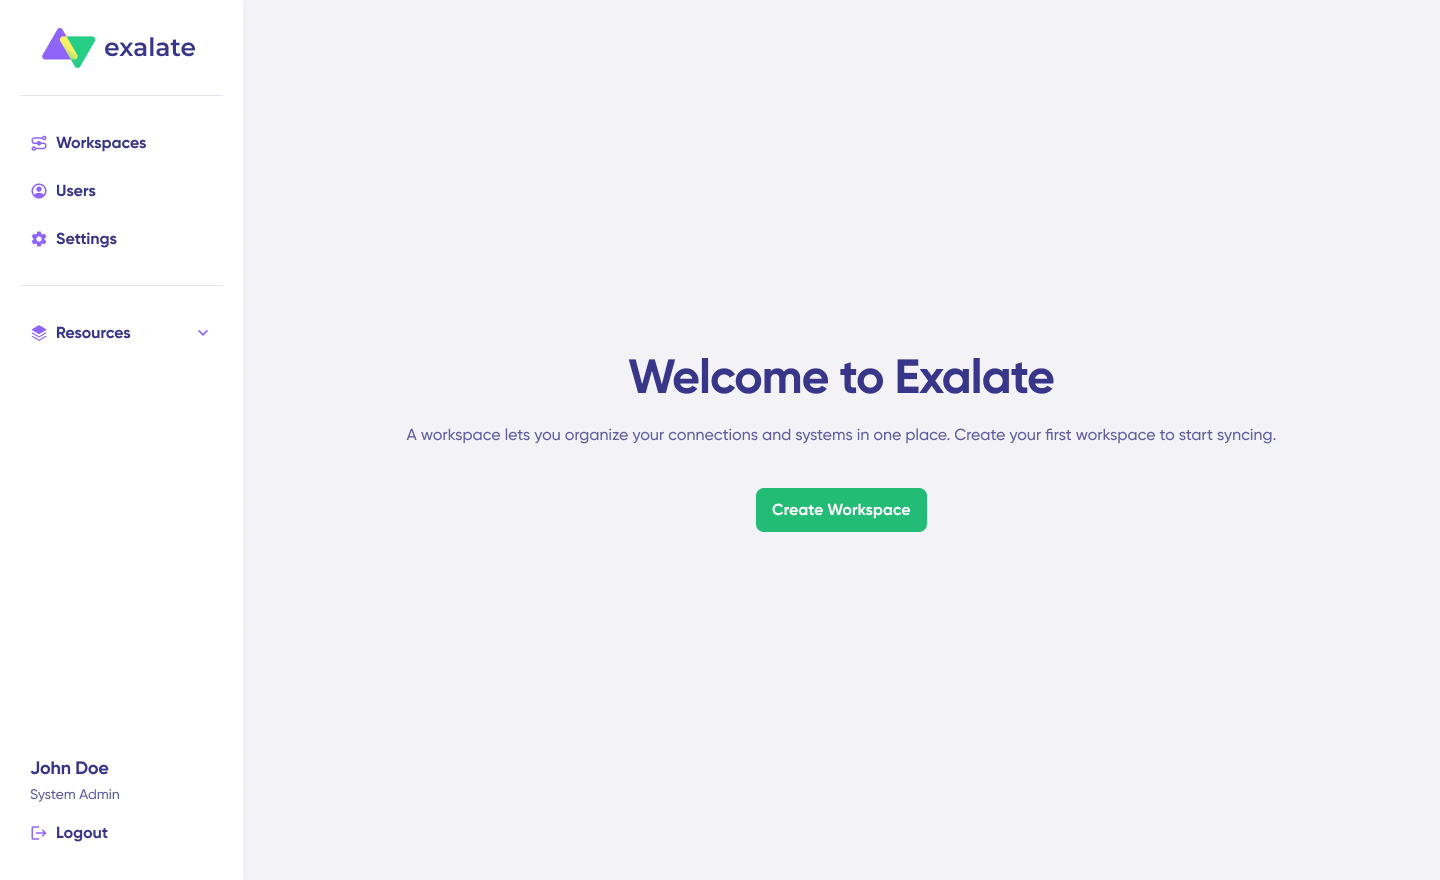
Set up a workspace to organize your integrations and connections. Access all your workspaces through the “Workspaces” tab.
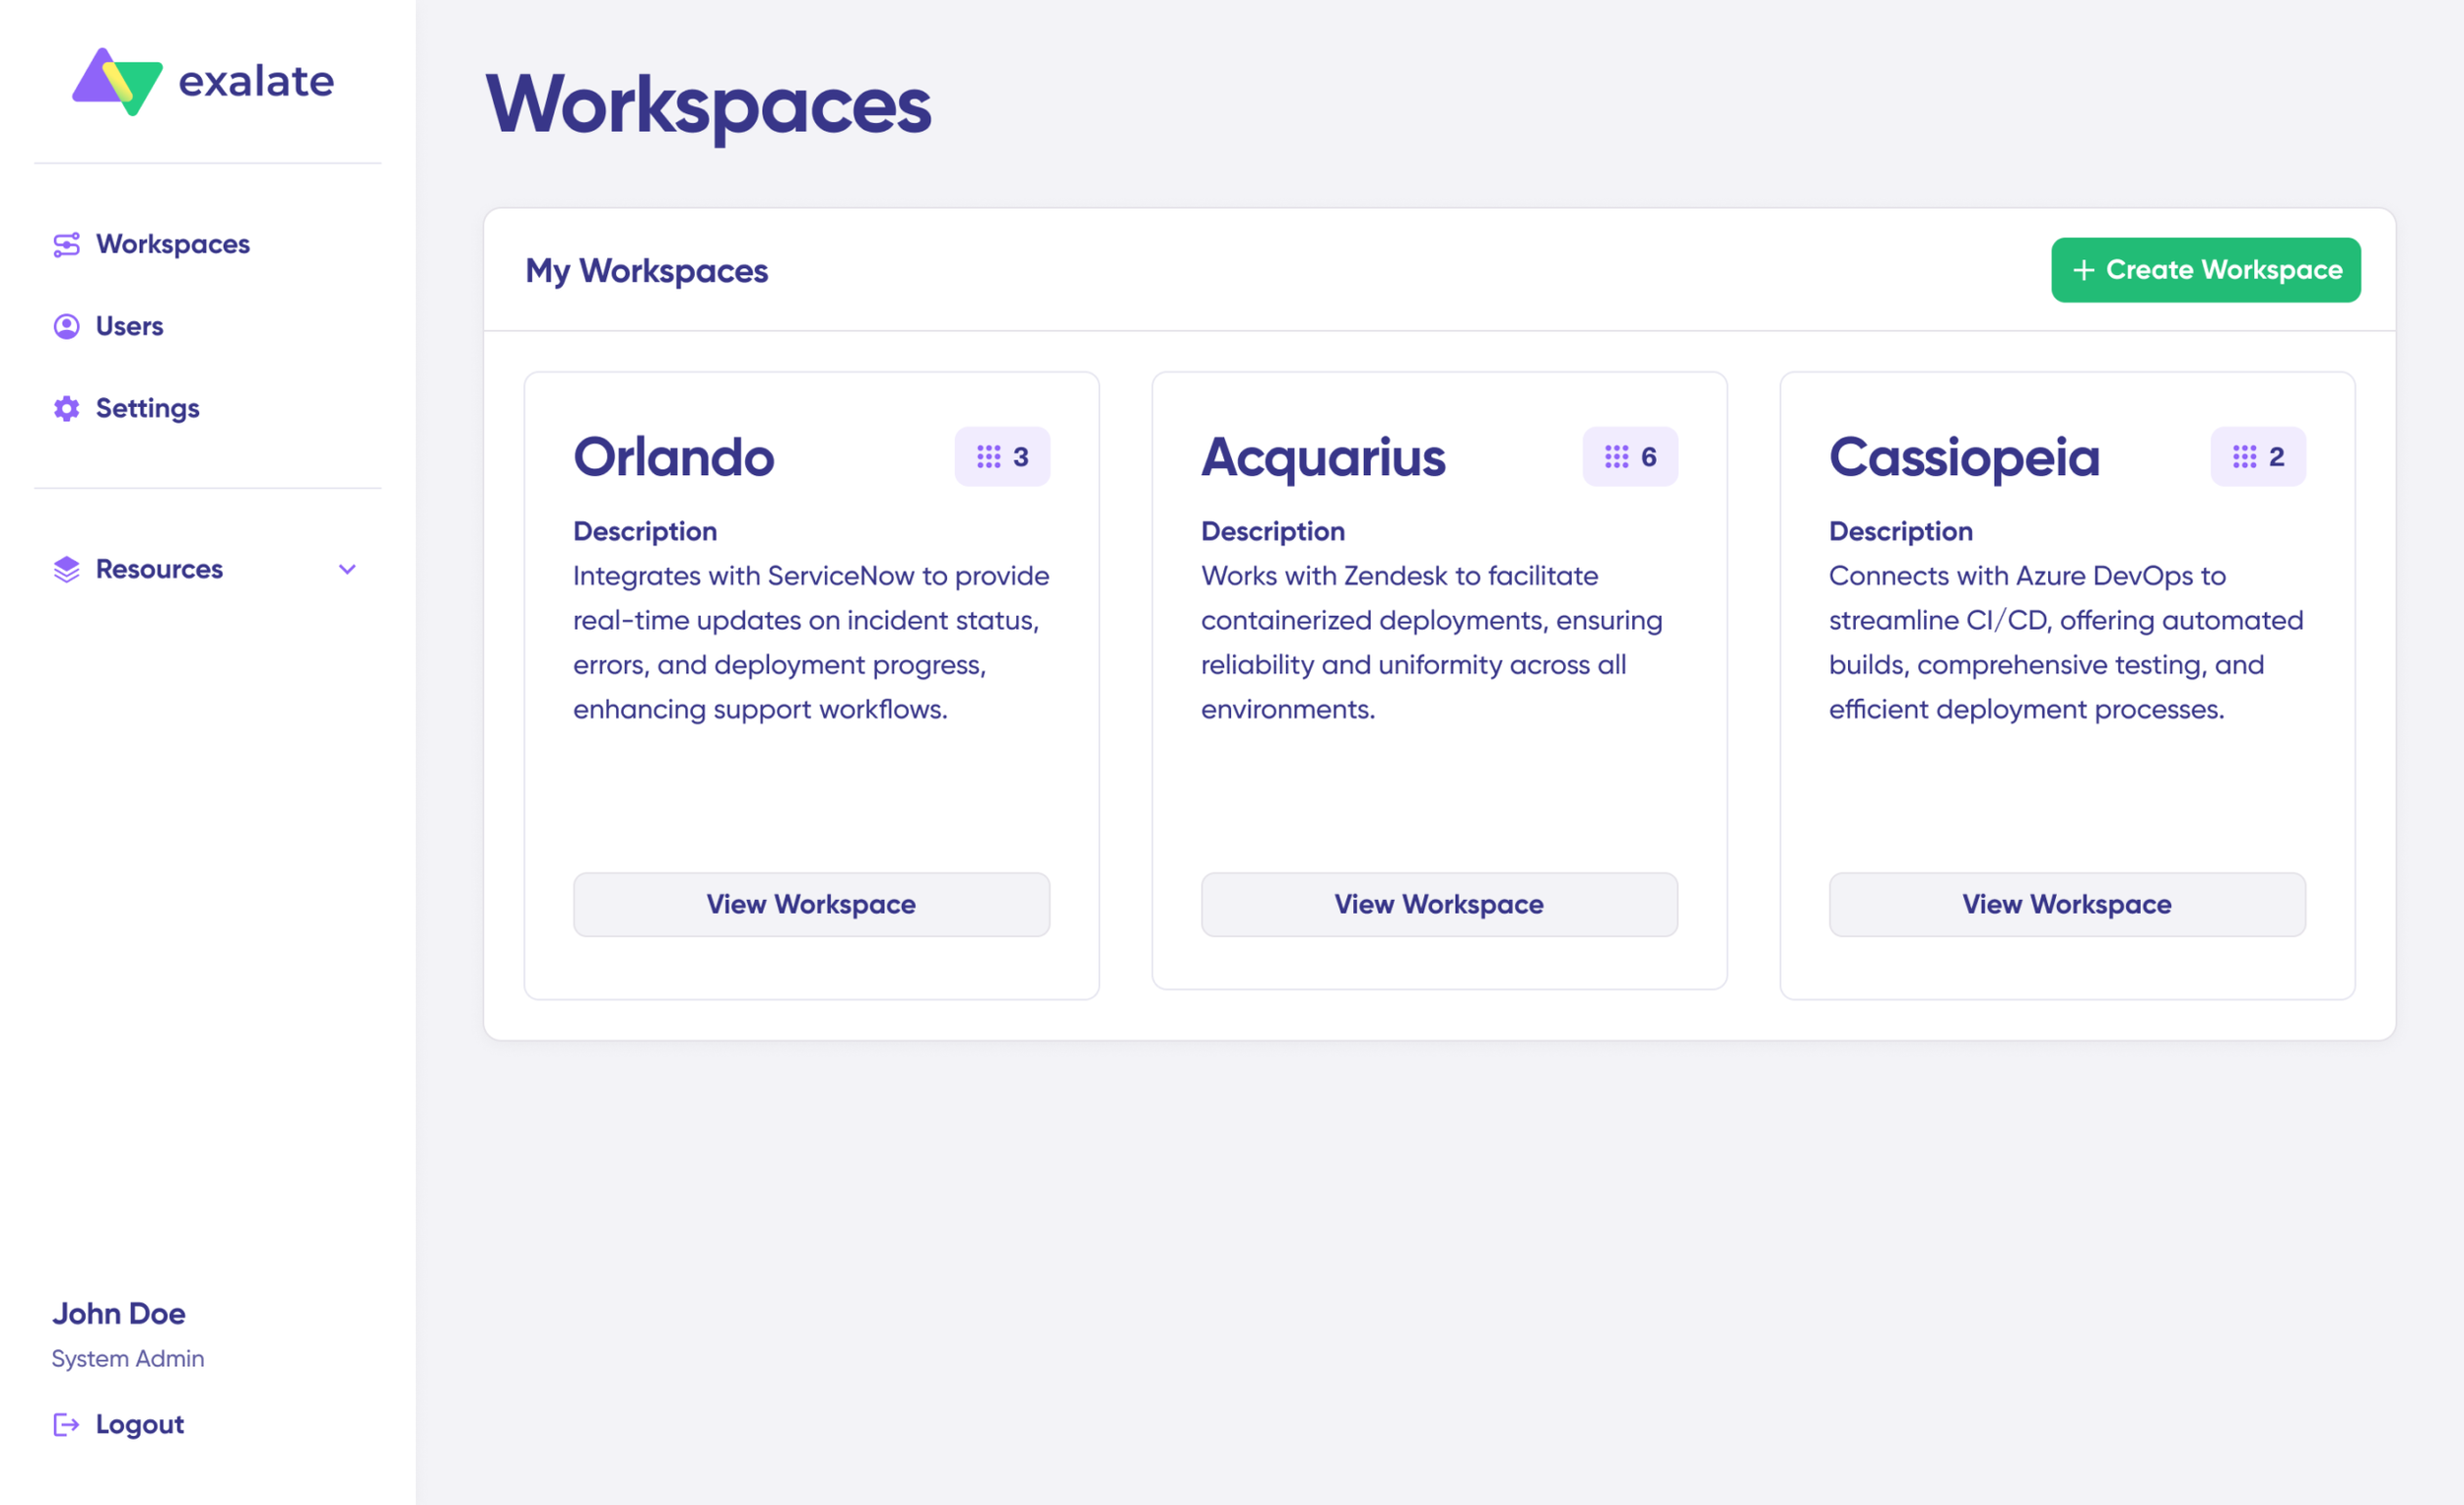
Ready to build your own? Hit the “+ Create Workspace” button. Give it a name and description, then select “Create workspace.“
Before connecting systems, you’ll need an Exalate account with at least one workspace and login credentials for both platforms you’re linking (System A and System B).
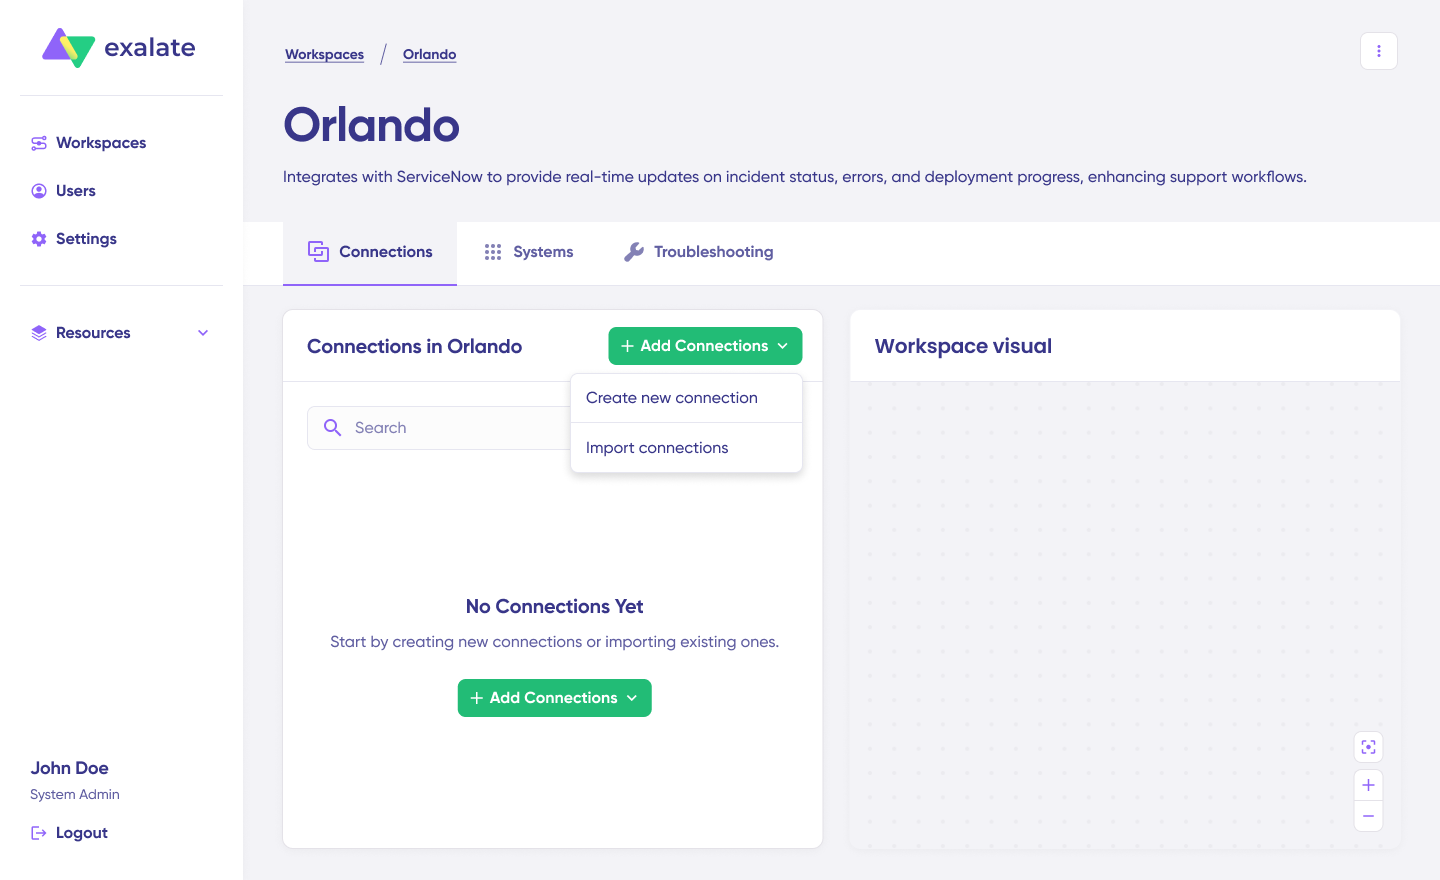
Select “+ Add connections” > “Create new connection“. Provide a name for your first system and input your system URL (ServiceNow).
Exalate will automatically verify and authenticate your credentials in the background. Systems from other workspaces will register automatically for your current workspace.
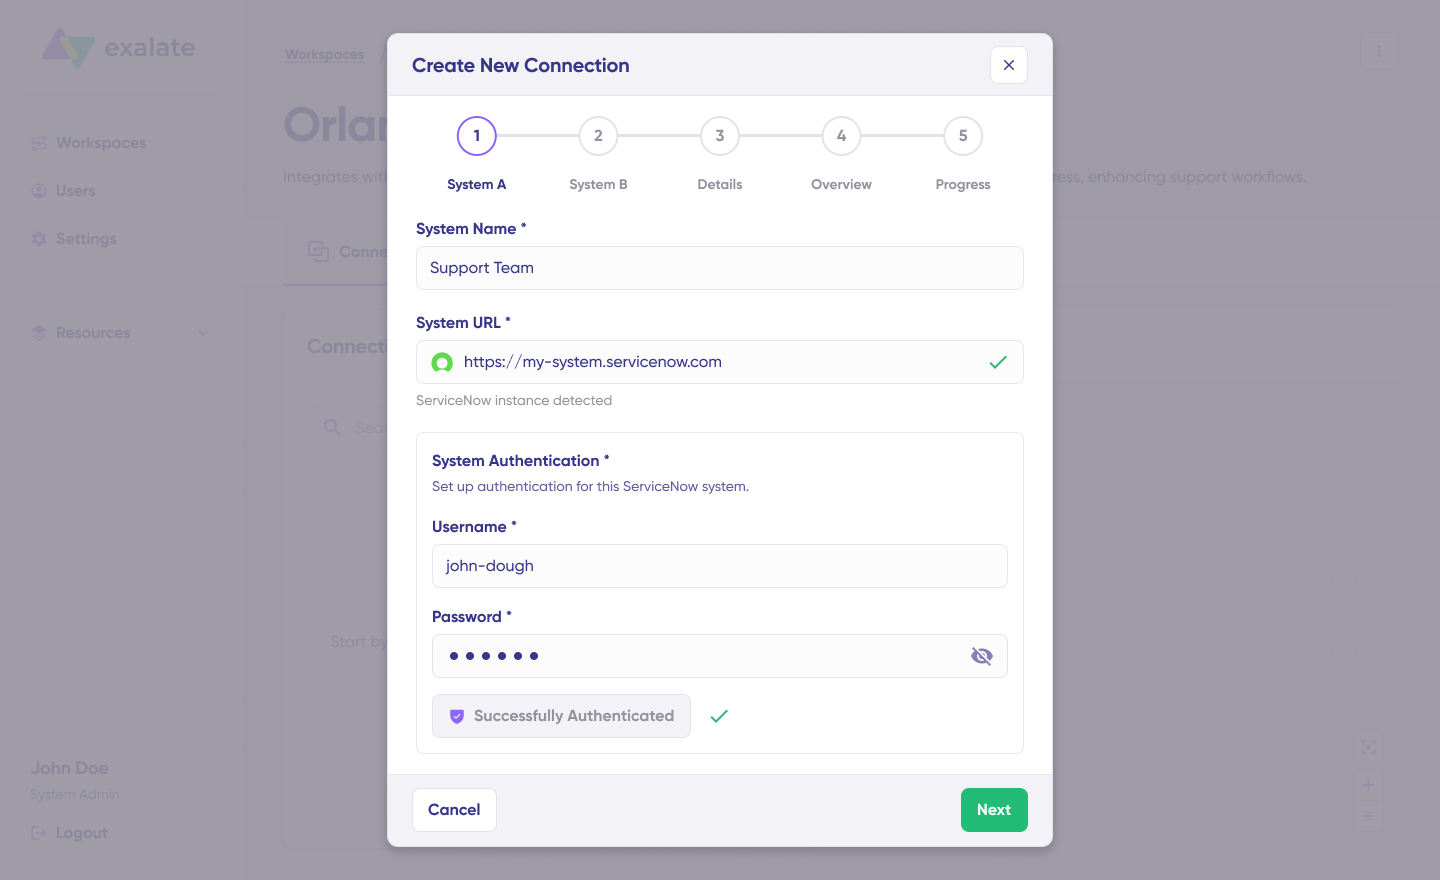
You’ll need your username and password as well as the API Key. Hit “Check Authentication“. Upon successful verification, you will see “Successfully Authenticated“.
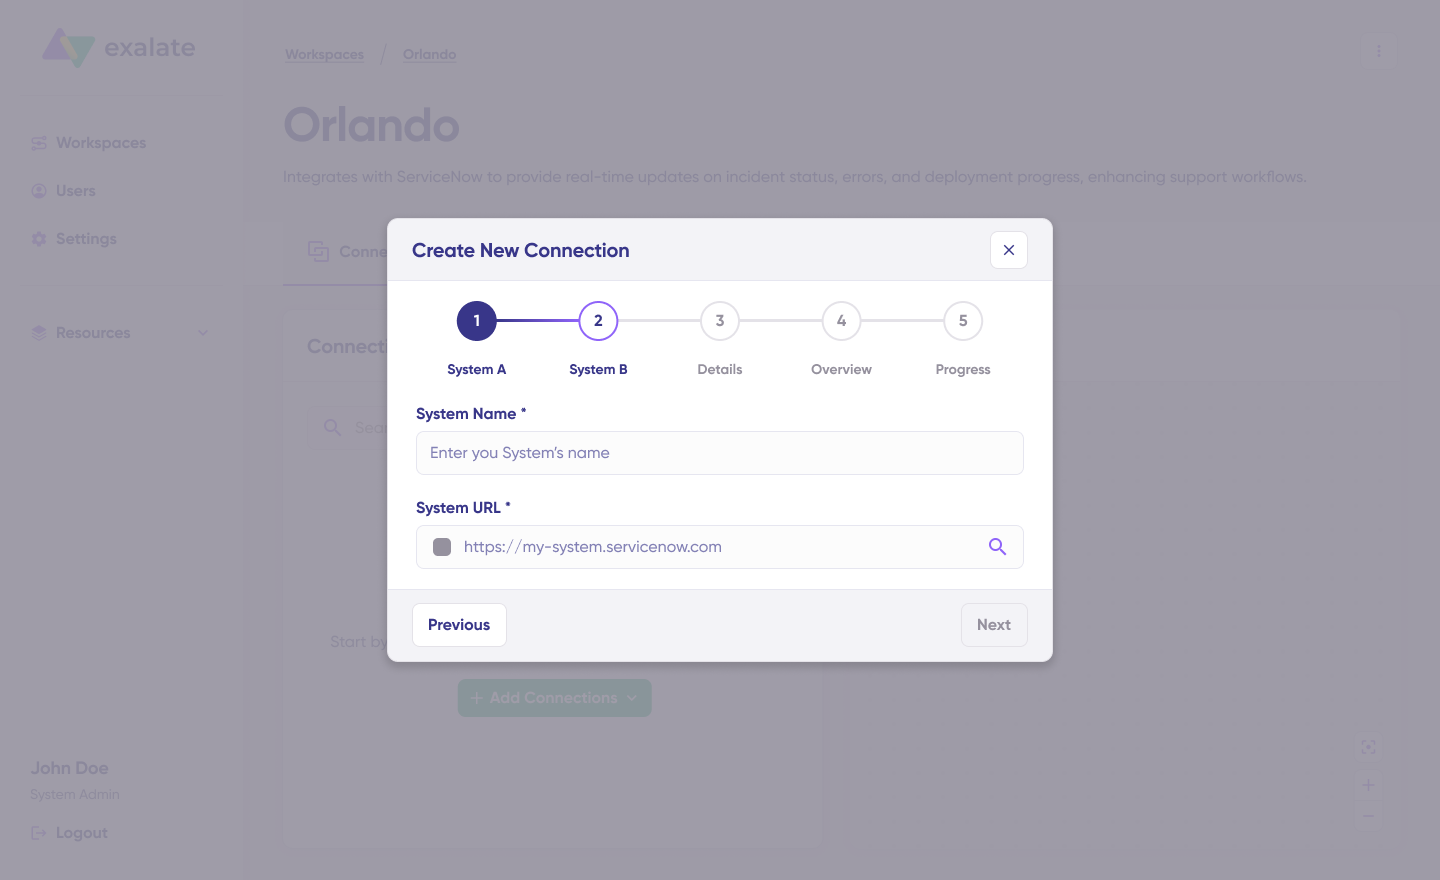
Select Next to set up System B (Freshdesk). Repeat the authentication process used for your ServiceNow instance. This time, you’ll need OAuth and your username and password.
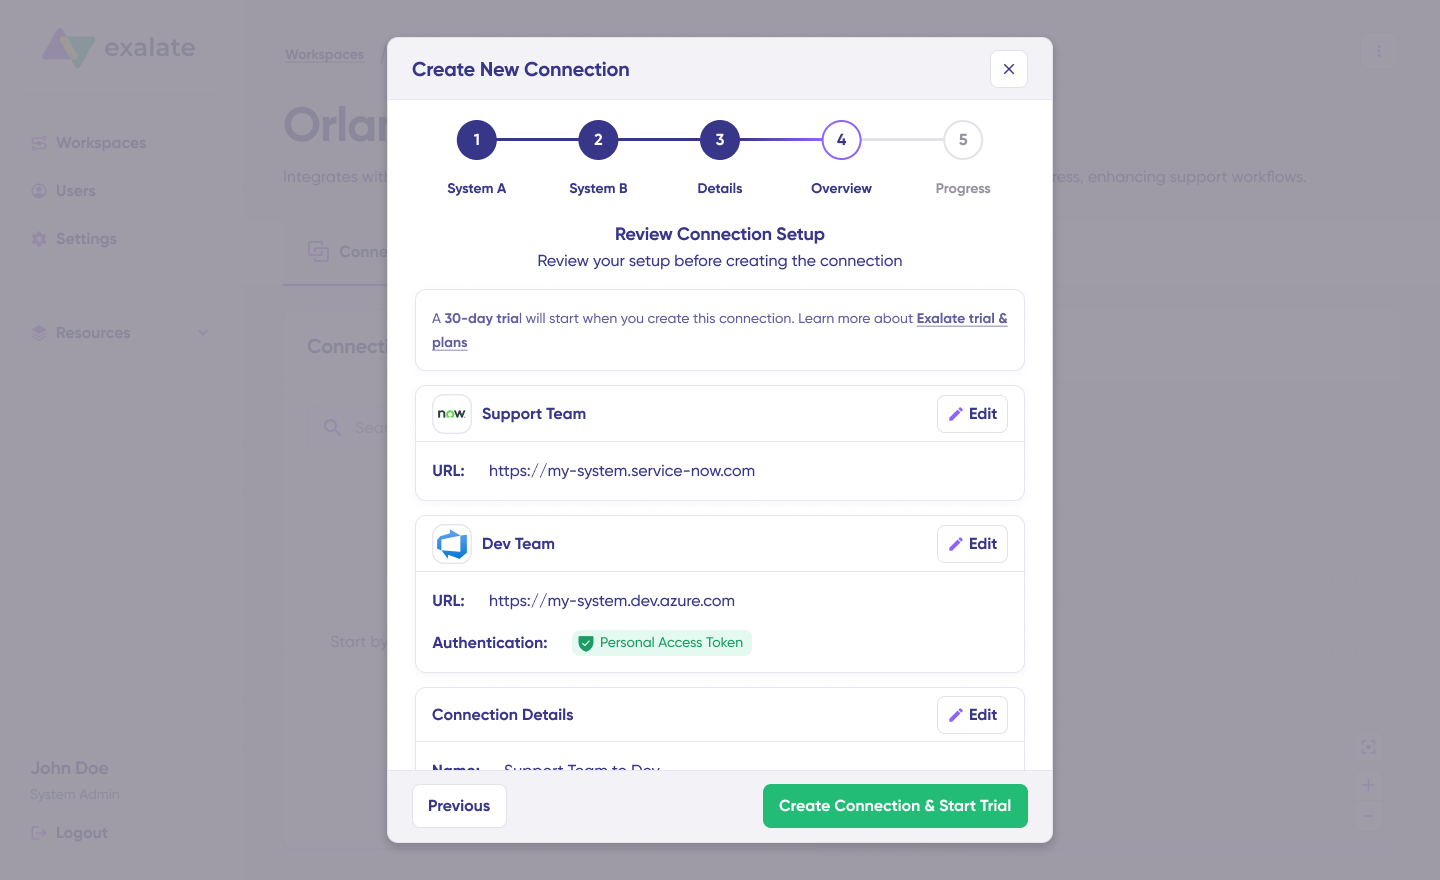
Name your connection and optionally add a description. Double-check your connection details and select “Create Connection“. Allow a few minutes for background configuration and system checks.
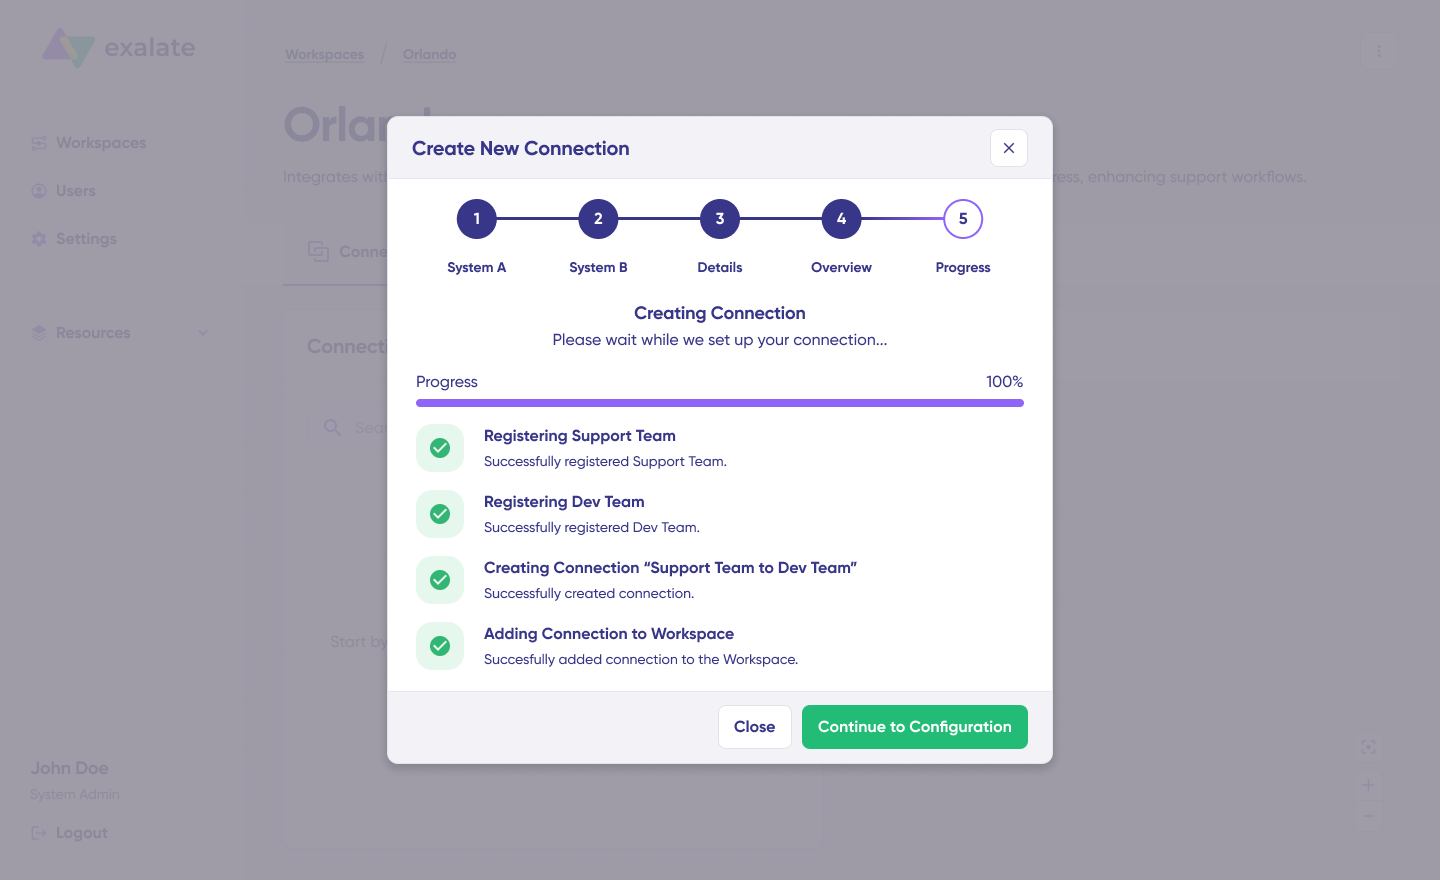
When complete, select “Continue to Configuration“. Success! Your connection is now live in your workspace.
On the next screen, select “Build and Continue“.
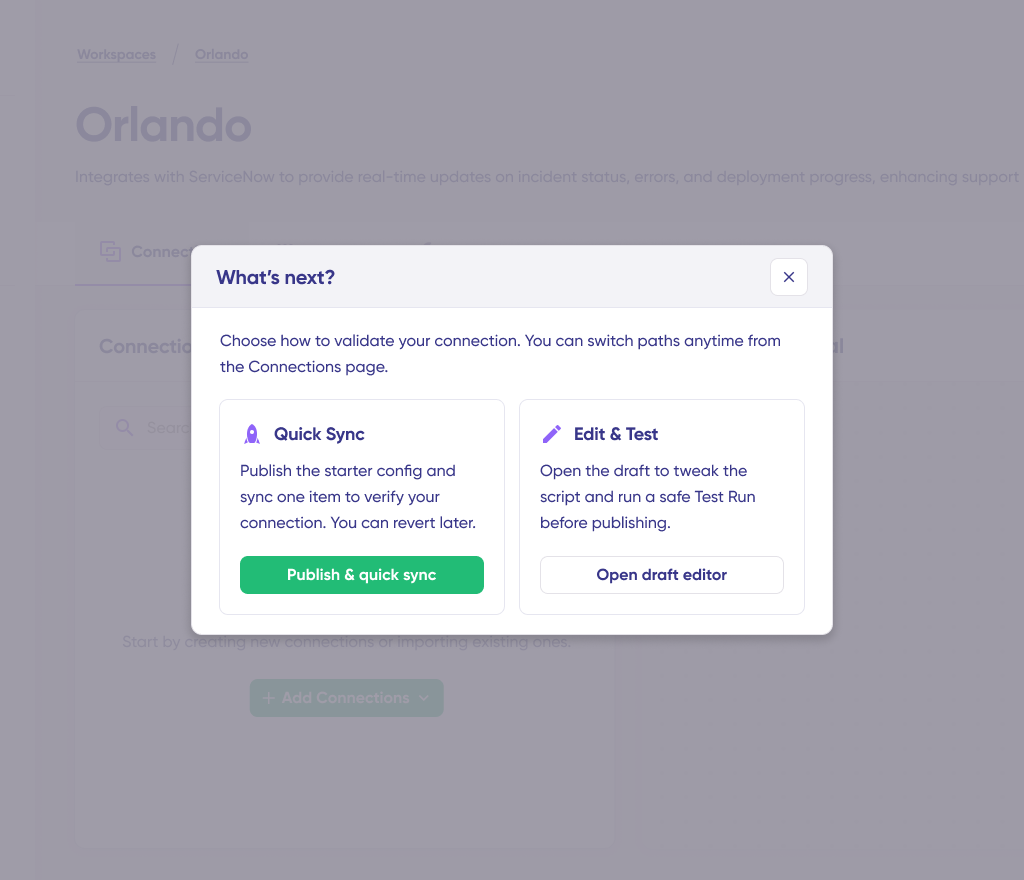
You now have 2 paths forward: “Quick sync” and “Edit & Test“. Let’s explore both.
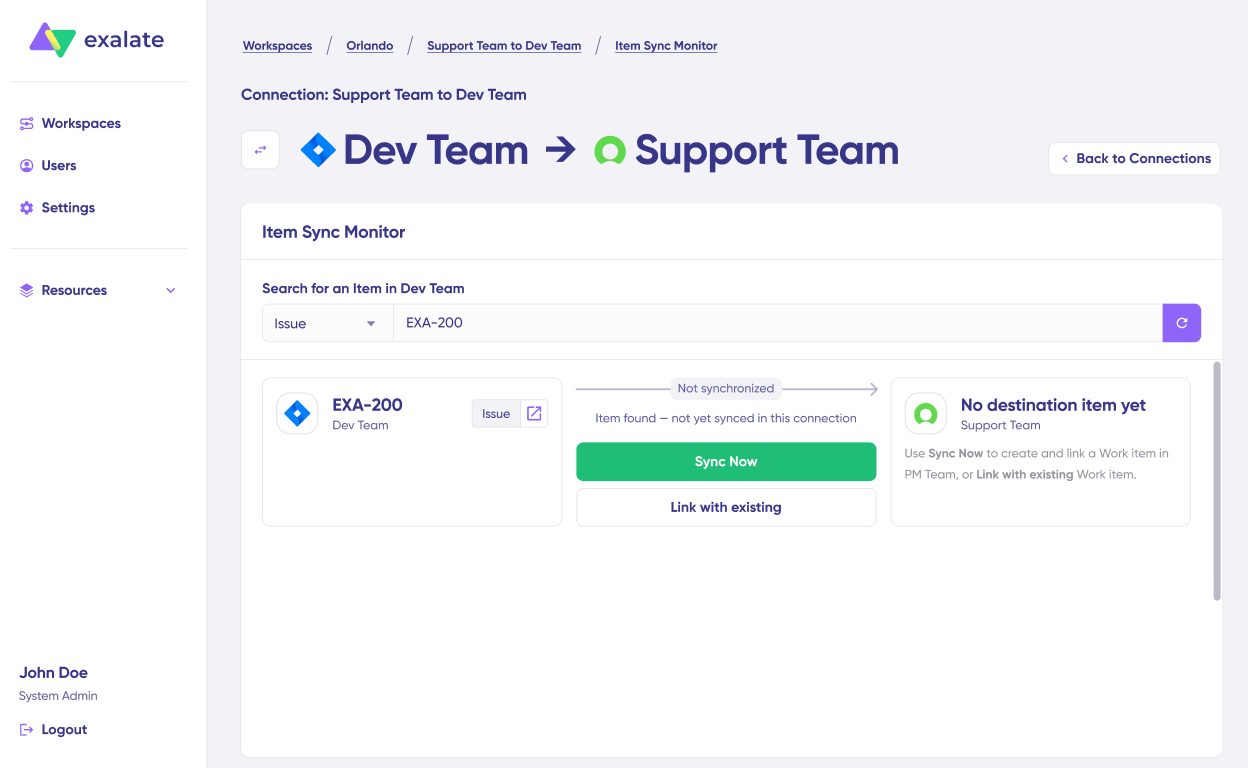
Quick Sync: Synchronize a single incident between Freshdesk and ServiceNow instantly. In the “Item sync monitor,” type the ticket or entity key and hit “Sync Now“.

To connect 2 pre-existing tickets and incidents, select “Link with existing“. After synchronization completes, view both synced tickets in a new window. You can also compare the changes side-by-side.
Open draft editor: Make modifications by selecting “Create a new version” or “Open latest draft“. This safeguards your live configuration from accidental changes.

Once active, hit “Edit” to access the editor and modify sync rules (Groovy-based scripts). These scripts let you implement custom data logic and field mapping for sophisticated workflows.
Switch sync direction by clicking on the two arrows beside the connection name.
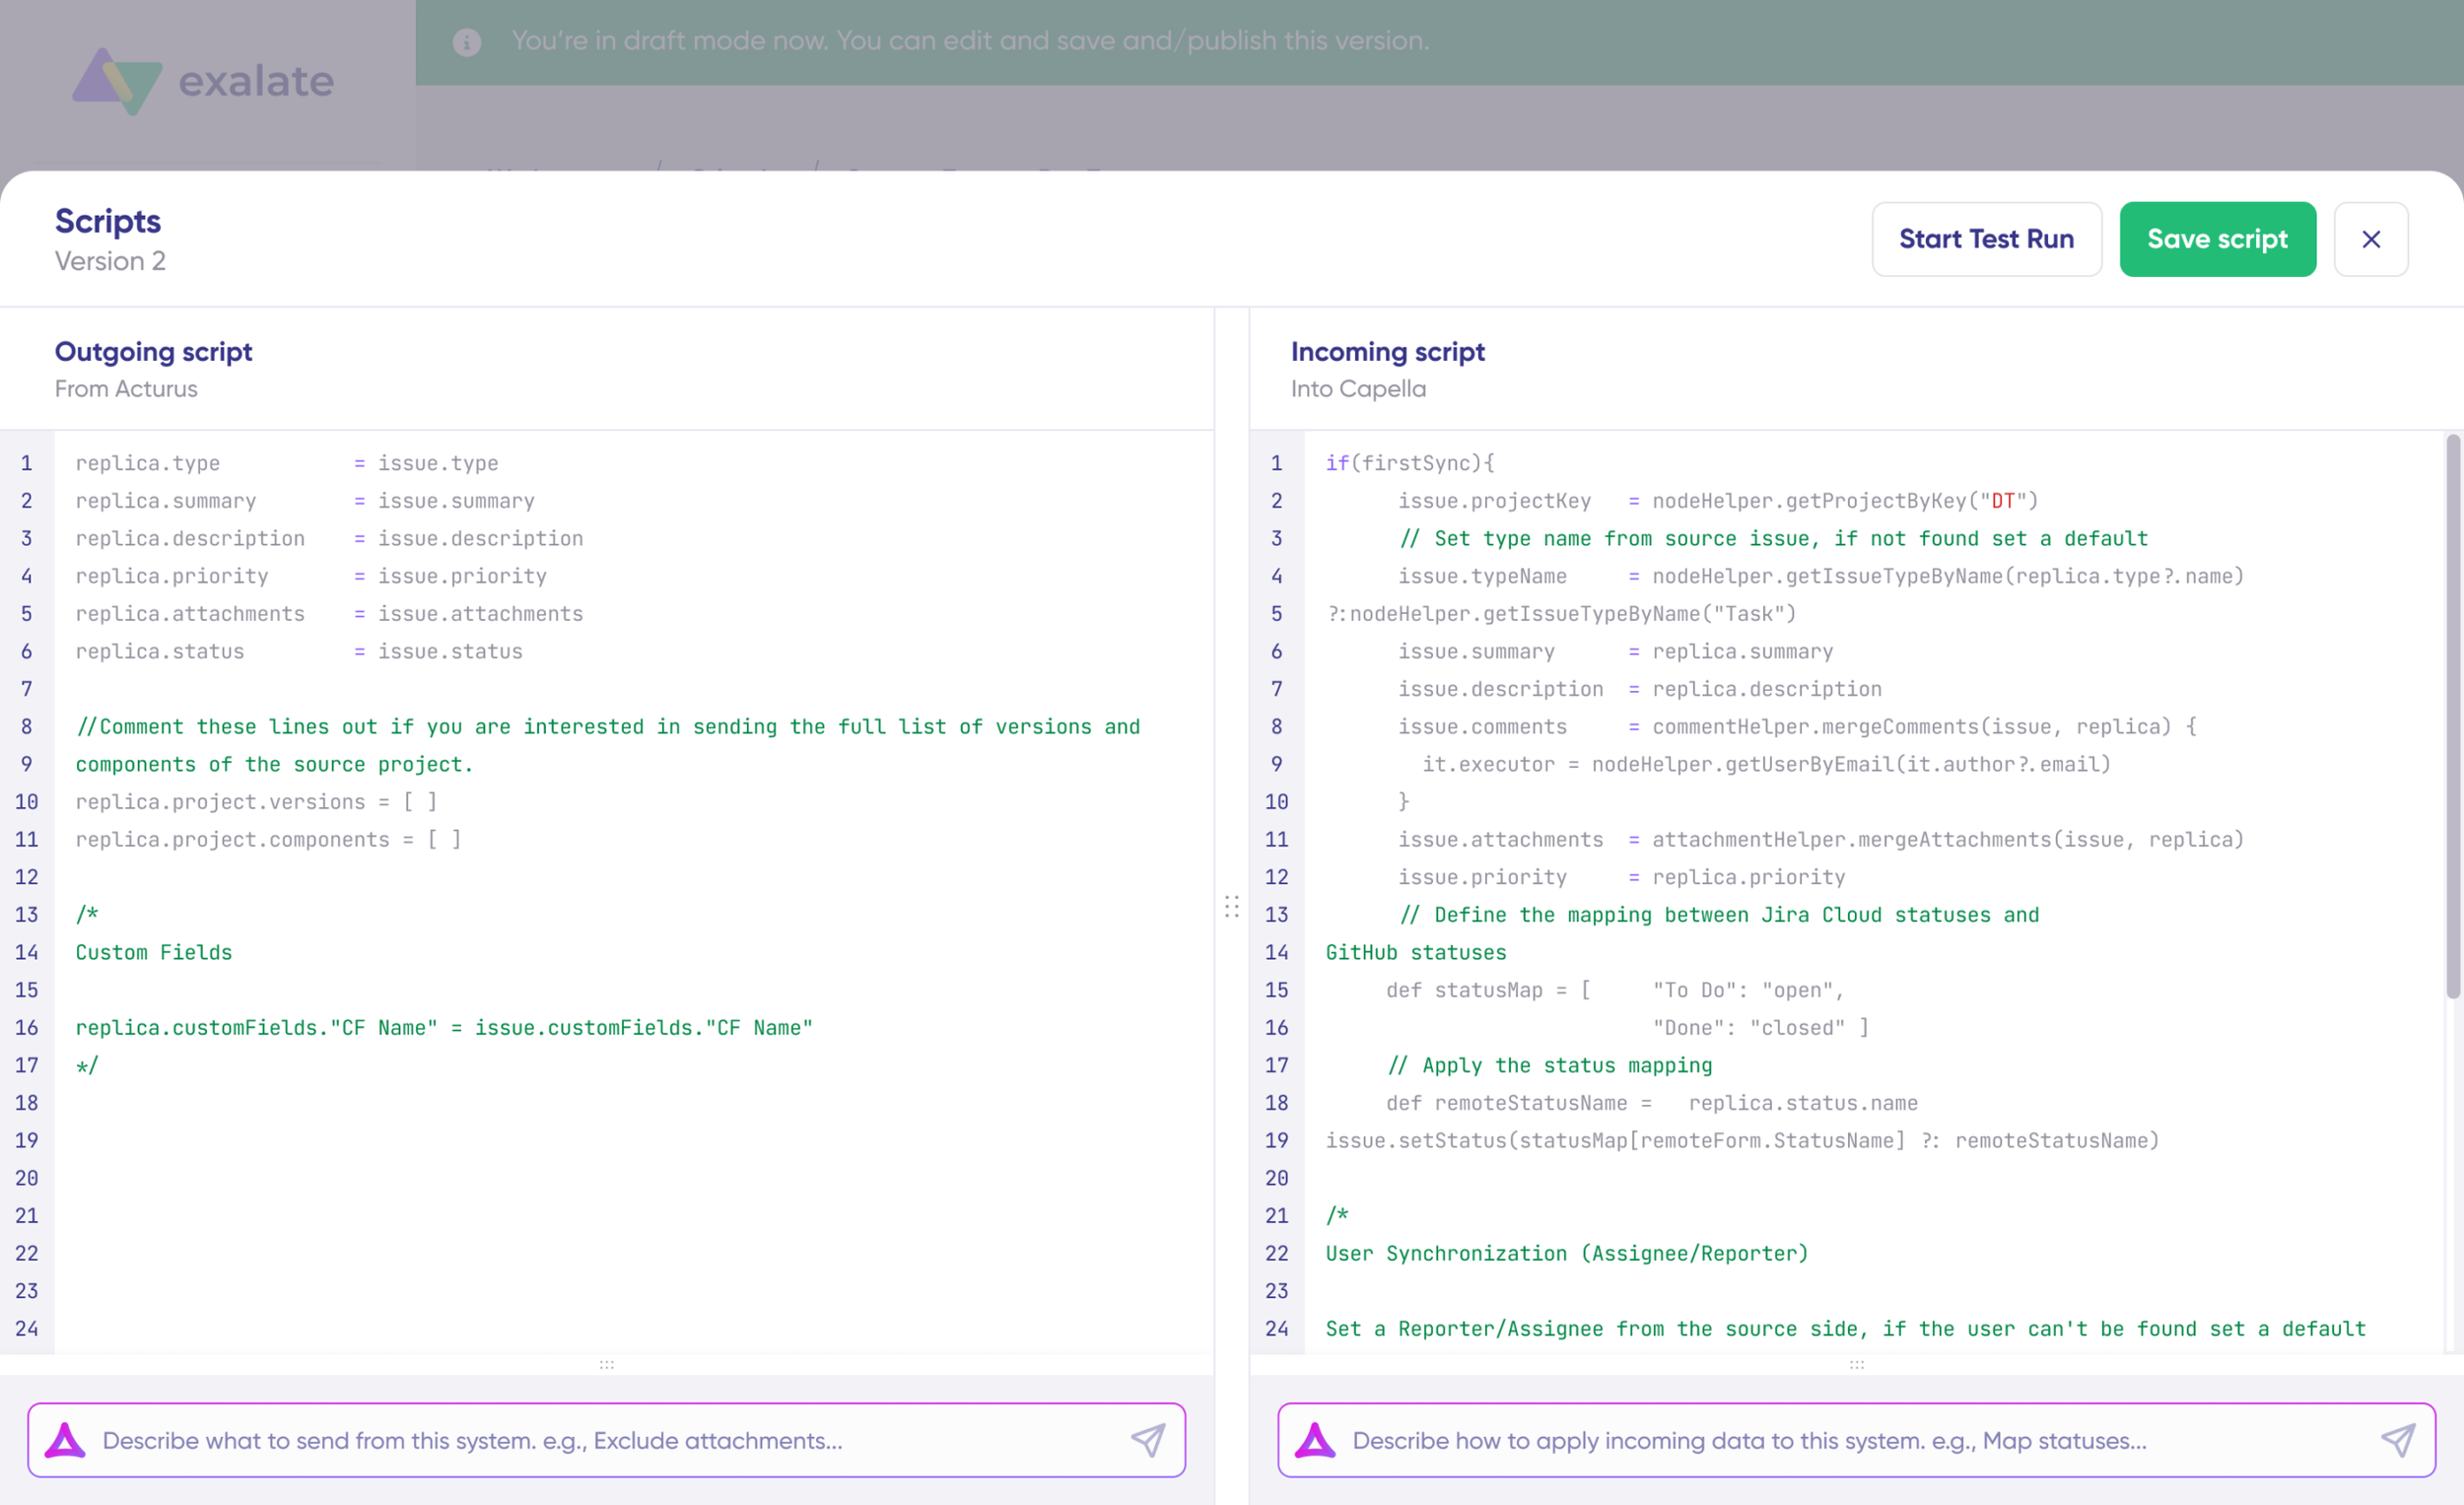
The outgoing script defines values transmitted from Freshdesk to ServiceNow, while the incoming sync determines how values from ServiceNow map into Freshdesk.
The Replica is a JSON file containing the payload with data shared between entities on both Freshdesk and ServiceNow instances. You can modify sync scripts if you’re familiar with Groovy. Otherwise, leverage Aida, our integrated AI assistant.
Aida appears in both incoming and outgoing script sections—select the appropriate side for your needs.
For Outgoing scripts: Specify what data should exit your system. Example: “Sync only urgent incidents instantly.”
For Incoming scripts: Define how incoming data should integrate into your system. Example: “Map ticket priority to the corresponding incident.”
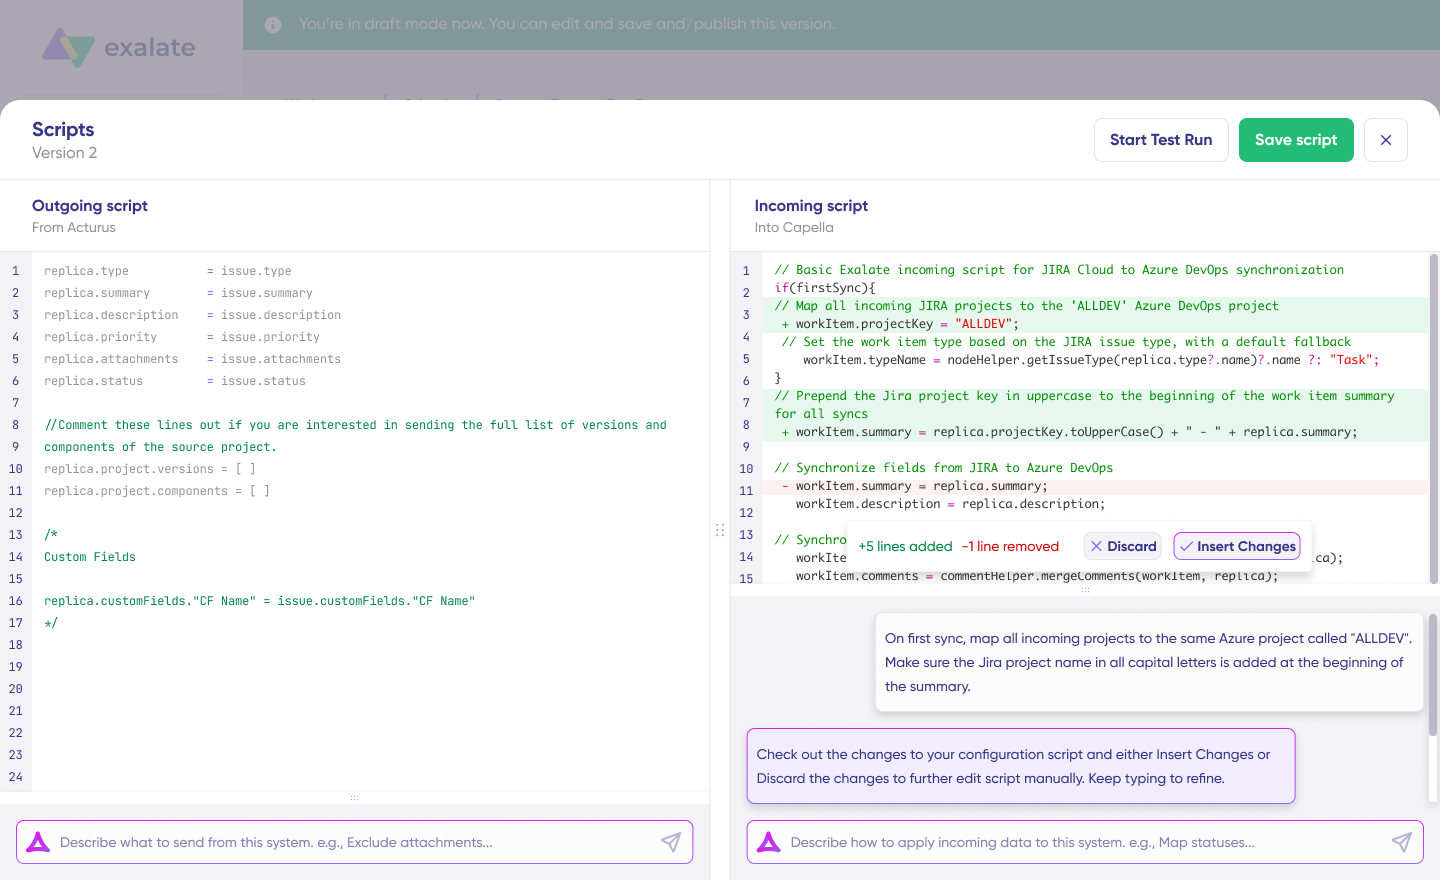
Scripts are generated based on Exalate’s scripting API and your current configuration.
Validate the output to confirm suggested modifications. New additions appear highlighted in green, while proposed deletions are shown in red. Choose to “Insert” or “Discard” each suggestion.
Note: Like any AI tool, always review generated code before implementing it.
With your sync scripts prepared, either “Save script” or run a dry-run test before going live.

Select “Start Test Run” and “Select items” for synchronization. Choose multiple tickets or incidents if needed. Wait briefly to see detailed results showing synced fields and the payload exchanged between both instances. Once you’re satisfied with the outcome, hit “Publish Version“.
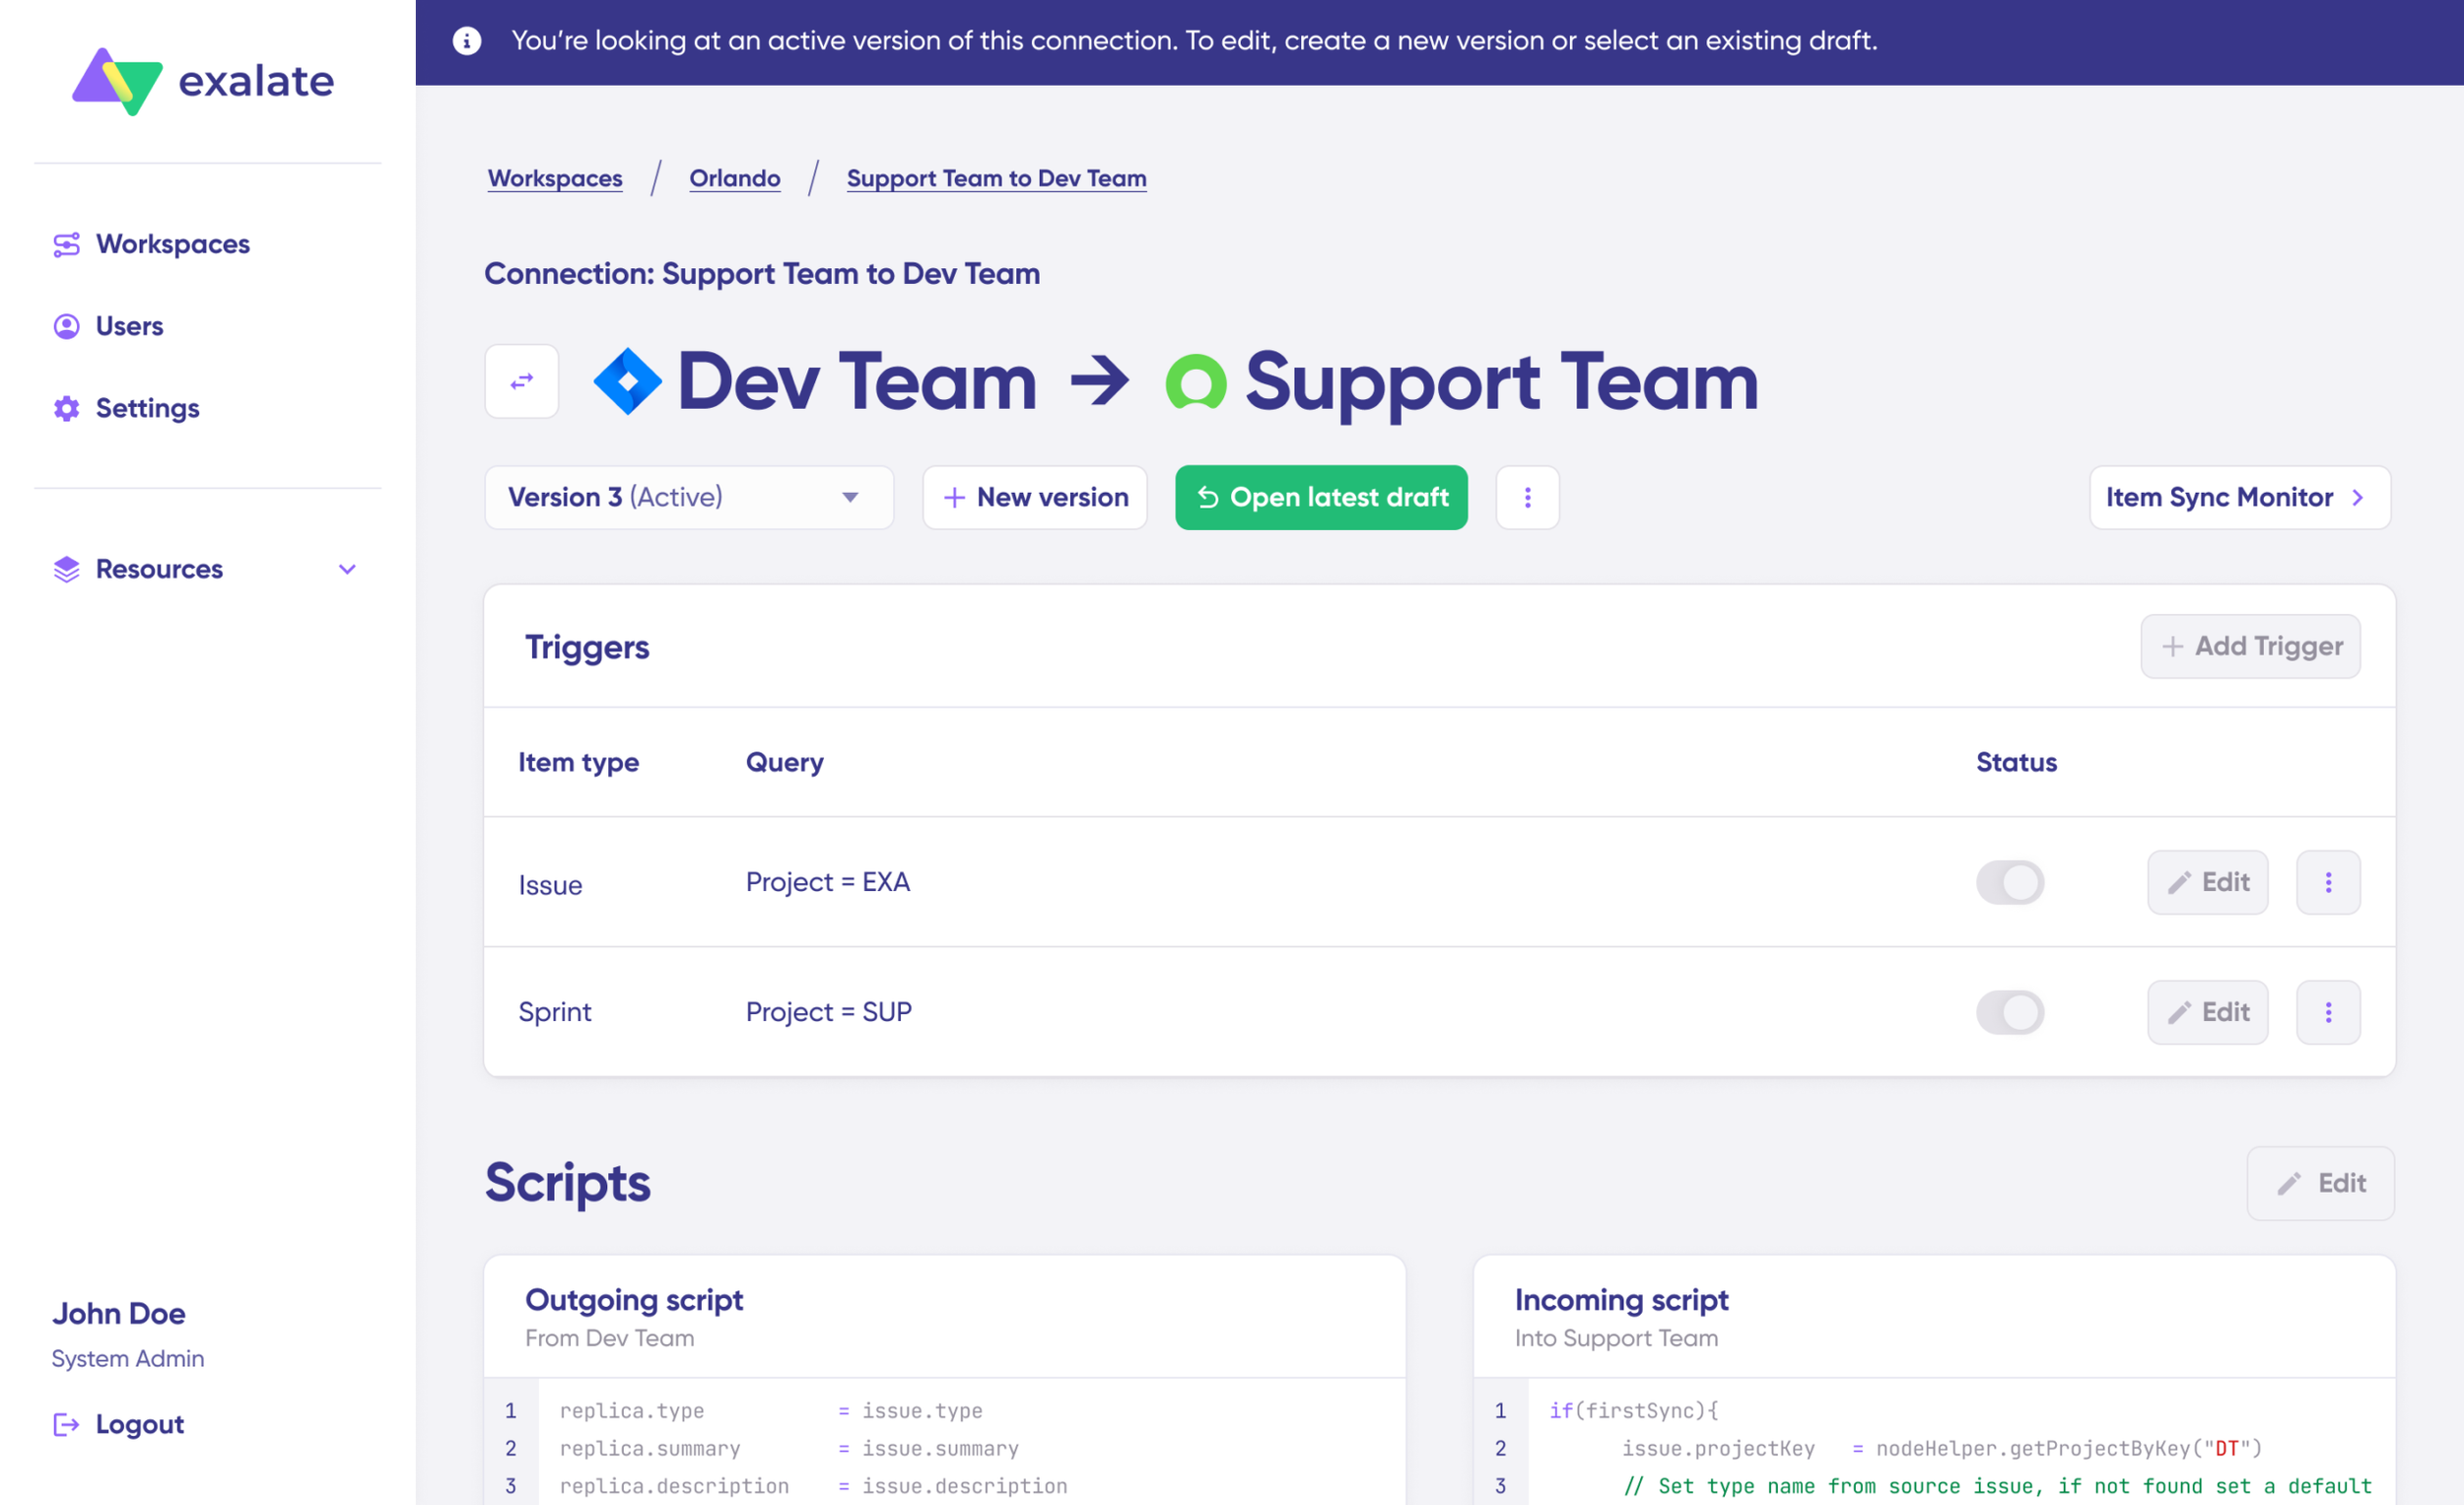
Access all versions through the “Version” dropdown. Versions exist as “Active“, “Draft” (editable), or “Archived“.
Configure triggers to automate synchronization. Triggers are filters that target specific tickets and incidents.
Select “+Add trigger” to build platform-specific triggers.
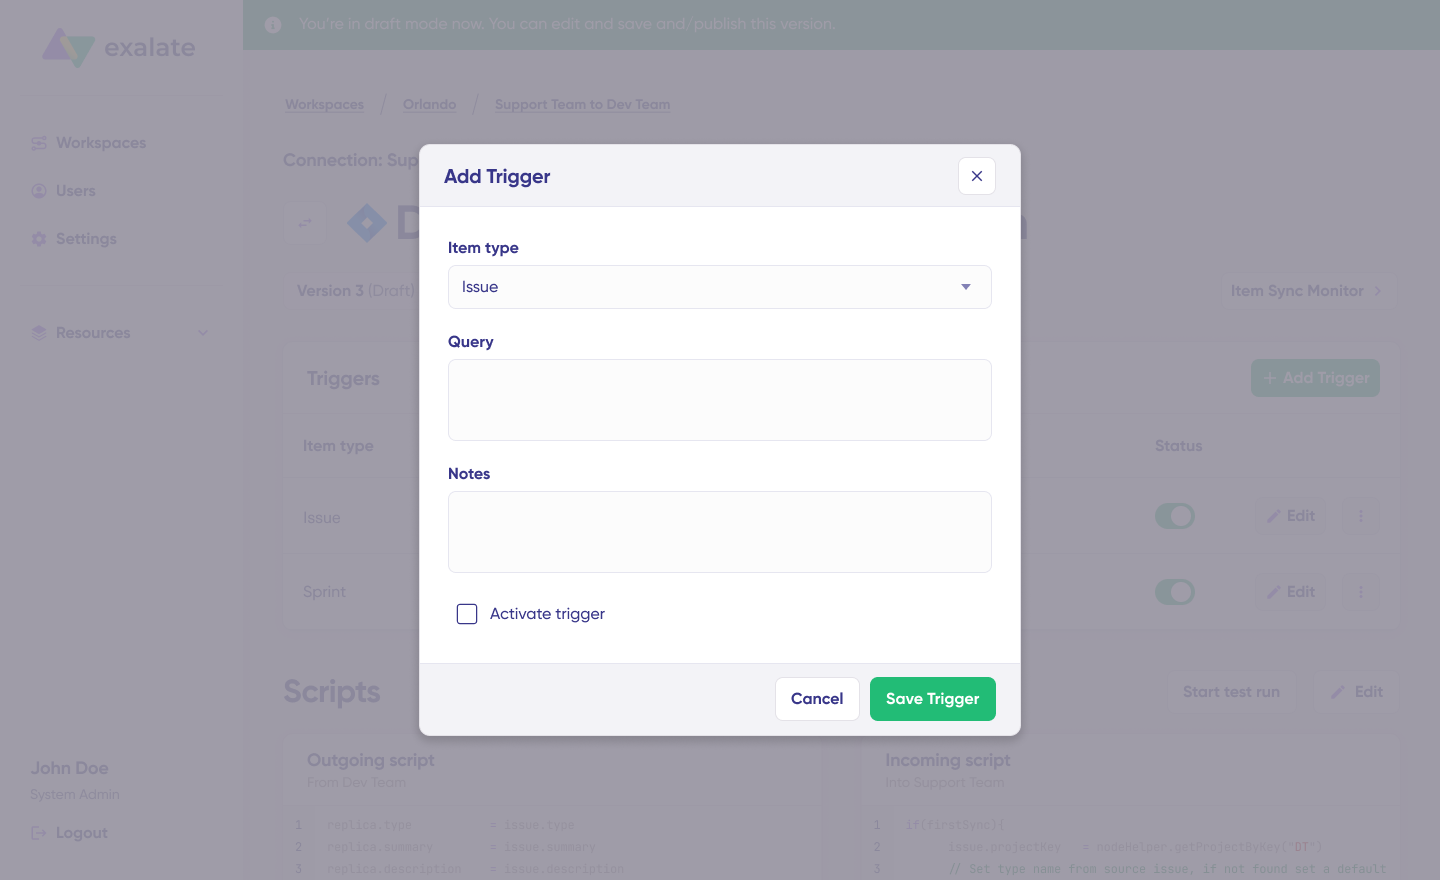
Pick the entity type (ticket). For Freshdesk, use the search syntax to define conditions for ticket escalation: “filter = new_and_my_open” syncs only new and open tickets.
For ServiceNow, use the advanced search syntax. To sync high-priority incidents (changes, problems, RITMs), enter “urgency=1”. Save your trigger when ready.

The next step is to diagnose connection issues using Aida. If errors occur, navigate to your workspace’s “Troubleshooting” tab. Hover over any error and select the Aida icon that appears.
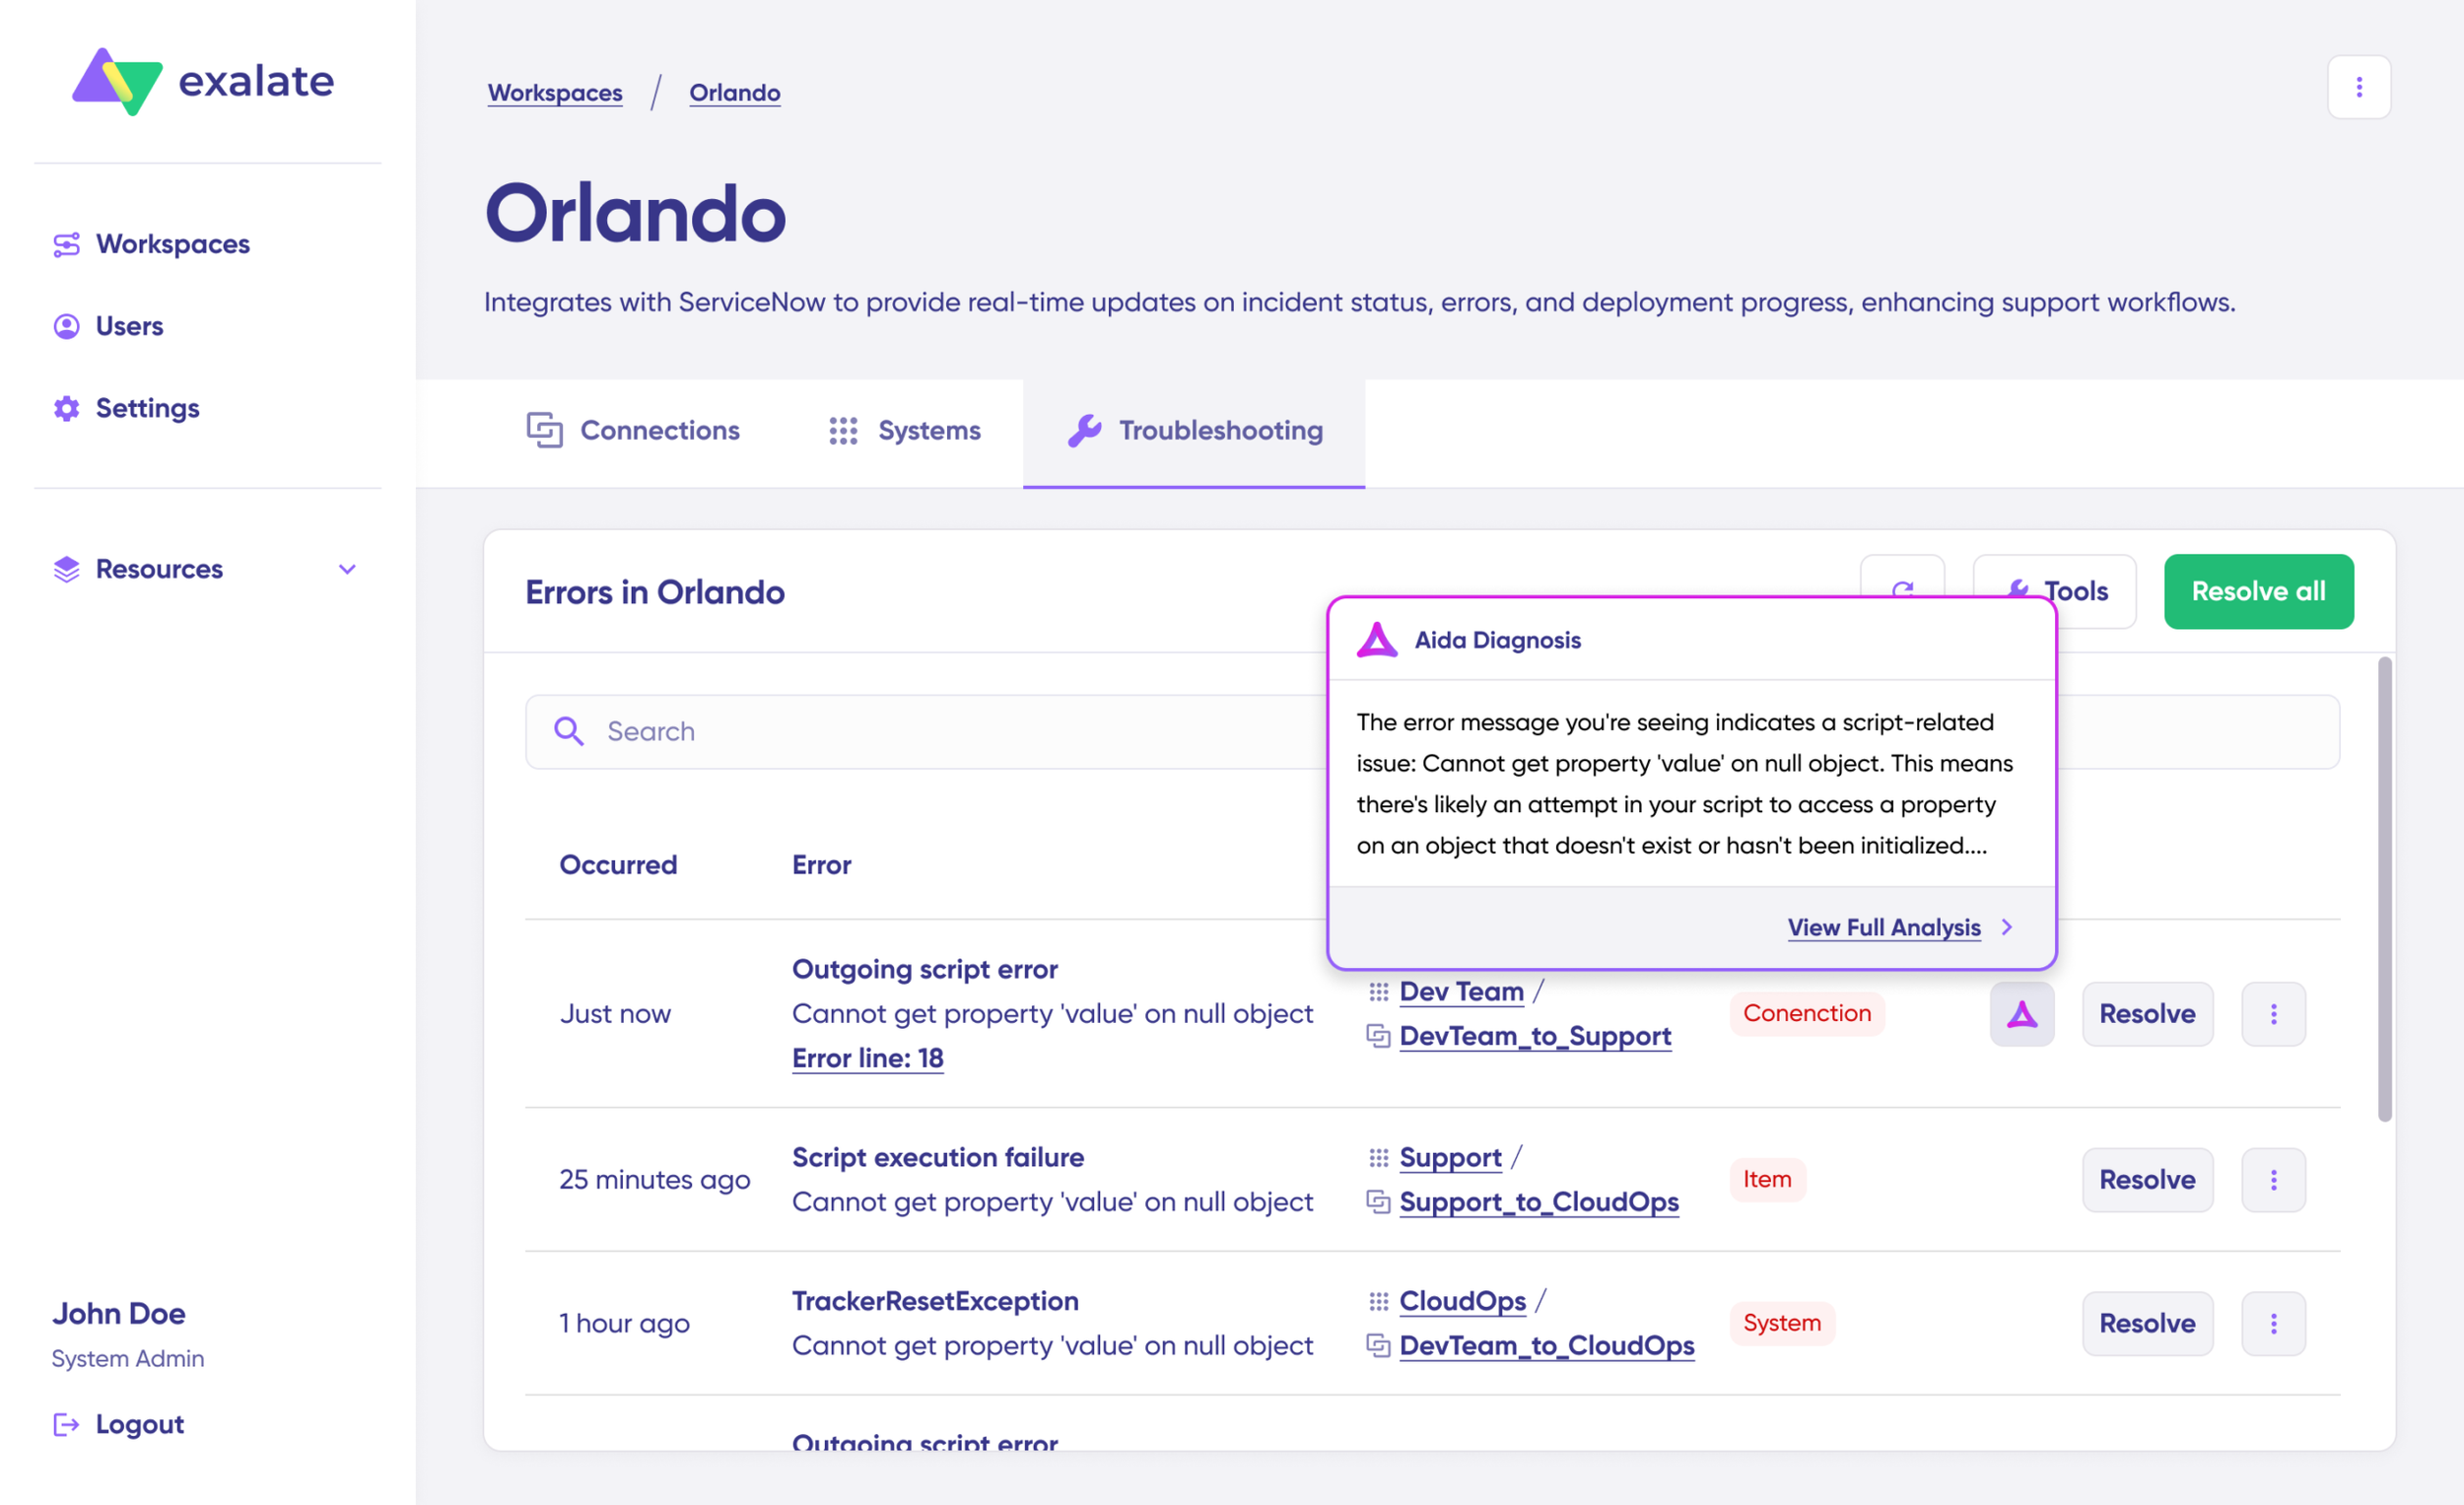
You’ll see all affected systems, connections, and tickets. Aida delivers a concise analysis of the error message.
Need more details? Select Error Details to view impact level, stack trace, error type, and occurrence date. Choose “View Full Analysis” for deeper context.
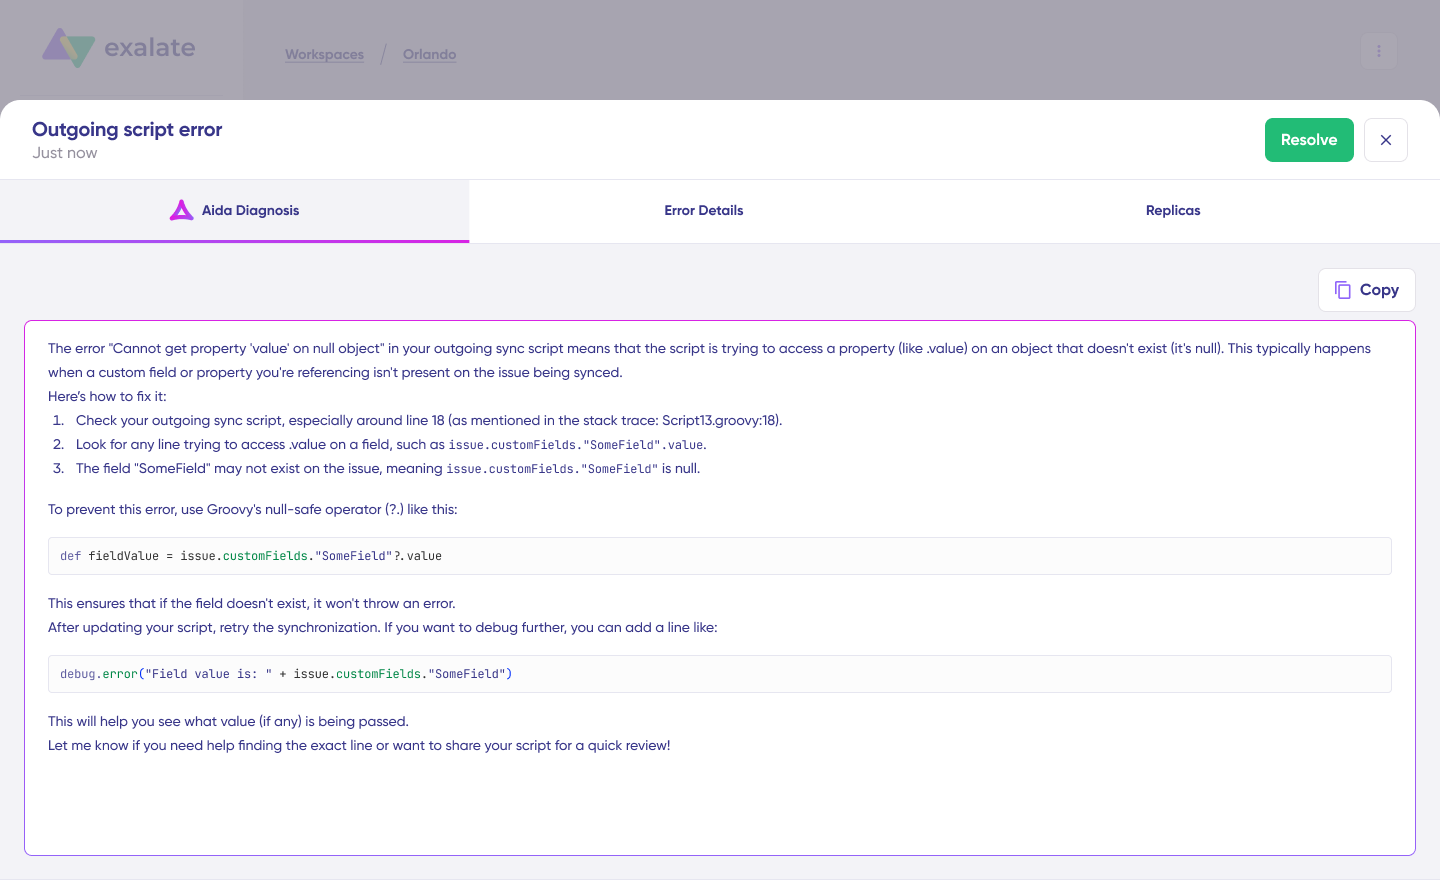
Resolve the error and mark it as “Resolve“.
That’s it. Your synchronization begins automatically based on your configured sync rules and triggers. Happy syncing.
Practical Use Cases for Freshdesk ServiceNow Integration
Case 1: Automate Incident Workflows
Challenge: Support teams in Freshdesk create tickets that require IT intervention, but manually forwarding information to ServiceNow creates delays and data inconsistencies.
Solution: Automatically sync Freshdesk ticket status with ServiceNow incident states. When agents update a ticket in Freshdesk, the corresponding ServiceNow incident updates in real-time.
Real-World Application: A retail company handles customer complaints in Freshdesk. When a ticket reveals a backend system issue, it automatically creates a ServiceNow incident with all relevant context—descriptions, attachments, and priority levels—eliminating manual handoffs and reducing resolution time by 40%.
Case 2: Leverage ServiceNow’s Advanced Reporting
Challenge: Organizations with multiple Freshdesk or ServiceNow instances struggle to compare performance metrics across teams and regions.
Solution: Pull data from multiple instances into ServiceNow for unified analysis. ServiceNow’s robust reporting capabilities let you analyze service resolution times, SLA compliance, and team performance across all connected instances.
Real-World Application: A global enterprise with regional Freshdesk instances consolidates all support data into its central ServiceNow platform. This creates a unified view of global support operations, identifying performance gaps and best practices across regions.
Case 3: Share CMDB Asset Information
Challenge: Freshdesk agents lack visibility into hardware and software configurations when troubleshooting customer issues, leading to longer resolution times.
Solution: Sync ServiceNow’s Configuration Management Database (CMDB) with Freshdesk, giving support agents immediate access to asset information without leaving their platform.
Real-World Application: An IT services company integrates ServiceNow’s CMDB with Freshdesk. When a customer reports a printer malfunction, the agent instantly sees the printer model, firmware version, service history, and warranty status—enabling accurate troubleshooting without switching systems.
Case 4: Managed Service Provider (MSP) Operations
Challenge: MSPs managing multiple clients on different platforms struggle to maintain visibility and consistent service delivery across their customer base.
Solution: Use ServiceNow as the central management hub while clients operate on Freshdesk, Jira Service Management, or other platforms. Sync all relevant tickets to your ServiceNow instance for monitoring and response.
Real-World Application: An MSP serves 50 clients, each using different support platforms. By syncing all client tickets to ServiceNow, the MSP maintains a unified view of all customer issues. When a high-priority ticket appears in a client’s Freshdesk instance, it immediately syncs to ServiceNow with complete context—title, description, priority, customer details, and status updates flow bidirectionally.
Case 5: IT and Customer Support Collaboration
Challenge: Customer-facing support teams in Freshdesk escalate complex technical issues to IT teams in ServiceNow, but manual ticket forwarding causes delays and information loss.
Solution: Automatically escalate Freshdesk tickets to ServiceNow when specific conditions are met (priority level, category, keywords). All comments, attachments, and updates sync bidirectionally, so both teams stay informed.
Real-World Application: A software company’s Level 1 support uses Freshdesk while backend engineering uses ServiceNow. When a ticket involves a production bug, it automatically creates a ServiceNow problem record with full context. As engineers add diagnostic information in ServiceNow, support agents see these updates in Freshdesk and can communicate progress to customers without switching tools.
Case 6: Cross-Platform Change Management
Challenge: Changes initiated in ServiceNow impact services managed in Freshdesk, but manual communication about changes causes confusion and service disruptions.
Solution: Sync ServiceNow change requests with Freshdesk to keep support teams informed about planned maintenance, deployments, and system changes.
Real-World Application: An enterprise IT team schedules a database upgrade in ServiceNow. The change request automatically syncs to Freshdesk, where support agents receive notifications about the maintenance window. When customers report issues during the change window, agents already have context and can provide accurate information.
Conclusion
Freshdesk and ServiceNow are powerful platforms that serve different needs. Freshdesk excels at customer support while ServiceNow dominates IT service management. An integration lets organizations leverage both platforms’ strengths without creating data silos or forcing teams to switch tools.
The right integration tool makes the difference between seamless collaboration and fragmented workflows. Look for solutions offering bidirectional sync, independent data governance, enterprise security, full customization capabilities, and proven reliability.
Exalate delivers all of these features with AI-assisted configuration, comprehensive platform support, and security measures that meet enterprise requirements. Whether you’re connecting two instances or building a complex multi-platform integration network, Exalate provides the flexibility and control you need.
Frequently Asked Questions
Can I sync custom fields between Freshdesk and ServiceNow?
Yes, Exalate supports synchronization of custom fields from both platforms. You can map any custom field in Freshdesk to any field in ServiceNow (standard or custom) that’s accessible via REST API. The scripting engine provides complete flexibility for custom field mapping.
Can I sync only specific types of tickets or incidents?
Yes, triggers let you define exactly which tickets sync based on any available field criteria. Sync only high-priority tickets, specific categories, tickets with certain tags, or any combination of conditions using platform-native query syntax.
Can I test the integration before syncing production data?
Yes. Best practice involves setting up the integration in test or sandbox environments first. With the Exalate Test Run feature, you can try out your sync rules with a small dataset, verify field mappings work correctly, and confirm security configurations before connecting production instances.
Can I connect more than two instances?
Yes, Exalate supports multi-platform connections. Connect multiple Freshdesk instances to one ServiceNow instance, or create complex topologies connecting Freshdesk, ServiceNow, Jira, and other platforms in any configuration that serves your workflow.
What data gets synced between Freshdesk and ServiceNow?
You control exactly what syncs. Common fields include ticket/incident title, description, priority, status, assignee, comments, attachments, custom fields, and timestamps. You can sync all fields or selectively sync specific data based on your requirements.
Is my data secure during transmission?
Exalate encrypts all data in transit using TLS 1.2 and TLS 1.3. Data is also encrypted at rest. The platform maintains ISO 27001 certification and implements role-based access controls. See the Exalate Trust Center for complete security details.
Can I sync attachments and comments?
Yes, Exalate syncs attachments, inline images, and comments bidirectionally. You can configure whether attachments sync automatically or only for specific ticket types. Comment synchronization maintains the original author and timestamp information.
Do I need coding skills to set up the integration?
Not necessarily. Exalate offers AI-assisted configuration (Aida) that generates sync scripts from natural language descriptions. For more complex customizations, scripting knowledge helps, but the platform provides extensive documentation, examples, and support to assist with configuration.
Can I map multiple Freshdesk tickets to a single ServiceNow incident?
Yes, you can map multiple Freshdesk tickets to a single ServiceNow incident. This is particularly valuable for MSP scenarios where multiple customer tickets relate to a single underlying issue. Exalate’s scripting capabilities let you implement custom logic for one-to-many, many-to-one, or many-to-many relationships.
Recommended Reads:
- ServiceNow Connectors: How to Keep Systems and Companies Connected
- Everything You Need to Know About ServiceNow Data Integration
- Freshdesk Jira Integration in the Age of Customer Satisfaction
- ServiceNow Integrations: Integrate ServiceNow and Other Systems Bidirectionally
- ServiceNow to ServiceNow Integration: How to Set up a Two-Way Sync