AI is becoming part of everything, including collaborations with other teams and organizations. In the integration context, AI acts as a partner or assistant to help make sure every system is connected correctly. This assistance is particularly relevant in script-based integrations.
Suppose you have a Jira Service Management instance and want to integrate with your Azure DevOps instance. An AI-powered integration can triple the scripting and implementation speed and reduce human errors.
This guide focuses on the role AI plays in specific integration use cases between Jira and Azure DevOps.
Note: Jira now refers to “issues” as “work items.” Throughout this guide, we use Jira’s updated terminology.
Key Takeaways
- AI-powered Jira Azure DevOps integration uses natural language prompts to generate sync scripts, eliminating the need for deep Groovy scripting knowledge.
- Aida (AI-assisted configuration) analyzes your requirements and generates field mappings, transformations, and sync rules automatically.
- Common use cases include work item type mapping, maintaining parent-child hierarchies, syncing custom fields, and aligning statuses between platforms.
- AI-generated scripts require human review before deployment, so always test in a non-production environment first.

What is AI-Powered Jira Azure DevOps Integration?
AI-powered Jira Azure DevOps integration uses AI solutions to map fields, generate code, and automate triggers for connections between both systems. This allows you to implement any kind of use case without writing scripts from scratch.
This applies specifically to script-based integration solutions that allow admins to customize syncs with their custom code. AI-powered integration tools level the playing field so both experienced developers and non-technical users can rely on them.
For instance, the QA team might want to send information from a Jira bug as a work item in Azure DevOps. With an AI-powered integration tool, the admins in charge generate the script using natural language prompts.
The process requires clear prompts and careful review, but the applications of this technology are extensive.
Use Cases for AI-Powered Integration
System admins and developers can use AI-driven Jira to Azure DevOps integration solutions for the following use cases:
Use Case 1: Map Jira Work Items to Azure DevOps Work Items
Challenge: When a user creates a Task, Epic, or Feature on the Azure DevOps side, it should map to a Story, Task, or Bug in Jira. Teams need consistent work item type mapping across platforms without manual configuration.
Solution: Use AI-assisted configuration to generate mapping scripts. The AI interprets your requirements and produces the appropriate Groovy code.
Sample prompt:
“I want to create a mapping so that when a user creates a task in Jira, it maps as a feature in Azure DevOps, when a user creates a story, it maps as an Epic in Azure DevOps, and when a Jira bug is created, it maps as an Azure DevOps task.”
Example output:
def workItemMap = [

    "Epic" : "Story",

    "Feature" : "Task",

    "Task" : "Bug"

]

workItem.typeName = workItemMap[replica.type?.name]Code language: JavaScript (javascript)
Real-World Application: A software company uses Jira for product management and Azure DevOps for development. When product managers create Epics in Jira, AI-generated scripts automatically map them as Features in Azure DevOps, ensuring developers see the correct work item types without manual intervention.
Use Case 2: Maintaining Work Item Links, Relations, and Sub-task Mappings
Challenge: Both sides need to maintain links between work items and entities for traceability. Stories in Jira should arrive as user stories in Azure DevOps showing links to tasks and bugs. This relationship should be replicated for stories, bugs, tasks, and sub-tasks in a coherent hierarchy.
Solution: Use AI to generate parent-child relationship mapping scripts that preserve hierarchy across platforms.
Sample prompt (Azure DevOps Incoming):
“I want Jira stories to come in as User Stories (work items) in Azure DevOps, showing links to tasks and bugs. This relationship should be replicated for stories, bugs, tasks, and sub-tasks in a hierarchy.”
Example output:
workItem.parentId = null

if (replica.parentId) {

    def localParent = syncHelper.getLocalIssueKeyFromRemoteId(replica.parentId.toLong())

    if (localParent)

        workItem.parentId = localParent.id

}Code language: JavaScript (javascript)
Real-World Application: An enterprise maintains a 3-level hierarchy (Epic → Story → Task) in Jira. When syncing to Azure DevOps, the parent-child relationships remain intact. Developers in Azure DevOps see the complete hierarchy without manually recreating links.
Use Case 3: Syncing Epics from Azure DevOps to Jira Cloud
Challenge: You want to transfer an Epic from Azure DevOps and make content from custom fields appear on the related Jira Cloud Epic.
Solution: AI generates scripts that handle custom field extraction and mapping between platforms.
Sample prompt:
“I want to transfer an Epic from an Azure DevOps project named ‘Project X’ and make content from custom fields named ‘User Info’ and ‘Contact Name’ appear on the related Jira Cloud Epic.”
Example output:
if (firstSync) {

    issue.projectKey = nodeHelper.getProject(replica.project?.key)?.key ?: "ProjectX"

    if (replica.type?.name == "Epic") {

        issue.typeName = "Epic"

        issue.customFields."Epic Name".value = replica.summary

    } else {

        issue.typeName = nodeHelper.getIssueType(replica.typeName)?.name

    }

}Code language: JavaScript (javascript)
Real-World Application: A product team tracks high-level initiatives in Azure DevOps while customer-facing teams work in Jira. When Azure DevOps Epics sync to Jira, custom field values like stakeholder contacts automatically populate, giving Jira users complete context.
Use Case 4: Aligning CreatedDate Field Between Jira and Azure DevOps
Challenge: The CreatedDate field in Jira is read-only since it indicates when the work item was created. You need this information in Azure DevOps for tracking and accountability.
Solution: Use the integration solution to map the CreatedDate to a custom field in Azure DevOps.
Sample prompt:
“I want to sync the created date of a Jira work item to a custom field named ‘Original Created Date’ in my Azure DevOps work item.”
Example output:
issue.customFields."Original Created Date" = replica.created
Real-World Application: An analytics team needs to track when work items were originally created for SLA reporting. By syncing CreatedDate to a custom Azure DevOps field, they maintain accurate historical data across both platforms.
Note: Code snippets may need adjustment based on your platform environment and architecture.
Use Case 5: Enterprise DevOps Alignment
Challenge: Development teams in Azure DevOps need visibility into customer-reported issues tracked in Jira Service Management without switching platforms.
Solution: Configure bidirectional sync so customer-reported bugs in JSM automatically create corresponding work items in Azure DevOps. Status updates flow both directions.
Real-World Application: A SaaS company syncs customer bug reports from JSM to Azure DevOps. When developers mark bugs as “Resolved,” JSM tickets update automatically. Support agents see resolution details without pinging developers.
Use Case 6: MSP Multi-Tenant Operations
Challenge: Managed Service Providers manage multiple clients, each with their own Jira and Azure DevOps instances. Routing work items to correct destinations while maintaining client isolation is complex.
Solution: Configure independent connections for each client. Exalate’s architecture allows direct connections between each system pair with complete data isolation.
Real-World Application: An MSP serves 15 clients. When Jira tickets require development escalation, Exalate routes them to the correct client’s Azure DevOps project based on organization identifiers. Each client’s development team sees only their relevant work items while the MSP maintains visibility across all accounts.
Benefits of AI-Powered Integration
Organizations exploring AI-powered Azure DevOps Jira integration benefit in the following ways:
- Faster Configuration Speed: Instead of back-and-forth iterations to get a working snippet, AI scours multiple sources to provide relevant solutions within minutes.
- Increased Mapping Accuracy: AI-driven integrations limit human input to prompting. Output quality depends on how detailed, clear, and concise your prompt is.
- Faster Data Extraction: Instead of manually sifting through code and fields, AI fetches data from fields or through API interactions.
- Better Error Handling: AI-powered integration solutions find errors by running quick scans to locate bugs or typos, refine them, and suggest improvements.
Challenges of Using AI for Jira and Azure DevOps Integration
AI-driven solutions save time and effort, but they come with unique challenges:
- Errors and Hallucinations: AI-generated scripts can contain errors. Always review every suggestion and test rigorously before implementing in your production environment.
- Prompt Quality Matters: Vague prompts affect output quality. Invest time in crafting detailed, specific prompts. Consider working with someone experienced in prompt engineering for complex use cases.
- Internet Connectivity Requirements: Most AI models require internet connectivity. If the model goes offline, it becomes unusable, which could impact time-sensitive syncs.
- Privacy and Compliance Concerns: AI features introduce privacy and compliance considerations. This is particularly relevant in cross-company collaborations where one side has a “no-AI” policy.
Understanding these challenges helps you implement AI-powered Jira Azure DevOps integration effectively.
How to Integrate Jira and Azure DevOps with Exalate: Step-by-Step Guide
This walkthrough shows you how to set up a Jira Azure DevOps integration using Exalate.
Get started on the Exalate integrations page
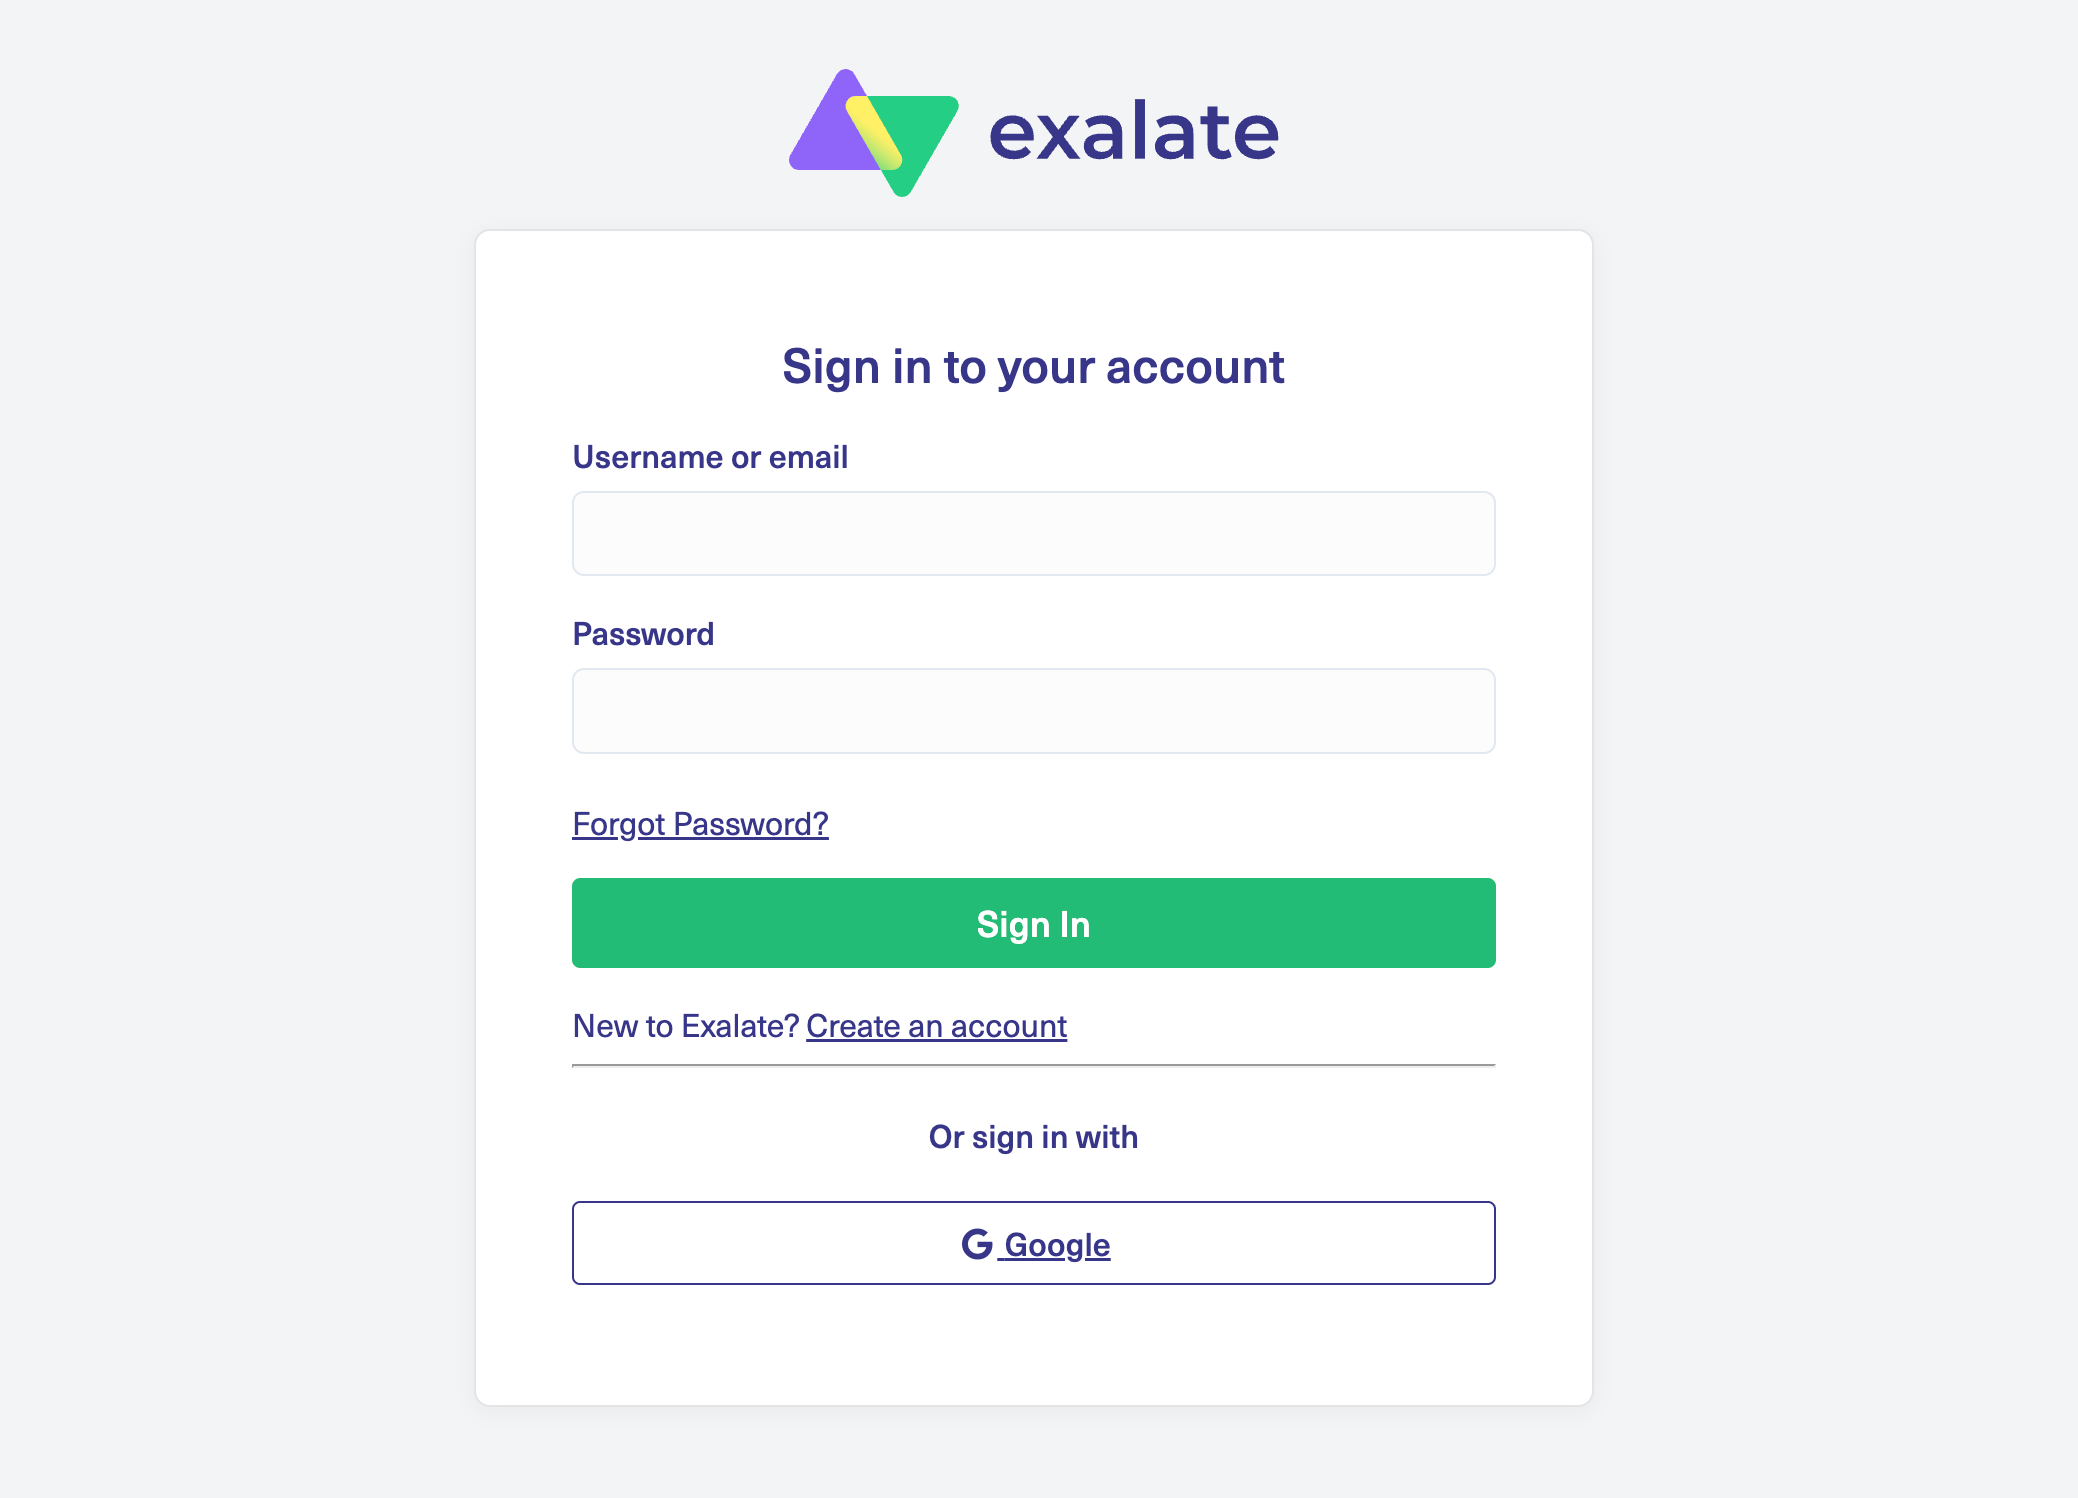
Head over to the Exalate integrations page and create a new account. Already have one? Just log in. You can register manually with your email (verification required) or sign up directly through Google.
Set up a workspace
Workspaces let you organize and manage all your integrations and connections from one place. Check the “Workspaces” tab to see any existing workspaces. First time here? Click the “+ Create Workspace” button.
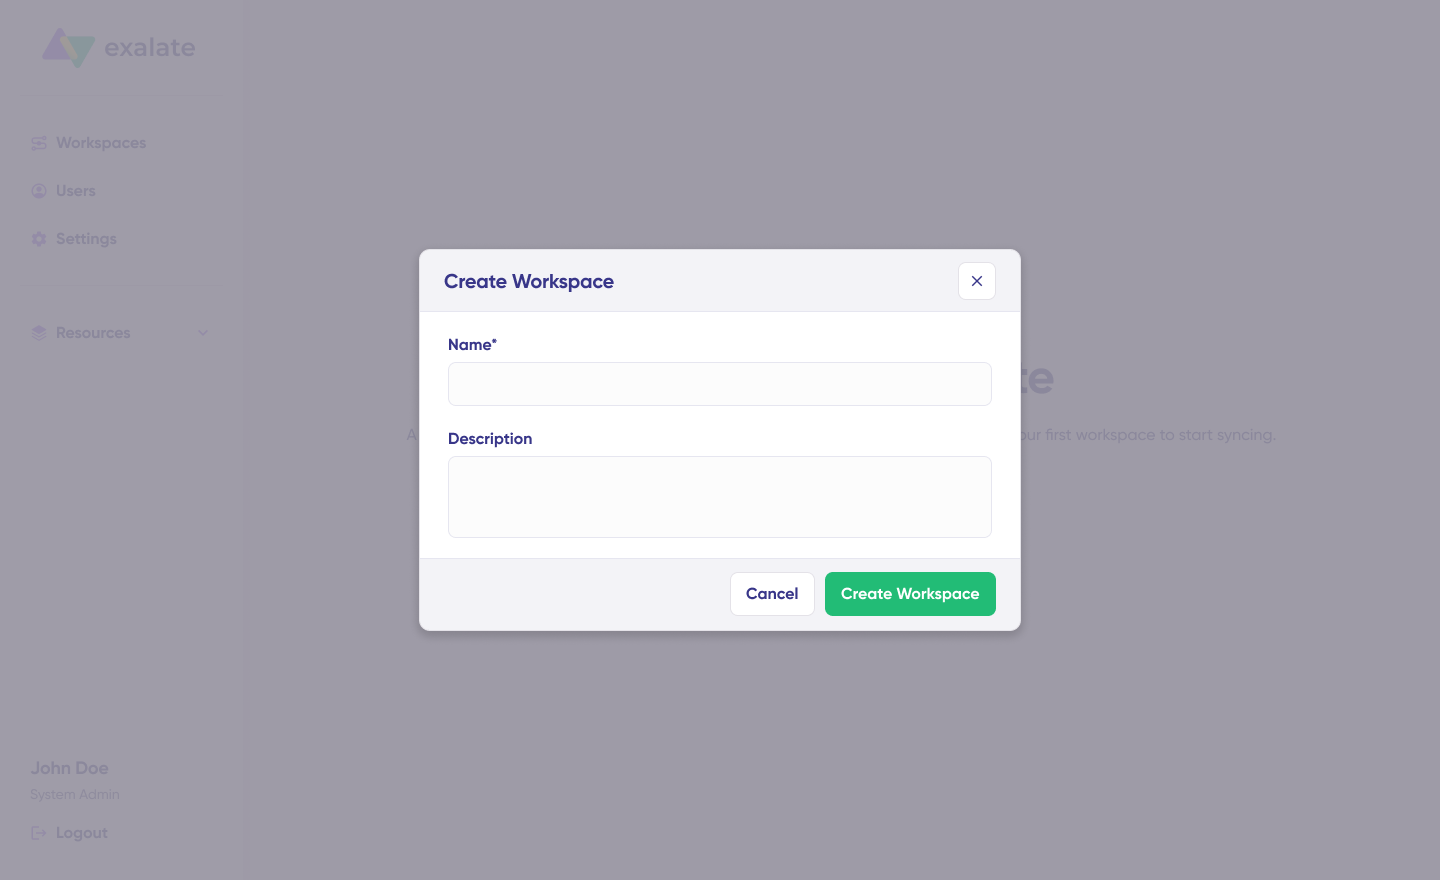
Enter a name and description for your workspace, then click “Create workspace.”
Create your first connection between Jira and Azure DevOps
If you already have a workspace, the “Connections” tab displays all your existing connections. From there, you can edit connection settings or view details.
Note: Creating a connection requires an active Exalate account with at least one Workspace, plus access credentials for both systems.
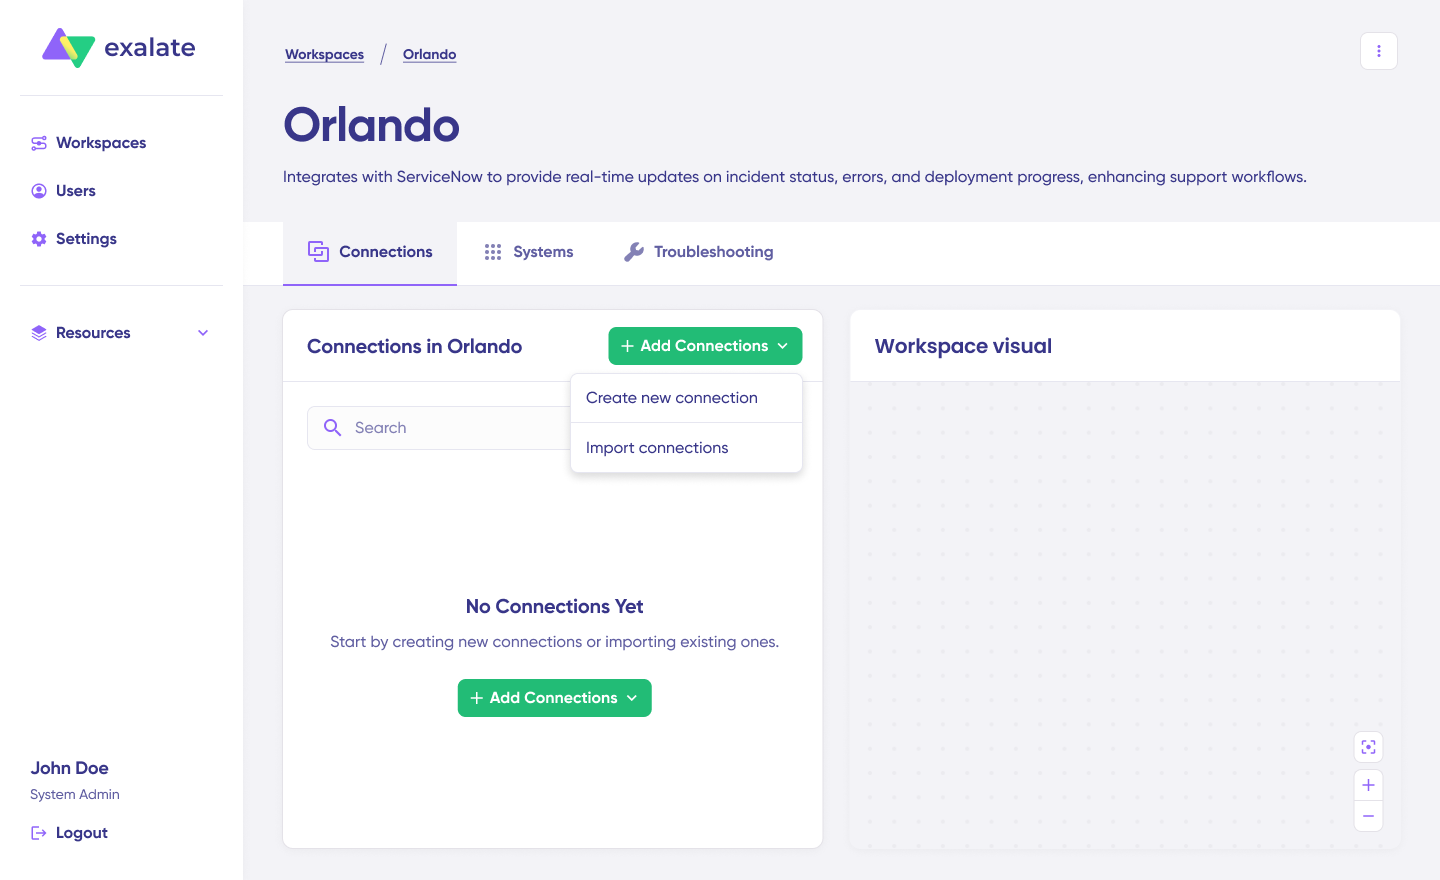
Click “+ Add connections” > “Create new connection.” Enter the name for your first system. Designate either Jira or Azure DevOps as System A—the order doesn’t matter. Enter your system’s URL. Starting with Jira? Enter your Jira instance URL.

Once you enter the URL, a background check runs automatically. If your system already belongs to the current workspace, authentication happens seamlessly. If it’s part of a different workspace, your system gets registered to the current one.
Edit & Test: Open the draft editor
Click “Create a new version” or select “Open latest draft” to start making changes. This protects your existing configuration from accidental modifications. Draft changes save automatically.
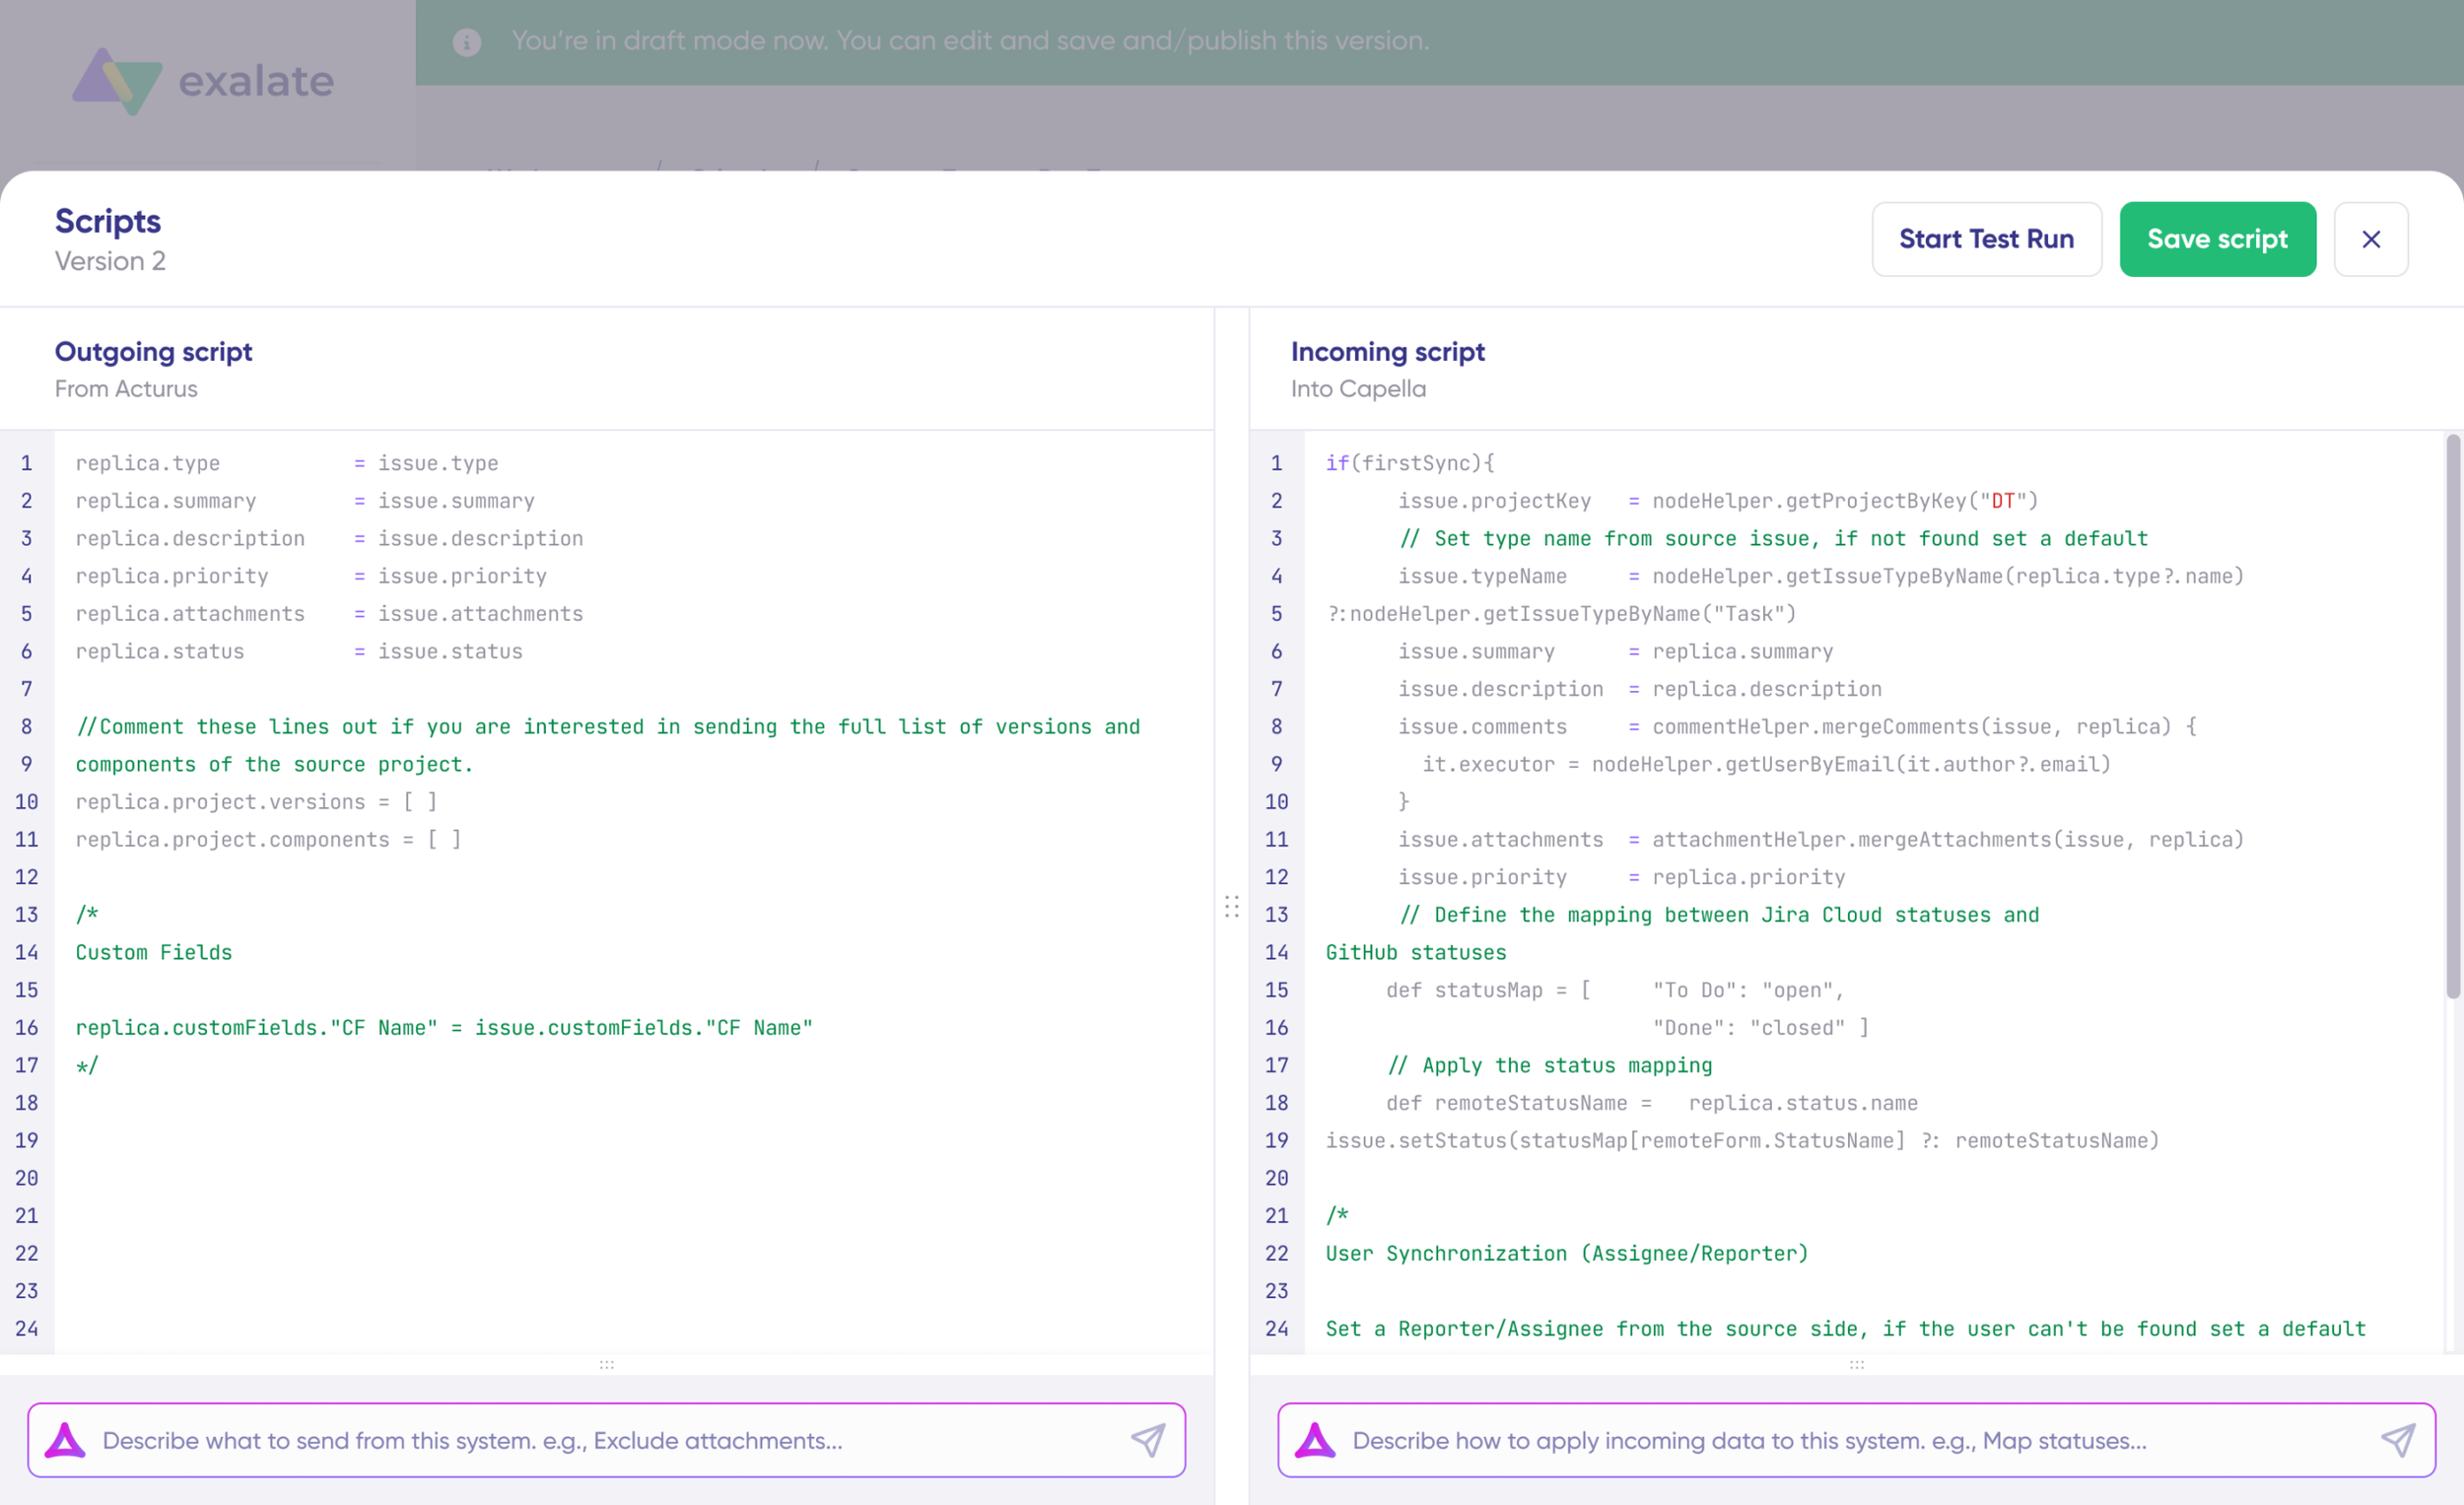
Click the “Edit” button to open the editor and modify your sync rules.
Sync rules use Groovy-based scripts. These scripts let you add custom data logic, field mappings, and conditional flows; basically, adapting to any complex workflow or advanced use case.
Use AI-assisted configuration to generate your sync rules
Want to skip the scripting hassle? Use Exalate’s AI-assisted configuration feature, Aida, to generate sync scripts for you. Aida appears in both incoming and outgoing script sections.
Based on Exalate’s scripting API and your existing scripts, Aida generates working Groovy code with proper field mappings.
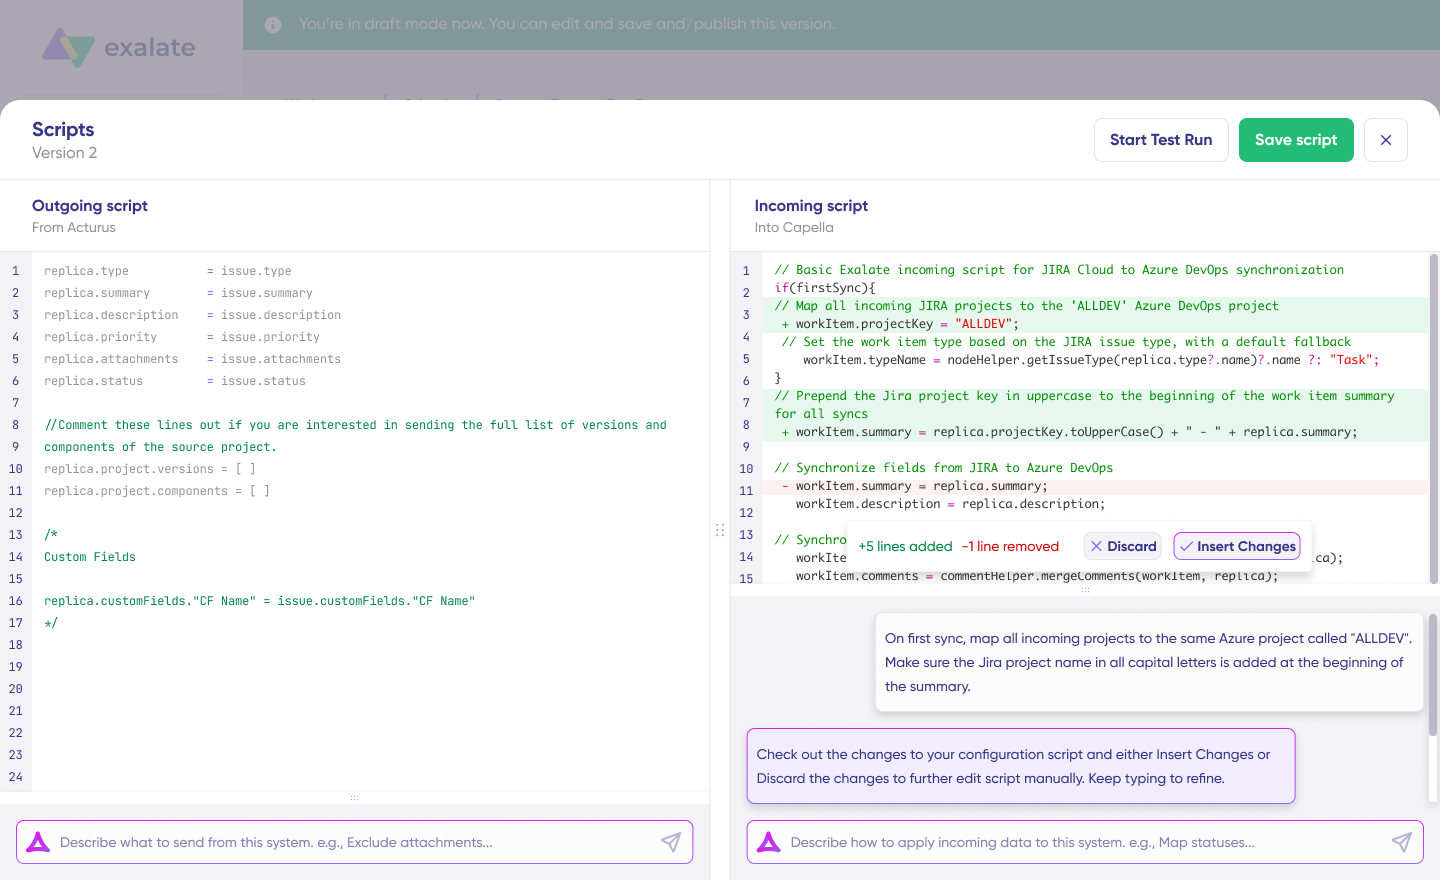
After Aida drafts your script, review the suggested changes. Green highlights indicate new lines being added. Red highlights show lines that will be removed. Choose to “Insert” or “Discard” Aida’s suggestions.
The outgoing and incoming scripts operate independently, and so does Aida.
Note: Aida is helpful, but like any AI, review the generated code before applying it.
TestRun: Validate before production
With your sync scripts ready, either “Save script” or validate them using “Start Test Run.”
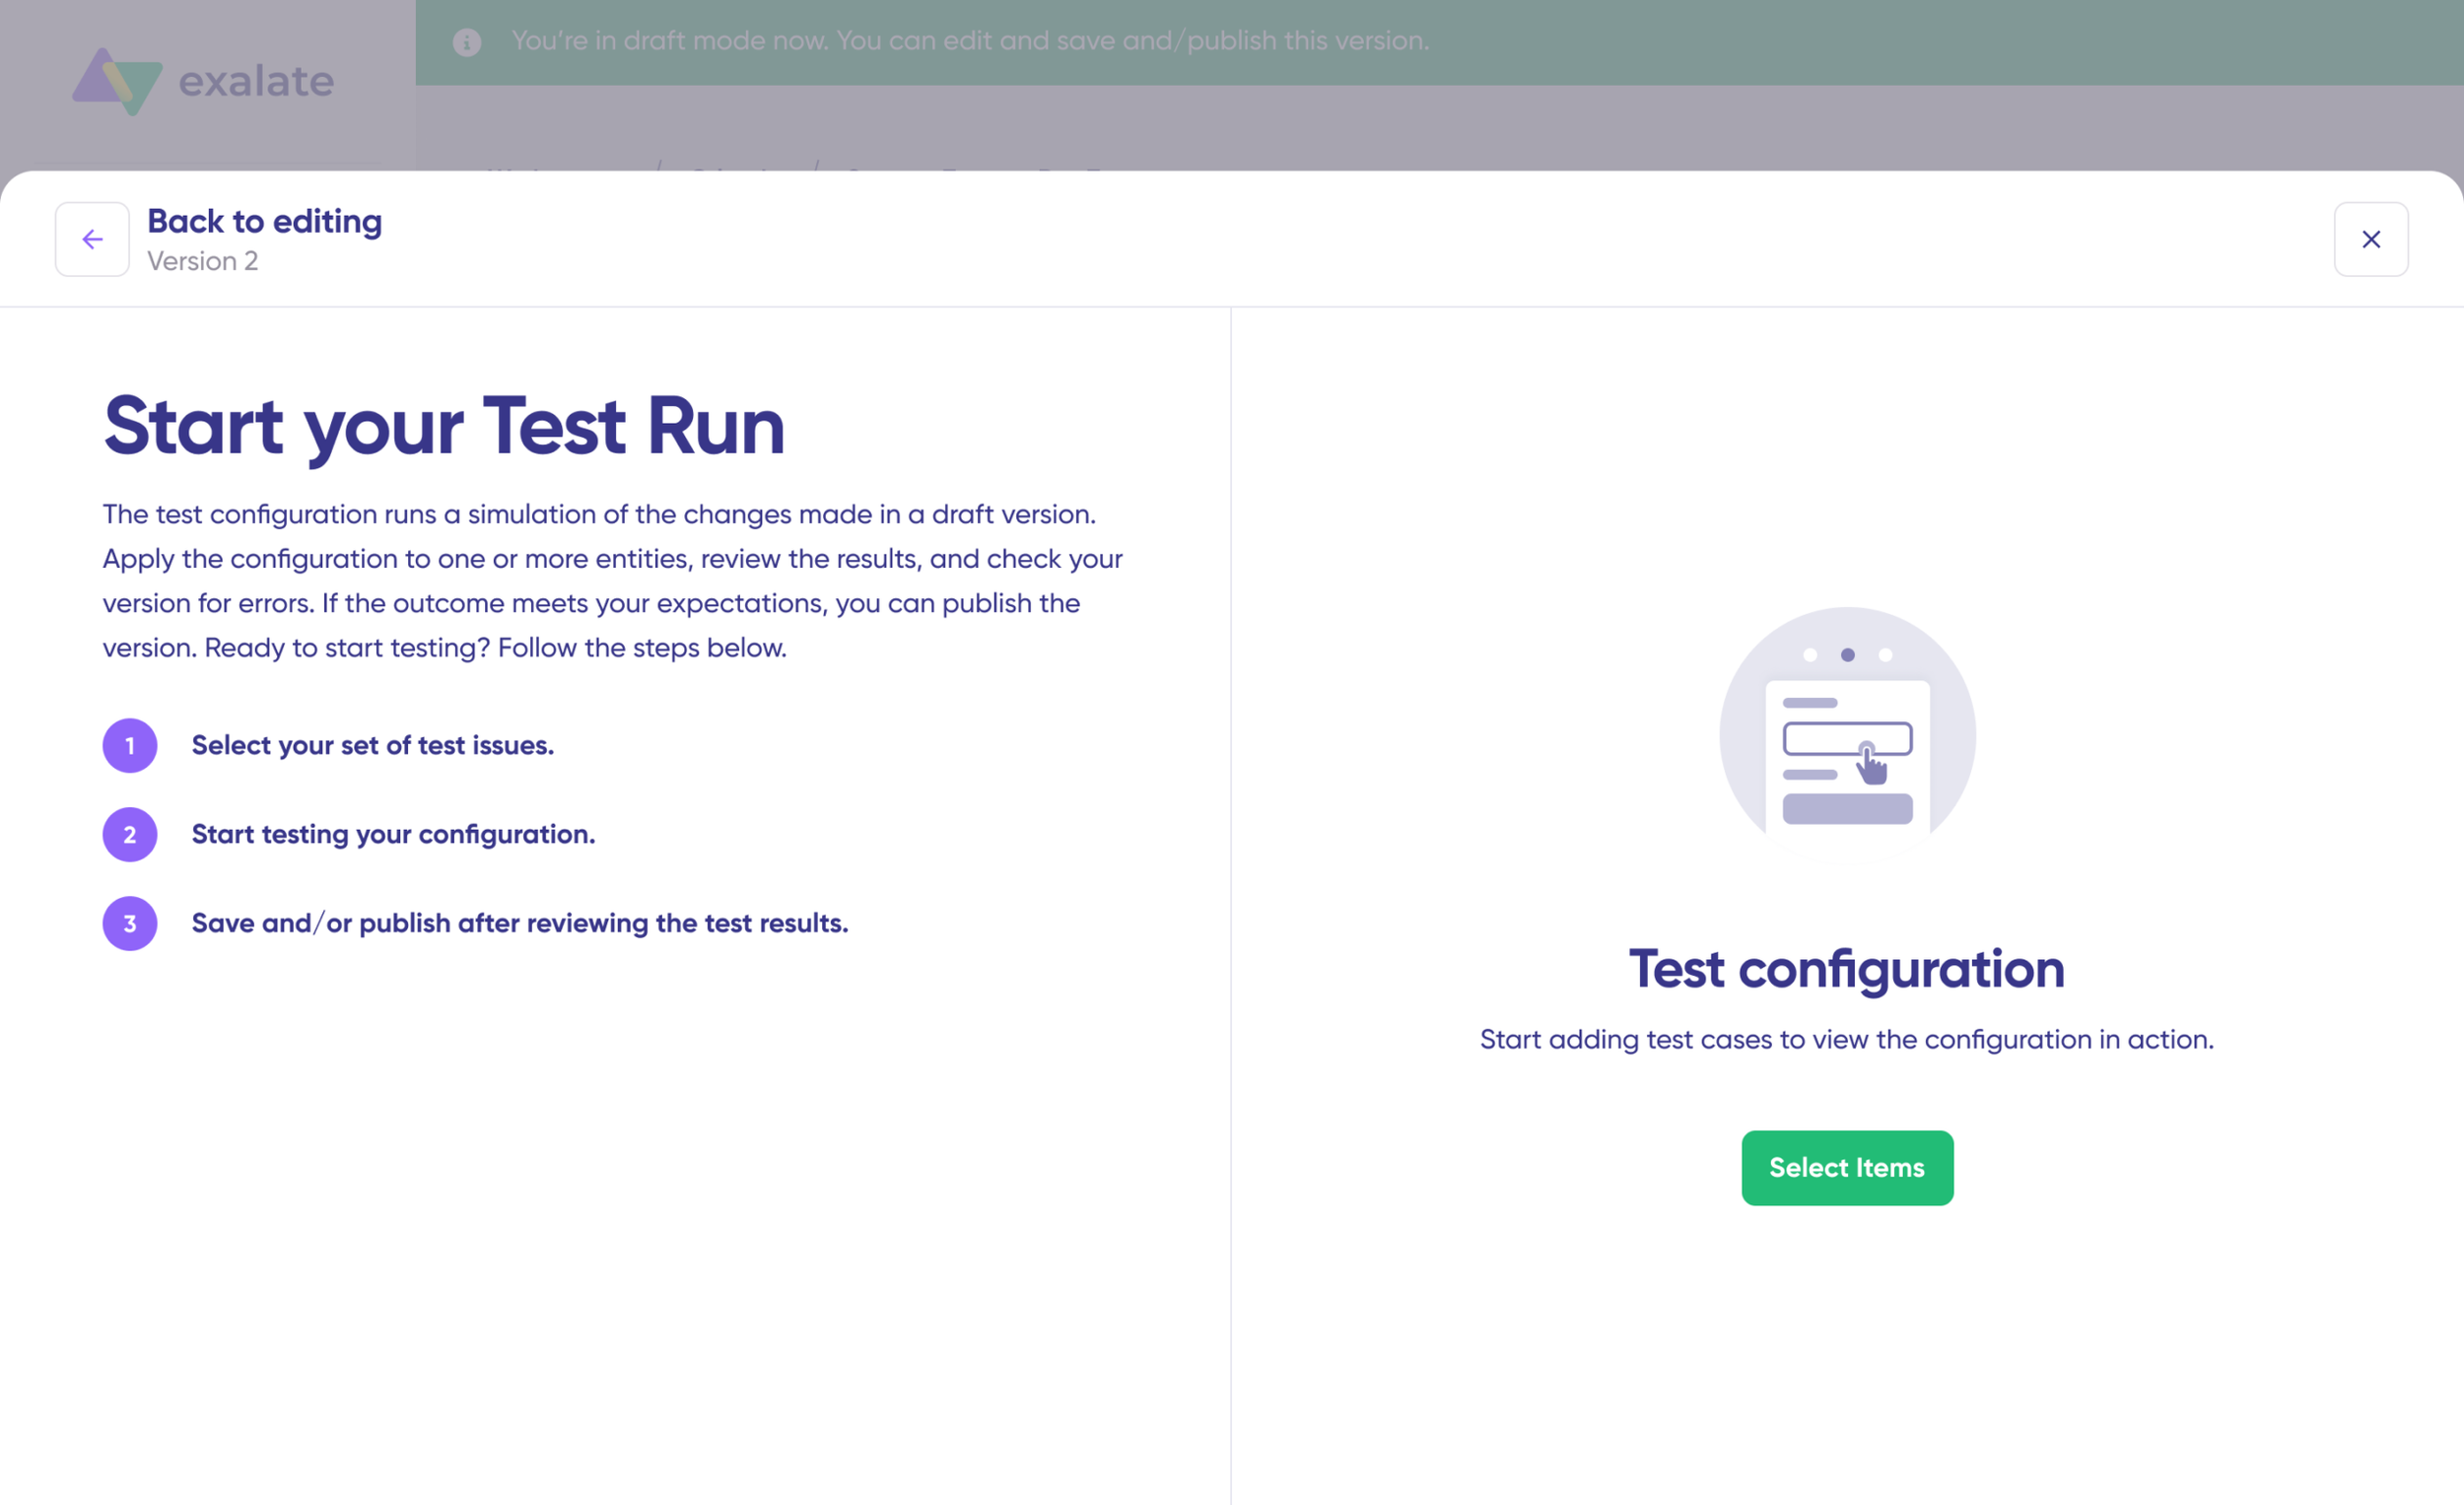
To test the configuration, click “Select Items” and choose the work items you want to apply the sync to. You can select multiple items. Once selected, click “Start Test Run.” View all incoming and outgoing replicas for each item in their respective tabs.
Preview how your sync configuration applies to items, examine the replica, and verify field mappings look correct.

Need adjustments? Go back, modify the scripts, and test again. Deploy only when you’re confident everything works.
Once everything matches your needs, click “Publish Version” to apply the updated configuration to your live synchronization.
Add triggers to automate your sync
Triggers are conditions or filters you apply to specific items to start synchronization automatically. Examples: sync all Jira work items with label = "todev," or sync all Azure DevOps work items in a specific area path or iteration.
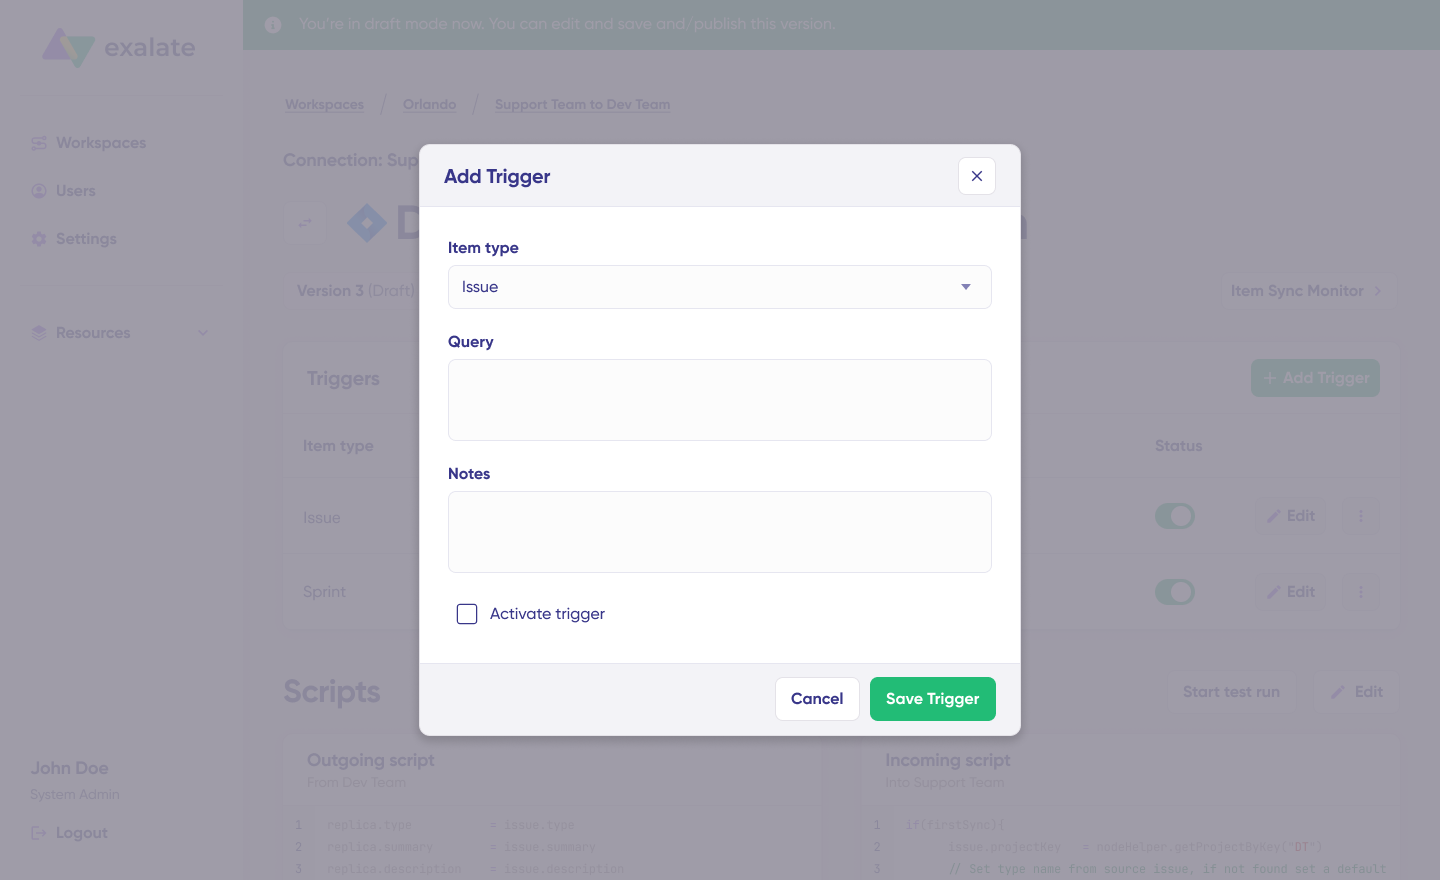
Click “+Add trigger” to create triggers. These are platform-specific:
- Jira: Use Jira Query Language (JQL) to specify conditions for work items or sprints. Example:
project = "PROJ" AND priority = High AND labels = "escalate" - Azure DevOps: Use Work Item Query Language (WIQL) to apply triggers to work items. Example:
[System.WorkItemType] = 'Bug' AND [System.State] = 'New' AND [System.AreaPath] UNDER 'ProjectName\TeamArea'
Save your changes by publishing them.
Troubleshooting with Aida
Aida helps you troubleshoot errors faster by offering clear, context-aware suggestions right where errors appear.
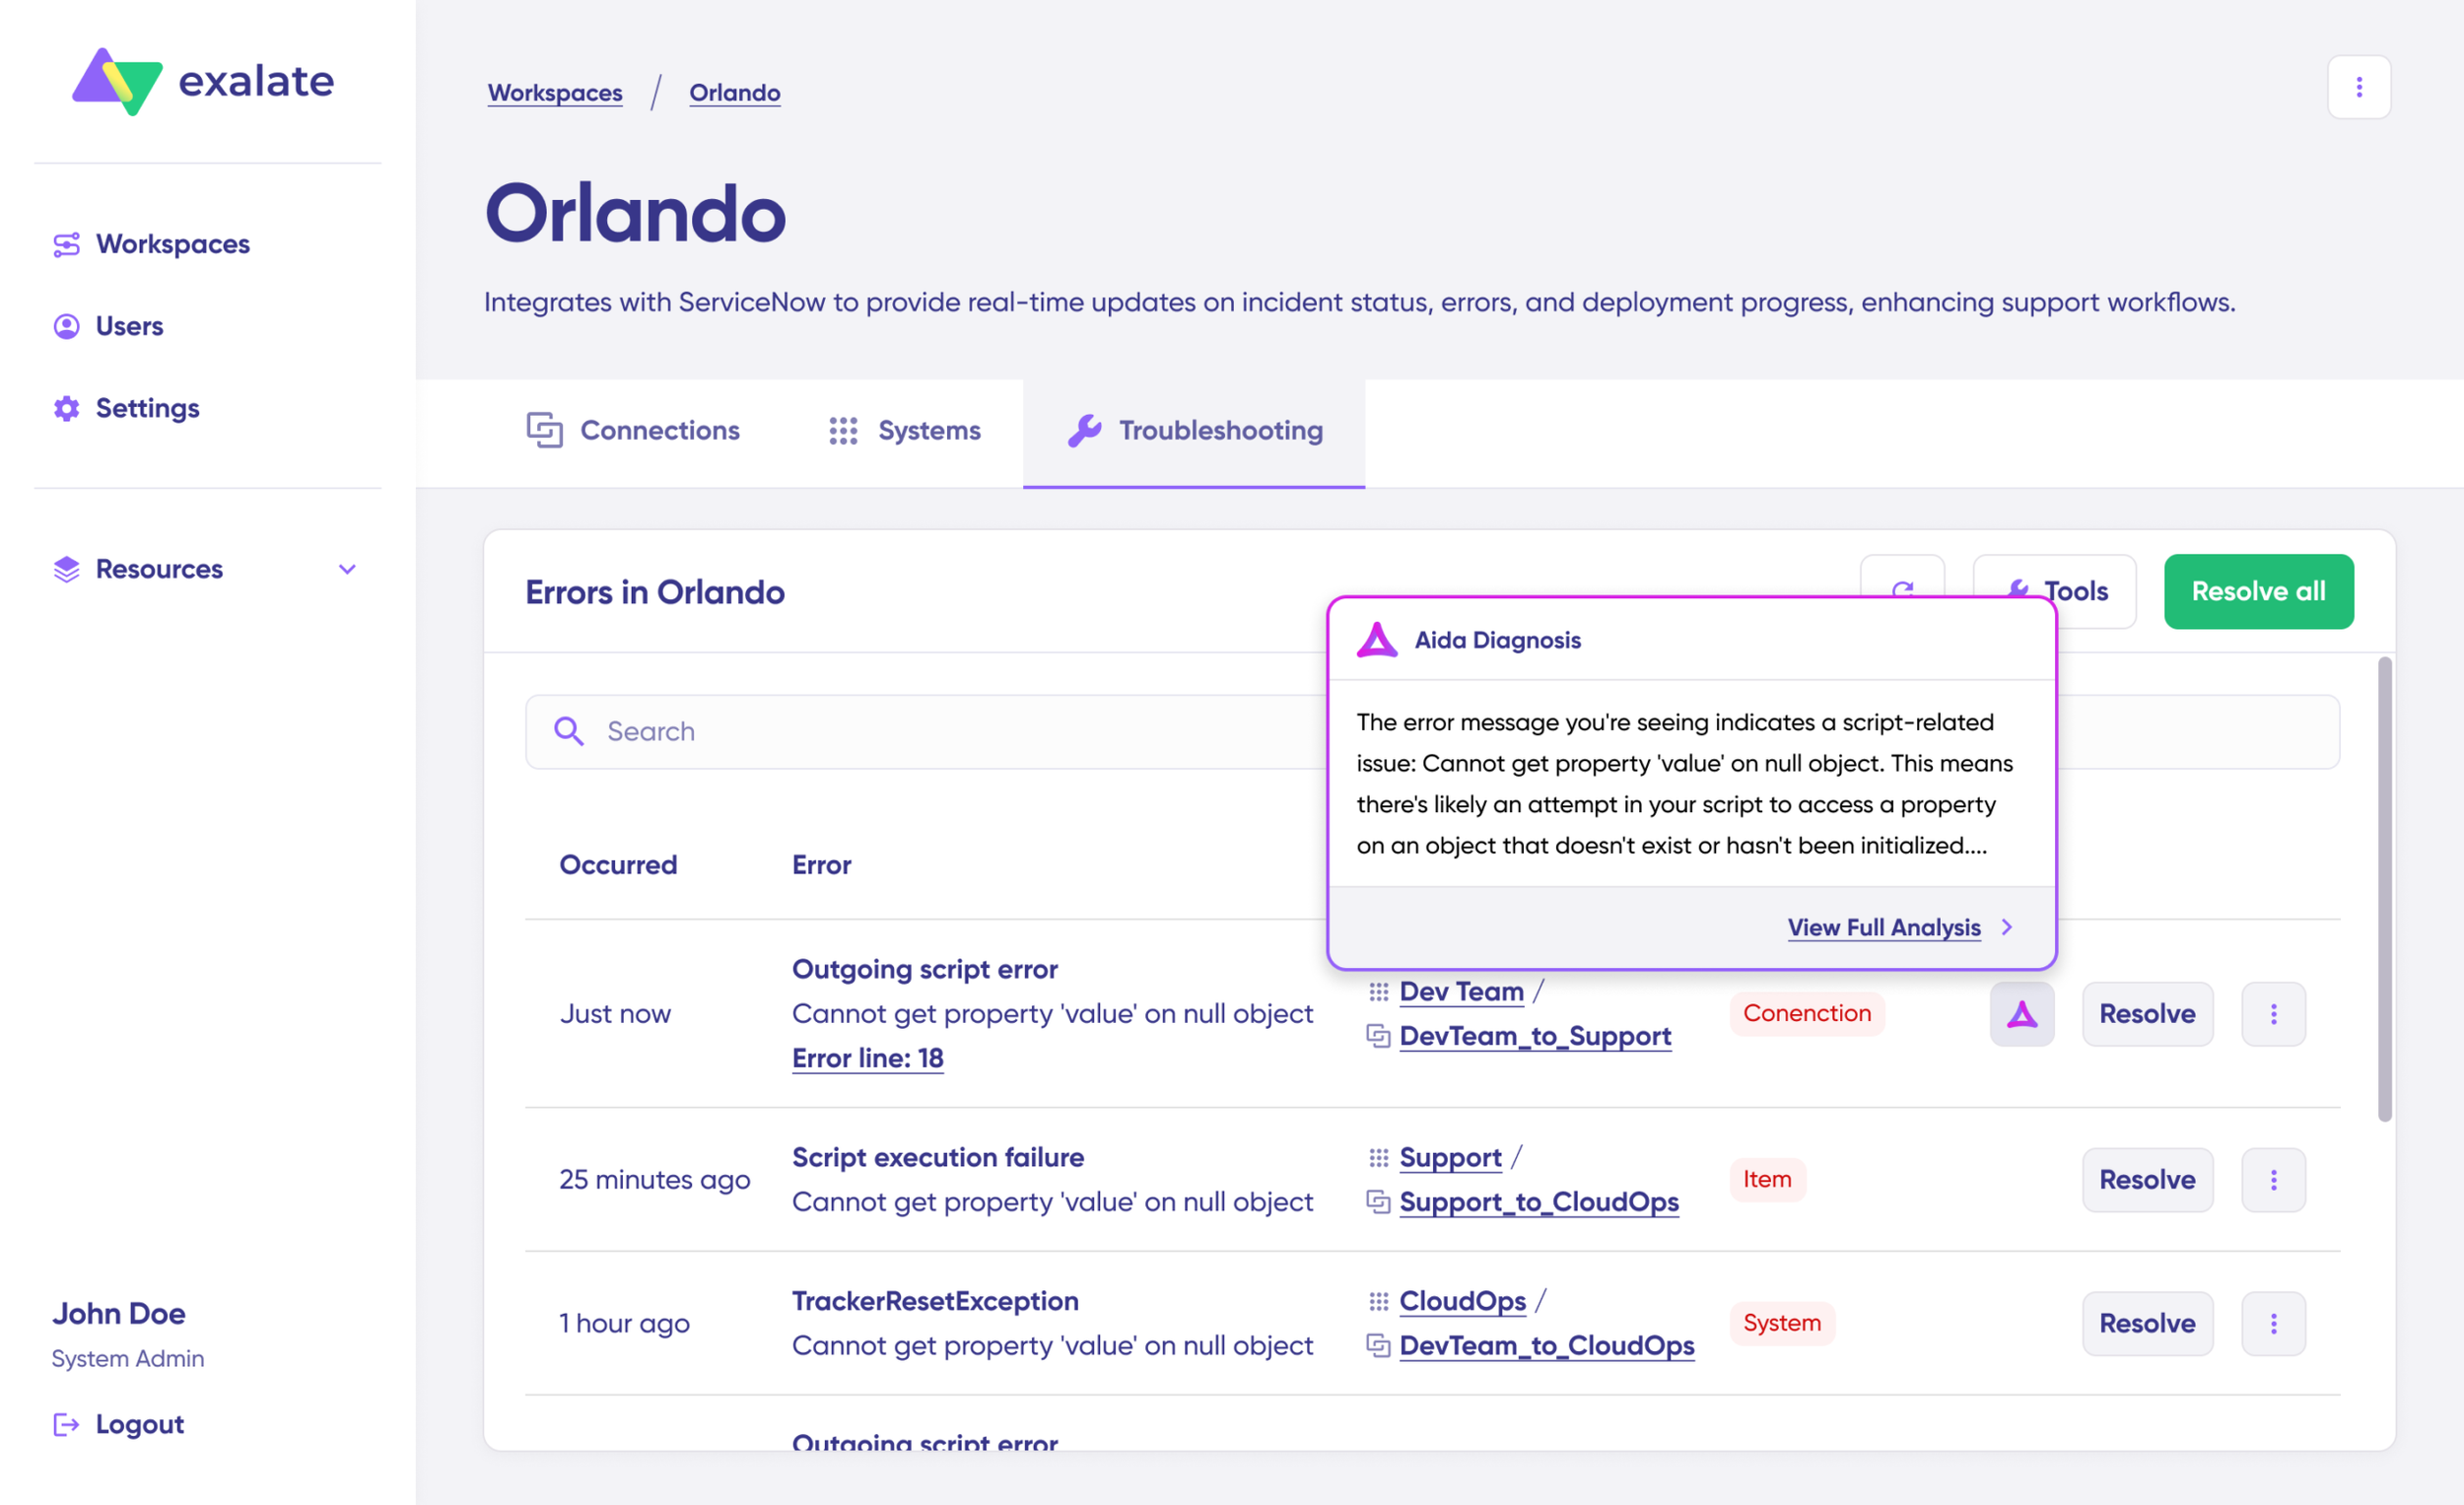
If an error occurs, navigate to the “Troubleshooting” tab in your workspace. Hover over the error you want to diagnose and click the Aida icon that appears next to it. An AI-generated suggestion appears in the modal window, including a brief explanation of the error and a proposed solution.
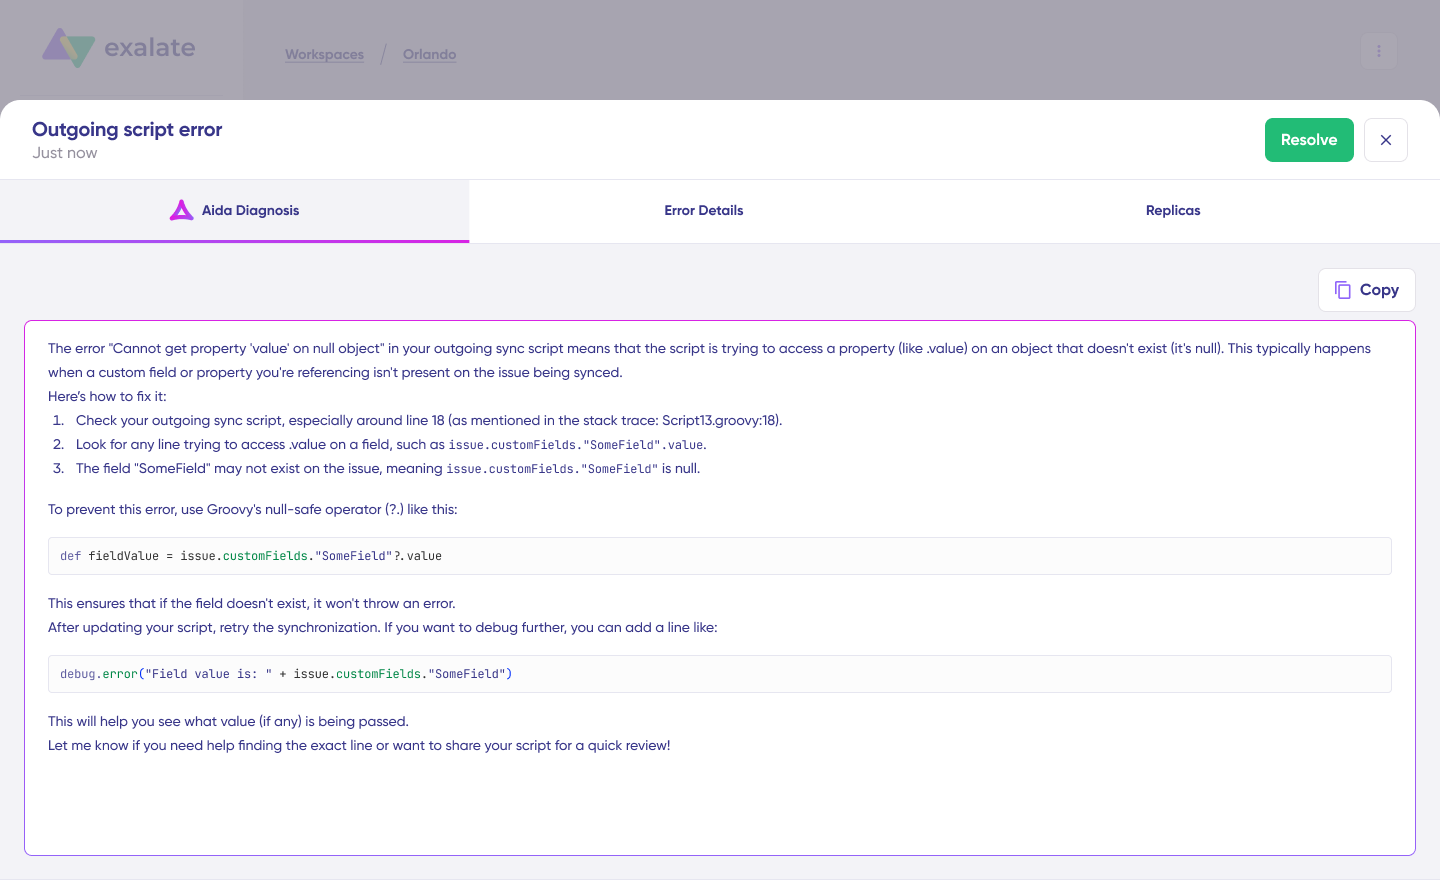
Click “View Full Analysis” for additional context. Access “Error details” to copy the stack trace or “Replicas” to view the JSON format if needed. Choose “Resolve” to retry errors.
How Exalate Handles Jira and Azure DevOps Integrations
Exalate is an AI-powered integration solution that connects Jira and Azure DevOps instances. It also supports integrations with ServiceNow, GitHub, Zendesk, Salesforce, Freshservice, Freshdesk, Asana, Azure DevOps Server, and custom platforms via REST API connectors.
Aida is Exalate’s AI-powered assistant for integration configuration. It accepts natural language prompts and generates Groovy scripts for connections and mappings.
Aida is embedded directly in the scripting console and considers your existing sync rules while suggesting scripts. You describe what you want to sync in plain language and Aida generates the configuration.
Aida handles common scenarios without requiring scripting knowledge:
- Field mapping between standard and custom fields
- Status mapping between different workflows
- Comment synchronization with filtering
- Work item type transformations
- Attachment handling
For complex requirements involving conditional logic, data transformations, or external API integration, technical teams can customize the generated scripts using Groovy.
Security Considerations
Exalate implements enterprise-grade security:
- ISO 27001 Certification: Exalate maintains ISO 27001 certification for information security management.
- Role-Based Access Control (RBAC): Control who can configure, modify, and monitor integrations.
- Encryption: Data is encrypted both in transit (TLS 1.2/1.3) and at rest.
- Full Scripting Control: Maintain complete operational control over what data leaves your side and how incoming data is processed.
- OAuth 2.0 Support: Alternative authentication method for organizations that cannot use Personal Access Tokens (PATs).
For complete security documentation, visit the Exalate Trust Center.
Conclusion
AI-powered Jira Azure DevOps integration transforms how teams configure and maintain cross-platform synchronization.
Key points to remember:
- Use Aida to generate sync scripts from natural language descriptions instead of writing Groovy from scratch
- Always review AI-generated configurations before deploying to production
- Clear, detailed prompts produce better results than vague requirements
- Maintain complete operational control over your sync side with full scripting capabilities
- Security features like ISO 27001 certification, RBAC, and encryption protect your data
- The same integration approach extends to ServiceNow, Salesforce, Zendesk, and other platforms
If you have a specific use case in mind and want to see how Aida can help you set it up faster, reach out to our solutions engineers for a demo.

Frequently Asked Questions
What is AI-powered Jira Azure DevOps integration?
AI-powered Jira Azure DevOps integration uses AI to simplify the setup and configuration of cross-platform synchronization. Instead of manually writing complex Groovy scripts, Aida (AI-assisted configuration) generates code based on natural language descriptions of what you want to sync. Exalate supports Jira Cloud, Azure DevOps Services, and Azure DevOps Server in any combination.
How does Aida improve Jira Azure DevOps integration?
Aida analyzes your requirements and automatically generates Groovy scripts for field mapping, transformations, and sync rules. This speeds up configuration and eliminates the need for deep scripting knowledge while maintaining full customization control. You describe sync needs in plain language, while Aida produces a working configuration that you review and refine.
What can I sync between Jira and Azure DevOps?
Work items, custom fields, attachments, comments, status changes, assignees, priorities, sprints, labels, parent-child relationships, and more. You define exactly what syncs and how it maps between platforms using Aida-generated or manually written scripts.
Does AI-powered integration support bidirectional sync?
Yes. Changes flow in both directions in real-time based on your sync rules. Updates in either Jira or Azure DevOps automatically appear in the other system. Aida generates mapping code for custom fields, including transformations when field formats differ between platforms.
Do I need coding skills to set up an AI-powered integration?
Not for common scenarios. Aida handles script generation from plain language instructions. Review and modify the generated code as needed, but technical expertise isn’t required to get started. For complex requirements such as conditional logic, data transformations, and external API calls, technical teams can extend AI-generated scripts using Groovy.
Is AI-powered Jira Azure DevOps integration secure?
Yes, Exalate implements enterprise-grade security:
- ISO 27001 certification for information security management
- Role-based access control (RBAC) for configuration governance
- Encryption of data both in transit (TLS 1.2/1.3) and at rest
- OAuth 2.0 support for enhanced authentication
- Full operational control over what data leaves your instance
Visit the Exalate Trust Center for complete security documentation.
Can Exalate connect Jira with platforms other than Azure DevOps?
Yes. Beyond Azure DevOps, Exalate connects Jira with ServiceNow, Zendesk, Salesforce, GitHub, Freshservice, Freshdesk, Asana, Azure DevOps Server, and supports custom connectors for proprietary platforms via REST API integration.
How do I handle AI-generated script errors?
Always review AI-generated configurations before publishing. Test in a non-production environment first. Aida considers your existing sync rules when generating suggestions, but AI can make mistakes. Refine prompts if initial results don’t match requirements. For complex scenarios, engage Exalate’s professional services team or community support for guidance.
Can I use Exalate for MSP multi-tenant environments?
Yes. Exalate’s architecture supports independent connections for each client with complete data isolation. Configure routing logic based on client identifiers, custom fields, or tags. Each client connection operates independently, preventing cross-client information leakage.
What happens if AI generates incorrect scripts?
Aida displays generated scripts with highlighted changes: green for additions, red for deletions. Review carefully before accepting. Use “Discard” to reject suggestions and refine your prompt. Never publish untested configurations to production environments.
Recommended Reading:
- Jira Azure DevOps Integration: The Complete Step-by-Step Guide
- How to Implement Jira Issue Sync For Cross-Team Collaboration
- AI-Powered Integration: The Future of Business Connectivity
- How SaaS Integration Can Improve Your Business Processes
- How to Sync Text, Date, and Picklist Custom Fields Between Jira and Azure DevOps
