Welcome to this comprehensive Groovy scripting guide! If you are curious to know what Groovy scripting has to offer and how it can be used in real-world scenarios, then you’re in the right place!
We’ll dive into the world of Groovy and explore its features and capabilities.
We’ll also focus on the role of Groovy scripts in integrations. And see how it supplements integration solutions like Exalate to perform advanced integrations.
With a lot of practical examples, you’ll better understand how Groovy scripting can streamline your coding workflows. So let’s get started!
Note: This is a complete handbook, so feel free to jump to the chapter of your choice by using the floating menu on the bottom left of this page.
Chapter 1: Get On with Groovy Scripting
I am always curious about expanding my knowledge, whether it’s related to the field I work in or not. And sometimes, I find myself wondering, “What could I learn today that’s completely different from what I already know?”.
It’s fun to explore new skills and interests, like maybe even taking up swimming! It’s just a thought that pops into my head every so often.
Then, I look around the world of programming. And I’m amazed by the endless opportunities to learn and grow. Programming languages are like fashion trends that come and go at lightning speed. Keeping up with these trends can be challenging, but staying on top of the game is quite important.
Learning the Groovy language has proven to be a wise decision for me. With my prior experience in Java and fondness for the language, it seemed like the perfect choice. Not only is it syntactically similar to Java, but it also reduces the amount of boilerplate code.
| Apache defines Groovy as: A multi-faceted language for the Java platform. Apache Groovy is a powerful, optionally typed, and dynamic language, with static-typing and static compilation capabilities, for the Java platform aimed at improving developer productivity thanks to a concise, familiar, and easy-to-learn syntax. It integrates smoothly with any Java program, and immediately delivers to your application powerful features, including scripting capabilities, Domain-Specific Language authoring, runtime and compile-time meta-programming, and functional programming. |
Groovy scripting simplifies Java coding, automates recurring tasks, and makes domain-specific language modeling easy. Plus, it supports ad-hoc scripting.
With Groovy, you get advanced language features like closures, dynamic methods, and the Meta Object Protocol (MOP) on the Java platform (we will learn all of this, be rest assured).
And your Java knowledge won’t become obsolete as Groovy builds on it seamlessly.
But it is wrong to say that Groovy is only a scripting language. While it certainly functions as one, there’s much more to it than meets the eye.
It can pre-compile into a Java bytecode, integrate into different applications (especially Java-based), be the basis of building a whole new application, and so much more.
Groovy is also used in major projects like Grails, Jenkins, and Gradle.
As seen it can clearly do much more than just scripting. So labeling Groovy is like trying to fit a square peg into a round hole; it’s simply too versatile to be restricted to a single category.
It’s safe to say that when you write a program in Groovy, you are writing a special kind of Java program, with all the power of the Java platform at your disposal, including the massive set of available libraries.
The only hope is that you learn to write concise code as opposed to the verbose Java syntax.
Let’s take a closer look at why Groovy is such an interesting language.
Why Groovy Scripting Makes a Programmer’s Life Easy
It’s Friends with Java.
What I mean by being friends with Java:
- Smooth integration with the JVM (Java Virtual Machine), i.e it works as a dynamic scripting language for JVM
- Blends seamlessly with existing Java code and libraries
- Extends the java.lang.Object class
- Implements operator overloading as Java methods, which can be called in Groovy as if they were operators
- Uses Java features like abstract classes and interfaces seamlessly
Calling Java classes or functions from within Groovy code and also doing so in the opposite direction is easy.
For instance, you can still use Groovy Date to access all the methods from the java.util.Date class. And you can also easily call within a Java class a Groovy class called ‘MyGroovyClass’ by ensuring MyGroovyClass is on the classpath for your Java application.
A really cool thing about Groovy is that it plays well with Java syntax! So you don’t need to worry about learning a new syntax altogether.
The seamless interplay of Groovy and Java opens 2 dimensions: using Java to optimize code for runtime performance and using Groovy to optimize code for flexibility and readability.
It Supports Dynamic Typing (and Static Typing).
Dynamically typed languages, like Groovy, move type checks, from compile-time to run-time.
Type safety includes handling type (data type) mismatch errors in a programming language. Enforcing type safety can happen at compile time or run-time.
For instance, in languages like Java (that enforce static typing), you must give a data type to every variable you define. Then the code gets compiled, and a type mismatch error occurs if the type assigned to the variable and the value do not match.
So you cannot assign a String value to a variable you have defined as an integer (int), i.e String str = 123
Groovy allows you to defer specifying the data type of a variable until runtime, providing greater flexibility.
Of course, this can be disadvantageous since it can cause the entire system to crash, but it’s a fair price to pay for the features and flexibility it offers in return.
It Allows Optional Typing
An extension of the above feature is optional typing.
It means you can leave out mentioning the data types while writing your code. It’s done with the help of the keyword “def”. We will look at this in detail a little later.
//when a data type is not specified in Groovy it still belongs to the //type Object. It doesn't mean there is no type
def hello = "Hello World"
It’s Object-Oriented
In Groovy scripting, you can leverage all the object-oriented properties and features available in Java.
So you can create classes, call class methods, set properties, and instantiate class objects in Groovy.
It’s Loaded With Some Cool Features.
There are a lot of great features that Groovy scripts offer. Discussing all of them is beyond the scope of this blog post.
A few amazing ones are:
- Consider a common example (I know what you are smiling at, my fellow programmers) ?:
println "Hello World."
In Groovy, you don’t need a semicolon or a parenthesis. Even System.out.println (in Java) is reduced to println.
- It doesn’t need to import packages or make it mandatory to specify data types.
import java.util.*; // Java
Date today = new Date(); //Java

myday = new Date() //Groovy doesn't need a semicolon, nor does it //need to import the package.
- It supports closures, a really awesome feature we will see in a while.
- It generates setters and getters automatically at compile time. It’s called a POGO (Plain Old Groovy Object).
- It’s super easy to work with Lists and Maps in Groovy.
- It supports operator overloading, albeit makes it easier than Java.
- It’s exciting to witness an increasing number of developers adopting Groovy lately! It’s gaining a lot of attention and momentum in the industry. Plus, it’s equally corporate-backed and has robust community support.
Talking about the features of Groovy is like asking a chef how many ingredients they have in their pantry. Just like a skilled chef uses a variety of ingredients to create unique and flavorful dishes, programmers can use diverse Groovy features to craft something powerful and efficient. The features blend so well that coding in Groovy soon becomes second nature, not to forget pure fun.
Building on the flexibility that Groovy offers, there are different ways in which you can start your journey.
Groovy Environment: How to Run Groovy
To run Groovy 2.4, ensure you have a Java Runtime Environment (JRE) for Java versions 6,7, or 8 installed on your computer. It is available for free here.
After this, simply set the JAVA_HOME environment variable to point toward the location of your Java installation.
A detailed installation guide for Groovy is available on its official website. It will walk you through all the latest instructions.
Note: You can also refer to Groovy documentation if you prefer so.
| Like I haven’t stressed enough, you can start using Groovy in different ways. Just open a new tab in your browser and hit it with the Groovy web console The web console is a handy way of getting hands-on with Groovy- whether it is for learning or for debugging small code segments. It’ll save you the trouble of installing a full-blown IDE or an interpreter on your machine. All the code snippets can be safely and correctly run within it. All you have to do is type your required script in the white area and click “Execute Script” to view the output.  |
Once you have installed Groovy, you can run it directly as scripts. You can do so via “groovy”, “groovysh”, or “groovyConsole”.
You can even compile Groovy with “groovyc” or run a compiled Groovy script with Java.
If you feel adventurous, you can install a Groovy plug-in for your favorite IDE: IntelliJ IDEA plug-in, Netbeans IDE plug-in, Eclipse plug-in, and other editors.
By now, you might have an idea about how easy it is to work with Groovy. It can be a handy tool. But hey, we all need to be practical as well, right?
So in the next section, we’re going to check out how to use Groovy scripts in real-world situations.
Chapter 2: Infinite Possibilities with Groovy Scripting
Depending on your situation and domain, you might want to use the features of Groovy differently.
Groovy for the Plain Old Java Programmer
One of the most obvious ways to make use of Groovy is by pairing it up with Java programming.
As someone who has been a Java developer, I empathize with the challenges that arise when trying to introduce a new language to the team, only to face resistance from management who insist on sticking with Java. It’s often the case because Java is widely acclaimed and cherished.
Groovy can be your savior and trusted ally here, allowing you to introduce dynamic behavior on top of your existing Java code while making it concise. So with Groovy, you can open a plethora of use cases and get the ball rolling on new projects.
Let’s consider a simple example here.
I’m sure, as a developer, there must have been countless occasions where you needed to access a file and perform some operations before closing it (or sometimes forget to close it, resulting in some awkward stares from peers).
Here is how you would use Java to achieve this seemingly simple task.
import java.io.BufferedReader;
import java.io.FileReader;
import java.io.IOException;

public class FileProcessor {
    public static void main(String[] args) throws IOException {
        BufferedReader reader = new BufferedReader(new FileReader(args[0]));
        String line;
        while ((line = reader.readLine()) != null) {
            System.out.println(line);
        }
        reader.close();
    }
}
And with Groovy, bingo!
new File(args[0]).eachLine { line ->
    println line
}
See the difference?
It’s a win-win for everyone.
So the software application that you have been burning the midnight oil for, can be taken up a notch with the features that Groovy offers. And your managers remain happy you haven’t abandoned Java altogether.
Its support for features like functional programming and metaprogramming allows you to write concise and expressive code, at the same time providing seamless integration with Java libraries and frameworks.
Automate Your Way with Groovy Scripts
Groovy is a perfect language to automate daily, repetitive tasks like extracting data from a data source, processing a batch file, or generating your quarterly sales report.
With built-in scripting capabilities, you can automate your way forward with Groovy scripting and make your life easier.
If you are the DevOps or the Agile programmer kind and your daily work is managing a bunch of cards and statuses across different workflows, Groovy can be your genie.
It can build simple automation for everyday tasks or even pull up continuous integration (CI) and reporting capabilities.
Scriptrunner, an add-on app on the Atlassian marketplace, advocates Groovy and its vast capabilities by offering automation for everyday Jira tasks. It helps you create custom-scripted fields, design unique workflows, automate bulk actions, and much more.
Groovy can even help you with your testing needs, both unit and functional testing, so your testers feel right at home.
Integrations Made Easy with Groovy Scripting
You can’t think of standalone applications in a digitally evolving world.
As a developer, you might have already felt the need for different software applications and programming languages you use to be interoperable with each other.
Groovy originated from this motivation.
So it can play a huge role in a lot of different integrations.
You might have used APIs and the pain that goes along with making them talk to one another. To make this issue easier, you can use Groovy to integrate with RESTful APIs, SOAP services, and other web services. It is possible because of built-in support for HTTP, JSON, and XML, making it easy to handle and manipulate data.
Groovy features like support for JDBC and SQL make it easy to integrate it with your data sources like MySQL, Oracle, and PostgreSQL. And a cherry on top is that you can use this extracted data to generate reports with Groovy as we saw a while ago.
We have all struggled with conflicting message formats and structures. Groovy’s dynamic typing gives the flexibility to work with these formats. So you can use it to integrate with middleware technologies like Apache Kafka, RabbitMQ, and Apache Camel.
Cloud services have taken the world by storm. You can use Groovy to integrate with various Cloud services and applications like AWS, Azure, and Google Cloud. You can also use it to integrate with other cloud applications like Jira, Azure DevOps, Salesforce, ServiceNow, Zendesk, GitHub, etc.
You can use Groovy scripting for enterprise integration tasks like ETL, data integration, and application integration. Its support for functional programming and collections, along with the Java libraries and frameworks within its reach, can be a powerful integration tool and resource.
Have these concrete examples opened your minds to the world of Groovy and the value it brings to the table?
You might have already started thinking of newer ways to implement your next project using Groovy scripting. Or you might ponder about how to use the integration prowess it natively supports.
Let’s dig into this thought a little more.
Groovy Scripting in Exalate
Throughout this blog post, we will explore an interesting way in which Groovy adapts to diverse scenarios.
We’ll discuss a solution called Exalate that uses Groovy scripts to synchronize information between different applications.
| Feel free to skip the Exalate-related sections if you only want to keep your mind occupied with Groovy and get a hands-on experience faster. However, it wouldn’t hurt to quickly scan through and acquire some extra knowledge along the way. |
Before we discuss how Exalate uses Groovy, let’s briefly understand what Exalate is in the first place.
Exalate is an integration solution that aims to provide uni or bi-directional synchronizations between different software applications. It supports integrations for Jira, Salesforce, ServiceNow, Zendesk, GitHub, Azure DevOps, HP ALM, etc.
Now there are many integration solutions available in the market. Then why talk only about Exalate?
Exalate is the only integration solution in the market that uses Groovy scripting to set up advanced, tailor-made integrations with multiple dependencies and custom data mappings.
So it would be intriguing to study how you can use Groovy scripts for synchronizing information across our favorite platforms.
Exalate has its reasons for choosing Groovy as the preferred language. Regarding this, I had a conversation with the chief software engineer at Exalate, and this is what he had to say:
| Basically, when the product was conceptualized, we started looking into options for selecting a language that the Jira admins would be comfortable with. Exalate started with Jira on-premise as its first connector. And because Scriptrunner was the most popular addon in the marketplace at that time, and it used Groovy, the choice was a no-brainer for us. Another reason why we chose Groovy was because it provided seamless integration with the Jira API. You could call the Jira API without the need for any translation between Jira’s own language and Exalate scripts, as long as the scripting language was Java-based. Finally, we wanted to be able to run within Jira without making the customer install anything on their systems and without relying on the internet (since some Jira’s are only available within the company network), which means whatever language we use needs to be executable within Jira’s Java process. |
Exalate supports decentralized integration. It uses Incoming and Outgoing sync processors on both sides that wish to interchange data. These processors allow independent and full control over information exchange.
How to Set Up Your Development Environment in Exalate
The Exalate admin console has Outgoing and Incoming sync processors in the form of “Incoming sync” and “Outgoing sync” respectively. These windows are present under the “Rules” tab that is displayed when you configure the connection.
For instance, if you want to set up a Jira Zendesk integration, you must first install Exalate on both Jira and Zendesk instances. Then create a connection in the Script mode.
You then need to configure the Outgoing sync script to determine what information to pass to the other side and an Incoming sync script that interprets the information received from the other side. You can choose to add, delete, or edit these sync “Rules” according to your integration use case.
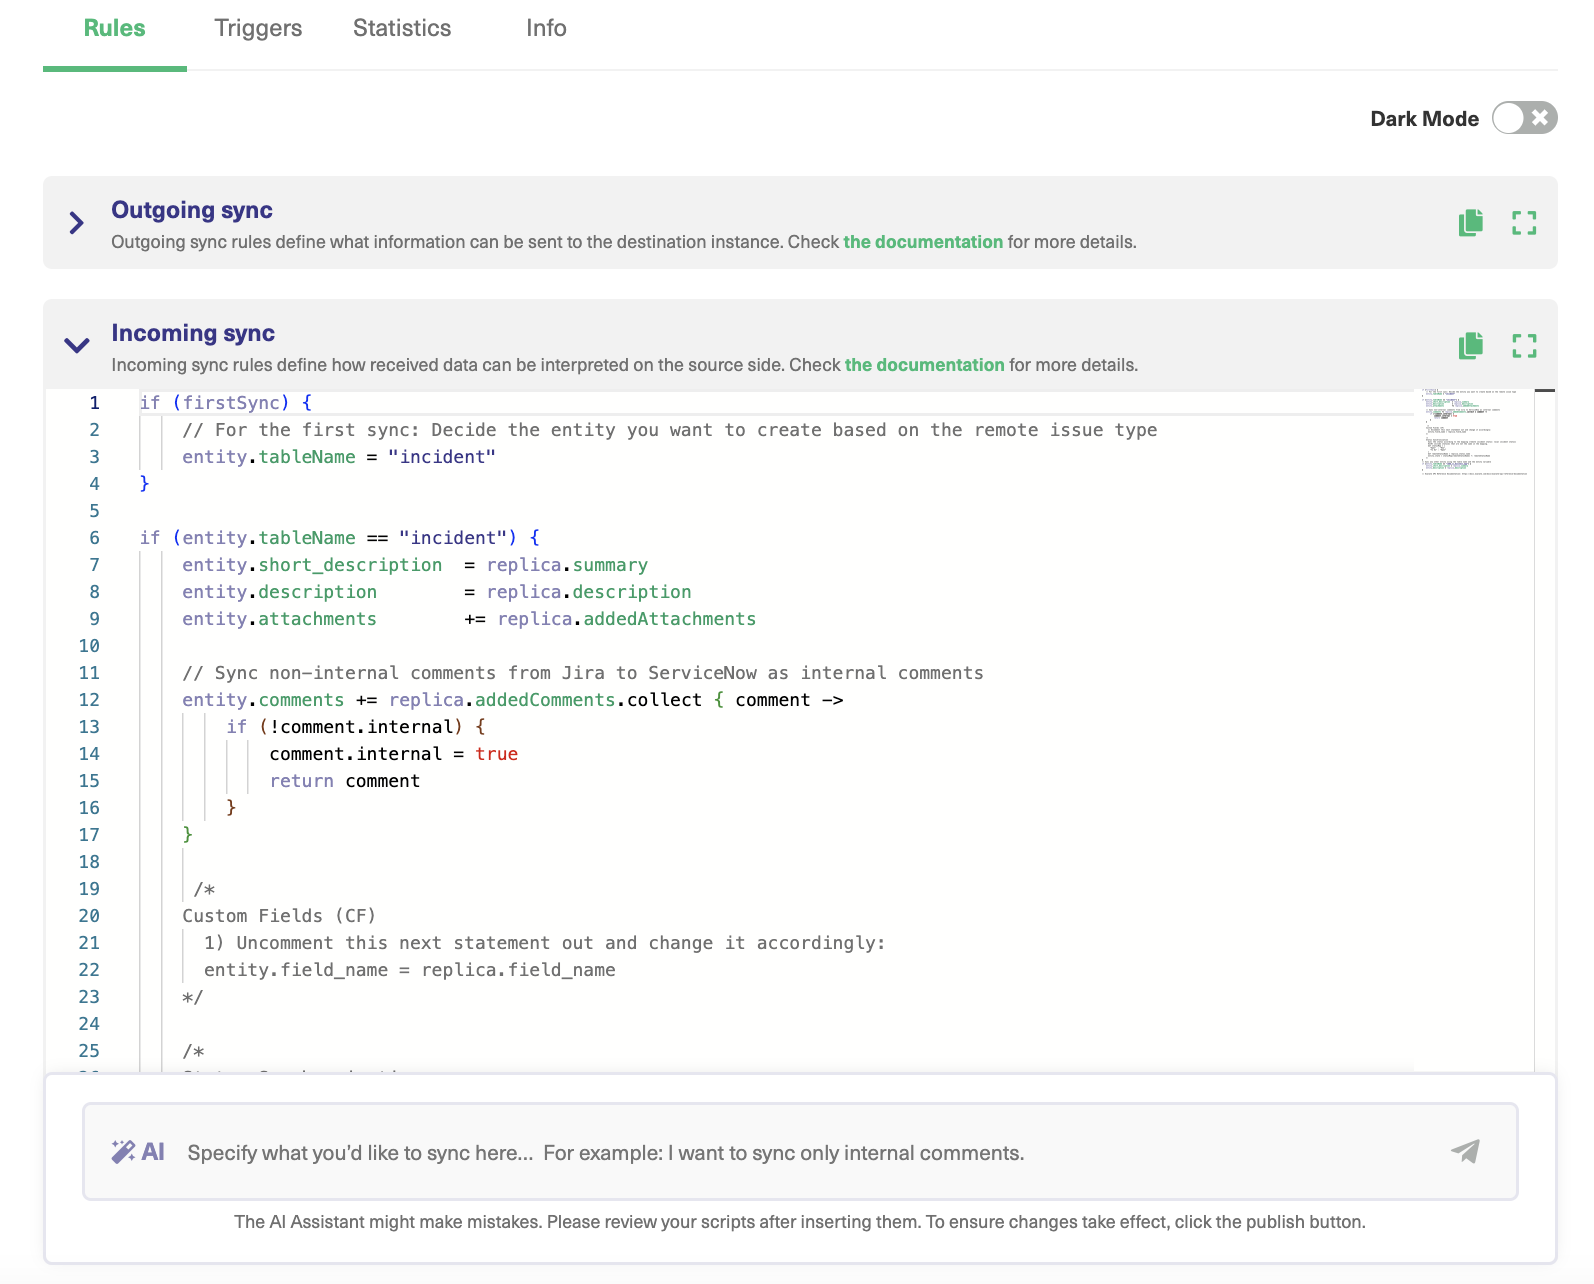
Connections in Script Mode Using AI Assist
The Script Mode allows you to generate and optimize scripts using the AI Assist feature — which appears as a tab under both the incoming and outgoing sync rules.
How does it work?
Enter your sync requirements into the chat box, and AI Assist will generate scripts based on your input, existing configurations, and Exalate’s scripting API.
It is also important to note that AI is not perfect. So, you need precise and detailed prompts to ensure the best results.
Let’s say you want to sync statuses between Azure DevOps and Salesforce; the prompt could look something like this:
“I want to sync the status of my work item with the status of a Salesforce case.”

After a moment, the script will be generated, with suggested changes highlighted in green and red. The green scripts are suggested additions, while the red scripts are suggested deletions.
If the new snippet works for you, click on “Insert Changes”. Otherwise, you can discard the suggested code. If needed, you can refine your prompt and, once satisfied, publish the changes.
Proceed to create automatic synchronization triggers now.
You must “Publish” the changes and then test the sync upon configuring the scripts.
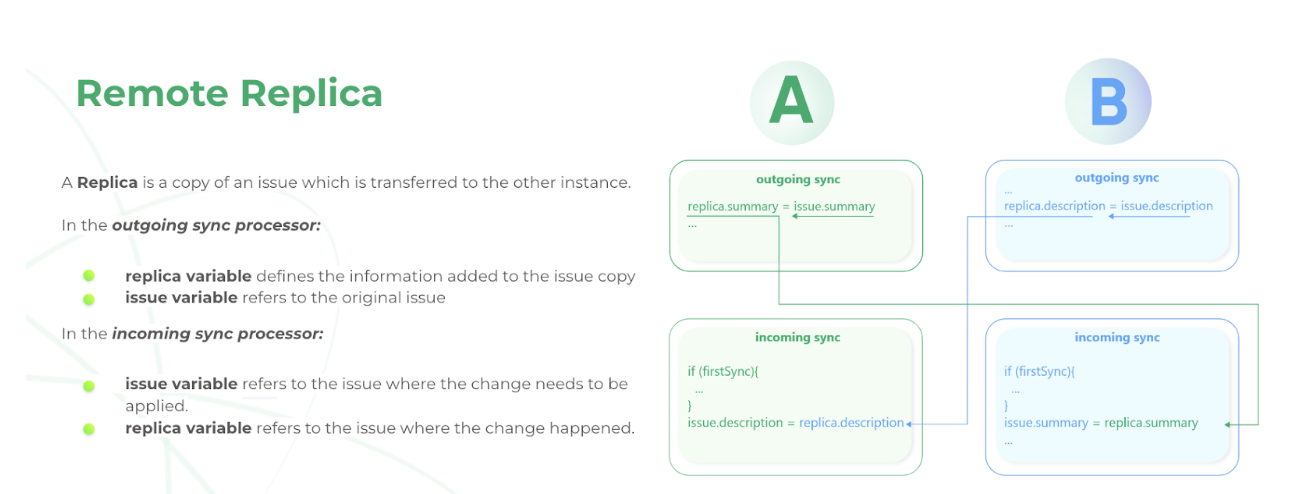
While using Exalate, you’ll come across something called “replica”. You can see it in the image above.
A copy of the original entity transferred to the other side is called a replica. It is a payload containing details of the information exchange.
You can learn more about Exalate through its Academy tutorials or get hands-on experience with a step-by-step Getting Started guide on its documentation.
Note: Hereon, I’ll include Exalate Groovy scripting examples wherever applicable.
Chapter 3: Understanding the Fundamentals Before You Start Coding in Groovy – aka Groovy Scripting Basics
Each programming language has its distinct look and feel, but the general structure remains the same. If you are familiar with a few such languages, following this blog will be easy for you. It’ll also help to have some background knowledge of Java.
Nevertheless, I will provide the necessary information for each concept we cover, enough for you to get started with the language. But you must be aware of general programming concepts: braces, indentation, operators, parenthesis, comments, statement terminators, and the like.
If you are eager to learn these concepts, move on to the next chapter.
Of course, you can always revisit any section if you feel like you are struggling.
We’ll cover a few starters here so you are comfortably settled within the Groovy environment.
Commenting a Groovy Code
Like all programming languages, you can use single-line or multi-line comments in Groovy.
//this is a single line commentSome Groovy code here.
/*this is a multi
multi-multi-line comment */
Some Groovy code here.
Less is More in Groovy
As we have already discussed, you can write shorter, more concise, and more expressive code using Groovy scripts.
- Parentheses, package prefixes, and semicolons are optional in Groovy. However, in certain situations, like in methods with no parameters or constructors, parentheses are a good practice.
- Using “return” statements is optional in Groovy.
- Type (data type) declarations are optional in Groovy.
- Type casts are optional in Groovy.
- Methods and attributes in Groovy are public by default.
- You can omit mentioning the “throws” clause in the method signature if a checked expression is thrown.
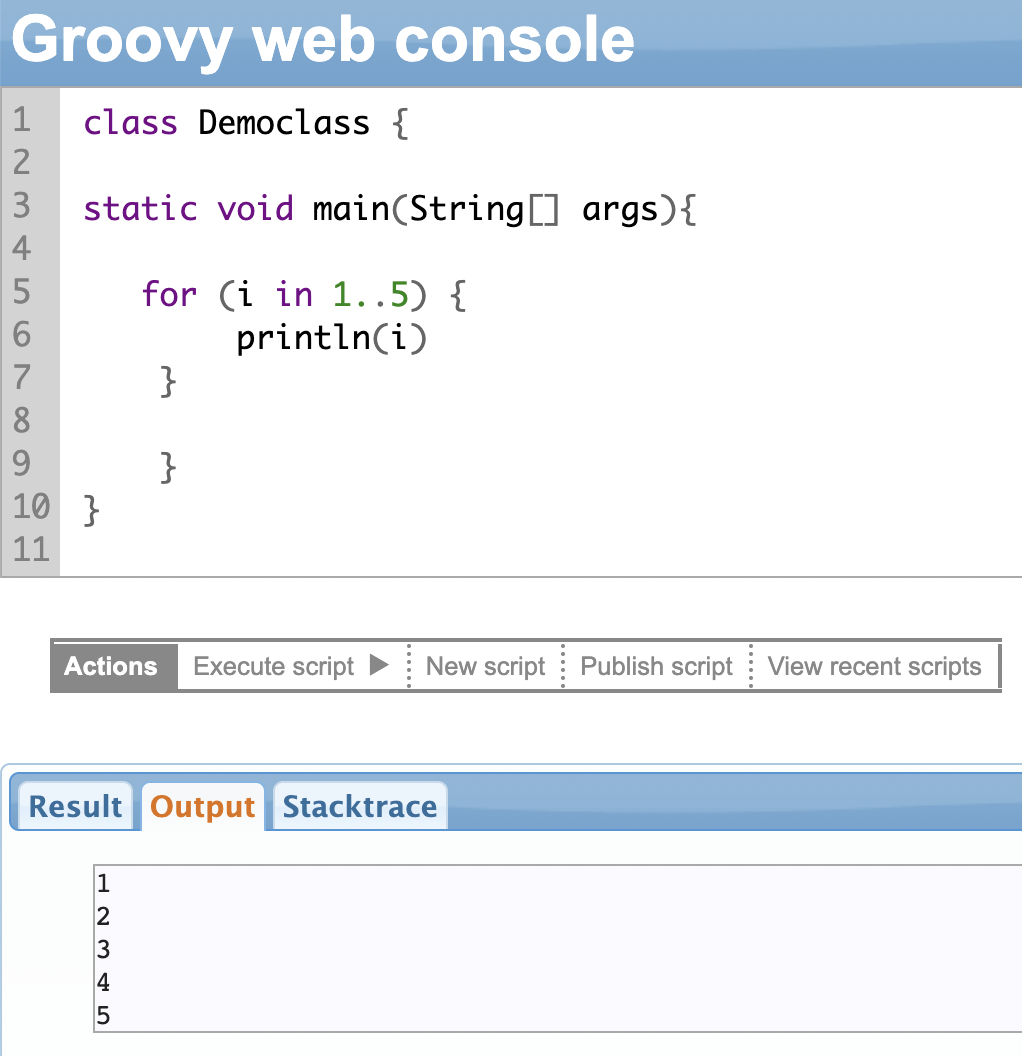
With this under your belt, let’s study the principle tool we will be using throughout this blog: the println or print statement
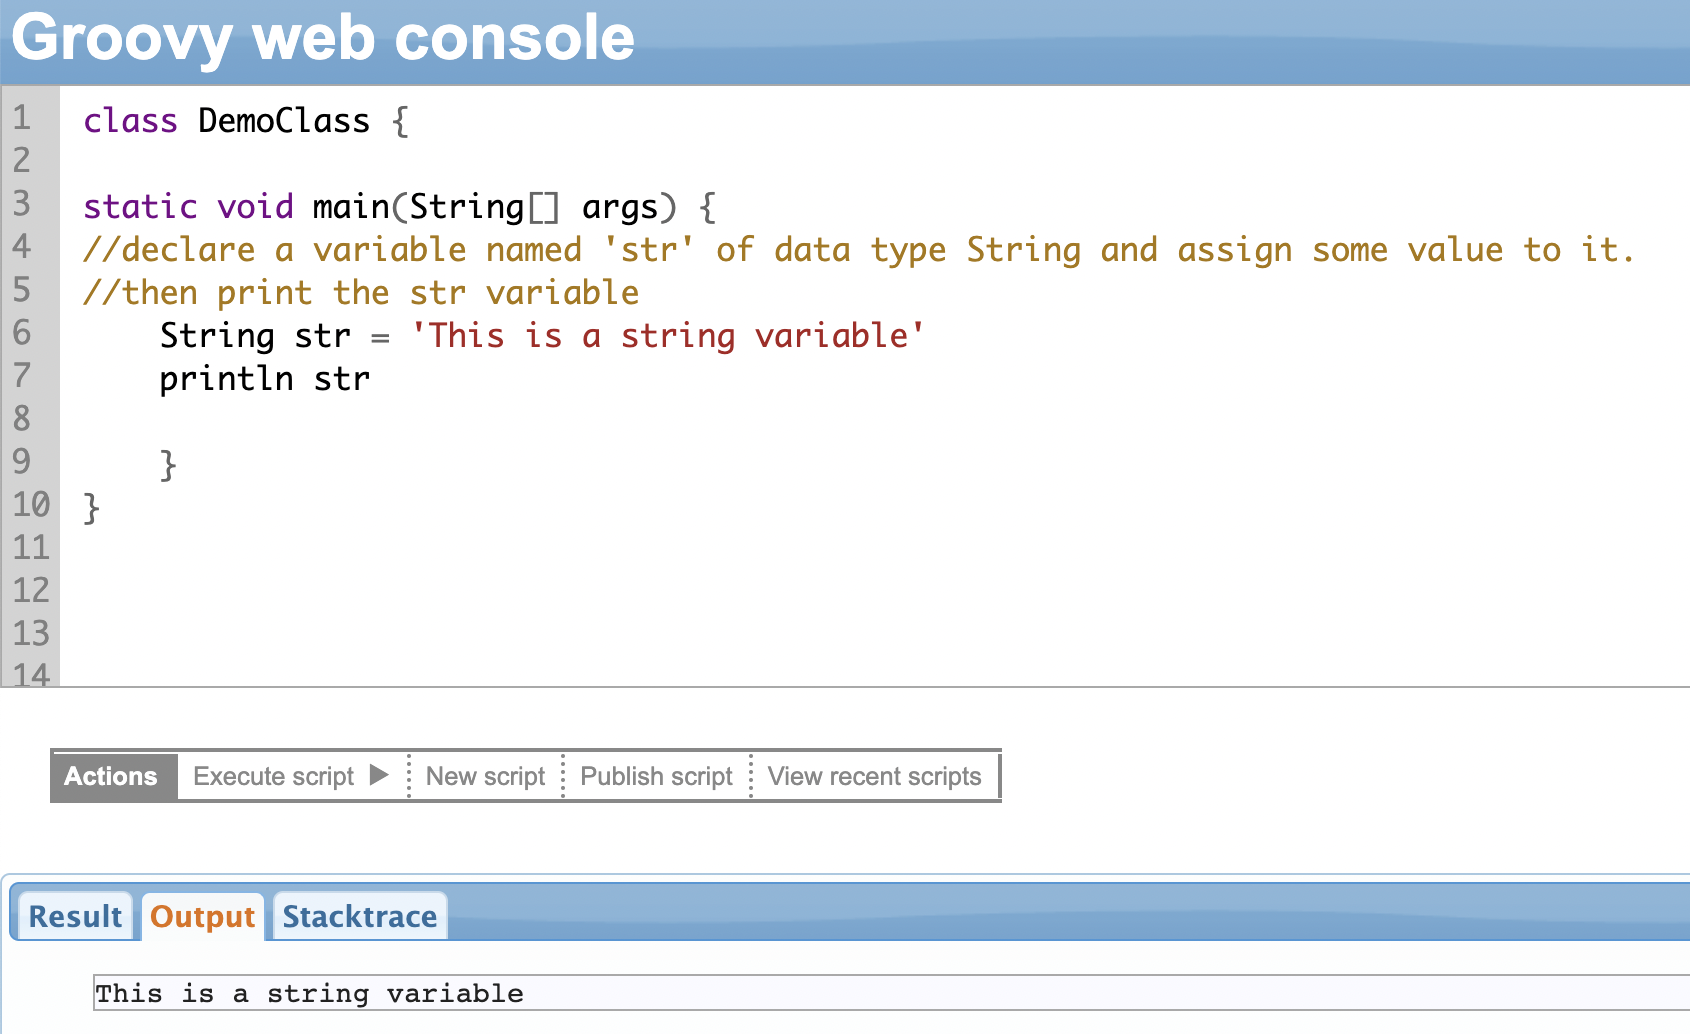
Displaying the Output in Groovy
You can use the print or println statement to display the output in Groovy. Classically these methods print the toString value of the object.
Ignore the other lines of code written in the example below. We will study them a little later. You might already know what a class is if you are familiar with Java.
class DemoClass {
static void main(String[] args) {
//use the print or the println statement to display the //output.
println 'car'
print 'car'
}
}Groovy Scripts
Groovy scripts are files that hold the “.groovy” extension.
- They can contain any non-specific statements, plain text, class, or method definitions.
- They can be run from the command line or within a Groovy environment.
- When a Groovy script is executed, the Groovy interpreter reads the script from top to bottom and executes each statement in turn. If the script contains method definitions or class declarations, these are compiled into bytecode and loaded into the JVM at runtime.
- They can also import or use external libraries, such as Java libraries or other Groovy scripts to extend their functionality.
Note: You can externalize Groovy scripts in Exalate so you can use (or reuse) them outside the product scope.
Import Statements in Groovy
You can use import statements in Groovy to implement some functionality provided by libraries.
By default, Groovy imports the following libraries, so you don’t need to worry about importing them.
import java.lang.*
import java.util.*
import java.io.*
import java.net.*
import groovy.lang.*
import groovy.util.*
import java.math.BigInteger
import java.math.BigDecimal
Using Import Statements in Exalate
The most common example of Groovy packages used in Exalate is for transformers. You can use these transformers to convert information from one specific format to another.
For instance, every application has a different format, Jira – Wiki, Azure DevOps, Salesforce and ServiceNow – HTML and GitHub, and Zendesk – Markdown.
The following packages can be used to handle these formatting differences:
import com.atlassian.jira.component.ComponentAccessor
import com.atlassian.jira.security.groups.GroupManager
import com.atlassian.jira.user.ApplicationUser
import java.text.SimpleDateFormat;
import java.text.DateFormat;
Note: You can also check for more information on the packages here.
Groovy Keywords
Keywords are special words that are reserved to perform a certain function. So you cannot use them as a variable or function name.
We will be learning about a few important keywords in the coming sections.
| abstract | as | assert |
| boolean | break | byte |
| case | catch | char |
| class | const | continue |
| def | default | do |
| double | else | enum |
| extends | false | final |
| finally | float | for |
| goto | if | implements |
| import | in | instanceof |
| int | interface | long |
| native | new | null |
| package | private | protected |
| public | return | short |
| static | strictfp | super |
| switch | synchronized | this |
| threadsafe | throw | throws |
| transient | true | try |
| void | volatile | while |
Phew! That was long. I hope you are all set to move further. If not, take a break and come back soon.
There is only one way to hit the road now, to start coding! So let your fingers groove with Groovy and follow on.
Chapter 4: Groovy Variables and Data Types
Consider the following statement:
String str = 'This is a string variable'
We have declared a variable called str. It belongs to the data type: String. Its value is: ‘This is a string variable’.
Variables are named memory locations that have a data type. You’ll want to use variables to store some information. You can then use these variables to perform some operations throughout the program.
Keep in mind:
- Variables are case-sensitive. So, int x = 5 and int X = 5 are two different variables: x and X.
- Variable names can include alphabets, numbers, or the underscore sign. It can start with either an alphabet or an underscore, not a number.
- Variables need to be declared. That is, you must specify the data type of the variable either explicitly or using the “def” keyword (we will cover it soon).
Data types denote what kind of data that variable holds: a string, a character, a boolean, an integer, a decimal, etc.
Groovy has several built-in data types. We will quickly look at each of them.
Numbers
Numbers can be integers (whole numbers) or decimal (floating point) values.
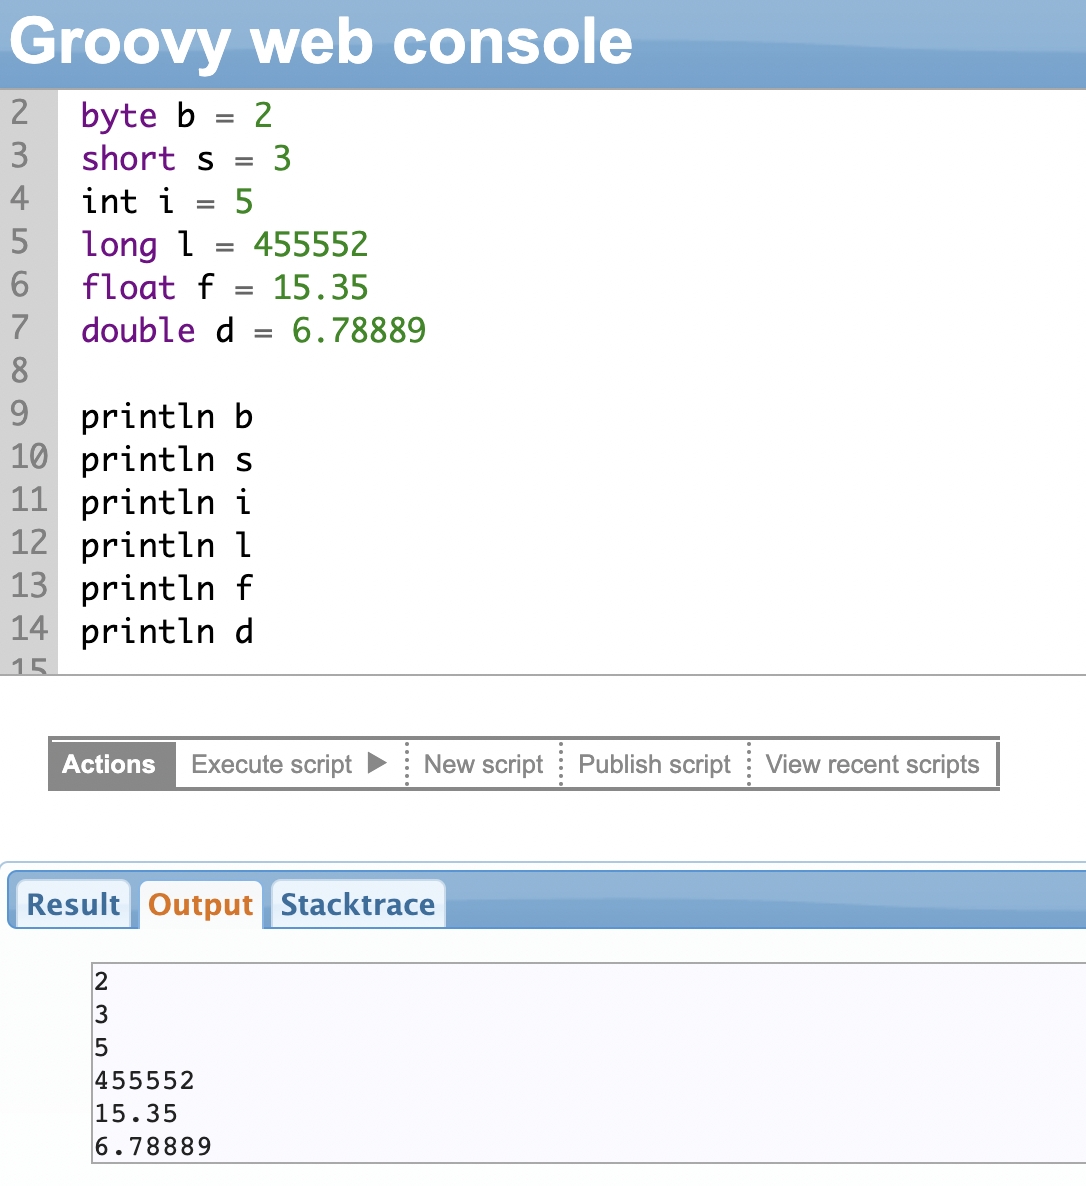
The following table summarizes the data types and the range of values under each category.
| Data type | Description | Range of values for the data types | Example (Use the above image for the reference code) |
| byte | Represents a byte value | -128 to 127 | byte b = 2 |
| short | Represents a short number | -32,768 to 32,767 | short s = 2 |
| int | Represents an integer | -2,147,483,648 to 2,147,483,647 | int i = 3 |
| long | Represents a long number | -9,223,372,036,854,775,808 to +9,223,372,036,854,775,807 | long l = 455552 |
| float | Represents a 32-bit floating point number | 1.40129846432481707e-45 to 3.40282346638528860e+38 | float f = 15.35 |
| double | Represents a 64-bit floating point number | 4.94065645841246544e-324d to 1.79769313486231570e+308d | double d = 6.78889 |
Note: You cannot assign a higher value like 45552 to a short data type since it will be out of its range. For instance, short s = 45552. Try it yourself and see the result!
Strings
Strings are used to give some text value to variables. It can be either a single character (char) or a block of text (String).
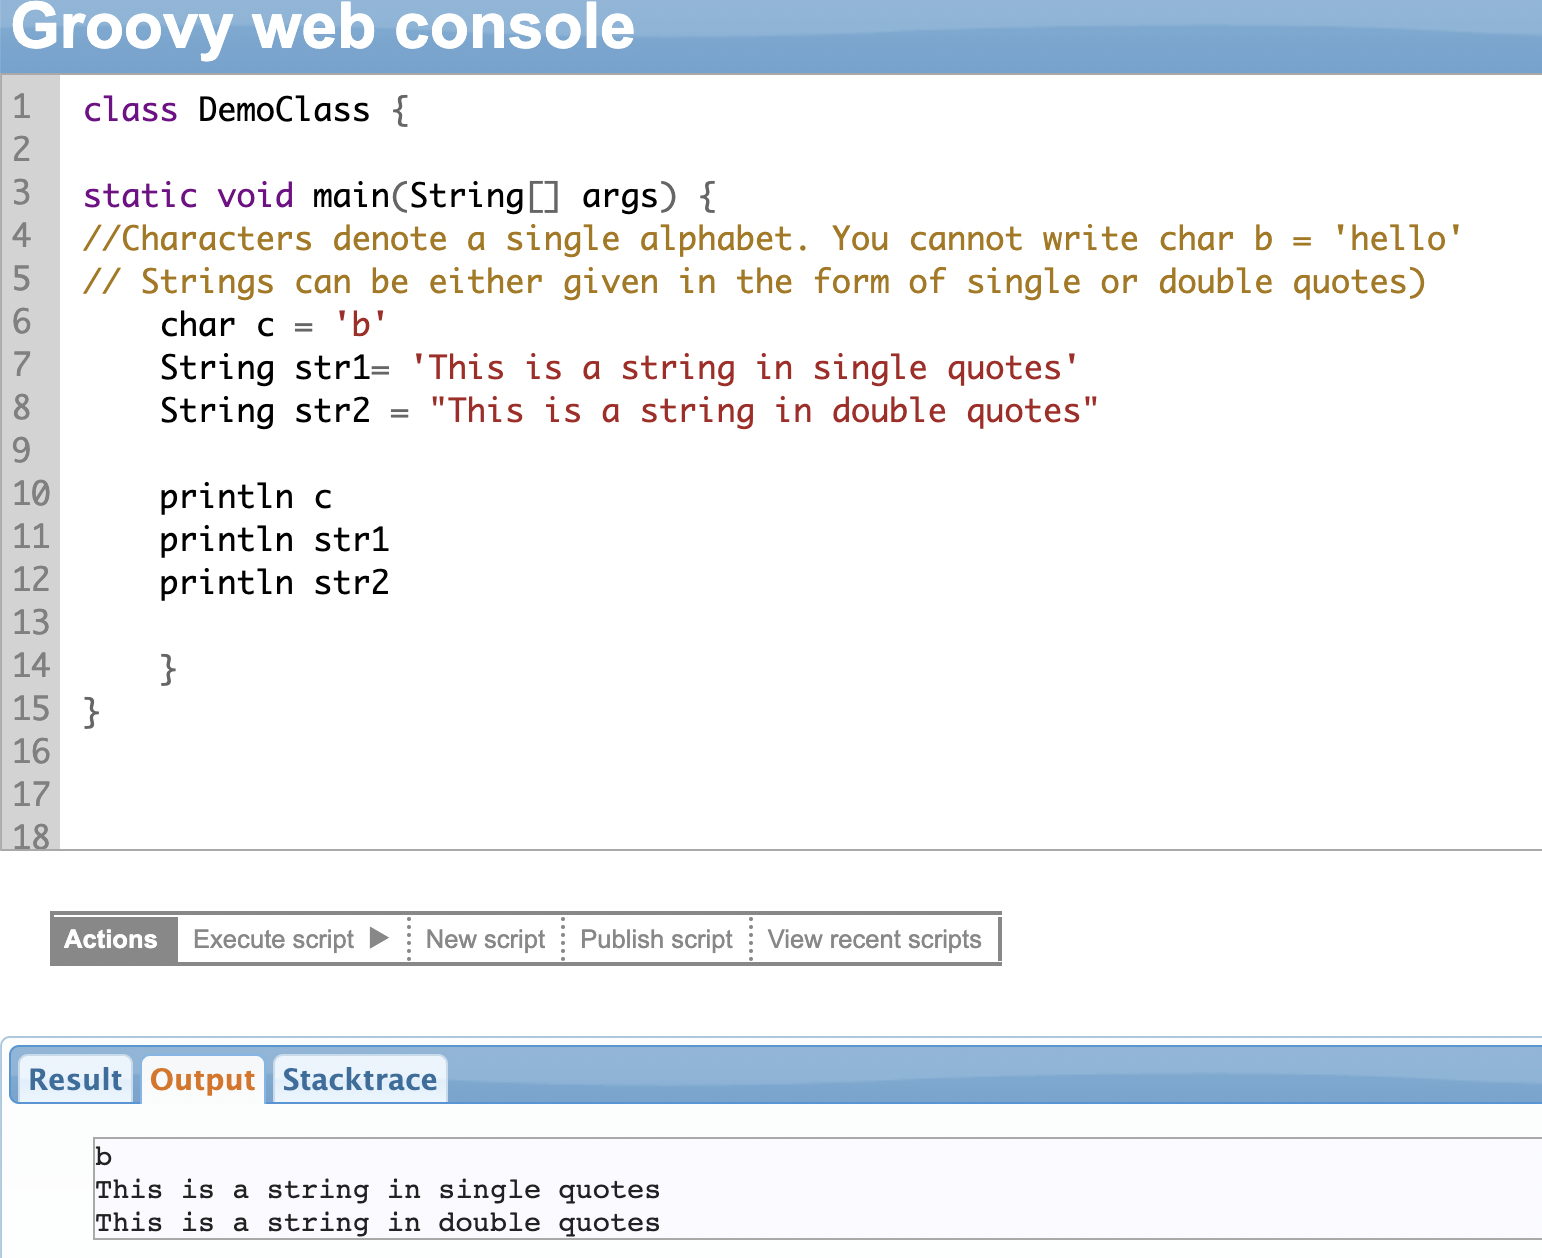
Strings can be enclosed in single, double, or triple quotes. Strings enclosed in triple quotes can span across multiple lines.
Strings are formed out of single characters placed in a sequence. So you can access individual characters one at a time. The index position of the first character is 0, and the last character is one less than the length of the string.
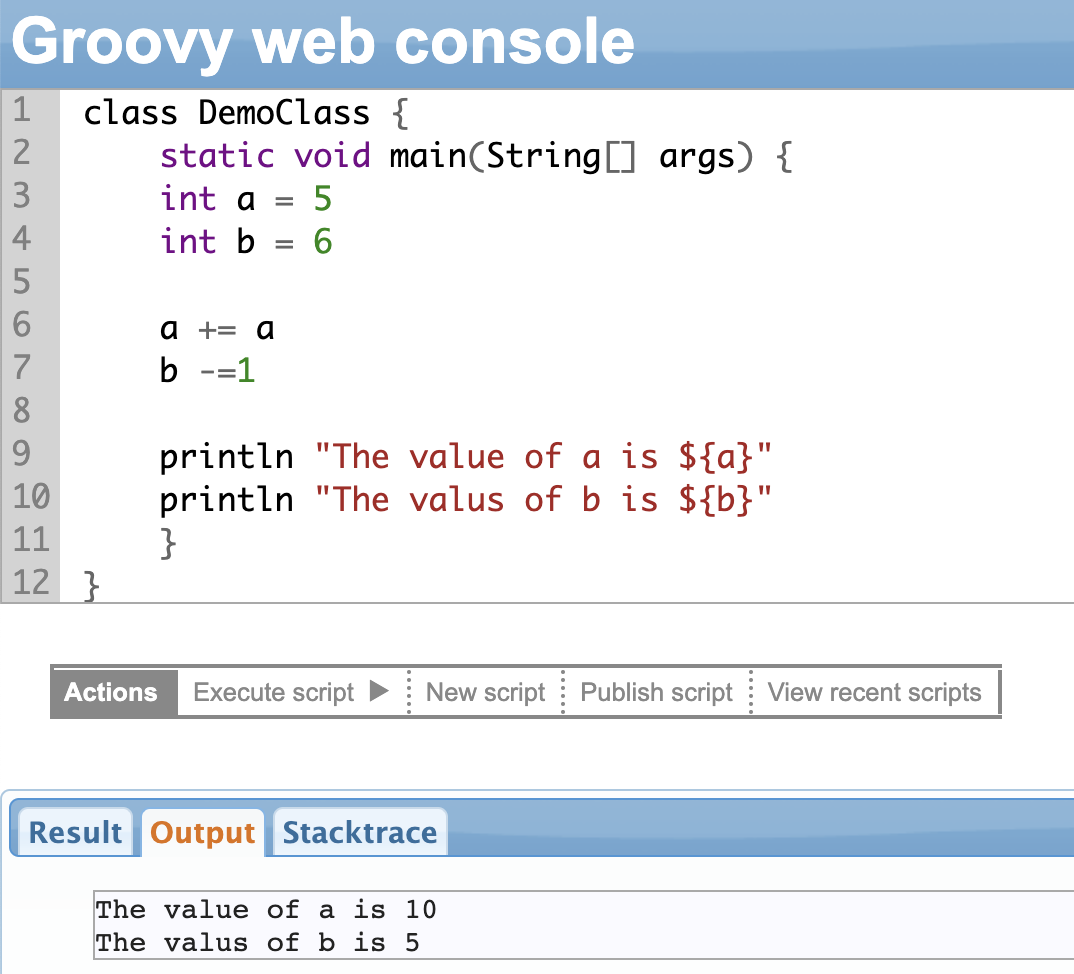
String Interpolation
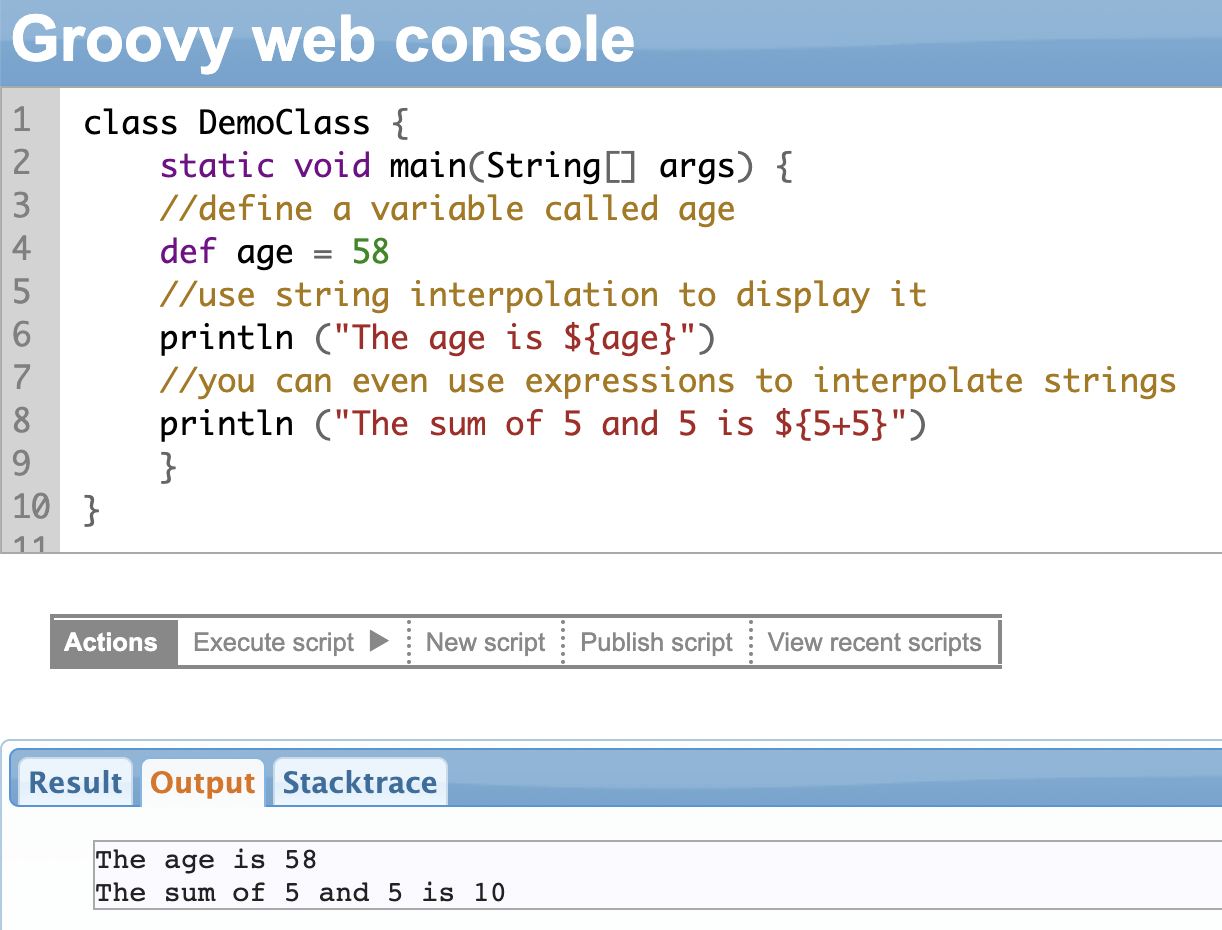
String interpolation allows you to include variables or expressions (like 5+5) within a string. You can include variables or expressions with dynamic content without concatenating strings and variables manually.
Whenever an expression is given within ${expression} in a string literal (double quotes), it works as a placeholder. When the code is executed, the expression is evaluated and replaced by the actual value.
For instance, if the expression says hello ${age}, the aim is to replace age with the actual value. Likewise, if there is an expression like ${5+5}, it will be replaced with the actual answer 10 at run-time. String interpolation aims to achieve this.
Groovy supports string interpolation.
Note: String interpolation works only for strings in double quotes. Single and triple quotes aren’t valid candidates for it.
Using String Interpolation in Exalate Scripting
Suppose you want to synchronize comments from one system to another and have a specific requirement for this sync. You want to mention the original author of the comment from the source side and send it to the destination instance. You also want to sync the comment creation time.
The Groovy script used in Exalate for this use case would be
entity.comments += replica.addedComments.collect { comment ->
comment.body = "${comment.author.email} commented at ${comment.created}: \n${comment.body}"
comment
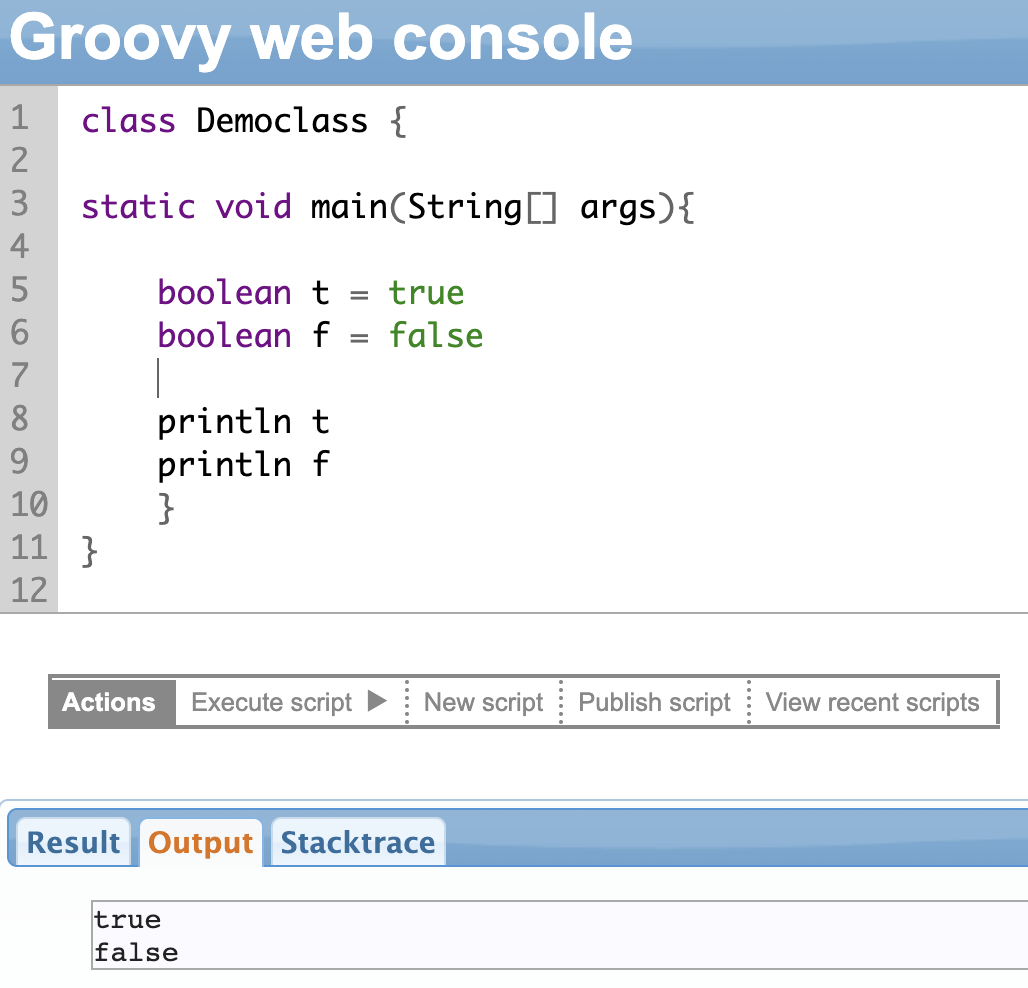
}Boolean
Boolean is a special data type. You can assign only 2 values to Boolean variables: true or false. It is mostly used in conditional statements to check whether a value is true or false. You can use it like a regular data type and assign it to variables, methods, or any other field.
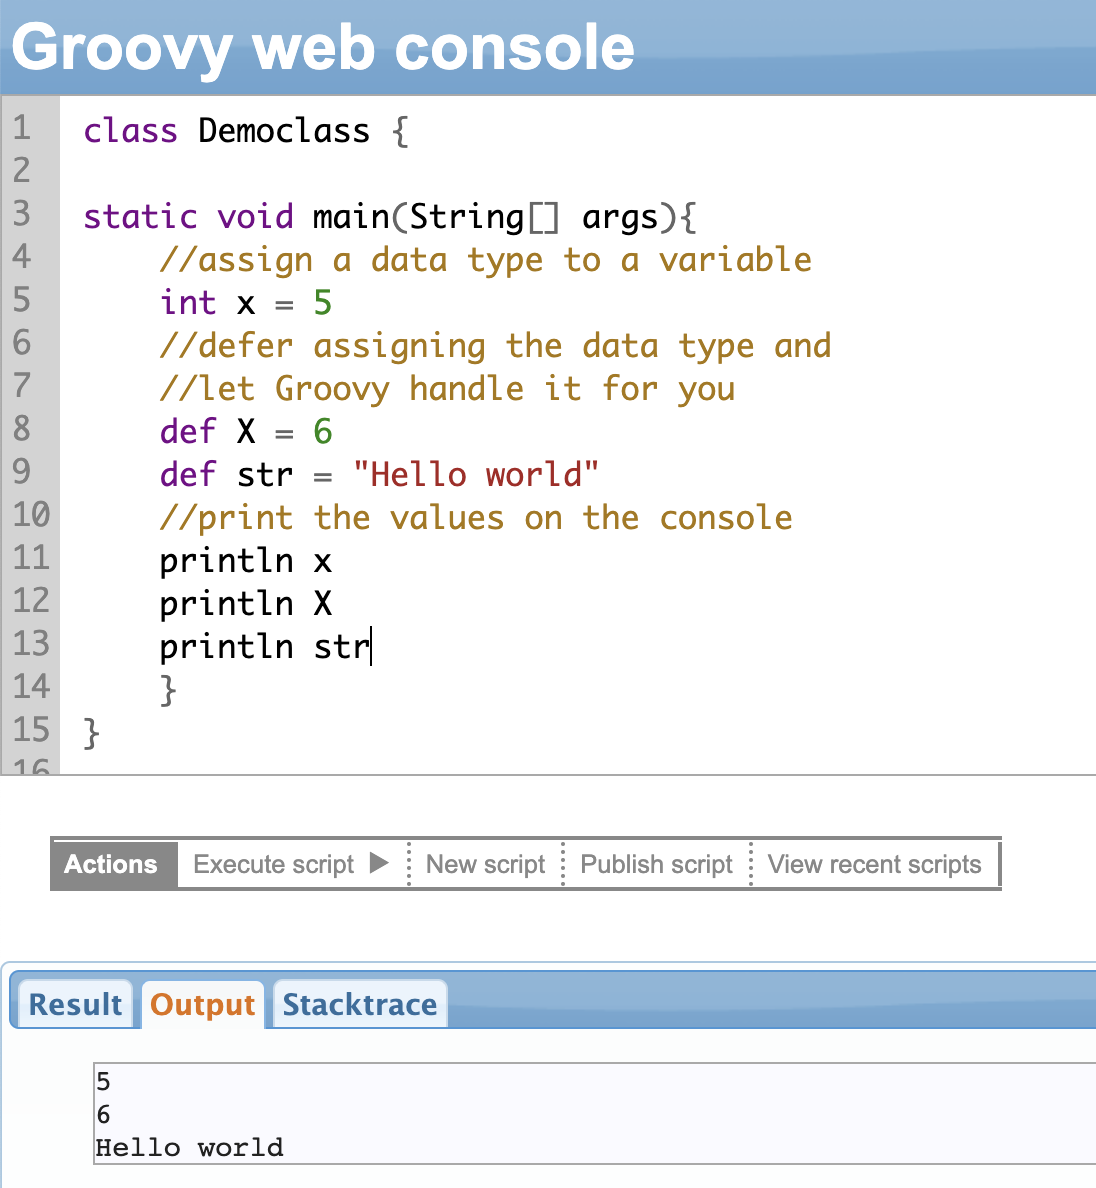
Optional Typing with the def Keyword
I have been harping about how Groovy scripting is so versatile. Here’s a good one.
There are 2 ways to declare (or define) variables (or methods) in Groovy.
The first one is the traditional Java-based static approach, where it is mandatory to assign a data type to a variable name.
The second one, the Groovy way, says that assigning a data type is optional.
So, how do you do that? By using the “def” keyword.
Let’s understand it with the help of an example. We have defined 2 variables def X = 6 and def str = “Hello World” and assigned a numeric value and a text value to both of them respectively. Note here that we didn’t explicitly state the data type and simply used the keyword “def”.
Optional typing is the idea of deferring the knowledge of data type until you run the program. So in programming lingo, (data) type checking will happen at run-time instead of compile-time.
This is achieved using the keyword “def”.
The keyword “def” can also be used with methods, where it is not mandatory to mention the data types for parameters.
When a variable is declared using “def”, Groovy infers the type of the variable based on the value that is assigned to it.
Using the keyword def doesn’t imply that a data type doesn’t exist; it’s just a Groovy equivalent to an Object in Java.
Note: Groovy can blow your mind away by allowing static type-checking using the @TypeChecked annotation.
Note: You can use optional typing with Exalate scripting just like you would in Groovy.
Chapter 5: Groovy Operators
Operators in a programming language allow you to manipulate data. They help perform some kind of operation on integers, strings, or booleans.
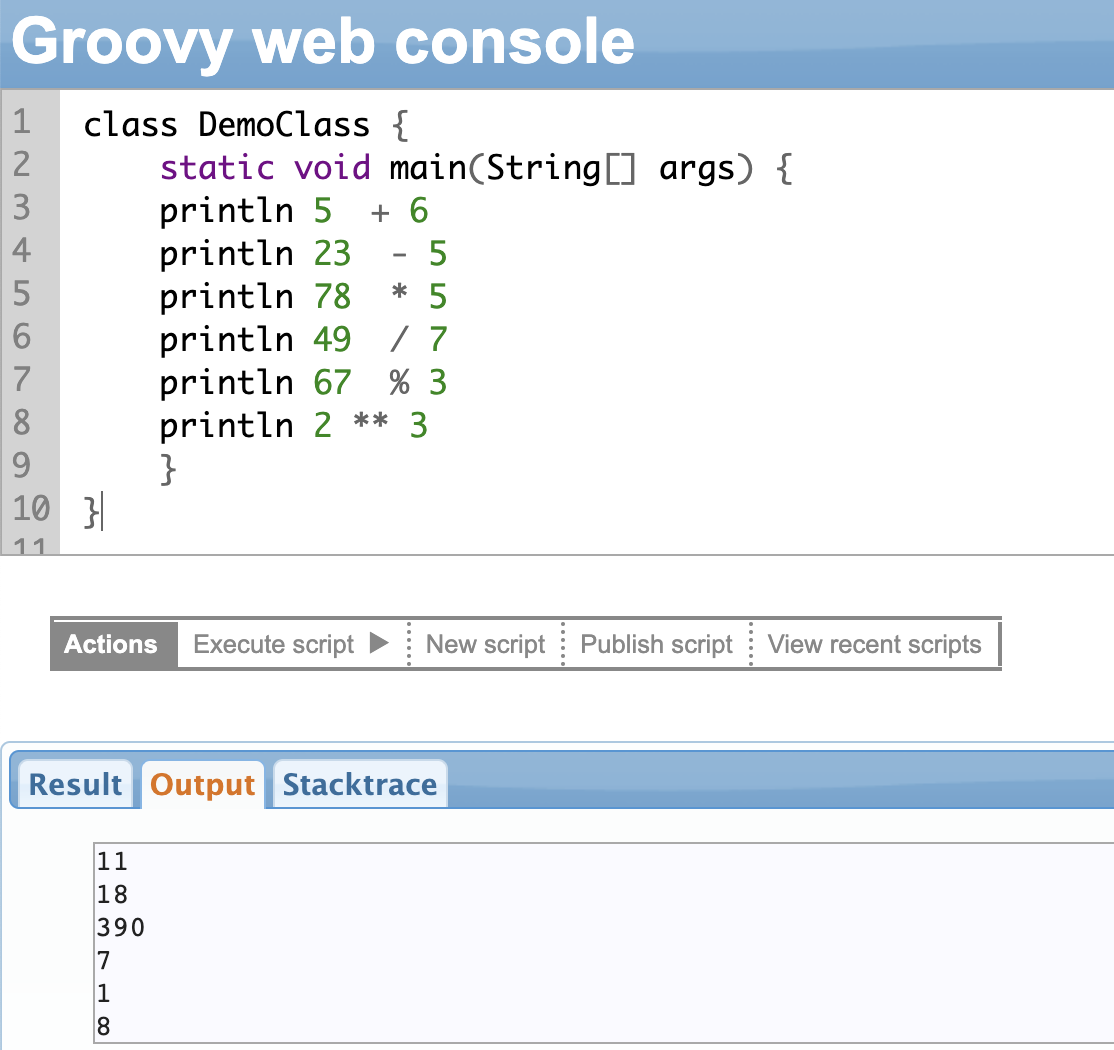
Arithmetic Operators
In Groovy, you can perform normal math operations like:
- Addition (+): Adds two numbers
- Subtraction (-): Subtracts one number from the other
- Multiplication (*): Multiplies two numbers
- Division (/): Divides two numbers
- Remainder (%): Returns the remainder of a division operation
And then there is a power operator “**”.
The power operator has two parts: the base and the exponent, like in math. The result will depend on the value of the operands (base and exponent) and the data type they belong to.
Plus, you also can use the usual postfix and prefix operators: ++ (increment) and – – (decrement) within expressions in Groovy.
For instance, x++ uses a postfix operator. It means that the value of ‘x’ is first used in the expression, and then incremented afterward.
A prefix operator, ++x means that the value of ‘x’ is first incremented, and then used in the expression.
You can refer to the example shown below.

You can also use the Unary operator in Groovy. A unary operator operates on a single operand, i.e it takes a single input and produces a single output. They are used to modify the value of a variable or perform a specific operation on it.
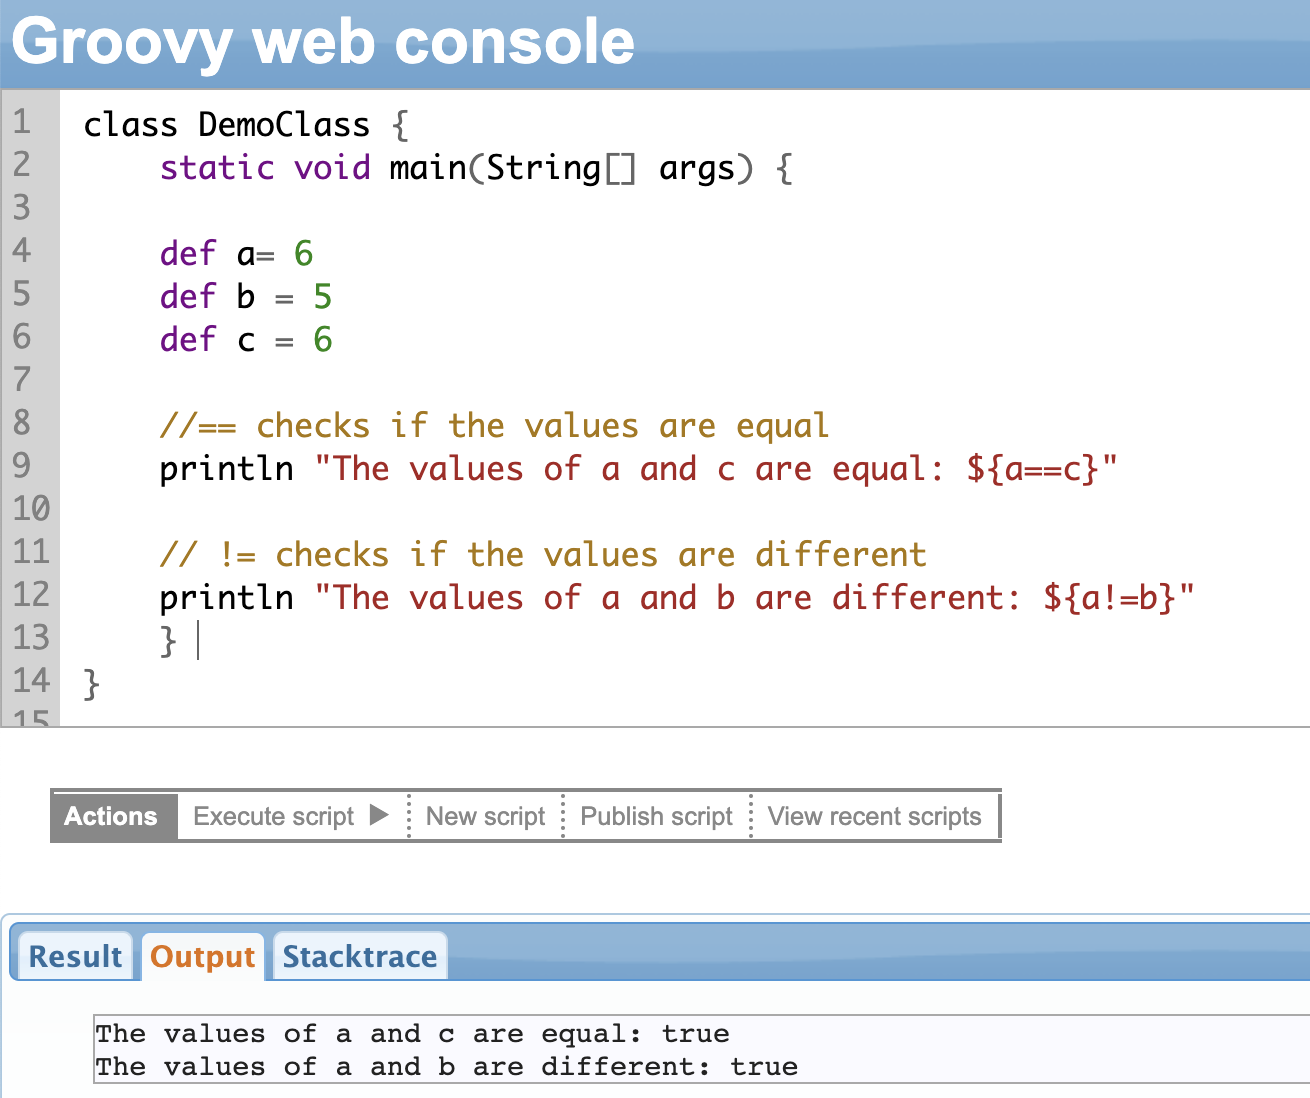
Relational Operators
Relational operators are used for comparing two variables, values, or objects. So the two values can be equal, greater than, smaller than, or not equal to.
It returns a boolean value (true or false) based on the comparison made.
| Operator | Description |
| == | Checks if the two values are equal |
| != | Checks if the two values are not equal |
| < | Checks if one value is less than the other |
| > | Checks if one value is greater than the other |
| <= | Checks if one value is less than or equal to the other |
| >= | Checks if one value is greater than or equal to the other |
Here is an example to demonstrate some of the operators.
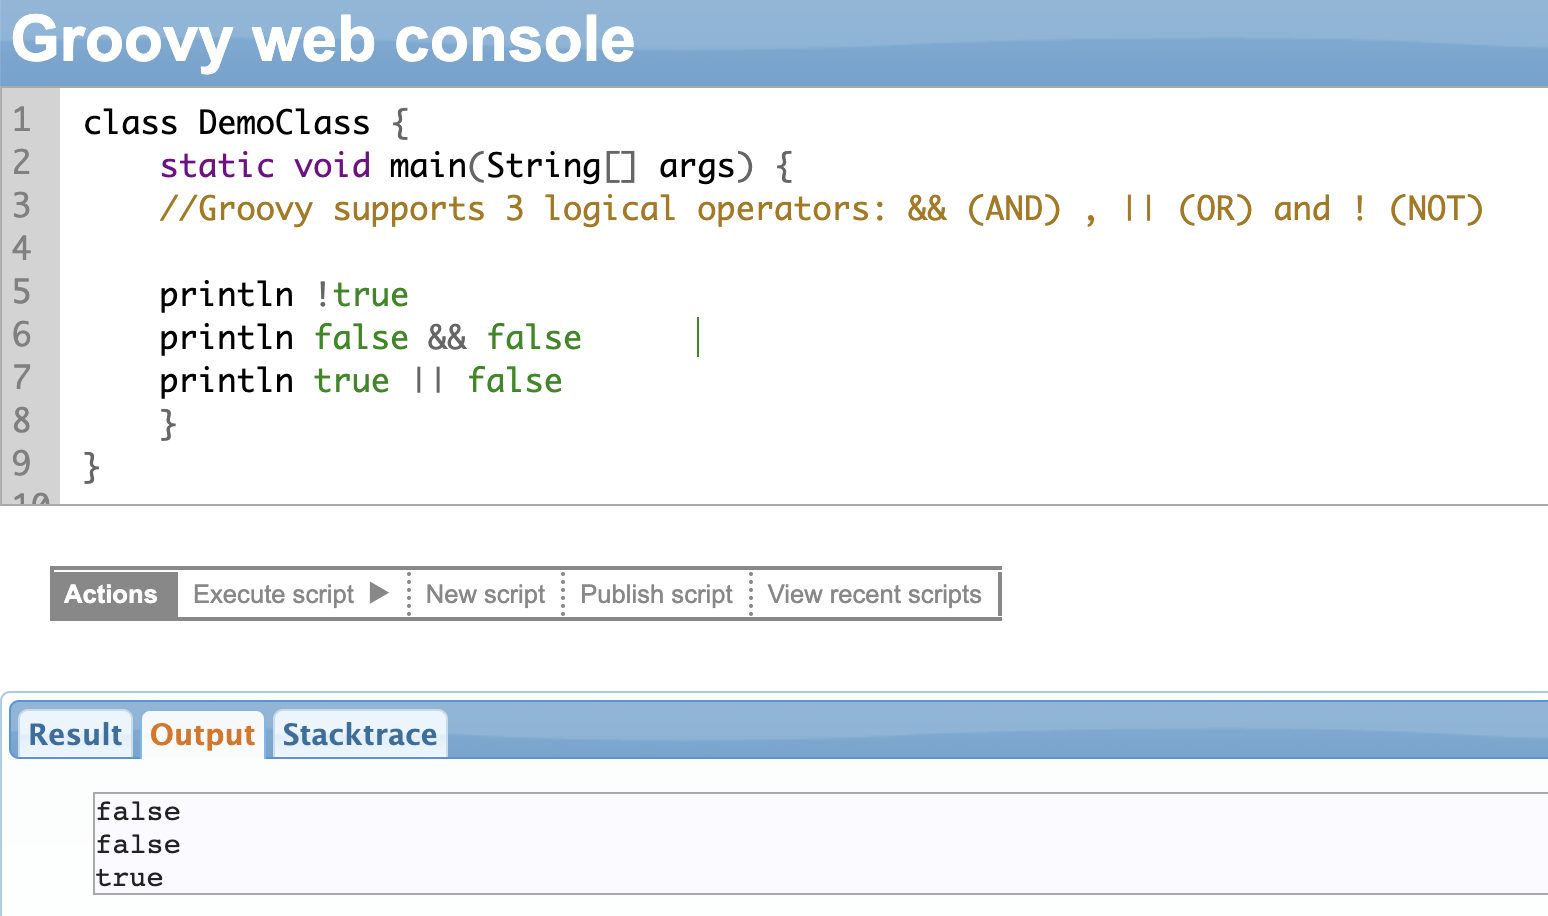
Logical Operators
Logical operators are used to evaluate boolean values and return a boolean result. Groovy supports 3 logical operators:
- Logical AND (&&): returns true if both operands are true, false otherwise
- Logical OR (||): returns true if at least one operand is true, false otherwise
- Logical NOT (!): returns the opposite boolean value as that of the operand
Bitwise Operators
Bitwise operators are operators that perform operations on the binary representation of integer values.
Bitwise operators are used for int, byte, short, long, or BigInteger. If you use bitwise operators with an int and a long, then the result will be long, between a BigInteger and a long, then the result will be a BigInteger.
In short, the result will always be the largest numerical data type.
There are four bitwise operators that Groovy supports:
- AND operator (&): returns a value where each bit is set to 1 only if both operands have a corresponding bit set to 1 (e.g: x&y)
- OR operator (|): returns a value where each bit is set to 1 only if either operand has a corresponding bit set to 1 (e.g: x|y)
- XOR (exclusive or) operator (^): returns a value where each bit is set to 1 only if exactly one of the operands has a corresponding bit set to 1 (e.g: x^y)
- Negation operator (~): returns a value where each bit is flipped from 1 to 0 or from 0 to 1 (e.g ~x)
Groovy also offers three bitwise shift operators:
- Left shift operator (<<): shifts the bits of the first operand to the left by a number of positions specified by the second operand (e.g: x << 2)
- Right shift operator (>>): shifts the bits of the first operand to the right by a number of positions specified by the second operand (e.g: x >> 2)
- Right shift unsigned (>>>): shifts the bits of the first operand to the right by a number of positions specified by the second operand, filling the leftmost bits with 0’s instead of preserving the sign bit like the regular right shift operator (>>)
Bitwise operators are typically used while working with low-level binary data, such as when implementing networking protocols or device drivers. They can also be used in other contexts when optimizing certain algorithms or data structures.
Note: You can learn more about Bitwise operators here.
Range Operator
The range operator is used to create a sequence of values that have a starting and an ending point. It is represented by two dots (..) and can be used to create a range of integers, characters, and other data types.
Range operators can be used in conjunction with other Groovy scripting data structures like lists, arrays, or collections. It can be useful when working with large data sets or when generating sequences of values.
Safe Navigation Operator (?.)
Before we learn about the safe navigation operator, let’s see what a dot(.) operator is.
Like Java, Groovy also uses the dot (.) operator to access the class members and functions.
In the example shown below, we have declared a class called Company that has a name and address. To access a class variable (or method) we create an object of the class. Then use the dot operator after the name of the object followed by the variable (or method) name.
So if the object is def acme = new Company(), we access the name as acme.name.
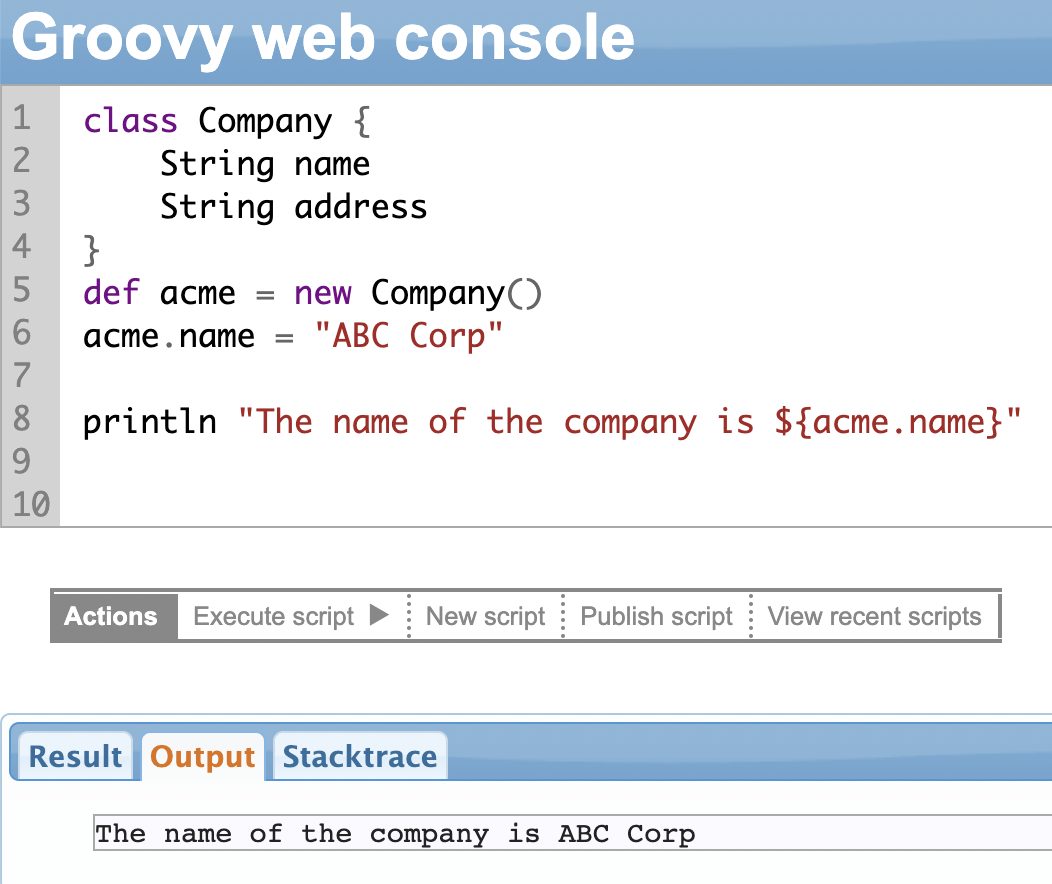
Now, what happens when you execute the code below?
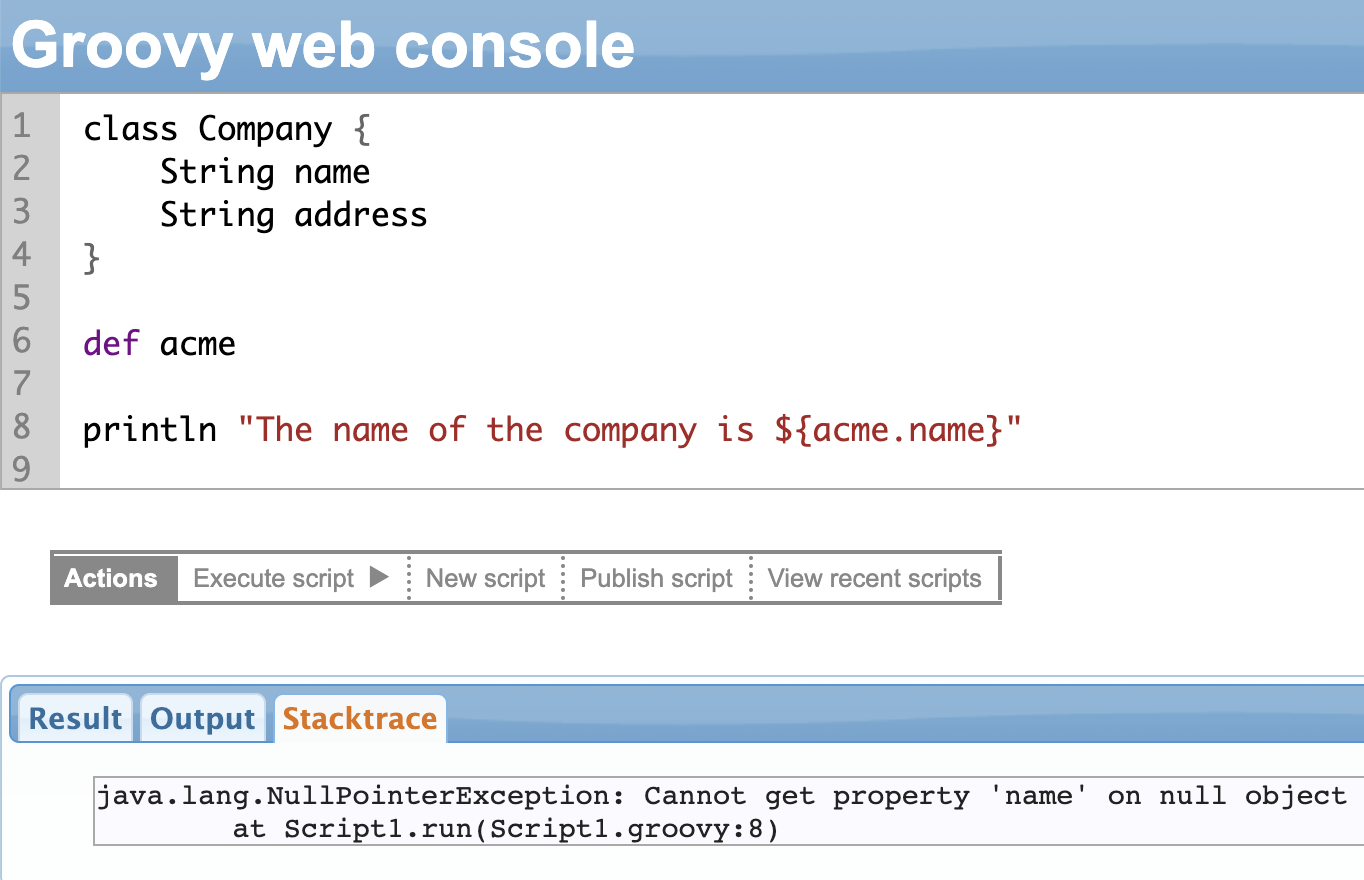
It throws a NullPointerException, a classic pain in the neck situation. Sometimes this exception can make your entire system crash.
The safe navigation operator was born out of the need to avoid the NullPointerException.
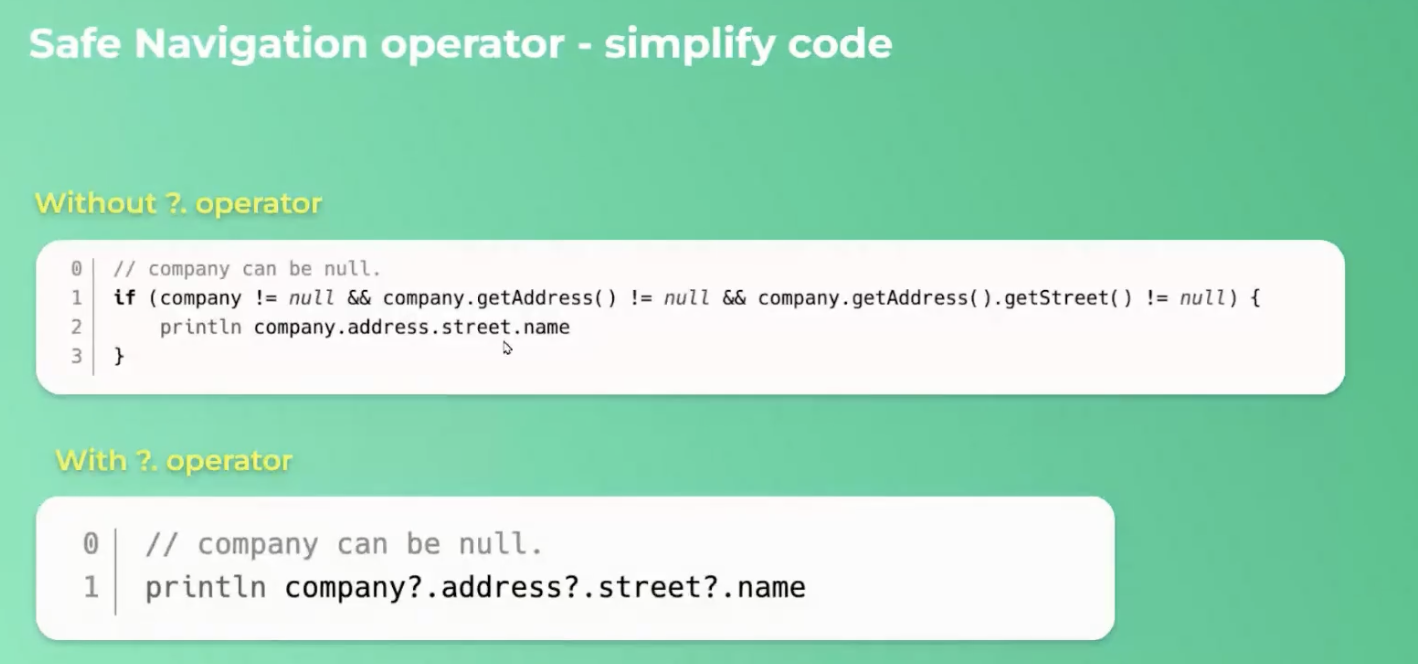
Instead of a single dot, it has a question mark followed by a dot(?.). If the first argument or operand is null the entire expression will be null. It won’t throw an exception but just return the value null, not breaking anything in the process.
Another reason the safe navigation operator is so popular is that it can simplify your code.
Consider the example shown below.
Note: We will learn more about the if loop in a while.
Using Safe Navigation Operator In Exalate Scripting
As we saw in this section, the Safe Navigation operator (?.) is used to avoid the NullPointerException.
Exalate uses this operator in a simple yet innovative way.
For instance, you want to access the email property of a user while syncing the reporter from a Jira instance.
We can use the operator in the following manner.
issue.reporter = nodeHelper.getUserByEmail(replica.reporter?.email)
The above line ensures that if the email address of the reporter isn’t found, then the Safe Navigation operator would return a null value instead of throwing an exception.
Elvis Operator (?:)
Many of us have grown up listening to Elvis. Let’s read about the Elvis operator in Groovy now.
Let’s start with the following example:
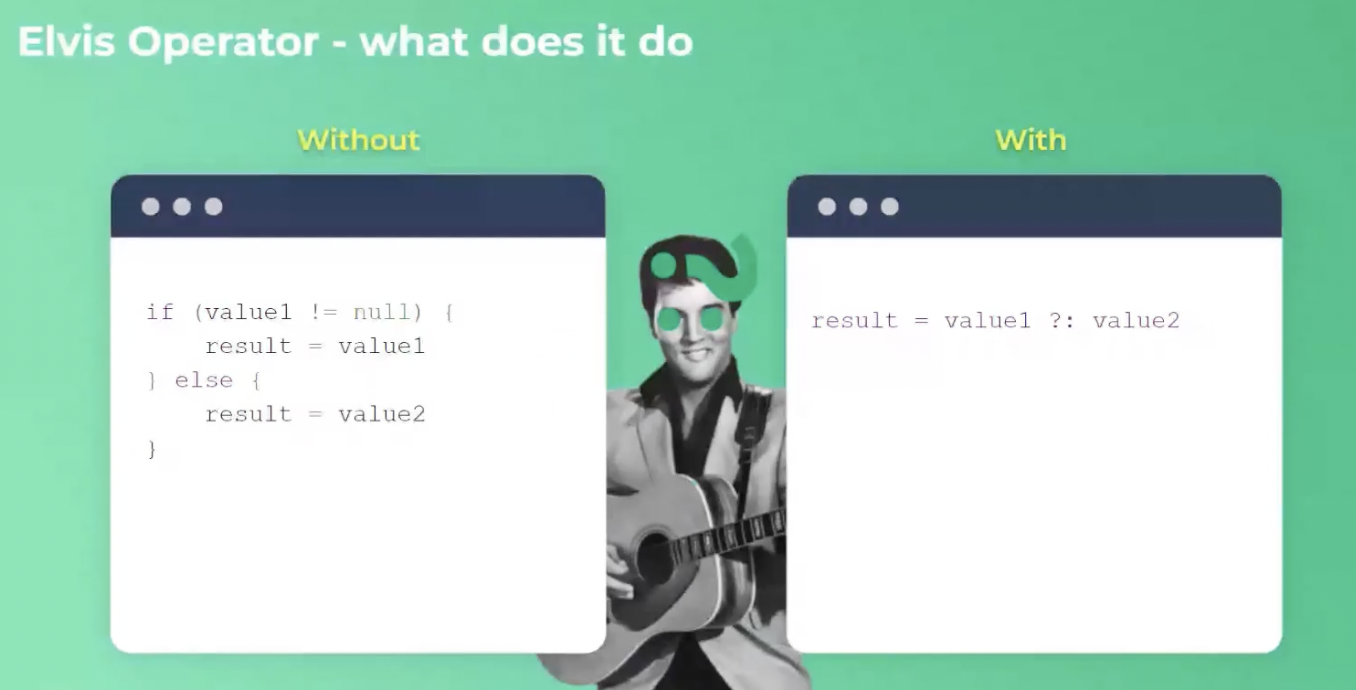
The Elvis operator (?:) is a shorthand operator that allows you to simplify null checks in your code. It’s often referred to as “ternary operator for null safety”.
As seen in the example above, if value1 is not null then it simply picks it up and assigns it to the result. If the value1 is null then pick value2 and assign it to the result. So you can assign a sensible default value in case one of the values is null.
The Elvis operator can also be used in method calls or as a part of complex expressions. It is useful to write a more concise and readable code that handles null values elegantly.
| Groovy allows you to overload the various operators you learned in this section. This concept is called operator overloading. Operator overloading allows you to redefine the behavior of built-in operators when applied to your custom objects. |
Using Elvis Operator in Exalate Scripting
We saw how the Elvis operator allows you to simplify null checks in your code and assign sensible default values in case the code encounters a null value.
Say, you want to assign a default value when syncing some information from Jira to Zendesk. In Jira, the description for the ticket is optional, while in Zendesk, it’s mandatory.
So your Incoming sync script in the Zendesk instance would look like this.
entity.description = replica.description ?: "No description provided"
The above script ensures that if an issue doesn’t have a description in Jira, “No description provided” will be auto-filled as the fallback description in Zendesk.
Now that your mind is operated enough on Groovy, let’s take you for a loop ride.
Chapter 6: Groovy Control Flow Statements
Groovy supports all the control flow structures that Java offers. So you can use the if-else, for, while, do-while, and switch statements.
Control flow structures alter the flow of the program. So instead of statements executing sequentially, they run in an order specified by the control statement.
If, If/else or Nested If Statement
The ‘if’ statement evaluates a condition, and if the result is ‘true’ then statements preceding the truth (if statement) are executed, otherwise, the statements preceding the false (else statement) are executed.
You can skip the ‘else’ statement and only use the ‘if’ condition.
You can even use nested ‘if’ loops in Groovy.
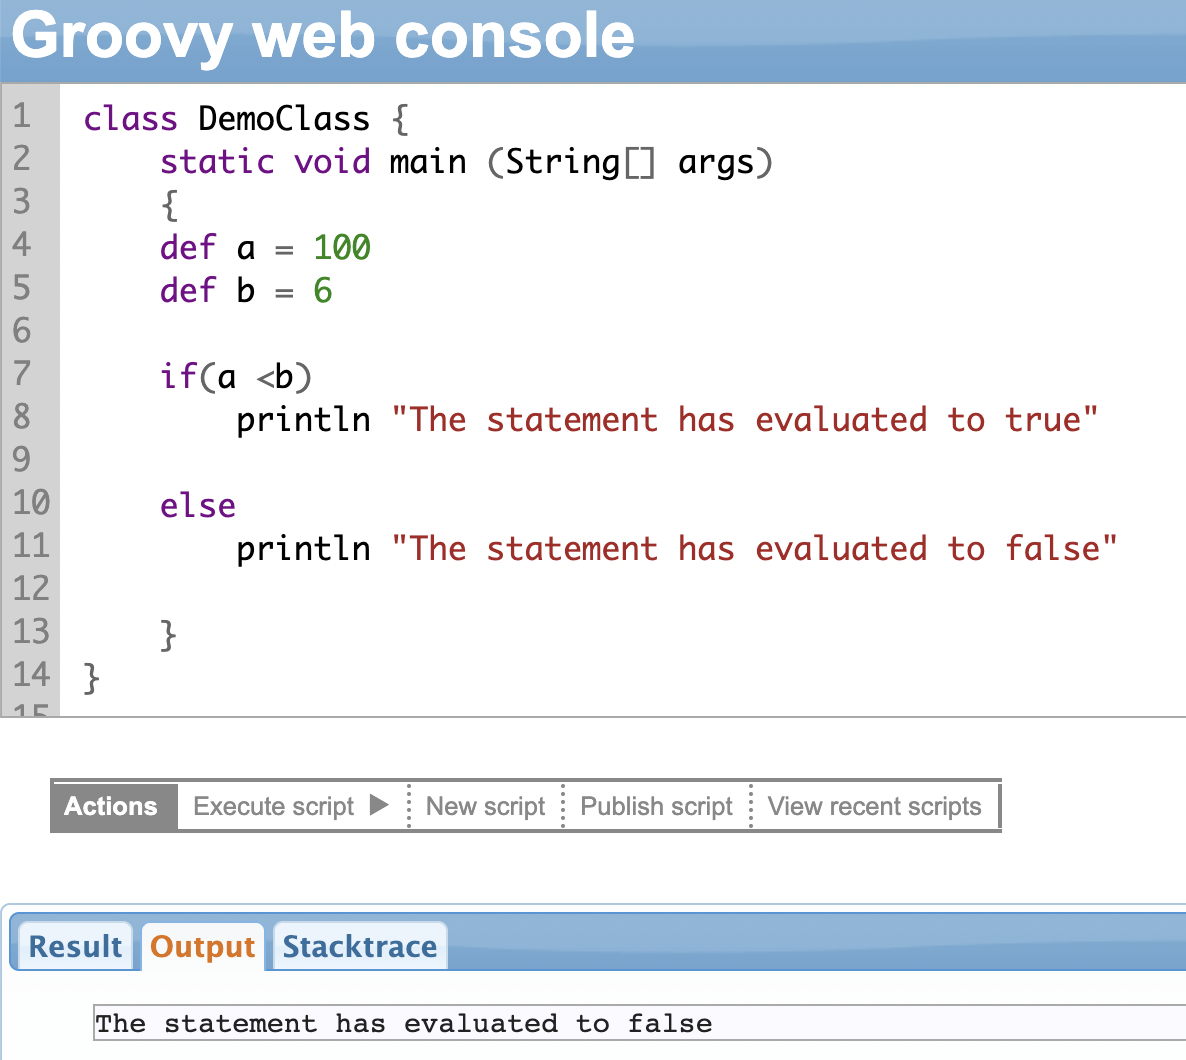
You can also use a short-hand way of writing a long if-else statement by using the ternary operator.
If the condition is true, then expression1 is executed, otherwise expression2.
condition ? expression1 : expression2
Using the If Statement in Exalate Scripting
The use of the ‘If’ statement in Exalate can be varied because you can do a variety of things based on the values received from the other side or modify the values you want to send to the other side the way you want.
Suppose in Jira, you want to create an issue in a particular project. You also want to create an issue of a particular issue type based on the value of a field present in the replica.
You can use the following code:
//'x' is the value of the field in the replica you are testing against.
if (replica.x == "abc"){
issue.projectKey = ABC
issue.typeName = "Task"
}
else if (replica.x == "def){
issue.projectKey = DEF
issue.typeName = "Story"
}
Switch Statement
A switch statement allows a program to perform different actions based on the value of a variable or an expression.
It provides a way to test the value of an expression against multiple cases and execute different blocks of code depending on which case matches the value. The expression being evaluated is compared against each of the cases, and when a match is found, the code block associated with that case is executed.
The switch statement is often used as an alternative to a series of if-else statements, particularly when there are multiple conditions to check.
The variable or expression you need to evaluate must be given in the round brackets after the keyword switch. For the cases, use the keyword ‘case’ followed by the actual value you want to test, and finally a colon (:). Use the break statement after every case. The entire switch block is enclosed within curly braces {}.
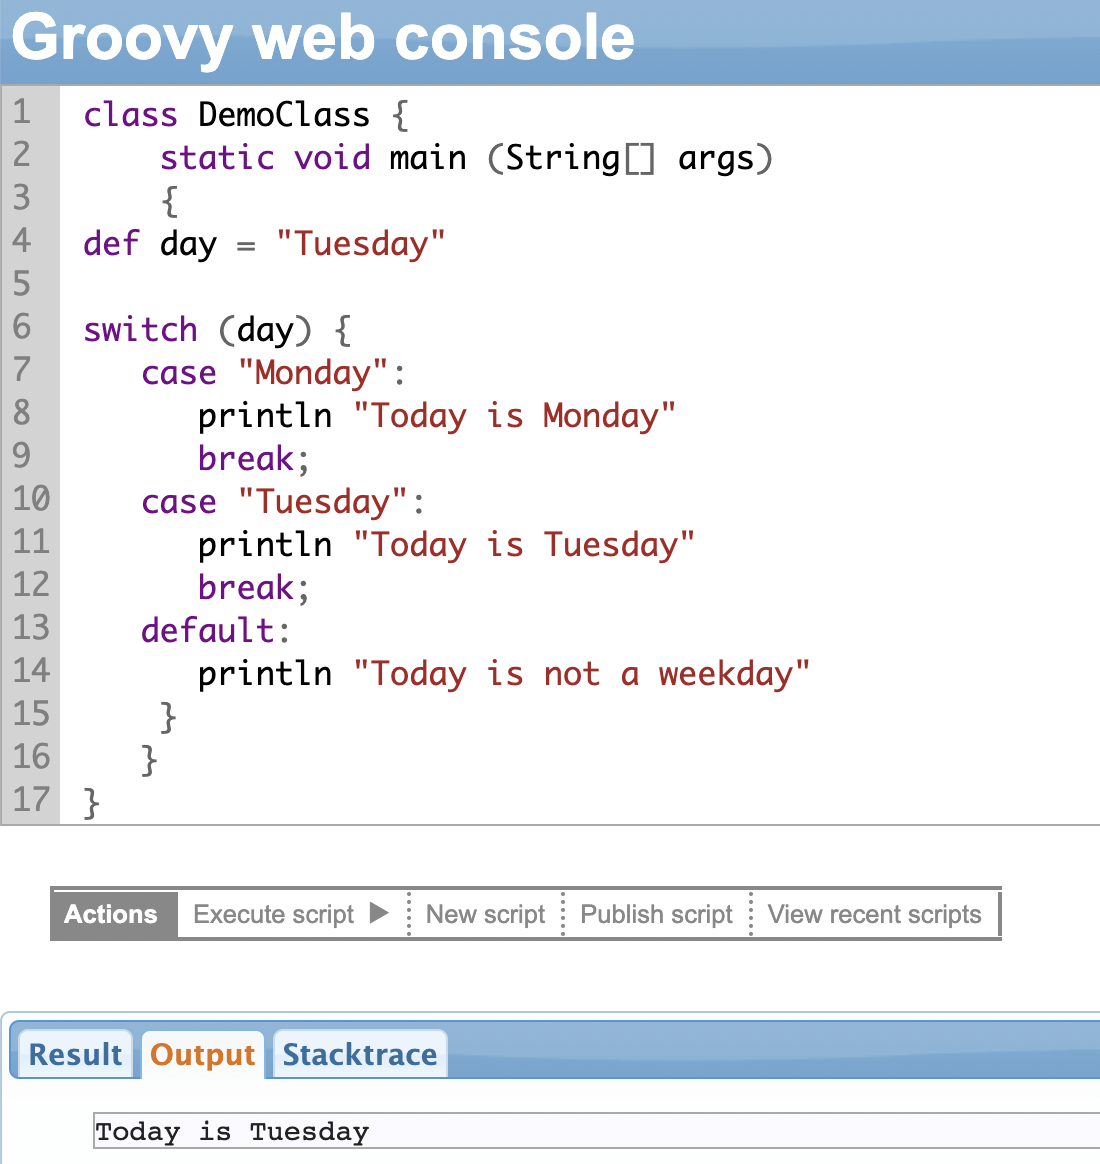
A variable day is defined and you switch on the value of the day, i.e. Tuesday. The second case turns true when the value of the variable day matches “Tuesday”.
So the output of the second case is printed and then the “break” statement is executed.
| We use the “break” statement to exit the case once the code block has been executed. When none of the case conditions are true, the “default” statement gets executed. It’s optional. |
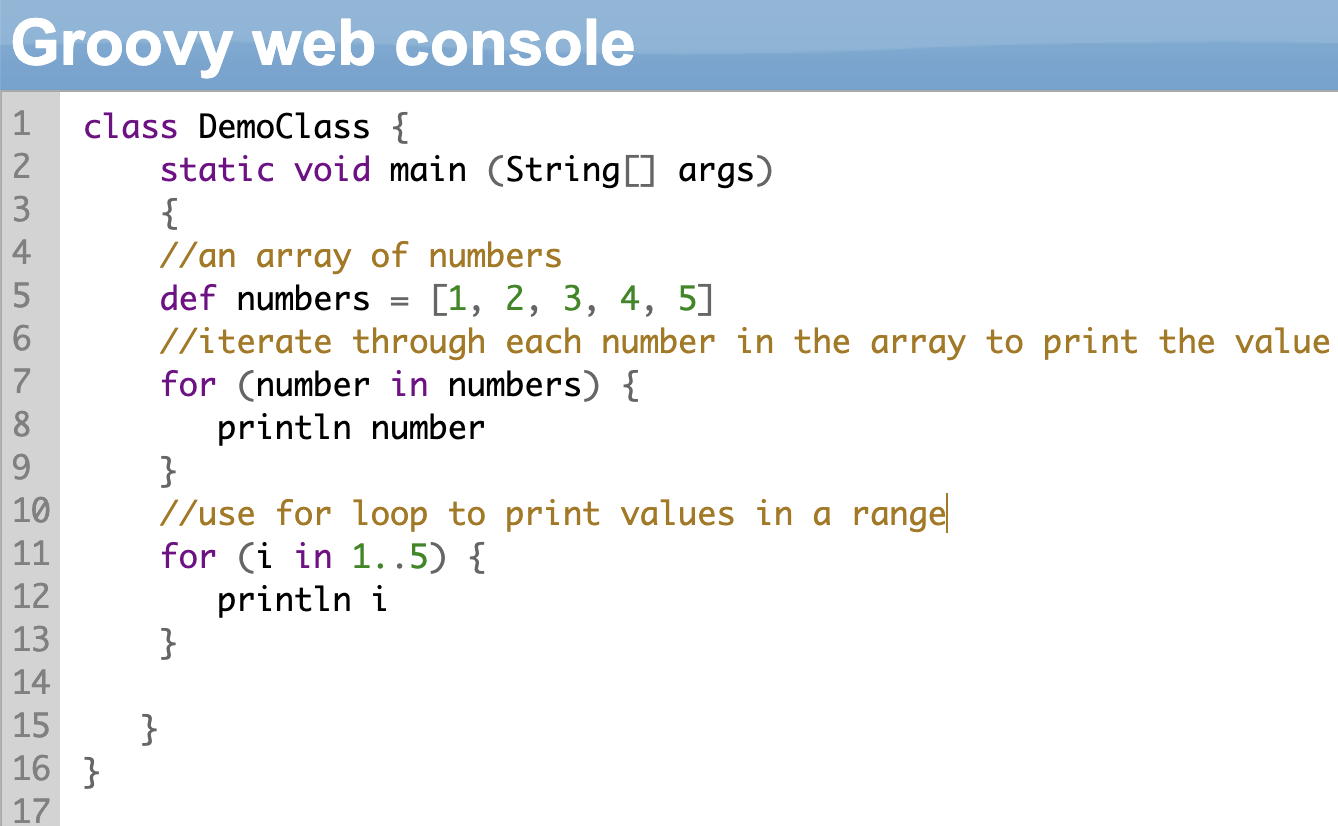
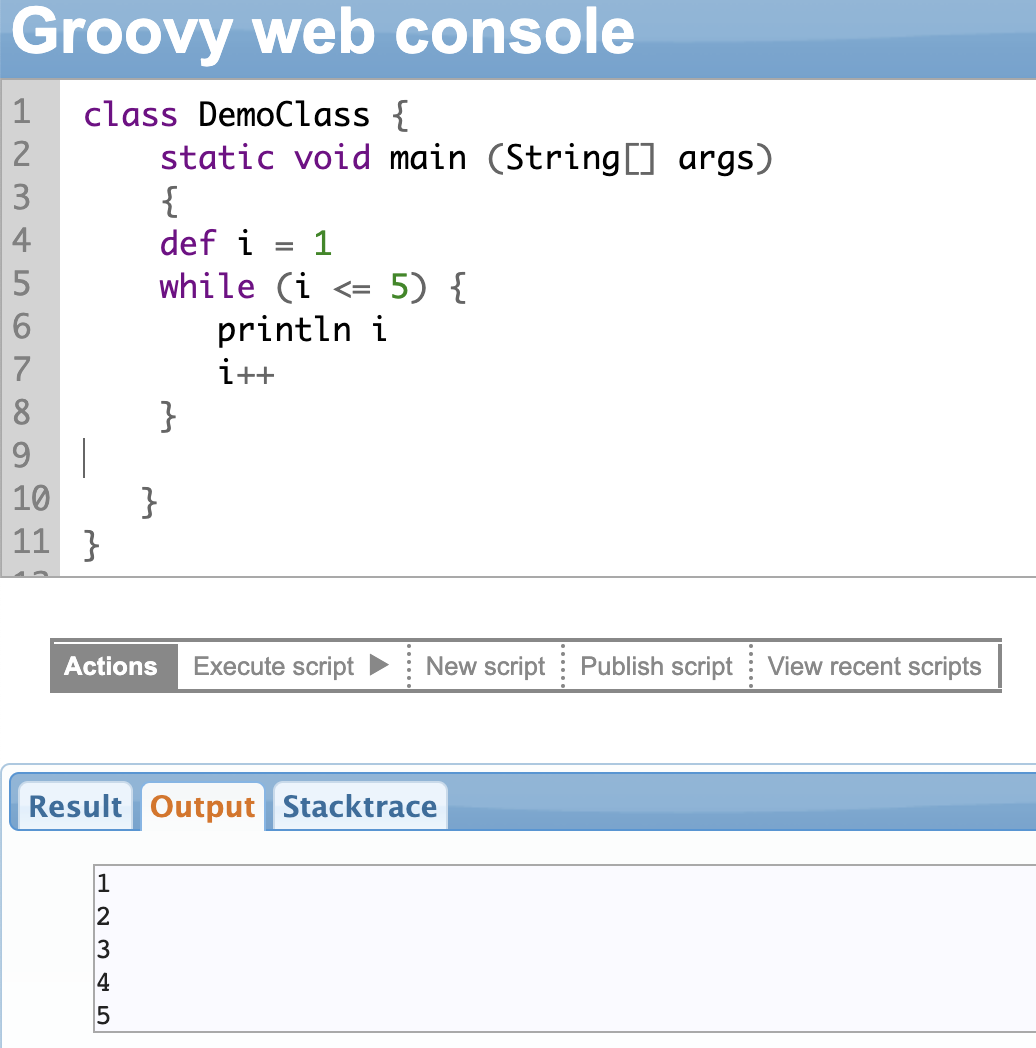
For Loop
Groovy supports ‘for’ loops where you can iterate over a sequence of values, such as a range of numbers or a list of items. You can use ‘for’ loops with arrays, collections, Maps, etc.
The actual condition for which you need to run the for loop is given in round brackets. For instance, in the second example shown below, print the value of ‘i’ 5 times. The condition to check whether the value of ‘i’ has reached 5 and incrementing (or decrementing) the value after each iteration of the ‘for’ loop is given within the round brackets. The actual statements that need to be executed within the ‘for’ loop are mentioned in curly brackets {}.
Using For Loop in Exalate Scripting
You can use the “for” loop with Exalate.
If you want to store some information from a user-defined field in the description field of an issue in Jira, you can do so as follows:
def p = ""

for(int i=0; i<replica.customFields."10035".value[0].approvers.size(); i++)
{
p += replica.customFields."10035".value[0].approvers[i].approver.displayName.toString() + " : " + replica.customFields."10035".value[0].approvers[i].approverDecision.toString() + "\n"
}

issue.description = pNote: For loops are not always the most elegant solution to use. There are other methods like .each(), .find(), and .collect(), that we’ll see in a while which serve the same purpose and are a better option.
While Loop
The ‘while’ statement will execute a block of code repeatedly till a condition is true. The condition is evaluated at the beginning of each iteration of the loop. If it is true the code inside the loop is executed. This repeats until the condition remains true.
The condition is given inside round brackets after the keyword ‘while’. The entire loop is then enclosed within curly brackets {}.
In the example shown below, the condition checks the value of “i”. It prints this value till “i” becomes equal to 5. For every iteration, the value of “i” is incremented.
Do While Loop
The ‘do-while’ statement is a variation of the while statement, where the condition is evaluated after the first iteration of the loop, ensuring the block is executed at least once.
Thereon, for every iteration, the code in the ‘do-while’ block is executed until the condition remains true.
Chapter 7: Object Orientation in Groovy Scripting
If you’re familiar with Java, you might already know most object-oriented programming concepts like classes, objects, interfaces, etc.
Groovy is a full-fledged object-oriented programming language; everything is an object.
You can create classes in Groovy like you can in Java.
A class is like a blueprint that defines the structure and behavior of objects. It has a set of properties (or attributes) and methods (or functions).
Properties hold the data within the class, and the methods are operations you perform on that data.
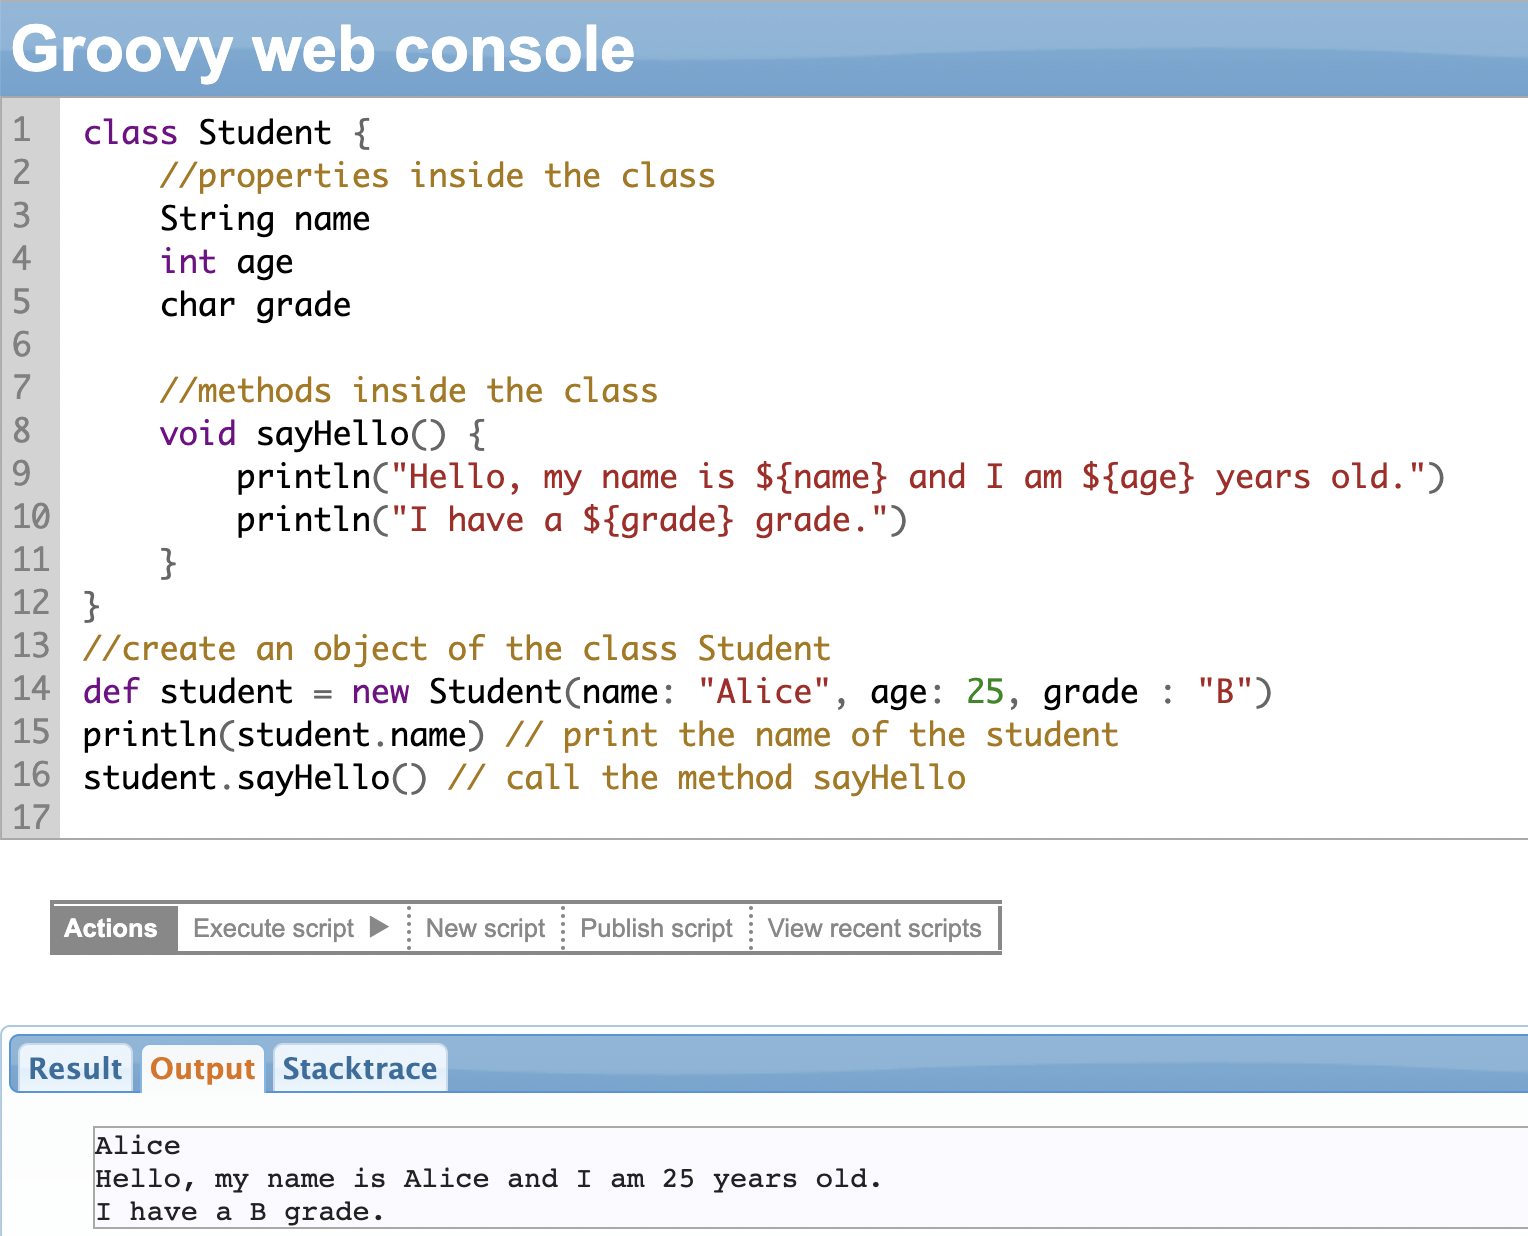
In the following example, we have defined a class called Student that has a few properties: name, age, and grade. It has a method called sayHello to print the students’ information. We create an instance (object) of the class called “student” (class names are case sensitive, so “student” is different from the class “Student”) and give values to its properties.
Then we call the sayHello method to print those values. As seen, you can access individual properties and methods of the class with the dot(.) operator.
You can control the visibility, that is, which methods and properties are accessible outside of the scope they are defined in through the usual access modifiers: public, private, and protected.
By default, properties, and methods are public, but you can use other access modifiers to change the visibility.
You can also create constructors for the classes you define. Constructors are methods used to initialize the objects of a class. A constructor has the same name as that of the class.
Plain Old Groovy Object (POGO) is a simple class in Groovy where you don’t need to define setter and getter methods (constructors) since Groovy will automatically generate them for you.
Groovy supports inheritance, where the child class inherits properties and methods from the parent class. An inherited class is defined by the keyword: “extends”.
class Student extends Person {
    int grade

    void sayHello() {
    println("Hello, my name is ${name}, I am ${age} years old, and I am in grade ${grade}.")
    }
}
You can also create interfaces in Groovy. An interface acts like a contract that the class must adhere to. Interfaces only consist of a list of methods for which no implementation (method body) is provided. The class that “implements (a keyword)” an interface must provide the method body, i.e, the implementation. Interface methods can be public and abstract. The properties of the interface can be public, static, and final.
//define an interface Speaker with a single method speak
interface Speaker {
    void speak()
}
//a class called George implements the interface and defines
//a method body for the speak method
class George implements Speaker{
    void speak(){
        println "George is speaking"
    }
}
You can also create abstract classes or methods in Groovy scripting. It is similar to interfaces but can contain method implementation. You cannot create an object of an abstract class. They can be created by using the “abstract” keyword.
You must provide an implementation for the abstract methods if you create a class that inherits the abstract class.
/* We have defined an abstract class Animal with a single abstract method called speak() and a non-abstract method run(). Any class that extends the Animal class must provide an implementation for the speak() method, but it can also call the run() method provided by the Animal class. */
abstract class Animal {
    abstract void speak()

    void run() {
        println("The animal is running.")
    }
}
Object Orientation in Exalate Scripting
At the heart of Exalate is a replica that works as a payload to pass information between two applications. The replica itself is an object, and everything within it is also an object.
So, let’s consider the example of “status” in a Jira issue. When you say replica.status.name, you’re using the same object-oriented concepts we discussed earlier. We use the dot (.) operator to access the name property of the status object.
Chapter 8: Groovy Scripting Closures
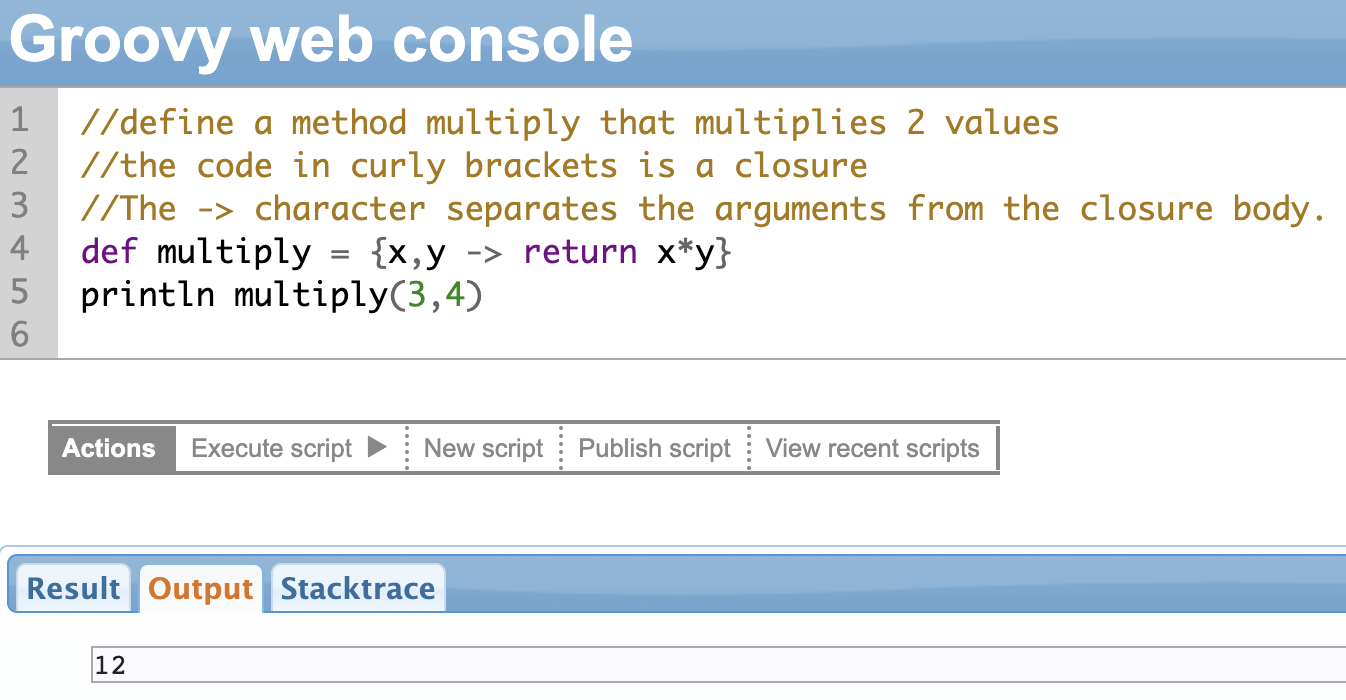
Groovy closures are an interesting concept. Closures are anonymous blocks of code performing some function. They are defined within curly brackets: {}. A closure can contain multiple statements.
You can assign them to a variable and call it a function (or method) with a return value or you can even use them as arguments to a function. The block of code gets passed around and executed at a later time, more like a “function-on-the-go”.
Groovy closures are a powerful way to write flexible or reusable code; they also save you a lot of time and make the code concise.
You can see a lot of use for closures in Groovy data structures.
That brings us to our next chapter: Groovy data structures.
Using Groovy Closures in Exalate Scripting
Perhaps, the most common and popular way of using Groovy Closures in Exalate is when you want to manage the comment visibility between different applications.
In Jira Service Management, you can create comments as internal or public. And you want to filter and send only public comments from Jira to the destination instance.
You can do so using the following code snippet:
//the !it.internal enclosed within curly brackets (Groovy Closures) //ensures
only public comments are saved in replica to be send over //to the
destination side.

replica.comments = issue.comments.findAll { !it.internal }
Chapter 9: Groovy Scripts Data Structures
We have seen data types like int, long, short, etc. These are called primitive data types.
Data structures are collections of these primitive data types in a list, an array, or a map format. We’ll look at them one by one.
Lists
Groovy Lists allow you to store a collection of data. You can think of a List as a sequence of items, like your grocery or to-do list.
To create a List in Groovy scripts, enclose it within square brackets [] and separate the items within the list with a comma (,).
def myGroceryList = ["apples", "bananas", "bread", "milk"]
Lists are a one-dimensional data structure. The items in a List can be primitive data types, or they can be object references.
Some List Methods
As we saw, Lists are sequences of items. So to perform some operations on Lists you can iterate over the list items one-by-one through indices.
The first item has an index of 0 and refers to the first item in the list.
There are a lot of other operations you can perform on Lists. They allow you to read, add, remove items from the list, and do much more.
We’ll see a few of them.
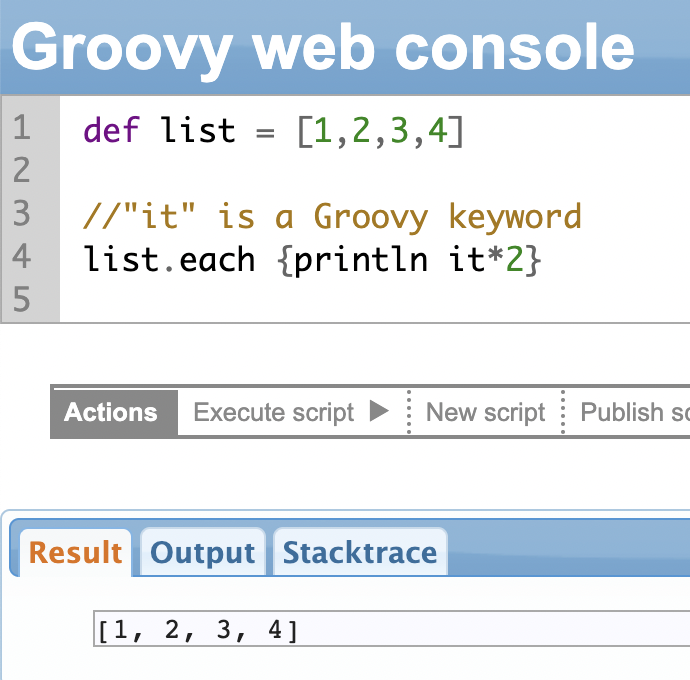
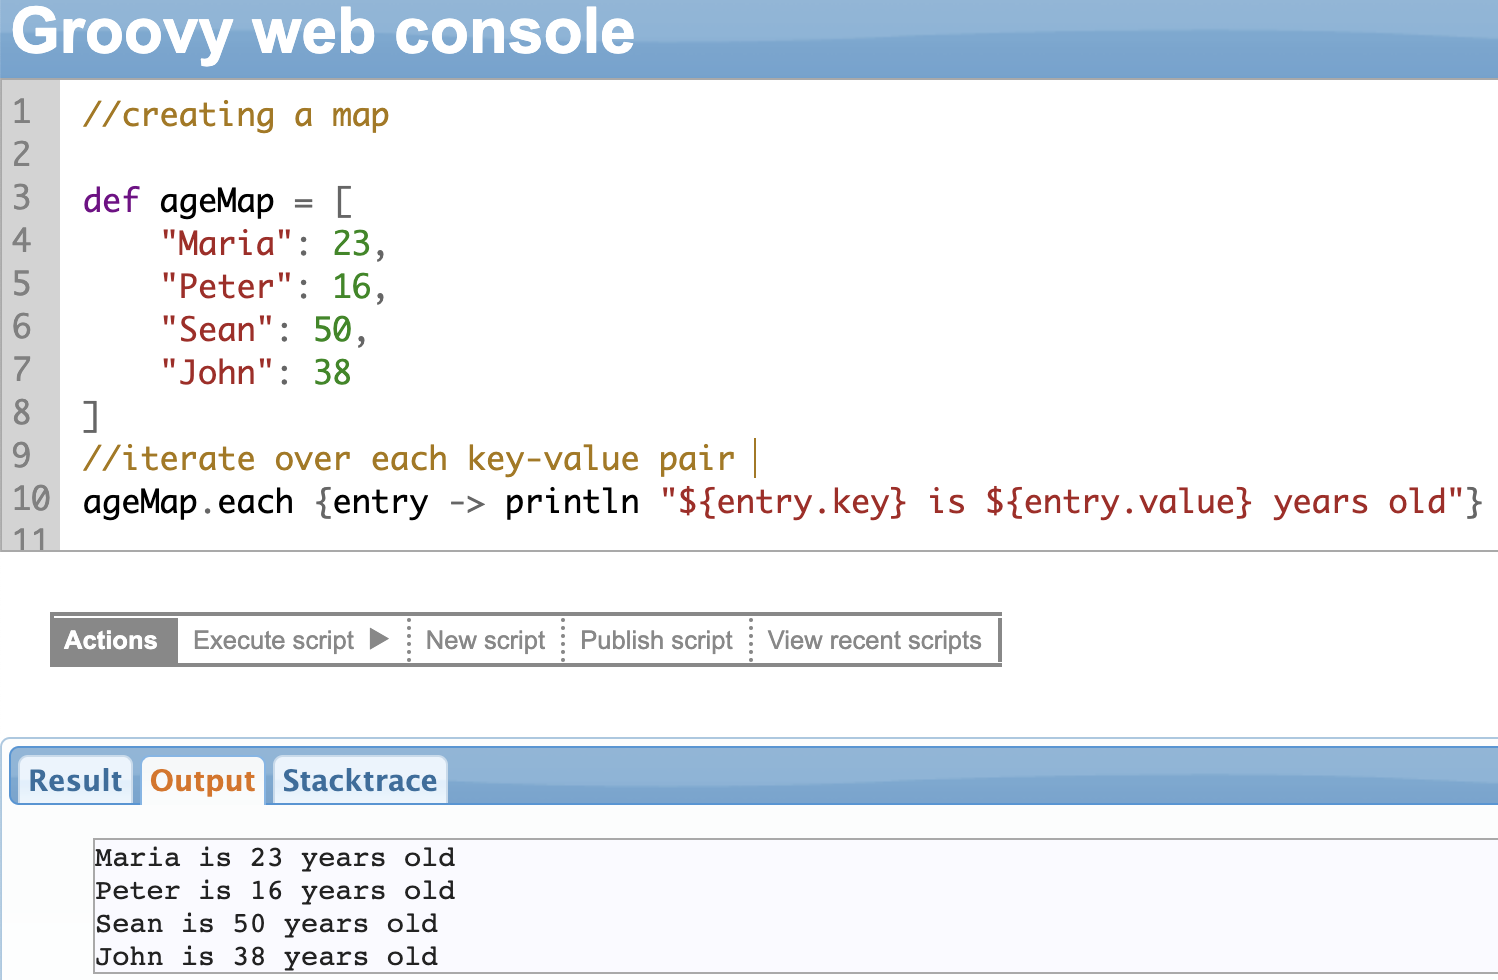
each() Method
The each() method helps you iterate over all the items in the List and perform some operation on them. It’s a convenient way to apply the same operation to every item on the List.
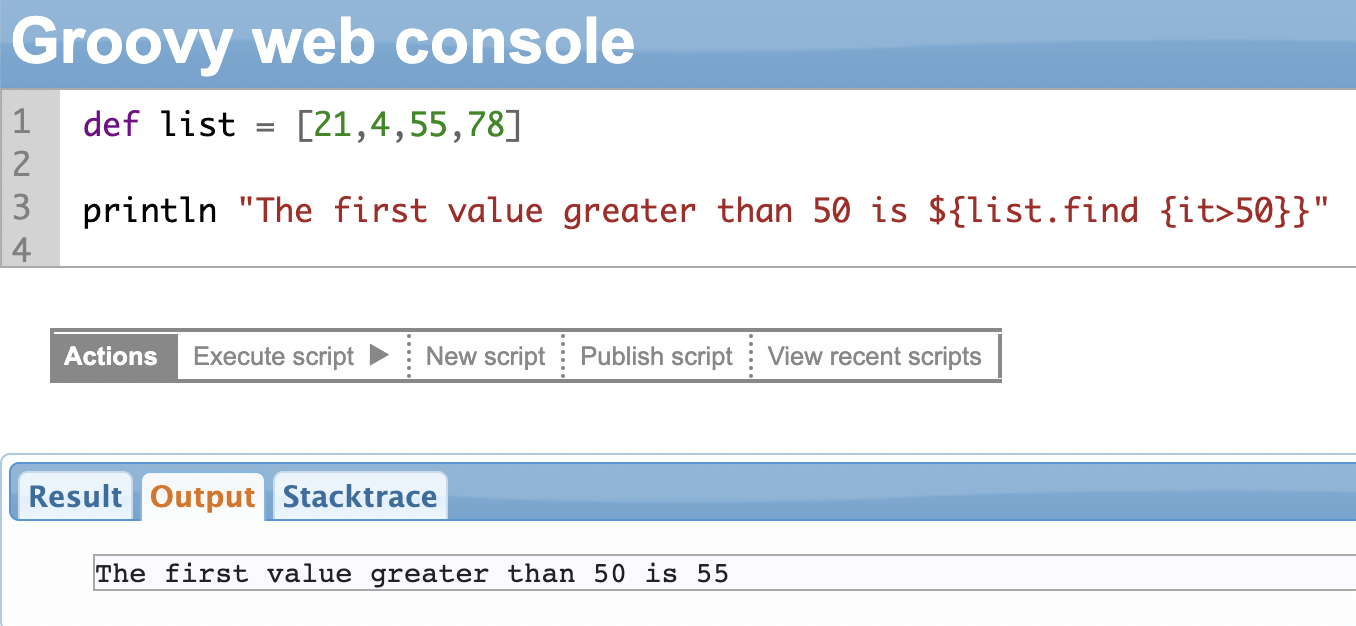
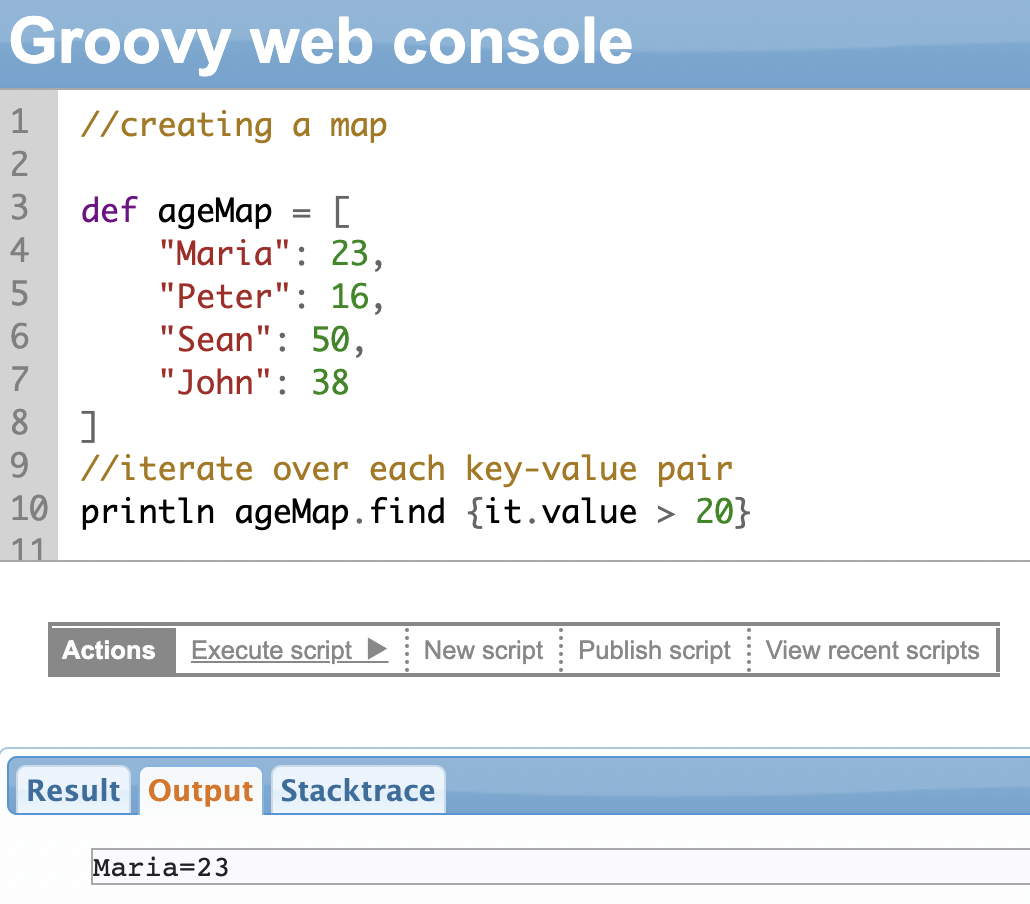
find() Method
The .find() method allows you to search for a specific item in a list based on a condition you specify. It helps you find the first item within the list.
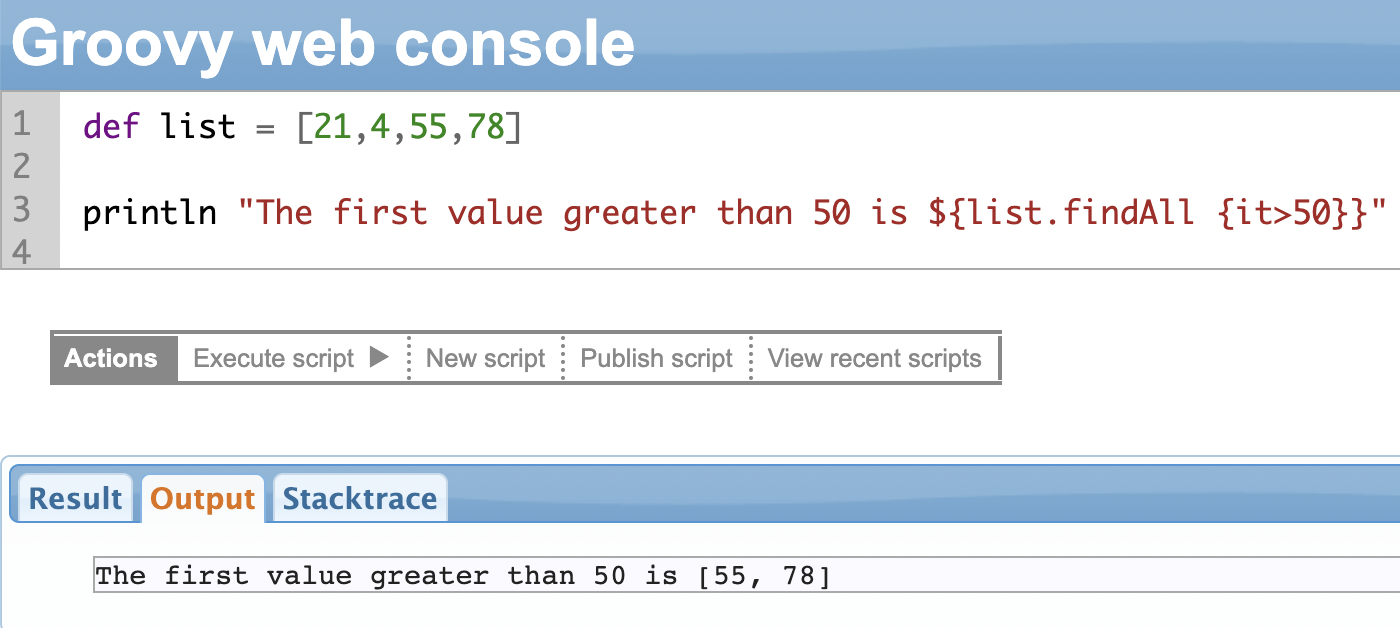
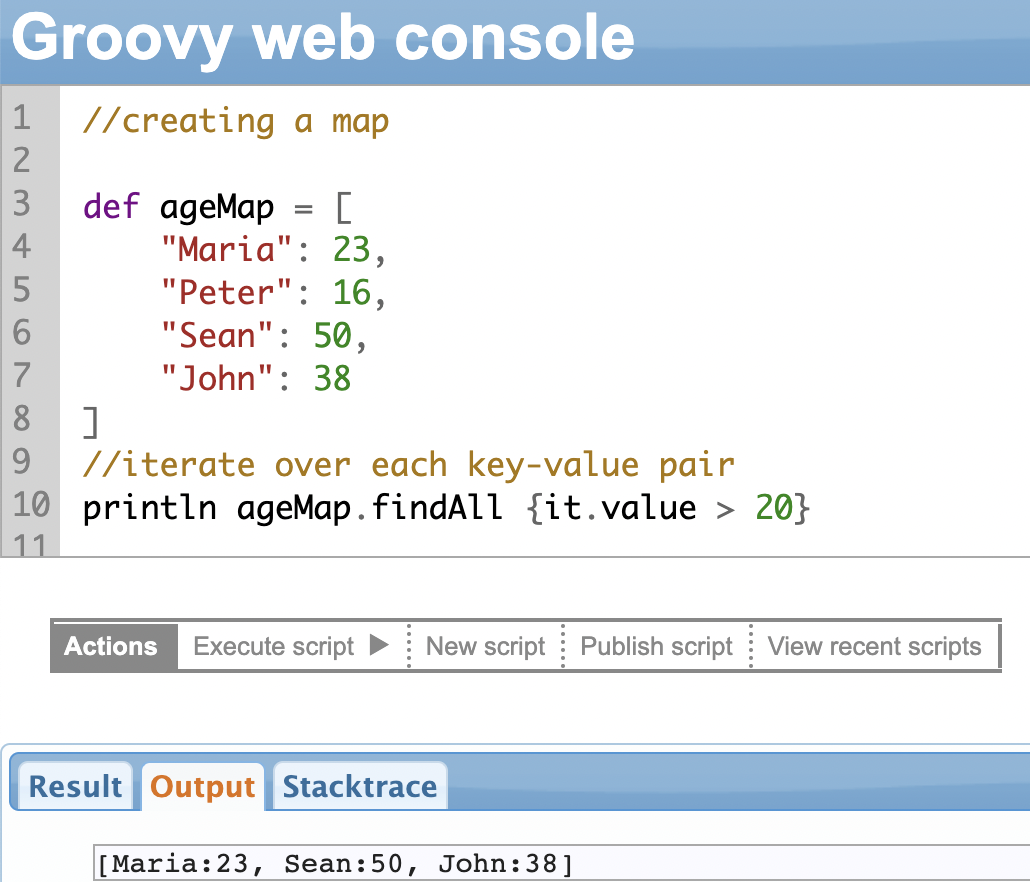
findAll() Method
The findAll() method works in the same way as the find() method. The only difference is that the findAll() method returns all the items that match the criteria instead of only the first item.
Continuing the above example.
collect() Method
The .collect() is used to manipulate the list and return the manipulated list. It transforms the list into something else.
In the example shown below, we create a new list by multiplying all items in the old list by 2.

Some More List Methods
A few more list methods are:
| Method name | Description | Usage |
| add() | Adds a new item to the end of the list. | def myList = [1, 2, 3, 4, 5] myList.add(6) println(“List with added element: ${myList}”) |
| contains() | Allows you to check if a particular item is present in the list or not. It returns a boolean value. | def myList = [1, 2, 3, 4, 5] def result = myList.contains(3) println(“Result: ${result}”) |
| get() | Allows you to retrieve a specific item from a list based on its index position. | def myList = [1, 2, 3, 4, 5] def result = myList.get(2) println(“Result: ${result}”) |
| isEmpty() | Allows you to check if a list is empty or not. It returns a boolean value. | def myList = [1, 2, 3, 4, 5] def emptyList = [] def result1 = myList.isEmpty() def result2 = emptyList.isEmpty() println(“Result1: ${result1}”) println(“Result2: ${result2}”) |
| minus() | Allows you to create a new list by removing specific items from the list | def myList = [1, 2, 3, 4, 5] def newList = myList.minus([3, 4]) println(“Original List: ${myList}”) println(“New List: ${newList}”) |
| plus() | Allows you to create a new list by adding specific items to an existing list. | def myList = [1, 2, 3, 4, 5] def newList = myList.plus([6, 7]) println(“Original List: ${myList}”) println(“New List: ${newList}”) |
| pop() | Allows you to remove the last item from the list and return that item. | def myList = [1, 2, 3, 4, 5] def lastElement = myList.pop() println(“Original List: ${myList}”) println(“Last Element: ${lastElement}”) |
| remove() | Allows you to remove a specific item from the list. It removes the first occurrence of the item. | def myList = [1, 2, 3, 4, 5] myList.remove(3) println(“Original List: ${myList}”) |
| reverse() | Allows you to reverse the order of the items in the list. It modifies the original list and returns the modified list. | def myList = [1, 2, 3, 4, 5] myList.reverse() println(“Reversed List: ${myList}”) |
| size() | Allows you to fetch the number of items in the list. It returns an integer denoting the size of the list. | def myList = [1, 2, 3, 4, 5] def listSize = myList.size() println(“List Size: ${listSize}”) |
| sort() | Allows you to sort the elements in the list. It modifies the original list and returns the sorted list. | def myList = [5, 2, 3, 1, 4] myList.sort() println(“Sorted List: ${myList}”) |
Using Groovy Lists in Exalate Scripting
One of the most common examples of Lists in Exalate scripting could be when syncing sprints in Jira.
//Only the sprints belonging to the following Board IDs will be //synced.
def boardIds = ["50", "80", "130", "144"]

//Here, boardIDs is the list of board IDs we want to sync.
//We use the .find method of the List data structure

if(entityType == "sprint" && boardIds.find{it == sprint.originBoardId}){
replica.name = sprint.name
replica.goal = sprint.goal
replica.state = sprint.state
replica.startDate = sprint.startDate
replica.endDate = sprint.endDate
replica.originBoardId = sprint.originBoardId
}
Maps
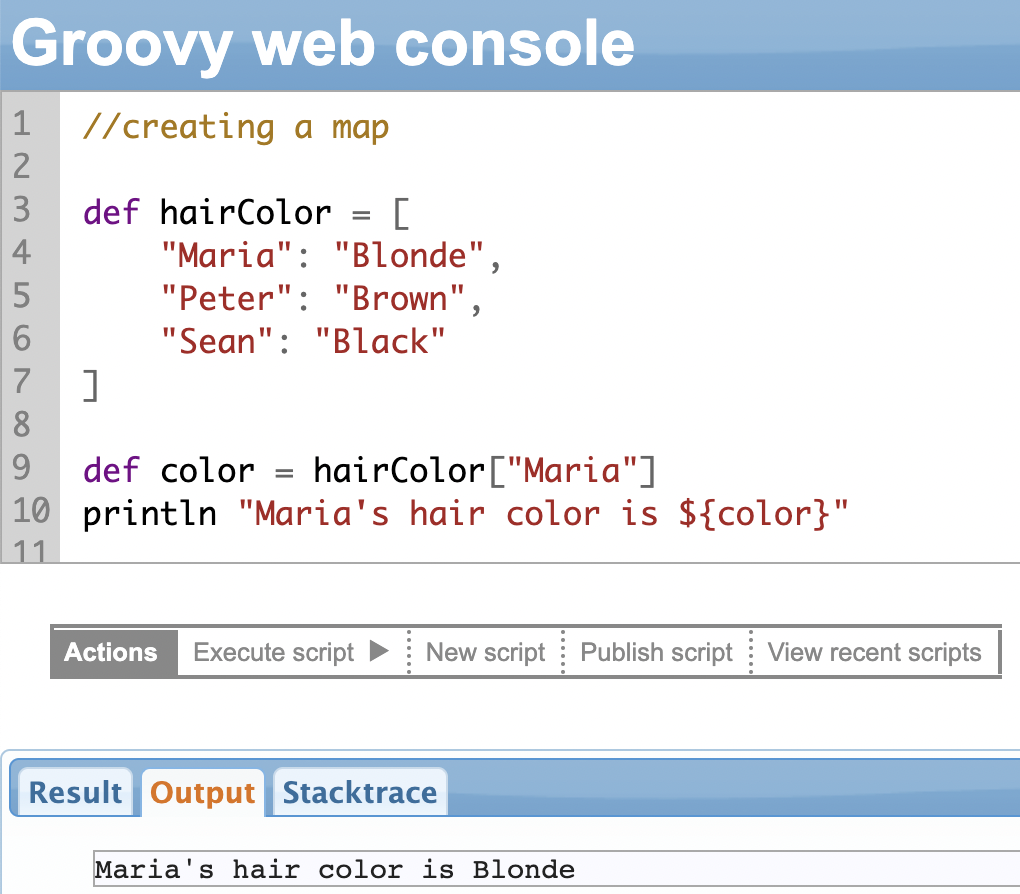
Maps represent an unordered collection of items in the format of a key:value pair. The keys and values are separated using colons and each key/value pair is separated by commas. The entire set of keys and values are enclosed in square brackets.
The key works like an index to search for the value. They are also called associative arrays or dictionaries in some programming languages.
Some Map Methods
Like Lists, there are methods you can use to manipulate the items in maps.
We’ll discuss a few examples.
each() Method
The .each() method is used to iterate over maps and perform a specific operation on each of its key-value pairs.
find() Method
This method can be used to search for a key-value pair in a map that matches a given value based on a condition. The find() method returns the first key-value pair in the map that matches the given condition, or null if a match isn’t found.
findAll() Method
The findAll() method is used to search for all the key-value pairs in a map that matches a given value based on a condition. The findAll() method returns a new map that contains all the key-value pairs in the original map that match the given condition.
Some More Map Methods
A few more map methods are
| Method name | Description | Usage |
| collect() | Iterates over each key-value pair in the map and executes a closure that transforms the key-value pair into a new value. | def originalMap = [a: 1, b: 2, c: 3] def newMap = originalMap.collect { key, value ->[“${key}”, value * 2] } println “Original map: ${originalMap}” println “New map: ${newMap}” |
| inject() | Iterates over each key-value pair in the map and accumulates a value by executing a closure on each pair. | //use inject to calculate the sum of //all values in a map def map = [a: 1, b: 2, c: 3] def sum = map.inject(0) { acc, key, value -> acc + value } println “Sum of values: ${sum}” |
| get() | Returns a value for the given key, or a default value if the key is not found. | def map = [a: 1, b: 2, c: 3] def value = map.get(“b”) println “Value of ‘b’ is: ${value}” |
| put() | Adds a new key-value pair to the map or updates an existing one. | def map = [a: 1, b: 2, c: 3] map.put(“d”, 4) map.put(“b”, 5) println “Map after using the put method: ${map}” |
| remove() | Removes a key-value pair from the map for a given key. | def map = [a: 1, b: 2, c: 3] map.remove(“b”) println “Map after removing ‘b’: ${map}” |
| containsKey() | Returns true if the map contains the given key, false otherwise. | def map = [a: 1, b: 2, c: 3] def hasB = map.containsKey(“b”) def hasD = map.containsKey(“d”) println “Map contains ‘b’: ${hasB}” println “Map contains ‘d’: ${hasD}” |
| containsValue() | Returns true if the map contains the given value, false otherwise. | def map = [a: 1, b: 2, c: 3] def has2 = map.containsValue(2) def has4 = map.containsValue(4) println “Map contains value 2: ${has2}” println “Map contains value 4: ${has4}” |
Using Groovy Maps in Exalate Scripting
There are a lot of use cases for Maps in Exalate. You can map issue types, priorities, statuses, etc between two systems and perform some sync operations on them.
/*We have mapped the different statuses in a map variable called statusMap.
Based on the value of the remote instance's status value, the
corresponding correct local status is fetched and assigned to the entity. */

def statusMap = [
"Done": "Resolved",
"In Progress": "In Action"
]
def remoteStatusName = replica.status.name
issue.setStatus(statusMap[remoteStatusName] ?: remoteStatusName)
Arrays
An array is a fixed-size collection of items of the same data type. So you can create an array of integers, long or strings.
You must use square brackets [] to create an array, just like with lists. The only difference is that the data type declaration is compulsory in arrays. You can also create arrays with the new keyword.
//an array of integers
int [] array = [1, 2, 3, 4, 5]
// use the new keyword to create arrays
def array1 = new int[5]
//accessing the first element of the array
//the indices start at 0
def array2 = [1, 2, 3, 4, 5]
def firstElement = array2[0]
//you can even use loops to manipulate arrays
def array3 = [1, 2, 3, 4, 5]
for (int i = 0; i < array.length; i++) {
println array[i]
}You can use the functions we discussed, such as collect, findAll, each, inject, and more, with arrays as well.
Chapter 10: Groovy Scripting Regular Expressions
Groovy supports regular expressions through the use of the java.util.regex package. This package allows you to create, manipulate and search for regular expressions through inbuilt classes and methods.
A regular expression is a pattern that defines a set or subset of strings. You can use regular expressions in a variety of ways for different purposes. For instance, find all instances of a particular word, phrase, or pattern in a large block of text, extract data from strings, and even replace a certain block of text with another block.
Regular expressions in Groovy can be denoted with a /…/, where the dots represent the pattern. For instance, the regular expression /world/ matches the string “world” wherever it occurs.
To search for a regular expression within a string, you can use the =~ operator.
You can also use the ==~ operator to match a regular expression against a string and return true or false.
You can use various special characters in regular expressions to create and match complex patterns. The most common ones are
| Character | What it does |
| . | Matches any character except a newline |
| * | Matches the preceding character 0 or more times |
| + | Matches the preceding character 1 or more times |
| ? | Matches the preceding character zero or one time |
| \d | Matches any digit (0-9) |
| \s | Matches any whitespace character (space, tab, newline, etc) |
| \w | Matches any word character (letter, digit, underscore) |
You can use certain characters to match another set of characters. For instance, [aeiou] matches any vowel whereas [a-z] matches any lowercase character.
You can also include grouping or alternation of characters. To group, use parentheses and to alter use the pipe (|) character. For instance, the regular expression /(hello | world)/ matches either “hello” or “world”.
Consider an example where you want to search for all the strings that match the pattern of an email address.
def text = "Please contact us at [email protected] or [email protected]"
def emailRegex = /\b[\w.%-]+@[\w.-]+\.[a-zA-Z]{2,4}\b/

def matcher = (text =~ emailRegex)

matcher.each { match ->
    println "Found email address: ${match[0]}"
}
Groovy supports a lot of inbuilt methods to work with regular expressions, such as find, findAll, replaceAll, split, etc.
Regular expressions can be complex and difficult to read, so it’s important to use them with caution. They can also be computationally expensive, so make sure you consider their performance in performance-intensive code or while dealing with large strings.
Phew! That’s a lot of coding we already learned.
But during this coding journey, have you yet encountered an error message that left you puzzled already?
The next step is to learn exception handling in Groovy scripting; so you don’t crash your program right away (hopefully never, fingers crossed).
Using Groovy Regular Expressions in Exalate Scripting
Regular expressions allow you fine-grained control over matching patterns within strings.
This can be particularly useful when you need to send information between two applications based on specific sub-string or pattern matches.
One example of regular expressions (Regex) in Exalate is when you want to sync only selected comments that match a filter.
Let’s say you only want to send those comments that include the word ‘[SEND]’ in the comment text. Any other comments should not be sent.
replica.comments = issue.comments.findAll {it.body =~ /\[SEND:\]*/ }Chapter 11: Groovy Exception Handling
Programs crash all the time, and the only way for it to recover is to handle exceptions gracefully.
Exceptions are errors or events that occur during the execution of a program causing it to behave in unexpected ways. These exceptions can occur due to various reasons, such as file i/o errors, invalid input, wrong program logic, network errors, etc.
Groovy supports “try-catch” blocks to handle exceptions. The “try” block includes the code that might throw an exception, and the “catch” block contains the code to handle the exception.
When an exception occurs in the try block, the code execution stops in that block and the program jumps to execute the code in the “catch” block.
An example of a try-catch block:
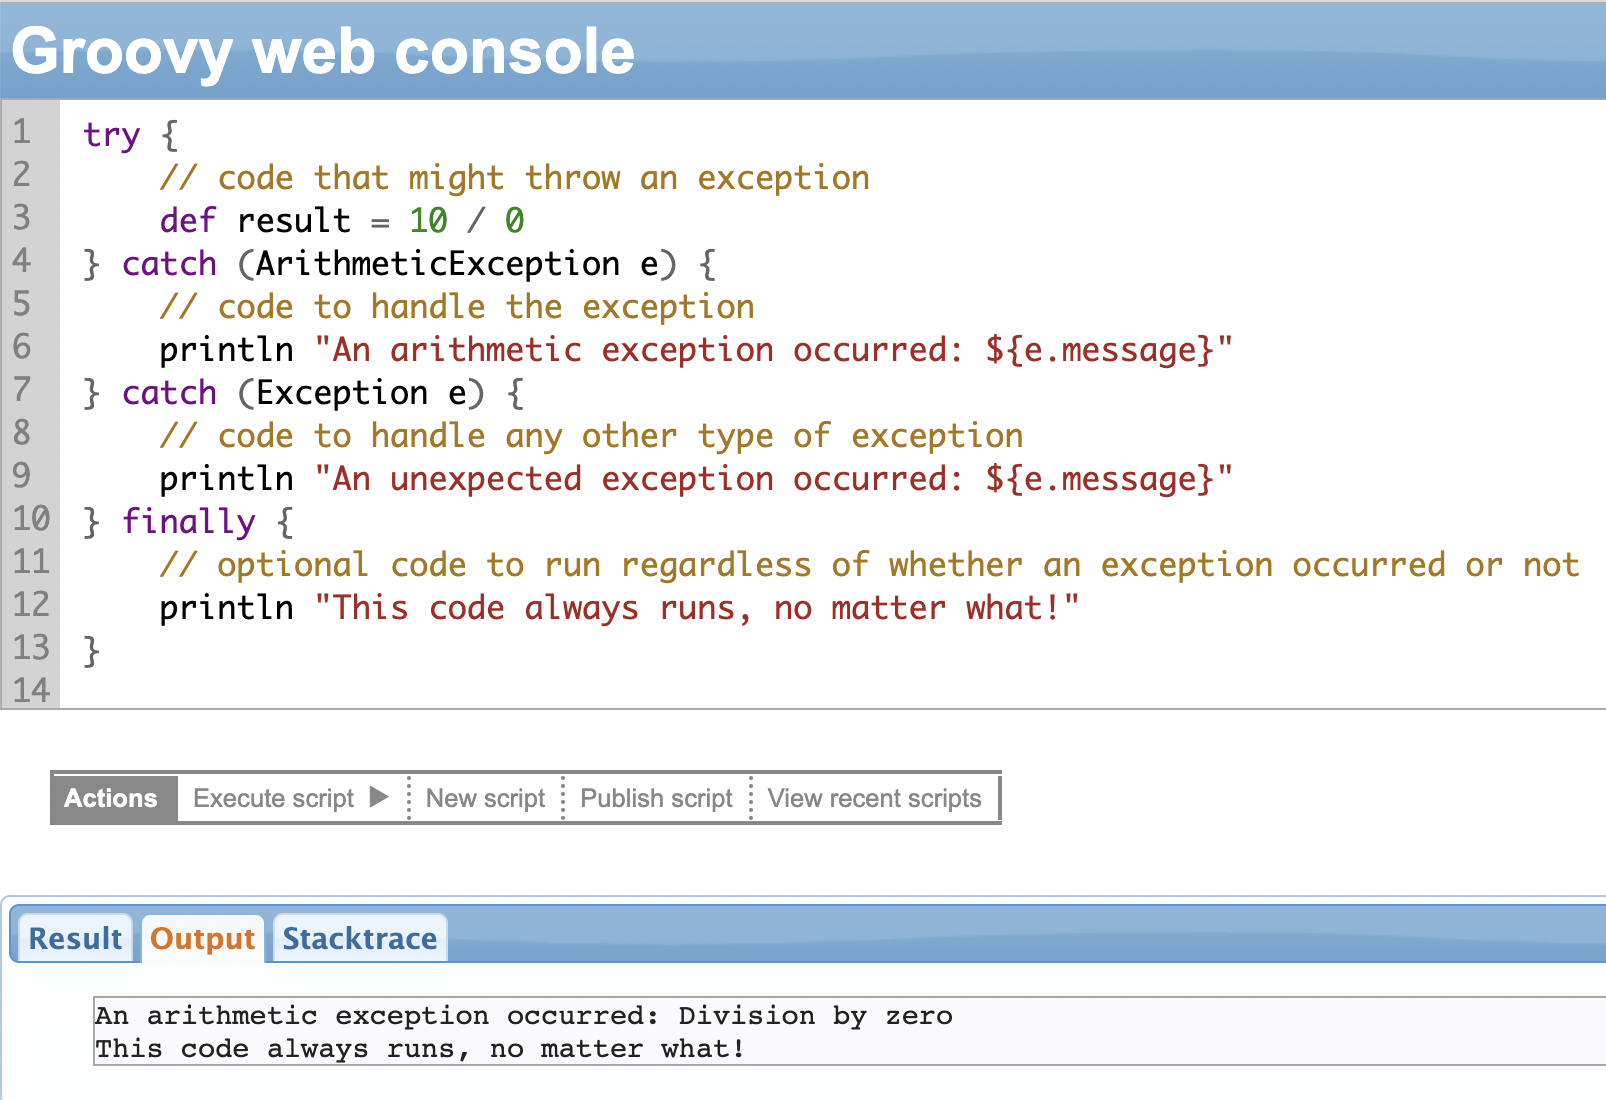
As seen in the example, the try block attempts to divide a number by 0, resulting in an ArithmeticException. The catch block catches the exception and prints out the required message. The “finally” block is optional and is executed regardless of whether the exception occurs or not.
You can have multiple catch blocks to catch different types of exceptions.
In addition to the general try-and-catch block, you can also throw your own exceptions using the “throw” keyword. It allows you to create custom exceptions and handle them in a manner you deem fit.
Exception handling is important for any programming language to write more reliable and robust code.
Chapter 12: Groovy Testing Framework: the Assert Statement
The Groovy programming language is loaded with awesome features that are super handy for test-driven development. Yeah, it’s true!
When it comes to writing tests and making sure your code is rock solid, Groovy has got your back. It offers a bunch of cool features and state-of-the-art testing libraries and frameworks that have proven to be valuable in the world of test-driven development.
One such feature is the “assert” keyword.
An assertion (or an assert statement) is a nifty tool that lets you test your assumptions about your program. Let’s say you’re working on a method to calculate the ability of an individual to vote. With assertions, you can make sure the age of the person is always greater than 18.
Basically, you create an assertion with a statement that should be true when it is executed. If the statement turns out to be false, the system will throw an error your way. By double-checking that the statement is true, the assert keyword gives you that extra confidence that your program is error-free and behaving just as you expect it to.
Here’s the cool part: writing assertions while you’re coding is like a superpower to finding and fixing bugs.
So how do you use the assert keyword in Groovy?
There are two forms in which you can use the assert keyword.
The first form is:
assert Expression1
Where Expression1 is just a fancy term for a Boolean expression. When your program hits this assertion, it checks if Expression1 is true. If the expression is true, it continues executing the next statement in the program and doesn’t print anything. If it’s false, then an AssertionError is thrown.
And the second form of the assert statement is:
assert Expression1: Expression2
Where Expression1 is still our older Boolean expression and Expression2 is something that actually has a value. It can’t be something like a void method call. Bummer!
But here’s where it gets interesting. You can use this second form of the assert statement to display a super cool detailed message for the AssertionError. To do this, the program will grab the value of Expression2 and use it as an error message. That way, you’ll get more details about what went wrong in your assertion. Pretty handy, right?
Consider the following code:
def age = 15
assert age >= 18: "Age should be 18 or above"
If the age isn’t above 18, you’d be thrown a pretty direct error message as to why your assertion failed.
The detailed message is all about capturing and sharing the details of the assertion failure. It can help you diagnose and fix the error that made the assertion go kaput. It isn’t catered toward regular users but is to be viewed alongside your stack trace and the source code. So you don’t have to worry about making it more understandable for the general public.
Chapter 13: JSON Handling in Groovy
JSON stands for JavaScript Object Notation and is a lightweight format for storing and transporting data.
It’s a popular way to represent data in a human-readable format. It consists of data in the form of key-value pairs, as we saw with Groovy Maps.
JSON formatting in Groovy is extremely useful. It simplifies the handling and manipulation of JSON data. It enhances the capabilities of Groovy when working with JSON-based technologies and facilitates data exchange, configuration management, testing, and more.
In Groovy, you can work with JSON easily because it has in-built support for handling JSON data.
JsonBuilder Class
If you have your data handy, Groovy can convert it into JSON using the JsonBuilder class. You can start using this class by creating its object and using its methods to build your JSON structure.
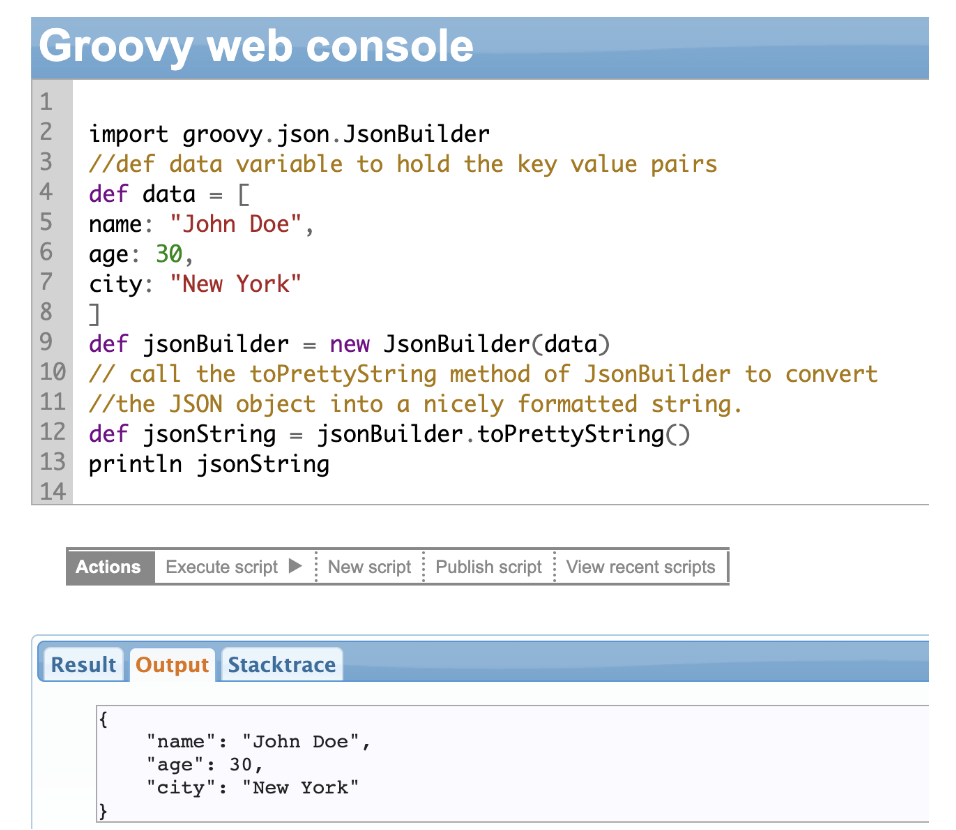
Note: toPrettyString() is optional here. It’s only used to add some indentation and line breaks to make the JSON more readable.
JsonSlurper Class
JsonSlurper is another fantastic class in Groovy that makes working with JSON data a breeze. It allows you to parse JSON strings and convert them into Groovy objects that you can easily manipulate and access.
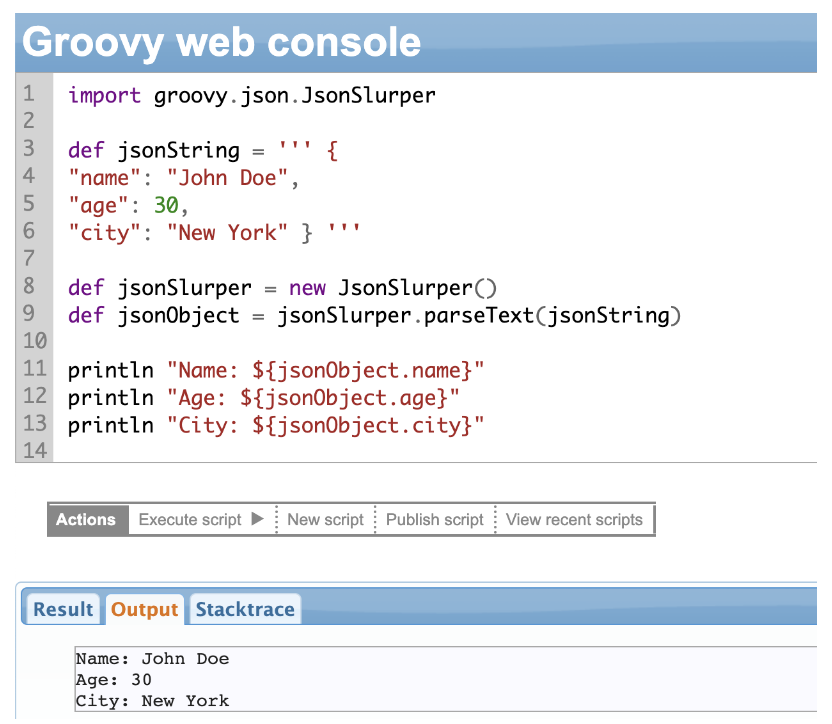
In the example above, we create an object of the jsonSlurper class and call the parseText method of that class. We pass the JSON string to the method.
All you need to do now is to access individual elements of the JSON object using the dot (.) operator. So you can access the name via jsonObject.name.
And there you have it!
With JsonSlurper, you can parse JSON strings and work on the data as Groovy objects. The JsonSlurper class also has a lot of other helpful methods like parse(File file) to parse the JSON data structure given within a file.
JSON Formatting Using Exalate
We saw earlier that a replica is the payload passed from one system to another. It contains the data and the metadata in the JSON format.
There are two replicas per platform: the local replica and the remote replica.
Let me explain how Exalate accesses and works with the replica with an example.
Let’s sync the priority field from ServiceNow to Jira. If you view the replica on the ServiceNow instance, the local replica is the one in ServiceNow, and the remote replica will be the one on the Jira side. Similarly, the replicas will be interchanged if you view them in the Jira instance.
The replica on the ServiceNow instance looks like this:
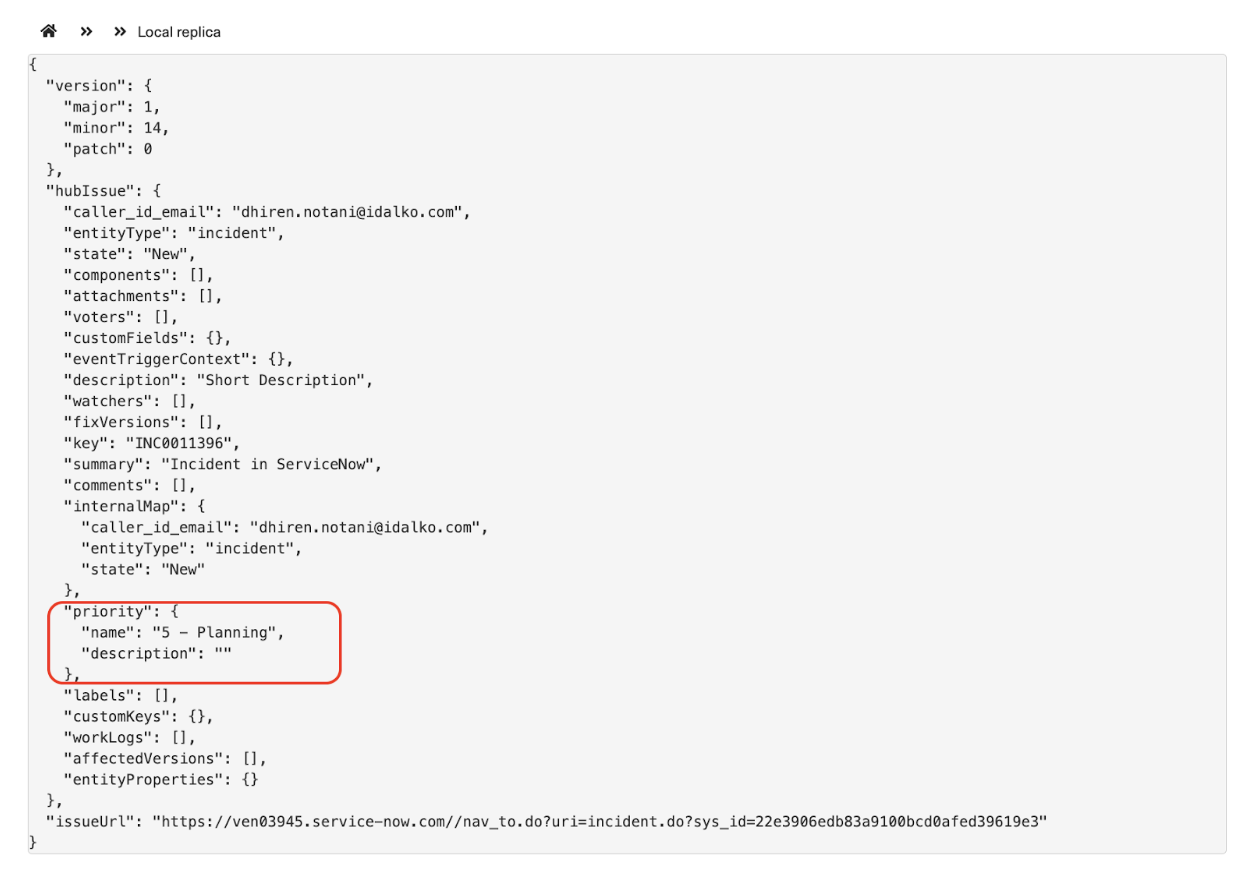
The image shows the hubIssue (aka the replica) with all the incident fields.
Now, our use case is to sync the priority from ServiceNow to Jira.
The first thing you must do is send the priority information in the “Outgoing sync” in ServiceNow.
ServiceNow Outgoing Sync
The following incident information is sent from ServiceNow to Jira. You can see the priority being sent too.
Now, if you check the replica details, you can get the priority information in priority.name tag.
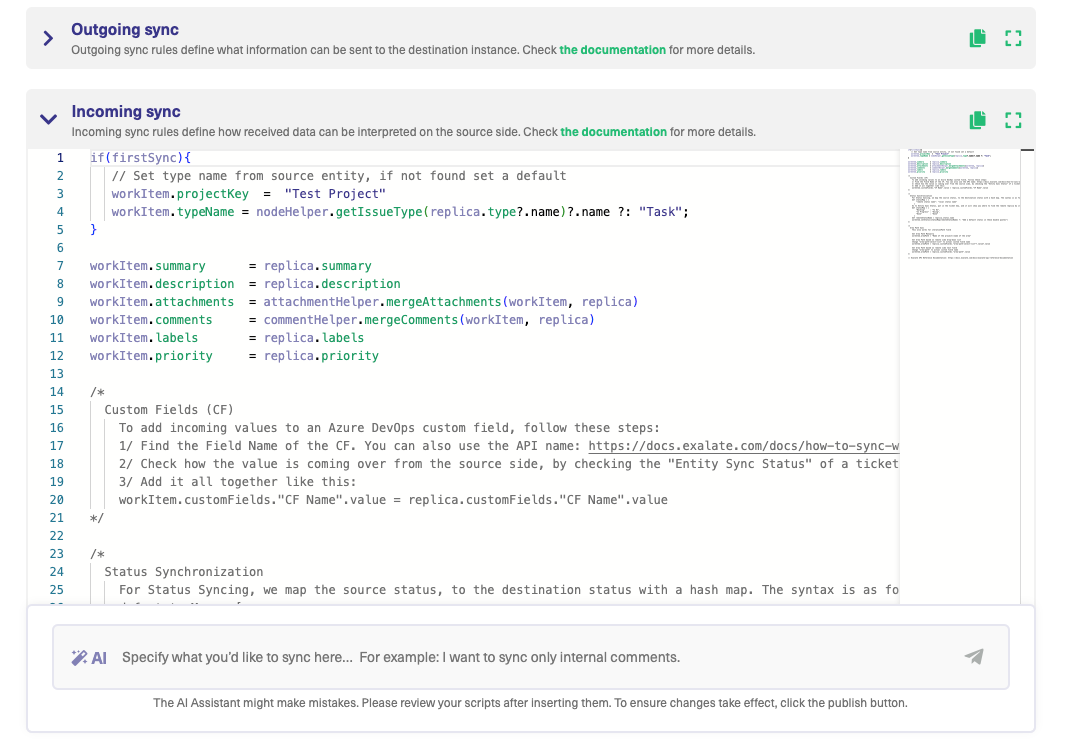
Jira Incoming Sync
Accordingly, the “Incoming sync” will be used to get the priority details in Jira.
def priorityMapping = [
// Snow incident priority <-> Jira issue priority
"1 - Critical": "Highest",
"2 - High": "High",
"3 - Moderate": "Medium",
"4 - Low": "Low",
"5 - Planning": "Lowest"
]
// set default priority in case the proper priority could not be found

def defaultPriority = "Low"
def priorityName = priorityMapping[replica.priority?.name] ?: defaultPriority // set default priority in case the proper urgency //could not be found
issue.priority = nodeHelper.getPriority(priorityName)
Here, we have mapped the priorities in ServiceNow to the priorities in Jira. After that, the issue priority in Jira is assigned based on the mapping.
Chapter 14: Groovy Scripts Networking
You can create a host of networked applications using the powerful set of networking features that Groovy supports.
Networking in Groovy is built on top of Java’s networking APIs. So if you are familiar with Java’s networking concepts, this one should be easy for you.
Some of the key features of Groovy networking include:
- Support for HTTP/ HTTPS client: Groovy provides an HTTP(s) client library making it easy to request and receive responses. This library supports both HTTP and HTTPS and allows you to set cookies, headers, and other parameters.
- Socket programming: You can create and manage sockets easily with Groovy. Sockets are endpoints for communication between two systems over a network. You can create both client and server-side sockets and use them to send and receive data.
- URL processing: You can use a rich set of classes to work with URLs. You can create and manipulate URLs, parse query parameters, and extract information from the URL.
- DNS lookup: Groovy provides classes for DNS lookups.
- Email handling: You can use the JavaMail API to send email messages using SMTP, POP3, and IMAP protocols.
Groovy provides you with powerful networking features that make it easy to create and work with networked applications and get your job done.
Using Groovy Networking Concepts in Exalate
Since Exalate supports Groovy-based scripts to extract, transform, and exchange information between multiple platforms, it can use Groovy’s networking features in many ways.
Some common examples of HTTP client requests for information exchange are:
- How to make any Jira Cloud REST API calls with the Jira Cloud HTTP client.
- REST APIs used by Exalate to access ServiceNow.
- How to use REST APIs for monitoring purposes.
- How to sync Tempo worklogs using external scripts in Jira Cloud.
- How to perform multiple consecutive operations in one synchronization with the store(issue) function in Exalate.
The store(issue) function is handy for peculiar use cases. One example is, where the Jira workflow configuration does not let you make changes to an issue when it is closed. To make changes, you must open the issue first. The store(issue) function will check the issue status and, depending on the status execute different sets of actions. - Making an HTTPS call to an external service
For instance, you need to map the GitHub user ID to a Jira email address and vice versa. You need to keep the mapping in an external service that provides endpoints that you can call via an HTTPS link.
You can also perform URL Processing using external scripts in the Jira cloud.
So are you ready to explore the infinite possibilities with Groovy scripting and be amazed at what you can achieve?
Whether you are a seasoned developer or just getting started, there’ll always be something Groovy has to offer.
Chapter 15: Best Practices and Tips for Groovy Scripting Development
- Like we haven’t stressed enough the flexibility that Groovy offers. Use some cool features it supports like closures, dynamic typing, a safe navigation operator, and other in-built methods like find(), each(), etc. Use them fully and wisely to get the best out of Groovy.
- Groovy allows operator overloading, for +,-,*,/, and %. This can be used to create domain-specific languages (DSLs).
- Groovy supports the @Delegate annotation that allows you to delegate method calls to another object. This can be useful to create adapters or for providing a simpler interface to complex objects.
- Groovy allows you to modify the behavior of objects at run-time using metaprogramming. You can use it to create dynamic DSLs or for adding some other behavior to objects at run-time.
We have been working with the Groovy console for quite some time now. It’s a fantastic tool to quickly test out code snippets and a perfect way to play around with Groovy and learn more about the language. You’ll love how easy it is to use. Give it a try and see for yourself.
Chapter 16: Most Popular Exalate Scripts
1. Transformers – Converting HTML to Wiki and Others
The most common example of Groovy scripts in Exalate can be for transformers. These transformers can convert information from one specific format to another, such that it is understood by the destination instance.
For instance, every application has a different format, Jira – Wiki, Azure DevOps, Salesforce and ServiceNow – HTML and GitHub, and Zendesk – Markdown. Transformers help convert the HTML format to Wiki, the Markdown format to Wiki, or the Wiki format to HTML.
Following are the different transformers that can be implemented via Exalate scripting:
1.1. HTML to Wiki
1.2. Markdown to Wiki
1.3. Wiki to HTML
2. Syncing User Mentions, Rich Text, and Inline Images
2.1: Syncing User Mentions
It’s common knowledge that team members often tag (or mention) each other in comments for various reasons.
You can use Exalate scripts to sync user mentions in comments between systems like Jira, Azure DevOps, Salesforce, etc.
The following scripts would do the magic.
Note: The only pre-requisite for this use case is that the user property (like email IDs) should be the same in both systems.
Azure DevOps Incoming Sync For User Mentions
String start1="#exalate_comment#"
String end1="#exalate_comment_end#"
for(comment in replica.addedComments)
{
def matcher = comment.body =~ /(?<=#exalate_comment#).*?(?=#exalate_comment_end#)/
matcher.each {
x->
def userId=nodeHelper.getUserByEmail(x,"Project_key")?.key
if(userId){
def string = "<a href=\"#\" data-vss-mention=\"version:2.0,"+userId+"\"></a> "
def test = comment.body.replaceAll(start1+ x + end1,string)
comment.body = test
}
}
}
Azure DevOps Outgoing Sync for User Mentions
def newComment
def allComments = workItem.comments.collect {
    comment ->
def comment1=comment.body
def matcher  = comment1 =~ /(?<=data-vss-mention="version:2.0,).*?(?=\")/
matcher.each {
 x->
def userId=nodeHelper.getUser(x,"project_key")?.email
 if (userId)
{
   def matcher1  = comment =~ /  <a href="#" data-vss-mention="version:2.0,${x}.*?<\/a> /

matcher1.each{
    y->
    comment1=comment1.replaceAll(y,"[~accountid:"+userId+"]")
  }
}

}
    comment.body=comment1
    comment
}
replica.comments   	= nodeHelper.stripHtmlFromComments(allComments)
Jira Incoming Sync For User Mentions
for(comment in replica.addedComments){
    def newCommentBody=comment.body
    def matcher  = comment.body =~ /\[~accountid:([a-zA-Z0-9+._-]+@[a-zA-Z0-9._-]+\.[a-zA-Z0-9_-]+)\]/
 matcher.each {
 x->
    def target = nodeHelper.getUserByEmail(x[1])?.key ?:x[1]
    newCommentBody = newCommentBody.replace(x[1],target)
}
 comment.body=  newCommentBody
}

def addedComments = commentHelper.mergeComments(issue, replica)
Jira Outgoing Sync For User Mentions
String start1="#exalate_comment#"
String end1="#exalate_comment_end#"
replica.comments = issue.comments.collect {
comment ->

    def matcher  = comment.body =~ /\[~accountid:([\w:-]+)\]/
    def newCommentBody = comment.body

    matcher.each {
     target = nodeHelper.getUser(it[1])?.email ?: "Stranger"
     target = start1+target+end1
     newCommentBody = newCommentBody.replace(it[0],target)
    }

    comment.body = newCommentBody
    comment
}
The details of what happens behind the scenes in this use case can be found here.
You can also sync user mentions from Jira Cloud comments to Salesforce chatter feed.
2.2 Syncing Rich Text and Inline Images
Another common requirement is to handle rich-text and inline images and sync them correctly over to the destination instance.
We’ll consider Jira and Azure DevOps for this use case as well.
You can use the following code.
Jira Outgoing Sync For Rich Text and Inline Images
replica.description = nodeHelper.getHtmlField(issue, "description")
Azure DevOps Incoming Sync For Rich Text and Inline Images
if(firstSync){
// Set type name from source entity, if not found set a default
workItem.projectKey = "Demo"
workItem.typeName = "Task"
}
workItem.summary = replica.summary
workItem.attachments = attachmentHelper.mergeAttachments(workItem, replica)
workItem.comments = commentHelper.mergeComments(workItem, replica)
workItem.labels = replica.labels
def await = { f -> scala.concurrent.Await$.MODULE$.result(f, scala.concurrent.duration.Duration.apply(1, java.util.concurrent.TimeUnit.MINUTES)) }
def creds = await(httpClient.azureClient.getCredentials())
def issueTrackerUrl = creds.issueTrackerUrl()
def processInlineImages = { str ->
def processLtGtTags = {
def counter = 0
while (counter < 1000) {
def matcher = (str =~ /<!-- inline image filename=#(([^#]+)|(([^#]+)#([^#]+)))# -->/)
if (matcher.size() < 1) {
break;
}
def match = matcher[0]
if (match.size() < 2) {
break;
}
def filename = match[1]
def attId = workItem.attachments.find { it.filename?.equals(filename) }?.idStr
if (!attId) {
log.error("""Could not find attachment with name ${filename},
known names: ${replica.attachments.filename},
match: ${replica.attachments.find { it.filename?.equals(filename) }}
""")
str = str.replace(match[0], """""".toString())
} else {
def tmpStr = str.replace(match[0], """ """.toString())
if (tmpStr == str) {
break;
}
str = tmpStr
}
counter++
}
str
}
def processNoImage = {
def counter = 0
while (counter < 1000) {
def matcher = (str =~ /
""".toString())
if (tmpStr == str) {
break;
}
str = tmpStr
}
counter++
}
str
}
def processNoImage = {
def counter = 0
while (counter < 1000) {
def matcher = (str =~ / /)
if (matcher.size() < 1) {
break;
}
def match = matcher[0]
if (match.size() < 2) {
break;
}
def filename = match[2]
def attId = workItem.attachments.find { it.filename?.equals(filename) }?.idStr
if (!attId) {
log.error("""Could not find attachment with name ${filename},
known names: ${replica.attachments.filename},
match: ${replica.attachments.find { it.filename?.equals(filename) }}
""")
str = str.replace(match[0], """
/)
if (matcher.size() < 1) {
break;
}
def match = matcher[0]
if (match.size() < 2) {
break;
}
def filename = match[2]
def attId = workItem.attachments.find { it.filename?.equals(filename) }?.idStr
if (!attId) {
log.error("""Could not find attachment with name ${filename},
known names: ${replica.attachments.filename},
match: ${replica.attachments.find { it.filename?.equals(filename) }}
""")
str = str.replace(match[0], """ """.toString())
} else {
def tmpStr = str.replaceAll(match[0], """""".toString())
if (tmpStr == str) {
break;
}
str = tmpStr
}
counter++
}
str
}
if (str == null) {
return null
}
str = processLtGtTags()
str = processNoImage()
log.error("#processimages $str")
str
}
String value = processInlineImages(replica.description)
workItem.description=value
""".toString())
} else {
def tmpStr = str.replaceAll(match[0], """""".toString())
if (tmpStr == str) {
break;
}
str = tmpStr
}
counter++
}
str
}
if (str == null) {
return null
}
str = processLtGtTags()
str = processNoImage()
log.error("#processimages $str")
str
}
String value = processInlineImages(replica.description)
workItem.description=value
3. Syncing a Parent-Child Relationship
Agile and project management systems like Jira and Azure DevOps often have entities that have a parent-child relationship with one another. The relationship can also have multiple levels of hierarchy.
We’ll discuss two examples of how Exalate maintains a parent-child relationship.
The relationship in Azure DevOps is Epic → Feature → Task. The same needs to be mirrored as Story → Task → Bug in Jira on-premise. You can see behind the scenes of this use case in this community post.
Azure DevOps Outgoing Sync
replica.parentId = workItem.parentId

def res = httpClient.get("/_apis/wit/workitems/${workItem.key}?\$expand=relations&api-version=6.0",false)
if (res.relations != null){
    replica."relation" = res.relations[0].attributes.name
    replica."relationid" = (res.relations[0].url).tokenize('/')[7]
    }
Jira incoming sync
import com.atlassian.jira.issue.link.IssueLinkManager
import com.atlassian.jira.component.ComponentAccessor
import com.atlassian.jira.security.JiraAuthenticationContext
import com.atlassian.jira.issue.link.IssueLinkTypeManager
import com.atlassian.jira.issue.link.IssueLinkType
import org.slf4j.Logger

class LogIn {

        static logIn(u) {
            def authCtx = com.atlassian.jira.component.ComponentAccessor.getJiraAuthenticationContext()
            try {
                //Jira 7
                authCtx.setLoggedInUser(u)
            } catch (Exception ignore) {
                // Jira 6
                //noinspection GroovyAssignabilityCheck
                authCtx.setLoggedInUser(u.getDirectoryUser())
            }
        }

        static  R tryLogInFinallyLogOut(Closure fn) {
            def authCtx = com.atlassian.jira.component.ComponentAccessor.getJiraAuthenticationContext()
            def proxyAppUser = getProxyUser()
            def loggedInUser = authCtx.getLoggedInUser()
            try {
                logIn(proxyAppUser)
                fn()
            } finally {
                logIn(loggedInUser)
            }
        }

        static getProxyUser() {
            def nserv = com.atlassian.jira.component.ComponentAccessor.getOSGiComponentInstanceOfType(com.exalate.api.node.INodeService.class)
            nserv.proxyUser
        }

    }
class CreateIssue {

        static def log = org.slf4j.LoggerFactory.getLogger("com.exalate.scripts.Epic")

        private static def doCreate = {
            com.exalate.basic.domain.hubobject.v1.BasicHubIssue replica,
            com.exalate.basic.domain.hubobject.v1.BasicHubIssue issue,
            com.exalate.api.domain.request.ISyncRequest syncRequest,
            com.exalate.node.hubobject.v1_3.NodeHelper nodeHelper,
            com.exalate.basic.domain.hubobject.v1.BasicHubIssue issueBeforeScript,
            com.exalate.api.domain.INonPersistentReplica remoteReplica,
            List traces,
            List blobMetadataList,
            Logger log ->
                def firstSync = com.exalate.processor.jira.JiraCreateIssueProcessor.createProcessorContext.get() == true
                def issueLevelError = { String msg ->
                    new com.exalate.api.exception.IssueTrackerException(msg)
                }
                def issueLevelError2 = { String msg, Throwable c ->
                    new com.exalate.api.exception.IssueTrackerException(msg, c)
                }
                def toExIssueKey = { com.atlassian.jira.issue.MutableIssue i ->
                    new com.exalate.basic.domain.BasicIssueKey(i.id, i.key)
                }
                final def authCtxInternal = com.atlassian.jira.component.ComponentAccessor.getJiraAuthenticationContext()
                final def imInternal = com.atlassian.jira.component.ComponentAccessor.issueManager
                final def umInternal = com.atlassian.jira.component.ComponentAccessor.userManager
                final def nservInternal = com.atlassian.jira.component.ComponentAccessor.getOSGiComponentInstanceOfType(com.exalate.api.node.INodeService.class)

                final def hohfInternal2 = com.atlassian.jira.component.ComponentAccessor.getOSGiComponentInstanceOfType(com.exalate.api.hubobject.IHubObjectHelperFactory.class)
                //noinspection GroovyAssignabilityCheck
                final def hohInternal2 = hohfInternal2.get(remoteReplica.payload.version)

                if (issue.id != null) {
                    def existingIssue = imInternal.getIssueObject(issue.id as Long)
                    if (existingIssue != null) {
                        return [existingIssue, toExIssueKey(existingIssue)]
                    }
                }

                def proxyAppUserInternal = nservInternal.getProxyUser()

                def loggedInUser = authCtxInternal.getLoggedInUser()

                log.debug("Logged user is " + loggedInUser)

                def reporterAppUser = null
                if (issue.reporter != null) {
                    reporterAppUser = umInternal.getUserByKey(issue.reporter?.key)
                }
                reporterAppUser = reporterAppUser ?: proxyAppUserInternal

                issue.project = issue.project ?: ({ nodeHelper.getProject(issue.projectKey) })()
                issue.type = issue.type ?: ({ nodeHelper.getIssueType(issue.typeName) })()

                def jIssueInternal = null
                try {
                    LogIn.logIn(reporterAppUser)

                    if (issue.id != null) {
                        def existingIssue = imInternal.getIssueObject(issue.id as Long)
                        if (existingIssue != null) {
                            issue.id = existingIssue.id
                            issue.key = existingIssue.key
                            return [existingIssue, toExIssueKey(existingIssue)]
                        }
                    }
                    def cir
                    try{
                        cir = hohInternal2.createNodeIssueWith(issue, hohInternal2.createHubIssueTemplate(), null, [:], blobMetadataList, syncRequest)
                    } catch (MissingMethodException e){
                        cir = hohInternal2.createNodeIssueWith(issue, hohInternal2.createHubIssueTemplate(), null, [:], blobMetadataList, syncRequest.getConnection())
                    }

                    def createdIssueKey = cir.getIssueKey();

                    jIssueInternal = imInternal.getIssueObject(createdIssueKey.id)

                    if (issue.id != null) {
                        def oldIssueKey = jIssueInternal.key
                        def oldIssueId = jIssueInternal.id
                        try {
                            jIssueInternal.key = issue.key
                            jIssueInternal.store()
                        } catch (Exception e) {
                            log.error("""Failed to sync issue key: ${e.message}. Please contact Exalate Support. Deleting issue `$oldIssueKey` ($oldIssueId)""".toString(), e)
                            imInternal.deleteIssue(proxyAppUserInternal, jIssueInternal as com.atlassian.jira.issue.Issue, com.atlassian.jira.event.type.EventDispatchOption.ISSUE_DELETED, false)
                        }
                    }

                    issue.id = jIssueInternal.id
                    issue.key = jIssueInternal.key

                    return [jIssueInternal, toExIssueKey(jIssueInternal)]
                } catch (com.exalate.api.exception.IssueTrackerException ite) {
                    if (firstSync && jIssueInternal != null) {
                        imInternal.deleteIssue(proxyAppUserInternal, jIssueInternal as com.atlassian.jira.issue.Issue, com.atlassian.jira.event.type.EventDispatchOption.ISSUE_DELETED, false)
                    }
                    throw ite
                } catch (Exception e) {
                    if (firstSync && jIssueInternal != null) {
                        imInternal.deleteIssue(proxyAppUserInternal, jIssueInternal as com.atlassian.jira.issue.Issue, com.atlassian.jira.event.type.EventDispatchOption.ISSUE_DELETED, false)
                    }
                    throw issueLevelError2("""Failed to create issue: ${
                        e.message
                    }. Please review the script or contact Exalate Support""".toString(), e)
                } finally {
                   LogIn.logIn(loggedInUser)
                }
        }

        /**
         * @param whenIssueCreatedFn - a callback closure executed after the issue has been created
         * */
        static com.exalate.basic.domain.BasicIssueKey create(
                com.exalate.basic.domain.hubobject.v1.BasicHubIssue replica,
                com.exalate.basic.domain.hubobject.v1.BasicHubIssue issue,
                com.exalate.api.domain.request.ISyncRequest syncRequest,
                com.exalate.node.hubobject.v1_3.NodeHelper nodeHelper,
                com.exalate.basic.domain.hubobject.v1.BasicHubIssue issueBeforeScript,
                com.exalate.api.domain.INonPersistentReplica remoteReplica,
                List traces,
                List blobMetadataList,
                Closure whenIssueCreatedFn) {

            def firstSync = com.exalate.processor.jira.JiraCreateIssueProcessor.createProcessorContext.get() == true
            def (_jIssue, _exIssueKey) = doCreate(replica, issue, syncRequest, nodeHelper, issueBeforeScript, remoteReplica, traces, blobMetadataList, log)
            com.atlassian.jira.issue.MutableIssue jIssue = _jIssue as com.atlassian.jira.issue.MutableIssue
            com.exalate.basic.domain.BasicIssueKey exIssueKey = _exIssueKey as com.exalate.basic.domain.BasicIssueKey
            try {

                whenIssueCreatedFn()
                UpdateIssue.update(replica, issue, syncRequest, nodeHelper, issueBeforeScript, traces, blobMetadataList, jIssue, exIssueKey)
            } catch (Exception e3) {
                final def imInternal = com.atlassian.jira.component.ComponentAccessor.issueManager
                final def nservInternal2 = com.atlassian.jira.component.ComponentAccessor.getOSGiComponentInstanceOfType(com.exalate.api.node.INodeService.class)
                def proxyAppUserInternal = nservInternal2.getProxyUser()
                if (firstSync && _jIssue != null) {
                    imInternal.deleteIssue(proxyAppUserInternal, _jIssue as com.atlassian.jira.issue.Issue, com.atlassian.jira.event.type.EventDispatchOption.ISSUE_DELETED, false)
                }
                throw e3
            }
            return exIssueKey
        }
    }
class UpdateIssue {

        private static def log = org.slf4j.LoggerFactory.getLogger("com.exalate.scripts.Epic")

        private static def doUpdate = { com.exalate.basic.domain.hubobject.v1.BasicHubIssue replica,
                                        com.exalate.basic.domain.hubobject.v1.BasicHubIssue issue,
                                        com.exalate.api.domain.request.ISyncRequest syncRequest,
                                        com.exalate.node.hubobject.v1_3.NodeHelper nodeHelper,
                                        com.exalate.basic.domain.hubobject.v1.BasicHubIssue issueBeforeScript,
                                        List traces,
                                        List blobMetadataList,
                                        com.atlassian.jira.issue.MutableIssue jIssue,
                                        com.exalate.basic.domain.BasicIssueKey exIssueKey ->
            try {
                final def hohfInternal2 = com.atlassian.jira.component.ComponentAccessor.getOSGiComponentInstanceOfType(com.exalate.api.hubobject.IHubObjectHelperFactory.class)
                //noinspection GroovyAssignabilityCheck
                final def hohInternal2 = hohfInternal2.get("1.2.0")
                final def nservInternal2 = com.atlassian.jira.component.ComponentAccessor.getOSGiComponentInstanceOfType(com.exalate.api.node.INodeService.class)

                def proxyAppUserInternal2 = nservInternal2.getProxyUser()

                log.info("performing the update for the issue `" + jIssue.key + "` for remote issue `" + replica.key + "`")
                //finally create all
                def fakeTraces2 = com.exalate.util.TraceUtils.indexFakeTraces(traces)
                def preparedIssue2 = hohInternal2.prepareLocalHubIssueForApplication(issueBeforeScript, issue, fakeTraces2)
                //@Nonnull IIssueKey issueKey, @Nonnull IHubIssueReplica hubIssueAfterScripts, @Nullable String proxyUser, @Nonnull IHubIssueReplica hubIssueBeforeScripts, @Nonnull Map> traces, @Nonnull List blobMetadataList, IRelation relation
                def resultTraces2
                try{
                    resultTraces2 = hohInternal2.updateNodeIssueWith(exIssueKey, preparedIssue2, proxyAppUserInternal2.key, issueBeforeScript, fakeTraces2, blobMetadataList, syncRequest)
                } catch (MissingMethodException e){
                    resultTraces2 = hohInternal2.updateNodeIssueWith(exIssueKey, preparedIssue2, proxyAppUserInternal2.key, issueBeforeScript, fakeTraces2, blobMetadataList, syncRequest.getConnection())
                }
                traces.clear()
                traces.addAll(resultTraces2 ?: [])
                new Result(issue, traces)
            } catch (com.exalate.api.exception.IssueTrackerException ite2) {
                throw ite2
            } catch (Exception e2) {
                throw new com.exalate.api.exception.IssueTrackerException(e2.message, e2)
            }
        }

        static Result update(com.exalate.basic.domain.hubobject.v1.BasicHubIssue replica,
                             com.exalate.basic.domain.hubobject.v1.BasicHubIssue issue,
                             com.exalate.api.domain.request.ISyncRequest syncRequest,
                             com.exalate.node.hubobject.v1_3.NodeHelper nodeHelper,
                             com.exalate.basic.domain.hubobject.v1.BasicHubIssue issueBeforeScript,
                             List traces,
                             List blobMetadataList,
                             com.atlassian.jira.issue.MutableIssue jIssue,
                             com.exalate.basic.domain.BasicIssueKey exIssueKey) {
            doUpdate(replica, issue, syncRequest, nodeHelper, issueBeforeScript, traces, blobMetadataList, jIssue, exIssueKey)
        }

        static class Result {
            com.exalate.basic.domain.hubobject.v1.BasicHubIssue issue
            List traces

            Result(com.exalate.basic.domain.hubobject.v1.BasicHubIssue issue, java.util.List traces) {
                this.issue = issue
                this.traces = traces
            }
        }
    }

int createIssueLink(){
 if (replica.parentId || replica."relation"){
    def parentLinkExists = false
    if (replica.parentId)
        flag = true
    def localParentKey = nodeHelper.getLocalIssueKeyFromRemoteId(replica.parentId ?: replica?."relationid" as Long, "issue")?.key
    if (localParentKey==null) return 1
    final String sourceIssueKey = localParentKey
    final String destinationIssueKey = issue.key

    def linkTypeMap = [
        "Parent" : "Relates",
        "Duplicate" : "Duplicate"
        ]
    String issueLinkName

    if (!parentLinkExists)
        issueLinkName = linkTypeMap[replica."relation"]
    else
        issueLinkName = "Blocks"

    final Long sequence = 1L

    def loggedInUser = ComponentAccessor.jiraAuthenticationContext.loggedInUser
    def issueLinkTypeManager = ComponentAccessor.getComponent(IssueLinkTypeManager)
    def issueManager = ComponentAccessor.issueManager

    def sourceIssue = issueManager.getIssueByCurrentKey(sourceIssueKey)
    def destinationIssue = issueManager.getIssueByCurrentKey(destinationIssueKey)

    def availableIssueLinkTypes = issueLinkTypeManager.issueLinkTypes

    int i,f=999
    for (i=0; i
Another use case is for Jira Cloud and Azure DevOps.
We can create issue links to other issues in Jira and define some kind of relationship between them. The use case revolves around picking up the issueLinks and their relationships from Jira Cloud and transferring them over to Azure DevOps with the help of mapping.
4. Syncing Multiple Tickets to a Single Issue Using httpClient
There is often a need to connect multiple customer tickets to a single development issue. There are different ways to achieve this using Exalate.
Here, we’ll use the httpClient method to sync multiple Zendesk tickets to a single Jira issue.
Zendesk Outgoing Sync
replica.customFields."Issue to connect to" = issue.customFields."Issue to connect to"
Jira incoming sync
def remoteIssueUrn =replica.customFields."Issue to connect to"?.value
if(remoteIssueUrn && firstSync){
  def localIssue = httpClient.get("/rest/api/2/issue/"+remoteIssueUrn)
  if(localIssue == null) throw new com.exalate.api.exception.IssueTrackerException("Issue with key "+remoteIssueUrn+" was not found")
  issue.id = localIssue?.id
  issue.key = localIssue?.key
  return;
}
5. Syncing Insights Custom Field
You can sync custom fields created in Insights using Exalate.
In the following example, we’ll sync an Assets custom Insight field in Jira on-premise. You can implement the same for Jira Cloud as well, but the code for that is a little different.
Jira On-premise Outgoing Sync
// SETTINGS
final def insightCustomFieldName = "Assets"
 // END SETTINGS

replica.customKeys.
"My Custom Field values as Strings" = issue.customFields[insightCustomFieldName]?.value?.collect{
 v ->
  def cfm = com.atlassian.jira.component.ComponentAccessor.getCustomFieldManager()
 def cf = cfm.getCustomFieldObject(issue.customFields[insightCustomFieldName].id)
 def cft = cf.getCustomFieldType()
 def vStr = cft.getStringFromSingularObject(v)
 vStr
}
Jira On-premise Incoming Sync
// SETTINGS
final def insightCustomFieldName = "Assets"
 // END SETTINGS

issue.customFields[insightCustomFieldName].value = replica.customKeys.
"My Custom Field values as Strings".collect {
 String vStr ->
  def cfm = com.atlassian.jira.component.ComponentAccessor.getCustomFieldManager()
 def cf = cfm.getCustomFieldObject(issue.customFields[insightCustomFieldName].id)
 def cft = cf.getCustomFieldType()
 def v = cft.getSingularObjectFromString(vStr)
 v
}
Note: Both the incoming and outgoing sync scripts work for Jira on-premise only.
You can also sync multiple Insight custom fields with Exalate
Conclusion
Finally, we are at the end!
I hope you’ve enjoyed this journey through the world of Groovy and discovered just how amazing this language can be. From its ‘beauty with brevity’ syntax to its versatile features, Groovy scripting is truly a language like no other.
Whether you’re building web applications, automating your daily tasks, or just tinkering around, Groovy scripting has something to offer for everyone. Amaze yourself and see what you can accomplish.
Till then, feel the groove and code your heart out!
Recommended Reading:
- Advanced Integration Use Cased using Exalate's Groovy-based Script Mode
- API Integration: A Practical Guide to Maximizing Business Efficiency
- Integration as a Service (IaaS): Everything Explained
- The Comprehensive Guide to iPaaS (Integration Platform as a Service)
- eBonding Integration: The Ultimate Guide to Flexible Data Sync
- The Definitive Guide to Cross-Company Integrations for IT Professionals