
Modern software teams use multiple software platforms to organize their work. There are many options, like IntegrationHub and Exalate, for teams looking to integrate them. Obviously, they all have their pros and cons and it’s important to be aware of these if you want to choose the right technology. By picking a system that meets your needs, you’ll be able to maximize the advantage you get from synchronizing your data.
There’s a key question when deciding whether to use ServiceNow IntegrationHub or Exalate: How do they compare? We’re going to look at both systems in detail today and see what they have to offer. We’ll also take you through the full setup of both systems so you could really understand what solution they both provide. Finally, we’ll cover common use cases for both IntegrationHub and Exalate.
ServiceNow is hugely popular with teams working on the cloud. Its IntegrationHub solution allows it to share workflows with other services.
Exalate is a cross-company integration solution that aims to deliver reliability, flexibility, and autonomy. It has many high-profile clients including brands like Dell, Panasonic, and IBM.
As well as describing what each platform does, we’ll see how they perform in use cases and will get an idea of what they do best.
Here’s what we’re going to cover in this article:
- Comparing ServiceNow IntegrationHub and Exalate
- What does ServiceNow IntegrationHub do?
- Installing ServiceNow IntegrationHub and Jira Spoke
- IntegrationHub Use Cases
- Exalate for ServiceNow and Jira
- Exalate Use Cases
- IntegrationHub or Exalate? The Verdict
ServiceNow IntegrationHub and Exalate: a Quick Comparison
As there is a vast variety of integration scenarios, it would be a good idea to first look from a broader perspective before comparing IntegrationHub and Exalate for a particular use case. We should as well acknowledge that ServiceNow IntegrationHub and Exalate target different sorts of organizations and needs.
IntegrationHub: It is used by enterprises as the main platform to manage IT services with the intention of taking IT automation to the next level. For such a purpose, IntegrationHub, along with the flow designer and the spokes for various systems, provides an excellent foundation. So with that purpose in mind, if an organization does not choose IntegrationHub, it would most probably be for strategic reasons.
Exalate: It is a cross-company integration solution for organizations with teams working on different platforms, like ServiceNow, Jira, Salesforce, Azure DevOps, GitHub, etc, that intends to streamline the collaboration between teams by synchronizing their tickets. Exalate is a good candidate for such a purpose, because of its autonomy(decentralized integration), flexibility, and reliability. So if a company is looking for a way to sync incident/ change/ problem tickets with Jira issues/ projects/ stories, then Exalate is a good solution.
Now that we’ve gone over the differences between the platforms, we’ll walk you through setting each of them up. We’ll then examine some use cases to see how things work in practice.
Let’s continue our investigation by looking at both solutions, starting with IntegrationHub:
What does ServiceNow IntegrationHub do?
IntegrationHub enables the execution of third-party APIs as a part of a flow when a specific event occurs in ServiceNow. These integrations referred to as spokes, provide powerful actions without the need to write a script. IntegrationHub provides the following functionalities:
- Spokes for integrations to a number of third-party tools
- Creates custom integrations
- Automate the administration of servers and applications in a network behind a firewall
Installing ServiceNow IntegrationHub and Jira Spoke
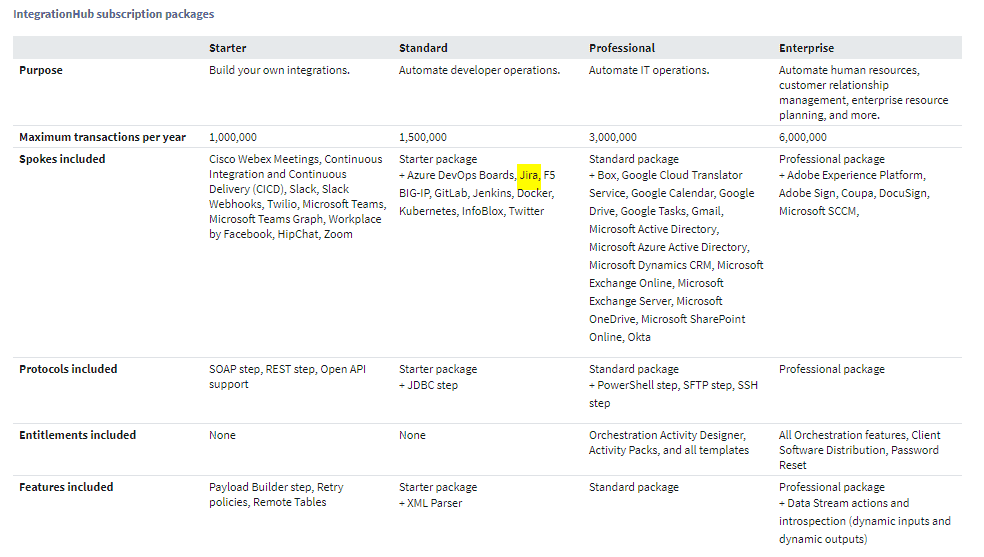
IntegrationHub is a separate subscription feature. It has four flavors as indicated below. Jira is included in the Standard subscription package.
Installing IntegrationHub with a subscription
If you have an Integration Hub subscription, ServiceNow will install it on your production and sub-production instances for you.
Installing IntegrationHub on a Sub-production Instance without a Subscription
If you just want to evaluate IntegrationHub before deciding to subscribe or not, check out the information here first on how to request it. You do need to have a ServiceNow HI instance account to request it (meaning that you have an active ServiceNow instance subscription).
Installing IntegrationHub on a PDI (Personal Development Instance)
If you just want to evaluate IntegrationHub without an active ServiceNow Instance, you can request a free evaluation on a PDI.
Go to your Developer’s account and find “My Instance”.

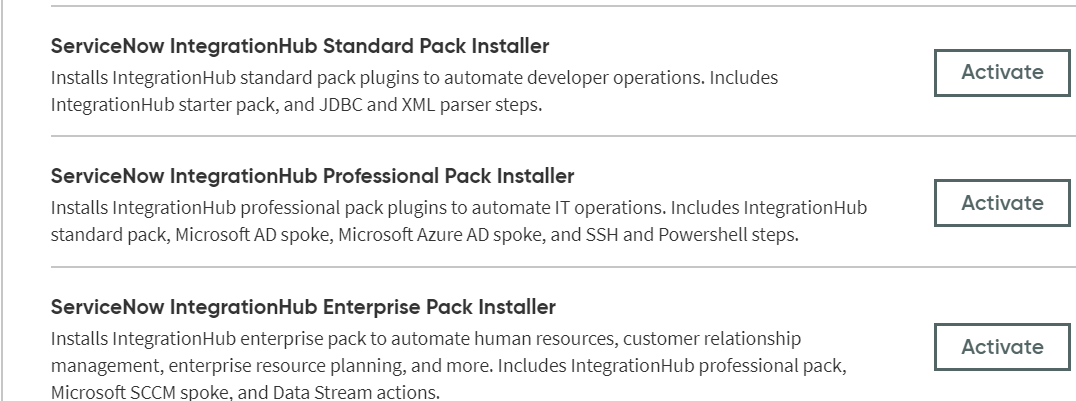
Click the “Activate plugin” and choose any of these installers that include the Jira Spoke:
Verify the Installation of IntegrationHub and Jira Spoke
On the ServiceNow instance, type “IntegrationHub” in the “Filter Navigator” on the left pane. You should be able to see the IntegrationHub Application.

In order to verify that Jira Spoke is installed correctly, you need to check that the Jira Spoke Actions are available in the ServiceNow Flow Designer Application.
Flow Designer is a Now Platform® feature for automating processes in a single design environment. Flow Designer lets process owners use the natural language to automate approvals, tasks, notifications, and record operations without coding. In connection with IntegrationHub, Flow Designer communicates with external instances and third-party systems.
(Flow Designer should be installed automatically on your ServiceNow instance. If not, you can activate it by going to “System Definition” → “Plugins” → “Flow Designer – Designer” → “Activate”)
Search for Flow Designer on the Left Pane and open it.
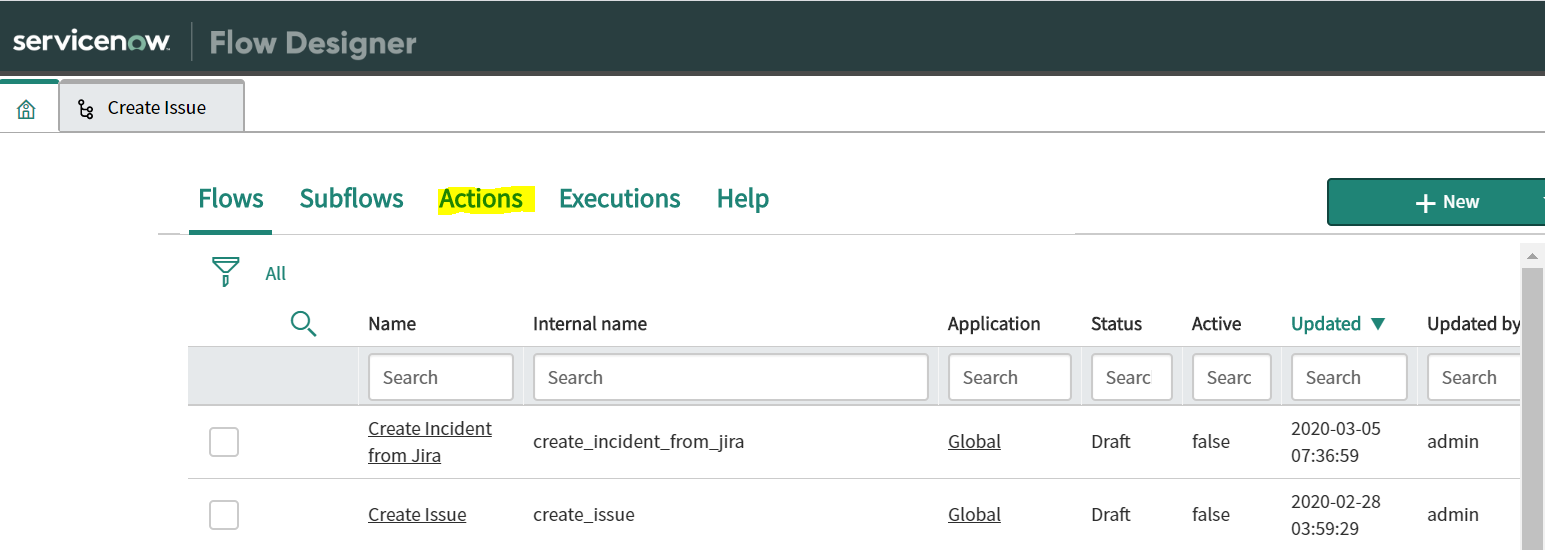

Go to “Actions” and type in “Jira Spoke” under “Application”. You should find a number of Actions belonging to the Jira Spoke application that can be used in the Flow Designer for the integration with Jira.
How to set up Jira Spoke
Use Jira Spoke to manage issues, users, stories, and groups in Jira. Retrieve Jira data to use in a flow. Use bi-directional webhooks and subscribe to Jira with a ServiceNow callback URL (Note: The bi-directional webhooks are supported in Jira Spoke version 2.6.5)
ServiceNow documentation has Step-by-Step instructions on:
- Setup Jira Spoke to create a connection between ServiceNow & Jira
- Create bi-directional Webhook and register it in ServiceNow
IntegrationHub Use Cases
Use Case 1: Create a Jira Issue from a ServiceNow Incident
In this use case, the trigger for the integration is an event in ServiceNow. e.g. an Incident is created and assigned to the Assignment group ServiceDesk-Jira. A corresponding Issue in Jira needs to be created. The integration is achieved by utilizing the Jira Spoke Action, the “Create Issue”. The sequence of integration steps is defined in a Flow:
Open ServiceNow “Flow Designer” → “Create New” → “Flow”.

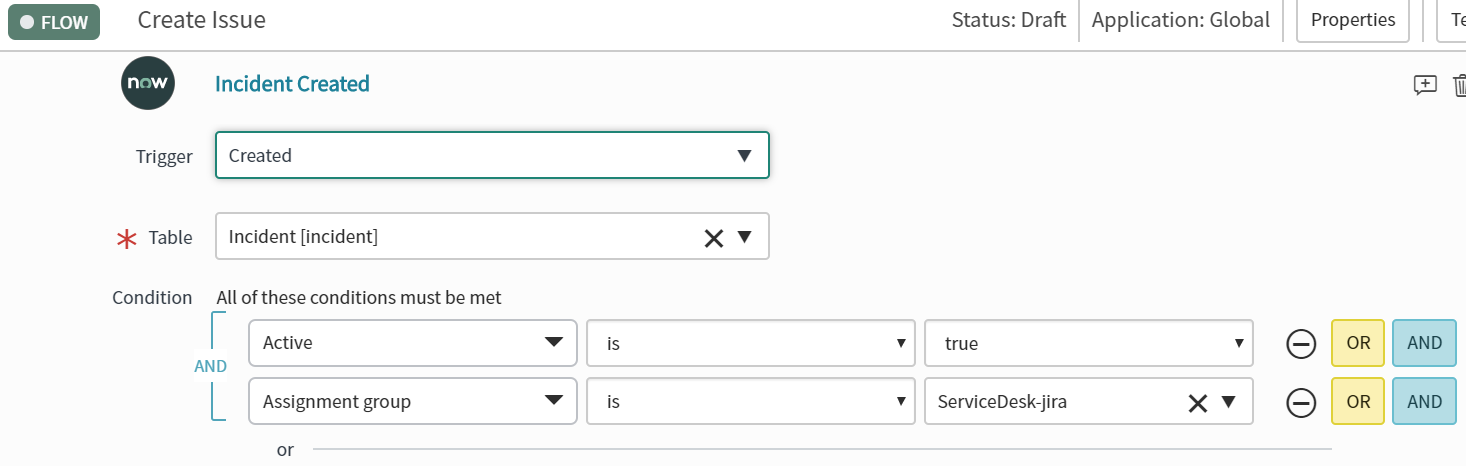
Define the trigger of the Flow: An Incident is created & assigned to ServiceDesk-Jira.
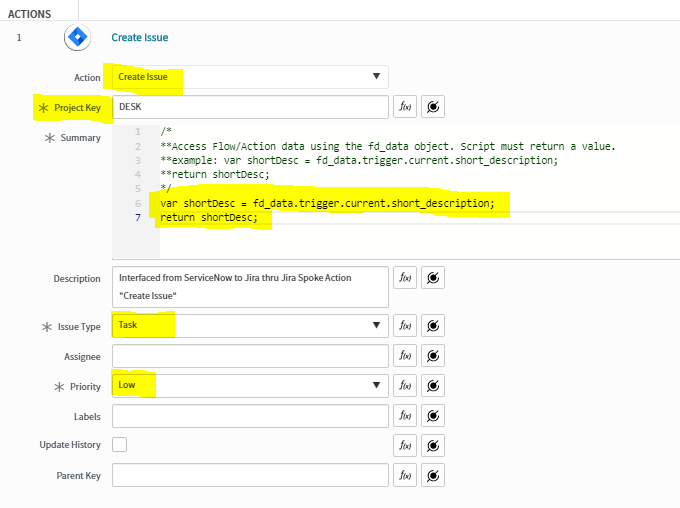
Define the Action to Create an Issue in Jira:
- The Action “Create Issue” is one of the Actions provided by Jira Spoke.
- The Project Key “DESK” is defined on the Jira side. It defines in which Project the Issue will be created.
- Summary: The scripts define that the Issue Summary will be derived from the Incident Short Description.
- All the other listed attributes can have either a fixed value or can be derived from the Incident.
The Issue created on the Jira side looks as following:

The above description gives an idea of how the Flow Designer works. In a real set-up of the Integration, the flow must be further configured to cover the subsequent scenarios of an integrated Incident/Issue.
- When an Incident/Issue is updated, update the twin ticket.
- Cover the Error case i.e. define Actions when the Creation/ Update has errors.
Below is an overview of the Jira Spoke Actions related to the Issues. For each Action, the supported attributes are defined/explained:

Besides the Actions for Issues, Jira Spoke also provides Actions to manage the following entities in Jira. See more details on supported Actions by Jira Spoke here.
- User
- Group
- Project
- SDLC
- MetaData retrieval
Use Case 2: Create a ServiceNow Incident from a Jira Issue
In this use case, the trigger for Integration is an event in Jira. e.g. an Issue is created. Through a webhook created in section 1.3, ServiceNow is informed about this event. This triggers a so-called Subflow. There is an OOB Subflow defined as an example, which is not editable. Users can copy this Subflow and do adjustments according to their own needs.
For this User case Subflow, “My process Jira Webhooks” is created and used in the default routing policy for the Jira webhook event.

The “My process Jira Webhooks” begins with a section that defines the Input and Output data. The Input data is the data that is transferred from Jira to ServiceNow when a Webhook event is triggered.
- The Input Data from Jira can be limited.
- OOB Subflow has included all the supported Jira Data.
- Because the Jira Webhook does define what event in Jira will trigger the Webhook, in practice only the relevant table, e.g. the Issue, should be included in the Input data.
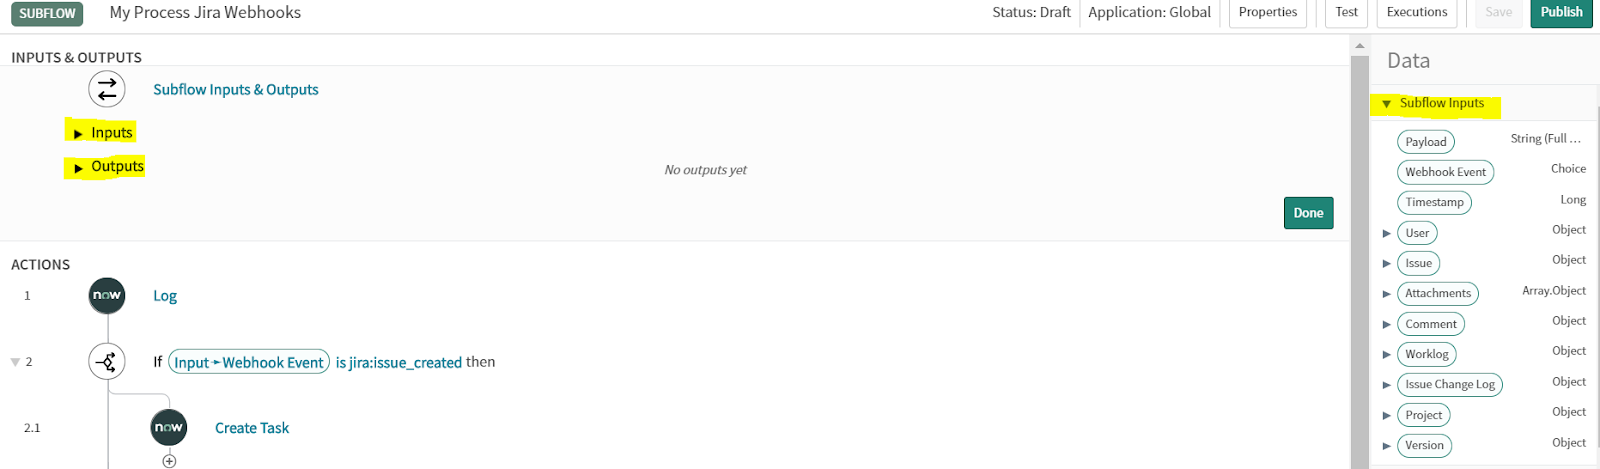
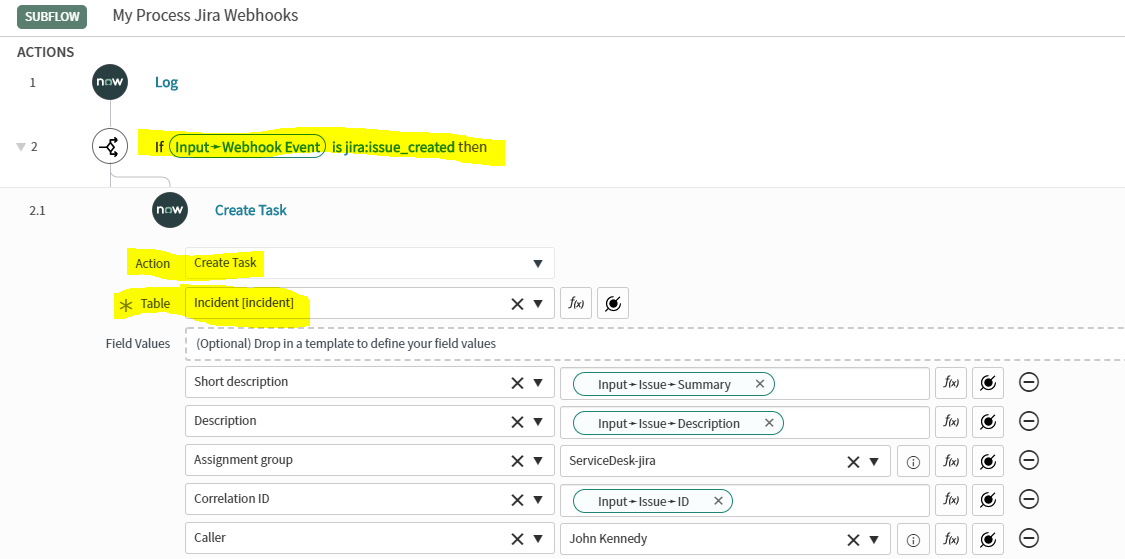
When the Jira Webhook Event “Issue Created” occurs, trigger ServiceNow Platform Action “Create Task” to use the Input data from Jira to Create an Incident in ServiceNow.
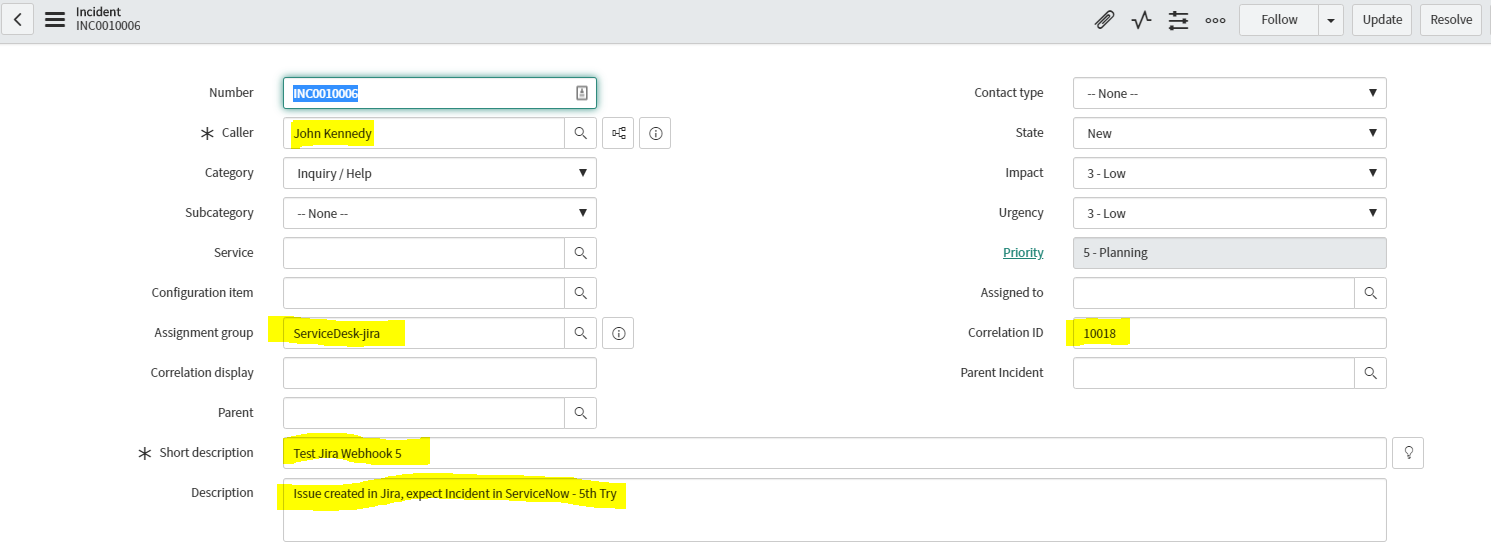
Due to the Routing Policy defined in the first step, whenever Jira Webhook events are triggered, this Subflow is executed and in case of a new Issue creation, an Incident is created in ServiceNow correspondingly.
The Subflow works in a stand-alone way as shown above. However, in an integration scenario, the subsequent synchronization of the integrated Issue/Incident pair needs to be covered in a Flow that uses the above Subflow.
Exalate for ServiceNow and Jira
Now we’ve seen how to integrate ServiceNow and Jira using IntegrationHub, let’s try setting up the same kind of integration with Exalate to see how they compare.
First, we need to install Exalate on both platforms. Then we’ll look at configuring it. Finally, we’ll examine some use cases to see how it performs in action. For a dedicated guide to this, read this document.
Install Exalate on ServiceNow
First, we’ll install Exalate on ServiceNow. The process is covered in this documentation.
The first step is to request an Exalate node for ServiceNow. You can do this on its integrations page.
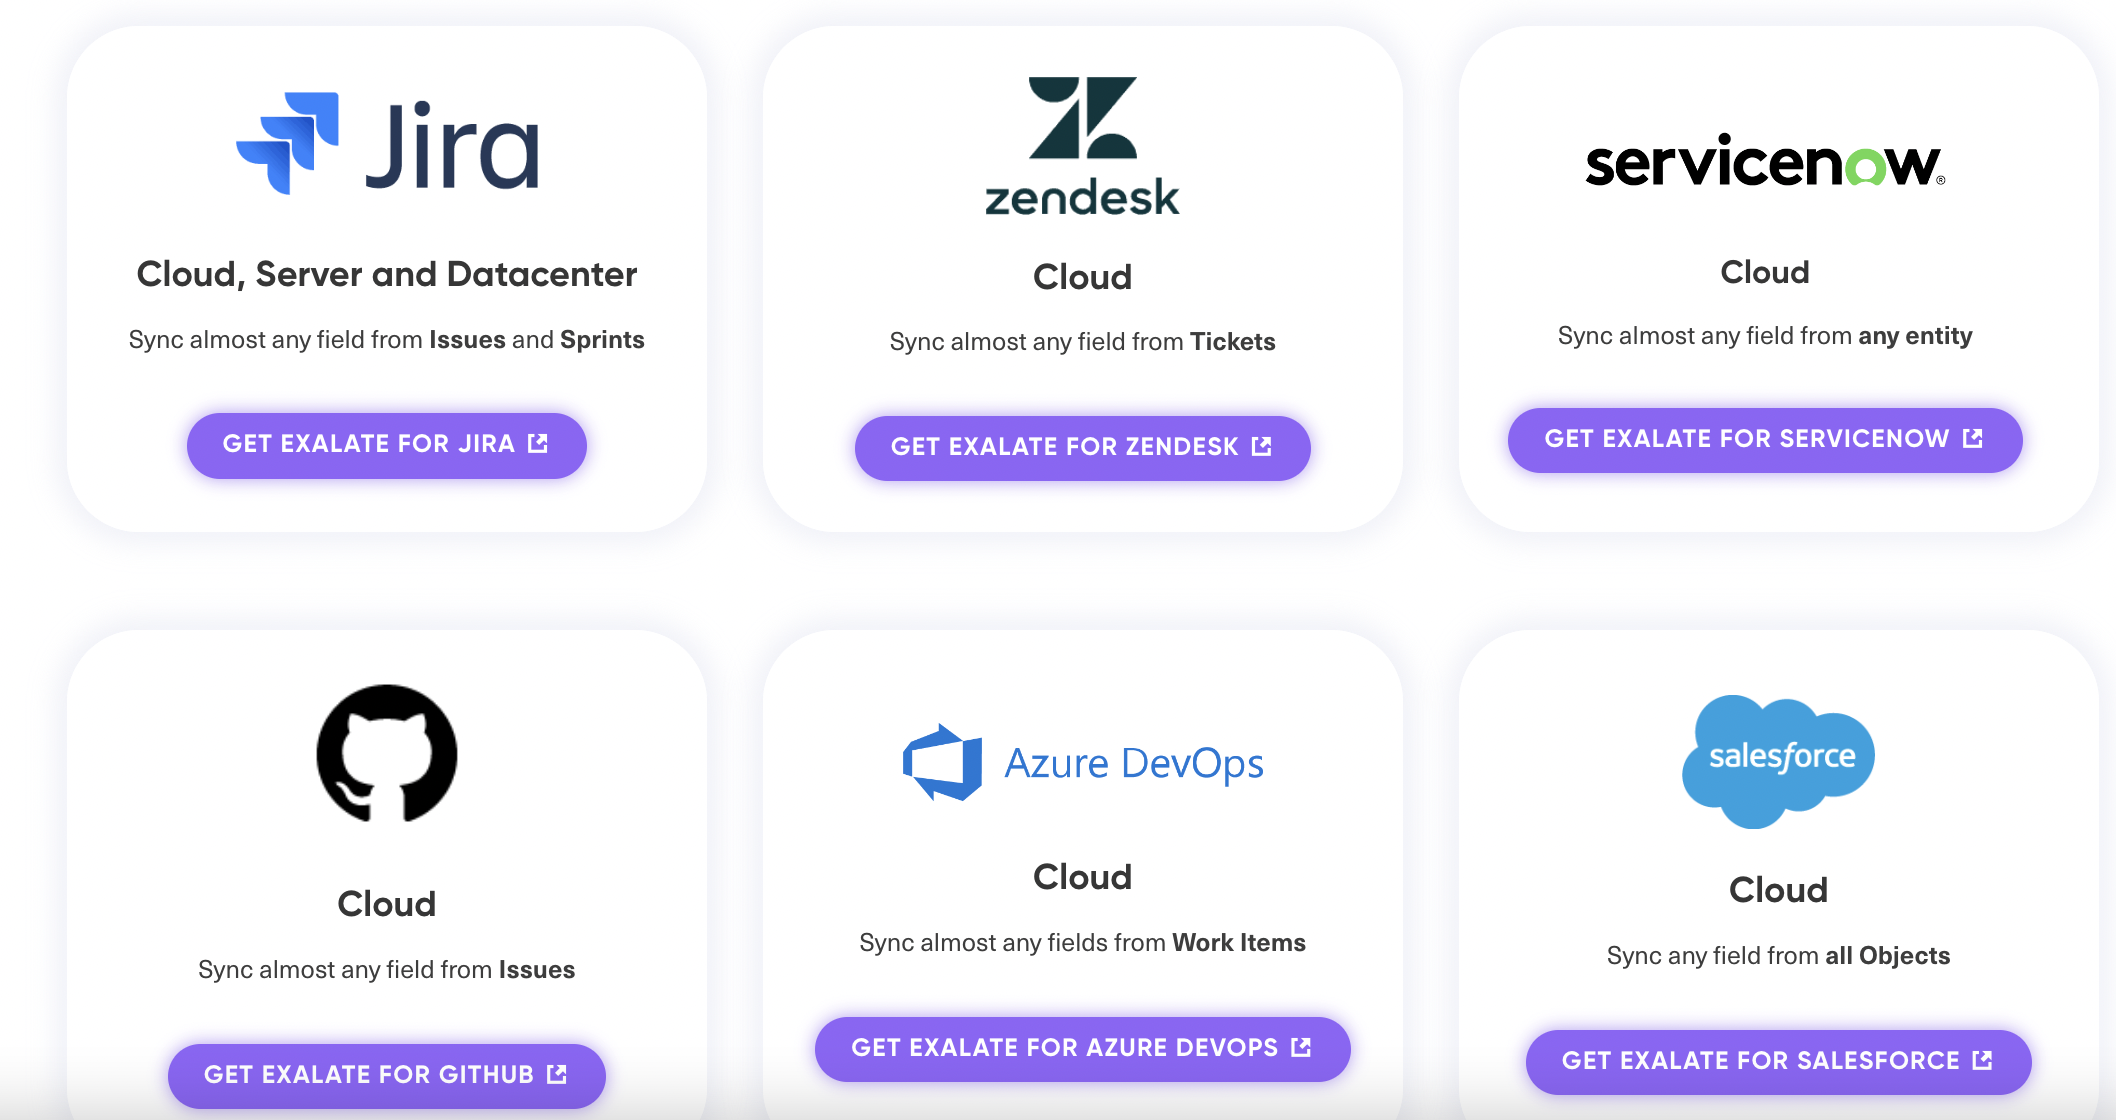
Choose ServiceNow as your application. And fill and submit a form that appears after. You will receive an email that will contain your Exalate for ServiceNow node URL.
Once this is done, download an Exalate “update set”, which is an XML file. Click here to download it.

Then open your ServiceNow account. From the “system update sets” menu on the left-hand side, navigate to “Retrieved Update Sets”. From here, click on the import update set from XML. Click the “Choose File” button and select the XML file you just downloaded. Then click the “Upload” button.

You should be able to view the uploaded file, with “Exalate” mentioned in the description.
Click the Exalate file and then the “Preview Update Set” button. If you see some errors, you might need to update your setup by clicking the “Accept remote update” button.
If things are working fine, click the “Commit Update Set” button and the installation should be complete for ServiceNow.
Install Exalate on Jira
Next, you’ll need to install Exalate in Jira. The process is different depending on whether you have the Cloud or on-premise version of Jira.
In either case, you can install Exalate and get started with a free trial.
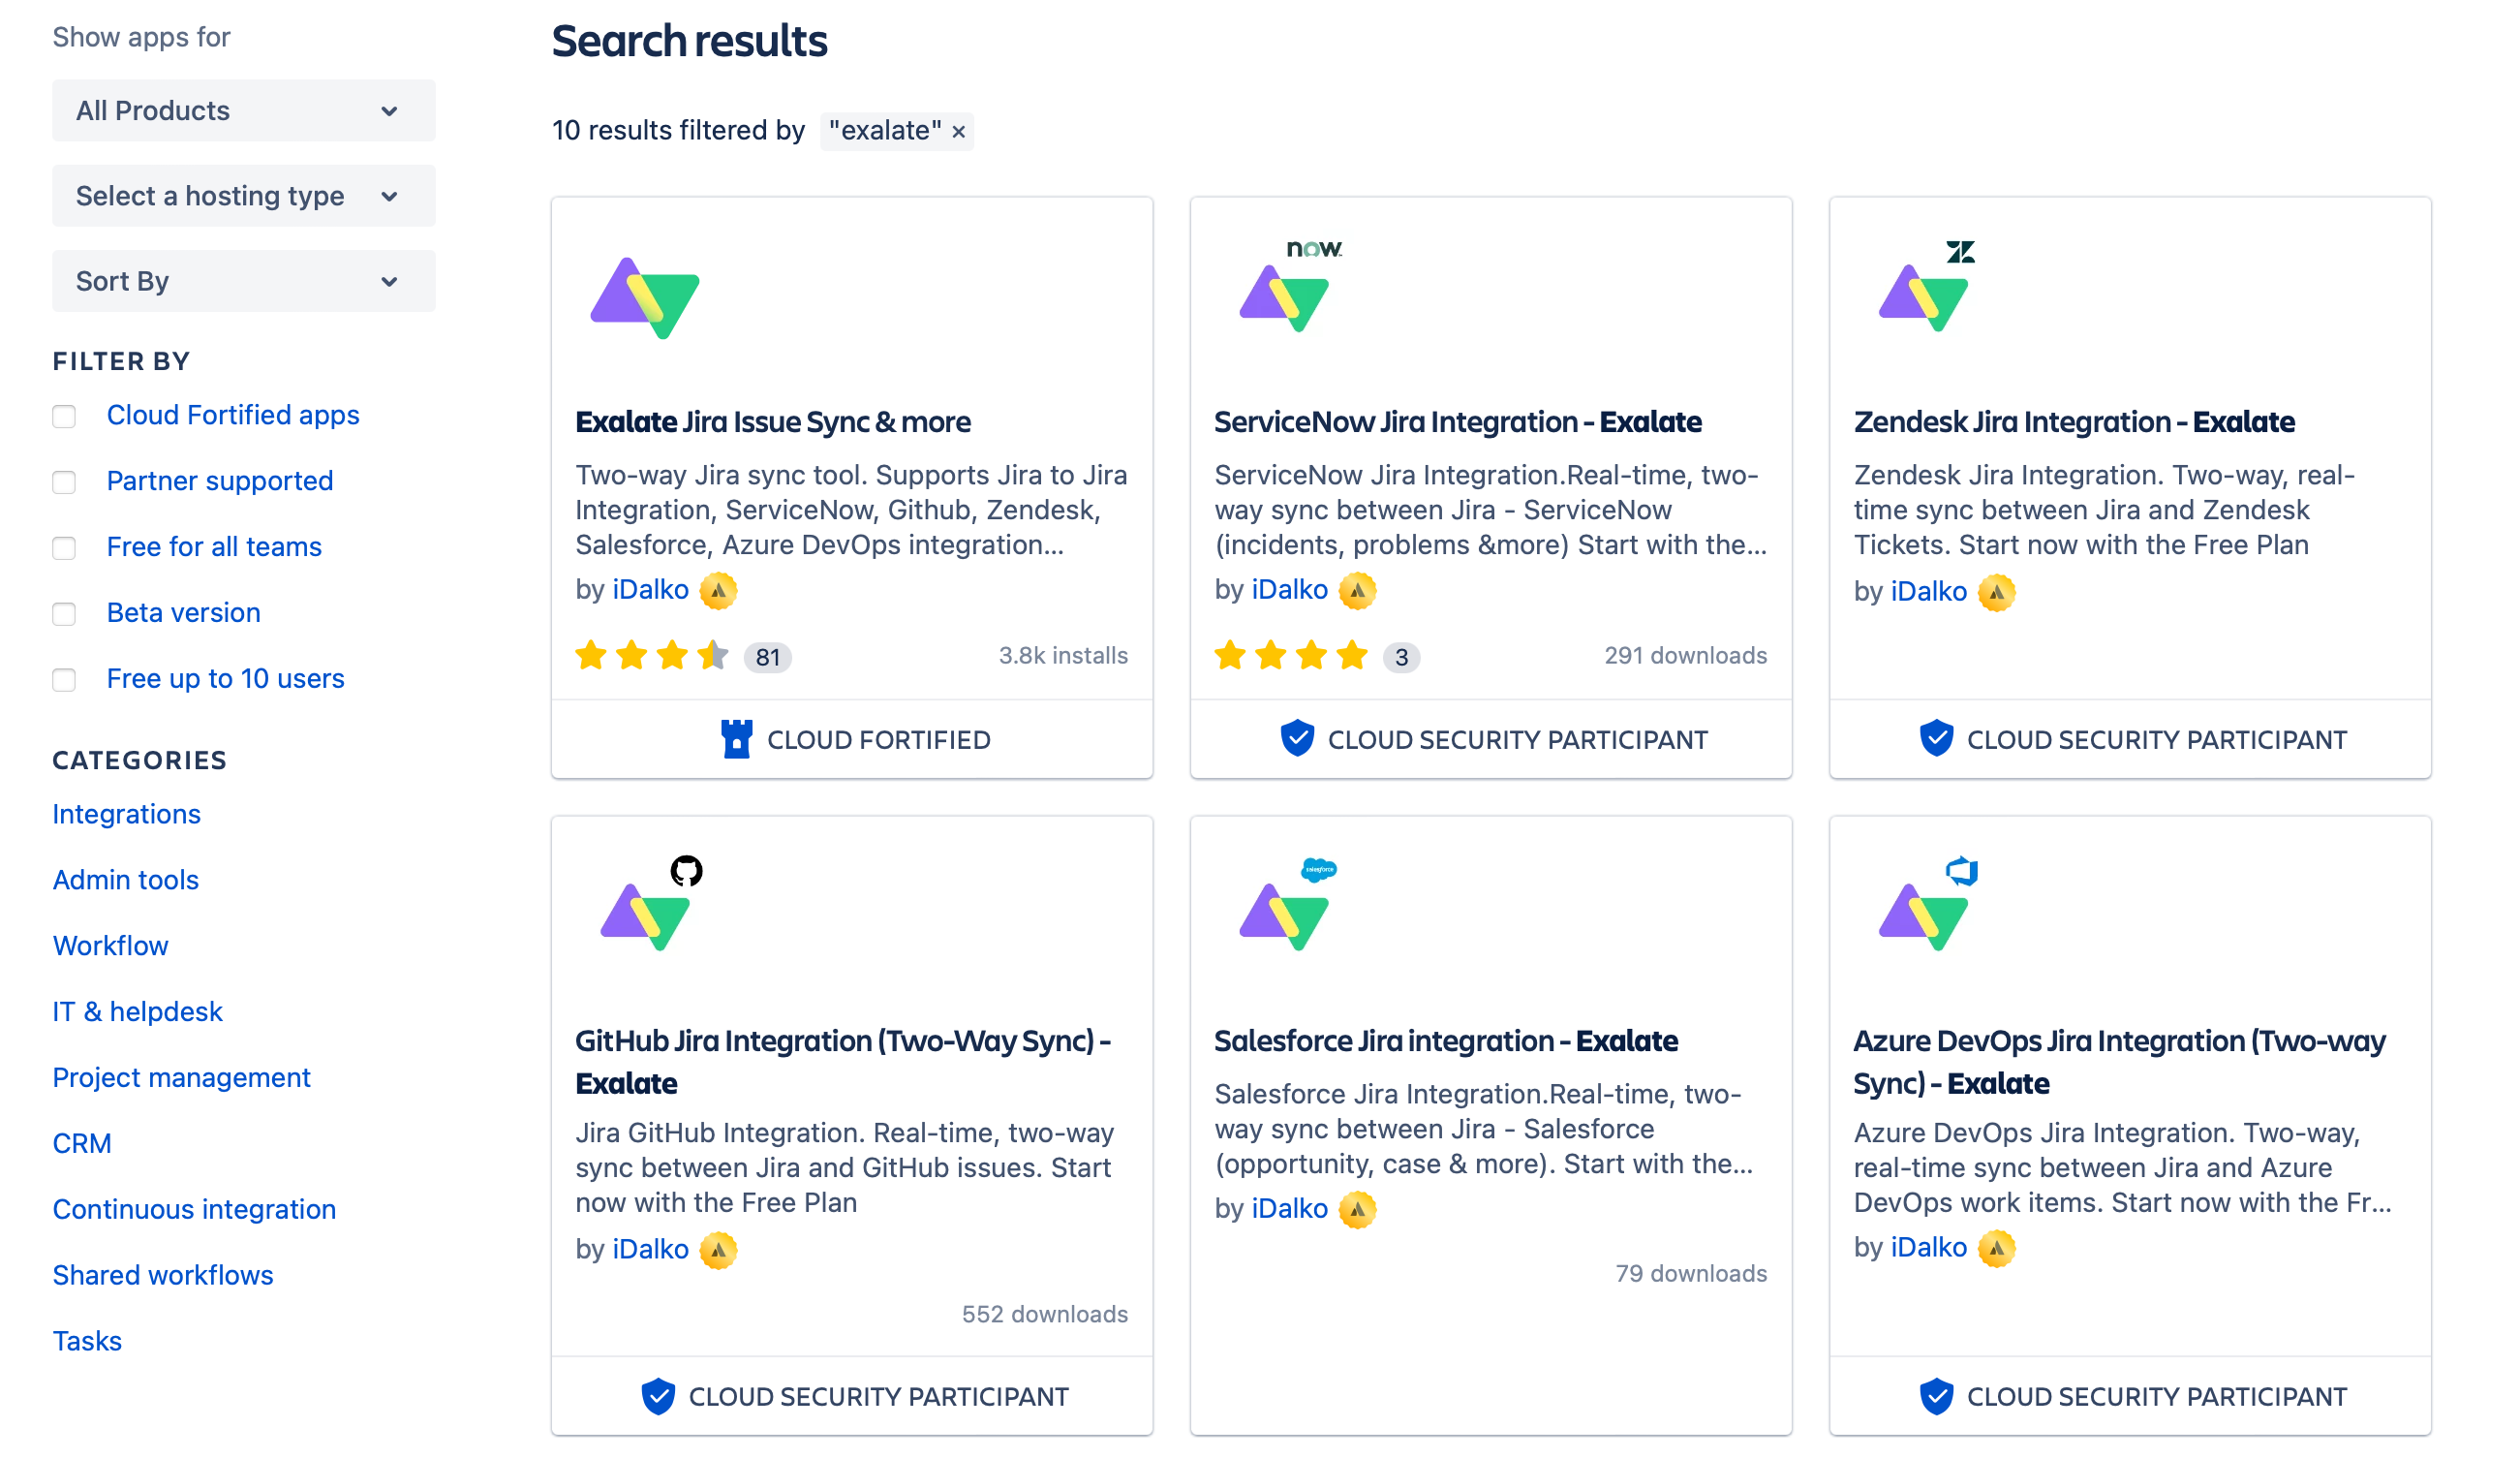
On the Cloud version, you can find Exalate in the marketplace. If you use on-premise, look in the add-ons menu. Click “Find New Apps” and then search for “Exalate”. The app you want is called “Exalate Jira Issue Sync & more”.
Click on the “Try it free” button. An “Add to Jira” pop-up displays a summary of Exalate features. Click on the “Start Free trial” button next.

While Exalate is added to Jira, a corresponding status update will be displayed.
After a short while, click “Get started” and you’re done.
For more details, read this Jira Cloud installation guide, or Jira on-premise installation guide.
Now we’ll discuss connecting the platforms and then move on to our use cases.
Connect ServiceNow and Jira via Exalate
With Exalate installed on both sides, the next step is to connect them. We do this by generating an invitation on one platform and accepting it on the other. We can create the invitation on either platform. The process is similar however we do it. For this example, we’ll look at creating it in Jira.
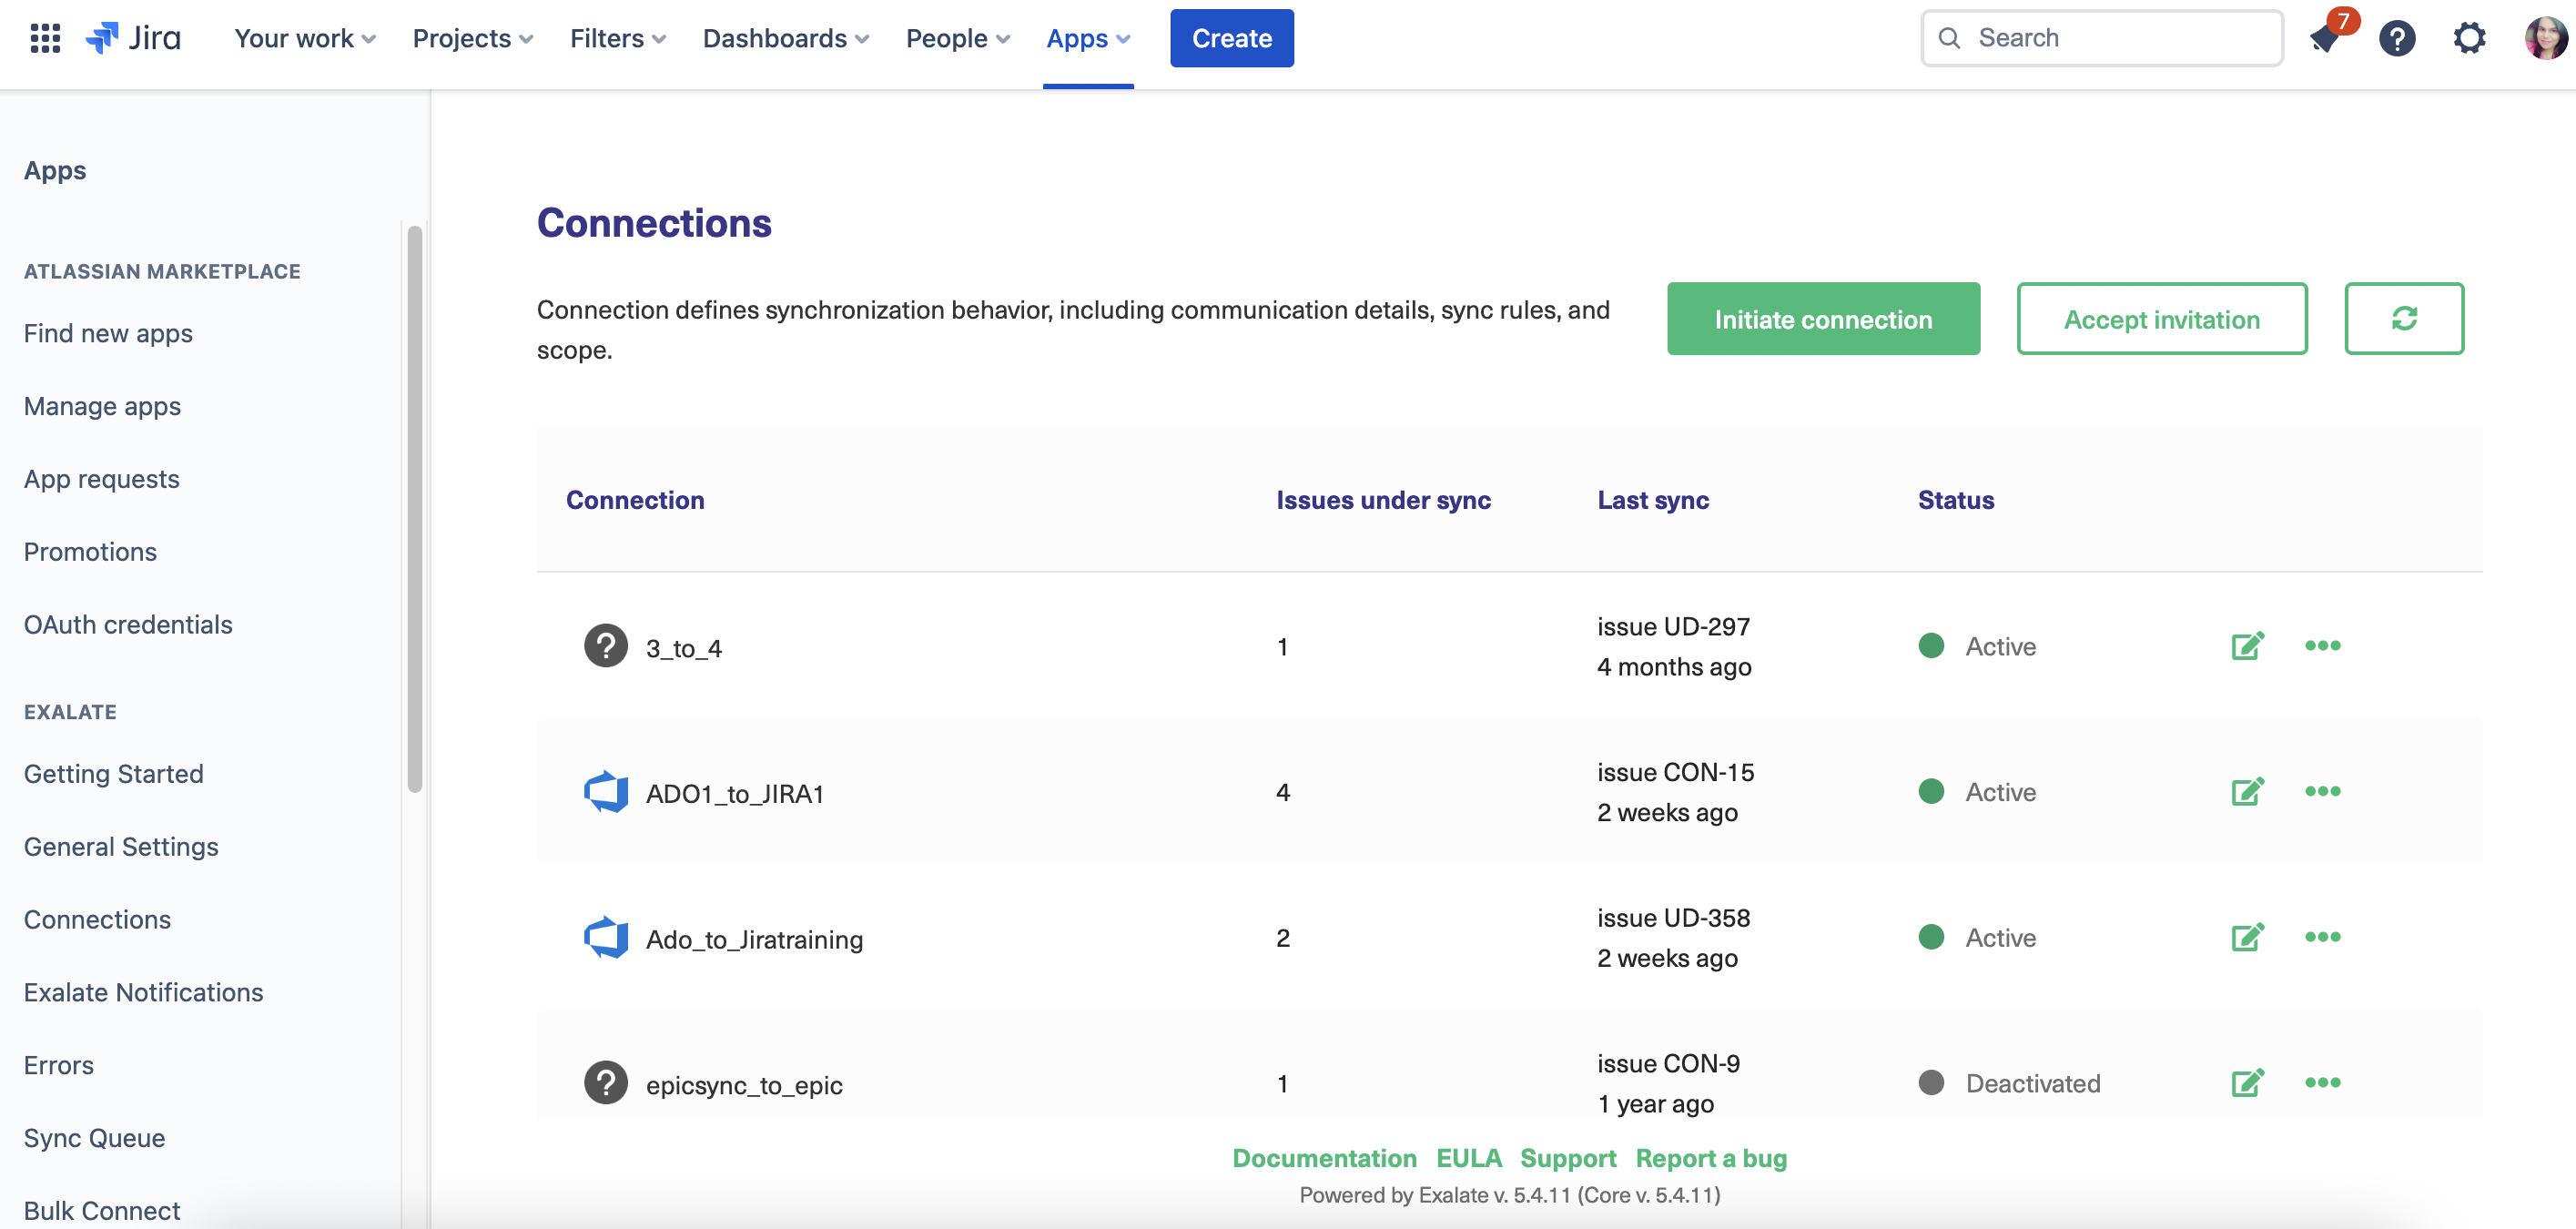
First, navigate to the “Connections” tab in your Exalate node. From here, click the green “Initiate connection” button to begin.
Enter the destination URL, in our case, it is the ServiceNow URL. After checking if Exalate has been installed on the destination side, new fields will appear.
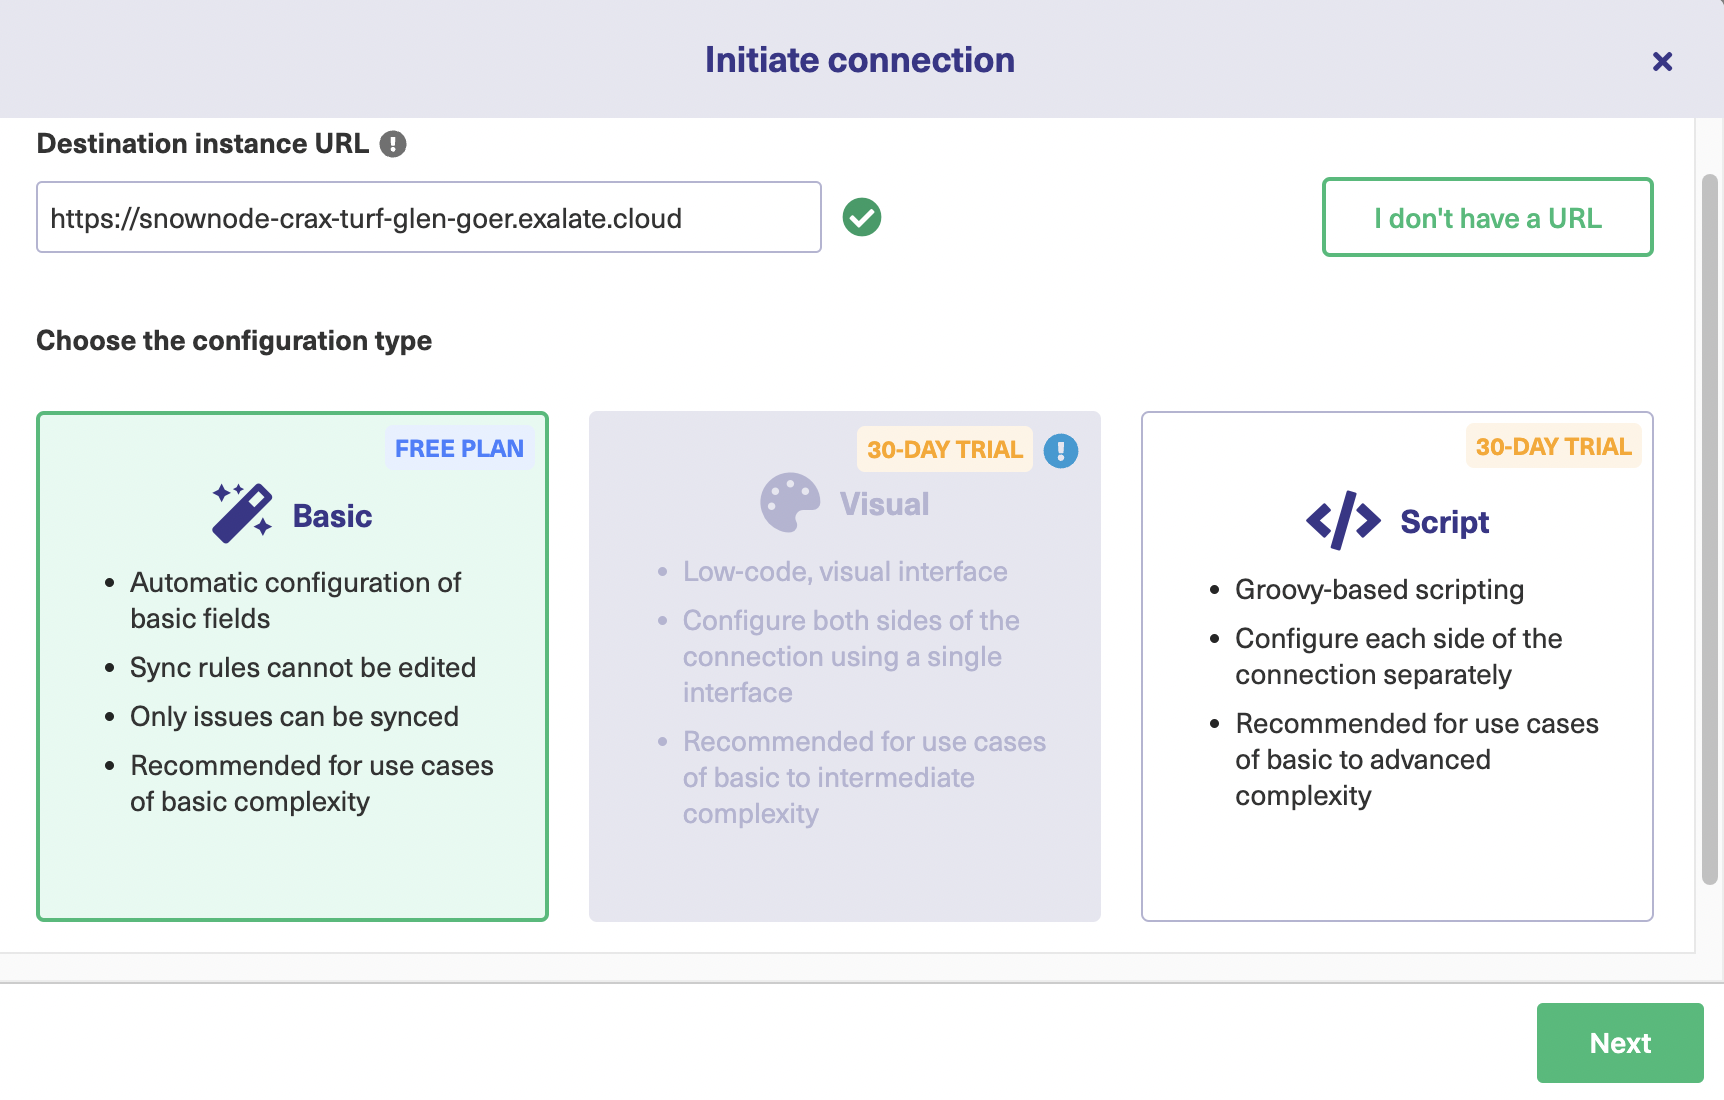
You have to choose the type of configuration mode.
Exalate comes in 2 modes: the Basic mode and the Script mode. These modes make Exalate customizable, so that it can be used easily by both technical and business users.
The Basic mode offers predefined mappings between Jira and ServiceNow entities that cannot be changed. The Script mode on the other hand has an intuitive scripting engine, due to which you can customize your integration case as you want.
For the Basic mode:
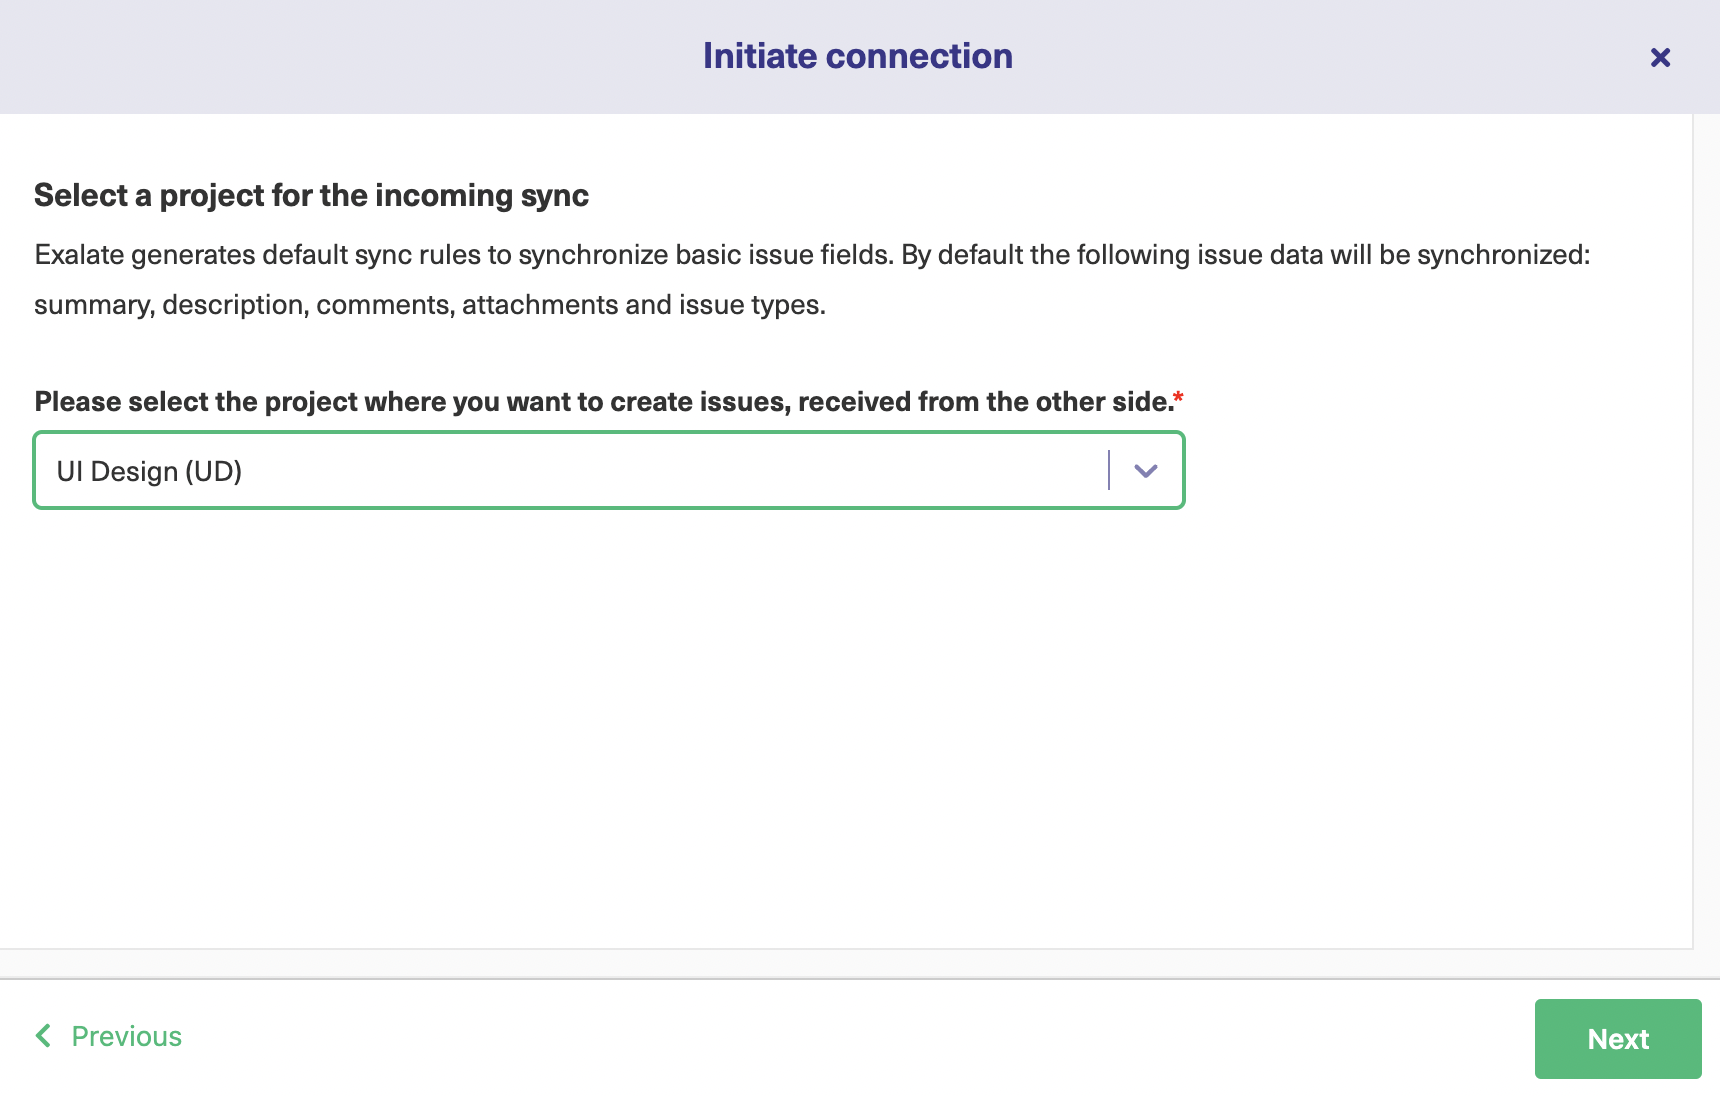
Press “Next” after selecting “Basic” on the screen above. Then proceed to select the project on the Jira instance. This will be the project in which you will synchronize ServiceNow Incidents. Select the correct one from the dropdown list and hit “Next”.
Proceed to verify if you have admin access to the ServiceNow instance.
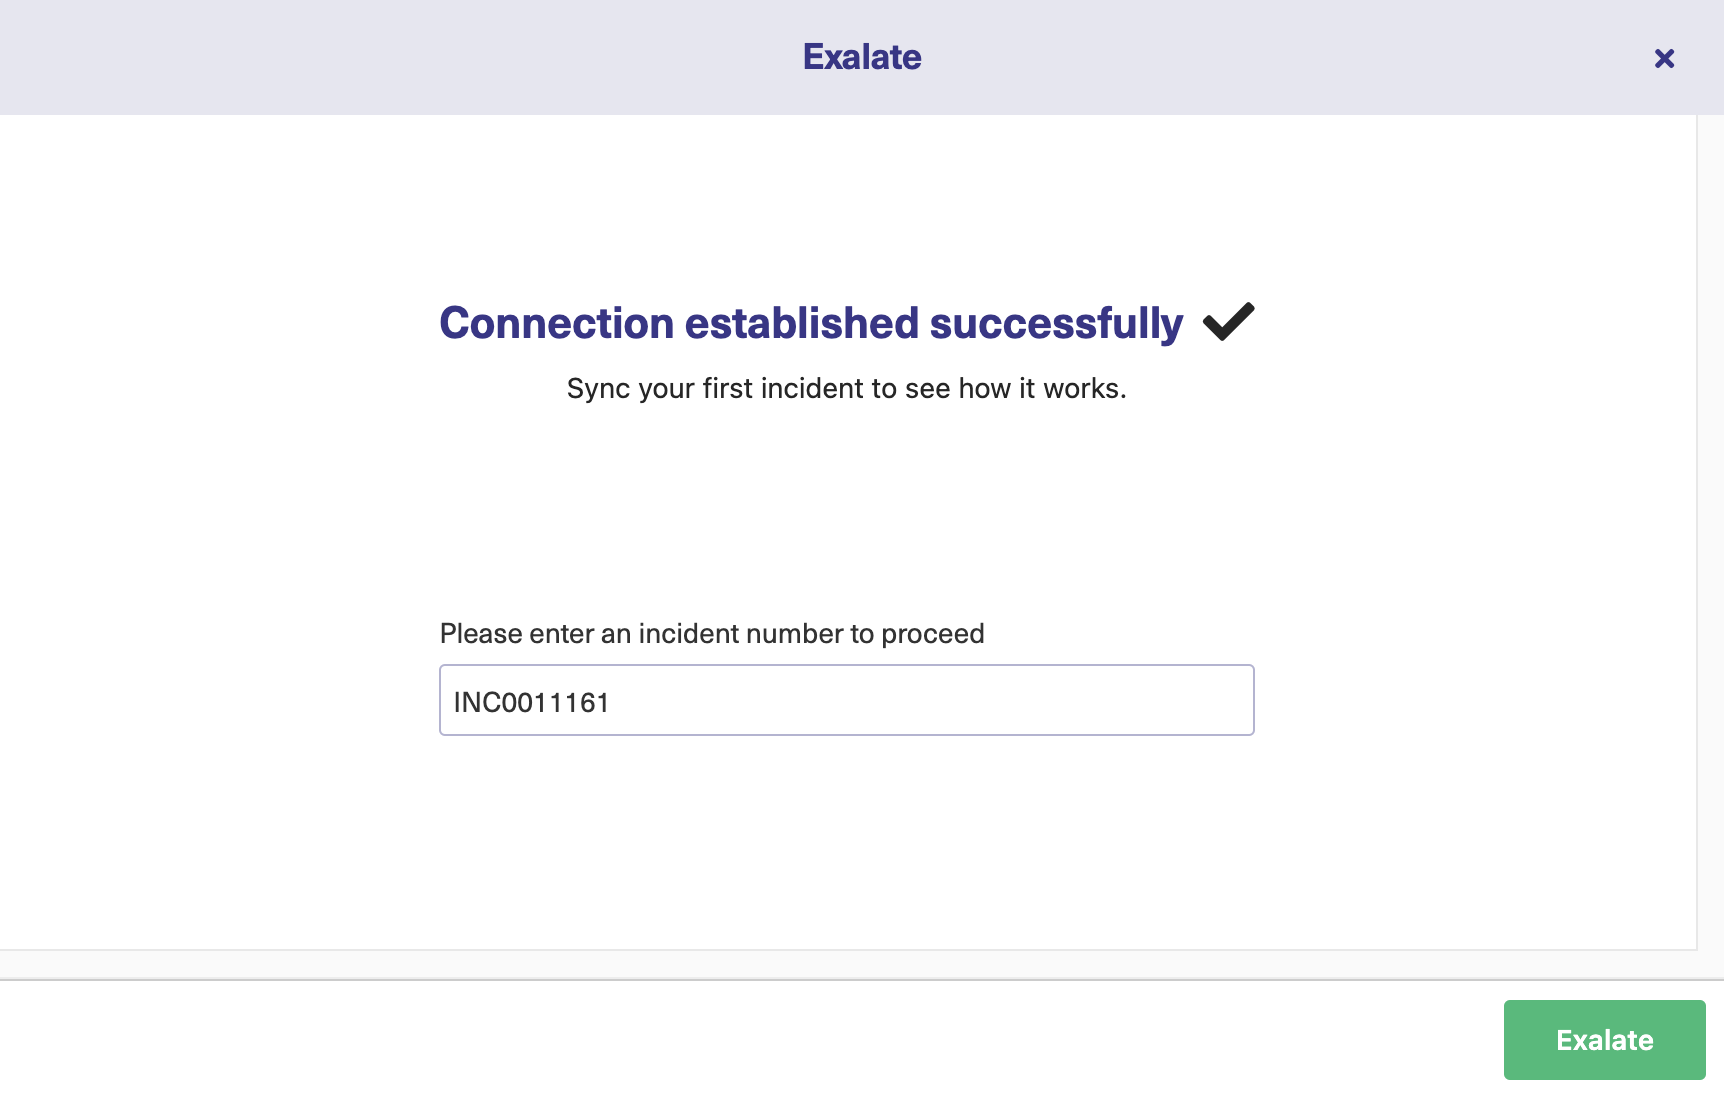
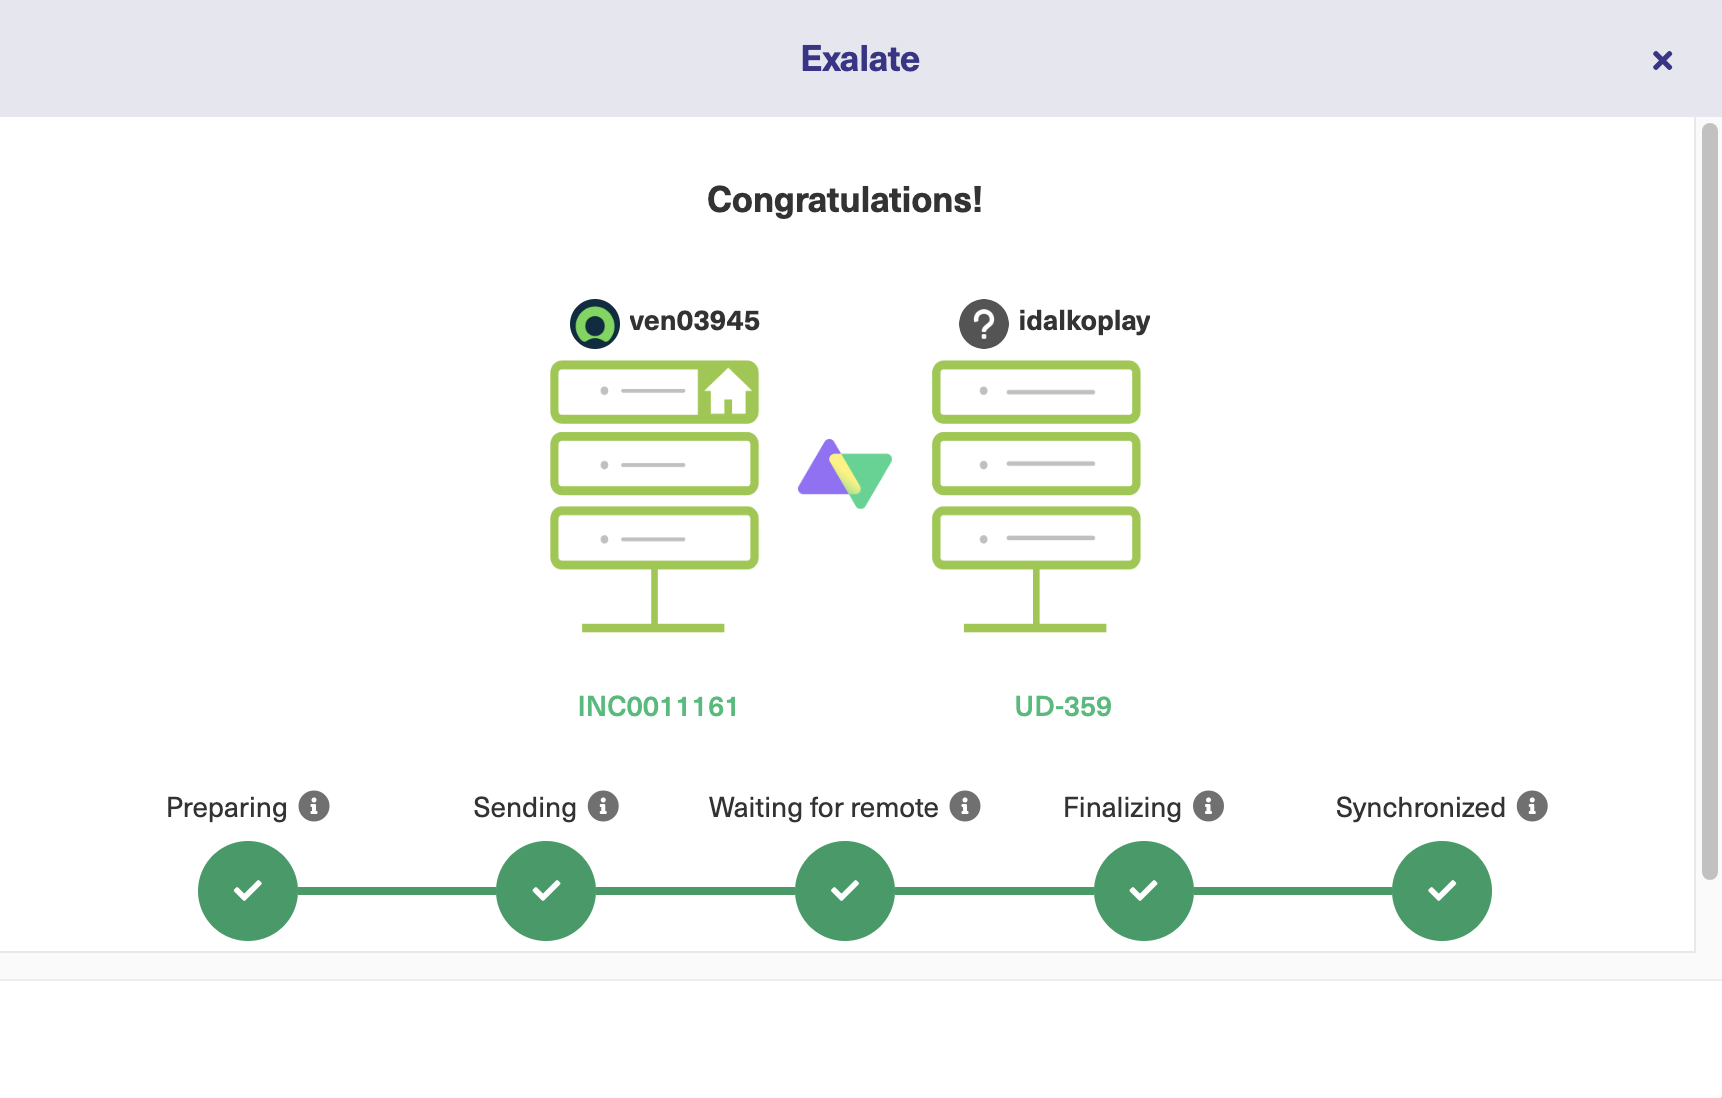
Exalate performs a check to determine if you have admin access. After confirmation, enter the “Incident” number on the ServiceNow side. If you navigate to the Jira instance now you will be prompted to enter the “Issue key” to sync. Either way, click “Exalate” when you are done.
Wait for some time for a successful synchronization to happen.
For the Script mode:
After clicking “Next” on the screen to select the configuration type, add a connection name. It is a good idea to give it a meaningful name as you may have multiple connections later and it is useful if the name conveys what each one does.
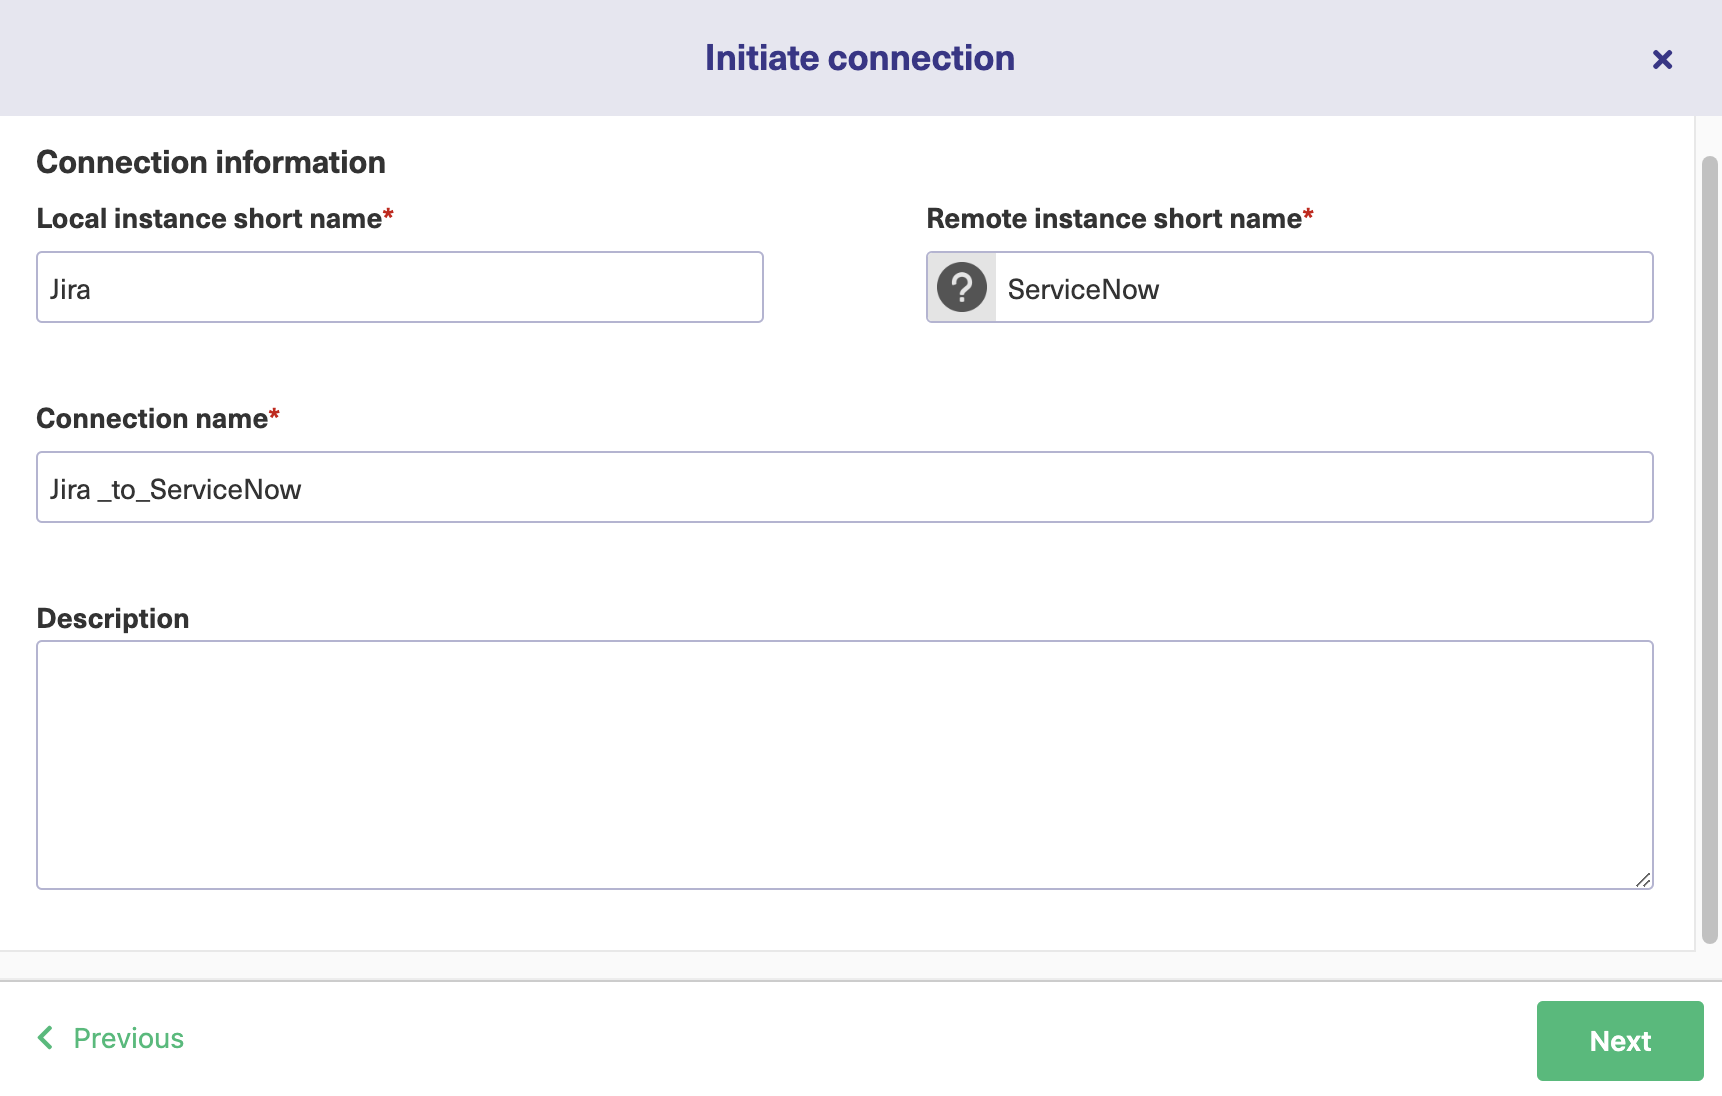
You can also add a description to give you more information about the connection. This is optional but again, it is good to have this information. It can be very helpful for you and anyone else that wants to know what your connection does. Click “Next” when you are ready!
Just like you selected a project for the Basic mode, select the Script mode as well. This will be the project you want to use to synchronize ServiceNow entities.
An invitation code will be generated. Copy this and paste it somewhere safe. You’ll need it in the next step.
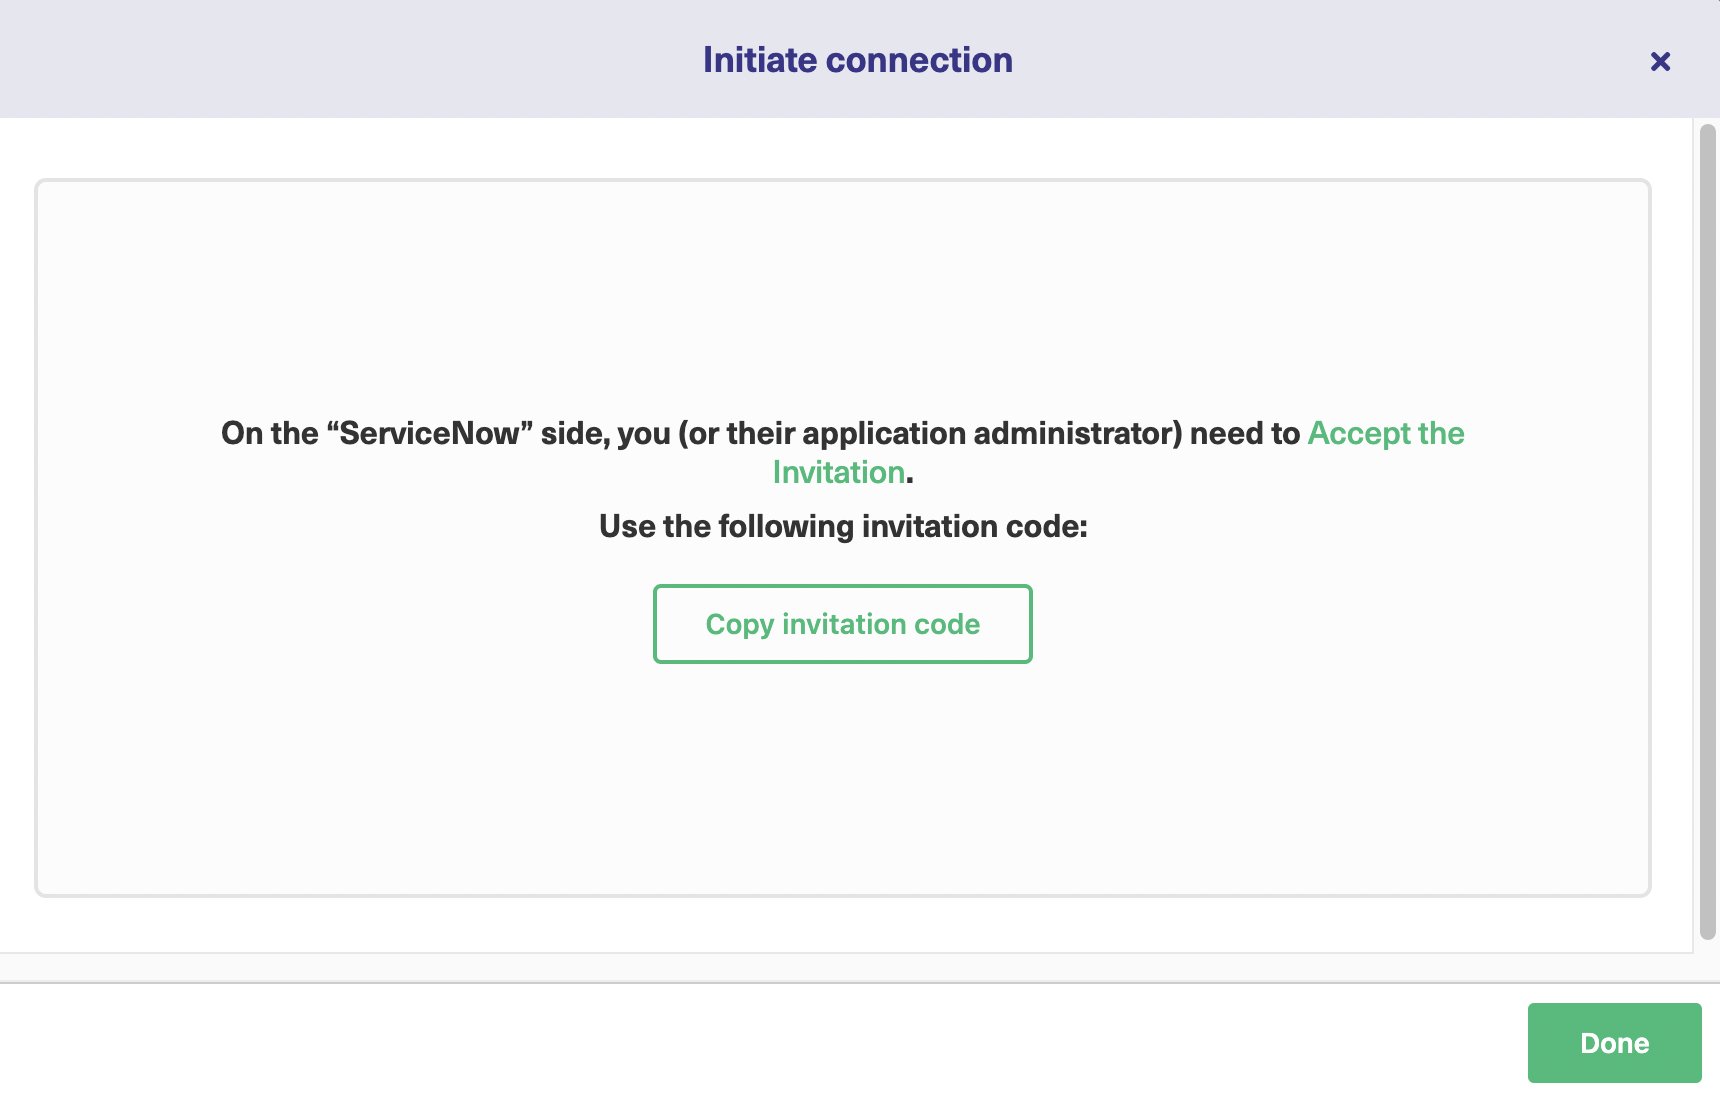
Now you need to go to the other platform. Since we started in Jira, we’ll now switch over to ServiceNow. Click the “Done” button and head over to ServiceNow.
Look for the connections item in the left-hand menu. From there click the “Accept Invitation” button in the top right.
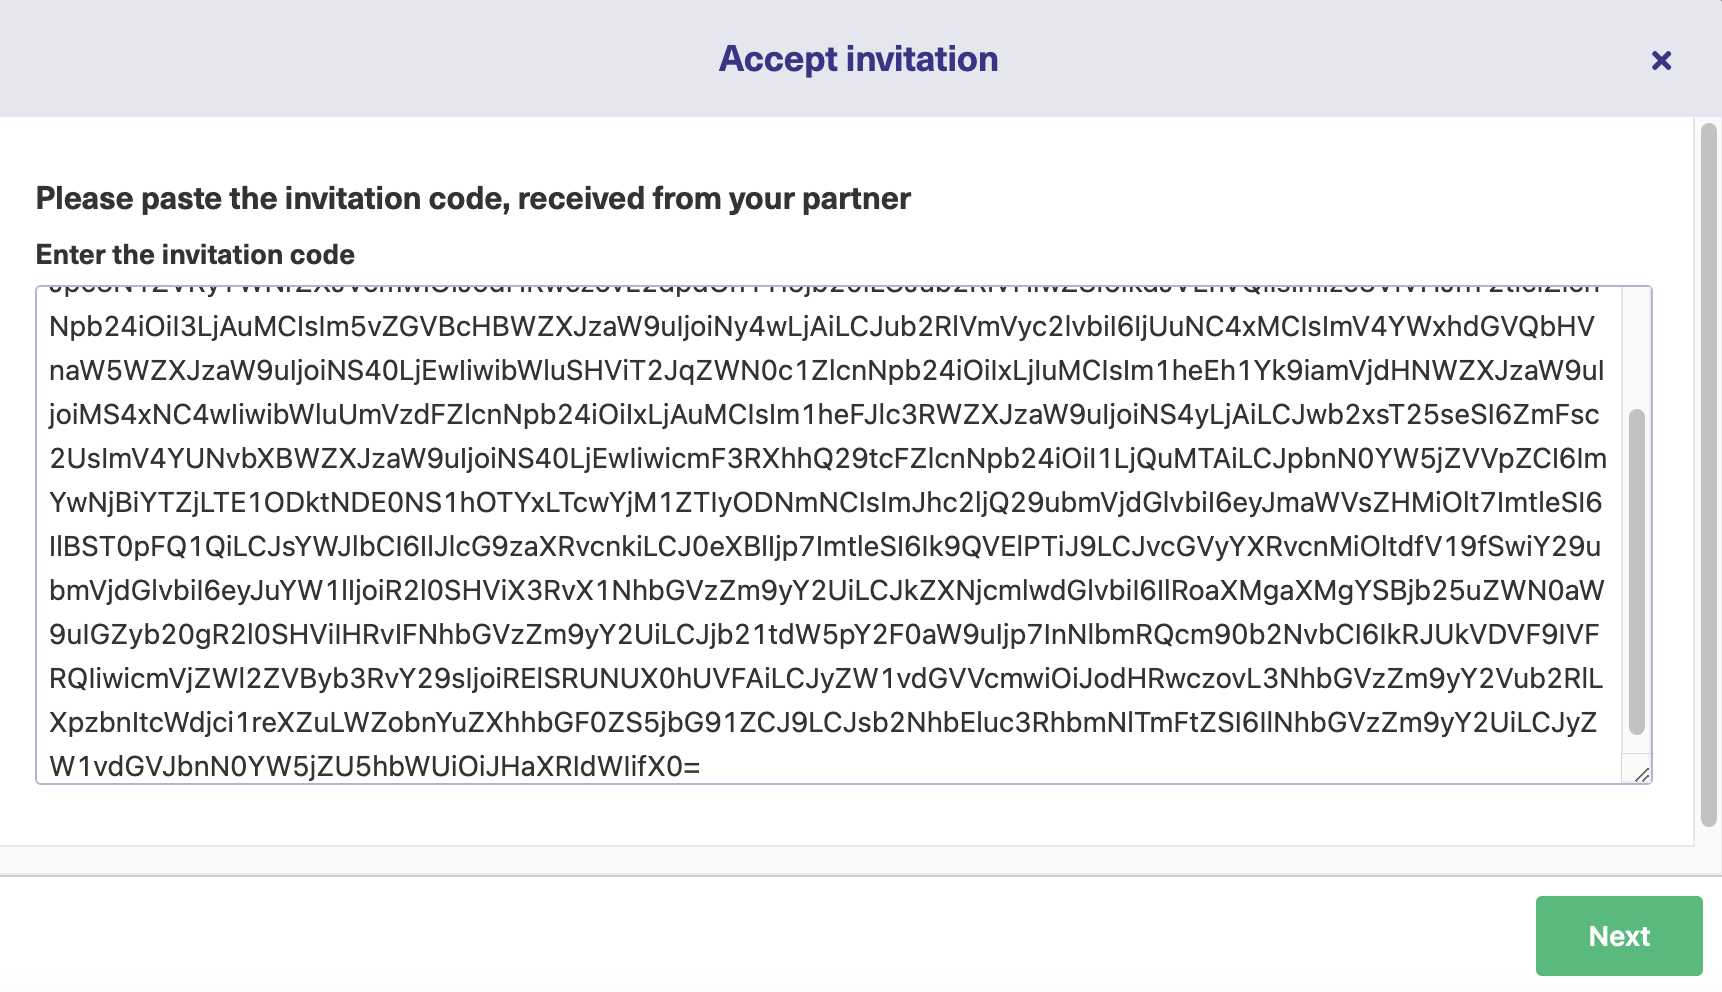
You’ll see a box with text about it saying “Enter the invitation code”. Paste the long code we just generated into this box and click the “Next” button.
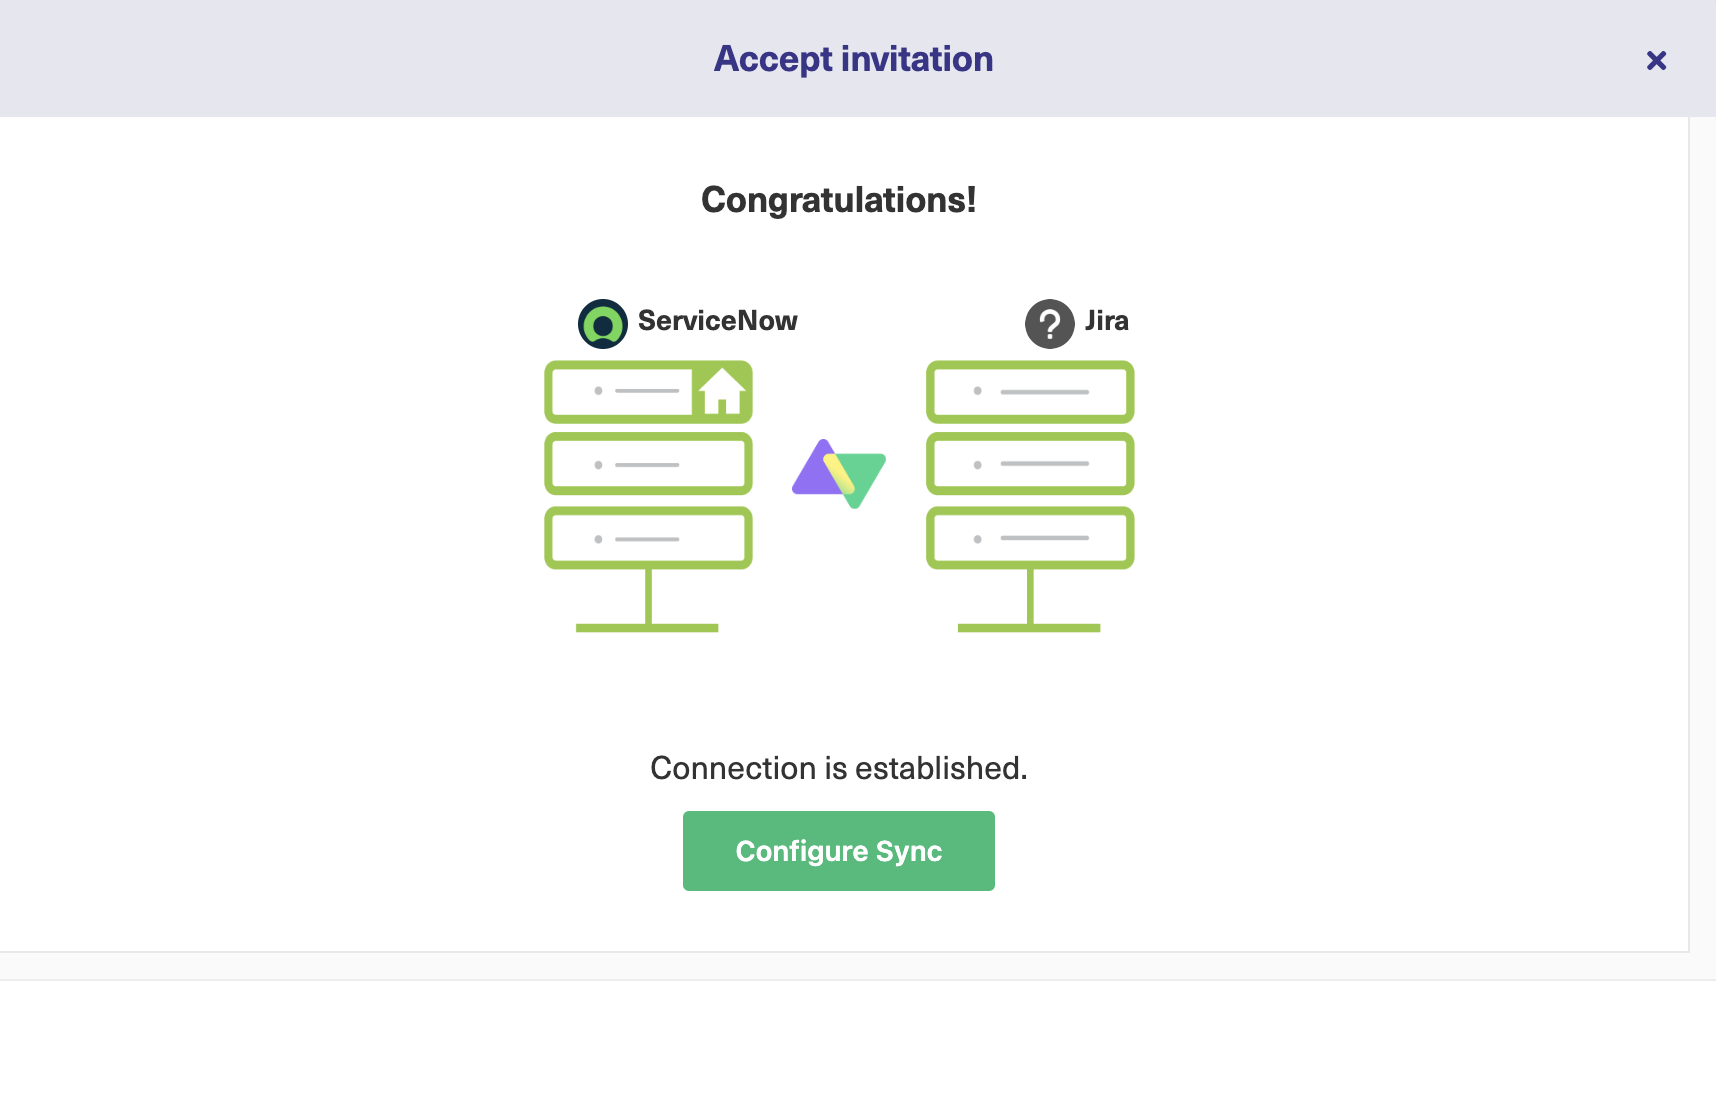
You will see the status of a successful synchronization.
Now let’s go over a couple of use cases to see what we can use it for.
Exalate Use Cases
Use case 1 – Create a Jira Issue from a ServiceNow Incident
We’ve seen how to do this with ServiceNow earlier, now let’s go through the same process with Exalate to get an idea of how they compare. With Exalate we control when data is shared using synchronization triggers, and we control what is shared by editing our synchronization rules.
The sync rules control how data in each platform is matched to data in the other.
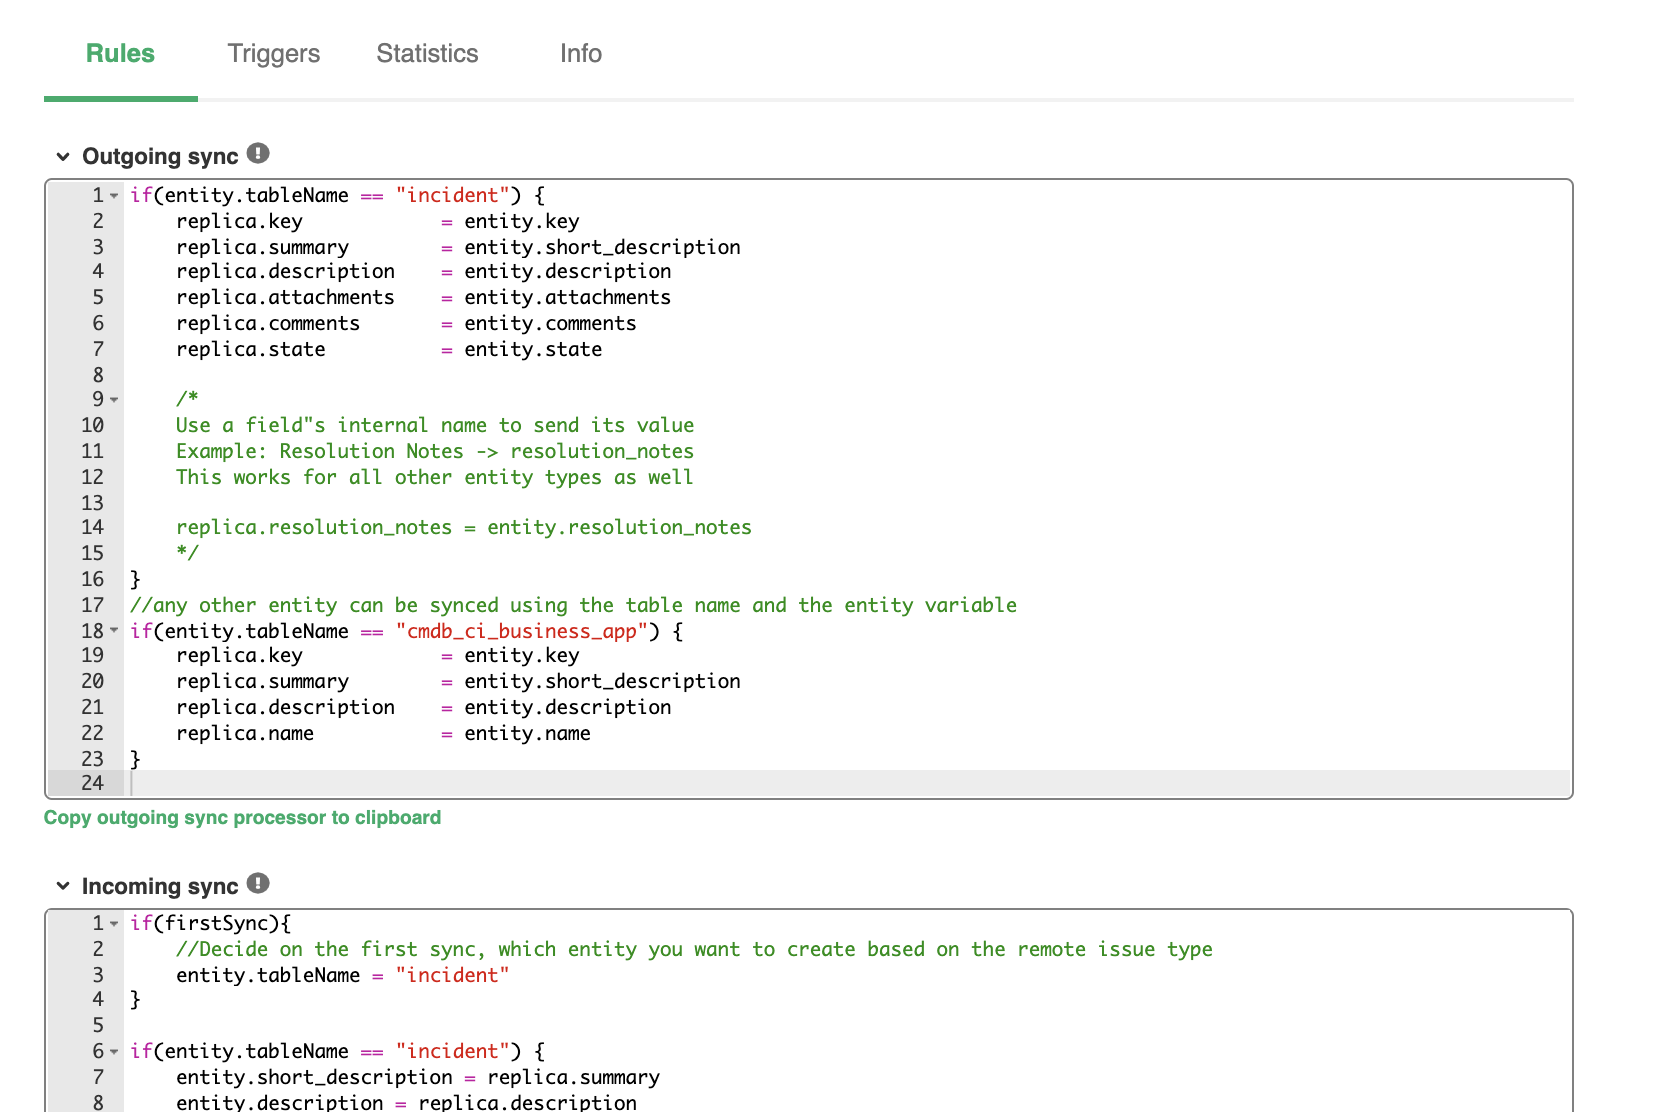
To create a Jira issue from a ServiceNow incident we need to edit the outgoing sync rules in ServiceNow and the incoming sync rules in Jira. To do this in Jira, look at the connections screen and click the three dots next to the connection we created earlier. Click the edit button and then the “Rules” tab on the screen that appears.
Adjust the rules so they look like the screenshot below.
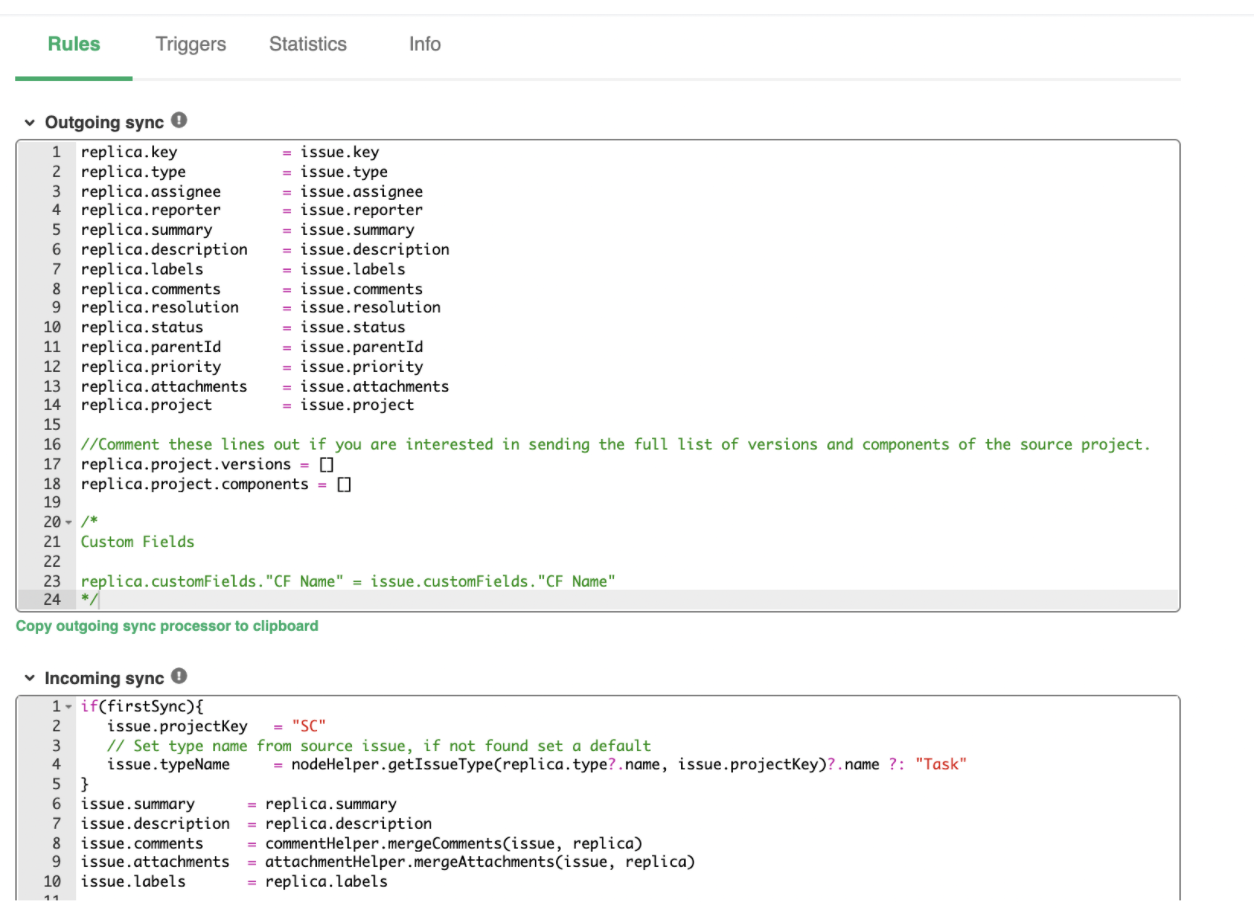
In ServiceNow, we do the same thing, finding our connection, and selecting edit. The outgoing sync rules need to look like this:
We also need to define a synchronization trigger, to make sure Jira creates an issue when ServiceNow creates an incident. We will create a trigger, that looks like this.
To create a trigger, select “Triggers” from the left-hand menu. You’ll see a green “Create Trigger” button. Click it to get started.
You can use ServiceNow search syntax to define exactly what conditions to set. The query we’ll use is: “urgency = 1”. It means that the Incidents having the urgency = 1 in ServiceNow will create an issue in Jira.
Enter that and choose your previously named connection from the dropdown box. You can add some optional notes if you want to make what you’ve done easier for other people to figure out. When you’re ready, click the “Add” button and you’re ready to go.
Use case 2 – Create a ServiceNow Incident from a Jira Issue
Now let’s move on to the inverse scenario, creating a ServiceNow Incident from a Jira issue. One advantage of Exalate is that it uses the same interface and steps for different systems, so we can integrate several platforms without having to learn a new process each time.
The process for this use case is essentially the same as the first one but in reverse.
To do it, we’ll need to look at our incoming and outgoing sync rules. This time, we’ll change the incoming rules on ServiceNow and the Outgoing rules on Jira.
Firstly, let’s look at the incoming rules on ServiceNow. From the Exalate screen, click on “Connections” in the left hand menu. Find the connection we created earlier and click the edit button that appears when you hover the mouse over the connection.
Then click “rules” and adjust what’s there as required. They should look like the inverse of the rules in use case 1. The rules page contains the incoming and outgoing sync rules. You’ll have to scroll down to see the incoming rules, which should look like this:
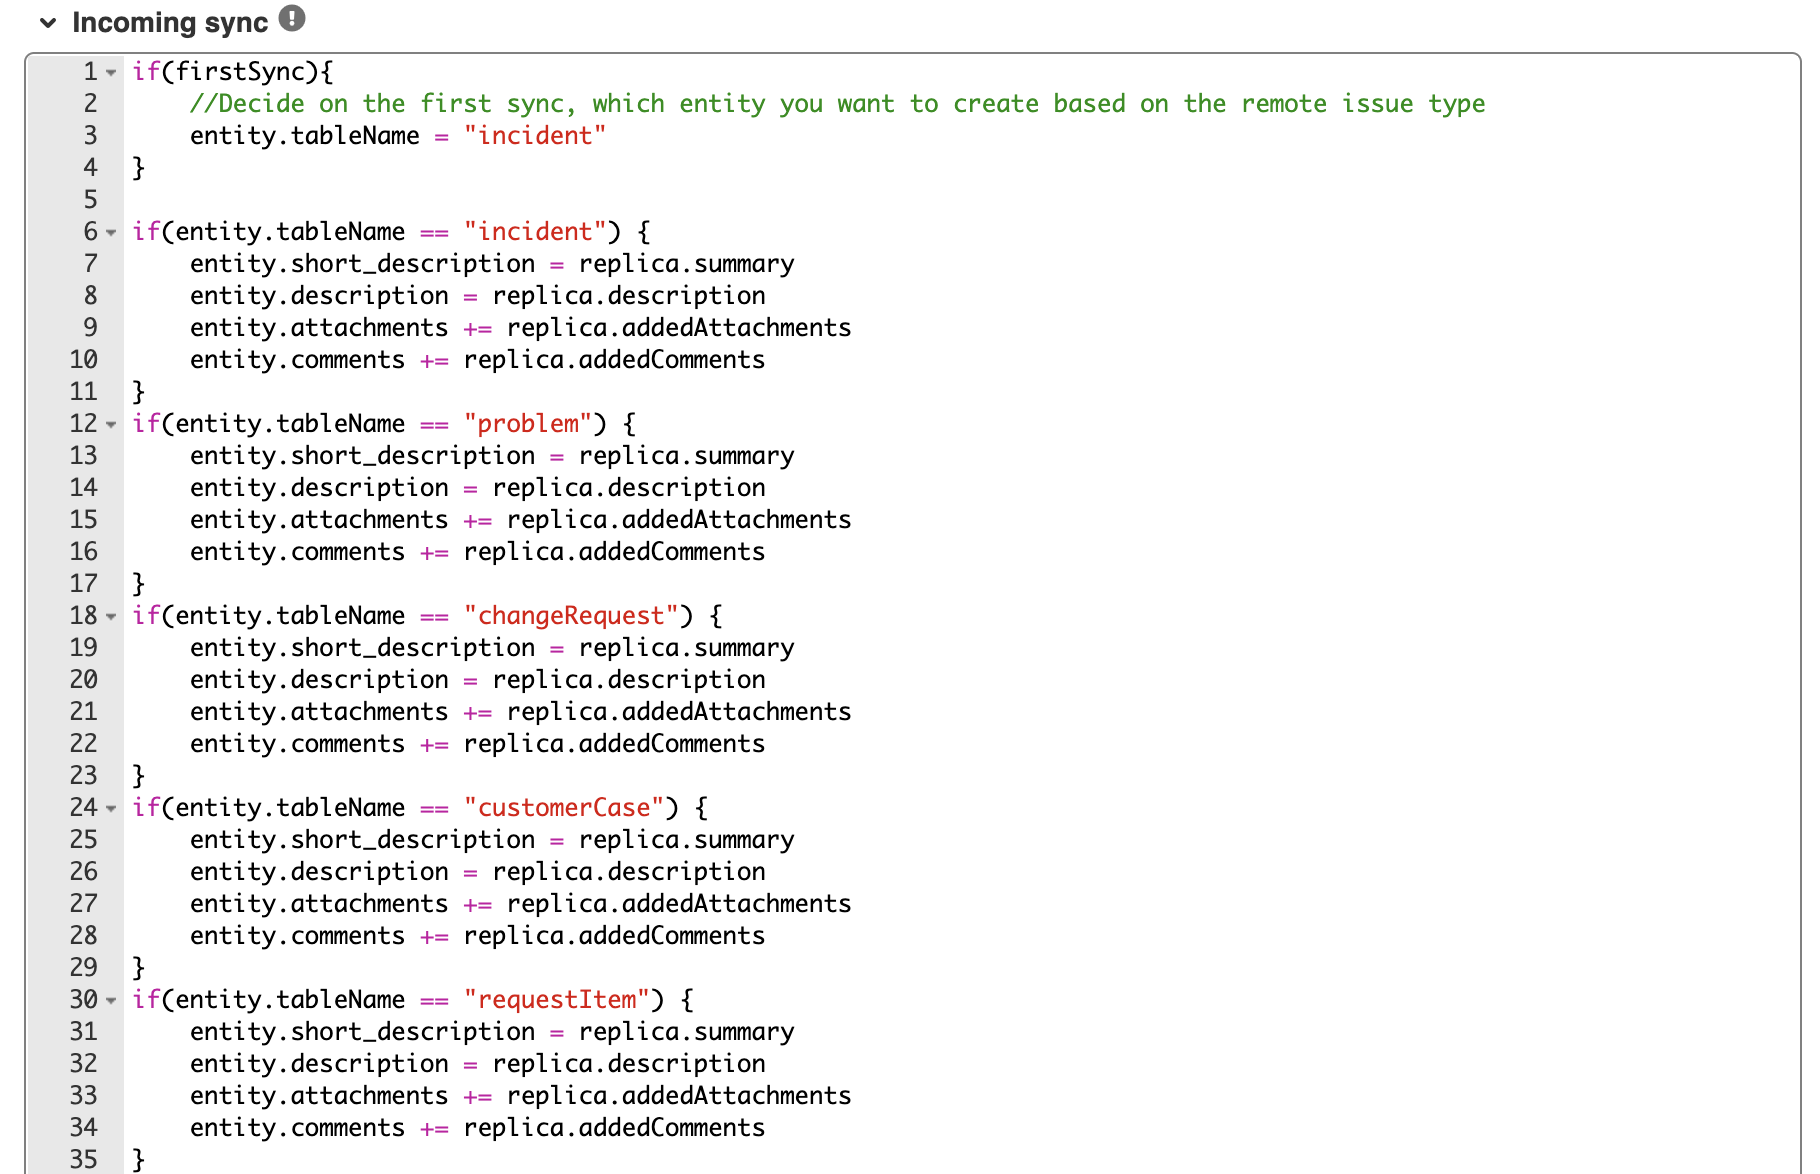
You can see the first entry, starting with the text “if(entityType == “incident”) {“. That will map incoming data from Jira to our incidents. Adjust the specifics here if you want to do it differently. Rules for other types of items have also been created. You can delete these if you don’t need them.
Now go to Jira and adjust the outgoing rules in the same way. Click the “Connections” text, then select the “edit” button near the connection. You can then adjust the rules so the information matches that on the other side. Here’s what it will look like by default:

Next, let’s look at the synchronization triggers on our ServiceNow Exalate node. We can find that by clicking “Edit”, then the “Triggers” item at the top.
Click the “Create Trigger” button and a pop-up will appear. Make sure “issue” is selected from the drop-down box and then enter the appropriate JQL to create the incident from your issue. You can see how we’ve done it below:
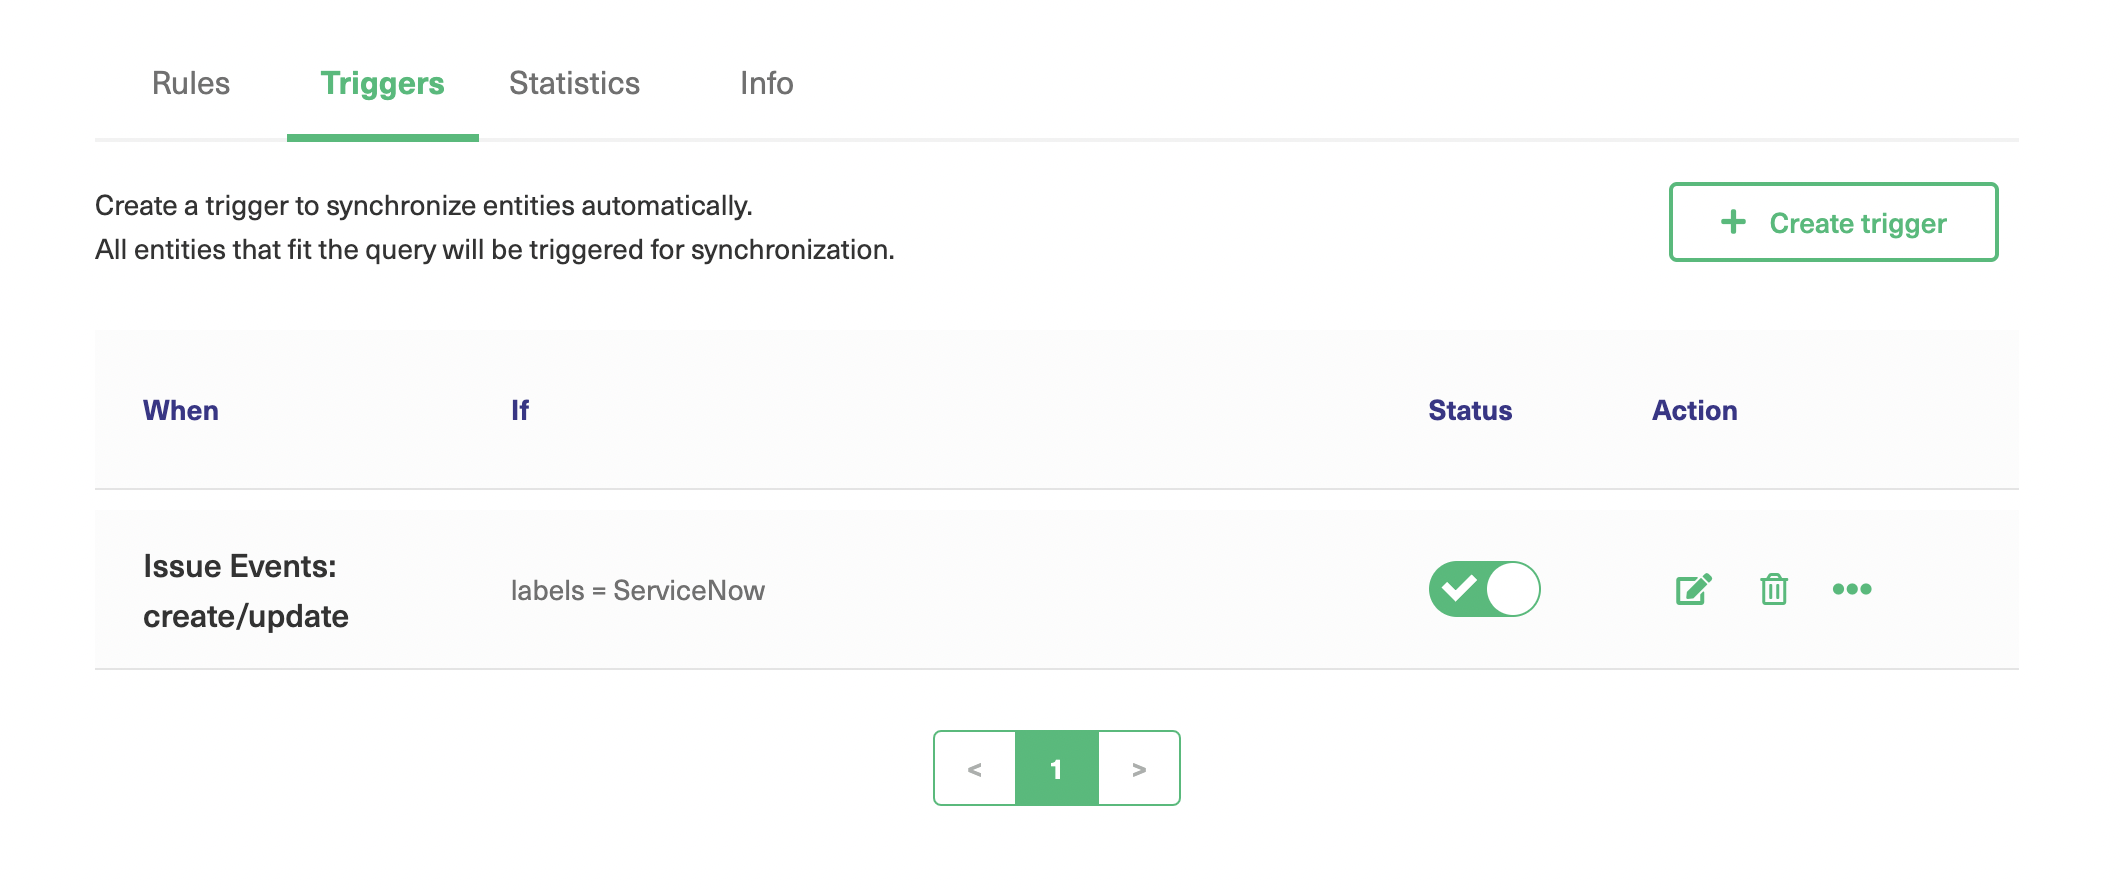
In this case, we’ve used the code labels = ServiceNow as our trigger condition. As we’ve noted, this will send issues to service now if we give them the “ServiceNow” type within Jira. This might not exactly match your setup, so you may need to adjust it. Take a look here for some information about the JQL query language.
We’ve also made sure the trigger is active, by clicking the tick to select it. Click the green “Add” button, and we’re done.
If you want to learn how Exalate can solve your integration problems and synchronize your teams, you can easily book a one-on-one demo with an expert here.
IntegrationHub or Exalate? The Verdict
Both of these tools are worth investigating if you’re looking to help your organization evolve, and it is worth spending time considering what they offer and how they match your organizational needs.
But if we want to compare the two based on a simple concrete integration use case, for example creating an Incident (Issue) from an Issue (Incident), the following conclusions could be drawn:
- To achieve such a simple integration scenario, ServiceNow IntegrationHub needs more configuration work and is consequently more costly from a financial point of view.
- Jira Spoke is a third-party application designed for IntegrationHub, the included Actions are extensive but fixed. Therefore, the integration of customized attributes/ process logic on Incident/Issue depends on what each Action supports. If an Action needs to be adjusted to allow more flexibility, an updated version from the creator of the Spoke is then needed.
- IntegrationHub provides the immediate means of creating a Jira Issue from different ServiceNow ticket types (e.g. Problem, Change, etc). The support of Integration scenarios is more flexible, for instance, it allows integration between Incident/ Issue, Change/ Story, Change/ Project, etc. with the same ServiceNow/ Jira connection. But different flows are needed to be designed in ServiceNow for every desired integration scenario.
So the bottom line is that IntegrationHub is more of a ServiceNow infrastructure for integration/ automation. Exalate is a solution for internal and cross-company integration scenarios between a variety of platforms. They are actually not direct competitors with one another. And if somebody intends to use ServiceNow IntegrationHub only for Jira integration, it would be like shooting birds with a cannon!
Conclusion
Getting your teams working together harmoniously doesn’t have to be a headache. We’ve looked at two excellent tools for connecting platforms and automating the transfer of data between them. IntegrationHub is a useful tool for connecting ServiceNow to other platforms.
Exalate is also an excellent solution that allows you to link data between multiple platforms. One of its advantages is that it gives you a consistent interface on different platforms which can make it easier to work with as your business grows and your collaboration goes from internal to cross-company integration.
Become an Exalate user and experience an optimized workflow.
Recommended Reads: